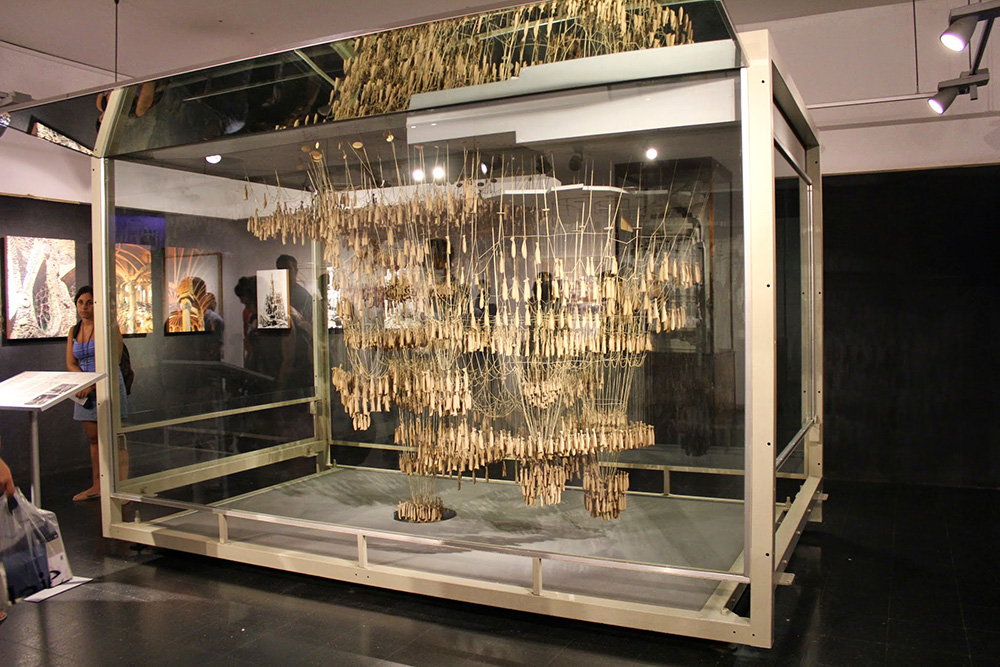
11. Textile as Scaffold
Research & Concept
The aim of this week is to explore technical textiles. We studied using textiles for polymerisation, solidification, fabric formwork, crystallization, composites and biocomposites, agglomerates. I wanted to explore creating textile composites where textile would gain new properties by forming composites with other materials.
References & Inspiration
Miguel Fisac, Antoni Gaudi and Frei Otto have been my inspiration when I was writing my master's thesis in computation in architecture.
Miguel Fisac looked at concrete from a whole different perspective that is actually more immenent with how concrete works. He understood the fluid nature of the material before curing and use it to as design input.
Antoni Gaudi's catenary structures look at the performance of how chain links behave under the force of gravity. Gaudi then inverts these chain models to form big arch, vault and dome structures that covers his buildings.
Frei Otto explored the soap film formations to design the cover of the Munich Olympic stadium.
Andrew Kuddless is a contemporary architect and design researcher who takes his influence from Fisac and explores soft nature of fluid materials before they cure. His wall series make use of not only the fluid nature but also changable molds that can be used again and again in different arrangements.
CNC milling tutorial
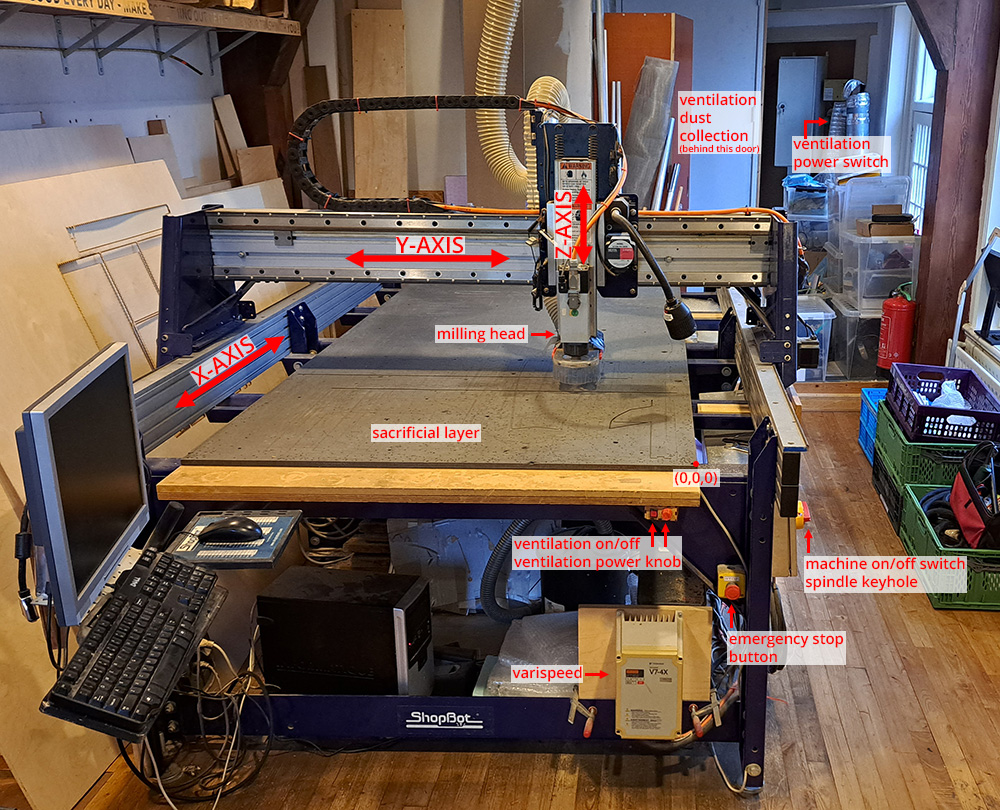
Henk gave a tutorial on how to operate the shopbot, the CNC milling machine at FabLab Amsterdam. CNC milling machines are very powerful machines so it is very important to abide by the safety measures.
Safety mesaures
- Do not wear cloths with dangling pieces. Do not wear jewellery. Pull your hair in a bun or ponytail.
- Check around the machine for clear movement in all three axis. The paths of movement should be free of obstructions.
- Clean the bed of the CNC milling machine, use a vacuum cleaner if necessary.
- Check for protruding screw marks on the sacrificial layer. If found, eliminate them with sand paper.
- Check if your material has screws or metal pieces. Remove them if there is any before you lay your material on the bed.
- Wear safety goggles and earmuffs to project yourself when running the machine.
2D milling
We started with learning about 2D milling of pockets and outlines.
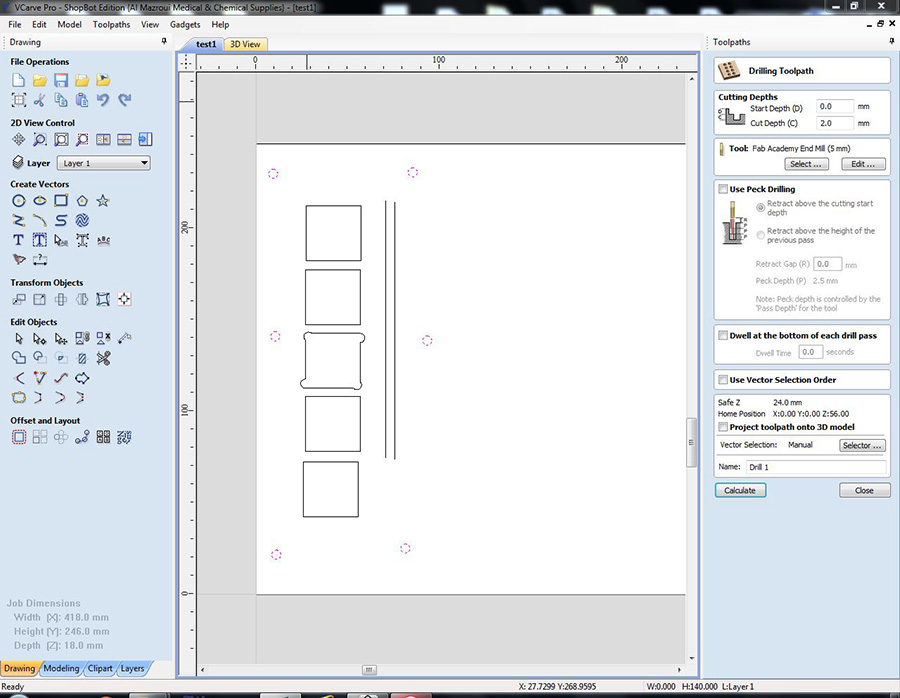
New job:
Job size: You firstly need the measurements of your material: 418x246mm (measured with a measuring tape)
Material thickness: 18mm (measured with a caliper on all sides and taken an average). The Z zero of the material is at the bottom of the material to avoid milling on the sacrifial layer.
XY datum position: always take the bottom left corner.
Accept the changes.
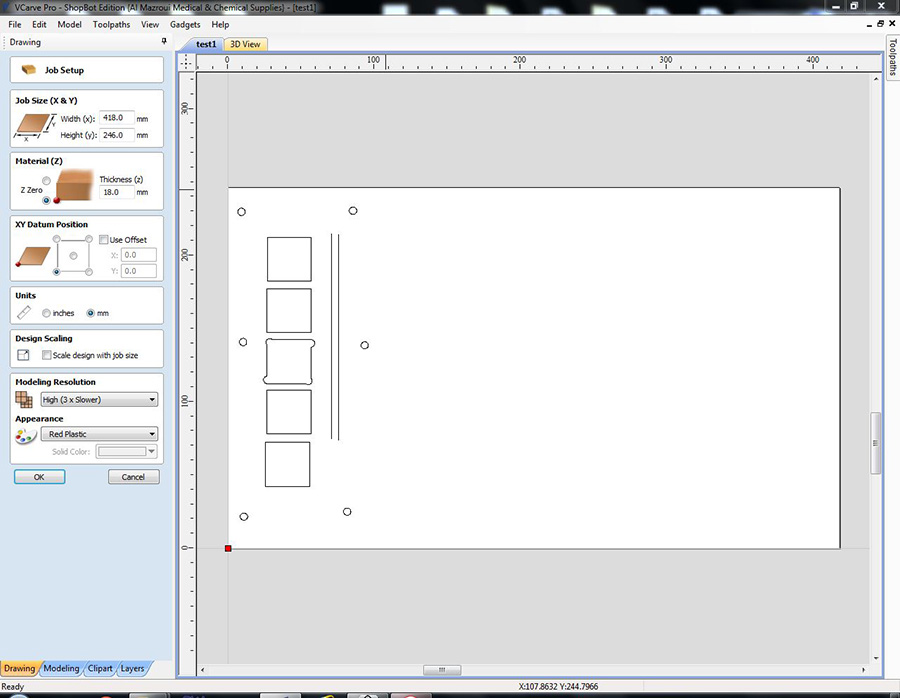
Drawing
Make some 2d closed polylines. Each polyline will have a different milling property.
Make circles of 5mm diameter for drilling holes. Make sure that they are a safe distance away from all the other drawings.
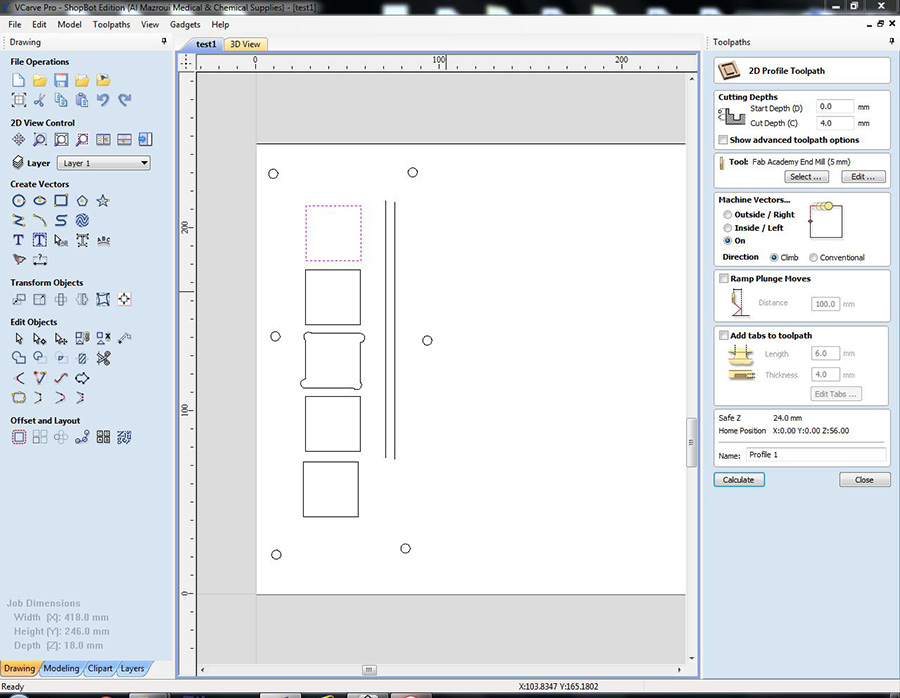
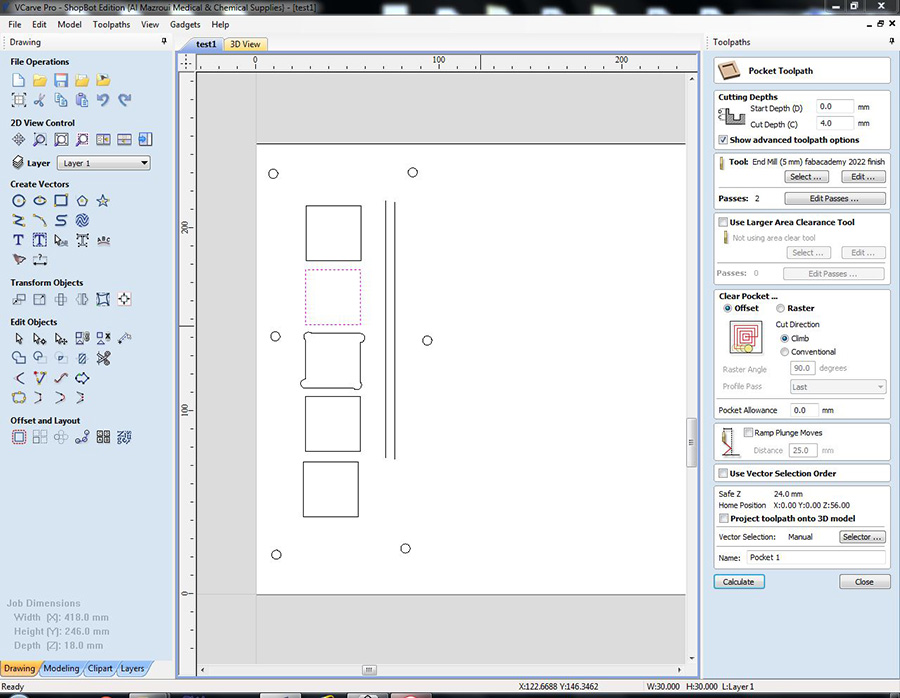
- Start depth: (0mm)
- Cutting depth: how much you want to cut into the material (4mm)
-
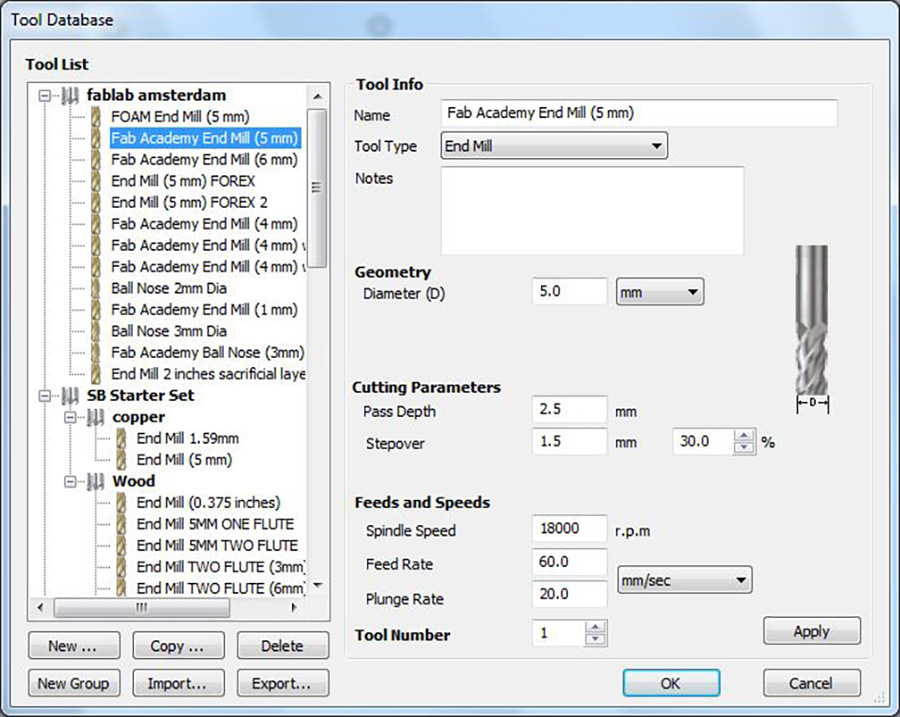
Tool > select: Fab Academy end mill (5mm)
- Diameter: diameter of the milling bit (5mm)
- Pass depth: how much the milling bit will go into the material with every layer (2.5mm)
- Stepover:
- Spindle Speed: 18000
- Feed rate: 60
-
Machine vectors: inside, outside, on (on)
- Machine vectors: (inside)
- Raster offset
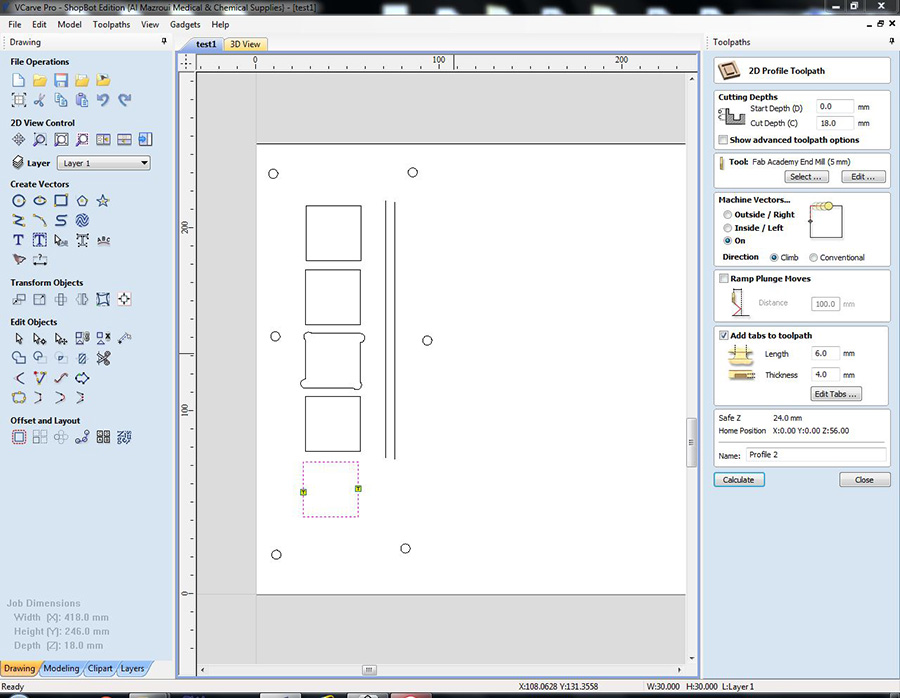
- Start depth: (0mm)
- Cutting depth: how much you want to cut into the material (18mm)
-
Add tabs: Adds tabs to the part so that it does not not fly away when it is cut all the way through.
- Lenght: (6mm)
- Thickness: (4mm)
-
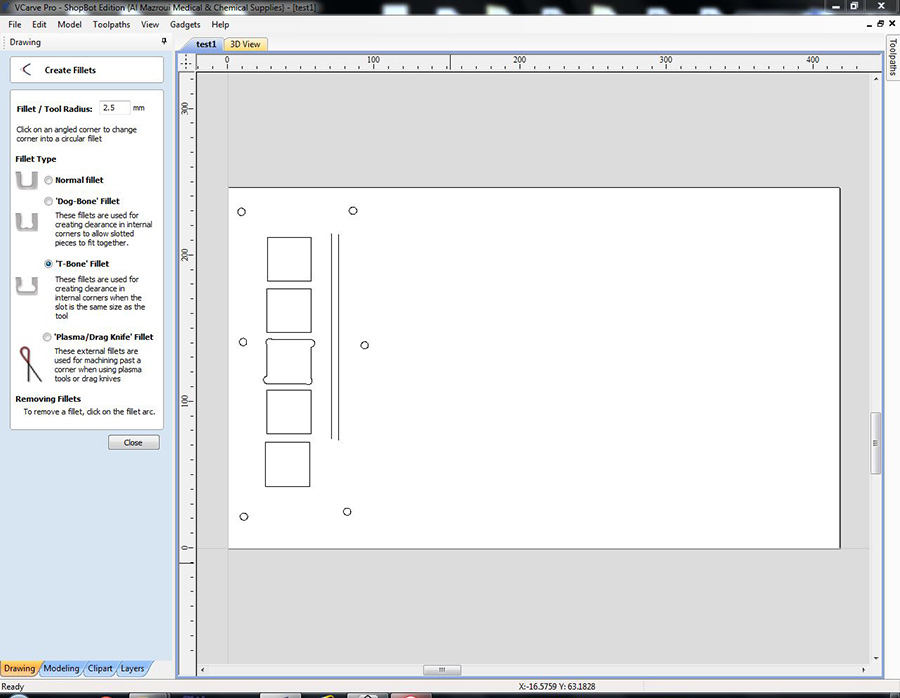
Add fillets to the corners to have sharp corners if you are doing an inside vector profile. Sharp corners are necessary especially with press fit designs. You can find the fillet tool under the lefthand side drawing toolset.
- dog bones: push the corner out equally on both lines
- t bones: push one of the lines out
- Make circles of diamater 5mm (with circle tool under the drawing toolset)
- End depth: (2mm)
Save the drill toolpath job separate from any other job. We need to send the drilling job first.
- Turn on the machine.
- Change the milling bit.
- Zero XY at the corner of the material. It should be the same corner as the XY Datum Position we determined in VCarve.
- Zero Z on the sacrificial layer.
- Turn on the ventilation system.
- Put the key in and turn it to turn the spindle on.
- Open your drilling file and start the job.
- Drill your screws in the screw holes created by the milling after the job finishes.
- Continue sending the rest of the jobs.
3D milling
- Create a new file.
- Set the dimensions. 250x250x50mm
- Import 3d
- Center your model in the material
- Zero plane position: Align your model so that you can get the lowest point of your model above or on the plane.
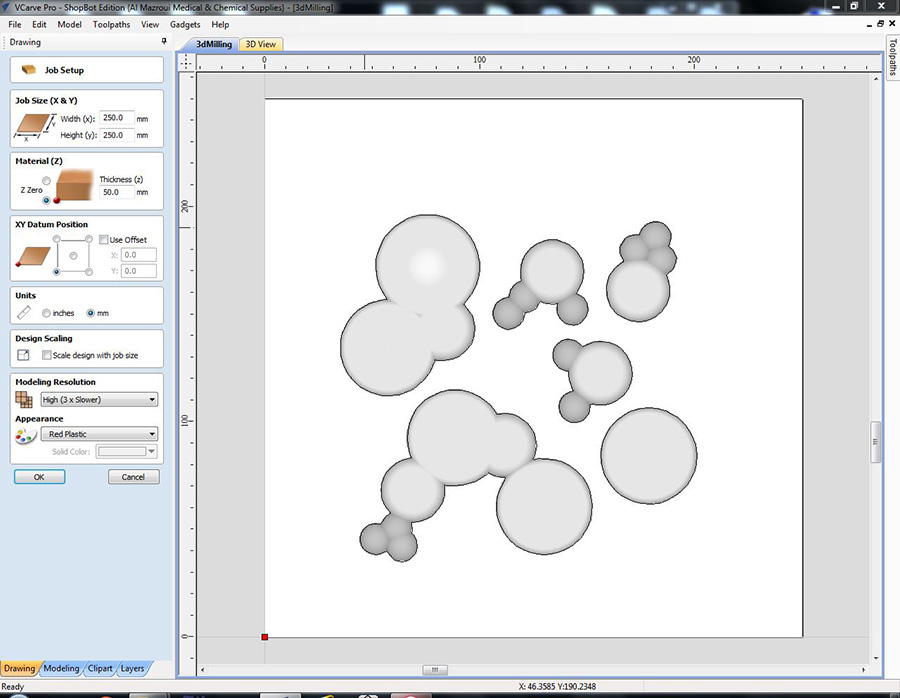
- Gap above the model: 0mm

Tool:
- Pass depth: 7mm
- stepover: 80%-90%
- feedrate: 90
Machining limit boundary: Material boundary
Roughing strategy: Take the long axis, so that it takes less time to finish. In our case, it does not matter as our piece is square.

Tool:
- stepover: 10%
- feedrate: 90
Machining limit boundary
- Model boundary (this actually did not produce the result we wanted because the milling did not go all the way down to the depth in the roughing stage. To be able to have the whole surface milled out, you need to use the material boundary)
- Boundary offset: 10mm
Machine strategy: Offset

Always make a preview of your toolpaths.
Save your toolpaths.
Use a double sided tape to fix your material on the sacrificial layer.
Do all the zeroing similar to 2D milling.
Change the ventilation bag to plastic dust bag.
Process
I explored various techniques this week:
- Crystallization technique
- Heat setting technique
- Composites
Crystallization technique
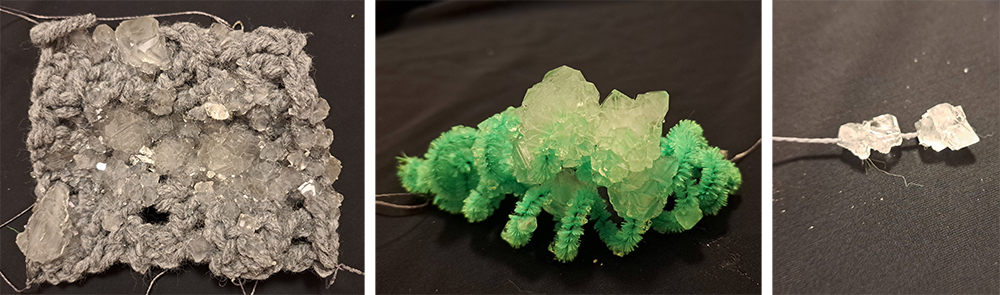
I tried crystallization process on crocheted samples and three pipe cleaners shaped as coils and intertwined together. I also tried to make electro conductive crystals, however, this still needs further exploration as at first I could not create a balanced mixture and did not explore it further later.
The mixture that I tried and worked is as follows:
- 1,5 lt water (we used drinking water but we were told that distilled water works better)
- 700 gr Aluin
You heat the water to simmering heat and add Aluin until you cannot dissolve any more mineral.
Note
a few things to consider while making crystallization exploration:
- crystals can stick easier to rough surfaces, the hairier the better.
- try to cool down the mixture slowly for better growth.
- do not stir/shake your mixture while it is cooling down and forming crystals. However it is also a good idea to give it a little shake now and then if you want smaller crystal pieces.
- try to put your materials closer to bottom as I observed more crystal growth towards the bottom than the surface of the water. However, make sure that your crystals do not merge with crystals that form at the bottom of the container to form a shapeless rock. Try to hang them.
Samples before the process:

After preparing the mixture, put your materials on which you want to grow crystals:
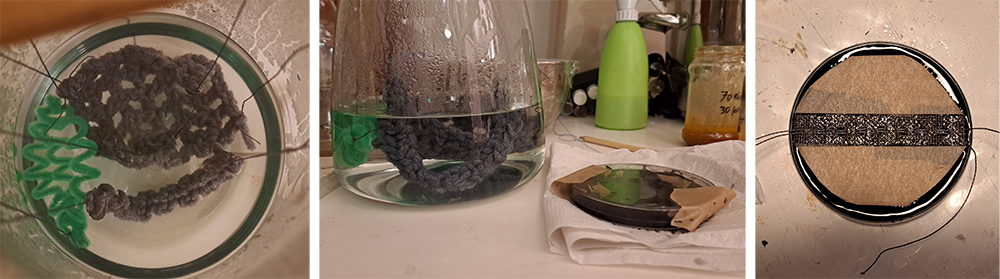
After approximately 24 hours, the results are as the following:
I did not stir or shake the container. Upon inspection of the results, I might have achieved smaller cyrstals and more homogeneous growth over the materials.
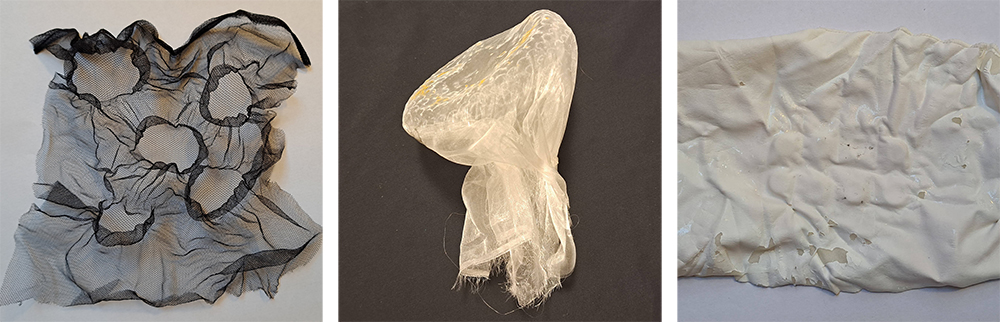
Heat setting technique
Heat setting is a technique usually used with synthetic textiles to give them form with heat. This technique is also referred to as shibori (bubble) technique. This technique works better with synthetic textiles.
You need to treat the fabric which has molding objects tied in them with heat (boiling, steaming or in the oven) for 20 minutes.
Here are a few tutorials:
- Mariko Kusomoto: she puts the fabrics with molds in the oven.
- Lorna Miller & Ceri Buller
- Julija Gobere: She steams the fabrics with mold with iron.

Composites
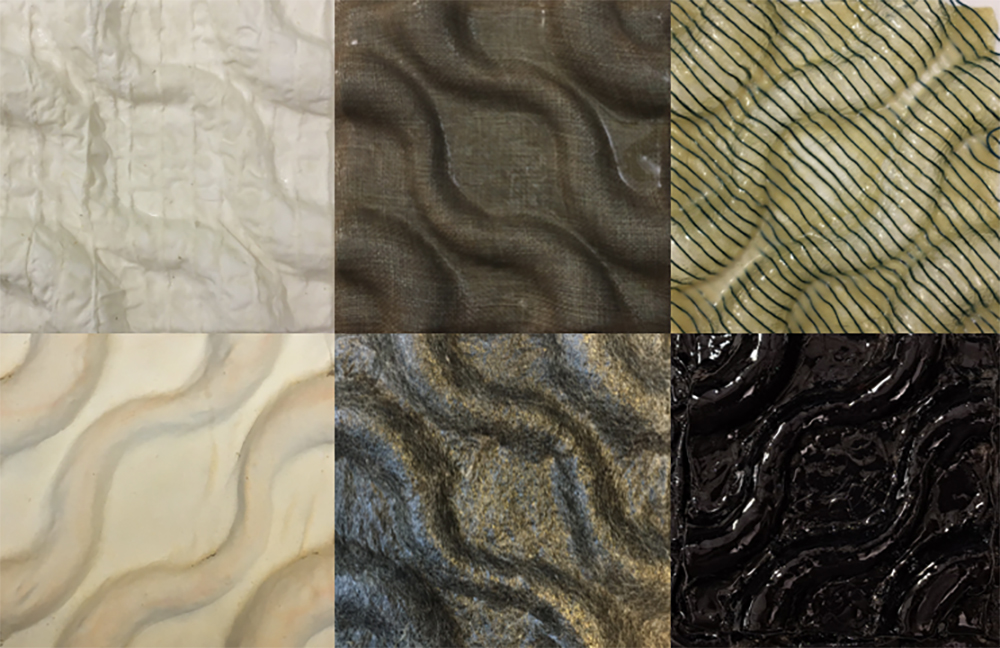
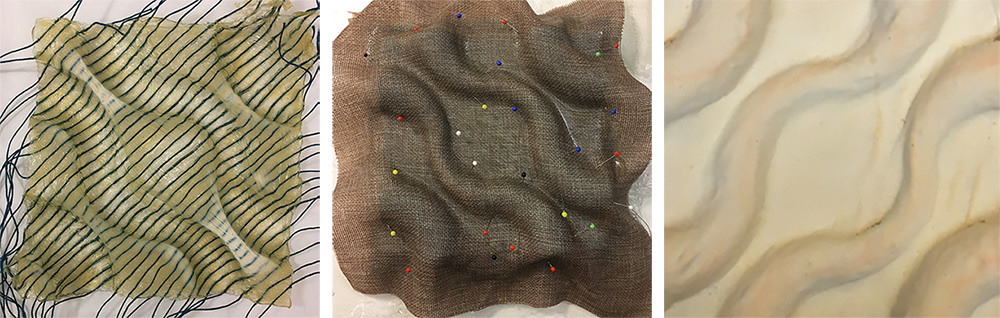
Due to the time and scheduling constraints of using the shopbot, we prepared our composite molds as groups. Stephanie and I worked on a mold that can give more variations. We used truchet tiles as our basis so that we can create many designs by changing the arrangement of tiles. We milled two tiles so that we each can work on one. While always discussing ideas of how to go about it and helping each other, we executed our own individual experiments of composites.
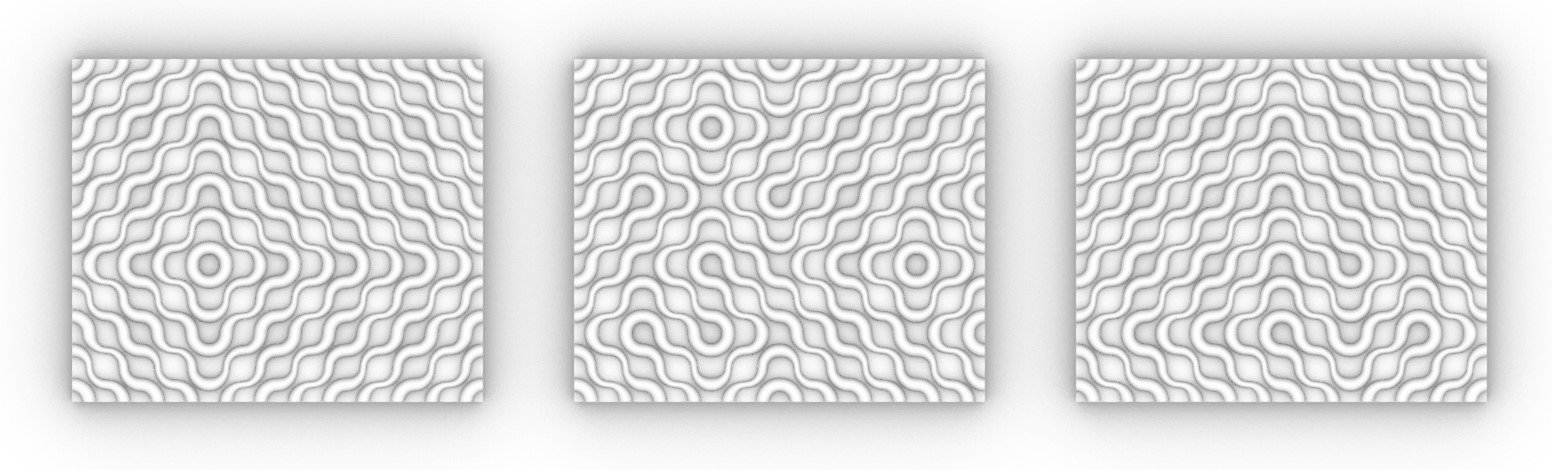
Truchet tiles are a set of square tiles, each featuring a pair of symmetrical patterns. The basic idea behind Truchet tiles is to use the tiles to create a tessellating pattern. Each tile has two possible orientations, and by rotating or flipping the tiles, you can generate a variety of patterns. When these tiles are arranged together, they form a continuous design. The multiscalar truchet tiles are an interesting further approach to studying these types of tiles.
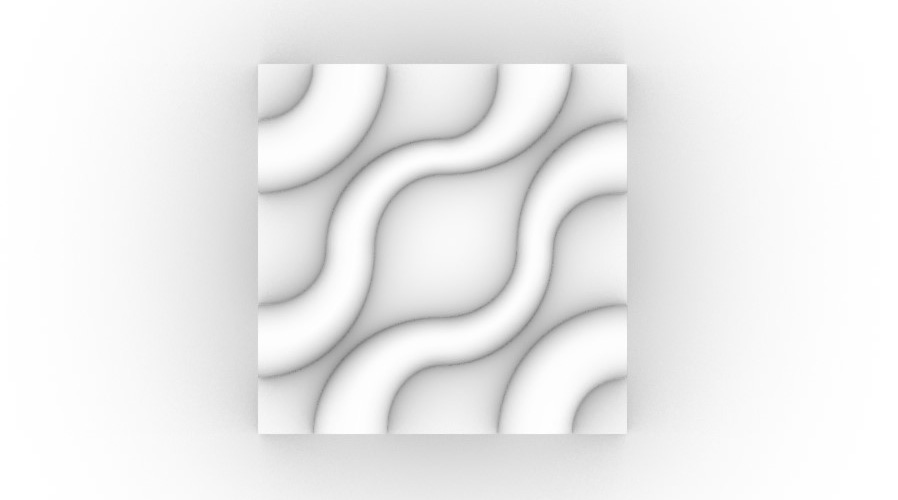
We cannot simulate in VCarve pro if the milling bit or the collet would hit the work while milling so it was important to include in our the modeling a simple bit to visualize how it compares to the milling surfaces. There is 10 mm drop from the design surface that extends to the 10 mm offset of the perimeter of the tile. The drop is designed for making seams, the offset is designed to precisely remove to mold from the rest of the block material.

The .stl file for the tile can be downloaded from this link1.
First tile is ready, second tile is being milled in rough milling stage:
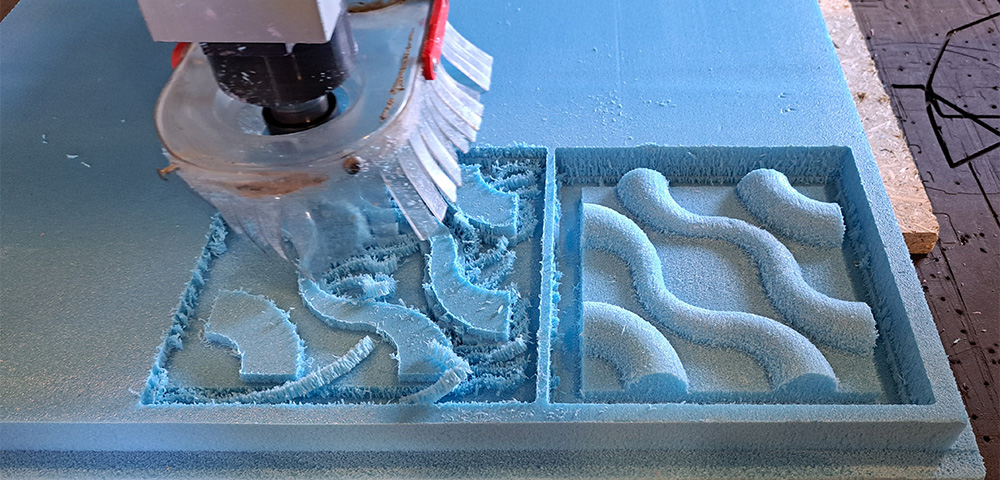
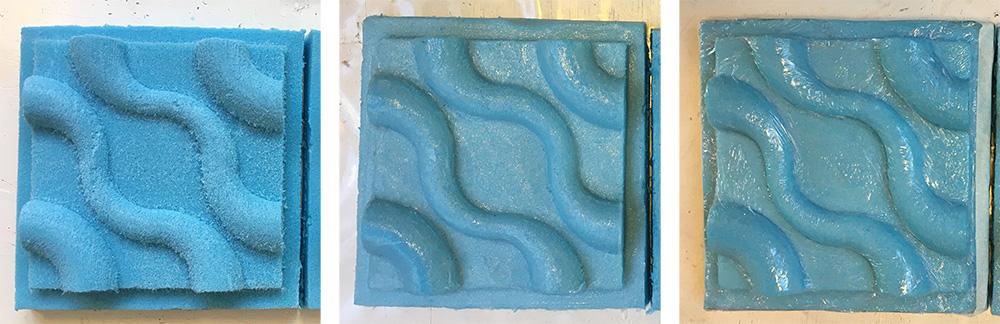
After milling is finished:
- We sanded the surface to remove irregularities
- We applied a coating of vaseline to close irregular spots and prepare the surface for the next layer
- We put a single layer of cling film so that the composite material would not stick to the surface of the mold and we can use the molds again and again.
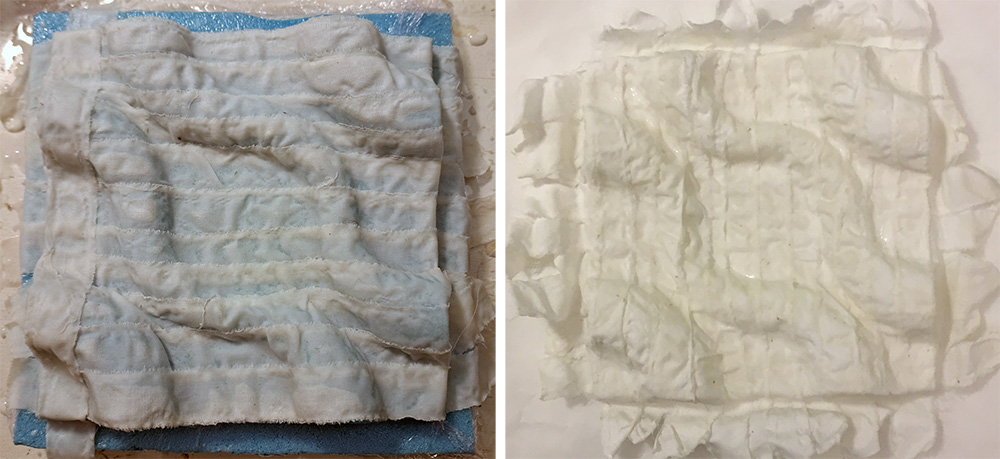
Sample 1
Gelatine composite with cotton fabric strips and bamboo strips.
Gelatine mixture:
- 96gr powdered gelatine
- 48gr glycerine
- 480 ml water
We prepared this mixture together with Stephanie and Stephanie applied it on the molds. It was really hard to apply the gelatine with the fillers. I assumed it was the water content that caused this. Foreseeing that water would evaporate eventually, in the next gelatine mixture preparation I increased the water ratio.

Sample 2
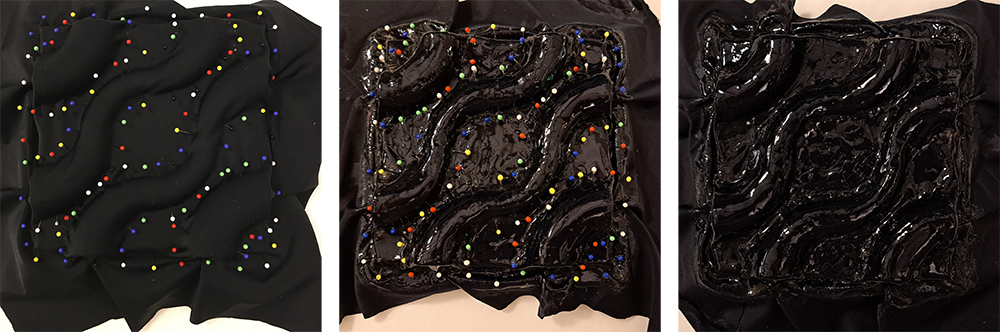
Gelatine composite with lycra.
The gelatine mixture has higher water ratio compared to the previous mixture for ease of application.
I fixed the lycra on top of the mold with pins and applied the watery gelatine mixture with a brush. In total, I applied 5 layers. Since the layers are really thin, I did not need to wait to apply the next layer.
Gelatine mixture:
- 48gr powdered gelatine
- 10gr glycerine
- 400 ml water
Sample 3
Since it is hard to apply the gelatine with the temperatures we have in Amsterdam, I wanted to cast Wool and bamboo leaf strips gelatine composites flat and then shape them on the mold making use of the heat sensitivity of gelatine-based plastics.
I used a little more glycerine content to make the bioplastic composite more flexible to mold it after drying.
Gelatine mixture:
- 144gr powdered gelatine
- 36gr glycerine
- 720 ml water
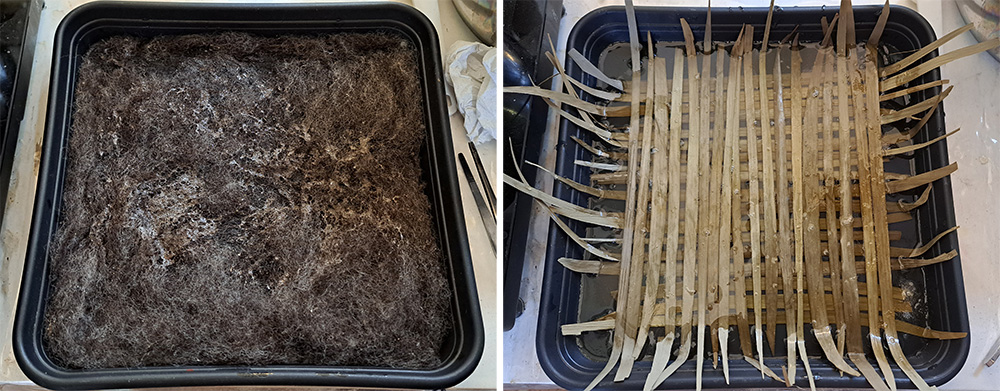
After casting the samples on sheets, I put them in the dehydrator for 10 hours at 35 degree celcius. When they came out of the dehydrator, the wool composite was dry but the bamboo composite was still cool and wet to touch.
I heated the samples with a heat gun and tried to give them shape on the molds. The wool composite took shape really well. However, bamboo composite did not comply with this method. Bamboo strips became brittle and they did not create a very merged composite with gelatine, hence the gelatine also broke.

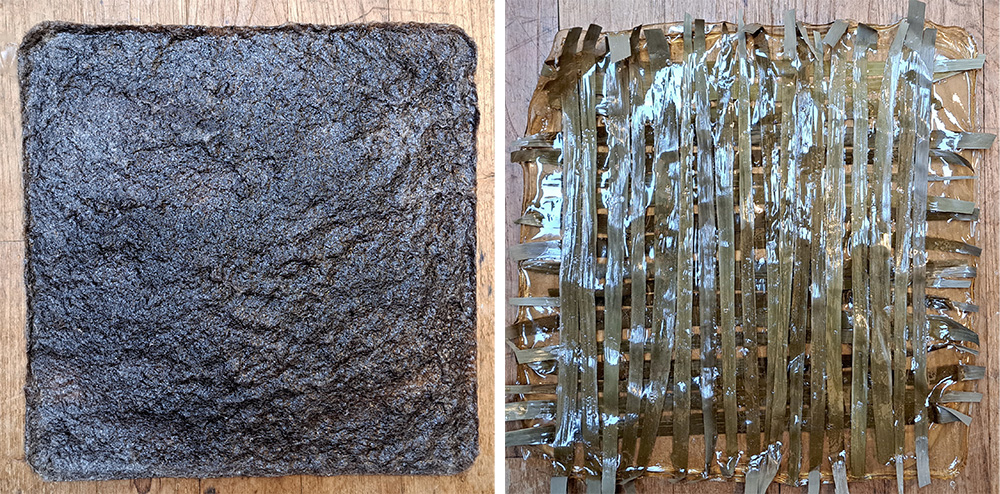
Sample 4
Cotton fabric strips with glue mixture.
Glue mixture:
- 1 tbs tapioca starch
- 2 tbs PVA glue
- 300ml water
Stephanie's composite samples
Please visit Stephanie's page to read more about the making and outcomes.
Notes from the Classroom
notes from the classroom
TEXTILE SCAFFOLD lecture by Anastasia Pistofidou
Textile: Hardening (leather),
Composites
-
Biocomposites: natural fibers as reinforcements, biopolymer matrixes
- 4 different types of natural fibers: collagen, cellulose,
- Thermoforamable matrix: polyactic acid (PLA), polycaprolactone(PCL),
Leather molding
Fabric formwork
You can leave the fabric on or remove it. If you remove it, it is called lost formwork.
Crystallization
Wood and textiles
Biological and digital fabrication
Fabrication files
-
File: truchet tile .stl file ↩