7. BioFabricating Materials
Previous Experiments
Before joining Fabricademy, I took Speculative Biophilia with Fabricademy alumna Catherine Euale at the School of Machines, and later attended the Fabricademy Bootcamp. I also joined a Root Patterning Workshop at the MIT Museum — experiences that helped me feel mentally prepared for this week’s assignment and gave me a sense of what to expect.
From these early explorations, I’ve learned a few lessons that continue to shape how I approach biofabrication:
1. We can only control the process so much — nature always has its own rhythm.
2. Patience is key; rushing only breaks the relationship between material and maker.
3. Everything affects everything — drying time, formula, environment, ingredients, and even the smallest variations in handling.
What still perplexes me is the paradox at the heart of biomaterial practice: although the goal is sustainability, we often create waste along the way. For instance, growing mycelium leather requires sterilization, plastic containers, and other resources that complicate the idea of “eco-friendly.”
Still, after working with bioplastics (gelatin, alginate, and agar), alginate biocomposites, mycelium composites and leather, and grassroot patterning, I wanted to take these experiments further — to explore how they could become more mindful, efficient, regenerative, and forward-thinking. I began asking not just how to make these materials, but how to make them better — both sustainably and creatively.
Working in the restaurant industry alongside my creative practice has also shifted how I see material waste. Every day, I witness how much food is discarded in commercial kitchens — ingredients with stories, colors, and chemistry still alive in them. This week, I decided to give those materials a second life, letting coffee grounds and fish skins reappear as pigments, binders, and living agents in new kinds of biofabrication.
Grown Material — Mycelium
Mycelium Biofabrication & Growth Manipulation
This idea came from the Fabricademy Bootcamp in Brussels (Summer 2025) — a group on Mycelium led by Annah-Ololade Sangosanya, whose concept we didn’t have time to explore. I decided to revisit it this week and see how mycelium behaves when I start interacting with its growth.
Concept
I see this experiment as a small dialogue between life and design — between what I can guide and what I have to let happen. Mycelium grows like intuition; it senses boundaries, feeds where it can, and retreats where it can’t. By painting and shaping its food, I wanted to see how far I could collaborate with it, rather than control it.
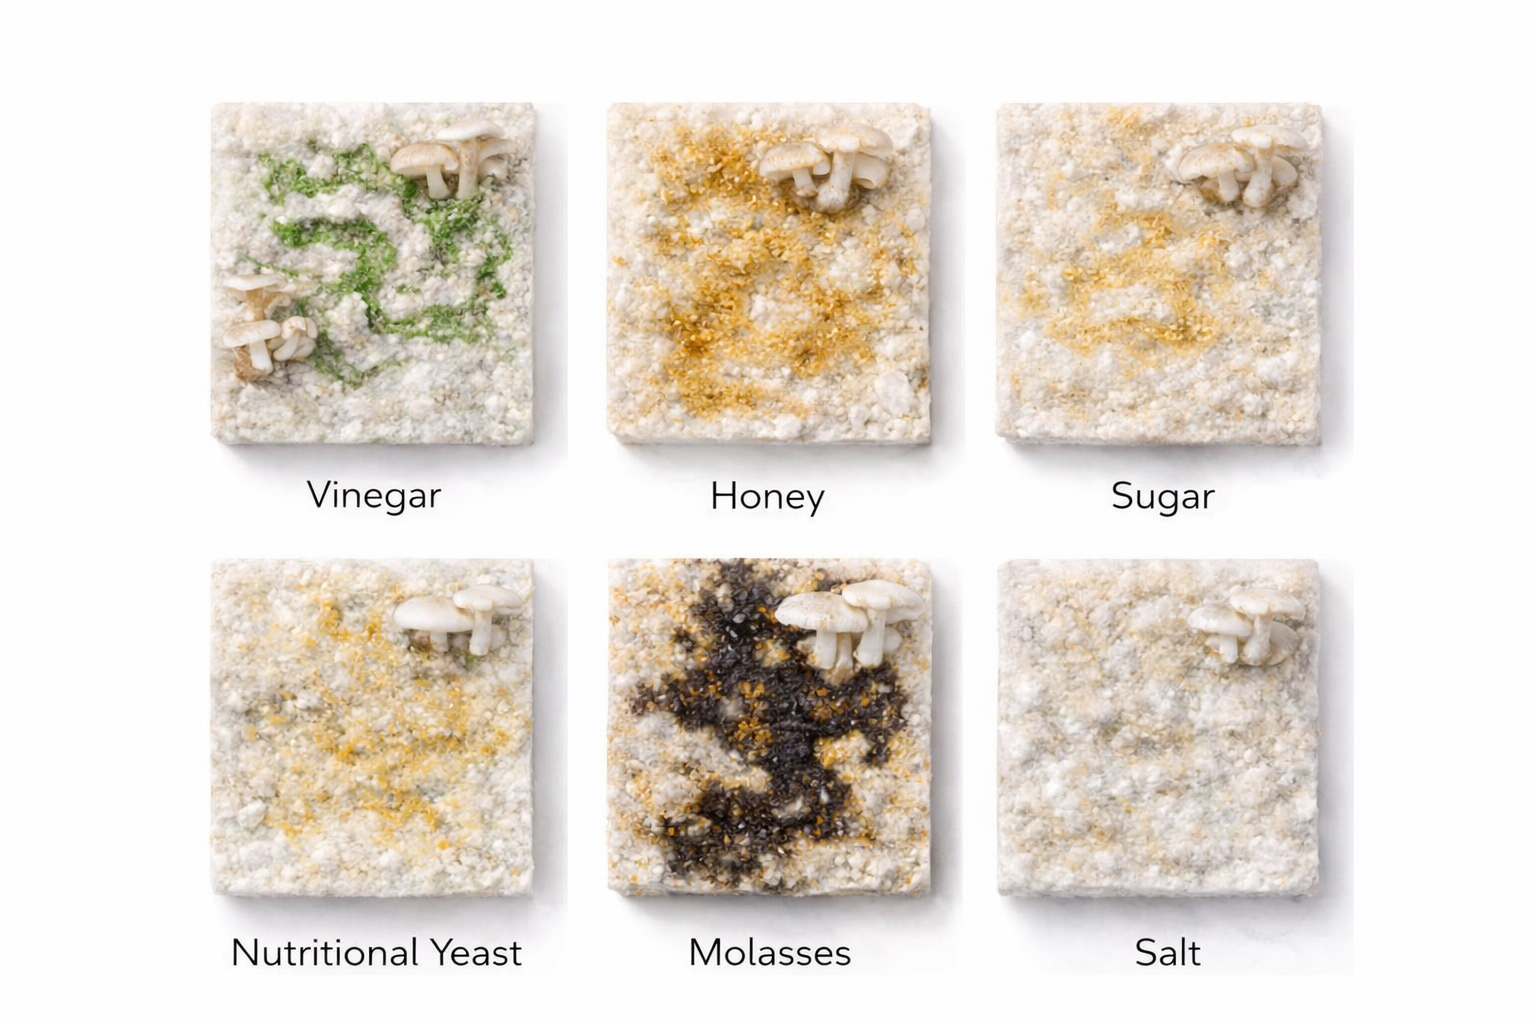
Natural Agent Study: Mycelium Growth. Concept Image by Pattaraporn “Porpla” Kittisapkajon
Goals
Grow mycelium material and observe how different natural agents affect its behavior. This week, I focused on keeping the scope simple but meaningful — exploring contrast between growth vs. inhibition, and structure vs. nutrient density.
Tools
- Mixing bowl (non-metallic)
- Spoon or spatula
- Plastic containers or molds (2–3 cm thick)
- Breathable plastic wrap or lid with holes
- Spray bottle (for misting water)
- Paper towels or cloth for lining
- Gloves and alcohol spray for cleaning
- Labeling tape or markers
Materials – Natural Agents Study
This experiment investigates how natural household agents influence mycelium growth patterns when applied locally on a fully colonized substrate.
| Ingredient | Role | Notes |
|---|---|---|
| Oyster Mushroom Mycelium – Ready-to-Grow Grain/Substrate Mix (5 lb) | Base living system | Pre-inoculated oak + soy hull (Masters Mix) |
| Vinegar | Growth inhibitor | Acidic; lowers pH and suppresses hyphal spread |
| Honey | Growth promoter | Simple sugars; encourages dense, fuzzy growth |
| Sugar | Mild promoter | Slower, more diffuse energy source than honey |
| Nutritional Yeast | Nutrient signal | Adds nitrogen + B-vitamins; may thicken growth |
| Molasses | Strong promoter | High mineral + sugar content; often causes dark, aggressive growth |
| Salt | Growth inhibitor | Osmotic stress; halts or severely restricts growth |
| Clean water | Dilution & moisture | Used to dilute agents and maintain humidity |
| Baking paper / gloves / alcohol | Hygiene | Prevent contamination during handling |
Step-by-Step Instructions
1. Incubate the Base Bag (2–3 Weeks)
- Injecting Liquid Culture
- Keep the sealed mycelium bag in a dark, warm space (22–26 °C)
- Wait until the substrate becomes fully white and firm
- This ensures an evenly colonized, responsive base for testing
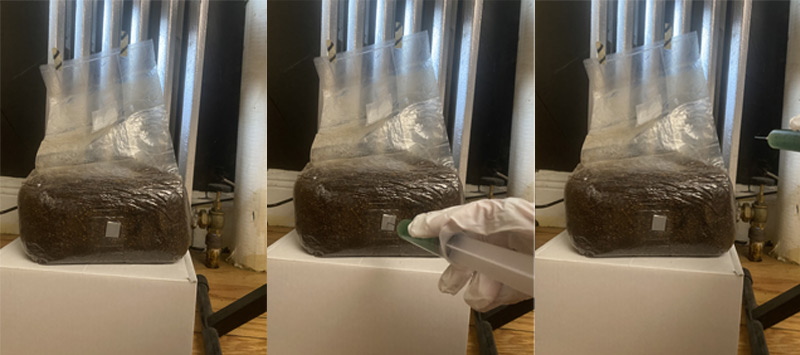
Injecting Liquid Culture
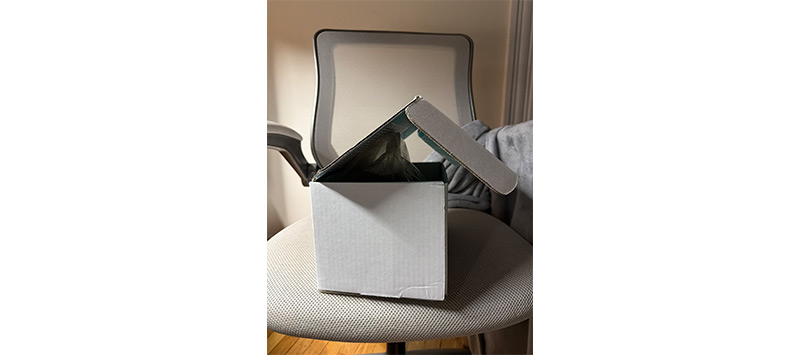
Incubation Setup. I placed the mycelium incubation bag inside a covered box with small openings for airflow, attempting to create a dark, warm, and more controlled environment for growth.
💭 I used Mycelium Mushroom Growing Kit, White Oyster Gourmet I Oak & Soy Hull Substrate for this experiment. Since I assumed mycelium preferred dark and warm environments, I placed the incubation bag near the heater in the corner of my room. I also placed the bag inside a covered box with small openings for air circulation to create a more controlled environment.
However, after nearly two months, I still observed no visible signs of growth. Reflecting on the process, I suspect the issue may have been related to environmental instability rather than warmth alone. The heater in my building is centrally controlled, causing the temperature to fluctuate frequently, and the setup was also positioned near a window, which may have introduced additional temperature variation.
It is also possible that placing the bag inside the box restricted airflow too much or reduced humidity over time. This experiment made me realize that mycelium growth may depend not only on darkness and warmth, but also on stable environmental conditions, balanced airflow, and moisture retention. As a result, I was never get to move on to the next stage of the experiment.
2. Prepare a Single Substrate Field
- Break the colonized substrate gently into chunks
- Mix lightly and press into molds or trays
- Target thickness: 2–3 cm
- Avoid compressing the mycelium
💭 Because the mycelium in the previous step never grew, I was unable to complete this stage of the process.
3. Mold and Label
- Line molds with baking paper
- Prepare one tile per natural agent
- Label clearly:
- Vinegar
- Honey
- Sugar
- Nutritional Yeast
- Molasses
- Salt
💭 Because the mycelium in the previous step never grew, I was unable to complete this stage of the process.
4. Apply Natural Agents (Surface Intervention)
| Agent | Role | Application | Expected Reaction |
|---|---|---|---|
| Vinegar | Inhibitor | Light brush or drops | Bleached zones, halted growth |
| Honey | Promoter | Dilute 1:3 with water, small drops | Dense, glossy, fuzzy growth |
| Sugar | Promoter | Dilute 1:3, light application | Subtle expansion, softer texture |
| Nutritional Yeast | Nutrient signal | Sprinkle dry or dissolve lightly | Thicker, uneven growth clusters |
| Molasses | Strong promoter | Dilute 1:5, minimal drops | Darkened, aggressive growth |
| Salt | Inhibitor | Sprinkle sparingly | Sharp boundaries, growth arrest |
💭 Because the mycelium in the previous step never grew, I was unable to complete this stage of the process.
5. Incubate and Observe
- Cover molds with breathable wrap or perforated lids
- Incubate in dark, warm conditions (22–26 °C) for 7–10 days
- Mist lightly only if surface dries
- Document daily:
- Growth density
- Color
- Texture
- Boundary sharpness
- Smell
💭 Because the mycelium in the previous step never grew, I was unable to complete this stage of the process.
6. Dry and Preserve
- Once growth stabilizes (≈ Day 7–10):
- Remove samples from molds
- Dry at 60–80 °C for 2–4 hours or air-dry for several days
- Ensure fully dry before storage
💭 Because the mycelium in the previous step never grew, I was unable to complete this stage of the process.
Experimental Matrix – Natural Agent Signals
| Sample | Agent | Type | Observed Effect |
|---|---|---|---|
| 01 | Vinegar | Inhibitor | |
| 02 | Honey | Promoter | |
| 03 | Sugar | Promoter | |
| 04 | Nutritional Yeast | Nutrient signal | |
| 05 | Molasses | Strong promoter | |
| 06 | Salt | Inhibitor |
💭 Because the mycelium in the previous step never grew, I was unable to complete this stage of the process.
Result
After approximately two months of incubation, there was no visible mycelium growth observed from the incubation bag. The image below represents a visualization of the intended outcome rather than an achieved result. I plan to regrow the mycelium and continue this experimentation in future iterations.
Grown Material — Kombucha Leather (Learning to Grow)
Goal
To learn how to grow and work with kombucha as a living material.
This experiment focuses on cultivating bacterial cellulose (SCOBY leather) through fermentation — observing how growth, thickness, and texture respond to environment and time.
The goal is to understand:
1. How kombucha grows
2. How temperature, sugar, and surface area affect thickness
3. How to harvest and dry a sheet suitable for future bio-design experiments
Tool
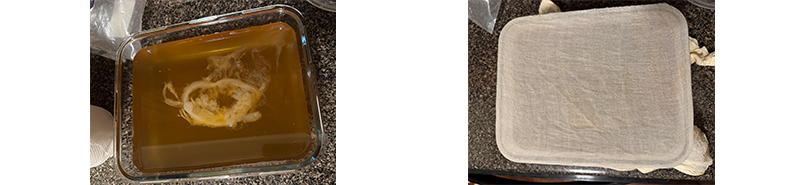
- Wide 120 oz (3.5 L) glass container (≈ 13 × 9 × 2.5 in)
- Breathable fabric or paper towel
- Rubber band
- Measuring cups & spoon
- Kettle or pot
- Thermometer (optional)
- Scale (grams preferred)
- Drying surface (parchment or clean cotton cloth)
- Glycerin (optional for finishing)
Materials & Ingredients
| Ingredient | Purpose | Notes |
|---|---|---|
| Water | Base liquid | Filtered or dechlorinated for best results |
| Black or green tea | Nutrient source | 2–3 tea bags |
| Sugar | Food for bacteria | 200 g |
| Apple cider vinegar (with “mother”) | pH adjustment & protection | 200 ml |
| Starter liquid (plain kombucha) | Inoculation | 450 ml |
| SCOBY | Culture | 1 piece, covering surface |
| Glycerin (optional) | Plasticizer | For post-treatment softness |
Recipe & Process
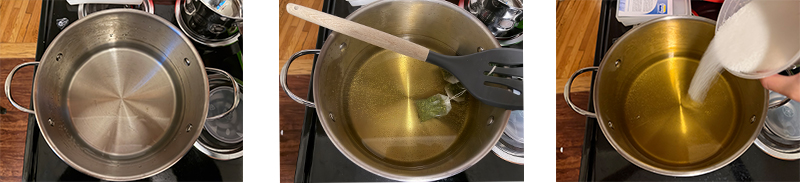
1. Brew the Sweet Tea
- Boil 2 L of water.
- Steep 3–4 tea bags for 10 minutes.
- Remove tea bags and dissolve 200 g sugar while still warm.
- Let cool completely to room temperature (below 30°C / 86°F).
2. Prepare the Fermentation Base
- Add 200 ml apple cider vinegar and 450 ml starter kombucha to the cooled tea.
- Pour into the glass container, filling up to about 1 inch below the rim.
- Gently place one SCOBY on the surface.

3. Ferment
- Cover with breathable fabric and secure with a rubber band.
- Keep in a warm (25–30°C / 77–86°F) area with good air flow, away from direct sun.
- Do not disturb — the SCOBY grows across the surface.
- Optionally feed around day 10 and day 20 with 2 Tbsp sugar dissolved in ½ cup cooled tea.
4.Harvest (After ~5–6 weeks)
- When the new cellulose layer reaches 12–18 mm wet thickness, gently remove it.
- Rinse with clean water to remove tea residue.
- Flatten on parchment or cotton cloth to dry at room temperature.
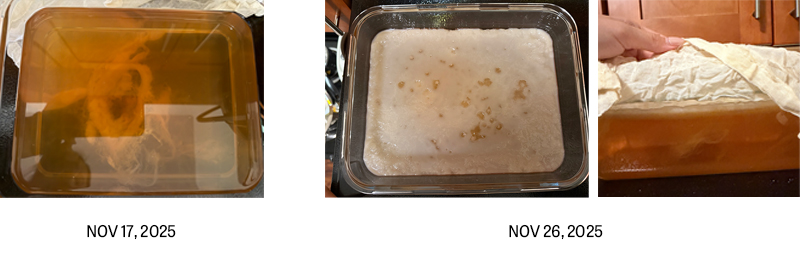
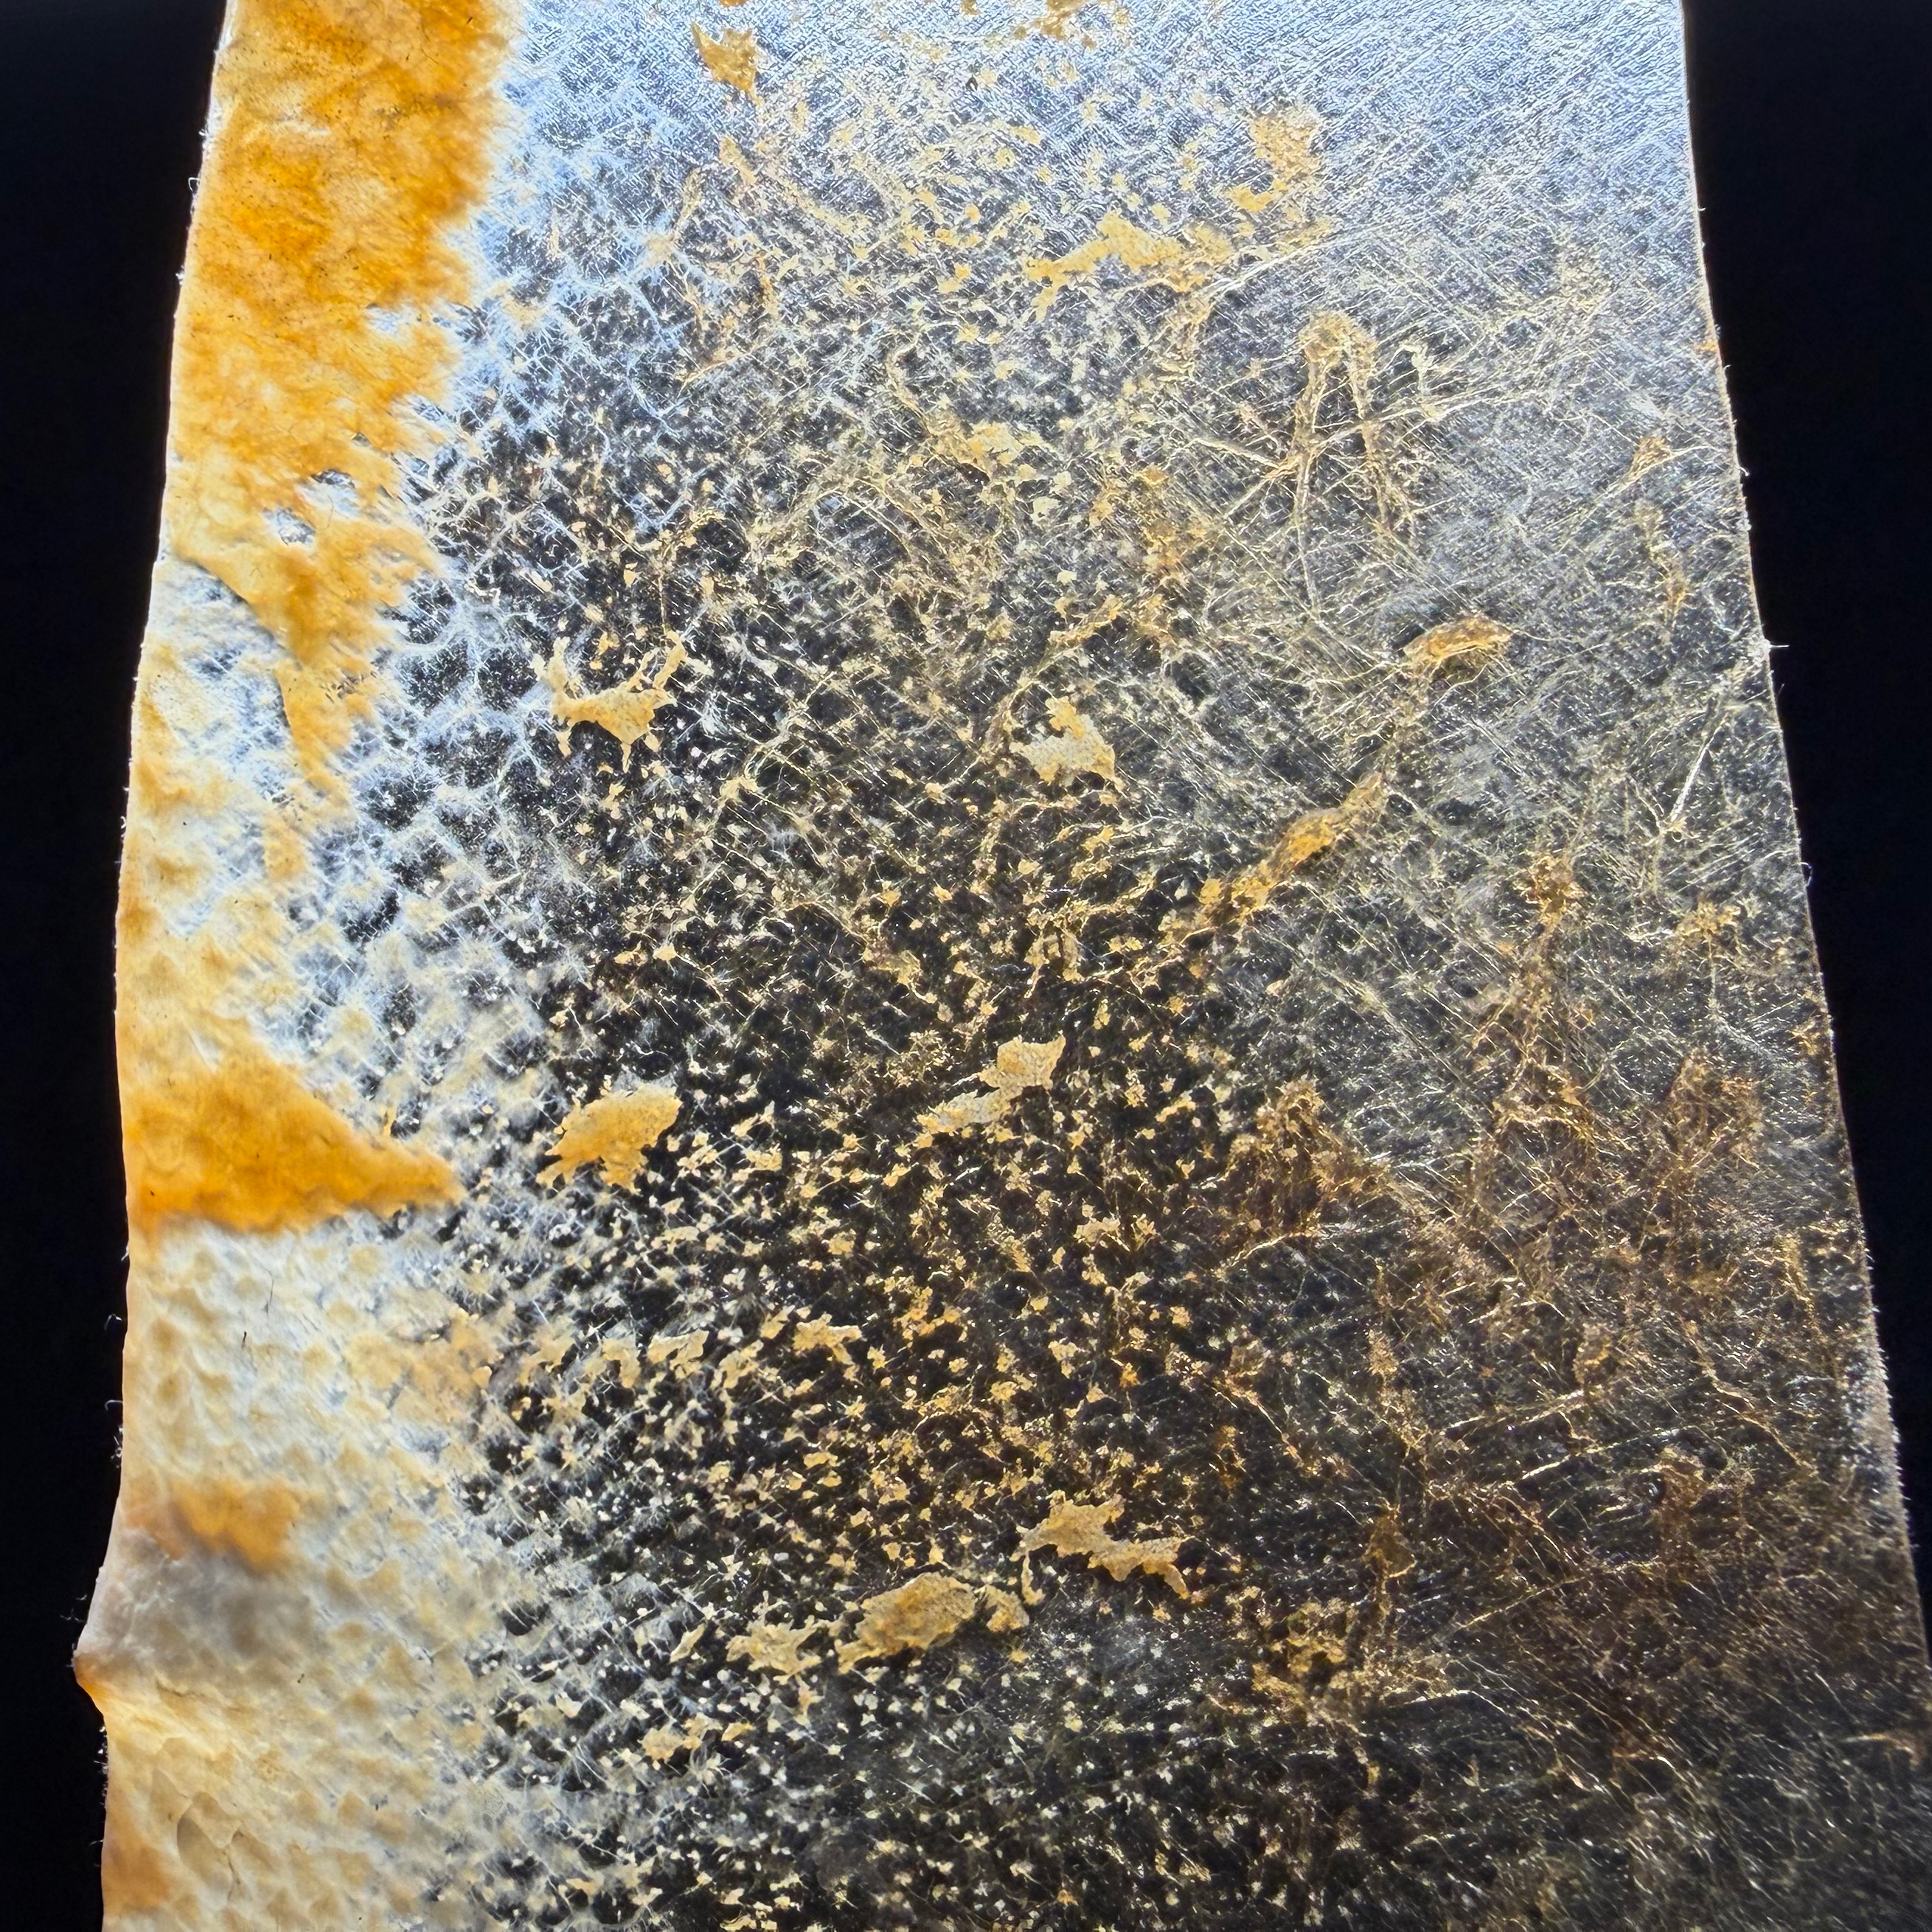
💭 I was surprised by how quickly the bacterial cellulose regenerated. After the surface layer was disrupted on Nov 17, 2025, the culture rebuilt itself into a continuous membrane within only 9 days. What initially appeared fragmented gradually reorganized into a cohesive cellulose layer with noticeable thickness and opacity.
5. Drying & Finishing
- Allow to air dry completely (1–3 days depending on humidity).
- Expect ~3–5 mm (⅛–¼ in) dry thickness after shrinkage.
- Optional: brush or soak in 5–10% glycerin solution for flexibility.
- Press flat between sheets or under light weight.
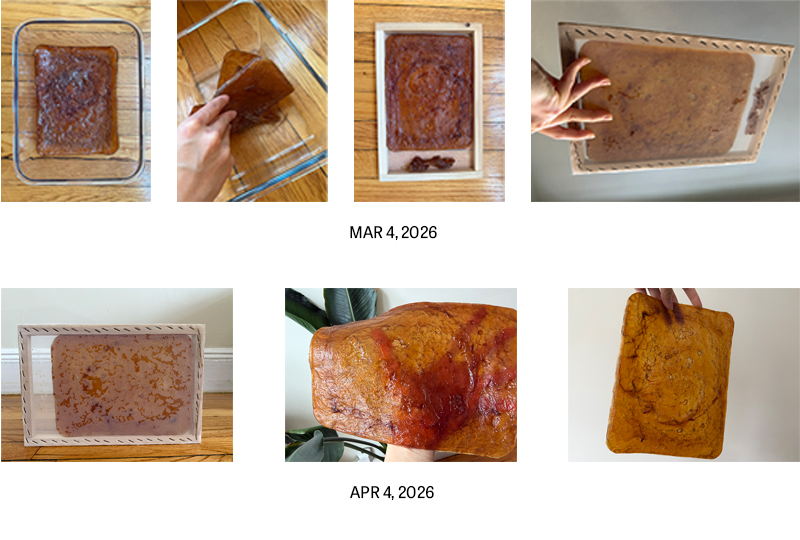
💭 I completely lost track of this kombucha leather experiment while balancing life and the final weeks of Fabricademy. For nearly three months, I neither fed nor monitored the culture. By the time I returned to it, most of the liquid medium had fully evaporated, leaving the bacterial cellulose adhered tightly and sticky at the bottom of the container.
Despite being neglected, the material itself remained surprisingly intact. The cellulose sheet had developed a darker amber color, denser texture, and more irregular surface patterning compared to the earlier harvests.
To continue processing it, I removed the sheet from the container and stretched it onto a silk-screen printing frame with mesh in an attempt to encourage more even airflow and drying. However, even after several weeks, the material remained tacky and never fully cured.
After researching the issue and comparing it to other bacterial cellulose experiments, I realized several factors may have contributed to the material never fully drying:
- Residual sugars and acids
Because I never thoroughly rinsed the cellulose after harvesting, residual sugars, tea compounds, and acetic acid likely remained trapped within the fiber network. These hygroscopic residues can continuously attract moisture from the air, preventing the material from fully curing.
- High ambient humidity and poor airflow
During this period, my room had limited ventilation because I kept the windows closed throughout winter. Bacterial cellulose is highly sensitive to environmental humidity, and insufficient airflow can dramatically slow evaporation.
- Overly thick cellulose structure
Since the culture continued growing unattended for months, the pellicle became unusually thick and dense. Thicker cellulose sheets retain significantly more internal moisture, especially near the core, making complete drying much more difficult.
- Possible partial microbial decomposition
Without fresh nutrients or maintenance, parts of the SCOBY ecosystem may have begun breaking down over time. This could explain the darker coloration, uneven surface texture, and slimy or sticky regions.
- Plasticizer-like behavior from retained organic compounds
Residual fermentation byproducts may have acted similarly to natural plasticizers, softening the cellulose structure and preventing it from becoming rigid or leather-like.
I later tried rinsing the material with water, patting it dry with a towel, and re-stretching it on the silk-screen frame multiple times. After each cycle, the surface became slightly less tacky, suggesting that washing gradually removed some residual compounds. However, even after repeated drying attempts, the material still never completely dried nor hardened.
Base recipe adapted from: Roussel, V. (2022). *Living Materials – Kombucha* (Textile-Academy tutorial).
(Link: https://class.textile-academy.org/tutorials/kombucha%20Living%20Materials_VivienRoussel_2022.pdf)
Reflection
This experiment taught me the importance of care within living material systems. The way a material grows, transforms, decays, or survives is deeply shaped by the conditions we create around it. Throughout this process, I learned that working with biomaterials is less about controlling outcomes and more about understanding and responding to the needs of the material.
The kombucha leather continued to change over time, even when left unattended, reminding me that living materials follow their own rhythms and processes. Rather than forcing the material into a predetermined result, I found that the most successful outcomes emerged when I worked with its natural behavior. This experience shifted my perspective from treating materials as passive resources to seeing them as active participants in the fabrication process.
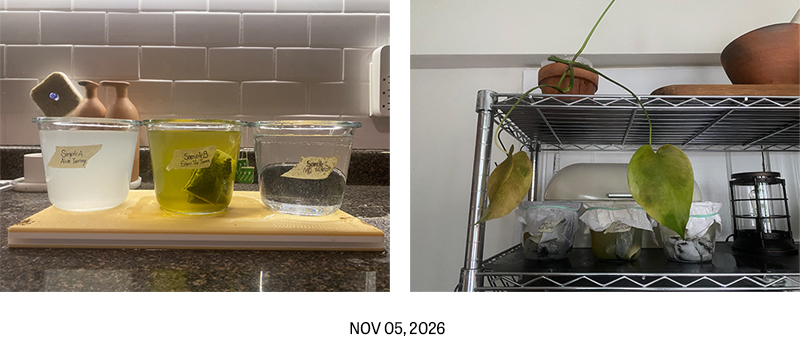
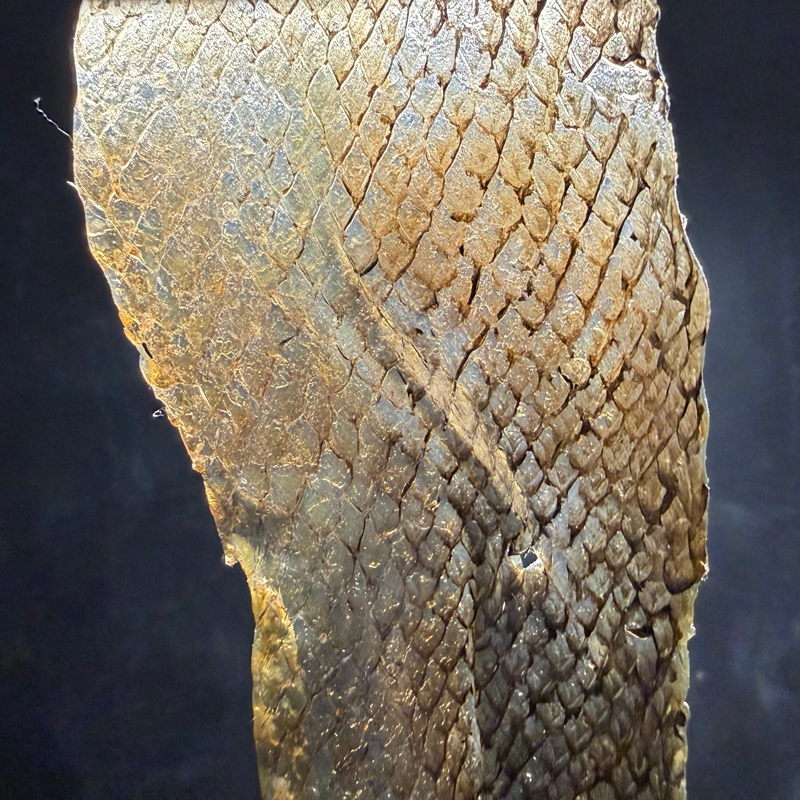
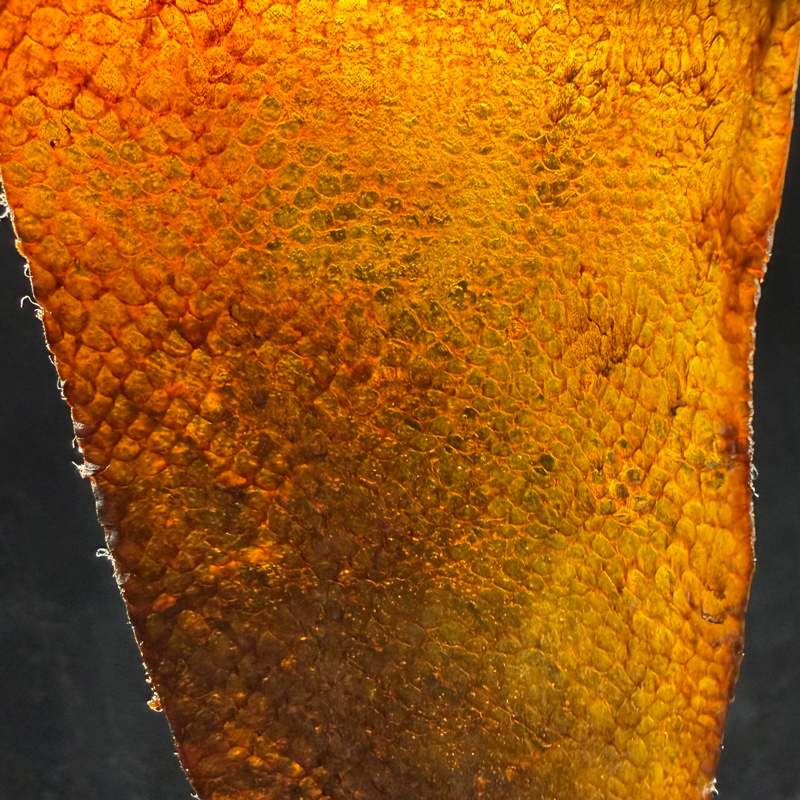
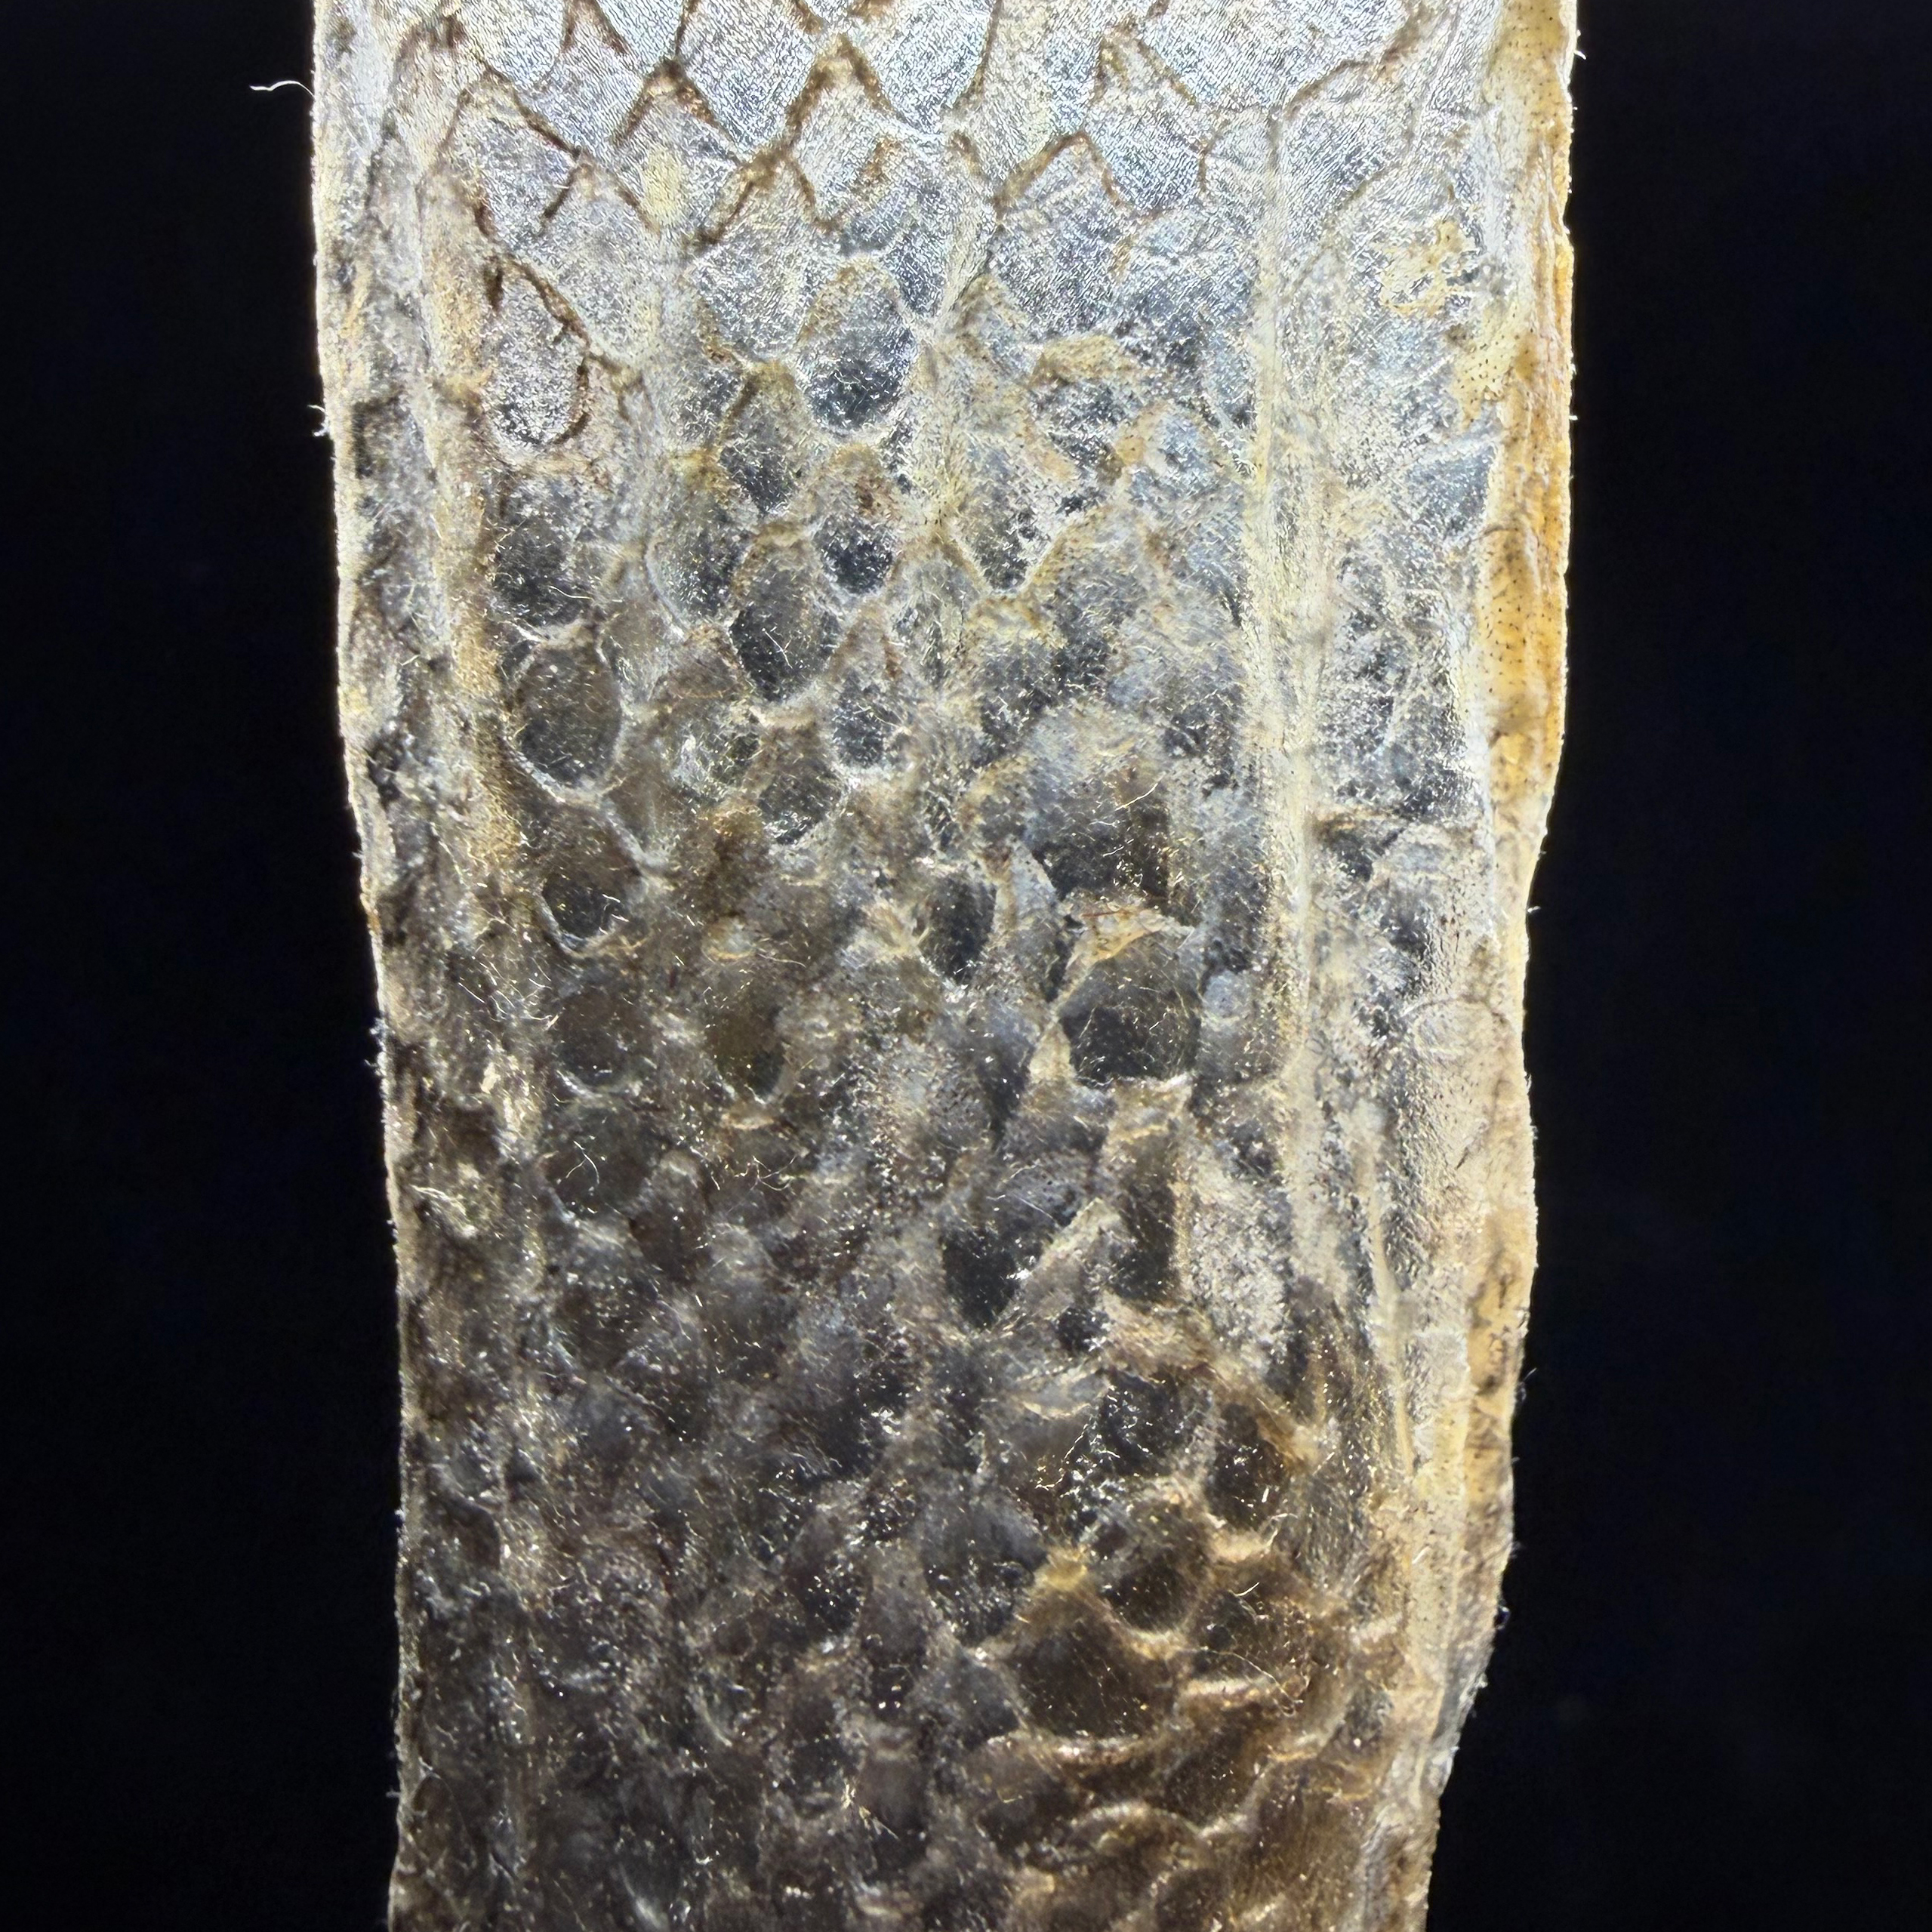
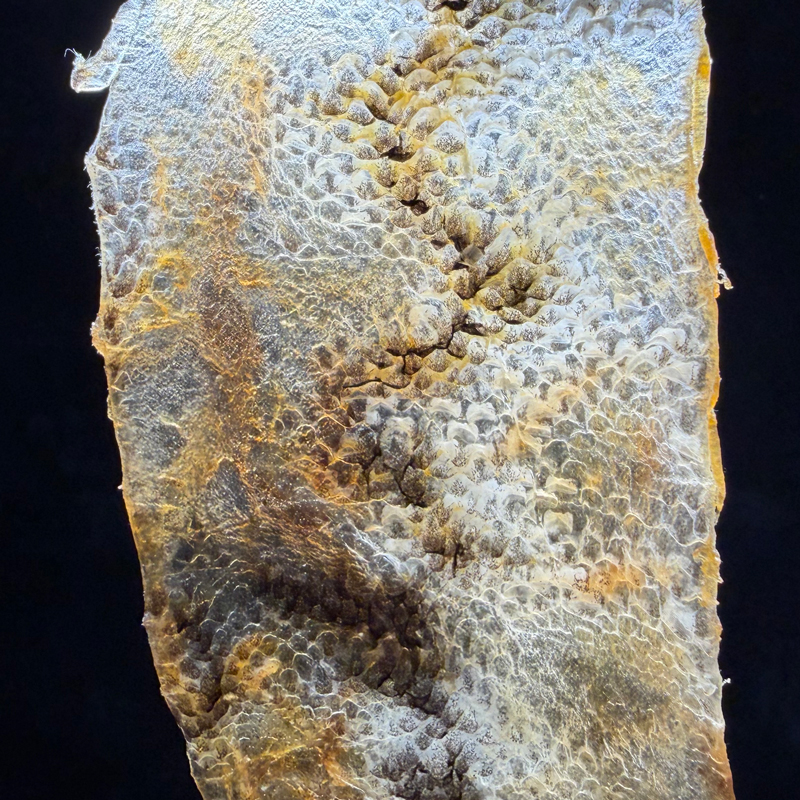
Crafted Material — Fish Leather (Alum vs. Green Tea vs. No-Tannin)
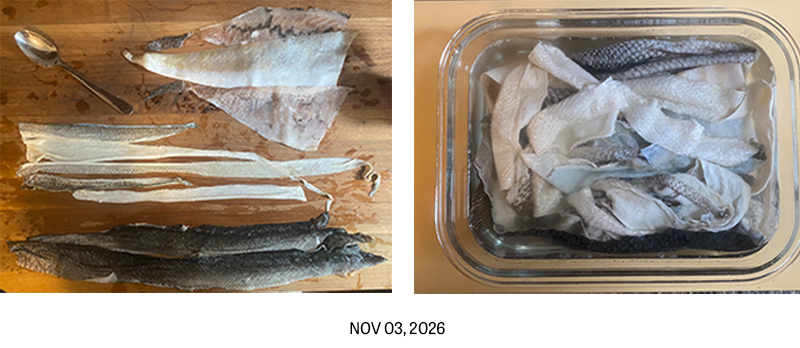
Shout-out to XOXO Sushi and Chef Josh for helping me collect the fish skins.
For this experiment, I used the skins of Salmon, Hon Hiramasa (Yellowtail Kingfish), and Kasugodai (Young Sea Bream).
Goal
To explore how different tanning agents — mineral, plant-based, and non-tannin — influence the look, texture, and scent of fish leather.
For this experiment, I prepared three samples:
-
Alum-tanned fish leather — mineral-based and pale.
-
Green-tea-tanned fish leather — plant-based and warm-toned.
-
No-tannin (Salt–Glycerin) fish leather — neutral, translucent, and minimal-chemical.
All three follow the same process so I can directly compare how each responds to its tanning chemistry.
Tools
- Bowl or tub (non-metallic)
- Gloves
- Dull knife or spoon
- Soft toothbrush
- Towel or cloth
- Drying rack or flat board
Materials & Ingredients
| Ingredient | Purpose | Notes |
|---|---|---|
| Fish skin (Salmon or Hiramasa) | Base material | Fresh, cleaned of meat — avoid oily species |
| Salt | Cleansing + preservation | Any coarse or table salt |
| Alum (Potassium aluminum sulfate) | Mineral tanning agent | Found in pharmacy or pickling section |
| Green tea (loose leaf or tea bags) | Plant tannin | Adds warm tone and herbal scent |
| Glycerin (or olive oil) | Softening / Non-tannin agent | Key for no-tannin method |
| Baking soda | Neutralizing acidity | Optional for rinsing |
| Water | Soaking + rinsing | Room temperature |
Step-by-Step Instructions
1. Cleaning the Skins
- Rinse fish skins under cool water.
- Use a spoon or dull knife to gently scrape off leftover meat or fat.
- Remove scales if needed for smoother texture.
- Soak cleaned skins in saltwater bath (1 part salt : 10 parts water) for 24 h.
2. Split the Experiment — Three Tanning Baths
Sample A — Alum Tanning (Mineral-Based) Mix:
- 1 L warm water
- 100 g salt
- 30 g alum powder
→ Stir until clear, add one pre-salted skin.
Soak 2–3 days, stir daily.
Sample B — Green Tea Tanning (Plant-Based)
Brew 5–6 tea bags (or 15 g loose leaf) in 1 L hot water for 10–15 min.
Add 100 g salt, cool to room temperature.
Add pre-salted skin, soak 3–4 days, stir daily.
Sample C — No-Tannin (Salt–Glycerin Method)
Mix:
- 1 L warm water
- 100 g salt
- 20 mL glycerin (or 1 tbsp olive oil)
→ Stir to dissolve.
Add pre-salted skin, soak 3 days, stir daily.
3. Neutralize and Rinse
For all samples:
- Prepare mild baking-soda water (1 tsp per L).
- Soak 10–15 min, then rinse thoroughly.
- Pat dry with a towel.
4. Oiling and Softening
- Lay skins flat on a towel.
- Brush a thin layer of glycerin or olive oil on both sides.
- Stretch and massage periodically as they dry (1–2 days) to keep flexibility.
5. Finishing
Press under books or boards until flat.
Trim edges and lightly polish with oil or beeswax.
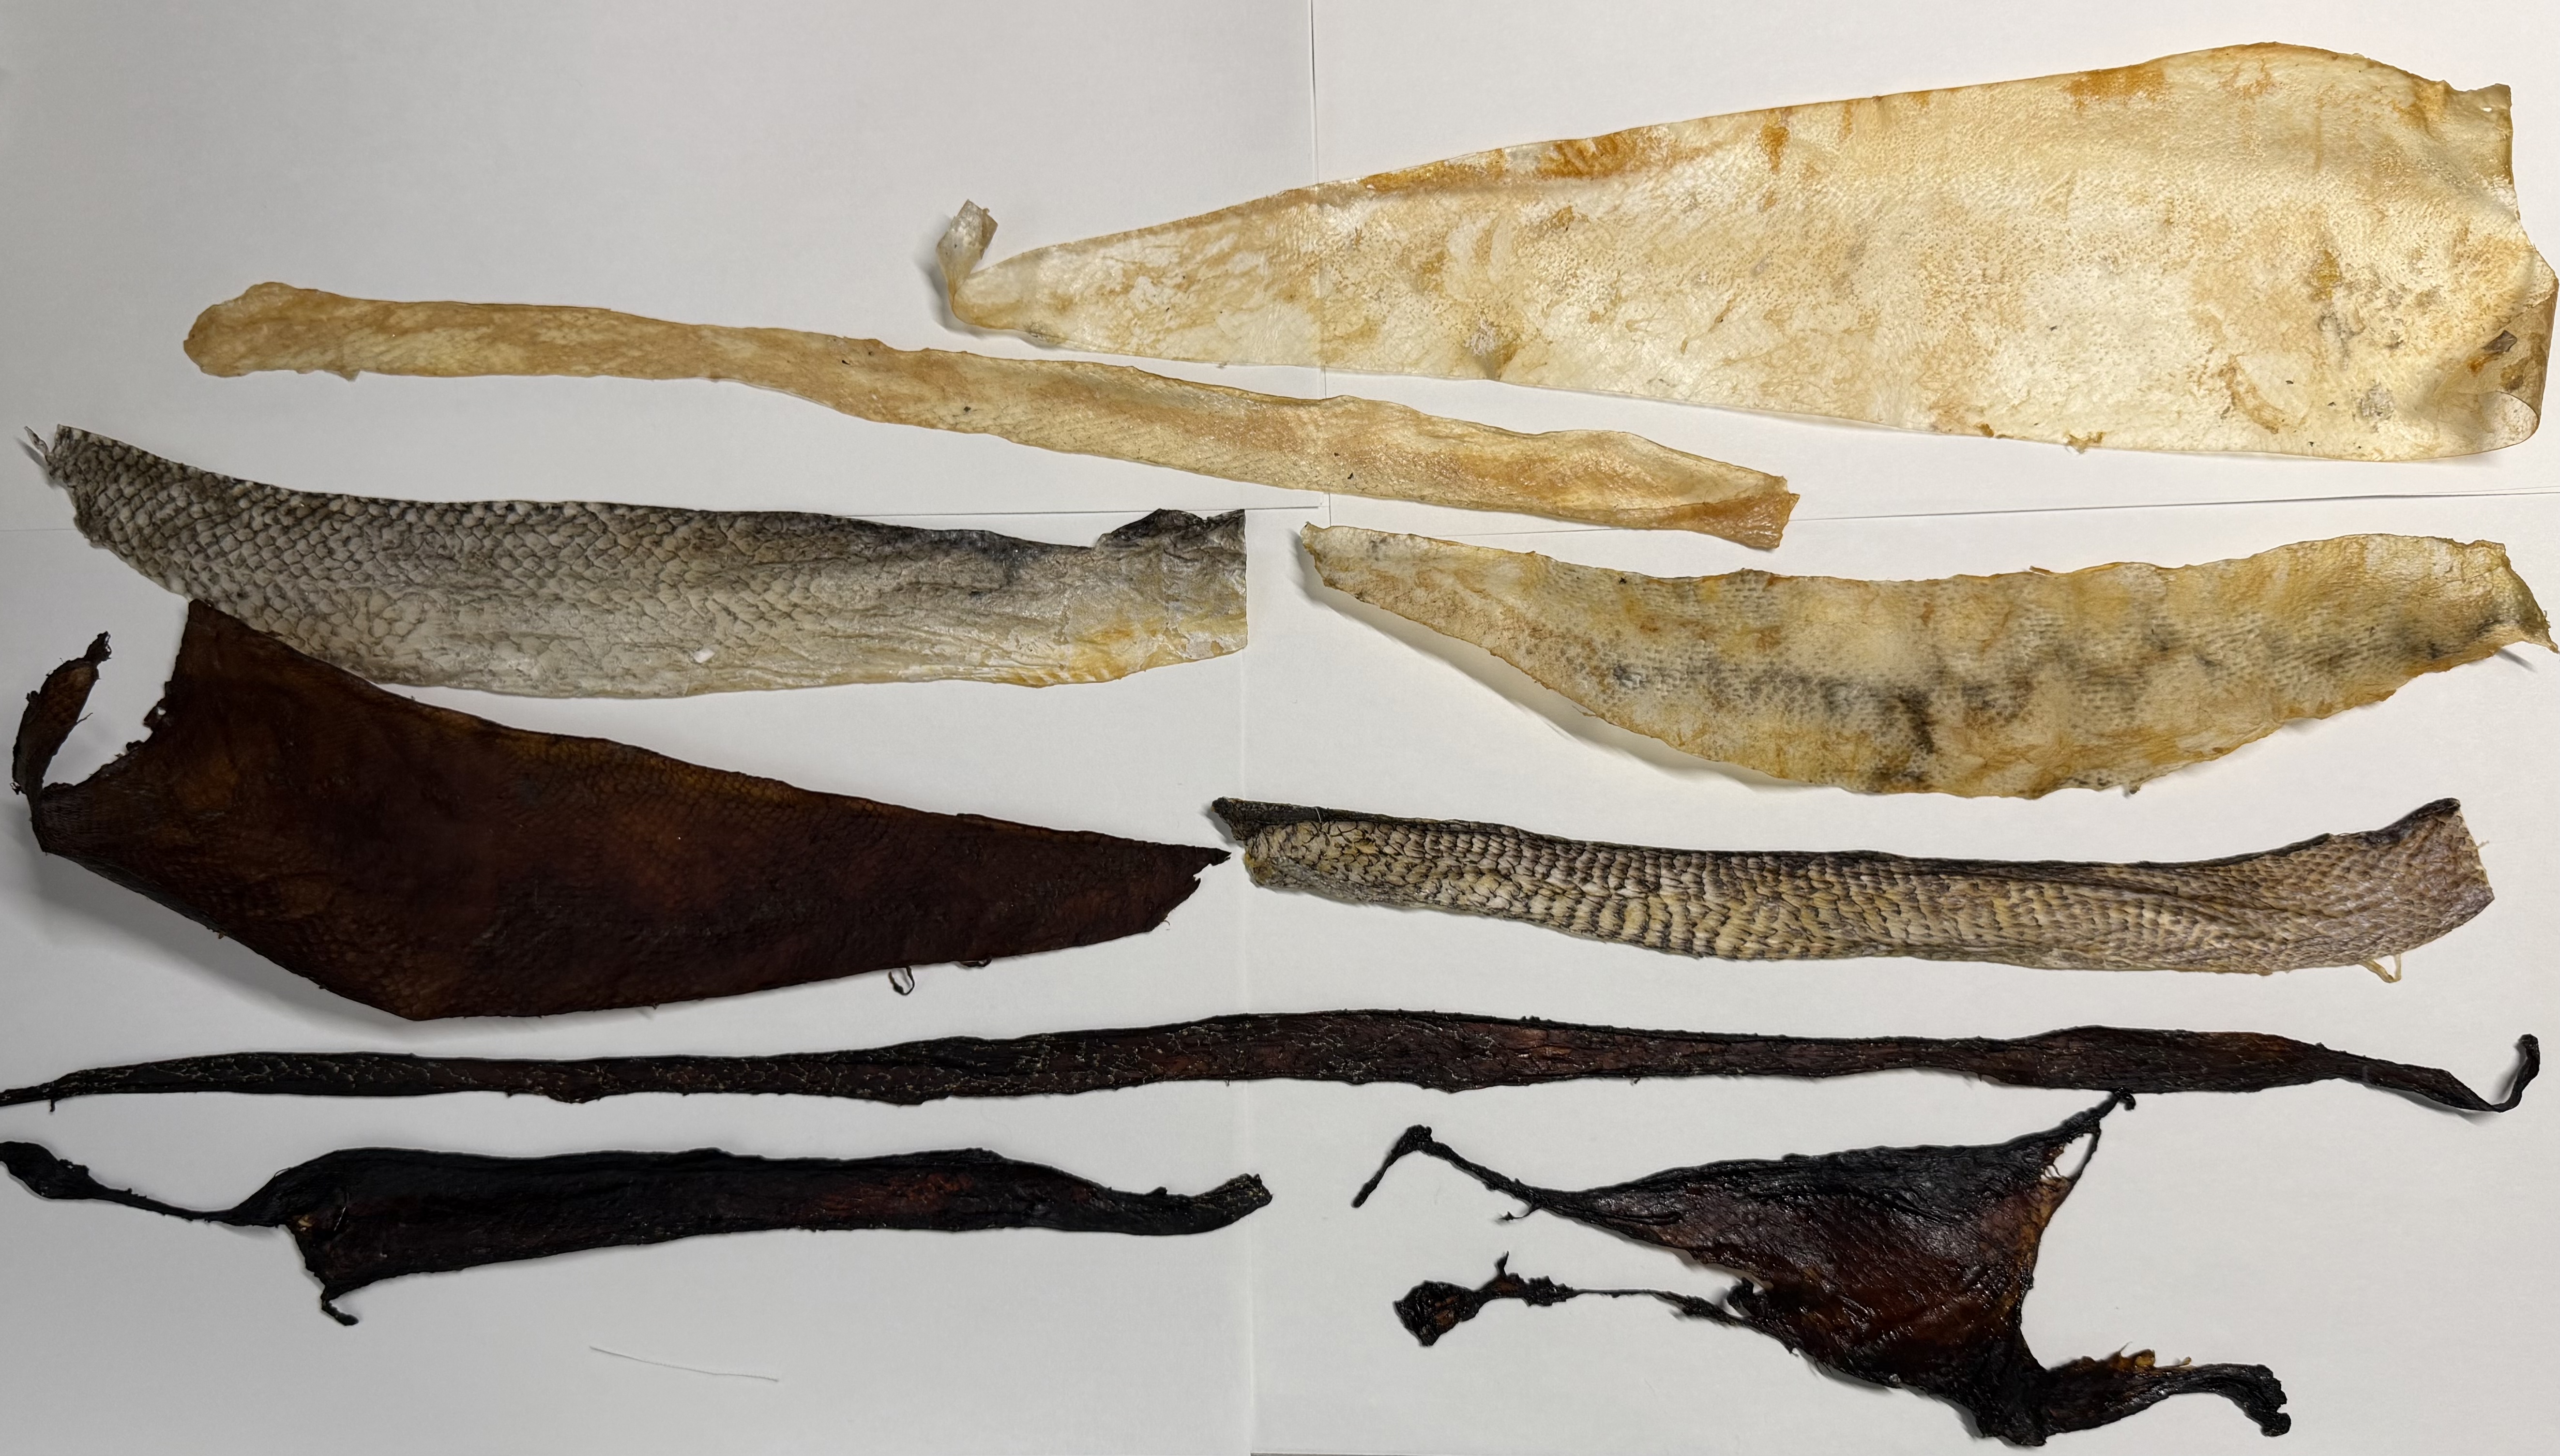
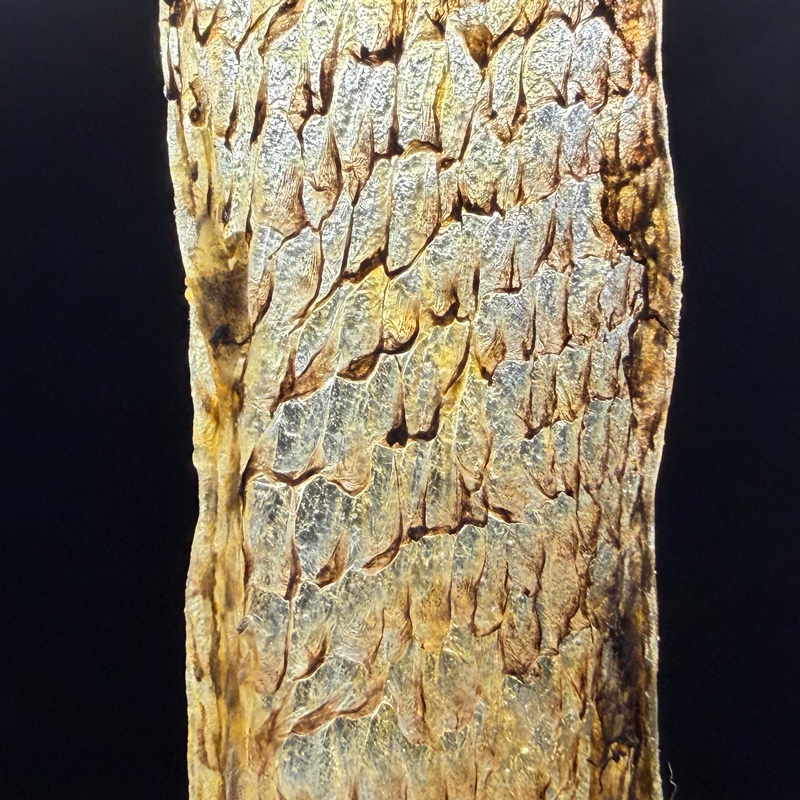
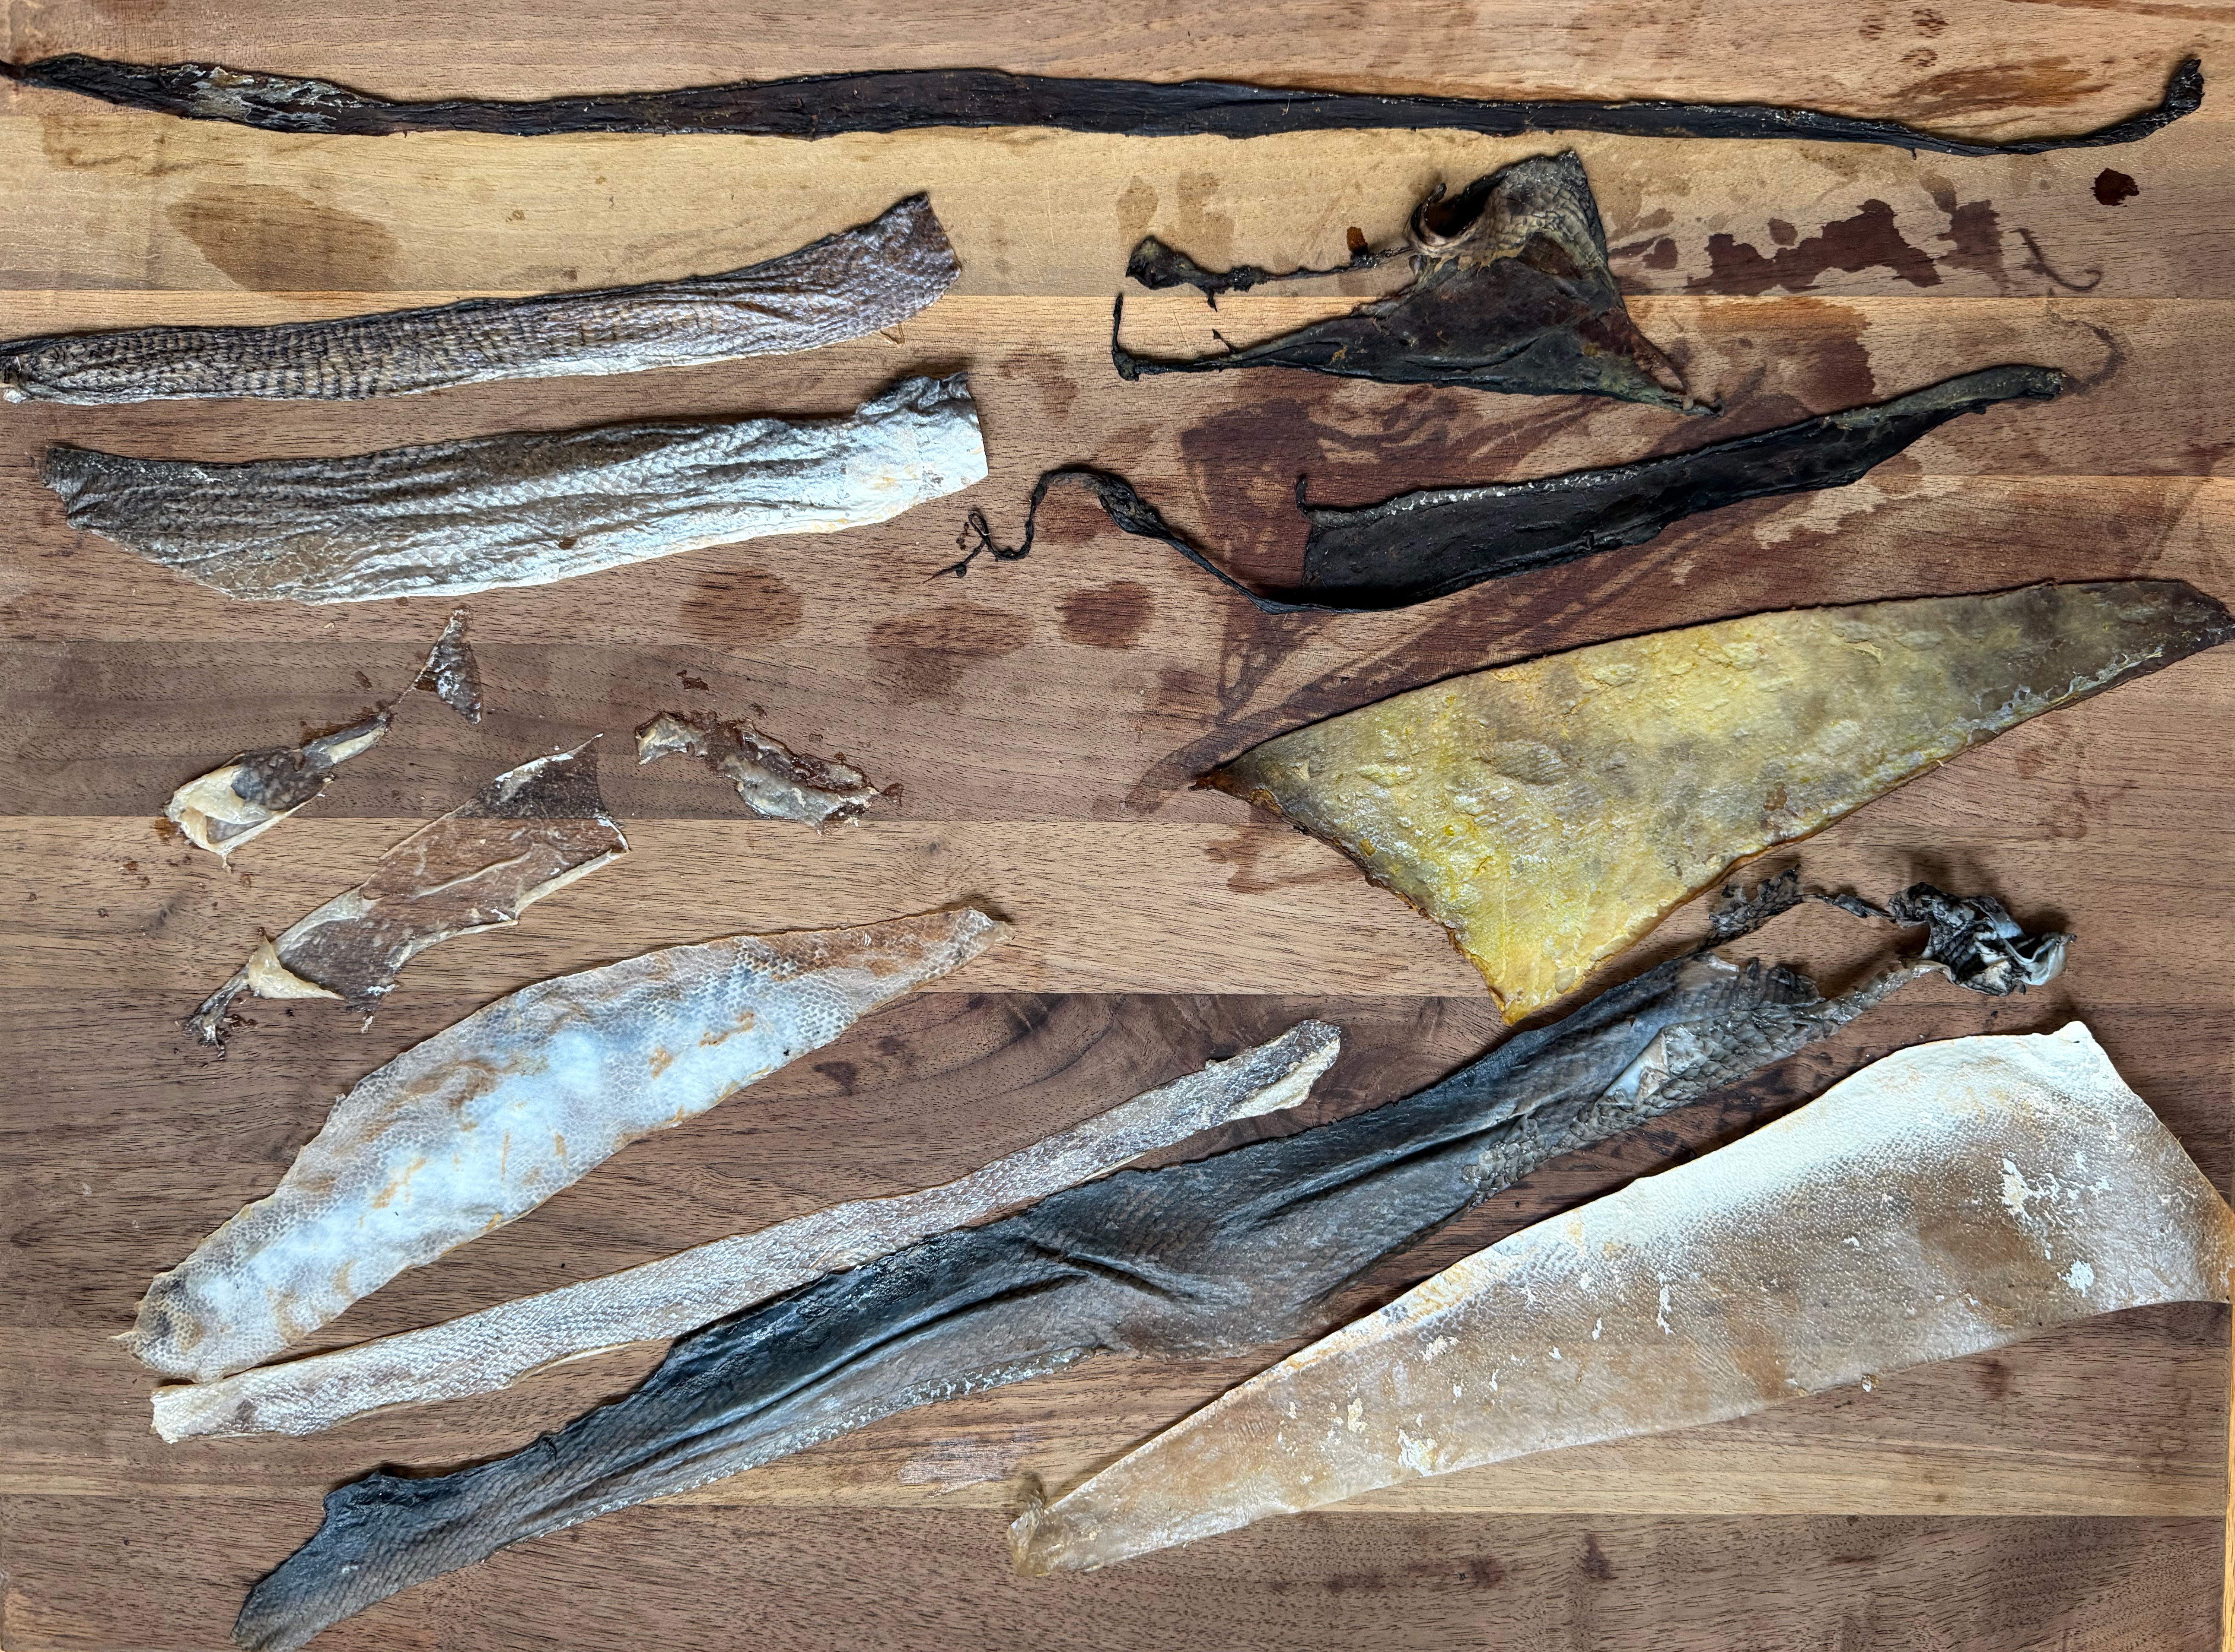
Reflection
💭 I honestly do not remember all the details of each sample, but one quality that stood out across all of them was their translucency. When held up to light, the fish skins revealed beautiful variations in texture, scale patterns, and color that were difficult to see otherwise.
One important lesson from this experiment was realizing that the Salt–Glycerin sample was preserved rather than truly tanned. Although it dried and remained flexible, it retained a strong fish smell, suggesting that the collagen was never fully stabilized like the alum- and tannin-treated samples.
Grown Material — Root Patterning (3D Living Structure)
Experiment: From Flat Growth to Self-Supporting Shell
In an earlier experiment, I explored 2D grassroot patterning, observing how roots spread and weave into living textiles across flat molds. This time, I wanted to move from pattern to structure — to see if roots could become a self-supporting form on their own.
Concept
Roots are nature’s quiet builders — they don’t just grow downward; they sense direction, moisture, and light, organizing themselves into networks of strength.
By using curved or flexible molds, I want to understand how geometry, humidity, and surface texture affect how roots find stability.
Goal Experiment with dynamic molds and natural curvature, letting the roots define their own architecture — like a living shell or dome grown from seed
Main Objectives
- Recreate root patterning using 3D or semi-dynamic molds (such as shell or dome shapes).
- Observe how roots bind and support themselves without external reinforcement.
- Produce one or more self-supporting root structures after drying.
Tools
- Small molds or forms (bowl, dome, shell, or folded fabric)
- Spray bottle (for watering)
- Baking paper or jute cloth (to line the mold)
- Measuring cup or bowl
- Spoon or spatula
- Gloves
- Plastic wrap or transparent cover
- Scissors or craft knife
- Camera / phone for daily documentation
🧂 Materials
| Material | Purpose | Notes |
|---|---|---|
| Grass or wheat seeds | Primary growth medium | Pre-soak overnight for faster germination |
| Soil, coconut fiber, or jute fabric | Growth substrate | Root anchoring and moisture control |
| Water (clean) | Moisture | Mist daily, avoid oversaturation |
| Flour paste or agar | Natural adhesive | Helps seeds stick to vertical or curved mold |
| Plastic wrap or cloth | Cover | Retains humidity |
| Paper or jute liner | Separation layer | Prevents sticking to mold |
| Light source | Growth direction cue | Indirect sunlight or lamp |
💫 Step-by-Step Instructions
1. Pre-Soak Seeds
- Soak grass or wheat seeds overnight (8–12 hours).
- Drain and rest for a few hours before layering.
2. Prepare Mold
- Choose a 3D form (like a small dome, bowl, or curved paper mold).
- Line with baking paper or jute cloth for air and easy removal.
- Brush a thin layer of flour paste or agar to help the seeds stick, especially on curved or vertical parts.
💭 I never actually got around to trying this experiment.
3. Apply Seeds
- Spread soaked seeds evenly across the mold surface.
- Press gently so they adhere without overlapping too densely.
- Spray lightly with water.
- Cover with a thin layer of jute or soil for extra support (optional).
💭 I never actually got around to trying this experiment.
4. Incubation & Growth
- Cover with plastic wrap or breathable cloth to keep humidity.
- Place in indirect light, maintaining warmth (20–25 °C).
- Mist 1–2 times per day to prevent drying.
- Observe root growth and weaving over 5–7 days.
💭 I never actually got around to trying this experiment.
5. Shape & Strengthen (Dynamic Molding)
- As roots grow, gently adjust or deform the mold slightly — tilt, bend, or lift corners.
- Observe how the structure responds and adapts.
- The aim is to encourage self-supporting tension through living geometry.
💭 I never actually got around to trying this experiment.
6. Drying & Preservation
- Once roots fully bind and create a stable network, carefully remove the structure from the mold.
- Rinse lightly to remove soil or debris.
- Dry under gentle airflow or in a dehydrator at 40–50 °C until completely dry.
- Optionally, coat with bioplastic or mycelium slurry for hybrid strength.
💭 I never actually got around to trying this experiment.
Observation & Notes
| Day | Action | Growth Observation | Mold Adjustment | Notes |
|---|---|---|---|---|
| 1 | Soaking | |||
| 3 | Germination | |||
| 5 | Root binding | |||
| 7 | Partial drying | |||
| 10 | Dried |
💭 I never actually got around to trying this experiment.
Reflection
💭 I never actually got around to trying this experiment.
Crafted Material — Coffee Ground Bio-Leather & Composite (Alginate vs Gelatin vs Agar)
1. What This Experimentation Is About
This experiment compares how three natural biopolymer binders —
sodium alginate, gelatin, and agar agar — behave when mixed with used coffee grounds to form two material types:
- Coffee Bio-Leather (8 in hoop) → thin, flexible sheet
- Coffee Composite (3 × 2 × 1 in mold) → dense, rigid block
The goal is to observe how binder chemistry changes texture, flexibility, color, smell, and drying using the same filler.
Inspired by the Fabricademy Bio-Leather recipes and Materiom Coffee Composite method.
2. Design Goals
- Recycle spent coffee as filler and natural pigment
- Compare three binder types (seaweed / animal / plant based)
- Create one hoop sheet + one composite block per binder
- Keep ingredients precise for minimal waste
- Observe surface feel, translucency, and durability
3. 🧰 Tools
- (3) 8 inch embroidery hoops
- (3) mixing bowls + spatulas
- Digital scale (reads to 0.1 g)
- Measuring cup / beaker (mL or fl oz)
- Silicone mat or parchment sheet
- (1) 3 × 2 × 1 inch mold ≈ 98 mL volume
- Oven or dehydrator set to 104–122 °F (40–50 °C)
- Gloves + alcohol spray
- Optional for alginate: 1–2 % Calcium Chloride (CaCl₂) solution
4. 🧂 Recipes (References)
| Binder | Fabricademy Base Ratio | Notes |
|---|---|---|
| Alginate Bio-Leather | 400 mL water : 12 g alginate : 30 g glycerin | Cross-link with 1–2 % CaCl₂ solution |
| Gelatin Bio-Leather | 240 mL water : 48 g gelatin : 12 g glycerin | Elastic and glossy finish |
| Agar Bio-Leather | 250 mL water : 5 g agar : 15 g glycerin | Matte and firmer |
| Coffee Composite (Materiom) | Alginate + coffee grounds (5–30 %) + glycerin | Cured with CaCl₂ for strength |
5. Recipe Adjustment for One 8″ Hoop + One 3×2×1″ Mold
Volume Estimation | Container | Approx. Volume | |---|---:| | 8 in hoop (≈ 0.12 in thick film) | ≈ 97 mL | | 3×2×1 in mold | ≈ 98 mL | | Total + 10 % extra for loss | ≈ 215 mL |
About “% w/v”
% w/v means “grams of solid per 100 mL of liquid solution.”
For example:
- 6 % w/v = 6 g coffee in 100 mL liquid
- 20 % w/v = 20 g coffee in 100 mL liquid
So for our volumes:
- Sheet (97 mL) → ≈ 6 g coffee
- Composite (98 mL) → ≈ 20 g coffee
Scaled Ingredient Amounts (≈ 215 mL total mix per binder)
| Binder | Water (mL) | Glycerin (g) | Binder (g) | Coffee for Sheet | Coffee for Composite |
|---|---|---|---|---|---|
| Alginate | 203 | 15 | 6 | 6 g | 20 g |
| Gelatin | 207 | 10 | 41 | 6 g | 20 g |
| Agar | 205 | 12 | 4 | 6 g | 20 g |
6. Detailed Instructions
A) Alginate Coffee Bio-Leather
- Slowly whisk 6 g alginate into 203 mL water.
- Let rest at least 1 hour (preferably overnight) to fully hydrate and remove bubbles.
- Add 15 g glycerin and mix gently.
- Stir in 6 g dried coffee grounds.
- Pour into the 8 in hoop (~3 mm thick).
- Spray or brush with 1–2 % CaCl₂ for 5–10 min to cross-link.
- Rinse lightly and drain.
- Dry at 40–50 °C until fully set.
- Rub surface lightly with olive oil for flexibility.
B) Alginate Coffee Composite
- To remaining alginate mixture, add 20 g coffee grounds (20 % w/v).
- Mix to a thick paste.
- Pour or press into the 3×2×1 in mold.
- Mist or dip in 1–2 % CaCl₂ to set.
- Dry at 40–50 °C until solid.
- Oil finish optional.
💭 I never actually got around to trying this experiment.
C) Gelatin Coffee Bio-Leather
- Sprinkle 41 g gelatin over 207 mL cool water; let bloom 5–10 min.
- Warm gently (≤ 140 °F / 60 °C) until clear.
- Add 10 g glycerin; stir.
- Mix in 6 g coffee grounds.
- Pour into 8 in hoop and level.
- Let gel at room temp, then dry at 40–50 °C.
- Massage a drop of olive oil after drying if edges stiffen.
💭 I never actually got around to trying this experiment.
D) Gelatin Coffee Composite
- Rewarm remaining gelatin mixture.
- Add 20 g coffee grounds; mix until dense.
- Pour into the 3×2×1 in mold and tap to release bubbles.
- Let set at room temperature, then dry at 40–50 °C.
- Peel out carefully once firm.
💭 I never actually got around to trying this experiment.
E) Agar Coffee Bio-Leather
- Bring 205 mL water to a gentle boil.
- Whisk in 4 g agar until dissolved (2–3 min).
- Remove from heat; stir in 12 g glycerin.
- Add 6 g coffee grounds and mix.
- Pour into 8 in hoop quickly — agar sets as it cools.
- Let cool to gel, then dry at 40–50 °C.
- Oil lightly if stiff.
💭 I never actually got around to trying this experiment.
F) Agar Coffee Composite
- Keep mix warm so it remains liquid.
- Add 20 g coffee grounds, stir to form thick slurry.
- Pour into 3×2×1 in mold and tap to de-air.
- Let cool to gel, then dry at 40–50 °C until hard.
- Oil finish optional.
💭 I never actually got around to trying this experiment.
7. Comparison Chart (to fill later)
| Sample | Binder Type | Coffee % | Form | Color | Texture | Flexibility | Transparency | Smell | Notes |
|---|---|---|---|---|---|---|---|---|---|
| A | Alginate | 6 / 20 | Leather / Composite | ||||||
| B | Gelatin | 6 / 20 | Leather / Composite | ||||||
| C | Agar | 6 / 20 | Leather / Composite |
💭 I never actually got around to trying this experiment.