1. State of art, project management and documentation
IDEA
For my final project I would like to continue my investigation of the Masks. When I did Fab Academy in 2017 I did for my final project an interactive mask but I wasn't satisfied about the final result, that is why I would like to make one mask for every assigment applying diferents technologies in each of the masks and for the final one I will decided wich technology is the best for the purpose I want.
My purpose in my final project of the Fab academy was to Make a mask that allows you to interact with other without showing your physical aspect, it was more about erradicate the racism or at least it was the main idea, but for this time I belive that future will be with Masks, eather for Pandemia issues or contamination or for avoid Face recognition technology.
"InterFACE: Fab Academy final project"
That's why in my dream utopia there is a world where all the people wear the same mask so people can not judge you by your phisical aspects, so the only interaction is transfering relevant information between people. For example if I only want to interact with people with high IQ, I send my own data until I match some one with similar IQ and other data. Imagine being with this mask in a crowded public space, how many matches you could do? in that place could someone find ten people like the love of them life? Whouldn't be cool? Hahahahahaha Anyway, I always ask my self, In Which future (or present) dystopian we will live?
You can see the rest of my research about mask Final project :)
NOW, PROJECT MANAGEMENT AND DOCUMENTATION
This week I have to work for this assignment that is about learning all the tools I have in Gitlab and Markdown to writte my documentation. I have to explain code, writte some links, add some video links, design and edit some images, etc. Besides I have to writte about my final project, explain some ideas, describe every tool I will need for fabricating my final prototype.
Gitlab and Markdown?
First of all I would like to say that I'm so happy to work on Gitlab. When I was working on my fab academy we have to upload or web from terminal, it wasn't complicated but compare with gitlab it has a interface that is super easy to work with. Besides, I used to work with HTML code wich is really nice but I have to confess that It was really slow my process of documentation because i didn't have any template, I wrote every damn HTML code line of my Fab Academy web page, evethough I'm proud of what i did now working with Markdown is like magic, everything is super fast, so this is good because i can focus on my project.
Ok, so, according to wikipedia these are Gitlab and Markdown concepts:
Gitlab is a web-based DevOps lifecycle tool that provides a Git-repository manager providing wiki, issue-tracking and CI/CD pipeline[7] features, using an open-source license, developed by GitLab Inc.
Markdown is a lightweight markup language with plain text formatting syntax. Its design allows it to be converted to many output formats, but the original tool by the same name only supports HTML.
First step
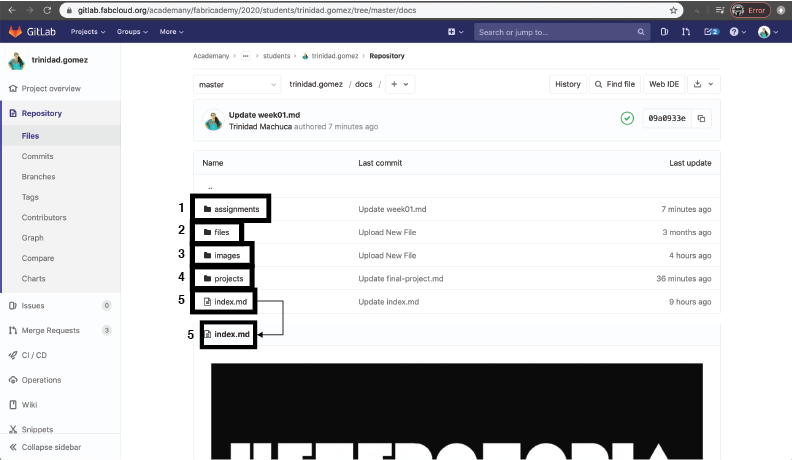
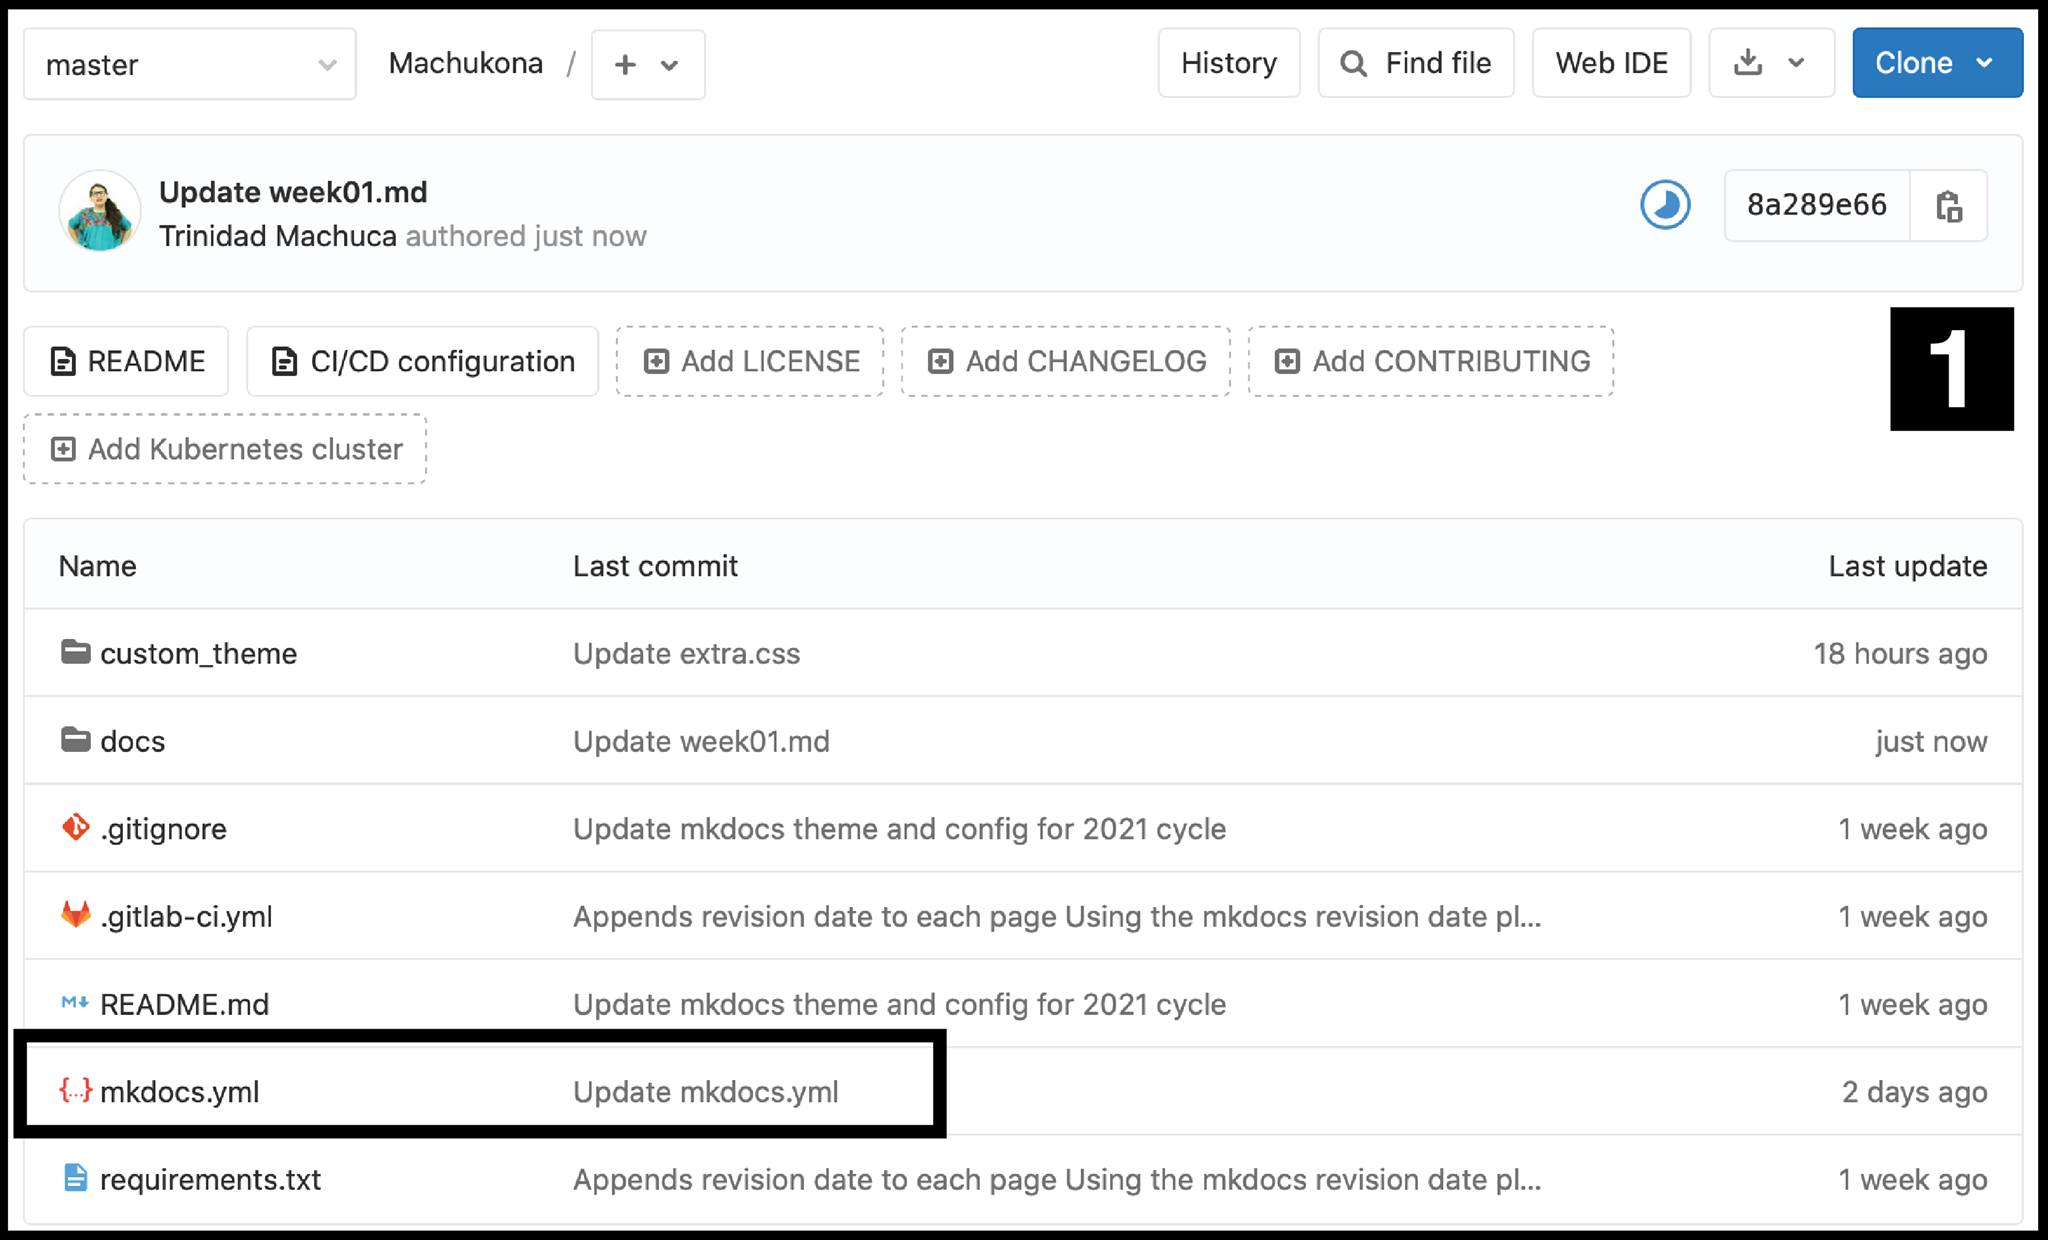
First of all, this is the interface of GitLab and Markdown. There is only two important links in this page number one and two.
- Number one, "docs": This folder is where I'm going to work a lot, there I will find the folders where I have to uploud pictures, files, embeded links of videos and 3d models and write all the proceses that I'm going to make for fabricademy in the next 6 months.
- Number two, "mkdocs.yml": This page is only for customize the page in a standard way, so, if I want to change all the typography or change the background color, here is the place where I can make those changes
Ok, so, If I click in the link number one, I will open another page with the following links.
- Number one, "assignments": Here are all the pages for the thirteen assignments, but instead of say "State of art" the file has the name like "week 1" and so on.
- Number two, "files": Here is the place where we have to upload all the special files that we want to share, like and audio (.mp3), or 3d model (.obj), etc, so later, people can download from a proper link from you page.
- Number three, "images": Here is the folder where we should upload all the images that we need to explain our information of the documentation, files like .jpg and .png are perfect. Before to uploud the images, remember to compres their sizes, they have to be less than 1 MG, otherwise the page will be very sloooooow, becuse it will be heavy. We are allowed to uploud 10 MG per commit and for all the web page 300 MG. So, take care of your Megas.
- Number four, "projects": Here is the page where we are going to write about your final project
- Number five, "index": Index page is where we have to write about ourselves, our education, inspiration, projects, besides is the first thing that people is going to see when they enter our page.
Upload images
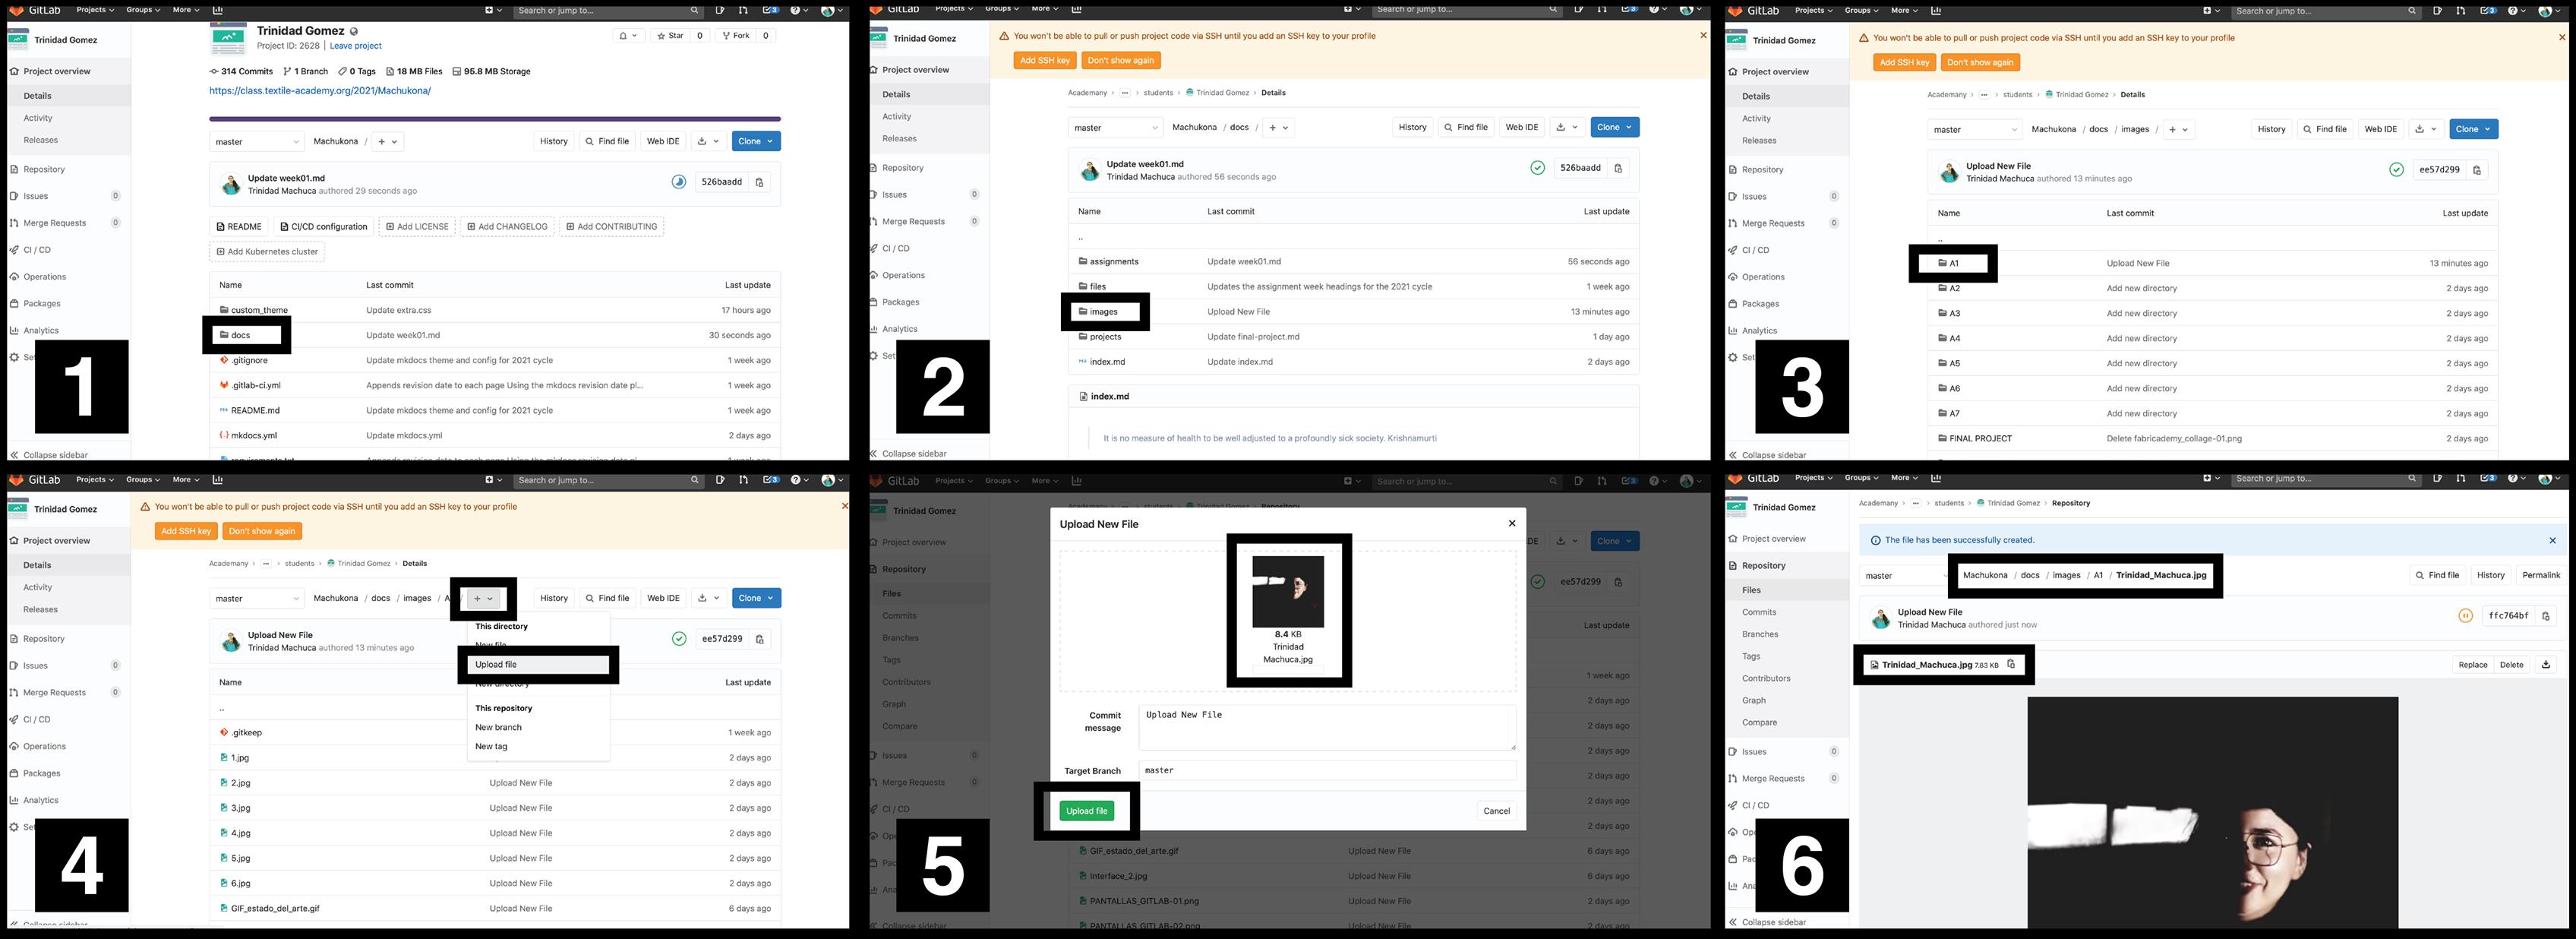
First, I had to locate myself in the folder I want to storage my images, files or videos (steps 1, 2, 3 and 4) en then, in the step 4, there is an "+" icon, I clicked it and i chose the "upload file" and that's it.
Compress images
For me, there is three ways to compress images.
-
From image editor software: This way is to learn how to do it from Photoshop or Illustrator, or in your case, any image editor that you use. In this case, I'm not expert at all and for sure this is the hardest way but the correct way also.
-
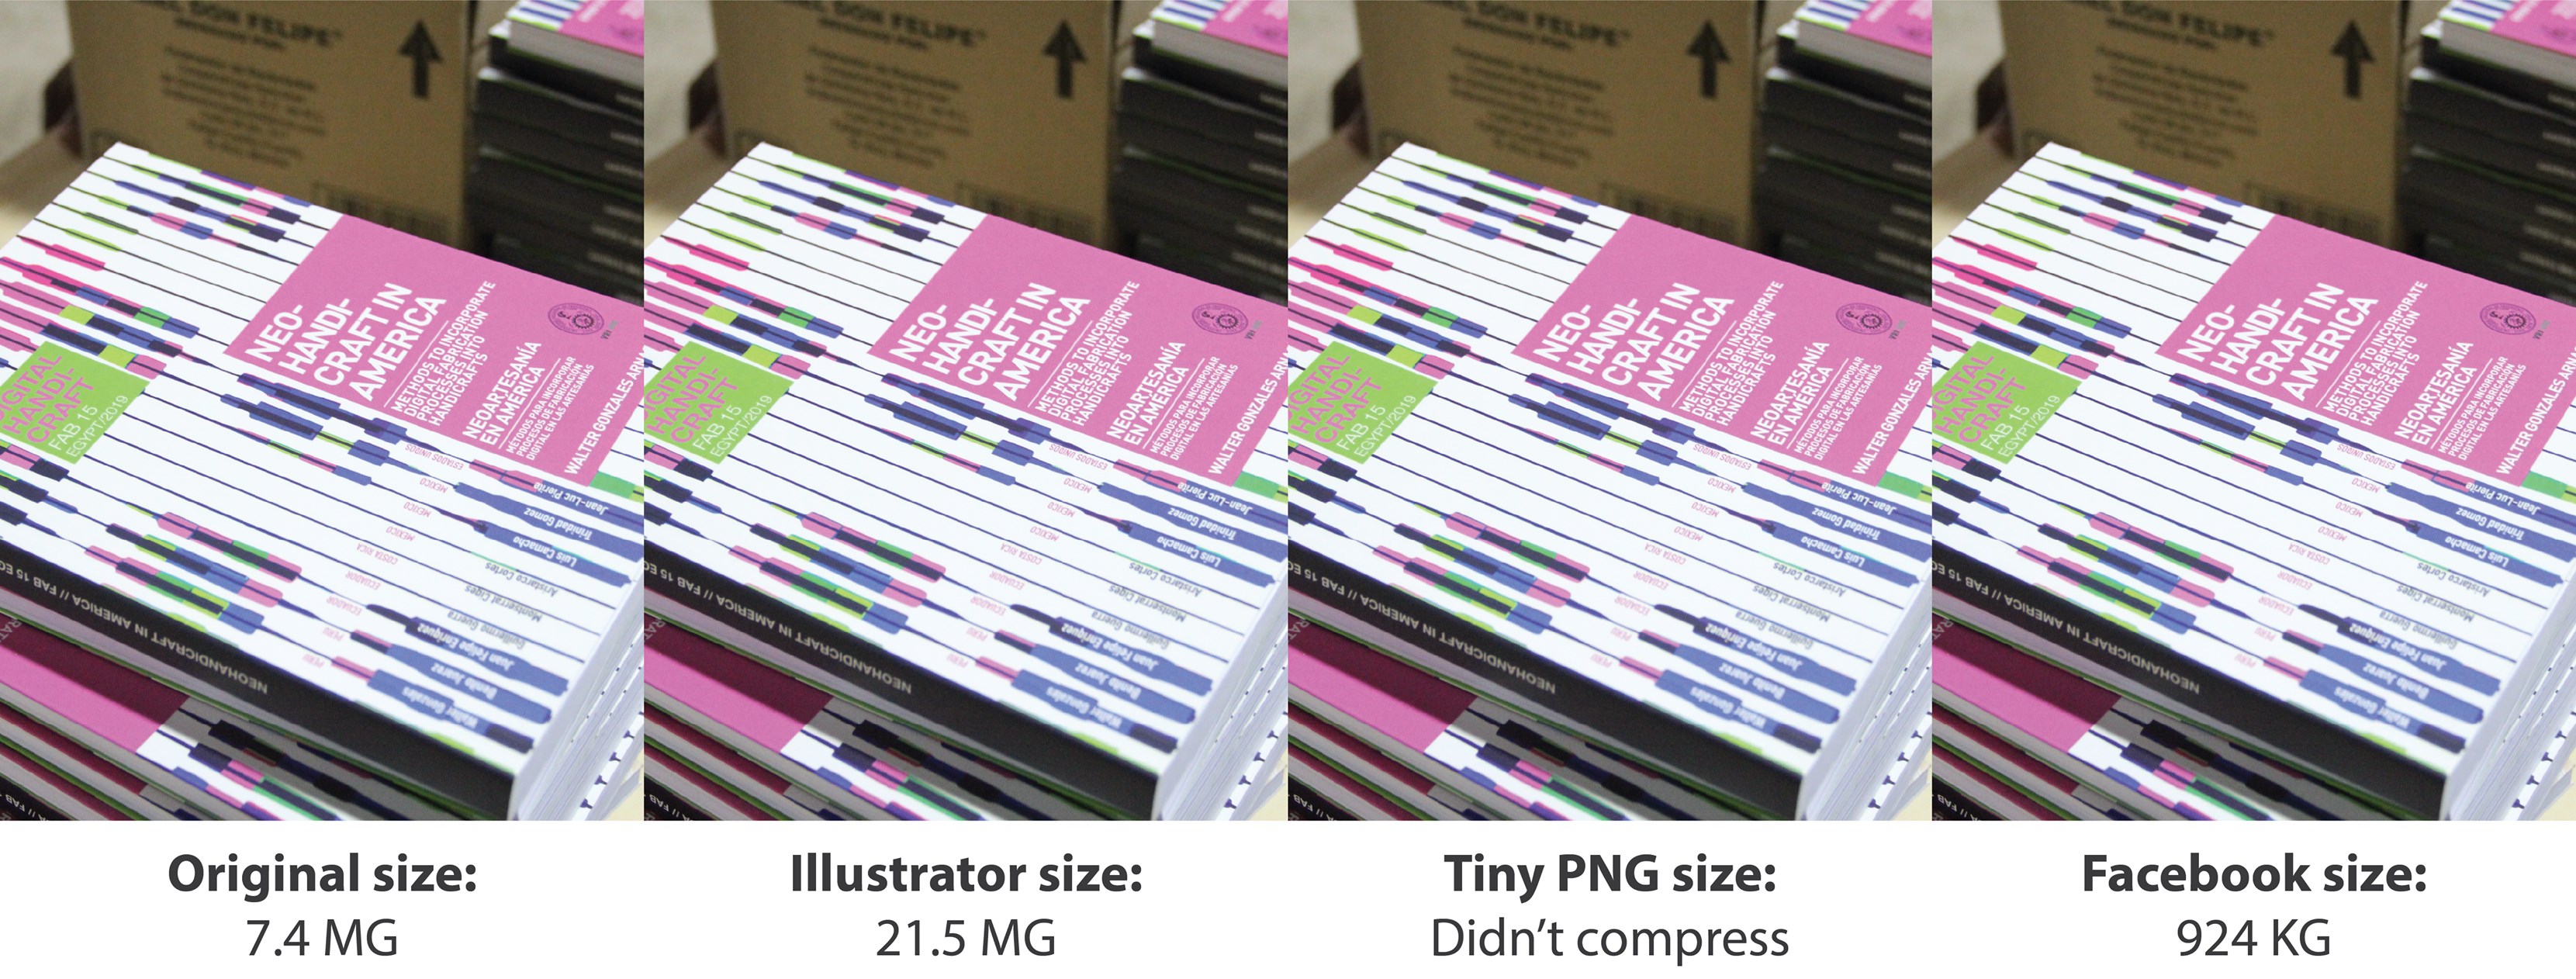
Tinypng: This is a web page that helps to compress any image that you need to re size. I barely found out about this page, I tried to used and in my experience it is not so good, because some of the pictures that I tried to compress, didn't compress at all. Here I show you a image that prove it.
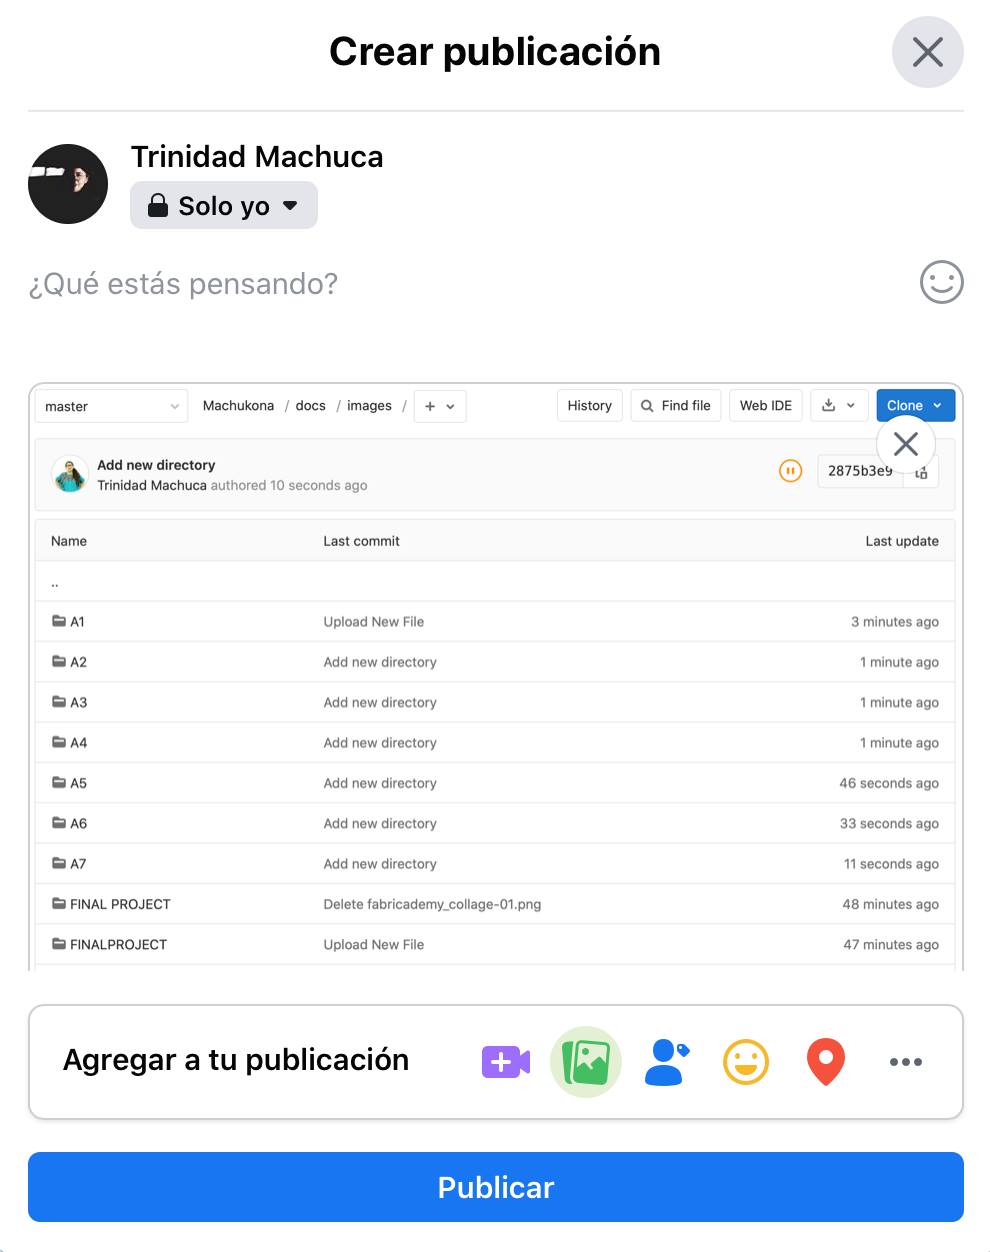
-
Facebook: Yes, facebook hahahaha. Everytime I finish to edit in illustrator or photoshop, I go to facebook, post the heavy images that i need and i changed ths status of the publish privacy option. I always choos "ONLY ME", next to the option it has a padlock icon, so this mean that when you press "Post" nobody is going to see it, just you. Then, when the uploaded it's done, I go and, download the images, the size are su much smaller than before and the best is that they look good, at least without horrible pixels. I know is not the best way and sometimes is not so practical but from the photoshop editor its litle bit hard. Someday I will learn the correct way and I will post it in here hahaha
Here you can see the different sizes of the image depending on the tool I used. maybe it didn't work for me but it doesn't mean that that won't help you, so try in your own way.
Embed videos and images from internet
This point, is about how to embed useful videos or images from Vimeo, Youtube, flicker or GIFs, etc,. It can be material from our own personal account or videos from other projects that we would like to show in the gitlab page. I followed the next steps

1.- After I upload a file in my account, I had to go to the option "Share"
2.- Then I found diferents option, I had to select the option that is generally with an icon with this characteres <> , all platforms has this option
3.- I copied that link and I just pastes it in my gitlab page.
It will look just like this:
<iframe width="560" height="315" src="https://www.youtube.com/embed/2ToHSUpi-iI" frameborder="0" allow="accelerometer; autoplay; clipboard-write; encrypted-media; gyroscope; picture-in-picture" allowfullscreen></iframe>
Videos and Images from our own Gitlab
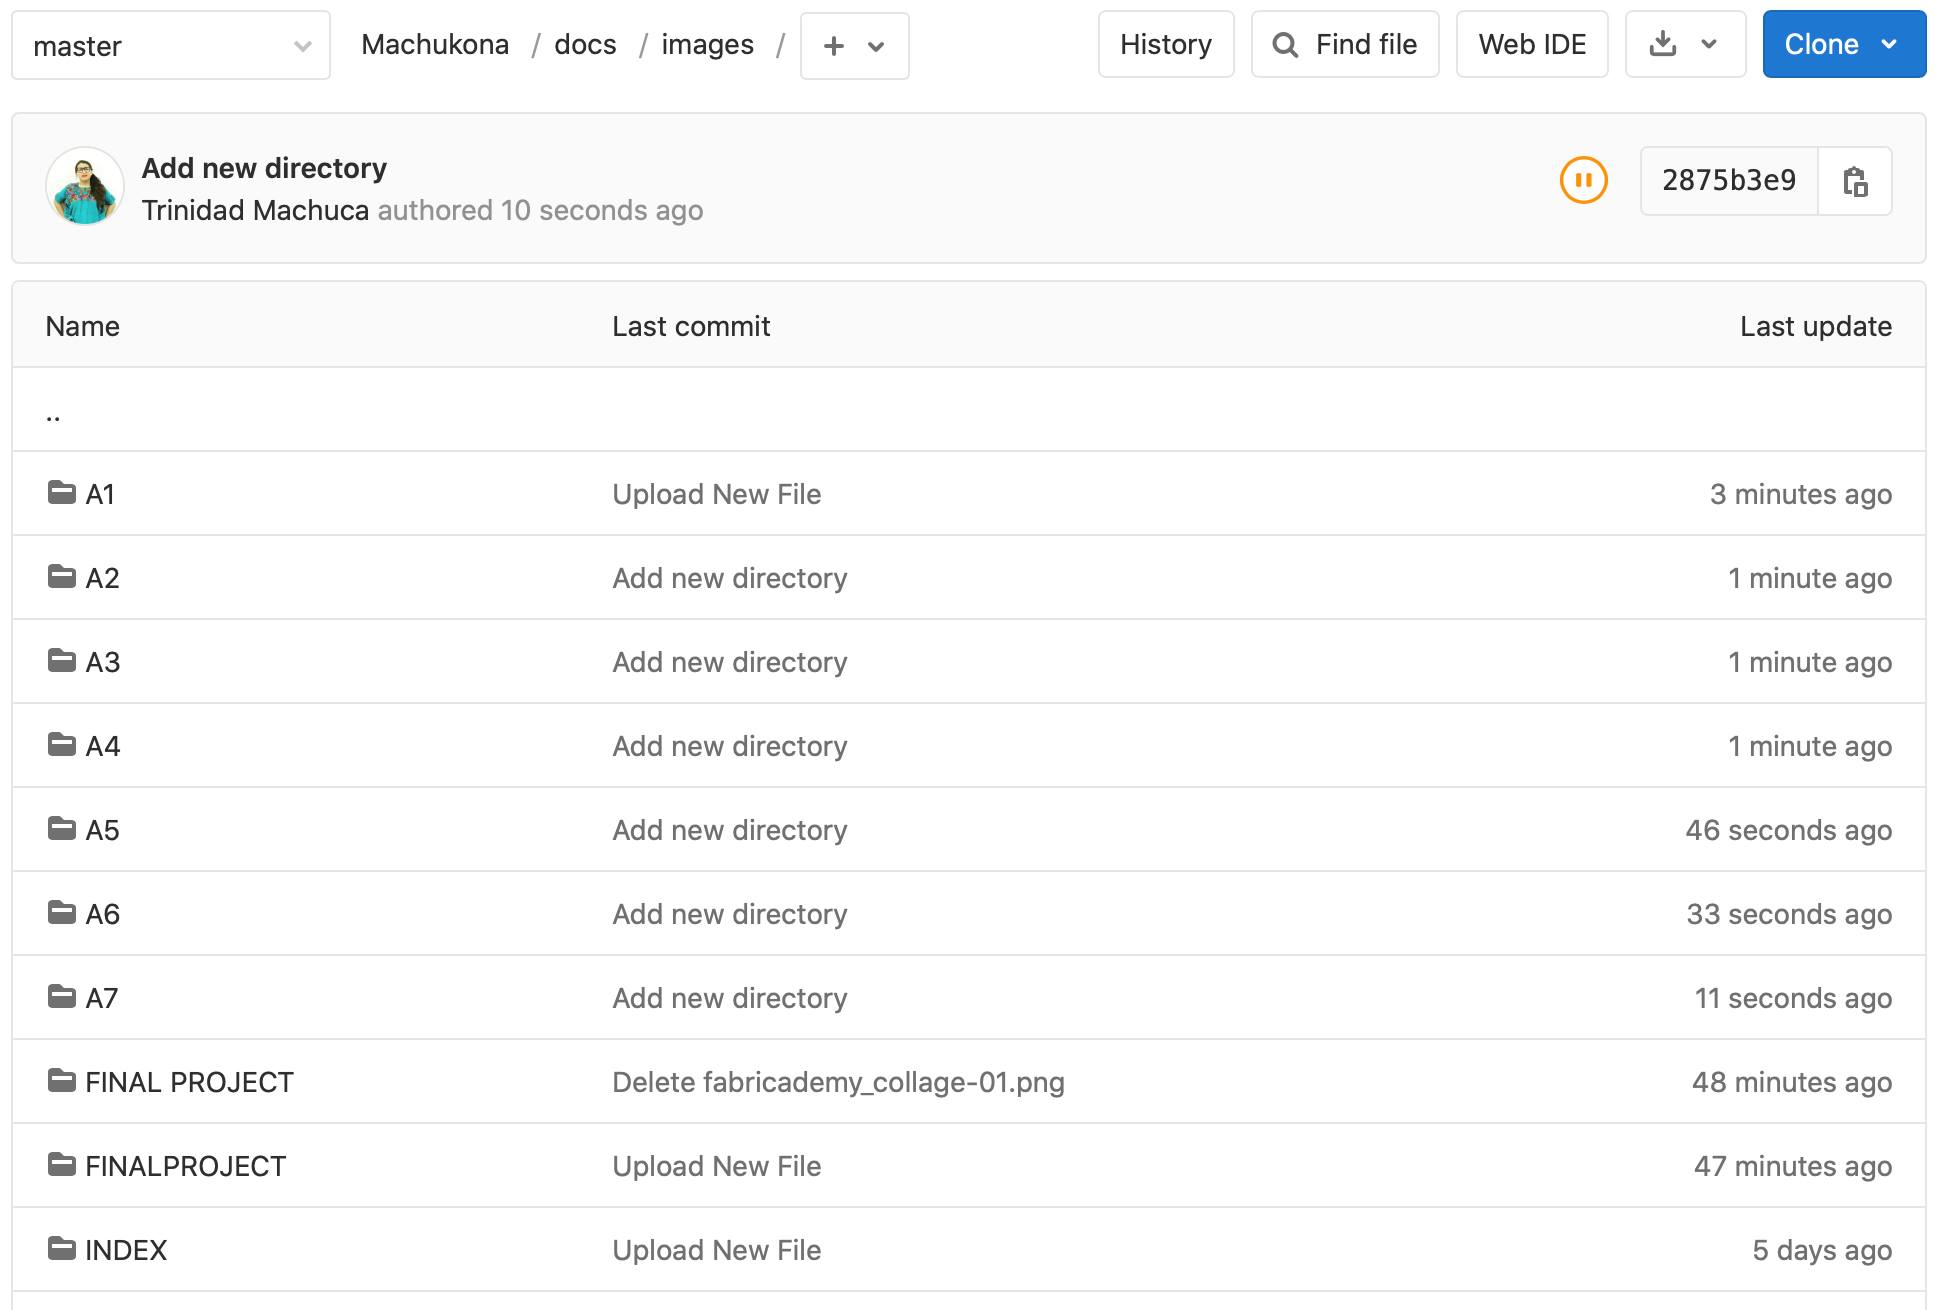
First of all, make sure to write the correct path of your images, for example, my images are in the folder "Files", then, inside there is another folder called "Images" and the I made a special forlder for the pictures for this assignment that I call "A1". This is very important, other wise you won't find your images.
A: For adding images in my GitLab web page, I only have to writte like this.


B: I write like this, in case I want to change the sizes like width and length

C: And like this, in case the image is a perfect square


Customize your website
 It's really easy to customize the github page honestly, because there is the links above the lines for those that you need to change, color, font, name, etc.
site_name: TRINIDAD MACHUCA ▲ # Writte your name here
site_description: HETEROTOPIA #Writte the name of your project
site_author: Trinidad de los Ángeles Gómez Machuca #Complete name
copyright: Copyright 2021 Trinidad de los Ángeles Gómez Machuca - Creactive Commons Attribution Non-commercial #Name for the Copy right it's importante

site_url: https://class.textile-academy.org/2021/Machukona/
repo_url: https://gitlab.fabcloud.org/academany/fabricademy/2021/students/Machukona
repo_name: Edit on Fabcloud

extra:
  social:
    # For other social icons at https://squidfunk.github.io/mkdocs-material/setup/adding-social-links/
    - icon: fontawesome/brands/instagram
      link: https://www.instagram.com/fablab_maya/
    - icon: fontawesome/brands/facebook
      link: https://www.facebook.com/fablabmaya/
    - icon: fontawesome/brands/linkedin
      link: https://www.linkedin.com/in/trinidadgomezmachuca/

theme:
  name: material
  custom_dir: custom_theme/
  extra_css:
    - css/extra.css
  favicon: img/Logo_ojo_icono-01-01.png
  # try other colors https://squidfunk.github.io/mkdocs-material/getting-started/#primary-colors
  palette:
    # try other colors https://squidfunk.github.io/mkdocs-material/getting-started/#primary-colors
    primary: black #Love color Black
    accent: black #Love color Black
   # See available fonts at https://fonts.google.com/
    text: Courier Prime
    header: Monoton
    h2: Monoton
    code: Courier Prime
  logo: img/Logo_ojo_icono-01-01.png
  #icon:
    #logo: material/library
    #repo: material/gitlab
  features:
    - tabs
  #tipografia de titulos
  #stylesheets:
    #- stylesheets/titulos.css

plugins:
  - search
  - git-revision-date-localized
markdown_extensions:
  - admonition
Customize your website
For changing my icon, I have to add to the code in the mkdocs.ylm file the following lines:
logo: img/Logo_ojo_icono-01-01.png
![]()
Acording to the internet, in the picture above, it is the size than an icon has to have.
I had two different ways to get my icon,
- -Designing it: I have design my own and export it to a .png format in the correct sizes. I would love to to this but, I think I'm in a early stage of the project, so I prefer to concrete my final project, so I can design it and change my logo.
- -Downloading it: choose and icon from the nounproject or Icon-icons
Tips for organizing information
I strongly recommend to prioritise the organization of your information, otherwise you will be nuts, I say this advice from my experience in Fab academy. So, every week that you work on something you put it in the right folder, DO NOT MIX EVERYTING TOGETHER OR YOU WILL REGRET hahahahaha Whatever, that's the way I will work.

The same advice for the files on Git Lab, in my case I created an image folder for every assignment.
another tip is that, try to finish every assignment in the corresponding week, otherwise, you will suffer at the end. I know I sound like a grandmother but I'm talking from my experience in the Fab academy. I hope it helps.
LINKS
Here you can find the links where I will storage my information for the documentation of Fabricademy
Documentation Links
- GitLAB Information about GitLAb
Personal links
- GIF Here you can find all the GIFS
- FLICKR Here you can find some pictures
- VIMEO Here you can find all videos
- SKETCHFAB Here you can find all my 3D models
Social media links
- FACEBOOK Here you can find some post about my fabricademy project
- INSTAGRAM Here you can find some post about my fabricademy project
- LINKED IN Here you can find some post about my fabricademy project
NOTES
- State of art I had to look the concept and definition of "State of art", because I'm not sure If I ever did it in the right way honestly, and I looked the others students from fabricademy from previous years and It was very confuse, I didn't find one that convince me. Can you make me some feed back? Thanks
- Drafting, writing and spelling Once again sorry for my bad english, I will have some one that will help me with this problem. Yes, I know, I really need it.
NECESSARY MATERIALS FOR THIS ASSIGNMENT
For this time, there is no need to buy any material, just to learn and write all the ideas and learnt codes.
| Qty | Description | Price | Link | Notes |
|---|---|---|---|---|
| 0 | ------------ | 00.00 $ | ---------------------- |
IMPORTANT INFORMATION ABOUT THE ASSIGNMENT
CLASS
LEARNING OUTCOMES
- Learn the process and tools used to document course work
- Acquire the necessary skills to publish projects, documentation and share the results of each assignment
STUDENT CHECKLIST
- [x] Build a documentation website describing me and my motivation for the textile-academy, including my previous work
- [x] Upload the documentation to my project page on class.textile-academy.org
- [x] Add references and research based on the topic of your interest
- [x] Learn how to upload images, videos, references and how to use Markdown and Gitlab
- [x] Customize your website and document how you did it (extra credit)