2. Digital bodies
IDEA
Some years ago, I was a big Fan of gore and horror movies but after i watched some really mad movies, I don't like them so much anymore anymore.
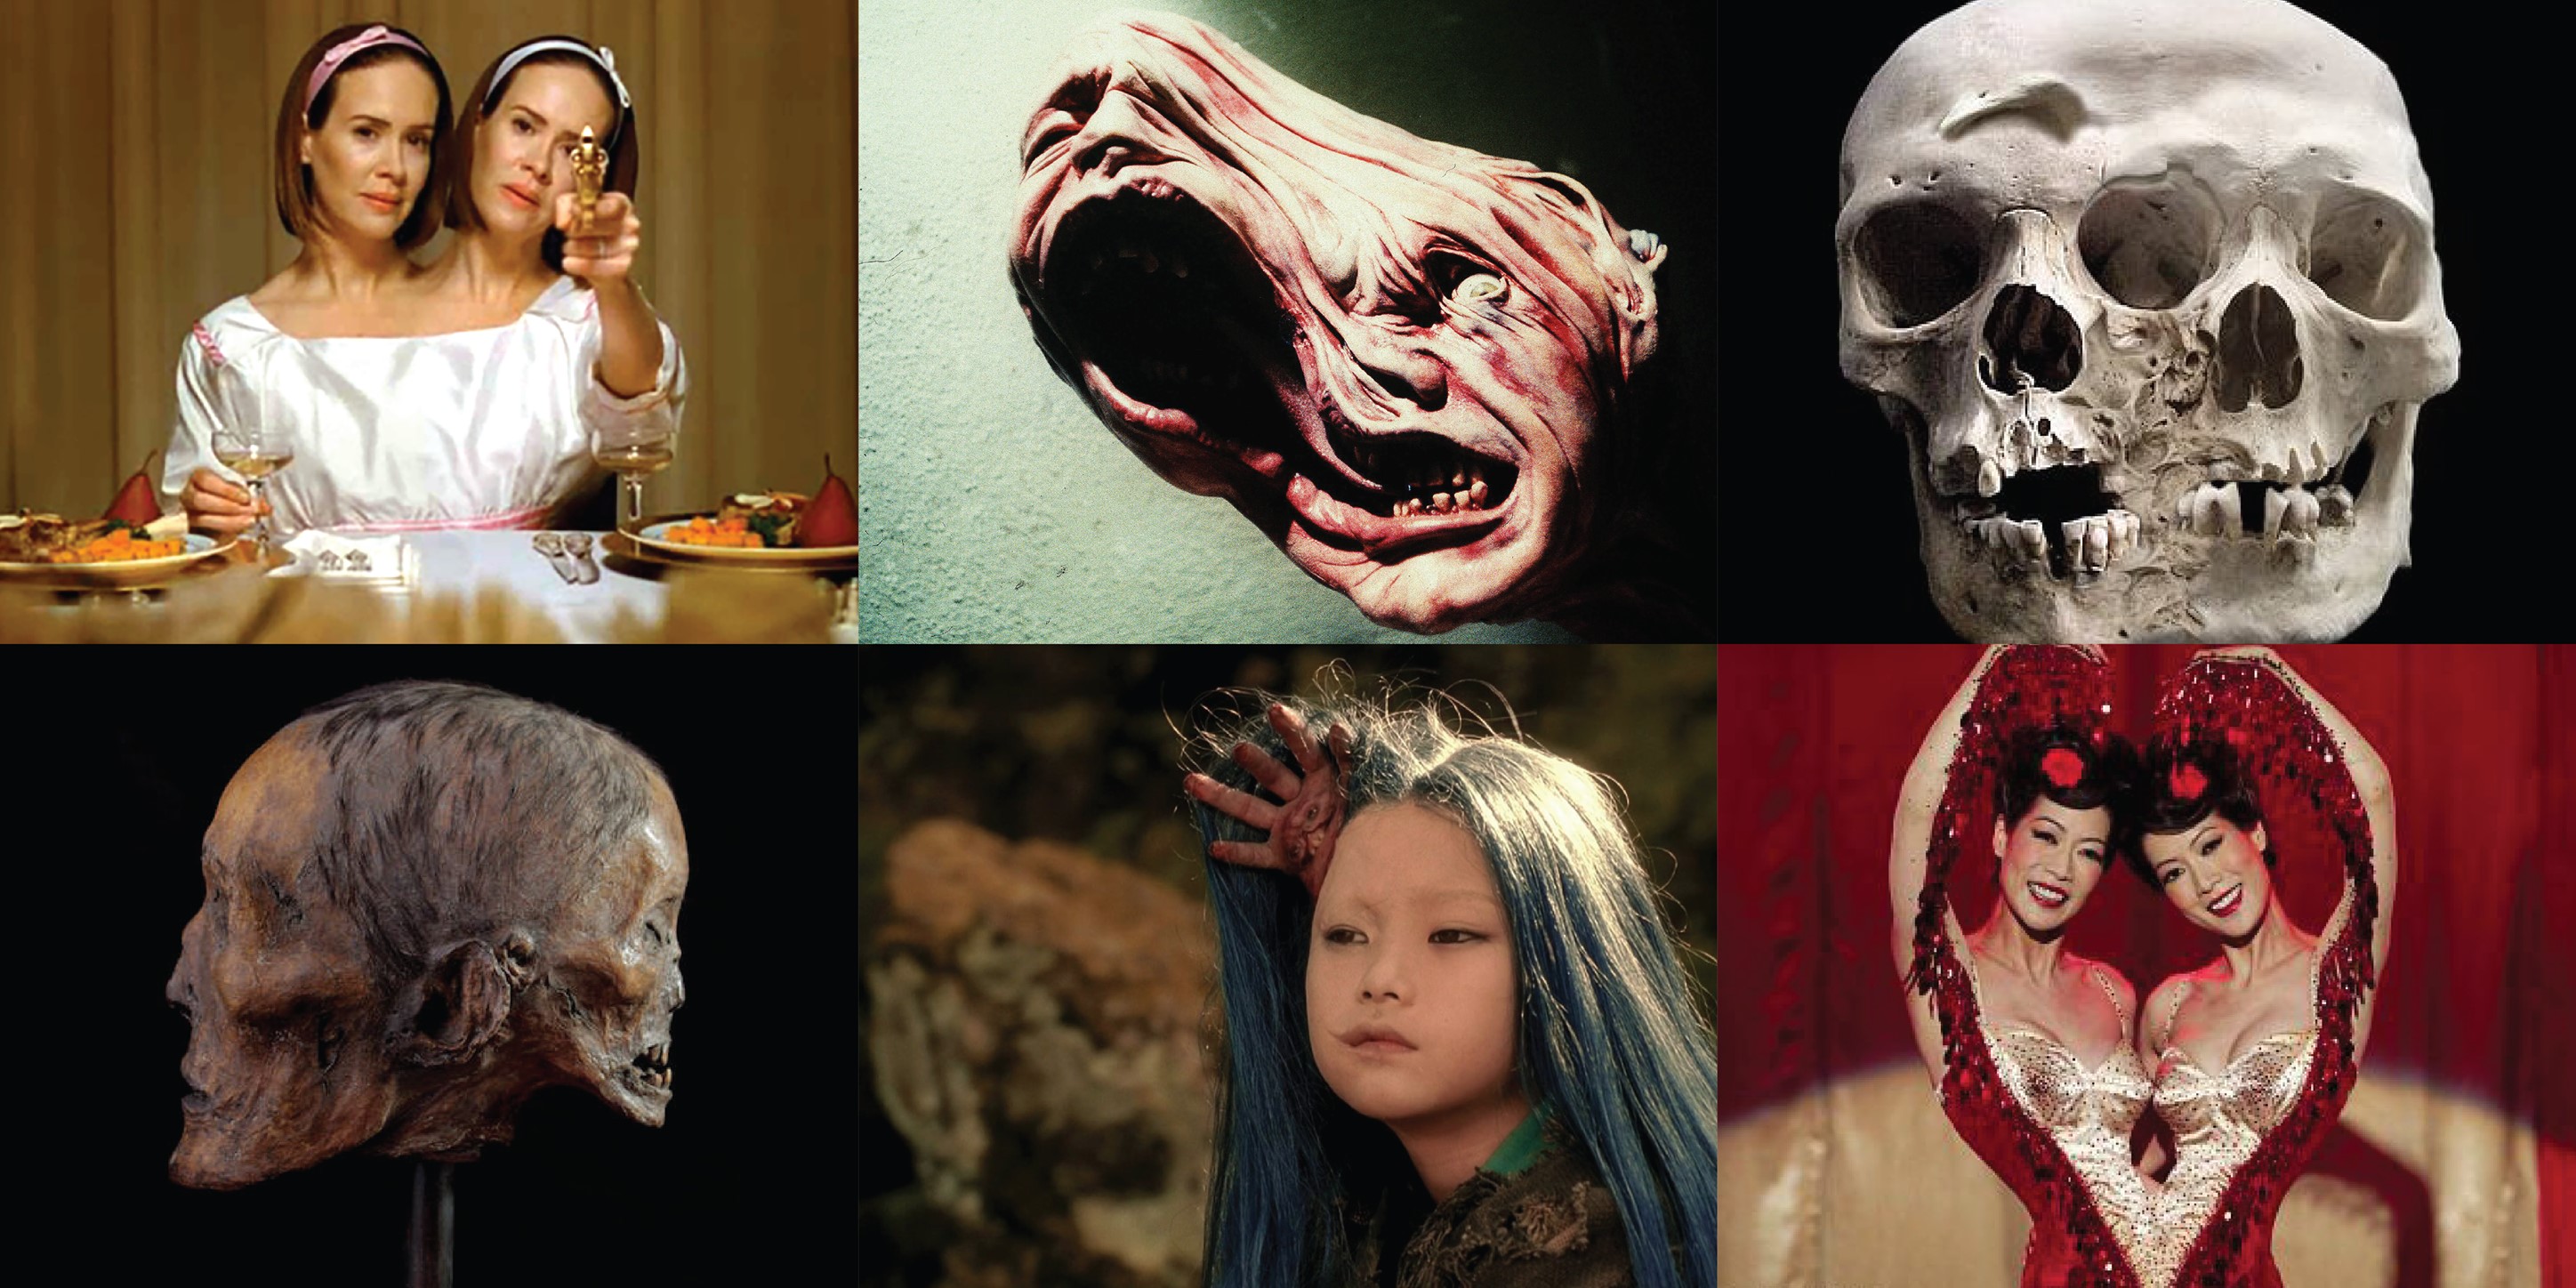
For this assigment I would like to explore the extra extension of the body, I like the the characters just like the circus lady with two bodie torsos in the movie "Big Fish", or the horror movie, "Imprint", where a japanise slave girl has a little head with the form of a hand incrusted in her head, that it is suposed that this little head was her evil part, or the humans in the real life that are born with deformities or extra extension like six fingers.
Besides, As I mentioned before, I would like to make masks for every assignment and I need a special manikin where I can be able to present all my masks. So first for practical aspects I need this kind of configuration bodie and besides I like the idea of make something different for this assignments.
I liked a lot the exaple from the Digital Bodie class where one of the artists like to show the movement in one piece, in my case, I don't need to show movement but I need a special body that carries a lot of my masks. Lets see what happen.
INSPIRATION
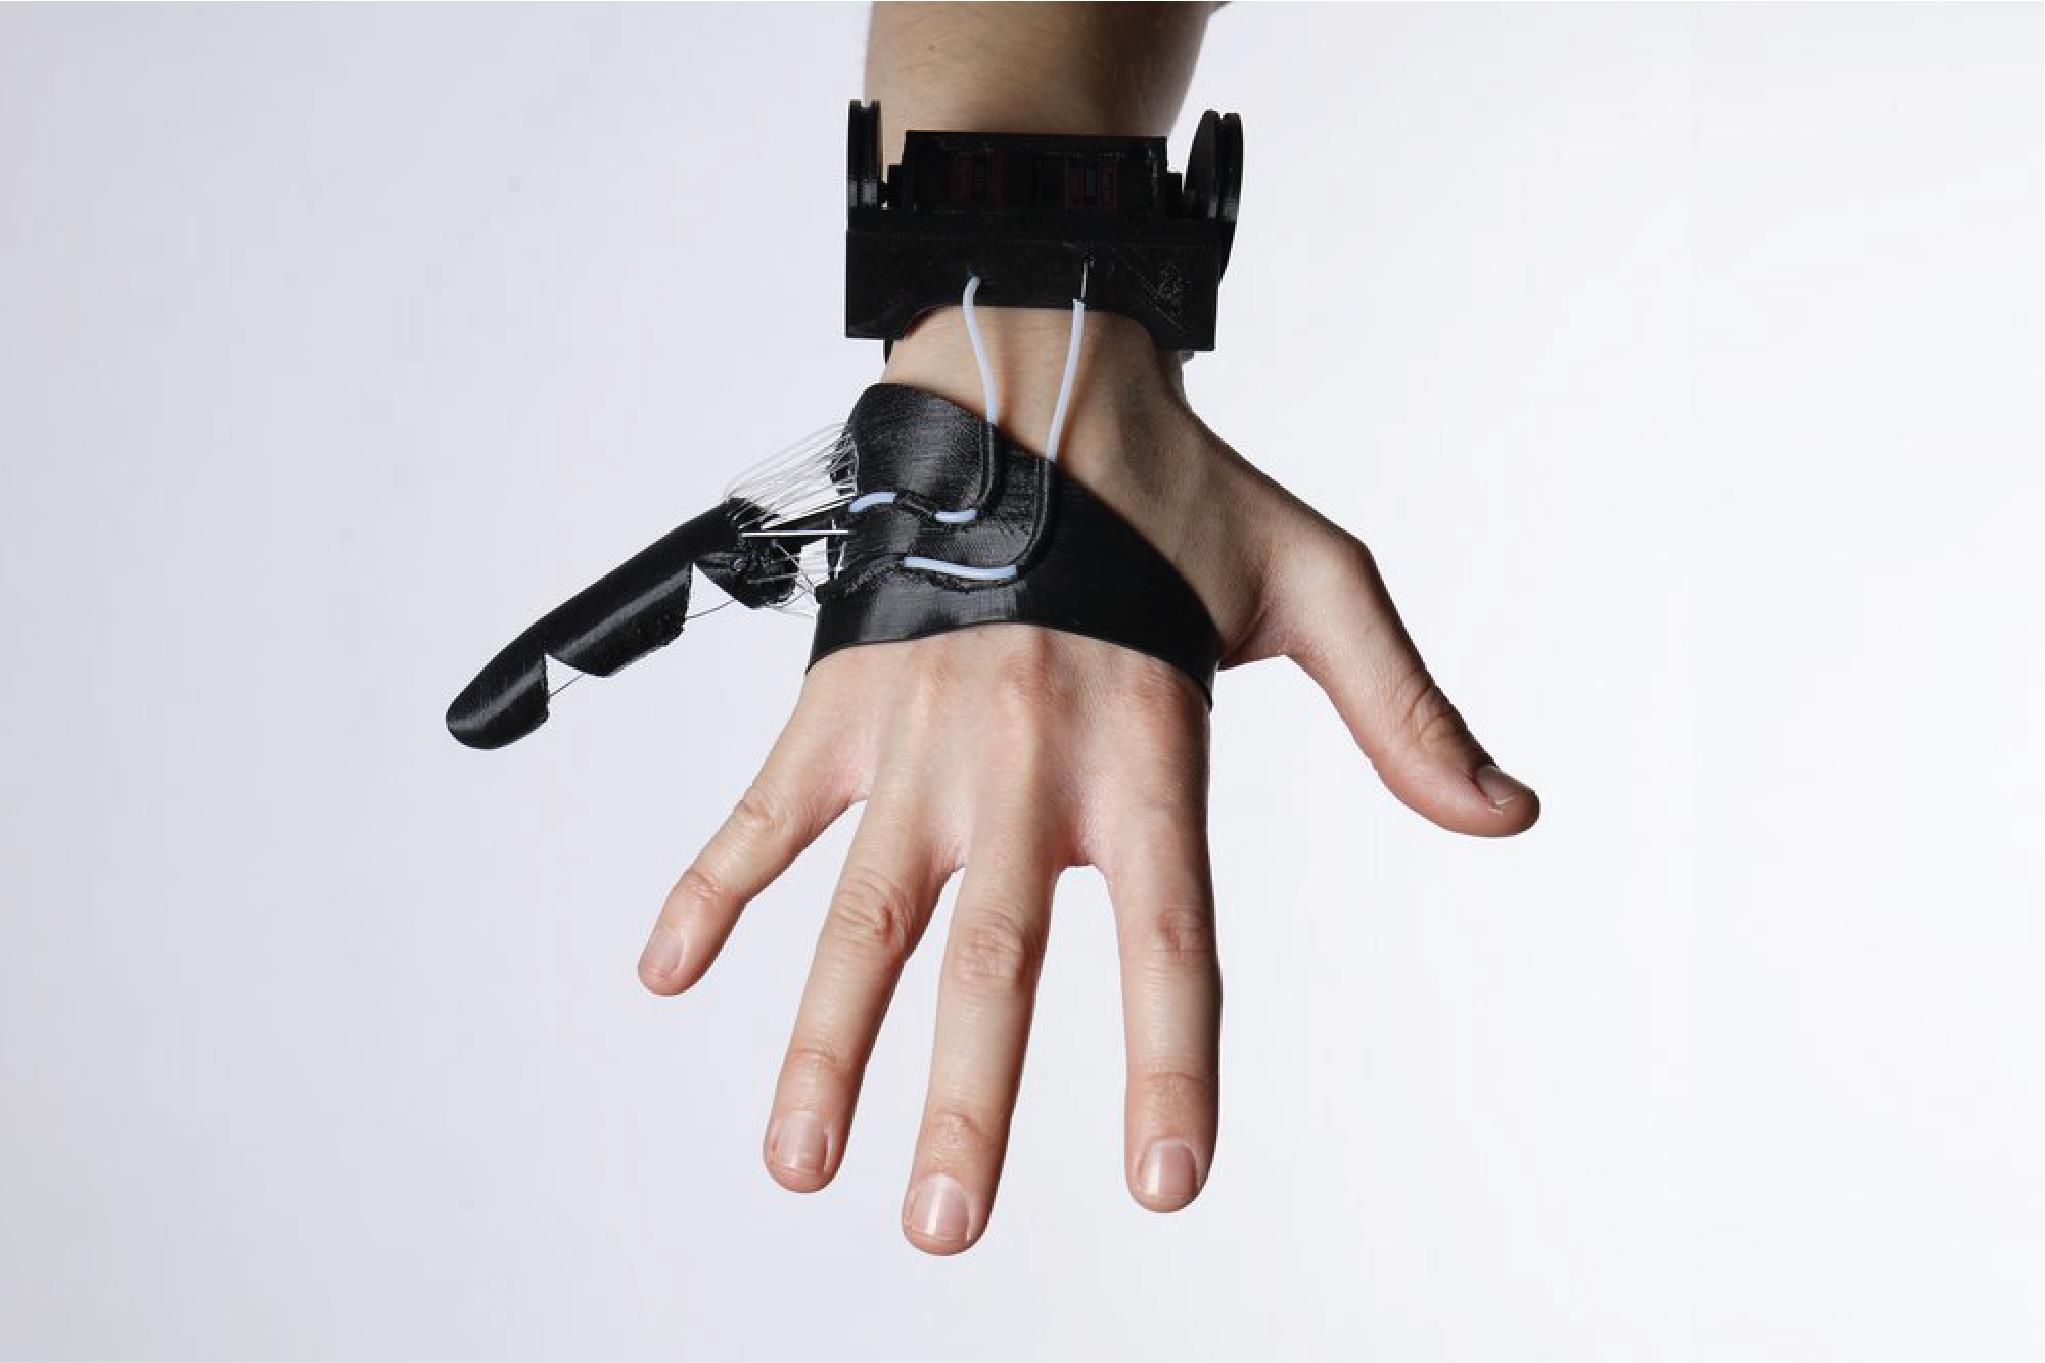 One of my favorites prosthetics us from Dani Clode. She creates a wearable to extend a hand with a sixth finger. It's nice to think how humans can adapt to the new extension.
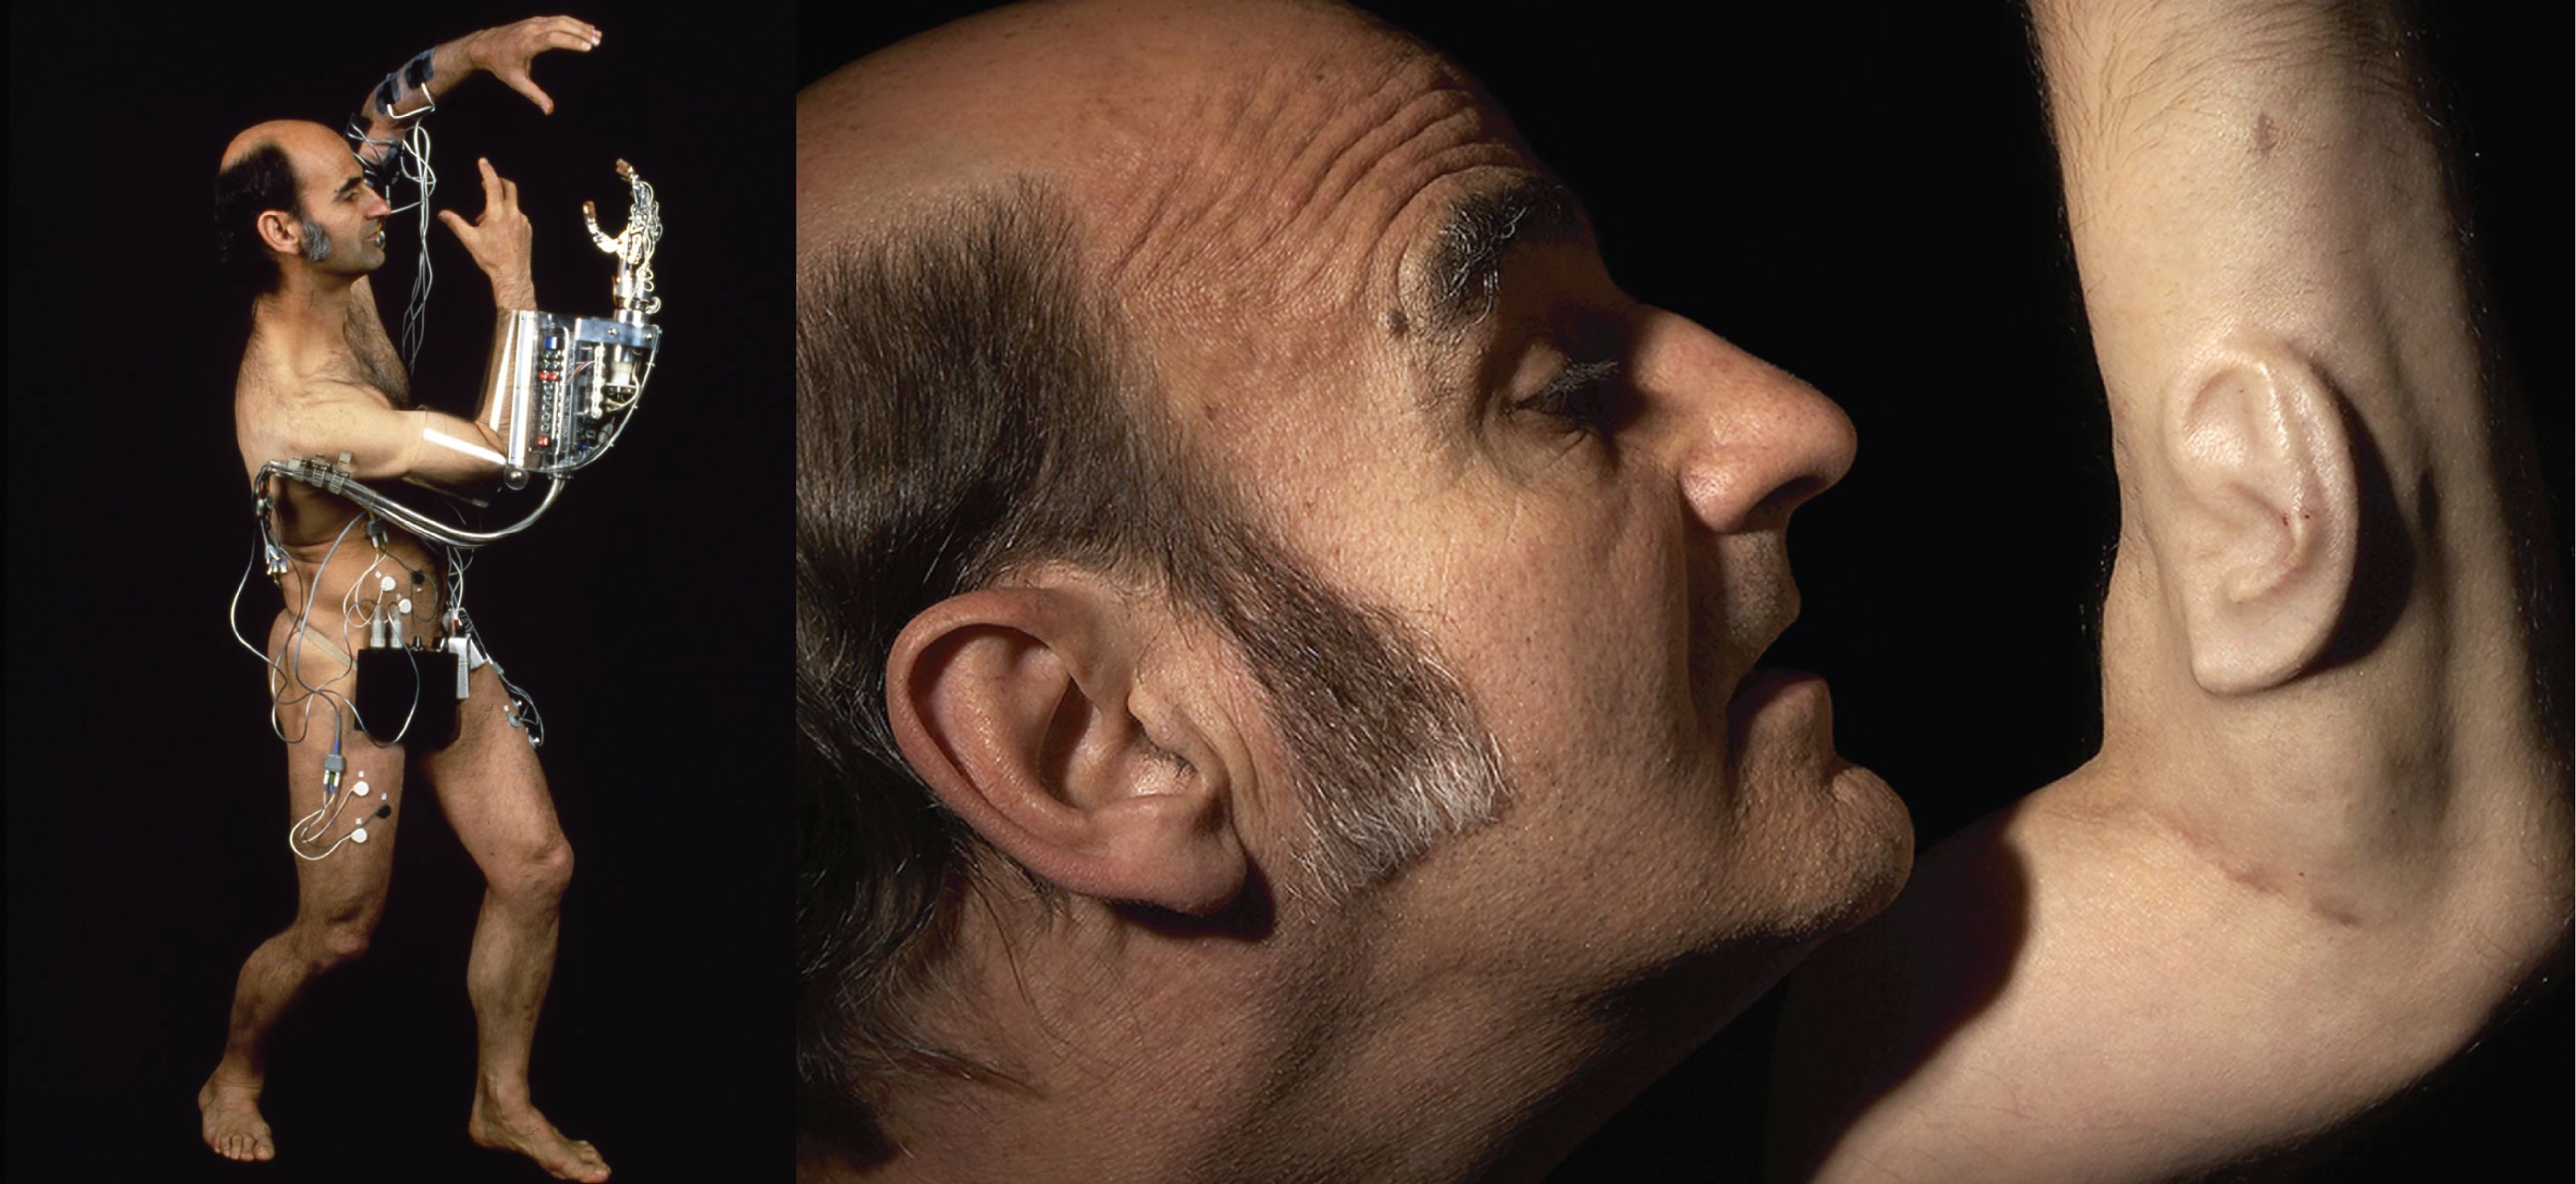 But my real insmipiration project is from the artist Stelarc. He belives that human body is obsolete, so he belives in the adition human architecture structure such as tree arms, or ear in a hand, as others parts. The third arm for example, was designed not like a combentional prosthesis, but as something additional to the body, rather than a replacement part.
You can watch his TedX talk here.
But my real insmipiration project is from the artist Stelarc. He belives that human body is obsolete, so he belives in the adition human architecture structure such as tree arms, or ear in a hand, as others parts. The third arm for example, was designed not like a combentional prosthesis, but as something additional to the body, rather than a replacement part.
You can watch his TedX talk here.
-Hay que ser superior a la humanidad por fuerza, por altura de alma,- por desprecio… Friedrich Nietzsche
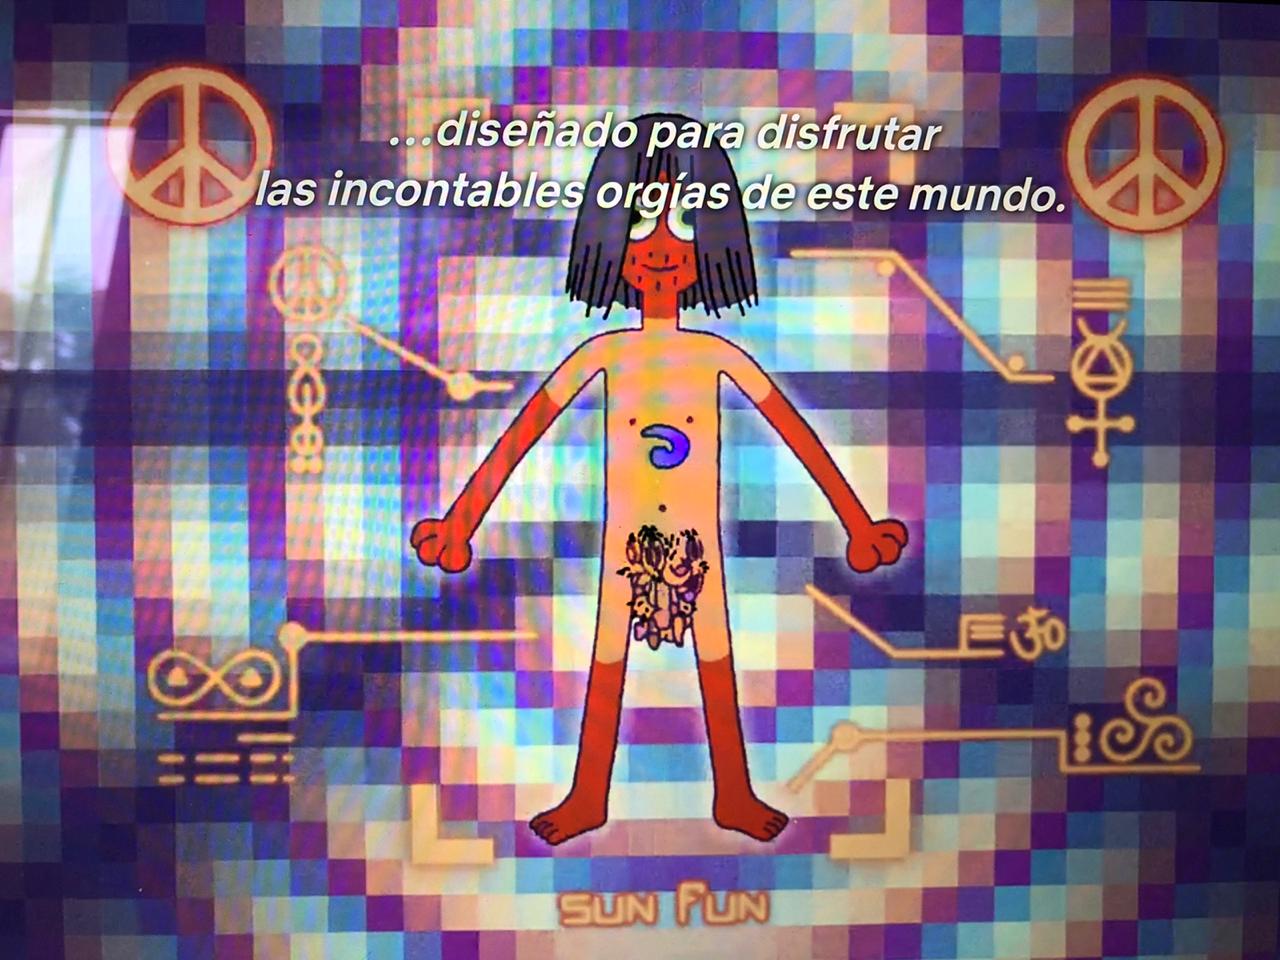 Another example It's in my mind, is the one of teh avatars of Clancy, the main character from the tv anime serie "The Midnight Gospel" from Netflix. This is my favore anime serie by the way. It is about this person that lives in a multiverse world and he has a machine that can transport him in to other planets from the galaxy. He has a asistant like Siri, and this machine voice sugest him to transforme himself into a diferents avatars that can be perfect for the world that Clancy is about to visit. One of the planets, is like super and crazy full of happiness world, so the asistant suggest him to tranforme into a body that has lots of penises, so he can participate in orgies. I love this serie hahaha
GROW
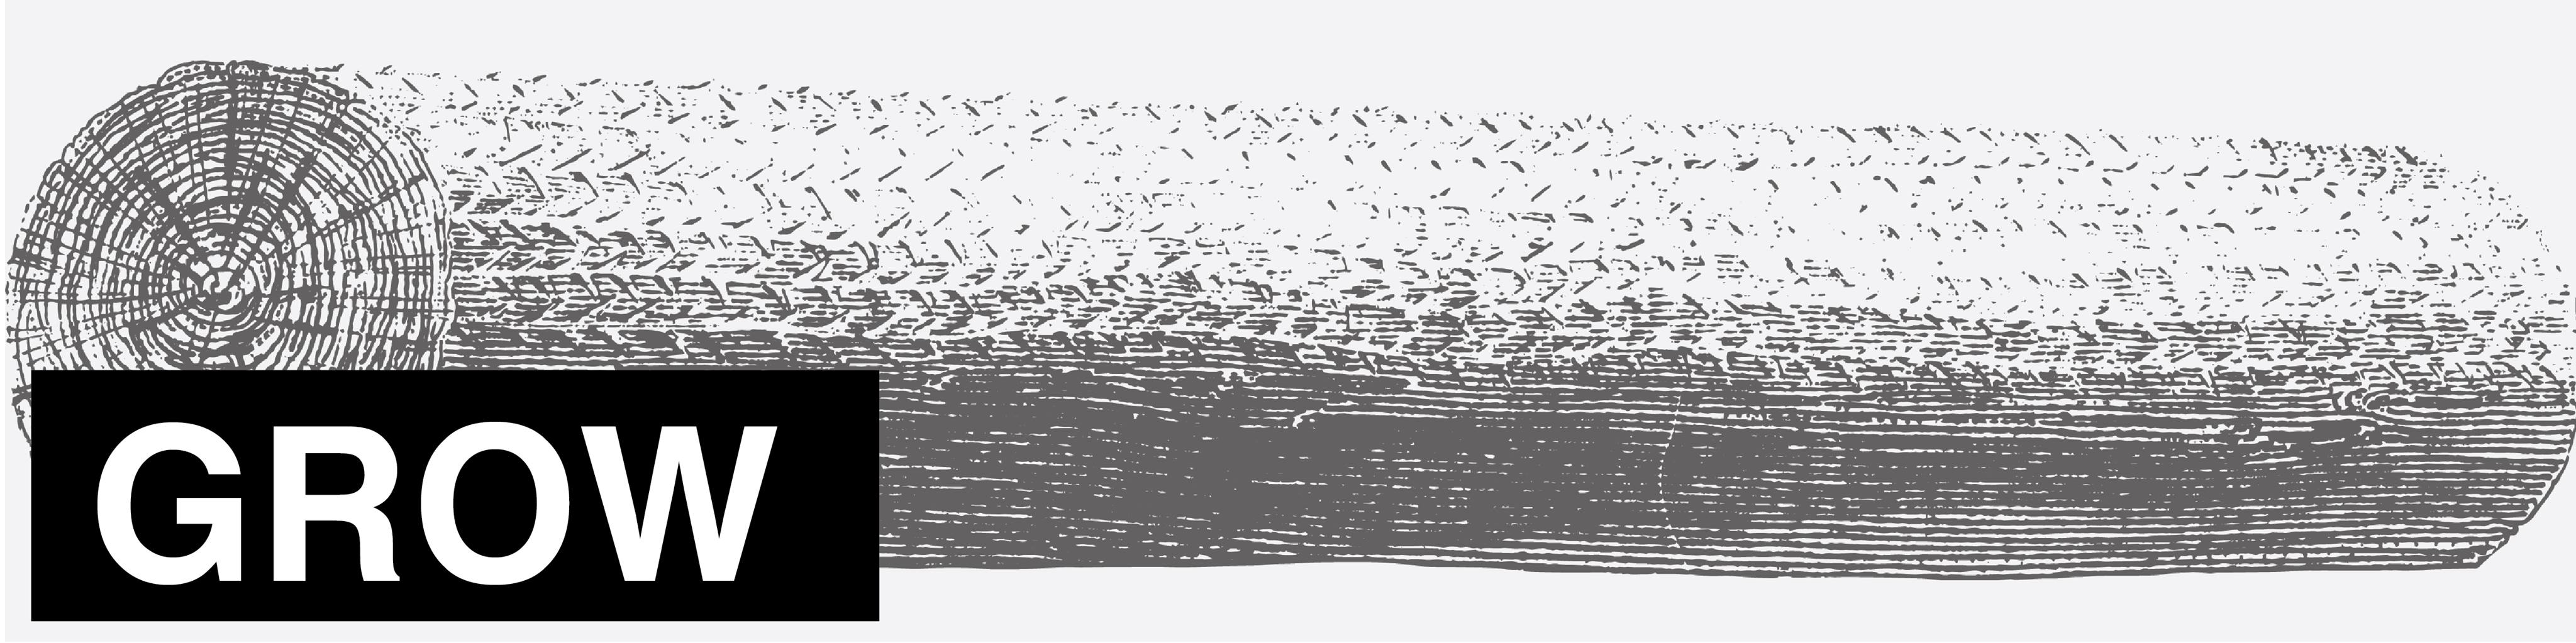 Before to start with the "Digital Bodies" assignement, as I said before, I will grow, or at least to try, to obtain my own raw material, becuase I'm really atracted the idea of have a real sustainable fab lab, so, I will try as much as I can to make this personal goal.
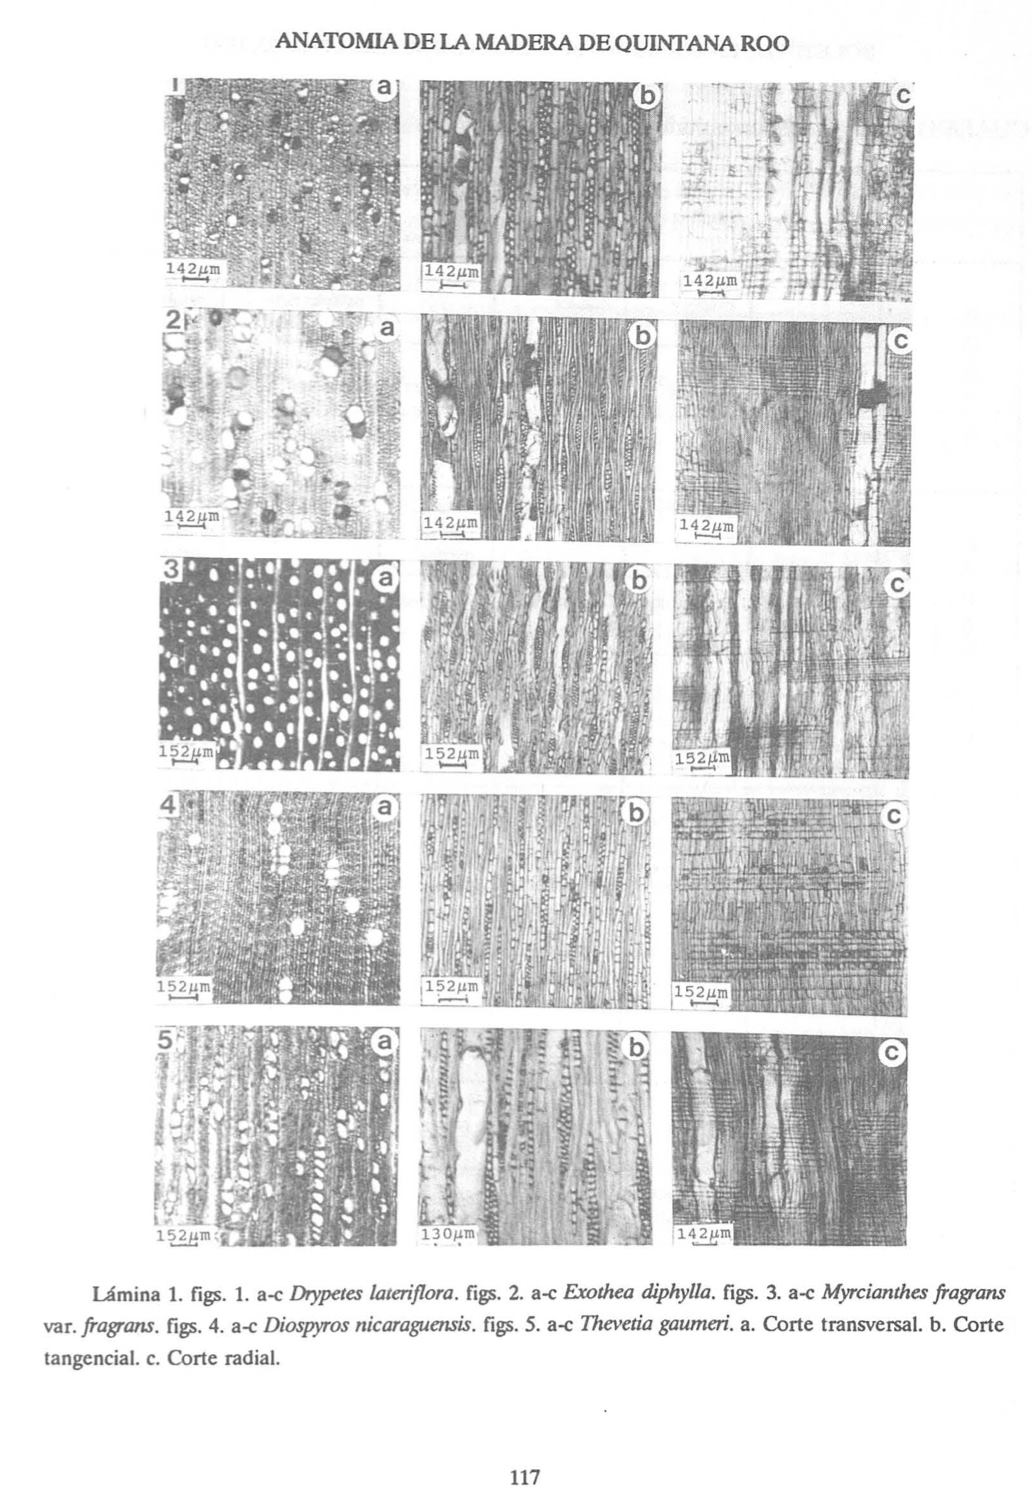
This is the first time I do this exercise, so I will start saying that where I live, precious woods are eveywhere in the jungle. There is a large variety of hard and becaituful types of woods. Actually, second most strong economic activirty here in the state of Quintana Roo, after the tourism, is the industry of wood. Along this 5 years we have been working here, It has been really interesting the differents aplication we could achieve experimenting with this beaitiful material. Here you can see a catalog of local wood and down you can see, a diagram picture of the architecture of the every kind of wood, this is very importa because it helps to undestand the best and optimal way to work with every one.
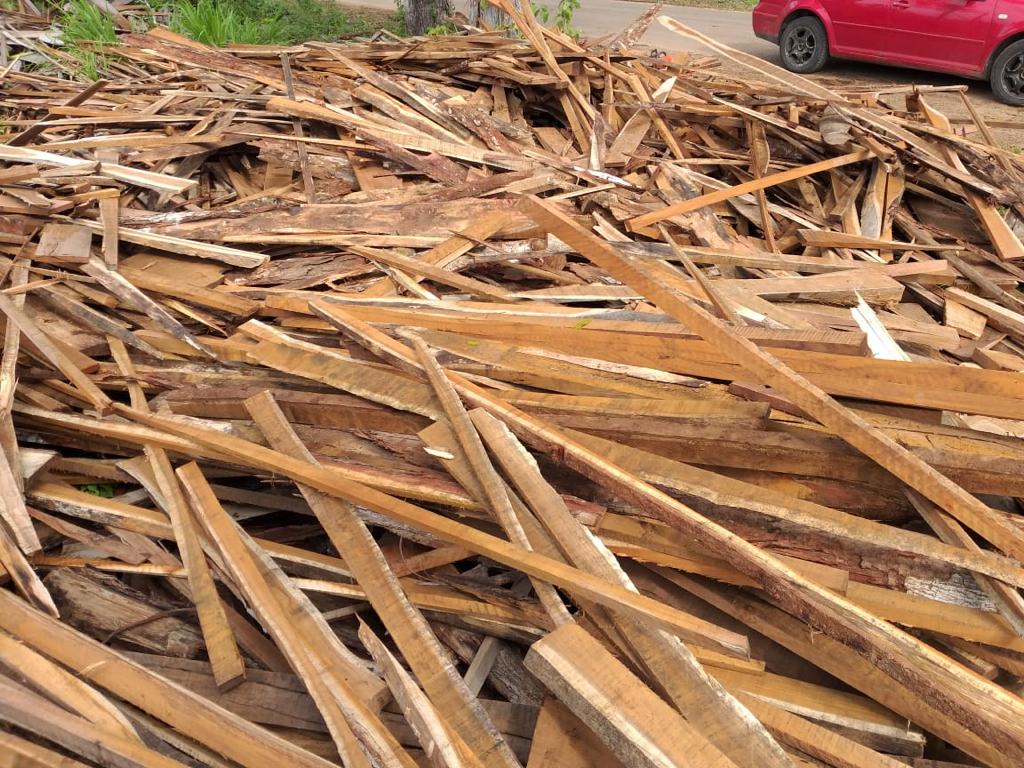
The first time I went to a sawmill, I found tons, literally, of wood waste, I was in shock, because for me It was good wood, ofcourse, you have to go and select the best ones, but with that waste, I've made many beautiful things and projects. I go ofter like a wood scavenger hahahaha. Some people's trash is others' treasure, in this case is the treasure of the fab lab maya.
So, wood grow really slow, so for this time, I will plant some trees of the local wood even though I can't be able to show the result. It turns out that german and canadian government helps mexico to fix the deforestation, they send funds to Quintana Roo, to grow more trees. Even though I have lots of this trees in the fab lab garden I will sow some plants and in 40 years, I will show you the result hahahaha The hardest part is to get used to with the idea of that this waste wood isn't in a standard size. Also, it is really hard to get the materials with 3mm thickness. I mention this because, in the fab labs we alwas used 3, 5, 12 mm thickness and all the sheets are like 1220 mm per 2440 area, this you can't be posible, so everytime you need to design something you have to adapt the files, so it harder to produce masibly or in a standar way.
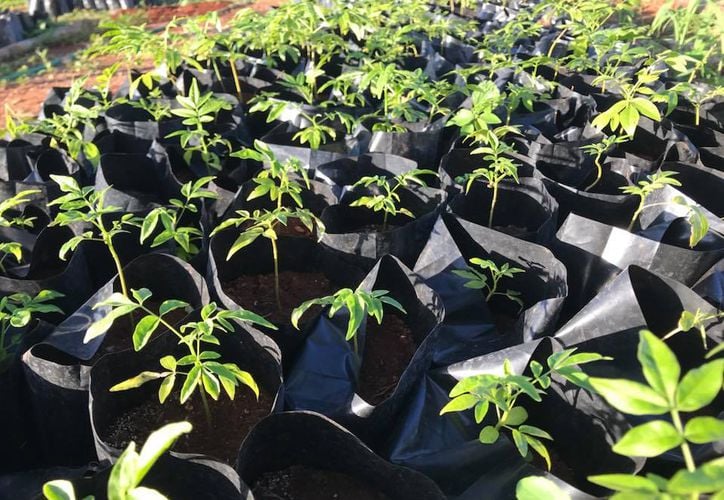
Here in the bio-lab we have "Caobas", but this one needs like another 20 years to cut down it.
Have you ever think about, how many years do a tree needs to grow for us to cut it in the laser cutter or in the milling CNC machine?
SCANNING
KINECT
Here I used one of the most common tools for scanning in fab labs, the skanect. This is the most cheap and accessible way to have a model faster of things you need right away.
For this time I tried to used and I found that is not working anymore, we tried to fixed but we couldn't, so I will show how it works and prove that I know how to used it, because I've used many times and ofcourse I used it for Fab Academy 3d print excersise.
-Foto de mi scaneandome en skanect
-foto the interface
DRONE
The drones are a useful tool for scanning, is the same technology that take a lot of picture, but from air. In this case, we used in the Fab Lab Maya to scanned the whole biulding. We drove the drone around the Lab and, as you can see, it scanned all the things that are around it. It is not so exact, but because, we did the first try, like a free vertion, the thing is that, you have to paid and then you can scan super nice things. Actually now that I think about it, I should try to search a free and open source software for this kind of 3D scan.
SCANNING FAB LAB MAYA from trinidad on Vimeo.
CELPHONE
-video
DOWNLOAD
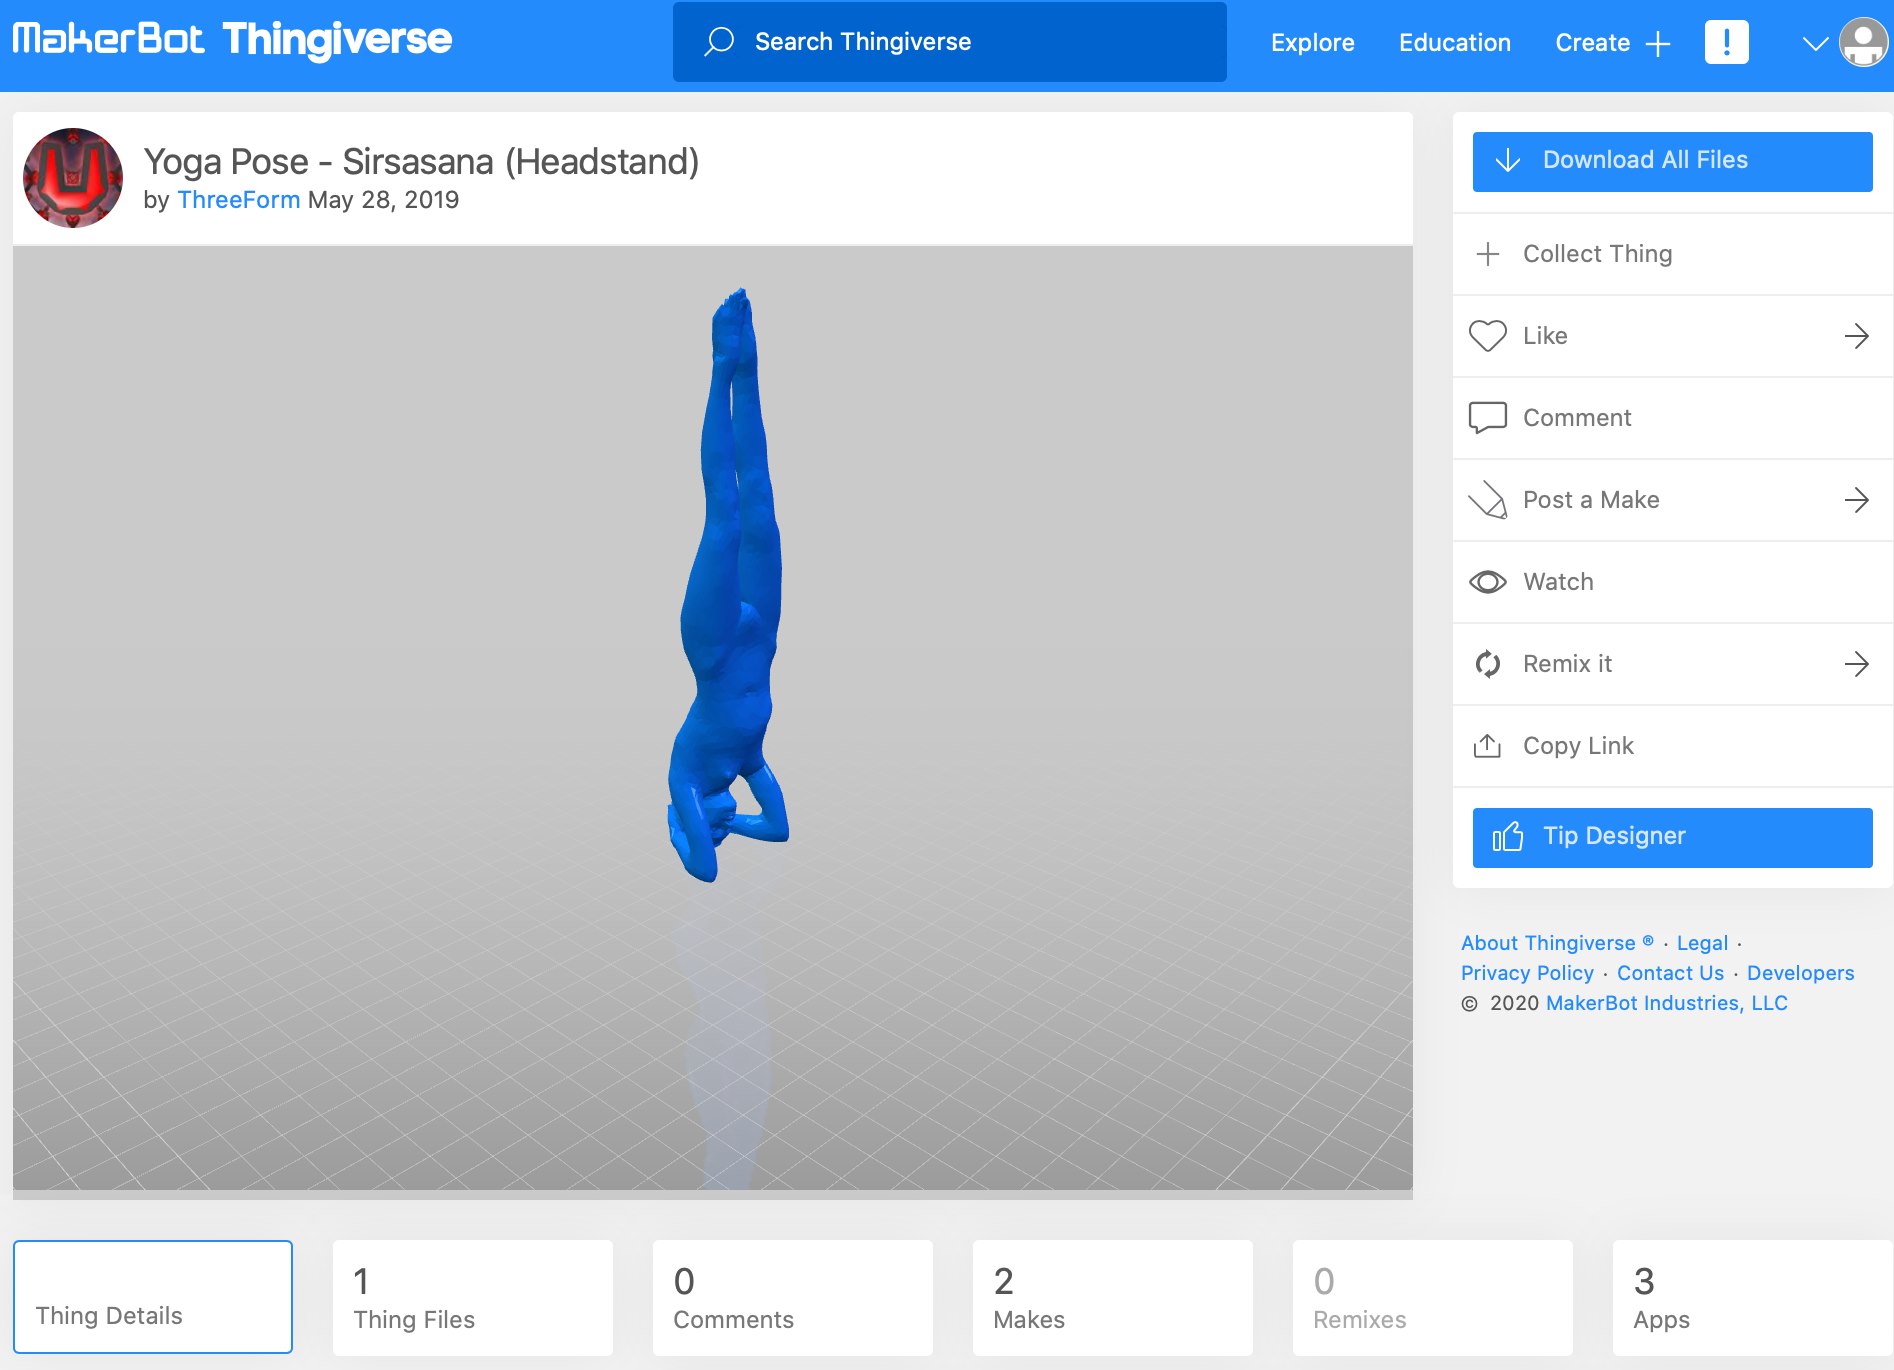
THINGIVERSE
Thingiverse is one of the most famous web pages where you can find all the community in the world that share its 3d creation and almost all are for free. It is amazin, you can find almost everything you are looking for. You only have to click in download for free and you can have two types of files, .obj or .stl.
.obj files: this one is better for me becuase isn't so hard to edditing it, but some times, the files are very heavy
*.stl files: .stl files are really practical to download and, immediately to 3d print, becuase it is like a mesh, and it's bit hard to modify them.
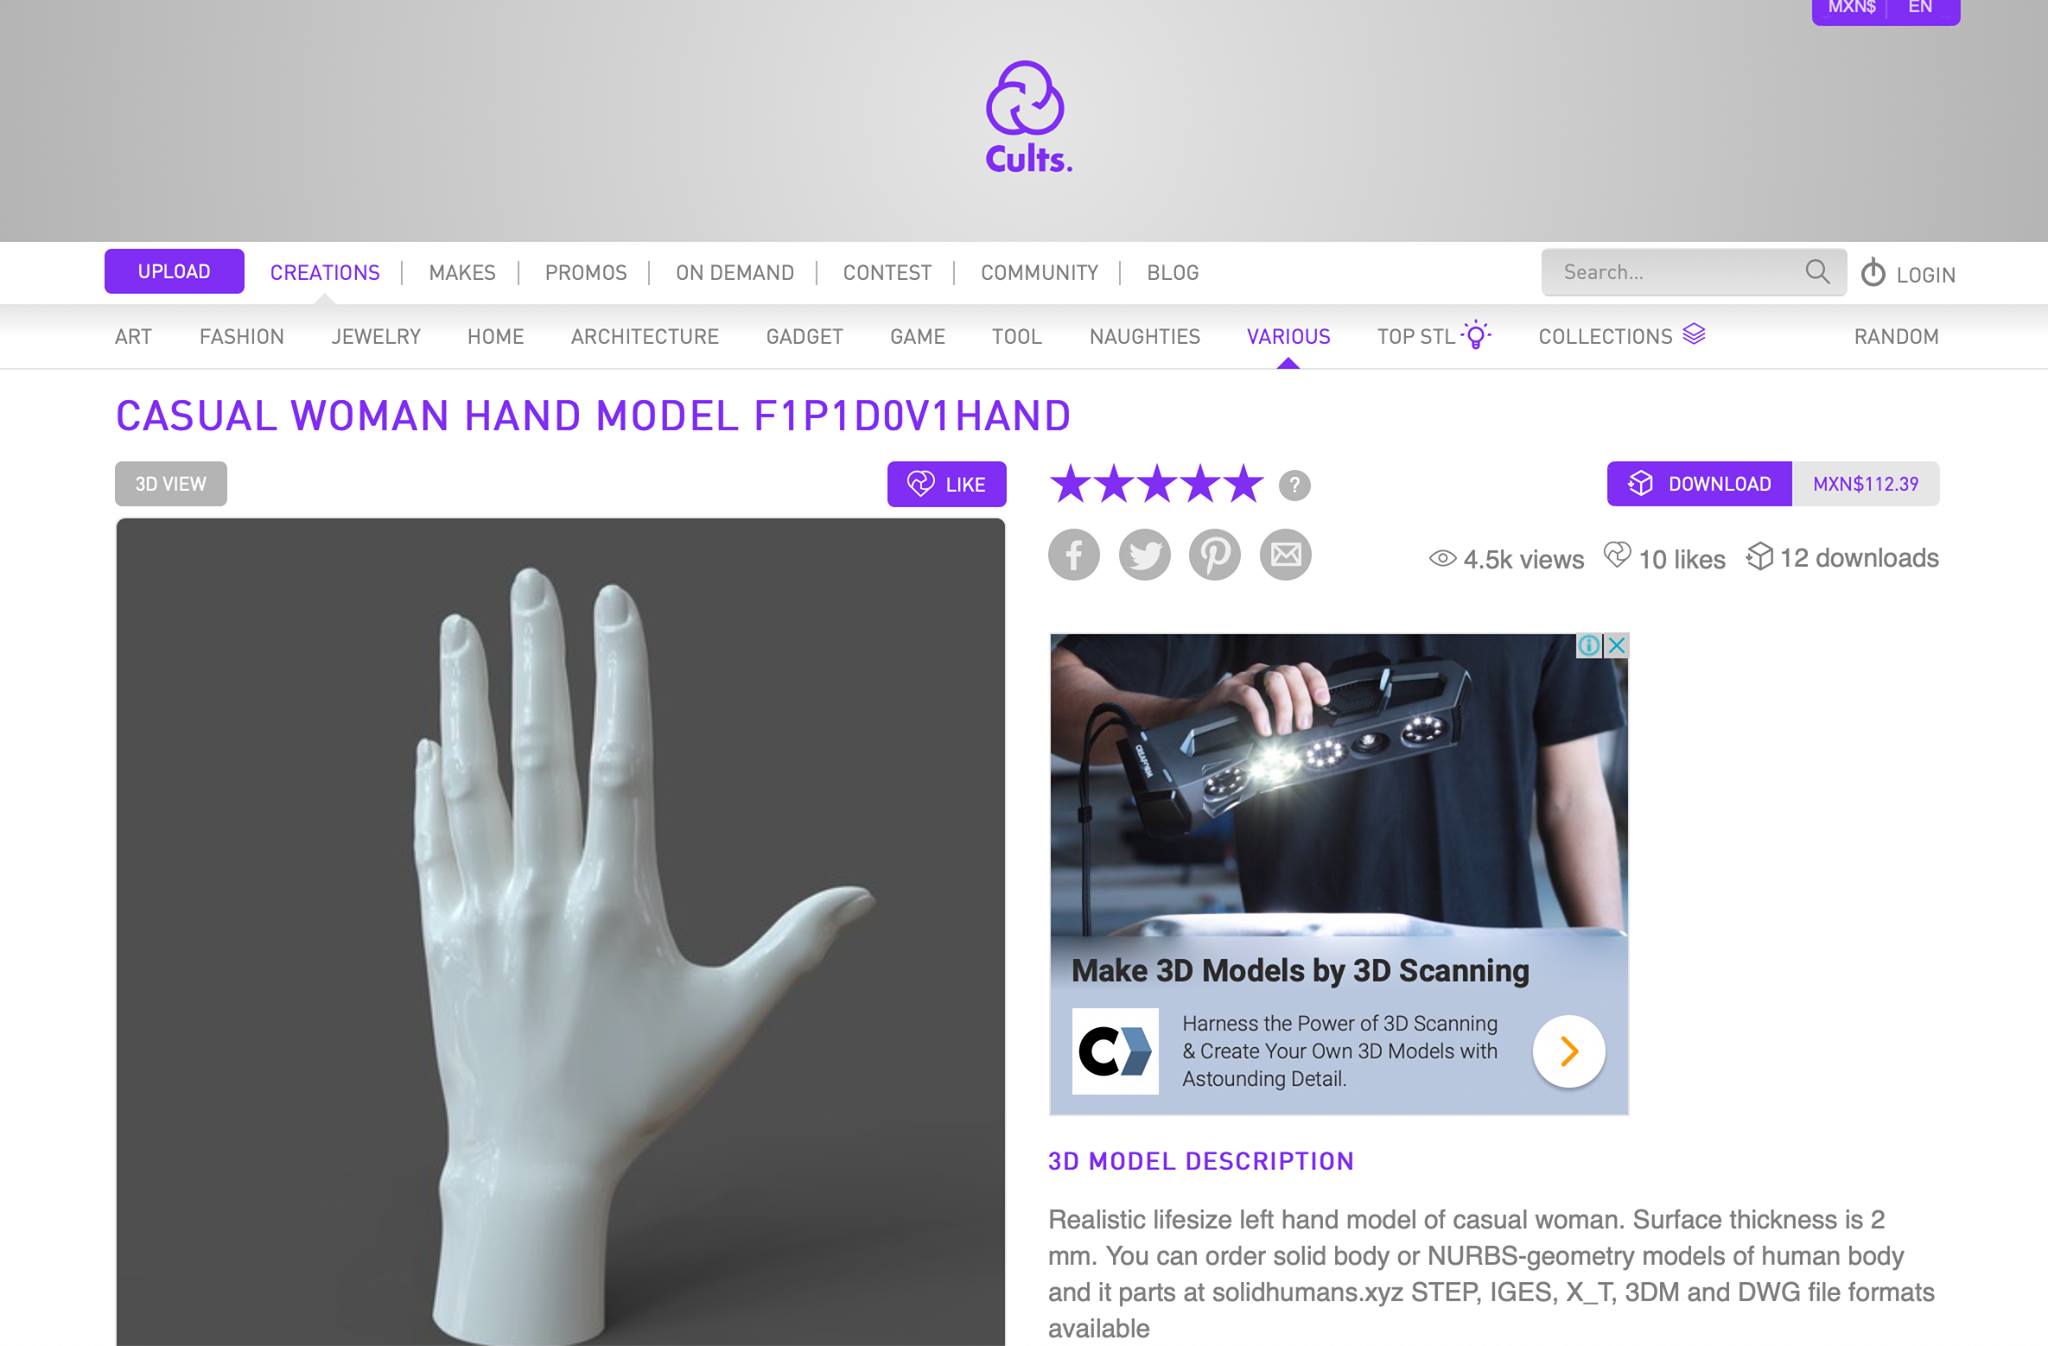
CULTS
Cults is another famous repository of 3d models. I used it once honestly and it's not bad, but the thing is that, in this platform, you have to pay almost for everything, almost all the 3D files has a price, but it really nice, if you look for something very specific, you only have to think that you have to spent some money.
SKETCHFAB
For me, Sketchfab is like thingiverese, but it is more simple, you can do the same, but in my case I find less things than in thingiverse. When I was in Fab Academy I used as a repository of my 3d models, so for this Fabricademy time, I will used again.
Of course you can find more repositories, but here, I only mentioned my favorites ones. If you have another example better than this ones, let me know please! thanks in advanced.
DESIGN, EDITION AND FABRICATION
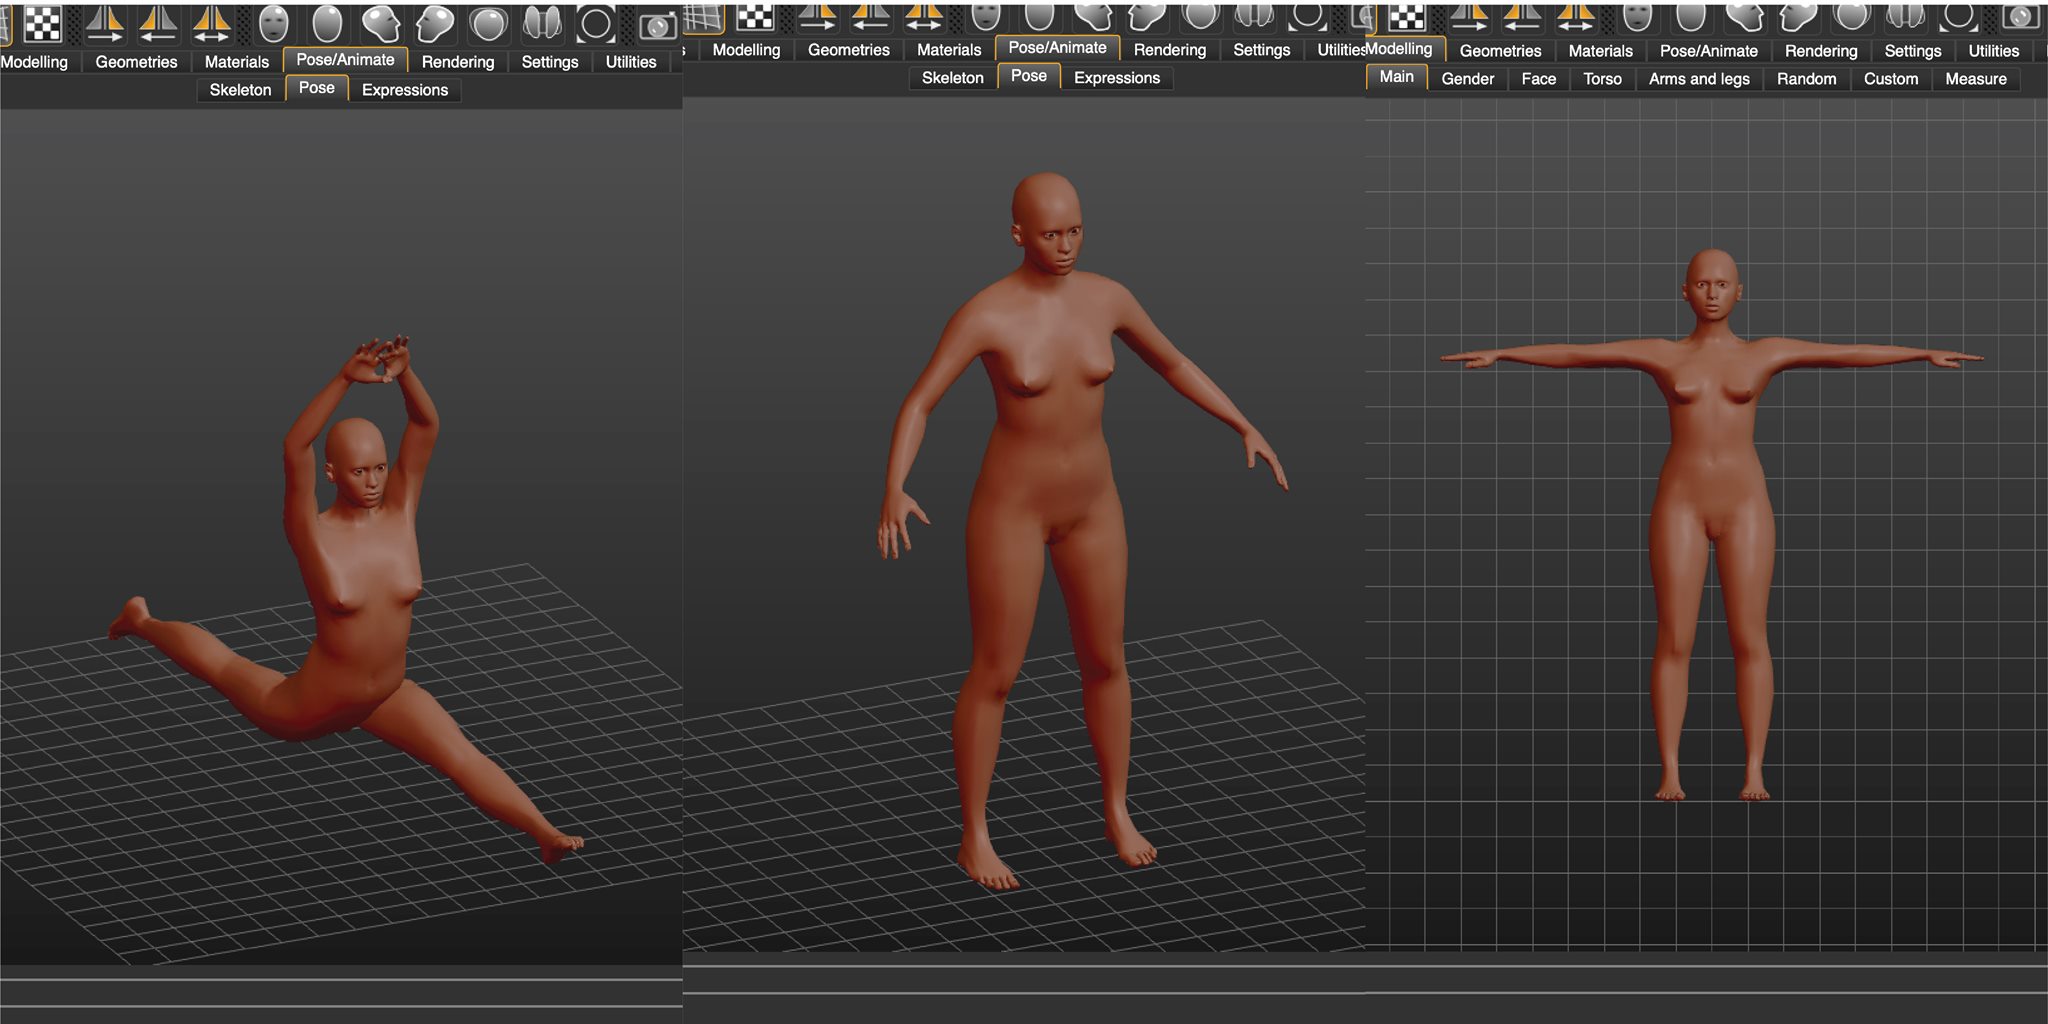
MAKE HUMAN
Make human is a very nice open source software where you can design a human body according of your needs. First step is to install the software. Note: I realized that the program for Mac is not working very well, I tried running the software on Windows platform and there is even better options.
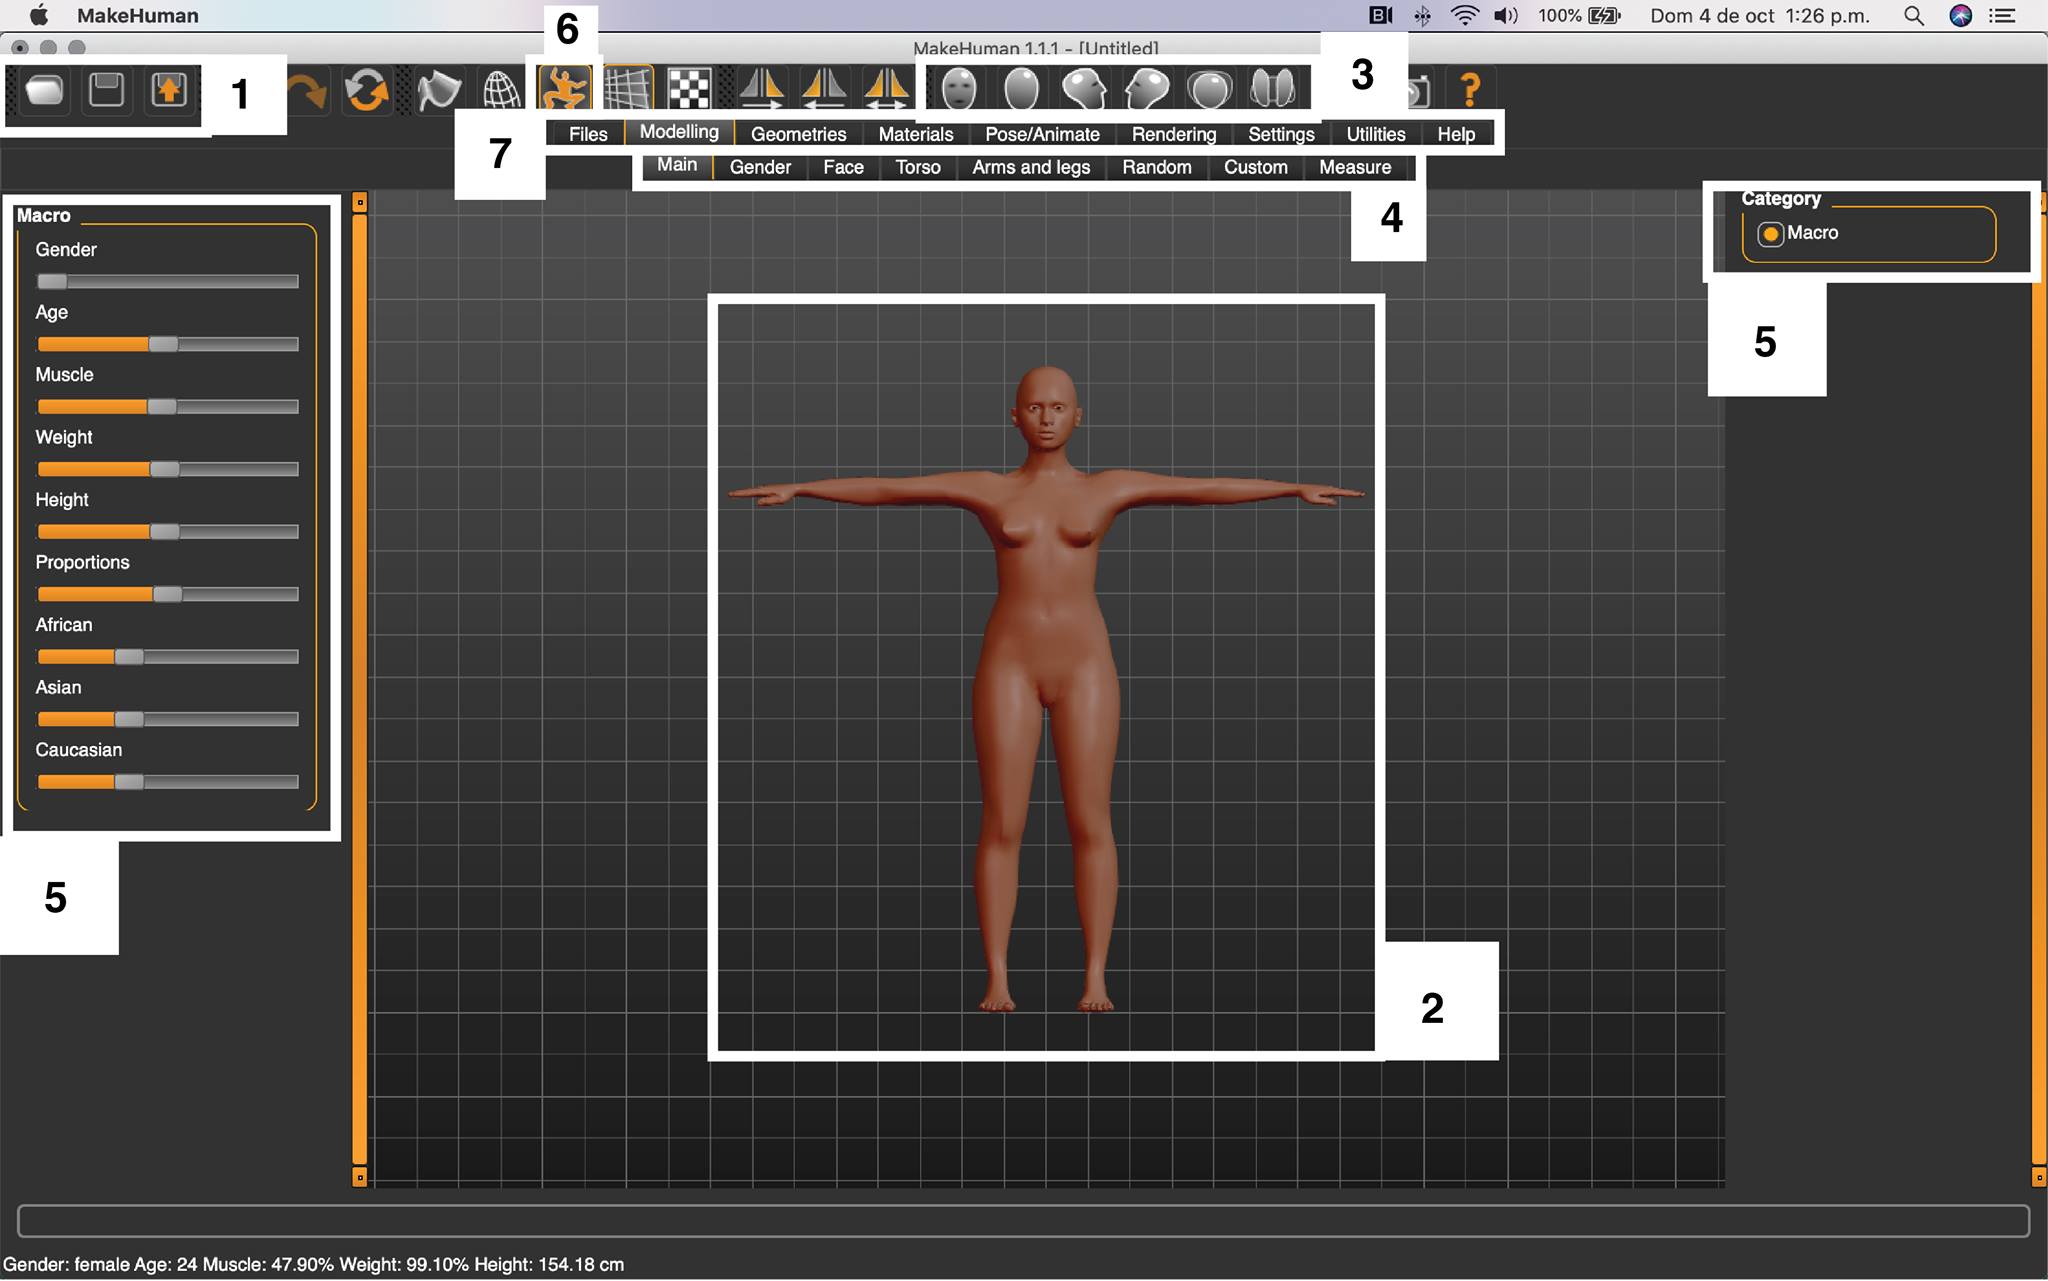
- 1 In this area you can find basic option, like save, open one model made it before and export when you finished.
- 2 Here is where you can visualize your model in real time
- 3 Here are very usefull options because here you can decided, how do you want to visualize your model, front area, up area, side, etc.
- 4 Here you can see the most important variables that you can use to transform your model, but first you have to select in the up area, the option, modelling. You can be able to change the form of the face, torso, etc
- 5 Here are two side bars. Apparently the right area is like the main one, here you can change the parameters of every detail and in the other side there is also parameters but they depend on the right side area.
- 6 This option is very interesting and useful, you can change the position of your model, like walking position, yoga position, etc. Note: It is really bad this software for mac, from my computer this option and other are not able to use them, in this case I have to use a Windows computer honestly, so don't worry if it happen the same for you.
- 7 This bar is for more advanced option, like changing materials for rendering, among others.
When you finished to editing the model, you have to save it in two formats:
-
.mhm : this one is the Make human format, this is good to keep it, in case you want to edit the model again, you only have to go and import it.
-
.obj : this is the file that you will need for working after on rhinoceros
After make many experiments in makehuman software, I decided to create a lot of the different human positions that the software can offer. So, the first body I made, I exported it to .obj file, in many positions.
I was thinking about one comment I heard in class, that makes a big impact when you try to model your body. For this model, I didn't sculpt my body, I choosed to design a "normal" mannequin body. why? I don't know, but maybe is about "Self love" o that kind of things, anyway this is a rare personal thought hahahaha
RHINOCEROS
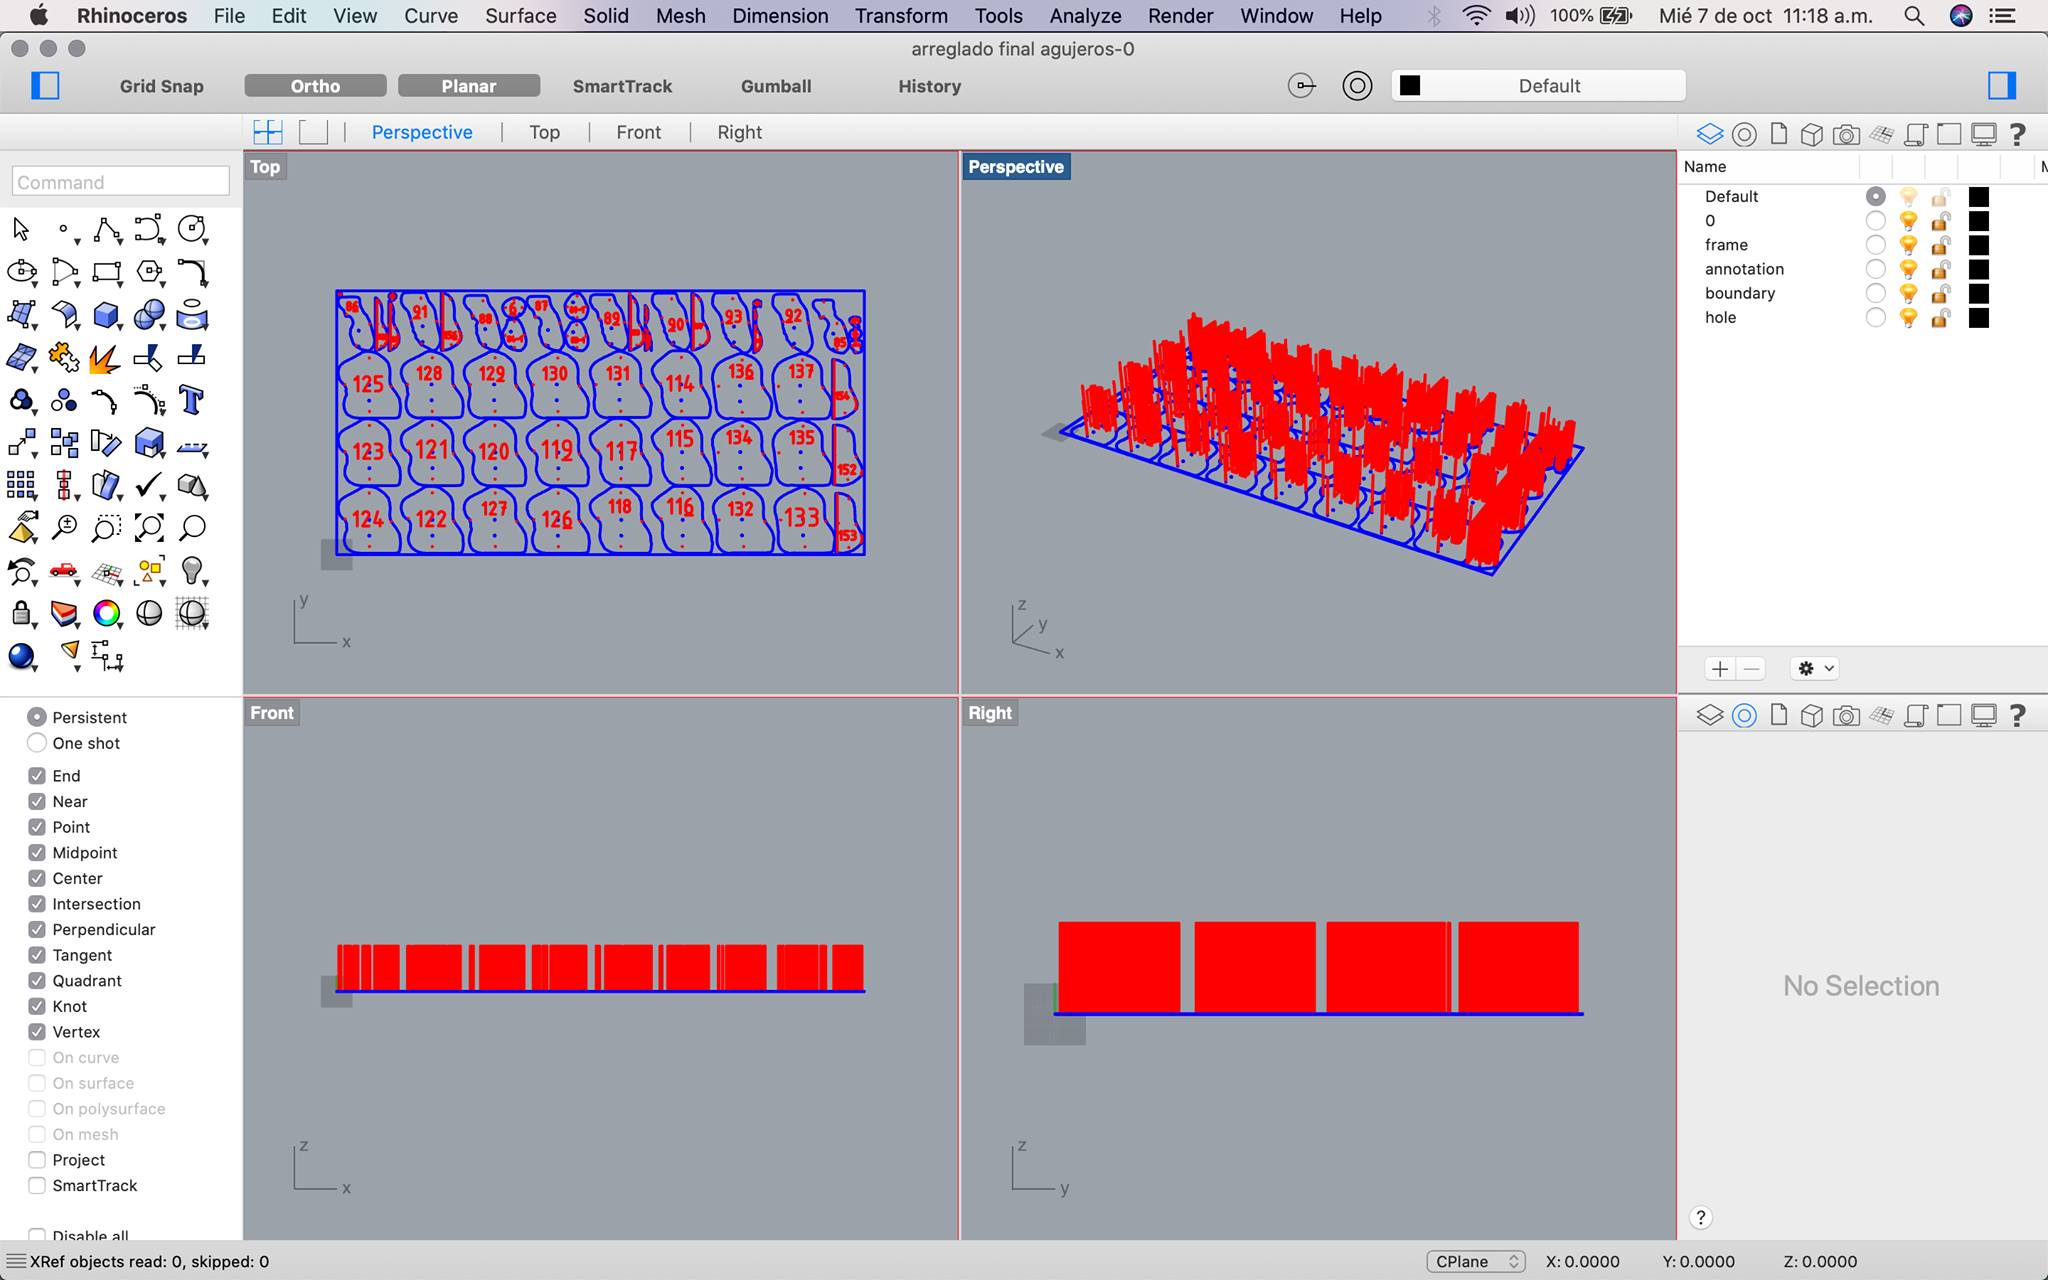
Now that I opened Rhinoceros 3D, I imported all the bodies, I realized that my computers was running a lot of RAM memory, so, in order that doesn't crash, I decided to keep the models in a small scale. You can see scale by the net behind, every model is very small, like 20 mm. NOTE: Everytime you open a new file, the first thing you have to do mandatory is change the units of the scale, for digital fabrication the best way is work on mm always.
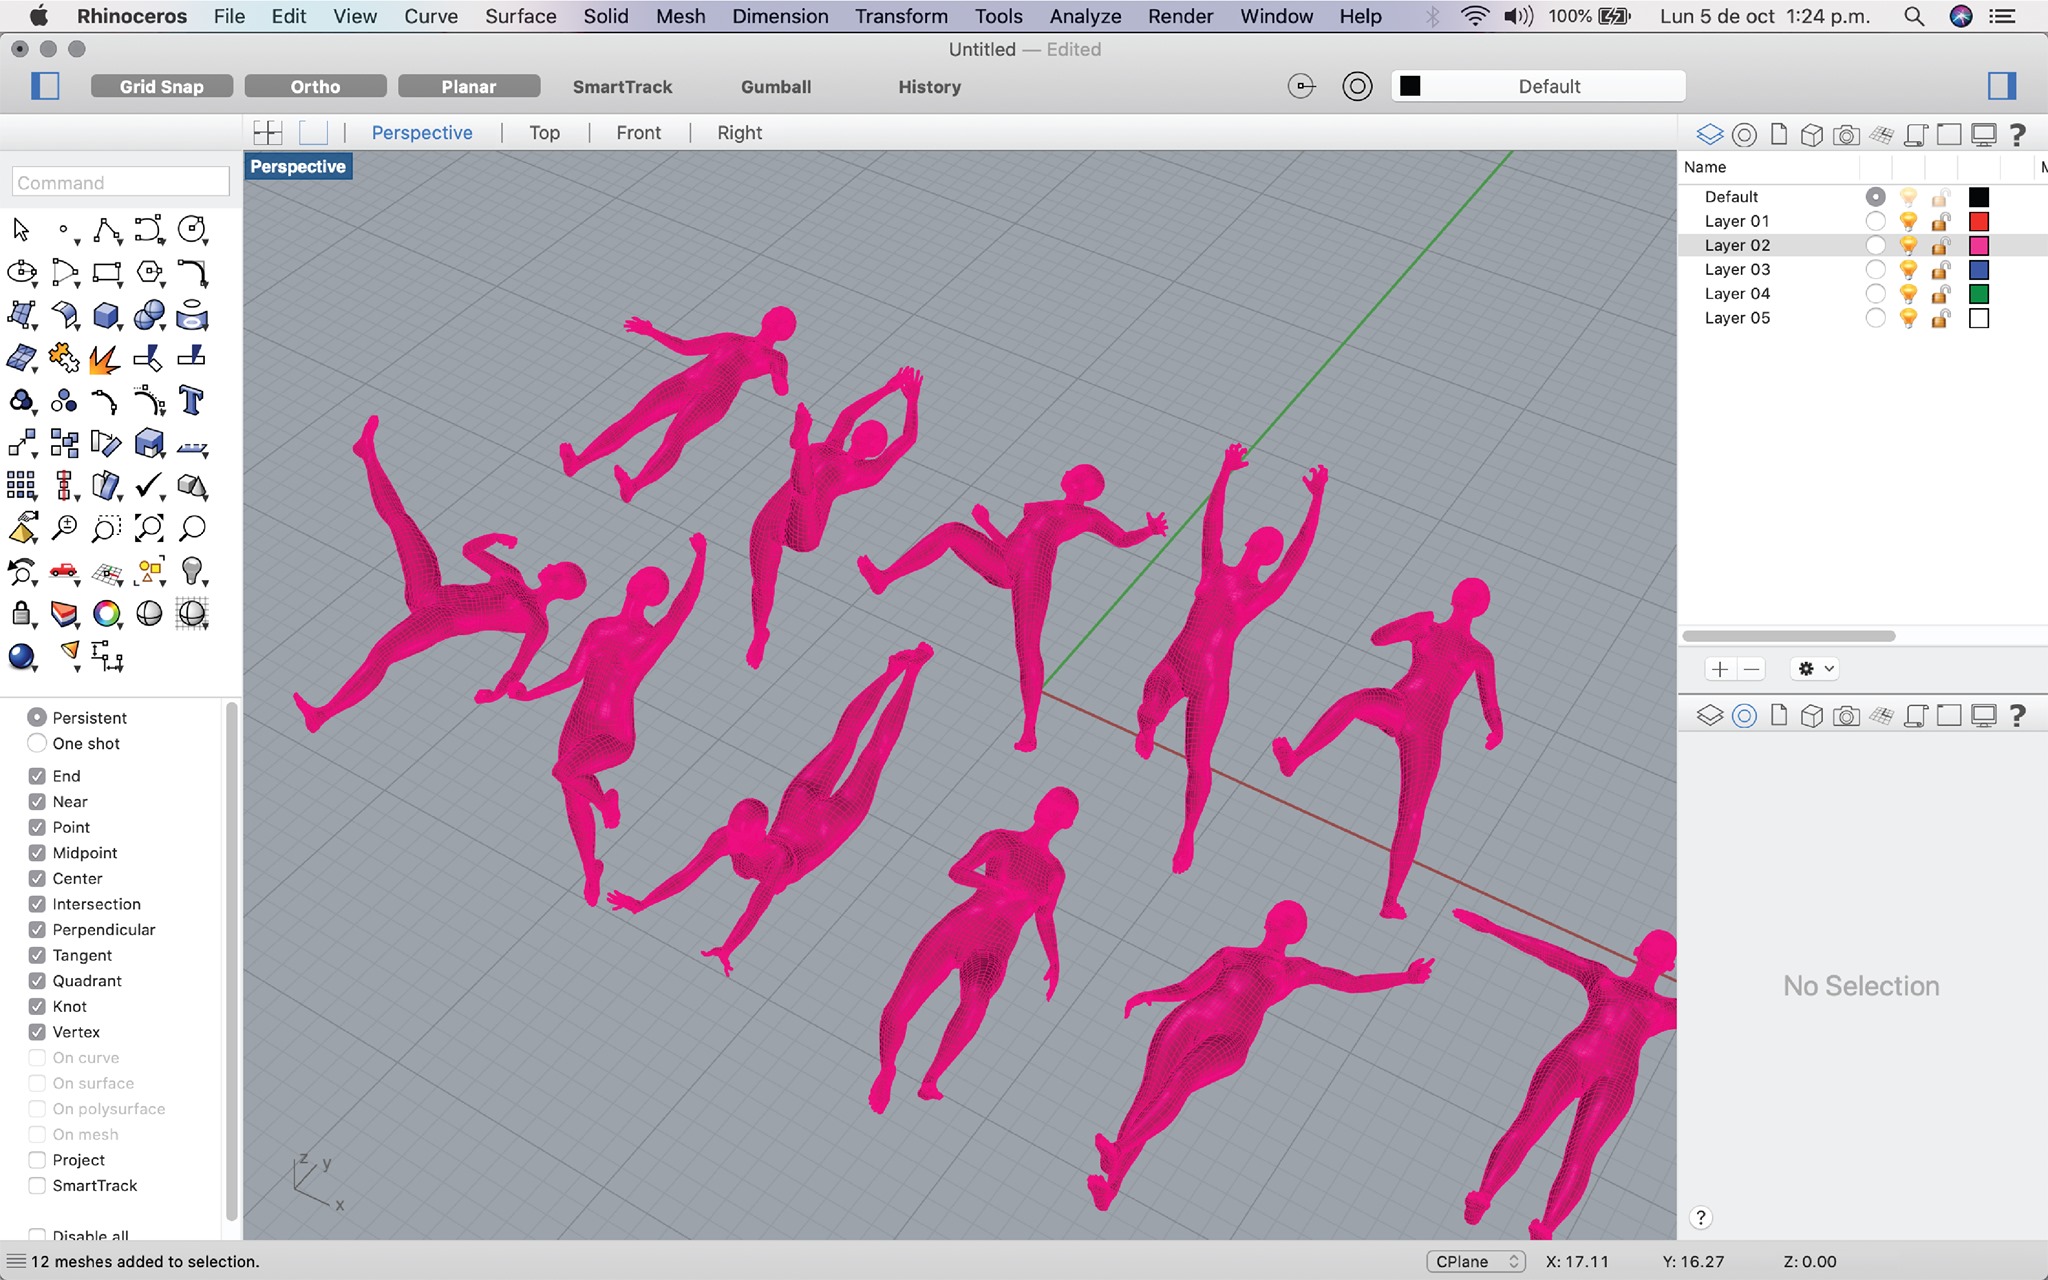
After changing the the units, I continued transforming the models from mesh to nurbs, as we saw in the class, it is easier to work with volumnes or nurbs, so, I had to select the model and writte the comand "Mesh To Nurbs" on Thinoceros 3D. Sometimes it takes a while to make the operations, it depends on the complex and the quality of the models, and then I started editing the models.
My fisrt idea for this assignment is to make a model like Shiva, the indian's god that has a lot of arms, and, in every hand will carry a head, why?, because I thought, that It would be very nice to have one like this to present every of my masks.
Now I started to edit the models, What i wanted is to take the arms and heads from every position and then put them all together in one body.
-
1: First I created a solid, like a cube or a square extruded, in all cases works, select the object you want to keep, then click, and then you have to select the object to want to take out.
-
2: Here you can see only the arms as a result of using the comand "boolean" comand.
-
3: I chose one body and I put all the arms togueter in one layer with the main body.
-
4: I moved them, rotated them, mirror them, etc. Just in the position i wanted

And here you can see the final result. I LOVE IT, but then the first thing i thought about the shiva heads was... SH*T, this is going to be hard to fabricate, maybe in the 3d printer could be easy but not for this method. Besides, other important thing is that, I did't have so many time, I just had one day to fabricate (just in this week, there were two huracans and electricity was unstable to use the machines, so I couldn't work, long story) and the most important, , I did't have so much material. I only had 5 MDF boards of 3mm, and for this shiva I would need at least 20 boards. Sad.
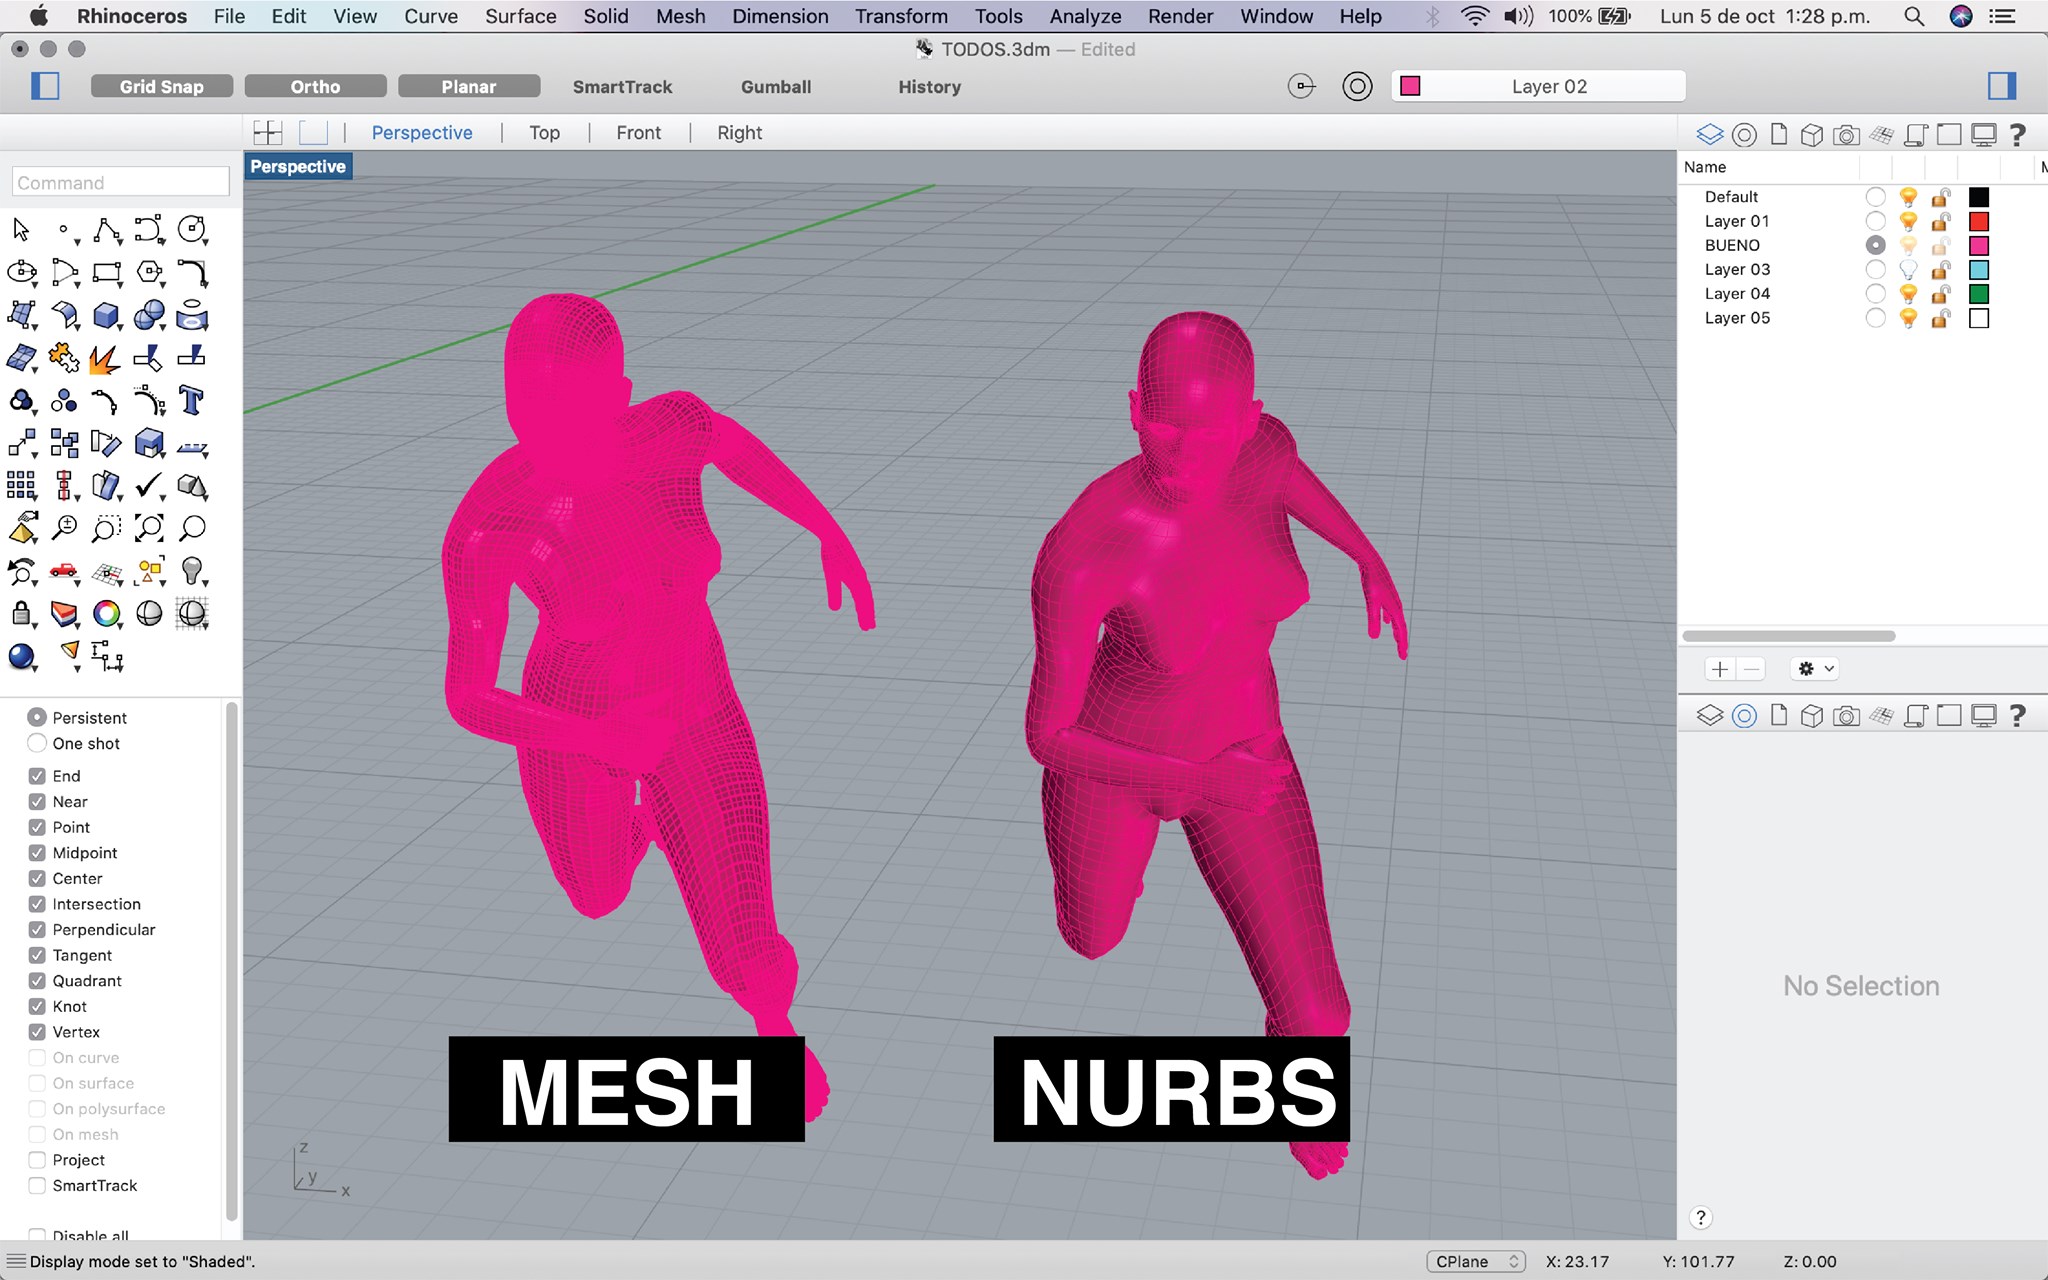
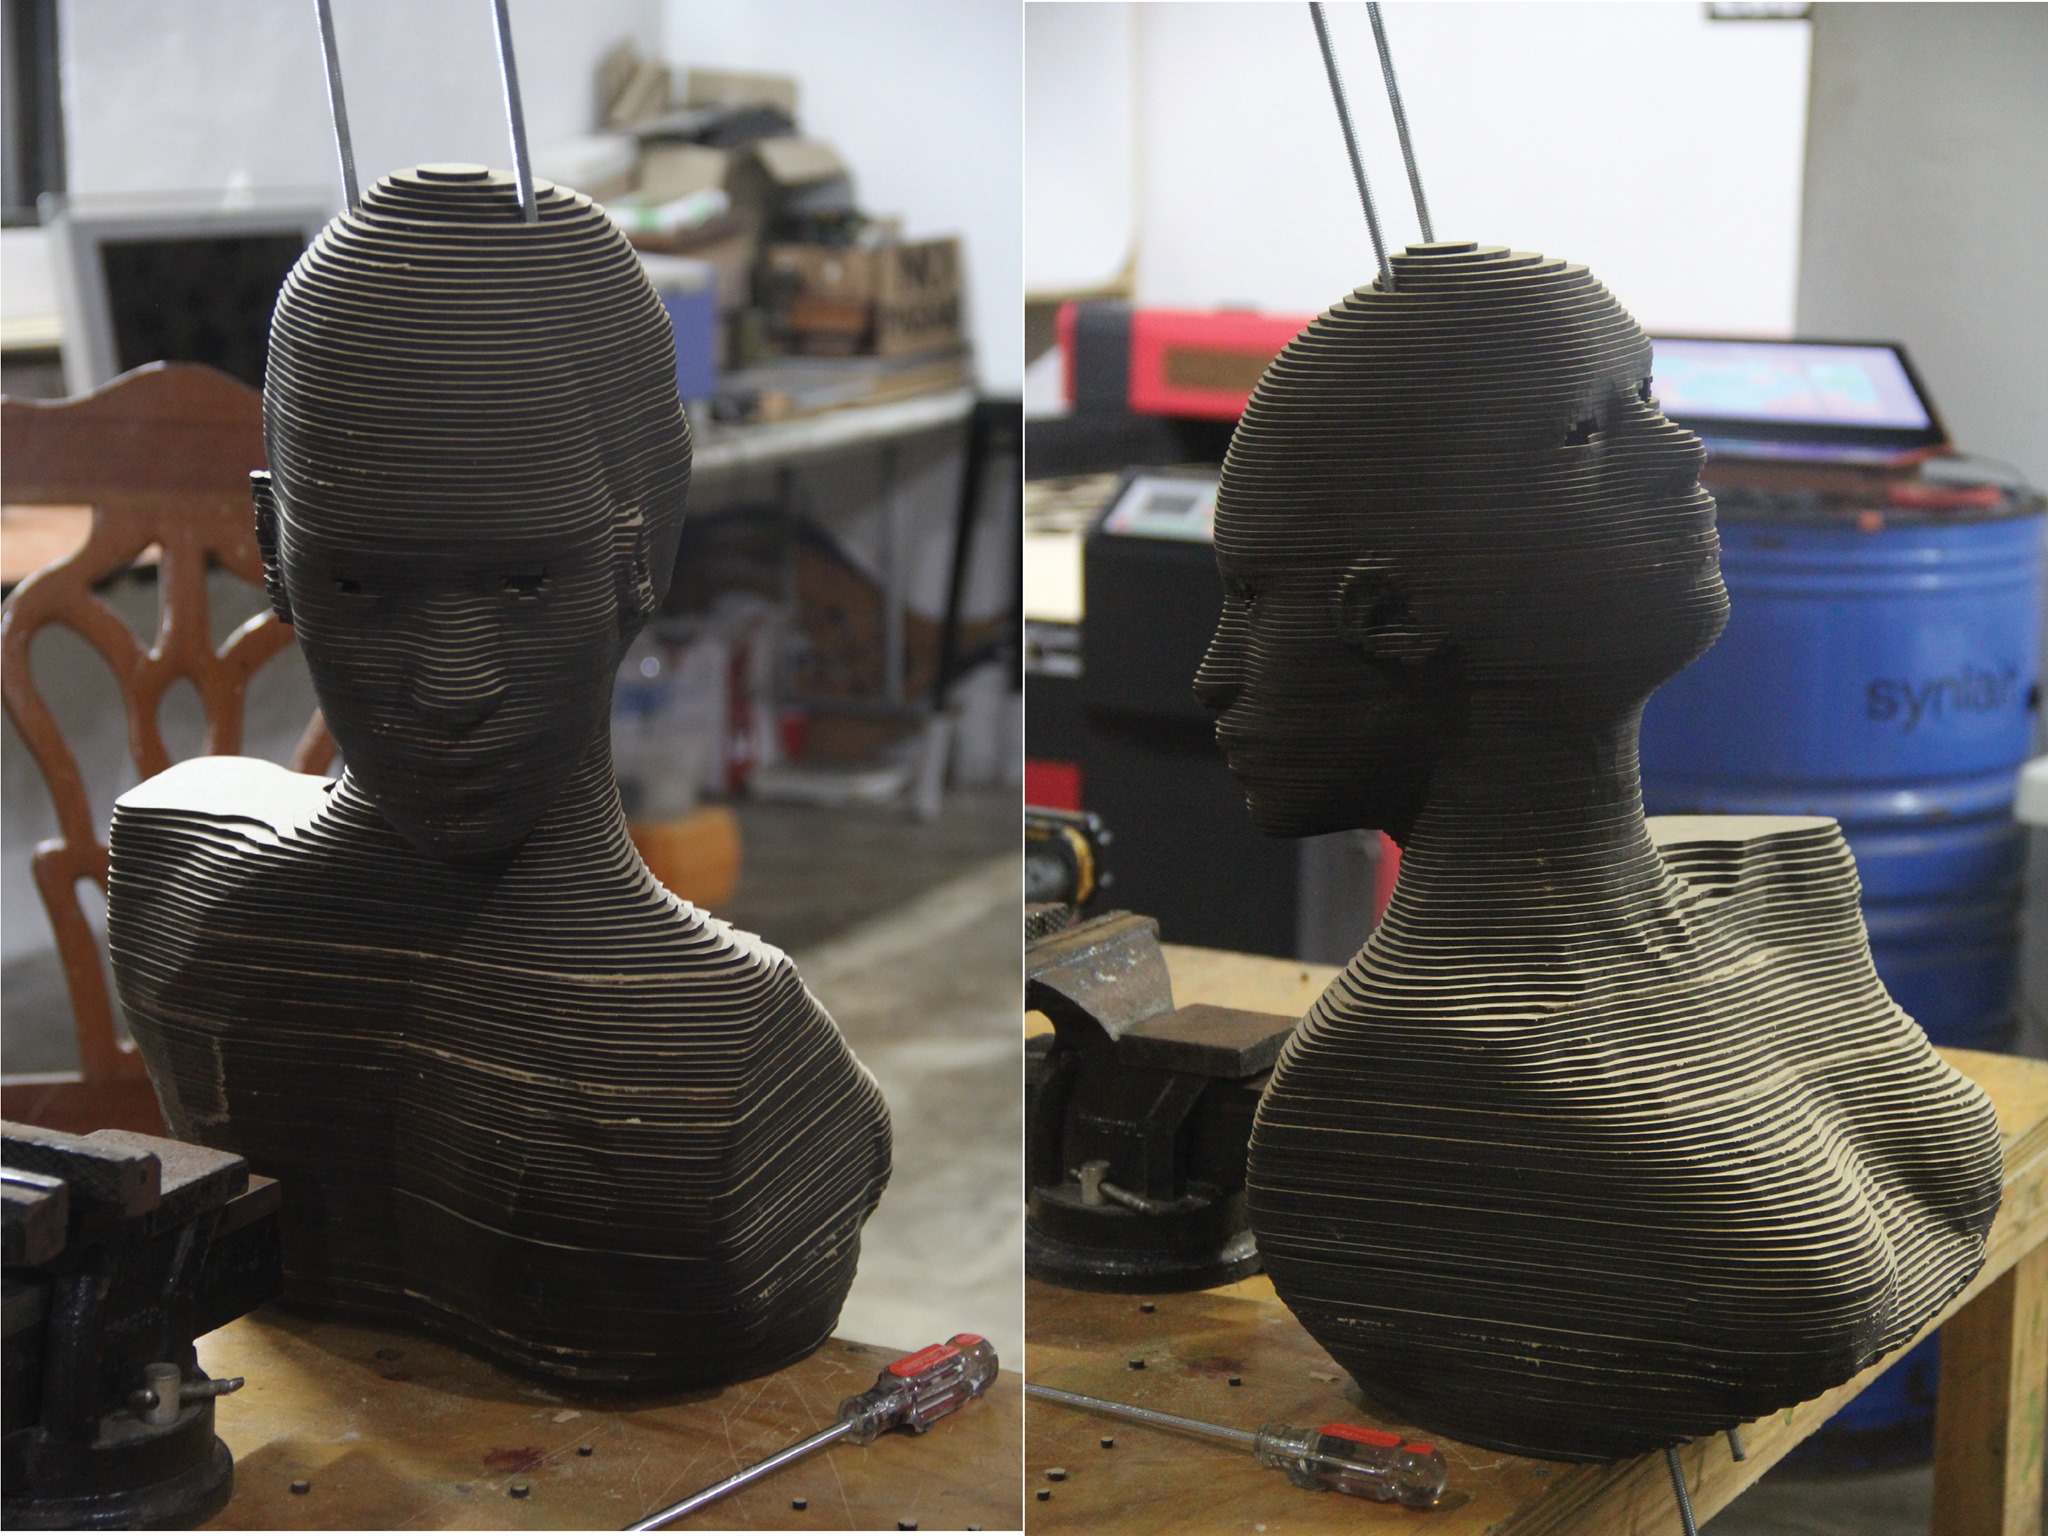
Eventhought I liked it, I changed to a other option that was, to make a torso with a double face, so I keep my idea to have unrealistic body.
I did the same process like the shiva and the final result was this. It is not as rad as the other but, I liked it too and It adapts to my situations.
MESHMIXER
Honesty is the first time I used meshmixer, and i liked it, It really helps, I would have like to know it before. So, I imported the .obj file into mesh mixer and the first thing happended was a huge error hahahahaha
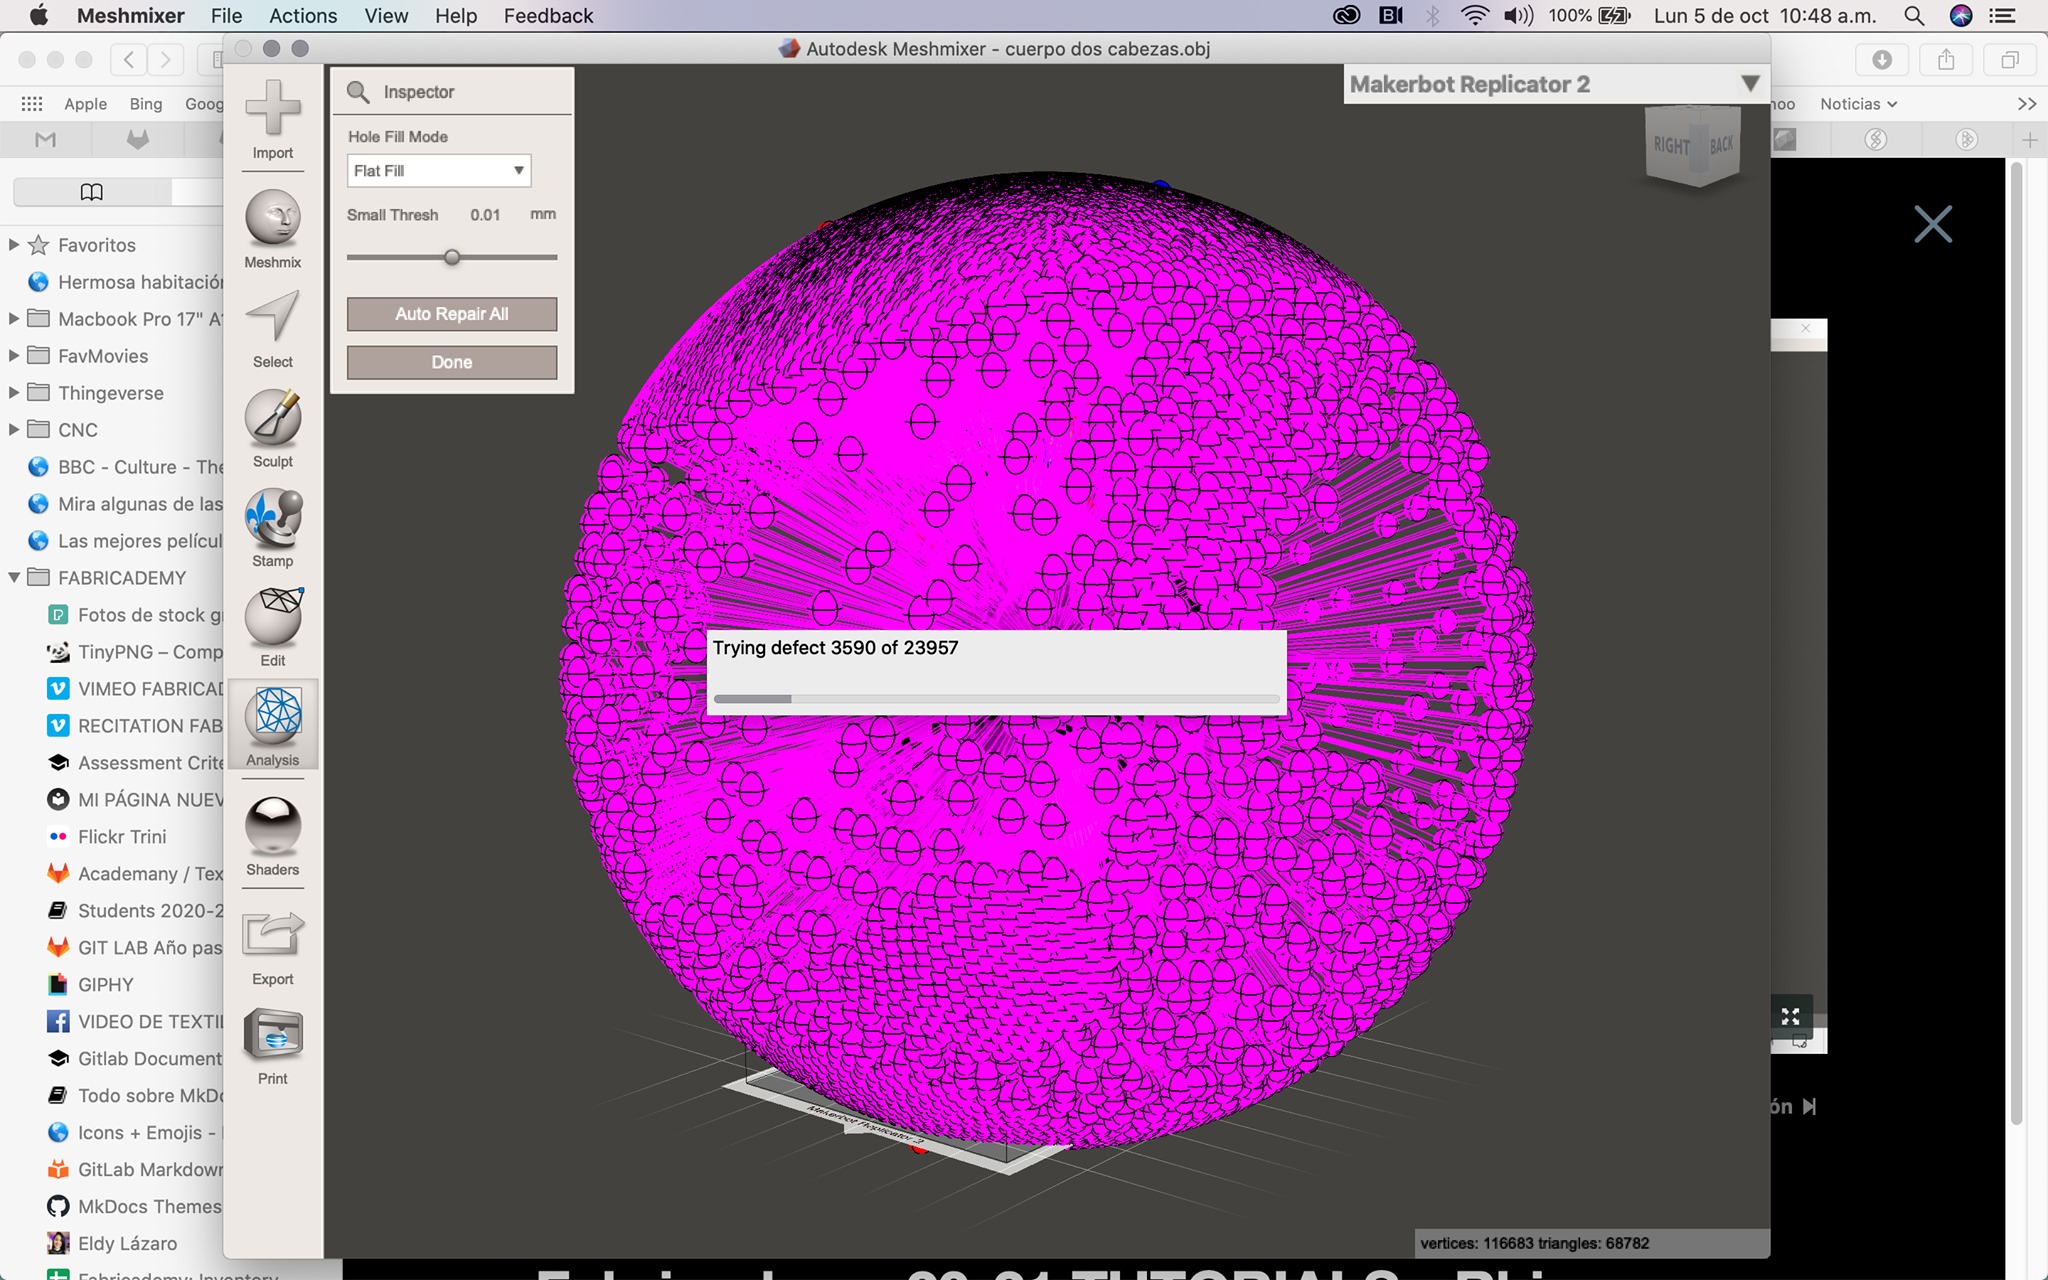
I was a little bit stress out, but after a while I discovered the way how to fixed, the file I exported first from Rhinoceros 3D was .obj, after the error, I tried exporting the rhino file as .stl and it works perfectly, at least I guess so.
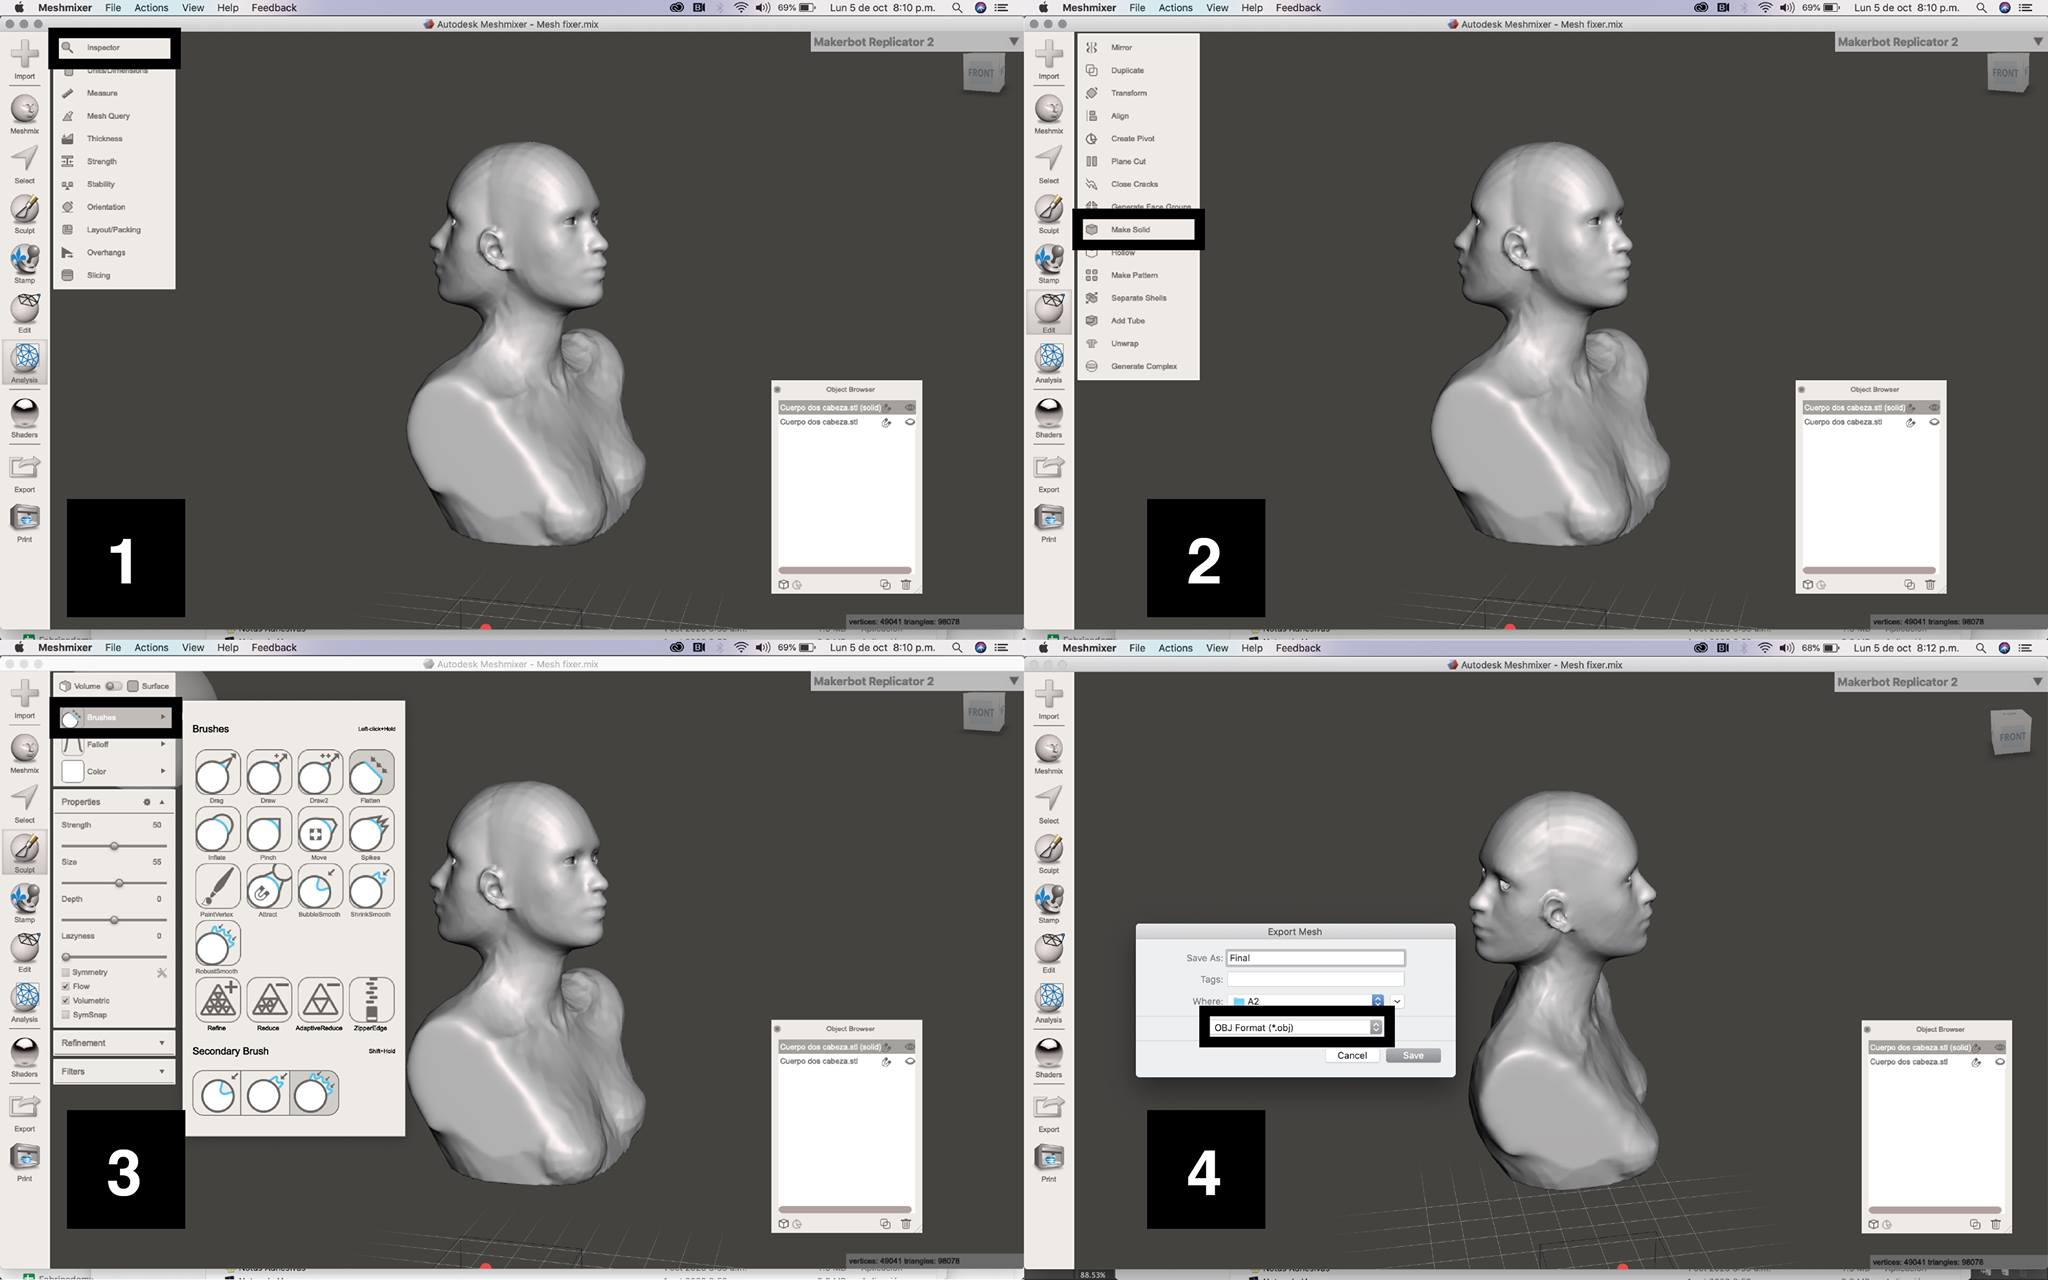
- 1: First you go and click in the icon "Analysis" and then select the "Inspector" option, this is for search for errors, like, I didn't have any, I went to the next step.
- 2: Second step is to go to the "edit" icon and then select the "Make solid" option, this will make so much easier the life, because it will make like a uniform solid and I think it makes the mesh less triagulated, so, with less data, will be faster to work with models.
- 3: Third helpful option is to go to "Brushes" and then look around all the option, this helps to kind of sculpt your model, I had some parts I didn't like, so a changed with this options. It is really easy to use.
- 4: Finally, when you finish, export the model to a .obj file and that's it :)
SLICER FOR FUSION 360
This software is really practical from my point of view, I shed a lot before to make workshops for kids, and for fabricating cardboard big things. Everything can be done in Grasshopper, a Rhinoceros's plug in, but as I said before, I would love to achive this, but it is hard honestly. I will try anyway when I have more time, some day...
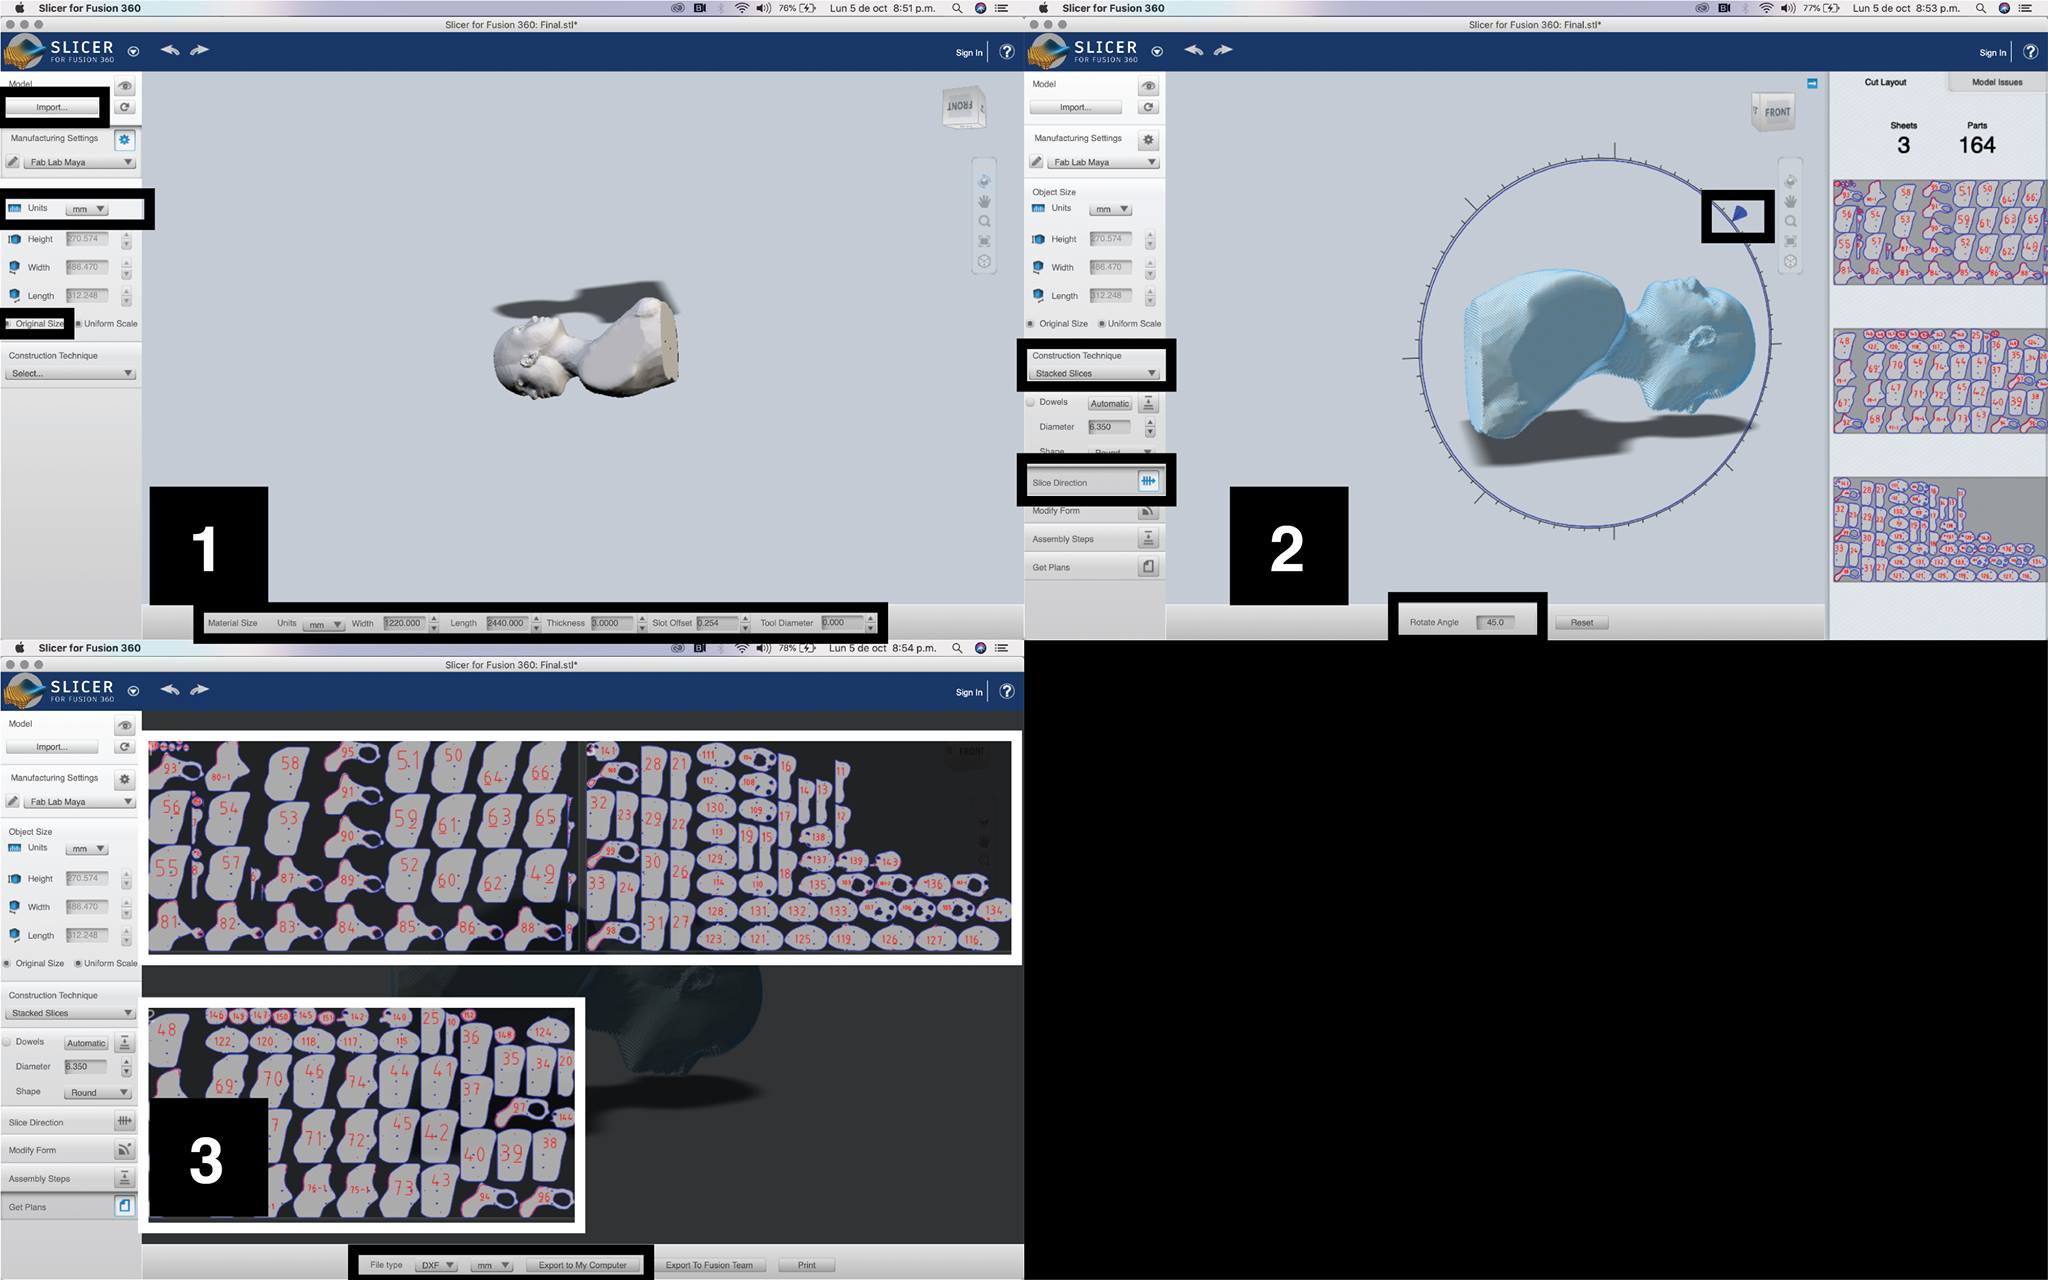
- 1: Here first thing is to import the file, and then make sure of your unit scale. For example, here I had my units by default. Don't forget to click in the "Original size" option.
- 2: Here you have to select the method of fabrication, in my case, I will use, the "Stacked slices", I don't like waffle structure, besides I have done it a lot of times before. I know that with the method I choosed I will do more work, and I will used more material but I like it more, is more stetic and resistant, and I can used as mine masks mannequin. After you choose the method, you can change the angle axis as you prefer. I changed a little bit.
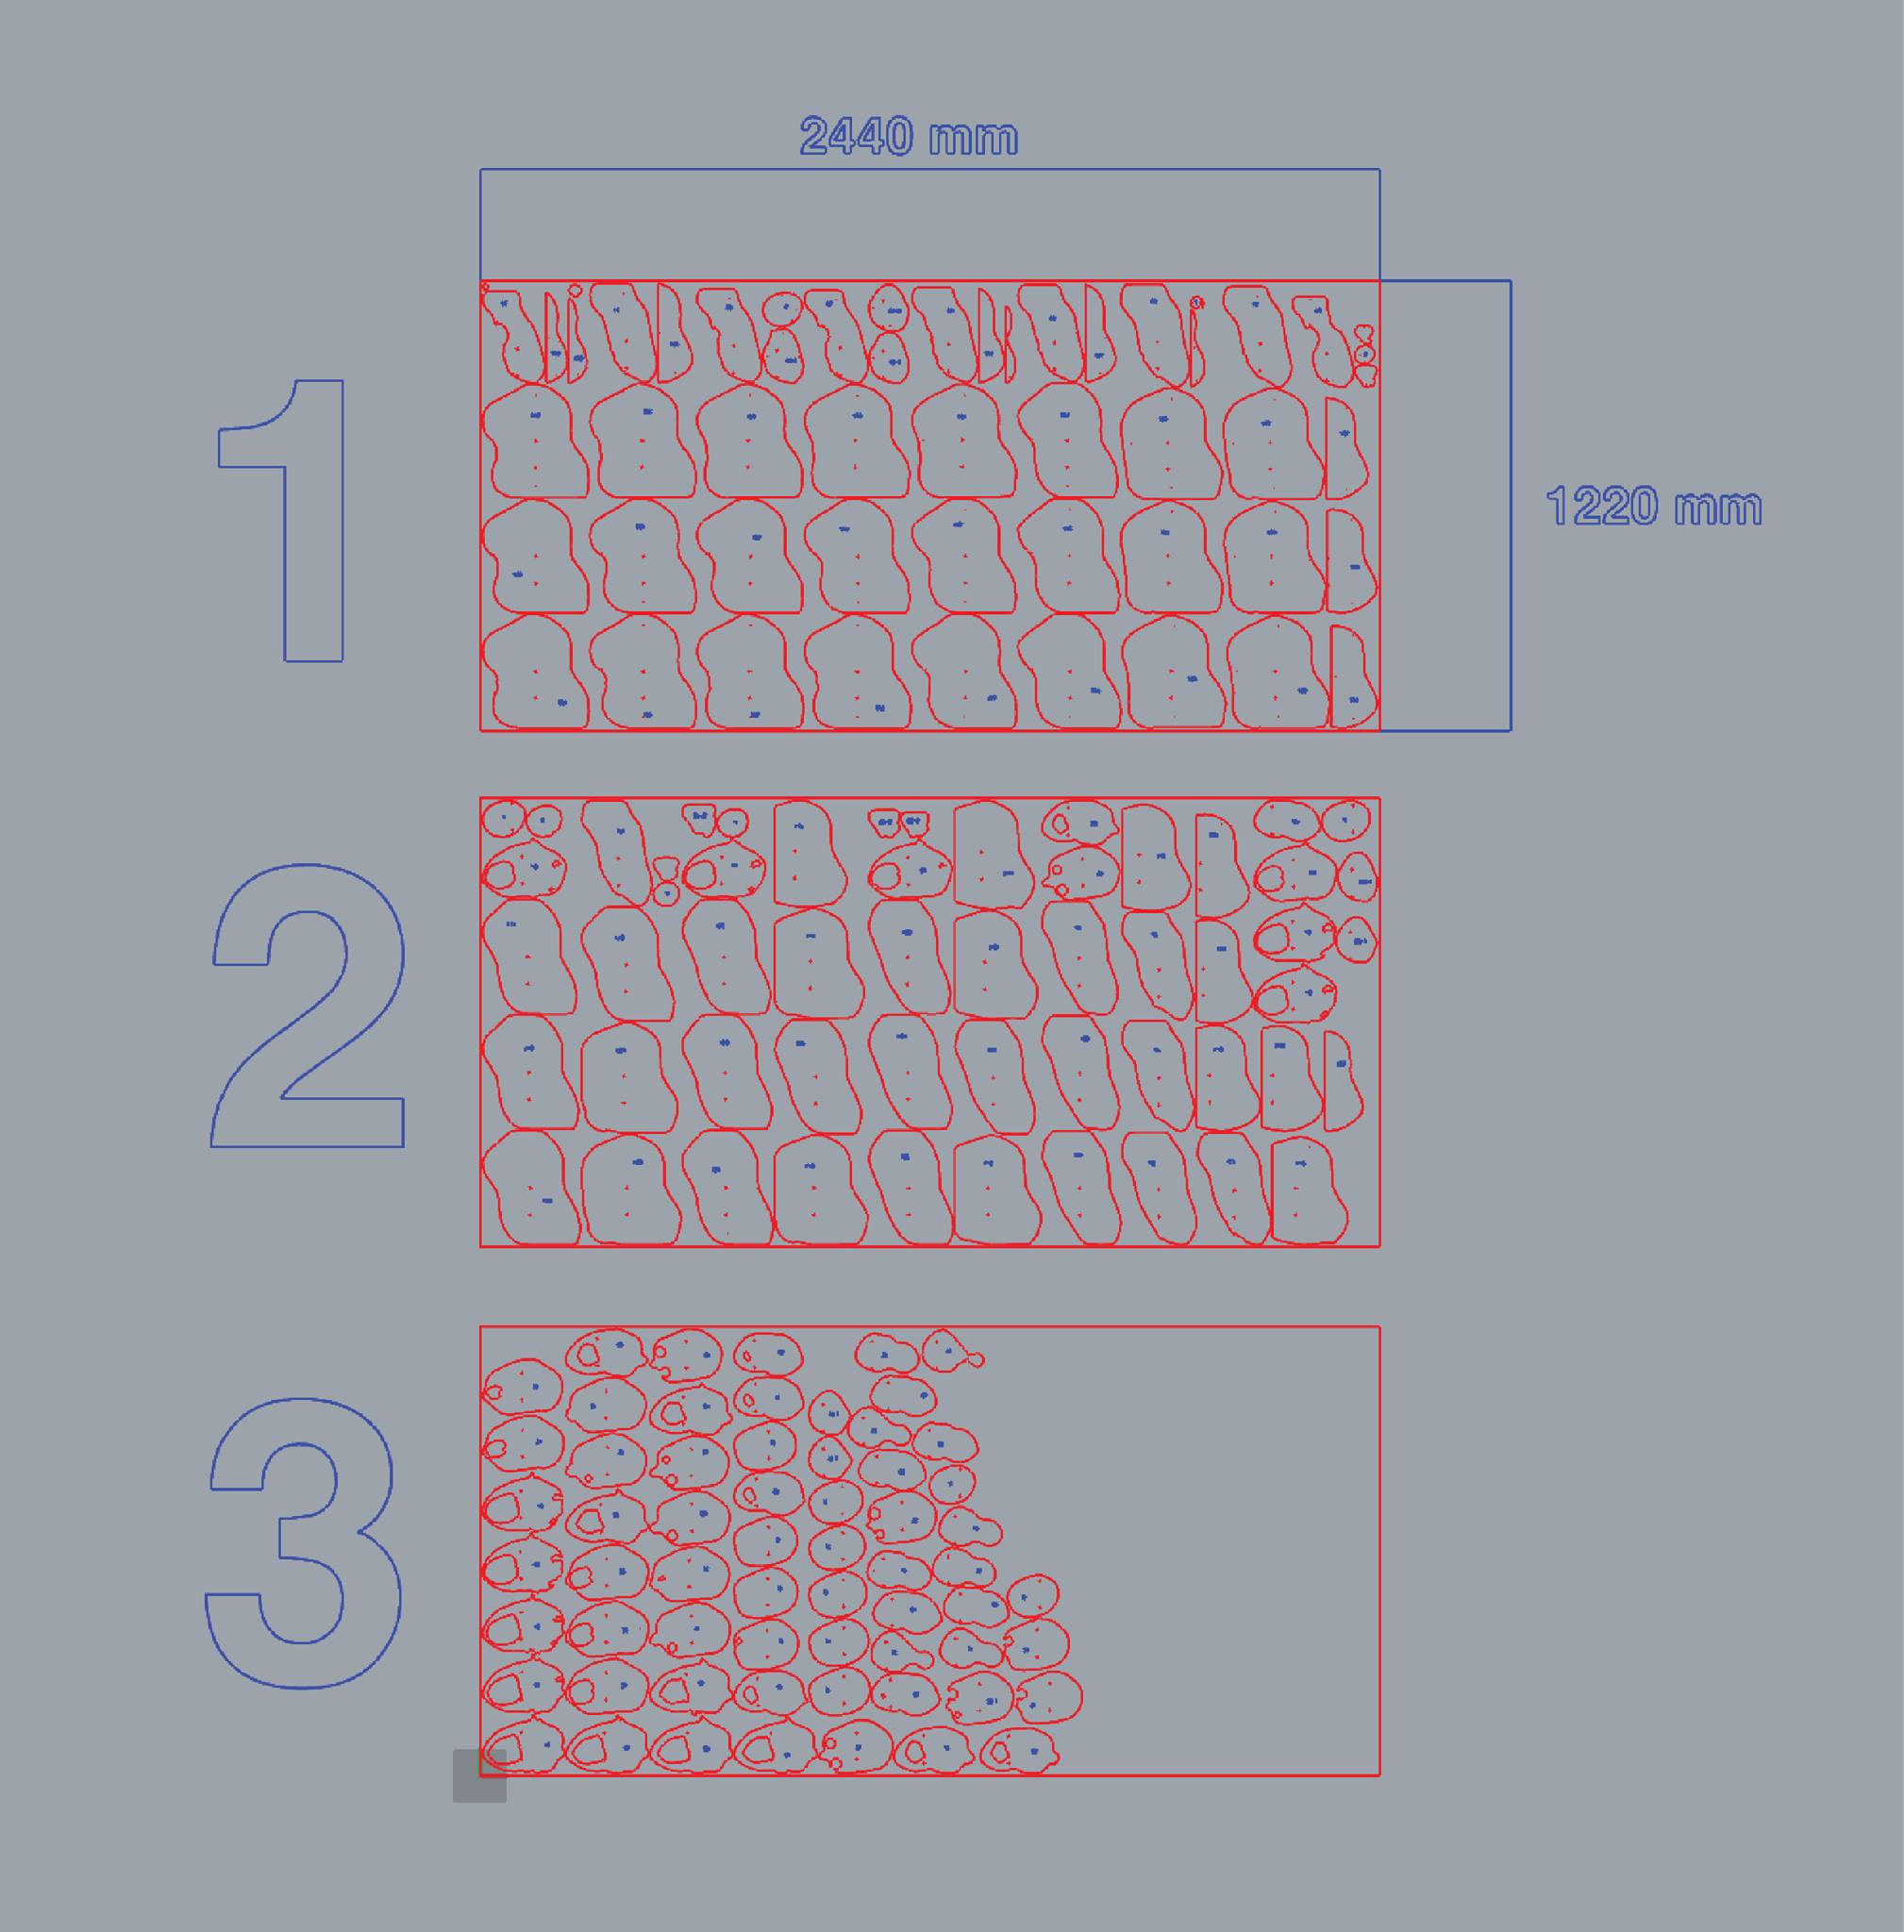
- 3: Finally, export it to a .DXF file. For laser cutters and CNC machines (in case you are working in 2D dimensions) .DXF files are made for this kind of fabrication, because is only about lines. In the right side of the interface of the software you can see how many boards you will need, the line draws with their corresponding numbers, and that's it.
BEFORE FABRICATION: RULES AND SAFETY
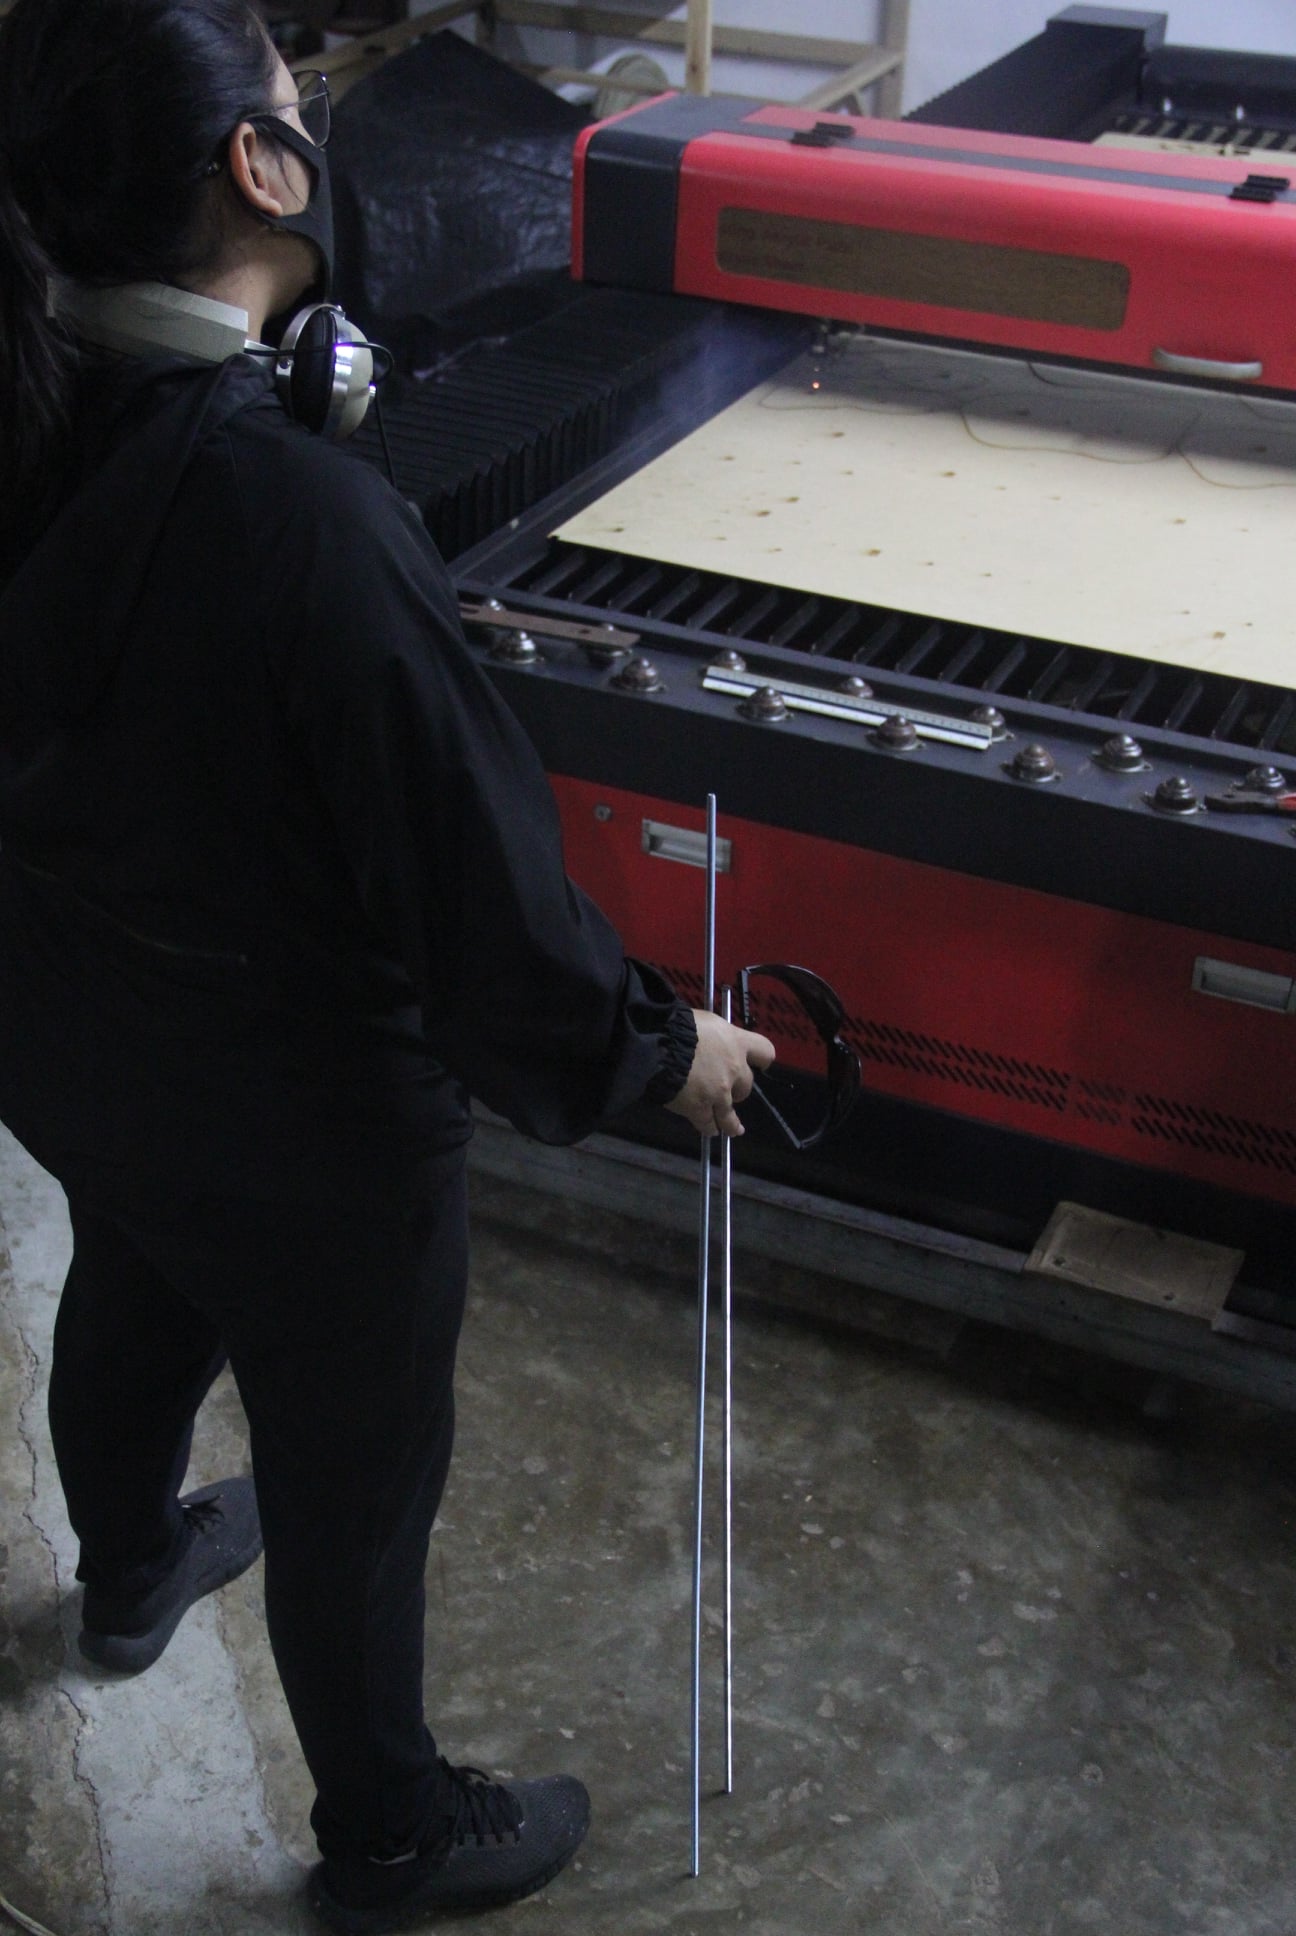
Before go into the fabrication process, you have to know the machine, I mean, you have to know that is the size of the work space, so, you can tell to Slicer software. Safety is also important, in the case of our Lab, we never let alone the machine while it is working, NEVER, error can cost you a lot. Once, we let the machine without supervition, suddenly, it started smelling rare, it was the machine and the laser was burning, we press the power off emergency button and we controled the flame with a extinguisher, this is my bigest advised, you're welcome hahahaha
Other important things are that, when you are working with this machines, or in general in a laboratory, wear tennis, tie your hair, wear special glasses in the case you have to observ the flame, in my case, I avoid to see the laser, because it cause me migraine, and finally, ofcourse, respect the new covid rules, like wear a mask, wash hands, etc.
In the case of having time to work with the machines, In the Fab Lab Maya, we don't have a fancy system, we just have to coordinate the times among us, so we can not interrupted some one else's time.
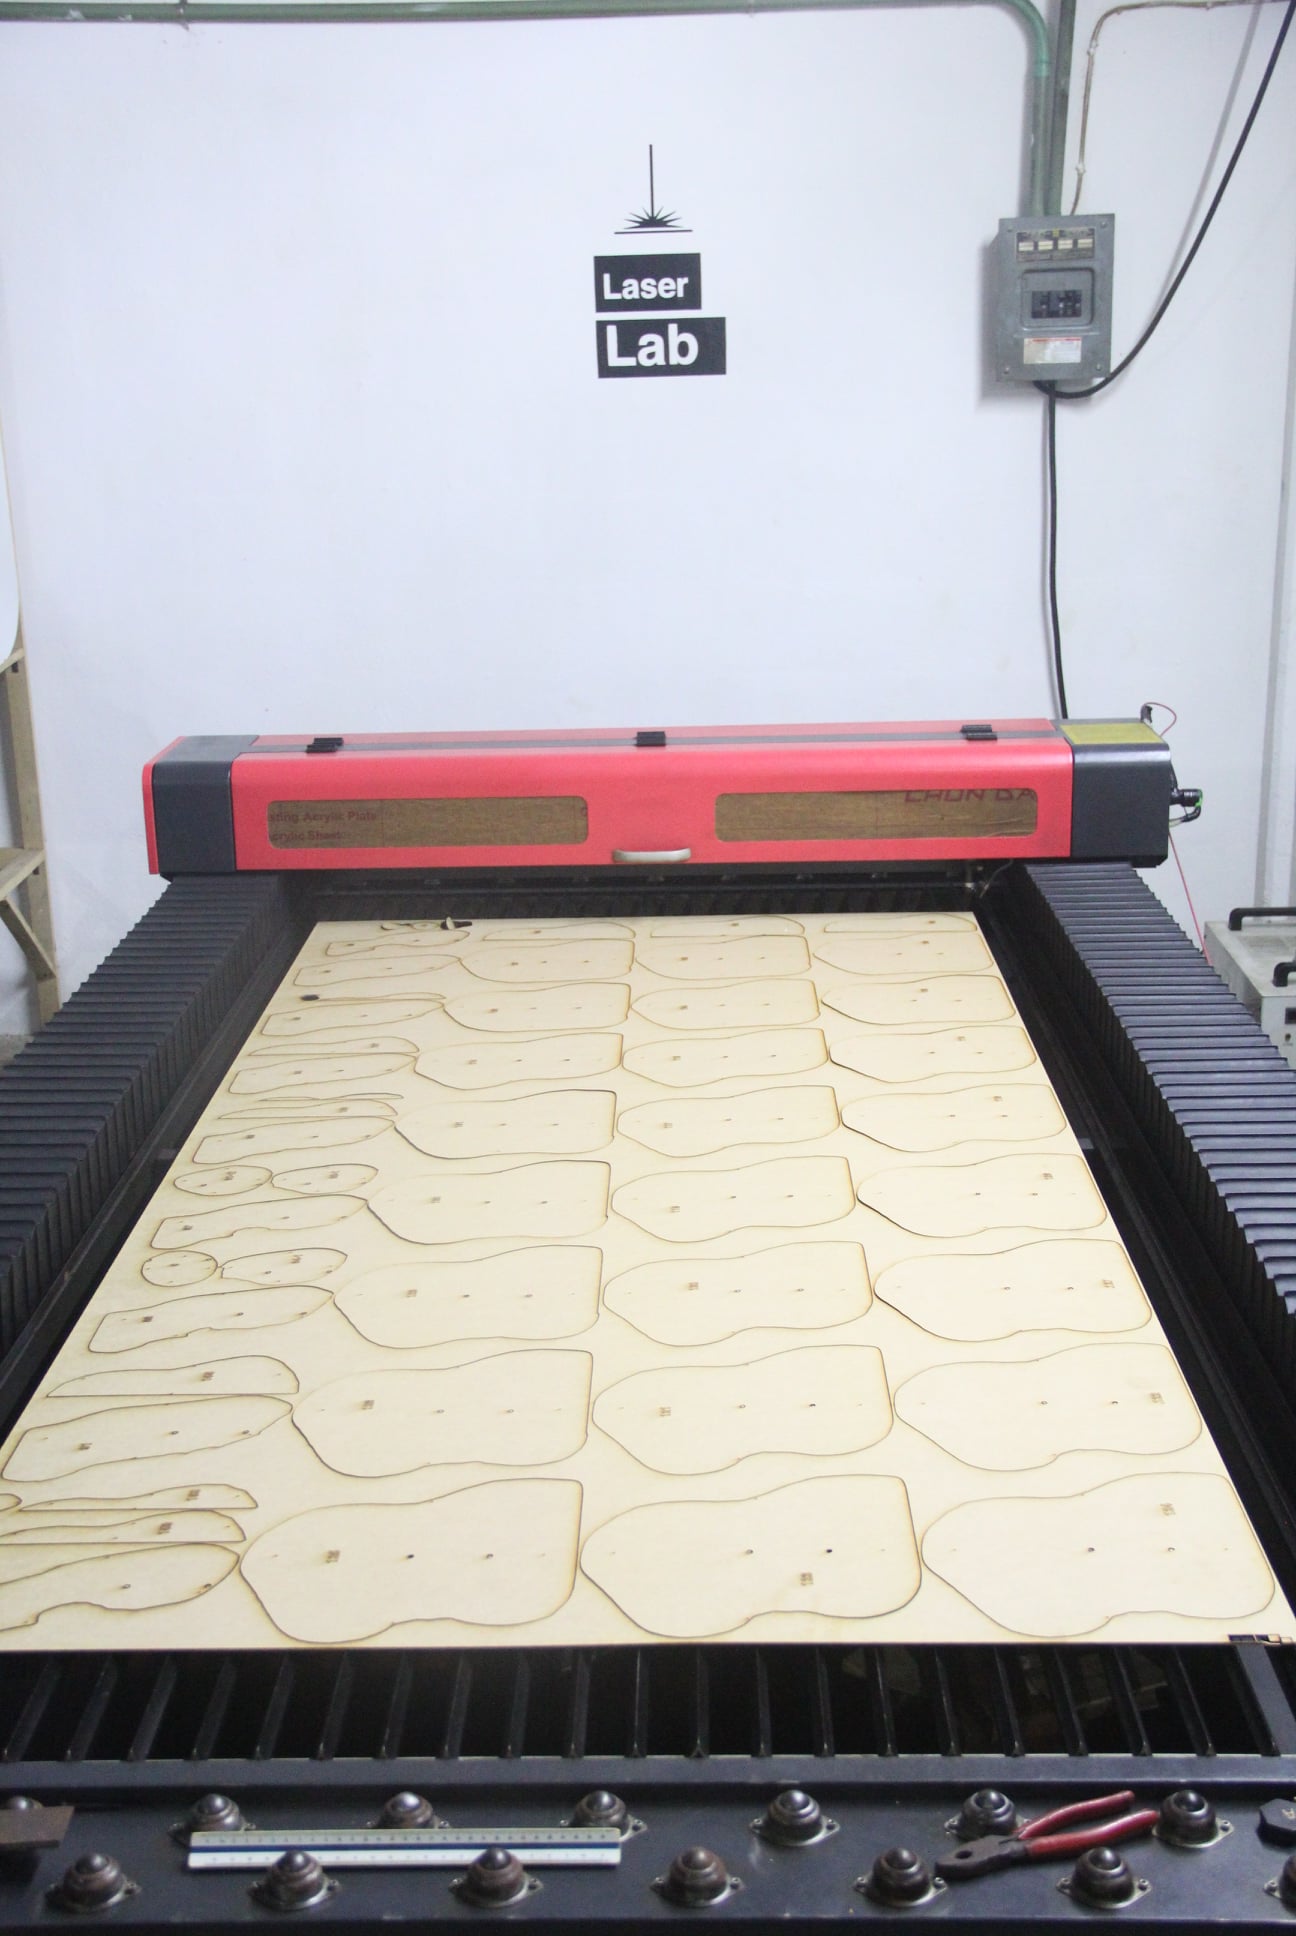
FABRICATION
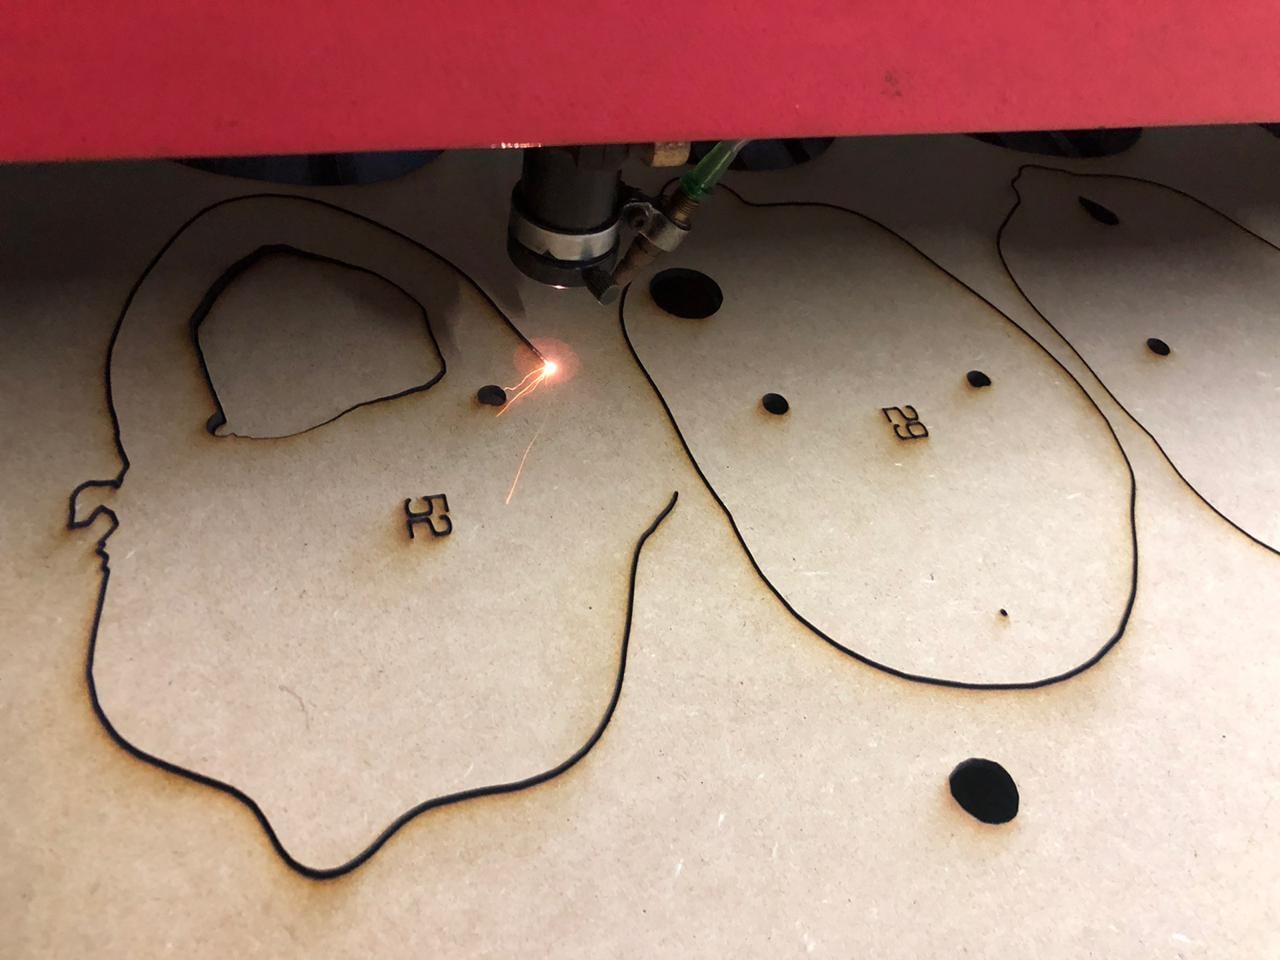
I present you our Laser cutter machine. Like I mentioned before, I suggest, that first thing you have to know your machine first. It is really important to know about the work space, so, for laser cutting your files, you will know how to accommodate your pieces or slices of your project.This one for example, is 1220mm x 2440mm
NOTE: When I finally finish to work in slicer, I opened in Rhinoceros to verify that everything it's ok, and I realized that, Slicer export the lines as shapes, I don't know why, but to fix this problem, I had to select everything from a top view of Rhinoceros 3D and writte "Make2D" comand and that's it. After, I only had to separate the lines for cutting or engraving.
Here, I have my files, As you can see, Slicer 360 arranged everything in 3 MDF boards. In this step, I made two important layers, Blue for engraving and Red for cutting, this is like a universal rule, is better to use this colors like this way, I learnt this since the first time I took a Lasercutter machine 10 years ago.
It is important to know that every machine hs their own software, and this software is not always Rhinoceros, every machine needs a gcode generator for moving their respective motors in the two axes. This is the software of our machine, RD WORKS, when i finished in Rhinoceros, I exported everything into a .dxf format, I imported the file and it detected automatically my two layers (Cutting and engraving).
Then, I had to select every layer to writte their settings. This is the parameters for 3MM MDF
- [Engraving] speed: 50 and power: 10-15
- [Cutting] speed: 10 and power: 40-45

When you finally go to the laser cutter to cut, make sure you first do the engraving lines, why?, because, if you start with the cutting lines, some of them will fall, it depends on the every laser cutter and their different sistems to hold the material, but in my case, I have to do this.
You have to consider that this parameter always change, depending on the material, wheater, machine problems, etc. For example for this time, there ir a lot of rain and a lot of humidity, so, here in the lab, we know that we have to increase the parameter for cutting MDF, because this material tend to be harder with the humidity.
FINAL RESULT
This is the final result, I LOVE IT. It is rare to see it from some perspectives but is nice and it was very very very helpful to put them the two metal rods, without them, I would have gone crazy. The assembly of the pieces was faster than I thought actually, it took memore time the laser cutter, but it works.
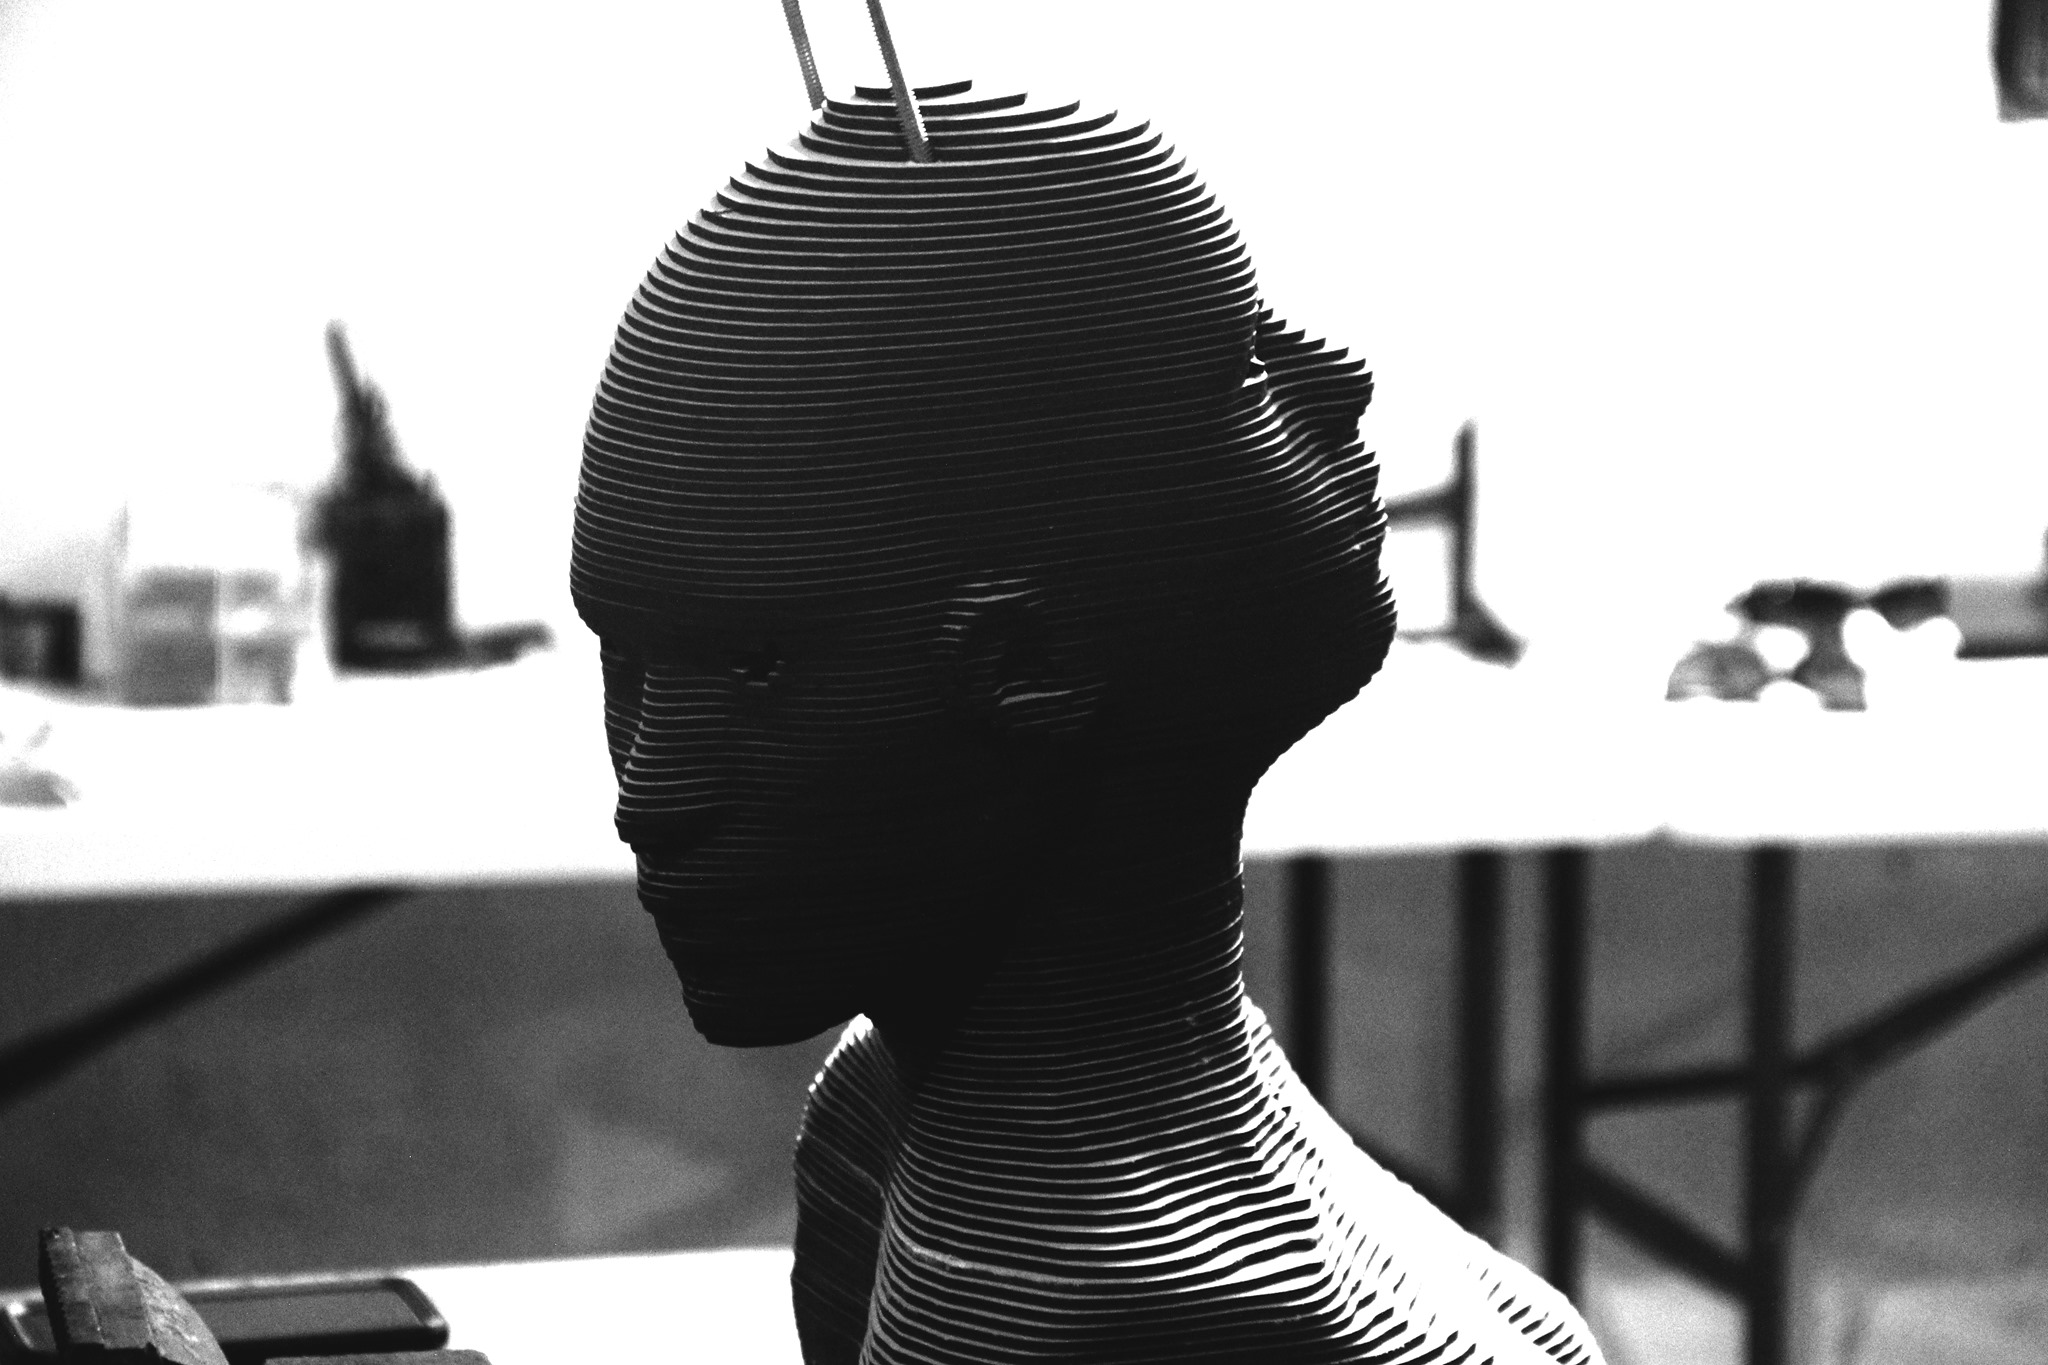
Here I Am, together with my team at 1am assembling all the part for my mannequin.
MASK A2
No mask for this assignment yet, because of the weather :(
LINKS
Here you can find the links where I will storage my information for the documentation of Fabricademy
- Rhinoceros For 3D modeling
- Meshmixer For reparing 3d models
- Slicer Fusion 360 For fabrication process
- MakeHuman For making human models in .obj files
- SVG NEST For laser cut files
Download files
NOTES
- Consider the unexpected weather Always consider the unexpected weather in your area for your times. Just in this week there was two hurricanes "Gamma" and "Delta", almost at the same time, this makes me lost a lot of time, practicly, I only had two days to work in this assignment, really stressfull
- Material properties I had 3 MDF boards but, thanks to the humidity that is in the enviroment because of the hurricane, i have to increase the parameters of my laser cutter, because with the normal ones, it didn't work. MDF tend to be harder when there is a lot of humidity, thats why that made me waste more time that i expected. #NerdAdF*CK hahahaha
- Angle of Stacked slices Be careful with the angle, I chose a little bit inclined and when I was assembling, I realized that it looks a bit rare.
NECESSARY MATERIALS FOR THIS ASSIGNMENT
| Qty | Description | Price | Link | Notes |
|---|---|---|---|---|
| 3 | 3 MM MDF | 21.00 $ | Local store | USD |
| 2 | 5 MM Rods | 02.00 $ | Local store | USD |
IMPORTANT INFORMATION ABOUT THE ASSIGNMENT
CLASS
Fabricademy 20-21 Week 2 Digital Bodies from Textile Academy on Vimeo.
LEARNING OUTCOMES
- References - Concept
- Design: 3D scanning , 3D file manipulation, mesh repair tools, explore 3D programs (open and closed sourced)
- Fabrication: Capable of executing from file to production workflow, from slicer to laser cutting
- Documentation: Anyone can go through the process and understand the project
- Final outcome: Is the project assembled, functioning and complete
- Originality - Aesthetics: Has the design been thought through and elaborated
STUDENT CHECKLIST
- [x]Include some inspiration: research on artists or projects that work with the human body
- [x]Document the use of 3D scanner and software to acquire a 3D model
- [x]Document the process of repairing and/or manipulating a 3D mesh and slicing it.
- [x]Create my ready to cut file for laser cutting, learn how to use the laser cutter and document the workflow and upload your 3D and 2D files
- [x]Learn about the fab lab processes, booking system, usage, machine demos, tools and safety rules
- [x]Build and/or assemble my mannequin, create a stop motion assembling it or stepped process
- [x]Send one picture (HIGH RES) of my mannequin to enter the competition for the annual exhibition (extra credit)