8. Wearables
Tuesday's Class
Fabricademy 2022-23 Week 8 - Wearables
Research
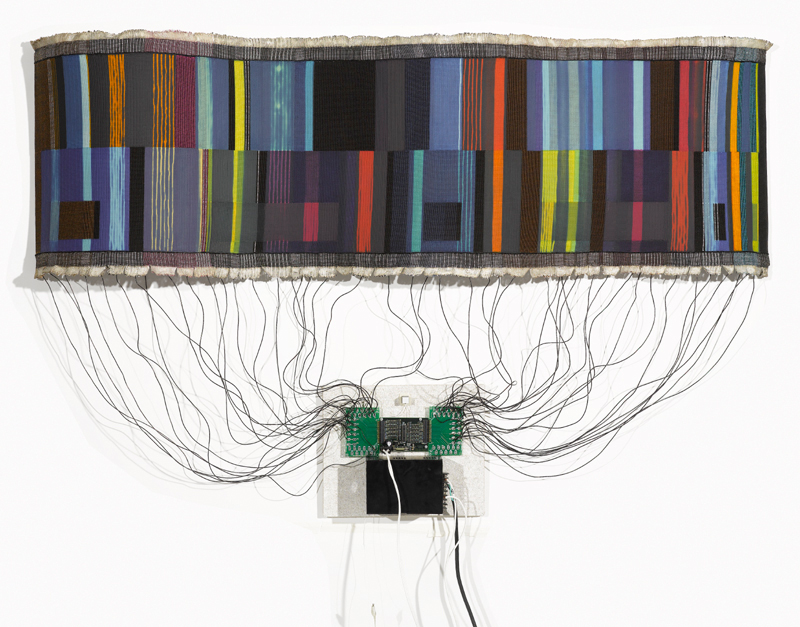
MAGGIE ORTH
100 Electronic Art Years, 2009
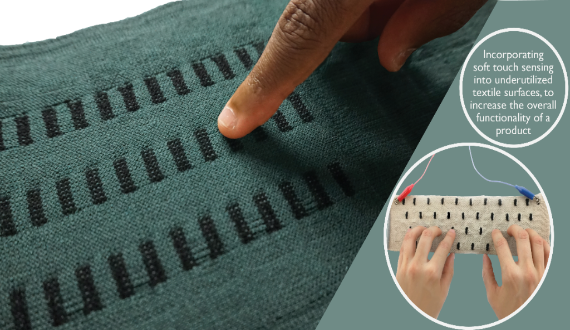
Drexel University - Cente for Functional Fabrics** CAPACITIVE TOUCH SENSORS
Inspiration
CLAIRE WILLIAMS
Broderies Sonores
The vibrations of sound
This project focuses on magnetic fields. The textile has as much a function of support as a function in the creation of the sound. It is the membrane of the loudspeaker.
The music emitted by these installations is very poetic. I find that this project crosses a hard science that is electromagnetism and a human science that is music.
PART 1 : SOUND
Setting up an electromagnetic field
Tools
- A coil of copper wire with an insulating varnish around the wire
- A transistor
- Micro controller arduino + high and low code with a short delay
- a 9V battery
- Alligator clips
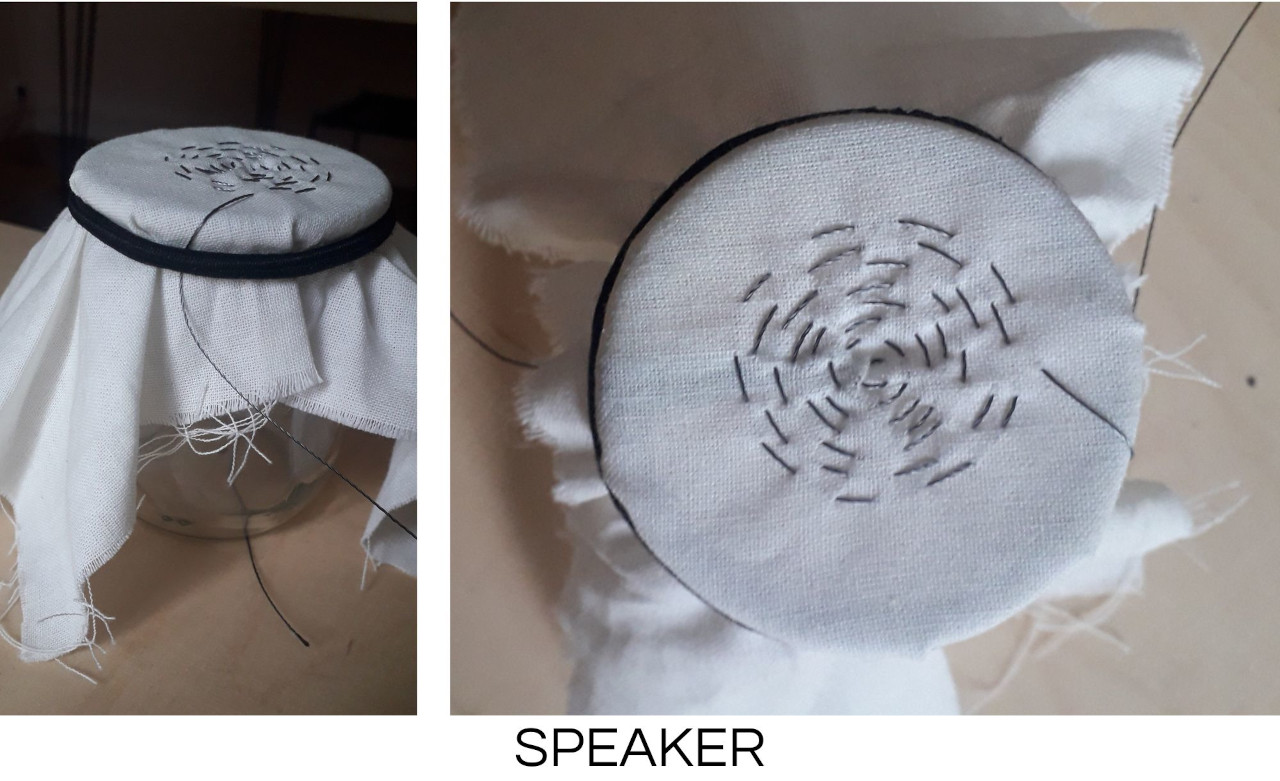
Creating a speaker on fabric
Every day I use headphones or a speaker to put sound in my apartment. But clearly, I just plug and play. But in fact, I clearly didn't know what was going on in my headphones. It was a bit like magic to me. But today, I understand the mechanism even if it is still impossible for me to visualize in my brain what is the current, the intensity or the voltage. My brain bugs every time I try to create an image. Let's leave this data aside and move on to creating a speaker.
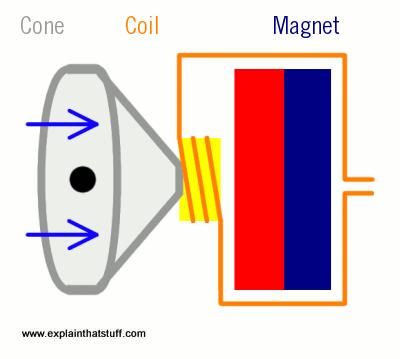
In a speaker, an alternating current flows through the coil. The magnet creates a magnetic field in contact with the electrified coil. This process causes the cone to vibrate. These vibrations form frequencies that reach our ears.
The composition of a speaker :
It is necessary to make a spiral of conductive wire with a resistance of 8hms. In search of 8hm with Laora and Amandine :
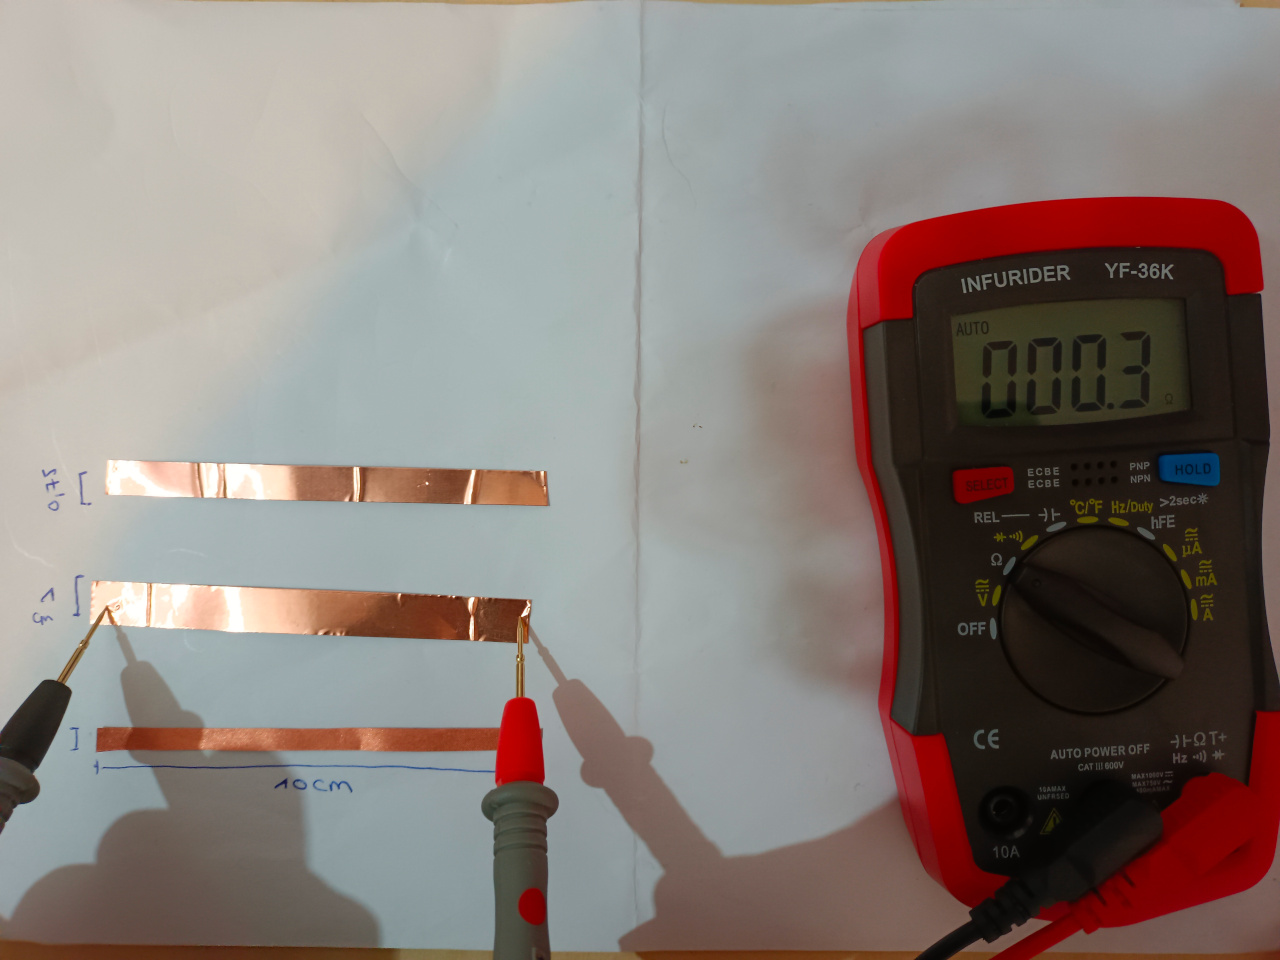
Why ? This question haunted us all week, why do you need 8 ohms.

The answer is that it is simply a choice that has been made in the industry. So it is possible to make a speaker with 17 ohms. We decided to stop our research and make it directly into a thread. The speaker I made did not work. To make it, I used an embroidery drum, and my fabric was very tight on the drum. I was trying to make a small circle, the spiral was pretty tight. When I pulled my fabric off the drum, the threads were touching. Because the thread I chose was not covered, the speaker would not work.
So I used Diane's that she had made two years ago :
Tools to make this speaker
- Piece of cotton fabric
- Conductive thread
- Hair elastic
- An empty, clean glass yogurt cup
- A little magic (or patience)
Creating a speaker with Jack
After making a speaker, I wanted to understand how a jack plug works so that I could eventually include it in a circuit with a speaker on textile and play music with my phone.
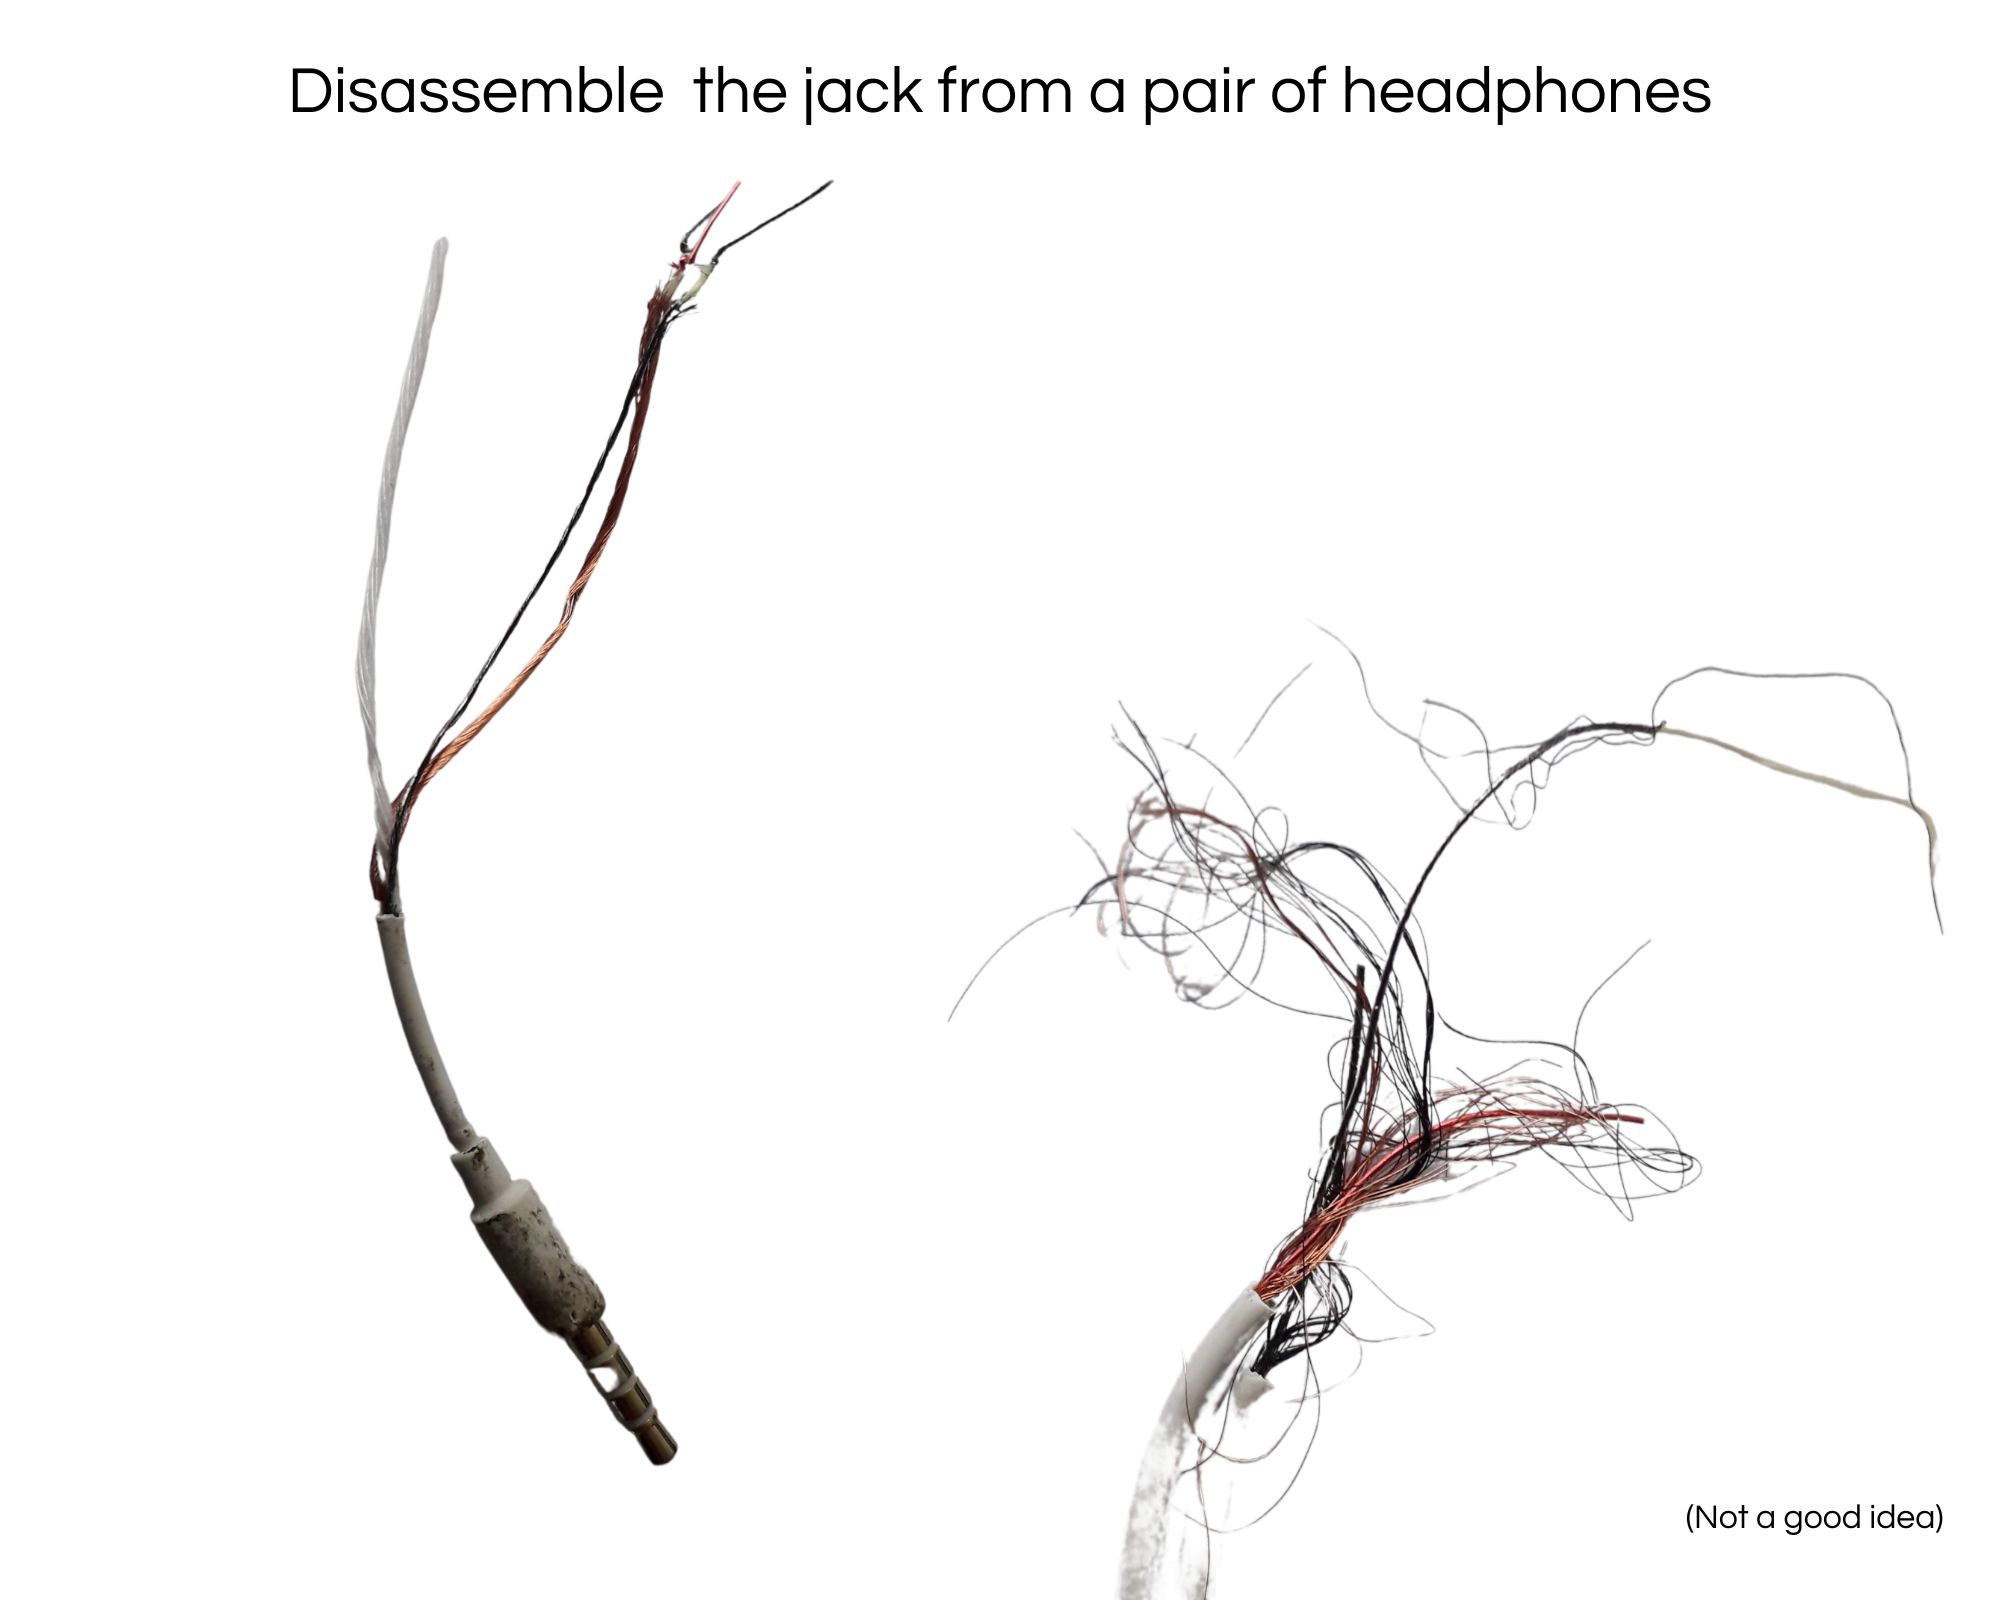
To understand a jack plug, I decided to use old headphones that no longer worked and contained a jack plug. This was not a very good idea.
The first thing I did was cut the cable to reveal the wires. Three wires appeared: a wool wire, a copper wire and a green wire (the picture below shows them).
I did well, I have my three wires: the VCC, the GND and the ground. So I tested the conductivity of these three wires. Nothing, the multimeter did not show anything. I still decided to connect a speaker, a battery and a phone. Nothing, no result. At that moment, I thought: what if the wires were wrapped in a sheath. So I peeled the wires (the picture below shows the bag of knots of peeled wires).
Then I tested the conductivity again. But nothing. The wire in the sheaths was very thin. Clearly, I didn't understand how a current could pass through such a thin wire. I stopped the experiment here, as I had already spent an hour and lost my patience. I turned to an already existing kit to assemble an amplifier and a jack.
Below are two pictures of my jack experience
Diane passed us a pouch containing an amplifier and some other components to add to a jack connection. Our goal with Camille and Berenice was to connect our phone to a fabric speaker. on.
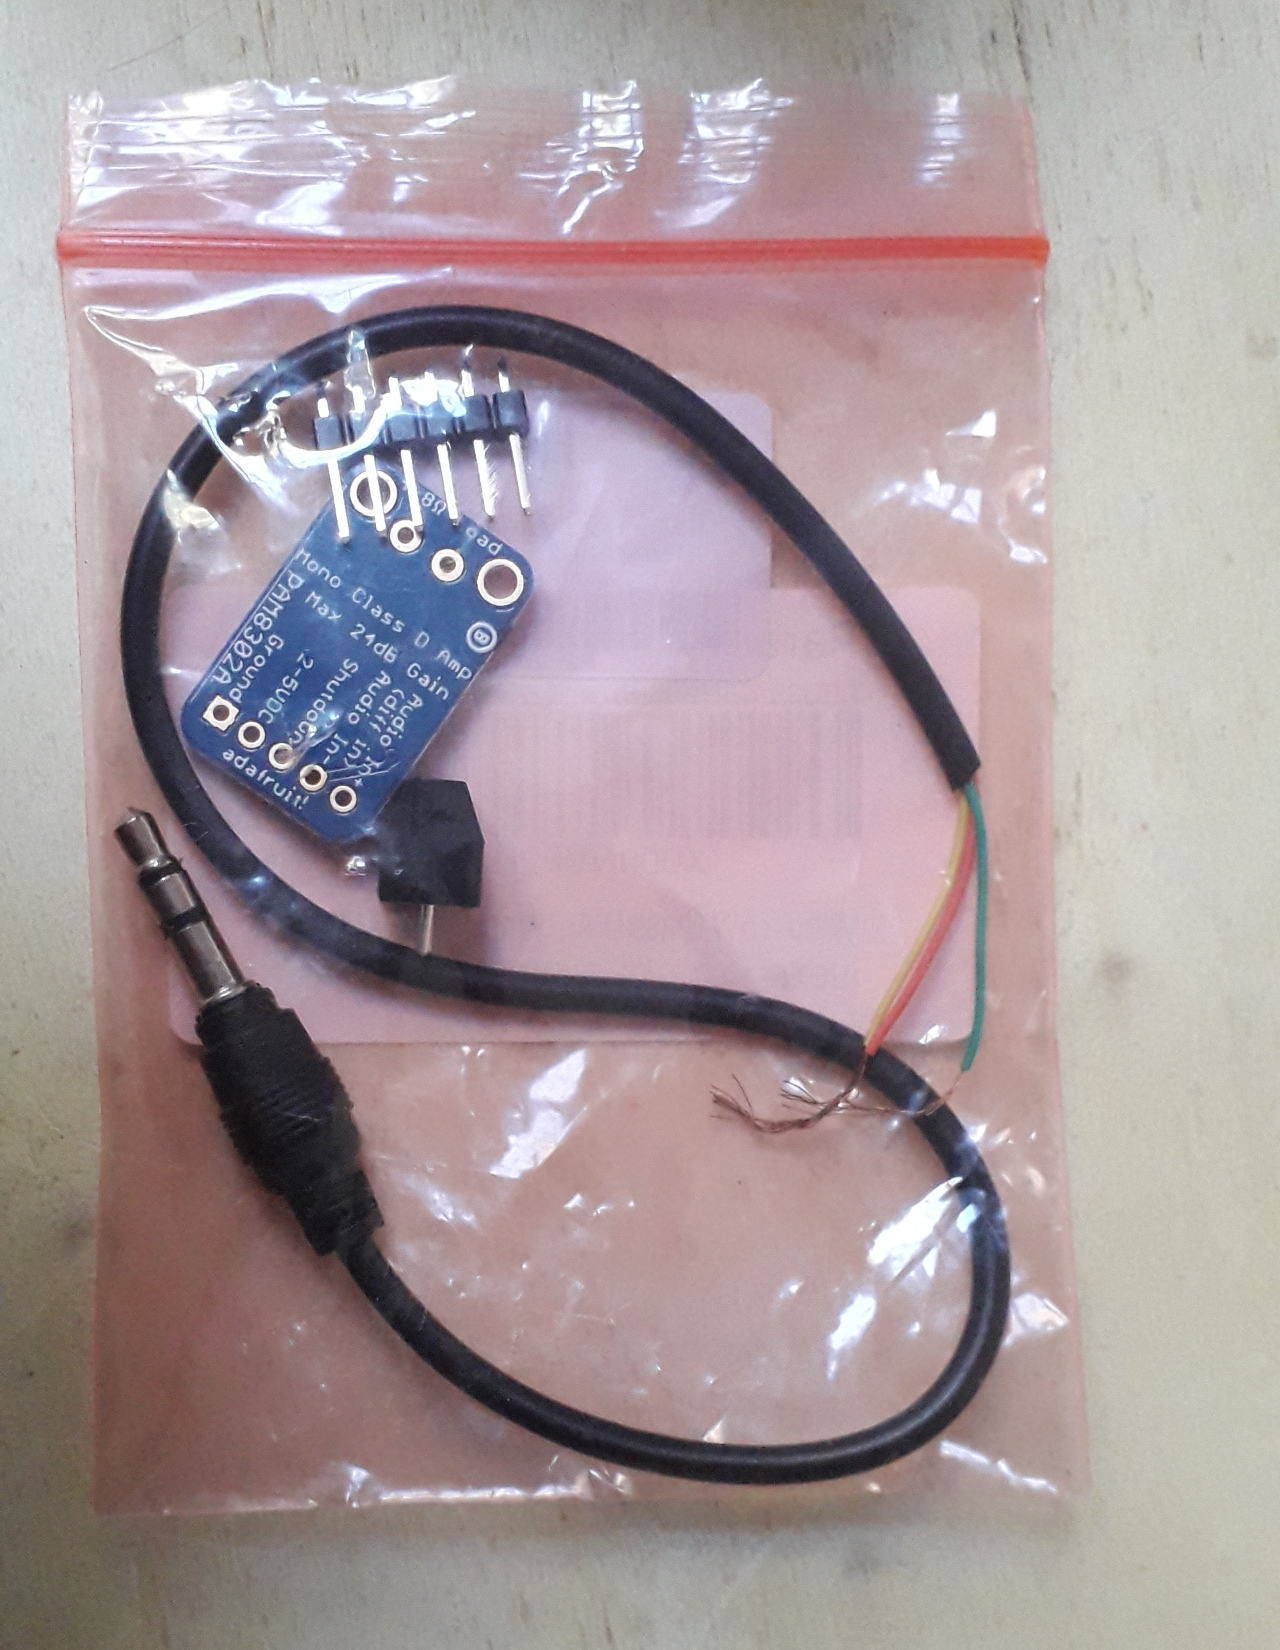
We followed the model of Lisa Spark and her tuto.
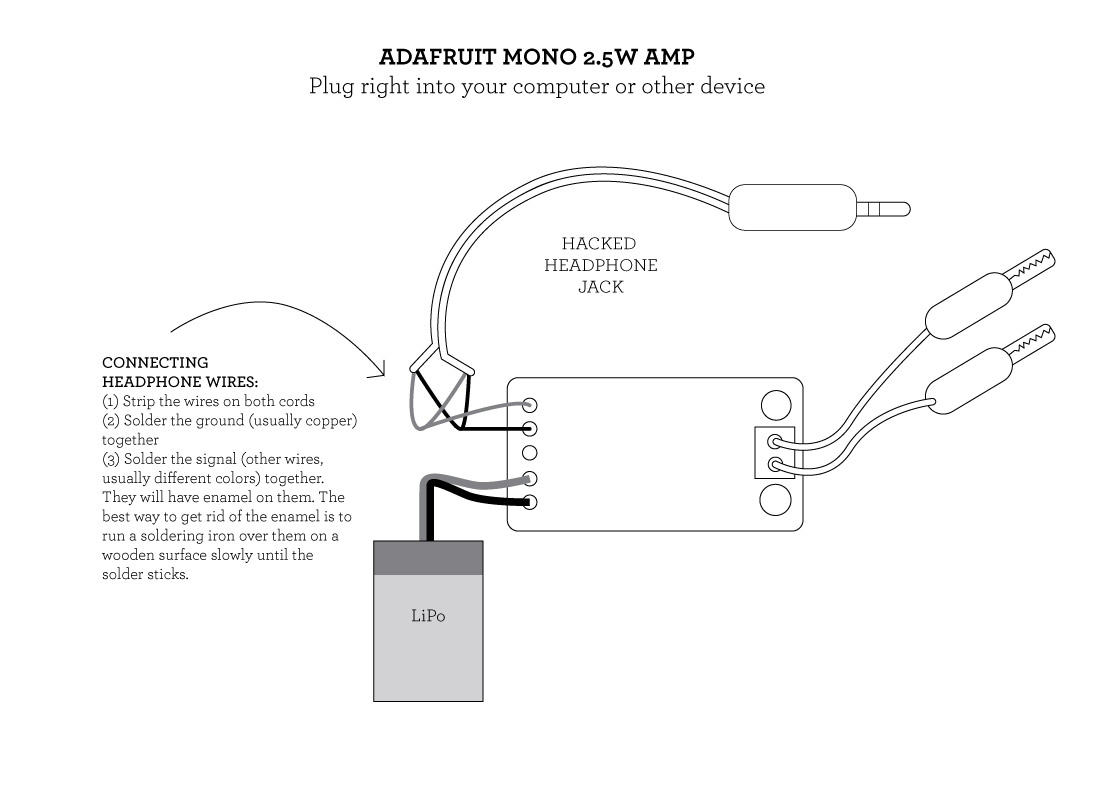
We did some soldering with a soldering station and tin wire. Precision was necessary, we had to repeat our soldering several times to succeed in forming beautiful little balls.
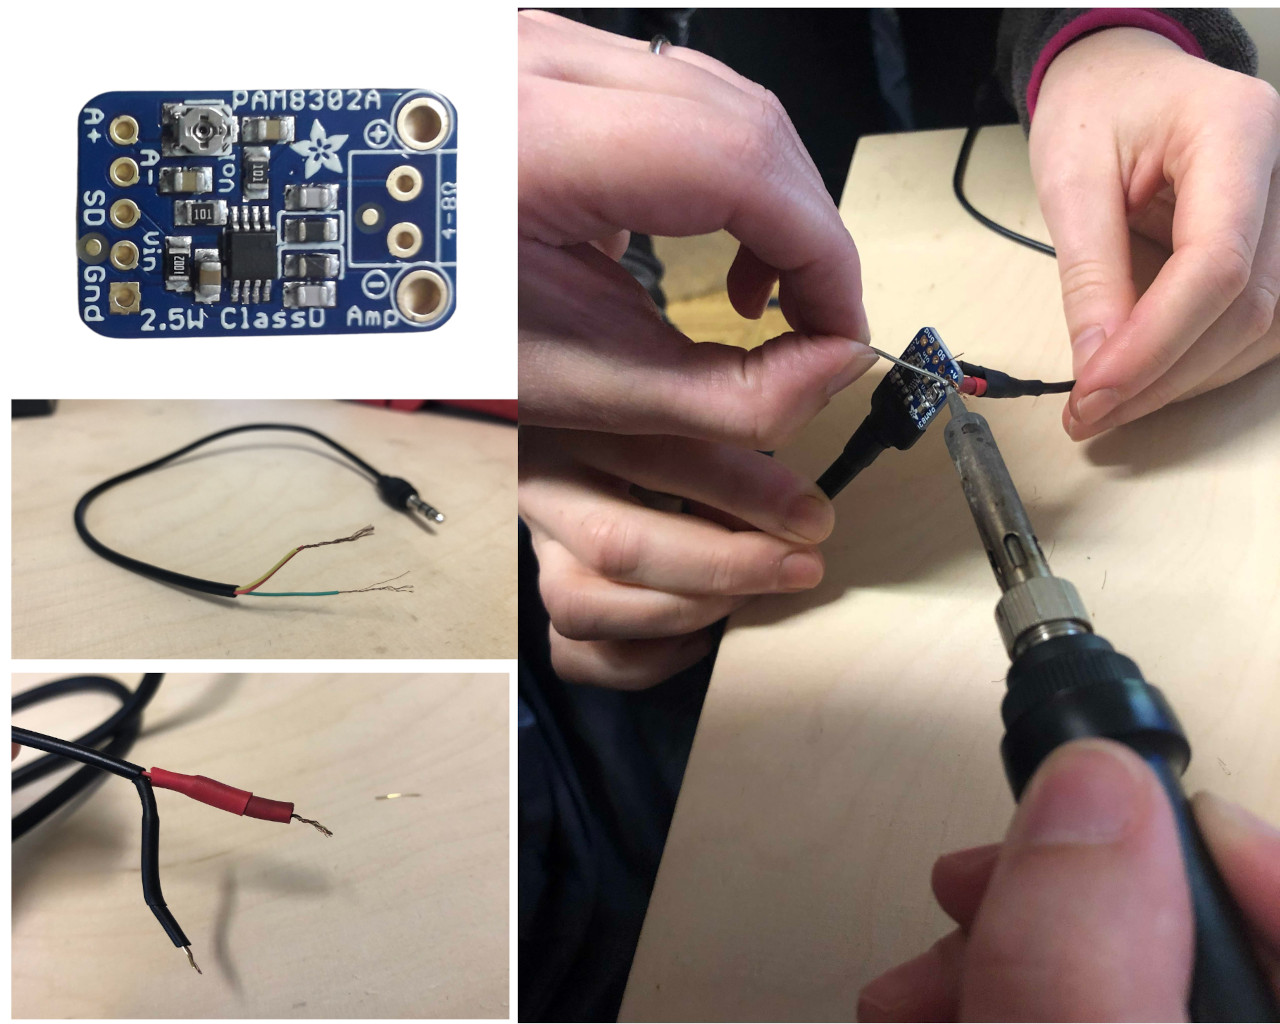
Here is the result :
After setting up the circuit, we experimented a lot in group. It was pretty fun.
Video by Camille
Video by Camille
Creating a speaker with Arduino 
To complete this project, our group needed a driver circuit to increase the voltage in our circuit.
Elaboration of a driver circuit (transitor)
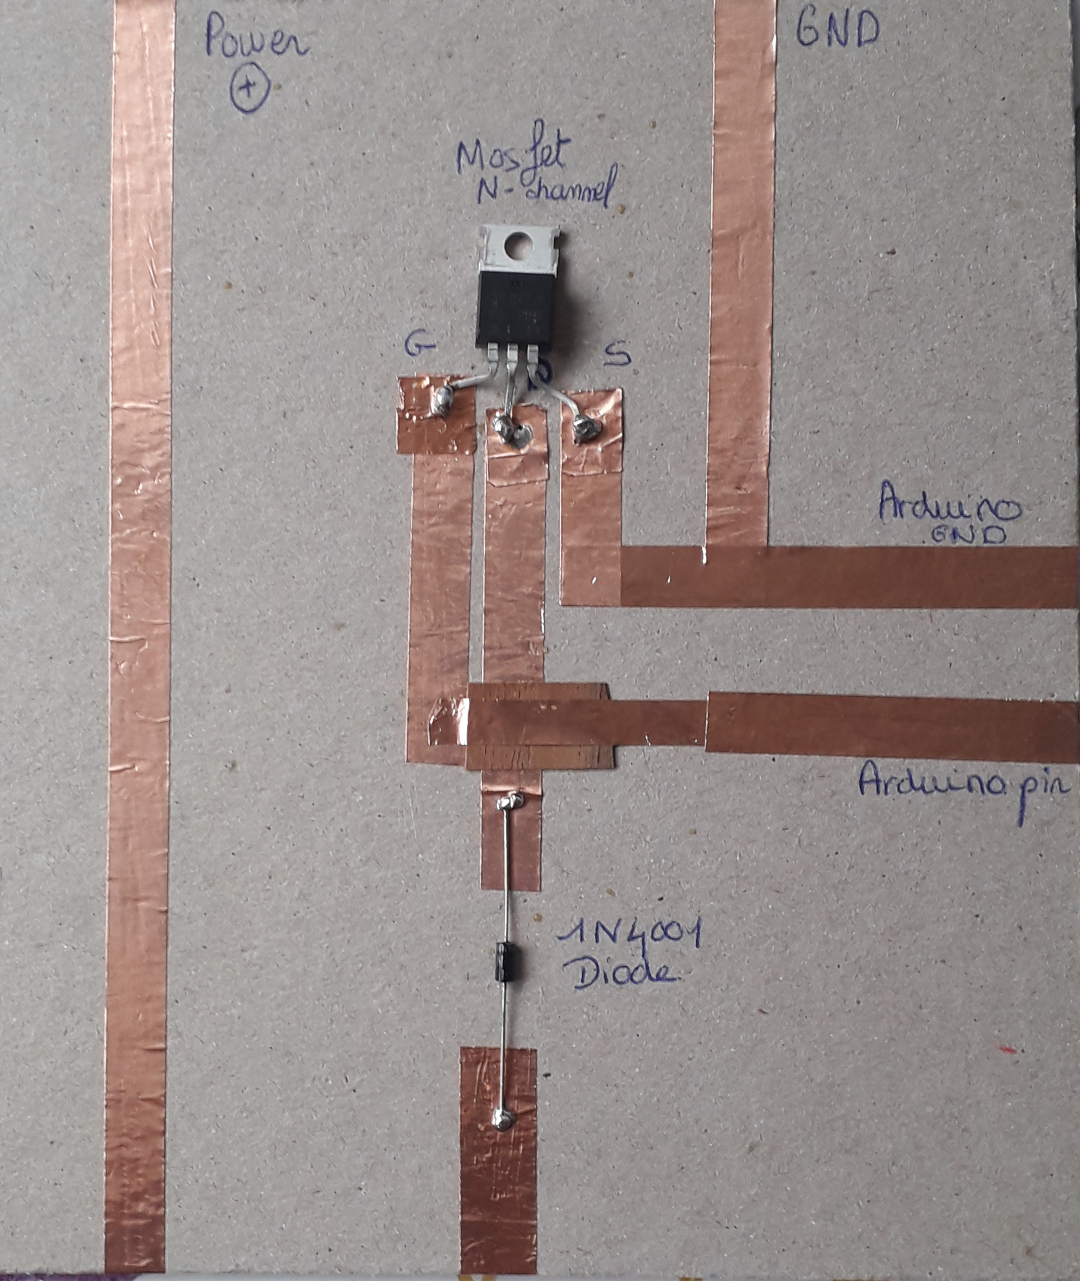
Tools
- Driver circuit
- Speaker
- Magnets
- Alligator threads
- Arduino
- Code
Setting up the circuit
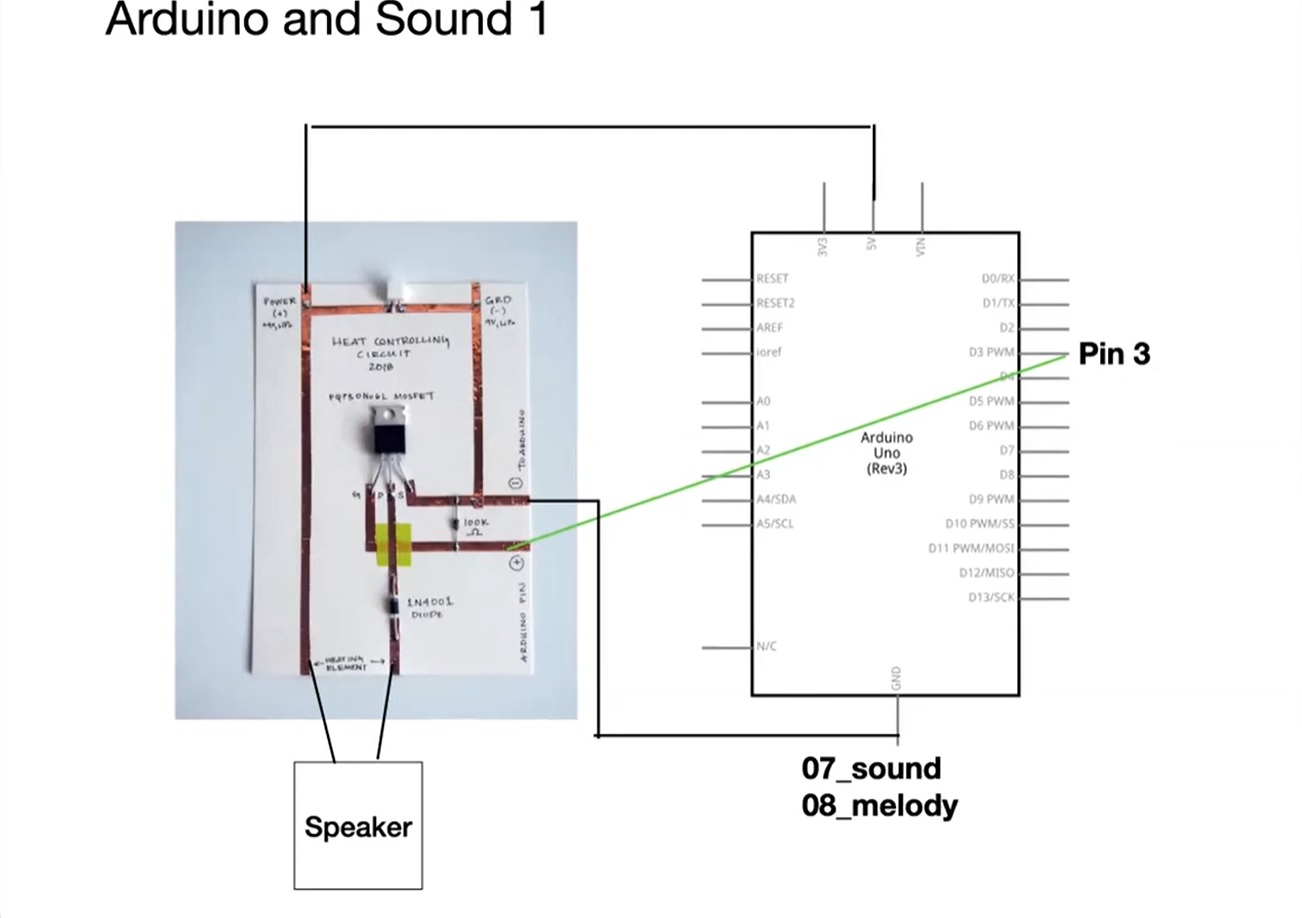
Result
I used the code that Emma gave us in class : Starwars v1
Coding exploration
I changed the tempo parameter to 1200 instead of 120.
It sounds like a phone ringing, so strange.
Code :
#define NOTE_B0  31
#define NOTE_C1  33
#define NOTE_CS1 35
#define NOTE_D1  37
#define NOTE_DS1 39
#define NOTE_E1  41
#define NOTE_F1  44
#define NOTE_FS1 46
#define NOTE_G1  49
#define NOTE_GS1 52
#define NOTE_A1  55
#define NOTE_AS1 58
#define NOTE_B1  62
#define NOTE_C2  65
#define NOTE_CS2 69
#define NOTE_D2  73
#define NOTE_DS2 78
#define NOTE_E2  82
#define NOTE_F2  87
#define NOTE_FS2 93
#define NOTE_G2  98
#define NOTE_GS2 104
#define NOTE_A2  110
#define NOTE_AS2 117
#define NOTE_B2  123
#define NOTE_C3  131
#define NOTE_CS3 139
#define NOTE_D3  147
#define NOTE_DS3 156
#define NOTE_E3  165
#define NOTE_F3  175
#define NOTE_FS3 185
#define NOTE_G3  196
#define NOTE_GS3 208
#define NOTE_A3  220
#define NOTE_AS3 233
#define NOTE_B3  247
#define NOTE_C4  262
#define NOTE_CS4 277
#define NOTE_D4  294
#define NOTE_DS4 311
#define NOTE_E4  330
#define NOTE_F4  349
#define NOTE_FS4 370
#define NOTE_G4  392
#define NOTE_GS4 415
#define NOTE_A4  440
#define NOTE_AS4 466
#define NOTE_B4  494
#define NOTE_C5  523
#define NOTE_CS5 554
#define NOTE_D5  587
#define NOTE_DS5 622
#define NOTE_E5  659
#define NOTE_F5  698
#define NOTE_FS5 740
#define NOTE_G5  784
#define NOTE_GS5 831
#define NOTE_A5  880
#define NOTE_AS5 932
#define NOTE_B5  988
#define NOTE_C6  1047
#define NOTE_CS6 1109
#define NOTE_D6  1175
#define NOTE_DS6 1245
#define NOTE_E6  1319
#define NOTE_F6  1397
#define NOTE_FS6 1480
#define NOTE_G6  1568
#define NOTE_GS6 1661
#define NOTE_A6  1760
#define NOTE_AS6 1865
#define NOTE_B6  1976
#define NOTE_C7  2093
#define NOTE_CS7 2217
#define NOTE_D7  2349
#define NOTE_DS7 2489
#define NOTE_E7  2637
#define NOTE_F7  2794
#define NOTE_FS7 2960
#define NOTE_G7  3136
#define NOTE_GS7 3322
#define NOTE_A7  3520
#define NOTE_AS7 3729
#define NOTE_B7  3951
#define NOTE_C8  4186
#define NOTE_CS8 4435
#define NOTE_D8  4699
#define NOTE_DS8 4978
#define REST      0

int tempo = 1200;
int buzzer = 3;
int melody[] = {

  NOTE_A4,-4, NOTE_A4,-4, NOTE_A4,16, NOTE_A4,16, NOTE_A4,16, NOTE_A4,16, NOTE_F4,8, REST,8,
  NOTE_A4,-4, NOTE_A4,-4, NOTE_A4,16, NOTE_A4,16, NOTE_A4,16, NOTE_A4,16, NOTE_F4,8, REST,8,
  NOTE_A4,4, NOTE_A4,4, NOTE_A4,4, NOTE_F4,-8, NOTE_C5,16,

  NOTE_A4,4, NOTE_F4,-8, NOTE_C5,16, NOTE_A4,2,//4
  NOTE_E5,4, NOTE_E5,4, NOTE_E5,4, NOTE_F5,-8, NOTE_C5,16,
  NOTE_A4,4, NOTE_F4,-8, NOTE_C5,16, NOTE_A4,2,

  NOTE_A5,4, NOTE_A4,-8, NOTE_A4,16, NOTE_A5,4, NOTE_GS5,-8, NOTE_G5,16, //7
  NOTE_DS5,16, NOTE_D5,16, NOTE_DS5,8, REST,8, NOTE_A4,8, NOTE_DS5,4, NOTE_D5,-8, NOTE_CS5,16,

  NOTE_C5,16, NOTE_B4,16, NOTE_C5,16, REST,8, NOTE_F4,8, NOTE_GS4,4, NOTE_F4,-8, NOTE_A4,-16,//9
  NOTE_C5,4, NOTE_A4,-8, NOTE_C5,16, NOTE_E5,2,

  NOTE_A5,4, NOTE_A4,-8, NOTE_A4,16, NOTE_A5,4, NOTE_GS5,-8, NOTE_G5,16, //7
  NOTE_DS5,16, NOTE_D5,16, NOTE_DS5,8, REST,8, NOTE_A4,8, NOTE_DS5,4, NOTE_D5,-8, NOTE_CS5,16,

  NOTE_C5,16, NOTE_B4,16, NOTE_C5,16, REST,8, NOTE_F4,8, NOTE_GS4,4, NOTE_F4,-8, NOTE_A4,-16,//9
  NOTE_A4,4, NOTE_F4,-8, NOTE_C5,16, NOTE_A4,2,

};
int notes = sizeof(melody) / sizeof(melody[0]) / 2;
int wholenote = (60000 * 4) / tempo;
int divider = 0, noteDuration = 0;
void setup() {
  for (int thisNote = 0; thisNote < notes * 2; thisNote = thisNote + 2) {

    divider = melody[thisNote + 1];
    if (divider > 0) {
      noteDuration = (wholenote) / divider;
    } else if (divider < 0) {
      noteDuration = (wholenote) / abs(divider);
      noteDuration *= 1.5; // increases the duration in half for dotted notes
    }
  }
}
void loop() {
}
PART 2 : LIGHT
Research & Inspiration
IGA WEGLINSKA
This designer explores the function of garment. In this creation, she has included stress sensors that highlight body sensations. This wearable project mixes technology and psychology. The body is thus approached as forms and as sensors. I particularly like this project, because it makes visible invisible data. The garment, this body envelope, is given a new function in direct link with the body, which without it the garment would not exist.
Article : Iga Węglińska's Emotional Clothing responds to the wearer's stress levels (dezeen.com)
YING GAO
This designer creates garments collections that interact with their environment. The video below presents a dresses project that activates with the viewer's gaze. The clothing becomes almost alive with the help of sensors, which animate these dresses. This designer questions the garment and the machine, and the environment (around the garment) has a large place in her creations.
Interview : Interview Montreal Museum of Fine Arts: Clothing or machine?
Article : Ying Gao's Flowing Water, Standing Time dresses react to colours
Circuit
To work on the neopixels, I used a sample that was made last year. This sample is composed of 4 neopixels. They are connected between them from IN to OUT and ends connected to the circuit.Before starting, we had to install the Adafruit library.
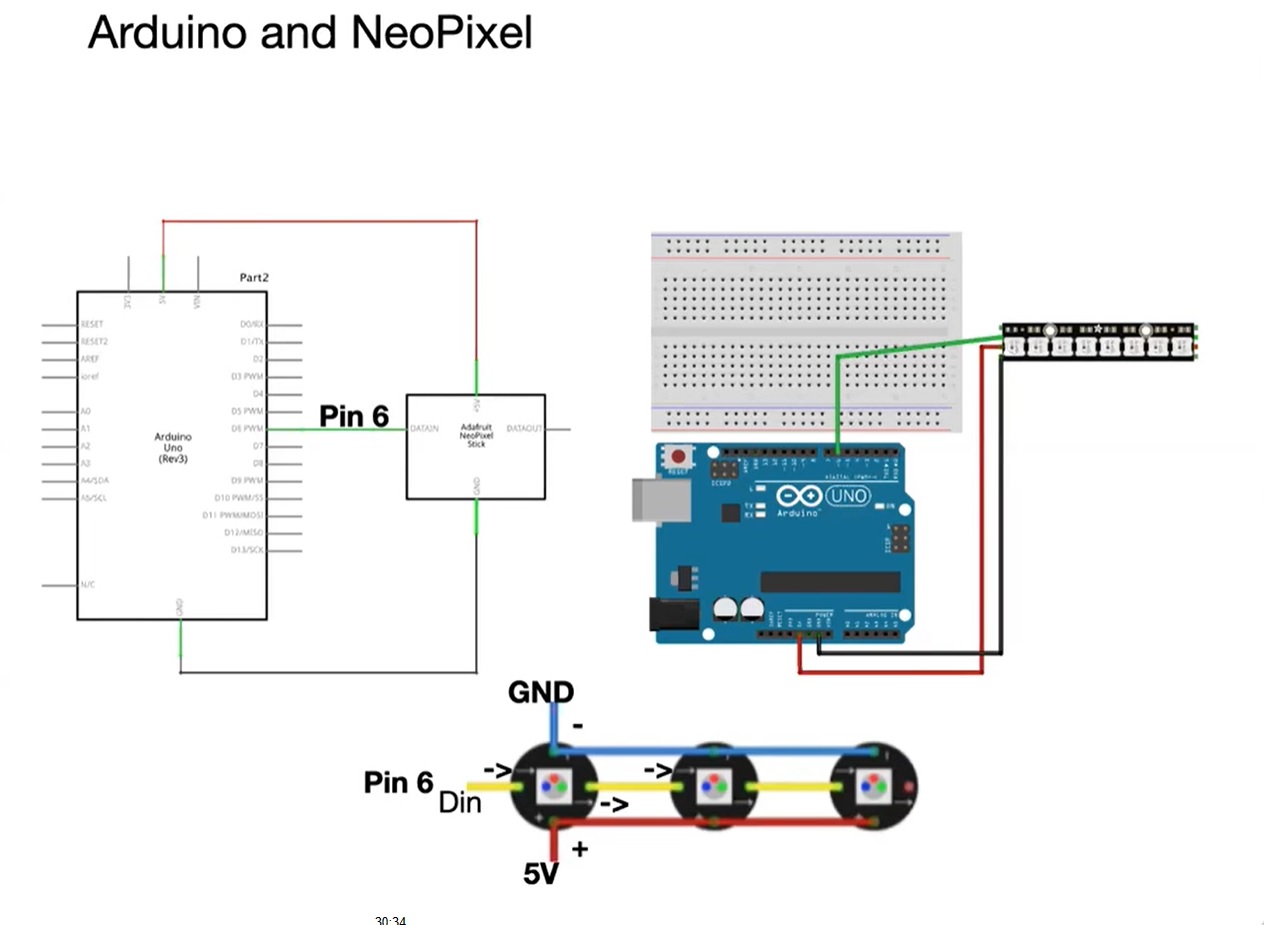
![]()
Code
The code I used for this exercise is the one proposed by Emma Pareschi during the class called Wipe.
#include <Adafruit_NeoPixel.h>
#define LED_PIN    6
#define LED_COUNT 4

Adafruit_NeoPixel strip(LED_COUNT, LED_PIN, NEO_GRB + NEO_KHZ800);

void setup() {
  strip.begin();
  strip.show();
  strip.setBrightness(50);
}

void loop() {
  colorWipe(strip.Color(255,   0,   0), 50); // Red
  colorWipe(strip.Color(  0, 255,   0), 50); // Green
  colorWipe(strip.Color(  0,   0, 255), 50); // Blue
  colorWipe(strip.Color(0,   0,   0), 50); // Off
}

void colorWipe(uint32_t color, int wait) {
  for(int i=0; i<strip.numPixels(); i++) {
    strip.setPixelColor(i, color);
    strip.show();
    delay(wait);
  }
}