8. Wearables
 Picture: Fabric Speaker in Reggae Colors
I have to admit once again that the electronics is the most challenging part of Fabricademy to me. I've put it on the backburner a little bit, to focus on my project finals, but I'm not giving up!
In these past weeks I've done a rerun of as many possible videos done by Emma Pareschi and Liza Stark over the years of Fabricademy. Something I can advice anyone doing Fabricademy, do not just focus on the lectures and tutorials from your study year but look into previous years as well. This has refreshed my memory and given me additional insight. Things I've missed before I've been able to pick up on. This is my main resource. More about this in the research header.
I've also revisited my initial idea for wearable electronics and decided to do more of a step by step approach. Regarding the availability of electronic components: many components have not been easy to buy locally. Getting these online or through my IoT network has been a life saver.
The Assignment
Learning outcomes
-
Research skills: the participant has acquired knowledge through references and Concept development
-
Design skills: the participant has learnt by programming a microcontroller, design a circuit and schematic
-
Fabrication skills: the participant acquired skills necessary to integrate inputs and outputs in a microcontroller wearable project
-
Process skills: Anyone can go through the process, understand it and reproduce it
-
Final outcome: Assembled project, functioning and complete
-
Originality: Has the design been thought through and elaborated?
Student checklist
-
Document the concept, sketches, references also to artistic and scientific publications
-
Create a swatch/sample using an ATTiny/Arduino/Adafruit with one input and one output, using hard-soft connection solutions and battery
-
Create 2 actuator swatches and test them with the Arduino or ATTiny, chosing from examples such as:
-
motors / mini vibration
- leds / neopixels
- flip dot / electromagnet
- heat pad / with thermochromic coating
- speaker / mp3 player
- SMA (shape memory alloy)
- Learn how to program an Arduino/ATTiny/Adrafruit, documenting your process, the libraries added, power requirements and source code
- Document the schematic and circuit
- Upload a small video of your object working
- Integrate it to a project (extra credit)
Research, References & Inspiration
I spend most of the research on the technology. I enjoy the design side of wearables alot more but like I explained earlier, grasping the technology especially the making of it, is very challenging for me.
Fabricademy tutorials and resources
In the introduction I already referenced the Fabricademy tutorials and lectures from Emma Pareschi en Liza Stark. Most can be found here: Fabricademy Electronics Tutorials
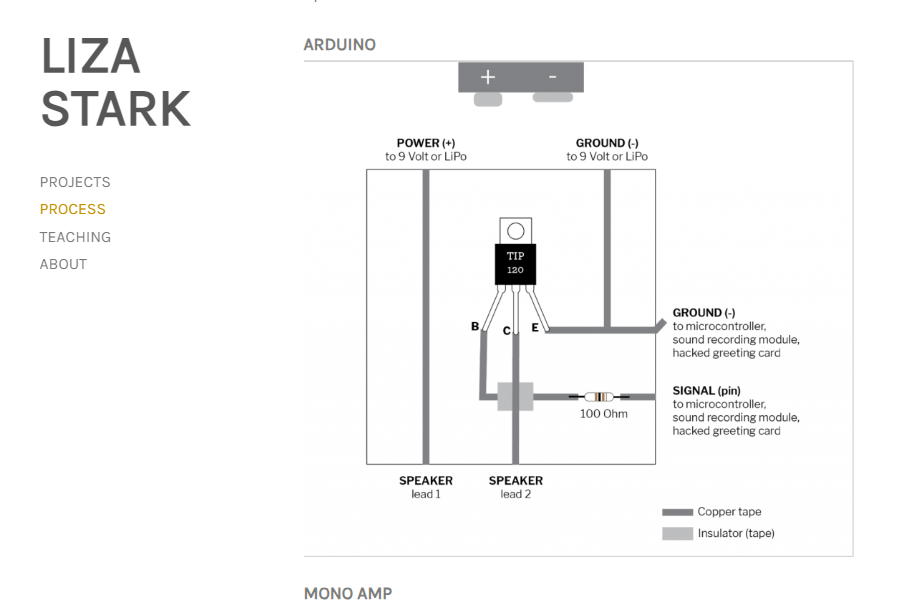
In addition the page of Liza Stark is very insightful: Liza Stark page I learned alot from the links to other tutorials and educational resources Liza shared on her page.
More online sources:
Adafruit including the youtube channel Ada Industries on Youtube. Lady Ada makes everything look easy (But it's not!)
Also: to identify a board or component, since I get lost in the forest alot! I make a picture and upload it to Google Search by Image. Even the smallest diode would be identified. There are probably more apps for this.
To teach children and beginners about electronics basics including wearables I found this resource that shares ebook tutorials. STEM and electronics educational website Wearables circuits projects
Information about FREENOVE (Made in Shenzhen, China) an electronics starterkit compatible with Arduino and Adafruit:
FREENOVE
freenove starterkit
Calculating the dimensions and effects of a coil speaker - Flat spiral coil inductor calculator
Inspiration from FABRICADEMY alumni:
Pauline Bianchi She designed with bioplastic from earlier assignment. I liked the natural biological effect of her project.
Nuria Robles Nuria, my remote coach Nuria Robles made a cool remote control/ Gaming controle pillow when she did her electronics assignment, where an object on the computer screen made the same movement the pillow made.
Lights inside Purse by Ana Maria Lopez
From Ana Maria Martin Lopez I've seen two inspiring wearables and e-textile designs: A bag every woman needs: when you open it there is light inside so you can find your key or whatever is lost in that universe of the Purse. Also, a dress that responds to someone blowing on the sensor. Very cool. I would wear it!
Research on Wearable tech design
Apart from all the fascinating examples in Liza Stark her lectures on wearable (fashion) tech, I came across these fascinating designs:
This one is on pinterest:
Iris Van Herpen Infinity Dress in collaboration with kinetic sculpture Anthony Howe presented in Paris haute couture week in 2019. The dress took 4 months to construct. Even the timeline is amazing to me!
The electronic ballet shoes by Lesia Trubat E-traces is the first fashion design wearable tech I read about. I can't believe it's 10 years ago! Still amazing.
E-TRACES, memories of dance from Lesia Trubat on Vimeo.
Wearable solar by Pauline Van Dongen 2013
Solar dress Pauline van Dongen
This dress and coat have solar panels and a battery integrated in them. In full sun they can charge a smartphone for 50%. This is more than 10 years ago, so I recon there must be alot of efficiency improvements by now.
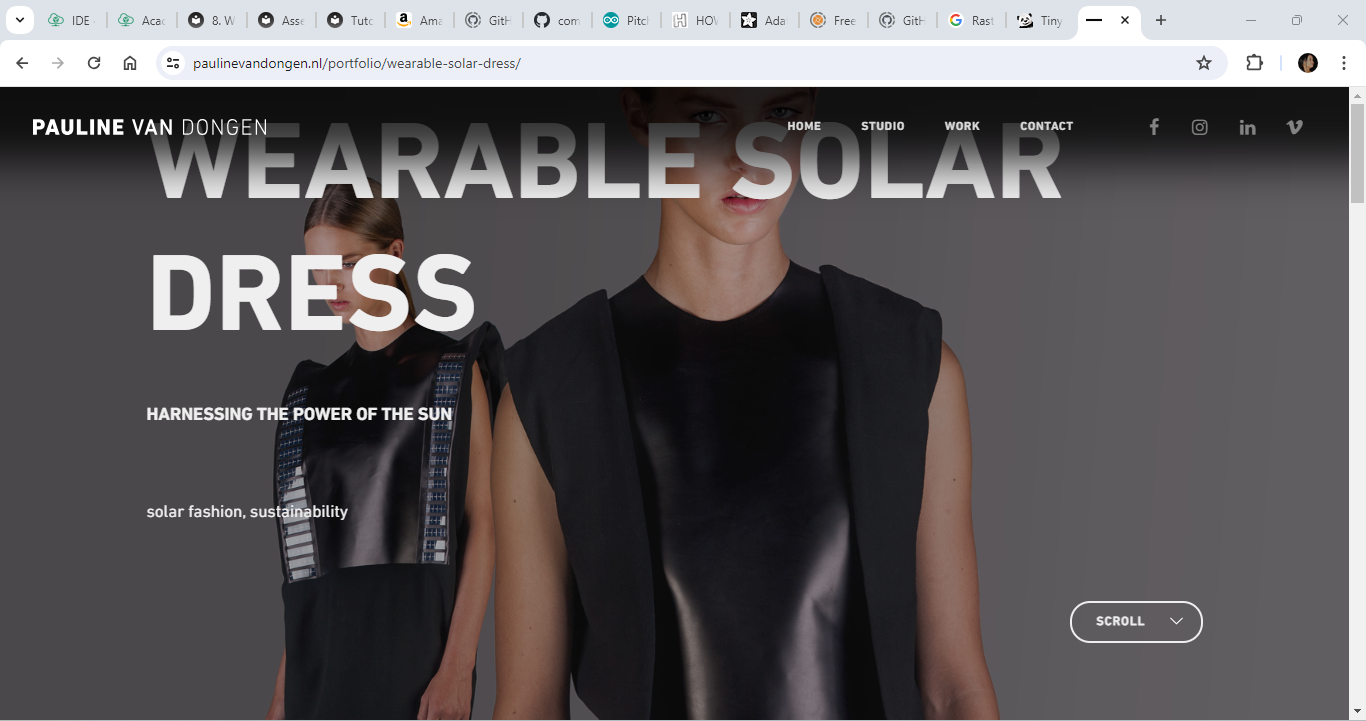
This article gives an overview of all the applications of wearable solar technology Article on wearable solar tech
Wearable tech and the Amazon rainforest
Wearable solar technology is definetly an application that is needed in the Amazone rainforest. Digital technology and the Amazon Rainforest have primarily focused on general Connectivity, GPS tracking and wildlife monitoring. The role of Artificial Intelligence is growing as well.
I couldn't find alot of information on wearable tech and the Amazon Rainforest so I Chat GTP'd 'wearable technology for the amazon rainforest'.
ChatGPT on wearables for the rainforest
Wearable technology for the Amazon rainforest would need to address the unique challenges of the environment while providing benefits to those who live there or work in conservation efforts. Here are some ideas:
- Environmental Monitoring Devices: Wearable sensors could monitor air quality, temperature, humidity, and pollution levels. This data could be valuable for researchers studying the effects of deforestation, climate change, and human activity on the rainforest ecosystem.
- GPS Tracking: GPS-enabled wearables could help researchers and conservationists track animal movements, monitor illegal logging or poaching activities, and map out biodiversity hotspots.
- Health Monitoring: Wearable devices could monitor the health of indigenous communities living in the rainforest, tracking vital signs, detecting diseases early, and providing alerts for potential health issues.
- Language Translation: Since there are many indigenous languages spoken in the Amazon, wearable devices with real-time translation capabilities could facilitate communication between different groups, aid in education efforts, and improve access to healthcare services.
- Solar-Powered Wearables: Given the limited access to electricity in remote areas of the rainforest, wearable devices with solar-powered batteries could ensure continuous functionality without relying on external power sources.
- Emergency Response Systems: Wearable devices equipped with SOS buttons or automatic distress signals could help individuals in distress alert authorities or receive assistance during emergencies such as accidents, injuries, or natural disasters.
- Education and Training Tools: Wearable technology could be used to provide educational resources and training materials to indigenous communities, helping them learn about sustainable practices, conservation techniques, and their rights as guardians of the rainforest.
- Biofeedback Devices: Wearable devices that provide biofeedback could help individuals manage stress, anxiety, and other mental health issues often associated with living in isolated or high-stress environments.
- Community Empowerment Platforms: Wearable technology could serve as platforms for community engagement, enabling indigenous groups to share traditional knowledge, cultural practices, and stories with the wider world while preserving their heritage.
- Water Quality Monitoring: Devices that monitor water quality could help detect pollution, contamination, or other threats to freshwater sources in the rainforest, ensuring the health and safety of both wildlife and human populations.
These are just a few examples of how wearable technology could be tailored to the specific needs and challenges of the Amazon rainforest. The key is to develop solutions that are sustainable, culturally sensitive, and empower local communities to protect their environment.
Planning the assignment
I wont be making the - heat pad / with thermochromic coating and - SMA (shape memory alloy) because I do not have these.
My experiments will focus on creating 2 actuators from any of the following examples:
-
motors / mini vibration
-
leds / neopixels (Check!)
-
flip dot / electromagnet
-
speaker / mp3 player (Check!)
Process and workflow
Starting with the speakers / mp3 player
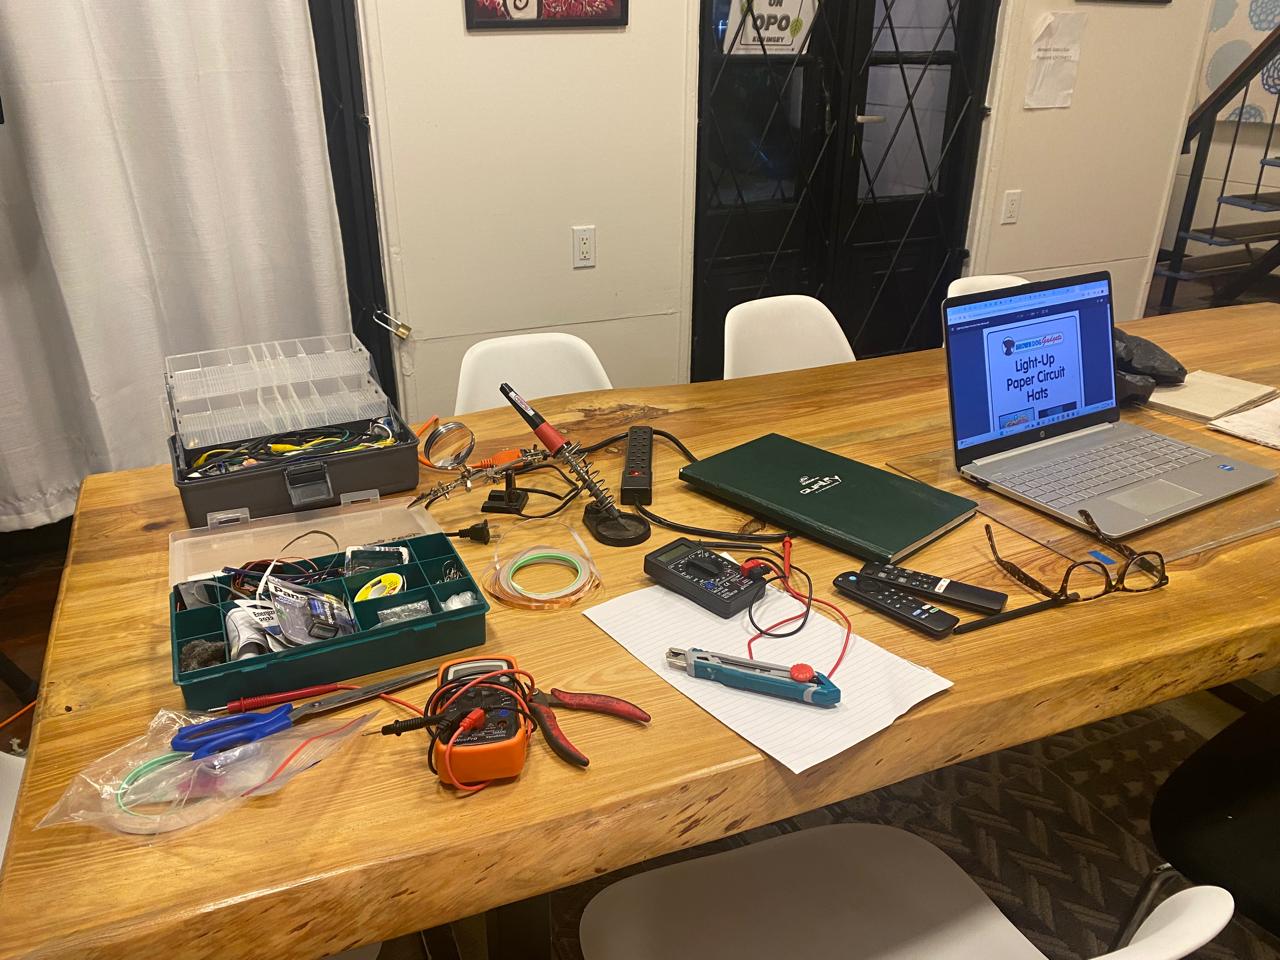
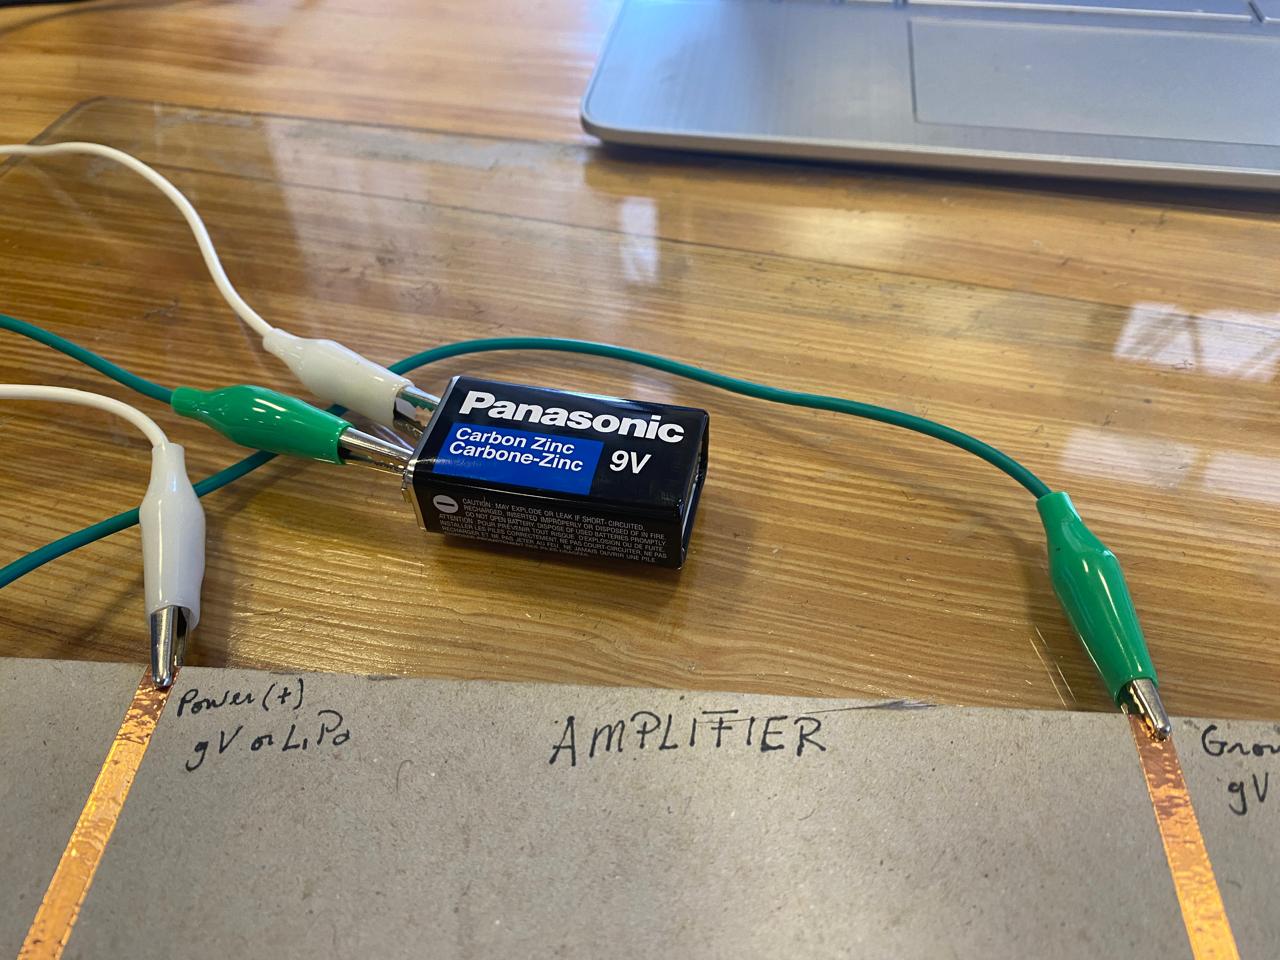
First I got all the electronics tools and components needed according to the instructions during the lecture.
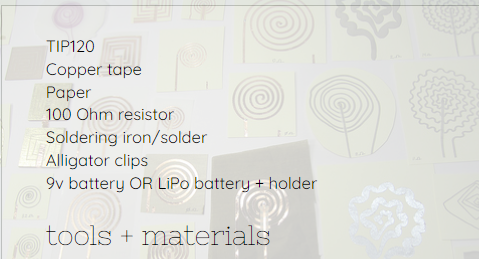
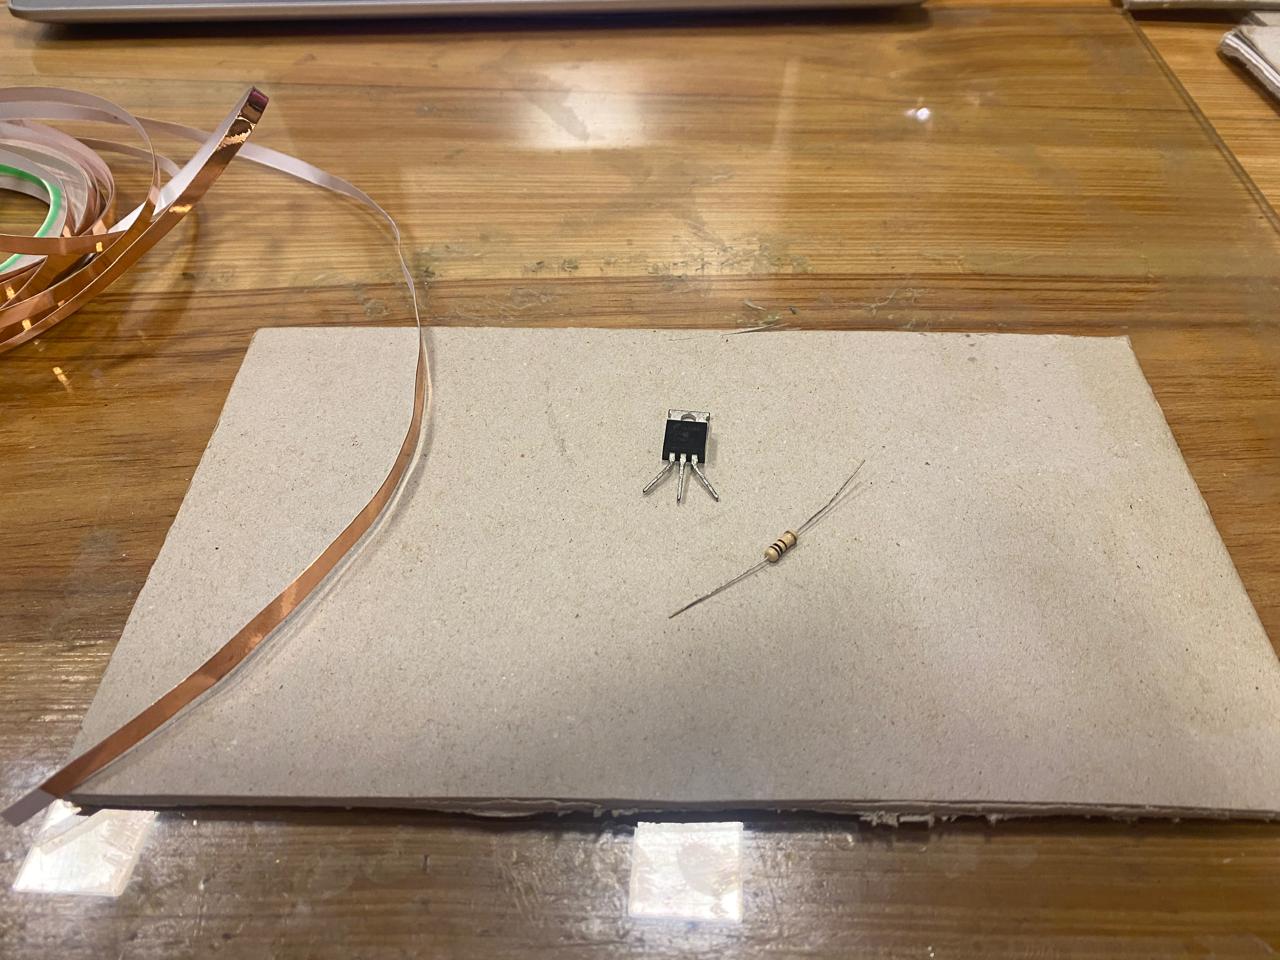
I cut the cardboard to size and then copied the example by taping the copper tape to the cardboard and the Mosfet and resistor in their place. Afterward I soldered the components on the coppertape with a soldering iron. I also soldered the different parts of coppertape at their connection point.
Finally I checked all connections with the multimeter. Everything worked.
I realize the solderpoints do not look neet so I got another soldering iron for the next assignments.
After connecting all pionts of the amplifier circuit and soldering them, I testest each trace and connection with the multimeter continuity setting. I had to solder 1 connection again and after that everything worked.

It is now time to connect the speakers, battery and microcontroller to see if the circuit really works.
I used an 8 Ohm speaker from the Freenove kit to do the first test. My battery is a 9V battery. And I used an Arduino Nano as a micro controller.

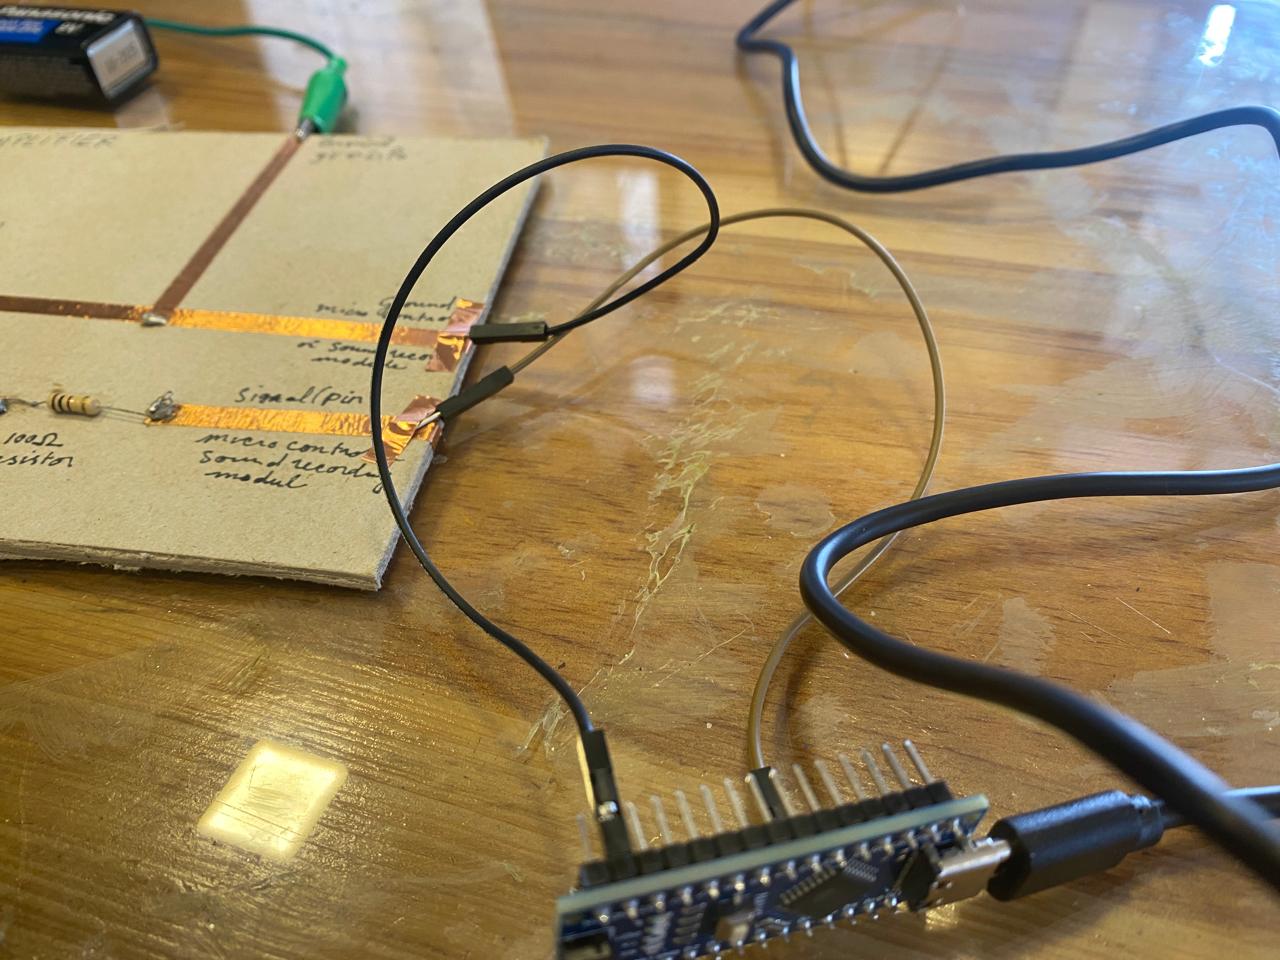
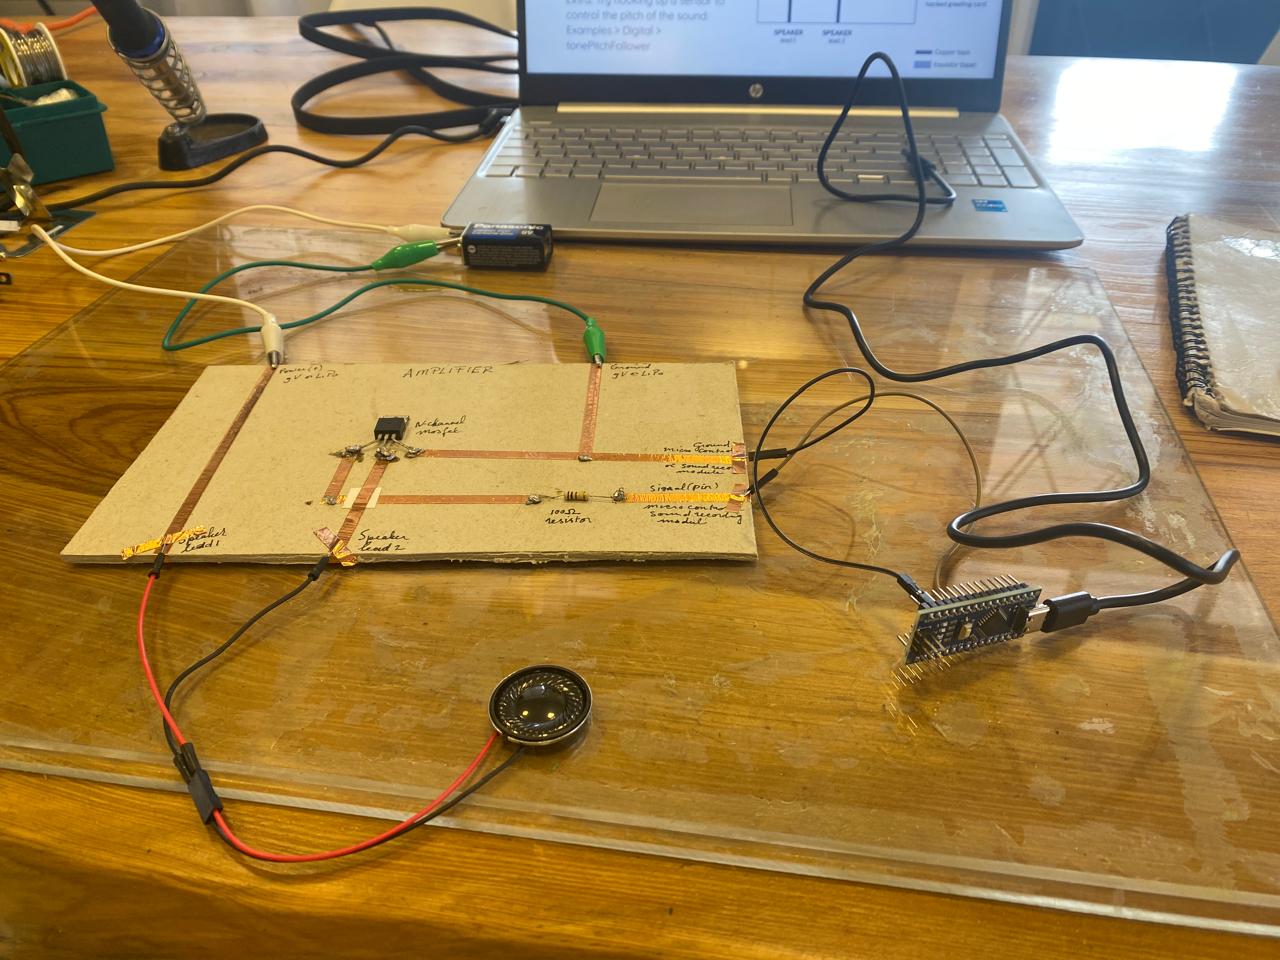
After making all connections as in the example, it's now time to upload the Arduino code.
FIRST WORKING SPEAKERTEST (NOT FABRIC)
Here is how I got the first speaker test working. Click on the picture below to start the youtube video.
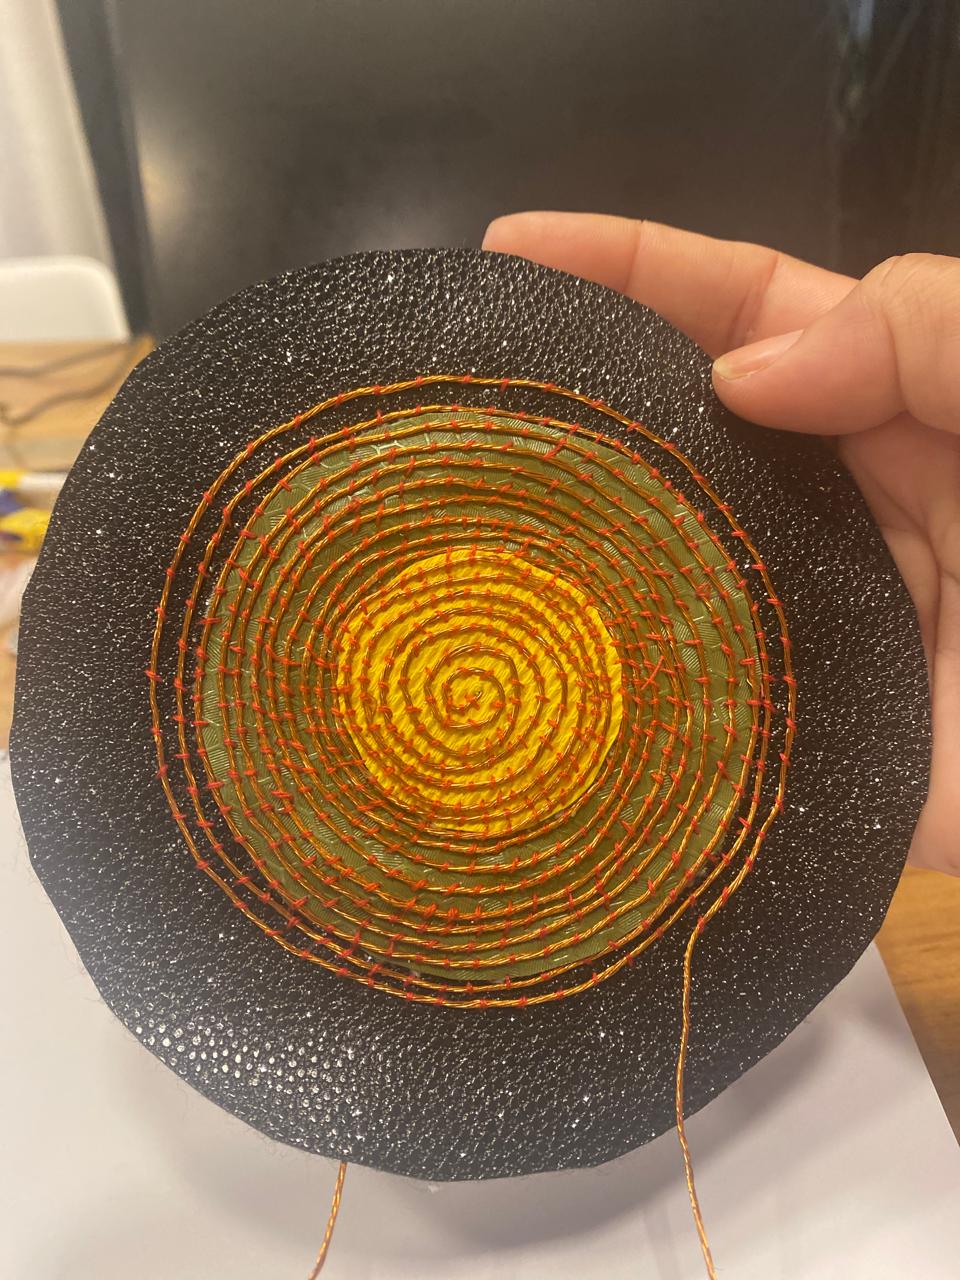
CREATING A FABRIC SPEAKER
Now that I have tested the circuit, the microprocessor and the arduino code, I'm designing and fabricating the fabric speaker. I'll make it in reggae colors yellow, green, red and black. The fabric speaker turned out looking like a vintage music single record. I made a video presentation of the process and result here. It's not entirely working well yet, so updates will follow soon.
I'm also including a picture of how I'm planning to integrate this in a beach tote bag, the best place to have music and speakers under your arm.
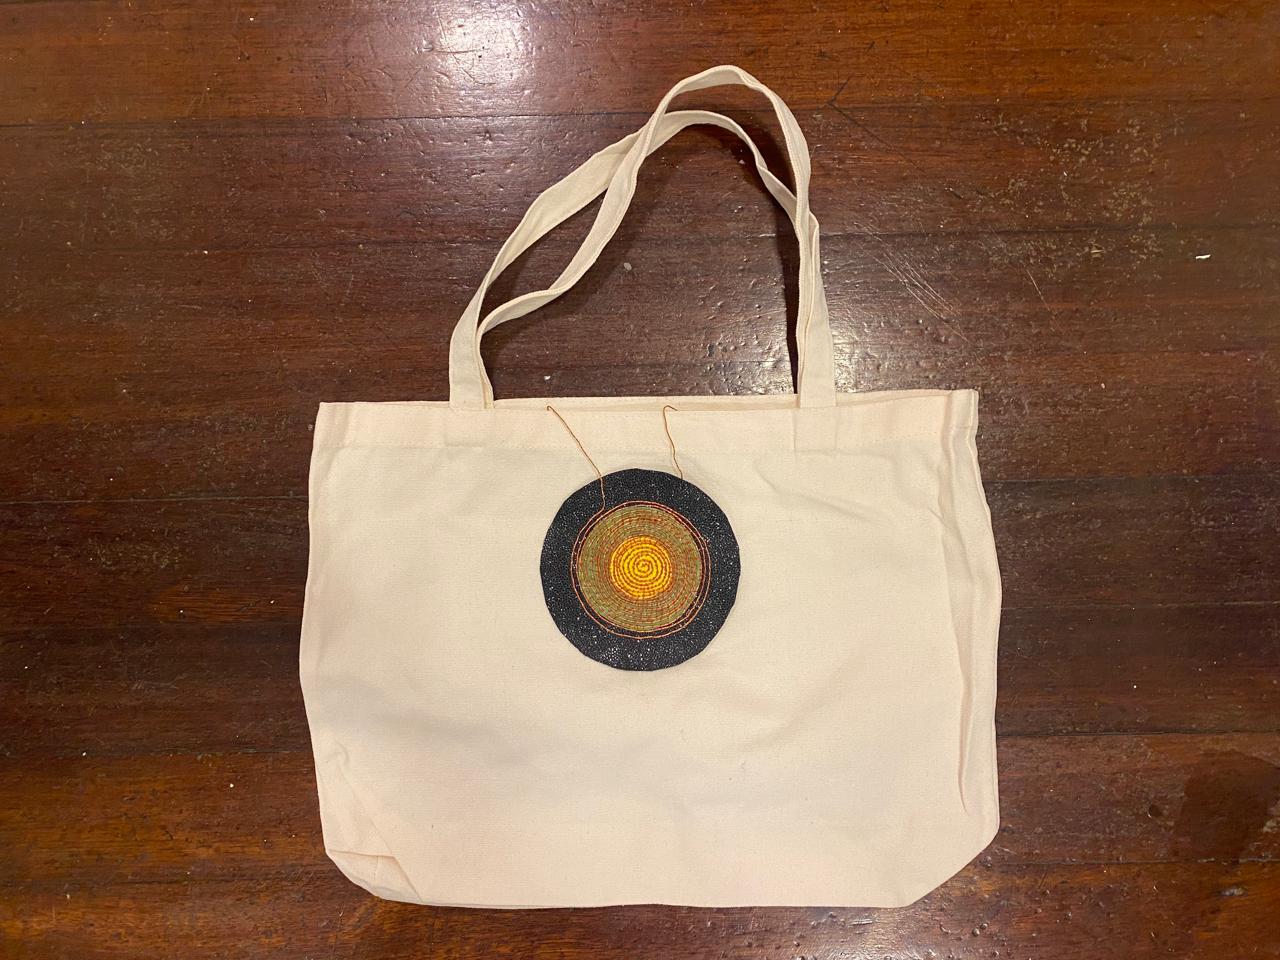
creating a fabric speaker by Reina Raveles
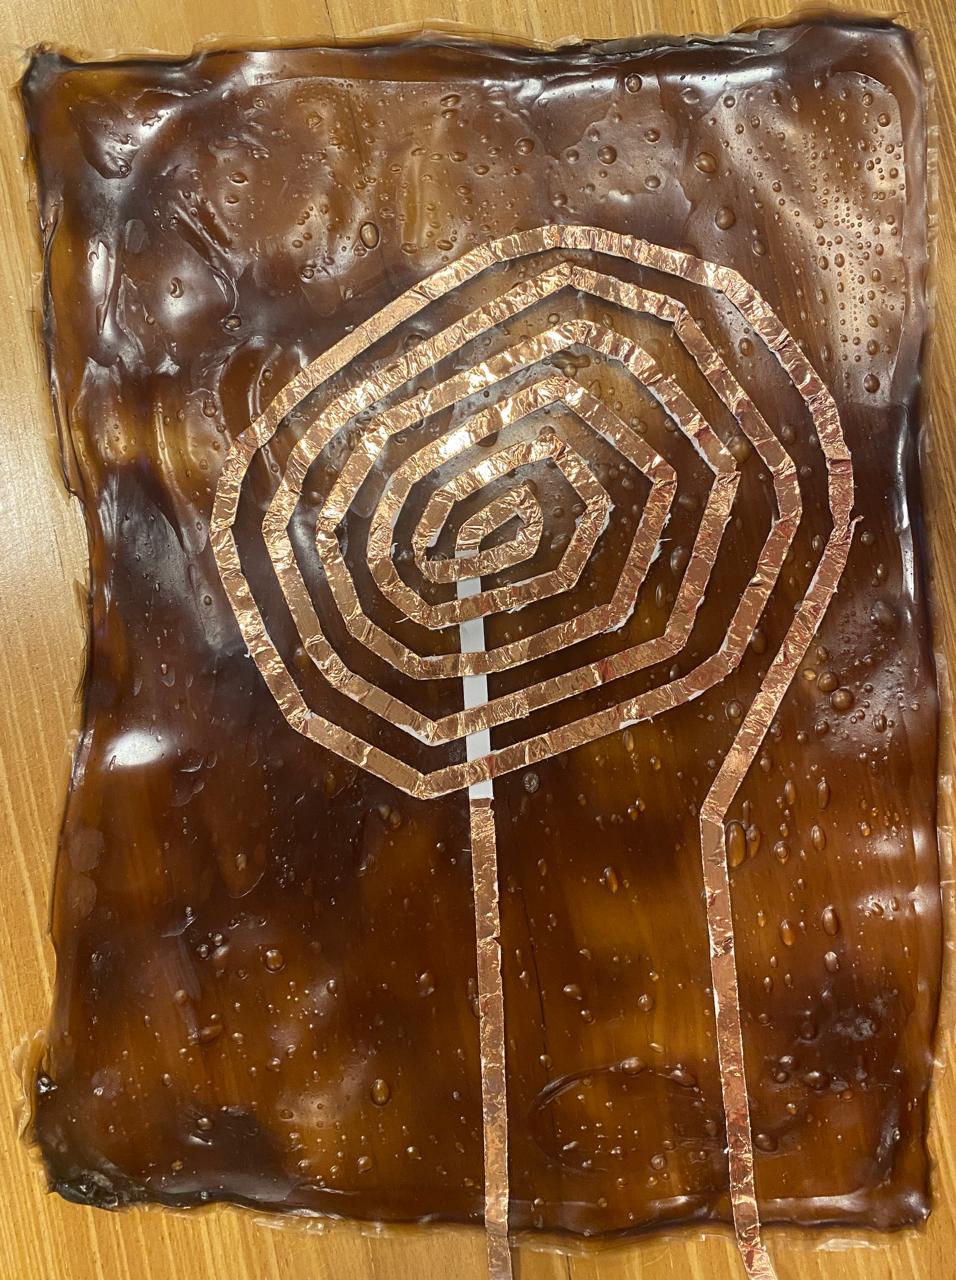
CREATING A BIOPLASTIC SPEAKER
As a third speaker I created a speaker with self=adhessive copper and a bioplastic sheet.

I did a continuity test of the speaker as well. You can click on the picture of the bioplastic speaker to see the continuity test.
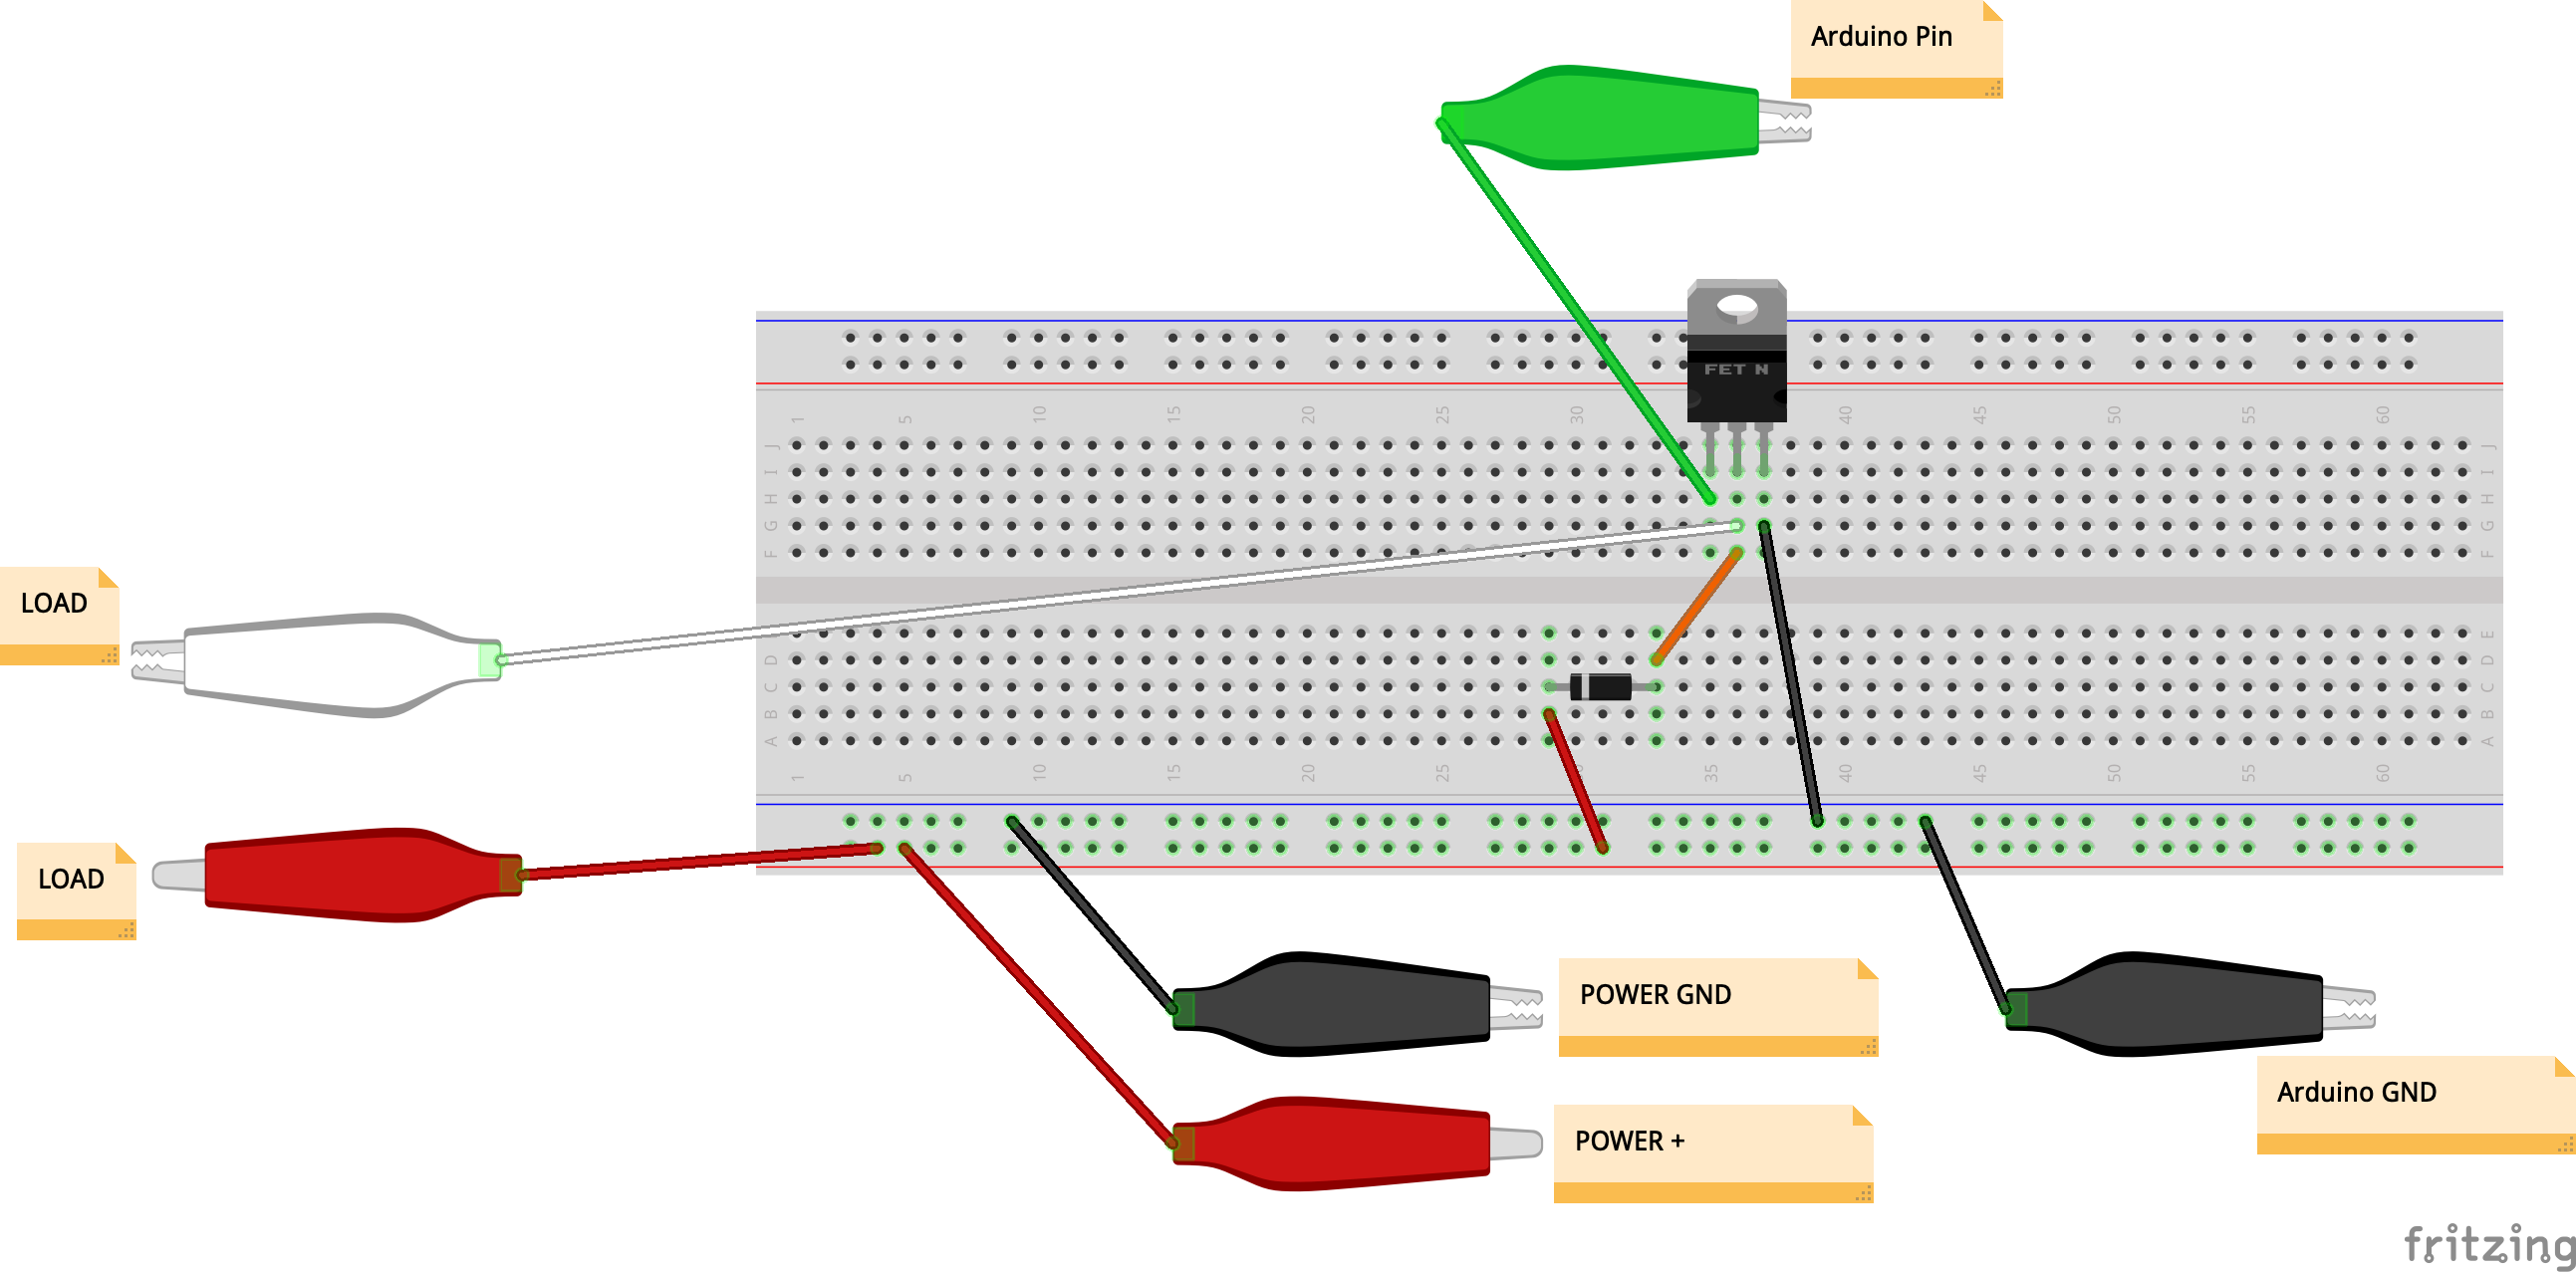
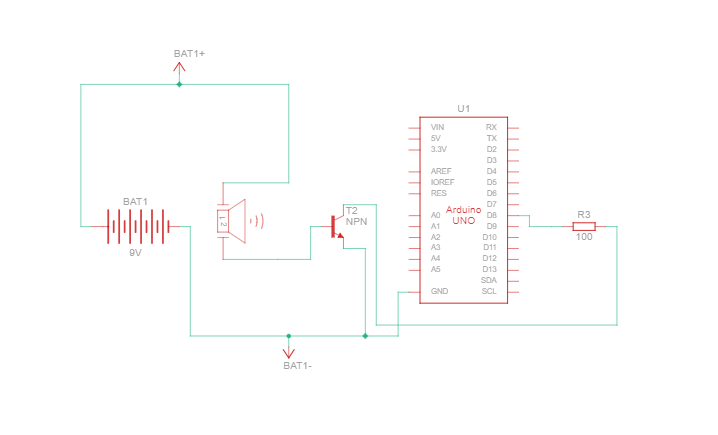
SPEAKER AND SOUND AMPLIFIER CIRCUIT DRAWING
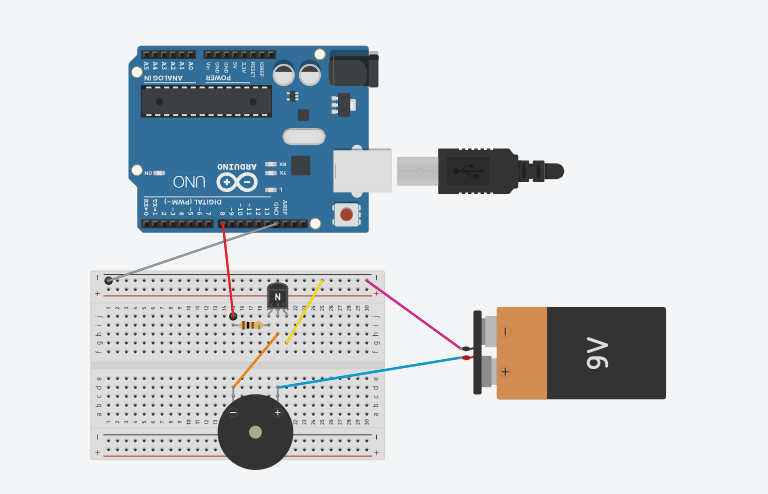
SPEAKER AND SOUND AMPLIFIER TECHNICAL DRAWING
ARDUINO CODE
In the Arduino IDE App
In the "Tools" menu: I selected Board: Arduino Nano I selected Port: Portcom 6
In the "File" menu - Examples- 02 Digital I selected "Tone Melody"
A window opened with code (see ####ToneMelody).
I then did a testrun of the code by pushing the verify button. It was good because I got this notification: If it's not good you would get this:
Then I connected the Arduino to the computer and clicked on the Upload button.
Later I also tested "Tone Multiple"
ToneMelody Code
/*
  Melody

  Plays a melody

  circuit:
  - 8 ohm speaker on digital pin 8

  created 21 Jan 2010
  modified 30 Aug 2011
  by Tom Igoe

  This example code is in the public domain.

  https://www.arduino.cc/en/Tutorial/BuiltInExamples/toneMelody
*/

#include "pitches.h"

// notes in the melody:
int melody[] = {
  NOTE_C4, NOTE_G3, NOTE_G3, NOTE_A3, NOTE_G3, 0, NOTE_B3, NOTE_C4
};

// note durations: 4 = quarter note, 8 = eighth note, etc.:
int noteDurations[] = {
  4, 8, 8, 4, 4, 4, 4, 4
};

void setup() {
  // iterate over the notes of the melody:
  for (int thisNote = 0; thisNote < 8; thisNote++) {

    // to calculate the note duration, take one second divided by the note type.
    //e.g. quarter note = 1000 / 4, eighth note = 1000/8, etc.
    int noteDuration = 1000 / noteDurations[thisNote];
    tone(8, melody[thisNote], noteDuration);

    // to distinguish the notes, set a minimum time between them.
    // the note's duration + 30% seems to work well:
    int pauseBetweenNotes = noteDuration * 1.30;
    delay(pauseBetweenNotes);
    // stop the tone playing:
    noTone(8);
  }
}

void loop() {
  // no need to repeat the melody.
}
Tone Multiple Code
/*
  Multiple tone player

  Plays multiple tones on multiple pins in sequence

  circuit:
  - three 8 ohm speakers on digital pins 6, 7, and 8

  created 8 Mar 2010
  by Tom Igoe
  based on a snippet from Greg Borenstein

  This example code is in the public domain.

  https://www.arduino.cc/en/Tutorial/BuiltInExamples/toneMultiple
*/

void setup() {
}

void loop() {
  // turn off tone function for pin 8:
  noTone(8);
  // play a note on pin 6 for 200 ms:
  tone(6, 440, 200);
  delay(200);

  // turn off tone function for pin 6:
  noTone(6);
  // play a note on pin 7 for 500 ms:
  tone(7, 494, 500);
  delay(500);

  // turn off tone function for pin 7:
  noTone(7);
  // play a note on pin 8 for 300 ms:
  tone(8, 523, 300);
  delay(300);
}
Let there be light! (Genesis 1:3); Leds / neopixels actuator
For wearables I embedded neopixel lights inside a clutch.
Freenove kit arduino compatible
All I can say here is: "It's about time! I got it finally! A working led neopixel ring of 8. In fact, not just one, but 2 times 8 in series!
It was not entirely arduino though, not even Adafruit but a Freenove kit, sponsored by Unasat College Suriname, thank you very much! Succesful collaboration is very satisfying!
Information about Freenove ESP32 boards compatible with both Arduino, Adafruit and Raspberry Pi can be found here:
Tutorial on embedding neopixels in a clutch
Here is a step by step through the process.
Step by step guide to embed neo pixel lights in a wearable purse
Tutorial step by step Neopixels LEDs by Reina Raveles
Video neopixels in clutch wearables project
In the next video I am showing the process of creating a wearable ( a purse) with LED neopixels integrated. In the video I try to go as detailed as possible.
NeoPixelLedActuators film instruction by Reina Raveles
Neopixel actuator film and tutorial
ARDUINO CODE FOR LIGHTS
Rainbow Code: Running the code for an 8 pixelring (8 neopixel leds)
/*

*/

#include "Freenove_WS2812_Lib_for_ESP32.h"

#define LEDS_COUNT  8
#define LEDS_PIN    2
#define CHANNEL     0

Freenove_ESP32_WS2812 strip = Freenove_ESP32_WS2812(LEDS_COUNT, LEDS_PIN, CHANNEL, TYPE_GRB);

void setup() {
  strip.begin();
}

void loop() {
  for (int j = 0; j < 255; j += 2) {
    for (int i = 0; i < LEDS_COUNT; i++) {
      strip.setLedColorData(i, strip.Wheel((i * 256 / LEDS_COUNT + j) & 255));
    }
    strip.show();
    delay(5);
  }
}
Rainbow Code: Running the code for two 8 pixelring (16 neopixel leds)
/*

*/

#include "Freenove_WS2812_Lib_for_ESP32.h"

#define LEDS_COUNT  16
#define LEDS_PIN    2
#define CHANNEL     0

Freenove_ESP32_WS2812 strip = Freenove_ESP32_WS2812(LEDS_COUNT, LEDS_PIN, CHANNEL, TYPE_GRB);

void setup() {
  strip.begin();
}

void loop() {
  for (int j = 0; j < 255; j += 2) {
    for (int i = 0; i < LEDS_COUNT; i++) {
      strip.setLedColorData(i, strip.Wheel((i * 256 / LEDS_COUNT + j) & 255));
    }
    strip.show();
    delay(5);
  }
}
RGBW Code: Colorchange to one uniform color, one after the other Red, Blue, Green and White
/*

*/

#include "Freenove_WS2812_Lib_for_ESP32.h"

#define LEDS_COUNT  16
#define LEDS_PIN    2
#define CHANNEL     0

Freenove_ESP32_WS2812 strip = Freenove_ESP32_WS2812(LEDS_COUNT, LEDS_PIN, CHANNEL, TYPE_GRB);

u8 m_color[5][3] = { {255, 0, 0}, {0, 255, 0}, {0, 0, 255}, {255, 255, 255}, {0, 0, 0} };
int delayval = 100;

void setup() {
    strip.begin();
    strip.setBrightness(10);
}
void loop() {
    for (int j = 0; j < 5; j++) {
        for (int i = 0; i < LEDS_COUNT; i++) {
            strip.setLedColorData(i, m_color[j][0], m_color[j][1], m_color[j][2]);
            strip.show();
            delay(delayval);
        }
        delay(500);
    }
}
/*
*/
RGBW: Colorchange to one uniform color, one after the other different shades of Blue
I wanted to change RGBW color change to different shades of blue. To find the right color codes I used RapidTables/RGB Color Codes Chart app. RapidTables/RGB Color Codes Chart app
/*

*/


#include "Freenove_WS2812_Lib_for_ESP32.h"

#define LEDS_COUNT  16
#define LEDS_PIN    2
#define CHANNEL     0

Freenove_ESP32_WS2812 strip = Freenove_ESP32_WS2812(LEDS_COUNT, LEDS_PIN, CHANNEL, TYPE_GRB);

u8 m_color[5][3] = { {204, 204, 255}, {51, 51, 255}, {0, 0, 102}, {125, 170, 200}, {255, 255, 255} };
int delayval = 100;

void setup() {
    strip.begin();
    strip.setBrightness(10);
}
void loop() {
    for (int j = 0; j < 5; j++) {
        for (int i = 0; i < LEDS_COUNT; i++) {
            strip.setLedColorData(i, m_color[j][0], m_color[j][1], m_color[j][2]);
            strip.show();
            delay(delayval);
        }
        delay(1000);
    }
}
NEOPIXEL LED CIRCUIT DRAWING AND TECHNICAL DRAWING
I looked into several opensource online platforms to make the technical drawings starting with * Tinkercad Tinkercad * Arduino has an online platform Arduino * Wokwi Wokwi
The major issue I had researching these platforms was that some components and ESP boards (3rd party brands) were missing in the component libraries. I eventually circled back to Tinkercad Circuits module. It is very user friendly and automatically transfers a drag and drop function into technical drawings.
I'm making 2 remarks here: First the freenove neopixel rings I used have 8 lights, compared to 7 in Tinkercad Secondly there was no ESP board available in the components library so I used the Arduino Uno which is the generic board.
NEOPIXEL LED CIRCUIT DRAWING
![]()
NEOPIXEL TECHNICAL DRAWING
![]()
Tools
- 1 or more LED Neo pixels
- Microprocessor Arduino or compatible
- USB data cable
- Jumper cables/ wires
- Crocodile clips
- Breadboard
- Cardboard
- Laptop
- Arduino IDE app
- Coppertape
- Cardboard
- Resistor 100 Ohm
-
9V battery
- Freenove kit
- Arduino IDE
- Canvas
- RapidTables/RGB Color Codes Chart app
- Tinkercad
- Kobakant
- Adafruit
- Ada Industries on Youtube