4. Electronica
Motors
Motor choosing is an important part of the project, because the whole system must work correctly and reliably. In this part, I will talk about three motors between which I had to choose. These motors are: DC motor, stepper motor, and servo motor. I will describe the pluses and minuses of each of them.
Servo motor
Firstly, let’s talk about the servo motor. It is a very common and easy-to-use motor, and I have already worked with it before. The big minus for my project is that it is not strong enough and does not have enough torque to roll the threads and then come back. However, for first mini prototypes it is very useful, easy to control, and good for testing ideas.
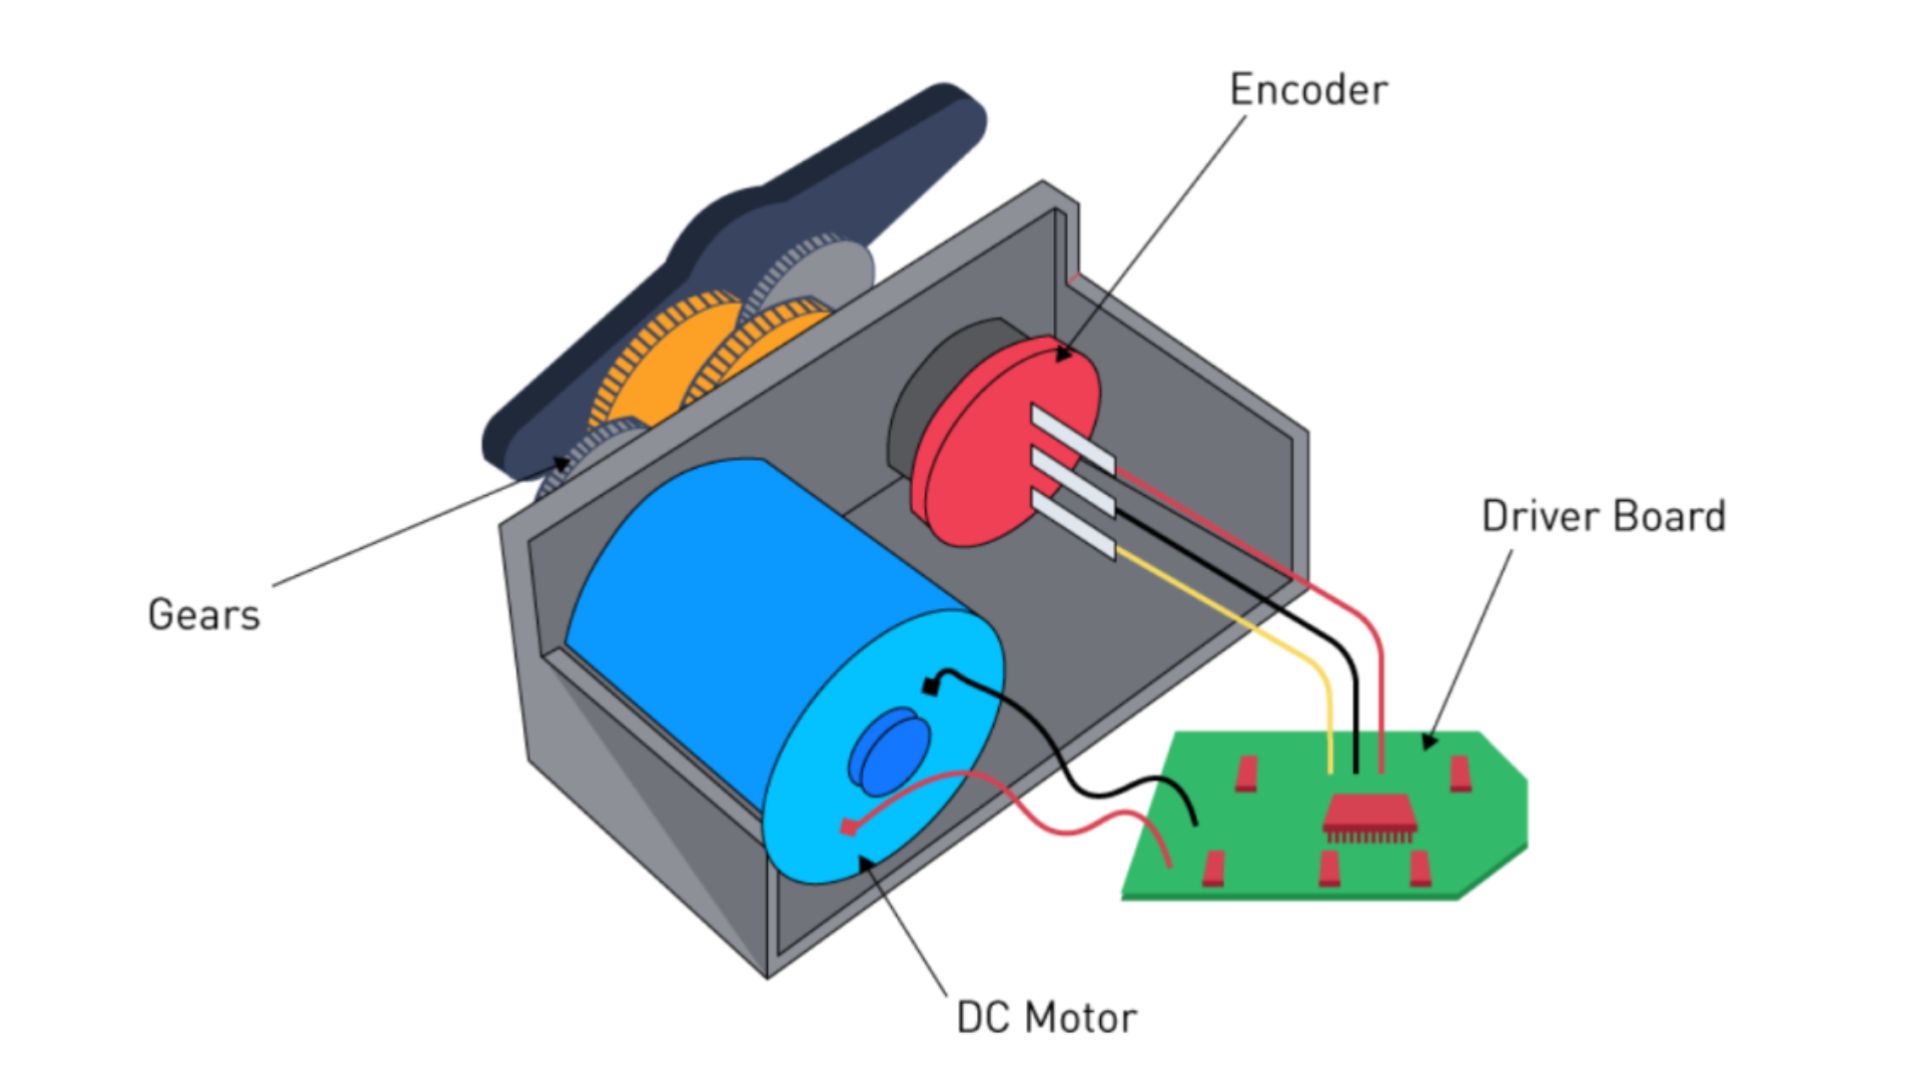
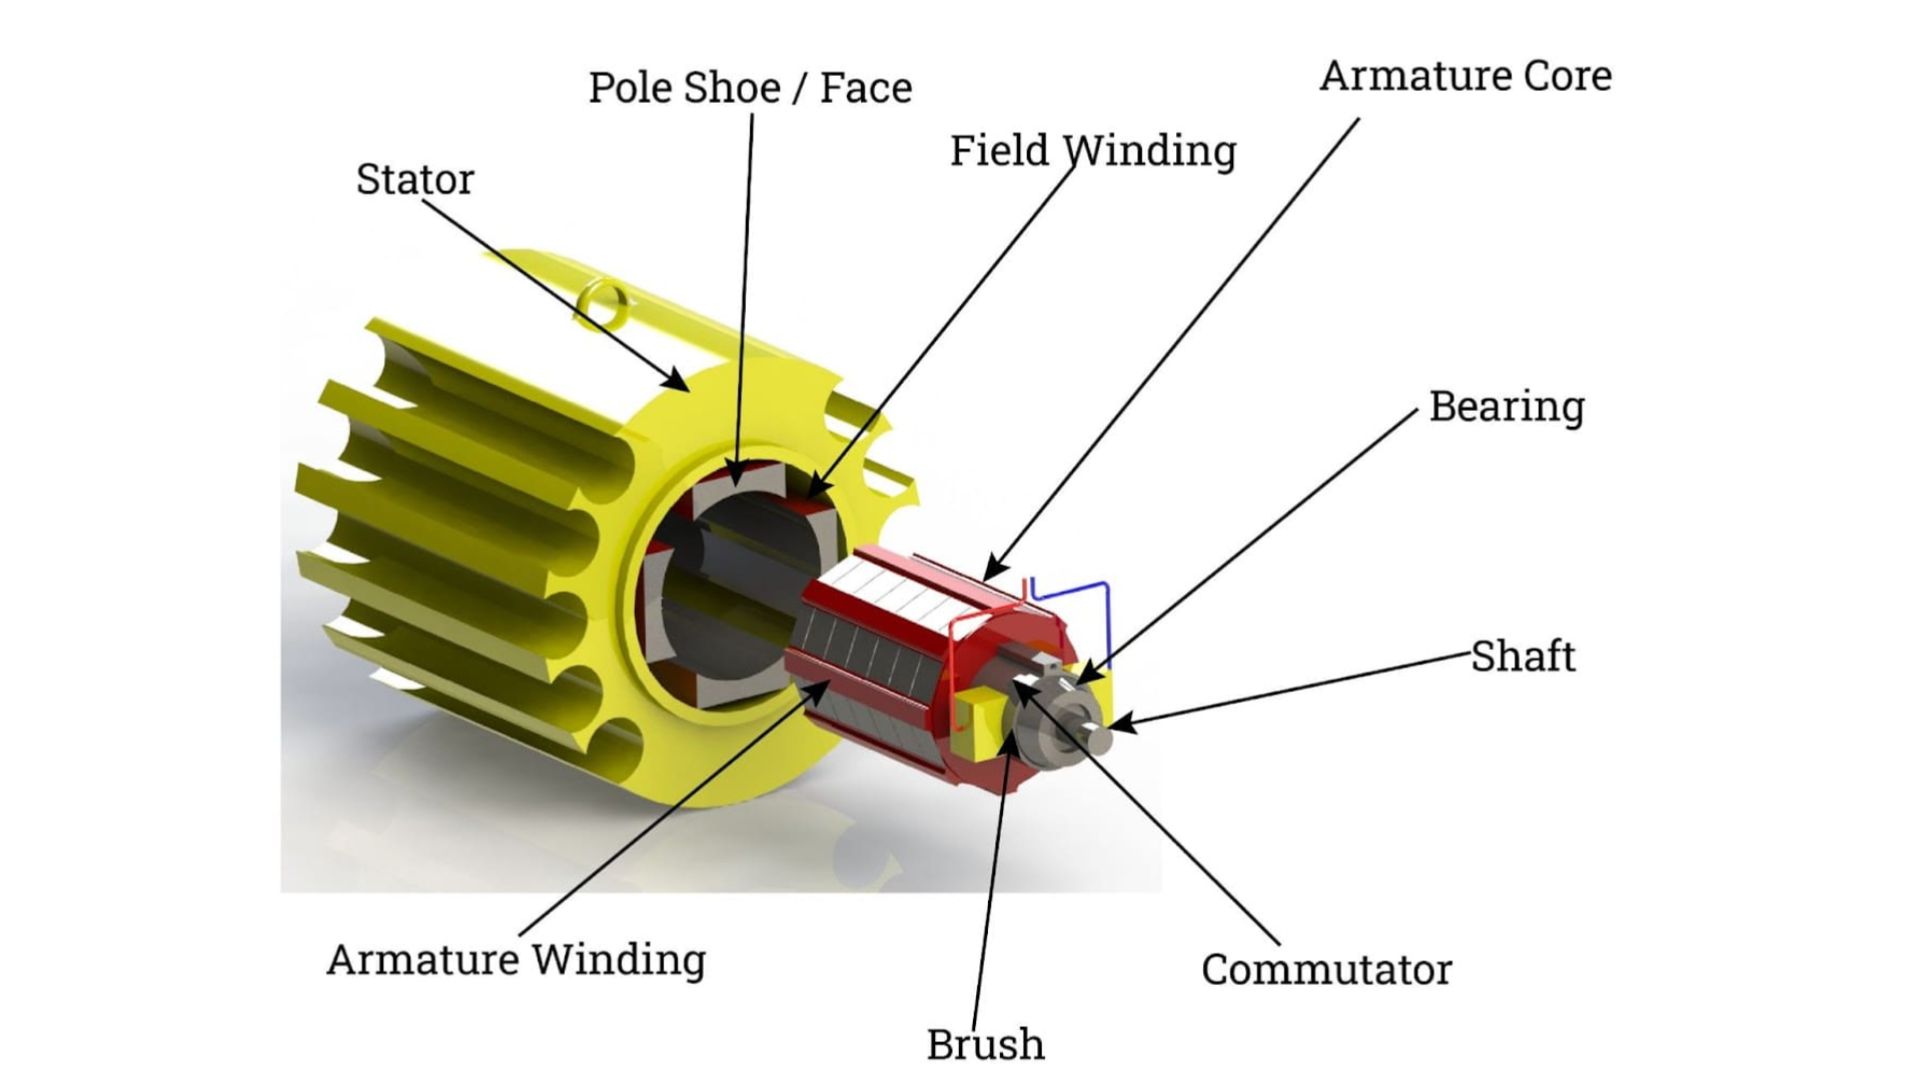
DC motor
A DC motor is a good choice for robots or anything that needs strong, fast, and continuous movement. For my project, it is too fast. Another minus is that the angle is not controllable — you can control speed using voltage and change direction by reversing polarity, but this level of control is not enough for my needs. DC motors are cheap and work well. They are perfect for wheels, fans, pumps, and simple continuous motion.
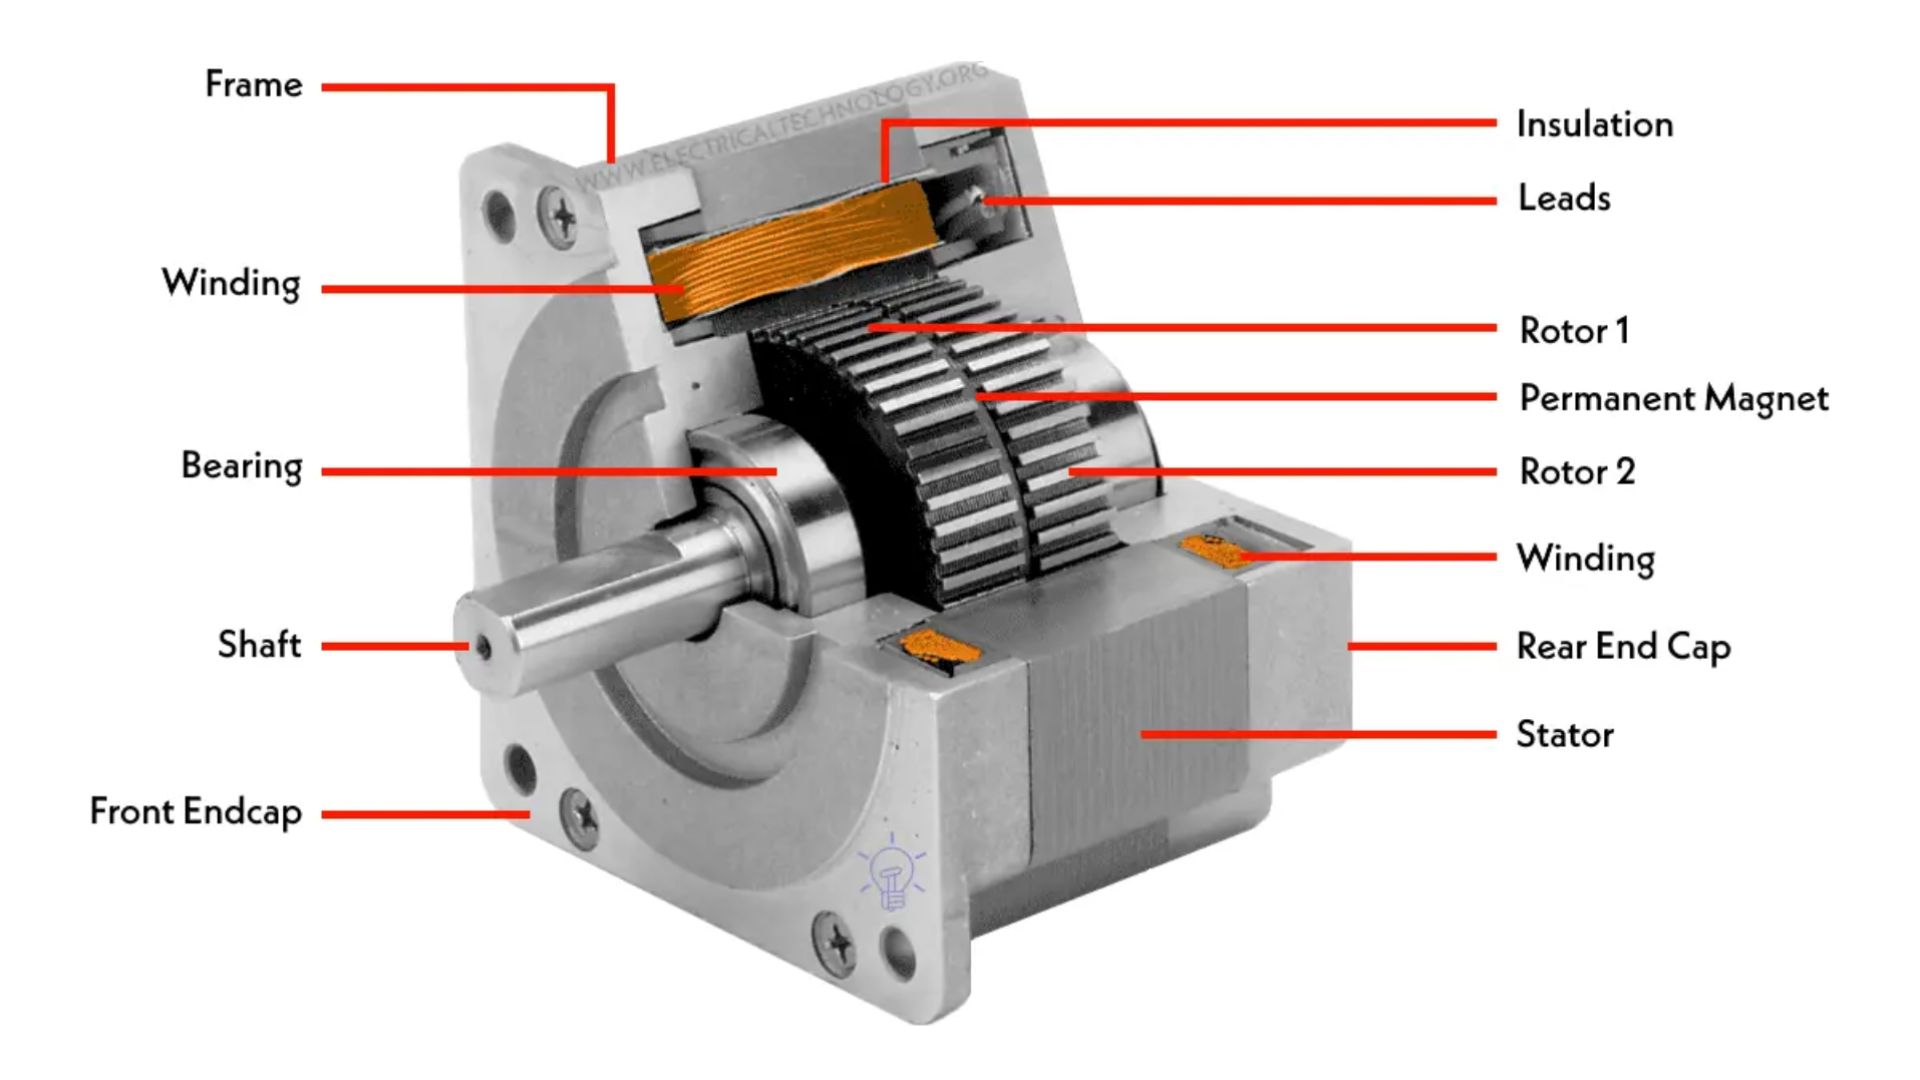
Stepper motor
A stepper motor works with discrete steps instead of freely spinning. One step is usually 1.8°, which makes angle control very precise. It is excellent for repeatable motion. A stepper motor needs a driver (A4988, DRV8825, TMC, etc.). The minus is that it consumes power even when holding position. The big plus is that it can rotate continuously or move to exact positions, which makes it the best option for my project.
Comparison chart of motors
| Parameter | Servo Motor | DC Motor | Stepper Motor |
|---|---|---|---|
| Angle control | Yes (limited range) | No | Yes (very precise) |
| Speed control | Yes | Yes | Yes |
| Torque | Low–Medium | Medium–High | High |
| Continuous rotation | Limited / modified | Yes | Yes |
| Position accuracy | Medium | Very low | Very high |
| External driver needed | No | No | Yes |
| Power consumption when holding | Low | Low | High |
| Best use cases | Small mechanisms, prototypes | Wheels, fans, pumps | CNC, 3D printers, precise systems |
After all this research and discussion with the Armenian lab staff, we decided to use a stepper motor for my final project, and a servo motor for the first experiments and examples. This motor will work with threads.
Sensors Types
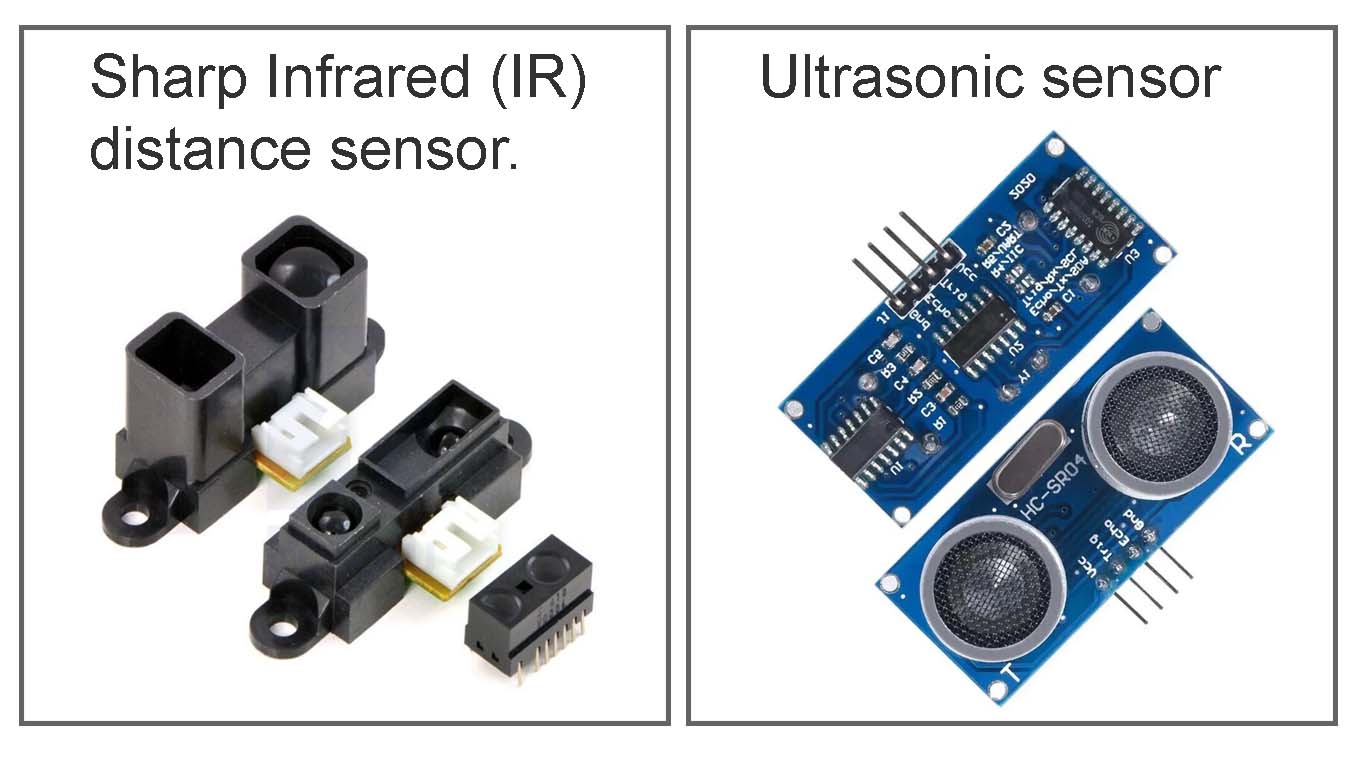
For my project, I was choosing between two distance sensors: an ultrasonic sensor and a Sharp distance sensor. Which one is better really depends on the idea and concept of the project — why I am doing it and what kind of interaction I want to create.
My concept is to detect the movement of people, almost like a breathing, living system that senses presence and communicates — to welcome people and see them off.
For this idea, the Sharp distance sensor is a better choice, because it is more stable and precise for close-range, continuous interaction. But for the first experiments, I used an ultrasonic sensor, because it is easier to use and faster to test with.
What is an ultrasonic sensor ?
An ultrasonic sensor measures the distance to an object by emitting high-frequency sound waves and calculating the time it takes for the echo to return.
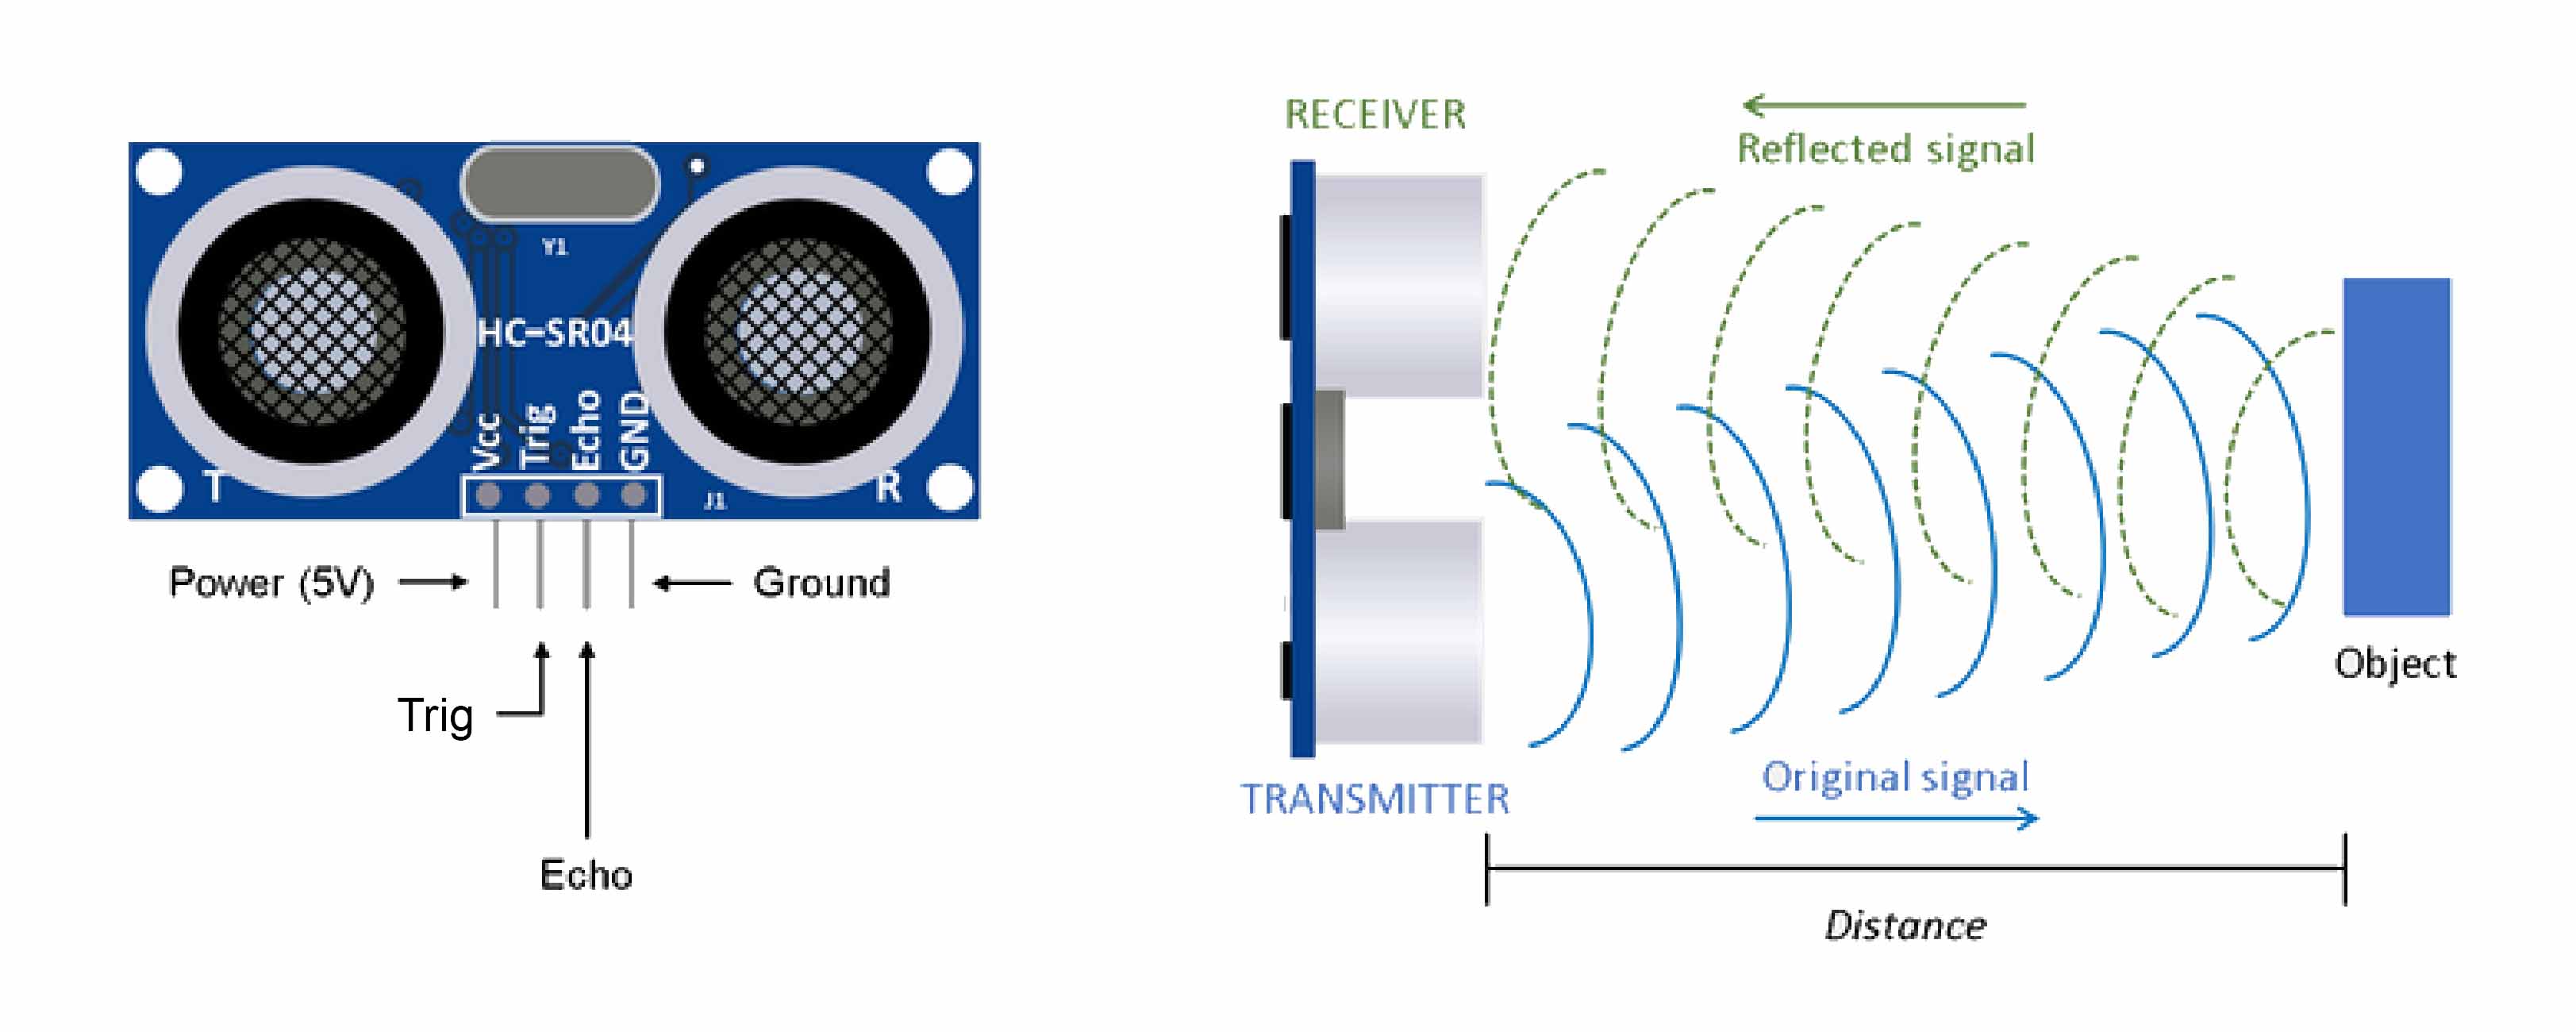
If my concept is based on the effect of movement, steps, sound, voice, or anything similar, this sensor would be a perfect choice.
What is a Sharp Infrared (IR) distance sensor? It is an optoelectronic device that measures the distance to an object by emitting infrared light and detecting its reflection. It usually works at short ranges — from a few millimeters up to about a meter.
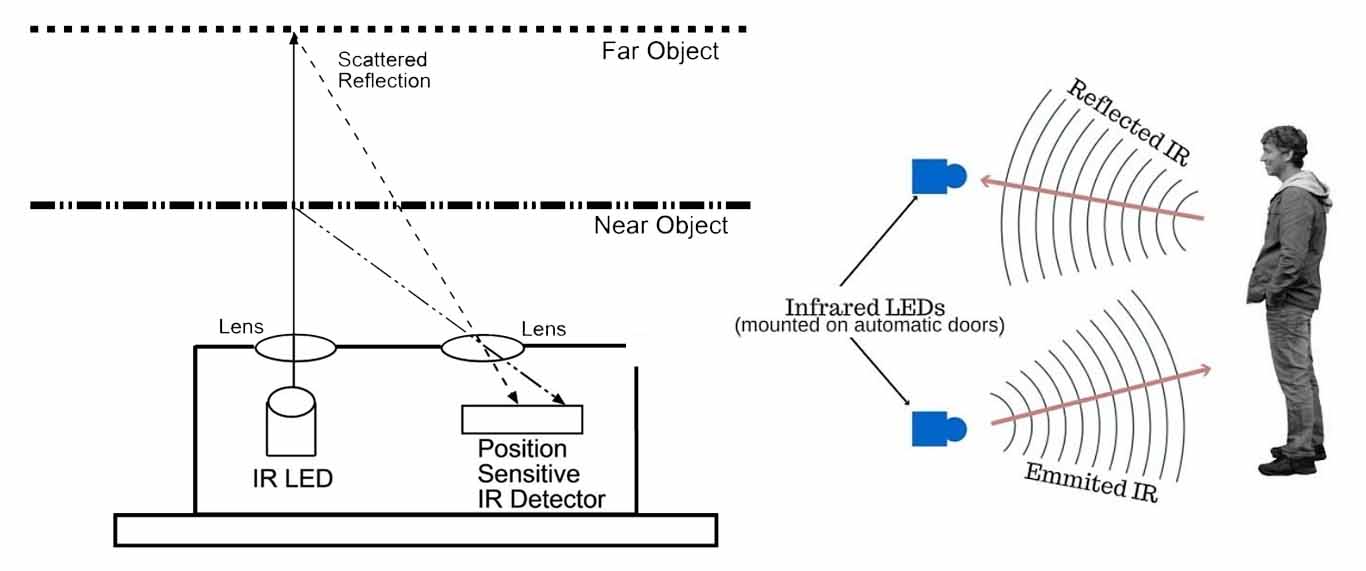
This makes it perfect for my project idea, because it can detect human movement quite accurately and consistently.
I settled on this sensor.
First coding steps
Ultrasonic sensor
#include <Adafruit_NeoPixel.h>

#define TRIG_PIN 10
#define ECHO_PIN 9
#define PIXEL_PIN 8   // Built-in NeoPixel on FLORA
#define NUMPIXELS 1

Adafruit_NeoPixel pixels(NUMPIXELS, PIXEL_PIN, NEO_GRB + NEO_KHZ800);

long duration;
float distance;

void setup() {
  pinMode(TRIG_PIN, OUTPUT);
  pinMode(ECHO_PIN, INPUT);

  Serial.begin(9600);
  while (!Serial); // Needed for FLORA

  pixels.begin();
  pixels.clear();
  pixels.show();

  Serial.println("Ultrasonic sensor ready...");
}

void loop() {
  // Trigger ultrasonic pulse
  digitalWrite(TRIG_PIN, LOW);
  delayMicroseconds(2);
  digitalWrite(TRIG_PIN, HIGH);
  delayMicroseconds(10);
  digitalWrite(TRIG_PIN, LOW);

  // Read echo (long timeout for sensitivity)
  duration = pulseIn(ECHO_PIN, HIGH, 30000); // ~5 meters

  if (duration > 0) {
    distance = (duration * 0.0343) / 2;

    Serial.print("Distance: ");
    Serial.print(distance);
    Serial.println(" cm");

    // Very sensitive: anything detected
    if (distance > 2 && distance < 400) {
      pixels.setPixelColor(0, pixels.Color(255, 0, 0)); // RED
    } else {
      pixels.clear();
    }
  } else {
    // No echo detected
    Serial.println("No object detected");
    pixels.clear();
  }

  pixels.show();
  delay(80);
}
Ultrasonic sensor & Servo motor
#include <Servo.h>

#define TRIG_PIN 10
#define ECHO_PIN 9
#define SERVO_PIN 6   // <-- Servo is on D6

Servo myServo;

long duration;
float distance;

int servoPos = 0;
bool directionUp = true;

void setup() {
  pinMode(TRIG_PIN, OUTPUT);
  pinMode(ECHO_PIN, INPUT);

  Serial.begin(9600);
  while (!Serial); // Needed for FLORA

  myServo.attach(SERVO_PIN);
  myServo.write(0); // start position

  Serial.println("Ultrasonic + Servo ready...");
}

void loop() {
  // Trigger ultrasonic pulse
  digitalWrite(TRIG_PIN, LOW);
  delayMicroseconds(2);
  digitalWrite(TRIG_PIN, HIGH);
  delayMicroseconds(10);
  digitalWrite(TRIG_PIN, LOW);

  // Read echo
  duration = pulseIn(ECHO_PIN, HIGH, 30000);

  if (duration > 0) {
    distance = (duration * 0.0343) / 2;

    Serial.print("Distance: ");
    Serial.print(distance);
    Serial.println(" cm");

    // If something is detected
    if (distance > 2 && distance < 400) {

      // Move servo back and forth
      if (directionUp) {
        servoPos += 2;
        if (servoPos >= 90) directionUp = false;
      } else {
        servoPos -= 2;
        if (servoPos <= 0) directionUp = true;
      }

      myServo.write(servoPos);
    } else {
      // Nothing detected
      myServo.write(0);
    }

  } else {
    Serial.println("No object detected");
    myServo.write(0);
  }

  delay(30);
}
Everything worked in terms of connections, but with the small experimental piece it couldn’t fold properly. The servo motor is not powerful enough for this.
Stepper Motor & Distance Sensor
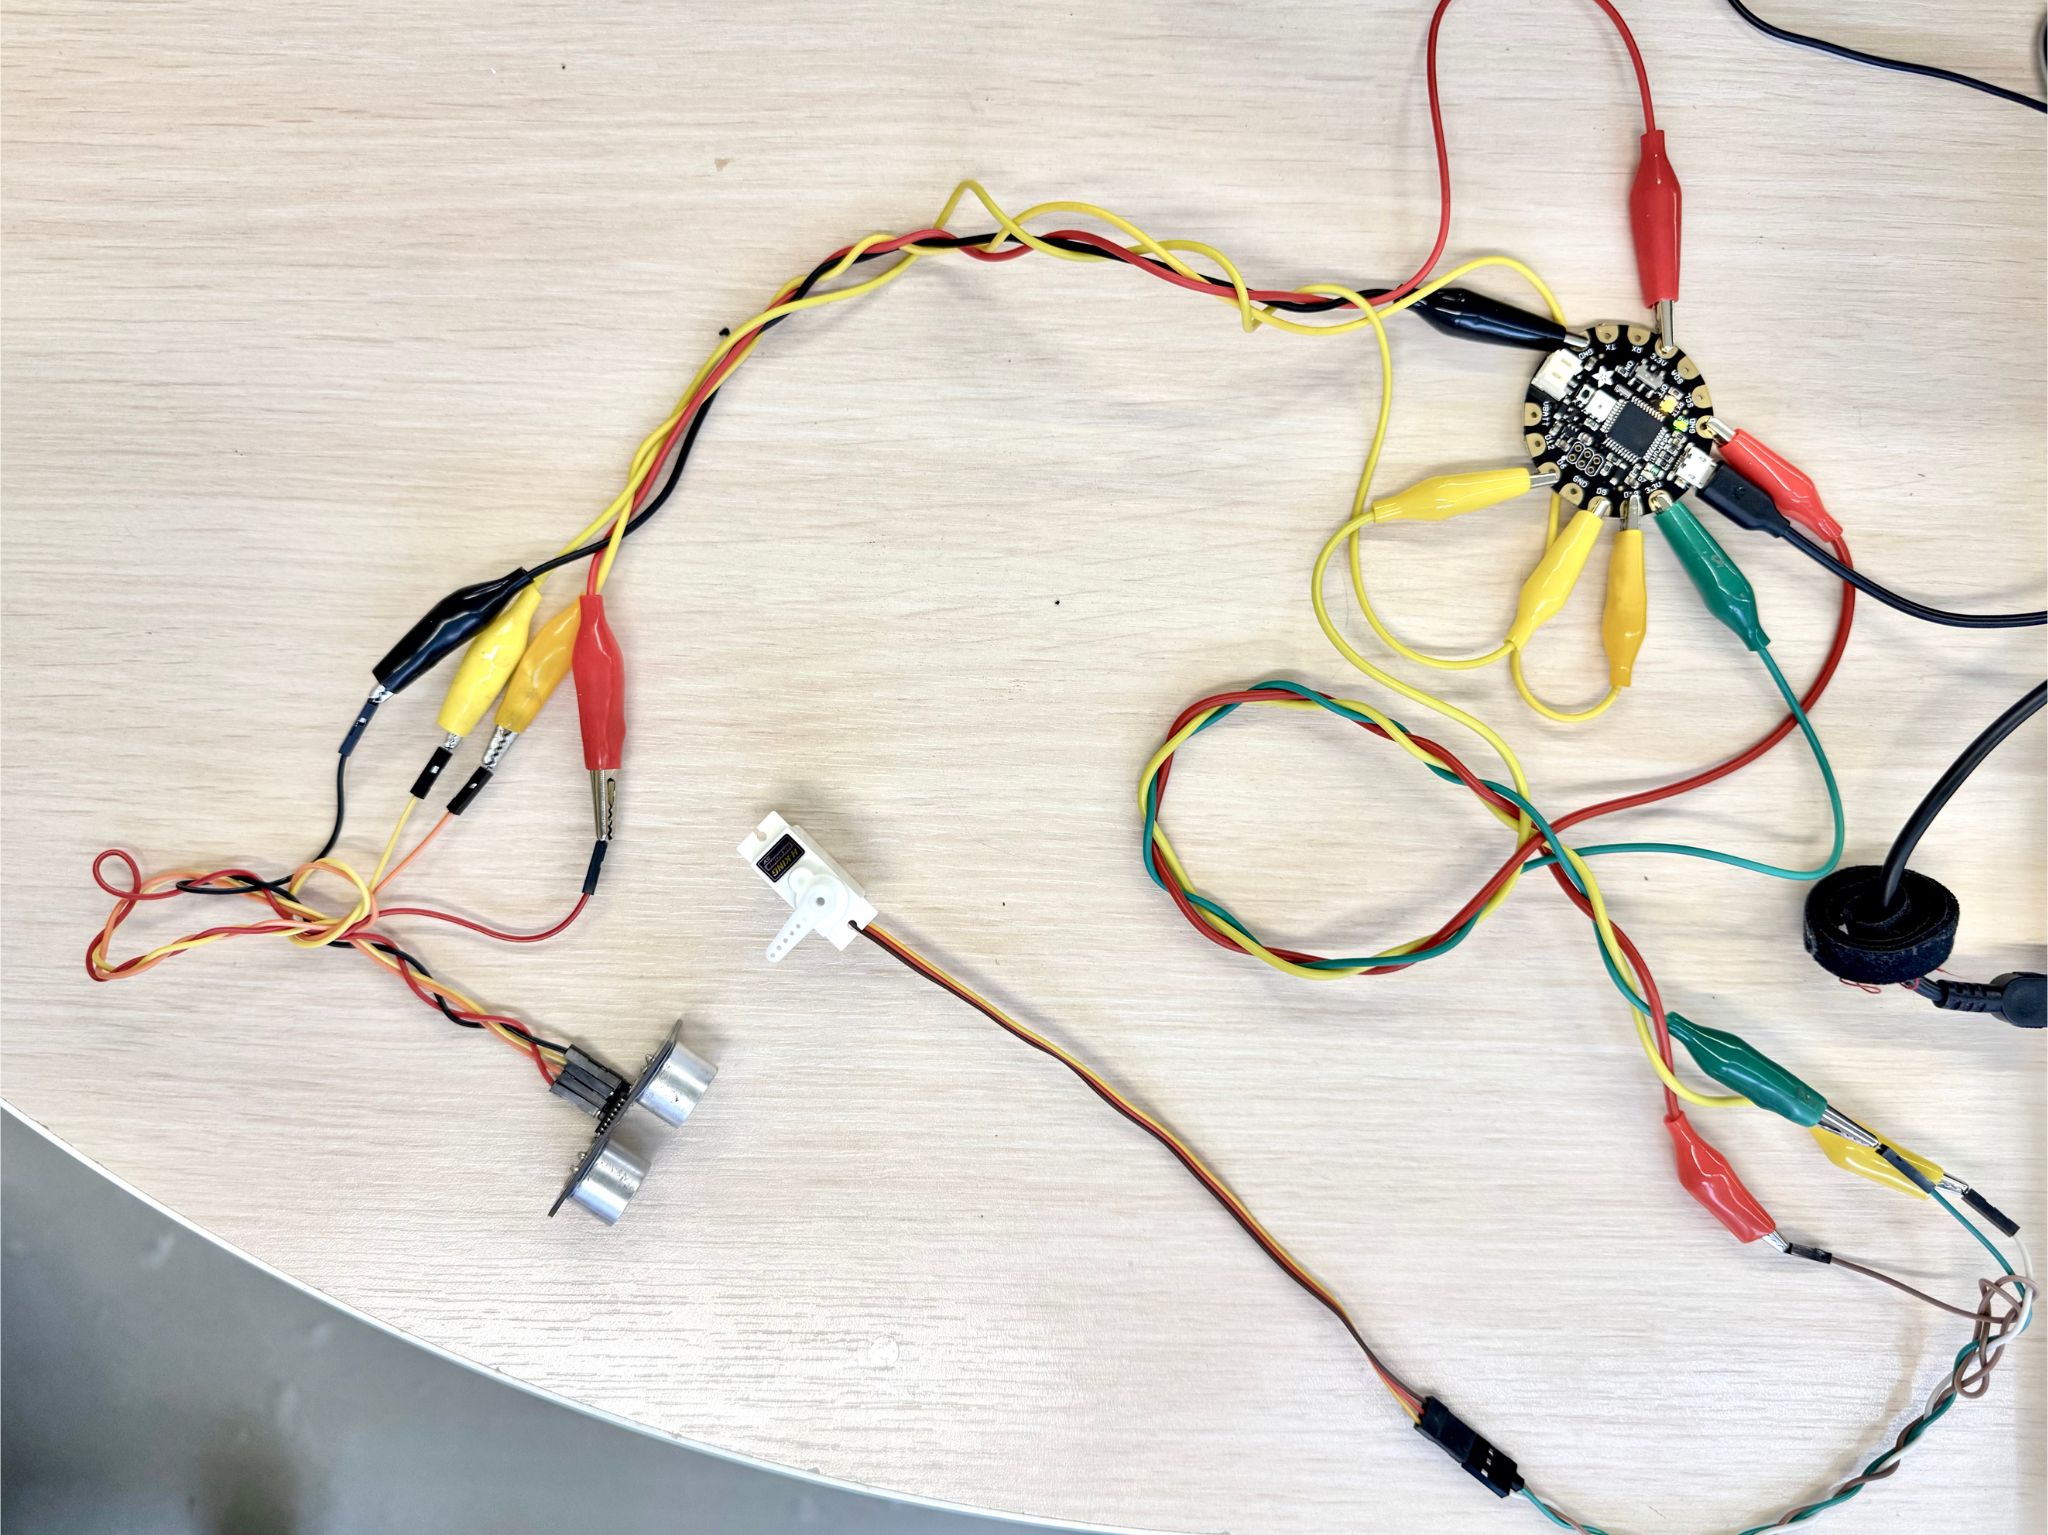
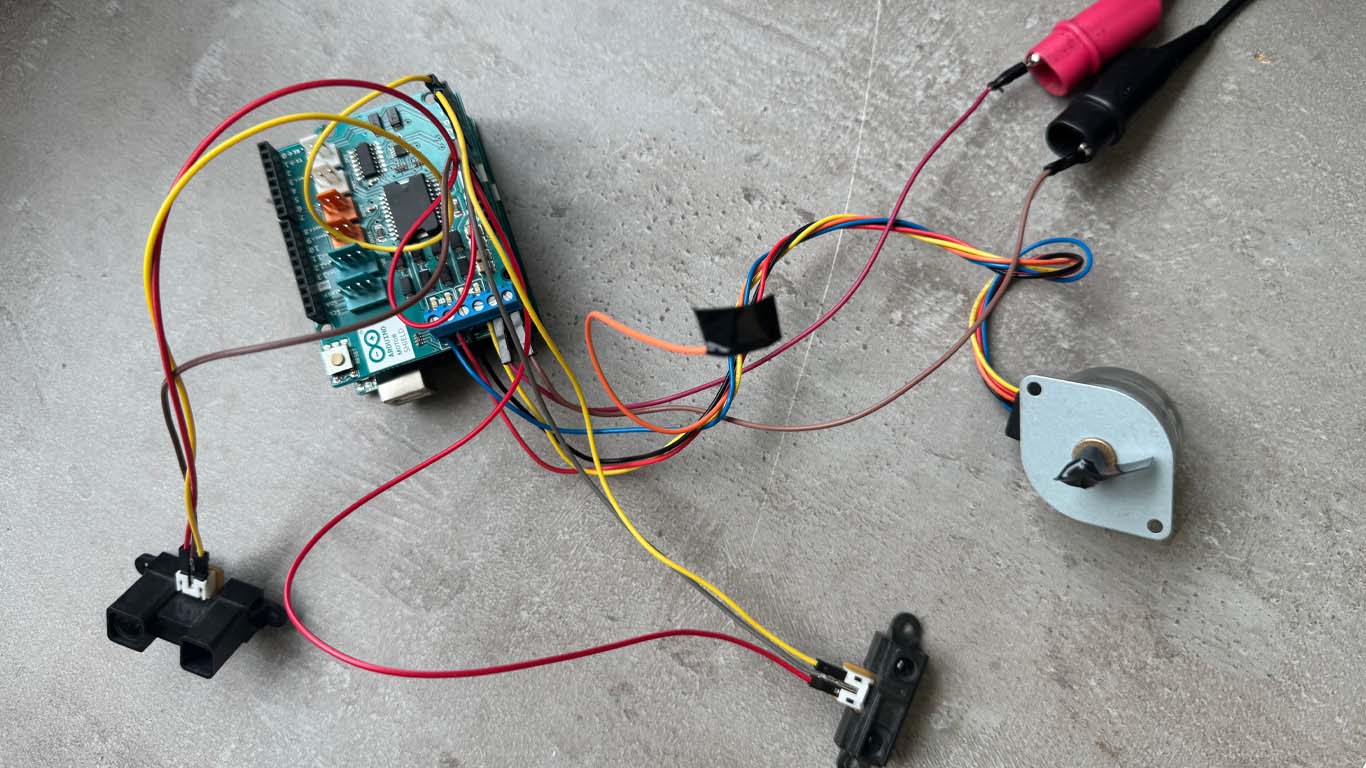
In this step, I took several stepper motors with different power levels and started experimenting with them — trying to understand how to connect everything and how it works. To run the stepper motor without a separate driver, I used an Arduino Motor Shield with an Arduino Uno and connected everything through it.
In this photo, you can see how two motors can be connected to the board, but I used only one motor and added two sensors. Let’s see which pins I connected.
Distanc Sensor Connections
First, let’s talk about the distance sensor pins. It has three pins: VCC (voltage), signal, and GND. They are connected like this:

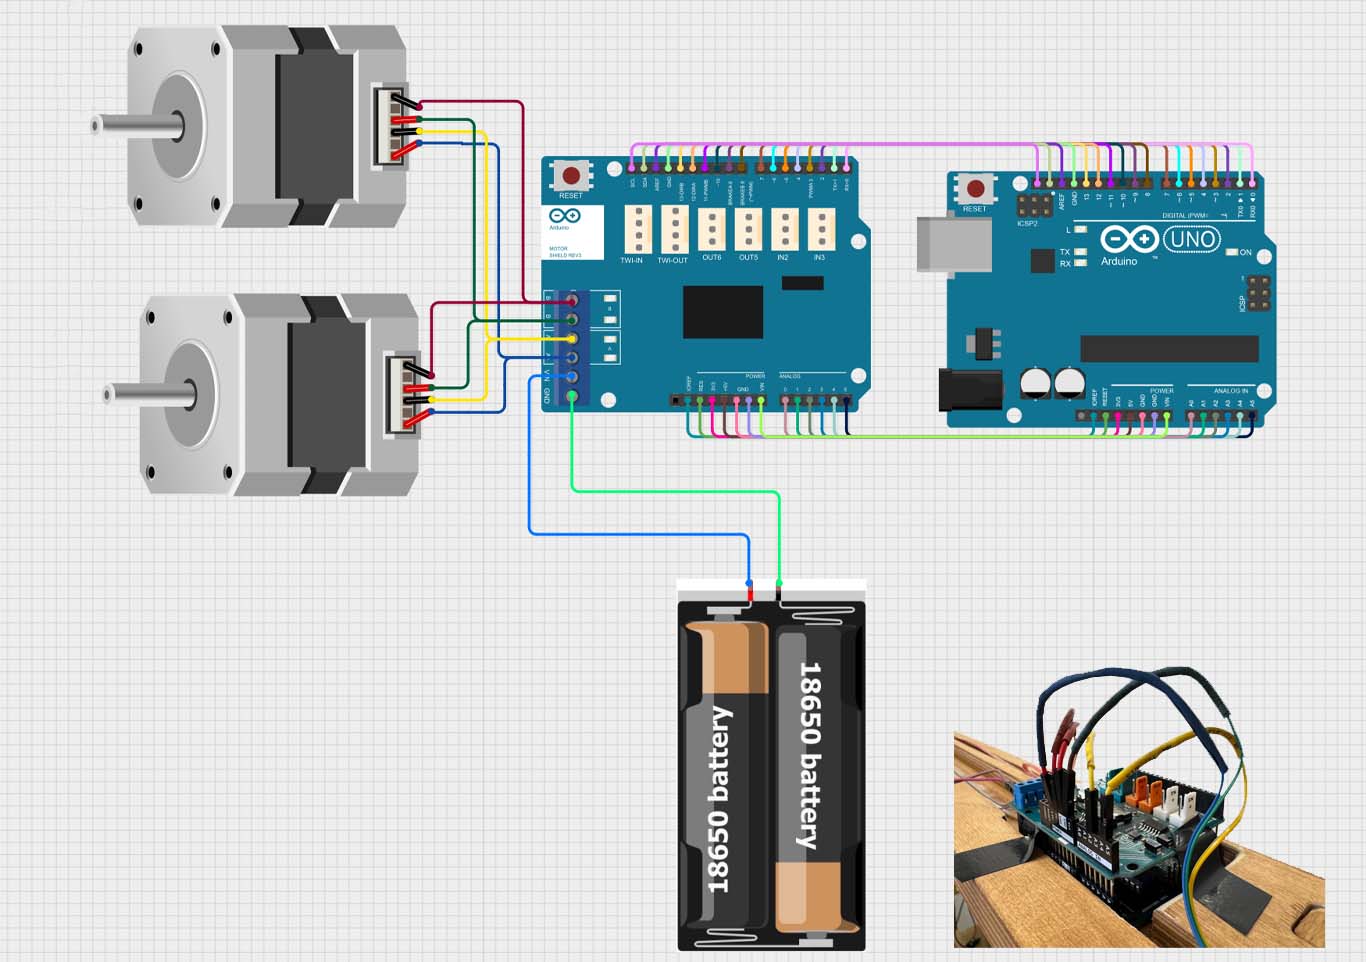
Motor Connections
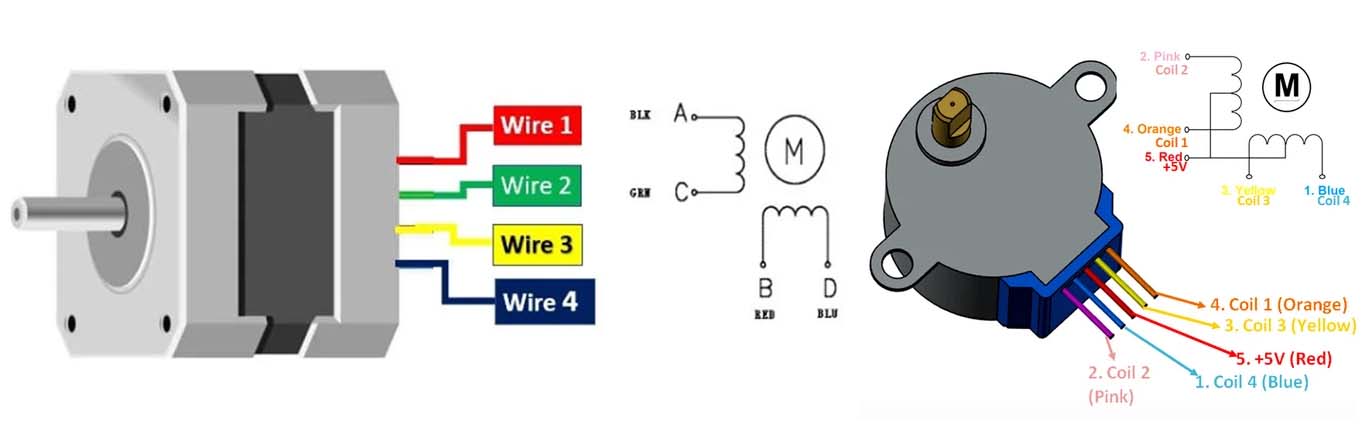
Stepper motors have different types, and each of them can have 5 or more wires for connection. If it has 5 wires, it is quite easy to understand how to connect it. You can look at the схемa for your specific model and/or check which wires have resistance between each other.
If you don’t have a resistance tester, you can also do it manually: connect two wires together and try to rotate the motor shaft. If it becomes harder to rotate, it means those two wires belong together.
Let’s see all of this in the schematic.
How All Connections Work
The code:
#include "Stepper.h"

// Number of steps per revolution
const int stepsPerRevolution = 200;

// Motor shield pins
#define pwmA 3
#define pwmB 11
#define brakeA 9
#define brakeB 8
#define dirA 12
#define dirB 13

// Sensor pins
#define sensor1 A2
#define sensor2 A4

Stepper myStepper(stepsPerRevolution, dirA, dirB);

void setup() {

  pinMode(pwmA, OUTPUT);
  pinMode(pwmB, OUTPUT);
  pinMode(brakeA, OUTPUT);
  pinMode(brakeB, OUTPUT);

  pinMode(sensor1, INPUT);
  pinMode(sensor2, INPUT);

  digitalWrite(pwmA, HIGH);
  digitalWrite(pwmB, HIGH);
  digitalWrite(brakeA, LOW);
  digitalWrite(brakeB, LOW);

  myStepper.setSpeed(60);

  Serial.begin(9600);
}

void loop() {

  int sensor1State = digitalRead(sensor1);
  int sensor2State = digitalRead(sensor2);

  // If sensor 1 detects something → rotate right
  if (sensor1State == HIGH) {
    myStepper.step(200);   // one revolution right
  }

  // If sensor 2 detects something → rotate left
  if (sensor2State == HIGH) {
    myStepper.step(-200);  // one revolution left
  }

}
Conactions with fraim
This part is very important, because it directly affects how well the system will work. For all the connections, I cut a wooden frame with empty spaces designed for the electronic integrations.
The electrical wires were too long, so to make the process easier, I cut male and female jumpers and used them to connect the wires. I also fixed the wires on both sides using tape.
The sensors need to interact with the outside environment, so I left openings in the frame for the sensor heads and placed them there. I also printed a head/mount for the stepper motor to keep it fixed in the correct position.

After a long time and all the connections, it finally worked
Buuuuut… we have a small problem…
The motor didn’t have enough power to make the rotation, so I had to change it.
Motor Changing
I found a hybrid stepper motor with stronger power, slightly bigger than the previous one. I printed a new head and stand for it, connected everything, wrote new code, and started testing.
And finally, the most exciting part — it actually worked with my fabric and did its job.
All of this really works — and works really well.
Final working code
Of course, I adjusted the head rotation, speed, and some other important details to better match this motor and the mechanism.
Final code:
#include "Stepper.h"

// Steps per revolution
const int stepsPerRevolution = 200;

// Motor shield pins
#define pwmA 3
#define pwmB 11
#define brakeA 9
#define brakeB 8
#define dirA 12
#define dirB 13


// Sensors
#define rightSensor A2
#define leftSensor  A4

Stepper myStepper(stepsPerRevolution, dirA, dirB);

unsigned long int counter = 0;

void setup() {

  Serial.begin(9600);

  pinMode(pwmA, OUTPUT);
  pinMode(pwmB, OUTPUT);
  pinMode(brakeA, OUTPUT);
  pinMode(brakeB, OUTPUT);

  pinMode(rightSensor, INPUT);
  pinMode(leftSensor, INPUT);

  digitalWrite(pwmA, HIGH);
  digitalWrite(pwmB, HIGH);
  digitalWrite(brakeA, LOW);
  digitalWrite(brakeB, LOW);

  myStepper.setSpeed(60);
}

unsigned long int sum_left = 0;
unsigned long int sum_right = 0;

int filtered_right = 0;
int filtered_left = 0;
bool data_ready = 0;

void loop() {

  /*Serial.print("left: ");
  Serial.print(filtered_left);
  Serial.print("  right: ");
  Serial.println(filtered_right);
  filtered_right = analogRead(rightSensor);
  filtered_left  = analogRead(leftSensor);
  data_ready = 1; */
  if(data_ready == 0)
  {
    while(counter < 20)
    {
      int rightState = analogRead(rightSensor);
      int leftState  = analogRead(leftSensor);
      sum_left += leftState;
      sum_right += rightState;
      counter++;
    }
  }
  if(counter == 20)
  {
    counter = 0;


    filtered_left = sum_left / 20;
    filtered_right = sum_right / 20;
    Serial.print("left: ");
    Serial.print(filtered_left);
    Serial.print("  right: ");
    Serial.println(filtered_right);
    data_ready = 1;
    sum_left = 0;
    sum_right = 0;
  }


 // Serial.println(rightState);

  // LEFT detector → +360 then back
  if (filtered_left > 200) {
    digitalWrite(pwmA, HIGH);
    digitalWrite(pwmB, HIGH);
    data_ready = 0;
    Serial.println("Left!!!!!!!!!!!!!!");
    myStepper.step(200);   // +360°
    //delay(30);

    myStepper.step(-200);  // return to 0
    //delay(30);
  }
  else if(data_ready == 1)
  {
    digitalWrite(pwmA, LOW);
    digitalWrite(pwmB, LOW);
    data_ready = 0;
  }


  // RIGHT detector → -360 then back
  if (filtered_right > 100) {
    digitalWrite(pwmA, HIGH);
    digitalWrite(pwmB, HIGH);
    data_ready = 0;
    Serial.println("Right!!!!!!!!!!!!!!");
    myStepper.step(-200);  // -360°
    //delay(30);

    myStepper.step(200);   // return to 0
    //delay(30);
  }
  else if(data_ready == 1)
  {
    data_ready = 0;
    digitalWrite(pwmA, LOW);
    digitalWrite(pwmB, LOW);
  }
 // Serial.println(data_ready);

}
Along this journey, I received a lot of support and help. I would like to thank Rudolf Igityan for his guidance during the first steps of the project, and Onik Babajanyan for his help in the final stages with coding and connections.
I’m very grateful for their support.