Computational Couture¶
Week 6 assignment for Fabricademy. A 3D printer is a flat machine; this week was about making it build relief on cloth. Three attempts, two failures, and finally one field of blue triangle pyramids printed through a dyed cloth — modelled from scratch in Rhino 8, starting from the teacher's test file.
1. Objective¶
weekly assignment
Check out the weekly assignment here or login to your NuEval progress and evaluation page.
What this week is. Computational couture is the point where a textile stops being a substrate and becomes part of the structure. The printer does not decorate the cloth — it prints through it, and the cloth ends up buried inside the print. What comes off the bed is one composite sheet: hard where the filament is, soft where only the mesh is, able to fold along the lines where the print stops.
My version started as a copy of the teacher's test file — a square lattice of columns with varying heights, the simplest possible "height field" — and turned into a field of triangular pyramids (棱锥) arrayed in offset rows. Three printing attempts got it there:
- print straight onto a woven fabric, no base layer → the filament had nothing to grab and came out as loose curls;
- change the fabric, but print with a filament that was not PLA → the first layer let go and the print became a bird's nest (the lab calls it 炒面, "fried noodles");
- base skin first, cloth laid in, print resumed → a clean field of blue pyramids fused to the cloth.
Attempt 3 actually ran twice. On 26 Oct it printed onto white tulle as a proof; on 28 Oct the same field went onto a thin indigo-dyed cloth and that is the version this page ends on.
1.1 How this page answers the student checklist¶
| Student checklist item | Where it is answered |
|---|---|
| Document the concept, sketches, references (including artistic / scientific ones) | § 2, § 4 — hand sketches still to be photographed |
| Design a parametric model; upload the 3D design file + parametric files | § 5.4 — Rhino, with the screen recording the handbook asks for when a non-Grasshopper tool is used; .3dm + .stl in § 9 |
| Learn the 3D printer; document the step-by-step process and settings | § 5.5 — settings table + slicer screenshot |
| Document the workflow for exporting the file, preparing the machine, G-code and settings | § 5.5, first paragraph |
| Print the file and document the outcomes | § 5.5, § 5.6, § 6 |
| Upload the STL | § 9 |
2. References & inspiration¶
2.1 Three references that set the direction¶
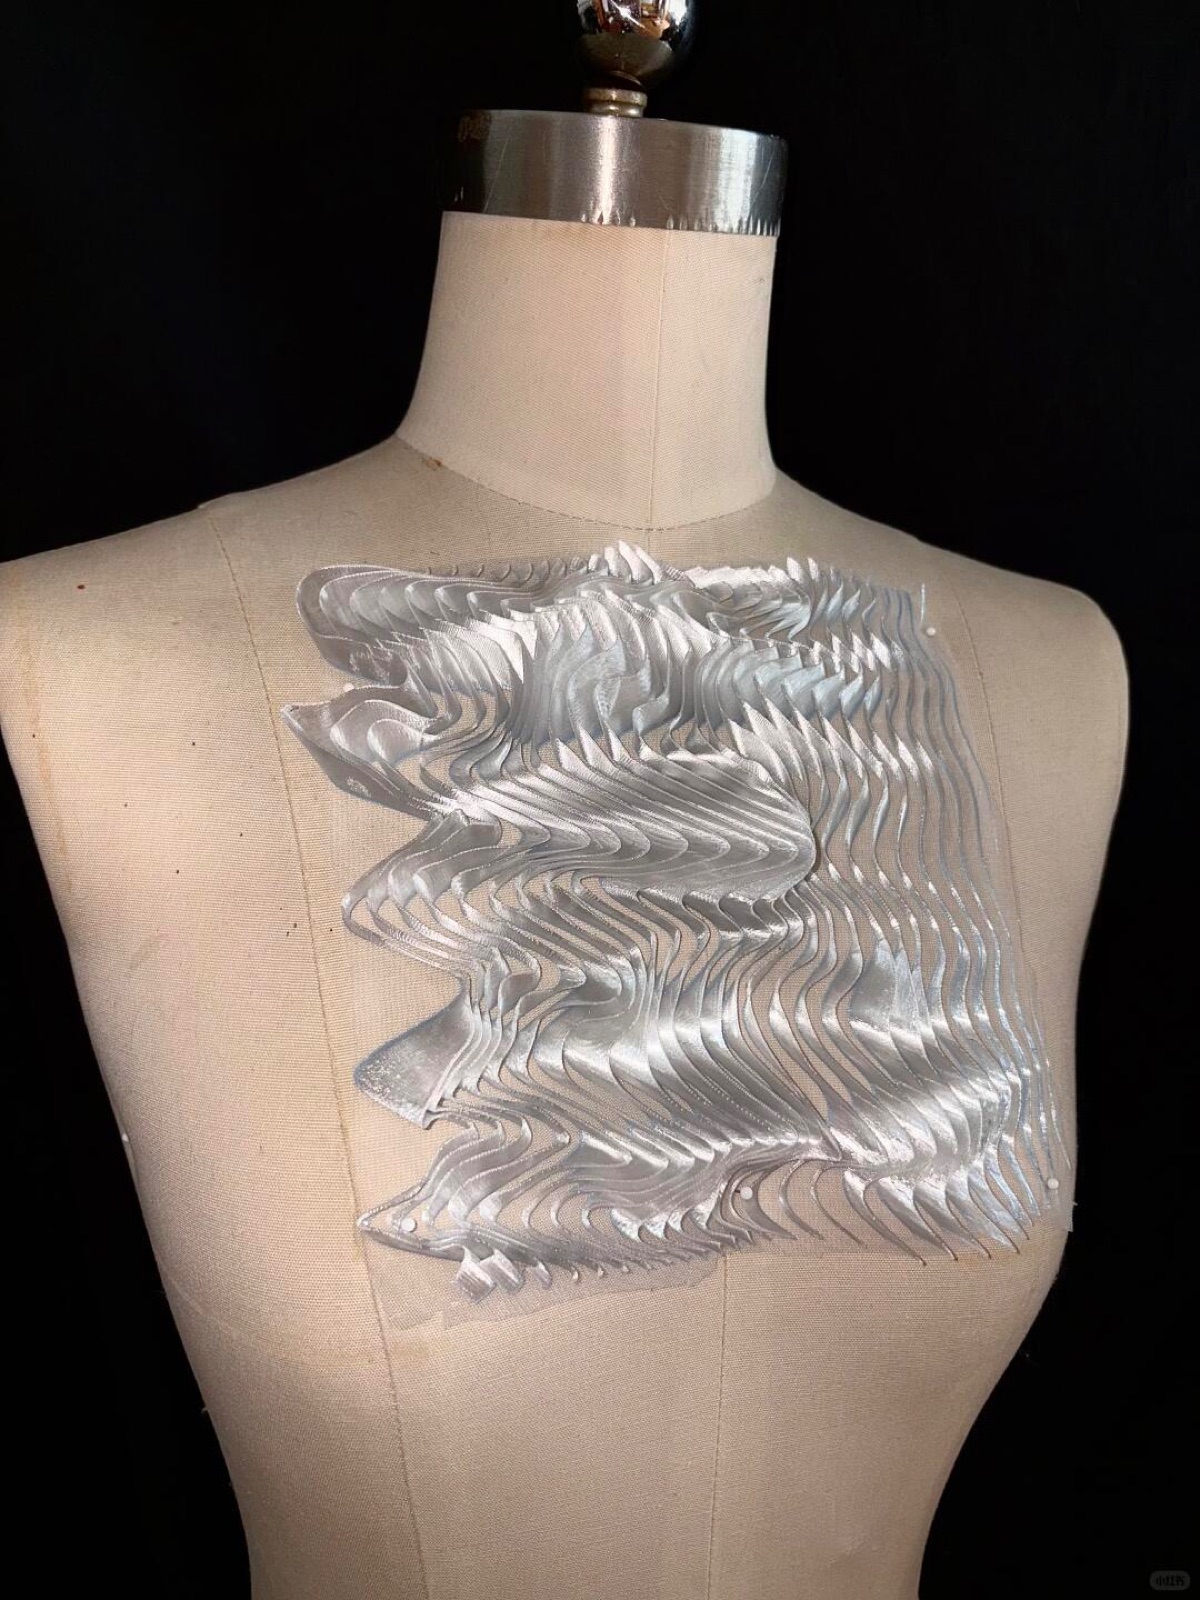
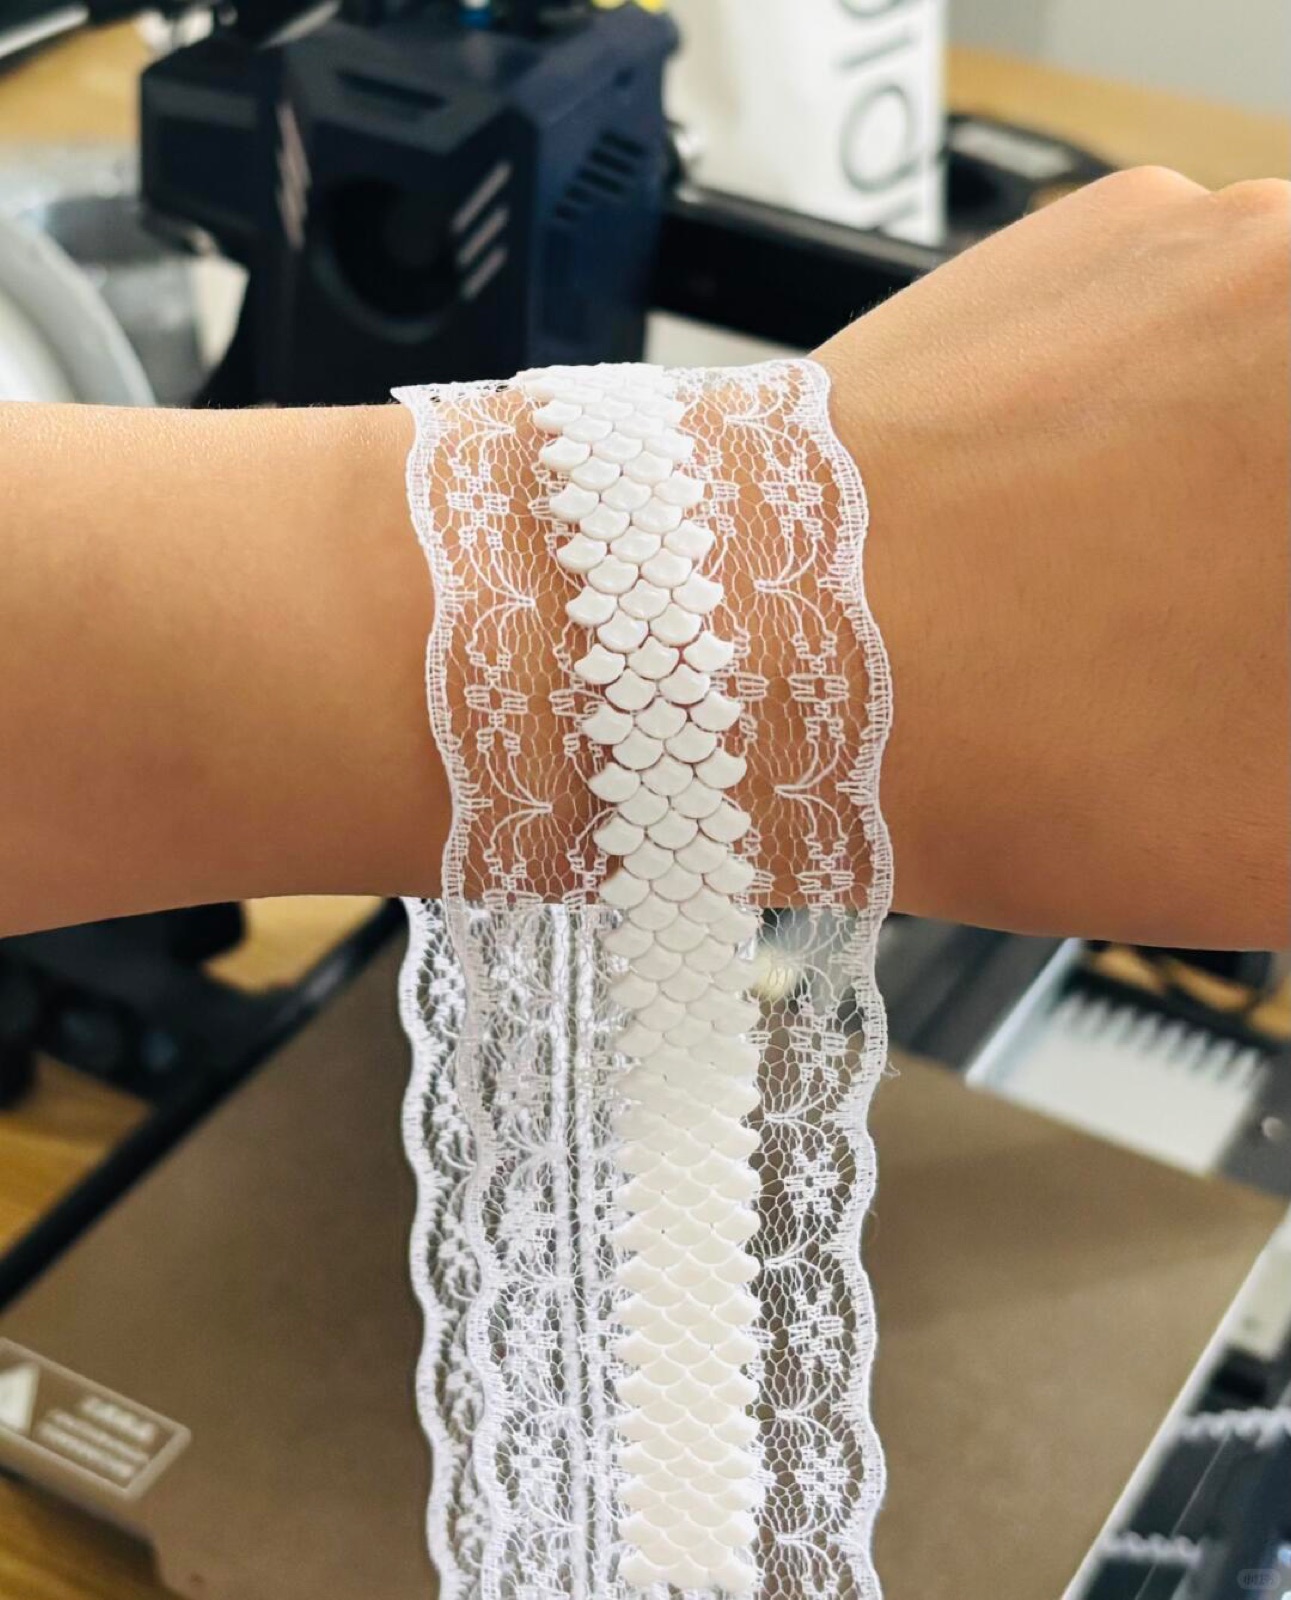
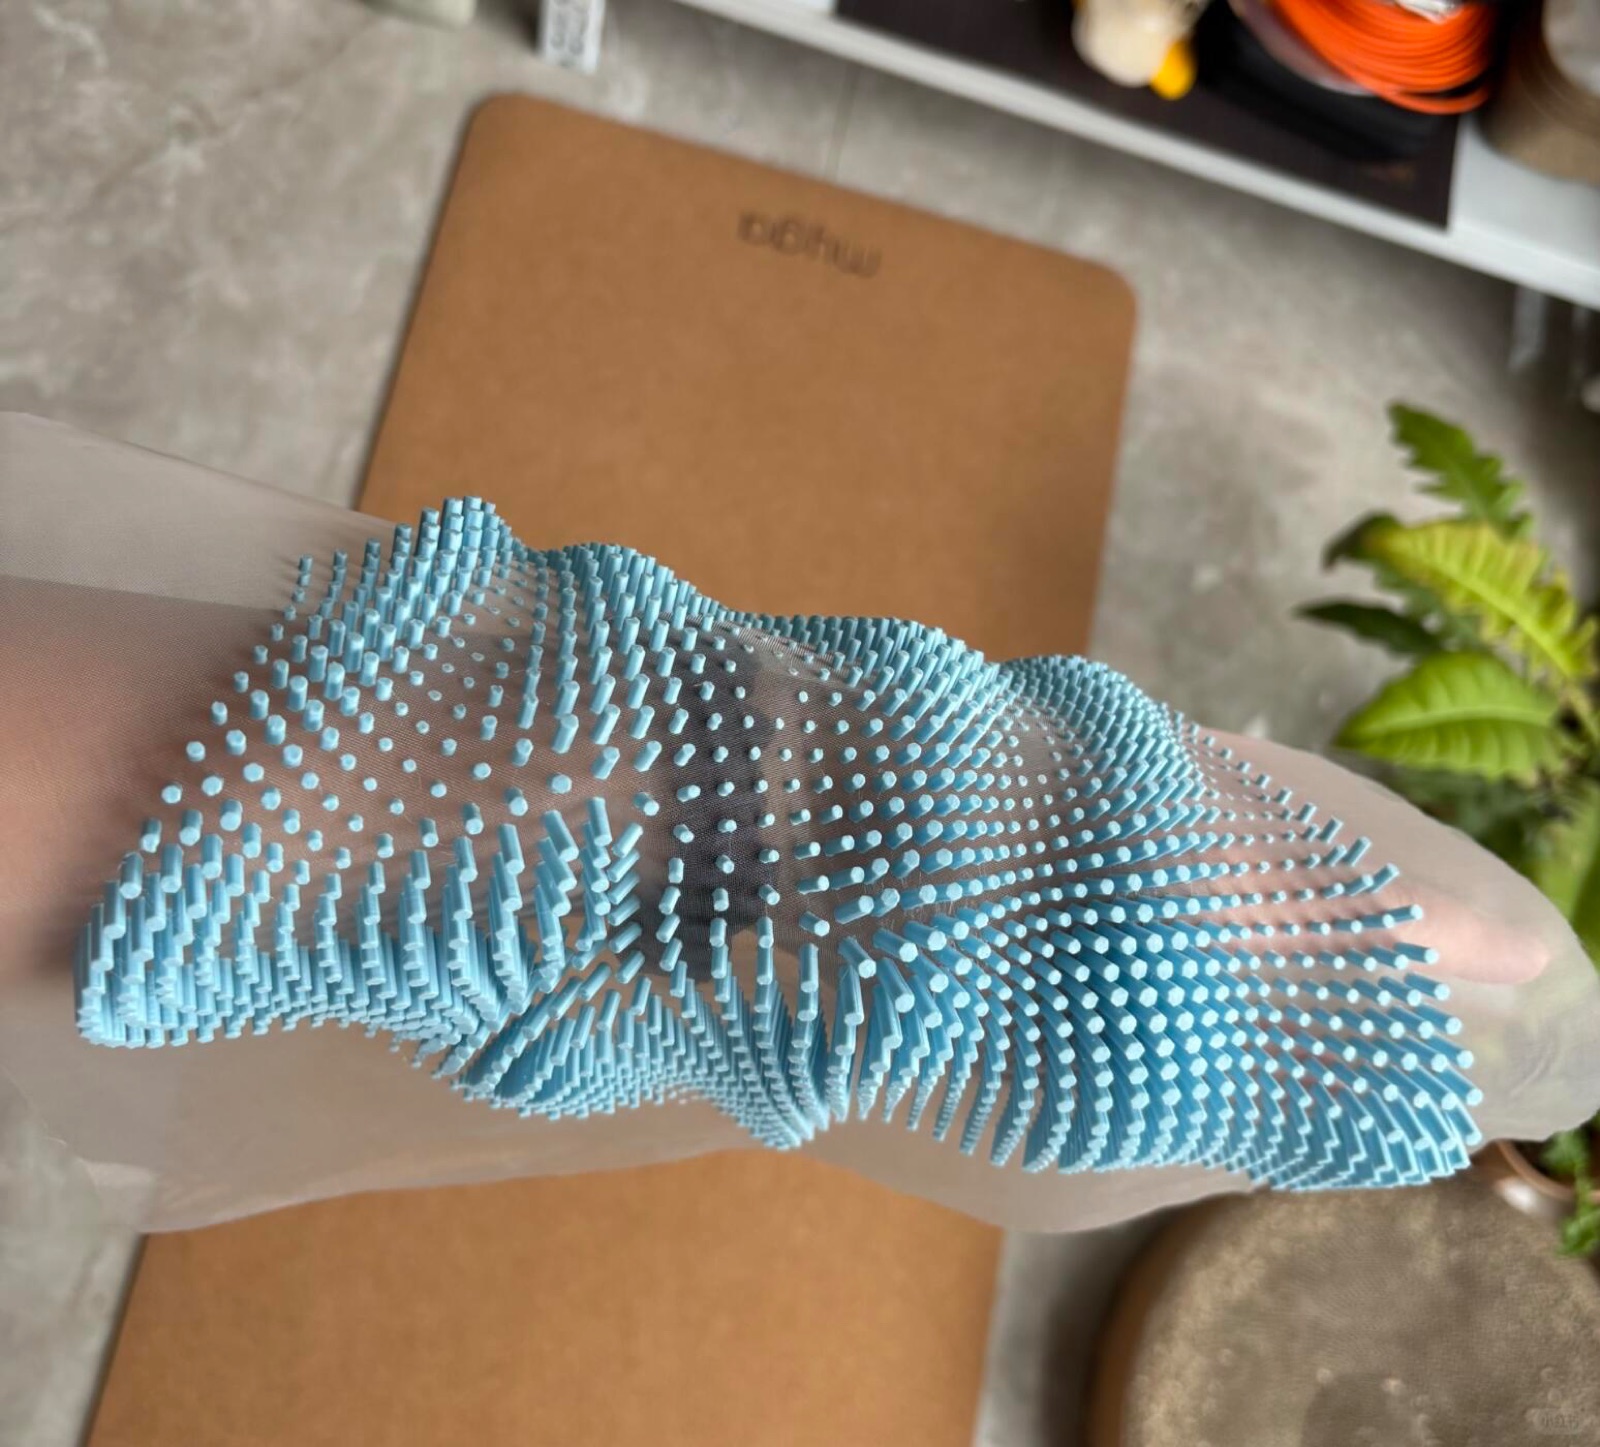
Left: a pleated metal-toned ruffle pinned on the dress form — relief as a surface behaviour, not as ornament (source: 小红书 repost, original author not identified). Centre: a narrow spine of printed shingles fused onto a wide band of lace; the lace keeps doing the soft work while the print adds a hard edge. Right: a bristle field on tulle where the height of each element varies continuously — the gradient itself is the design.
What I took from the three, in order:
- From the ruffle: the value is in the fold line, not in the shape. A surface that pleats reads as cloth even when it is rigid.
- From the lace: print small and let the textile be the majority of the area. The print does not need to cover the fabric to control it.
- From the bristle field: one cell + one parameter (height) is enough to generate a whole surface. That is exactly what a height field is, which is where the teacher's test file comes in.
2.2 Where my version departs¶
The three references are all soft: pleats that fold, shingles that follow a wrist, bristles that bend. I wanted the opposite reading — something closer to scale armour that still folds, so the cell had to be a solid volume with a flat face that can weld to its neighbours. A triangular pyramid gives that: three slanted faces to share, one apex to vary, and in plan view it tiles the plane without gaps.
get inspired!
Check out and research alumni pages to better understand how to document and get inspired.
- 3d print on fabric — Zahia Albakri - CPF Makerspace
- 3d print on fabric — Aslı Aydın Aksan - TextileLab Amsterdam
- Dual filament 3d print research — Stephanie Johnson - TextileLab Amsterdam
- Blender research and tutorials — Erika Mirzoyan - FabLab Armenia
3. Tools & materials¶
Software
- Rhino 8 — modelling the cell, the row and the field (Chinese UI, units in mm)
- Bambu Studio — slicing for the H2S
- The lab's slicer profile for the SPARKX i7 (attempt 2)
Hardware
- Bambu Lab H2S — the final print (textured PEI plate)
- SPARKX i7 — the second attempt
- Digital calliper, tweezers, tape / clips for fixing the cloth to the plate
Materials
- PLA, blue — Bambu PLA Basic, 1.75 mm (attempts 1 and 3)
- PLA, white — the flat strips in the tulle proof, which is why the divisions inside the field are so legible there
- A non-PLA filament — attempt 2 (the exact spool was not recorded; see § 5.3)
- Plain woven cotton — attempt 1
- Fine white tulle / mesh — attempt 3, first run (26 Oct)
- Thin indigo-dyed cloth — attempt 3, final run (28 Oct). Light enough that the base pass is visible through it while it is being laid down, tightly woven enough that the pyramids weld to it
4. Concept: one cell, a field, one sheet¶
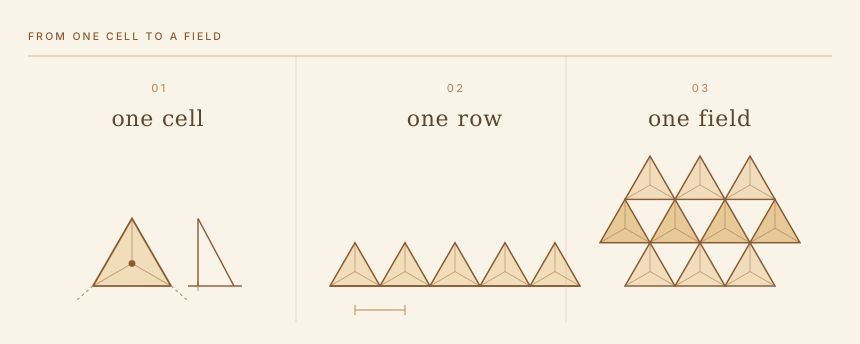
The whole model in three steps. Left: one triangular pyramid — a base triangle plus a numerically typed apex height, with the two slanted faces that will bond to its neighbours. Centre: a row at a fixed pitch, every cell sharing a face with the next. Right: the next row offset by half a pitch, so each cell locks against two neighbours instead of one.
4.1 Why a pyramid and not a column¶
The teacher's test file is a lattice of square columns with varying heights (§ 5.1). It proves the idea — a grid of numbers becomes a surface — but a square column only touches its neighbours along a vertical edge, so an array of them stays a field of separate posts.
A triangular pyramid solves that in plan view: three slanted faces, each of which can be shared with a neighbour. Fill the plane with them and the faces stop being separate walls and become one continuous zigzag skin. The apex becomes the only free variable: keep it constant and you get a corrugated sheet, vary it and you get relief.
4.2 Where the flexibility comes from¶
Three things, in order of importance:
- The cloth. The tulle is the hinge. Where the print stops, the mesh is still there — it takes the fold, and it never fatigues the way a thin printed living hinge does.
- The gaps between cells. The pyramids are welded along their faces but not merged into a slab; the valleys between rows stay open, so the sheet can close and open like a fan.
- The places where the print stops. The field is never a continuous slab: between rows the filament runs flat instead of rising into a pyramid, and at the perimeter the field breaks up into single pyramids. Those interruptions are the fold lines — the sheet creases along a seam instead of buckling somewhere random.
5. Process¶
5.1 The teacher's test file: a height field of columns¶
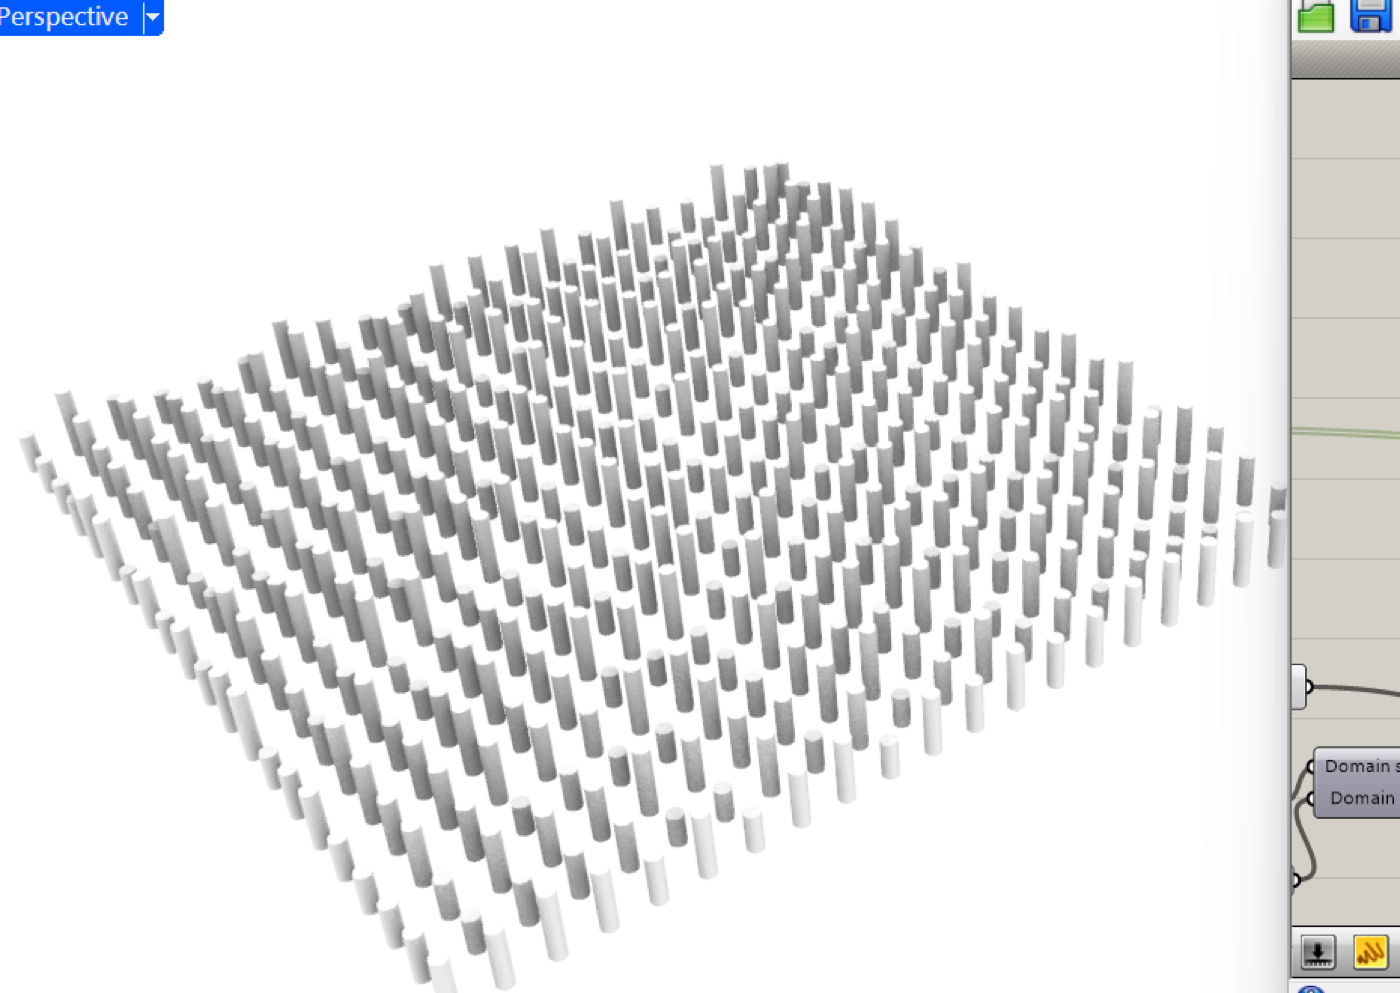
The starting file. A square footprint, a constant pitch, and one number per column: the height. Nothing is modelled by hand — the whole surface is the result of that number set.
This is the file I was given to test the printer with, and it is also the clearest possible definition of computational design: one cell + a list of values = a surface. Before touching the pattern I copied this logic exactly (constant footprint, variable height) and only later replaced the square column with a triangular pyramid, because the pyramid is the version that can bond sideways.
5.2 Attempt 1 — straight onto fabric (failed)¶
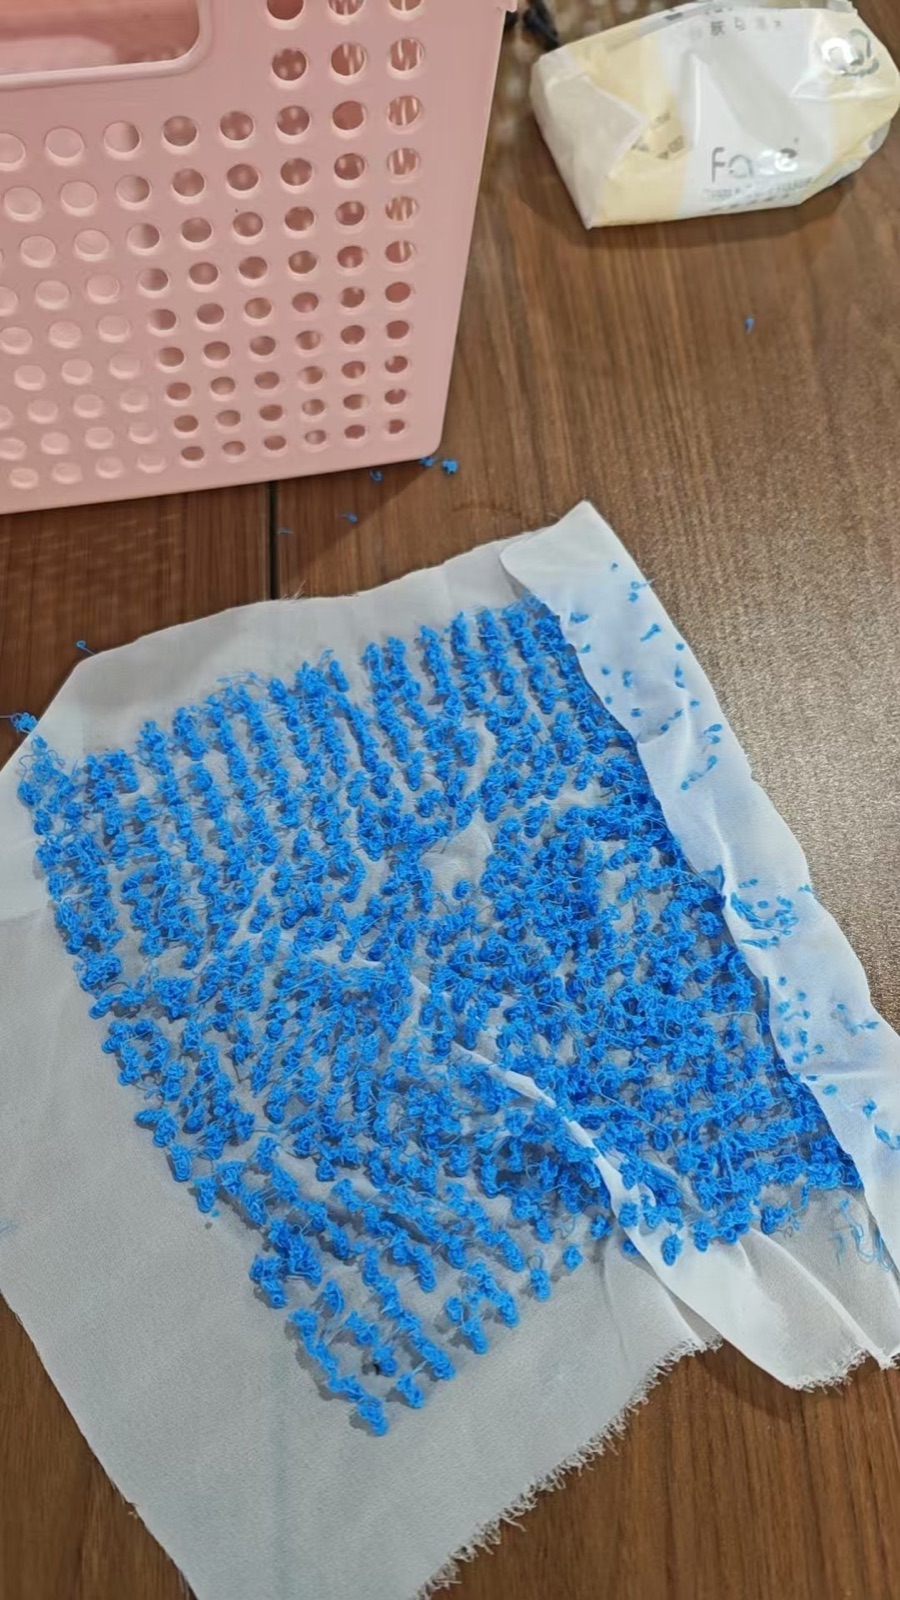
Attempt 1. Blue PLA laid directly onto a plain woven cotton. The result is not a surface but a scatter of curled strands — the filament never had a plane to sit on.
What went wrong. I printed the pyramids directly onto the cloth as if the cloth were the build plate. It is not: it is porous, it is not flat at the 0.1 mm scale that matters, and it does not hold the first layer. The nozzle dragged each strand as it left, and because there was no continuous skin underneath, every line stayed a loose loop. The fabric also puckered, which made the next line worse than the one before.
The fix, as explained to me. Print a base skin first, pause, lay the cloth over it, then continue. The first layers are printed on the bed as normal and act as the anchor; the cloth is pressed into them while they are still warm; the rest of the model is printed on top, welding through the mesh.
5.3 Attempt 2 — new fabric, wrong filament (spaghetti)¶
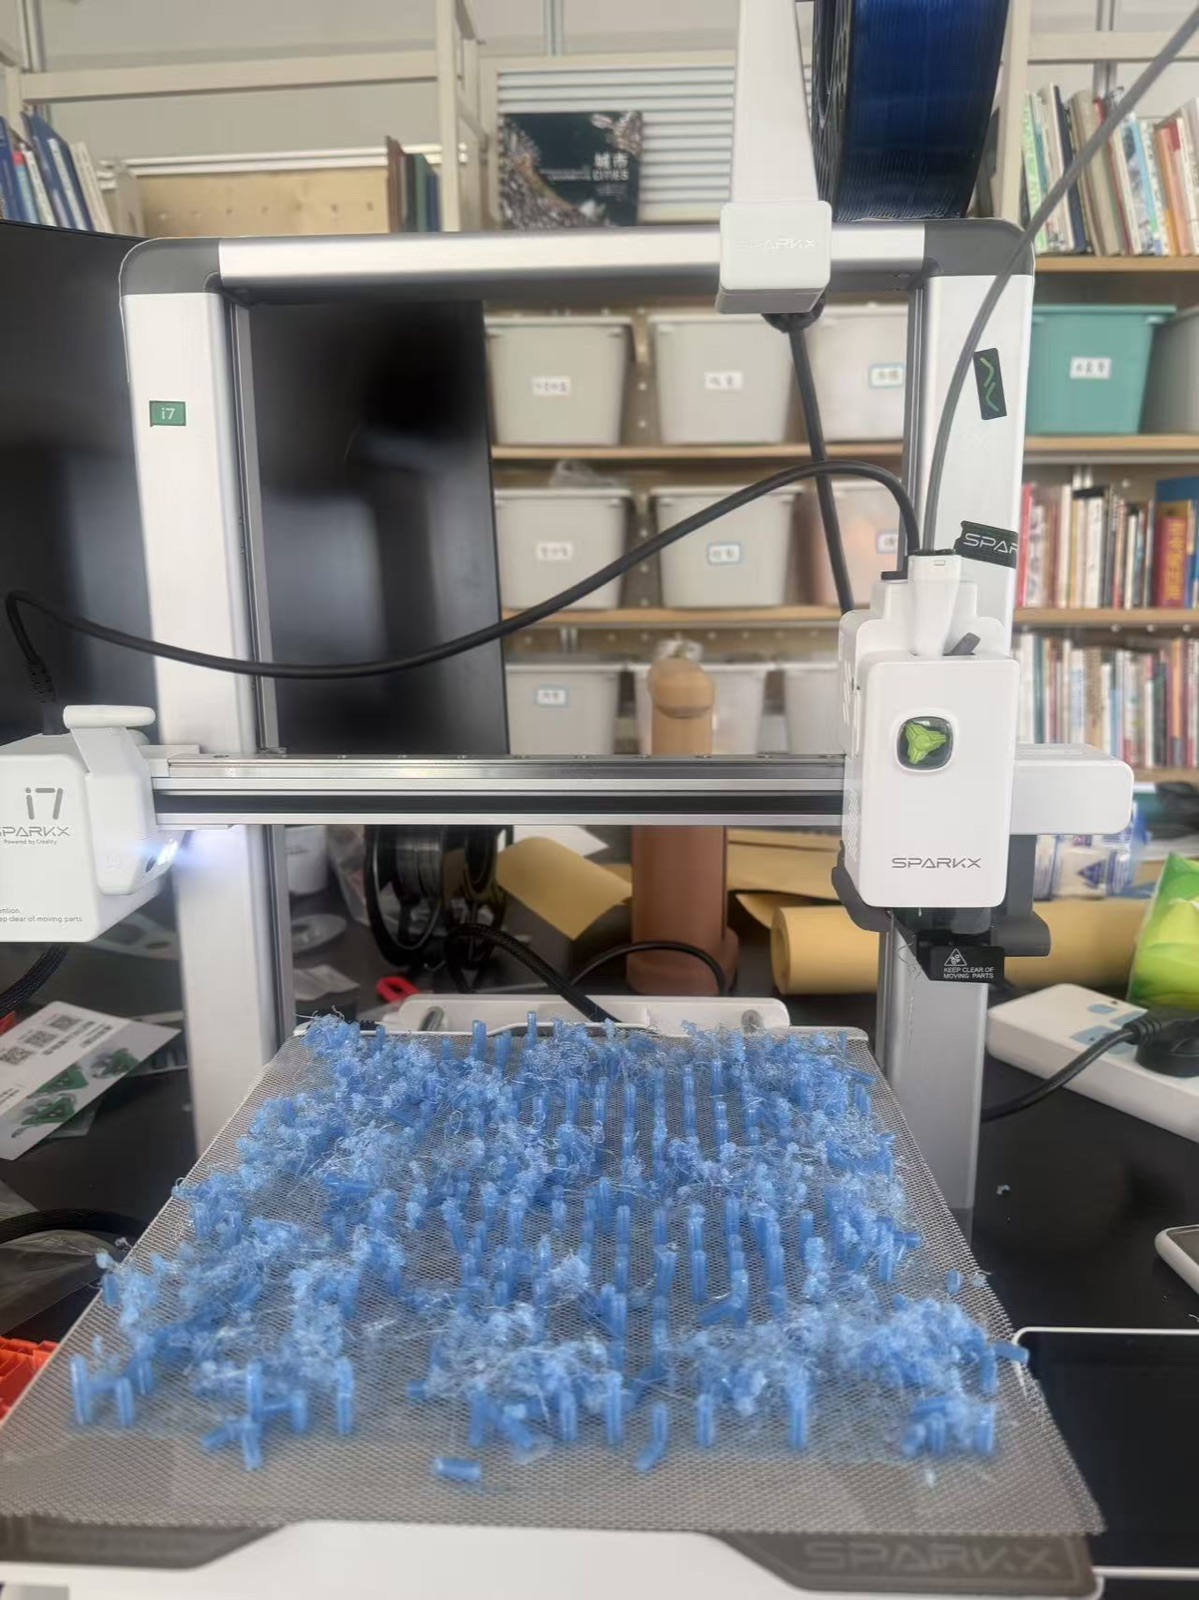
Attempt 2. A different cloth, and a filament that was not PLA. The print detached early and the nozzle kept extruding into empty air — 炒面, "fried noodles".
Two things changed at once, which is why this attempt taught me less than it should have: a new fabric and a different filament (not PLA — the spool was not recorded). Either change alone might have been recoverable; together they removed both references at the same time. The first layer never bonded, the plate emptied, and about fifteen minutes of extrusion ended up as a tangled nest on the bed.
Lesson. Change one variable per run. The material sets the temperatures and the adhesion behaviour; the cloth sets the surface the first layer has to hold onto. If both move, a failure tells you nothing about which one caused it.
5.4 Learning Rhino 8 from zero¶
This was the part with no shortcut. I had never modelled in Rhino, so the video below is the actual learning session, unedited: one pyramid, then copies of it, then two rows.
Why Rhino and not Grasshopper. The handbook asks for a parametric model and, if another tool is used, an explanation plus a screen recording. I built this in Rhino directly for one reason: with a single cell and a single height, I needed to understand the geometry by hand before automating it, and a definition I could not read would have hidden the mistakes. The screen recording is the substitute the handbook asks for — every command is visible, so the block can be rebuilt from it without the file. The honest limitation is that the field is still a copy, not data: varying apex height per cell is the next step, and § 8 says why.
Modelling session, 3:16. Rhino 8, four viewports, everything built from one command and one copy operation.
What happens in it:
- 0:00 — an empty file. The only thing set up beforehand is the view: Top / Perspective / Front / Right, units in mm.
- 0:44 —
Pyramid(棱锥). The base triangle is drawn in Top as three clicks, then the command line asks for 棱锥顶点 — the apex. The height is typed as a number, not dragged, so the first cell is already exact. - 1:30 — the cell is duplicated with the Gumball: hold Alt while dragging an arrow, so the drag makes a copy and keeps the apex height identical.
- 2:11 → 2:33 — cells two and three, each Alt-copied at the same pitch. Three pyramids become a row.
- 2:55 — the row is mirrored, not copied: the second row is flipped and offset by half a pitch so its cells lock into the valleys of the first.
- 3:10 — the two rows are grouped. That group is the printable block; the rest of the sheet is the same group repeated until the field fills the build area.
Two things I would tell anyone starting this in Rhino: keep Osnap limited to endpoints and intersections (midpoints and quadrants will grab the wrong point and quietly skew the pitch), and use Alt-copy rather than Copy, because the copy stays in the same operation and the spacing can be checked in the command line as you go.
5.5 The print that worked: base skin, cloth, pyramids¶
File → machine, in four moves. In Rhino: Export → STL, binary, tolerance 0.01 mm, units kept in mm. In Bambu Studio: import the STL, select the Bambu Lab H2S printer and the textured PEI plate, confirm the object sits on the plate with no supports, Slice, inspect the preview (first layer first), then send the plate to the machine. The G-code is whatever that slice produces — the profile is the stock 0.20 mm Standard @BBL H2S, not a hand-tuned one, which is why the table below is short: the only thing I changed was the pause.
The protocol, as finally run on the Bambu Lab H2S with the textured PEI plate:
- Print the base pass. The bottom layer of the field goes down on the plate as a lattice of triangle footprints, welded edge to edge. This is the layer the cloth will be bonded to, so it has to be continuous — not a brim, not a raft.
- Pause with the base still hot. Lay the cloth over the plate, pull it flat, and clip all four edges so it cannot move when the nozzle comes back.
- Resume. The nozzle picks up at the paused height and prints the pyramids through the cloth: the layer lines weld to the pass below, trapping the cloth in between.
- Let it cool completely before touching the plate. The composite releases as one piece.
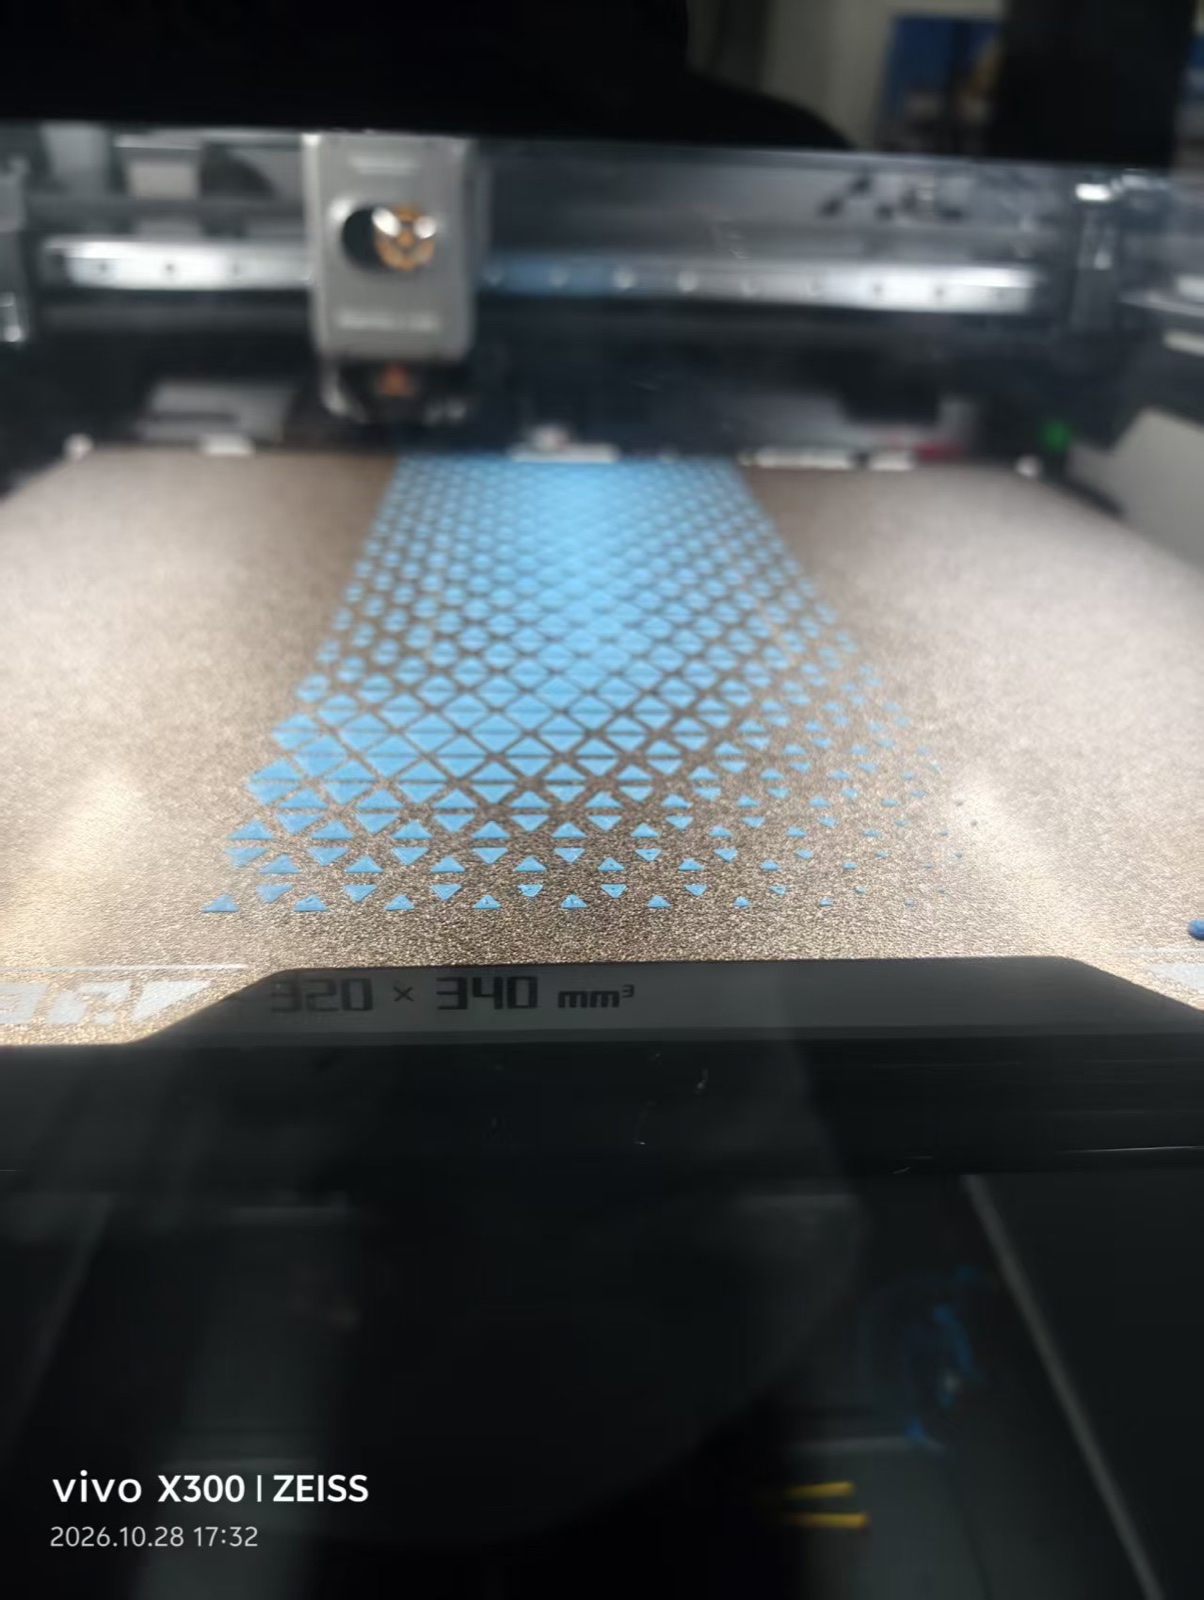
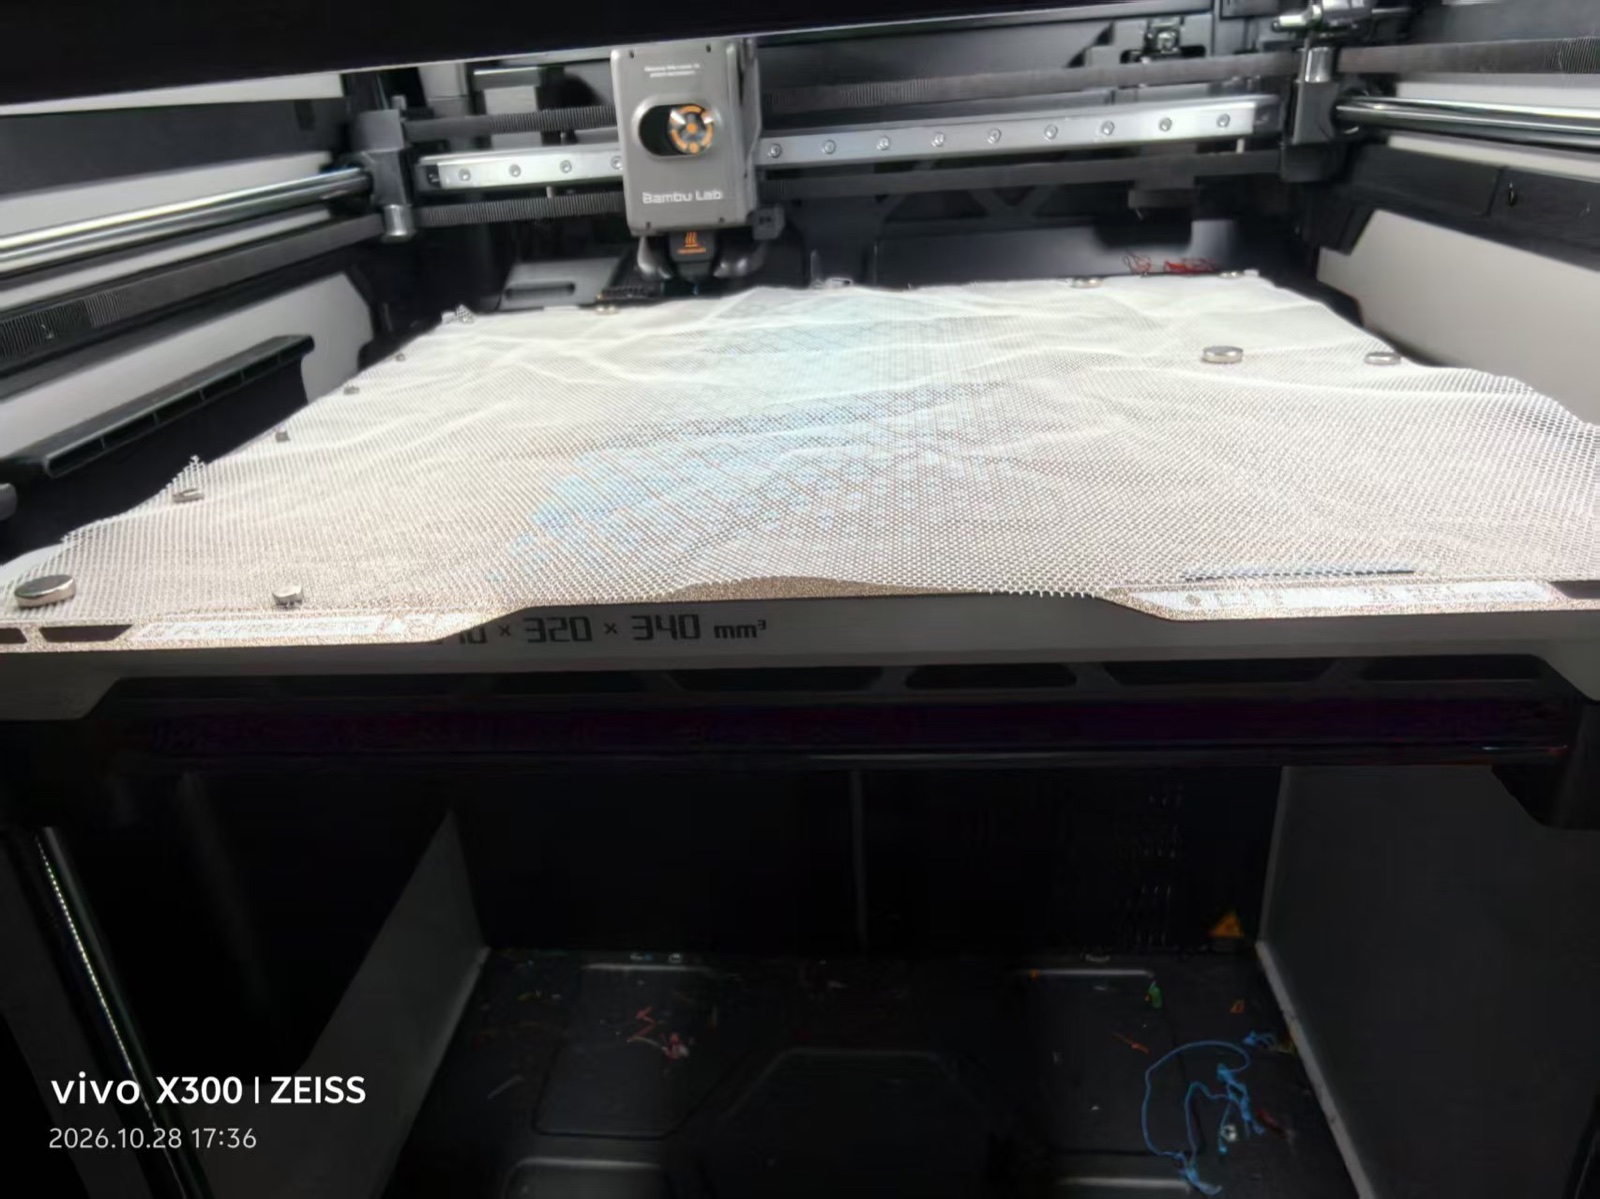
Left, 17:32 — the base pass. A lattice of triangle footprints, each one the bottom face of a pyramid, sharing edges with its neighbours; nothing solid rises above them yet. Right, 17:36 — the same plate four minutes later, cloth over the print, edges clipped. The blue lattice is still faintly visible through the cloth, which is how I checked that it was lying flat rather than bridged over the pyramids.
0:20. The head printing over the clipped cloth. Watch the cloth itself: no ripple travels through it as the nozzle crosses, which is the only real proof that the clamping held. Underneath, the surface goes from a flat lattice to a field of peaks within a few millimetres of height.
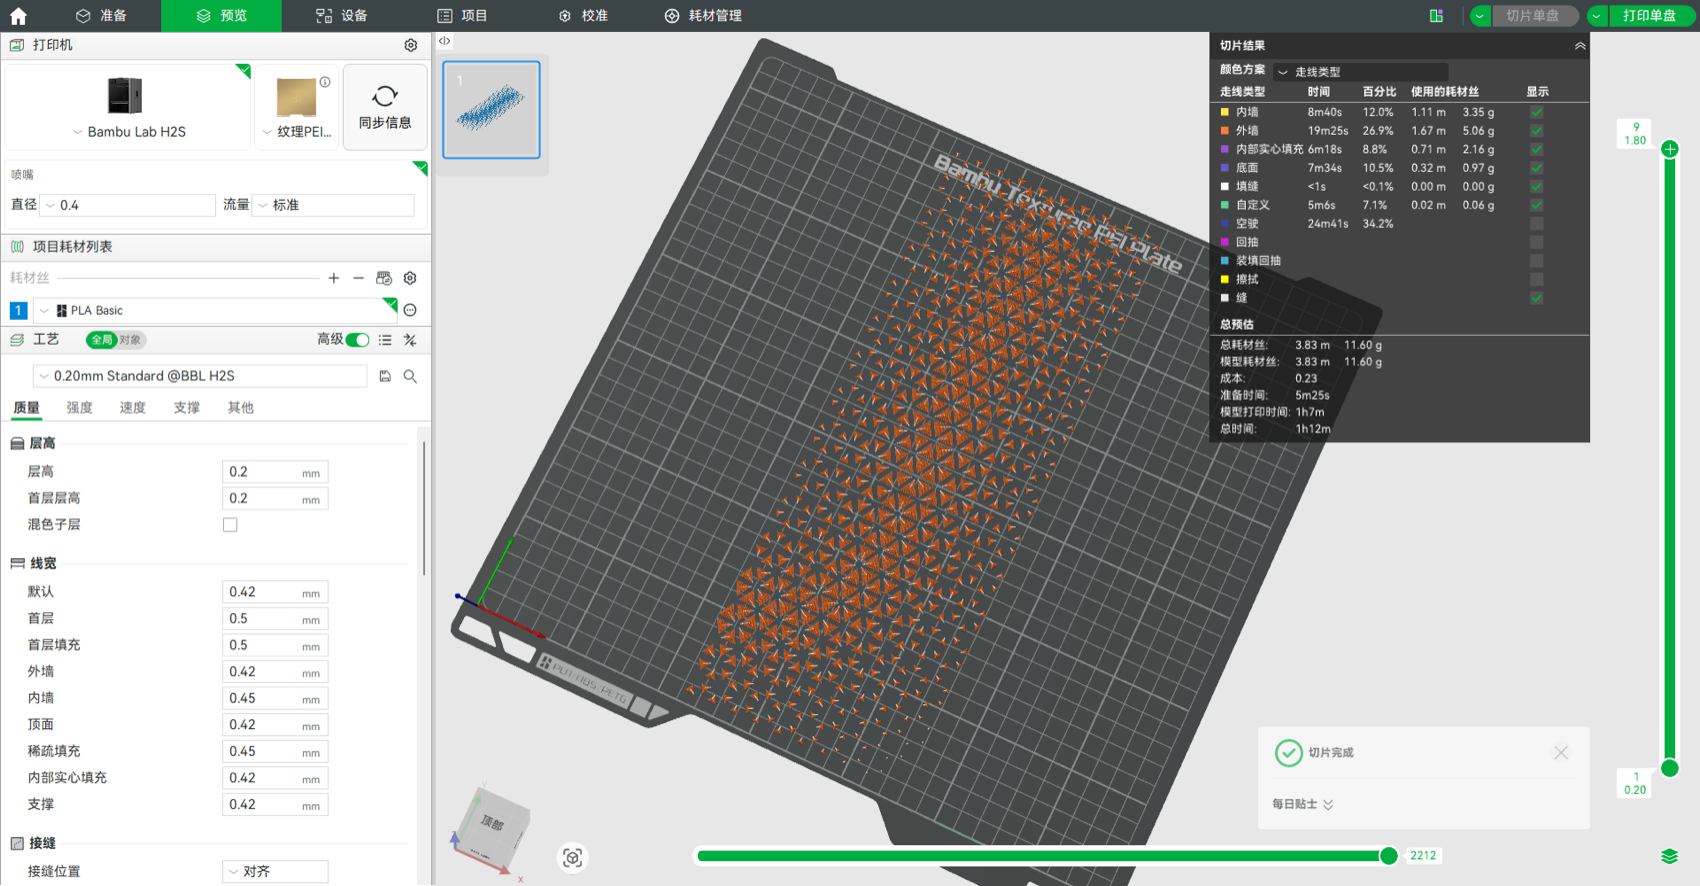
The slice as it was sent — model preview top left, toolpath in orange, parameter panel on the right. Every number in the table below is read off this screen.
| Setting | Value as printed |
|---|---|
| Printer / plate | Bambu Lab H2S, textured PEI |
| Nozzle | 0.4 mm, flow standard |
| Profile | 0.20 mm Standard @BBL H2S |
| Layer height / first layer | 0.2 mm / 0.2 mm |
| Line widths | outer wall 0.42 mm, inner wall 0.45 mm, top and bottom 0.5 mm |
| Infill | sparse, 0.45 mm — the inside is never seen; the slanted walls carry the shape |
| Filament | Bambu PLA Basic, blue — 3.83 m, 11.60 g |
| Estimated time | preparation 5 m 25 s + model 1 h 7 m |
| Supports | none |
The one setting the slicer could not know about is the pause. The cloth goes in by hand, at a layer height the operator chooses, and the machine waits — so the decisive parameter of this week is not in the profile at all.
0:30, the last few millimetres. By this point the pyramids are stiff enough to hold their own geometry, while the cloth between them is still following the plate. This is the stage where a bad bond shows up: the peaks start to lean and the cloth puckers around them. Neither happened.
5.6 Demoulding¶
Taking the sheet off the plate (26 Oct, the tulle proof). No tools: the print and the cloth come away together, and the piece holds its own shape the moment it is lifted.
This is the moment that decides whether the whole idea works. If the pyramids had popped off the cloth, the print would have been decoration; if the cloth had torn, the composite would have been a rigid slab. Neither happened — the sheet lifted with the pyramids still locked to it, and the first fold happened immediately, in the hand.
6. Results¶
6.1 First proof: the field on tulle (26 Oct)¶
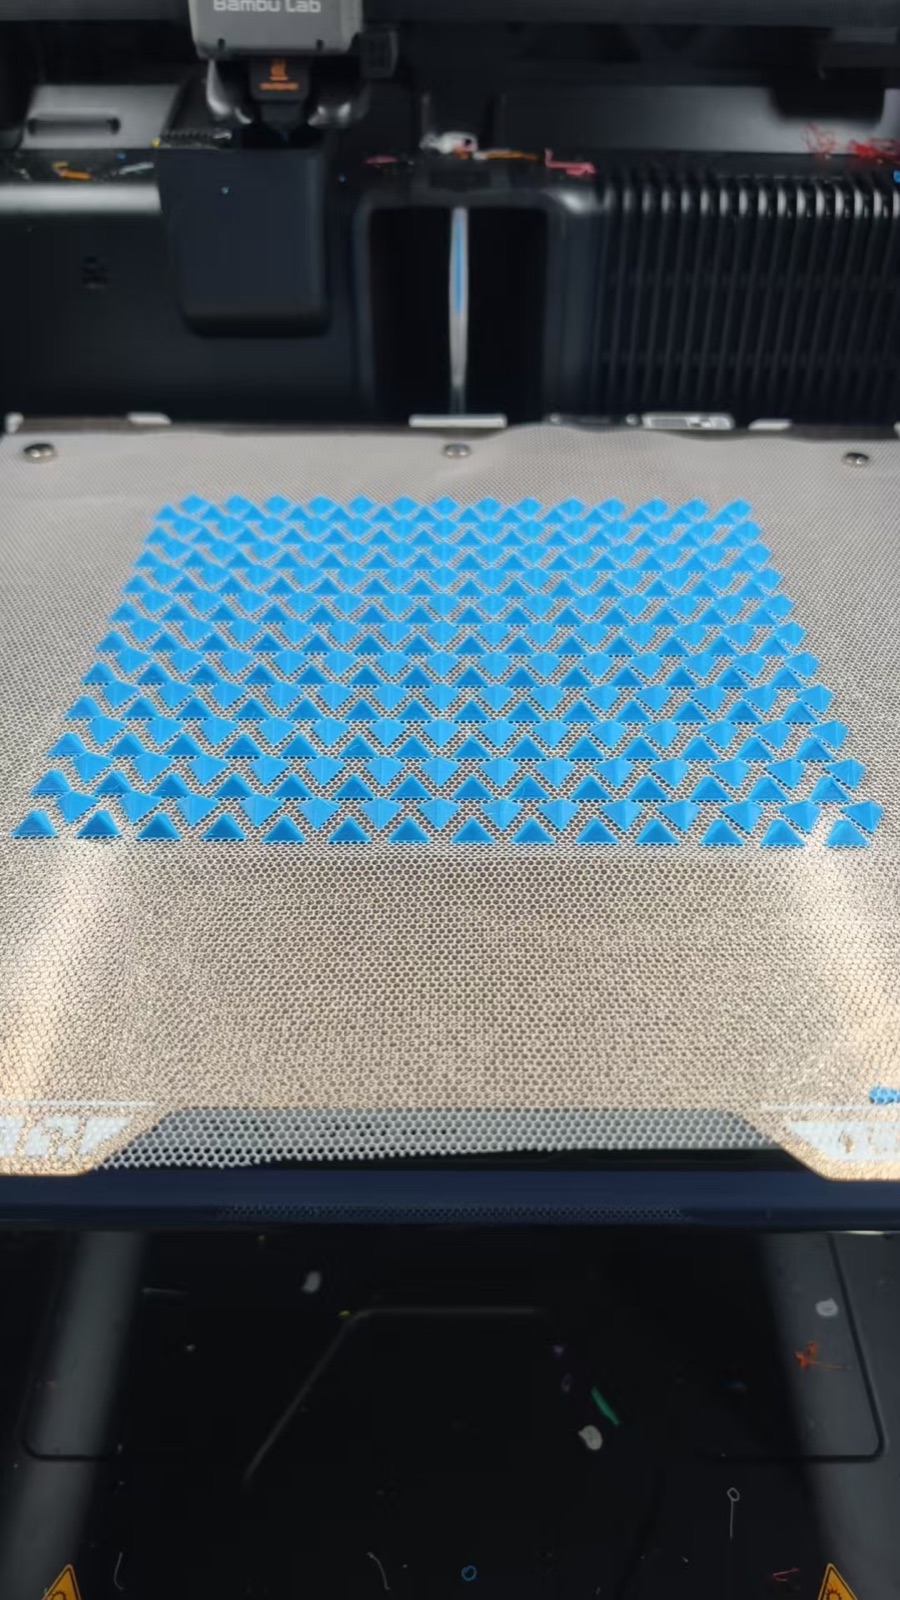
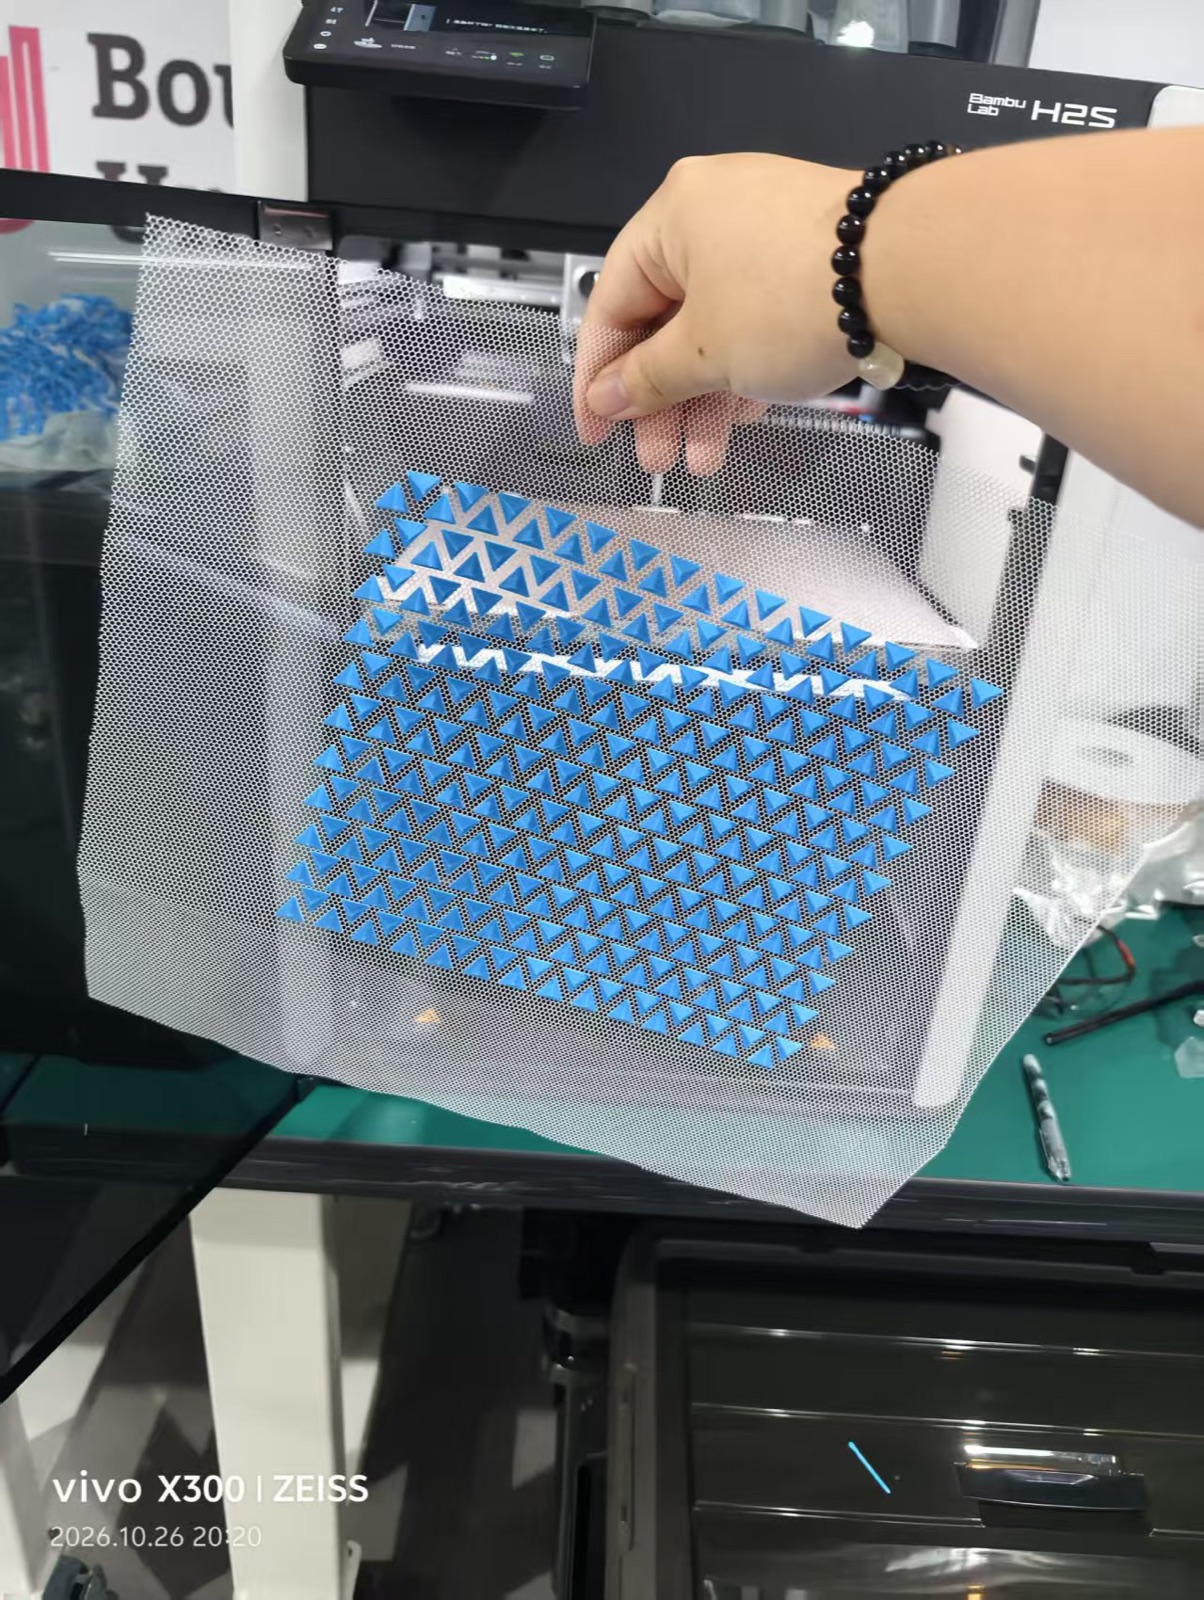
Left: on the bed, the field reads as rows of blue chevrons. Right: lifted, the same field reads as triangles — the two views of the same pyramid. In this proof the flat strips between the rows were printed in white, which is what makes the internal divisions of the field so legible; in the final version everything is one blue and the seams disappear.
6.2 Final version: the same field on dyed cloth (28 Oct)¶
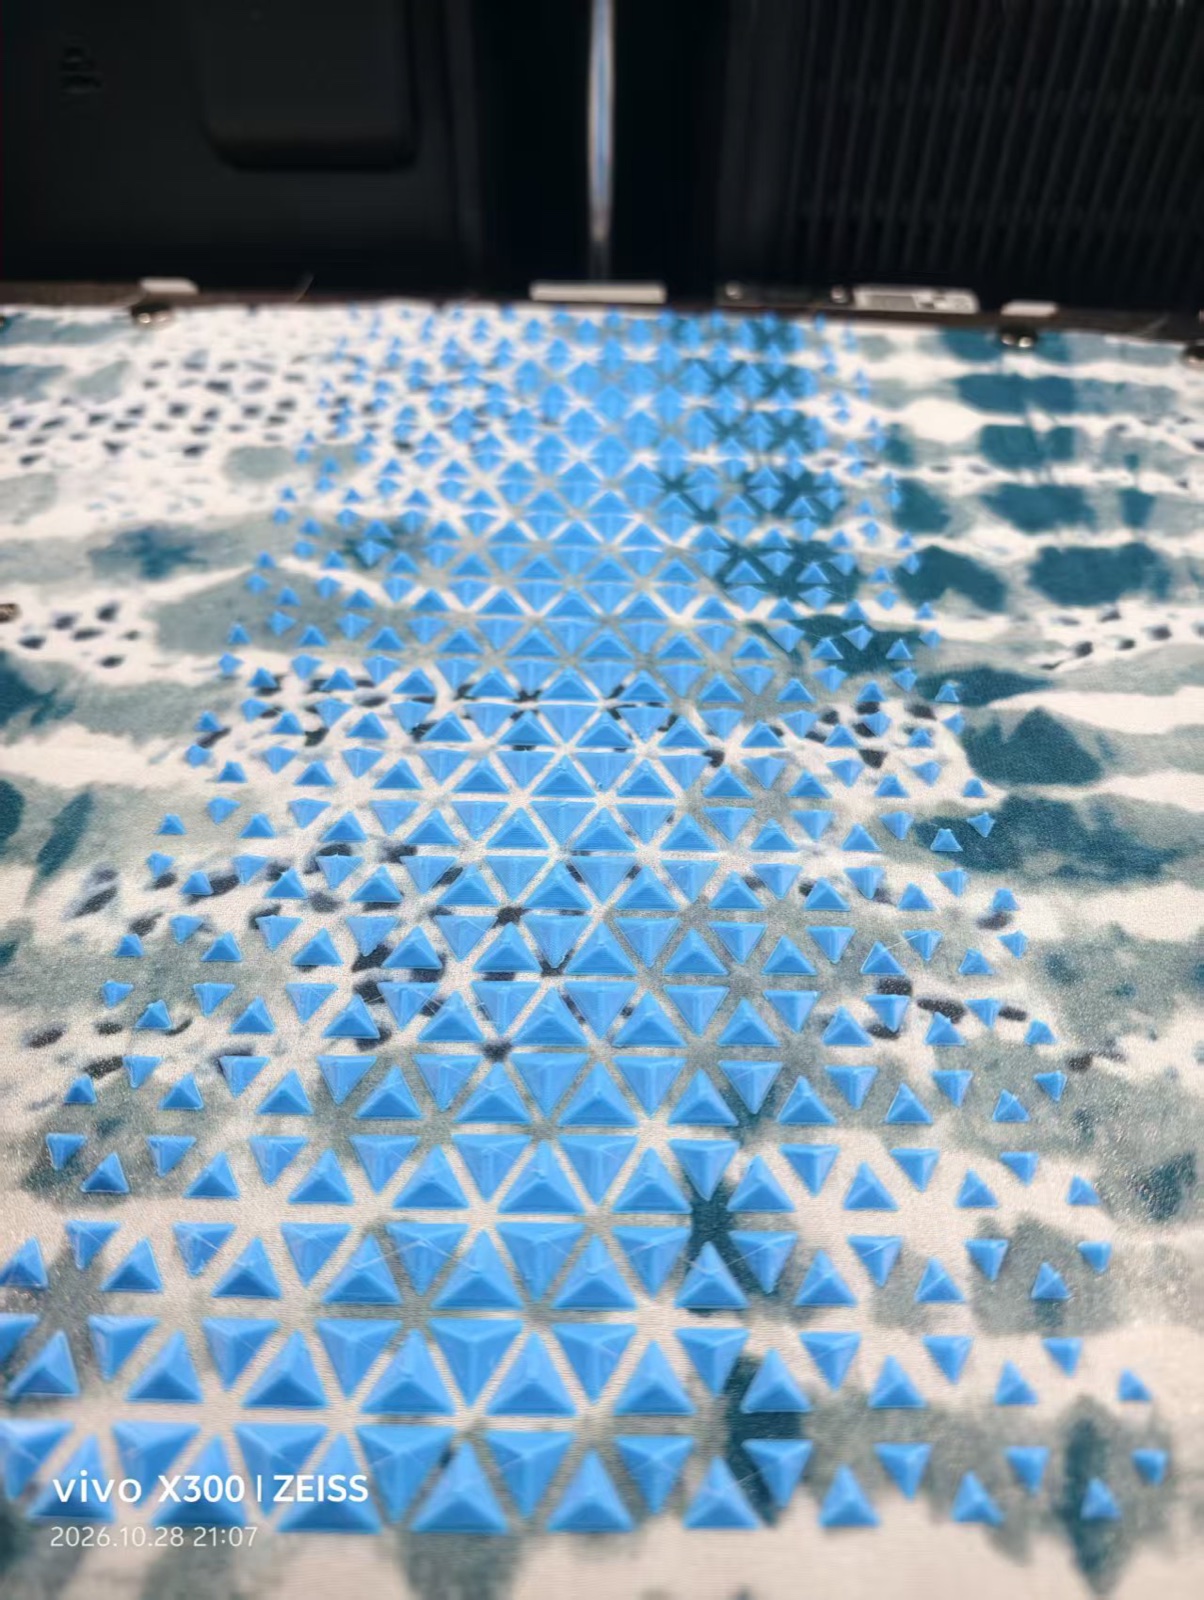
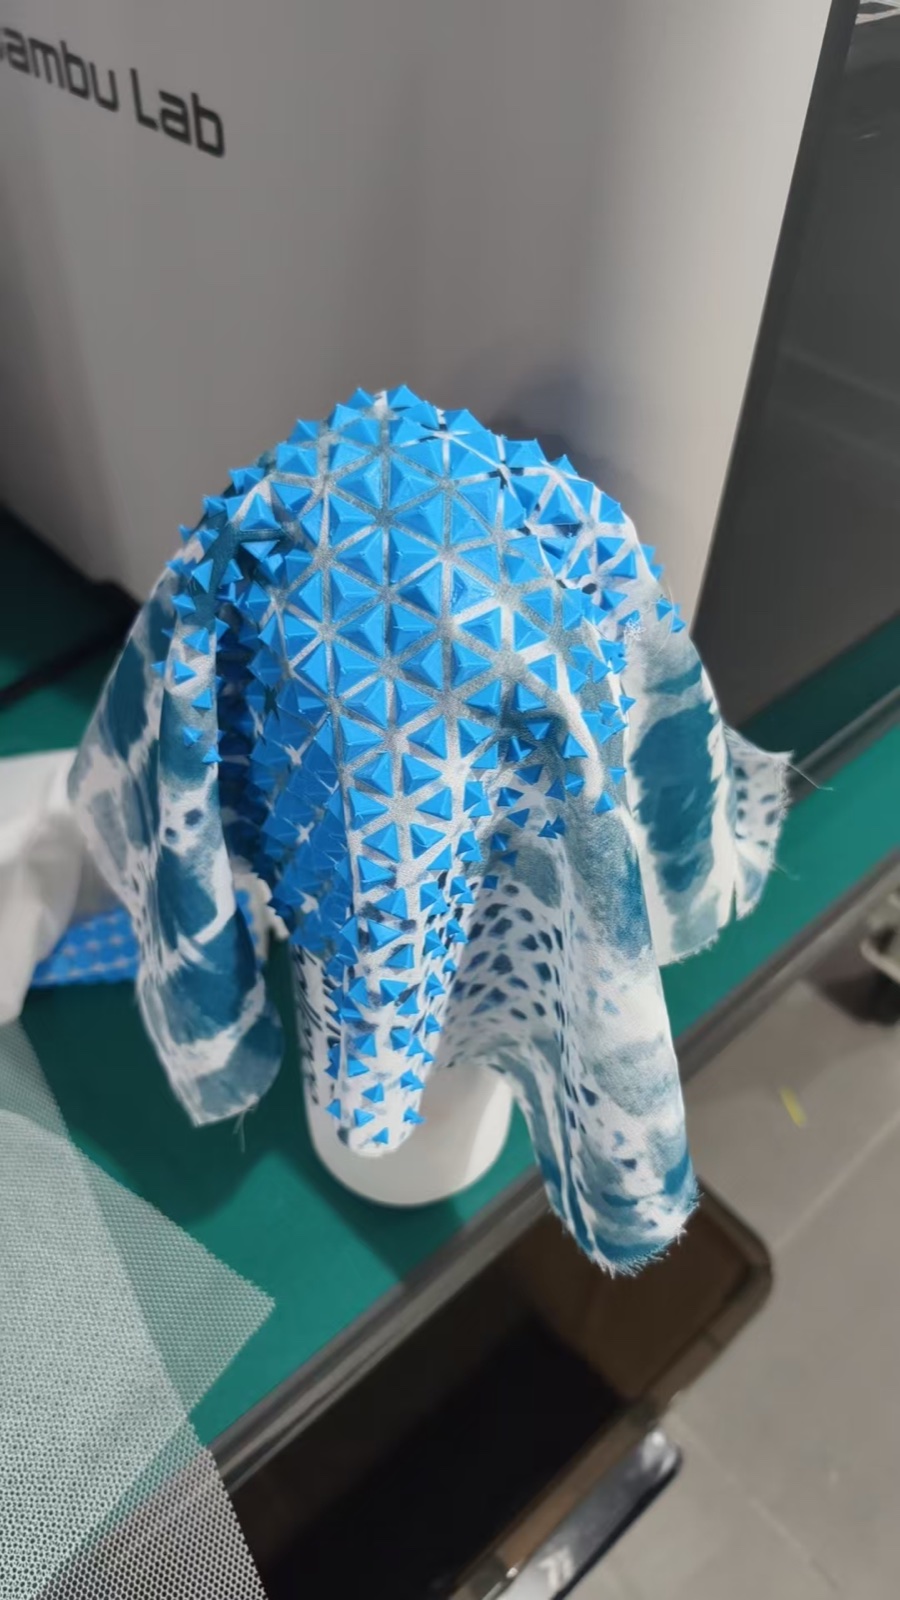
Left, 21:07 — the print ends: the field in raking light, every apex catching it. Right — the same sheet off the machine and dropped over a form, which is the first time it reads as a garment surface rather than a sample.
Two things changed between the tulle proof and this run, and only one of them was technical. The cloth was already dyed when it went on the plate, so the print had to work with a pattern it did not design: the pyramids are a regular, hard geometry laid over an irregular, soft one, and the two only agree because the blue of the filament and the indigo of the cloth sit in the same family. The other change is at the edge: the field does not stop at a straight line, it dissolves into isolated single pyramids. That feathered boundary is not a fault — it is what a hem would need if this were sewn into a garment.
6.3 What the piece is¶
One sheet of cloth with a field of blue PLA triangular pyramids welded onto it in offset rows — the field spans roughly two hand-widths across, each pyramid close to a fingertip in width.
| Property | What I observed |
|---|---|
| Mass | light for its size: most of the area is still cloth, the print is a pass plus the pyramids |
| Bending | folds easily along a row, resists across the rows — the sheet is directional, like a woven fabric with a grain |
| Transparency | the unprinted cloth stays semi-sheer; the print reads as opaque relief on a soft ground |
| Adhesion | no glue, no stitching: the cloth is mechanically locked between base pass and pyramids |
| Surface | the apexes read as a scale / armour field in raking light; the valleys stay open so the sheet can close like a fan |
| Edge behaviour | the perimeter dissolves into single pyramids, which is an asset here — but a cut edge of the cloth still frays, and a printed border would fix that next time |
Scale reference. No ruler in the photos yet, so the hand in the demoulding photo is the scale: the field is about two hand-widths across. Measured dimensions and piece count still to be filled in.
7. Three attempts side by side¶
| Attempt 1 | Attempt 2 | Attempt 3 | |
|---|---|---|---|
| Textile | plain woven cotton | changed fabric (not recorded) | white tulle (proof, 26 Oct) → thin indigo-dyed cloth (final, 28 Oct) |
| Filament | PLA, blue | not PLA | PLA, blue (+ white for the flat strips in the tulle proof) |
| Base skin first | no — printed straight onto cloth | not reached | yes — base pass, pause, cloth, resume |
| Machine | lab printer | SPARKX i7 | Bambu Lab H2S, 0.4 mm nozzle, 0.2 mm layers |
| Model | pyramids, no support structure | same | pyramid field in offset rows; perimeter dissolves into single cells |
| Outcome | loose curled strands, fabric puckered | spaghetti (炒面), print detached | clean field, cloth locked inside the print |
| Lesson | the first layer needs a plane to sit on | change one variable per run | the pause is the real parameter — print less, not more |
8. Weekly reflection & critical thinking¶
- What I learned. The printer does not need to cover the cloth to control it. In the final sheet the printed area is maybe half the surface, and the sheet behaves as one material anyway — because the two halves are welded through the cloth rather than glued on top of it. The cloth stops being a substrate: it becomes the hinge and the tension member.
- What surprised me. How much of the design is the pause. The difference between attempt 1 and attempt 3 is not the model, not the pattern, not the machine — it is one interruption in the print, with the cloth laid in at the right moment. The most important parameter of this week was a keystroke.
- What I would do differently. One variable per run: attempt 2 changed fabric and filament, and taught me almost nothing. I would also model the height field as data instead of copying cells by hand — the Alt-copy method is honest for a first attempt but it does not scale, and a Grasshopper definition (or a small Python script writing the pyramid array) would let me vary apex height per cell the way the teacher's test file does. That is the obvious next step for this piece: a gradient in the field, so the sheet goes from flat to spiky across its width.
- Connection to my final project. My project keeps returning to textile structures built from repeated units. This one adds the thing the previous weeks could not: rigidity on demand. A field that is stiff where printed and soft where not is a way to build shape into cloth without boning, interfacing or moulding — and it can be printed as a flat sheet, which means it can still be cut and joined like fabric.
- Ethical / environmental note. Two of the three attempts ended as waste, and the failures are the honest part of this page: PLA on cotton cannot be separated, so attempt 1 is landfill by construction. The final composite has the same problem at end of life — cloth and PLA are welded, not sewn — which is why the next iteration should use a single-material mesh (a printed or woven PLA/PET monofilament) so the whole sheet can go back into one recycling stream. Open-sourcing the model file is the other half of the argument: a file that anyone can re-print at a different scale is the cheapest form of repair.
NuEval — final step
Go to NuEval and fill in the checklist, when not complete notify your instructor.
9. Fabrication files & References¶
Files
- Model (Rhino 8,
.3dm) — the cell, the row and the field: to be uploaded,week06-triangle-field.3dm - Export for slicing (
.stl) — the printable block: to be uploaded,week06-triangle-field.stl - Process video, modelling: rhino-modeling.mp4
- Process video, cloth going in and the print resuming: cloth-in-place.mp4
- Process video, final centimetres: print-near-end.mp4
- Process video, demoulding: demoulding.mp4
- Slice, as sent: slicer-preview.png
References
- Pleated metallic ruffle on the dress form — 小红书 repost, original author not identified
- 3D-printed shingle spine on lace — reference image, source not recorded
- Bristle field on tulle — reference image, source not recorded
- Fabricademy handbook, week 6 assessment criteria — fabricademy.fabcloud.io
- Rhino 8 documentation,
Pyramidand Gumball — docs.mcneel.com