1. State of the Art, Project Management and Documentation
For our first assignment, we have to create our webpage and talk a little about what are our references and inspirations.
Inspiration
First of all, I want to talk about what inspires me. Well, I'm completely in love with Japanese culture and origami, but that's not only what I like about it. There are also some people who inspire me, some for the material they use when working and others for the style of their work:
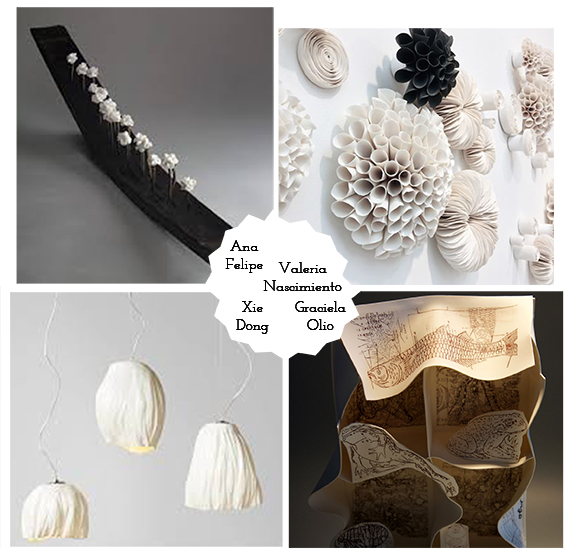
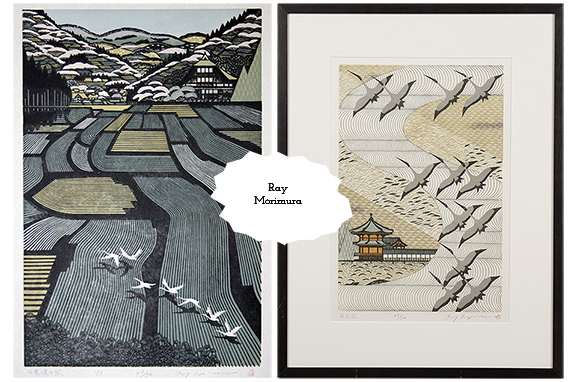
All of these, are above all the things that inspire me in general terms:
- Some words or concepts from Japanese culture: Wabi-Sabi, Mono No Aware, Kintsugi and Ikigai
- Origami
- Pattern Design
- Light & Translucency
- Screen-Printing
Briefly, I'm going to explain a bit all of them:
-
Wabi-Sabi, Mono No Aware and Kintsugi, are concepts which talk about finding beauty in imperfection, not only talking about objects but also life experiences. The concept of Ikigai, means more or less something like "your purpose in life", the reason for what you came to life.
-
Origami: I fold since I can remember, not really difficult figures, but Origami means for me like a time for relax and meditate when I'm feeling anxious or confused, for example. Its geometrical shapes inspire me a lot to create my designs.
-
Pattern Design: I don't really know when the time that I started creating my designs was, but they are almost always symetric and geometric, maybe because of origami inspiration.
-
Light & Translucency: When I started working with porcelain, I was so impressed by its translucency, and for what this material allows me to do. Since then, light became one of the materials I use, always combined with porcelain.
-
Screen-Printing: This technique allows me to combine all the things that inspire me. It allows me to create geometric and symetric pattern designs, put them on my porcelain pieces, and the possibility of repeat them as many times as I need.
Research
Now I'm going to talk about what inspires me about Fabricademy. I knew about Fabricademy by chance, and then I enrolled the BDCamp in June (a one-week intensive introduction to the Fabricademy assignments). This course was so great, and I realize that I could create a different kind of things, with more sustainable materials, learn about new methods and techniques, and so on. I was completely amazed with all those new things!
So know, thinking about my future project, I have to say that I don't really know exactly what I want to do, but, I know some things that I would like to learn about and maybe combine for my project.
- Natural dyes
- Screen-printing with natural dyes
- Shibori, a Japanese technique of dyeing
- Light
What Is Shibori?
Shibori is a Japanese manual tie-dyeing technique, which creates a number of different patterns on fabric.
In Japan, one of the earliest examples of shibori-dyed cloth dates back to the 8th century and was donated to the Tōdai-ji Buddhist temple in Nara. Shibori can be created with differents tehcniques, normally grouped in three categories: kōkechi, tied or bound resists; rōkechi, wax resists; and kyōkechi, resists where the fabric is folded and clamped between two carved wooden blocks. There are different techniques among those three cathegories with different names and variations of technique.
The ways one can stitch, fold, bind, compress or twist cloth are endless, and each one creates very different results. As each one of the methods creates different results, it depends on what we want to achieve that we chose both, the technique and the fabric. Some of the different techniques are the following ones:
-
Kanoko Shibori: Kanoko shibori is what is commonly thought of in the West as tie-dye. It involves binding certain sections of the cloth using thread to achieve the desired pattern. The pattern achieved depends on how tightly the cloth is bound and where the cloth is bound. If random sections of the cloth are bound, the result will be a pattern of random circles. If the cloth is first folded and then bounded, the resulting circles will be in a pattern depending on the fold used.
-
Miura Shibori: Miura shibori is also known as looped binding. It involves taking a hooked needle and plucking sections of the cloth. Then a thread is looped around each section twice. The thread is not knotted; tension is the only thing that holds the sections in place. The resulting dyed cloth is a water-like design. Because no knot is used, miura shibori is very easy to bind and unbind.
-
Kumo Shibori: Kumo shibori is a pleated and bound resist. This technique involves pleating sections of the cloth very finely and evenly. Then the cloth is bound in very close sections. The result is a very specific spider-like design.
-
Nui Shibori: Nui shibori includes stitched shibori. A simple running stitch is used on the cloth then pulled tight to gather the cloth. The thread must be pulled very tight to work, and a wooden dowel must often be used to pull it tight enough. Each thread is secured by knotting before being dyed. This technique allows for greater control of the pattern and greater variety of pattern, but it is much more time consuming.
-
Arashi Shibori: Arashi shibori is also known as pole-wrapping shibori. The cloth is wrapped on a diagonal around a pole. Then the cloth is very tightly bound by wrapping thread up and down the pole. Next, the cloth is scrunched on the pole. The result is a pleated cloth with a design on a diagonal. "Arashi" is the Japanese word for storm. The patterns are always on a diagonal in arashi shibori which suggest the driving rain of a heavy storm.
-
Itajime Shibori: Itajime shibori is a shaped-resist technique. Traditionally, the cloth is sandwiched between two pieces of wood, which are held in place with string. More modern textile artists can be found using shapes cut from acrylic or plexiglass and holding the shapes with C-clamps. The shapes prevent the dye from penetrating the fabric they cover.
Different examples of Shibori techniques:


Different Shibori Techniques by Honestly WTF
So, I think that Shibori could allow me to combine some of the things that inspire me to work like natural dyeing, based on folding (like origami) and to create patterns. Depending on what kind of fabric I use, it could be possible to create different kind of lamps, with different pattern designs and different shapes.
Documenting With GitLab
Regarding the creation of our documentation and page with GitLab, I have to say that I felt very dizzy at first. Actually, it seemed to be more difficult than it is, so I'm happy for it.
What is GitLab?
GitLab is the platform we are going to use for editing our page. The language we're going to use for writing into it is called "Markdown" and is a markup language that allows easy to read and write a plain-text document.
The Markdown Language: How to Use it for Customizing Your Page
Here you can see how our template page was at first:

· Changing the Name, Font & Color Theme
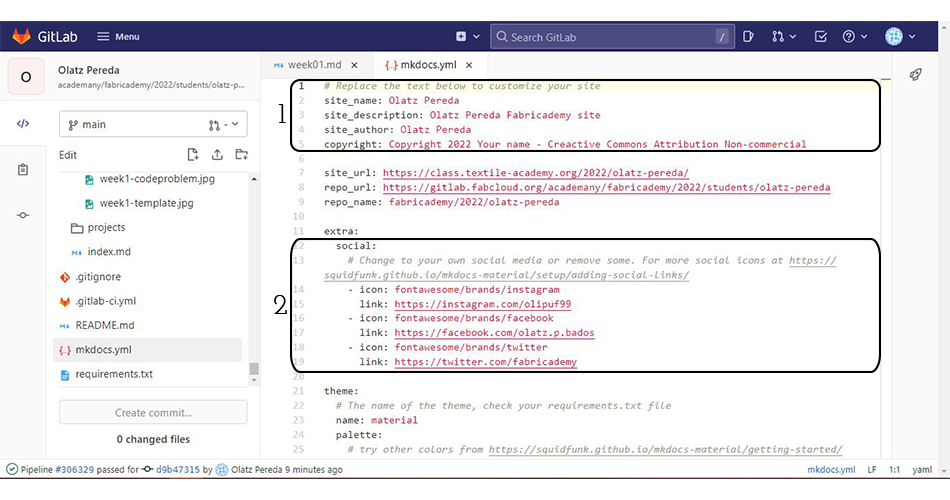
First of all, I wanted to change the title of the page "Your Name" to my name "Olatz Pereda". Apart from that, I wanted a neat and clear appearance for my page so I also changed the color scheme to "white" and I chose one new font for the page. From here, you can also add your social media accounts in case you want to do it.
All of these changes need to be done from the "mkdocs.yml" file.
- 1. For changing the name of your page you need to do it in here.
- 2. For adding you social media accounts here.
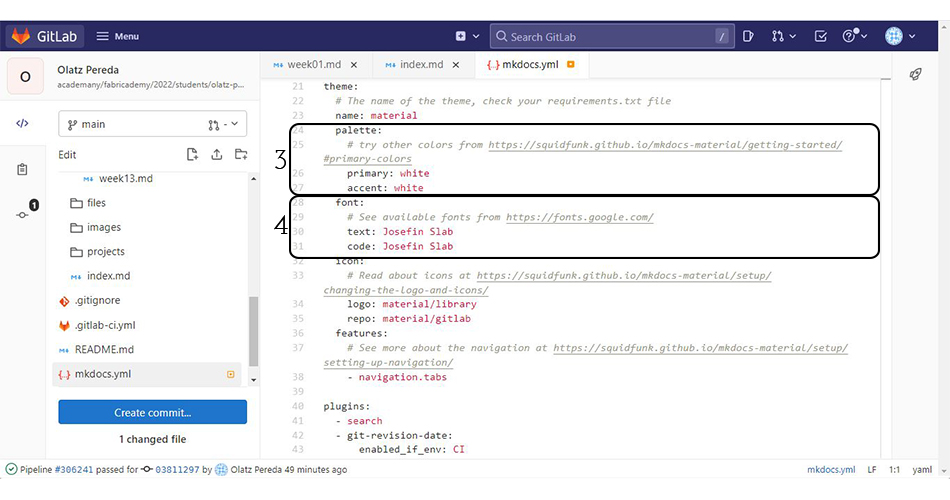
- 3. For changing a new color theme in here.
- 4. For changing the font on the page here.
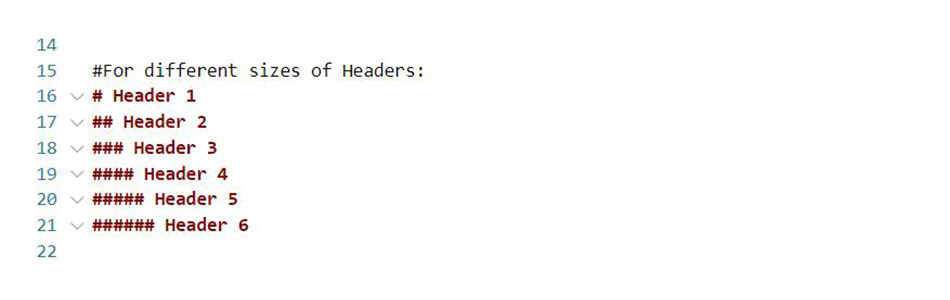
· Organizing the Headers
To make headers in Markdown, you have to preface the phrase with a hash mark (#). Depending on the size of header that you want, you need to put the same amount of hars marks before the header text.
· Using Bold, Italic & Both
Since the font I chose is very thin, I decided that the way of making a difference between the titles and the text could be to put all the titles in bold and leave the rest as regular type. I also use this type when I want to highlight something relevant in the text.
In the case of the titles of my previous artworks, I used the italic type.
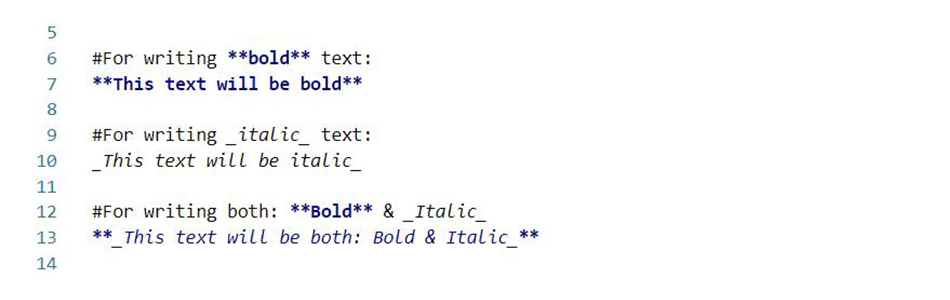
So these are the code lines you need to write in case you want to use bold, italic or both:
· To make phrases in bold: You need to surround words with two asterisks ( ** )
· To make a phrase italic: You need to surround words with an underscore ( _ )
· To make a phrase both bold & italic: You need to mix the two previous ones, surround the words with the asterisks & the underscores (**_)
· How to Create a List
This is how you can create a list of items:

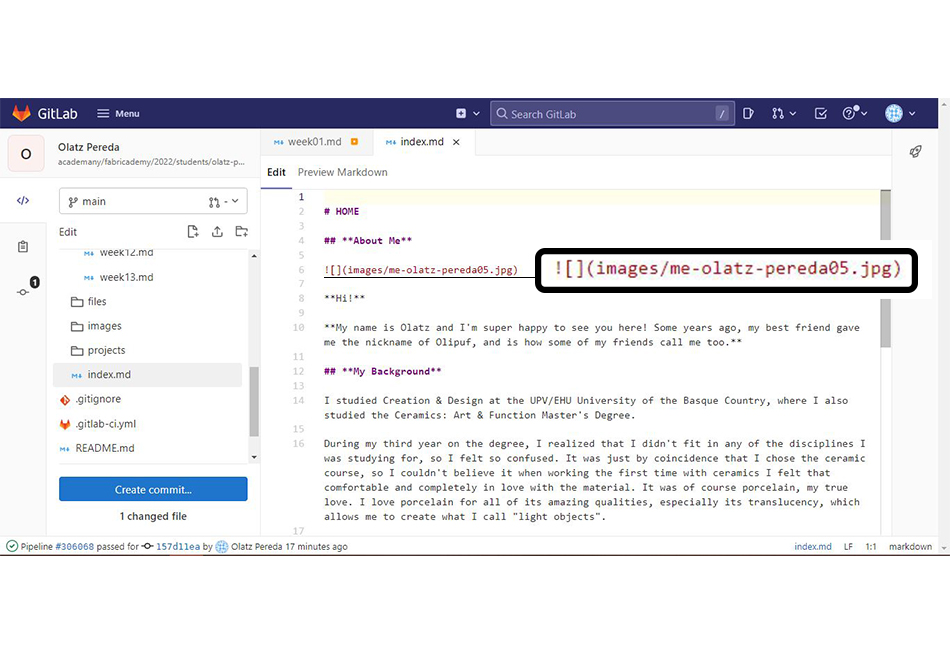
· How to Add Your Images
This is the code line you need to write for inserting images:

· How to Embed Videos
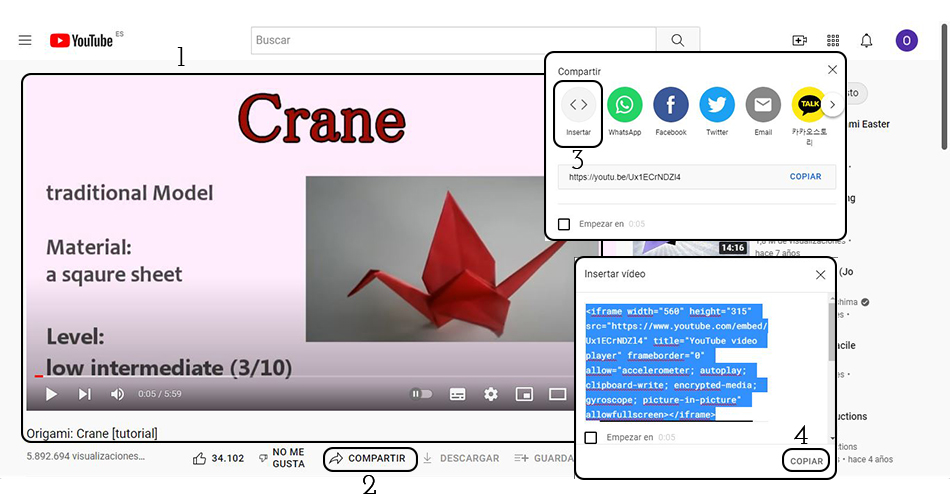
These are the steps you need to follow in case you want to add videos to your page:
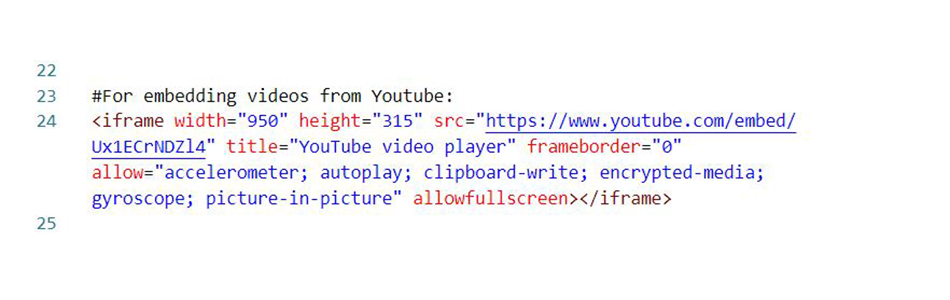
· To embed videos from Youtube:
- 1. Go to Youtube and select the video.
- 2. Press the "Share" button.
- 3. Choose the "Embed" option.
- 4. Copy the given code.
- 5. Paste the code into your code page.
It should look like this into your code:
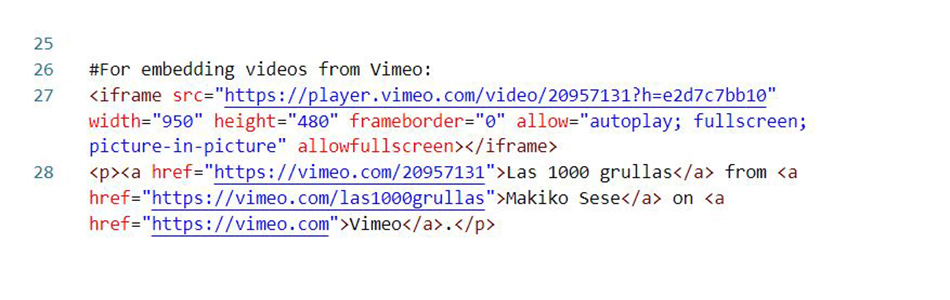
· To embed videos from Vimeo:
- 1. Go to Vimeo and select the video.
- 2. Press the "Share" button.
- 3. Copy the code given in the "Embed" part.
- 4. Paste the code into your code page.
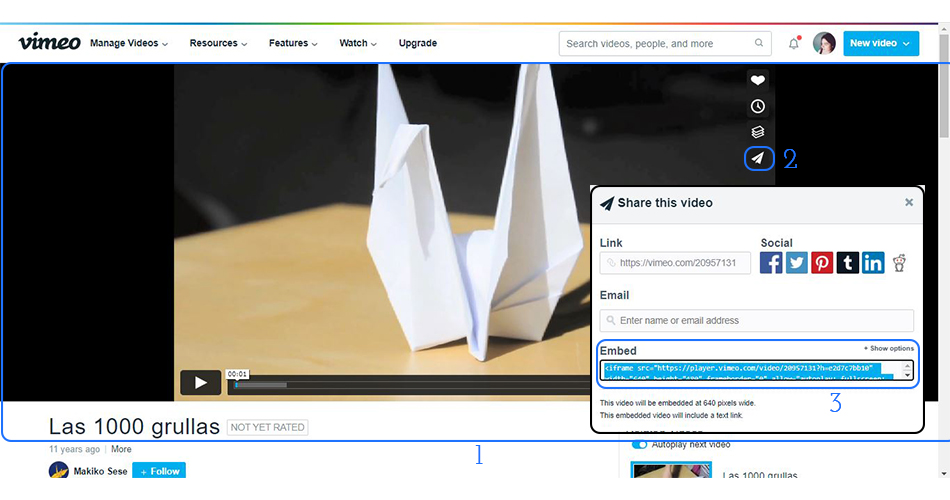
It should look like this into your code:
· How to Insert Links
This is the code line you need to write for inserting links:

This is a Markdown Cheat Sheet where you can find a quick reference to the Markdown syntax.
This is a Handbook Markdown Guide.
Here you can try a super easy and quick tutotial for training this language.
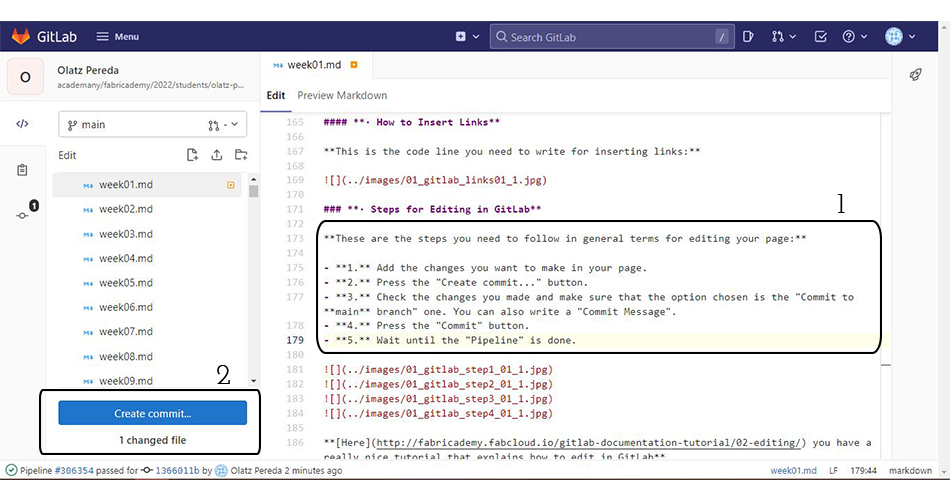
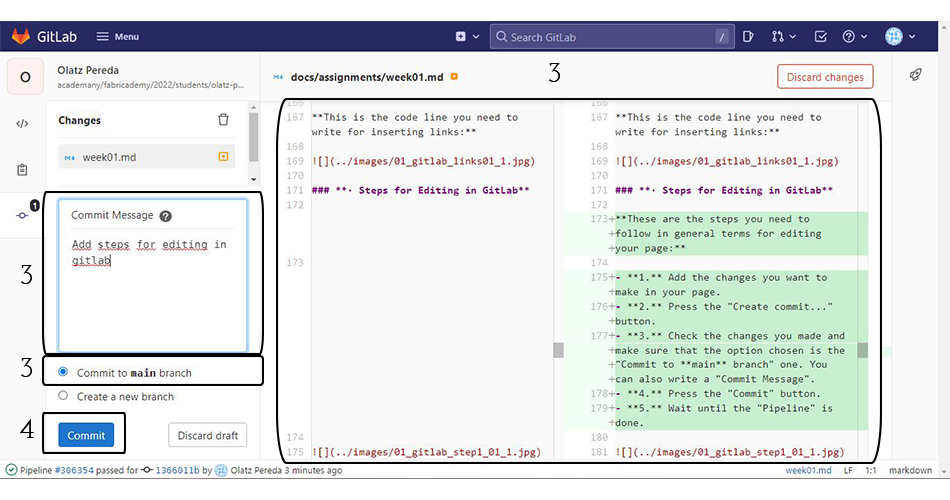
· Steps for Editing in GitLab
These are the steps you need to follow in general terms for editing your page:
- 1. Add the changes you want to make in your page.
- 2. Press the "Create commit..." button.
- 3. Check the changes you made and make sure that the option chosen is the "Commit to main branch" one. You can also write a "Commit Message".
- 4. Press the "Commit" button.
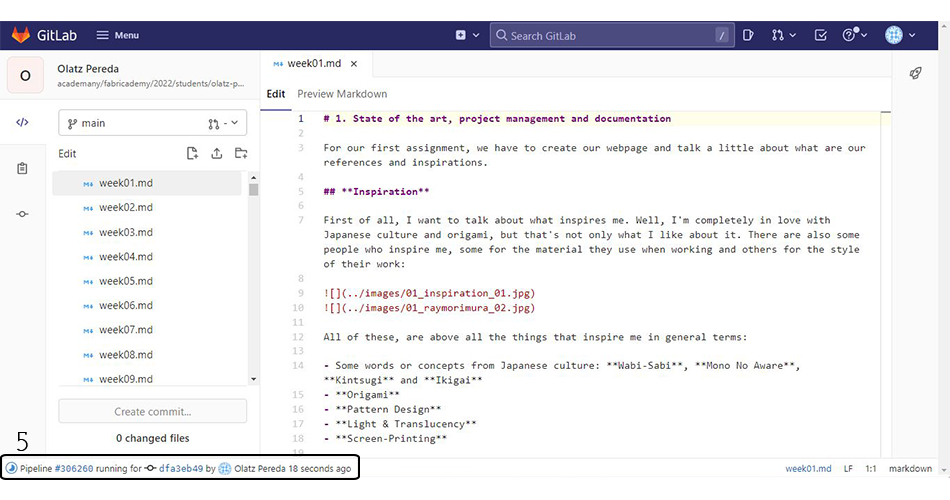
- 5. Wait until the "Pipeline" is passed.
Here you have a really nice tutorial that explains how to edit in GitLab.
· Some Problems
I would like to show you, anyway, some situations I've been through when I started working.
-
First of all, I have a problem when uploading an image because the name was written with capital letters. I didn't know why it wasn't working, and that was the problem. So, I changed the name, only with small letters and spaced by "-", as Julian recommended to us.
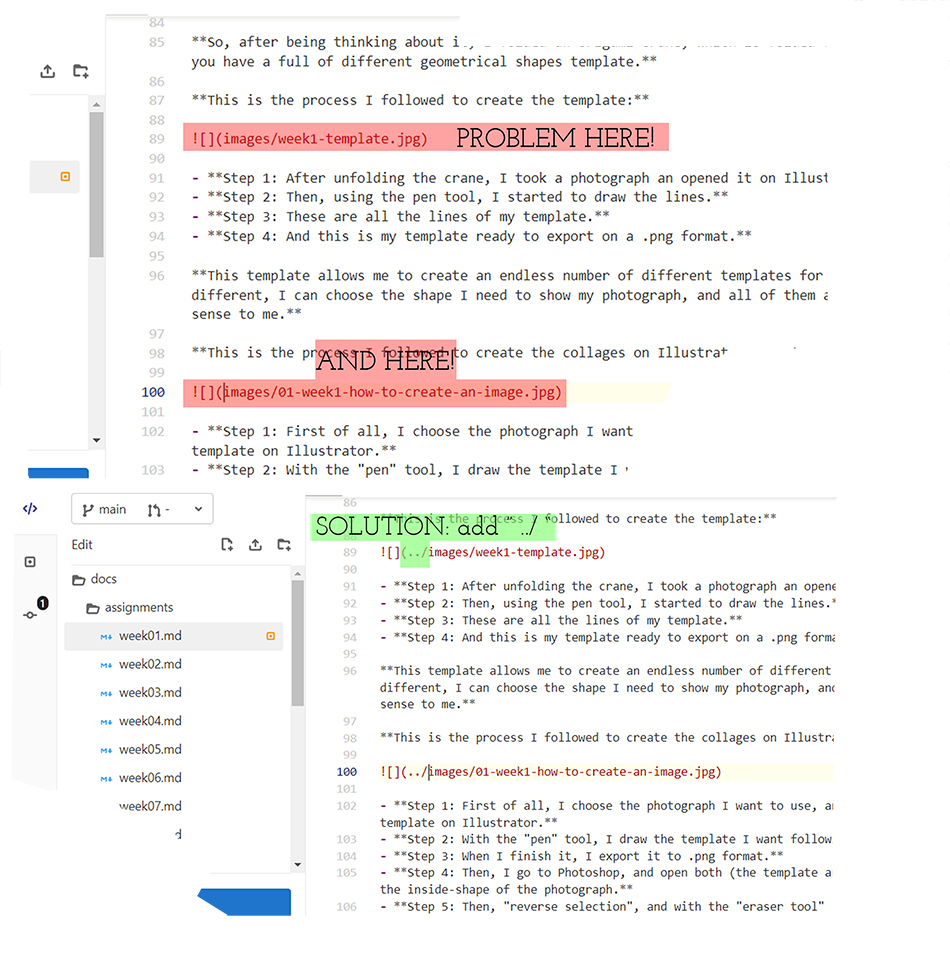
-
When I was going to upload my images on the week 1 assignment-page, doing the same process with the code for all my pictures, it didn't work. So I was so confused, it almost took me an hour before I realize that it wasn't any of these problems: the image name was well written, the image size was fine, the code was exact the same as for the other photographs. So I wrote on Mattermost and see that I wasn't the only one with the same problem, I finally fix it with help (so thank you so much).
· A Crane Template
Now, I want to explain a bit about how I dispose my images on the website. I wanted to follow a Japanese-inspired style (white-page and inspired by geometrical shapes). I didn't know how to put my images to achieve this proposal and one of my peers told me about creating a collage. So firstly, I created some templates inspired by the square shape, but those templates limited a lot how the photographs could be located in the space.
So, after being thinking about it, I folded an origami crane, which is folded from geometrical shapes so that when unfolding it, you have a full of different geometrical shapes template.
This is the process I followed to create the template:
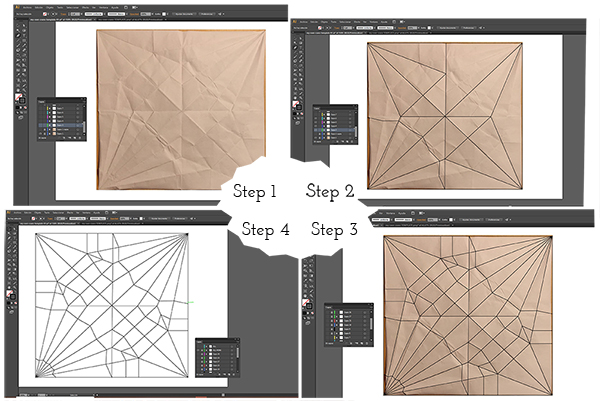
- Step 1: After unfolding the crane, I took a photograph an opened it on Illustrator.
- Step 2: Then, using the pen tool, I started to draw the lines.
- Step 3: These are all the lines of my template.
- Step 4: And this is my template ready to export on a .png format.
This template allows me to create an endless number of different templates for my photographs. This way, even if each template is different, I can choose the shape I need to show my photograph, and all of them are based on an origami crane, which makes a lot of sense to me.
This is the process I followed to create the collages on Illustrator & PhotoShop:
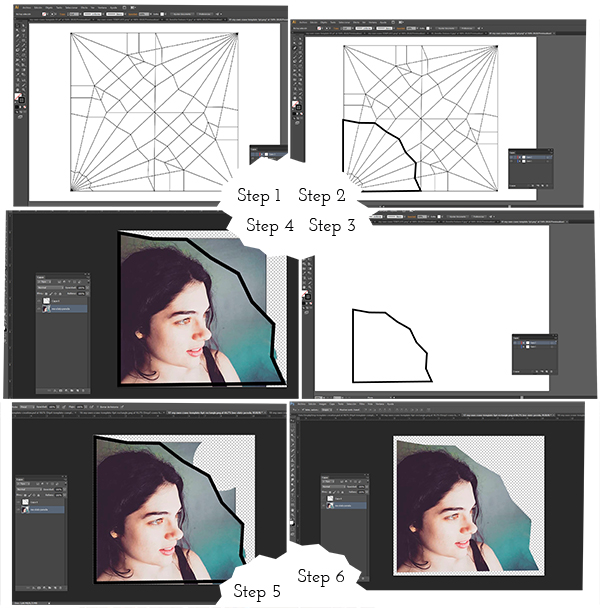
- Step 1: First of all, I choose the photograph I want to use, and depending on it, I create the template. So first, I open my template on Illustrator.
- Step 2: With the "pen" tool, I draw the template I want following the lines.
- Step 3: When I finish it, I export it to .png format.
- Step 4: Then, I go to Photoshop, and open both (the template and the photograph), and with the "poligonal lace" tool I select the inside-shape of the photograph.
- Step 5: Then, "reverse selection", and with the "eraser tool" I erase the rest of the image.
- Step 6: I prefer the image without the template line, so I hide them to have a clean border.
And, in case that someone wants to know how to fold a crane, here you have a tutorial:
Las 1000 grullas from Makiko Sese on Vimeo.
References & Useful Links
- Wikipedia
- Shibori
- Craftatlas
- DIY Shibori- Honestly WTF
- Tutorial GitLab &MakDocs
- GitLab Documentation Tutorial
- Markdown
- Markdown Cheat Sheet
- Markdown Tutorial
- Handbook Markdown Guide