5. E-textiles
This week started with the Lecture by Liza Stark, which was both so interesting but also scary. We're asked to work on E-textiles this week and I didn't have any idea about electronics before this week, so here we go!
First Touch With E-Textile
I've been in touch with this topic at the BDCamp which had place in June this year. There, I sewed my first E-textile circuit, a very simple one actually, but helped me to understand better this week's assignment.

Inspiration

These are some amazing other works that Liza showed us in the lecture:
· "Stymphalian Birds" by Audrey Briot
· "A Fabric that Remember" by Laura Devendorf
· "Connextyle" by Jessica Smarsch
· "Embroidered Touch" by Anke Loh
What are E-Textiles?
"An electronic textile (E-textile) is a type of fabric that contains electronic elements. In general, the development of electronic textiles supports the idea of wearable computing, or electronic devices worked into garment designs. However, there are other applications of electronic textiles, such as interior design technologies, that also rely on integrating electronic components into fabrics or fibers.
An electronic textile may also be known as a smart textile."
This information is taken from this Electronic Textile (E-Textile) webpage.
This is the video of the amazing Lecture by Liza Stark about E-Textiles:
I'll make a brief introduction to the topic of the week since it has a lot of information that will be needed to understand to process to follow for the assigment. Liza's slides are amazing for understanding everything clearly.
· What Is a Circuit?
"A circuit is a path for electricity to flow."
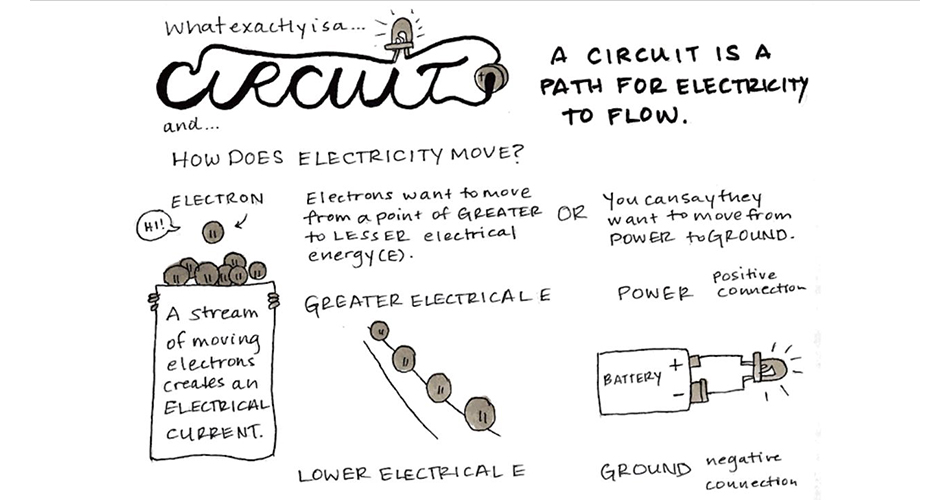
Image from Liza's Lecture
Some important concepts to know about:
- Voltage (Volts/V): Electrical pressure of force between two points.
- Current (Amps/I): Rate at which electrical charge flows.
- Resistance (Ohms/R): The amount of material that resists the flow of current.
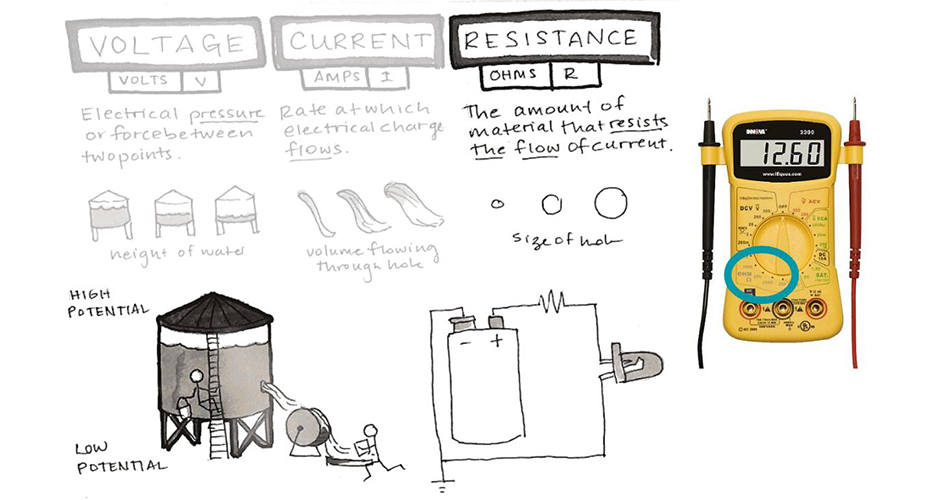
Image from Liza's Lecture
Important equation to know about: OHM'S LAW
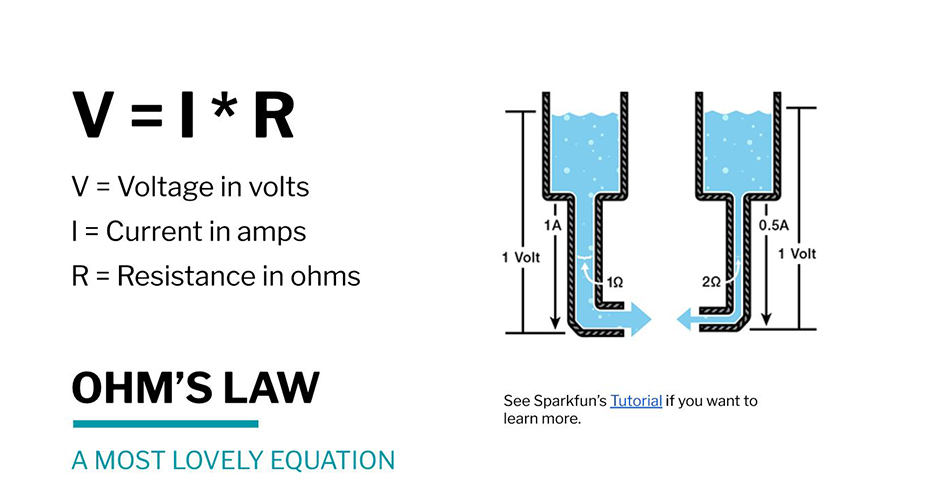
Image from Liza's Lecture
If you want to learn more about it, see this Sparkfun Tutorial.
· What Materials and Tools Can Be Used?
Among the materials that can be used there is a wide range since you can use "Any that are conductive."
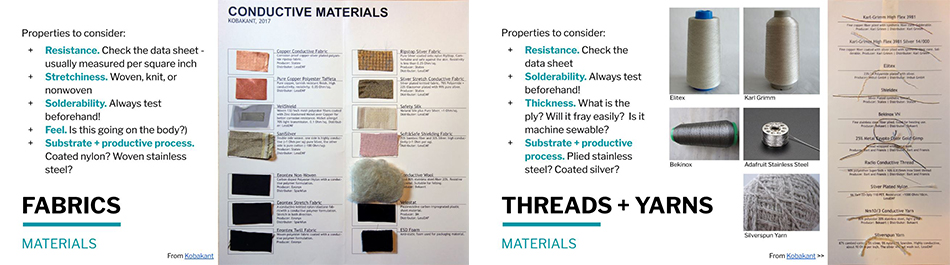
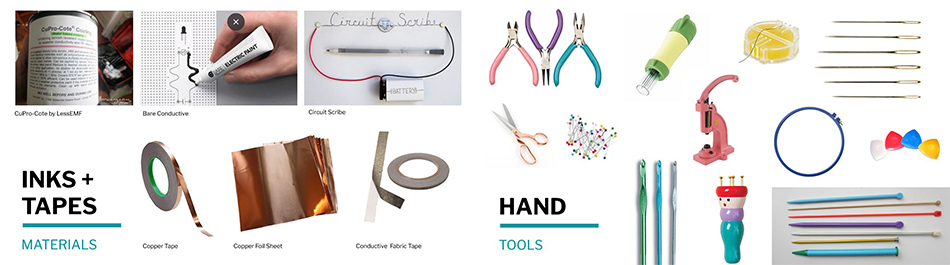

Images from Liza's Lecture
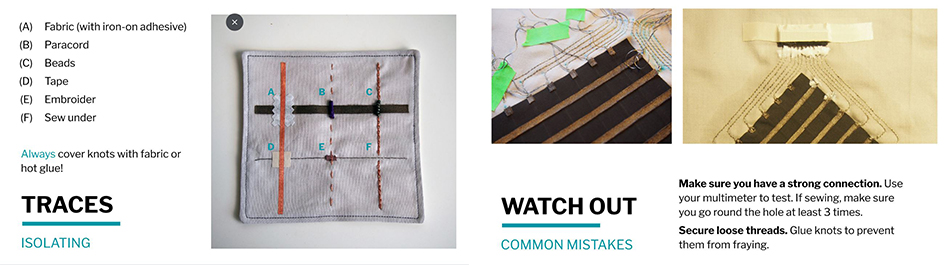
· Options for Creating Traces
"Traces are the physical paths of conductive material that electricity moves along in a circuit."
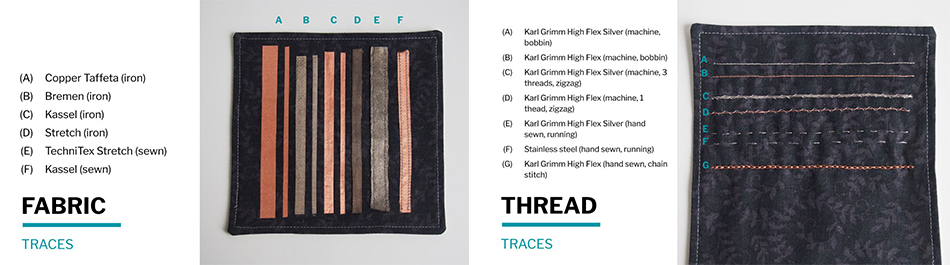
Images from Liza's Lecture
· How to Do Connections
These are some ways of doing the connections:
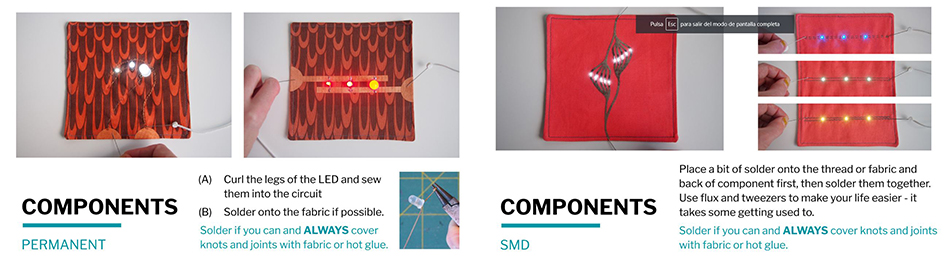
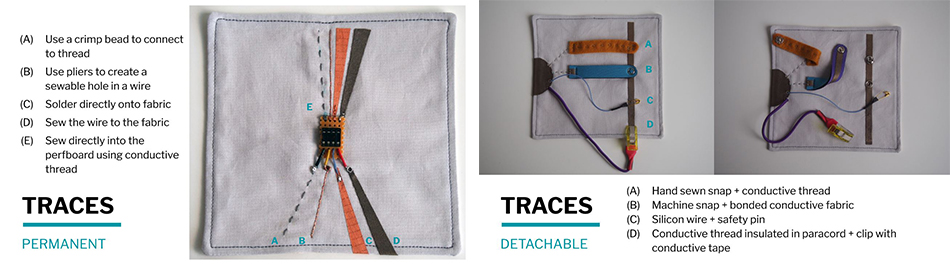
Images from Liza's Lecture
· What Sensors Can Be Done
"The Input is the information or data that enters a system."
There are different kind of sensors that can be done, depending on their input:
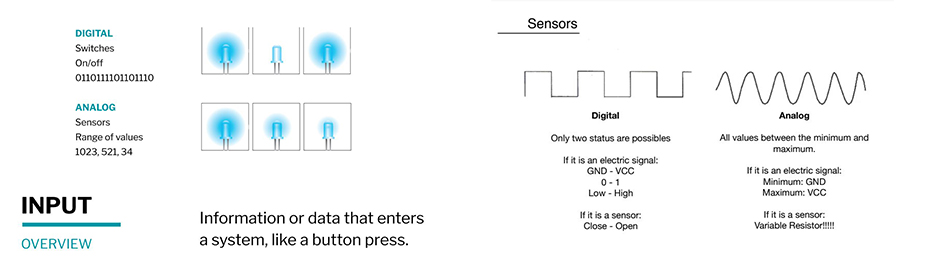
- Digital (Switches): A switch is a break in a circuit. Since the circuit is not complete, no electricity can flow to the components.
- Analog (Sensors): We can use resistance to get a broader range of values. By allowing more current to get through, you can change the brightness of a LED, the frequency of a sound, or the speed of a motor.
Some examples of the different kind of sensors that can be done:
· Digital (Switches) examples:

Images from Liza's Lecture
· Analog (Sensors) examples:

Images from Liza's Lecture
· How to Program Sensors Behaviours
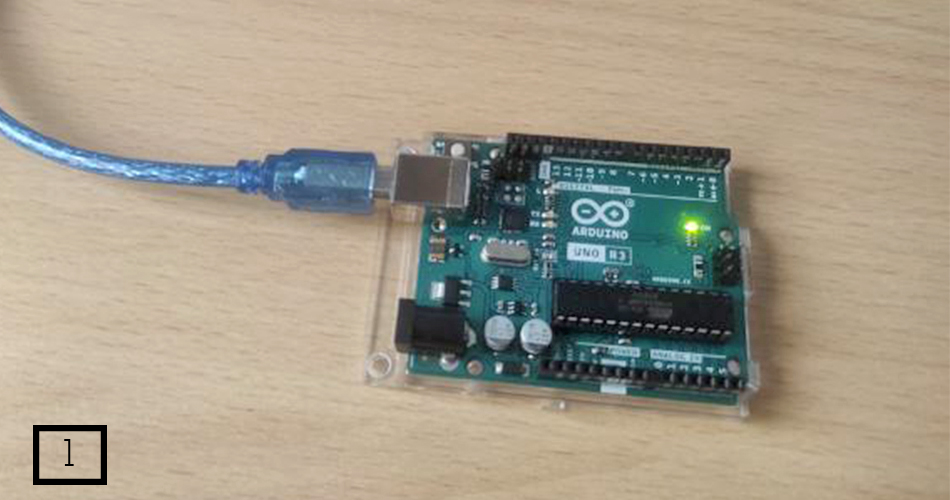
For programming the behaviour of our sensors we will be using Arduino. "Arduino is an open-source electronics prototyping platform. It is a hardware and software."
This is how the Arduino UNO looks like:

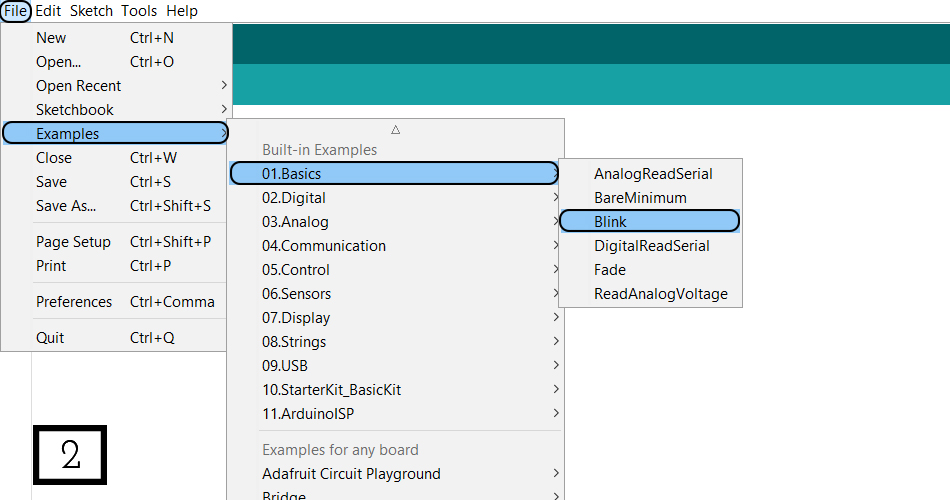
And these are the steps you need to follow, in general terms, to use your Arduino:
- 1. Plug your Arduino into your computer and open the IDE.
- 2. Open your sketch (Blink example: File > Examples > 01.Basics > Blink).
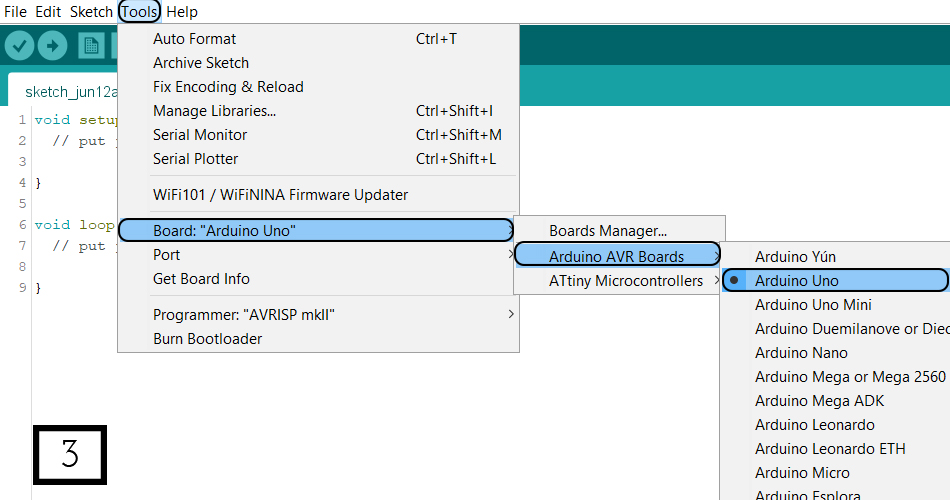
- 3. Choose the correct board (Tools > Board > Arduino AVR Boards > Arduino Uno).
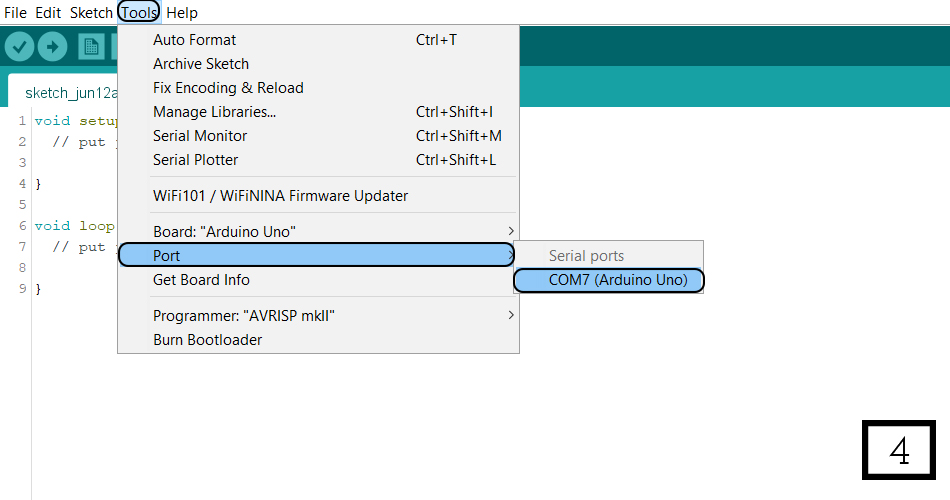
- 4. Tell Arduino which port you are using (Tools > Port > COM7 Arduino Uno).
- 5. Verify the skecth.
- 6. Upload the sketch.
- 7. Wait until the uploading is done.

All the information above is taken from Liza's Lecture
This Week's Practice
My peer Marisa and I watched all the tutorials together, It was the first time in touch with the Arduino (at least mine), and we both made a great team together!
· Shape & Support Creation
Once again I tried to find some inspiration in my Crane Template, I wanted to design a sample which could allow me to have my both samples together and for that I followed the process down bellow.
· List of Materials & Tools Required:
This is the list of the materials & tools you need:
- A piece of pink felt
- A piece of black felt
- Pink thread
- Black thread
- 6 wooden buttons
- A needle
- Fabric scissors
· The Step by Step Process:
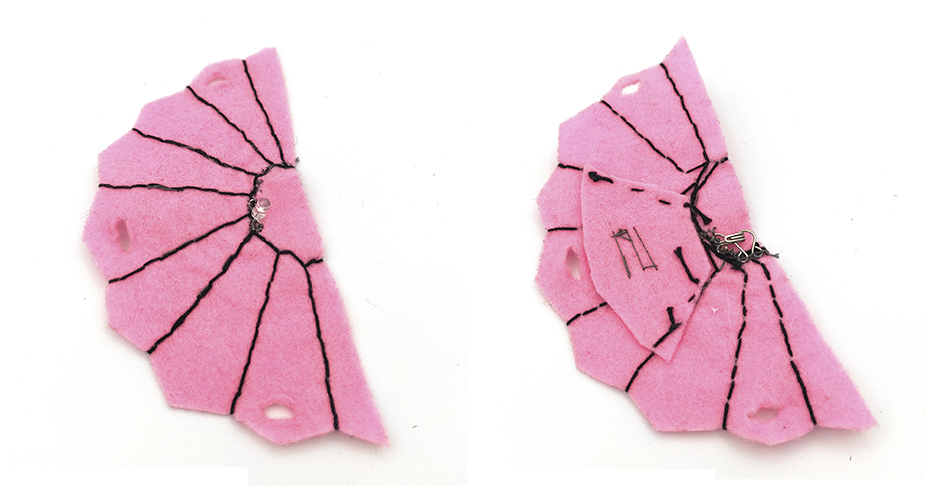
This support creation process is 100% handmade.
These are the steps you need to follow:
- 1. First of all, you need to draw each sample shape in each felt colour.
- 2. Cut both shapes with the fabric scissors.
- 3. Draw with a pencil the inner circled shape and also the lines that fit with the outer corners of the design.
- 4. Sew each piece separatelly, the pink piece of felt with black thread and the black piece with pink thread, with the technique of the "Back Stitch" (I'm not really good at sewing so I'll link a tutorial down bellow to show how this technique is done, it's actually a so easy one).
- 5. Put both samples together and draw the outer contour on another black felt piece, then cut it with the scissors.
- 6. Make 3 holes on each felt piece, calculate the spaces so that it look visually symmetric (thinking that the holes are the places for the buttons).
- 7. Sew the buttons in the big piece of felt, calculating were the holes of the smaller pieces will fit with the buttons.
- 8. Attach both samples with the buttons.
- 9. The support is ready! :)
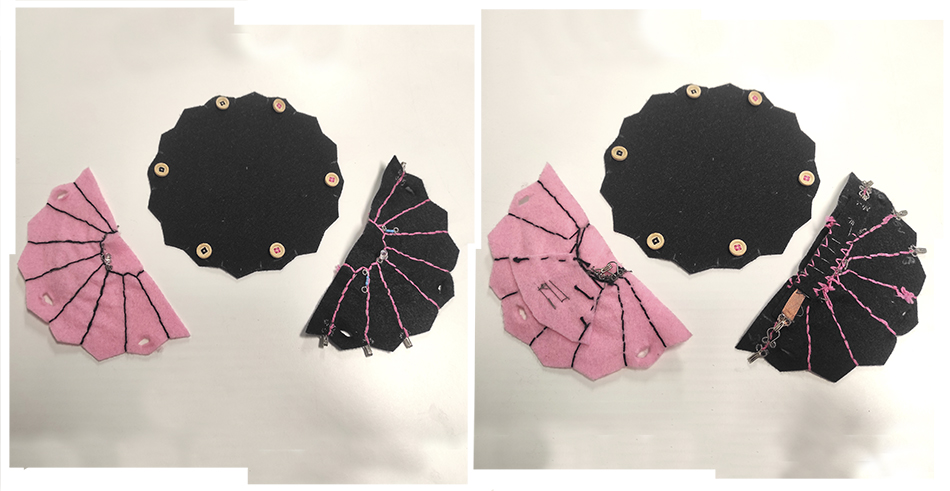
This is a collage that shows the process of creating the support:
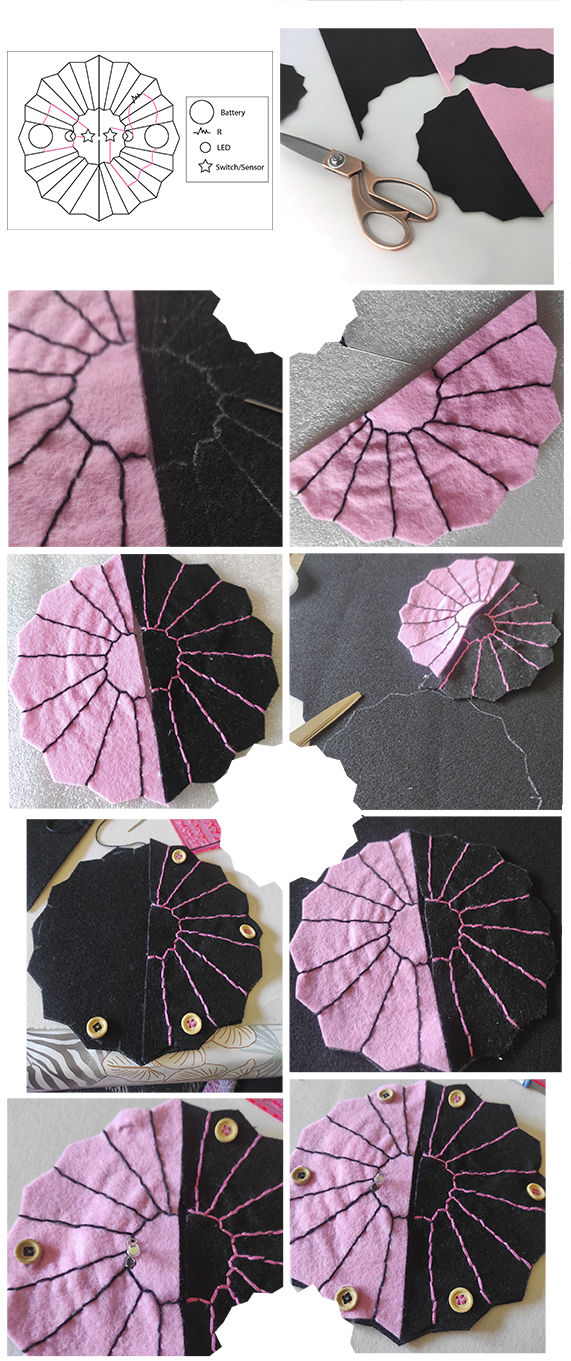
NOTE: This support is designed this way for making the creation of the digital & the analog swatches for the assigment separatelly and then, both will fit together into a bigger swatch.
This is a tutorial that shows some manual techniques for sewing in a so easy way:
So tadah! When my cute support was ready the next step was the most difficult and scary one of the week: The creation of the sensors.
· The Digital & Analog Swatches
· Digital Swatch
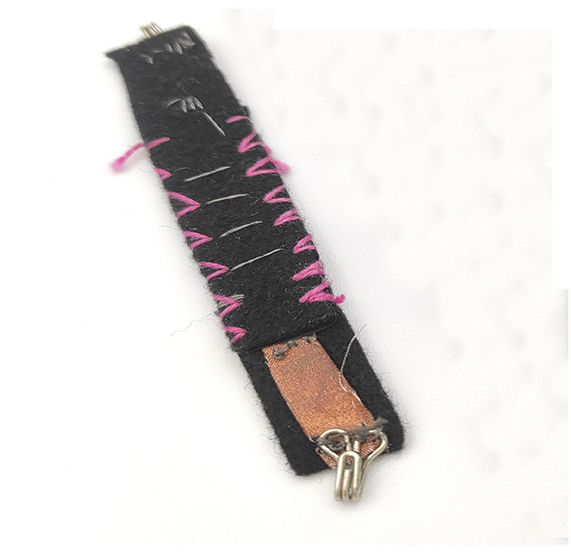
· DIGITAL SENSOR: ON/OFF BUTTON
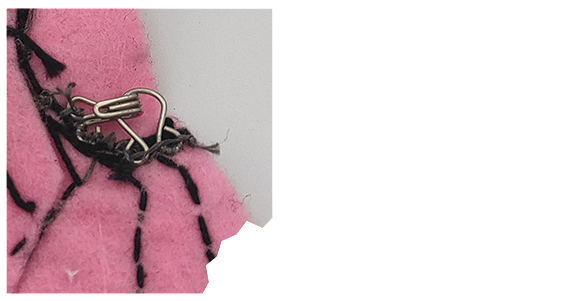
For my digital sensor I wanted to make an On/Off Button, and I just sew two metalic parts that can be joined and removed easily.
· DIGITAL SWATCH CREATION
These are the materials & tools required:
- Pink felt sample
- 1 3V battery
- 1 LED
- 2 pieces of a metal snap hook closure
- Conductive thread
- Conductive fabric
- Needle
- Fabric scissors
- Pliers that are used in jewellery
This is the schematic I followed:
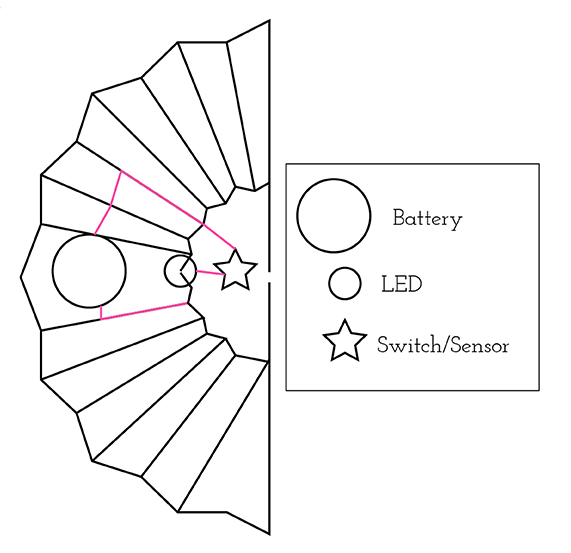
These are the steps:
- 1. Check the schematic above. The pink line is where the conductive thread needs to be sewed.
- 2. With the fabric scissors cut an small piece of pink felt for making a pocket for holding the battery in the back part (it will be hidden).
- 3. Bend the legs of the LED until they look like circles (make sure that you put a mark or remember what leg is the "+" and the "-" one).
- 4. Start by sewing the "+" leg of the LED (allways check the schematic before starting sewing) with the conductive thread using the "Running Stitch" technique shown in the video tutorial above. Sew the thread close to the other one so that the conductive thread will be hidden from the eyes and with a cleanner result.
- 5. Sew until you arrive to the part of the sample where the felt touches the "+" side of the battery (here you have 2 options: 1. Sew a big circled-shape with the conductive thread, as big as the battery for ensuring that both parts touch or 2. Cut an small conductive fabric piece and sew it into the fabric were the battery will touch).
- 6. For the "-" side of the battery, you need to take the small piece of pink felt for the pocket that you cut before. Put it above the battery and sew it in place.
- 7. Now we're going to sew the connection between the "-" side of the battery and the switch. For doing so, you need to repeat the process explained above (decide between the 2 options: 1. Sew a big circled-shape with the conductive thread, as big as the battery for ensuring that both parts touch or 2. Cut an small conductive fabric piece and sew it into the pocket fabric were the battery will touch).
- 8. Continue sewing while checking on the schematic the path of the pink line until the switch.
- 9. Take one of the two metal parts (the snap hook closure for fabrics) that will compose the switch and sew it in place.
- 10. Fit both metal part together to verify the location of the second one to be sewed.
- 11. Sew the second part in place and continue sewing until the "-" leg of the LED.
- 12. Your circuit is ready now, so is your digital swatch! :)
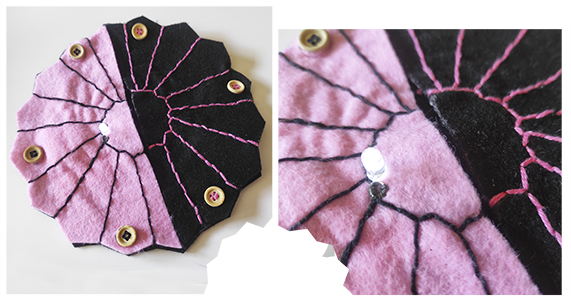
This is a detail of the digital sensor I made:
This is the result of my digital swatch:
· Analog Swatch
· ANALOG SENSOR: BEND SENSOR
For my Analog Sensor I made this Bend Sensor found in KOBAKANT. There you can find the Step by Step explanation. It's not only so easy to make but also it's also too sensitive and works really well.
This image helped me a lot:
You can download this stencil for the accurate measures of the sensor (but it can be customized too).
These are the Materials and Tools you need for creating this analog sensor:
- Black felt (in my case)
- Conductive thread
- Conductive fabric
- Velostat
- 2 pieces of a metal snap hook closure
- Needle
- Fabric scissors
- Fabric pen
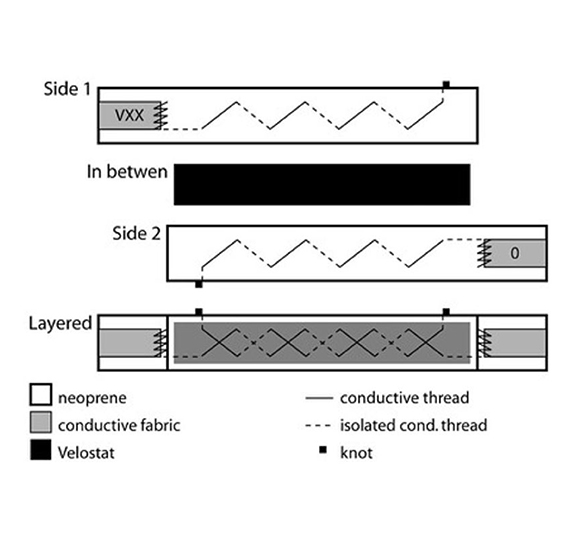
These are the steps you need to follow:
- 1. Cut the felt pieces from the outer part of your sensor with the fabric scissors.
- 2. Draw were the conductive thread should go following the drawing from the schematic above.
- 3. Put two pieces of conductive fabric in the edges of the felt piece (as shown in the image).
- 4. Stitch the conductive thread to the conductive fabric with a few stitches to make good contact (repeat for both sides).
- 5. Layer the felts parts with the conductive traces inwards so that the stitches criss-cross.
- 6. Put a velostat piece in between both felt pieces.
- 7. Sew both parts together around the edges making sure not to sew too tight.
- 8. Sew the 2 metal snap hook closure pieces in the edges (one on each edge) for making the attachment to the swatch easier.
- 9. Your analog sensor is ready! :)
You can follow this step by step explanation on the NEOPRENE BEND SENSOR page from Kokabant.
So following those steps, I made my own sensor which is this one:
This is a video where we tried in a easy circuit that the sensor worked:
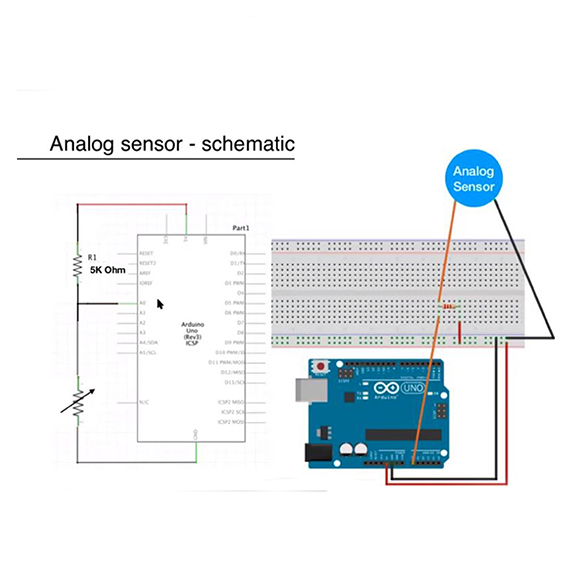
It is possible to read an Analog Sensor, and for doing that, as it is a sensor which generates an analog voltage we need to use the Analog Pins (A0-A5 on the Arduino Uno board).
We need to use the following Schematic and Code:
*with this sketch we read the analog sensor connected to pin analog_sensor_pin
*/

int analog_sensor_pin = A0;   //change the pin, where the sensor is connected?
int analog_sensor_value = 0;

void setup() {
// put your setup code here, to run once:
pinMode(analog_sensor_pin, INPUT);
Serial.begin(9600);

}

void loop() {
// put your main code here, to run repeatedly:
analog_sensor_value = analogRead(analog_sensor_pin); //read the Voltage of the pin sensor

analog_sensor_value = map(analog_sensor_value, 230, 130, 0, 255); //we change the range
analog_sensor_value = constrain(analog_sensor_value, 0, 255); //we apply the limits

Serial.println(analog_sensor_value); // print the value on the Serial monitor
delay(100);

}
This is a video of the reading of my Analog Sensor:
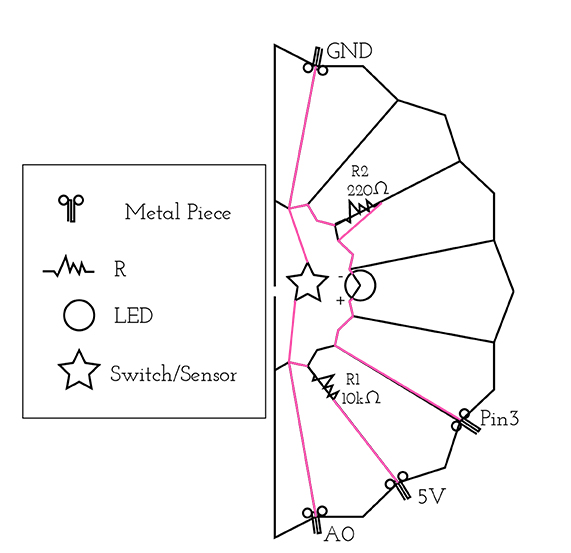
For adding a LED to the circuit we need this another schematic:

For finally reading and understanding this schematic and translate it into my sample, I freaked out. I couldn't see it, when you need to put and Arduino all looks so much difficult than the way it really is.
So finally this is the drawing of how I translated the previous schematic to my own sample:
· ANALOG SWATCH CREATION
These are the materials and tools you need for creating the swatch:
- Black felt sample
- Bend Sensor
- 1 LED
- 1 220 Ohm resistor
- 1 10k Ohm resistor
- 4 metal pieces (metal snap hook closure pieces, but only ones that has hook)
- 2 metal pieces (metal snap hook closure pieces, the opposite ones in this case for attaching the bend sensor)
- Conductive thread
- Needle
- Fabric scissors
- 4 Jumper wires
- 4 Alligator clips with wire
- Arduino Uno
- Pliers that are used in jewellery
- Multimeter
These are the steps you need to follow:
- 1. Check the schematic above. The pink line is where the conductive thread needs to be sewed.
- 2. Bend all the components legs (LED & resistors) with the pliers until they look like circles.
- 3. You can start sewing from you want with the conductive thread: These are the connections 1 (A0(metal piece)-R1(10kOhm)-Metal piece(the one without the hook for attaching the bend sensor to it)), 2 (5V(metal piece)-R1(10kOhm)), 3 (Pin3(metal piece)-LED("+" leg)), 4 (LED ("-" leg)-R2(220Ohm)) and 5 (R2(220Ohm)-GND(metal piece)-Metal piece(the one without the hook for attaching the bend sensor to it)).
- 4. Once you sewed everything, attach the bend sensor to the sample.
- 5. Take the Multimeter and verify that all the conections are well sewed.
- 6. Connect the alligator clips to the metal pieces in your sample (one end to the metal piece and the other to a jumper wire), following the schematic for doing so.
- 7. Upload the code that is down bellow into your Arduino Uno (following the process explained above about how to program an Arduino Uno).
- 8. Once the code is uploaded, the analog swatch will be ready! :)
This is the Code I used, I used Emma's circuit and only changed the parametters for my own sensor:
/*Emma Pareschi,
 * with this sketch we read the analog sensor connected to pin analog_sensor_pin,
 * we map the value and we use it to control the Led
 */

int analog_sensor_pin = A0;   //change the pin, where the sensor is connected?
int analog_sensor_value = 0;
int led_pin = 3;


void setup() {
  // put your setup code here, to run once:
  pinMode(analog_sensor_pin, INPUT);
  pinMode(led_pin, OUTPUT);
  Serial.begin(9600);

}

void loop() {
  // put your main code here, to run repeatedly:
  analog_sensor_value = analogRead(analog_sensor_pin); //read the Voltage of the pin sensor

  analog_sensor_value = map(analog_sensor_value, 100, 750, 0, 255); //we change the range
  analog_sensor_value = constrain(analog_sensor_value, 0, 255); //we apply the limits

  analogWrite(led_pin, analog_sensor_value);  //we use the mapped value to control the Led
  Serial.println(analog_sensor_value); // print the value on the Serial monitor
  delay(10);

}
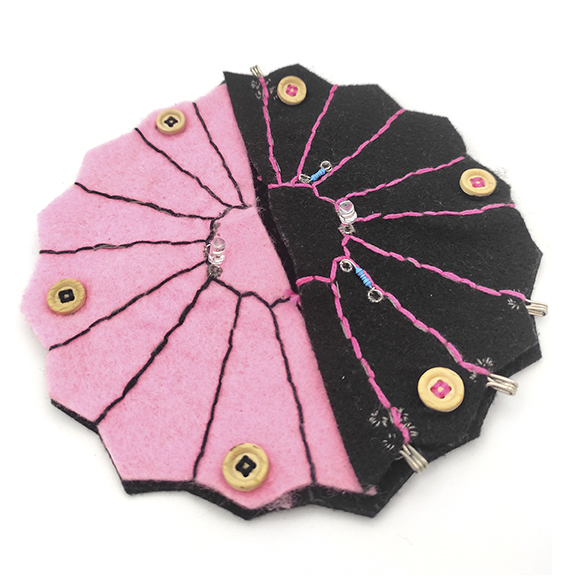
Finally, here you have my result (and I couldn't be prouder once I saw it worked, since it has been really but really difficult for me to finally understand it):
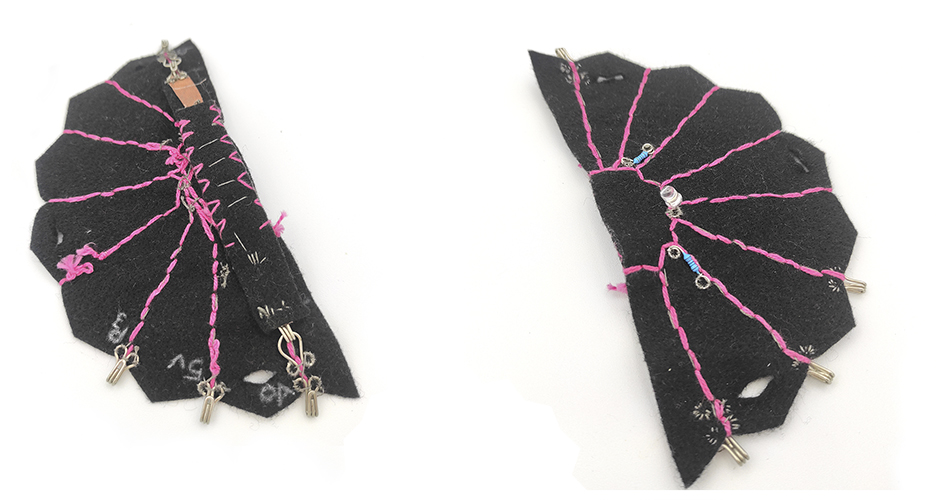
· Final Result Of Both Samples Together
· BOM of the Swatches:
This is the BOM (Bill Of Materials) for creating these two swatches:
| Qty | Description | Price | Link |
|---|---|---|---|
| 1 | Black & Pink Felt | 5,80€ | https://www.amazon.com/-/es/fieltro-pulgadas-surtidos-artesan%C3%ADas-manualidades/dp/B01GCLS32M/ref=sr_1_omk_3?__mk_es_US=%C3%85M%C3%85%C5%BD%C3%95%C3%91&keywords=felt&qid=1654959079&sr=8-3 |
| 1 | Conductive Thread | 19,36€ | https://www.amazon.com/-/es/Aurifil-Bobina-grande-inoxidable-yardas/dp/B017TQW1SQ/ref=sr_1_24?crid=2U6LJC9B5WBPI&keywords=conductive+thread+for+sewable+circuits&qid=1654959250&sprefix=conductive+thread%2Caps%2C424&sr=8-24 |
| 1 | Velostat | 9,70€ | https://www.amazon.com/-/es/Chibitronics-Pl%C3%A1stico-conductor-sensible-Velostat/dp/B09KS72DV2/ref=sr_1_1?crid=2OE3R57XS94C1&keywords=velostat+conductive+sheet&qid=1654959389&sprefix=velostat%2Caps%2C562&sr=8-1 |
| 1 | Conductive Fabric | 13,58€ | https://www.amazon.com/-/es/RF-Reduce-conductora-protecci%C3%B3n-medidores-inteligentes/dp/B07WNR2YDR/ref=sr_1_1?__mk_es_US=%C3%85M%C3%85%C5%BD%C3%95%C3%91&crid=261ZOD6O7N1D&keywords=conductive+copper+fabric&qid=1654959469&sprefix=conductive+copper+fabric%2Caps%2C209&sr=8-1 |
| 1 | Resistors Kit | 10,66€ | https://www.amazon.com/valores-resistencia-ohm-3-3-pel%C3%ADcula-resistencias/dp/B08FD1XVL6/ref=sr_1_2_sspa?crid=1PNITAONQ9OEE&keywords=resistor+kit&qid=1654959532&sprefix=resistor%2Caps%2C516&sr=8-2-spons&psc=1&spLa=ZW5jcnlwdGVkUXVhbGlmaWVyPUEySzNGNzNIUjEyQzlJJmVuY3J5cHRlZElkPUEwOTE0MjUyMk44VzJDVVVQRFJLUCZlbmNyeXB0ZWRBZElkPUEwMjIwOTU3Rk9XOEYxWEk5MTU1JndpZGdldE5hbWU9c3BfYXRmJmFjdGlvbj1jbGlja1JlZGlyZWN0JmRvTm90TG9nQ2xpY2s9dHJ1ZQ== |
| 1 | LEDs Kit | 12,60€ | https://www.amazon.com/bombillas-iluminaci%C3%B3n-brillante-componentes-electr%C3%B3nicos/dp/B09XDMJ6KY/ref=sr_1_1_sspa?crid=3EN8L8VBD6IQI&keywords=led+kit&qid=1654959601&sprefix=LED+kit%2Caps%2C291&sr=8-1-spons&psc=1&spLa=ZW5jcnlwdGVkUXVhbGlmaWVyPUEzQktOVE45QlBQV0JIJmVuY3J5cHRlZElkPUEwNjM4NDIzMjk4WE9KQjlLRVFBQSZlbmNyeXB0ZWRBZElkPUEwMzY4ODE4S0hUVURKWU1KWFZSJndpZGdldE5hbWU9c3BfYXRmJmFjdGlvbj1jbGlja1JlZGlyZWN0JmRvTm90TG9nQ2xpY2s9dHJ1ZQ== |
| 1 | 3V Battery | 4,74€ | https://www.amazon.es/Duracell-Specialty-bot%C3%B3n-Litio-Paquete/dp/B01CG0TO76/ref=pd_lpo_1?pd_rd_i=B01CG0TO76&psc=1 |
| 1 | Metal Snap Hook Closure | 3,45€ | https://www.amazon.es/EUROXANTY-corchetes-Corchetes-resistencia-sujetador/dp/B08N73FVB4/ref=asc_df_B08N73FVB4/?tag=googshopes-21&linkCode=df0&hvadid=482763699017&hvpos=&hvnetw=g&hvrand=10120124918624144729&hvpone=&hvptwo=&hvqmt=&hvdev=c&hvdvcmdl=&hvlocint=&hvlocphy=1005493&hvtargid=pla-1049249980450&th=1 |
| 1 | Arduino UNO | 40,10€ | https://www.amazon.es/SMART-PROJECTS-A000073-Arduino-Uno/dp/B00PUOVSYS/ref=sr_1_7?keywords=arduino+uno&qid=1654959834&sr=8-7 |
| 1 | USB Wire for Arduino UNO | 3,60€ | https://www.amazon.es/Christians-Technik-Shop-Conector-Arduino/dp/B01G1FEKGM/ref=sr_1_6?__mk_es_ES=%C3%85M%C3%85%C5%BD%C3%95%C3%91&crid=1B4KFJZR57XZM&keywords=arduino+uno+usb&qid=1654959877&sprefix=arduino+uno+usb%2Caps%2C474&sr=8-6 |
| 1 | Alligator Clip With Wires | 9,52€ | https://www.amazon.es/Senven%C2%AE30-Cocodrilo-Alligator-pulgadas-colores/dp/B07R44H819/ref=sr_1_2_sspa?crid=20Y4AEK0PWUIU&keywords=alligator+clips&qid=1654959986&sprefix=alligator+clip%2Caps%2C275&sr=8-2-spons&psc=1&spLa=ZW5jcnlwdGVkUXVhbGlmaWVyPUEyRldQVjhXUTdaNEpIJmVuY3J5cHRlZElkPUEwMjY1ODk0MzFXR0ExMDAzTlNESyZlbmNyeXB0ZWRBZElkPUEwNTUyMzMwMkhPMUJOTzU2QlhLRyZ3aWRnZXROYW1lPXNwX2F0ZiZhY3Rpb249Y2xpY2tSZWRpcmVjdCZkb05vdExvZ0NsaWNrPXRydWU= |
| 1 | Jumper Wires | 9,49€ | https://www.amazon.es/AZDelivery-Jumper-Arduino-Raspberry-Breadboard/dp/B07VFK8L9F/ref=sr_1_2_sspa?crid=2GC08EZ5TMWA8&keywords=jumper+wire+cables&qid=1654960059&sprefix=jumper+wire%2Caps%2C224&sr=8-2-spons&psc=1&smid=A1X7QLRQH87QA3&spLa=ZW5jcnlwdGVkUXVhbGlmaWVyPUFLRzRMRUgxV1Y2MzcmZW5jcnlwdGVkSWQ9QTAxNzg5NjI3VkdHUTZFUTRINVcmZW5jcnlwdGVkQWRJZD1BMDYxNDE4OVIzS0hTUUZHSVU5WSZ3aWRnZXROYW1lPXNwX2F0ZiZhY3Rpb249Y2xpY2tSZWRpcmVjdCZkb05vdExvZ0NsaWNrPXRydWU= |
References & Useful Links
These resources from Liza Stark's page are amazing for this assigment:
Useful Links
- E-Textile Lecture by Liza Stark
- Electronic Textile (E-Textile)
- Voltage, Current, Resistance, and Ohm's Law
- Arduino
- Basic Electronics Tutorial by Emma Pareschi
- Tutorial Intro to Arduino by Emma Pareschi
- Neoprene Bend Sensor