9. Textile as Scaffold
This week began with the Lecture by Anastasia Pistofidou, where she showed us A LOT of different techniques. For this week's assignment we need to choose at least 2 of them to try. I chose the Crystallization and then, the CNC milling to create a mold to make Biocomposites with it.
Inspirations:
· Criaterra by Adital Ela
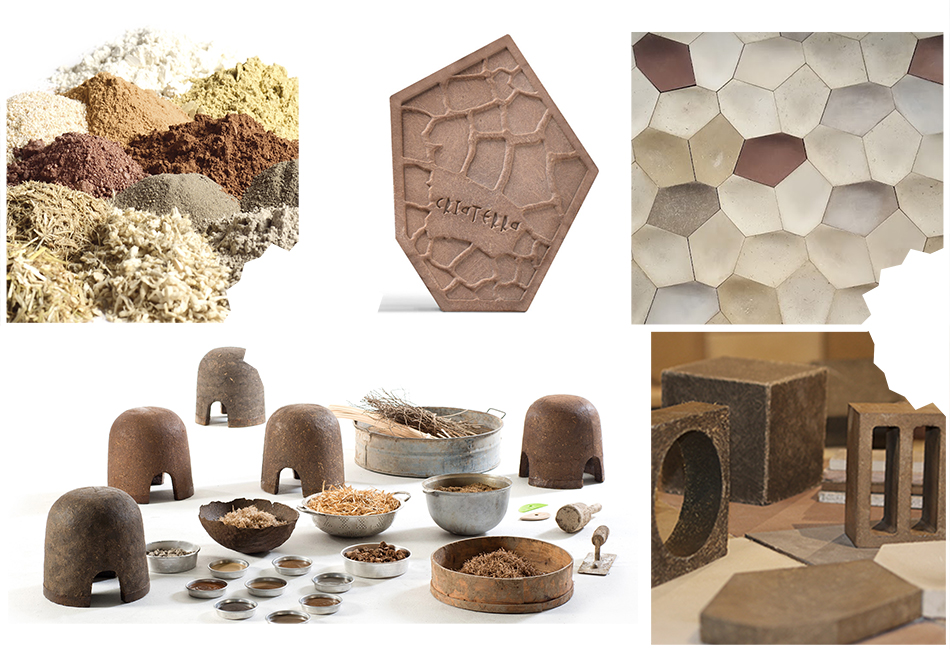
· Ceramics For The Anthropocene by Francesca Perona
This Week's Processes I: Biocomposite & CNC Milling
· Biocomposites
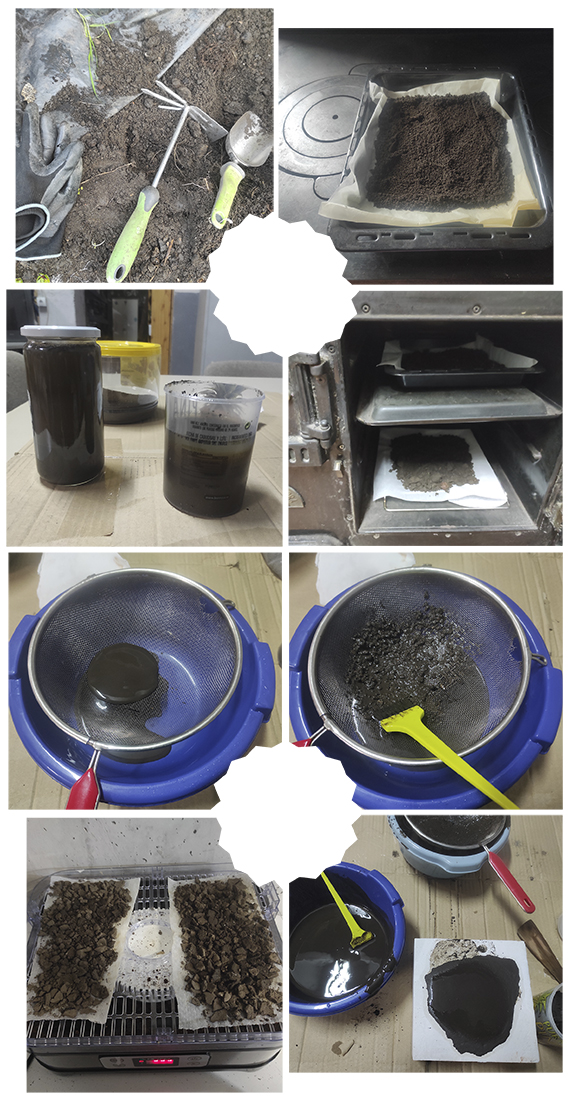
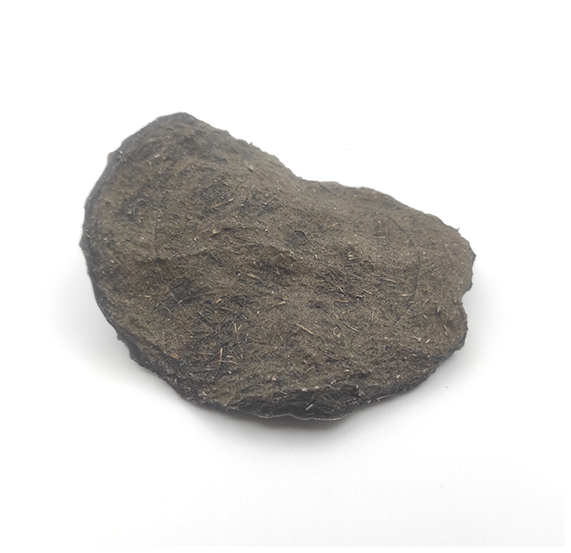
When I was at university, we learnt how to process the soil for taking the clay contained on it. For this assignment, I wanted to try making that with my garden's soil to work with it and make Biocomposites (in BioFabricating material's week I made bioplastics with clay, so I wanted to try with my own soil this time, you can see the results of the bioplastics here.
So, I felt so inspired by Adital Ela's and Francesca Perona's work, and I spent the whole weekend processing my soil for using it for this week's assigment. Although it is not a really difficult process, it takes time but it is worth it.
· How to process and clean your soil
What Is Levigation?
The Levigation process consists on grinding a substance that is insoluble to a fine powder while it is wet.
This is the process you need to follow to process your soil for cleaning it off impurities and get it ready for using it:
- 1. First, you need to find a place where you could take the soil. In my case, I took it from my garden. Make sure that you take a big amount of it since after the processing of cleaning the amount will be less.
- 2. You need to dry your soil in your kitchen oven (50ºC) and then grind it.
- 3. Once dried, you need to mix it in a jar or container in an amount of 50/50 of water and soil until homogenize it.
- 4. Now you need to wait 24h without moving it.
- 5. Then, the useful soil and the impurities would be separated in the jar, so first you need to remove the water of the surface.
- 6. The rest needs to be filtered to remove the organic material.
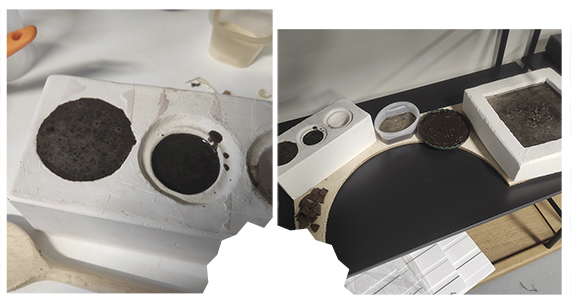
- 7. The thing we have is the result of our cleaning and what we're going to work with, so we can put it on a plaster surface to dry it. I like to dry it and then grind it again to use when needed (it is easier to weight it when it's dry, to have a better control of the amounts when you want to reproduce the process).
This collage shows the whole process:
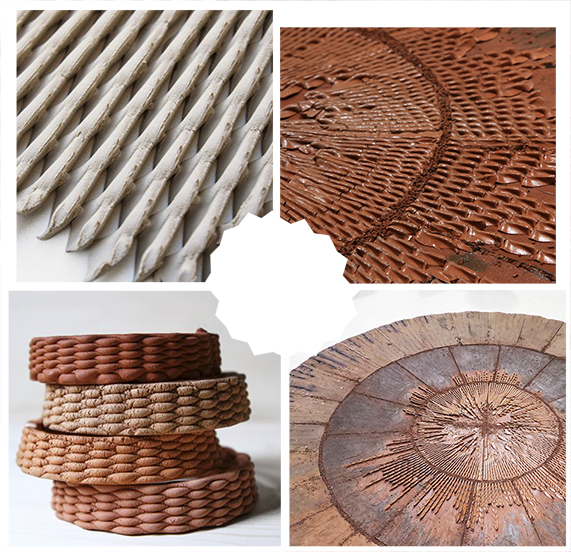
· Trying a New Recipe With Soil
Once I had my material dried and grinded, I retried the recipes I used for the Biofabricating Material's Week, I just wanted to see the difference between both materials.
I also wanted to make a Biocomposite with it, so I changed the recipes a bit and add some Esparto and Sisal to see what happened. I also wanted to try with Sawdust and Ash. I tried with drying them in plaster's moulds that I made some years ago, just to see how they could be dried.
· Gelatine + Garden's Soil Recipe
This is the recipe I used:
- Water: 60 ml
- Gelatine: 12 gr
- Soil: 5 gr
- Esparto & Sisal: 10 gr
And these were my results:
This final material was actually really interesting since it's a so strong material.
These are this material properties:
- Transparency:
- Elasticity:
- Smell: XXXXX
- Flexibility:
- Resistance: XXXXX
- Texture: XXXXX
· CNC Milling
"CNC milling is a substractive fabrication method that uses computer numerical controls systems for automating the process."
The CNC Milling include the following processes:
- Designing the parts in CAD.
- Translating the CAD files into code for machining.
- Setting up the machinery.
- Producing the parts.
This information is taken from this webpage.
· Designing in Grasshopper
Once I made the samples, I wanted to create a mold for making tiles with them. I felt really excited with the idea of doing tiles with my mum's garden's soil.
As I wanted to work with the soil, I thought about creating a positive mold on the CNC Milling which could allow me to create a negative plaster mold later.
I designed my positive shape in Grasshopper, using the code I created for the Computational Couture Week. I wanted to create a tile shape, so something that could be kind of symmetric also.
These is my Grasshopper definition:
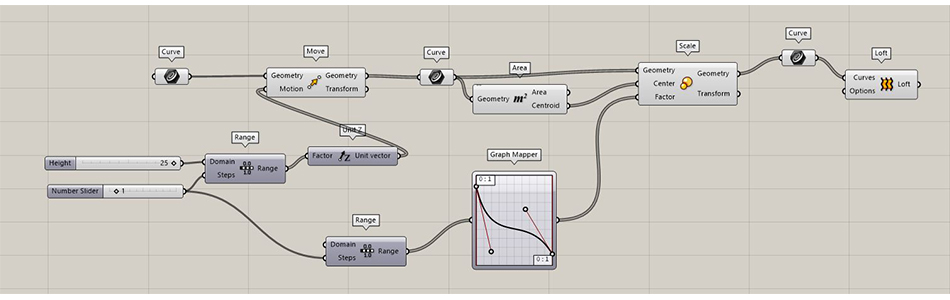
This is how the definition works:
- 1. I create one curve in Rhino, which I linked in Grasshopper as a "Curve" (my line shape comes from my Crane template, which I try to use for inspiring me for all the assignments).
- 2. Once it is linked, you can choose the height and the number of lines you want for your design.
- 3. You can choose what type of graphic you want for the "Graph Mapper".
- 4. Just PLAY until you find a shape you like!
- 5. "Bake" it, ant then "Cap" it.
- 6. Then I created a 250x250 mm squared surface below the model (for creating the limits for cutting with the machine and create a plaster mold).
- 7. "Scale" the model to 200 mm and put it in the middle of the square.
- 8. Extrude the square to 2 mm under the model.
- 6. Select both shapes and use the command "BooleanUnion".
- 6. Once it is done, export your model as an ".stl" file.
Here you have a video that shows the process of manipulating the shape and exporting it:
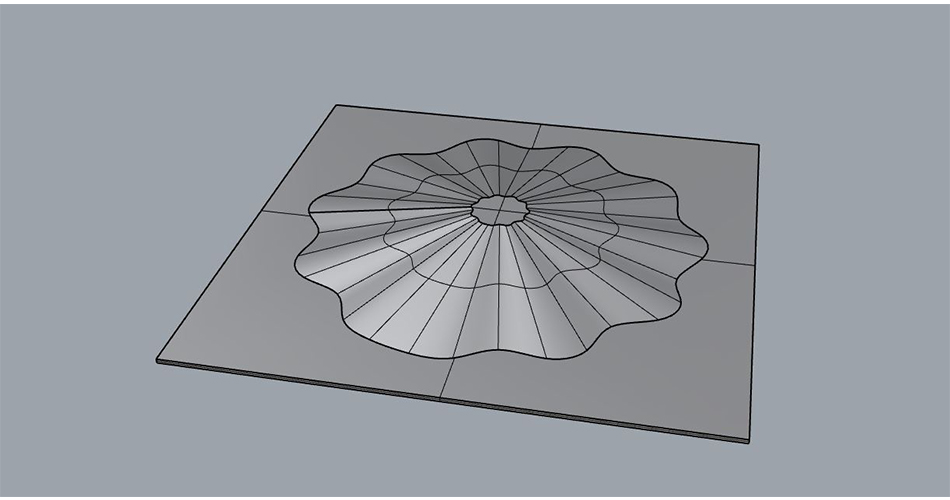
This is my final design:
· Our CNC Milling Machine: Beatrix
We named our CNC Milling machine Beatrix.
These are the technical details about Beatrix:
- We have a CNC Milling Machine by HDS
- It has an HDS spindle, air cooled 6kw
- The model is the AT/MT 1090-140, 18000RPM, ER32
- The bed size is 1300mm by 2500mm
· CNC Milling - The software we use: Aspire
For our CNC Milling Machine the software we use is called Aspire. As they explain in their page "Aspire provides a powerful but intuitive software solution for creating and cutting parts on a CNC router. There are tools for 2D design and calculation of 2D toolpaths such as Profiling, Pocketing, and Drilling as well as 2.5D toolpaths including; V-Carving, Prism carving, Moulding Toolpaths, Fluting, The Chamfer Toolpath and even a decorative texturing strategy.
What makes Aspire our premium package is the added 3D design tools which enable you to create your own 3D relief models and machine them with 3D machining strategies. Aspire’s unique 3D modeling tools coupled with the comprehensive set of 2D design and editing tools make it easy to create your own 2D and 3D parts from scratch as well as the ability to import and edit external 2D and 3D data."
And here you have some tutorials about how to use it:
And these are the machine parameters for my design:
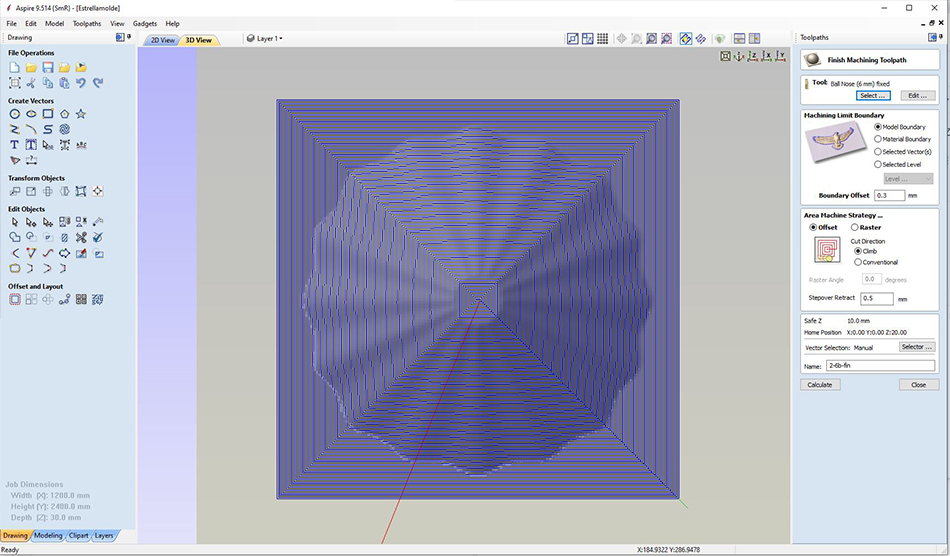
The material and tools that we used:
- Material: Type: Low density foam; Thickness: 30 mm
- Tools: Ball nose 6mm bit milling cutter
The processes of the CNC Milling:
Normally there are 2 main processes:
- Roughing: The roughing process is to make the material into a rough shape by removing excess parts.
- Finishing: This process can be used to remove aesthetic flaws.
In my case, I only used the first process, the roughing since the appearance of the foam looked really organic to me so I didn't apply the finishing to my mold.
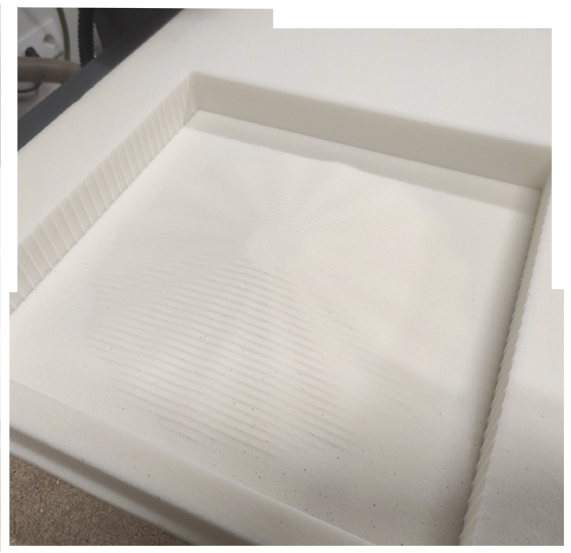
This is a small part of the milling process of the the model:
The machine was so fast that it only took her 20 minutes to do de roughing.
And this is the final process of cutting the frame:
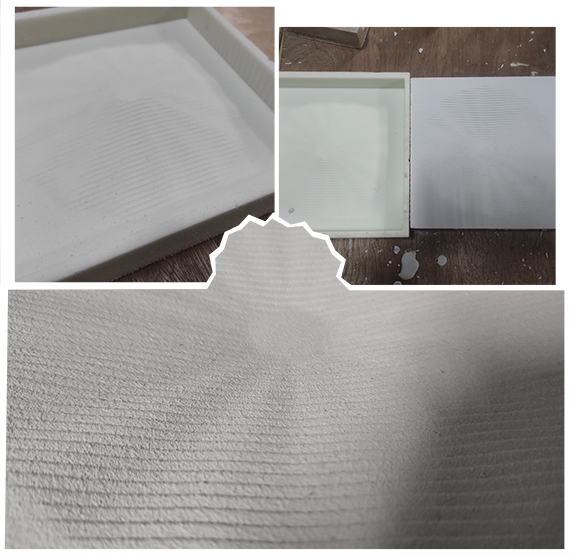
This is the final milling result:
· Creating a Plaster Mold for Drying the Samples
So once I had that, I made a plaster mold of it.
These are the tools and materials you need to prepare your plaster mold:
- Small bucket
- Latex Gloves
- Brush
- Neutral Soap
- Plastic Bag
- Plaster
This is the plaster I used for making my mold:

And these are the steps you need to follow for doing your mold:
- 1. Put your positive foam mold in on top of a flat surface.
- 2. Wet your brush with water and take a little of neutral soap, wet the foam with it (this is for avoiding the plaster to stick into the foam).
- 3. Take the plastic bag and put it into the foam mold. Then, fill it with water (this is for meassuring the amount of water you need for your mold).
- 4. Pour the water of the plastic bag into the bucket, and add the amount of plaster powder that the provider recommends (each plaster it's different and it will need a different ratio of water/plaster).
- 5. Stire the mixture with your hand (put on a glove for this).
- 6. Pour the mixture into your mold and wait until it is ready (the plaster should solidify, warm up and then cool down).
- 7. Separate both parts (plaster & foam) from each other.
- 8. Wash your plaster mold with hot water to remove the soap from it (this is so important since the soap could avoid a proper drying of the material later).
- 9. Let your plaster mold dry.
- 10. Your mold is ready to use! :)
This is the result of my mold:
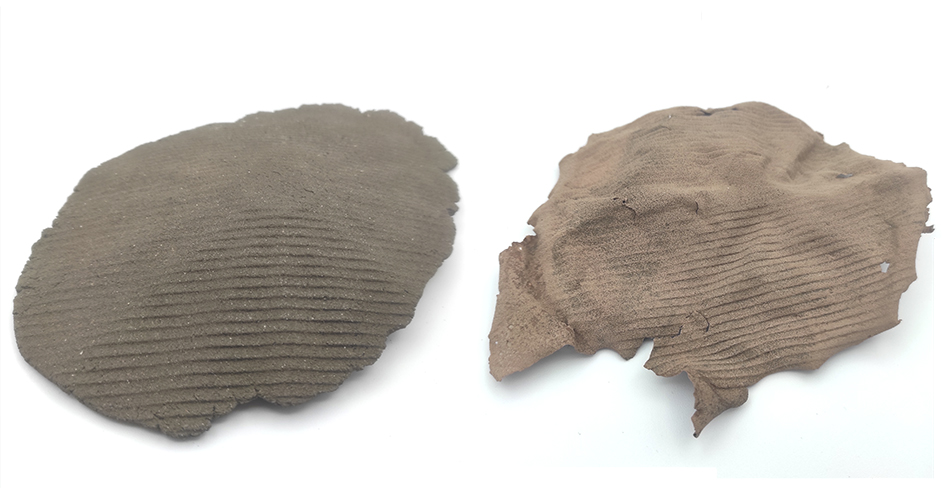
· Tries With Biomaterials:
Once the mold was dry, I tried making my Biomaterials on it. My first try was to mix the soil with ash and press it into the mold; for the second try, I tried with the Agar Agar + Clay recipe I used in Biofabricating Material's Week and the results were really interesting for me.
· BOM: Biocomposites & CNC Milling parts of this assignment
This is the BOM (Bill Of Materials) you need for this experimentations of the assignment:
| Qty | Description | Price | Link |
|---|---|---|---|
| 1 | Gelatine | 21,80€ | https://www.amazon.es/Gelatina-granulada-grado-profesional-neutro/dp/B087N96LF5/ref=sr_1_4?crid=4K3MCKB6WCW4&keywords=gelatina+1kg&qid=1643641858&sprefix=gelatina+1k%2Caps%2C171&sr=8-4 |
| 1 | Glycerine | 13,95€ | https://www.amazon.es/Glicerina-Vegetal-1L-1kg-25/dp/B07ZKXBP4R/ref=sr_1_5?crid=3FBEV10FD4VU3&keywords=glicerina+1kg&qid=1643642044&sprefix=glicerina+1kg%2Caps%2C73&sr=8-5 |
| 1 | Esparto & Sisal Roll | 11,61€ | https://www.bricomart.es/rollo-de-esparto-mezcla-mediano-10301445.html |
| 1 | Low Density Foam | 3,10€ | https://www.bricodepot.es/placa-de-poliestireno-expandido-100-x-60-x-3-cm-8435133640274 |
| 1 | Plaster (17kg) | 2,25€ | https://www.bricomart.es/escayola-placo-iberyola-ga-17-kg-10966935.html |
This Week's Processes II: Crystallization
I wanted to try also the Crystallizations. I chose the Sugar Crystals because they would be fun to create those ones which could be eaten later on.
· Sugar Crystals
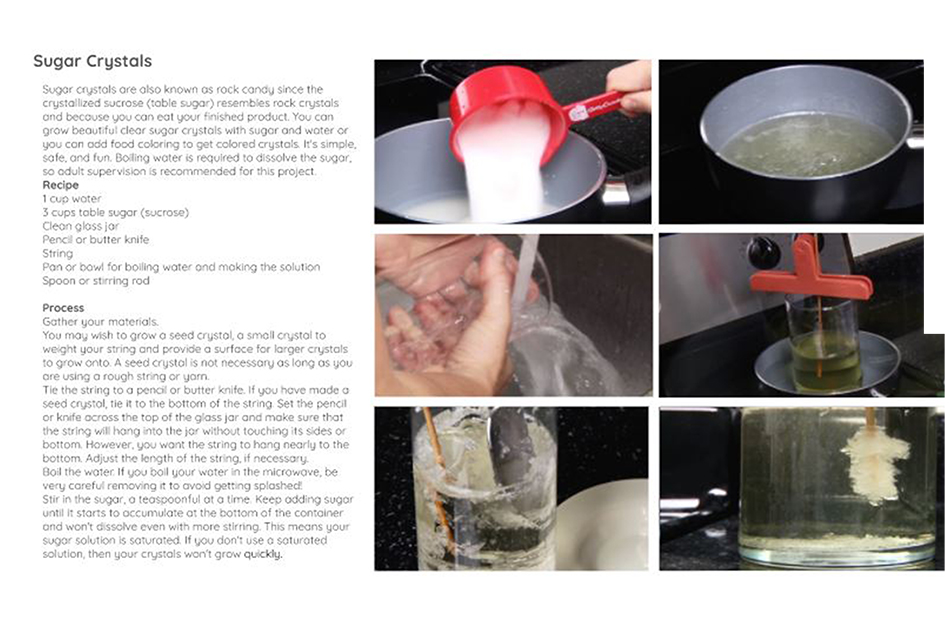
So here is the recipe to create this kind of crystals:
- 1 cup water
- 3 cups table sugar (sucrose)
- Clean glass jar
- Pencil
- String
- Pan or bowl for boiling water and making the solution
- Spoon or stirring rod
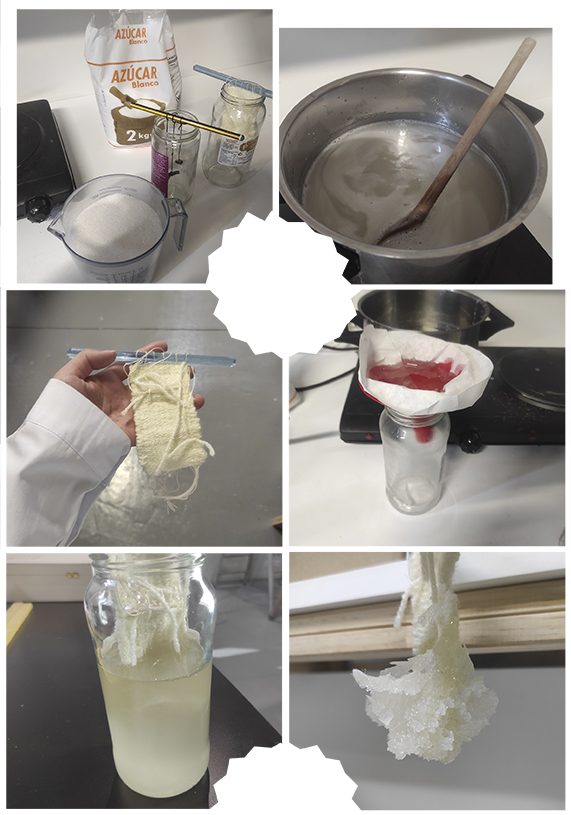
I need to tell that I got huge crystals, but the process was absolutely disgasting. Maybe I put more sugar than needed and the solution was that saturated that couldn't filter properly. Also, every single part of the space I was using ended up being sticky, so it took me longer the process of cleaning than the process of preparing the solution.
Here you can see the Crystallization Tutorial by Anastasia Pistofidou:
Downloadable Files
In this DOWNLOADABLE FILES FOLDER you can find all the files of this assigment.
References & Useful Links
These amazing works inspired me:
Useful Links
- Textile as Scaffold Lecture by Anastasia Pistofidou
- CNC Milling - Process, Machines & Operations
- Crystallization Tutorial by Anastasia Pistofidou
- Vectric