4. BioChromes
This week started with the lecture by Cecilia Raspanti. We were asked to produce dyes and inks from natural resources, so we will see how beautiful could be the colours that nature can offer to us!
First Touch With Natural Dyeing
· Ecoprint at the BDCamp
At the BDCamp we had an amazing intensive course with Flor from WÜL. I met her some years before so I knew about her work but i dind't know anything about her techniques. This first touch with Ecoprint was an amazing way to see how we can use nature for color creation in a more soustainable way.
This is a collage which shows some of the results we got that day:
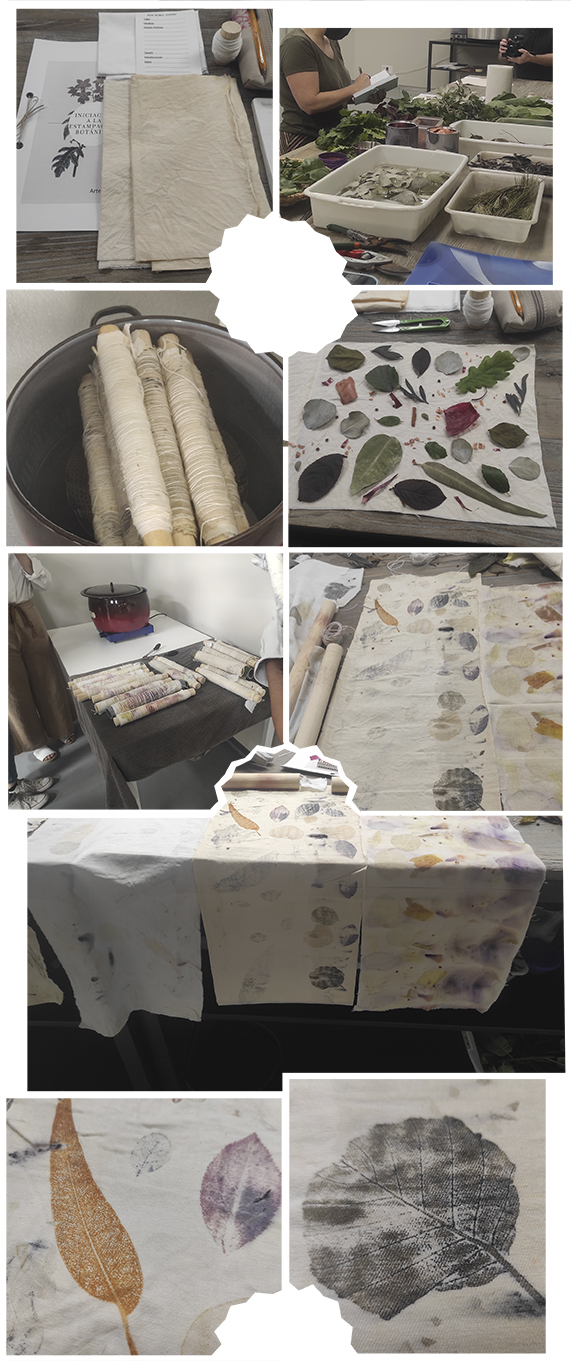
· Ecoprint With Flor From WÜL
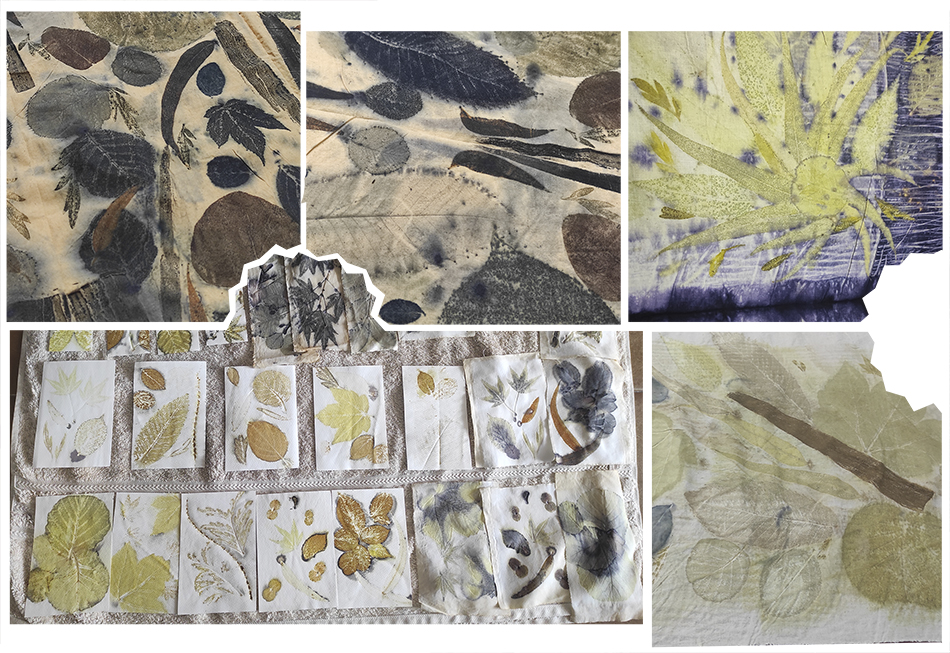
Flor also invited us to another amazing two-day course with her. We started the course by going to the forest and took the leaves we were going to use directly from the trees. Then we mordanted the fabrics with two type of mordants (alum and iron) and then do the eco-printing on the mordanted fabrics and also on paper with really amazing results.
These were the results of that day:
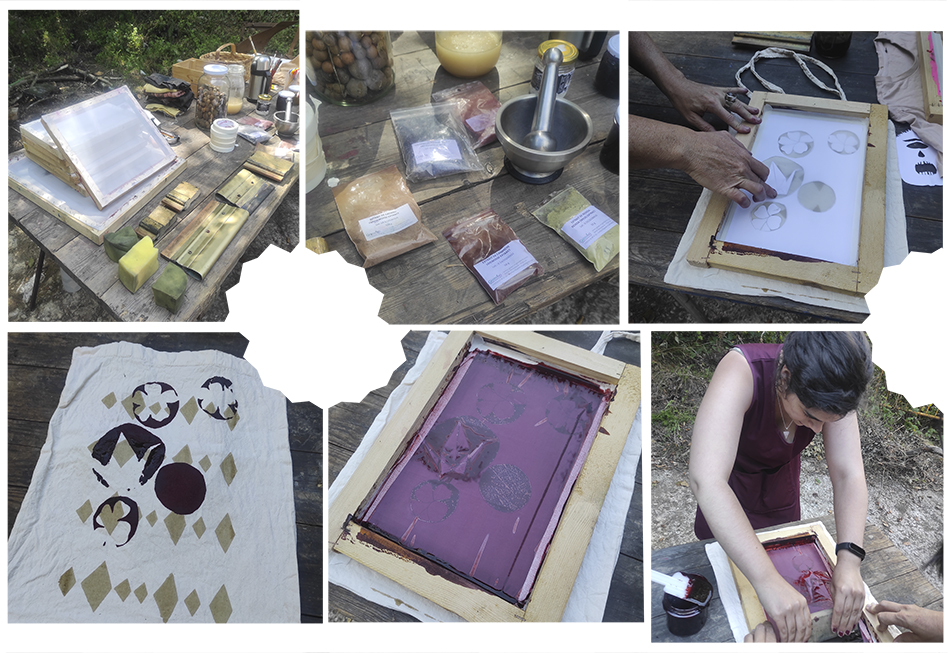
· Screen-Printing With Natural Dyes With Virginia Ameztoy
A month later, I went to an Artist Residency Program where I met Virginia Ameztoy. She gave a one-day course about Screen-Printing with Natural Dyes. I love the screen-printing technique so it was a fantastic course cause I never though before about how interesting could be doing it with natural dyes.
Inspiration
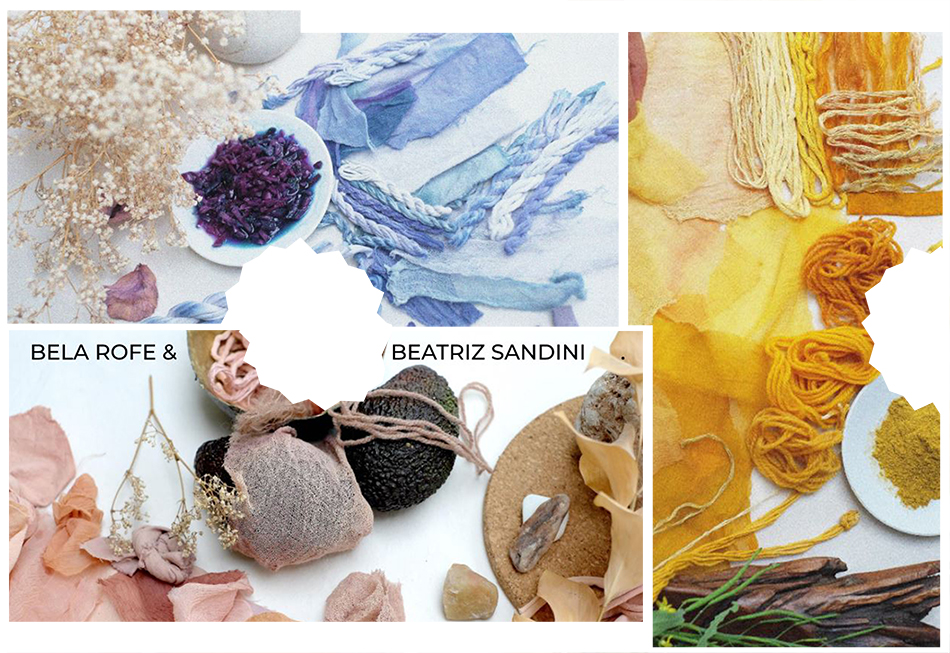
BioChromes
· WHAT ARE BIOCHROMES?
"BioChromes are any pigment produces by a living organism."
· NATURAL COLOUR SOURCES
· Organic:
- Plant: Flower, stems, leaves, bark, wood and algae.
- Animal: Insects and mollusks.
- Organism: Bacteria and myco.
· Inorganic:
- Mineral: Minerals, earth, rocks, salts and metals.
· DIFFERENCES BETWEEN INK, DYE & PIGMENT
- Ink: Dense liquid - Soluble/ Dispersed - Into the material & Onto the material
- Dye: Liquid bath - Soluble in water - Into the material
- Pigment: Powder - Insoluble in water - Onto the material
· Natural Dyes
WHAT ARE DYES?
"A dye is a coloured substance that chemically bonds to the substrate to which it is being applied."
NATURAL DYEING
These are briefly the steps you need to follow for this process, taken from Cecilia's Lecture:
- 1. Weight the textiles & fibers.
- 2. Combine water with mordant.
- 3. Heat up, stir & add fibers.
- 4. Combine dye stuff & vehicle.
- 5. Boil, stir & strain.
- 6. Preserve/Thicken/Modify.
WHAT ARE MORDANTS?
"A mordant is a substance, typically an inorganic oxide, which is combined with a dye bath to enhance the fastening proces of the dye onto organic fibers. They enchance the light and wash-fastness of the dye on the fibers, both the protein based and the cellulose based ones. Mordants also have an impact on the final colour.
Among the mordants we find: Alum, Iron, Copper & Soy.
WHAT ARE MODIFIERS?
"These are substances applied after the dye bath to extend the number of shades possible with one dye bath. The same modifier in combination with different mordants will produce different colours as well. With some dyes the colour change is drammatic, with other is subtle and soft. Some modifiers change the Ph of the water, other act as a stronger mordant while improving them. Usually they can be divided into 4 typologies of modifiers: Acidic modifiers, Alkaline modifiers, Copper modifiers & Iron modifiers."
This Week's Practice: The Whole Process
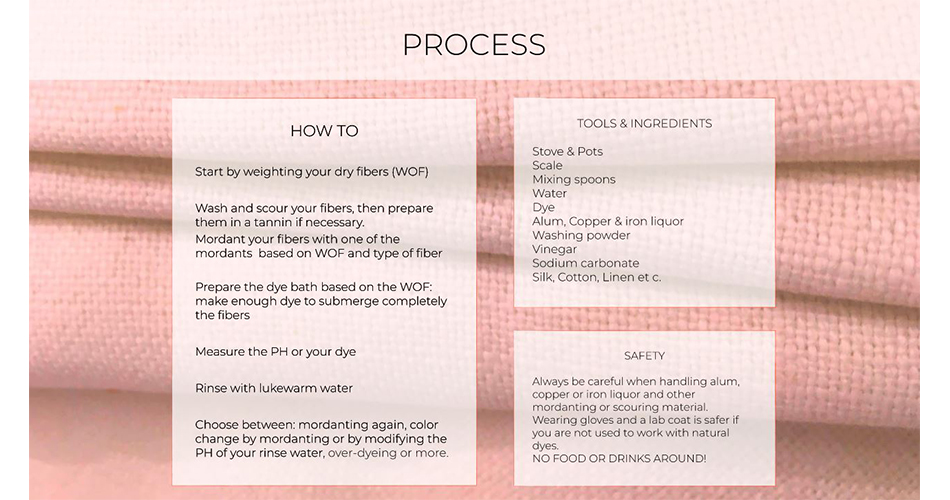
Tools & Ingredients needed:
- Stove & Pots
- Scale
- Mixing spoons
- Water
- Dye
- Alum, Copper & Iron liquor
- Washing powder
- Vinegar
- Sodium carbonate
- Silk, Cotton, Linen etc.
These are the steps of the whole workflow for natural dyeing that we followed, taken from Cecilia's Lecture:
- 1. Start by weighting your dry fibers (WOF).
- 2. Wash and scour your fibers, then prepare them in a tannin if necessary.
- 3. Mordant your fibers with one of the mordants based on WOF and type of fiber.
- 4. Prepare the dye bath based on the WOF: make enough dye to submerge completely the fibers.
- 5. Measure the Ph of your dye.
- 6. Rinse with lukewarm water.
- 7. Choose between: mordanting again, color change by mordanting or by modifying the PH of your rinse water, over-dyeing or more.
This image from Cecilia's Lecture summarises the process really well:
· Fibers Preparation: Weight Of Fibers (WOF), Scouring & Mordanting
I couldn't be present on the whole process of WOF, Scouring & Mordanting since I was being part of another intensive course so I worked from home this week and I was given the mordanted fabrics. Anyway, I'll explain how my peers did the process down below.
· WOF: Weight Of Fibers
First of all, the fibers need to be weighted.
We worked with two kind of fibers Animal (wool) and Vegetal (silk, viscose, cotton, linen).
This is how we got the fibers, image taken from my peer Marisa's documentation:
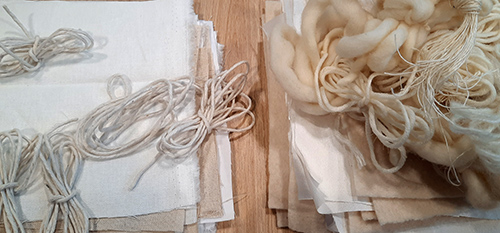
And this is the weight of each of them:
- Animal Fibers: 460,59gr
- Vegetal Fibers: 428,53gr
· Scouring
This is how you need to scouring each type of fiber, taken from Cecilia's lecture:
· Animal Fibres: Rinse the fibers gently with luke warm water and a little bit of soap. Keep in mind that too much friction and heat will felt the wool, while it will damage the silk fibers making them dull and brittle. Also sudden temperature changes are not recommended with animal fibers.
· Vegetable Fibres: Boil the fibers for 1hour in water and sodium carbonate (soda) ±2 spoons for 4-5L of water. This process will remove the oil and waxes that are naturally present in the fibers. It's not bad to repeat this process twice or to start by whashing the fibers at a high temperature (60º) in the washing machine.
In our case:
· Animal Fibers: 460,59gr (this kind of fibers only need water and a little soap for cleaning them).
· Vegetal Fibers: 428,53gr (we used 9L of water and 3,5 spoons of sodium carbonate and followed the process explained above).
These are the steps you need to follow for scouring your fibers:
- 1. Combine water with scouring agent.
- 2. Heat up, boil, stir & add fibers.
- 3. Remove, strain and rinse.
· Mordanting
As a mordant, we chose the Alum for all of our fibers.
"Alum can be used to mordant on all kinds of fibers. It helps brightening the colours and assures a good light and wash fastness."
This image taken from Cecilia's lecture shows the proportion you need when using this mordant:
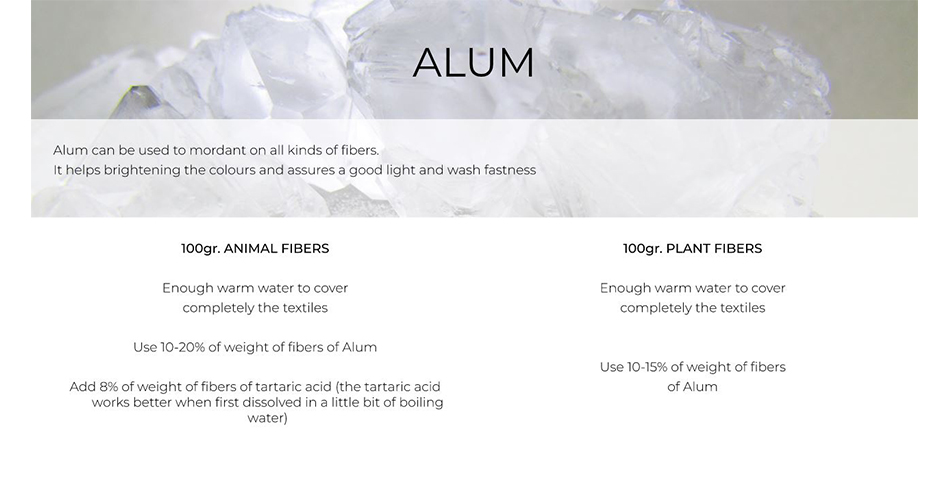
This is the process we followed when mordanting:
- 1. Calculate the Alum amount (in our case the 15% of the total WOF made 133,37gr of alum).
- 2. Combine water with mordant.
- 3. Heat up, simmer, stir and add fibers.
- 4. Remove and strain.
This is a gif of the whole process of preparing the fibers, also taken from Marisa's documentation:
As I said before, I was given the fabrics once they were mordanted and I worked from home for the following steps too.
· Dye Bath
These are the steps you need to follow:
- 1. Combine dye stuff and vehicle.
- 2. Boil, stir and strain.
- 3. Add fibers in dye bath.
- 4. Boil, stir and strain.
- 5. Remove, strain and rinse.
- 6. Preserve, thicken, modify.
I personally chose two recipes to work with: Purple Corn & Turmeric
These are the links for the dyestuff I used:
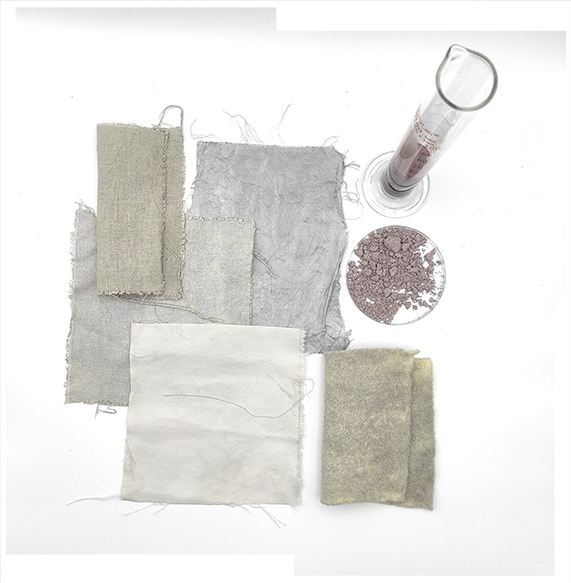
· Purple Corn Recipe:
- 1. Add 20gr of Purple Corn powder into 1L of water and stir it until disolved.
- 2. Cook the mixture until it boilds.
- 3. Filter the mixture to separate the rests of purple corn from the dye.
- 4. The dye is ready to use!
Note: I left my fibers in the dye bath for 1h.
This is the result of the dyeing:
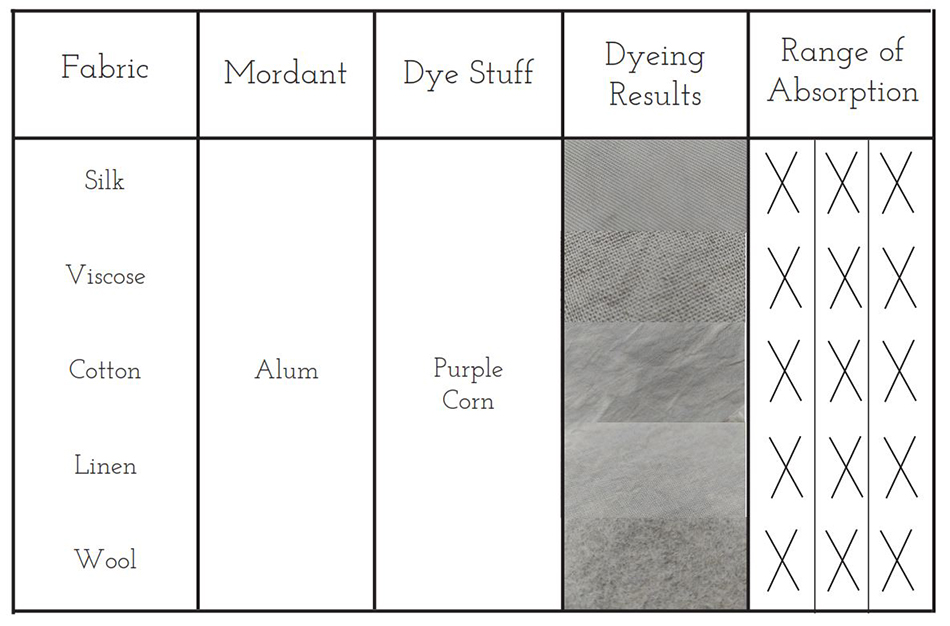
And this is a comparative chart of all the results:
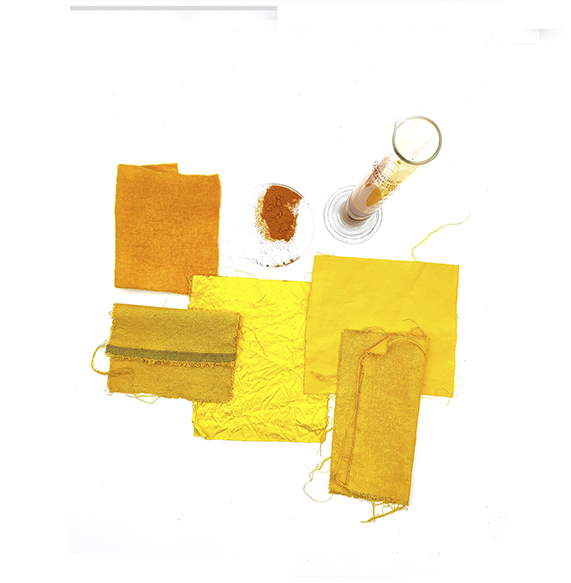
· Turmeric Recipe:
- 1. Add 56gr of Turmeric powder into 2L of water and stir it until disolved.
- 2. Cook the mixture until it boilds.
- 3. Filter the mixture to separate the rests of turmeric from the dye.
- 4. The dye is ready to use!
Note: I left my fibers in the dye bath for 1h.
This is the result of the dyeing:
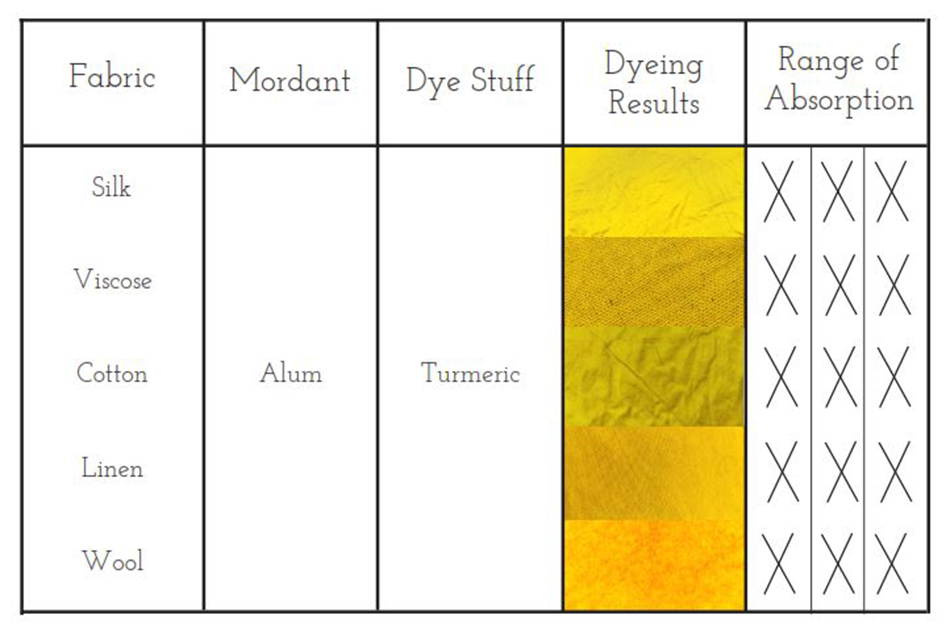
And this is a comparative chart of all the results:
This is an small collage of a process I followed for dyeing my fibers:
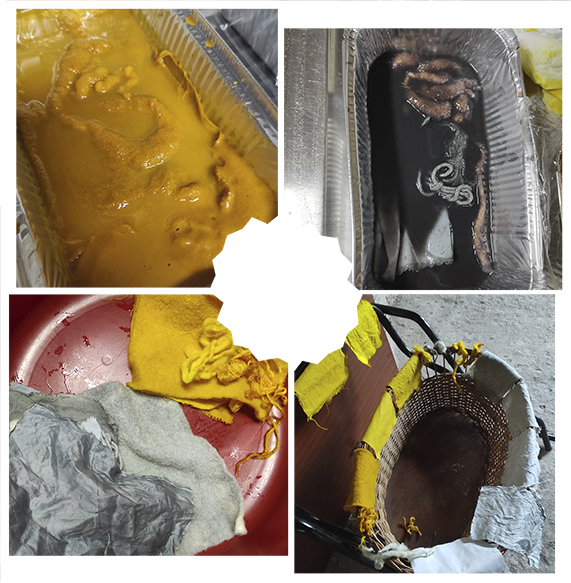
Unfortunatelly I didn't try any modifier here since I loved the colors like they were on these fabrics. Anyway, I tried modifying the color in the inks, so I'll show that down below.
· Inks
"An ink is a coloured liquid that is applied to a surface and is absorbed by, but not bonded to the surface."
This is the Ink Composition:
- Vehicle (water/ethanol/oil/gel): The liquid in which the pigment is supended.
- Binder (arabic gum): The substance that acts like a glue between the dye stuff and the liquid.
- Additive (salt/vinegar/metals): The substance that helps stabilising, intensifying, modifying, preserving or thickening the ink.
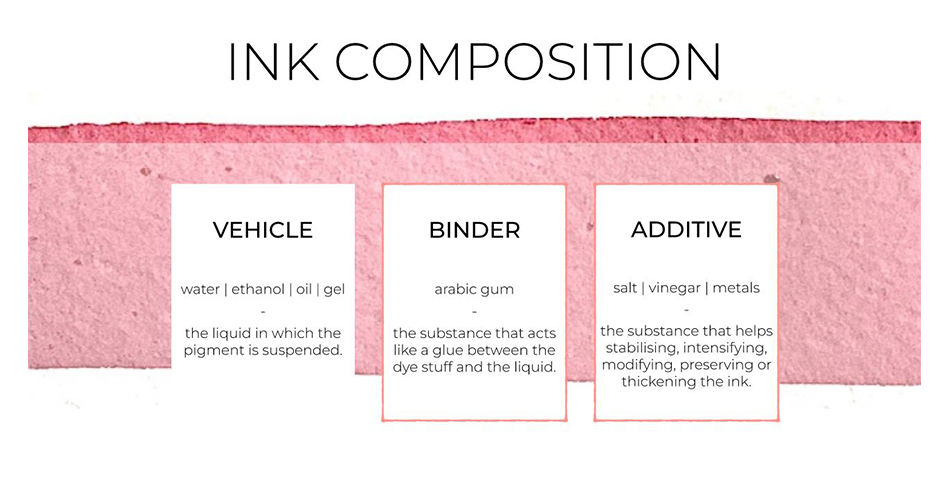
Slide from Cecilia's Lecture
These are the Vehicles & Binders:
- Water (ink): The liquid in which the pigment is suspended or solved in.
- Ethanol (marker ink): The substance in which the pigment solves.
- Oil/Gel (printing/painting ink): Both vehicle and binder.
- Arabic gum medium (aquarelle ink): Binder that suspends the pigment equally across the water.
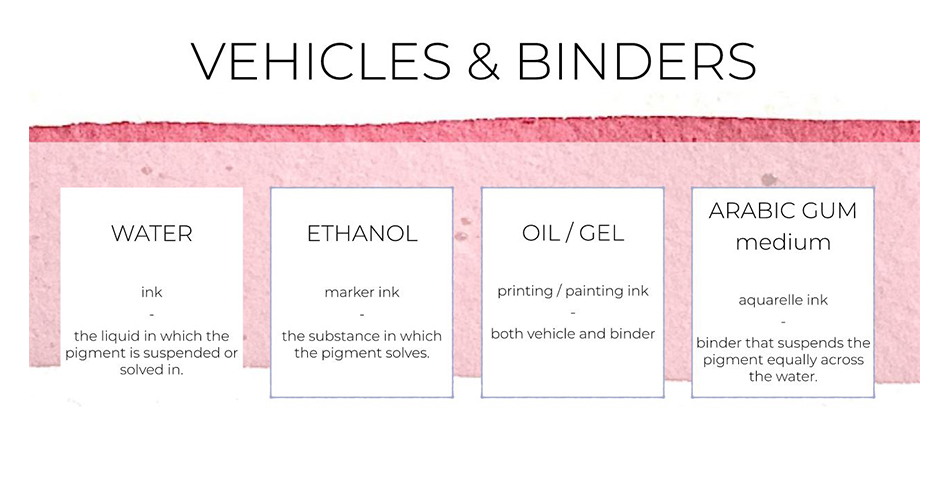
Slide from Cecilia's Lecture
This is the Process you need to follow in general terms:
- 1. Combine dye stuff & vehicle.
- 2. Boil/Stir.
- 3. Preserve/Thicken/Modify.
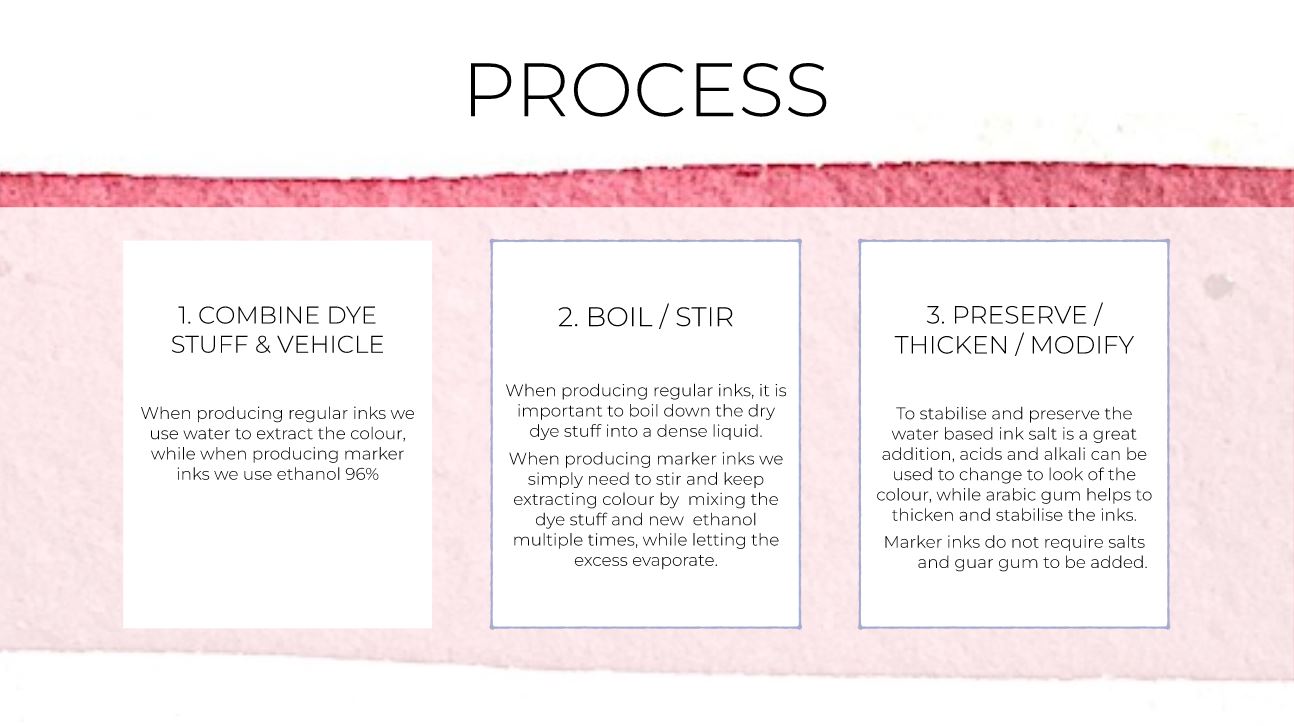
Slide from Cecilia's Lecture
Then, there are some slightly differences in the process regarding the vehicle:
· Water:
- 1. Combine dye stuff & water.
- 2. Boil & stir, then strain.
- 3. Preserve/Thicken/Modify.
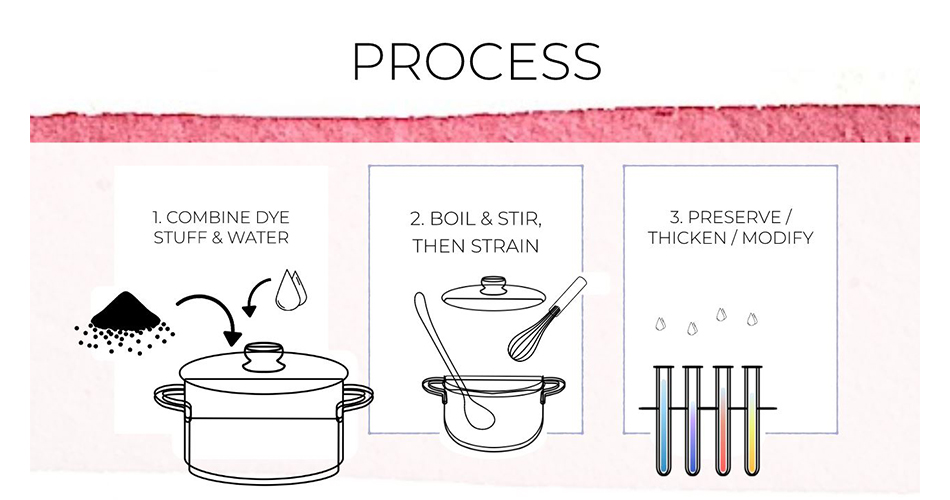
Slide from Cecilia's Lecture
· Ethanol:
- 1. Combine dye stuff & ethanol.
- 2. Stir & strain.
- 3. Modify.
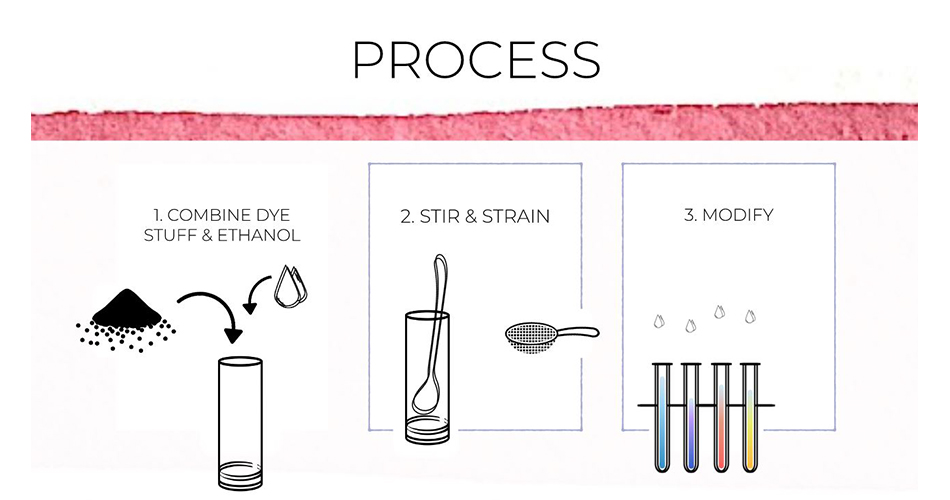
Slide from Cecilia's Lecture
I decided to try creating inks with Turmeric, Purple Corn too, just to see how they could look like. I tried with water and ethanol as vehicles and with vinegar and alum as modifiers.
These are my results of both inks:
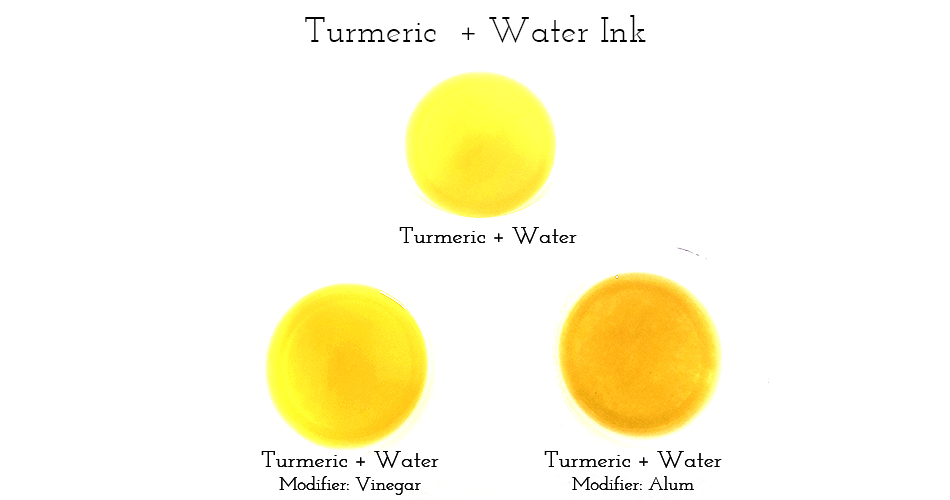
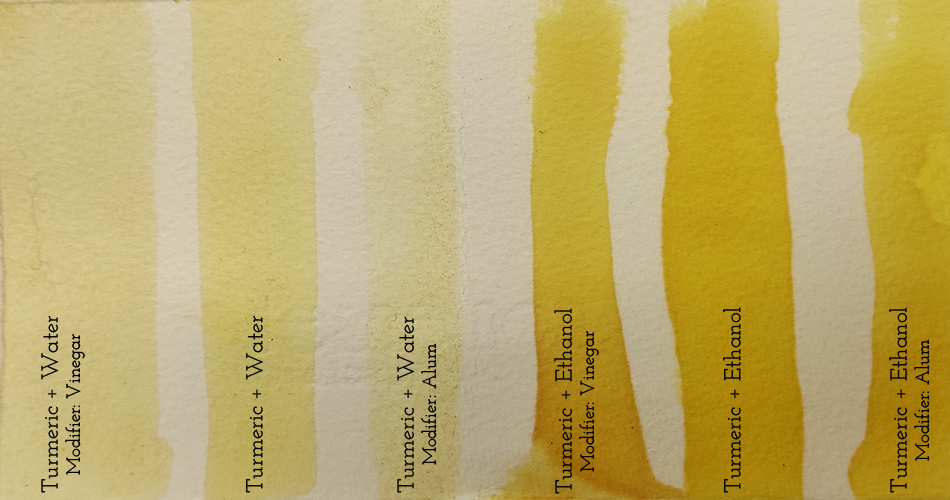
· TURMERIC
· Turmeric + Water:
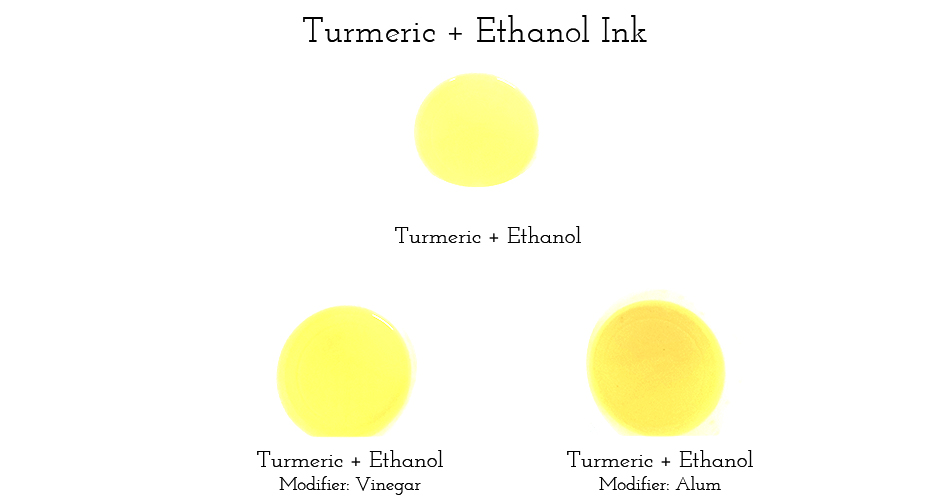
· Turmeric + Ethanol:
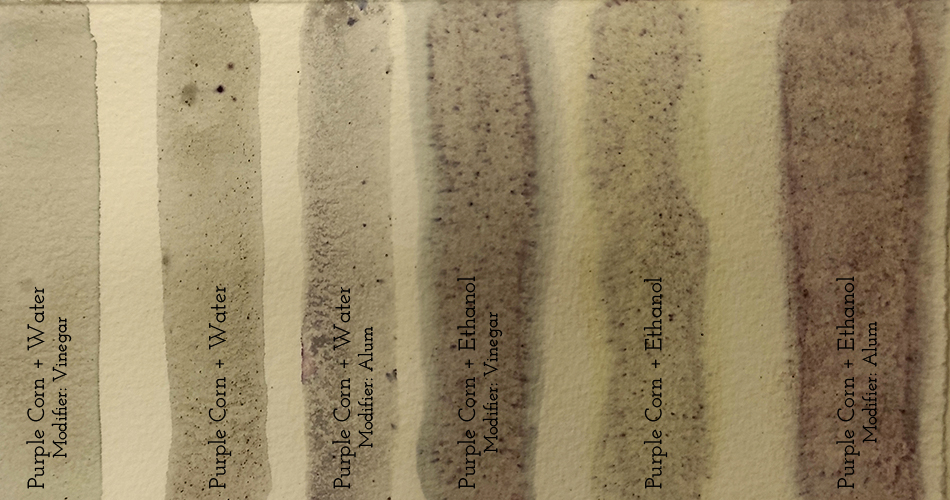
· PURPLE CORN
· Purple Corn + Water:

· Purple Corn + Ethanol:
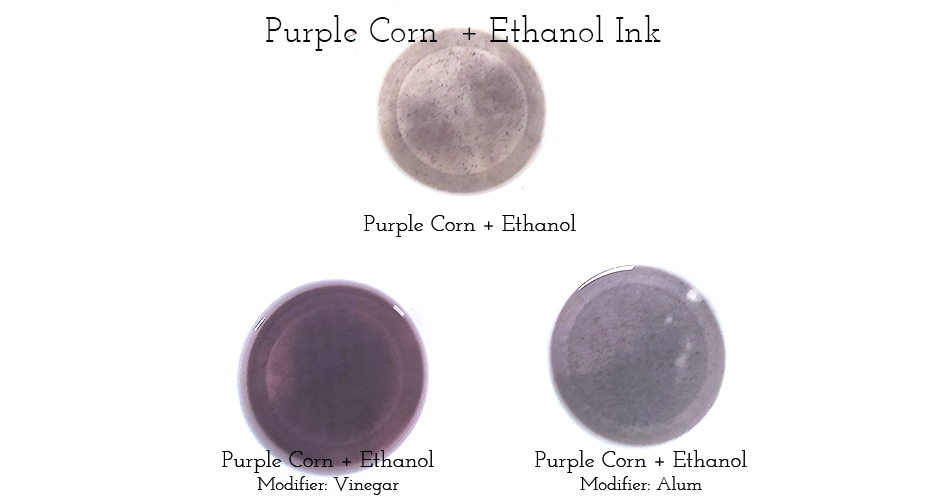
These is how the inks look on paper painted with a brush:
Conclusions:
-
Turmeric: The ones made with turmeric + ethanol are the most powerfull ones. The rest are quite pale and with similar colors once you try them on paper (if you see them in the containers, you can see the difference in a better way, but once you paint with them they look so papel).
-
Purple Corn: The ones made with purple corn are pale in general once you try them on paper. Also, I didn't strain the ones made with purple corn + ethanol since the only thing that passed the filter was the ethanol (without any color). Note: In this case, once you paint, the purple corn will stay in the paper (and give it a texture), if you don't like it, you just can wait until it dries and remove it by rubbing a paper over it.
· Bacterial Dyes
WHAT ARE BACTERIA?
"A single-celled organism. These dwell nearly everywhere on earth, from the bottom of the sea to inside animals."
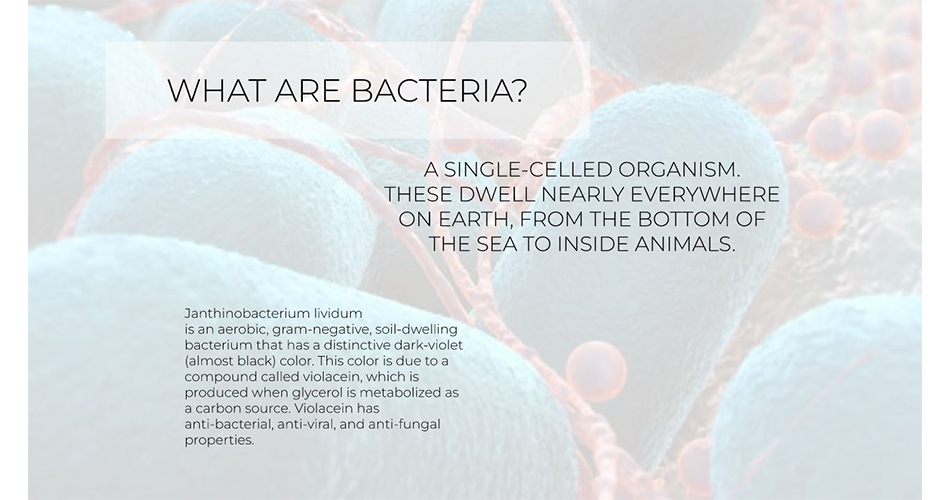
Image from Cecilia's Lecture"
This is the Bacterial Dyeing Tutorial by Cecilia Raspanti:
And this is a video from BioShades textile dyeing with bacteria:
We had the opportunity of having a Bacterial Dyeing Workshop with Ricardo from Biook in March 2022.
· The Process
These are briefly explained the steps of the process you need to follow to do this process, taken from Cecilia's lecture:
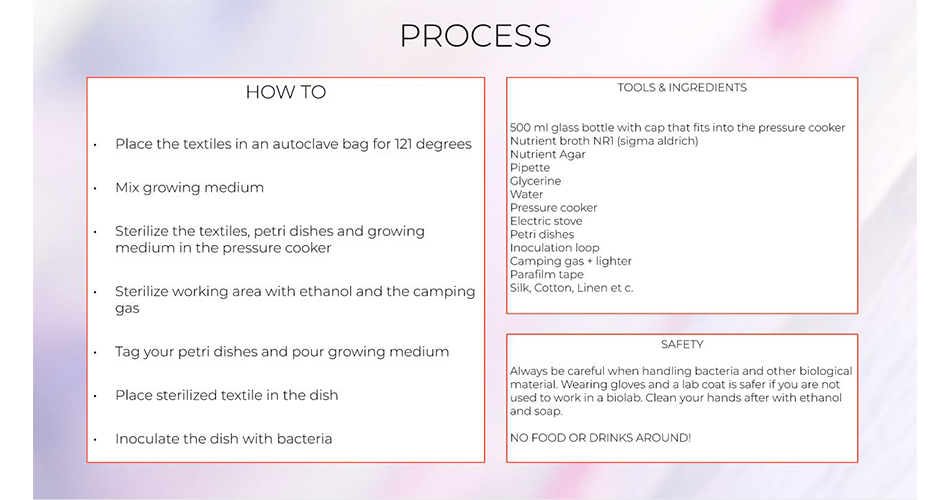
TOOLS & INGREDIENTS NEEDED:
- 500ml glass bottle with cap that fits into the pressure cooker
- Nutrient b
- Nutrient Agar
- Pipette
- Glycerine
- Water
- Pressure cooker
- Electric stove
- Petri dishes
- Inoculation loop
- Camping gas + lighter
- Parafilm tape
- Silk, Cotton, Linen etc.
These are the step by step Instructions for the Process taken from the BioShades website:
· THE TEXTILE:
- 1. Prepare the textiles.
- 2. Prepare the textiles in the desired style.
- 3. Place them inside a plastic disposable autoclave bag.
· THE MEDIUM
- 4. Preparing Nutrient Agar - (for the bacteria production).
- 5. Take the 500 ml bottle and fill it up to 250 ml with (distilled if available) water
- 6. Dissolve 5 gr of nutrient agar (dosage is 20gr / liter).
- 7. Add 0,5 ml of glycerine with a pipette.
- 8. Close the bottle with the cap and gently mix a little bit.
- 9. Unscrew the cap a little bit so that it’s not sealed.
Or
- 4. Preparing Nutrient broth nr 1 – (for the textiles).
- 5. Take the 500 ml bottle and fill it up to 250 ml with (distilled if available) water.
- 6. Dissolve 6,75 gr of nutrient broth (dosage is 25gr / liter).
- 7. Add 0,5 ml of glycerine with a pipette.
- 8. Close the bottle with the cap and gently mix a little bit.
- 9. Unscrew the cap a little bit so that it’s not sealed.
· STERILIZE
- 10. Sterilize with the pressure cooker.
- 11. Add ±1 liter water in the pressure cooker (as reference: less than in the liquid in the bottle you are sterilizing).
- 12. Put the bottle in the pressure cooker (with the cap slightly unscrewed). If planning on dyeing the textiles, add the bag with the prepared textiles.
- 13. Slide the lid of the pressure cooker to close it sealed.
- 14. Set the pressure cooker to high pressure/the most sealed (2 out of 2,1,steam,0).
- 15. Set the electric cooker at the highest temperature until it starts steaming.
- 16. Now put the electric cooker’s temperature to low heat for ±20 minutes.
- 17. At this point turn heat off and wait until the pressure cooker’s pin is down and there is no more steam.
- 18. Take everything out.
· PREPARING THE PETRI DISHES
- 19. Prepare the Petri dishes - without textiles.
- 20. Prepare the petri dishes by writing all the information on the back (medium, bacteria name, date and person).
- 21. Poor some alcohol on the table and sterilize area.
- 22. Place the camping fire next to the sterile area and turn it on.
- 23. Unscrew the bottle’s cap and sterilize the edge of the neck of the bottle on the fire.
- 24. Quickly open the petri dish and poor in a layer (a couple of mm) of nutrient agar.
- 25. Let it rest until firm/cooled down.
- 26. Prepare the Petri dishes - with the textiles.
- 27. Prepare the petri dishes by writing all the information on the back (medium, bacteria name, date and person).
- 28. Poor some alcohol on the table and sterilyze area.
- 29. Place the camping fire next to the sterile area and turn it on.
- 30. Sterilyze the metal pincet/tweezer with some alcohol.
- 31. Carefully open the disposable autoclave bag and take out the prepared textile using the pincet.
- 32. Place it in the petri dish and close it.
- 33. Unscrew the bottle’s cap and sterilize the edge of the neck of the bottle on the fire.
- 34. Quickly open the petri dish and poor in a layer (a couple of mm) of nutrient broth over the textiles.
- 35. Let it rest until firm/cooled down.
· THE INOCULATION
- 36. Poor some alcohol on the table and sterilyze area.
- 37. Place the camping fire next to the sterile area and turn it on.
- 38. Take the metal inoculation loop and sterilize it by passing it onto the flame (if plastic skip the sterilizing).
-
39. With quick and carefull movements:
-
Open slightly the cap of the dish with the bacteria.
- Dip the still warm inoculation loop in the medium next to the bacteria (not on bacteria).
- Now swipe gently over the bacteria.
-
Trasfer bacteria on the new petri dish (or on the textile). (TIP: always open both the petri dishes on the flame/sterile side)
-
40. Now seal the petridish with some Parafilm tape.
· GROWING
- 41. Now that petri dishes have been inoculated they need to be stored at around 26/30 degrees celsius in an incubator or similar.
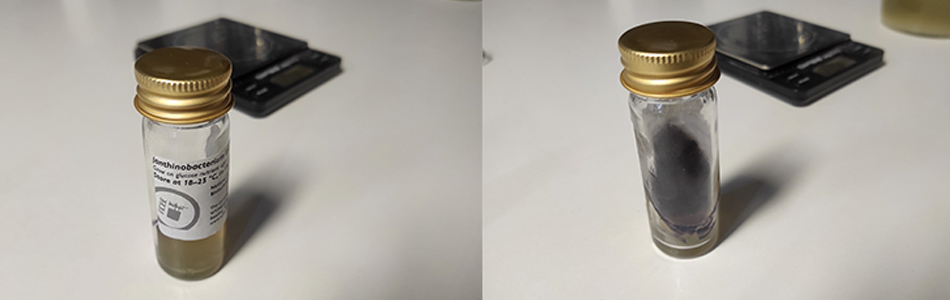
The bacterium that we used is Janthinobacterium lividum and we ordered it from the University of Reading.
This is how it looked like:
And this is a collage of the process that we followed:
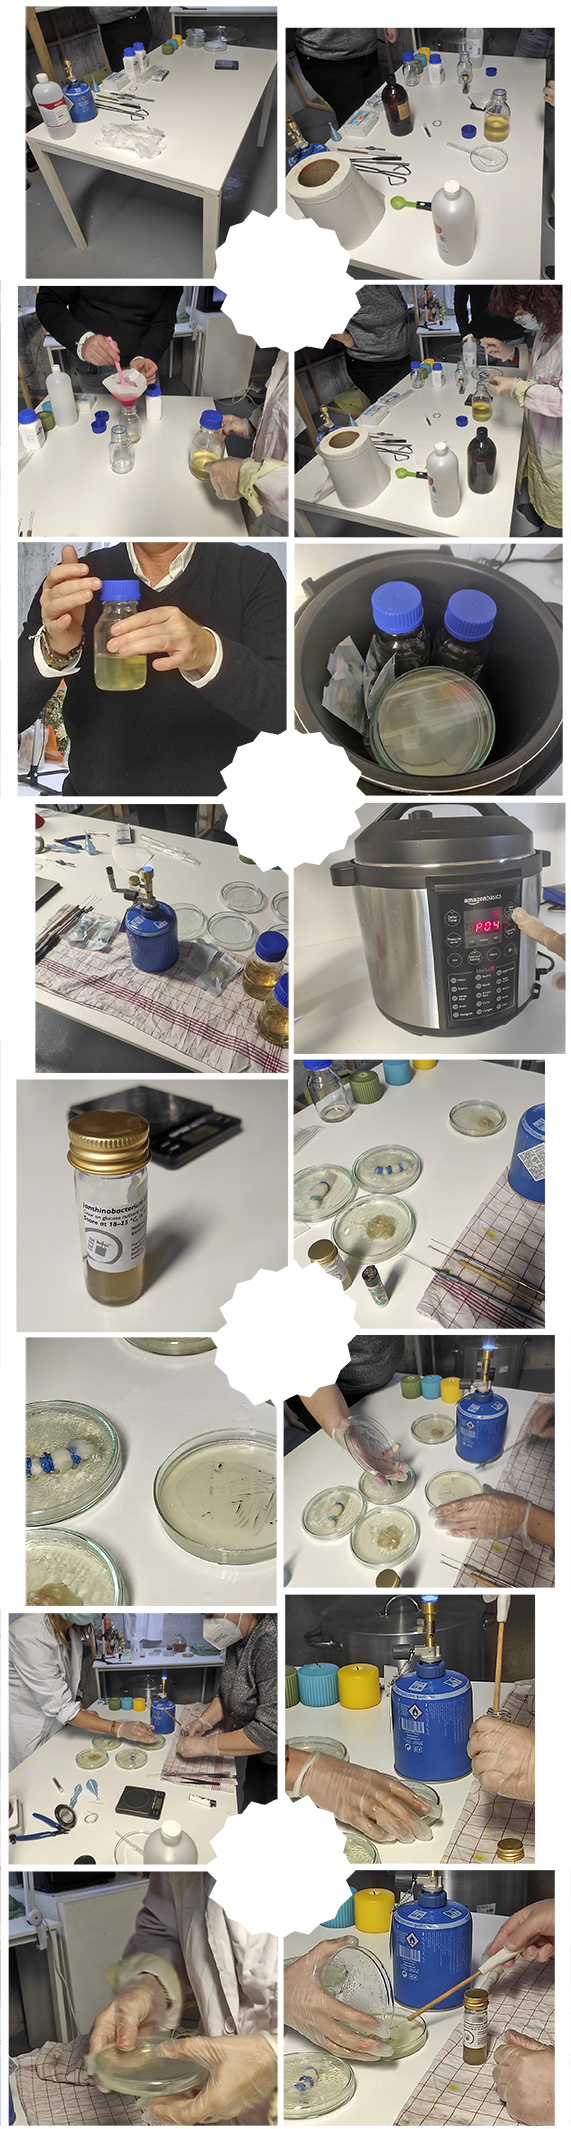
Unfortunately our bacteria dind't produce any colour. And this is the conclusion that my peer Marisa has about it, since I don't have a lot of knowledge on bacterial dyeing I'll copy her own words from her amazing documentation: "We put them in the incubator in 32 degrees. We used normal solid agar for this and I suspect that might have to do with it because in the protocol it says to use the liquid broth and not the solid one. The bacteria where kept in a dark and dry place for 3 months before we used them too.
References & Useful Links
These are my peer Marisa's amazing documentation pages:
Useful Links
- BioChromes Lecture by Cecilia Raspanti
- Textile Dyeing Tutorial by Cecilia Raspanti
- Bacterial Dyeing Tutorial
- BioShades
- Textile Lab Amsterdam