10. Open Source Hardware - From Fibers to Fabric
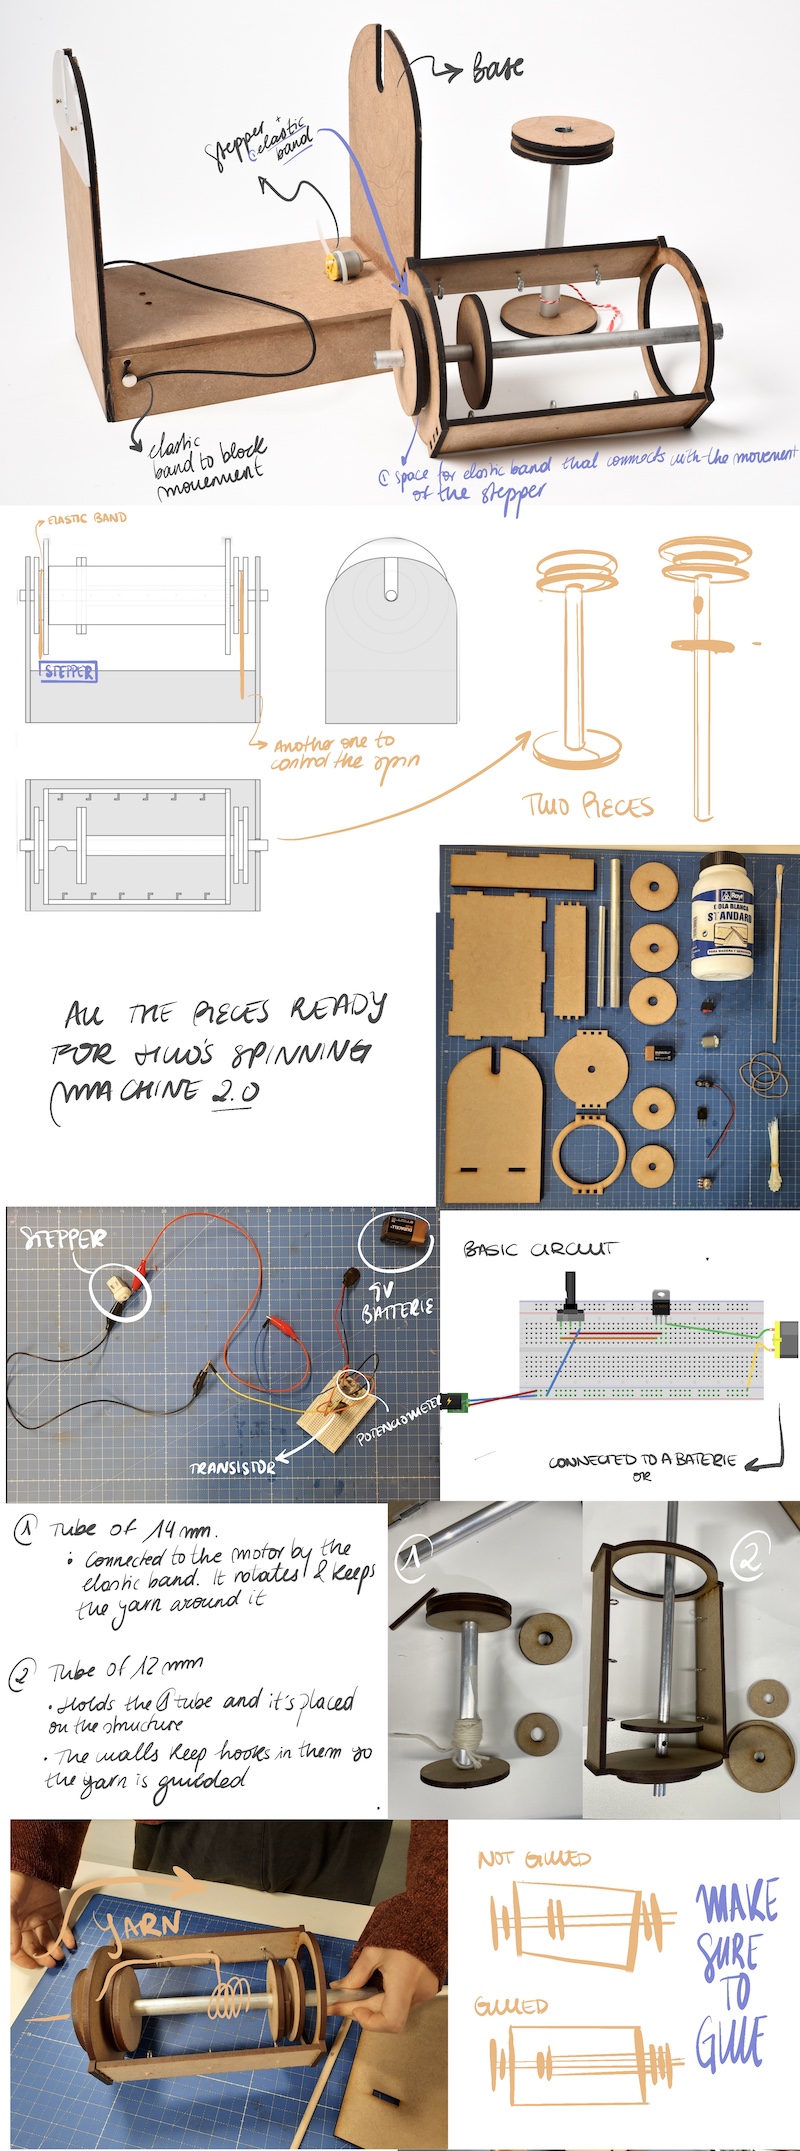
For this week's assignment, we worked as a group to build the HILO 2.0 Spinning Machine. Then, we decided to design a new version of that one, also we create some new small tools for weaving. So this week we designed our beautiful and cute URSULA 4.0!
Inspiration
Studio HILO
· About Studio HILO

"Studio HILO is a Berlin-based studio for textile innovation. We rethink the textile industry by offering open tools and expertise for small-scale textile manufacturing environments. HILO’s mission is to create playgrounds for independent yarn production.
By sharing our knowledge, we empower designers, researchers and producers to redefine their manufacturing processes from material choice to textile construction and production facilities."
· Open Technologies & The HILO Spinning Machine
"Studio HILO’s open-source projects challenge the process of textile production in the same way 3-D printers revolutionised manufacturing. Open knowledge on textile hardware and software enables experimentation, innovation and rapid prototyping for local yarn manufacturing."
"The open-source HILO Spinning Machine allows you to produce your own customized yarn. The open-source HILO Software helps you to design the yarn properties. You choose your raw fibres.
You can use the HILO Spinning Machine with software to spin small amounts of new fibres, such as recycled or regional materials. Existing yarns can be twisted into new designs and integrate new functions, such as elasticity through overtwist. Moreover, you can develop yarn samples and rapidly test different qualities for new business opportunities."
"Since 2015, we have iterated the HILO Spinning Machine from the version 1.0 (from wood, 2015) to the version 2.0 (in silver metal, 2018) to the new HILO 3.0 (in black, 2020). The HILO 3.0 Spinning Machine will run under the new official standardization for open-source hardware DIN SPEC 3105 by DIN (Deutsches Institut für Normung e.V.). We will publish the new documentation in December 2021."
Assembling HILO 2.0 as a Team
As a first year node we decided to build the HILO’s spinning machine 2.0. We thought that it was a good assignment for the team and we should develop some other tools.
This is how the HILO 1.0 Spinning Machine looks like:
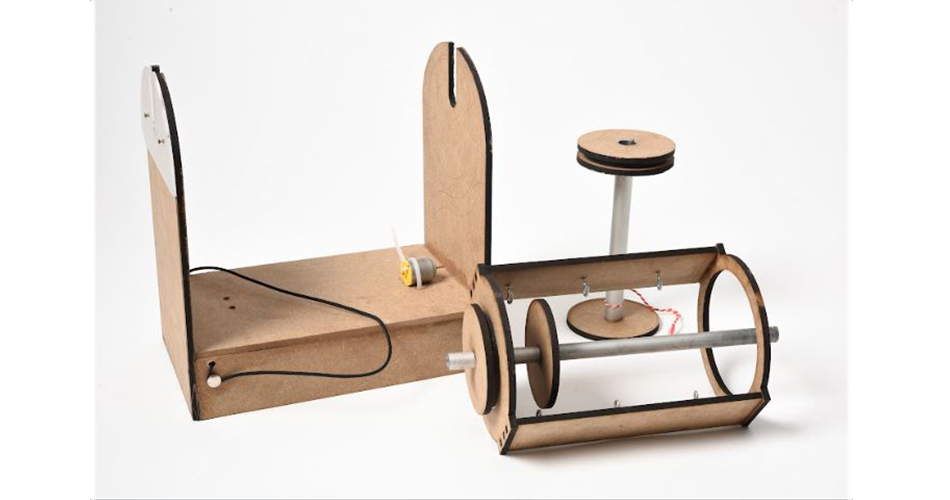
The day after the lecture we were given the pieces cut. As a team we decided to build the first machine together and see how it works, because we all needed to analyze all the steps. Building the machine was frustrating for the team, as we had several pieces (for more than one machine) and each for a different version. So everything was mixed and we took longer because of this.
Here you can find the cutting files for this HILO 1.0 machine.
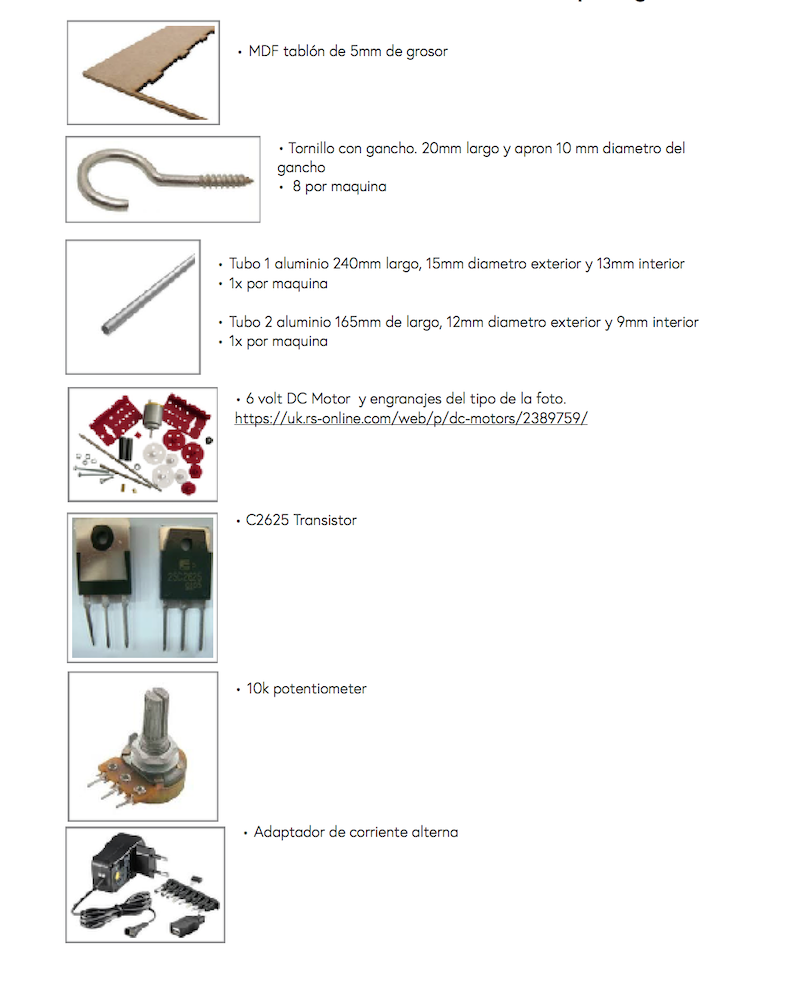
In this image you can see the materials you need for building this machine:
We tested the electronics apart from the structure to understand how the elastic band works and how much resistance can it make.
This following image was made by our coursemate Elsa Gil and shows the process we followed:
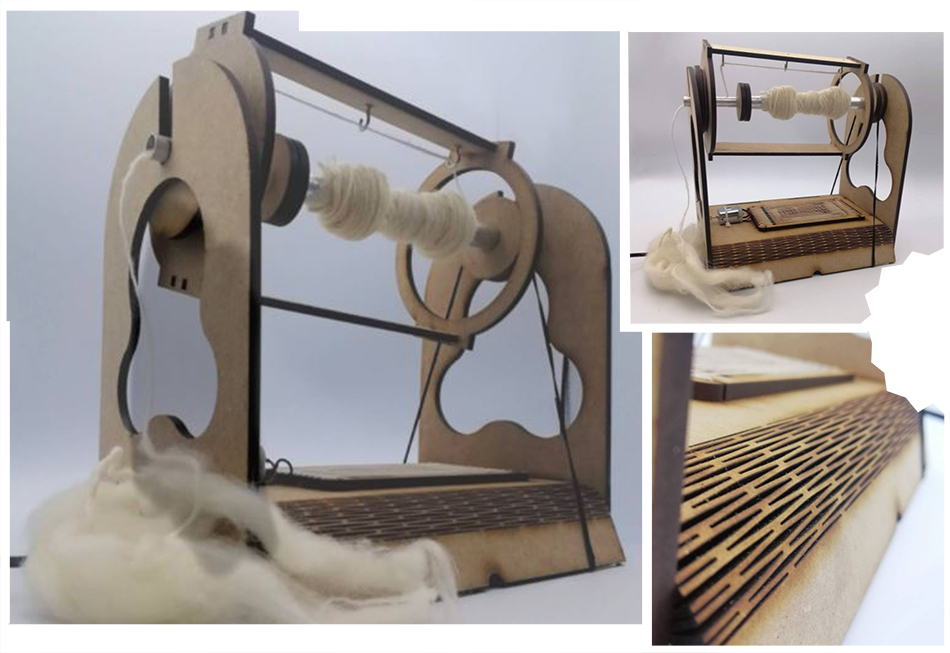
The Making of Our URSULA Spinning Machine 4.0
· People involved on URSULA's Design:
In the next lines, I'll explain our designing process for designing and building our URSULA. We did it as group and these are the people who contributed to making her:
- Marisa Satsia
- Eduardo Loreto
- Elsa Gil
- Arantza Tamayo
- Olatz Pereda, this is me :)
· Brainstorming
After (finally) getting HILO’s machine assembled, we decided to do a brainstorming in order to put in common the ideas of our new version of the spinning machine. We divided this brainstorming by 4 fields: design of the product, user experience, electronics and other tools or machines that could be linked. We took about 10 minutes of thinking out loud improvements.
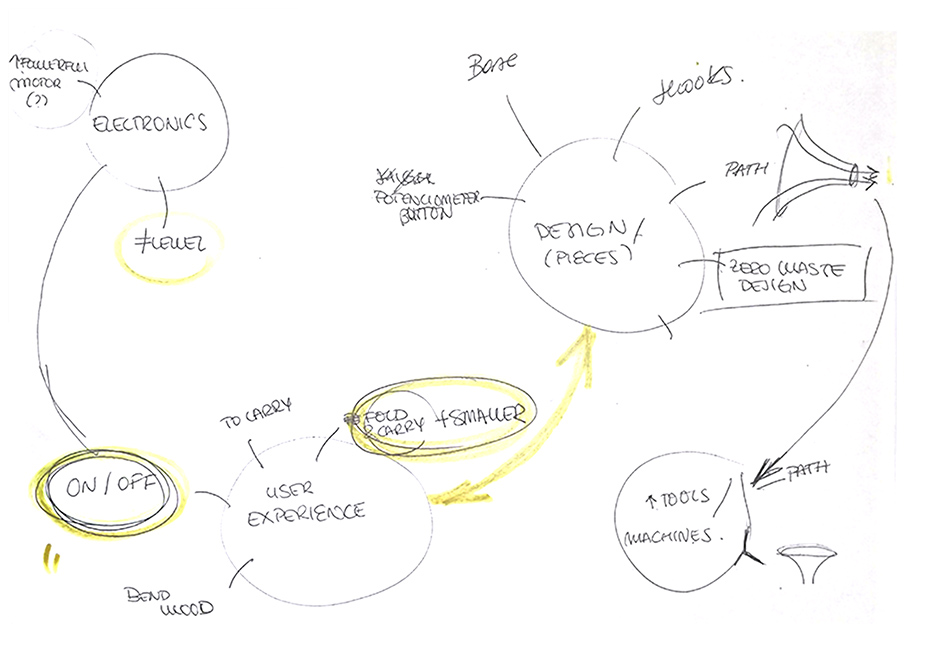
Based on our stressful situation on building it up, there were a lot of ideas in the user experience field and design. After gathering about 15 ideas, we selected 5 of them so it could be an approachable project. In the electronics we decided that there was a need to turn the circuit on easier, and not connect it to the battery directly.
At the User Experience we decided to try to make it as a transportable machine, easy to carry; and a little smaller. For the design improvement, we saw the necessity of reducing the waste and the material used, as there we analized that there were several components that weren’t that important in size. However more changes were included during the design process as we saw the opportunity. For example we included a mini loom in the base of the machine and a user manual (how to build it after cutting and how to use it) to make the Open Source file more complete.
After defining which path we were going to take as a group, we divided the work by teams: Edu for electronics, Marisa and Olatz for documentation and creating a manual; and Arantza and Elsa for the design of the new machine. As a group work, every task was linked to the others so communication was crucial to make it work.
· URSULA's BOM & Machines/Equipment Needed
This is the BOM (Bill Of Materials) you need for building URSULA:
| Qty | Description | Price | Link |
|---|---|---|---|
| 1 | MDF Board With 5mm thickness | 21,99€ | https://www.amazon.es/Tableros-disponibles-manualidades-decoraci%C3%B3n-bricolaje/dp/B07PS8RCZJ/ref=asc_df_B07PS8RCZJ/?tag=&linkCode=df0&hvadid=435719867989&hvpos=&hvnetw=g&hvrand=17958358974583452900&hvpone=&hvptwo=&hvqmt=&hvdev=c&hvdvcmdl=&hvlocint=&hvlocphy=20271&hvtargid=pla-905543182486&ref=&adgrpid=101601765339&th=1 |
| 3 | Hook screw 20mm long | 11,31€ | https://www.amazon.es/Tornillo-Ganchos-resistente-peque%C3%B1o-perchas/dp/B075FSKMHY/ref=sr_1_2?__mk_es_ES=%C3%85M%C3%85%C5%BD%C3%95%C3%91&crid=2N5LNJDXS3VS2&keywords=20mm+screw+hook&qid=1653739092&sprefix=20mm+screw+hook%2Caps%2C716&sr=8-2 |
| 2 | Aluminium tube 240mm long, 15mm exterior diameter, 13mm interior diameter | 6,19€ | https://www.amazon.com/-/es/TONUNI-extensi%C3%B3n-baloncesto-waterpolo-ejercicio/dp/B07FR65S9G/ref=sr_1_7?__mk_es_US=%C3%85M%C3%85%C5%BD%C3%95%C3%91&crid=16J06WGIJCZSH&keywords=small+air+pump+for+inflatables&qid=1653576598&sprefix=small+air+pump+for+inflatables%2Caps%2C351&sr=8-7 |
| 1 | Aluminium tube 165mm long, 12mm exterior diameter, 9mm interior diameter | 6,19€ | https://www.amazon.com/-/es/TONUNI-extensi%C3%B3n-baloncesto-waterpolo-ejercicio/dp/B07FR65S9G/ref=sr_1_7?__mk_es_US=%C3%85M%C3%85%C5%BD%C3%95%C3%91&crid=16J06WGIJCZSH&keywords=small+air+pump+for+inflatables&qid=1653576598&sprefix=small+air+pump+for+inflatables%2Caps%2C351&sr=8-7 |
| 1 | 9V DC Motor | 9,90€ | https://www.amazon.es/RC-280SA-motor-del-cepillo-11300RPM/dp/B01GHJF6H4/ref=sr_1_8?__mk_es_ES=%C3%85M%C3%85%C5%BD%C3%95%C3%91&crid=VTCWHPUE61EF&keywords=9V+DC+Motor&qid=1653739585&sprefix=9v+dc+motor%2Caps%2C277&sr=8-8 |
| 1 | 10k Potentiometer | 5,31€ | https://www.amazon.es/Potenciometro-Logaritmico-Potentiometer-Logarithmic-A2264/dp/B07HDLL4JY/ref=sr_1_23?crid=CILQ7V7BW9YU&keywords=10k+potentiometer&qid=1653739146&sprefix=10k+potentiometer%2Caps%2C276&sr=8-23 |
| 1 | 2SC-2625 Transistor | 6,19€ | https://www.amazon.com/-/es/TONUNI-extensi%C3%B3n-baloncesto-waterpolo-ejercicio/dp/B07FR65S9G/ref=sr_1_7?__mk_es_US=%C3%85M%C3%85%C5%BD%C3%95%C3%91&crid=16J06WGIJCZSH&keywords=small+air+pump+for+inflatables&qid=1653576598&sprefix=small+air+pump+for+inflatables%2Caps%2C351&sr=8-7 |
| 1 | Alternate Current Adaptor | 11,75€ | https://www.amazon.es/Suppyfly-Universal-Source-Adaptor-Charger/dp/B07WMNT762/ref=sr_1_4?__mk_es_ES=%C3%85M%C3%85%C5%BD%C3%95%C3%91&crid=3QAE4L2VHIUVT&keywords=alternate+current+power+supply+adaptor&qid=1653739390&sprefix=alternate+current+power+supply+adaptor%2Caps%2C147&sr=8-4 |
| 1 | Rubber Bands | 2,28€ | https://www.amazon.es/Gomas-Elasticas-Surtido-Color-Tama%C3%B1os/dp/B079JV78RF/ref=sr_1_5?__mk_es_ES=%C3%85M%C3%85%C5%BD%C3%95%C3%91&crid=3N37ZI6WK6C4X&keywords=rubber+bands&qid=1653739261&sprefix=rubber+bands%2Caps%2C608&sr=8-5 |
These are some of the machines and other tools needed for building URSULA:
- Laser Cutter
- Drill
- Glue
- Brush
- Soldering iron
· Design With Rhinoceros
After deciding what improvements we would make, it was time to design. We used Catherine Euale’s files to use the same measurements and make sure it would work. From that point, we made changes.
· Base
We wanted one of the sides to be able to be opened up to see the inside of the machine. We used Boxes.py website which generates the box that you want.
It has different shapes and types of box options. The plans it generates are for laser cutting because it has tabs that are used to fit the pieces.
One of the corners had to be “flexible” to open and close the machine. So, once you have entered the parameters, the box is generated with a parametric design to obtain that freedom of movement and you only have to download the file
We made some changes to that file. The box had 2 curved corners, but we wanted one. We combined it with the original file and got the plans of the box we wanted. Moreover, we reduced the height of the base, in order to save material (instead of 6 cm of height, it had 3 cm).
· Gear
We put the gears on the surface of the structure to have more space for other components. They had a circular shape, which complicated their distribution so as not to generate material waste and without affecting the structure of the machine.
As a result, we put 3 of them on each side of the structure and the other one inside the circle that would serve as the lathe structure. There would be waste of material, however we used it as another tool (you will see it).
Moreover, we scaled the diameter of 4 of them, because we noticed that they were just a stopper. The other ones were more “important”, I mean, they were connected to the motor with a rubber band, so if you change the diameter, it will affect the speed. We decided to leave as the original one, just in case.
We maintain the diameter of the holes that are in the gear. We used the same tubes as in the Spinning Machine 3.0.
· The Electronics
We received a sketch of a circuit with a DC motor connected to a transistor and a potentiometer. This circuit was supplied by a 9-volt battery. We did not have a clear or precise image of what type of transistor or if they have orientation, but like everything with trial and error we could discover it.
After closing the circuit and assembling the machine, we could analize the workflow of the machine. In the updated machine we removed the battery by electrical current using a transformer that we placed at 9 volts. Other changes were to added as an on/off button. However we didn't put it at the final circuit because we didn't see the neccesity. The rest of the circuit stayed the same since it worked perfectly for what we needed.
This is the graphic of the final circuit:
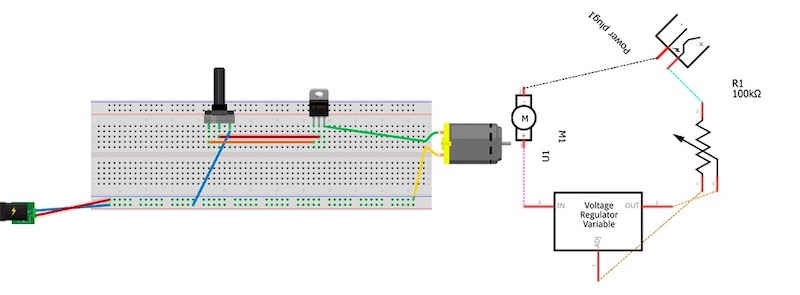
After approving the changes, we got down to work and replaced the elements in the breadboard. We decidede to keep it in there and not soldering because we just had one transistor and if something breaks in it is easy to fix.
· Structure Of The Lathe
We started placing the pieces to optimise the space. We started to place the pieces in order to optimise the space. We saw that the long pieces of the lathe could fit between the pieces of the structure if we reduced their width.
So we reduced it because it didn't affect the operation and it was to our advantage to do so. Instead of having 3 tabs, it would have 2 because they would be too thin and they could break easily.
· Holes
We added some holes to be able to regulate the speed with the potentiometer and another one to pass the power supply cable through.
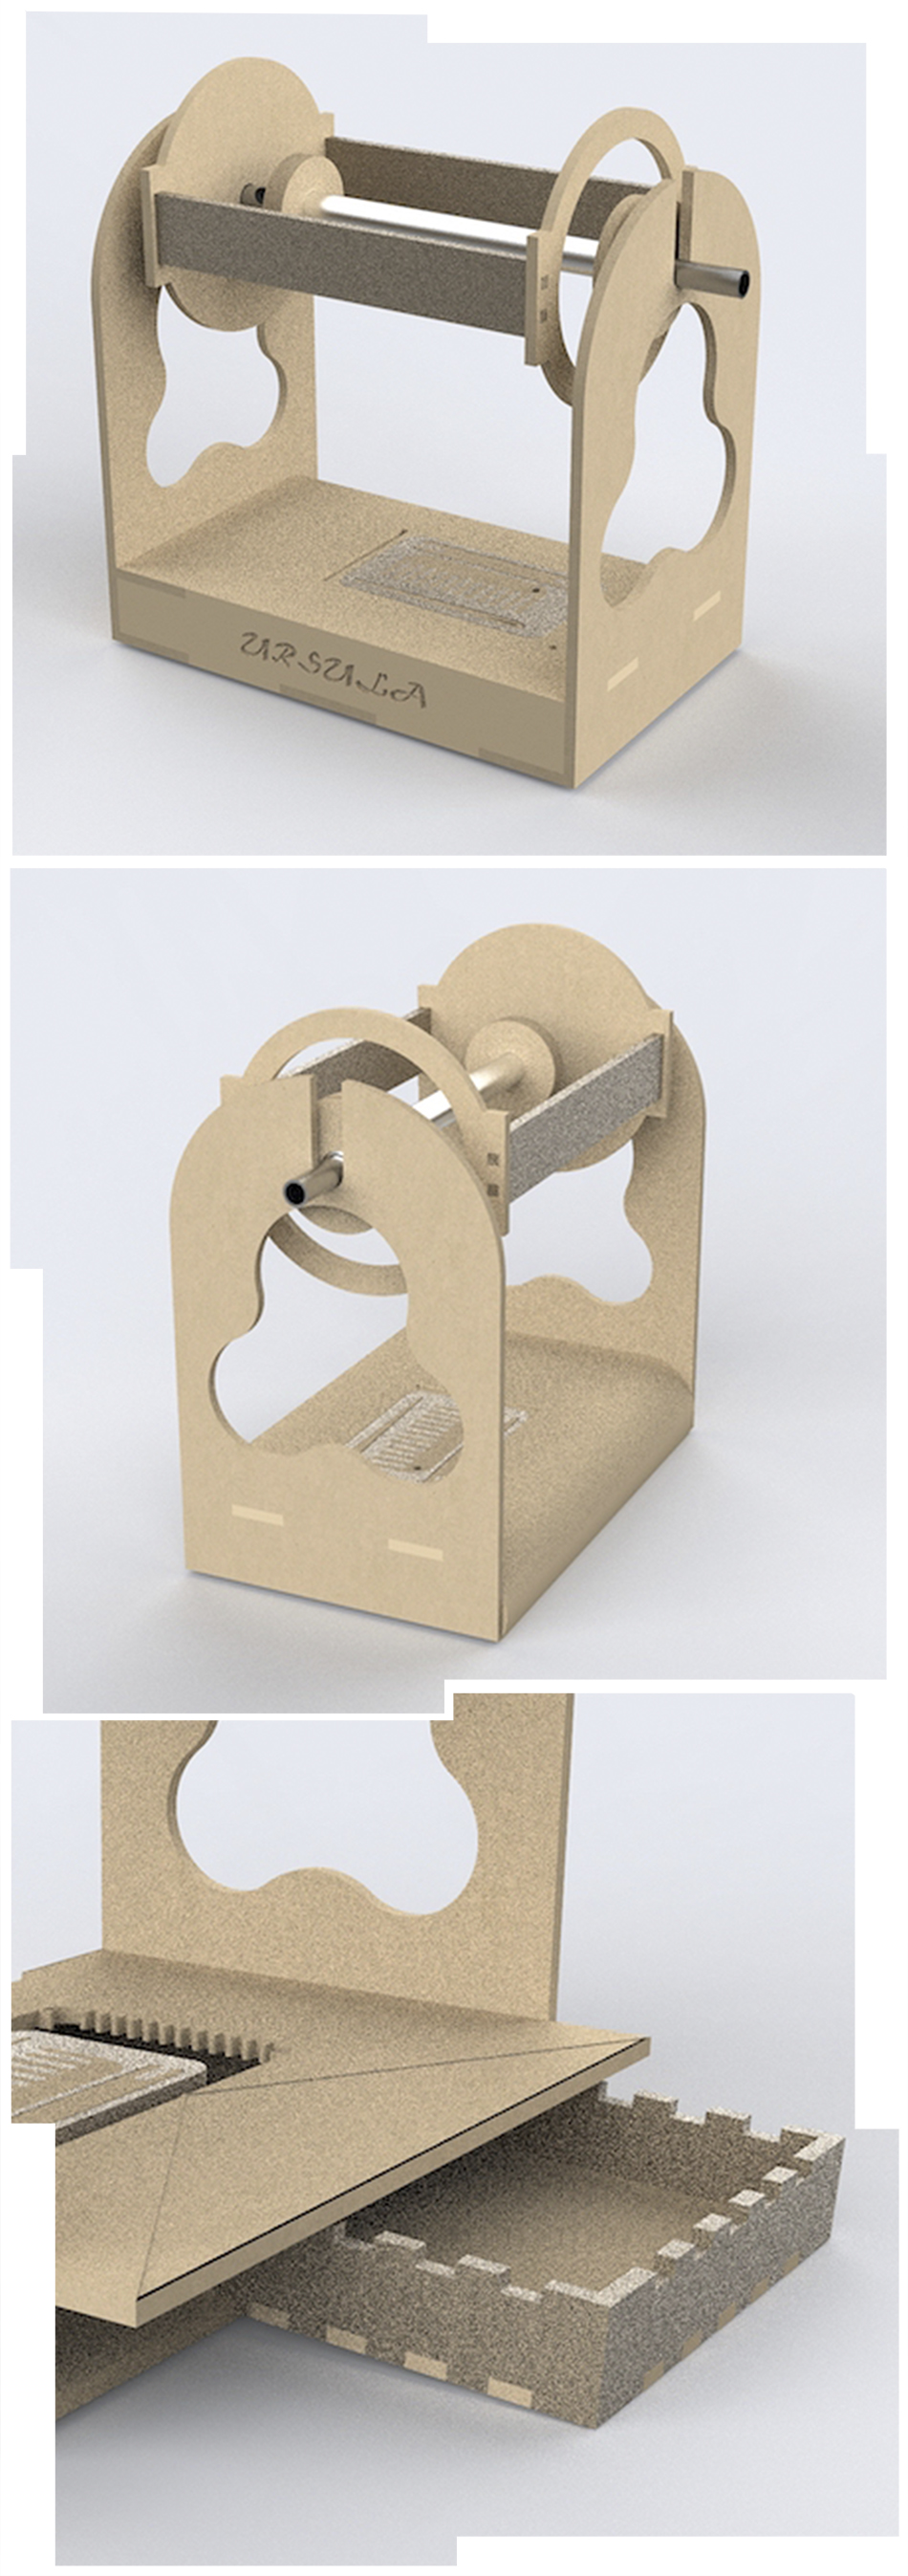
· Distribution: Reducing Waste and Material
This was the distribution to save material. It is true that we managed to save a little bit, however, we made a 2x1 machine: an hilo spinning machine and a mini loom, plus we added a small box to store tools.
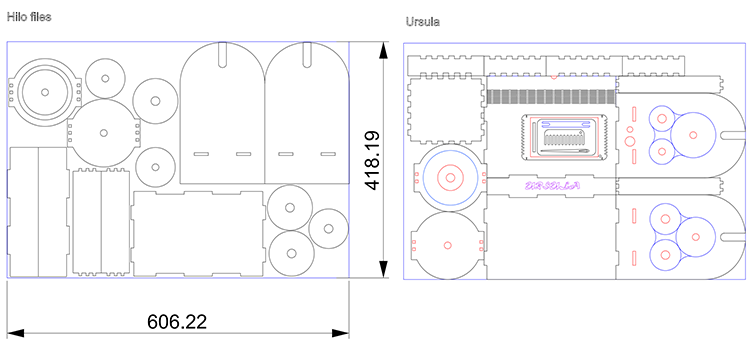
· Laser Cut Process & Assembling Ursula
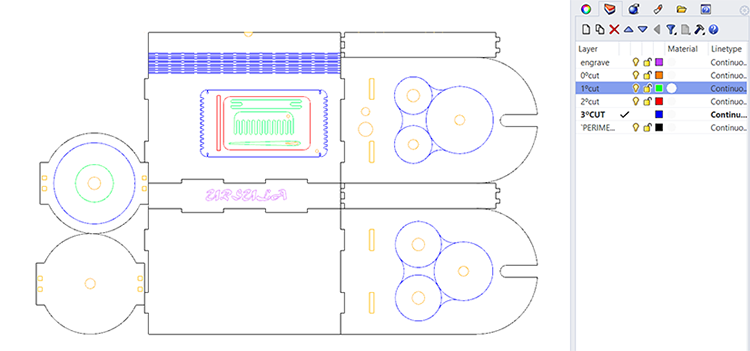
The material and the seetings for the laser cutter where these:
- Material: Type: MDF; Thickness: 5 mm
- Machine Settings: Cut: Speed: 25 / Power: Min.:70; Max.:75; Engrave: Speed: 400 / Power: Min.:35; Max.:35
· URSULA's User Manual
We saw the necessity, based in our experience, of making a user manual. This little book includes how to build the machine, step by step; the electronics circuit and where it is placed; and a little explanation on how the spinning machine works and how to use the yarn created in the loom.
· Wool Preparation Process
These are the steps that explain the process of the wool preparation in general terms:
- 1. Shearing the Sheep: Sheep farmers shear their sheeps at the end of winter every year, using an electrical tool (similar to a razor) for removing all of the sheep's fleece in one piece. Then, the wool is sorted and prepared for cleaning.
- 2. Cleaning the Wool: This steps will remove dirt, natural oils and other contaminants from the wool.
- 3. Carding the Wool: Carding is a process that pulls the wool fibers through fine metal teeth. This process straightens out the fibers and makes them soft and fluffly. At the end of the carding, thw wool fibers are lined up into a thin and flat piece. These sheets can be drawn into thin and long pieces that are called "rovings".
- 4. Spinning the Wool into Yarn: This process turns the previous mentioned pieces into a material that can be used. A wheel is used for the spinning, it spins 2-5 strands of wool together and forms long, strong pieces of wool, the yarn.
- 5. Weaving and Knitting: This is the process of turning the yarns into scarves, sweaters and other kind of clothing by weaving and knitting it.
- 6. Dyeing: Wool can be easily dyed since it quickly absorbs water. It actually can be dyed at almost any stage of the whole process. It can be done by submerging the wool into a boiling water with the dye material or by applying colorful dyes directly to the fabric.
This information has been taken from this webpage, that I found really useful.
· Spinning the Wool With URSULA
For spinning our wool with URSULA, we were given a pre-treated wool so we skipped a lot of steps as you can see. Our wool was ready for spinning it into yarn.
Here you can see our cute URSULA spinning:
Downloadable Files
In this DOWNLOADABLE FILES FOLDER you can find everything you need to build your own URSULA 4.0.
Other Tools
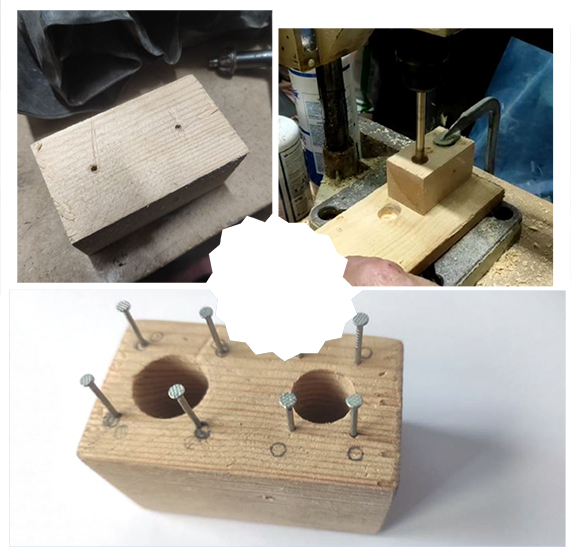
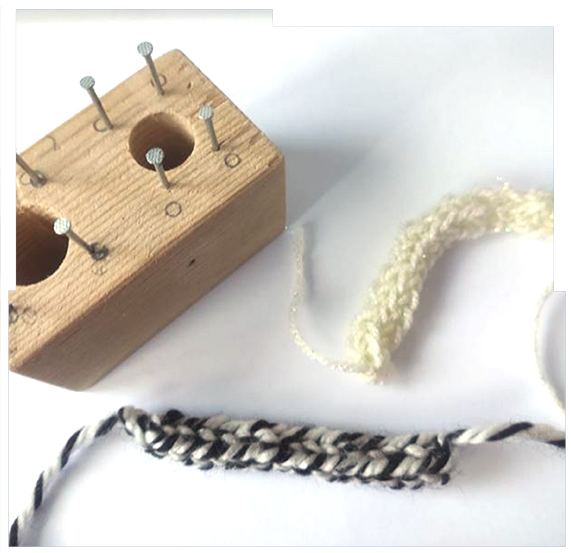
· DIY Weaving Tiny Tool
I went to my dad's workshop and found an small wooden piece and thought that I could maybe create an small tool for weaving with it. I make two holes and then put some nails around them, so I made a 2x1 tool by doing the two holes. This tool allows me to weave in a shape of an small string.
Shemakes - Wool Mondays: rethinking wool together in May 2022
"Wool Mondays are three hybrid and diffused events in May, 2022, that will be held contemporaneously at shemakes labs across europe."
"With the expansion of the shemakes network from the original set of labs to transfer labs, we’ve entered a phase of extended lab-to-lab experimentation dedicated to wool that seeks to establish an entire and circular wool production cycle at the small scale of a laboratory or home. Shemakes thus becomes a playground for wool research."
· Why Rethinking Wool
"Wool has a rich and deep history, and in fact many techniques from the past century are still in use today. Various cultures and places share this resource, at varying levels of quality according to the species of origin. Now, traditional techniques face the risk of being lost, some parts of the raw material are wasted, while post-consumer wool is poorly valued. Many local communities wish to reshape local value-chains around wool, from farmers, spinners, weavers, designers, makers, waste management and up-cycling centres."
· What is Wool Mondays
"For Wool Mondays, which take place on three Mondays in May, the shemakes network invites you to discover and dig into one wool-related topic at a time through convivial talks and hands-on workshops that will be hosted in different locations at the same time.
Three lenses shape our collective explorations: place, design, make. By this, we mean that labs are investigating their local ecosystems (place), experiencing original practices around sustainable natural dyeing processes (design) and developing open-source tool-making to create what we call Little Wool Factories (make).
We hope this event will inspire, connect and give concrete insights that will help foster local wool ecosystems driven by art, design and care."
You can find more information of the event on this webpage.
I was lucky to join this event on the first day and it was a really interesting experience, full of new information and amazing people explaining their bond with the wool. Unfortunately, I couldn't join the rest of the days, but the recordings are available and I'll share them down below.
· Recordings of the Event
Here you can see the recordings of each day of the event:
· Wool Mondays Day 1: Wool Ecosystems
· Wool Mondays Day 2: Natural Days
· Wool Mondays Day 3: Little Wool Factory
Here you can see some more recordings & tutorials:
· Wool Mondays: Carding Tutorial
· Shemakes Labs: REDU - weaving a traditional Romanian skirt and belt (1:1 version)
Shemakes - Re-Wool Workshop
"The workshop highlights wool and simple (DIY) methods - like spinning, manual weaving, carding, felting etc., and equipment that can be used to process wool at home or in your workshop."
You can find more information about the workshop in this webpage.
· Some Tutorials of the Workshop
· Shemakes Tutorials: Yarn Spinning (Re-Wool)
· Shemakes Tutorials: Wool Dyeing (Re-Wool)
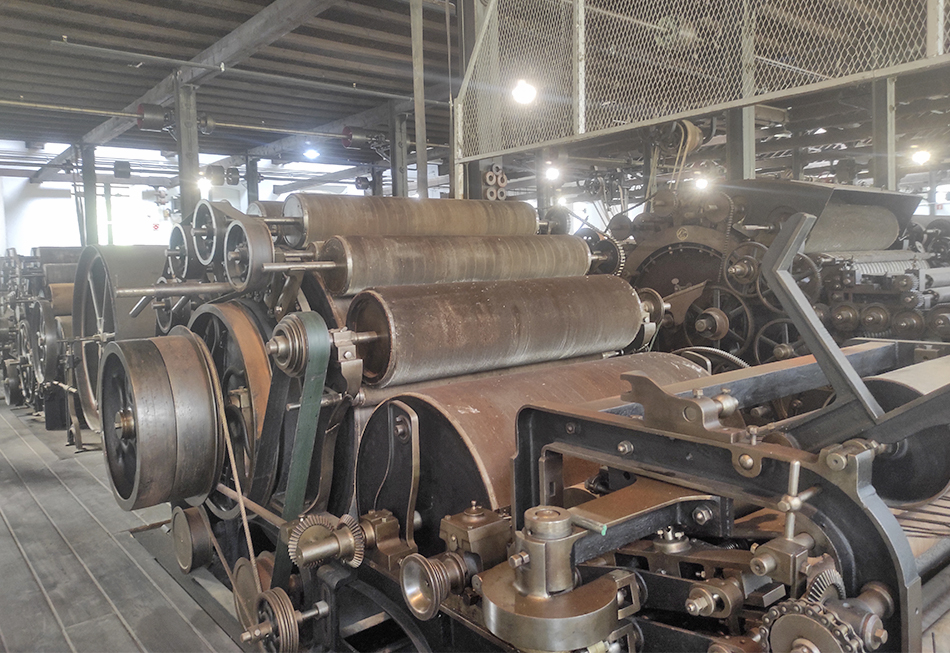
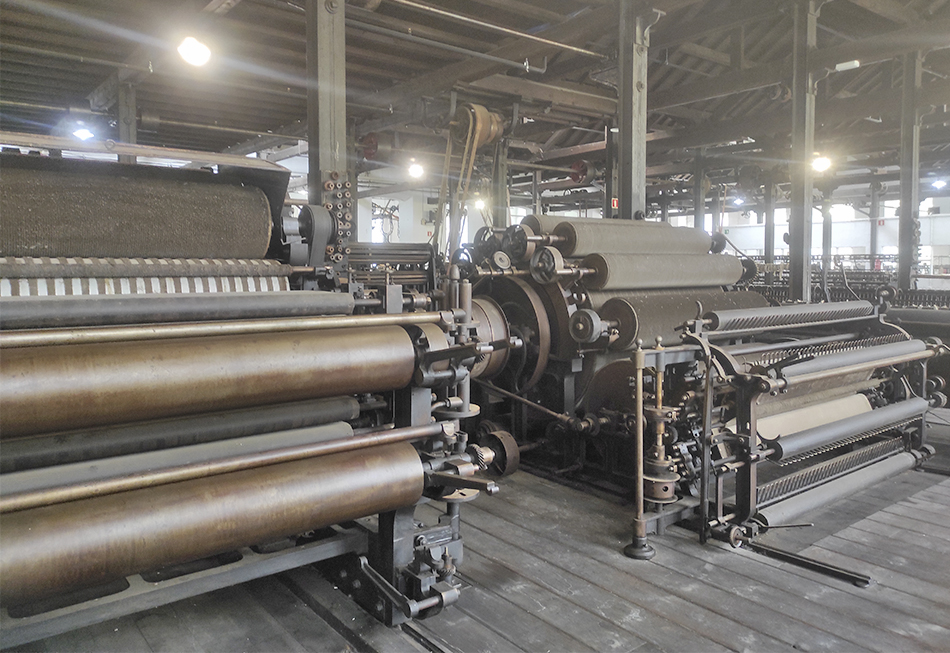
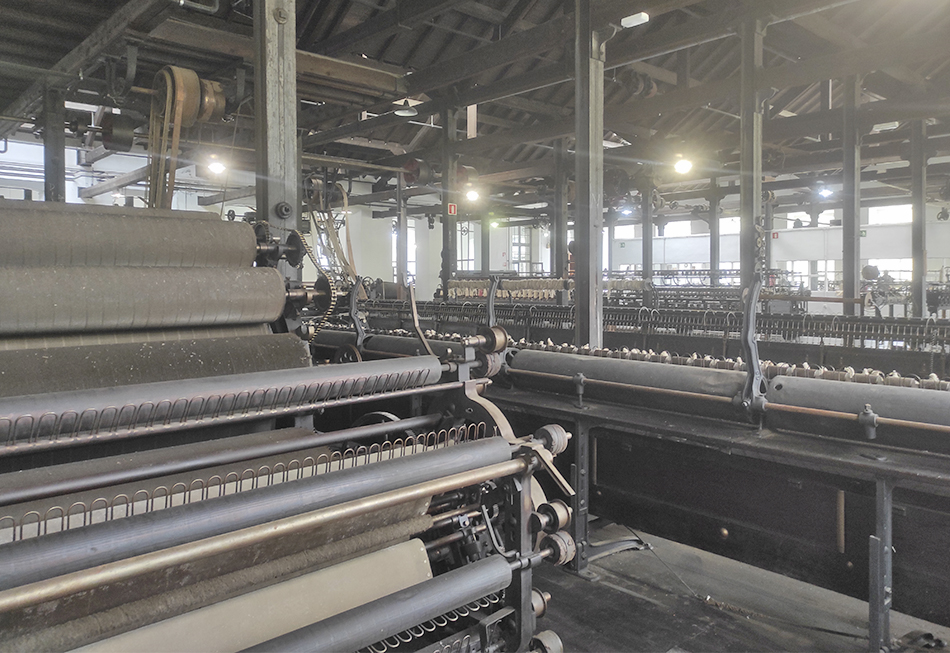
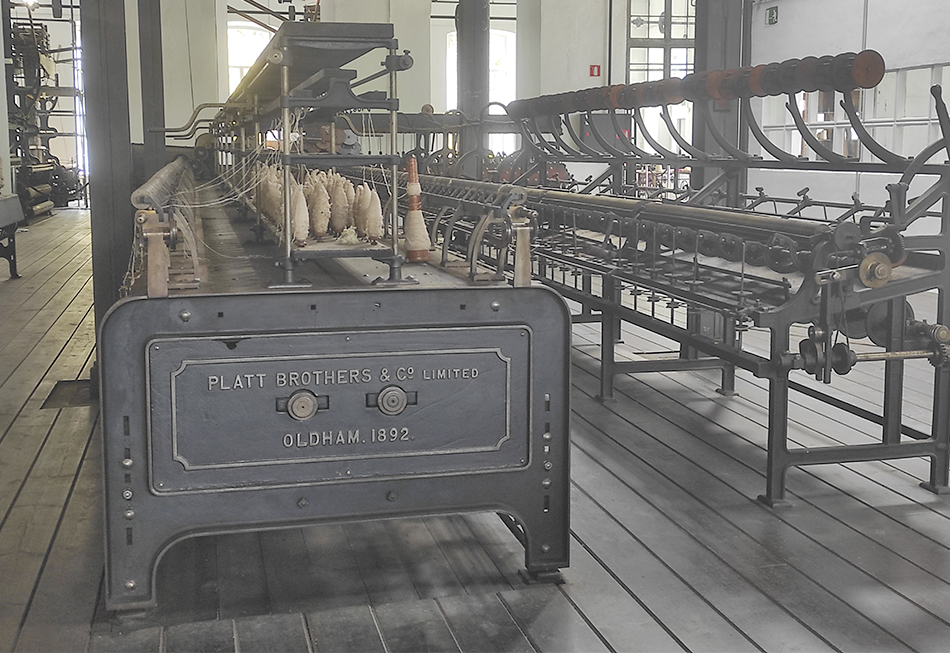
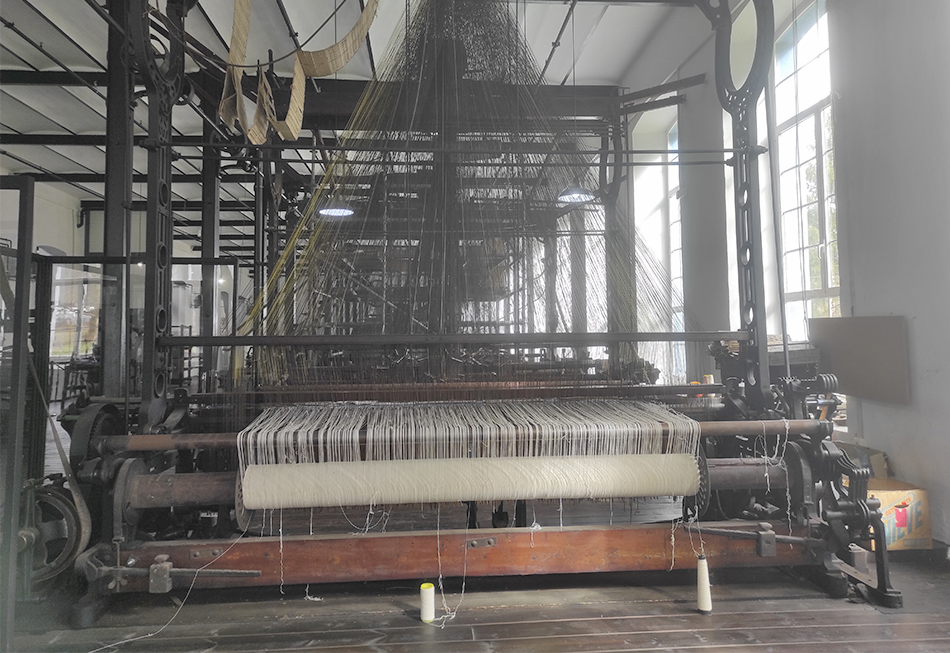
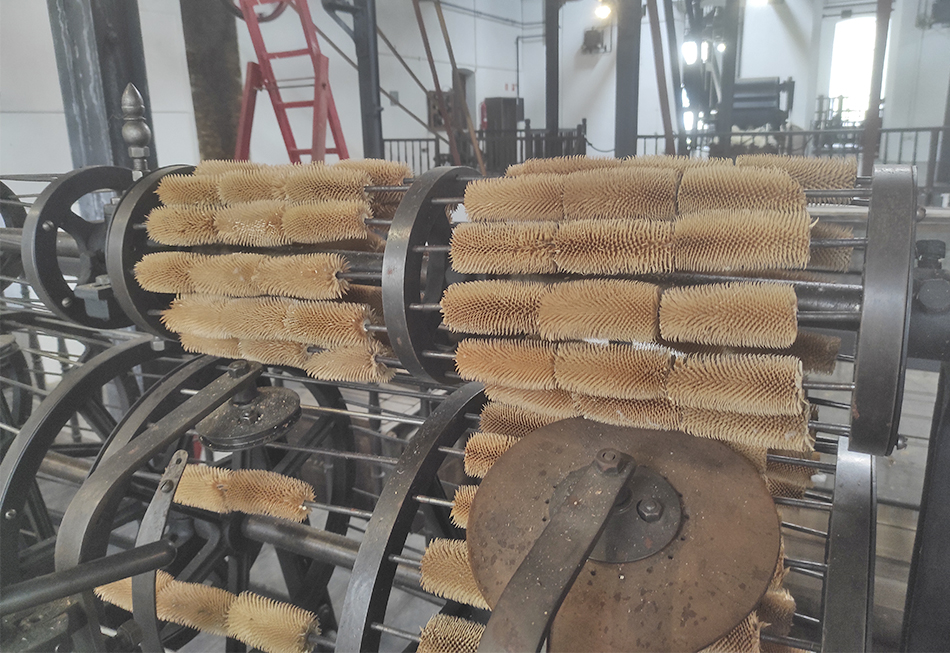
La Encartada Fabrika - Museoa 
"La Encartada S.A. was founded in 1892 and remained in business for exactly 100 years. Its stock capital was provided by five emigrants who returned to Bizkaia after making their fortunes in Mexico, three of whom came originally from Balmaseda. The company worked with wool and produced articles ranging from berets (its main product) to blankets, cloth, gloves, scarves, caps, balaclavas and wool in balls and skeins. A small residential district occupied by workers grew up around the factory, with a chapel, a school, a house for the headmaster (which no longer survives), etc.
In 2007 the factory became an industrial museum under the name La Encartada Fabrika-Museoa. The buildings, the machinery and the workers houses make up an evocative site that takes visitors back to the early years of the industrial revolution in Spain.
One of the biggest attractions of La Encartada is its exceptional collection of machinery dating from the late 19th and early 20th centuries, mostly manufactured in Britain. Its manufacturing technology and appearance have survived practically intact, with all parts of the production process still in place, from the section for taking in raw materials to final packaging and shipping. Its completeness and excellent condition make La Encartada a unique visitor attraction."
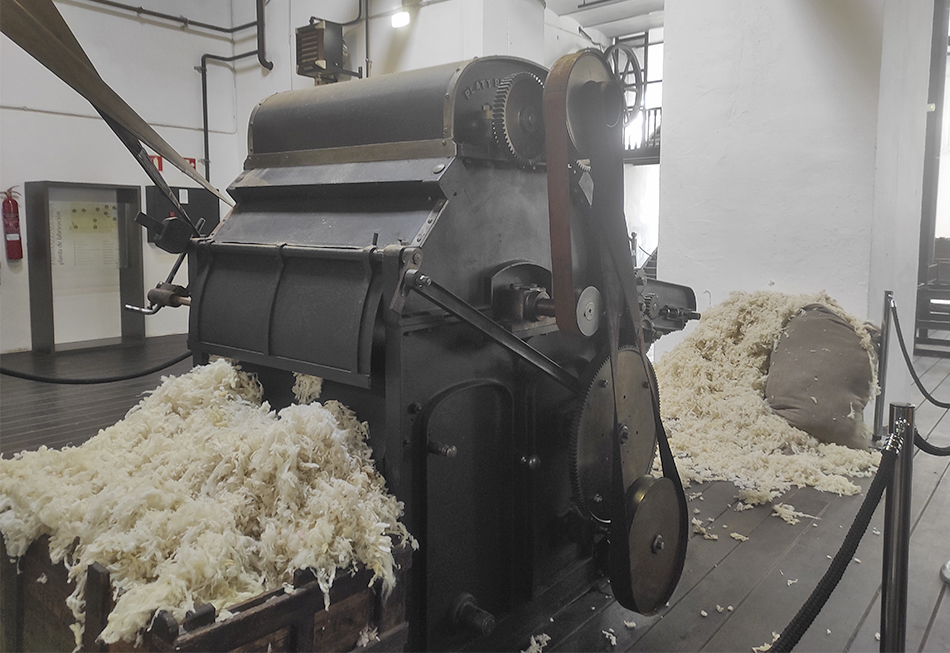
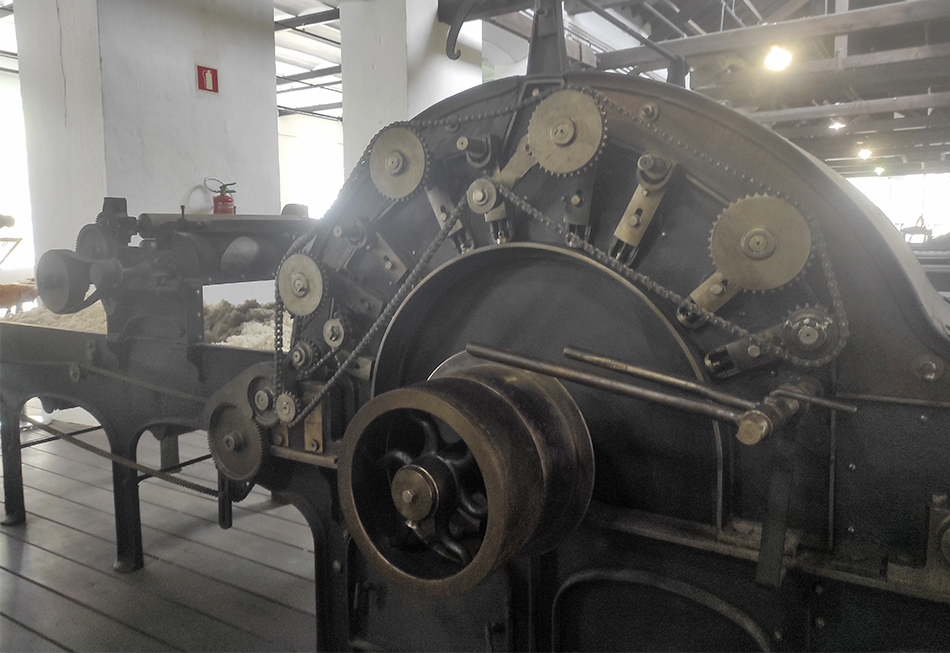
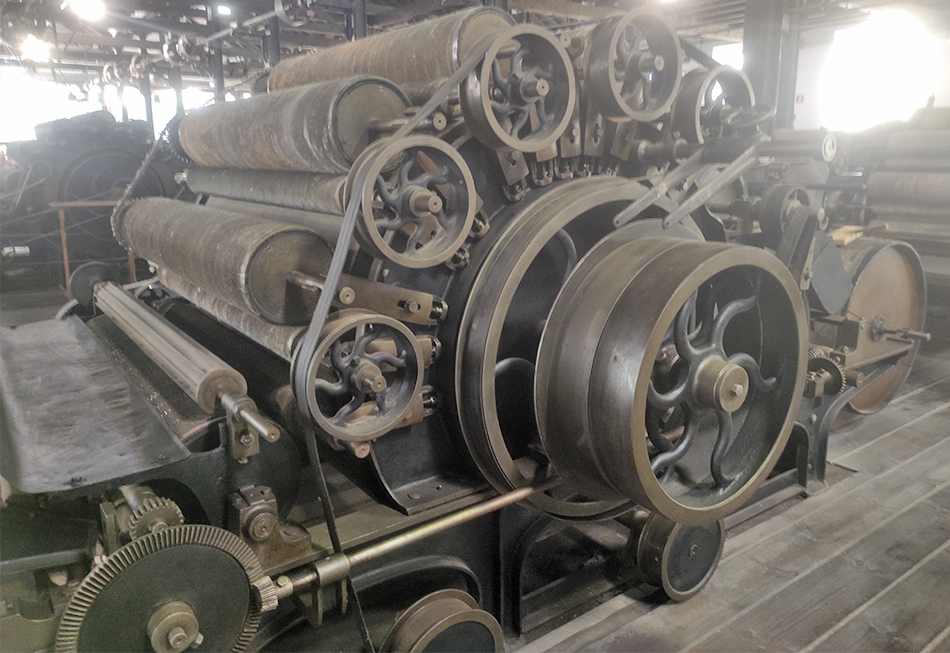
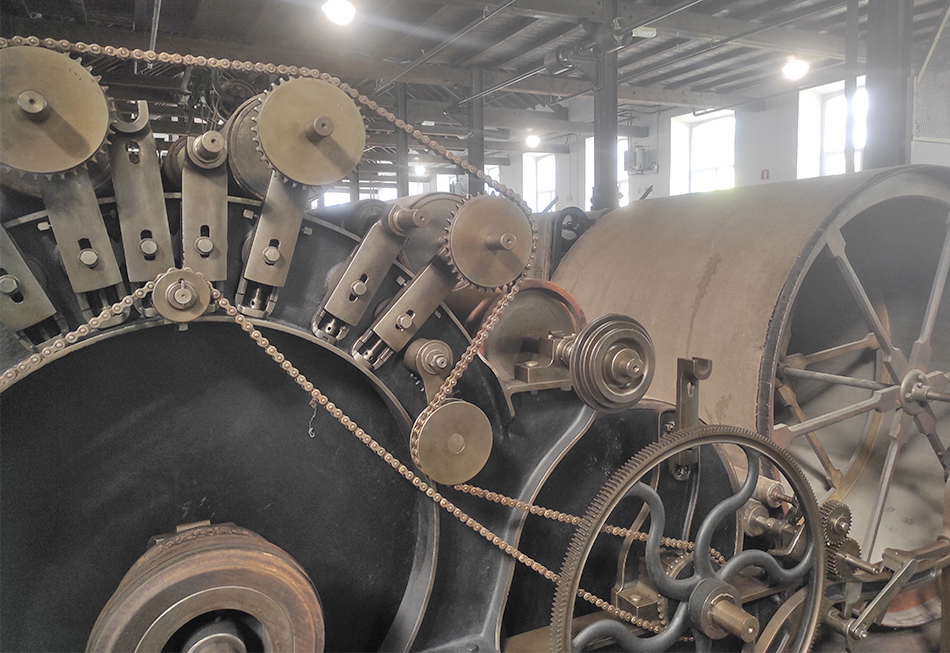
We visited La Encartada some weeks ago and it was an amazing experience. They explained us the whole process of processing the wool and the machines used for each process. I was absolutely amazed with not only the location but also with all the machinery that it's still there. Absolutely impressive <3
Here you can see some photos that I took in our visit:

References & Useful Links
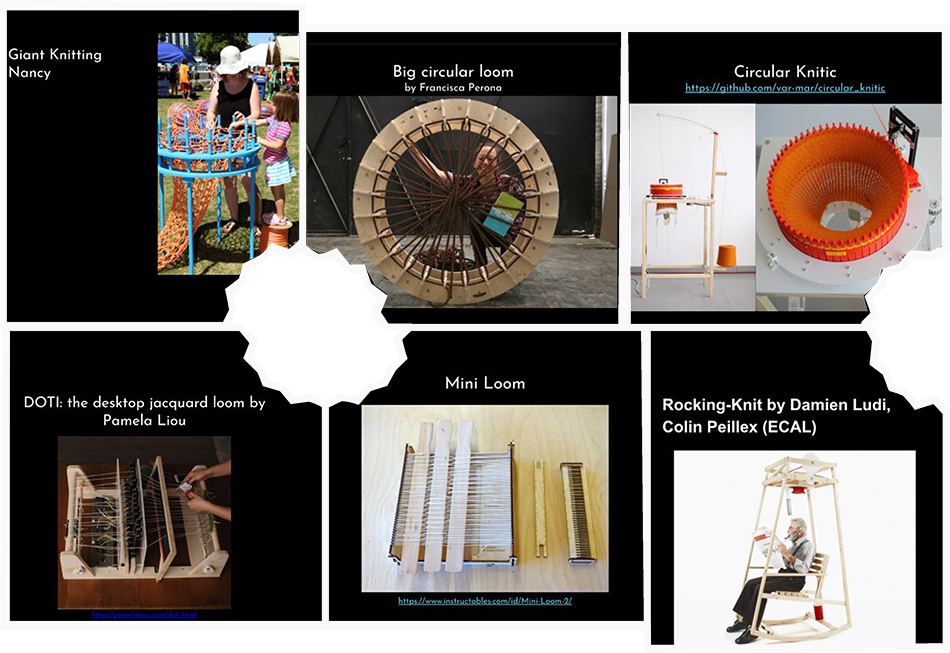
These previous year's students inspired us:
Useful Links
- STUDIO HILO
- HOW WOOL IS MADE - A SHEEP'S STORY
- SHEMAKES - Wool Mondays: rethinking wool together in May 2022
- Wool Mondays Day 1: Wool Ecosystems
- Wool Mondays Day 2: Natural Dyes
- Wool Mondays Day 3: Little Wool Factory -Wool Mondays | Carding tutorial
- Shemakes Labs: REDU - weaving a traditional Romanian skirt and belt (1:1 version)
- Shemakes Workshop: Re-Wool
- Shemakes Tutorials: Yarn Spinning (Re-Wool)
- Shemakes Tutorials: Wool Dyeing (Re-Wool)
- La Encartada Fabrika Museoa