13. Skin Electronics
This week started with the Lecture by Katia Vega who works on incorporating technology into cosmetics to make it interactive and this week we were asked to create our own skin electronic circuit.
Inspiration
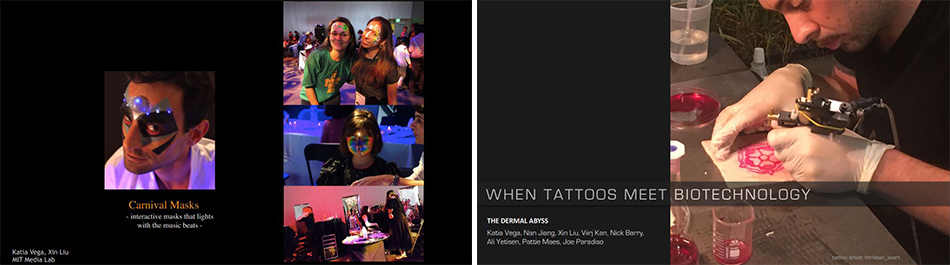
These are some more projects that Katia showed us in the lecture:
· KINISI by Katia Vega
· Aquadijing Prototype by Katia Vega
Skin Electronics & Beauty Tech
As I said, the week started with this amazing Lecture on Skin Electronics by Katia Vega:
You can watch the Lecture here:
"Katia Vega is a Beauty Tech Designer. Inspired by invisible computing, augmenting human capabilities and magic, she proposes novel ways of interacting with the world. Her invention is called Beauty Technology, a wearable computing subfield that integrates technology into cosmetics to be applied directly to one’s skin, fingernails and hair in order to transform the body’s surface in an interactive platform. Conductive Makeup, Tech Nails, FX e-makeup and Hairware are some of her Beauty Technologies. Imagine that you blink and turn on the lights, move your fingernails and open the door, touch your hair and record a conversation."
You can find more about it in Katia Vega's webpage.
I'll make a small introduction for linking the information with this week's assigment experimentation.
These are some slides from Katia's Lecture:


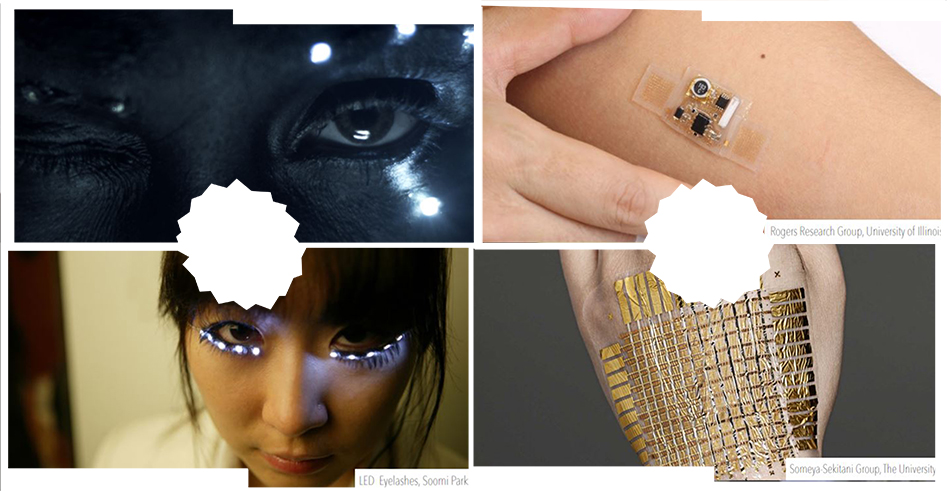
Images from Katia Vega's Lecture
As you can see (and these are only some slides of the whole amazing lecture from Katia) the possibilities are endless (actually, the possibilities where that many that I felt super dizzy after the lecture).
So for our assigment, we will use an ATtiny for making our circuits work as wished.
· What Is an ATtiny?
The ATtiny is an AVR Microcontroller, it's similar to the Arduino but smaller in size and with less capacities than the bigger one.
These are the differences in between the "Arduino UNO" and the "ATtiny" taken from Liza's Lecture in Wearables Week:
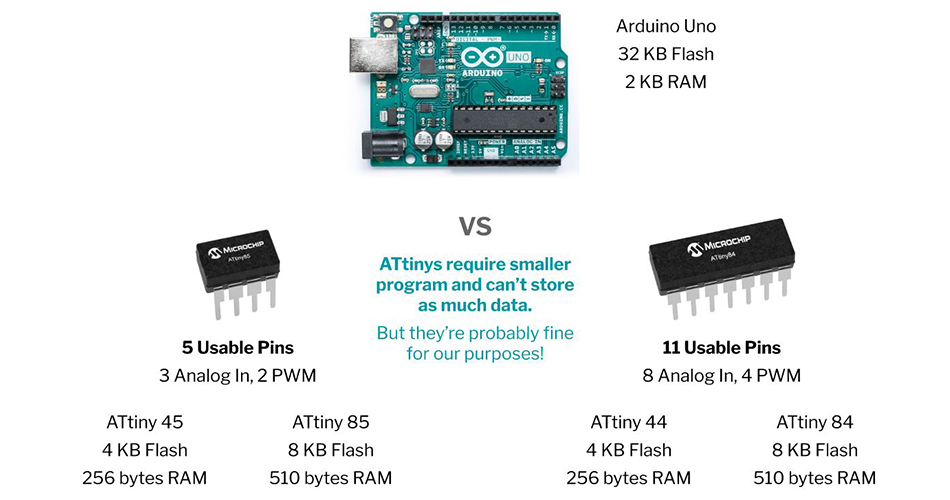
Images from Liza's Lecture in Wearables Week
· How to Program Your ATtiny
For programming the ATtiny we have two options:
- Using your Arduino.
- Using an AVR Programmer.
Here I'll explain the step by step of programming the ATtiny with an AVR Programmer since I'll explain the second option down below with my own experimentation.
These are the steps you need to follow for programming your ATtiny with an AVR Programmer:
- 1. For programming the ATtiny with an AVR Programmer you need first to install these drivers
- 2. Select your board (Tools > Board > ATtiny).
- 3. Select the correct ATtiny (Tools > Processor > ATtiny85).
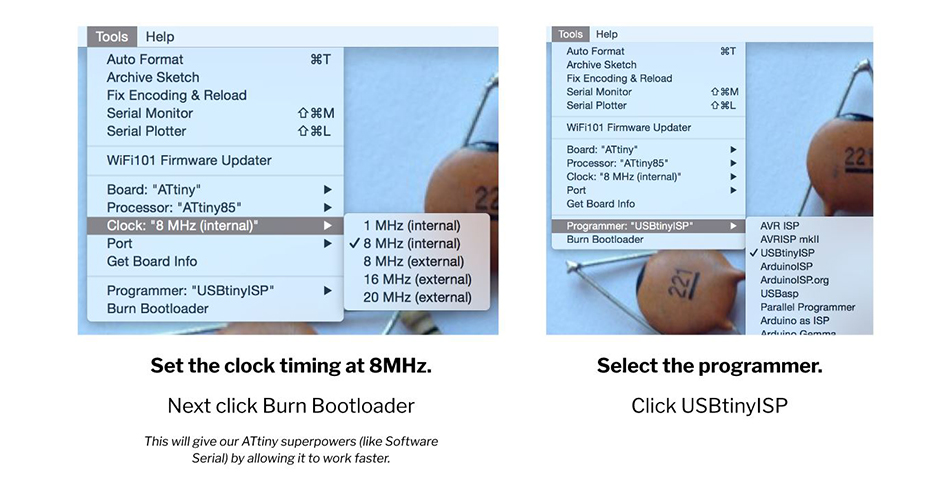
- 4. Set the clock timing at 8MHz (Tools > Clock > 8 MHz (internal)). Next click "Burn Bootloader".
- 5. Select the programmer (Tools > Programmer > USBtinyISP).
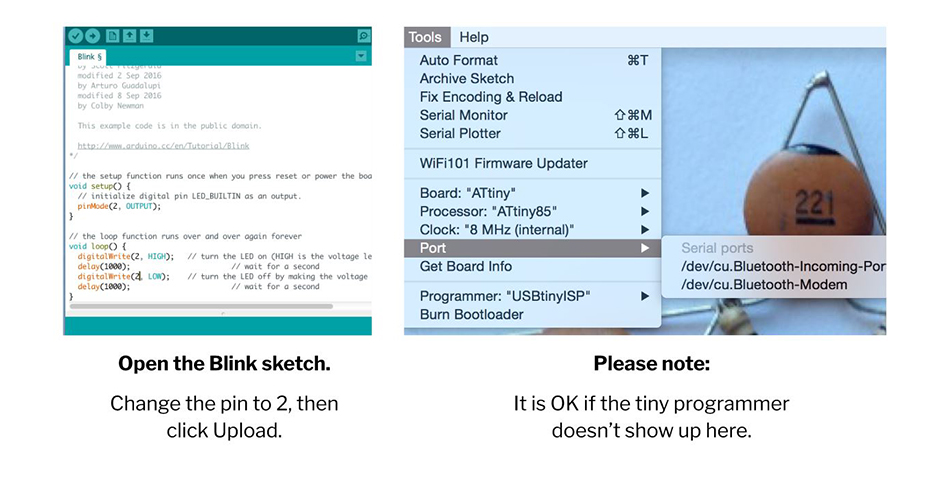
- 6. Open your sketch (in this case the Blink example). Change the pin to 2, then click on Upload. Note: It is OK if the tiny programmer doesn't show up here (Tools > Port > - ).
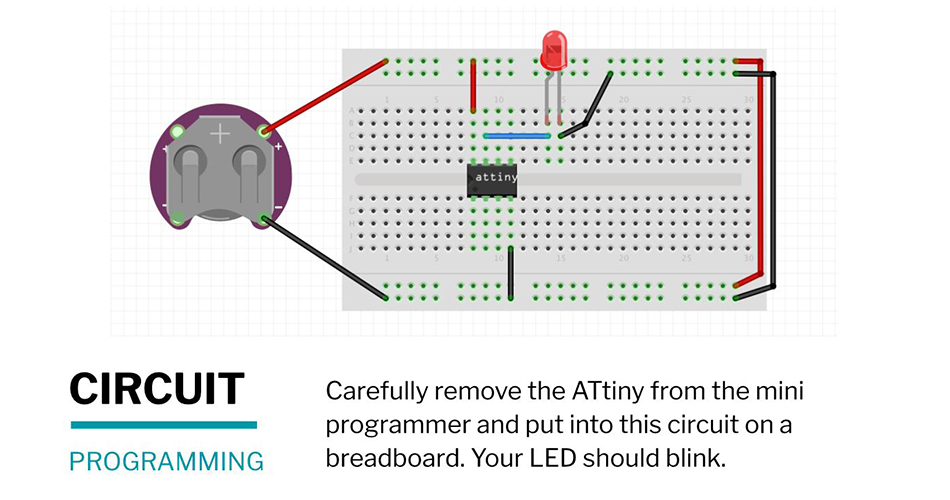
- 7. For trying the sketch uploaded before, carefully remove the ATtiny from the mini programmer and put into the circuit shown on a breadboard. The LED should blink.
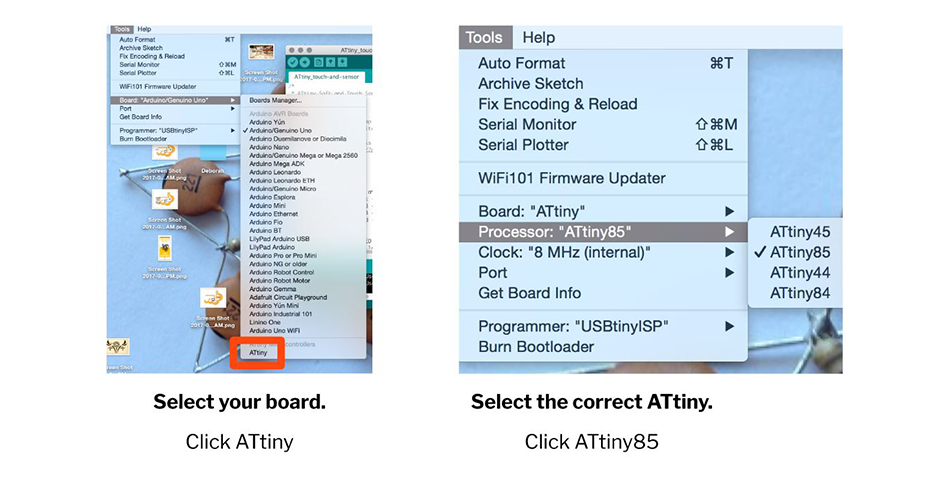
Images from Liza's Lecture in Wearables Week
This Week's Practice
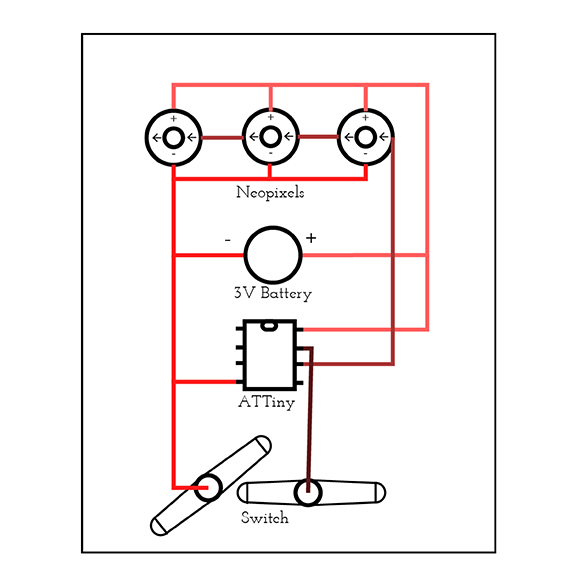
For this week I thought about reusing one of my biosilicone samples from Soft Robotics week. Fortunately, I tried the neopixels on it and they fit perfectly, so I started thinking about a circuit that could fit into my sample. I felt super inspired by Diane Wakim's project, so I changed her circuit from 4 to 3 neopixels and adapt it for my project.
So, this is the schematic for my circuit
· Programming the ATtiny With the Arduino
For programming the ATtiny I followed Emma's tutorial where she explains very well how you can do this.
First of all, you need to upload an sketch to your arduino which will allow you to program the ATtiny with it.
These are the steps you need to follow for programming your ATtiny with Arduino:
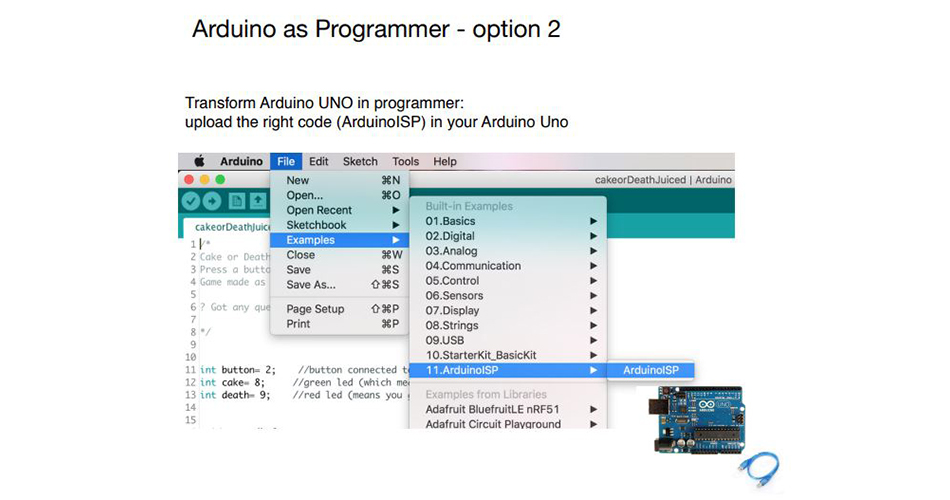
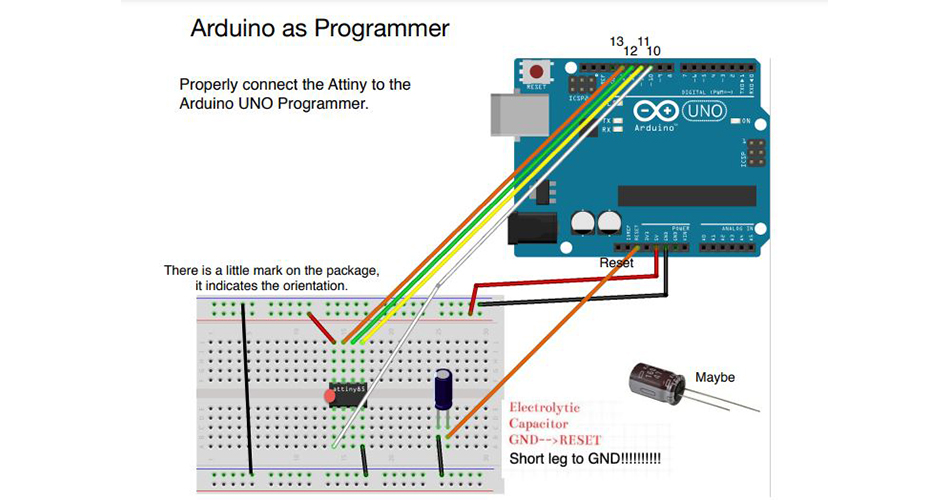
- 1. Connect the ATtiny to your Programmer (In this case the Arduino UNO - make sure that the Arduino is uploaded with the Arduino ISP sketch).
- 2. Open the Arduino ISP sketch (File > Examples > 11.ArduinoISP > ArduinoISP).
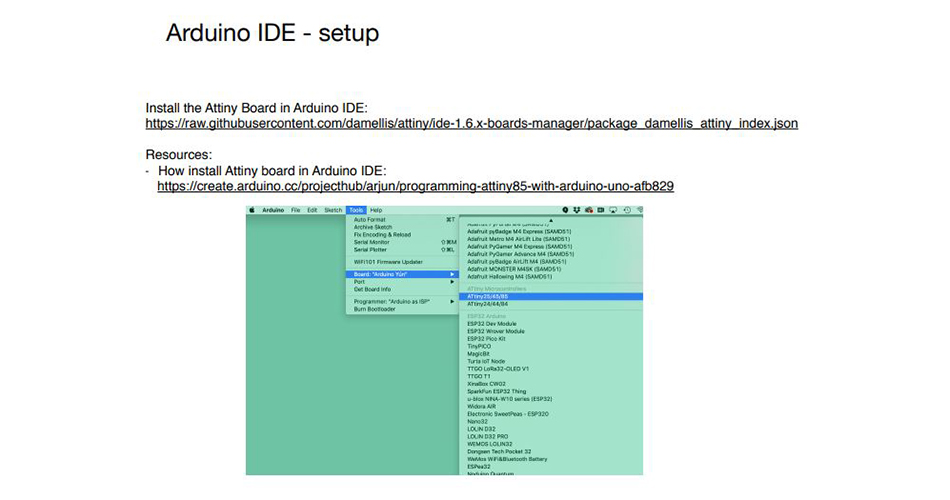
- 3. Install the ATtiny Board in Arduino IDE. Note: (Emma gave us this link for doing so: https://raw.githubusercontent.com/damellis/attiny/ide-1.6.x-boards-manager/package_damellis_attiny_index.json and this is a tutorial for doing so).
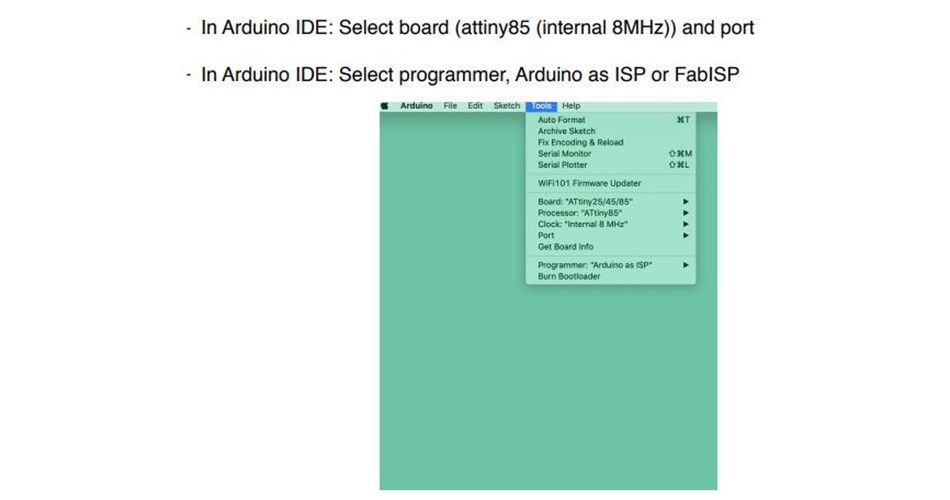
- 4. Select your board (Tools > Board > ATtiny).
- 5. Select the correct ATtiny (Tools > Processor > ATtiny85).
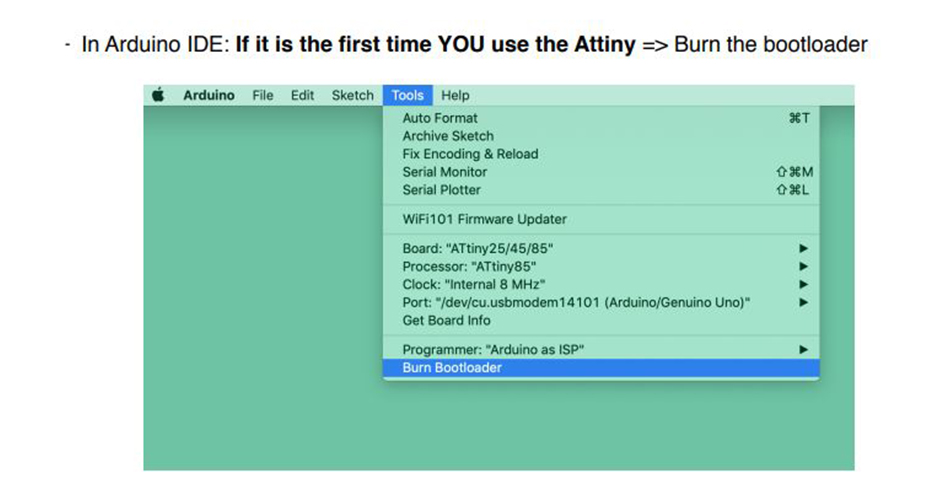
- 6. Set the clock timing at 8MHz (Tools > Clock > 8 MHz (internal)). Next click "Burn Bootloader" if it is the first time you use the ATtiny.
- 7. Connect the ATtiny to your input/output devices.
- 8. Upload your code to the ATtiny.
Images from Emma Parechi's Tutorial
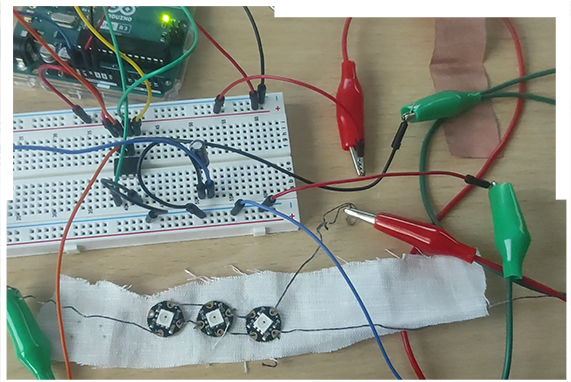
Thanks to this schematic from Emma's tutorial, I understood how I should make the connections for my own circuit with my 3 neopixels. So I uploaded the code and once I saw that it worked, I thought how I needed to sew it into my biosilicone sample.
![]()
This will be my Step n º 7:
- 7. Connect the ATtiny to your input/output devices).
And then, Step nº 8:
- 8. Upload your code to the ATtiny.
This is the Code I used, which is the same that Diane used but addapting it for my 3 neopixel circuit:
#include <Adafruit_NeoPixel.h>

// Pin where the NeoPixes are connected
#define LED_PIN    1

// How many NeoPixels are attached
#define LED_COUNT 3

// Declare our NeoPixel strip object:
Adafruit_NeoPixel strip(LED_COUNT, LED_PIN, NEO_GRB + NEO_KHZ800);
// Argument 1 = Number of pixels in NeoPixel strip
// Argument 2 = Arduino pin number (most are valid)
// Argument 3 = Pixel type flags, add together as needed:
//   NEO_KHZ800  800 KHz bitstream (most NeoPixel products w/WS2812 LEDs)
//   NEO_KHZ400  400 KHz (classic 'v1' (not v2) FLORA pixels, WS2811 drivers)
//   NEO_GRB     Pixels are wired for GRB bitstream (most NeoPixel products)
//   NEO_RGB     Pixels are wired for RGB bitstream (v1 FLORA pixels, not v2)
//   NEO_RGBW    Pixels are wired for RGBW bitstream (NeoPixel RGBW products)

// The switch pin and status
int sw_pin = 2;
int sw_status = 0;

// Defining the colours
uint32_t off = strip.Color(0, 0, 0);
uint32_t red = strip.Color(200, 0, 0);
uint32_t blue = strip.Color(0, 191, 255);
uint32_t green = strip.Color(51, 153, 51);
uint32_t magenta = strip.Color(153, 0, 204);

// Putting the colours into an array so I can access them randomly
uint32_t colors[] = {red, blue, green, magenta};


// setup() function -- runs once at startup --------------------------------

void setup() {

  strip.begin();           // Initialize NeoPixel strip object
  strip.show();            // Turn OFF all pixels ASAP
  strip.setBrightness(50); // Set BRIGHTNESS to about 1/5 (max = 255)
  pinMode(sw_pin, INPUT_PULLUP);

}


// loop() function -- runs repeatedly as long as board is on ---------------

void loop() {

  // Reading the switch status
  sw_status = digitalRead(sw_pin);

  if (sw_status == 0){
    // If switch status is 0, run the colorWipe function with a 50ms delay
    colorWipe(50);
  } else {
    // Else, successively turn off every NeoPixel in the strip
    for(int i=0; i<strip.numPixels(); i++) {
      strip.setPixelColor(i, off);
      strip.show();
    }
  }

}

// Fill strip pixels one after another with a color. Strip is NOT cleared
// first; anything there will be covered pixel by pixel.
// Color is not passed, but accessed in the global array
// The delay time (in milliseconds) between pixels is passed as an argument.
void colorWipe(int wait) {
  for(int i=0; i<strip.numPixels(); i++) { // For each pixel in strip...
    int randNumber = random(4); // Get a random number between 0 and 3
    // Set the color with one of the colors from the array
    strip.setPixelColor(i, colors[randNumber]);
    strip.show();  //display the color
    delay(wait);
  }
}
· Sewing My Skin Electronics Sample
So here is how I translated the circuit to sewing it into my Soft Robotics biosilicone sample:
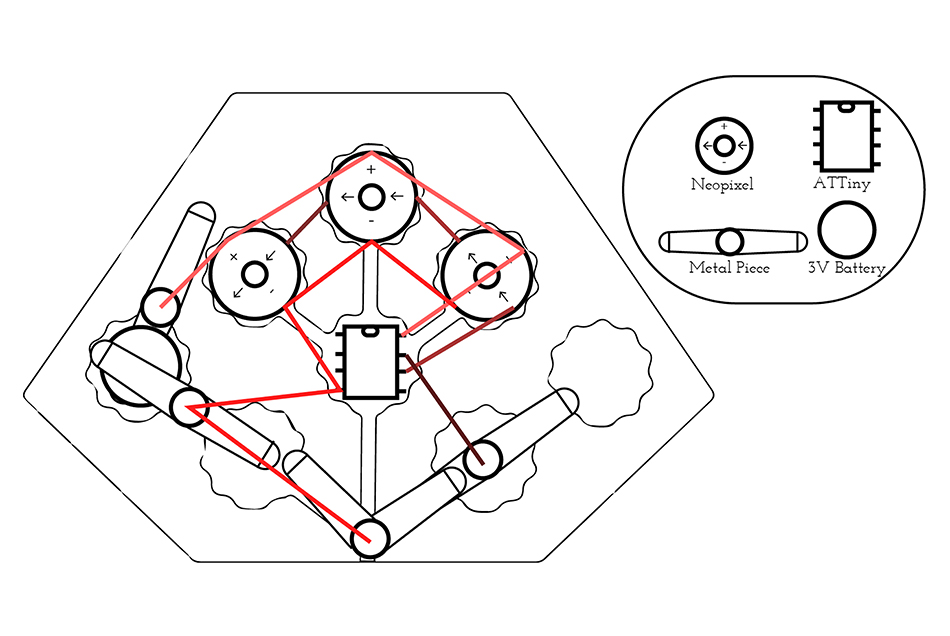
This is the list of materials and tools you need to create this sample:
- Biosilicone support
- 1 ATtiny
- 3 Neopixels
- 1 3V battery
- Conductive thread
- 4 Metal bookbinder
- Needle
- Fabric Scissors
The steps to follow are simple, you just need to sew everything following the schematic above with the conductive thread.
Note: Even if the lines have different colour in the schematic, that's only for making a difference on between the connections but all of them are sewed with the same conductive thread.
· Final Result
And this is the final result of my Skin Electronic design:
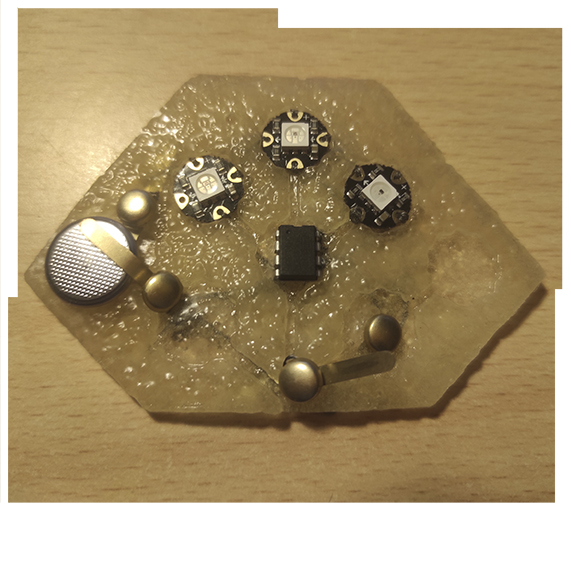
Also, if you put the other part of the biosilicone sample above for protecting the circuit the final result looks different.
Actually, when putting the sample into the skin it worked also but it was difficult to preserve the battery in its place, due to the fact that it didn't hold by itself. So, maybe it would've been easier if I had a battery holder instead of only the metal pieces.
· Possible Applications Of the Sample
In the case that you find a way (or a battery holder) to make the battery hold by itself, there can be some applications for the project since as it is made in biosilicone is not harmful for the skin.
Some applications that can be tried for this sample:
- It can be a necklace if you add a string.
- It can be a bracelet too.
- Or it can be used as a diadem if you find a way of holding it into your head.
- I guess it could be more applications but depends on each person's imagination :)
· BOM of the Assignment
This is the BOM (Bill Of Materials) you need for creating this sample:
| Qty | Description | Price | Link |
|---|---|---|---|
| 1 | Gelatine | 21,80€ | https://www.amazon.es/Gelatina-granulada-grado-profesional-neutro/dp/B087N96LF5/ref=sr_1_4?crid=4K3MCKB6WCW4&keywords=gelatina+1kg&qid=1643641858&sprefix=gelatina+1k%2Caps%2C171&sr=8-4 |
| 1 | Glycerine | 13,95€ | https://www.amazon.es/Glicerina-Vegetal-1L-1kg-25/dp/B07ZKXBP4R/ref=sr_1_5?crid=3FBEV10FD4VU3&keywords=glicerina+1kg&qid=1643642044&sprefix=glicerina+1kg%2Caps%2C73&sr=8-5 |
| 1 | 3V Battery | 4,74€ | https://www.amazon.es/Duracell-Specialty-bot%C3%B3n-Litio-Paquete/dp/B01CG0TO76/ref=pd_lpo_1?pd_rd_i=B01CG0TO76&psc=1 |
| 1 | Conductive Thread | 19,36€ | https://www.amazon.com/-/es/Aurifil-Bobina-grande-inoxidable-yardas/dp/B017TQW1SQ/ref=sr_1_24?crid=2U6LJC9B5WBPI&keywords=conductive+thread+for+sewable+circuits&qid=1654959250&sprefix=conductive+thread%2Caps%2C424&sr=8-24 |
| 1 | Metal Bookbinder | 1,50€ | https://www.amazon.es/Maped-330011-Bolsa-patr%C3%B3n-cabeza-redonda/dp/B002C2ON1Q/ref=sr_1_7?__mk_es_ES=%C3%85M%C3%85%C5%BD%C3%95%C3%91&crid=26SG1JRXCKOBA&keywords=encuadernadores+metal&qid=1655057855&sprefix=encuadernadores+metal%2Caps%2C179&sr=8-7 |
| 1 | Sewable Neopixels | 7,56€ | https://www.adafruit.com/product/1260 |
| 1 | ATtiny85 | 13,02€ | https://www.amazon.es/ATTINY85-20PU-DIP-8-TTINY85-85-20PU-ATTINY85-20/dp/B09WMBSDX9/ref=sr_1_34?keywords=attiny85&qid=1655105908&sr=8-34 |
| 1 | Arduino UNO | 40,10€ | https://www.amazon.es/SMART-PROJECTS-A000073-Arduino-Uno/dp/B00PUOVSYS/ref=sr_1_7?keywords=arduino+uno&qid=1654959834&sr=8-7 |
| 1 | USB Wire for Arduino UNO | 3,60€ | https://www.amazon.es/Christians-Technik-Shop-Conector-Arduino/dp/B01G1FEKGM/ref=sr_1_6?__mk_es_ES=%C3%85M%C3%85%C5%BD%C3%95%C3%91&crid=1B4KFJZR57XZM&keywords=arduino+uno+usb&qid=1654959877&sprefix=arduino+uno+usb%2Caps%2C474&sr=8-6 |
| 1 | Tiny AVR Programmer | $17.50 | hhttps://www.sparkfun.com/products/11801 |
References & Useful Links
Previous years student Diane Wakim work inspired me:
Emma's Tutorials
- Tutorial Sensing & Outputs - ATtiny Part 1
- Tutorial Sensing & Outputs - ATtiny Part 2
- Tutorial Sensing & Outputs - ATtiny Part 3
Useful Links
- Skin Electronics Lecture by Katia Vega
- Katia Vega
- Program an ATtiny With Arduino
- Tiny AVR Programmer Hookup Guide