8. Wearables

The wearables week is a suite of E-textile week. During this week we saw how to use an actuator and how to make it a wearables.
Inspiration
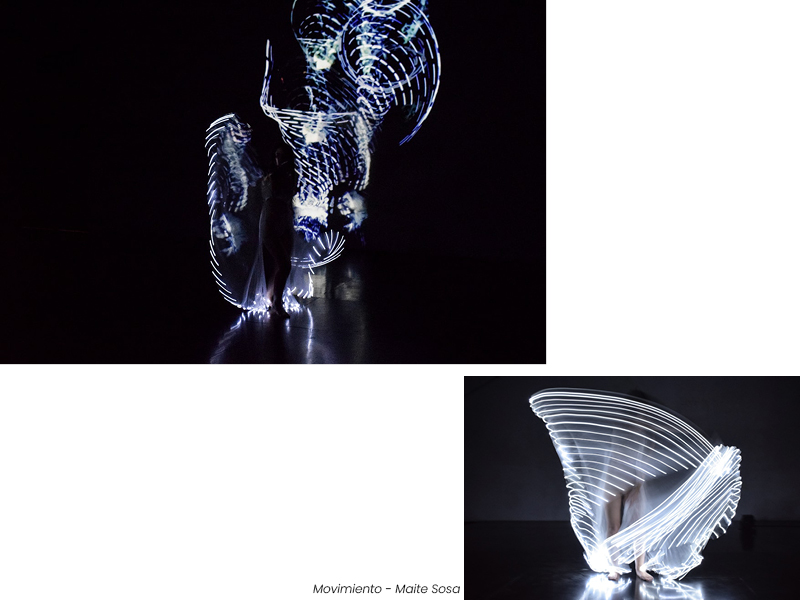
This week, I particulary liked the work of wearable ligts. So, I was focus my research and documentation on lights.

Artificial intelligence and its false lies by Mica Satomi
Artificial intelligence and its false lies
Ceres

Arduino
Some informations and languages on Arduino to understand better the code on Arduino.
| Code | Definition |
|---|---|
| INPUT_PULLUP | to say to arduino to use its resistor |
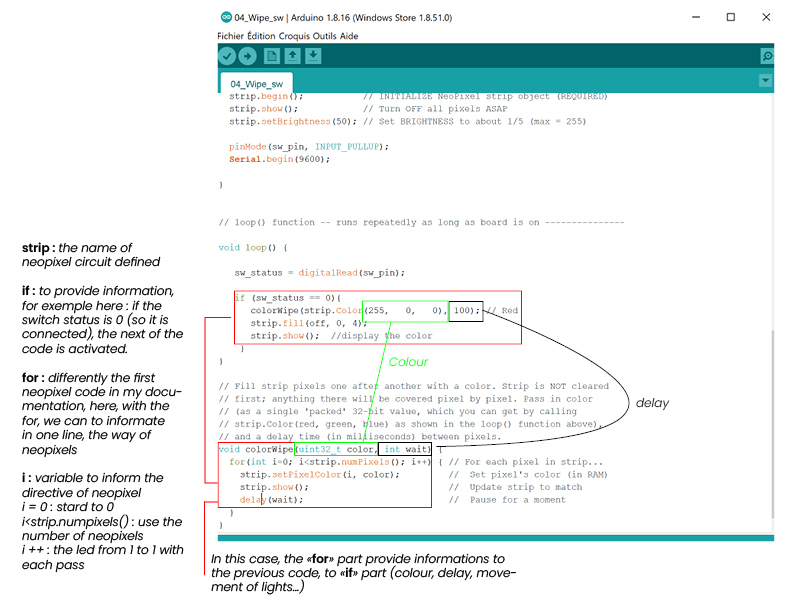
| if > | to provide information, for exemple here : if the switch status is 0 (so it is connected), the next of the code is activated. |
| > else | other information. For example : if the switch is connected, the if code is activated > else the switch is off, the code is disabled |
| for | with the for, we can to informate in one line, the way of neopixels for exemple |
| // | information / note on arduino (it is not a code) |
| { } | To inform the stard and end of a code |
| Serial.println(sw_status) | to read a switch in the serial monitor. When I open the serial monitor and I connect my switch sensor, I can see some 1 and 0 (if it is a digital sensor) |
Experimentation / Production
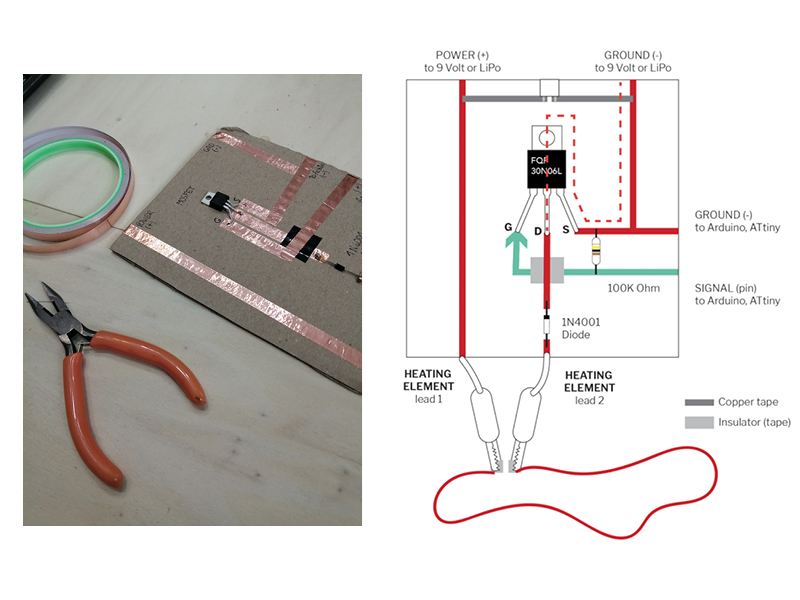
Transistor
We use the transistor as an electrical switch. By applying a small amount of voltage to the gate using the arduino, current can flow between the drain and the source.
Electromagnet
The magnetic hematite bead flips back and forth when we run current through the coil. It creates an electromagnetic field that attracts or repels the bead based on the direction of the current.
Neopixels
Neopixels are RGB LEDS with drivers embedded in the chip. This allows them to be addressable. This is nice because it lets have lots of leds and only take up three pins on your microcontroller. They do not light up on their own with just a battery. We have to connect them to a microcontroller like the Arduino and program them to light up.
Arduino library
To code a neopixel, we need a librery for neopixel. The code is different So, I upload the AdaFruit NeoPixel
To find this library :
-
Tools
-
Manage libraries
-
Research the library in search bar
-
Upload the library
To start a code and say to Arduido to use this new librery I have to insert this code information : #include
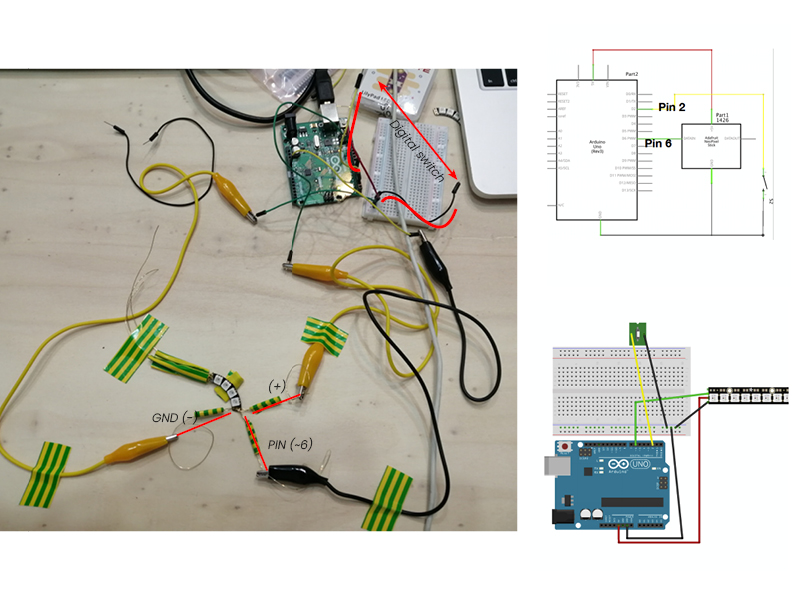
First circuit with neopixel
Embrodery circuit
After having experimented my neopixel circuit with, I did an embrodery circuit to apply a first wearable circuit and to have a soft circuit to experimented different codes on arduino.
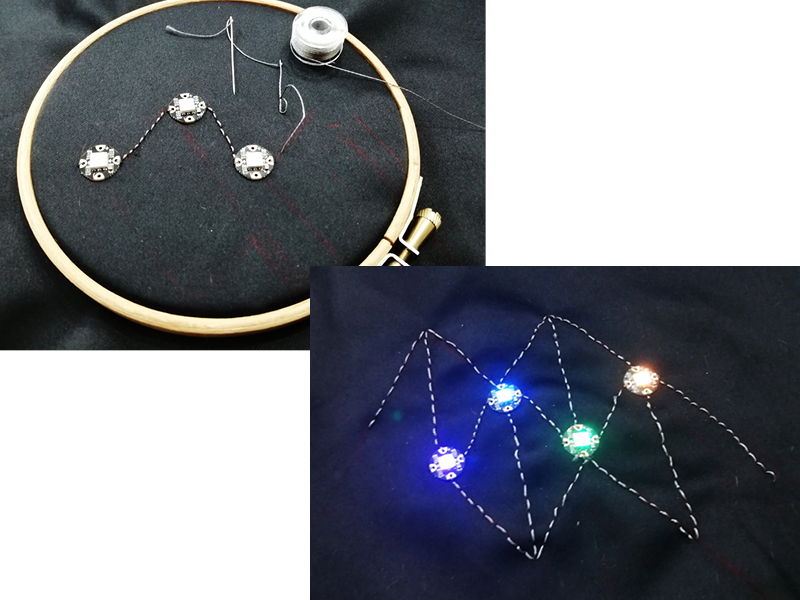
Some code experimentations on Arduino with my embrodery circuit :
Neopixel strip test
Code a Digital switch, delay and color
#include <Adafruit_NeoPixel.h>
// A basic everyday NeoPixel strip test program.

// NEOPIXEL BEST PRACTICES for most reliable operation:
// - Add 1000 uF CAPACITOR between NeoPixel strip's + and - connections.
// - MINIMIZE WIRING LENGTH between microcontroller board and first pixel.
// - NeoPixel strip's DATA-IN should pass through a 300-500 OHM RESISTOR.
// - AVOID connecting NeoPixels on a LIVE CIRCUIT. If you must, ALWAYS
//   connect GROUND (-) first, then +, then data.
// - When using a 3.3V microcontroller with a 5V-powered NeoPixel strip,
//   a LOGIC-LEVEL CONVERTER on the data line is STRONGLY RECOMMENDED.
// (Skipping these may work OK on your workbench but can fail in the field)

// Which pin on the Arduino is connected to the NeoPixels?
// On a Trinket or Gemma we suggest changing this to 1:
#define LED_PIN    6

// How many NeoPixels are attached to the Arduino?
#define LED_COUNT 4

// Declare our NeoPixel strip object:
Adafruit_NeoPixel strip(LED_COUNT, LED_PIN, NEO_GRB + NEO_KHZ800);
// Argument 1 = Number of pixels in NeoPixel strip
// Argument 2 = Arduino pin number (most are valid)
// Argument 3 = Pixel type flags, add together as needed:
//   NEO_KHZ800  800 KHz bitstream (most NeoPixel products w/WS2812 LEDs)
//   NEO_KHZ400  400 KHz (classic 'v1' (not v2) FLORA pixels, WS2811 drivers)
//   NEO_GRB     Pixels are wired for GRB bitstream (most NeoPixel products)
//   NEO_RGB     Pixels are wired for RGB bitstream (v1 FLORA pixels, not v2)
//   NEO_RGBW    Pixels are wired for RGBW bitstream (NeoPixel RGBW products)

int sw_pin = 2;

// Variables will change:
int sw_status = 0;         // current state of the button
int delayval = 1000; // delay for half a second


// setup() function -- runs once at startup --------------------------------

void setup() {

  strip.begin();           // INITIALIZE NeoPixel strip object (REQUIRED)
  strip.show();            // Turn OFF all pixels ASAP
  strip.setBrightness(30); // Set BRIGHTNESS to about 1/5 (max = 255)

  pinMode(sw_pin, INPUT_PULLUP);
  Serial.begin(9600);

}


// loop() function -- runs repeatedly as long as board is on ---------------

void loop() {

   sw_status = digitalRead(sw_pin);
   Serial.println(sw_status);

   if (sw_status == 0){
      strip.clear();

      strip.setPixelColor(0, 12, 0, 255); //set the color red on the first pixel
      strip.show();  //display the color
      delay(delayval);

      strip.setPixelColor(1, 255, 152, 51); //set the color green on the first pixel
      strip.show();  //display the color
      delay(delayval);

      strip.setPixelColor(2, 12, 0, 255); //set the color green
      strip.show();  //display the color
      delay(delayval);

      strip.setPixelColor(3, 255, 152, 51); //set the color green
      strip.show();  //display the color
      delay(delayval);

    } else {
      strip.clear();
      strip.show();
    }
}
First test : delay 1000 milliseconds
Second test : delay 400 milliseconds
Rainbow test with Arduino
Wipe test with Arduino
#include <Adafruit_NeoPixel.h>

// Which pin on the Arduino is connected to the NeoPixels?
// On a Trinket or Gemma we suggest changing this to 1:
#define LED_PIN    6

// How many NeoPixels are attached to the Arduino?
#define LED_COUNT 4

// Declare our NeoPixel strip object:
Adafruit_NeoPixel strip(LED_COUNT, LED_PIN, NEO_GRB + NEO_KHZ800);

void setup() {
  strip.begin();           // INITIALIZE NeoPixel strip object (REQUIRED)
  strip.show();            // Turn OFF all pixels ASAP
  strip.setBrightness(50); // Set BRIGHTNESS to about 1/5 (max = 255)
}

void loop() {

// Fill along the length of the strip in various colors...
//  colorWipe(strip.Color(255,   0,   0), 100); // Red
//  colorWipe(strip.Color(  0, 255,   0), 100); // Green
  colorWipe(strip.Color(  0,   0, 255), 100); // Blue
  colorWipe(strip.Color(0,   0,   0), 100); // Off

}


// Fill strip pixels one after another with a color. Strip is NOT cleared
// first; anything there will be covered pixel by pixel. Pass in color
// (as a single 'packed' 32-bit value, which you can get by calling
// strip.Color(red, green, blue) as shown in the loop() function above),
// and a delay time (in milliseconds) between pixels.
void colorWipe(uint32_t color, int wait) {
  for(int i=0; i<strip.numPixels(); i++) { // For each pixel in strip...
    strip.setPixelColor(i, color);         //  Set pixel's color (in RAM)
    strip.show();                          //  Update strip to match
    delay(wait);                           //  Pause for a moment
  }
}
Wipe test with switch on Arduino
#include <Adafruit_NeoPixel.h>
// A basic everyday NeoPixel strip test program.

// Which pin on the Arduino is connected to the NeoPixels?
// On a Trinket or Gemma we suggest changing this to 1:
#define LED_PIN    6

// How many NeoPixels are attached to the Arduino?
#define LED_COUNT 4

// Declare our NeoPixel strip object:
Adafruit_NeoPixel strip(LED_COUNT, LED_PIN, NEO_GRB + NEO_KHZ800);
// Argument 1 = Number of pixels in NeoPixel strip
// Argument 2 = Arduino pin number (most are valid)
// Argument 3 = Pixel type flags, add together as needed:
//   NEO_KHZ800  800 KHz bitstream (most NeoPixel products w/WS2812 LEDs)
//   NEO_KHZ400  400 KHz (classic 'v1' (not v2) FLORA pixels, WS2811 drivers)
//   NEO_GRB     Pixels are wired for GRB bitstream (most NeoPixel products)
//   NEO_RGB     Pixels are wired for RGB bitstream (v1 FLORA pixels, not v2)
//   NEO_RGBW    Pixels are wired for RGBW bitstream (NeoPixel RGBW products)

uint32_t off = strip.Color(0, 0, 0);

int sw_pin = 2;
int sw_status = 0;


// setup() function -- runs once at startup --------------------------------

void setup() {

  strip.begin();           // INITIALIZE NeoPixel strip object (REQUIRED)
  strip.show();            // Turn OFF all pixels ASAP
  strip.setBrightness(50); // Set BRIGHTNESS to about 1/5 (max = 255)

  pinMode(sw_pin, INPUT_PULLUP);
  Serial.begin(9600);

}


// loop() function -- runs repeatedly as long as board is on ---------------

void loop() {

   sw_status = digitalRead(sw_pin);

   if (sw_status == 0){
      colorWipe(strip.Color(255,   0,   0), 100); // Red
      strip.fill(off, 0, 4);
      strip.show();  //display the color
    }
}

// Fill strip pixels one after another with a color. Strip is NOT cleared
// first; anything there will be covered pixel by pixel. Pass in color
// (as a single 'packed' 32-bit value, which you can get by calling
// strip.Color(red, green, blue) as shown in the loop() function above),
// and a delay time (in milliseconds) between pixels.
void colorWipe(uint32_t color, int wait) {
  for(int i=0; i<strip.numPixels(); i++) { // For each pixel in strip...
    strip.setPixelColor(i, color);         //  Set pixel's color (in RAM)
    strip.show();                          //  Update strip to match
    delay(wait);                           //  Pause for a moment
  }
}
ATtiny
To create a wearable with a program, I need to program an ATtiny. A micro hardware programmed with Arduino and a PC. This micro hardware is wearable because it is very tiny.
To know more > Week 13
Project
(in progress)
As I explained during the week 5 (E-Textile), I will collaborate with a friend to create a wearable costume, with lights and sensors.
This idea project is in progress. During the Week 13, I learned other skills to create this costume (ATtiny).
To create a circuit with many led RGB or Neopixels, I will need an external battery.
- Lipo battery ?
Useful links
- Lecture - Wearables week - Liza Stark
- Tutorial #1 - Arduino and power loads - Emma Pareschi
- Tutorial #2 - Arduino / Neopixels / Sound - Emma Pareschi