2. Digital bodies
I can feel it in my gut
This week, I embarked on a journey where science and art converge.
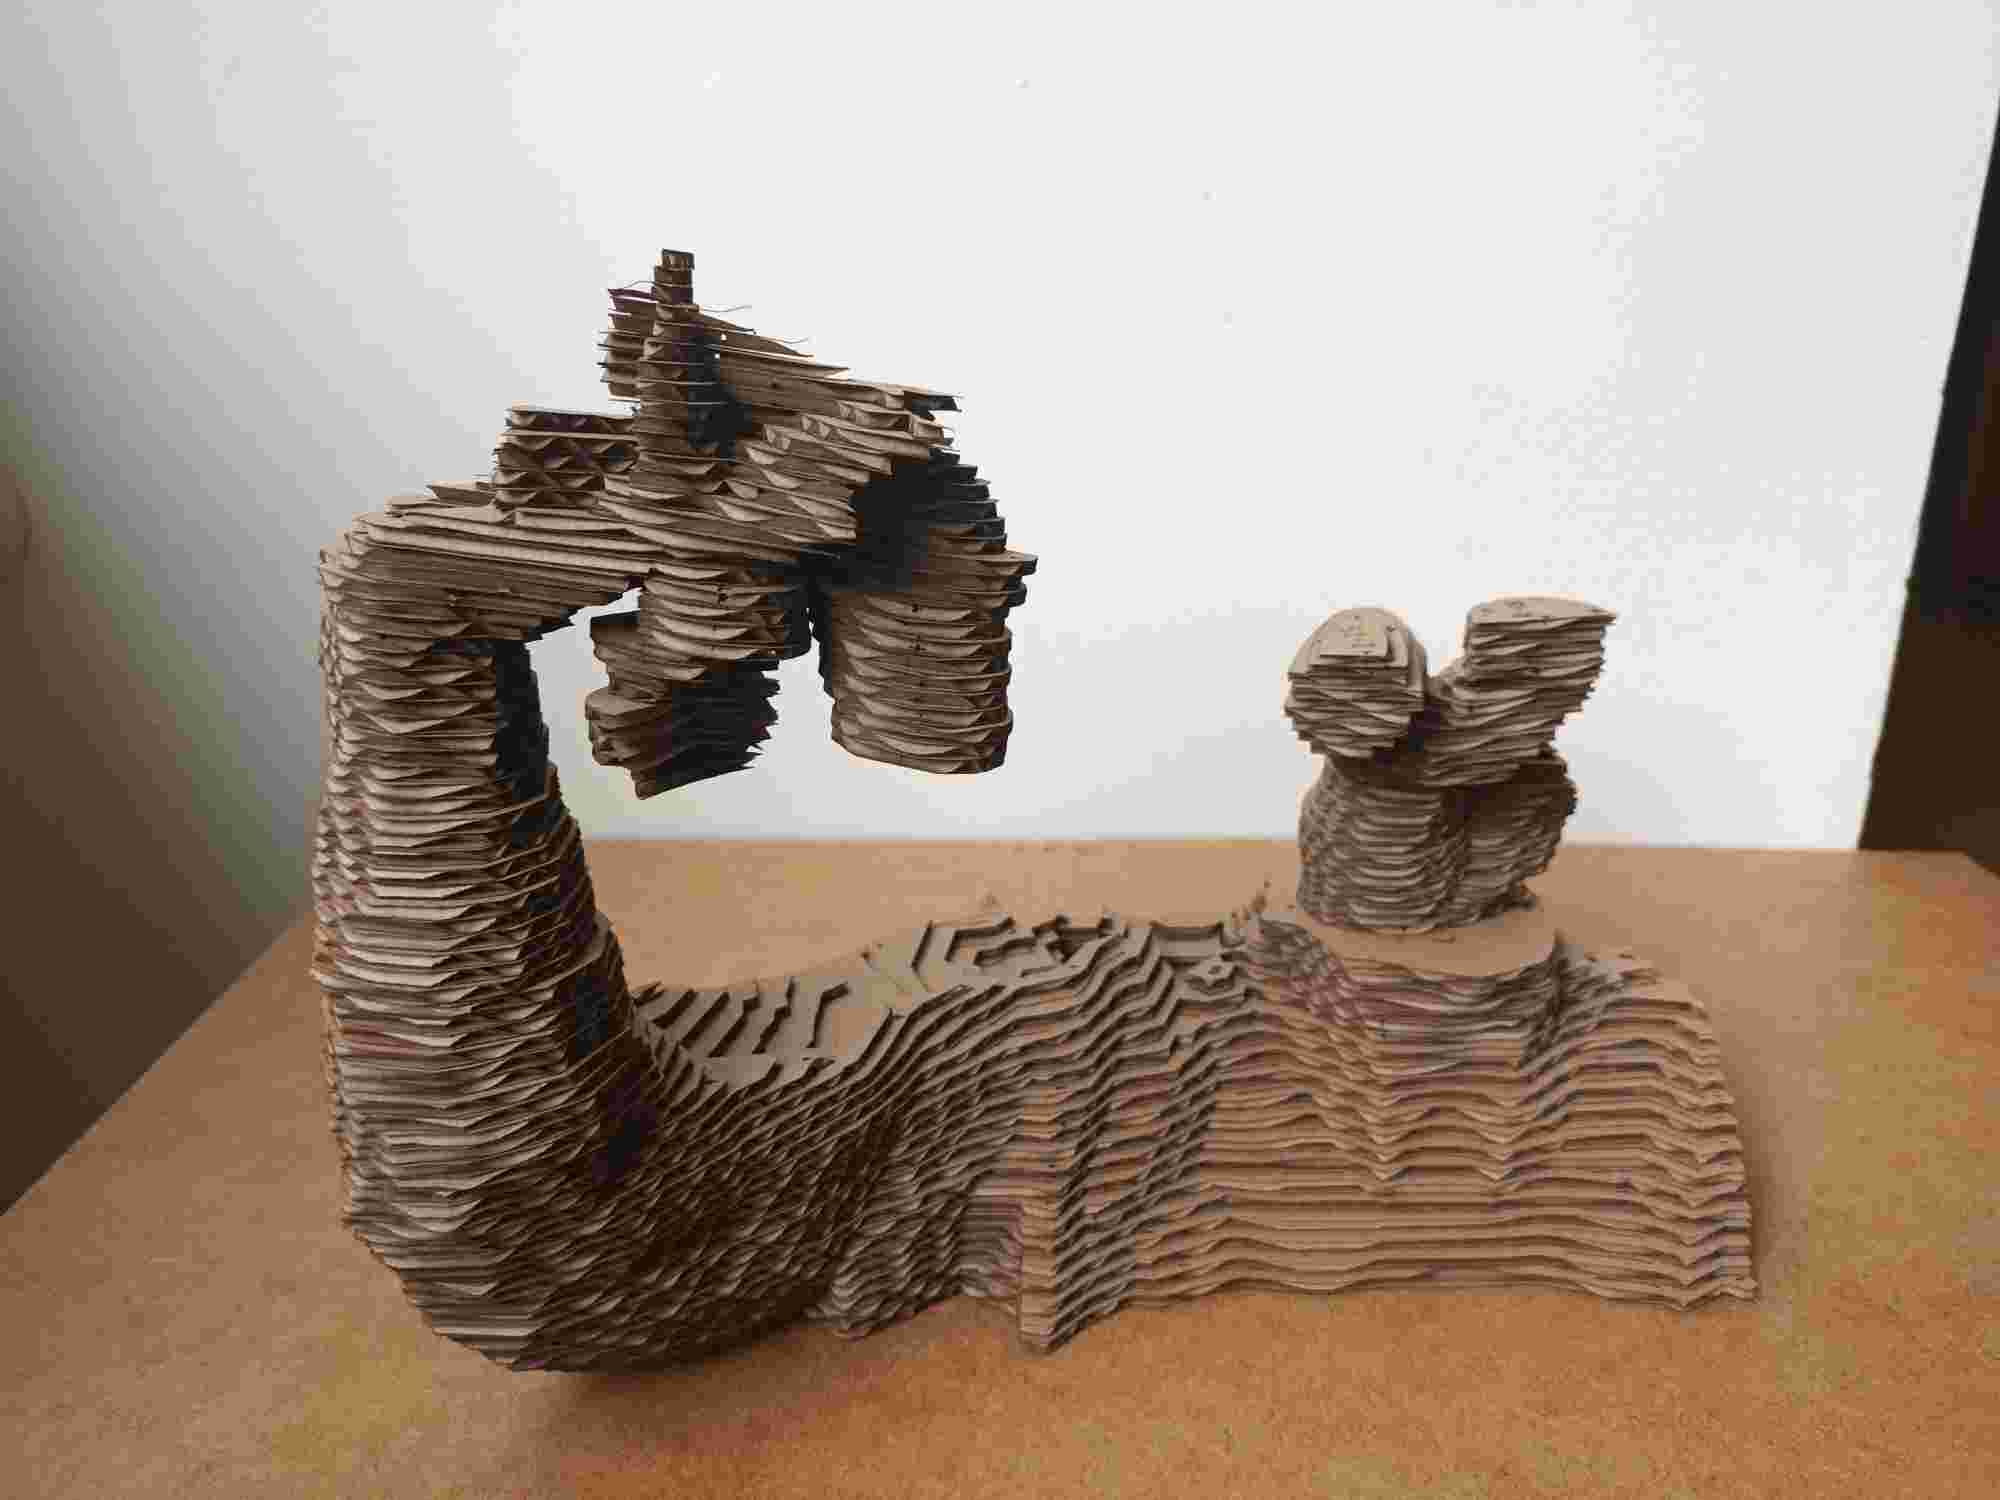
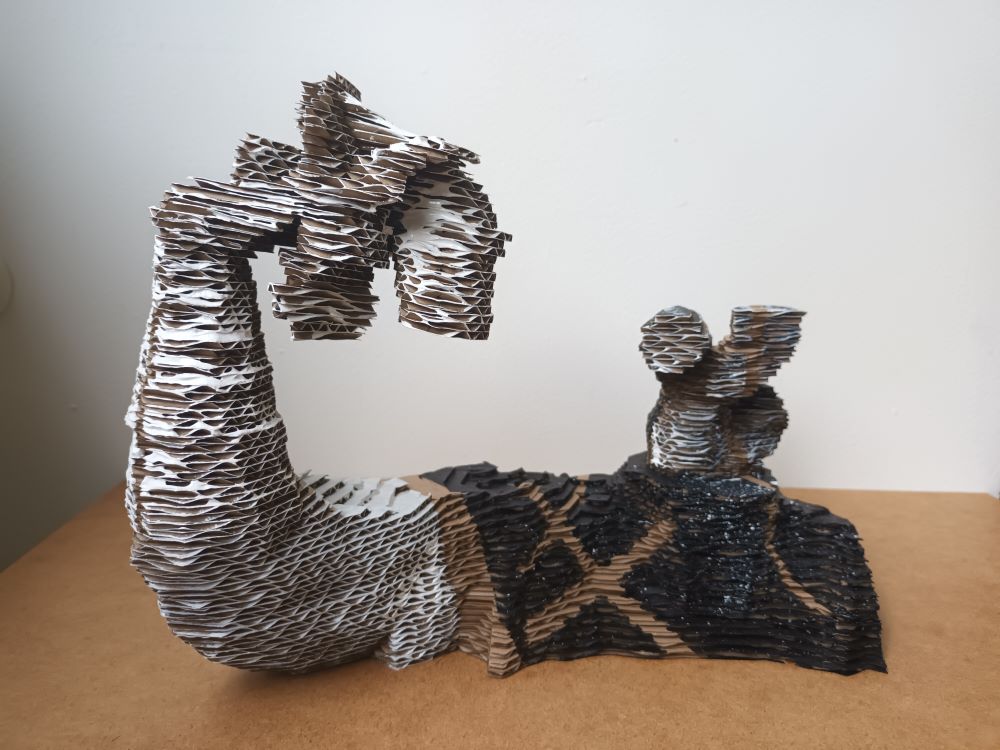
 I can feel it in my gut (2023). Card board and acrylic paint, 38 x 22 x 13 cm
In the dynamic world of 3D modelling, my project 'I Can Feel It in My Gut' takes centre stage. The assignment this week was to create a 3D model of the human body, and reshape it into an artistic view of the body, with the help of 3D scanning, software, and a laser cutter.
What you see is a sculpture of a headless torso. Where the head would be, are now guts. The hand, holding guts, is feeling the guts where the head would be, representing an artistic expression of the saying: 'I can feel it in my gut'.
Research & Ideation
Expanding our understanding of gut feelings
Emotions are processed in the brain. But why do we feel them the mostly in our gut?
Carl Sagan (1934-1996), renowned astronomer and astrophysicist, wrote in his book The Demon-Haunted World: Science as a Candle in the Dark (1996):
“But I try not to think with my gut. If I'm serious about understanding the world, thinking with anything besides my brain, as tempting as that might be, is likely to get me into trouble. Really, it's okay to reserve judgment until the evidence is in.”
Thinking with your gut may be a bad idea, scientifically speaking, yet medical scientists have been looking for evidence for an emotional connection between the brain and the gut.
According to recent research done at the Harvard Medical School and the Harvard T.H. Chan School of Public Health, the brain communicates with the gastrointestinal tract through the gut-brain axis. One theory is that the gut microbiome plays a starring role in the axis, linking physical and emotional health.
“Many studies have shown that disturbance in the gut microbiome can affect the gut-brain axis and lead to various health problems, including anxiety, depression, and even neurological disorders,” said co-corresponding author Yang-Yu Liu, an associate scientist at the Brigham and an associate professor at Harvard Medical School.
“This interaction likely flows both ways — the brain can impact the gut, and the gut can impact the brain,” said first author Shanlin Ke, a postdoctoral researcher in Liu’s lab. “The emotions that we have and how we manage them could affect the gut microbiome, and the microbiome may also influence how we feel.” (From: Expanding our understanding of gut feelings, The Harvard Gazette, April 2023.
With the sculpture 'I can feel it in my gut', I have made an artistic representation that unites the brain-gut axis. This surreal fusion of anatomy and art invites viewers to explore the depths of human existence. Also, it looks cool. To breathe a bit of extra liveliness into this creation, I've chosen to paint it in black and white. These colours (white on the left, black on the right - with some white on the right), portray both the separation and the blending of the gut-brain axis.
This is the 3Dmodel I made, where I replaced the head (and thus, the brain) with guts. The hand is grasping guts to get a gut feeling.
In order to create this, first I had to find a suitable image of intestines (the 'gut'). On Thingiverse I found a downloadable 3D model (designed by Phil Best in 2015).

References & Inspiration
When searching for inspiration for the 'I Can Feel It in My Gut' project in the art and fashion world, I found myself drawn to pictures of creations that had the intestinal design I was looking for.
 From top left, then clockwise: Louise Bourgeois, The Couple (2007 -2009); Unknown; Krystyna Kozhoma (2015); Rei Kawakubo for Comme des Garçons (2014); Gaetano Navarra (2008)
As I started looking for images for my vision board, they were not hard to find at all, I saw intestinal shapes used by creators everywhere, in both art and in fashion.
Great minds think alike.
Working with the tools and software
Making a scan with Skanect
When creating a 3D model for Rhino, the choice between MakeHuman software, handheld scanning, and Skanect scanning depends on your specific project needs and resources. Each method offers distinct advantages, but I've chosen Skanect because it gave the best model of my torso.
- Fired up Skanect and picked the right settings for my 3D scanner, like choosing "body" or "torso."
- Placed the torso (myself, in this case) within the scanning area and the wonderful Stephanie Johnson hit the scan button. She made sure I got a full 360-degree scan by adjusting the scanner's angle as needed.
- Skanect did its magic and turned the scan into a point cloud or mesh, which I saved as a .OBJ file.
in order to recreate my sculpture, make a scan of your body using Skanect.

Importing, Modeling and Editing into Rhino
Rhino is a 3D modeling software widely used in industries such as architecture, industrial design, and engineering for creating, editing, and analyzing complex 3D models and designs.
I imported the Skanect Scan into Rhino by using the import command. Rhino's like the canvas where I could work with the scan.

-The imported file usually needed a bit of TLC. I used Rhino's modeling tools to smooth out rough spots, patch up any holes, and make sure the mesh was on point. I could not have done this without the supreme Rhino skills of Aslı Aydın Aksan.
With Rhino, Boolean operations are important tools.
Boolean Union is used to combine two or more solid objects into a single, unified solid object.
Access Boolean Union:
Activate the Boolean Union command in Rhino. This can be done by typing "BooleanUnion" in the command line or navigating to the "Solid" menu and selecting "Boolean" followed by "Union." Specify Objects:
Click on the objects you want to merge and press Enter. Rhino will process the Boolean Union operation and create a new solid object encompassing the combined volume of the selected objects. Review Result:
Inspect the resulting object to ensure that the union was successful and that there are no unexpected artifacts. The merged object should represent the combination of the selected solids.
Boolean Difference in Rhino is a tool used for solid modeling, allowing you to subtract one 3D solid object from another.
- Select Objects:
Use the "Select" tool to choose the objects. Designate one as the primary object to subtract from. Access Boolean Difference:
Type "BooleanDifference" or go to "Solid" > "Boolean" > "Difference."
Specify Objects:
Click on the primary object, press Enter, then click on the objects to subtract, and press Enter again.
If working with meshes, use mesh repair tools to fix any issues. Mesh repair functions can close holes, remove degenerate faces, and improve overall mesh integrity.
I could go wild with Rhino, adding stuff or tweaking the mesh to make it seems as if my hand was grabbing intestines from my head-replacing-guts.
Check that the mesh has no openings
An open mesh can cause problems during the slicing process. Slicing software interprets the model layer by layer, and without a closed surface, it may struggle to generate appropriate toolpaths, resulting in incomplete or flawed prints.
To check your model for open meshes, utilize the "Check for Open Edges" or "Check for Holes" tool in your 3D modeling software. These tools will identify any gaps or openings in the mesh, ensuring it is watertight and ready for accurate rendering, simulation, or 3D printing. To repair open meshes in your 3D model, use the "Close Holes" or "Fill Holes" tool, often found in mesh repair or editing functions of your modeling software.

If the design is done, and there are no openings, save and upload the file into another software program called Slicer for Fushion 360, which will digitally cut your design into stackable layers which giant laser cutter machine can laser cut into card board (the chosen material for this week's assignment), like so:
Preparing for Fusion 360 Slicer
- To get ready for 3D printing, I had to prep the model for Slicer. First, I made sure it was in a file format that 3D printers love, like .OBJ.
- Then I took the model from Rhino into Fusion 360.
- Inside Fusion 360, I used their slicer tool to get the model ready for printing. I chose the option stacked slices.
- I did a quick run-through to make sure everything would come out right. If needed, I'd make a few adjustments in terms of settings or orientation.
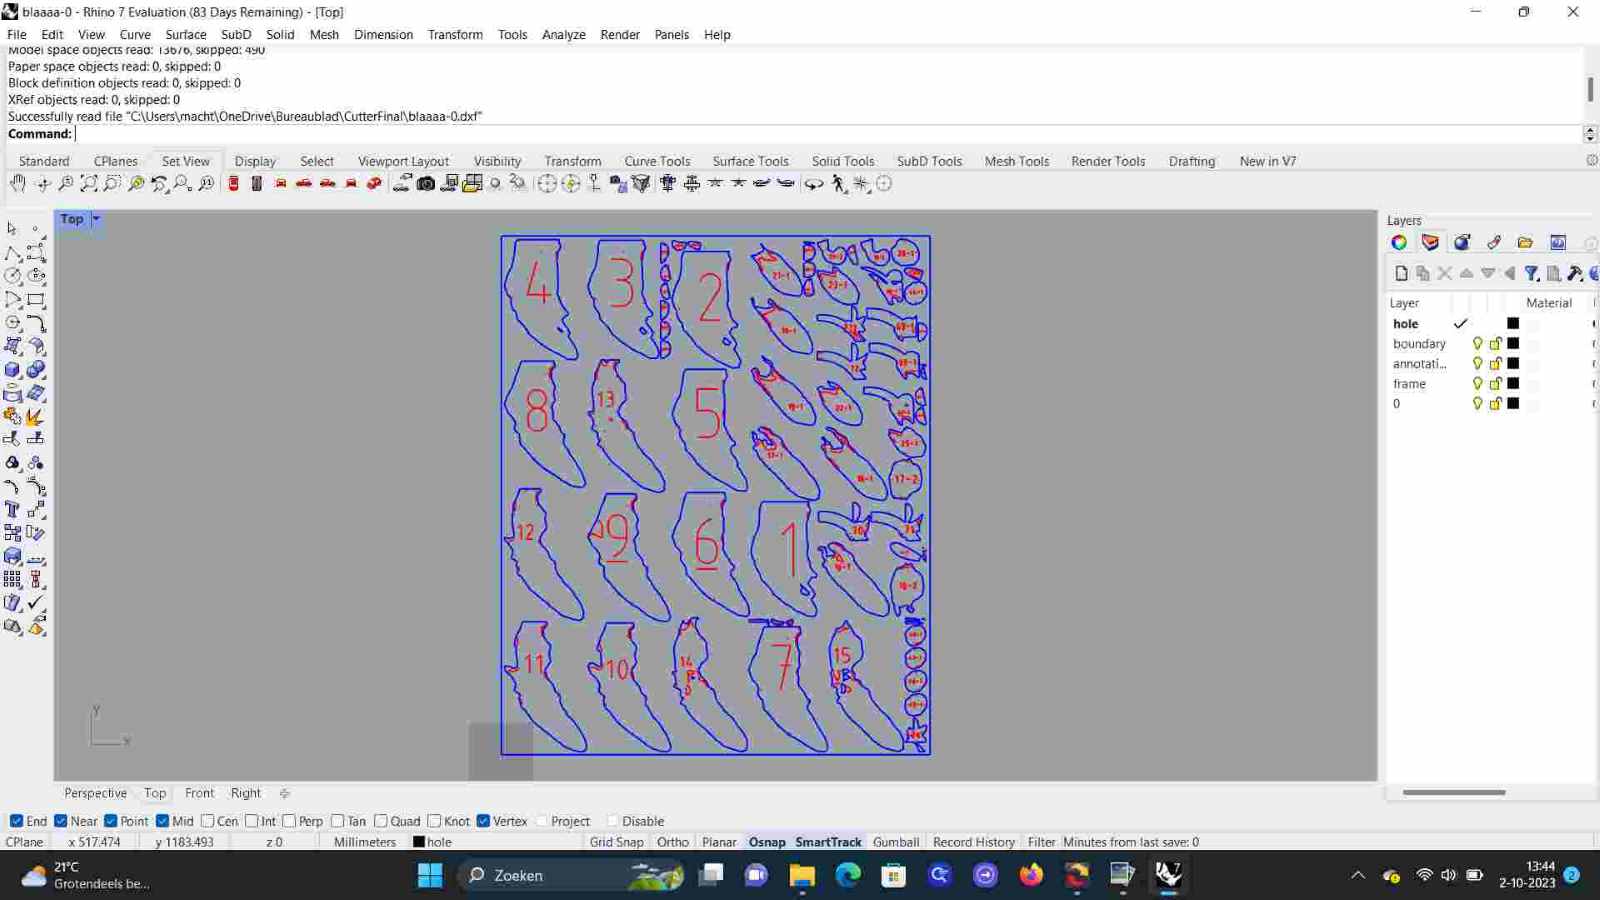
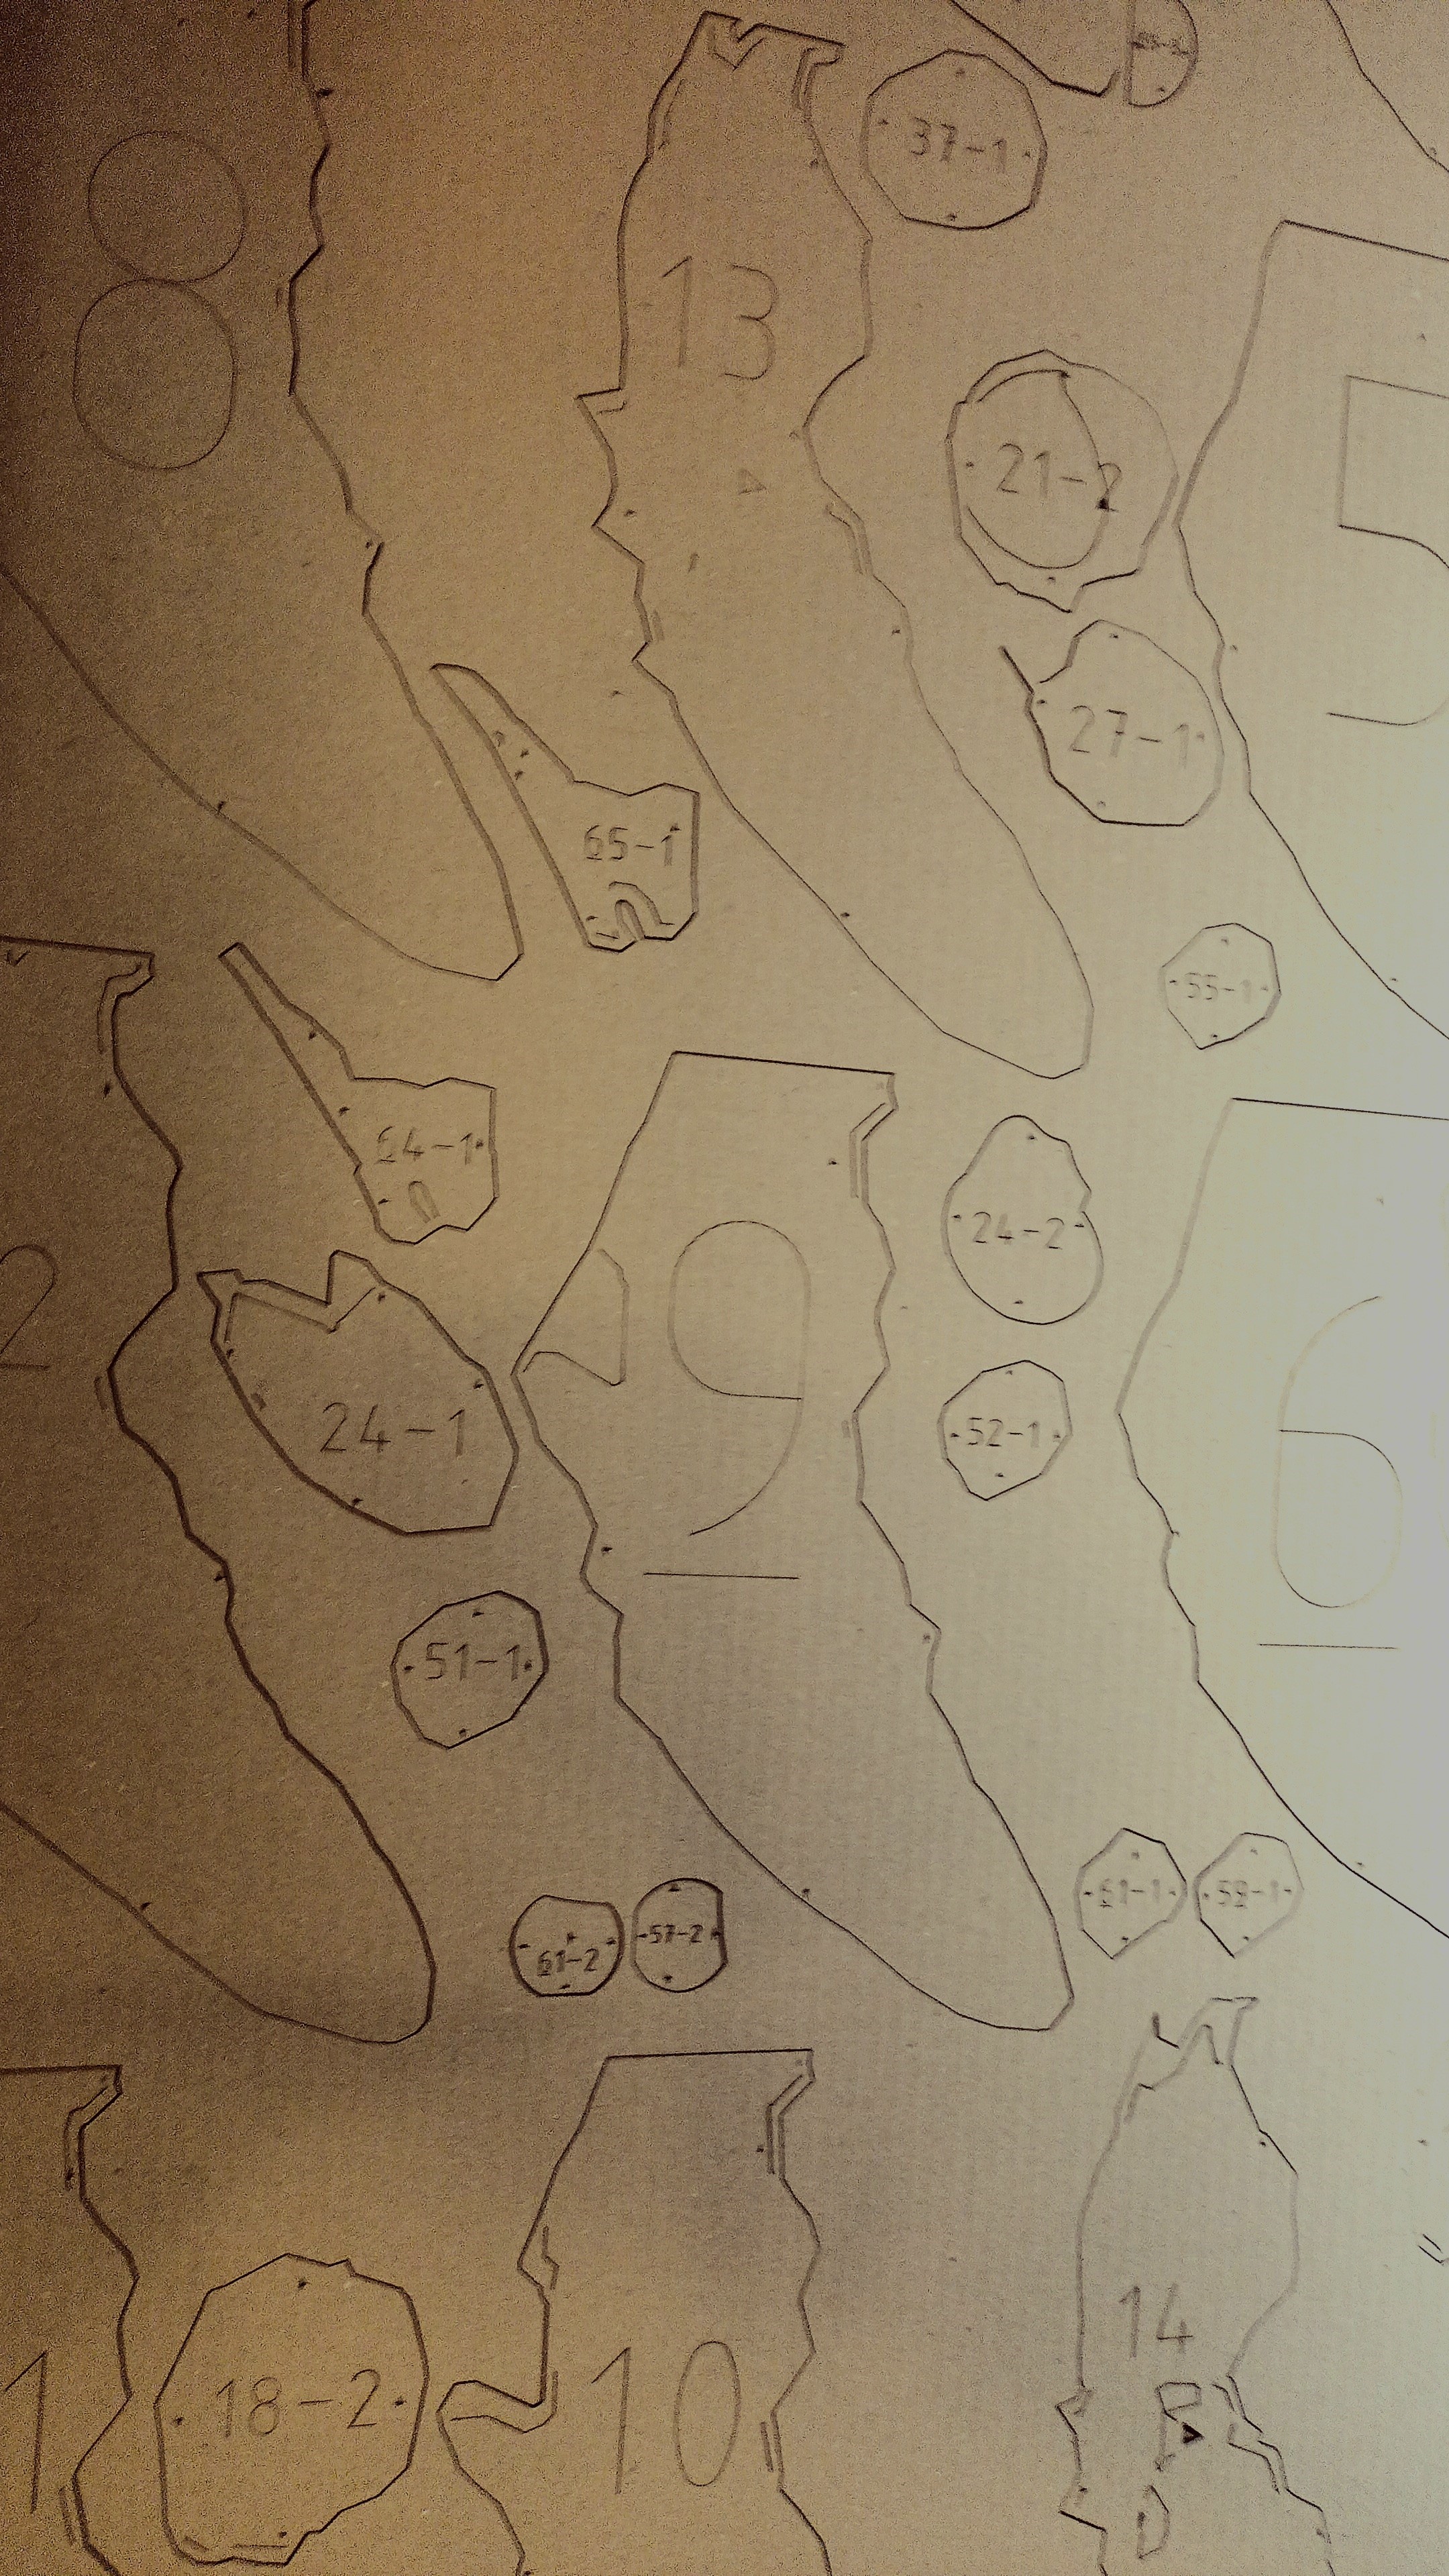
- Once I was happy with the slicing setup, I generated a DXF file and saved it. That file was ready to roll for the laser cutter to bring my creation to life!
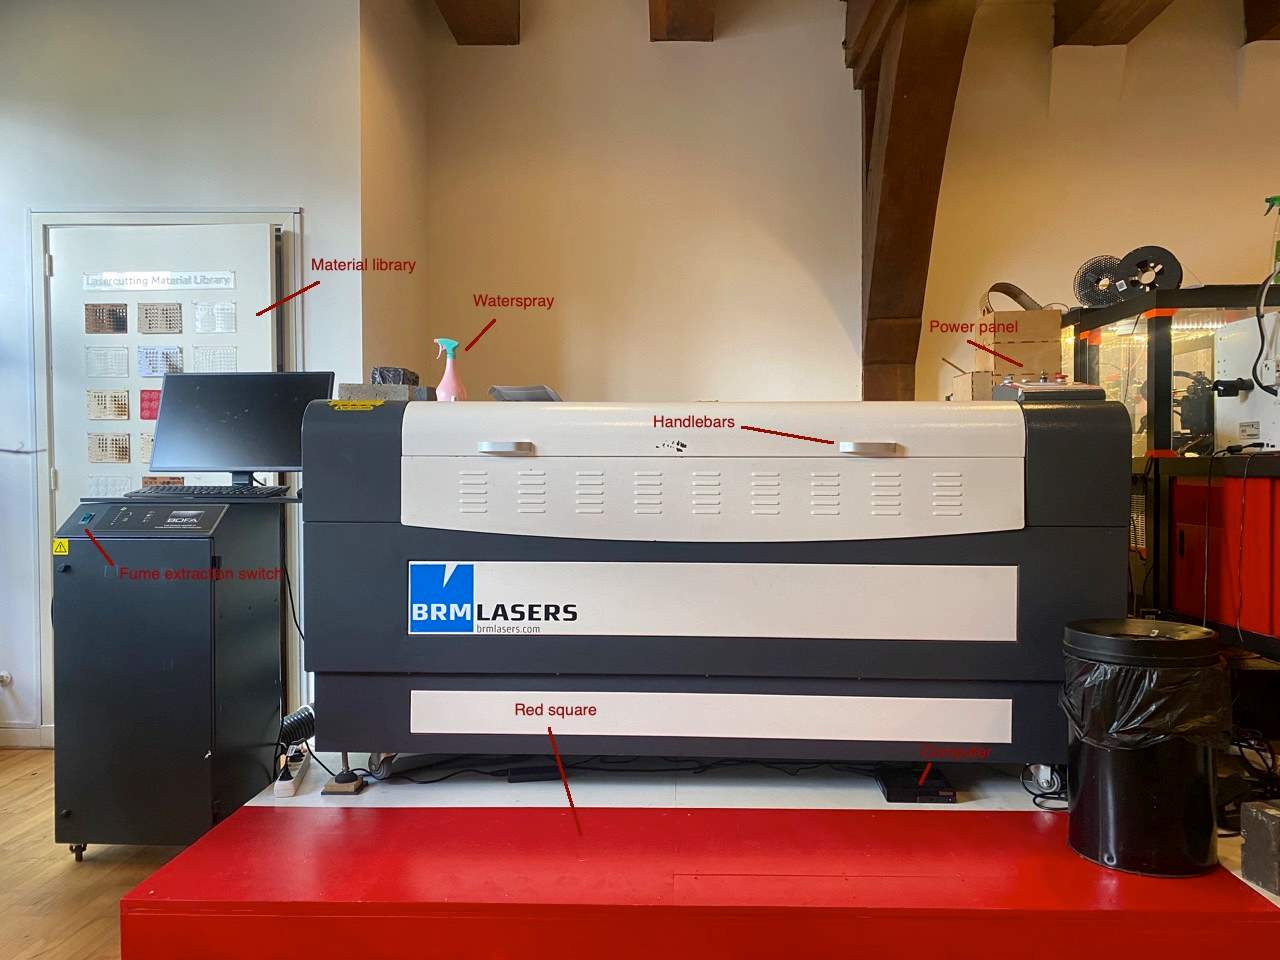
Using Lightburn and the Laser Cutter
- Importing the Design: - Open Lightburn. - Import the STL file created in Rhino into your project.
- Setting Cutting Parameters: - Specify cutting settings such as power, speed, and focus depth based on your material and design.

- Laser Cutter Control: - Ensure the laser cutter is correctly calibrated.
- Preview and Layout: - Use Lightburn's preview feature to visualize the cutting path by clicking ‘Frame’.
- Optimize the layout to minimize material waste by arranging multiple modules on the material sheet.
- Start the Laser Cutting: - Press the 'Start' button to initiate the laser cutting process. - Lightburn will communicate with the laser cutter to execute the design.
- Monitor Progress: - Monitor the cutting progress and ensure that the laser cutter follows the desired path.
Do not leave the laser cutter unattended in case something goes wrong. See for more (safety) instructions by Fablab Waag
Result
After glueing 168 pieces together for three hours - which was great, looks like this:
And after painting, looks like this:
Software and Tools
- Kinect with Scanect software
- Sense with 3D Systems Sense software
3D modeling and cut file preparation
- Slicer for Fusion 360
Laser cutting
- BRM 1612 laser cutter with Lightburn software