BioChromes
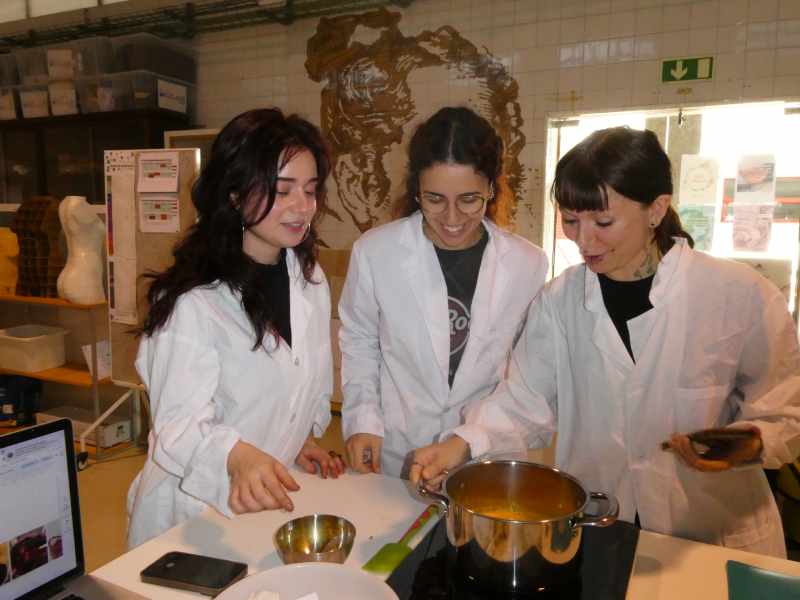 Team photo at BioLab Lisboa 2026, by Asli D
Tools
Protocols
Important Vocab
Dye: liquid bath, soluble (in water), into the material Pigment: insoluble colour particle, powder form, onto the material Ink: dense liquid, soluble / dispersed, into/onto the material Tanin: a plant-based, bitter, and astringent organic compound used in natural dyeing as a primer or natural mordant to help dye molecules bind to plant-based (cellulose) fibers like cotton, linen, and hemp Mordant: a chemical substance used to help bind natural dyes to textile fibers
References, Research & Inspiration
I have never worked with colour specifically, so I had little reference for dyeing or dye processes, so instead I researched deeper into the environmental impact of fabric dyeing. I quickly learnt that “the apparel industry uses an estimated five trillion litres of water each year to simply dye fabric”1, and reflected that out of all the techniques we learnt in the BioChromes week, bacterial dying was the most water-efficient, as even dying with natural resources and fibres included heavy water usage. In Bacterial Dye Revolutionizing the Textile Fashion Industry, Aiman Nisar highlights the potential water savings, stating that “the bacterial dye method requires 500 times less water”3 than conventional dyeing, although this figure relates to a particular approach and should not be assumed to apply to all industrial processes. Even so the need for alternatives is clear: Nisar reports that up to 200,000 tonnes of textile dyes are lost in wastewater each year, contributing to water pollution and harming aquatic ecosystems. “The World Bank has identified 72 toxic chemicals in our waterways, coming from textile effluents alone.”3
Alongside the clear environmental advantages, I was also inspired by the organic textures created by bacterial dyes. I enjoy more sporadic, bio-forms than solid shades. Examples can be found in the work of Natsai Audrey Chieza.
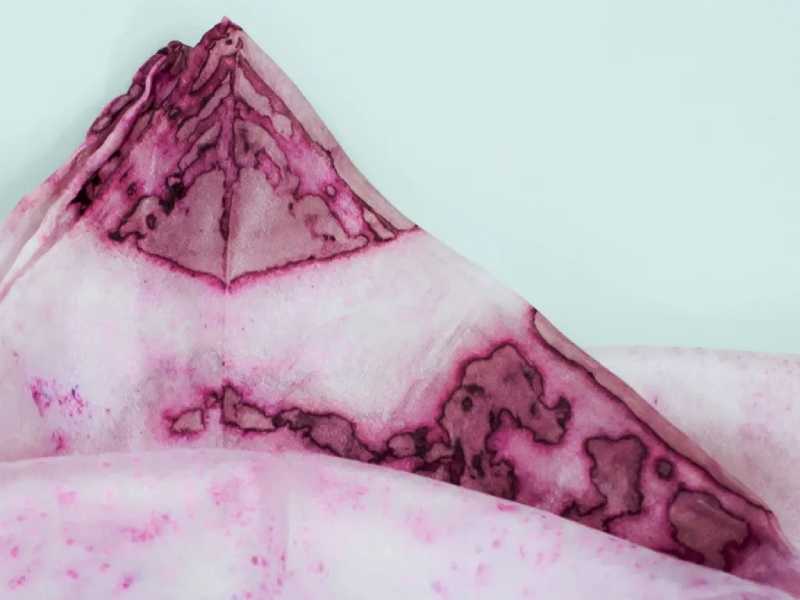
Natsai Audrey, Faber Futures: Fold.
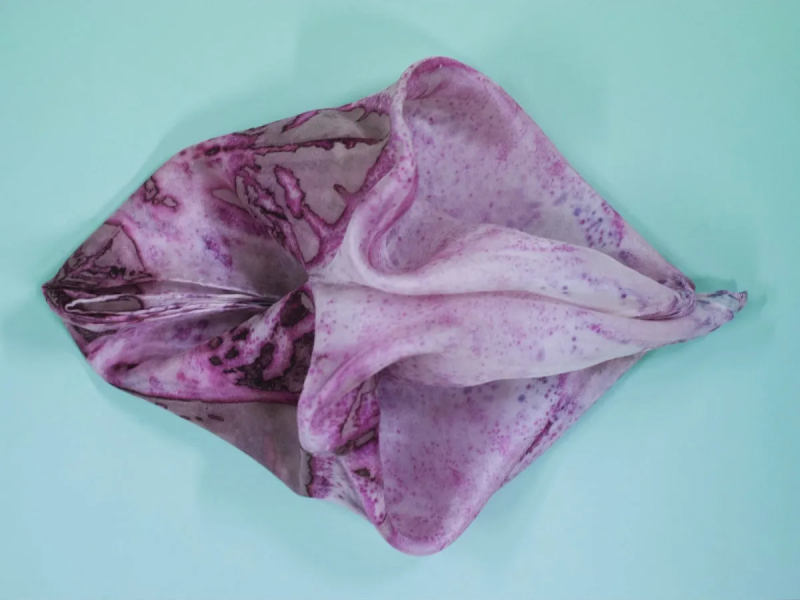
Silk scarves dyed with Streptomyces coelicolor, 2014
Process and Workflow
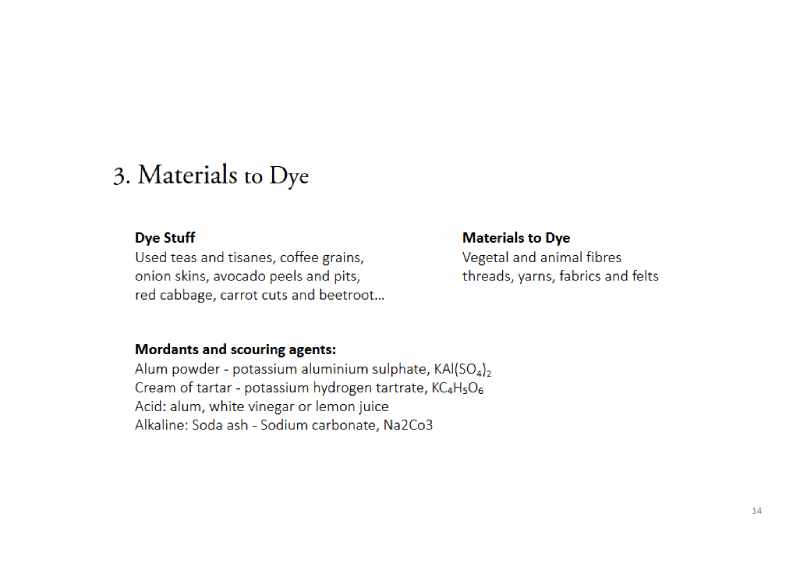 Slide from BioChromes with Food Waste, Carolina Delago, 2026
This week we learnt the processes of dying using three different natural materials and a mixture of both animal and vegetable fibres. We used:
Vegetable Fibres: linen thread, cotton yarn, recycled cotton thread, non-organic cotton thread, organic cotton thread, hemp thread, 100% cotton fabric, 100% raw cotton fabric, 100% linen fabric, hemp thread.
Protein Fibres: 100% pure silk fabric, Natural wool thread, 100% wool thread, 100% virgin wool thread.
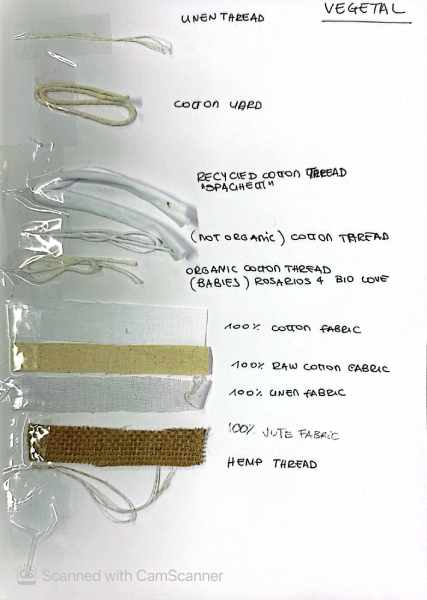
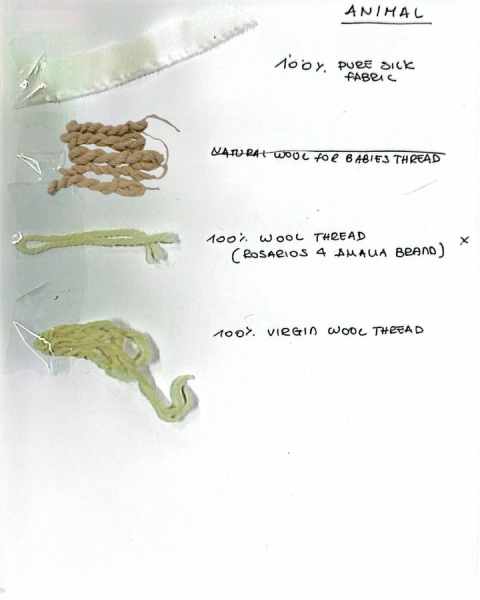 Carlotta Premazzi, Biolab Lisboa, 2026
STEP 1: FIBRE PREPARATION
We began by preparing the fibres for the dying process. We must first turn our fibres into ‘skeins’ to stop them mixing in the scouring/dying process. Here is a video of the creation process and finished product:
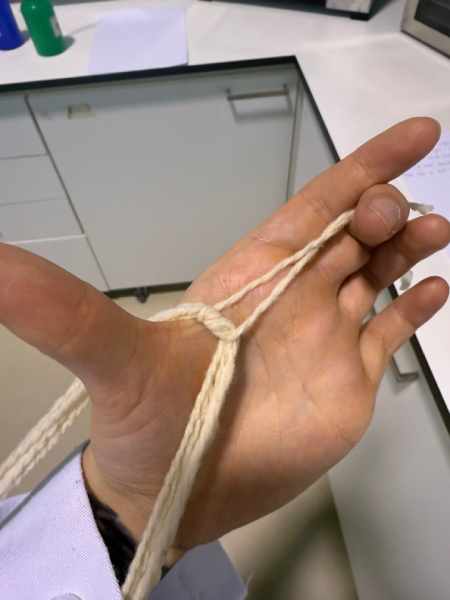
Skein technique
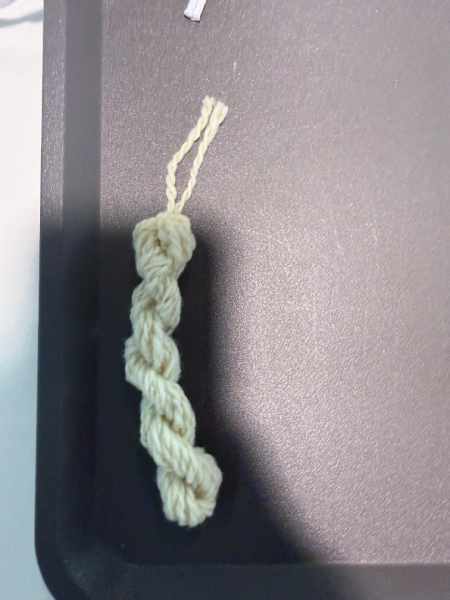
Completed wool skein
Skeins technique demonstrated by Carolina Delgado, BioLab Lisboa, 2026
Fibre volume correlates to weight, and you must make ⅗/8 loops of fibre depending on weight to have roughly equal fibre volumes.
TOTAL WEIGHTS:
Vegetable fibres: 287.9gr
Protein fibres: WoF 96.57gr
We used this to calculate the amount of mordant needed for our experiments. We did not use tannins this week. Process by Carolina documented below. We used alum at 10% and creme tartar at 5%.
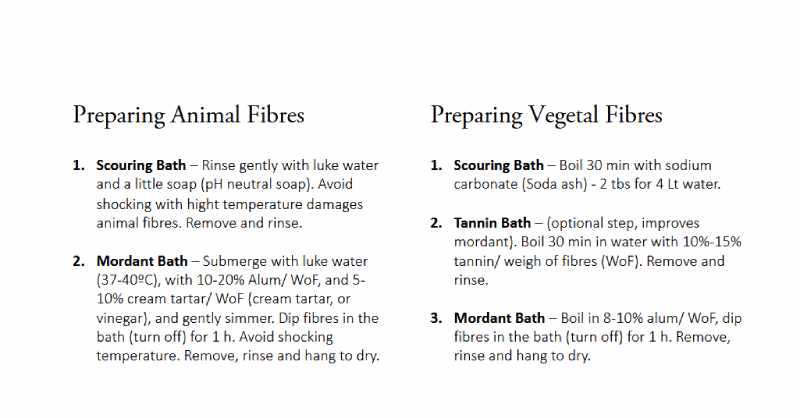 Slide from BioChromes with Food Waste, Carolina Delago, 2026
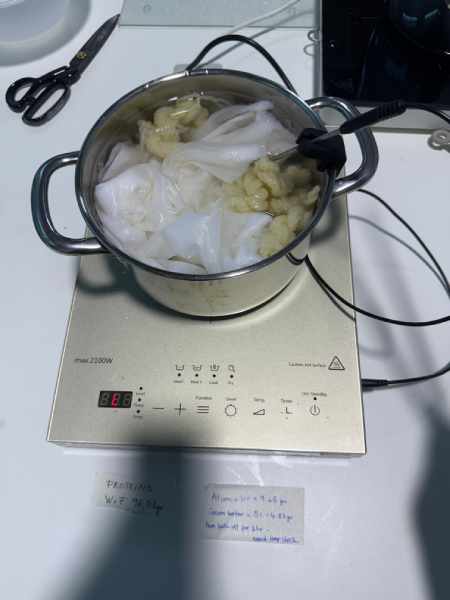
Preparing the fibres
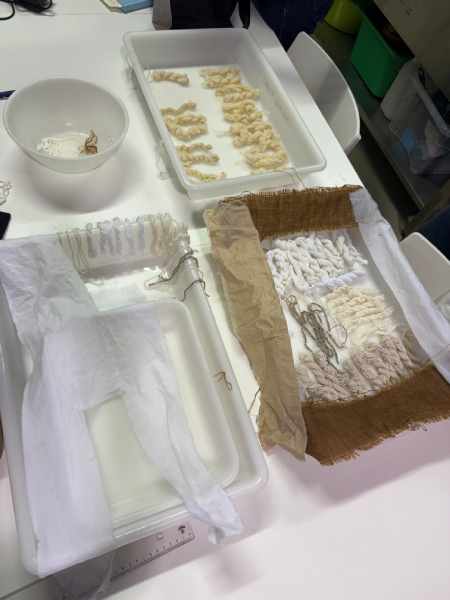
Leaving fibres to dry overnight
STEP 2: PREPARING DYE MATERIALS
We left the fibres overnight and in the morning we begun the dye process. We chose turmeric, hibiscus and red cabbage for a varied source material and varied result / process.
Weights of material used:
Cabbage: 480g Turmeric: 50g Hibiscus: 45.5g
Processes followed were:
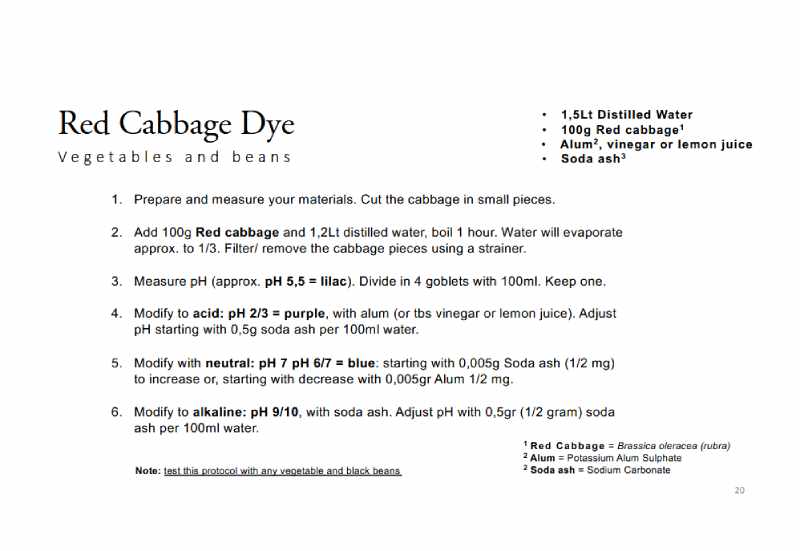
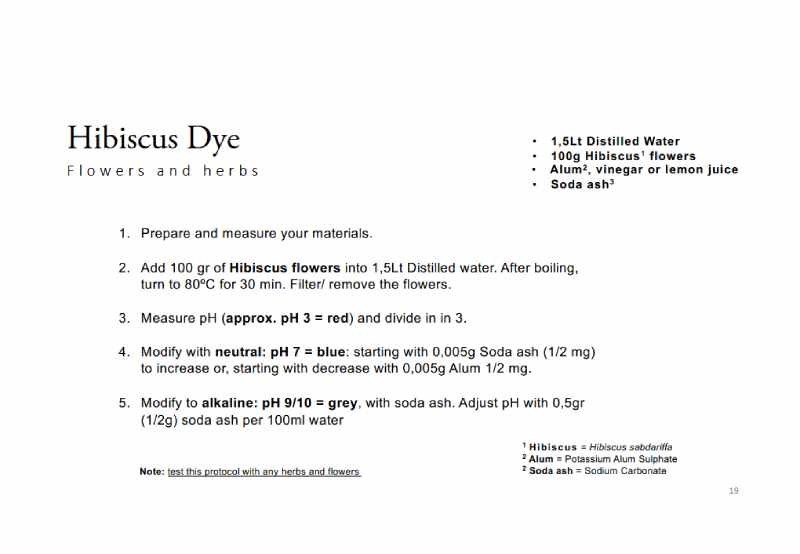
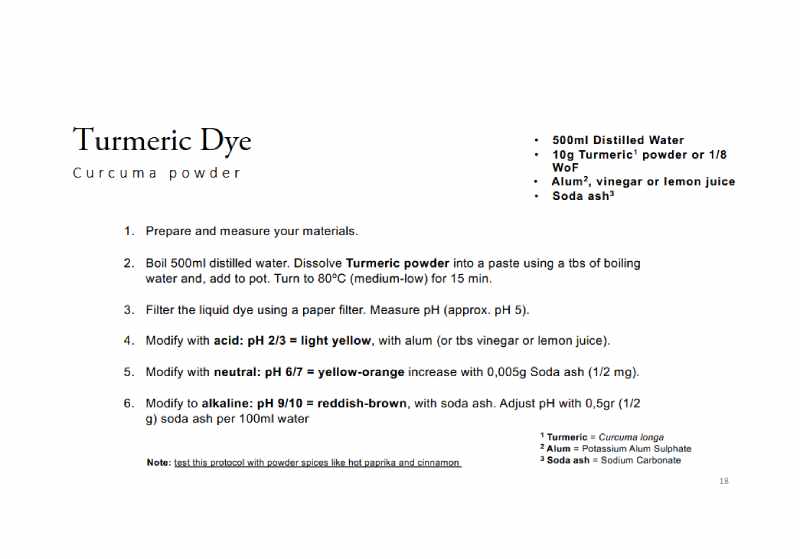 Slides from BioChromes with Food Waste, Carolina Delago, 2026
This let us with:
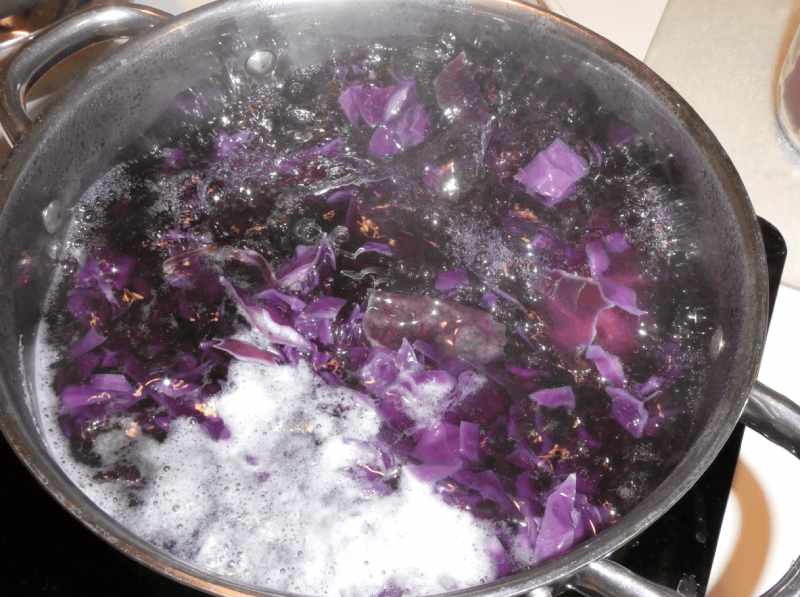
Preparing the Red Cabbage
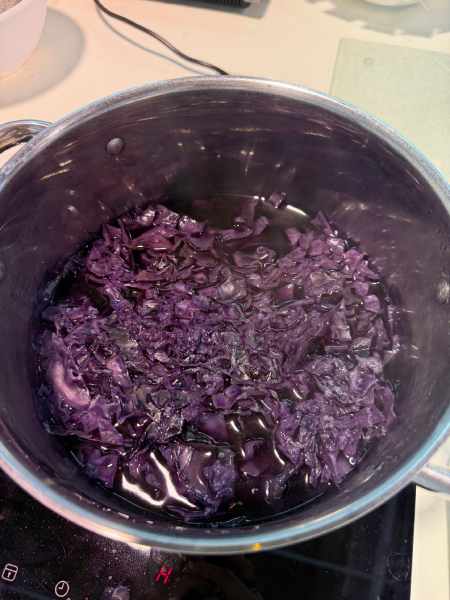
After boiling process, unfiltered
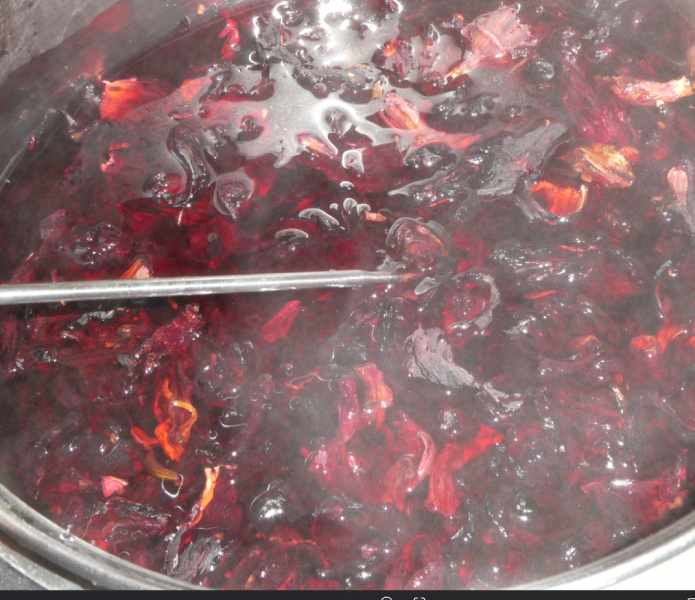
Preparing the hibiscus
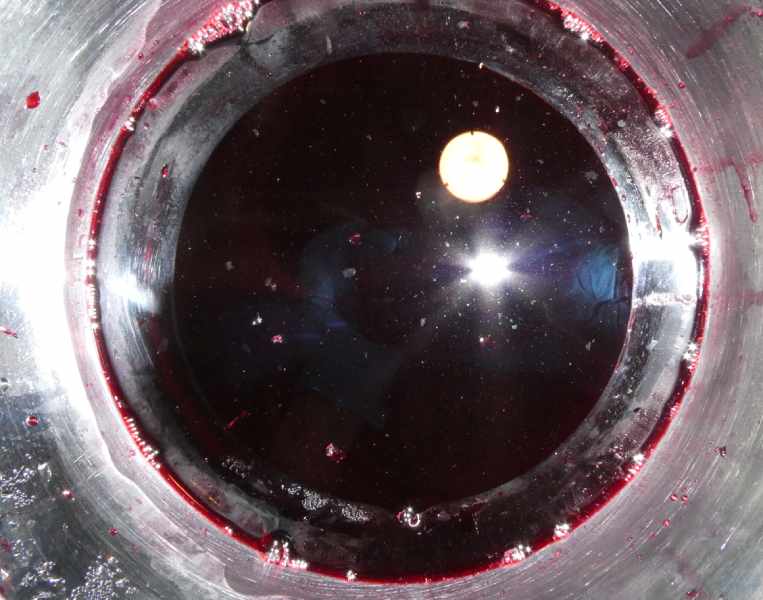
After boiling process, unfiltered
Photos by Asli D, BioLab Lisboa, 2026
STEP 3: FILTRATION
We began filtering the dyes by straining and removing the material.
Video of material straining, Biolab Lisboa 2026
After this, we filtered slowly through a coffee filter. The process for Tumeric was a little different as there was a lot of sediment left in this dye. Creating a paste helped the powder dissolve well, but there was still build up, and we needed to filter slowly / use multiple coffee filters for this process because of the weight. We were also informed that the material of the coffee filter can effect the dyes as it may contain chemicals. We used a strainer for extra support, but in hindsight the strainer would have been more useful beneath the coffee filter.
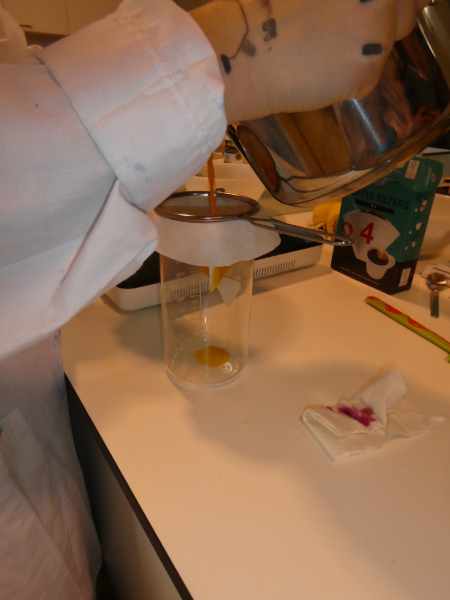 Photo by Asli D, BioLab Lisboa, 2026
After the dyes were successfully filtered, we added a selection of fibres to samples of each, letting them soak for roughly 24 hours.
STEP 4: MODIFICATIONS
We measure the PH of the dyes to help us identify different colourways and correlations, as well as monitor the changes in our experimental process.
Here are the initial PHs of our filtered, natural dyes:
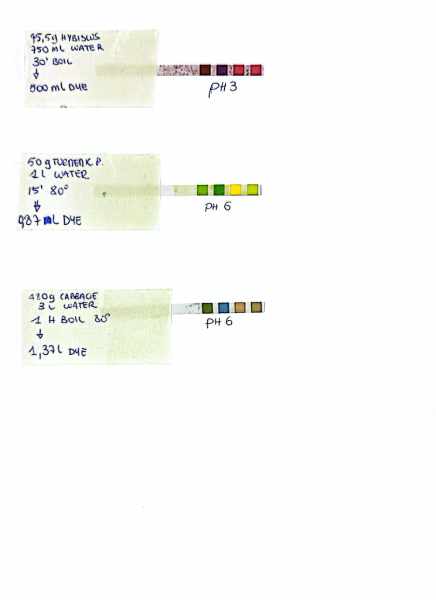 Scan of natural dye PH's from experiment at BioLab Lisboa, 2026
We made some modifications to our red cabbage dye using acid and alkaline to see its effects on our colours. We sectioned off 4 x 50ml into a petri dish and used citric acid, alum and soda ash to modify. Results are documented below:
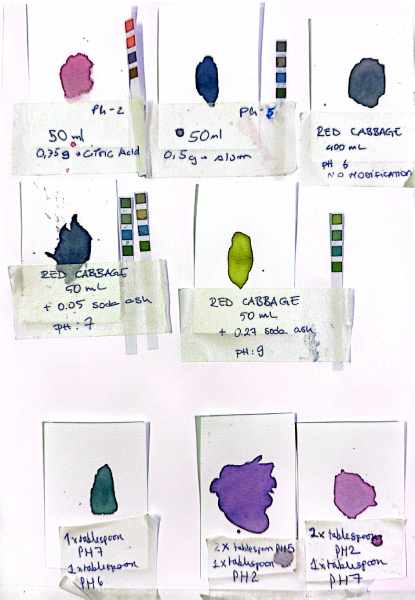 Scan of modified Red Cabbage dyes from experiment at BioLab Lisboa, 2026
As mentioned above, we also made some self experiments mixing numerous dyes together. Although not as chemically accurate, they created interesting shades, samples of which can be found below:
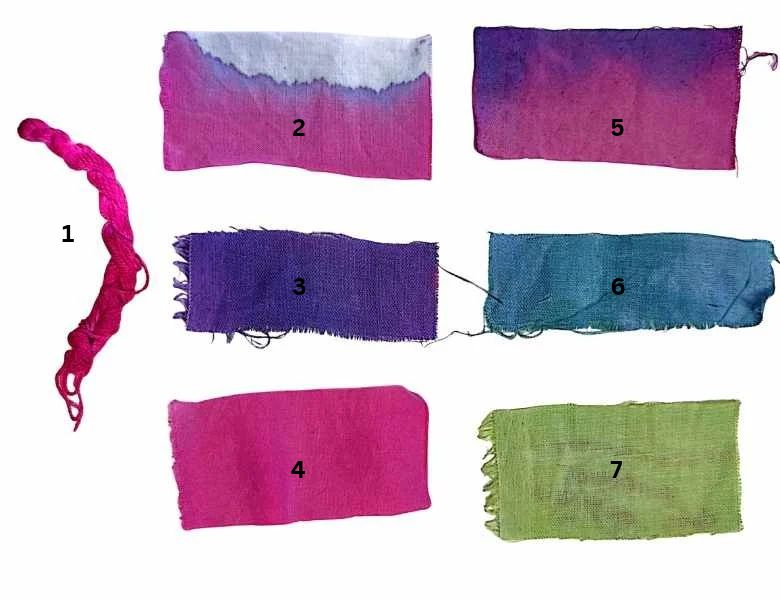
| Modifiers | PH | Fibres | Notes on Dyeing |
|---|---|---|---|
| SAMPLE 1 0.75g of Citric Acid | PH2 | 100% Virgin Wool Yarn | I used a 'dip dye' technique with only half the fibre in the dye to create a gradient. |
| SAMPLE 2 | experimental shade: 2 x PH2 tablespoon 1xPH7 tablespoon | 100% cotton fabric | dip dye absorbtion technique |
| SAMPLE 3 | experimental shade: 2 x tablespoon PH5 1xtablespoon PH2 | 100% linen fabric | |
| SAMPLE 4 0.75g of Citric Acid | 100% linen fabric | ||
| SAMPLE 5 | 2 x experimental shades: 2 x PH2 tablespoon 1xPH7 tablespoon / 2 x PH5 tablespoon 1 x PH2 tablespoon | 100% pure cotton fabric | one side was submerged, dried a little, then flipped and submerged in the second dye |
| SAMPLE 6 | experimental shade: 1 x tablespoon PH7, 1 x tablespoon PH6 | 100% pure linen fabric | |
| SAMPLE 7 0.27 soda ash | PH 9 | 100% pure linen fabric |
I also used some experimental techniques to create this examples, leaving the wool skein half in the sample and half out, to allow a gradient of absorbtion. I also used a similar absorbtion technique for the top left sample, and created the affect on the top right by dipping one side, drying and then submerging the rest in another dye. All these experimental samples were merely dipped, but Carlotta let some fibres soak for around 18-20hrs in different modified dyes. Examples of which can be found below:
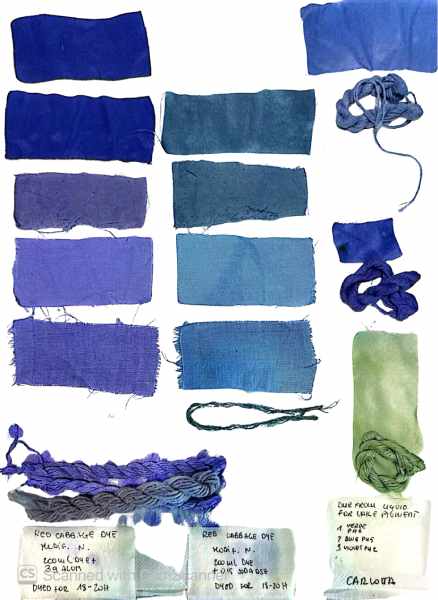 Modified samples by Carlotta Premazzi, BioLab Lisboa, 2026
...
5. Creating a Lake Pigment
We created three lake pigments, one from the unmodified cabbage dye (PH6) and twp from the modified (PH2/PH5) dye.
PROCESS: BioChromes Recipes: Hybrida Studio, Research by Carlotta Premazzi, 2026
Dissolve: Mix the alum into half a cup of hot water until dissolved. Do the same with the soda ash in a separate cup. Alum to Soda Ash Ratio: 2:1. 1% w/v means 1 gram of powder in 100 ml of liquid.
Mix: Pour the dissolved alum into your dye bath and stir well.
Precipitate: Slowly pour the dissolved soda ash into the dye bath. It will fizz up.
Filter: Let the mixture sit for a few hours until the powder settles at the bottom. Pour off the clear water from the top, then dump the remaining colorful sludge into a coffee filter.
Dry & Grind: Leave the paste to dry completely. Once it forms a hard crust, grind it into a fine powder (always wear a face mask!)
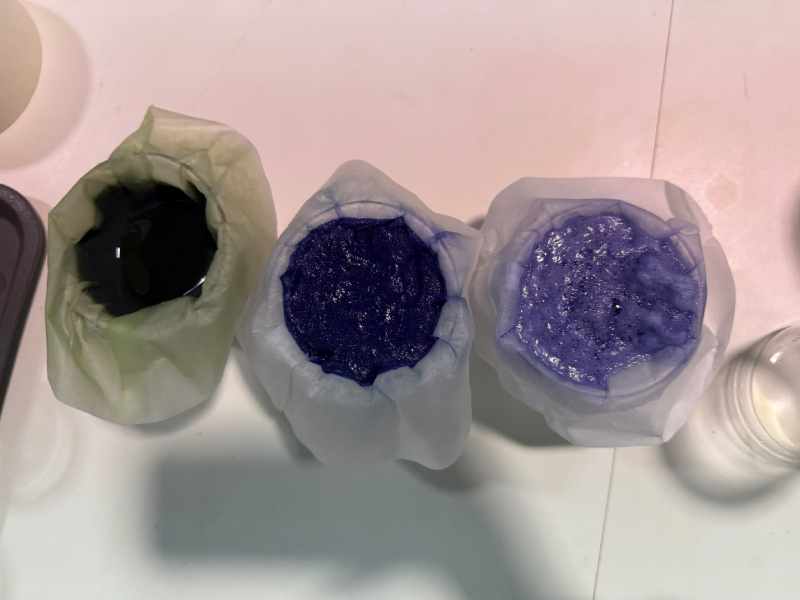 PH6 / PH5 / PH2: Lake Pigment in the filtering process
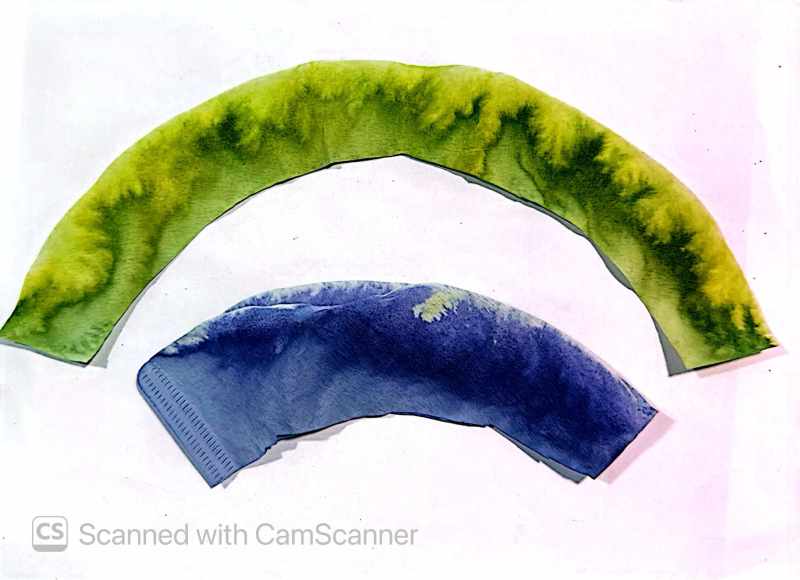
Colour from Lake Pigment on the filters documented by Carlotta Premazzi, BioLab Lisboa, 2026
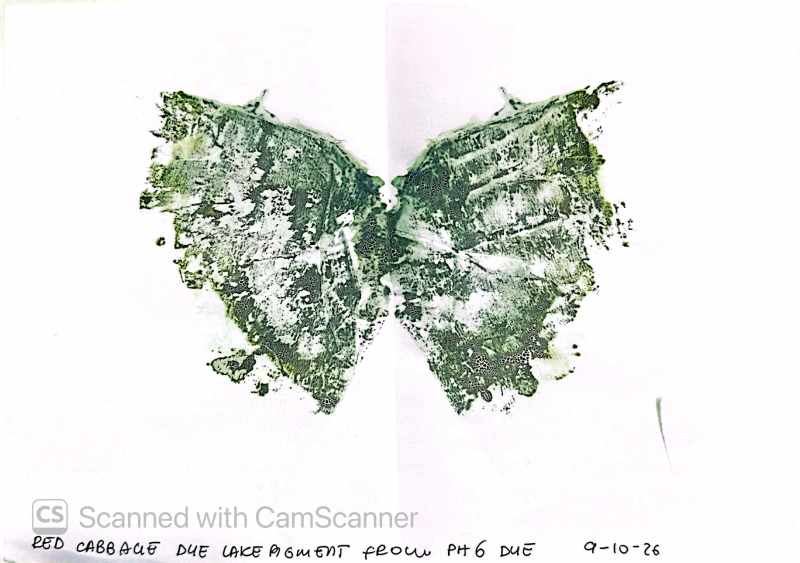
Lake Pigment documented by Carlotta Premazzi, Biolab Lisboa, 2026
Our PH2 pigment remained pretty much liquid overnight, probably because it was hard to make the quantities exact at such small amounts. If necessary, pigment can be placed into I observed that the modified dye kept its original colour, whereas the unmodified was completely transformed.
6. RESULTS:
How to rinse
When removing fibres, you must wash them gently with lukewarm/cold water to remove any excess dye. Make sure the water does not hit the fibres directly as this can cause patchiness, but rinse in a bowl with gentle squeezing once or twice before drying.
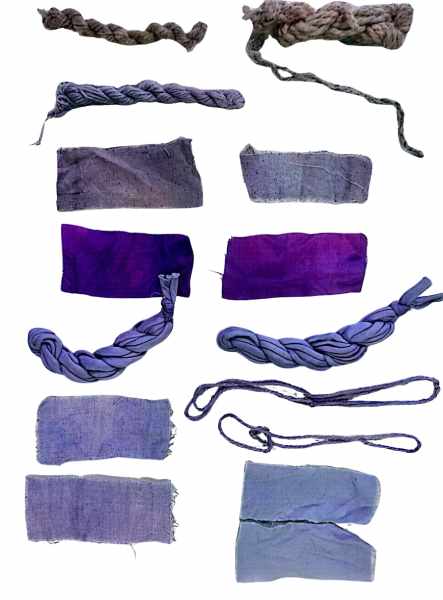
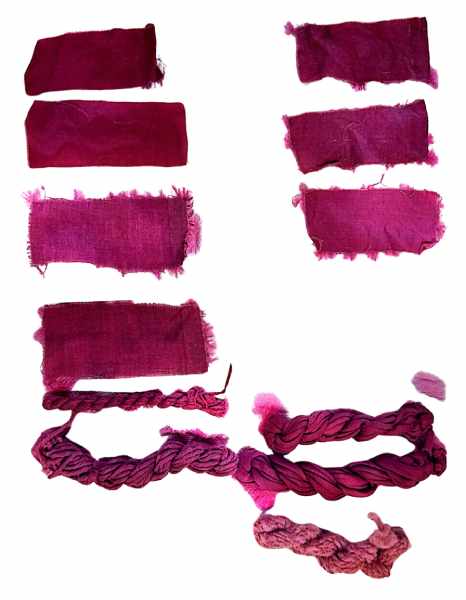
| Dye Source | PH | Pictured Fibres | Notes on Dyeing |
|---|---|---|---|
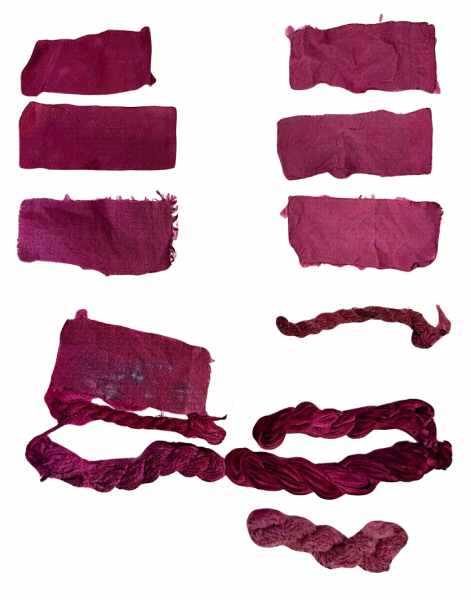
| Red Cabbage | PH6 | hemp thread, 100% raw linen fabric, 100% raw cotton fabric, 100% cotton fabric, non-organic cotton thread, recycled cotton 'spaghetti' thread, 100% pure silk fabric, 100% virgin wool yarn, natural wool yarn | 24 hour dye bath |
| Hibiscus | PH3 | 100% raw linen fabric, 100% raw cotton fabric, 100% cotton fabric, recycled cotton 'spaghetti' thread, 100% pure silk fabric, 100% virgin wool yarn, natural wool yarn | 24 hour dye bath |
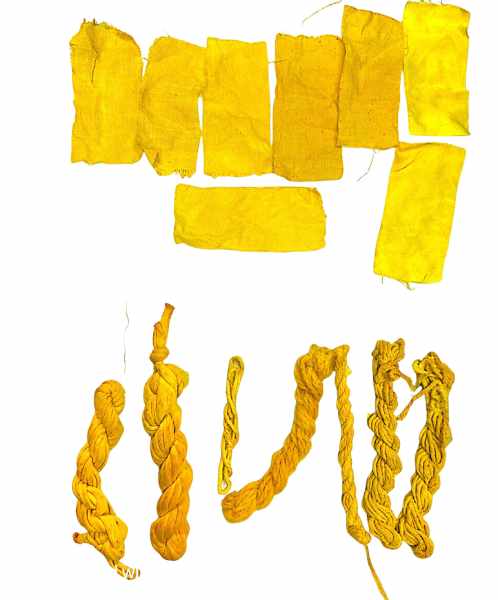
| Turmeric | PH6 | 100% raw linen fabric, 100% raw cotton fabric, 100% cotton fabric, recycled cotton 'spaghetti' thread, 100% pure silk fabric, 100% virgin wool yarn, natural wool yarn, 100% wool yarn, organic cotton thread | 24 hour dye bath |
UNMODIFIED DYE SWATCHES: FRESH
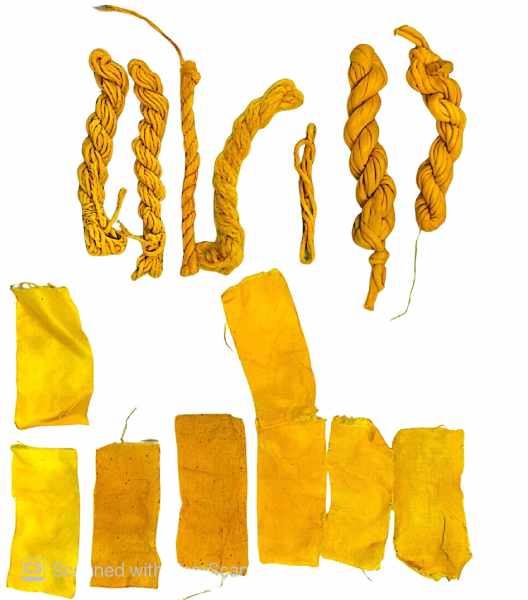
UNMODIFIED DYE SWATCHES: 3HRS DRY
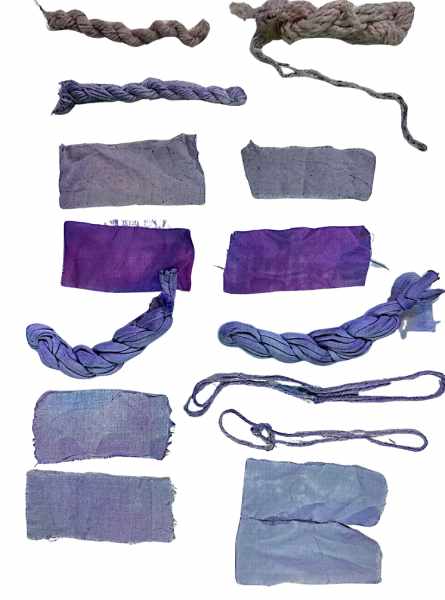
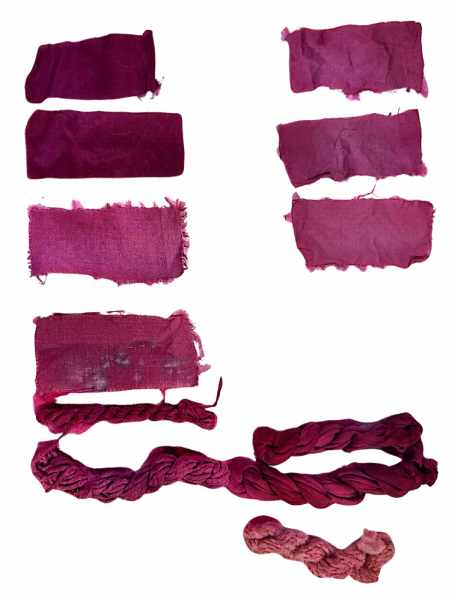
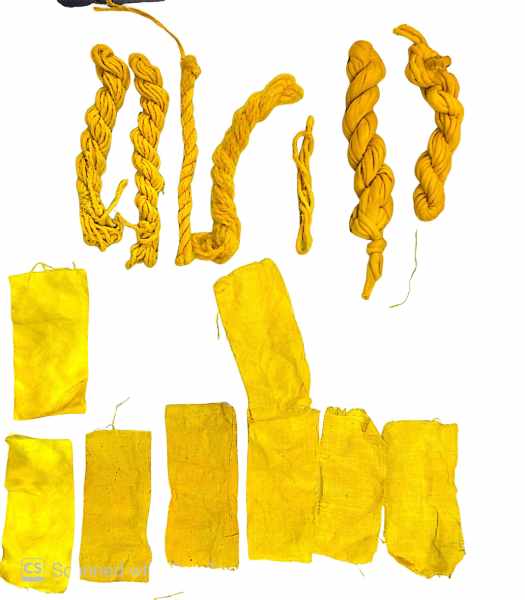
UNMODIFIED DYE SWATCHES: 3 DAYS LATER
7. Bacterial Dyes
Bacteria is a living medium, so we must always:
- Tie back hair.
- Wear a lab coat or similar protection.
- Wear gloves and don’t touch the bacteria with bare hands.
- Don’t touch faces while working with the bacteria.
- Wash hands thoroughly afterwards.
- Destroy petri dishes without opening if something unexpected begins to grow.
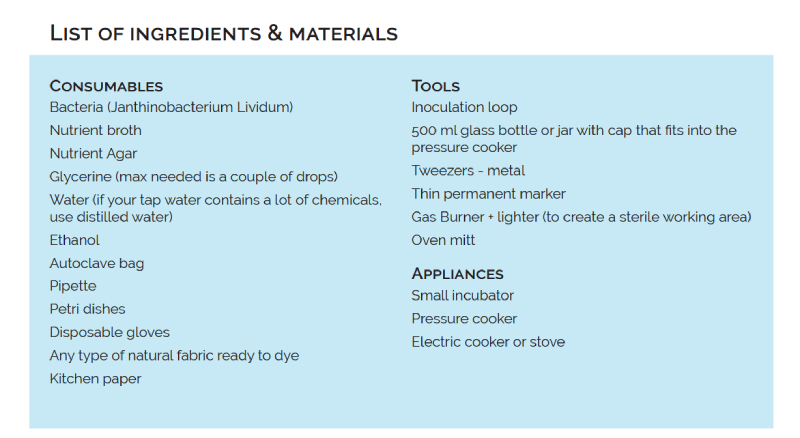
List of materials taken from TCBL BioShades workshop, Could bacteria dyeing be a valid alternative to chemical dyes?, By TextileLab Amsterdam - Waag Society, 15 March 2018
Protocol taken from TCBL BioShades workshop, Could bacteria dyeing be a valid alternative to chemical dyes?, By TextileLab Amsterdam - Waag Society, 15 March 2018
Preparing the Fabric
- Step 1: Start by preparing the fabric. Using an iron, fold the fabric according to the desired pattern. If you want to create free-form patterns, use small rubber bands instead (similar to the Japanese shibori dyeing technique)
- Step 2: Try to fold the textile piece so that it fits easily in the petri dish and try to minimise its volume as much as possible. You can stitch if necessary. - Step 3: Place the fabric in a petri dish to sterilise it using the autoclave.
Preparing the Medium
- Step 1: Collect all the ingredients you need to prepare the cultivation medium for your bacteria. You will need (distilled) water, a glass bottle and a spoon. - Step 2: Measure the amount of your medium (exact quantities will be best specified by the manufacturer of your bacteria.) using a scale. Precision of 0,1 gr is desirable. - Step 3: Place the medium in a glass bottle and add the appropriate amount of water for the solution. Make sure that the amount that you prepare is up to half of the volume of your glass container, so that the medium does not boil over while being sterilised. (e.g. for 250ml of medium use a 500 ml bottle and not smaller). Add 1-2% glycerine at this stage if you’re working with Janthinobacterium Lividum. - Step 4: Mix by shaking bottle, then loosen cap to allow air to escape whilst autoclaving.
Adding Bacteria
- Step 1: After steralisation and cooling, clean workspace with 70% alcohol. Gather together a gas burner, a lighter, the bacteria, an inoculation loop, the fabric and the medium. - Step 2: Fire up the gas burner and let the flame burn while you work. In this way, you’ll create a sterile environment around your workspace, so that you keep everything as clean as possible. - Step 3: Pass the edge of the bottle quickly back and forth through the flame and pour the medium into the petri dish, opening it as little as possible, towards the side of the glass burner. - Step 4: Wet the folded fabric piece in the petri dish by gently dropping the medium on to it. Repeat the last two steps until your fabric is completely soaked in the medium. - Step 5: Place the inoculation loop tip into the flame and burn it until it becomes red. Dip the loop gently onto an unoccupied area of the plate to cool it down. You’ll hear the sound of the loop cooling off if you have burnt it long enough. Then touch the culture to inoculate in a new petri dish. - Step 6: Open the lid of the petri dish with the fabric as little as possible and quickly drag the loop in a zigzag over a section of the fabric soaked in the cultivation medium. Drag it with a single stroke over the surface of the fabric. - Step 7: Repeat these two steps 3 to 4 times, rotating your petri dish every time so that you inoculate almost the entire surface of the fabric. Remember to keep it disinfected by burning the loop every time you use it. - Step 8: Write all the information on the petri dish (medium, bacteria name, date and person) and incubate your textile piece at the optimum temperature and in a stable environment.
"Reciepe for our Nutrient Broth:"
Beef extract: 1g / Yeast Extract: 2g / Peptone: 5g / NaCl: 5g / Agar Powder: 15g / Distilled water: 1L
"Quantities Used, BioLab Lisboa, 2026:"
250ml distilled water / 6,75 gr of nutrient broth (dosage is 25gr / liter) / 1 ml of glycerine with a pipette
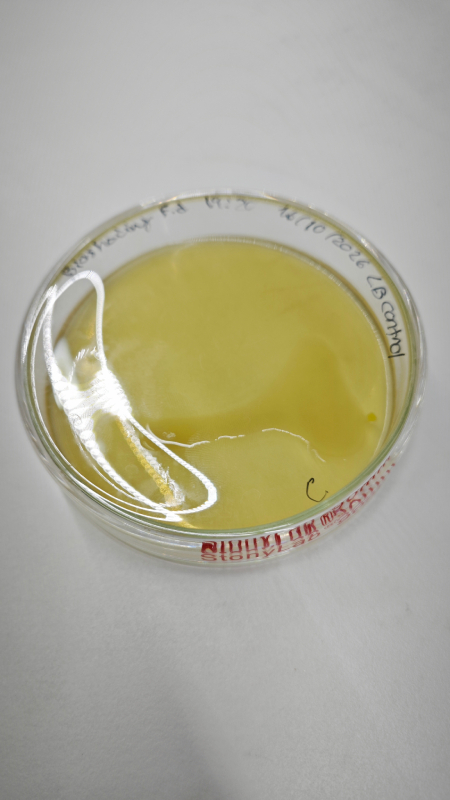
Bacterial Medium (nutrient broth, nutrient agar, glycerine) documented by Carlotta Premazzi, BioLab Lisboa, 2026
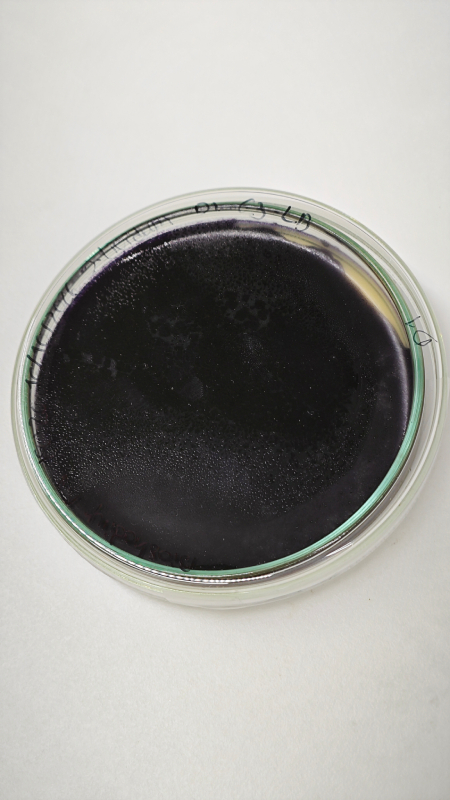
Janthinobacterium Lividum growth in medium after 4 days, documented by Carlotta Premazzi, Biolab Lisboa, 2026
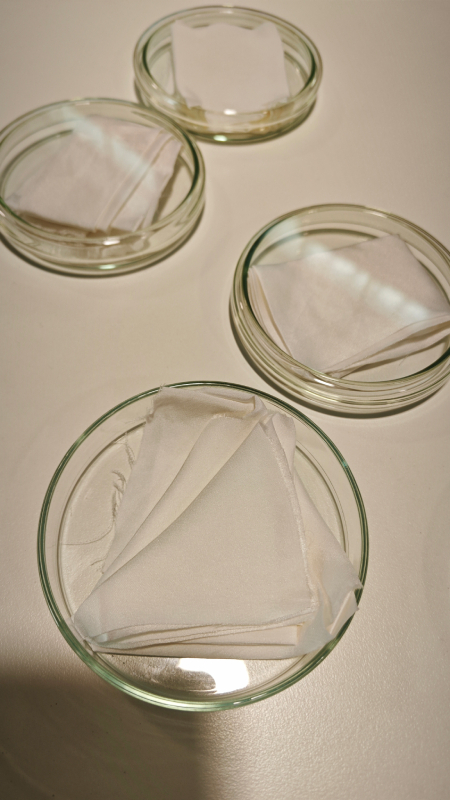
Fabrics folded in Petri dish, documented by Carlotta Premazzi, BioLab Lisboa, 2026
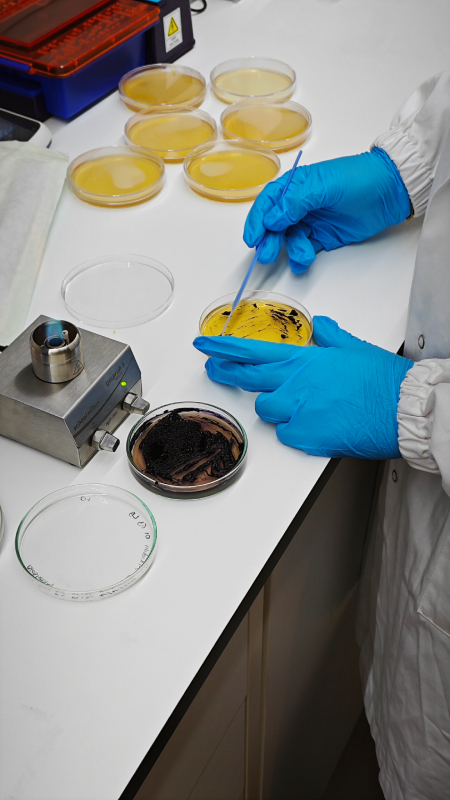
Extraction of bacteria onto fabric, documented by Carlotta Premazzi, Biolab Lisboa, 2026
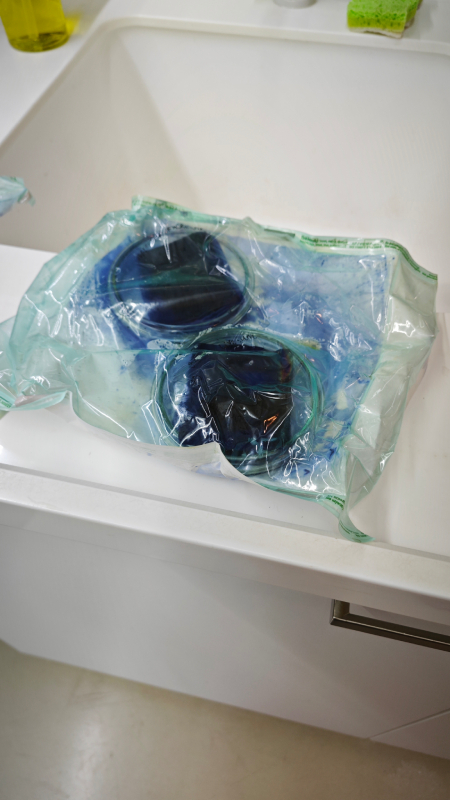
Steralising fabrics after culture development (4 days with daily observation), documented by Carlotta Premazzi, BioLab Lisboa, 2026
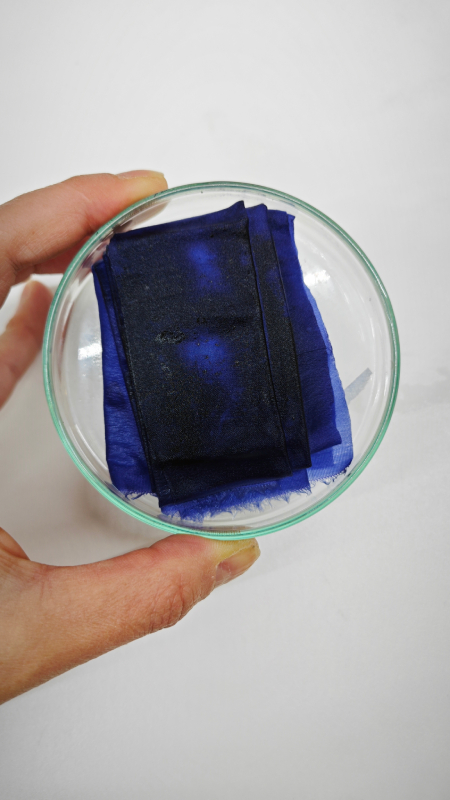
Steralised fabric, before washing, documented by Carlotta Premazzi, Biolab Lisboa, 2026
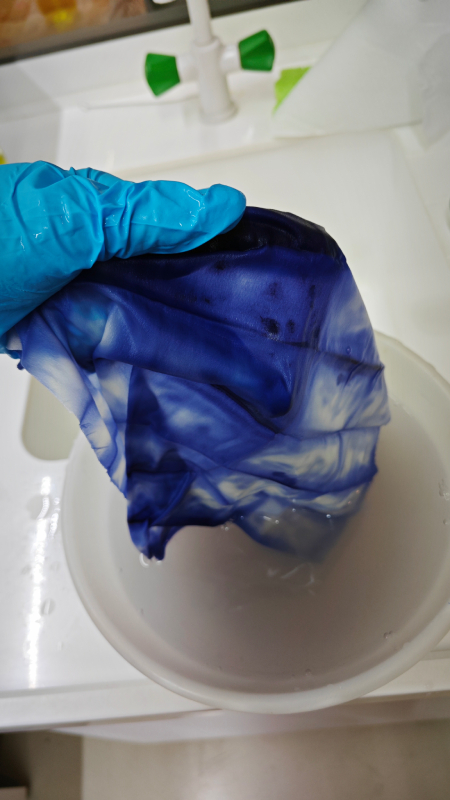
Washing bacterial dyed fabric, documented by Carlotta Premazzi, BioLab Lisboa, 2026
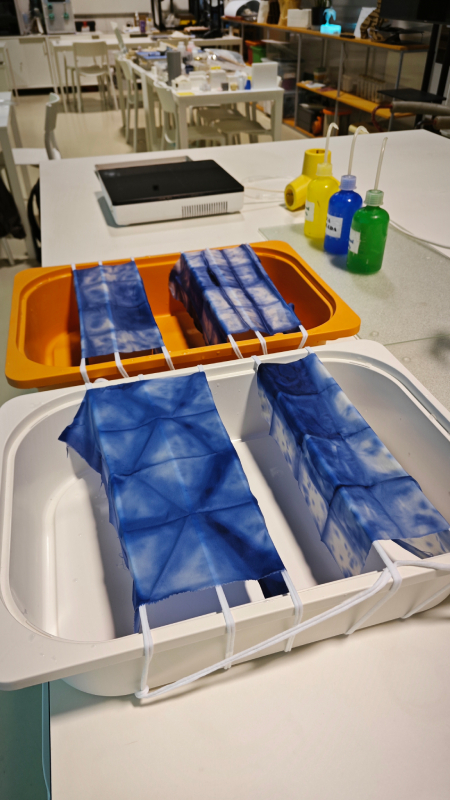
Drying fabrics, documented by Carlotta Premazzi, Biolab Lisboa, 2026
After Culture Development
- Step 1: Store fabrics in temprature controlled environment and monitor daily to see culture development. - Step 2: After 4 days, ours were looking adequetly developed. Steralise again to halt bacterial production. - Step 3: Wash fabrics in water to remove access bacteria/dye and growth medium - Step 4: Leave to dry.