Computational Couture
1. Objective
get inspired!
Check out and research alumni pages to better understand how to document and get inspired
-
Blender research and tutorials - Erika Mirzoyan - FabLab Armenia
-
Documentation grasshopper - Ola Muhanna - CPF
-
Dual filament 3d print research - Stephanie Johnson - TextileLab Amsterdam
-
3d print on fabric - Zahia Albakri - CPF Makerspace
-
3d print on fabric - Aslı Aydın Aksan - TextileLab Amsterdam
-
Visaulisations & Ideation - Dinesh Kumar - FabLab Bcn
Add your fav alumni's pages as references
2. References, Research & Inspiration
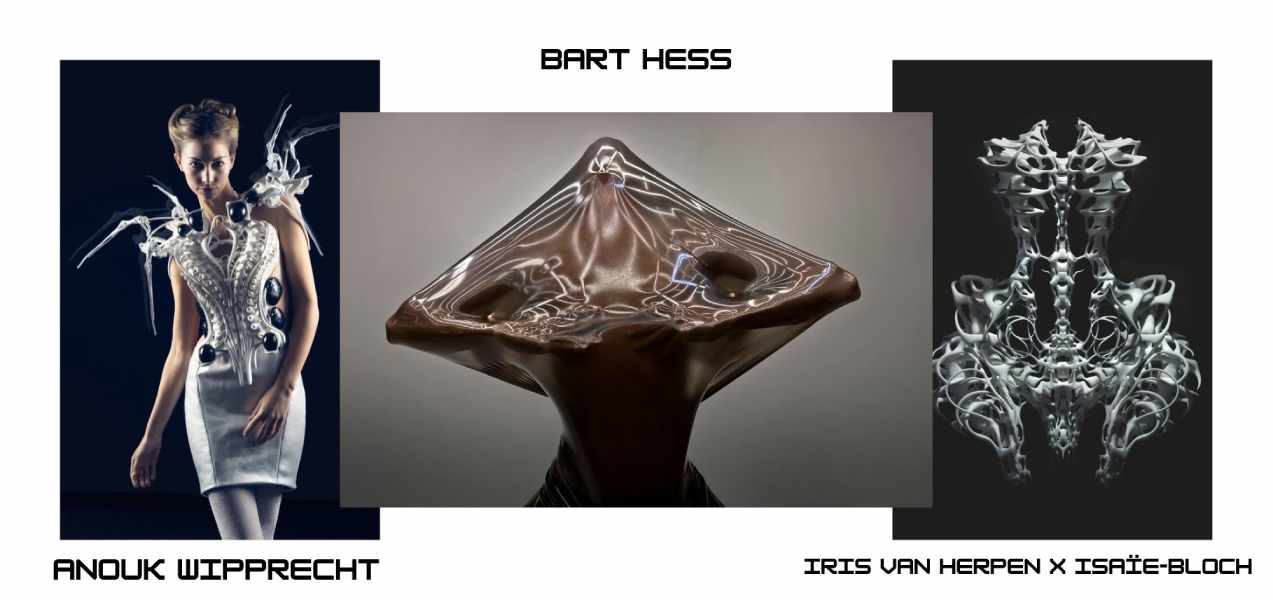 Week 6 Concept Board, gh0re.grl 2026 Image References: Image 1 / Image 2 / Image 3
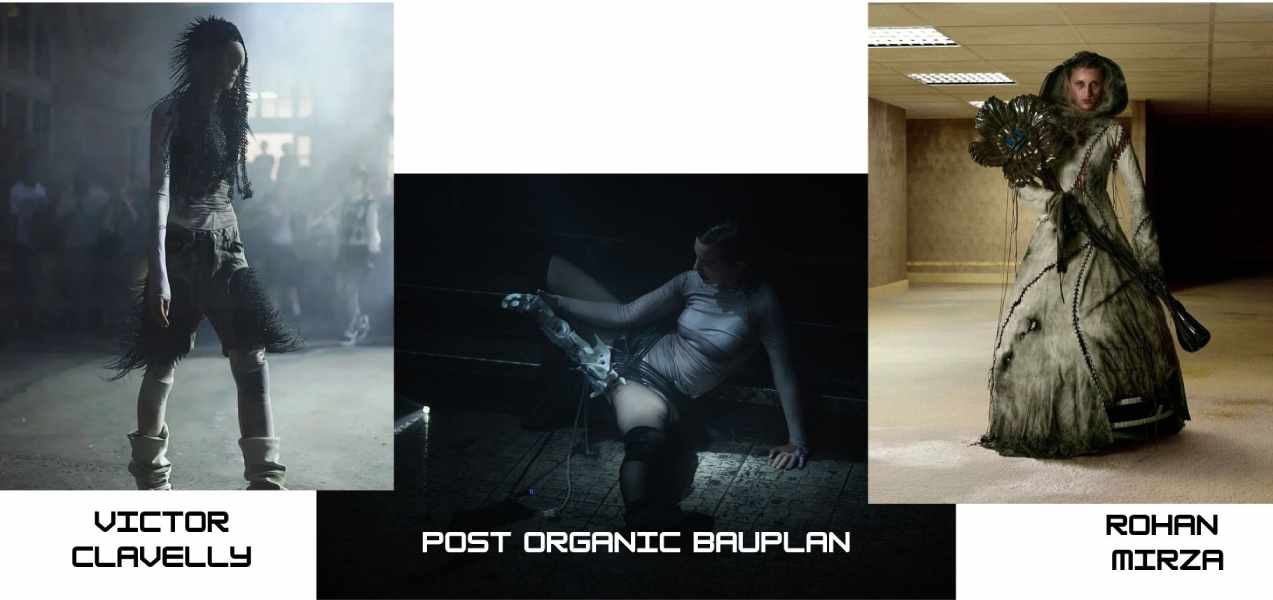 Week 6 Concept Board, gh0re.grl 2026 Image References: Image 1 / Image 2 / Image 3
For this week's project, I began with researching artists like Anouk Wipprecht and Architect Isaie Bloch. I appreciate their biomechanical couture, the body extension, and an aesthetic that flirts with the potential for functionality. But I felt that I wanted to create something a little softer and more organic this week. I found Bart Hess a great reference and found a lot of inspiration in the morphic shapes and textures. Like Hess, I aim to use “a material on the body that is not the body’s own, but making it look like it could possibly be, I create a tension between the body and material.” 1
When it came to designing, I took inspiration from three artists whose creative/adaptive 3D printing I admire: Victor Clavelly, Rohan Miza and Post Organic Bauplan. Although utilised in very different ways, all artists present ways of extending the body/challenging set notions of corporeality that I find interesting and adaptive, and I used Victor Clavelly’s designs as my main source of inspiration for my organic spike sample.
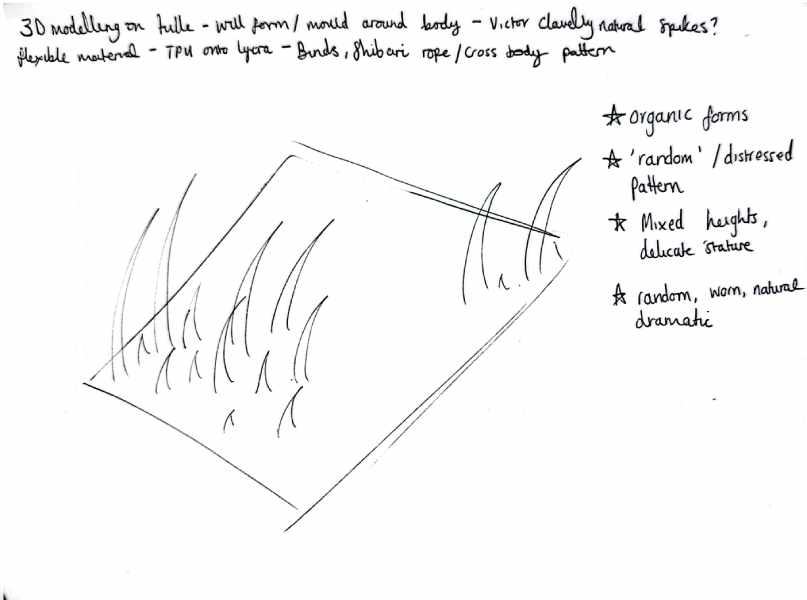 concept sketch for organic spike grid. gh0re.grl, 2026
3. Tools
4. Process and Workflow
Before creating spikes, I started by following the tutorial of Rico Kanthatham to create this sphere grid, but use a cone node instead of the UV sphere node.
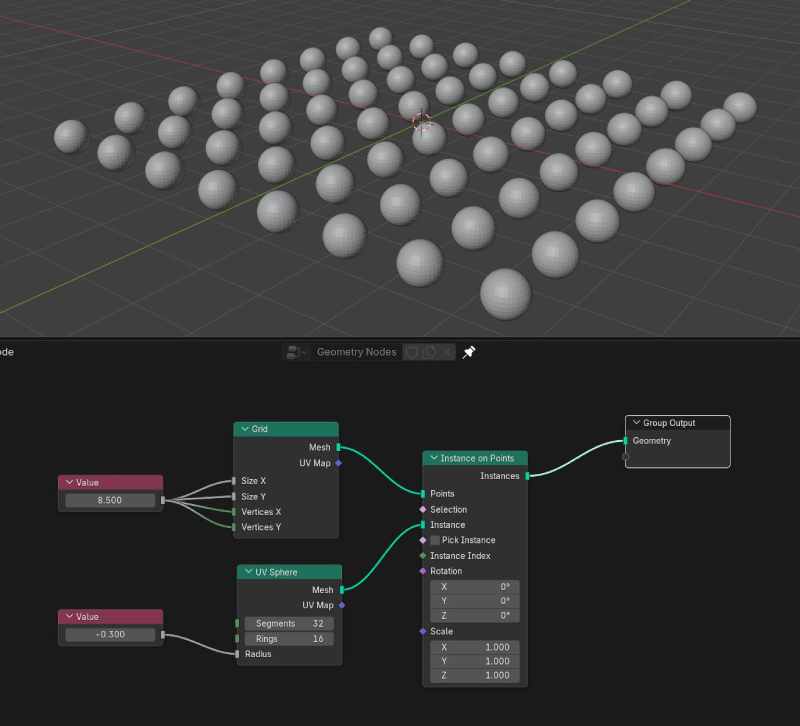 Example taken from Rico Kanthatham's Notes: Geometry Nodes, 2026
Step 1: Geometry Nodes set up
-
Select the Cube in your scene by clicking it.
-
Click the Geometry Nodes workspace tab at the top of Blender. If you cannot see it, use the workspace navigation arrows or the 'plus'to find it.
-
Click New in the Geometry Nodes editor to create a new node setup.
-
You should see Group Input/Output nodes, connected by lines:
 Screenshot from Blender, example of geometry nodes map initial map
The input recieves the original geometry, and the output sends the final result back to the viewer
How to control the node editor
Add a node: Press Shift + A, search for the node name, then click it. Move a node: Click and drag the node by its title bar. Zoom in or out: Use the mouse wheel. Move around the editor: Hold the middle mouse button and drag. Connect nodes: Click and hold an output circle, drag to an input circle, then release. The connectors on the right side of a node: usually outputs. The circles on the left side: usually inputs. Delete a node: Select it and press X or Delete. Change a setting: Click the number or dropdown inside the node and enter the new value.
Step 2: Creating a Grid / Spikes with Variables
-
Add a Grid node. This defines the space.
-
Set the grid’s size using the value 8.5. This is a very small grid, as I am looking to print a small swatch of compact spikes to give an organic/animal feeling.
Grid size controls how wide and long the surface is. The Vertices settings control how many positions are spread across it.
Making Spikes
- Add a Cone node.
-
Settings: Vertices: 32 Side Segments: 1 Fill Segments: 1 Radius Top: 0.02 Radius Bottom: 0.3 Depth: 2
-
Add a Transform Geometry node. This node can move, turn, or resize the spike. Leave its settings at their defaults: Translation X, Y, Z: 0 Rotation X, Y, Z: 0 Scale X, Y, Z: 1
-
Connect the Cone output to the Transform Geometry input.
Reproduce Spike
- Add an Instance on Points node.
- Connect the Grid output to Instance on Points input.
- Connect Transform Geometry’s output to Instance of Points input.
- Connect Instance on Points’ output to Group Output. This should create a series of identical cones across the the grid.
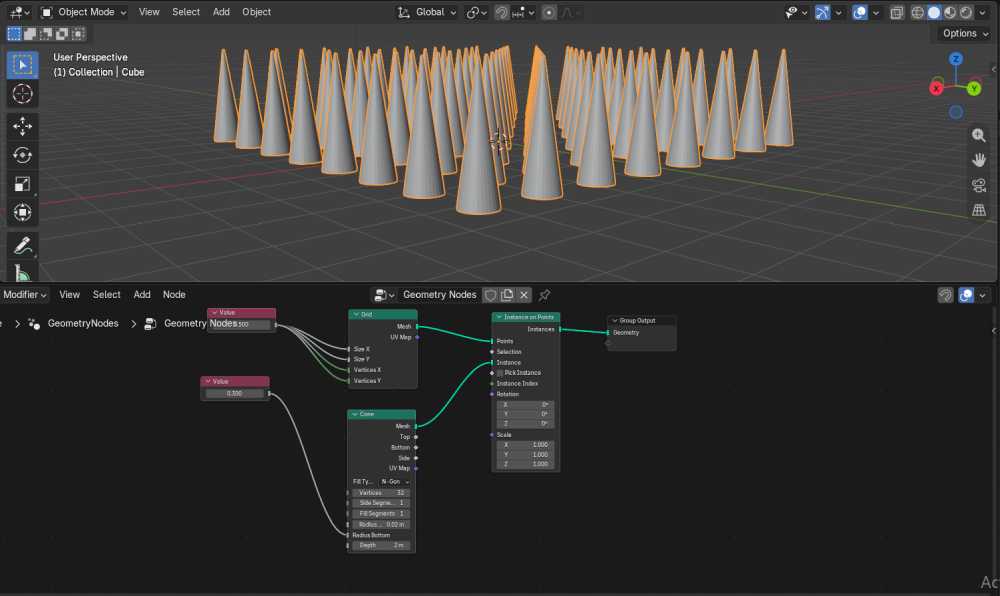
uniform spikes in blender grid with Geometry Nodes Map. gh0re.grl, 2026
Variable Heights
I wanted to create variety in height to make the pattern appear more natural and produce variables when worn.
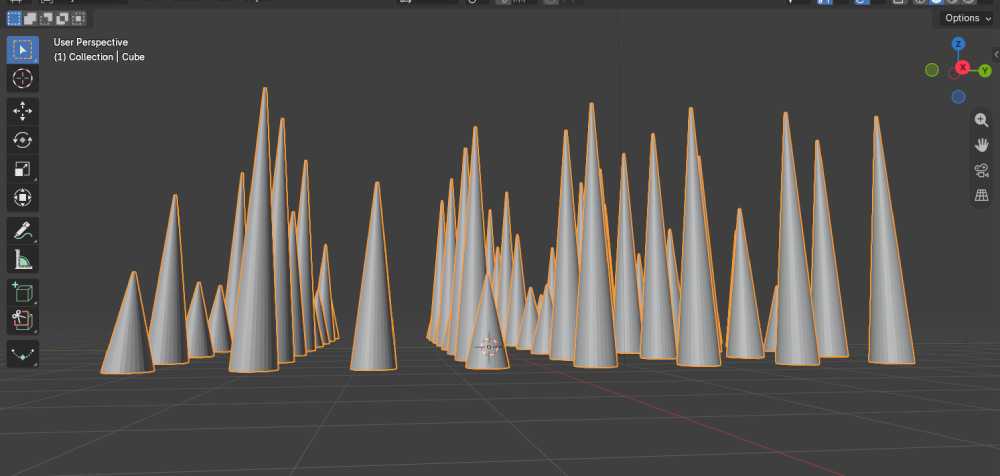
Final Spike design with three different height variables. gh0re.grl,2026
- Add a Random Value node.
- Set its data type to Integer. (this means whole numbers.)
- Values: Min: 1 Max: 3 Seed: 0 Blender will randomly choose 1, 2, or 3 for each spike.
- Add a Math node and set its operation to Multiply.
- Connect the Random Value output to the first input of Multiply.
- Set the second Multiply value to 0.5. Now the possible results are: 1 × 0.5 = 0.5 / 2 × 0.5 = 1.0 / 3 × 0.5 = 1.5
- Add a Combine XYZ node: Set X+Y to 0.8.
- Connect the Multiply output to Z.
- Connect Combine XYZ’s output to the Scale input on Instance on Points. X and Y control the width; Z controls the height. This makes the spikes a little narrower while giving them three different heights.
Error: Creating Tilt
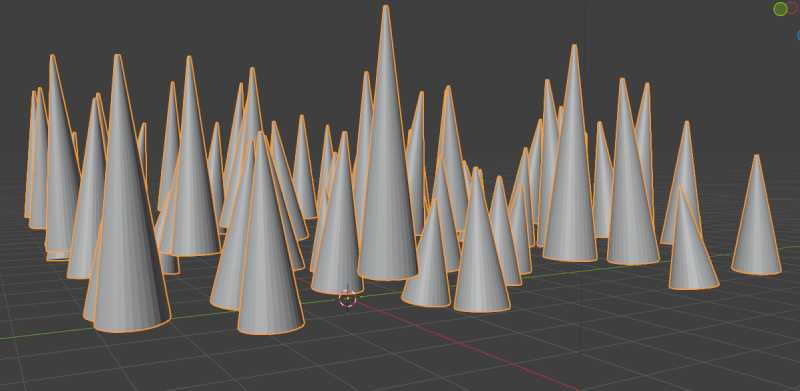
Adding rotation on Instance of Points Node. gh0re.grl, 2026
I wanted to create a tilt in the spikes so they would not have a uniform shape, but when I added a rotation to the cones, it rotated the whole form instead of creating a ‘wind-swept’ shape as I had envisioned. This made the design unprintable, as we need a flat base to fuse with the fabric.
For now, I left the Instance on Points rotation at 0, 0, 0, with no random rotation connected. That keeps the cones upright and their bases flat. I wanted to see if it was possible to create organic shapes without the rotations using the form of the body instead.3
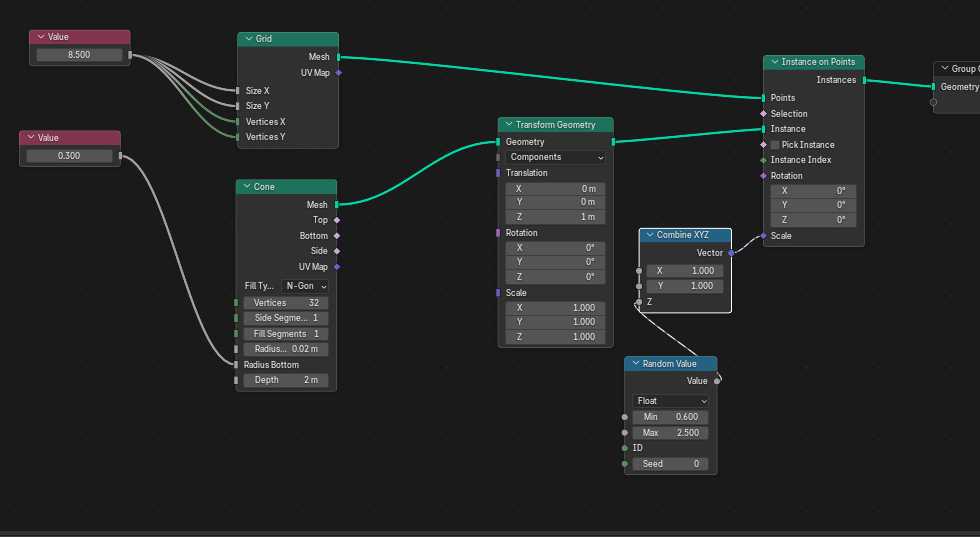
Final Geometry map before exporting to STL. gh0re.grl, 2026
4.3 Step 3: 3D printing on Fabrics
Material Properties: TPU + PLA
Properties of TPU: flexible+elastic, abrasive+water resistant, temperature resilient up to 100 degrees, absorbs high impact. Limitations of TPU: moisture absorption, yellowing tendency from UV, can break down in hot/humid environments over a long time. Properties of PLA: rigid, brittle, easy + faster to print, high detail, eco-friendly origin. Limitations of PLA: lower heat tolerance, poor outdoor longevity, brittle impact response.
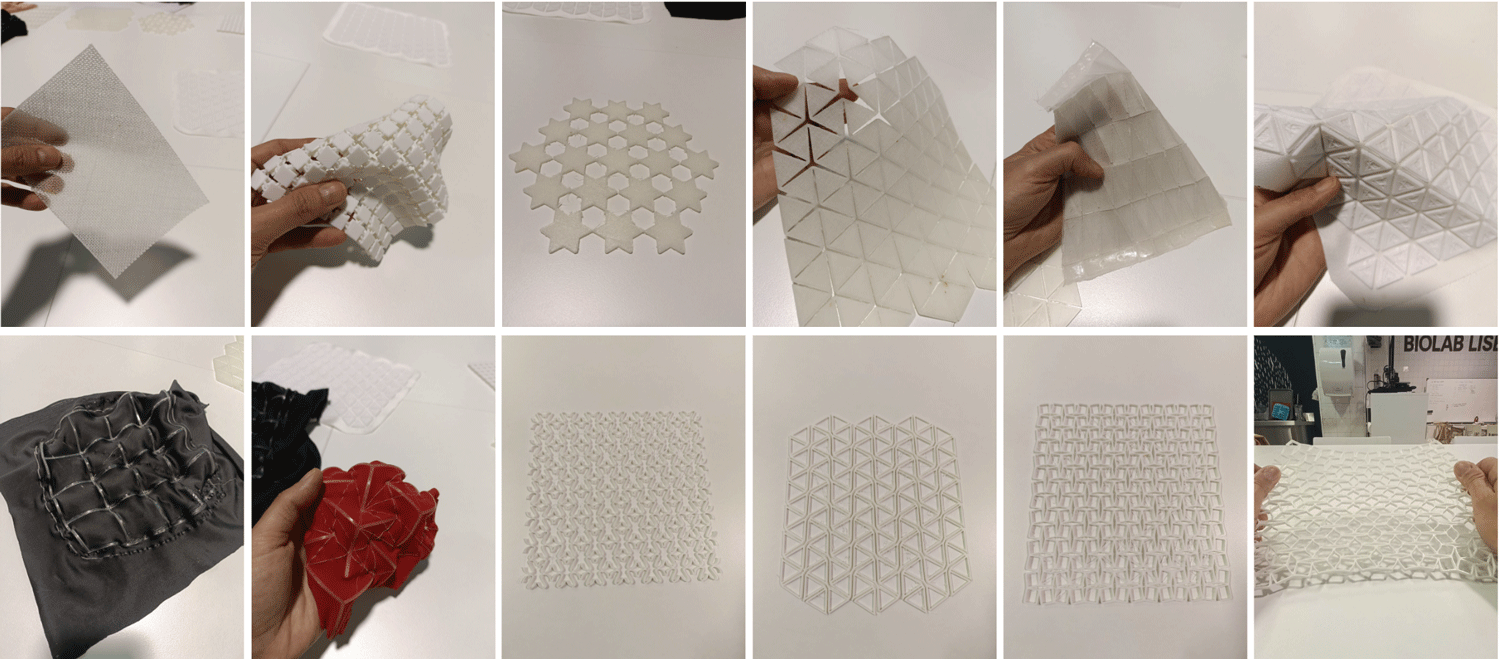 Biolab examples computational couture structures by Carlos Roque and Carolina Delgado. Montage by Carlotta Premazzi
| Category | Description | Key Characteristics |
|---|---|---|
| 3D Printed Textile-like Structures | Textile-like systems generated through additive manufacturing, where flexibility and porosity are defined by geometry. | Non-woven meshes (gyroid). Quasi-woven fabrics. Flexible TPU structures. |
| Hinged and Expandable Tilings | Planar geometries designed to transform through rotation, unfolding or expansion. | Hinged tilings. Expandable surfaces through cuts or joints. Geometry as mechanical mechanism. |
| Auxetic Structures | Geometry-driven systems exhibiting negative Poisson’s ratio, expanding in multiple directions under tension. | Re-entrant geometries. Rotating and retractable surfaces. Longitudinal expansion. |
| 3D Printed Origami | Folding principles translated into 3D printed geometries that transform after fabrication. | Geometry-defined fold lines. Post-print transformation. |
| 3D Printing on Fabric Under Tension | Flexible polymers printed onto stretched textiles to generate self-forming surfaces once tension is released. | TPU printed on Lycra. Self-forming surfaces. Passive shape-memory behavior. |
| Geometry-Driven Behavior | Structural behavior emerging primarily from geometric parameters rather than material properties. | Emergent form. Material–parameter–force relationship |
Table contents documented by Carlotta Premazzi
We used the Ender 3D Printer at Biolab Lisboa and the UltimakerCura software to experiment with printing on lycra fabric.
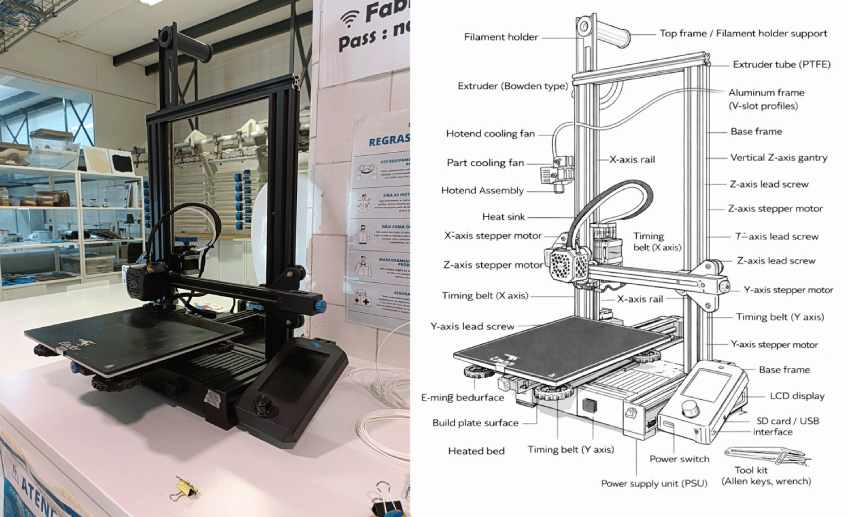
Ender 3D Printer at Biolab Lisboa and Ender 3D Printer AI illustration by Carlotta Premazzi. (eden.art illustration from a real photography)
For each material, we need a different heat for the plate, as well as a different temperature for the nozzle. manufacturer recommendations can usually be found on the box. For this project with TPU 98A - neutral we used:
200c for the nozzle 50c for the hot plate
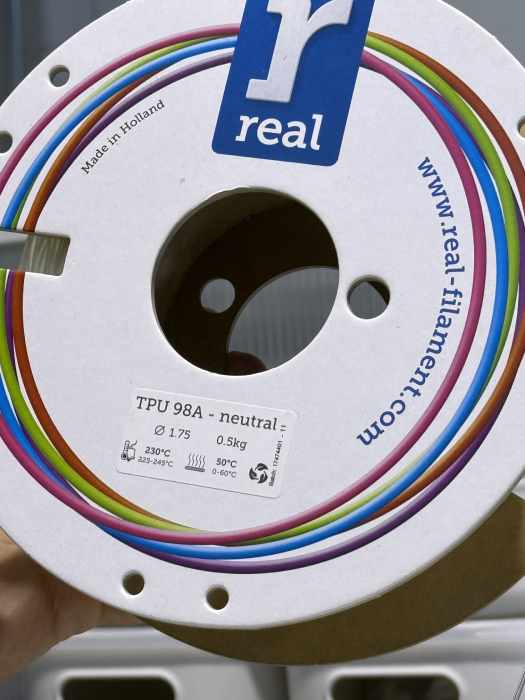 Manufacture settings for the TPU used in BioLab Lisboa, 2026. Photo by gh0re.grl
Make sure the plate is clean before printing (use isopropyl alcohol for cleaning - least water so it doesn’t oxidise).
We used Ultimakercura software for this project. In this software you can define all your settings, including nozzle size and material. Materials will have premade settings, but you can adjust if needed. Here is the Ultimakercura guide by Chris Mead which outlines how to prepare you stl for printing using this software.
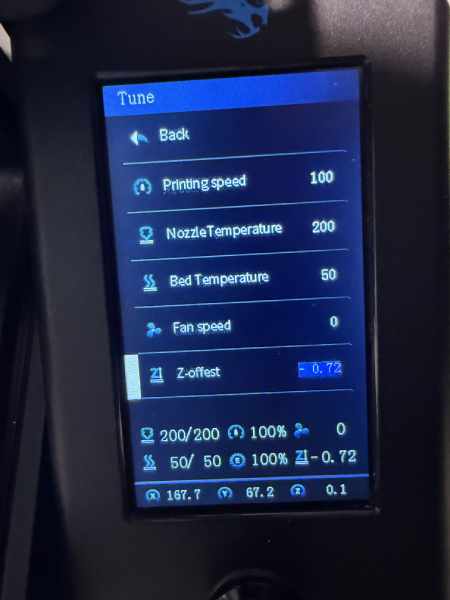 End 3D Printer settings menu. Photo by gh0re.grl, Biolab Lisboa, 2026
The 3D printer will also have a display where you can quickly adjust your settings if you need to after a material test. We had to adjust the Z-offset which controls the height of the nozzle above the fabric. The nozzle should remain close to the fabric to help force the filament into the weave and prevent peeling.
Preparing the Fabric
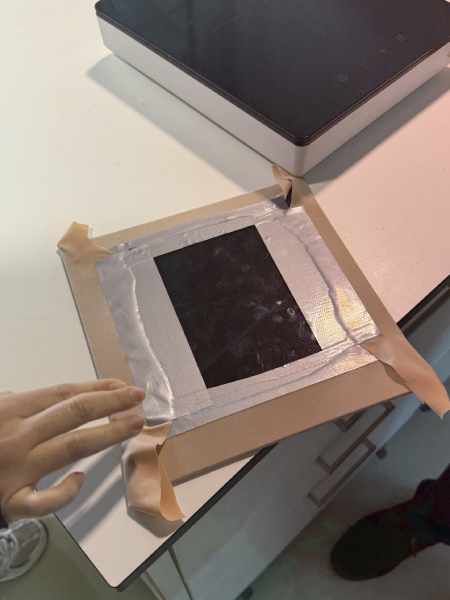 Taping technique for lycra to 3D Printer plate. Demonstrated by Carlos Roque, Biolab Lisboa 2026
To prepare the stretch fabric for printing, you need to stretch evenly across the plate and secure it with tape on the underside. This will ensure that the filament fuses with the fabric evenly to ensure optimum results. Unfortunately, with our experiment the fabric was not placed evenly and stretched too tight, so our sample did not fuse fully with the fabric to create distortions.
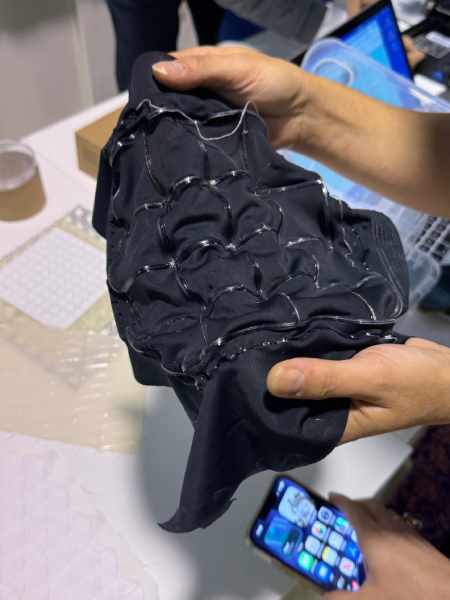
Successful TPU printing on Lycra by Carlos Roque and Carolina Delgado, 2025.
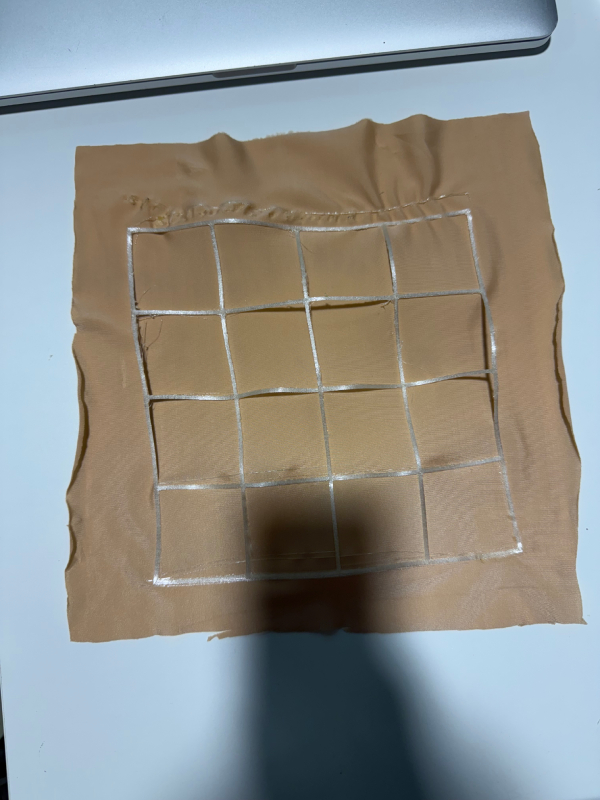
Failed Lycra printing: filament did not grip material correctly
When printing on fabrics, there are a lot of factors that can interfere with the results:
| Factor | Results |
|---|---|
| Fabric composition and stretch | stretch and blended fabrics react differently to heat and pressure. Knit structure, weave, thickness, and surface texture influence adhesion. High-elastane fabrics can retract, deform, or wrinkle during processing. Fabric recovery and stretch direction affect the final dimensions. |
| TPU properties | TPU grade, hardness (Shore A), thickness, elasticity, and melt or activation temperature. Film or powder age, moisture, contamination, and storage conditions. Compatibility between the TPU and the textile surface. Different TPU formulations can have different bonding and stretch-recovery behavior. |
| Temperature, pressure, and dwell time | Too little heat may cause incomplete melting or bonding. Excessive heat can shrink or discolor fabric, damage elastane, or degrade the TPU. Insufficient pressure can produce uneven adhesion; excessive pressure can flatten the textile or squeeze out molten TPU. Too little or too much dwell time changes bonding, penetration, and surface appearance. |
| Fabric tension and positioning | Uneven tension can cause distortion, skewing, wrinkles, or misalignment. Poor fixation or inadequate support can allow the fabric to move. Residual tension can make the print appear correct while mounted but distorted when relaxed. |
| Fabric surface and preparation | Textile treatments, dusts, oils etc. can reduce adhesion. Moisture can interfere with some processes or cause defects during heating. Uneven surface texture can create pinholes, incomplete contact, or inconsistent transfer. Fabric pretreatment, washing, and drying can change surface behavior. |
| Print Design and TPU Coverage | Large solid areas can restrict fabric stretch more than fine lines. Thick TPU deposits may feel stiff, crack, or peel under repeated extension. Sharp corners, narrow lines, and edges can become stress concentration points. Excessive print thickness can affect comfort, breathability, and recovery. |
| Age and Usage | Over time TPU can seperate from the fabric, or undergo discolourment/distortion depending on material usage and storage conditions. |
4.3 Step 4: 3D printing Spikes in PLA on Tulle
After creating my STL2, I was shown how to 3D print in the Bambulab printer. This printer is incubated, which is ideal for longer printing times to help maintain a stable temperature with less environmental impact. For this model we used the bambulab software required for this machine. Here is a link to the Bambulab Wiki that offers an in depth guide to using this software. We printed my design using PLA. The material was best suited to this project over TPU because its rigidity and ease of printing allowed for an adaptable small scale design on synthetic tulle.
Technique for Printing:
STEP 1: Launch Bambu Studio. Select your Bambu Lab printer. Confirm your nozzle size and printer profile. Import file.
STEP 2: Check the Model: Click the model to select it. Check the X, Y, and Z dimensions.Make sure the model is the correct size. (I had to upscale mine x10 for printing) If the dimensions are incorrect, use the Scale tool to adjust them.
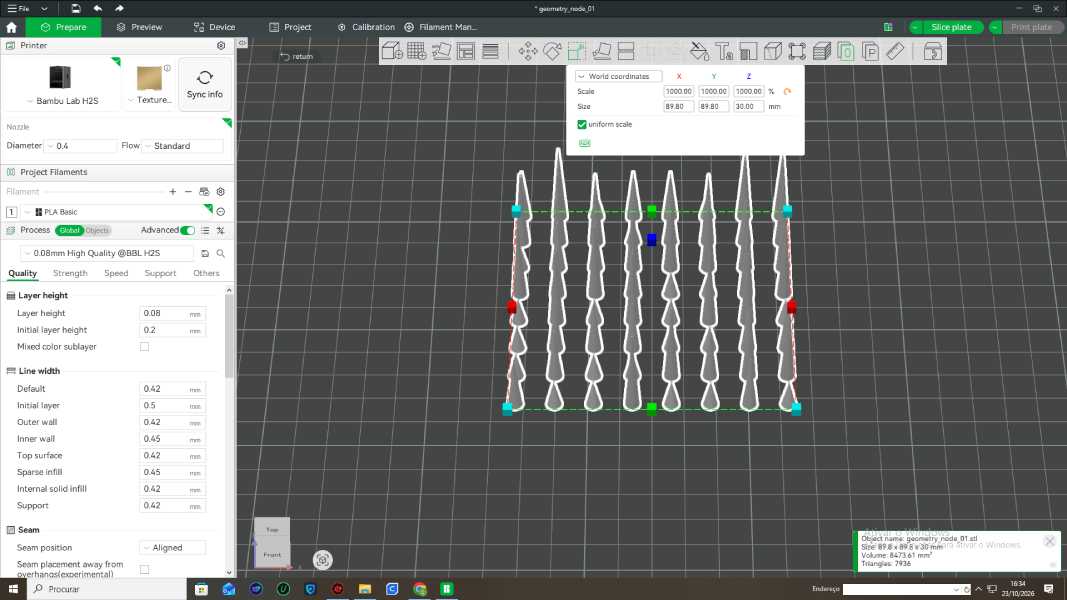 My model in Bambustudio: upscaled final settings, 2026
STEP 3: Select Printer and Filament. Filament will come with standard settings. Select your printer profile. Choose the correct build plate. Select the filament profile that matches the material loaded in your printer.
STEP 4: Position the Model Select the model. Use Move to position it on the build plate. Keep the entire model within the build plate boundaries. Center the model if appropriate.
Gcode is generated automatically in Bambustudio.
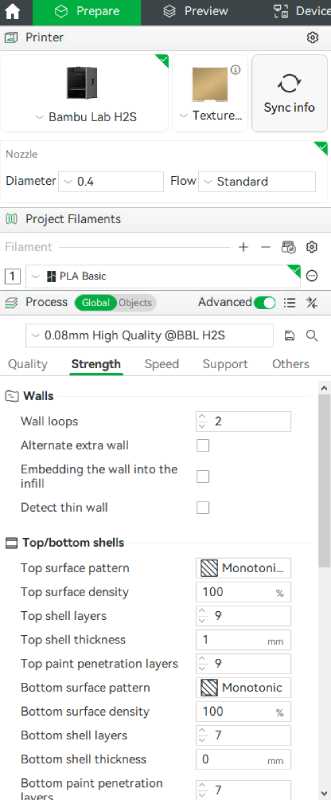
Final settings screenshot in Bambustudio, 2026.
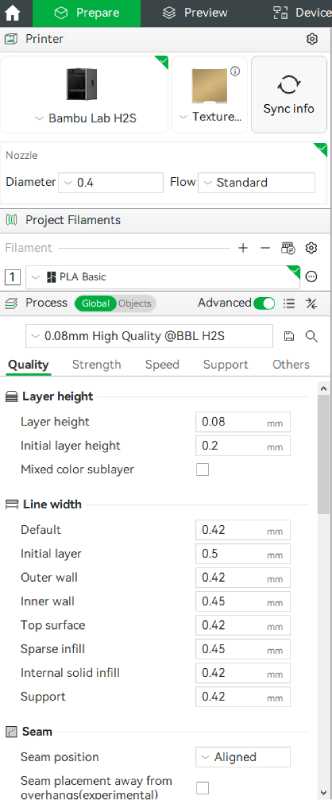
Final settings screenshot in Bambustudio, 2026.
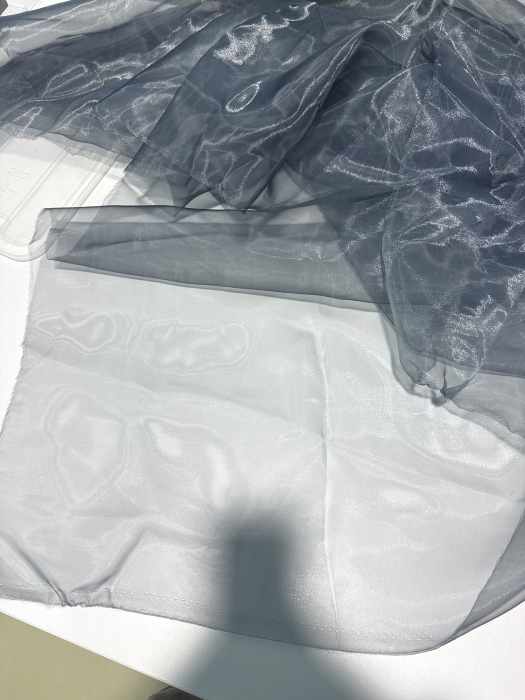
Synthetic Tulle. Biolab Lisboa, 2026.
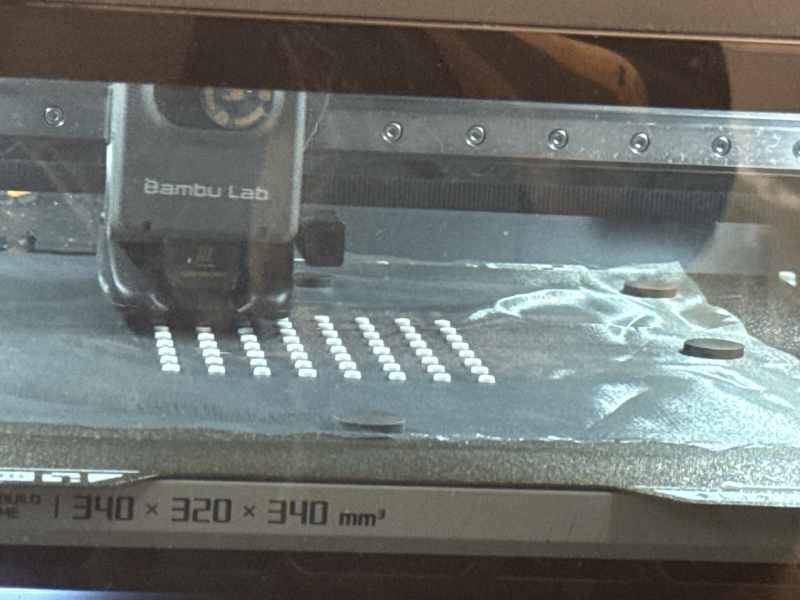
printing on synthetic tulle using Bambulab printer. Biolab Lisboa, 2026
Material used: synthetic ‘tulle’. Printing onto a thin fabric like this requires a special technique to fuse the filament to the fabric:
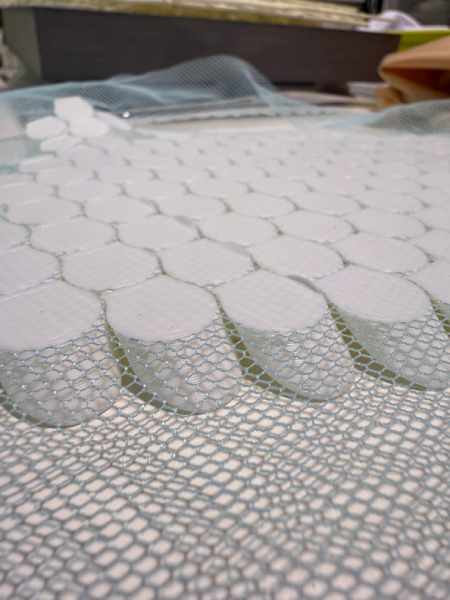 Underside example of 3D printing onto tulle, swatch made by Carlos Roque and Carolina Delgado, 2025
Step 1: cut material and line plate with a thin layer of glue to secure fabric for printing Step 2: begin printing WITHOUT fabric in place. Adjust settings if needed. Step 3: Print first 2 layers then pause (you can track printing layers on display screen) Step 4: place fabric, using glue as guide/ magnets if needed. Continue printing.
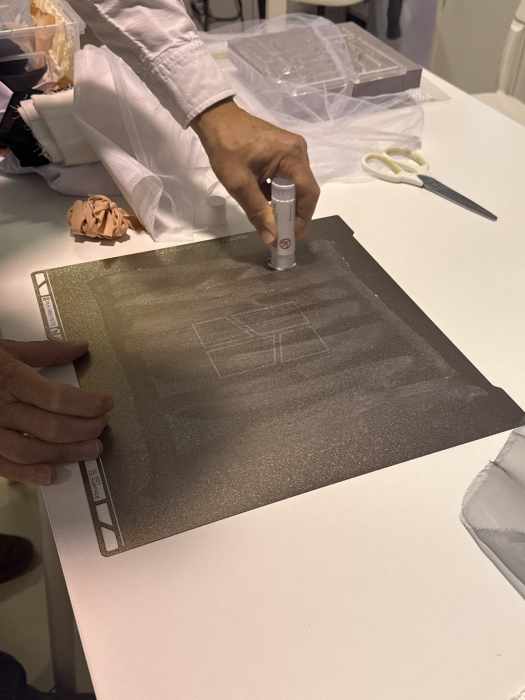
Preparing plate with glue. Demonstrated by Carlos Roque, Biolab Lisboa 2026.
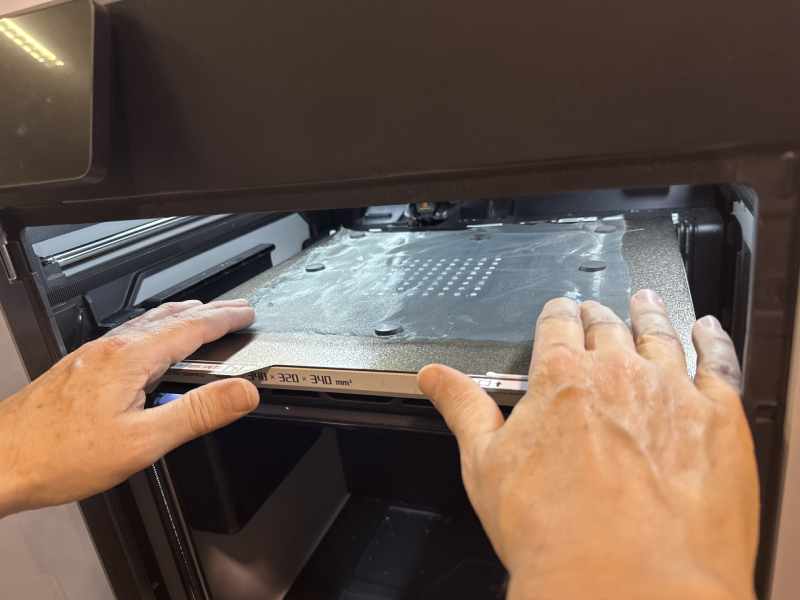
Placing material after 2nd layer printed. Demonstrated by Carlos Roque, Biolab Lisboa 2026.
When my print was finished, the filament had stuck to the plate. Carlos used alcohol to separate the swatch from the plate:
Removal of stuck 3D print from plate using Isopropyl Alcohol by Carlos Roque, Biolab Lisboa, 2026.
Isopropyl alcohol is used here to help seperate the filament, and is the best product for cleaning and removals as it is least likely to oxidise due to its purity.
5. Results
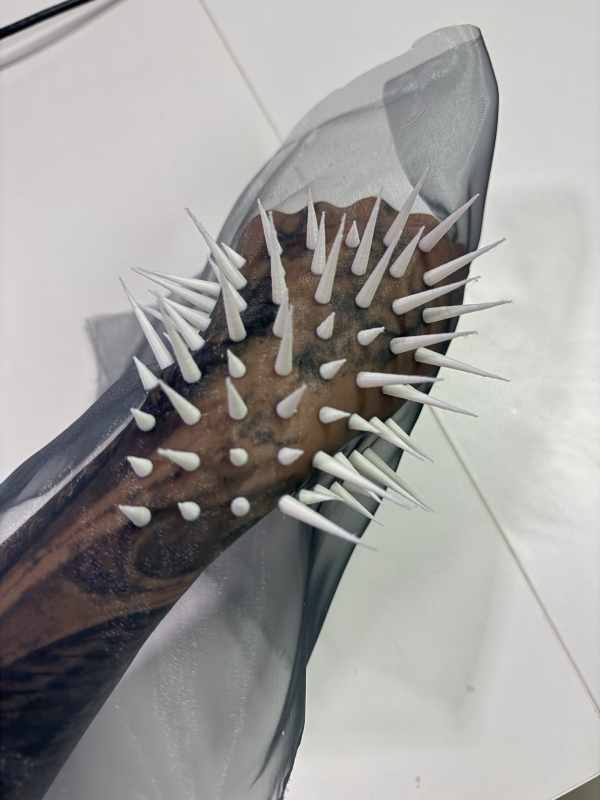
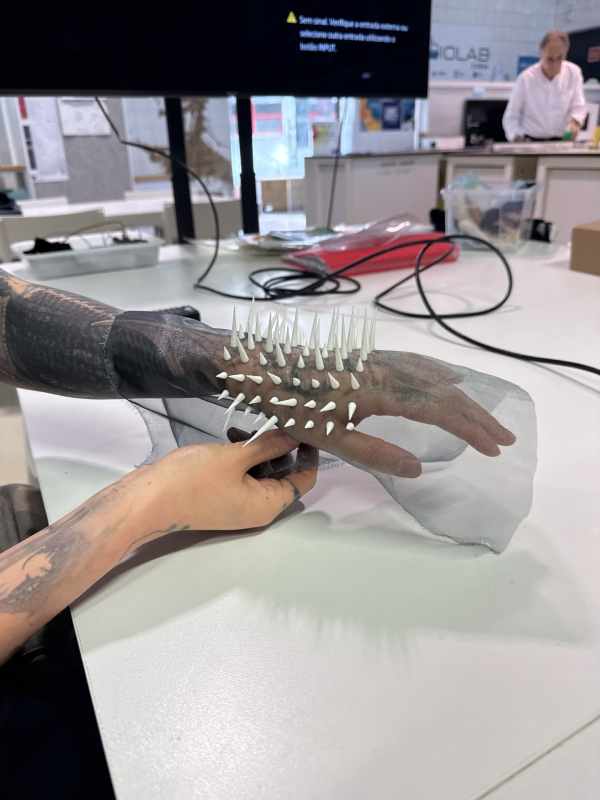
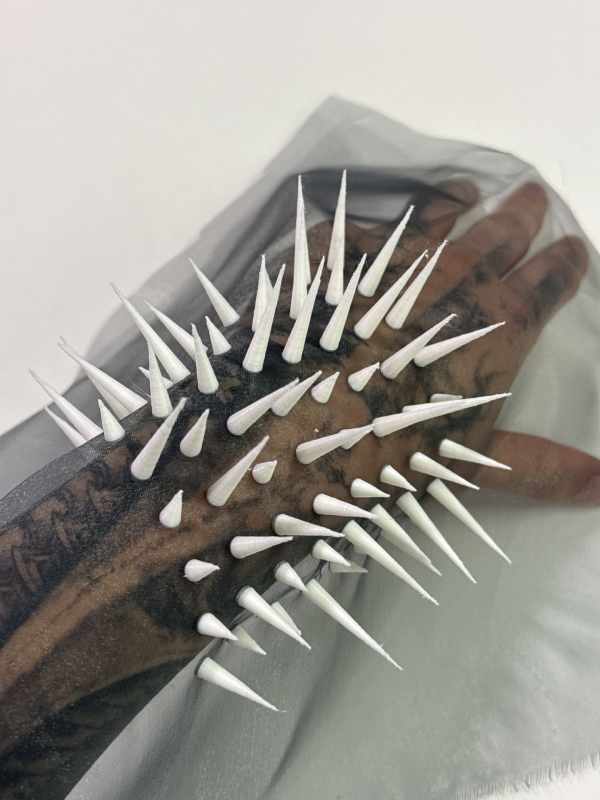
Video and photos of final 3D print mesh, interacting with my body. Biolab Lisboa, 2026. Photos by Gh0re.grl.
I was happy to see the natural movement of the spikes around the body, creating the desired shapes I had wanted, proving that spike distortion was not necessary when applying the design to the natural curves of the body.
7. Fabrication files & References
-
Reference: Philip Fimmano; Fetishism in Fashion; 2013 ↩
-
File: Final Spike Grid STL ↩
-
File: 3D model: Blender file ↩