BioFabricating Materials
get inspired!
Check out and research alumni pages to better understand how to document and get inspired
-
Comparison research - Aslı Aydın Aksan - TextileLab Amsterdam
-
Comparison research - Barbara Rakovska FabLab Bcn
-
Jute research - Julija Karas - FabLab Bcn
-
Polarisation in bioplastics Viviane Labelle - EchoFab
-
Local waste streams - Marieke van Eyndhoven
-
Medicinal Kombucha Patch - Ziortza Aurrutia
Bio Materials / Bio-based Materials
Bio-Materials: are substances or mixtures of substances, natural or artificial, that act partially on biological systems or to replace, augment or treat them (e.g. prostheses, implants, contact lenses) Bio-based Materials: are all materials of natural origin, organic or non-organic. (Stasiškienė et al., 2022)
Useful Links
References, research & inspiration
This week I was particularly inspired by the abilities of biomaterials (particularly) Kombucha, to intervene with the body. I appreciated the work of Suzanne Lee, whose biomaterial fashion often appears as ‘second skins’, an aesthetic I appreciate. However it was the discovery of Kombucha patches applied directly to the skin for medicinal and healing purposes that piqued my interests. This began with the discovery of Fabricademy Alumni Ziortza Urrutia’s final project, ONDDOAK +, a topical transdermal tishu made from Kombucha biomaterial that transmits the medicinal properties of fungi. This inspired me to research further into the ability of this biomaterial for topical treatment and discover engineered living materials (ELMs). I have compiled below a list of referential articles and collectives I discovered during my research:
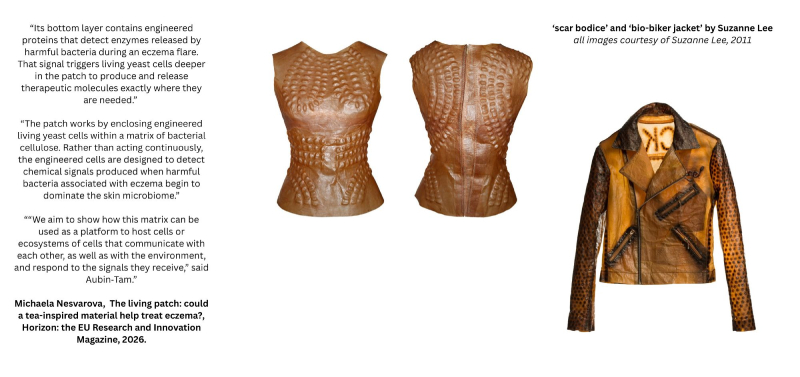
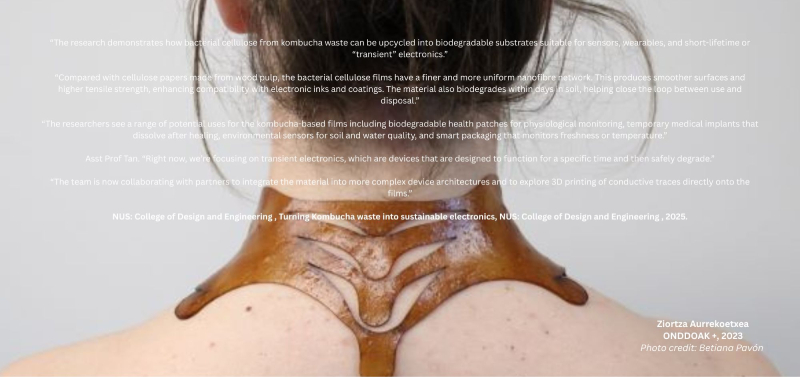
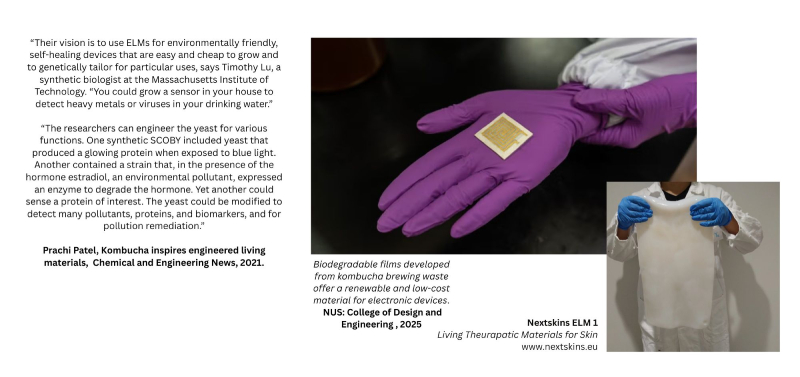
Research boards by gh0re.grl, 2026
This was of particular interest to me as my main goal through Fabricademy is to find new ways of modifying the body, introducing functionality into body modification. The idea of intervening / enhancing the body through ELMs is of great interest to me.
Process and Workflow: Grown Materials
ROOTBEDS
Before beginning with grown materials, we learnt how to use a Vaccum Forming Machine to create moulds for our root beds.
Using Vaccum Forming Machine
Uses heat and a vacuum to create a form around a mould. Machine used: Formtech:compacmini Materials used: PP / PETG Step 1: centre mould / lower into machine Step 2: prepare (peel - white side placed downwards) material and place over ‘hole’. Check all is aligned. Step 3: close latch and seal clamps w/ wood chips Step 4: pull over heated plate - time depends on material (for this PETG it was 15 seconds) Step 5: move plate, pull lever - material will melt over mould - then press vacuum button Step 6: press release button 2x to help release material Step 7: pull lever again to remove material
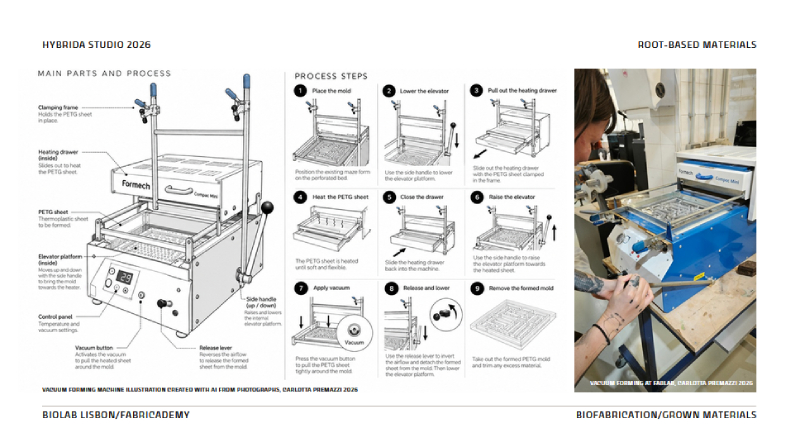
Diagram Documenting Machine Aanatomy and Moulding Process by Carlotta Premazzi, BioLab Lisboa, 2026
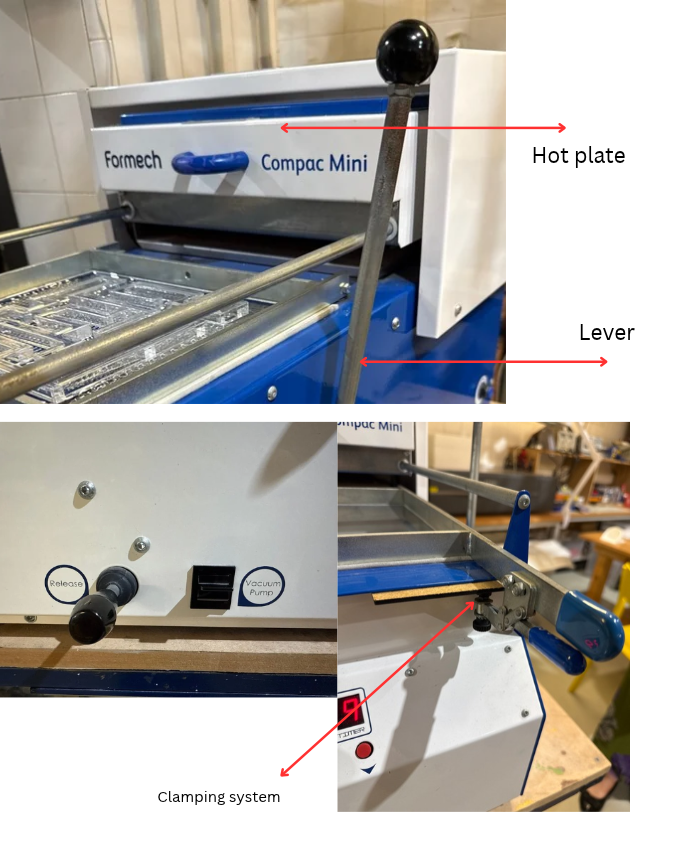
Key components of the Formtech:compacmini machine at BioLab Lisboa, labelled by gh0re.grl, 2026.
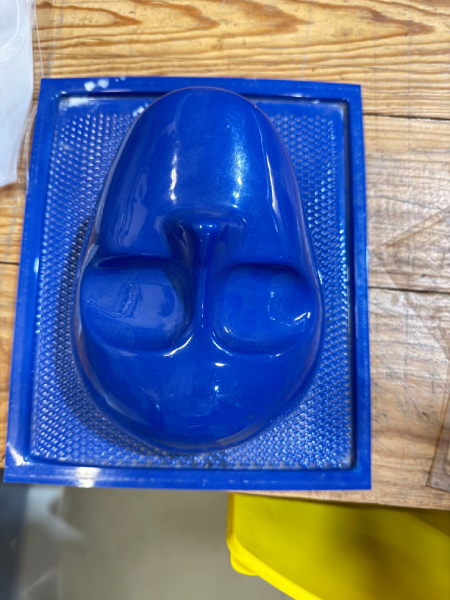
Example of 'PP' Vaccum mould. We used PETG for our root beds. Photo by gh0re.grl, 2026. Mould by BioLab Lisboa.
Further methods of Fabrication
| Method | Process | Advantages | Considerations |
|---|---|---|---|
| Vacuum-formed PETG | Hear a PETG sheet and form it over a 3D-printed or solid mater | Lightweight. Reusable, smooth surface, suitable for shallow patterns. | Requires a vaccum-forming machine and positive mould. |
| 3D-printed mold | Print the mold directly with connected channels and a removable geometry | Fast iteration, complex modification | Layer lines may affect the surface, material and print size can be limiting. |
| CNC-milled master | Mill the pattern into wood, foam, plastic or another machinable block. | Accurate geometry, smooth surfaces and durable master. | Requires CNC access and suitable tooling. More material waste. |
| Laser-cut layered mold | Stack and bond laser-cut sheets to build channels and relief patterns. | Accessible, modular and easy to prototype with repeated layers. | Visible layer transitions: limited depth and possible leakage between layers. |
| Hand-built relief Mold | Construct the pattern manually using clay, foam, wire or other relief materials | Low-tech, expressive and useful for quick experiments | Less precise and may require sealing. |
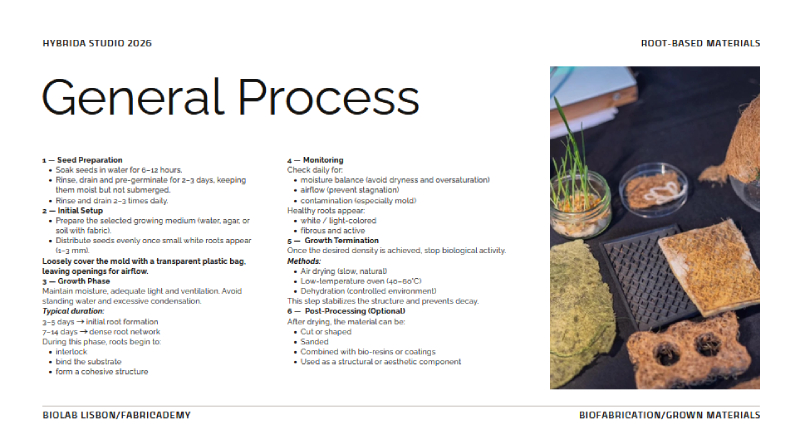
Grow bed process, documented by Carlotta Premazzi, 2026
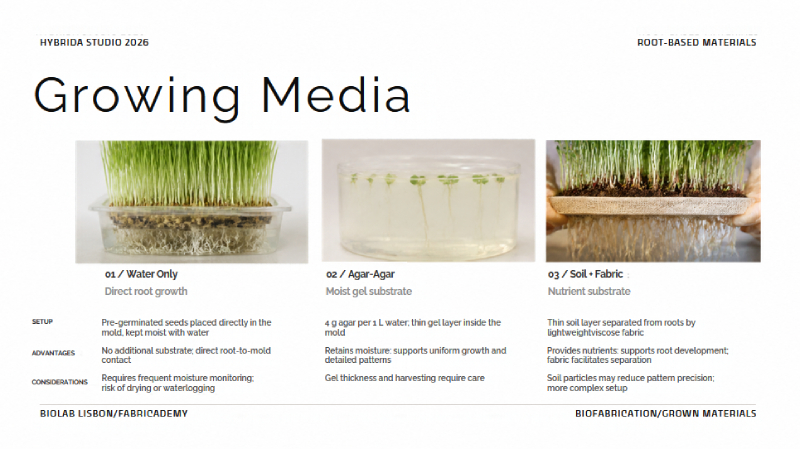
Growing media for root beds, documented by Carlotta Premazzi, 2026.
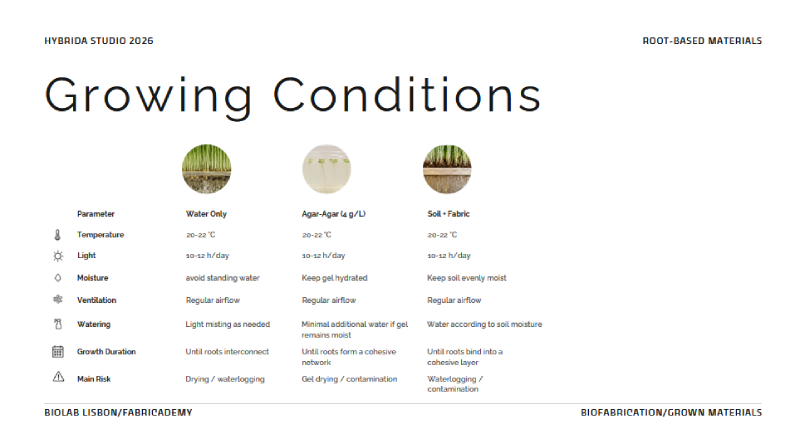
Root bed Growing Conditions, documented by Carlotta Premazzi, 2026.
We followed the protocol above using water and 80g wheat grass seeds. However we could not water or monitor over the weekend, so by Monday they were quite dry / had already begun to sprout.
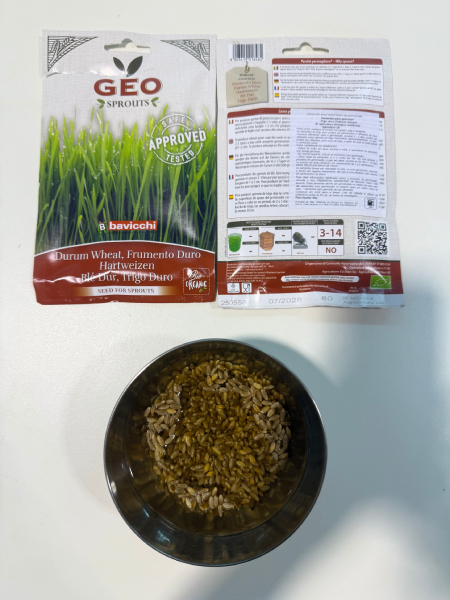
Submerged seeds next to package, documented by gh0re.grl, 2026.
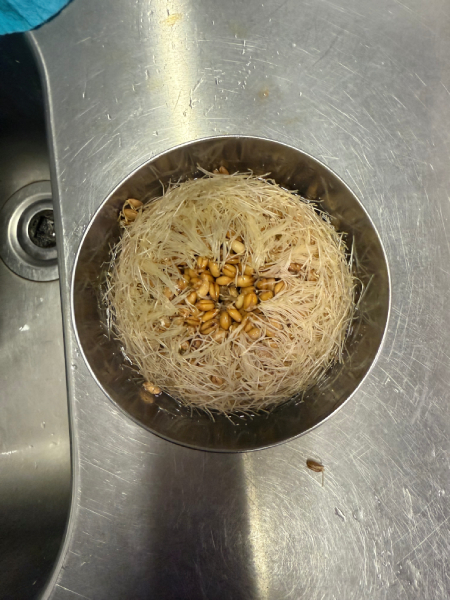
Overgrown roots after weekend, documented by gh0re.grl, 2026.
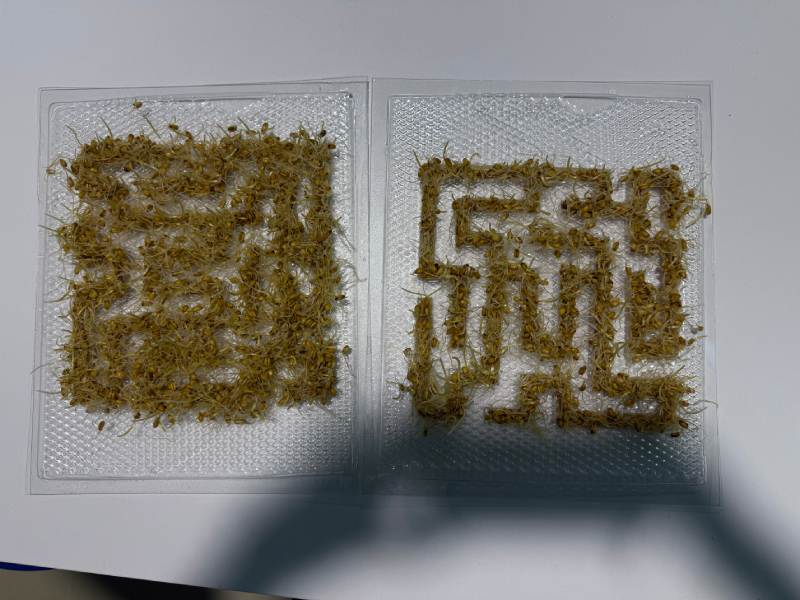
I was still able to break the seeds apart using water and a gentle hand, so I was able to place them in the mould. It made it a little more complicated to make a neat form, so I made two as my first attempt was a little messy.
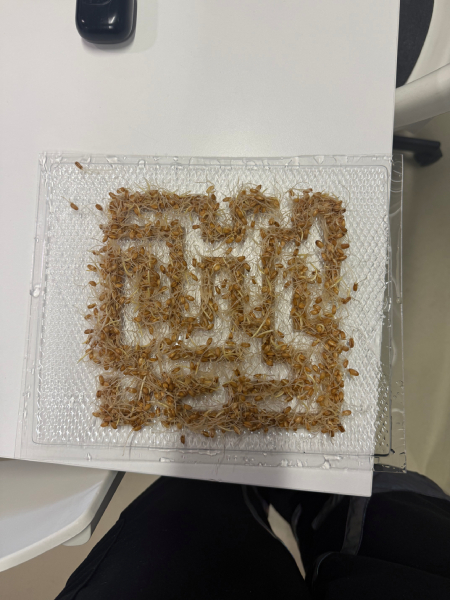
Rootbed attempt 01: a little messy due to already sprouting seeds, documented by gh0re.grl, 2026.
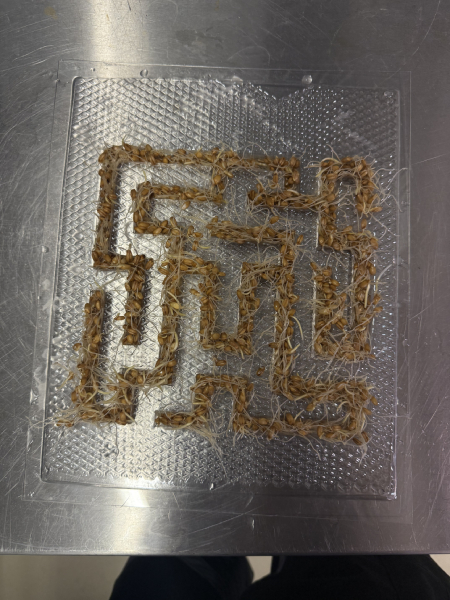
A neater rootbed application (02), documented by gh0re.grl, 2026.
We then stored the rootbeds in the dark and in unsealed platic bags to create a mini 'green house' affect. I have been misting with water / checking daily since. After day 2 we moced them into the mini-greenhouse in Biolab Lisboa, to allow more air.
Rootbeds Day 02, documented by gh0re.grl, 2026.
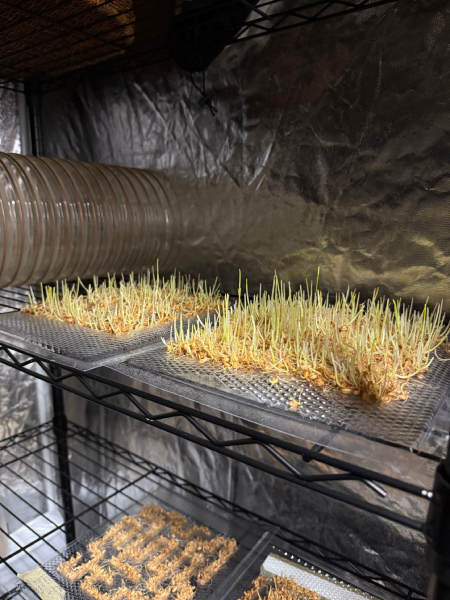
Rootbeds Day 03, documented by gh0re.grl, 2026.
Kombucha Starter
Kombucha Starter
Step 1: Boil water and add tea (5 green tea bags) Step 2: add 10% white sugar. We used 1L of water and 100g of sugar. Step 3: Turn heat down to low and stir Step 4: stir until all sugar is melted. Then remove from heat, cover and cool. Step 5: Clean inside jars with alcohol: smooth, equal layer, don’t pass twice over places. Step 6: When tea is cool, add 4-5 tablespoons of kombucha liquid. This liquid is found in a jar from an already prepared ‘scoby’ sample. It already includes the necessary bacteria. Step 7: Store in jars with lid covered with cloth, elastic bands around cloth. Dark cool places are better. Step 8: Wait 1-2 weeks for film / ‘scoby’ to form
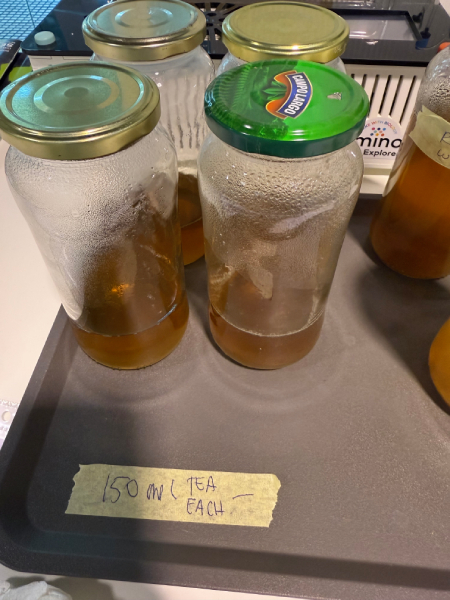
Cooled tea, divided into jars. Documented by gh0re.grl, 2026.
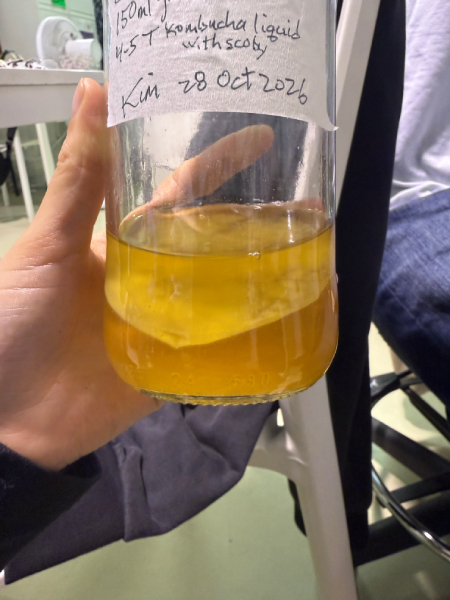
kombucha Scoby development after 2 weeks, documented by gh0re.grl, 2026.
Process and Workflow: Gelatine-based Biomaterials
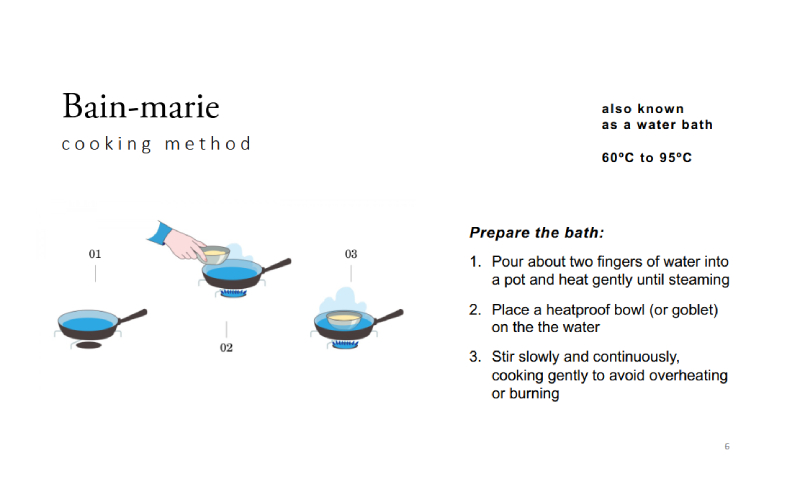 Bain-Marie Protocol, documented by Carolina Delgado, 2026
Preparing the Moulds
Disinfecting = 70% alcohol dries slower 1. Clean the moulds 2. Use Alcohol and dry (Air dry/ or demineralised water and paper towel) 3. Some moulds can be autoclaved or steamed in pressure cooker
Eggshells/Nuts Waste Prep
Seashells 1. Collect seashells from kitchen waste, restaurants, or markets. 2. Wash the shells, then boil them for about 30 minutes at over 140ºC to kill any bacteria. You can also use an autoclave if available. 3. While boiling, use a skimmer or slotted spoon to remove any foam and dirt. 4. Dry the shells in an oven at 140ºC for 15 minutes. Repeat if needed until they are completely dry and brittle, but not burnt. 5. Place the shells in a bag and use a hammer to break them into smaller pieces. Then grind them with a mortar or a high-power grinder. Eggshells 1. Gather eggshells from your home, neighbours, or even local restaurants. 2. Wash the eggshells, then boil them for about 30 minutes at over 140°C to kill any bacteria. You can also use an autoclave if you have one. 3. While boiling, use a skimmer or slotted spoon to remove any foam or dirt that appears. 4. Place the eggshells in the oven at 140°C for about 15 minutes. Repeat this step until they are completely dry and brittle, but not burnt. You’ll know they’re ready when you hear a slight crackle. 5. Grind the dried eggshells using a coffee grinder or a mortar and pestle.
Nuts and Fruits Waste Prep
Any Nuts shells 1. Collect dry shells from nuts like cashews, hazelnuts, or others. 2. Put the shells in a bag and use a hammer to break them into smaller pieces. Then, grind them with a mortar and pestle or a strong grinder. Used coffee grounds 1. Collect used coffee grounds and keep them in a zippered bag in the freezer. 2. When you need them, take the grounds out of the bag and dry them in the oven at 100 degrees for 15 minutes. Repeat if needed until they are completely dry. Fruit peels 1. Gather fruit peels from oranges, clementines, bananas, or other fruits. Remove any leftover fruit pulp, then place the peels in a zipper bag and refrigerate or freeze them. 2. Take off the white inner parts from the orange and banana peels, and remove any stems. 3. Toast the peels in the oven at 150 degrees for 30 minutes. They should be dry and brittle, but not burnt. 4. Grind the dried peels using a coffee grinder or a mortar and pestle.
* 40 ml Water
* 20 gr Gelatine
* 100 gr Eggshells or cashew shells
* Bain-Marie (around 80C)
* Sanitised Moulds
* Scale
* Spatulas x 2 / Spoons x 2
* Individual beakers for each material
* Measure all ingredients. Choose and sanitise a mould.
* Finely grind the eggshells.
* Mix water and gelatine in a glass beaker
* Cook beaker in Bain-Marie for 10 mins, keep stirring until texture has changed.
* Add shells and mix on heat until totally blended. For colour, mic food spices or terracotta.
* Pour the mixture into desired moulds.
The texture of my biocomposite was like a paste, making it easy to distribute into the moulds. The mixture shrank slightly in the drying process. It was stored overnight in the dehydrator, but in the larger mould the bottom side was still wet. It dried after approx. 48 hours in the dehydrator. The smaller robot mould lost its details, making me believe the material is better suited for smoother shapes.
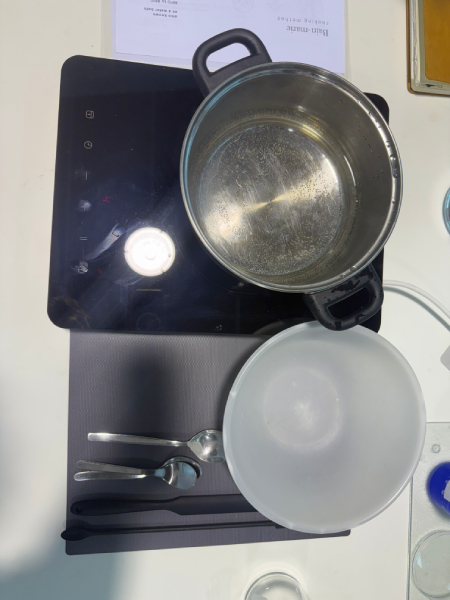
Equipment set up for Gelatine Protocols, documented by gh0re.grl, 2026.
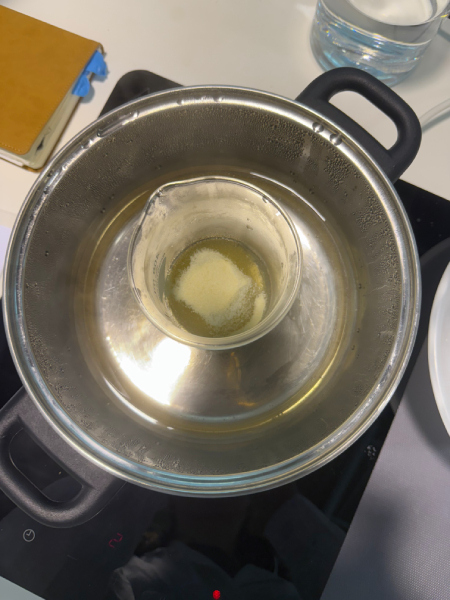
Melting Gelatine in Bain-Marie, documented by gh0re.grl, 2026.
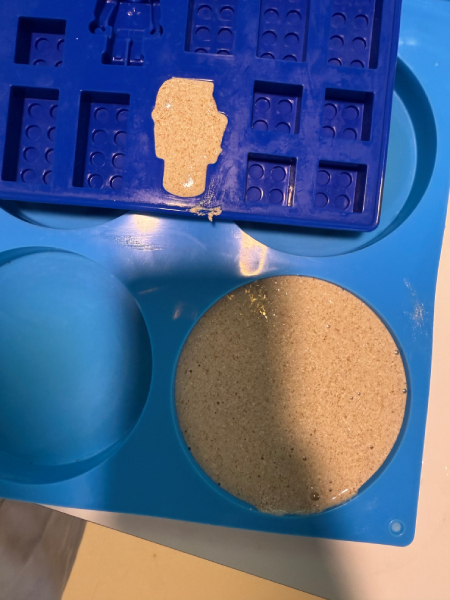
Wet Eggshell Biocomposites in mould, documented by gh0re.grl, 2026.
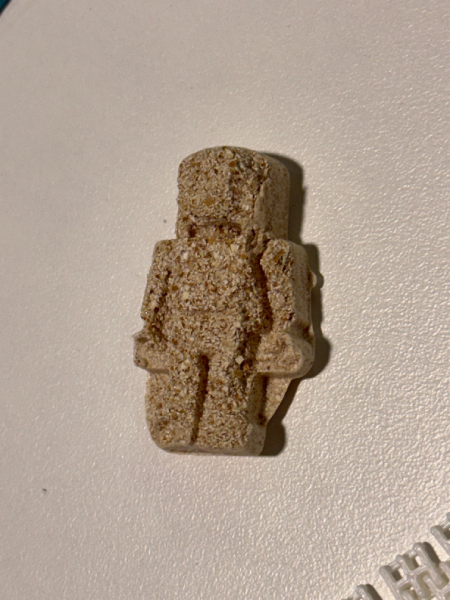
Small Robot Biocomposite that failed to retain detail, documented by gh0re.grl, 2026.
* 50 ml Water
* 5 gr Glycerine
* 10 gr Gelatine
* 5 ml Vinegar
* 15 gr coffee/orange/banana
* Bain-Marie (80C)
* Sanitised Moulds
* 2 x spatula / 2 x spoons
* Beakers for each material
* Scale
1. Measure the materials. Choose and sanitize a mould
2. On glass beaker (lab goblet) mix water with glycerine. After add the gelatine.
3. Cook in bain-marie – medium temperature (approx. 80ºC) for 10 min, keep stirring until you notice a change in texture
4. Add coffee grounds (or fruit peels) and keep stirring
5. Add the vinegar and mix well
6. Pour the mixture into the desired moulds
I made my first banana leather using the protocol provided, but believed the material was too runny. I made a second experiment, using 10ml less water and 5g more banana. This was quite thick and not as easy to fill the mould, so I think the perfect compromise would have been 5g more product and the same amount of water. However, after 1 night in the dehydrator, the drying had impacted the leathers greatly. The thicker one was no longer ‘clumpy’, and the protocol leather was strong enough and had amazing patterns caused by the deformation of the plastic moulds when I had poured the hot liquid into it. The modified leather was very tough like a traditional leather, and had more of a black/dense colouring. Both were strong but the second could confidently hold weight.
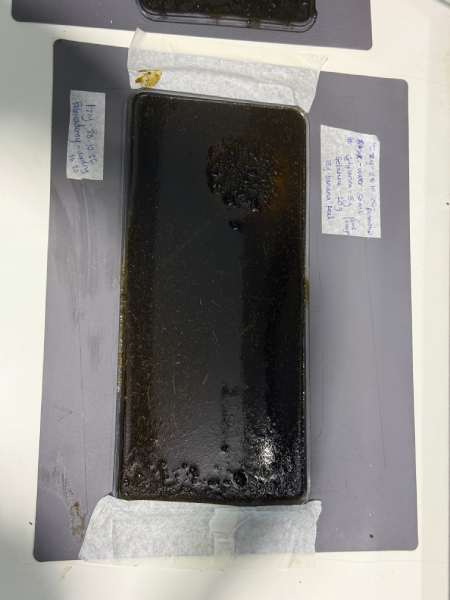
Wet banana leather had a markedly different texture, and was taped to help with mould deformation caused by heat. Documented by gh0re.grl, 2026.
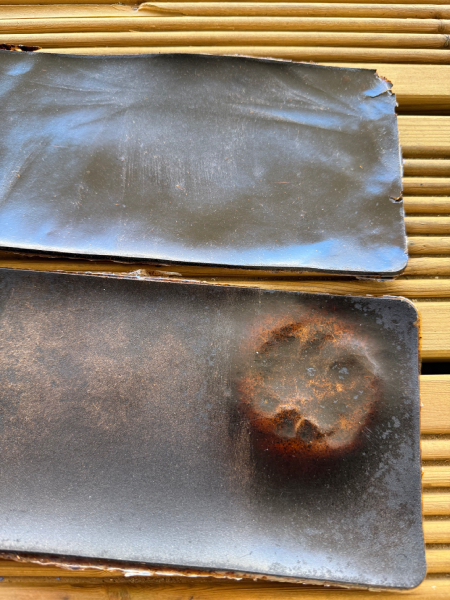
Banana leather samples, documented by gh0re.grl, 2026.
Video strength testing banana leather sample. Documented by Kim Ducharme, 2026
Process and Workflow: Alginate-based Biomaterials
Prepare the Spray: 10% Calcium Chloride Sol.
Ingredients: • 10g Calcium Chloride • 90 ml Distilled Water • 1 spray bottle Steps: 1. Measure 90ml Distilled Water and pour in a beaker 2. Measure 10g calcium chloride 3. Mix the calcium chloride using a wire whisk 4. Using a funnel pour in a spray bottle
* 30 ml Distilled Water
* 30 gr Eggshells
* 2 gr Sodium Alginate
* 10% Calcium Chloride solution (spray)
* 2 x spoon / 2 x spatula
* Sanitised Moulds
* Beakers for each material
* Scale
* Bowl for mixture
1. Measure the eggshells and ground to a powder.
2. Measure the remaining materials
3. Mix the shells and sodium alginate in a small bowl
4. Add water to the bowl slowly, mixing with a spatula
5. Spray moulds with 10% Calcium Chloride solution
6. Pour material into mould and spray again on top. Make sure spatula does not touch mould whilst pouring to avoid Calcium Chloride contamination.
this material was extremely clumpy and hard to mould. I experimented using turmeric and 96% ethanol ink as a dye. I used 5ml of the solution to create the documented colour, using a pipette to add 1ml at a time to adjust.
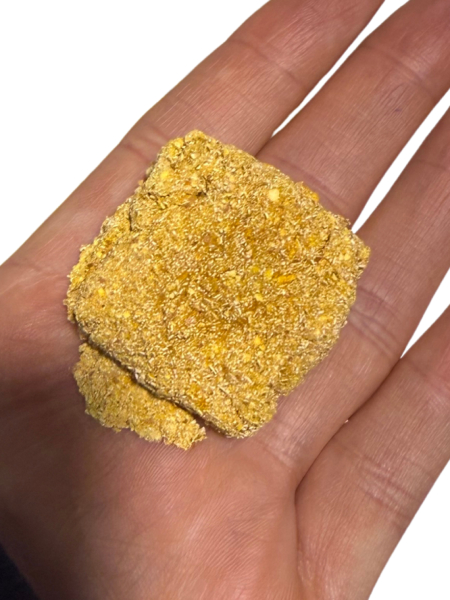
Dry bioceramic sample. Documented by gh0re.grl, 2026.
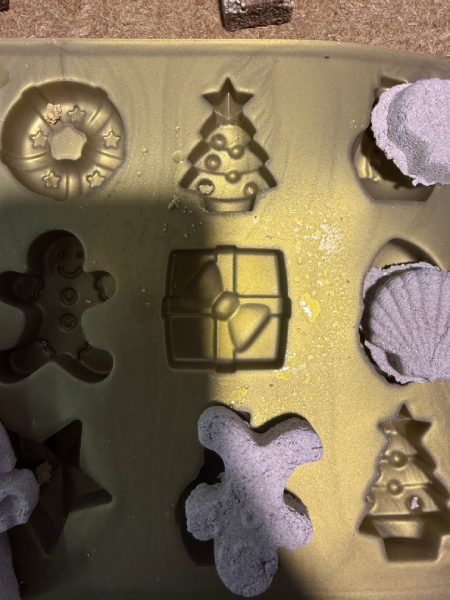
Mould used for Bioceramic. The material caused all loss of detail due to its viscosity. Documented by gh0re.grl, 2026.
* 75 ml Distilled Water
* 10 ml Glycerine
* 10% Calcium Chloride solution
* 5 gr Sodium Alginate
* 20 gr coffee/orange/banana
* 2 x spoon / 2 x spatula
* Sanitised Moulds
* Beakers for each material
* Scale
* Bowl for mixture
1. Measure the coffee grains and the remain materials.
2. Mix the coffee with alginate.
3. Mix water and glycerine in the beaker.
4. Add the coffee and alginate slowly, mixing with a spatula
5. Spray moulds with 10% Calcium Chloride solution
6. Pour material into mould and spray again on top. Make sure spatula does not touch mould whilst pouring to avoid Calcium Chloride contamination.
This recipe was a lot thicker than the gelatine bio-leather, making it very hard to mould. I used coffee grounds as my base material. I tried to spread it into the same mould as the banana bio-leather but it didn’t work well. The material remained thick, dense and cracked. I air dried the leather and it took 3 days.
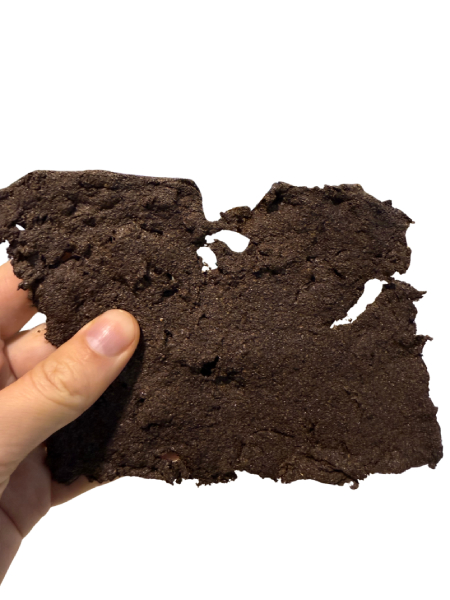
Dry Coffee leather sample. Documented by gh0re.grl, 2026.
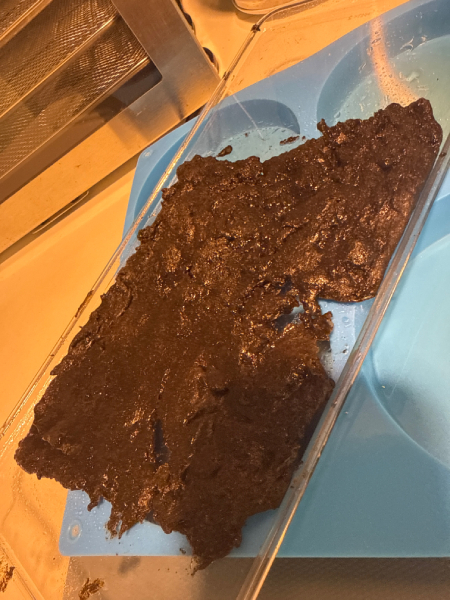
Wet coffee leather in mould. Difficult to spread and very thick. Documented by gh0re.grl, 2026.
Process and Workflow: Bio-Plastics
Preparing the bath: 5% Calcium Chloride Sol.
Ingredients: 20g Calcium Chloride 380ml Distilled Water 2 big bowls or beakers Steps: 1. Measure 380ml Distilled Water and pour in a beaker\ 2. Measure 20g calcium chloride 3. Mix the calcium chloride using a wire whisk 4. Reserve in a big bowl 5. Fill another bowl with 500ml tap water
Making yarn
- Fill syringe with material and extrude above cure bath in desired length. Try to prevent clogging/overlap
- Let bio-yarn harden for 2-5 minutes then remove from bath.
- Wash yarns in bowl of tap water and leave to dry
* 400 ml Distilled Water
* 30 gr Glycerine
* 12 gr Sodium Alginate
* 10% Calcium Chloride solution (spray)
* 2 x spoon / 2 x spatula
* Blender
* Beakers for each material
* Scale
* Bowl for mixture
1. Mix water and glycerine. Emulsify with blender.
2. Add alginate. Emulsify until uniform. Add colour.
3. Rest 8 hours to release bubbles.
4. Spray mould with 10% Calcium Chloride solution
5. Pour material into mould and spray again on top. Make sure spatula does not touch mould whilst pouring to avoid Calcium Chloride contamination.
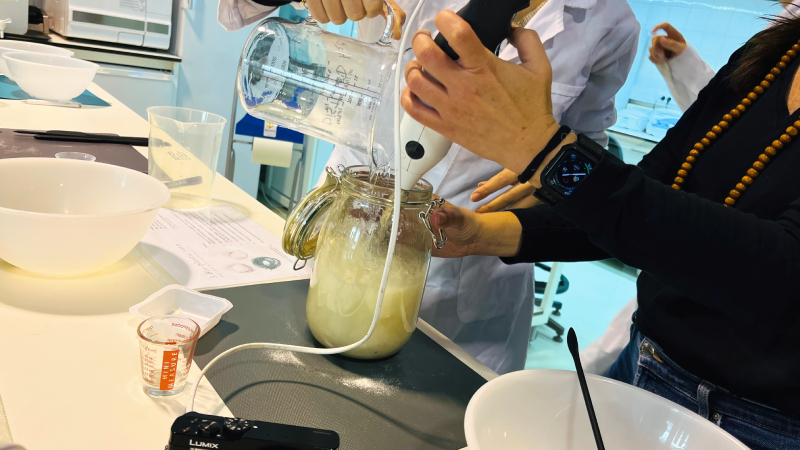 Emulsifying bioplastic at Biolab Lisboa, documented by Kim Ducharme, 2026
I added 15ml hibiscus dye to a 200ml sample of this mixture. It created a very small colour difference.
* 400 ml Distilled Water
* 30 gr Glycerine
* 8 gr Sodium Alginate
* 10% Calcium Chloride solution (spray)
* 2 x spoon / 2 x spatula
* Blender
* Beakers for each material
* Scale
* Bowl for mixture
1. Mix water and glycerine. Emulsify with blender.
2. Add alginate. Emulsify until uniform. Add colour.
3. Rest 8 hours to release bubbles.
4. Spray mould with 10% Calcium Chloride solution
5. Pour material into mould and spray again on top. Make sure spatula does not touch mould whilst pouring to avoid Calcium Chloride contamination.
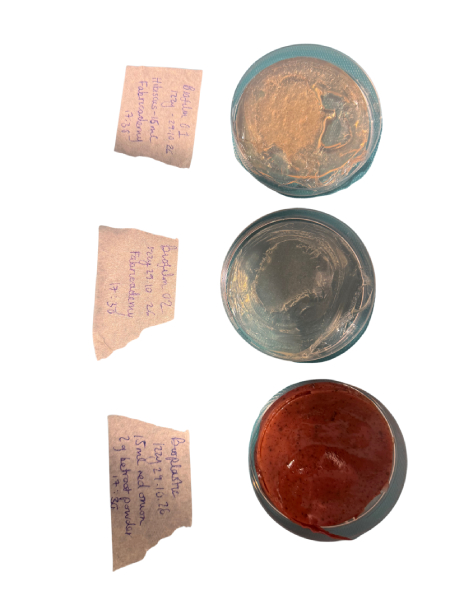
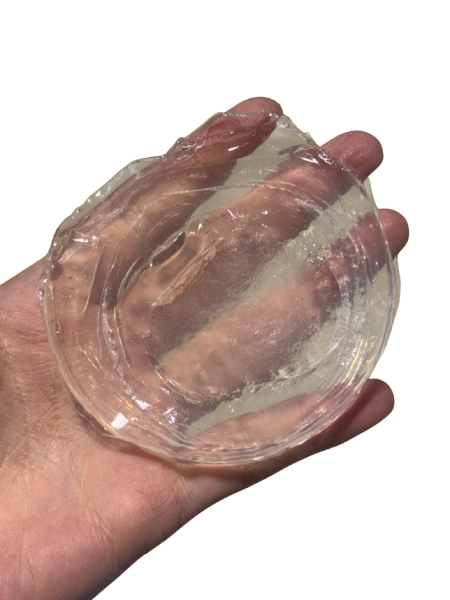
Wet bioplastic samples. Documented by gh0re.grl, 2026.
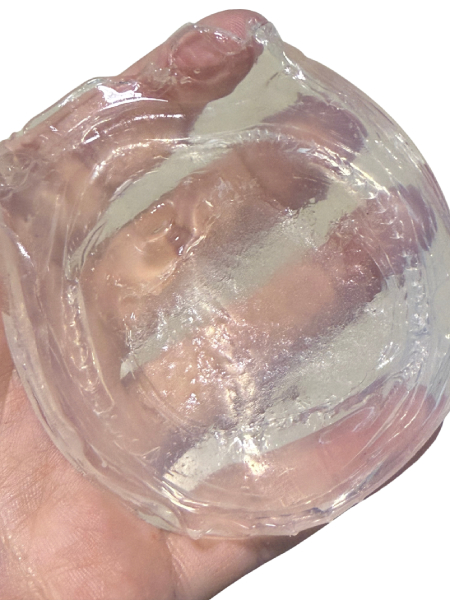
Biofilm 2 sample after 48 hours. Documented by gh0re.grl, 2026.
When adding my samples to the petri dishes, I should have utilised the high pour / tapping method used with silicone to minimise air bubbles. However a lot dispersed over the 48 hours I left the samples to dry. The materials felt and acted like silicone when handled.
* 400 ml Distilled Water
* 40 gr Glycerine
* 24 gr Sodium Alginate
* 20gr Sunflower Oil
* 10% Calcium Chloride solution (spray)
* 2 x spoon / 2 x spatula
* Blender
* Beakers for each material
* Scale
* Bowl for mixture
1. Mix water and glycerine. Emulsify with blender.
2. Add alginate. Emulsify until uniform. Add colour + sunflower oil.
3. Rest 8 hours to release bubbles.
4. Spray mould with 10% Calcium Chloride solution
5. Pour material into mould and spray again on top. Make sure spatula does not touch mould whilst pouring to avoid Calcium Chloride contamination.
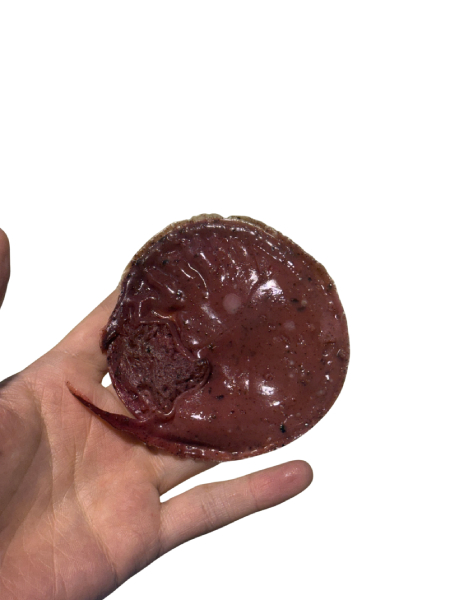
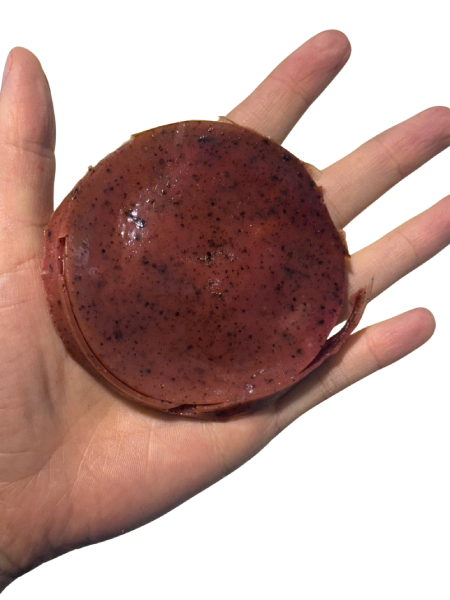
Dry bioplastic sample after 72 hours. Documented by gh0re.grl, 2026.
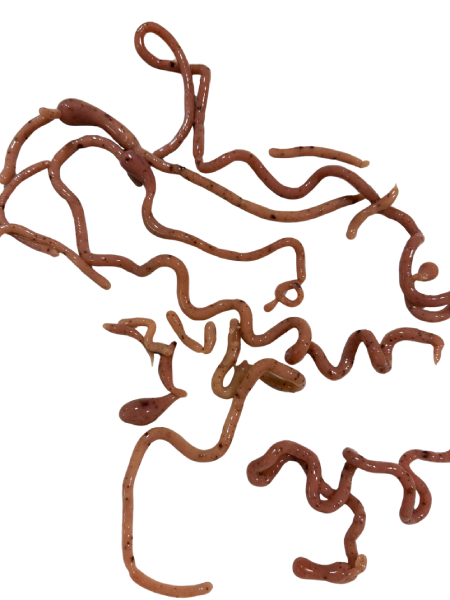
Bioplatic turned into 'yarns'. Documented by gh0re.grl, 2026.
I extruded the bio-plastic to make a yarn, which came out more like worms due to the thickness of the material and the colour. I used 15ml red cabbage skins and 96% ethanol dye but the colour change was barely noticeable, so I used 2g of the dehydrated beetroot powder. This was a very concentrated pigment, although it left some ‘lumps’ where the powder did not fully dissolve even after vigorous mixing.
Results Table
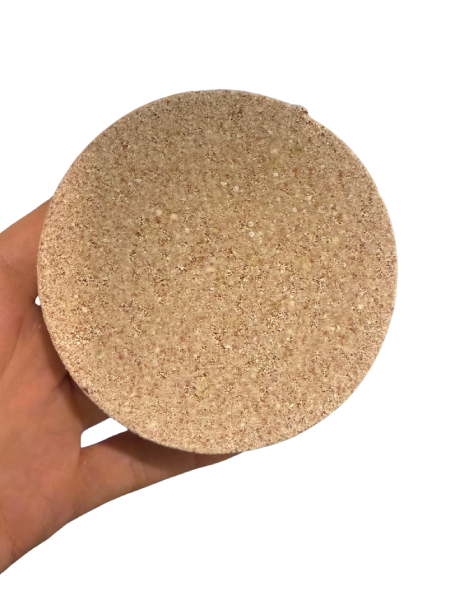 Biocomposite: Gelatine |
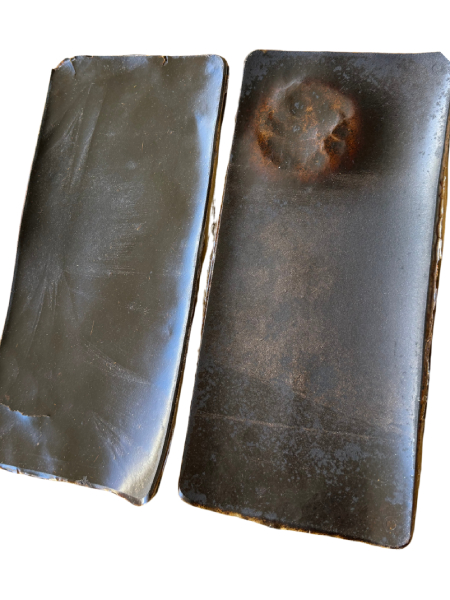 Banana Leather: Gelatine |
Coffee Leather: Alginate |
Bioceramic: Gelatine |
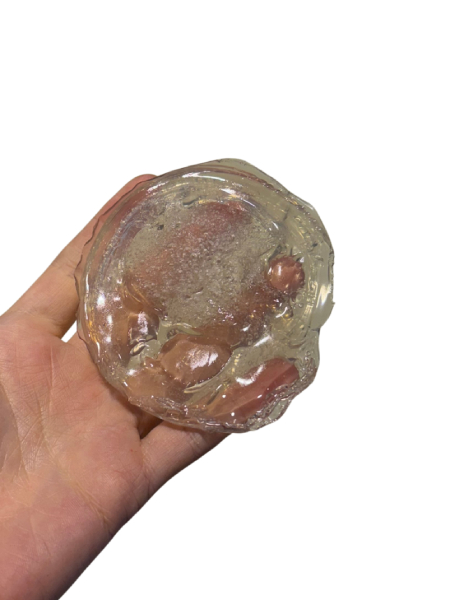 Biofilm 01 |
 Biofilm 02 |
Bioplastic YARN Protocol |
 Bioplastic |
Mycelium Starter
Preparing the Medium
Mycelium Medium Preparation Protocol Types Liquid (broth) & Solid (agar plates) Purpose: Prepare sterile nutrient media to grow and cultivate mycelium under controlled conditions. Liquid Medium (Malt Extract Broth) Ingredients: Malt extract – 2 g Distilled water – 100 mL Mix well, sterilise at 121°C for 40 min, and let cool before inoculation. Liquid Solid (Malt Extract Agar) Ingredients: Malt extract – 2 g Agar- 2 g Distilled water – 100 mL Dissolve, sterilise for 40 min, pour into Petri dishes, and store at 4°C. Tips: Start Agar mix with high temperature Use sterilization indicator strips/tape to verify that autoclaving or sterilization of media and tools is effective. Label containers with date, medium type, and batch. Store liquid medium at 4°C if not used immediately.
Laminar Flow Hood Preparation
- Turn on
- Clean inner surfaces with 70% alcohol: side walls, metal work surface, front glass, and under the metal work surface (if needed).
- If necessary, also clean the outer surfaces with 70% alcohol.Place all necessary materials inside
- Arrange all sterilised and required materials inside the hood before starting work.
- Organise items to avoid unnecessary movement during procedures.
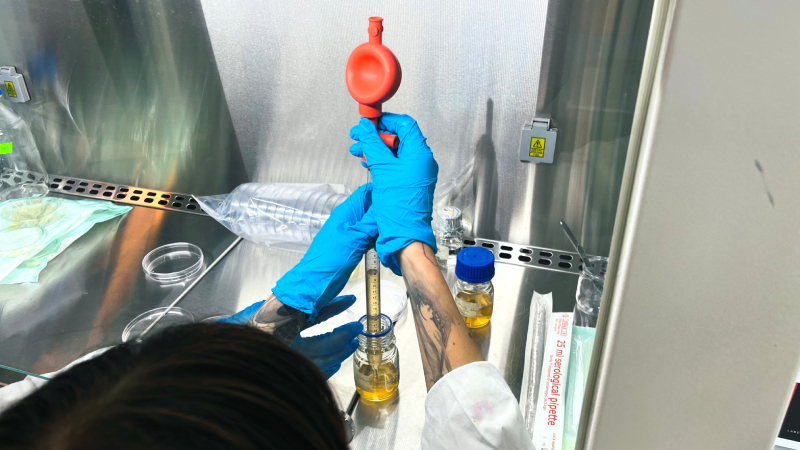
Extracting medium for new petri dish. Documented by Kim Ducharme, 2026.
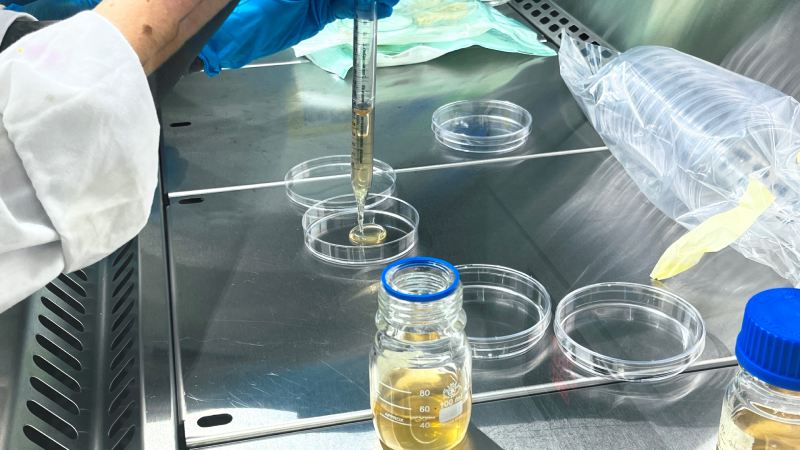
Placing medium into petri dish for inoculation. Documented by Kim Ducharme, 2026.
Inoculation / Incubation:
- Transfer culture to liquid or solid medium using sterilized tools.
- When using a pipette pump: E / S allow you to take / expel fluid.
- Make sure the pipette is always in medium to avoid air bubbles.
- Place the medium in the centre of the petri and distribute evenly.
- Slice mycelium from corners of prepared petri dish (as this is newest growths)
- Slice thinly so there is minimum medium on your sample, and place face down in the centre of your petri.
- Seal, label and pace inoculated plates and flasks in an incubator at 26°C. Post-Work Cleaning: Clean all internal surfaces of the hood again with 70% alcohol after finishing the session. Tips:
- For solid plates, invert during incubation to prevent condensation drops on mycelium.
- Always wear gloves, lab coat, and safety glasses when working in the hood.
- Always work in the center of the hood and avoid reaching over materials to prevent contamination.
- Minimize airflow and movement to reduce contamination risk.
- Label all plates and flasks clearly with date, name and culture type.
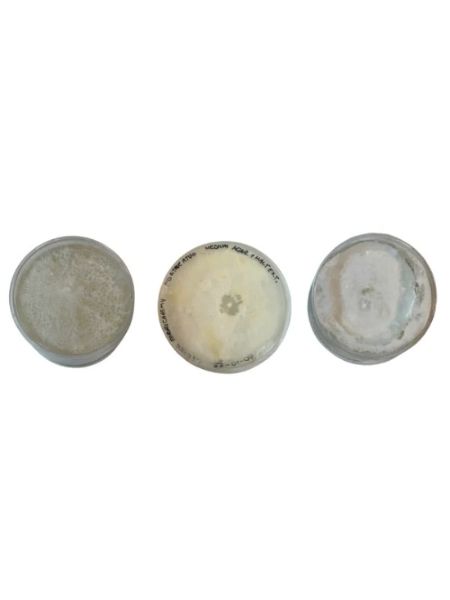
Mycelium samples available for extraction at Biolab Lisboa. Documented by gh0re.grl, 2026.
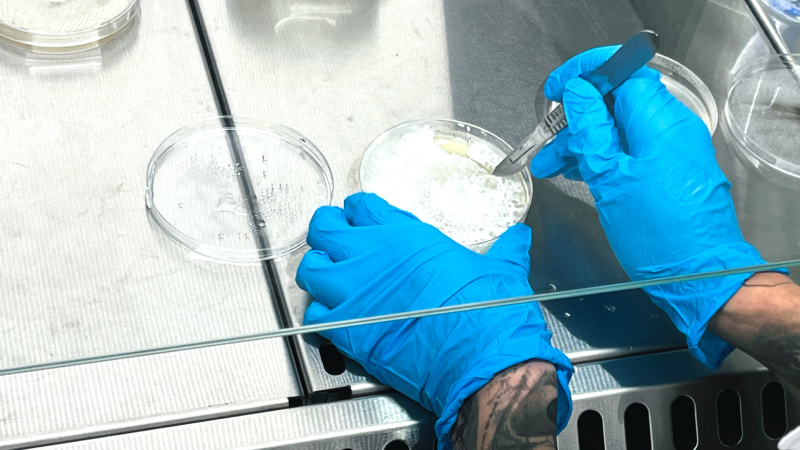
Inocolation process, documented by Kim Ducharme, 2026.
References
-
Reference: Michaela Nesvarova, The living patch: could a tea-inspired material help treat eczema?, Horizon: the EU Research and Innovation Magazine, 2026. ↩
-
Reference: Turning kombucha waste into sustainable electronics, NUS: College of Design and Engineering, 2025. ↩
-
Reference: Kombucha inspires engineered living materials, Prachi Patel, Chemical and Engineering News, 2021. ↩
-
Reference: Kombucha electronics: electronic circuits on kombucha mats, Andrew Adamatzky, Giuseppe Tarabella, Neil Phillips, Alessandro Chiolerio, Pasquale D’Angelo, Anna Nikolaidou, Georgios Ch Sirakoulis, PubMed Central, 2023 ↩
-
Reference: From Grave to Cradle: Kombucha Waste for Sustainable Electronics, Xin Ying Chan, Xiaolu Sun, Eddy Yi Ler Pang, Iris Zhiyu Ren, Xuan Zhang, Pengyu Chen, Yu Jun Tan, Advanced Science, 2025 ↩