Digital Bodies
Reconstructing a Dancer
This week, I explored creating digital bodies.
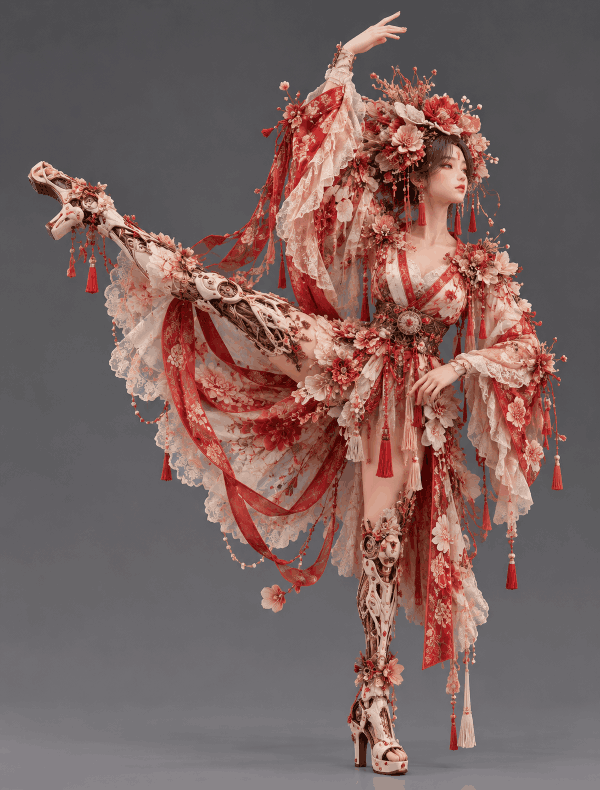
Both my mother and my uncle were professional dancers, so the human body has held a special meaning for me since my earliest memories. Dancers spend years training not only their bodies, but also their minds and spirits. The lines created by trained muscles—the extension of a leg, the curve of a back, the articulation of a hand—become both their artistic language and a source of pride.
Yet a dancer's body is also temporary. Eventually, age changes what it can do, and movements that once felt instinctive may no longer be possible. In the last few years, I have often noticed a trace of sadness in my families eyes when the body they spent a lifetime cultivating can no longer move as it once did. This project begins with that dab of blue sorrow: How can we preserve the memory of a body—not simply what it looked like, but how it moved?
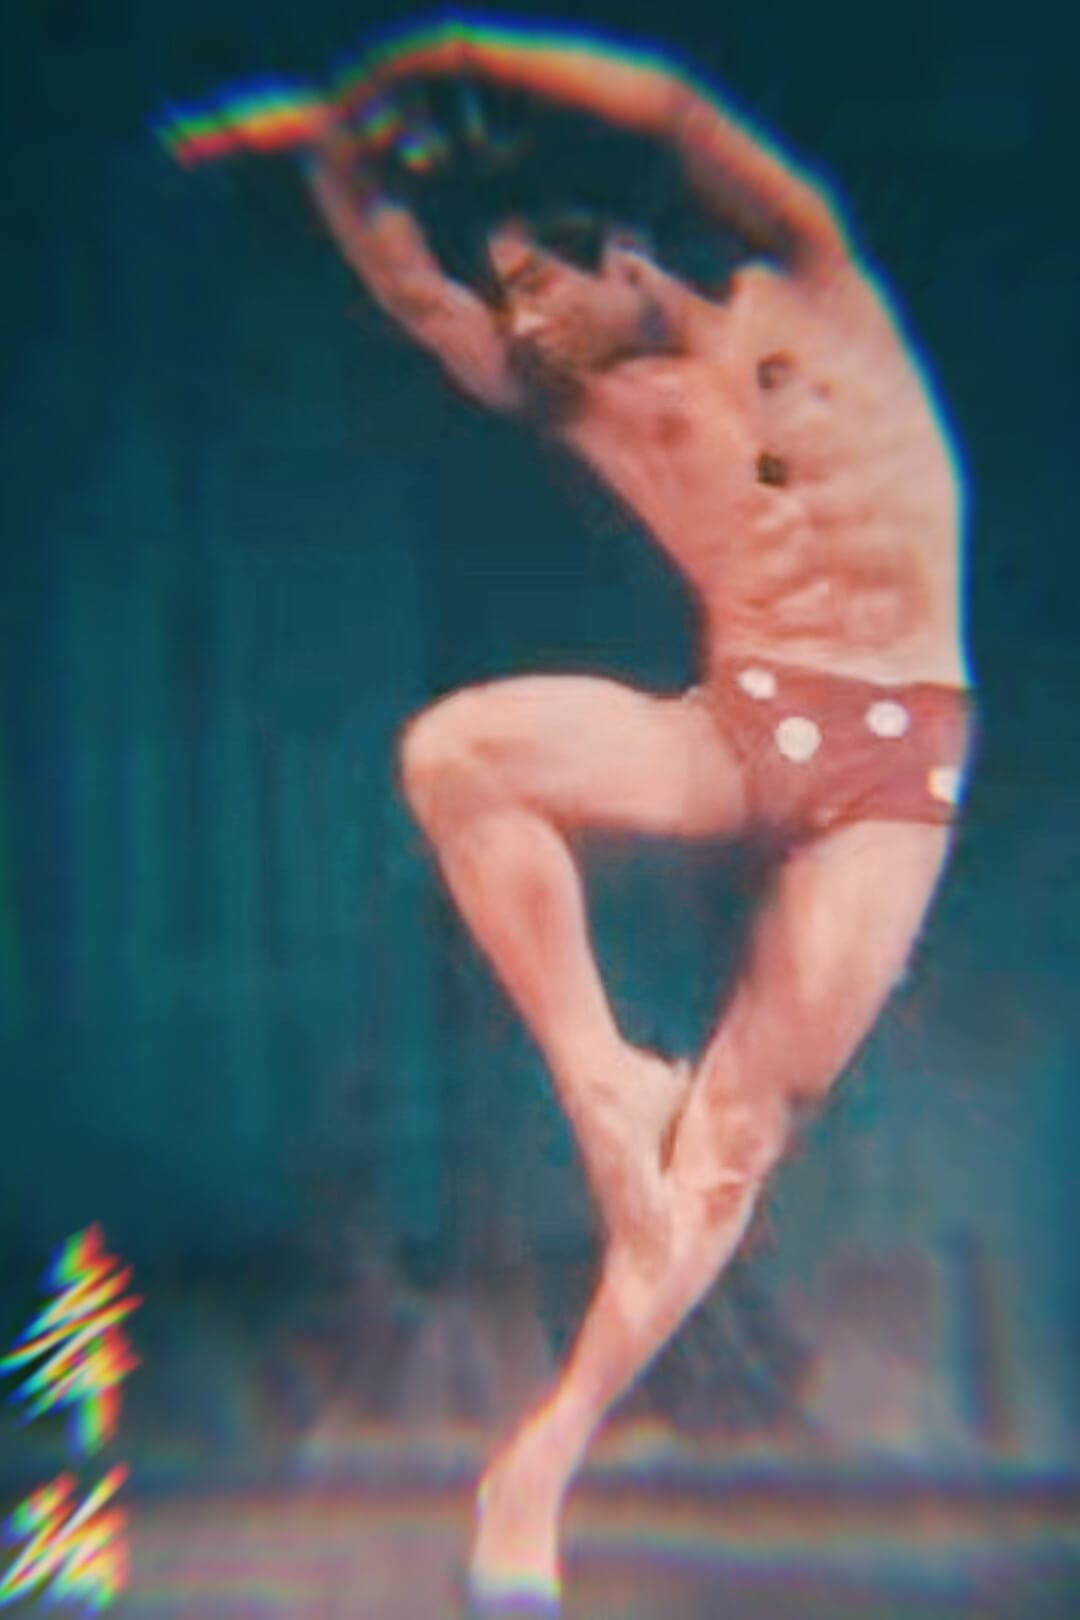
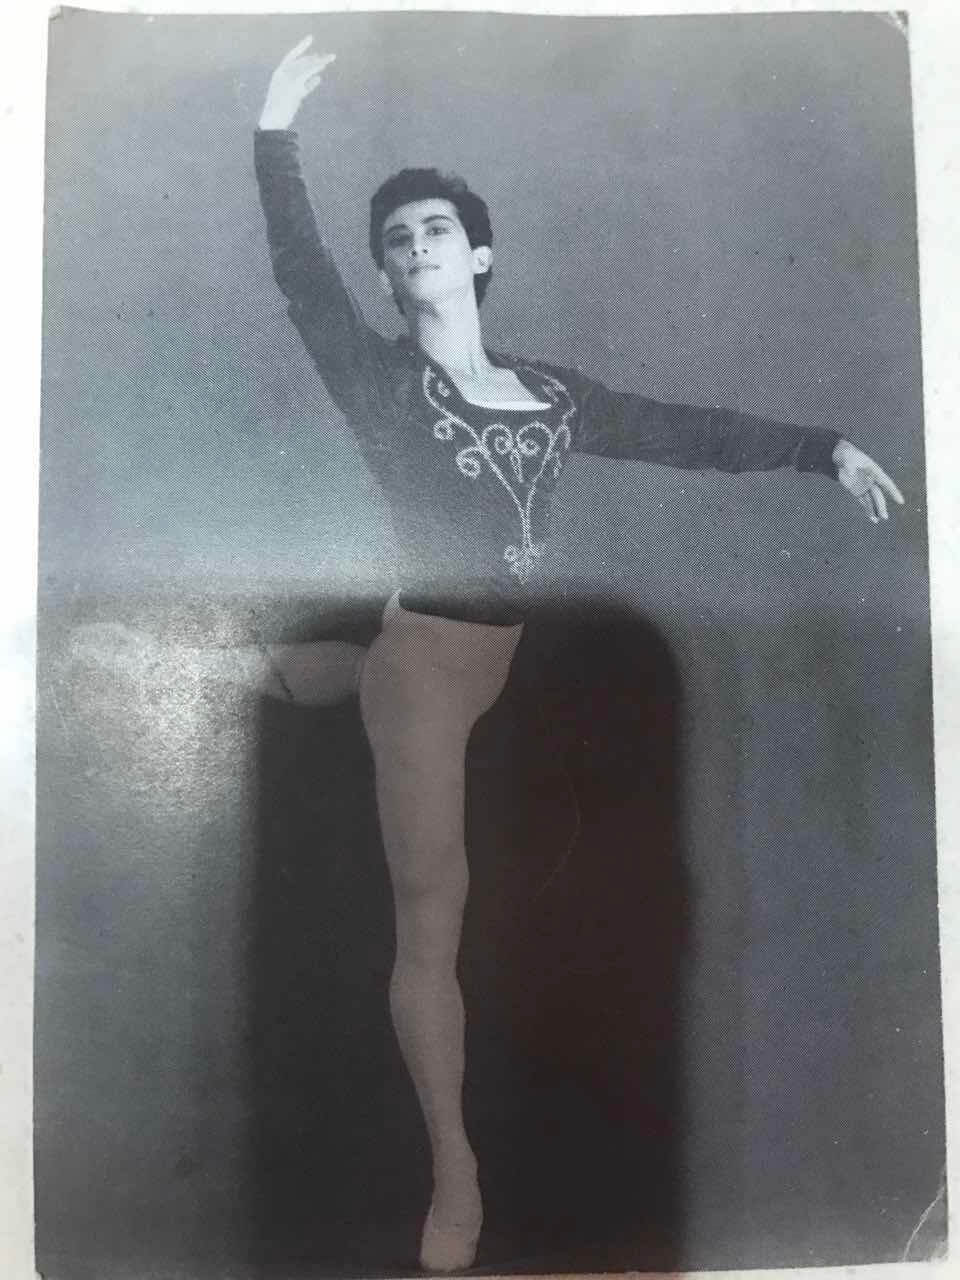
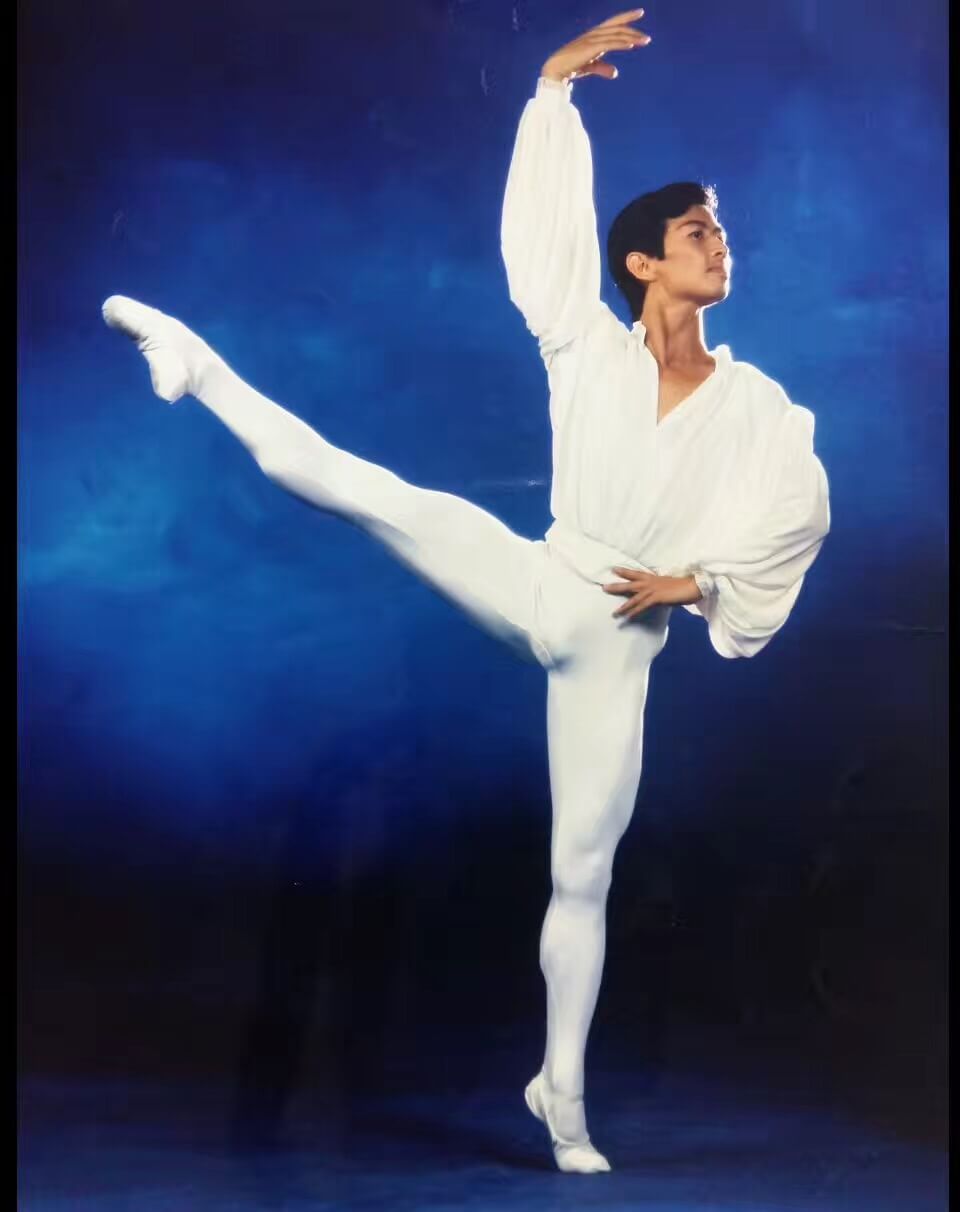
So for this project, I chose to honor my uncle - who dedicated his whole life to ballet. When I was growing up as a kid, he is like a hero to me. He performed in the United States as principle dancer at Ballet West (Salt Lake City) for nearly 20 years. I was a child living in China back then, and never was able to see him live on stage unfortunately. But I remember the fond memory of whole family getting together admire the postcards of his beautiful poses.
So I found one of my favourite archival photographs of him dancing, I want to create something special using the digital fabrication techniques we are learning in this course to honor his unique human body, and for all his artistic pursue and legends.
My workflow explores:
Photograph → Digital Body → Computational Slices → Fabricated Body
1. Concept & Inspiration
Rather than focusing only on anatomical accuracy, I wanted to preserve the qualities that identify a dancer:
- posture
- gesture
- balance
- extension
- movement
- silhouette
- the relationship between body and costume
These are some of my uncle's old archived photographs that I used in creating my human-body model:
I especially wanted to explore contour slicing sculpture style like this:
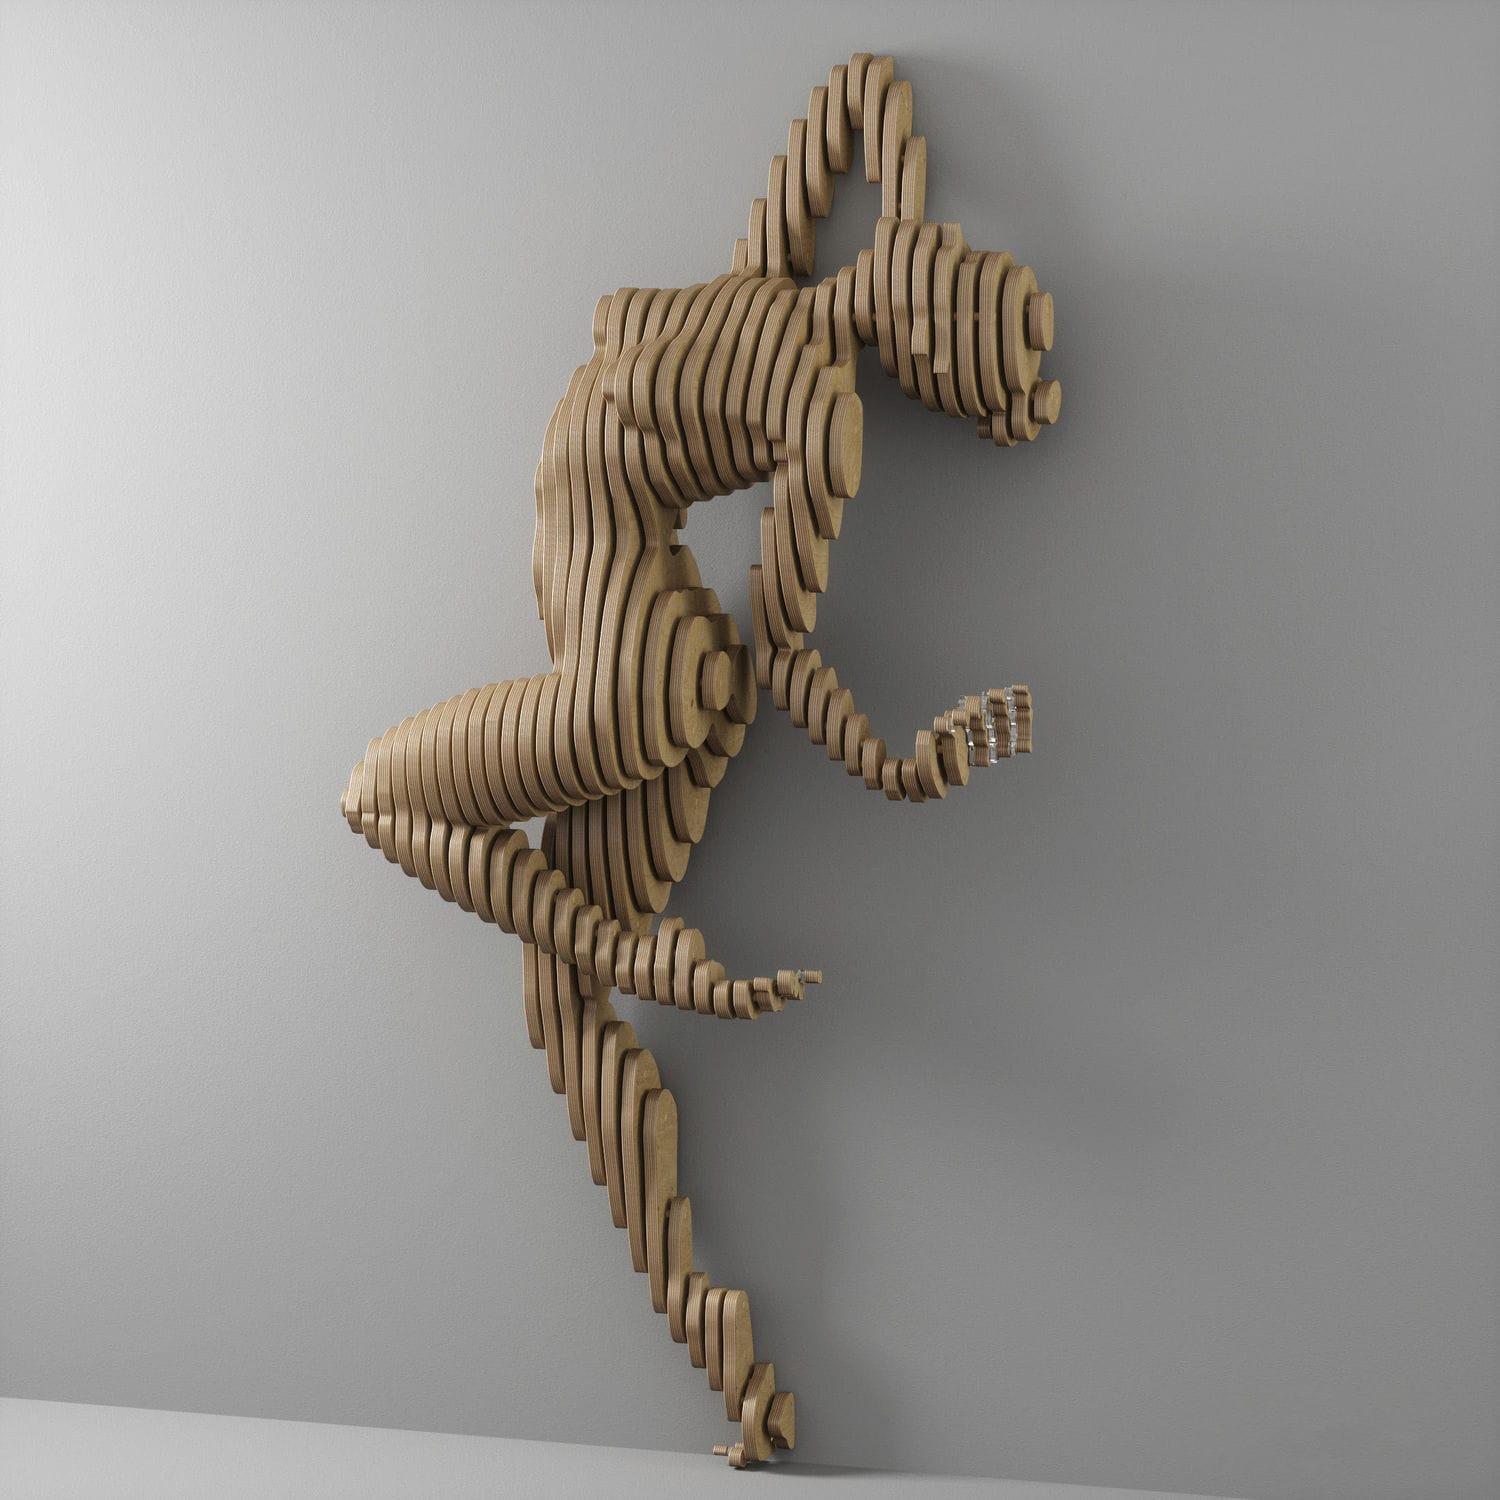
Source: Birch Sculture by Anna
I like it because it gives a beautiful metaphor for reconstructing a person from fragments of photographic information and memory. From materials wise, I can also interate this from cardboard, plywood to eventually do this with precious plastic.
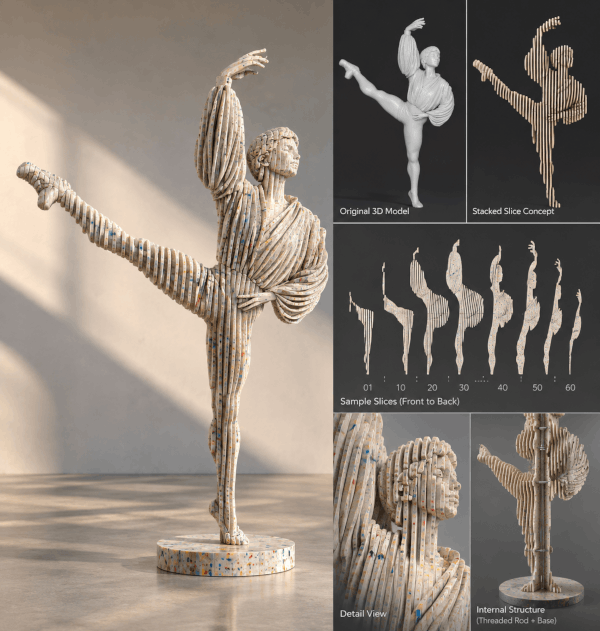
2. Creating the Digital Body
Tools
- MakeHumanBody — MakeHuman Open Source Project, add-on for Blender
- TripoAI — Generate the initial 3D body
- hi3d — Tried to use but failed
I tried the MakeHuman Project workflow in Blender - this is a powerful way to create any kind of digital avatar.
However, I liked the workflow of leverage new AI toolings to generate the 3D model better, as I was able to create a digital body from my uncle's archived photograph images.
I think it is a powerful way to bring memories and personal histories into new physical forms—transforming photographs that once existed only as records of the past into digital objects that can be explored, modified, and eventually fabricated.
Tripo3D's was very use to use, and there seems to be API options available to more advanced developer flow as well to bring it into a native product. However, there is a limited quantity of token that comes with free tier. I was able to get a first draft of 3D model file though.
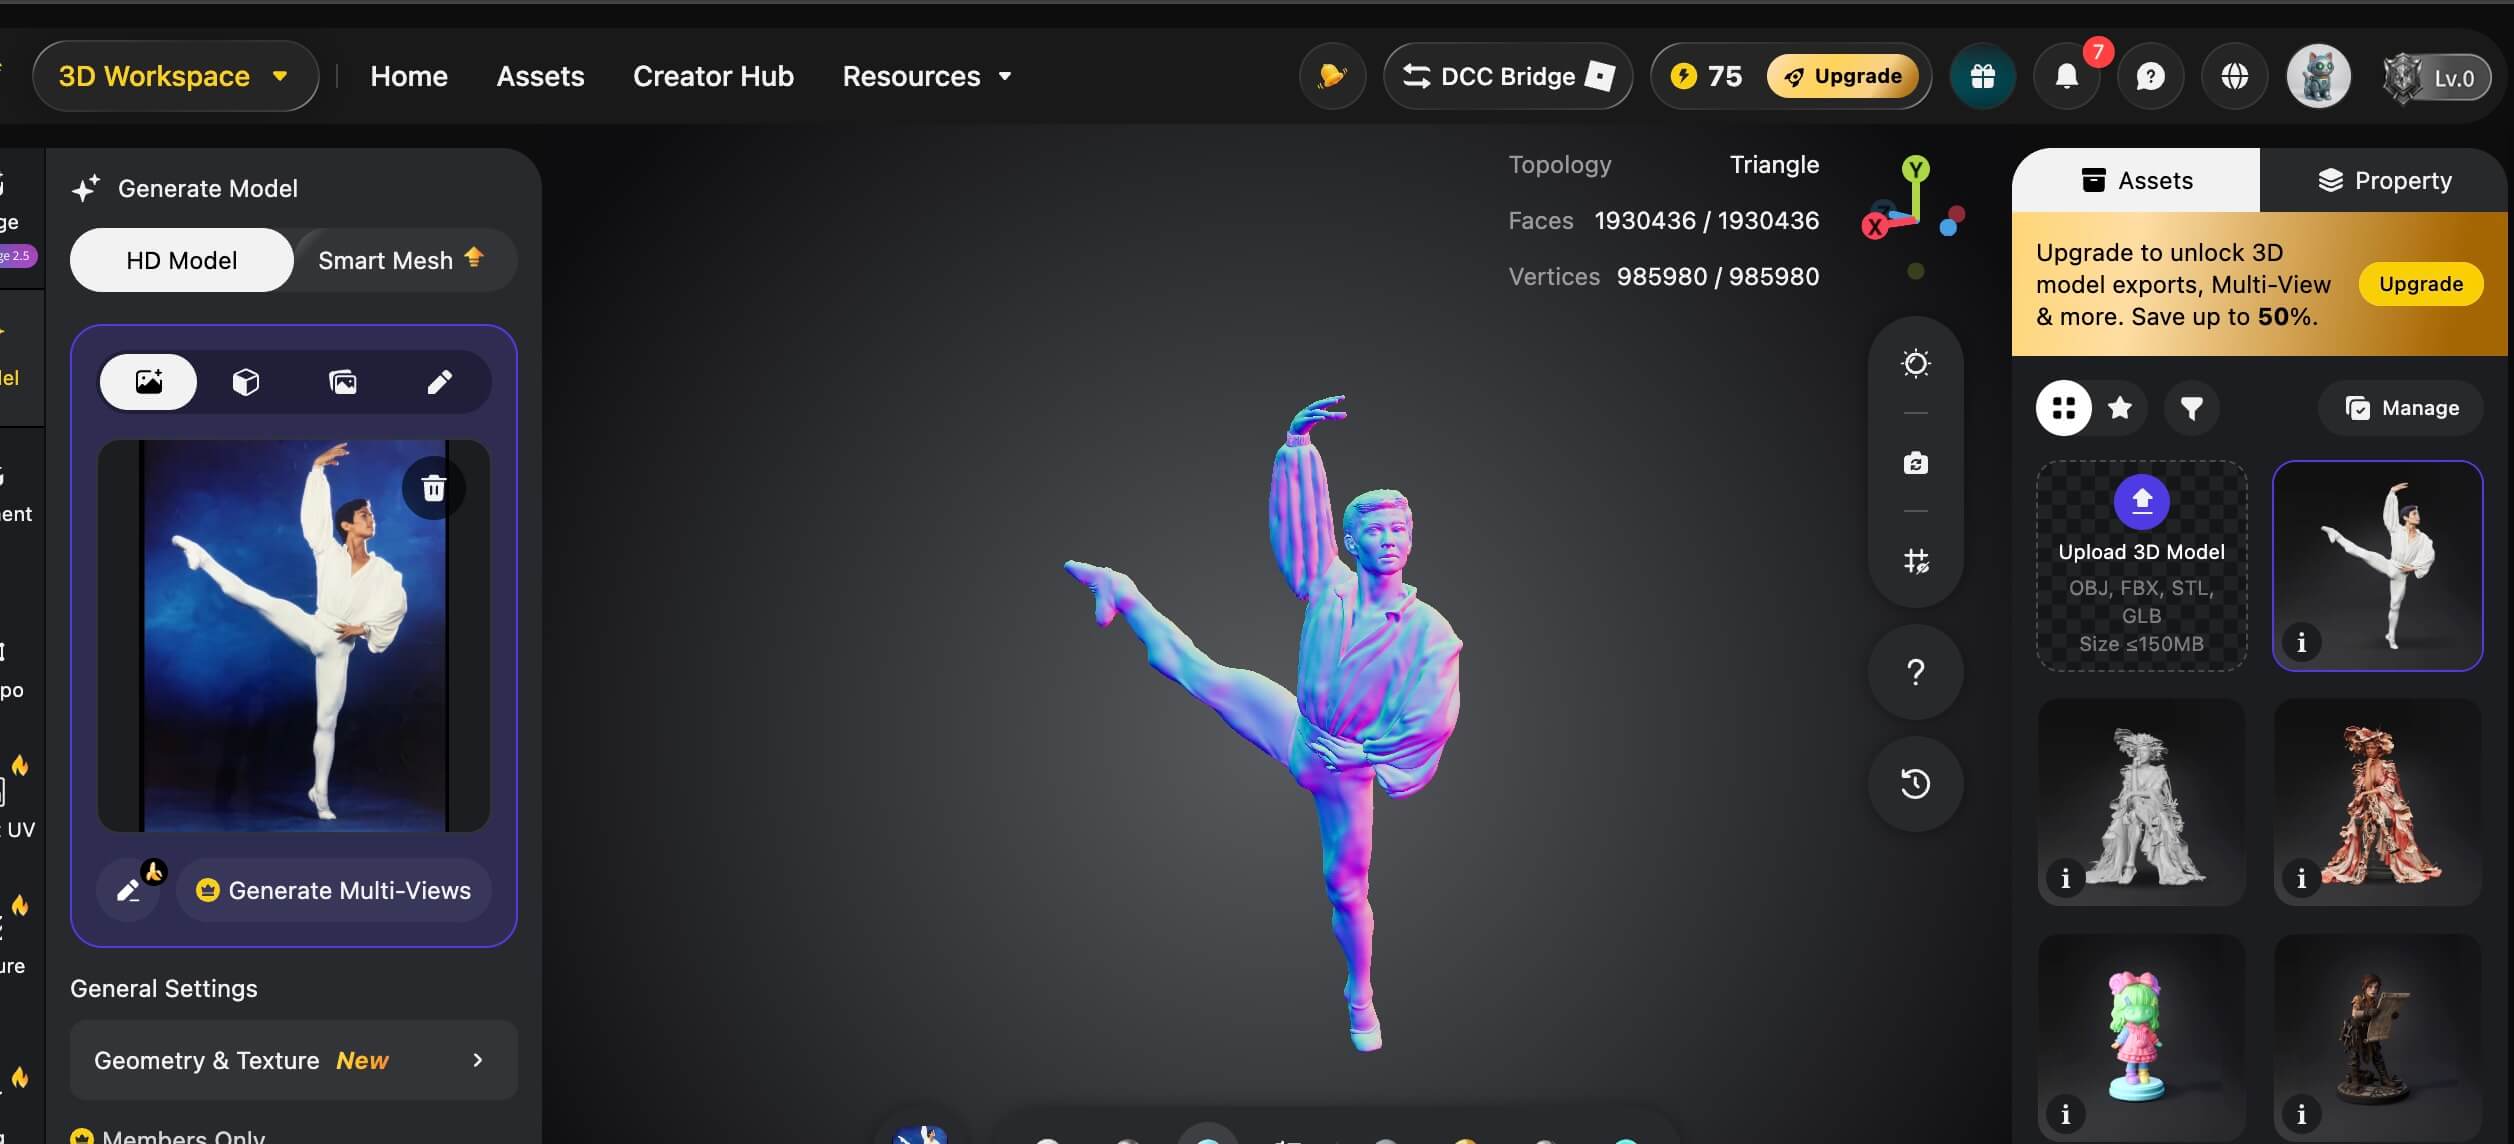
Tripo3D Generated 3D Model
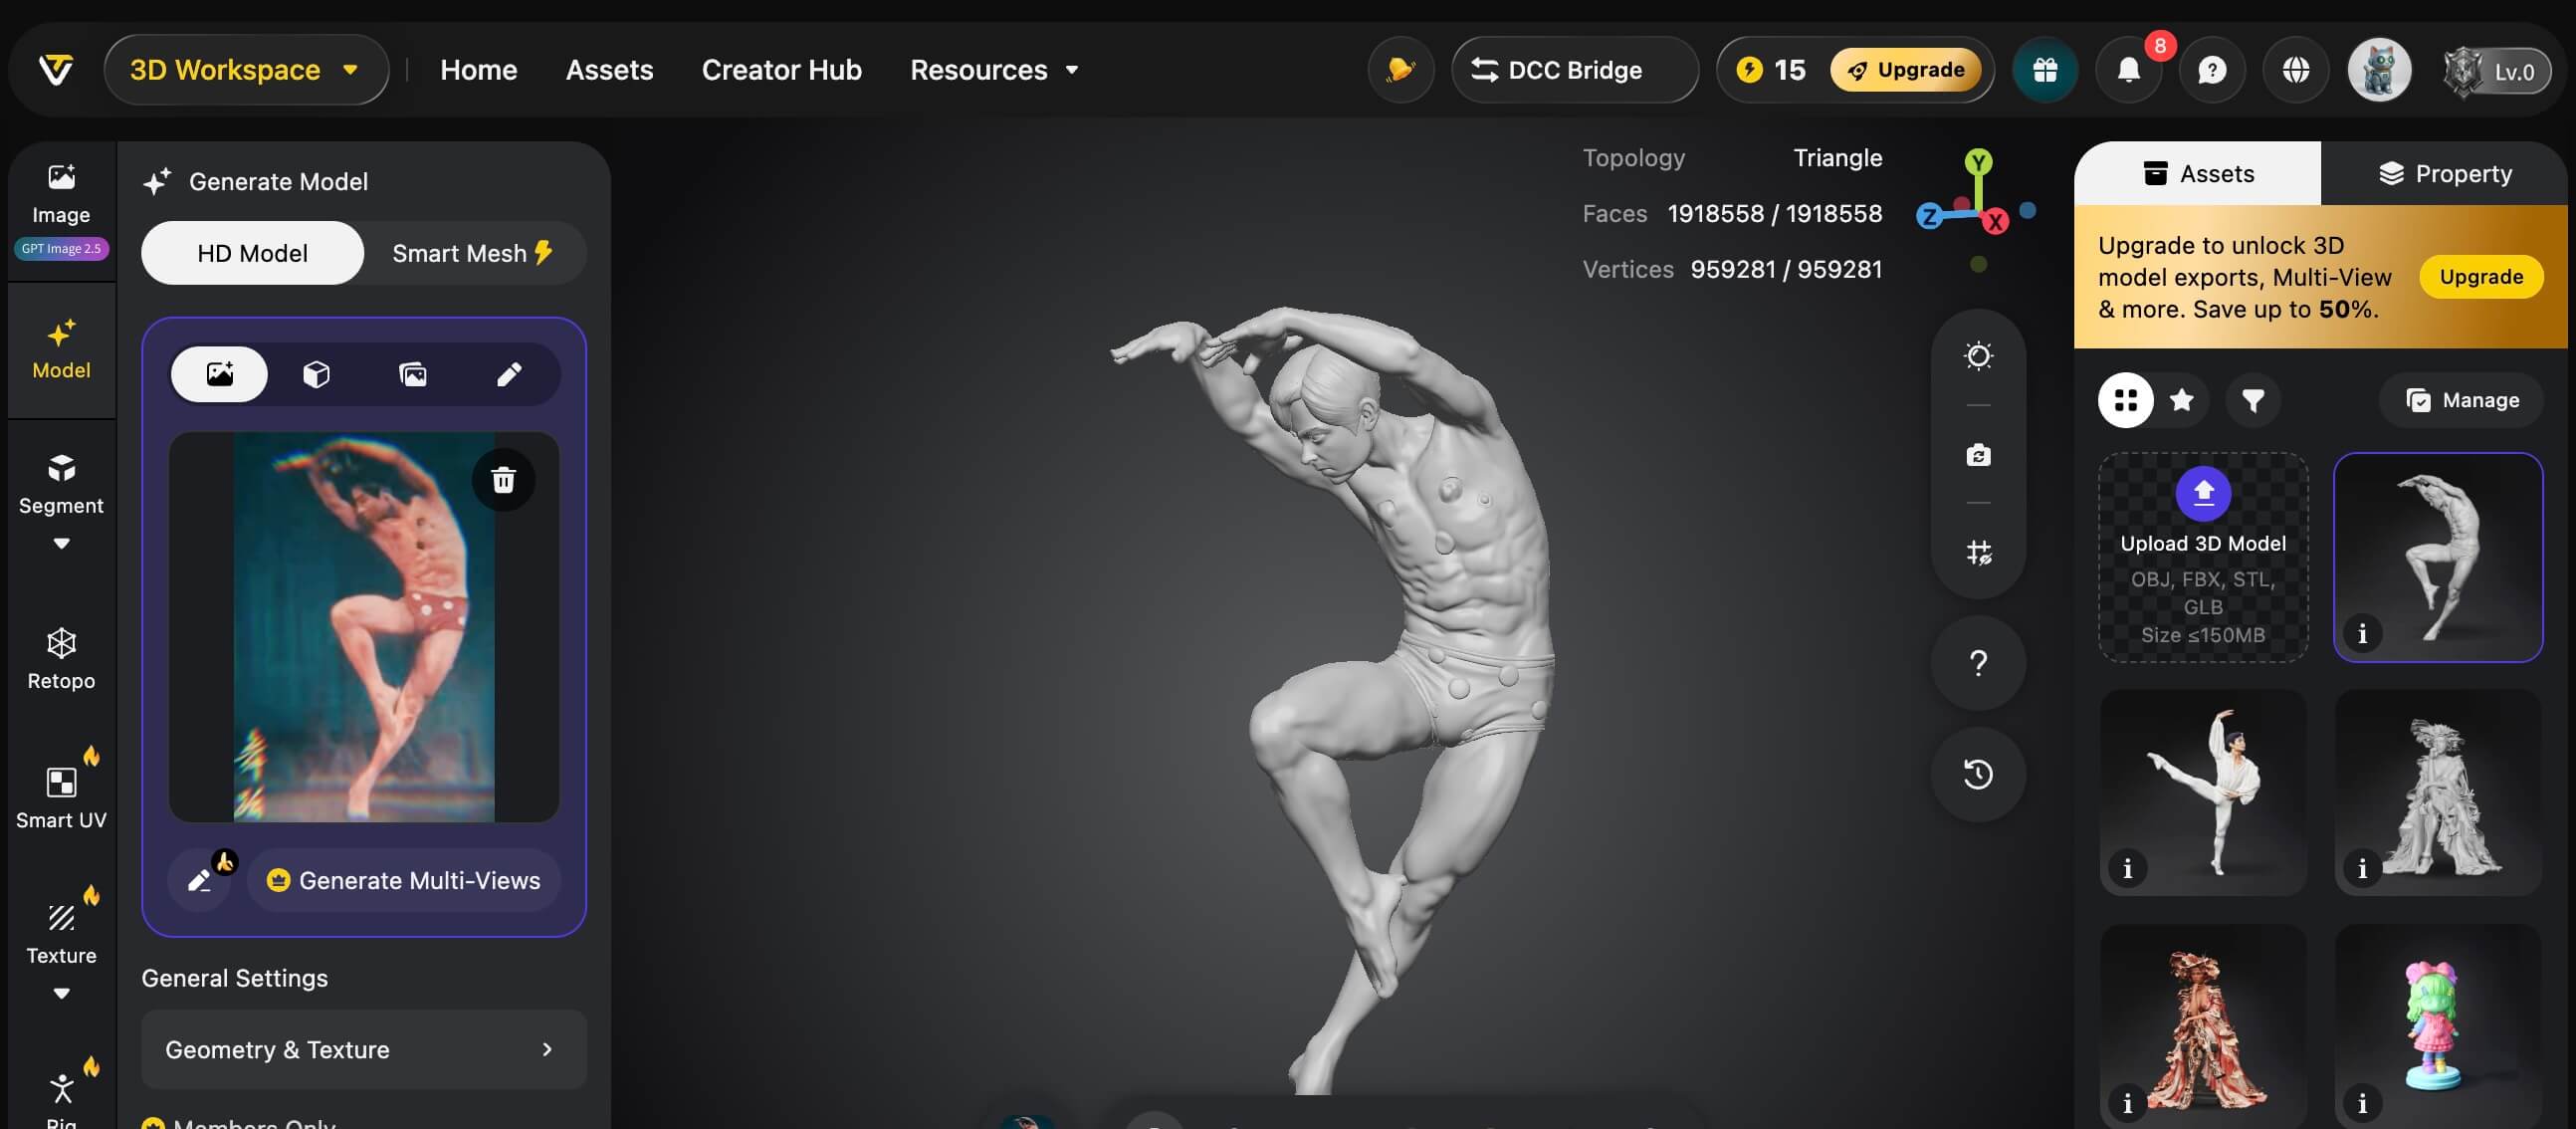
Tripo3D Generated 3D Model
First Fabrication File Output
STL: First draft 3D Model
I tried other AI software as well, such as hi3D. Some had a very interesting ChatGPT-like interface. But most of them all have weird billing issues like below.
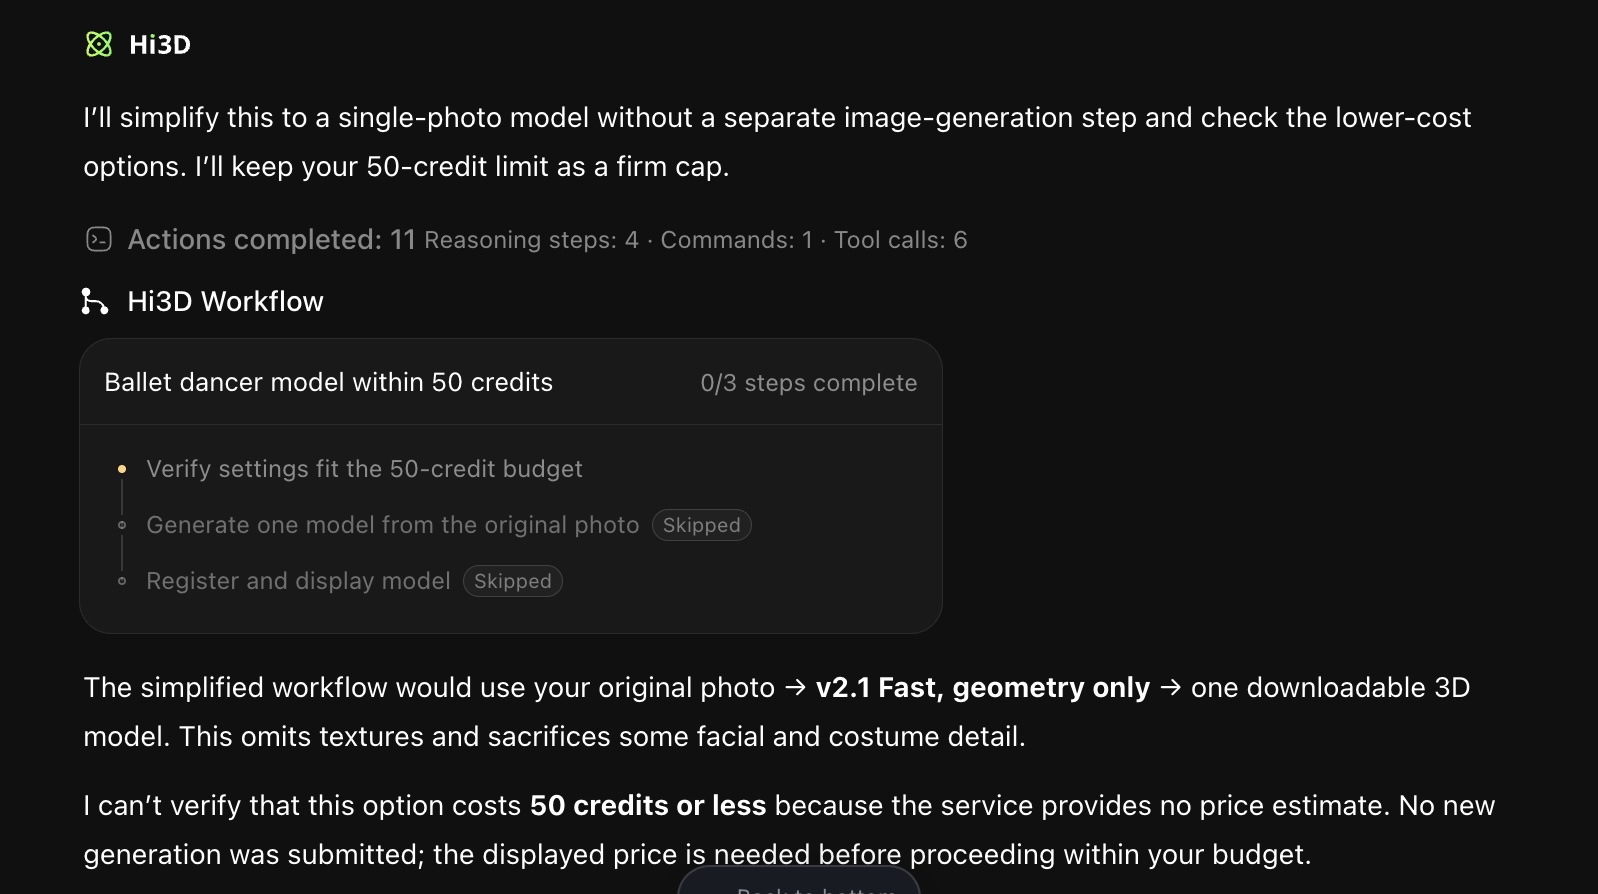
3. Manipulating and Repairing the 3D Model
Tools
Before fabrication, the mesh needed to be cleaned up/repaired.
I put the first 3D model file in ChatGPT and it said: the mesh contains about 204,000 triangles, its proportions are approximately 0.652 W × 0.199 D × 1.000 H, and the STL appears to be normalized rather than stored at a real-world scale. So if you make the dancer 1700 mm tall, the overall envelope would be roughly 1108 × 338 × 1700 mm. The mesh is currently not watertight and contains about 20 disconnected components, so I would repair/merge it before generating final cutting files.
Geometry Repairs
There could be a lot of detailed mesh manipulating work around: - hands - feet - costume folds - extended leg
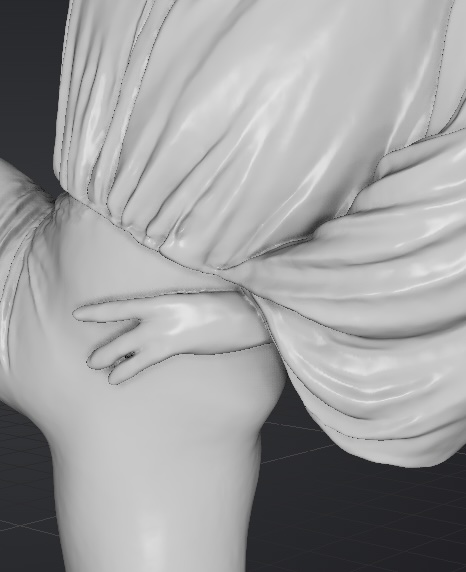
Left Hand
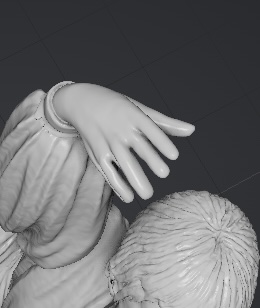
Right Hand
But for this project specifically, I didn't spend too much time on the details, understanding the process was more important, so I mainly was aiming to make a fabricatable model.
Making the Mesh "Watertight"
So the most important aspect end up being making sure the model was watertight. A watertight mesh forms a completely closed volume, without holes, open boundaries, or problematic non-manifold geometry.
I used 3 tools to do this operation (inspect, clean, and repair the STL)
MeshLab
First, I removed unnecessary or problematic geometry by using:
Filters → Cleaning and Repairing
Then I ran the following filters:
- Remove Duplicate Vertices — removes vertices occupying the same position.
- Remove Duplicate Faces — removes overlapping or repeated faces.
- Remove Zero Area Faces — removes degenerate faces that have no actual surface area.
- Remove Unreferenced Vertices — removes vertices that are no longer connected to any faces.
- Repair Non-Manifold Edges / Remove Faces from Non-Manifold Edges — addresses geometry where an edge is shared in an invalid way.
After all these operations, I visually inspected the model and then used MeshLab's hole-closing tool (Filters → Remeshing, Simplification and Reconstruction → Close Holes)
In Blender, it's really easy to inspect the holes by using the 3D print toolbox.
By using the toolpane and "check all" on the model, it will tell the exact # of holes.
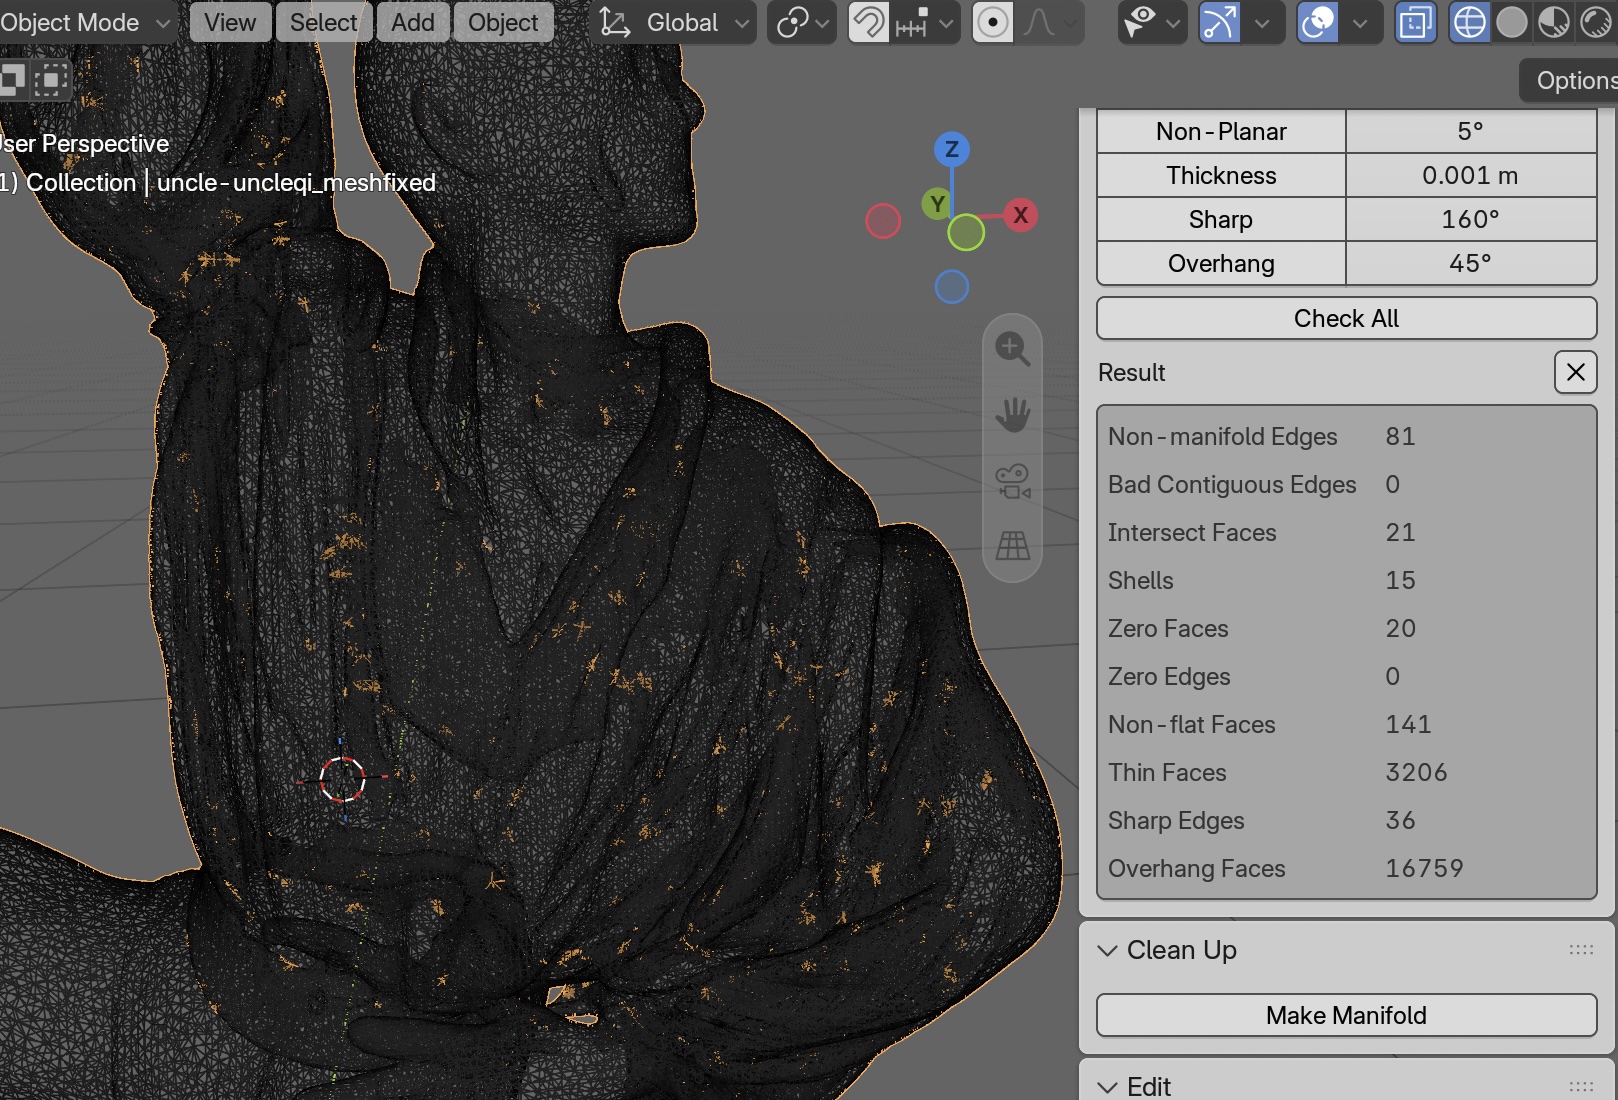
The "clean up" tool "make manifold" is able to fix some holes, but in this model couldn't fix all, which led me to explore the next tool - MeshMix.
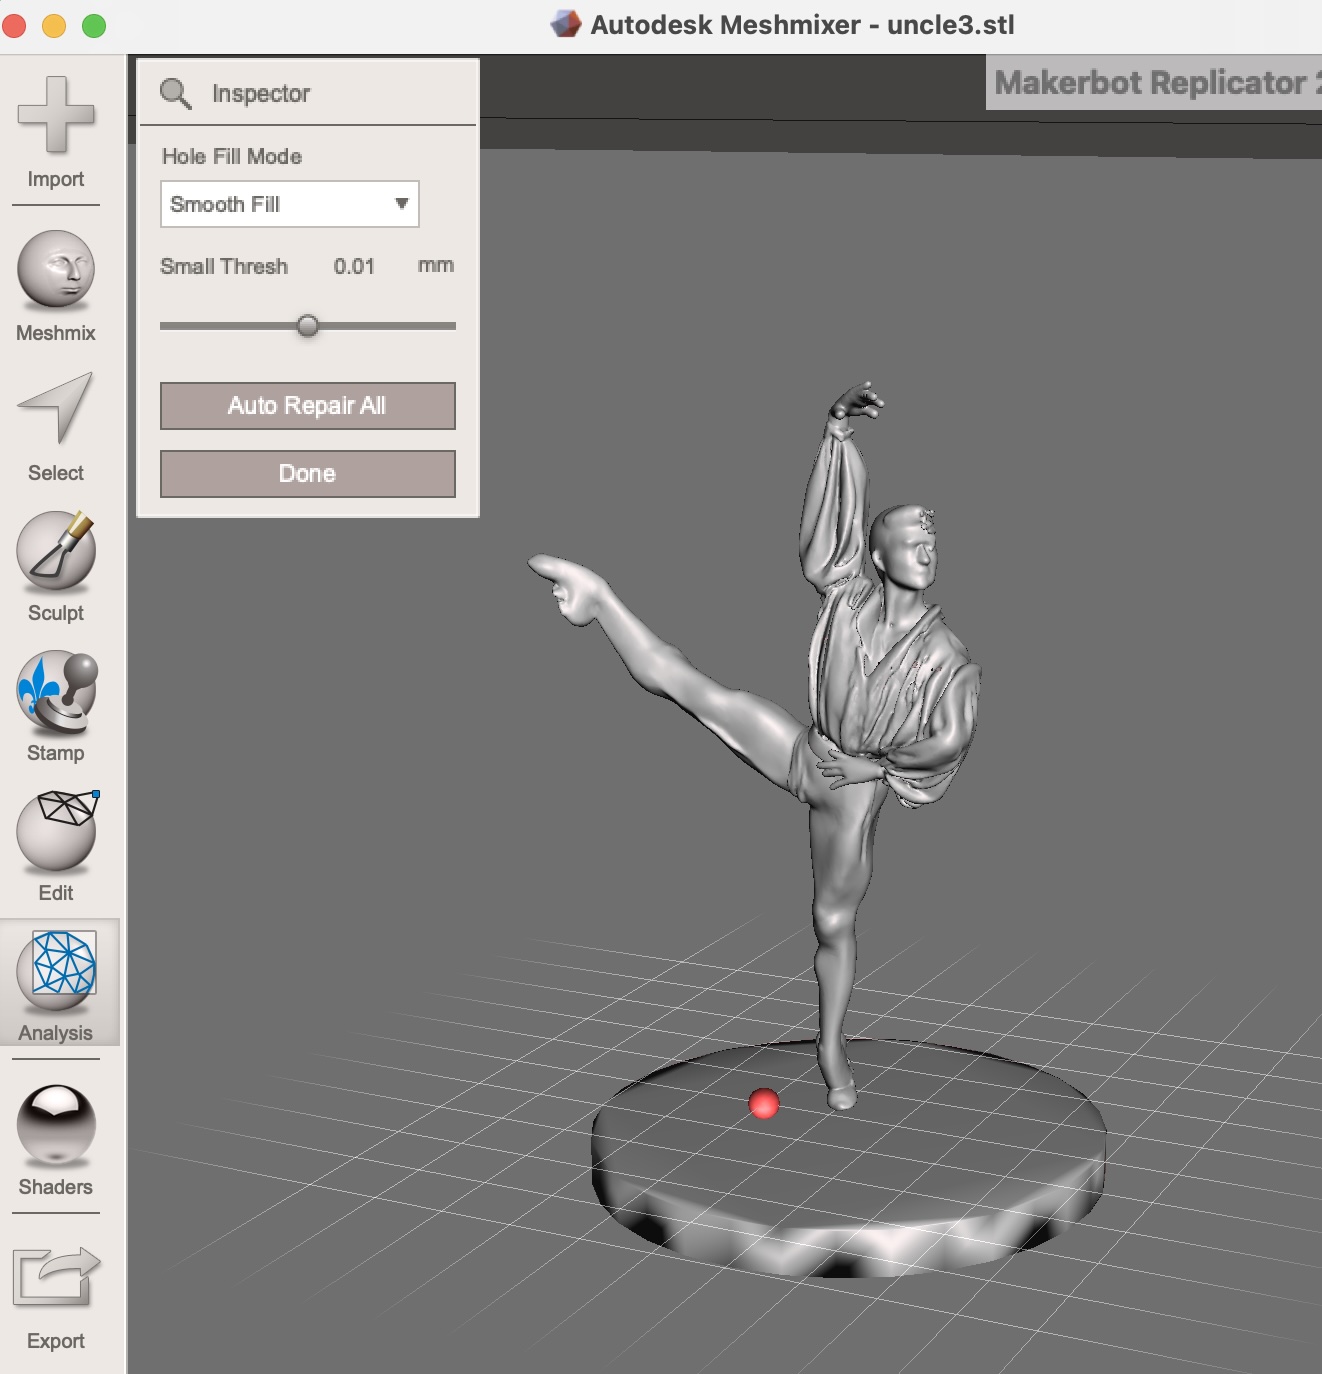
Meshmixer has a very simple and straightforward interface and able to fill all the holes in the my model quickly.
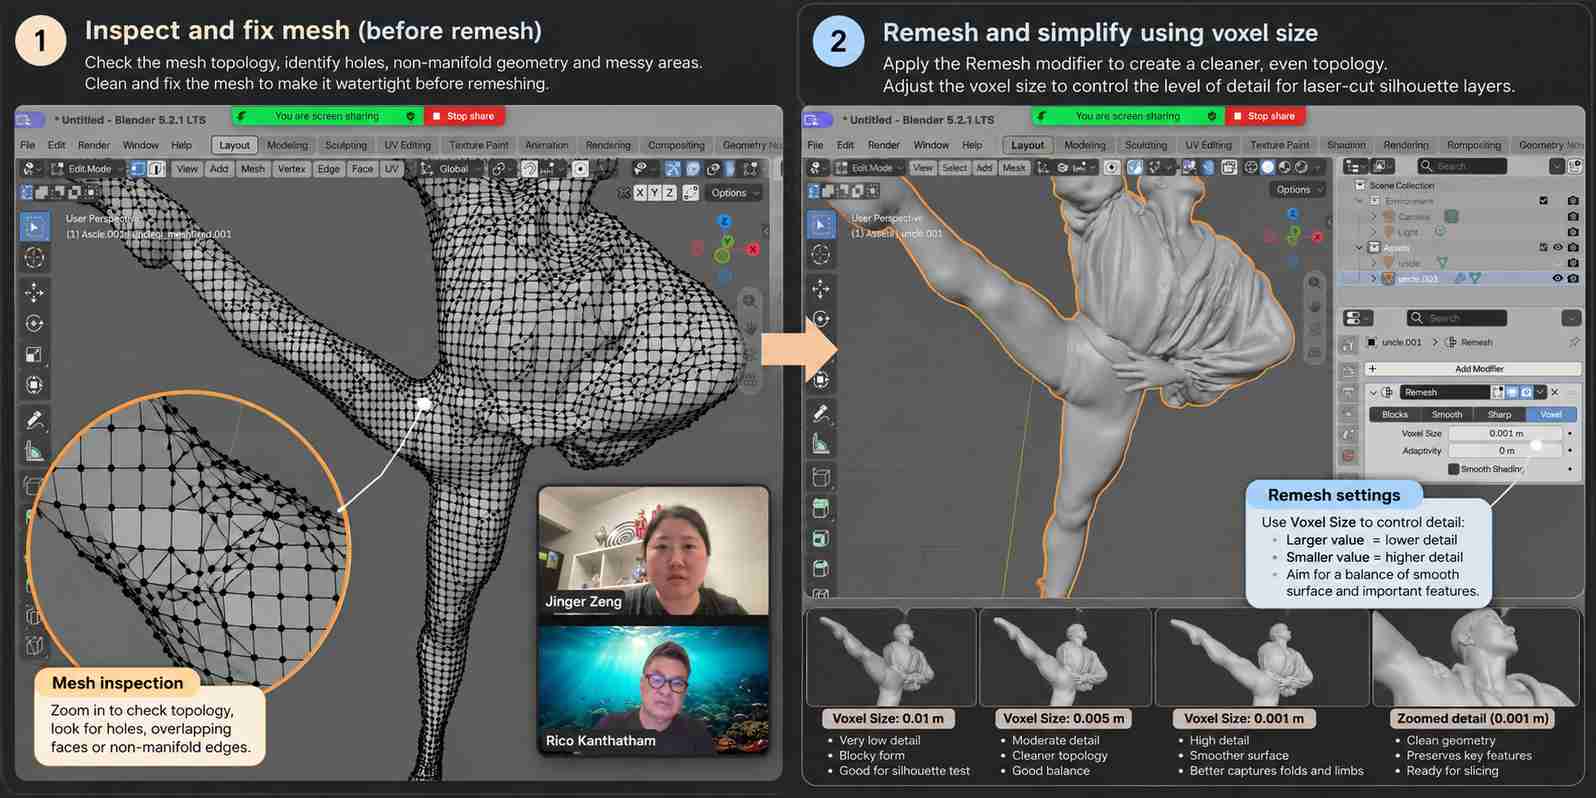
But then my model was still giving errors when I tried to sent it to fabrication software, I was so frustrated that I wanted to cut the models into pieces. But I was fortunate to get a tutorial from Rico on "remeshing":
Manipulating the Model Further
After repairing and remeshing the model, I wanted to experiment with manipulating the proportions of the digital body rather than treating the reconstructed figure as a fixed representation. In Blender, Rico taught me to use partial selection together with proportional editing to distort specific areas of the mesh while preserving the overall pose.
Instead of moving the entire limb, I selected a small group of vertices and adjusted the impact area (falloff radius) around the selection. A smaller impact area produced a more localized deformation, while a larger radius distributed the transformation across neighboring vertices and created a smoother transition.
This allowed me to use move, rotate, scale, push, and pull operations to exaggerate particular parts of the dancer—for example, extending the leg or changing the curvature of a limb—without completely destroying the surrounding anatomy.
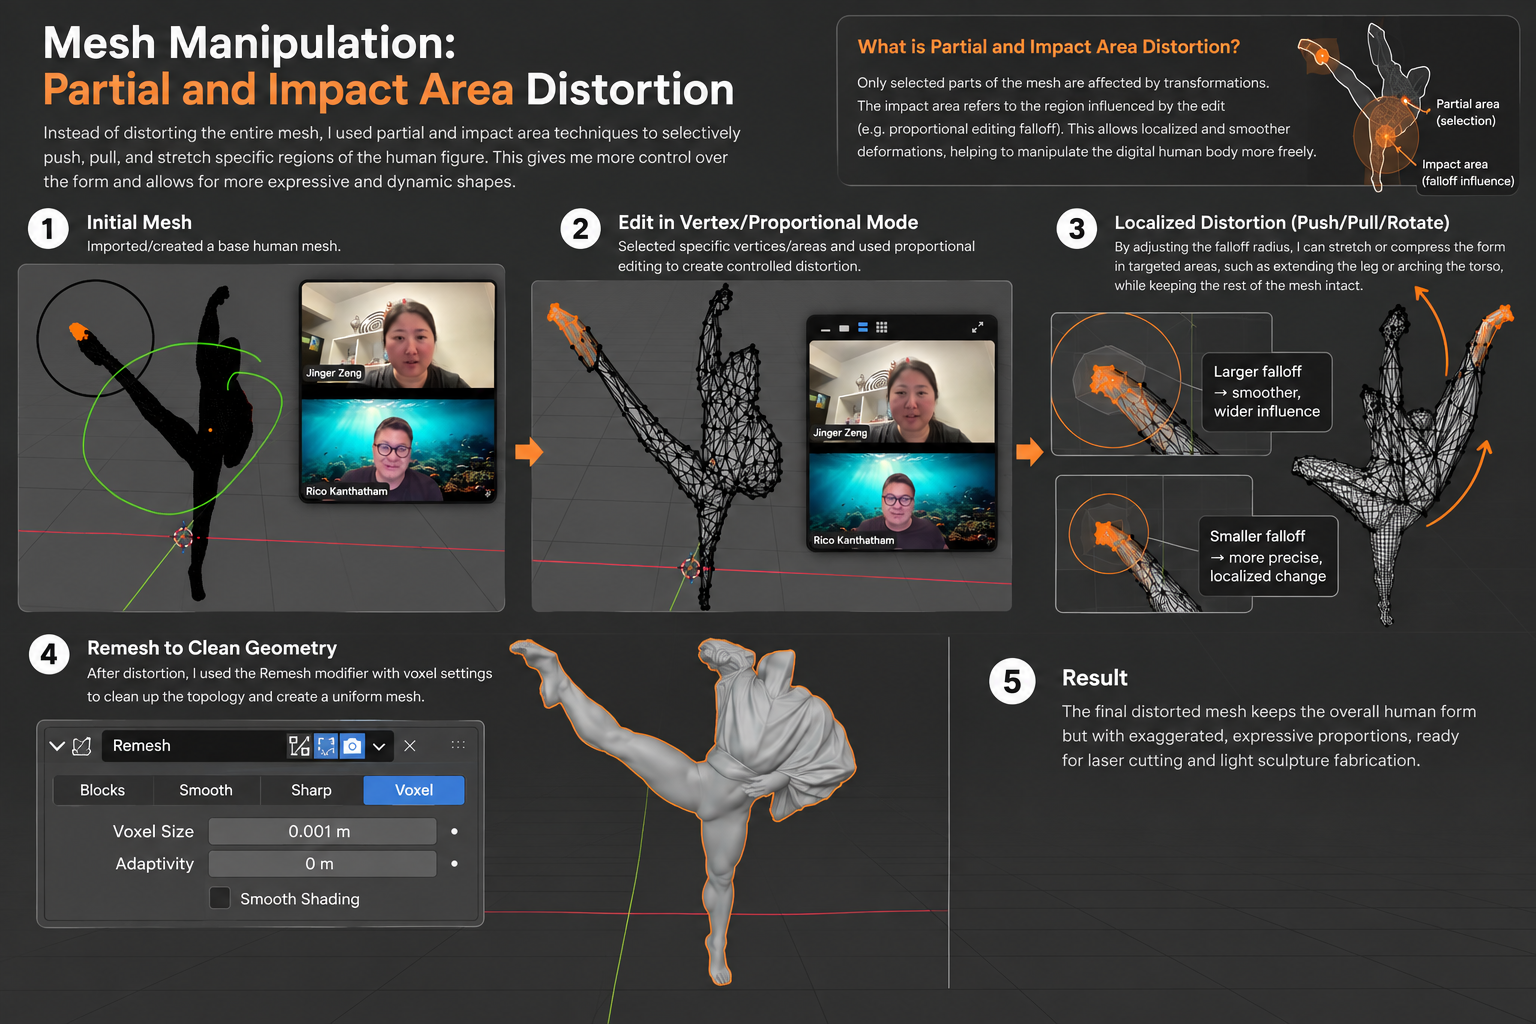
What interested me most about this process was the transition from 3D reconstruction to digital interpretation. The goal was no longer to reproduce the original body perfectly, but to explore how computational tools could exaggerate gesture, movement, and proportion. The digital body became something I could sculpt, abstract, and reinterpret before translating it into a physical object.
4. Creating a Stable Base Plate in Blender
Tools
- Blender — Edit, scale, and prepare the 3D model
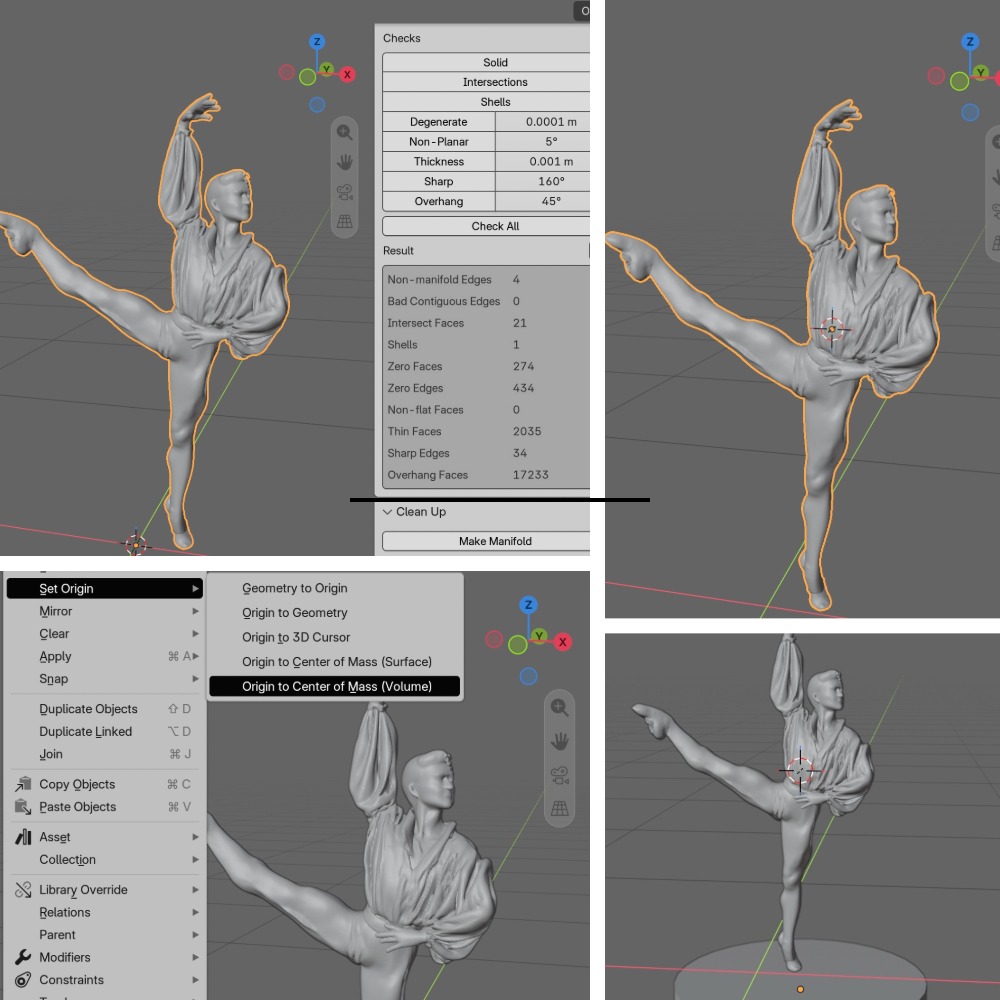
Another important feature to prepare the digital body for fabrication is its stability, I needed to create a base plate in Blender that would allow the figure to stand securely. Since the pose is asymmetrical, the model's center of gravity can be found in Blender rather than simply placing the base underneath the geometric center of the figure.
Importing the model and selected the model in Object Mode and use:
Object → Set Origin → Origin to Center of Mass (Volume)
This moved the object's origin to its calculated center of mass, assuming a uniform material density. I then used Shift + S → Cursor to Selected to position the 3D Cursor at this point, giving me a reference for positioning the base.
Next, I added a new mesh (I tried both square and cyclinder) to create the base plate and adjusted its X, Y, and Z dimensions. Using the front and side orthographic views, I moved the plate vertically until its upper surface aligned with the lowest contact point of the figure.
What is interesting is that - this moment reminded me of when I get trained with my uncle on human-body balance. When I saw that the Center of Gravity (CG) showed up on the screen where it's perfectly aligned with his supporting leg - all his words made a lot of sense how a ballet dancer stand on their toes.
5. Ready to Fabricate
The next step was to translate the continuous 3D form into 2D profiles that could be fabricated with a laser cutter.
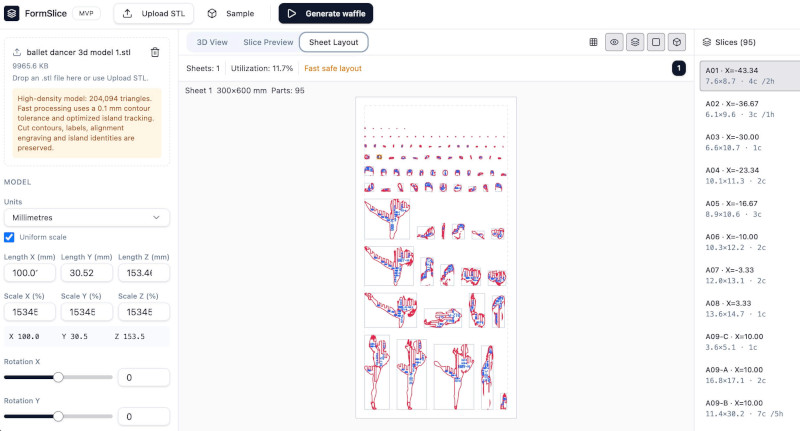
Formslice
I first experimented with FormSlice, an open-source web application that converts 3D models into fabrication-ready slices that we learned from our tutorial AI to Fabrication Workflow
FormSlice allowed me to explore two different construction methods: stacked slices and waffle construction. Although both techniques reconstruct a three-dimensional body from two-dimensional sheets, they create very different visual and conceptual results.
Stacked slices reconstruct the body through a sequence of parallel layers. As the layers accumulate, the volume of the original body gradually reappears. For this project, I think of this as memory accumulated in layers.
Waffle construction uses two intersecting sets of profiles to describe the volume of the body while leaving much of it open and transparent. Instead of reproducing the surface, it describes the body's occupation of space. I think of this as the body as spatial information.
Autodesk Slicer
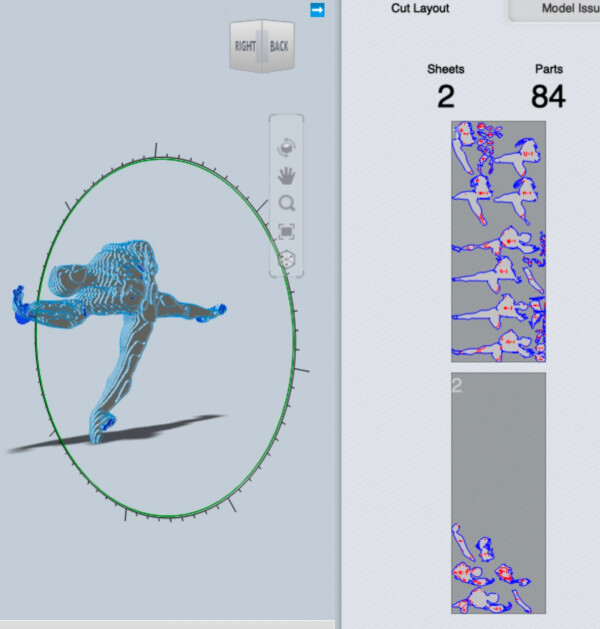
After experimenting with FormSlice and understood its limitations, I switched to Autodesk Slicer for Fusion 360 for the fabrication stage.
While FormSlice was useful for quickly exploring different construction strategies, Autodesk Slicer provided a more mature workflow for controlling parameters such as:
- construction technique
- material thickness
- slice direction
- slice spacing
- object scale
- sheet dimensions
- part layout and nesting
- assembly order
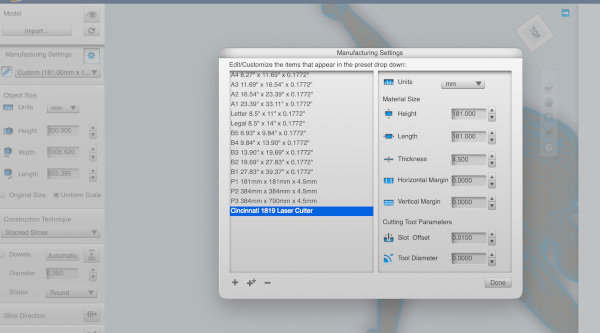
This made it easier to move from a visual experiment toward an actual fabrication-ready cutting layout.
Blender Slicer Add-on
Another technique that Rico showed me during our tutorial was using Blender’s Decimate Modifier to abstract the model further and make it more suitable for fabrication. While remeshing helped me create cleaner and more uniform geometry, Decimate allowed me to intentionally reduce the complexity of the mesh.
The modifier works by reducing the number of faces while attempting to preserve the overall form of the object. By gradually lowering the Ratio, I could move between a relatively detailed human figure and a much more simplified, faceted representation.
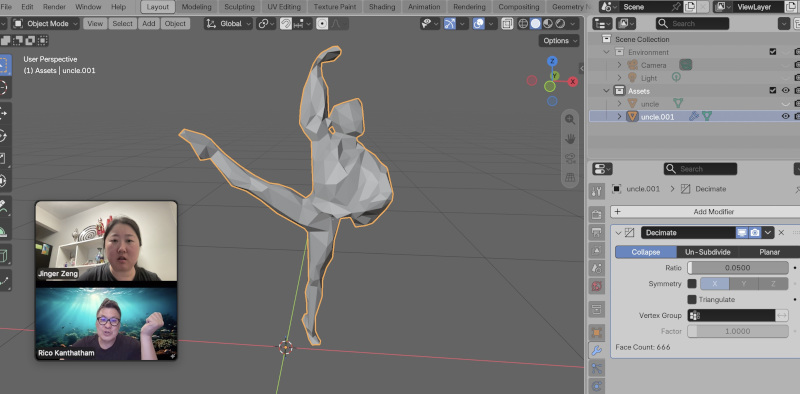
Then Rico also showed me his new add-on similar to the 3D Print Toolbox, that is a slicer tool to generate sheet files.
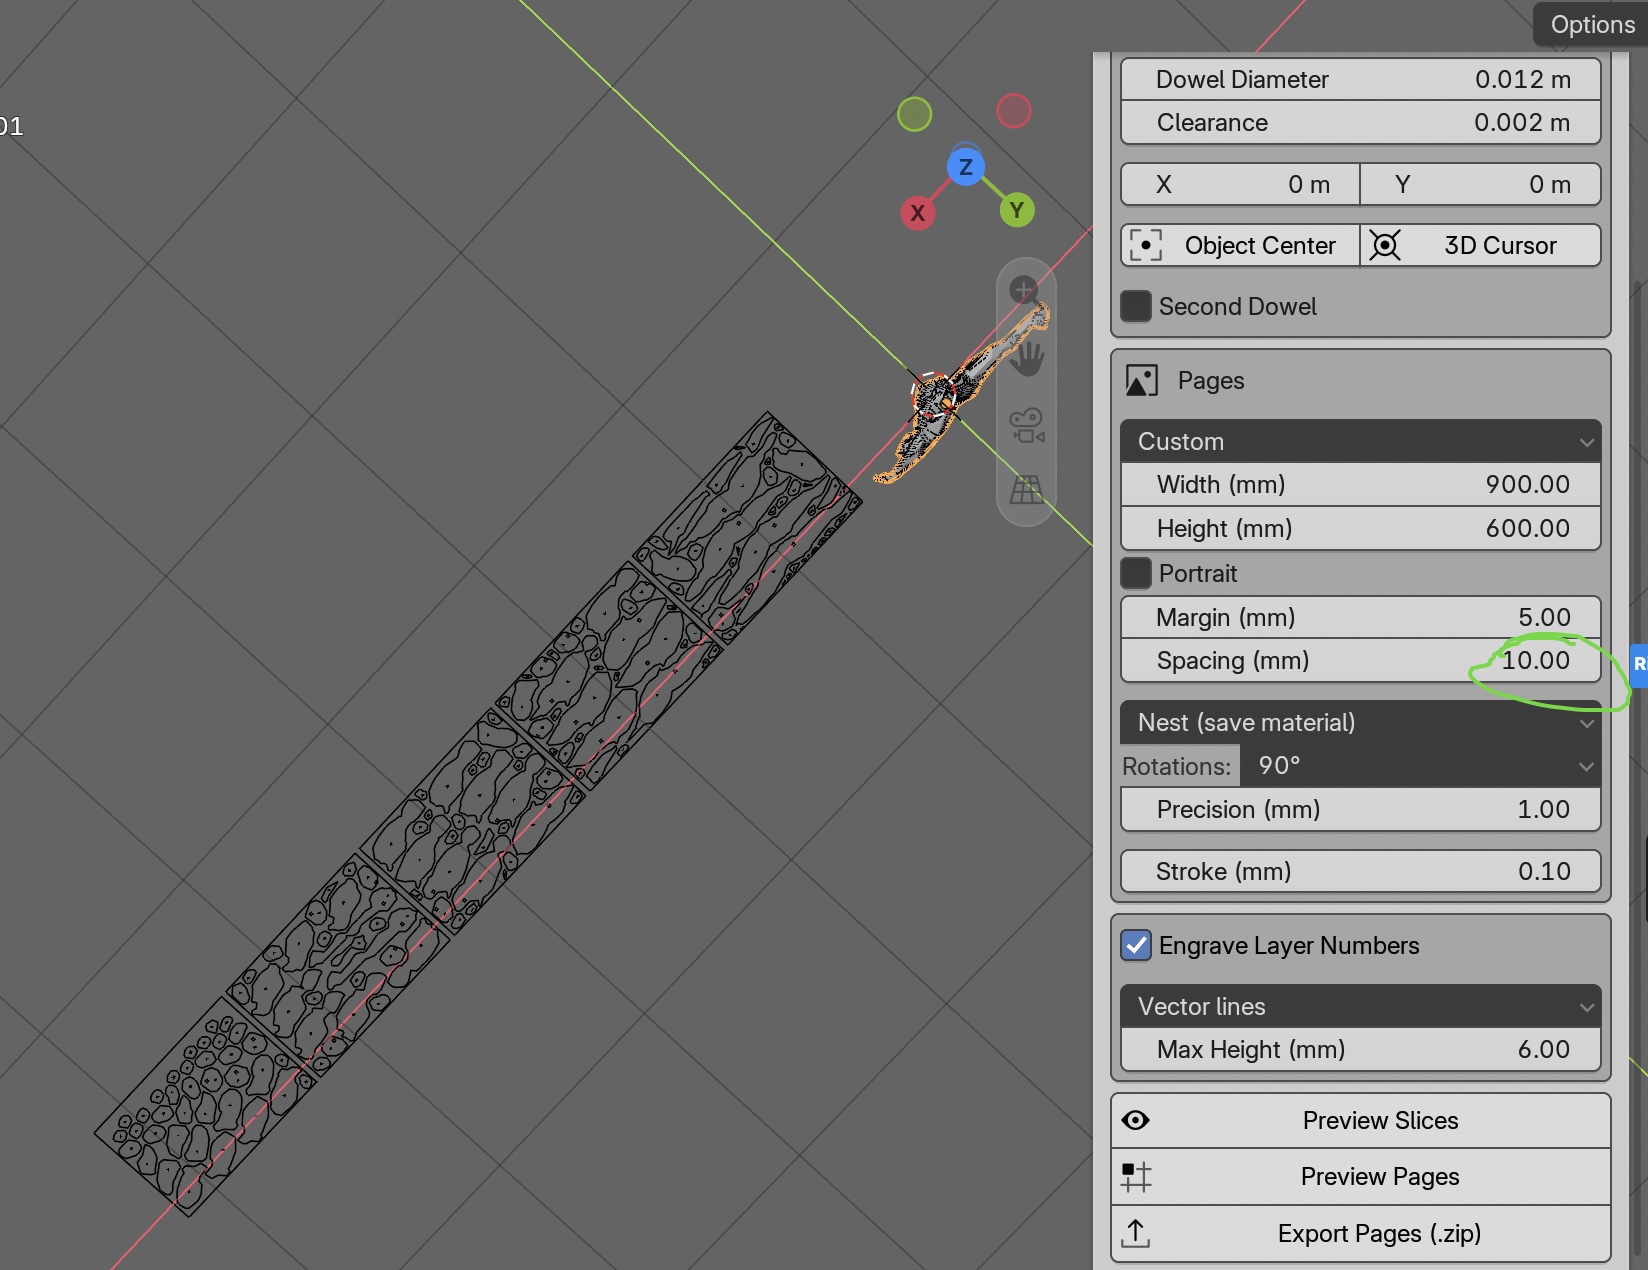
6. Final Fabrication and Assembly
So after all the model manipulation work and trying to create the sliced components, I tried it on cardboard as prototype
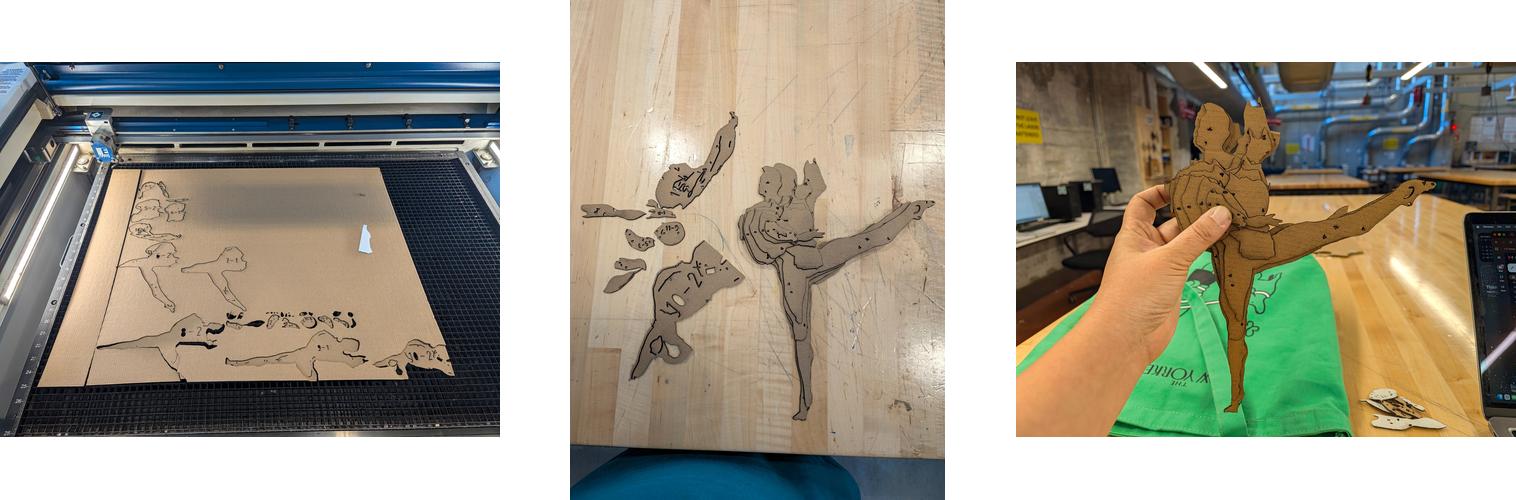
And, I didn't like it.
I think to eventually make the effect I like, I need more time to play around with fabrication files after the automatic outputs, and really dig into the pieces.
Since I was quickly running out of time, I decided to shift strategy to finish this homework. I need to simplify this and just get something fabricated and made.
Tools
- Atomm — AI assist fabrication software
- xTool Studio — Vector software
- Epilog Laser Cutter at UC Makerspace — using equipment at 1819 Innovation Hub in Cincinnati
I used Atomm to AI-assisted me in generating a desk-top sculpture file, I used the new models that I was able to work with Rico on in terms of an abstracted and slightly distorted model as input.
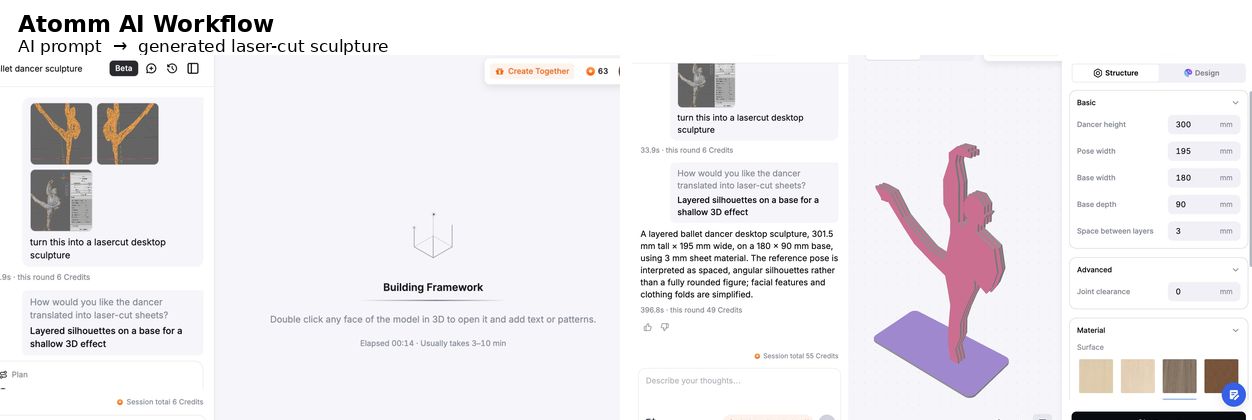
Then I used xTool Studio to make it laser-cut ready (I recently find this much easier than Adobe Illustrator)
Final Fabrication File Output
SVG: SVG

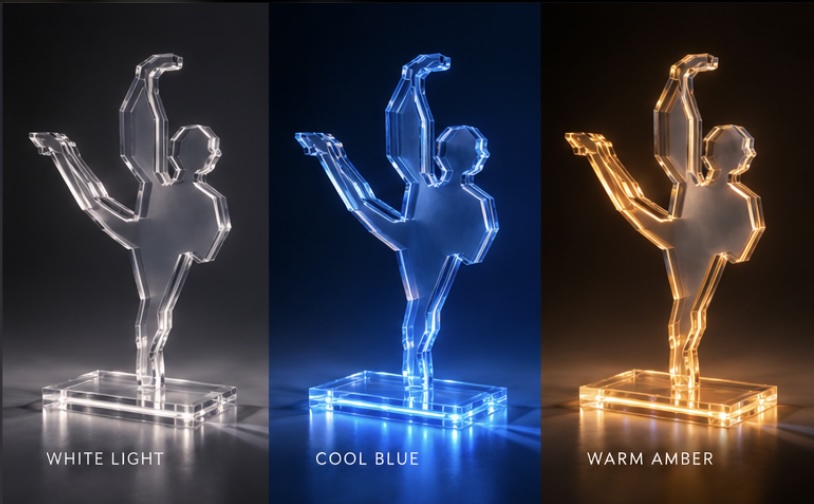
I choose clear acrylic as the material to laser cut this out with - as I'm thinking I can iterate this in the future to make it a light sculpture by adding LEDs to it.
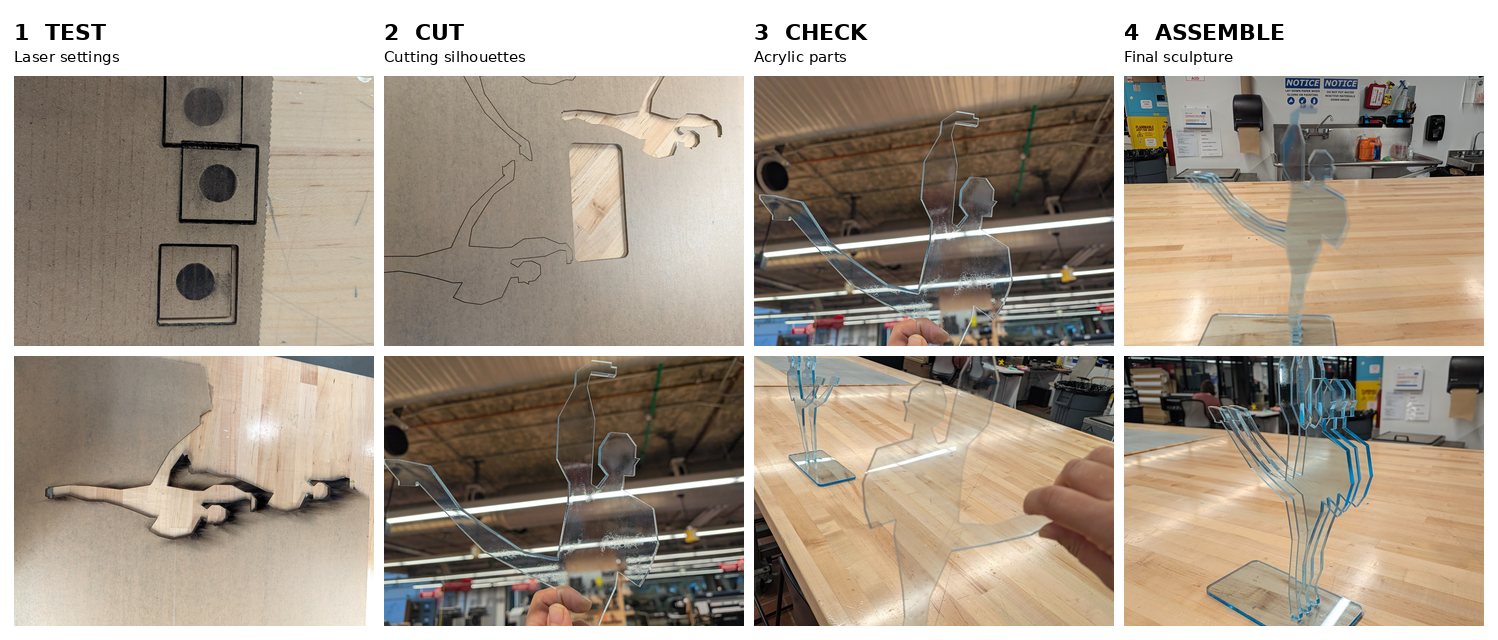
And here's the final sculpture:
Fig. — Digital body through modeling and fabrication.
I really liked this final turn-out, and played with a few concept renderings when adding lights to this for future iteration/add-ons. Acrylic allowed the outlines of multiple layers to overlap visually, creating a sense of motion and depth. Adding LED edge lighting will push this further: instead of simply illuminating the sculpture, light became another material that traces the geometry and makes the layered construction visible. I can't wait to play around with LEDs as course move along.
7. Reflections
-
The most time-consuming part of this project was not the laser cutting itself, but preparing the digital model. Manipulating the mesh, repairing geometry, making the model watertight, adjusting the pose, and translating a complex 3D body into manufacturable geometry taught me the most.
-
Moving between 3D and 2D required a different way of thinking. The original model contained volume, depth, and anatomical detail, but laser cutting required me to reinterpret those qualities as silhouettes and layers. Rather than simply “flattening” the model, I had to play around with different software, different techniques, then in the end totally changed my strategy to fabricate the object. During the abstration process, decide which contours were essential to preserving the gesture and movement of the dancer was a big learning. At one point in time, I almost want to "cut the legs", and Rico saved me by showing me tips and tricks in Blender to better manipulate the digital body.
-
Iteration was part of the design process, not a failure of it. There were many intermediate tests—mesh fixes, slicing experiments, material tests, laser settings, joint dimensions, and assembly trials. Some approaches did not work as expected, but each test revealed something about the relationship between the digital geometry, material thickness, kerf, and physical assembly. The final object emerged through these accumulated corrections.
-
My goal succeed in the sense of creating connection via memory, computation, and physical making. What began as archived images of my uncle, passed through AI-assisted 3D reconstruction, mesh manipulation, digital slicing, laser cutting, physical assembly, and finally light. The long workflow became meaningful because each transformation introduced a new interpretation of the same body. My workflow of photograph → data → mesh → geometry → material → light might be able to give joy of many other aged dancers, and something customizable, but also scalable, as personalized artpieces.
8. Other Research References and Inspirations on Dancer Body Art
Edgar Degas
Degas' dancer sculptures are an important historical reference for thinking about the relationship between the dancer's body, sculpture, and textile.
Oskar Schlemmer
Schlemmer's Triadic Ballet transforms dancers into geometric and architectural bodies through costume.
Nick Cave
Nick Cave's Soundsuits exist somewhere between sculpture, textile, costume, and performance. The sculptures are activated through the movement of the body.
Kohei Nawa + Damien Jalet
Vessel invented new genre between sculptural and choreography.
Benoît Maubrey
I had the pleasure to give Fab City Award to this artist's SPEAKER ARENA this year. And I learned about his work Audio Ballerinas - where the body becomes more than a performer—it becomes an instrument and a medium for sound. The dancers wear electronically augmented tutus embedded with speakers, amplifiers, sensors, microphones, and other electronic components. Their movements and interactions with the surrounding environment can trigger, transform, and broadcast sound, creating a direct relationship between body → sensor → electronic garment → sound. Rather than moving to a pre-existing soundtrack, the performers actively generate the sonic environment through their bodies. In this way, Maubrey transforms wearable technology into an extension of the human body, blurring the boundaries between dance, sculpture, electronic instrument, and performance.
9. 3D Scanning
Since I didn't use 3D scanning in my original workflow, for this experiment, I used a mobile photogrammetry workflow to digitize a robot instead - Reachy Mini.
Tools
- RealityScan — Mobile photogrammery app
- Sketchfab — Model publishing and sharing platform
The app is very intuitive in terms of instruction on how to scan. I photographed Reachy from multiple angles while moving around the object, trying to maintain sufficient overlap between images. The software then analyzed the photographs and generated a point cloud, using common visual features between images to estimate the position of points in 3D space.
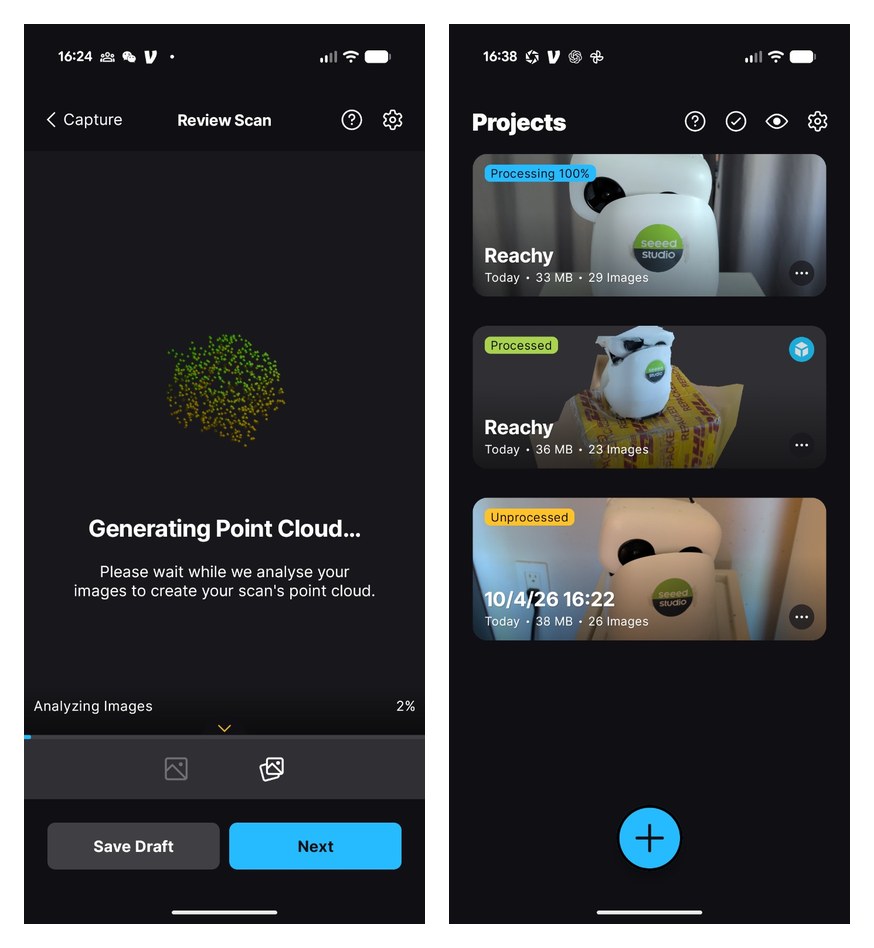
One interesting part of the process was seeing how much the quality of the source images affected the reconstruction. I made several attempts, using sets of approximately 20–30 photographs. The scans produced noticeably different results depending on camera coverage, viewing angle, lighting, and how clearly the software could identify features on the object's surface.
Reachy was also an interesting photogrammetry subject because much of its body is smooth, white, and relatively featureless. These surfaces provide fewer distinctive visual points for the reconstruction algorithm to track. Reflective black components and occluded areas around the head and joints introduced additional challenges.
The final model was uploaded to Sketchfab:
Much more work can be done for Blender cleanup → Remesh → repair → STL for fabrication