Circular Open Source Fashion
1. Objective & Inspiration
Introduction — 东北大花 (Chinese Northeastern Floral Pattern)
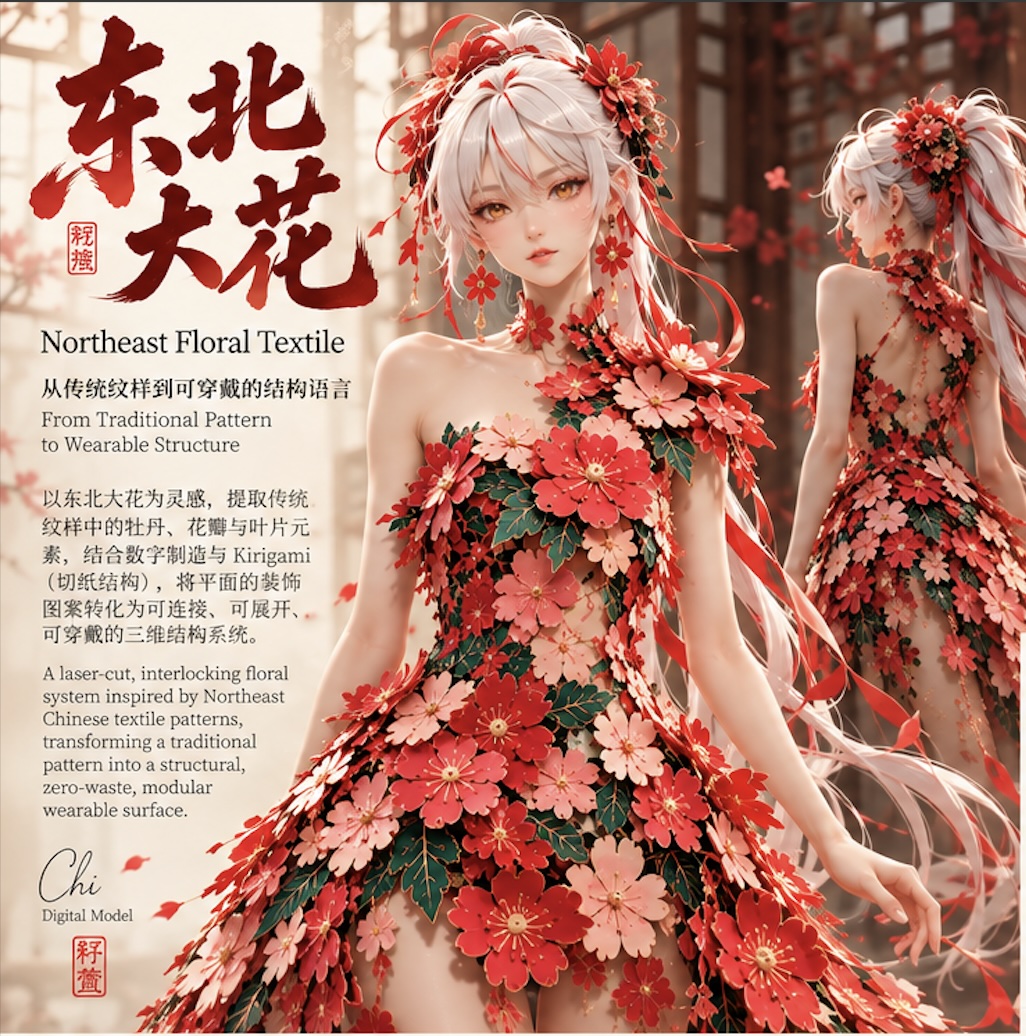
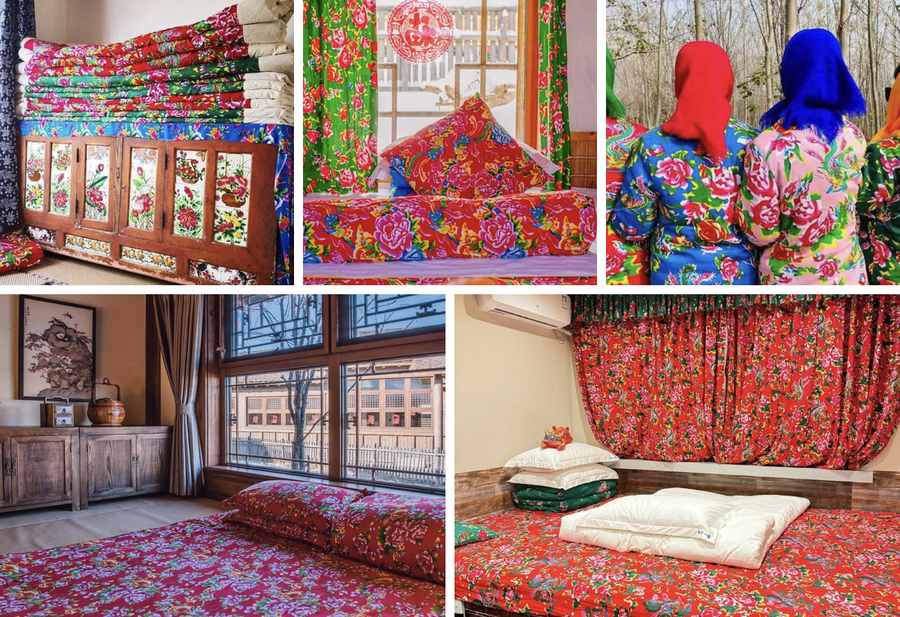
东北大花 (Dongbei Dahua) , literally “Northeastern Big Floral,” refers to a distinctive style of printed textile characterized by oversized flowers, highly saturated colors, and bold visual contrasts. In popular culture, it is strongly associated with Northeastern China, where similar floral fabrics have traditionally appeared on quilts, bedding, curtains, padded jackets, and everyday household objects of the rural community. Bright reds, greens, pinks, and yellows combined with enormous peonies and other flowers create a visual language that feels exuberant, warm, and unapologetically expressive.
Dongbei Dahua is not strictly a pattern unique to Northeast China. Similar large floral textiles were historically used across northern China and in rural communities. However, the cold climate of the Northeast, the widespread use of thick padded textiles, and the region's distinctive folk culture helped this aesthetic become particularly associated with Dongbei(Northeastern) identity.
Dongbei Dahua originated as part of everyday material culture rather than elite art. These textiles lived inside ordinary homes: on beds and kang platforms, in clothing, quilts, curtains, and objects made for celebrations and family life. Flowers such as the peony also carry traditional associations with prosperity, abundance, happiness, and vitality. The cultural value of Dongbei Dahua therefore comes not only from its visual pattern, but also from the memories of domestic life embedded within the material. For me, the most interesting aspect of Dongbei Dahua is precisely this folk quality. It is not heritage that existed only behind museum glass; it is a visual culture that people actually wore, slept under, cut, stitched, repaired, and lived with.
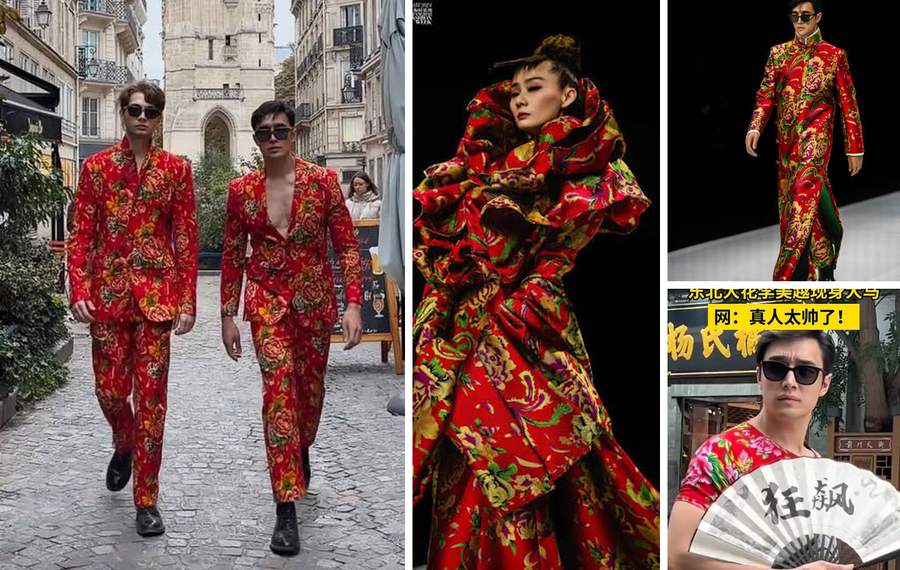
Over time, its cultural status has changed. What was once considered cheerful and desirable later became associated with rural life and was sometimes dismissed as “old-fashioned” or “tacky.” More recently, however, Dongbei Dahua has been reclaimed through fashion, internet culture, art, and contemporary design. Its exaggerated aesthetic can communicate humor and nostalgia, but it can also become a statement of regional identity and cultural confidence.
In this project, I want to extend that history by transforming Dongbei Dahua from a pattern printed onto fabric into a modular design system. By extracting and abstracting its floral geometries, the flower can become more than decoration: it can become the structural unit from which the garment itself is constructed. My goal is to turn a familiar traditional pattern to be reinterpreted through digital fabrication rather than simply reproduced as a printed surface.
From 2D Pattern → 3D Construction Modules
I played around with a lot of concepts in AI, and it helped me a lot in terms of conceptualizing the initial concept of Floral geometry → Repeatable module → Interlocking connection → Textile surface → Garment
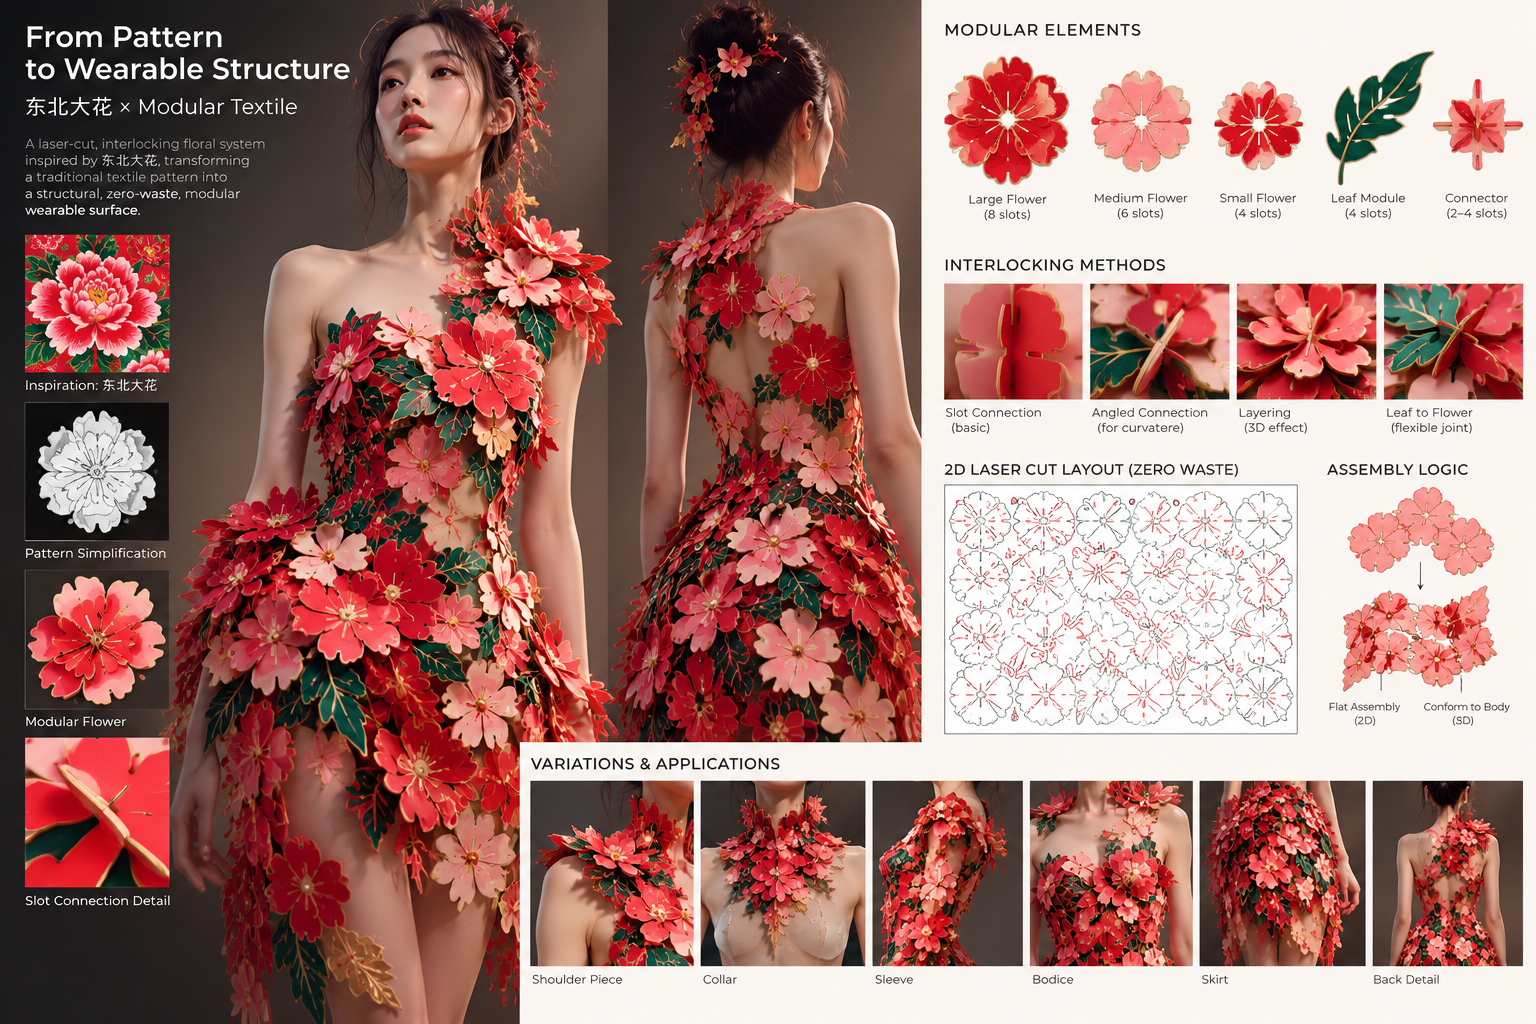
My Goal for This Module
My goal is to develop a modular textile system inspired by 东北大花 that can be fabricated using a laser cutter and assembled primarily through interlocking connections.
Modularity offers a different way of thinking about the lifecycle of clothing.
If one section becomes damaged, theoretically I do not need to discard the entire garment — I can replace one module. If the garment needs to become larger or smaller, modules can potentially be added or removed. And when the garment is no longer wanted in its original form, the same pieces could be rearranged into another garment, accessory, or textile object.
This means that the design is not necessarily a single finished object. It is closer to an open construction system.
For me, this is where the idea of open-source fashion becomes particularly interesting. Instead of sharing only an image of a finished garment, I can share the geometry and fabrication files that allow somebody else to cut the modules, modify their scale, experiment with different materials, or develop an entirely different object from the same system.
Also, rather than cutting conventional garment pattern pieces and sewing them permanently together, I want to investigate the method that was introduced in our course using interlocking components.
I will experiment with:
- abstracting floral forms into repeatable vector modules;
- paper prototypes to understand repetition and interlocking geometry;
- different connection mechanisms and tolerances;
- laser-cuttable textile materials;
- strength and flexibility of the assembled surface;
- arranging the modules around the human body;
- minimizing fabrication waste and documenting unavoidable offcuts;
- and making the resulting design reproducible through open-source fabrication files.
Ultimately, I want to explore how something visually associated with the past can become the starting point for a more modular, repairable, adaptable, and digitally fabricated fashion system.
2. Prototyping
2.1 Paper and Scissors
During the first prototyping stage, I worked entirely with A4 paper, scissors, and hand-cut slots.
Before moving into Illustrator or laser cutting, I wanted to physically understand how a modular textile connection behaves: where the material needs to bend, how two pieces lock together, and how the position of a slot changes the direction of the assembly.
I started with simple square modules inspired by the interlocking examples introduced during the Fabricademy tutorial. By cutting slots at different positions and orientations, I tested how identical pieces could connect horizontally, vertically, and at different angles. This simple exercise was surprisingly useful because the connection itself begins to create curvature and three-dimensional volume when multiple modules are assembled.
I then translated the same logic into a flower-shaped module, bringing the experiment back to my Dongbei Dahua concept. Instead of treating the flower as a graphic printed onto a textile, I began using the outline of the flower as the textile unit itself. Small slots cut into the petals and center allow individual flowers to interlock without glue or stitching.
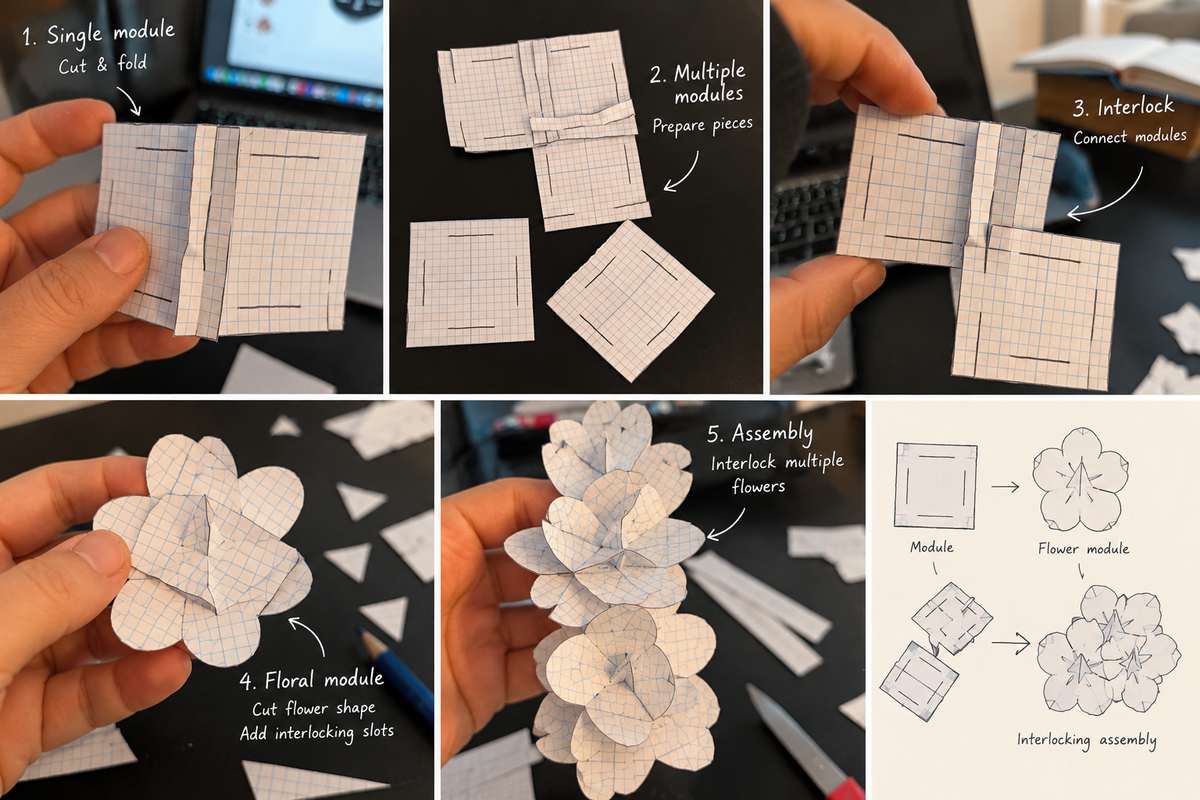
The paper prototypes also exposed an important design challenge: the geometry of the connector is just as important as the geometry of the flower. Slots that are too shallow separate easily, while long or poorly positioned cuts weaken the module. The direction of the slots also determines how the flowers overlap and whether the resulting surface stays flat or begins to curve around the body.
This low-fidelity process allowed me to under the male/female connector mechanism, before moving onto fabrics.
2.2 Fabrics and Laser-Cutter
Tools
- RecycledFabrics — my old T-shirts and Kimono
- Epilog Laser Cutter at UC Makerspace — using equipment at 1819 Innovation Hub in Cincinnati
- Atomm — AI assist fabrication software
- xTool Studio — Vector edit software
My original thought is to prototype with soft feltpaper - the material is easy enough to play with the interlocking connectors.
However, FELT IS A BANNED MATERIAL FOR LASER CUTTING AT UC MAKERSPACE.
So I changed my strategy into
- Laser cut cotton from recycled Tshirt (cheap, frugal option for low fidelity prototyping)
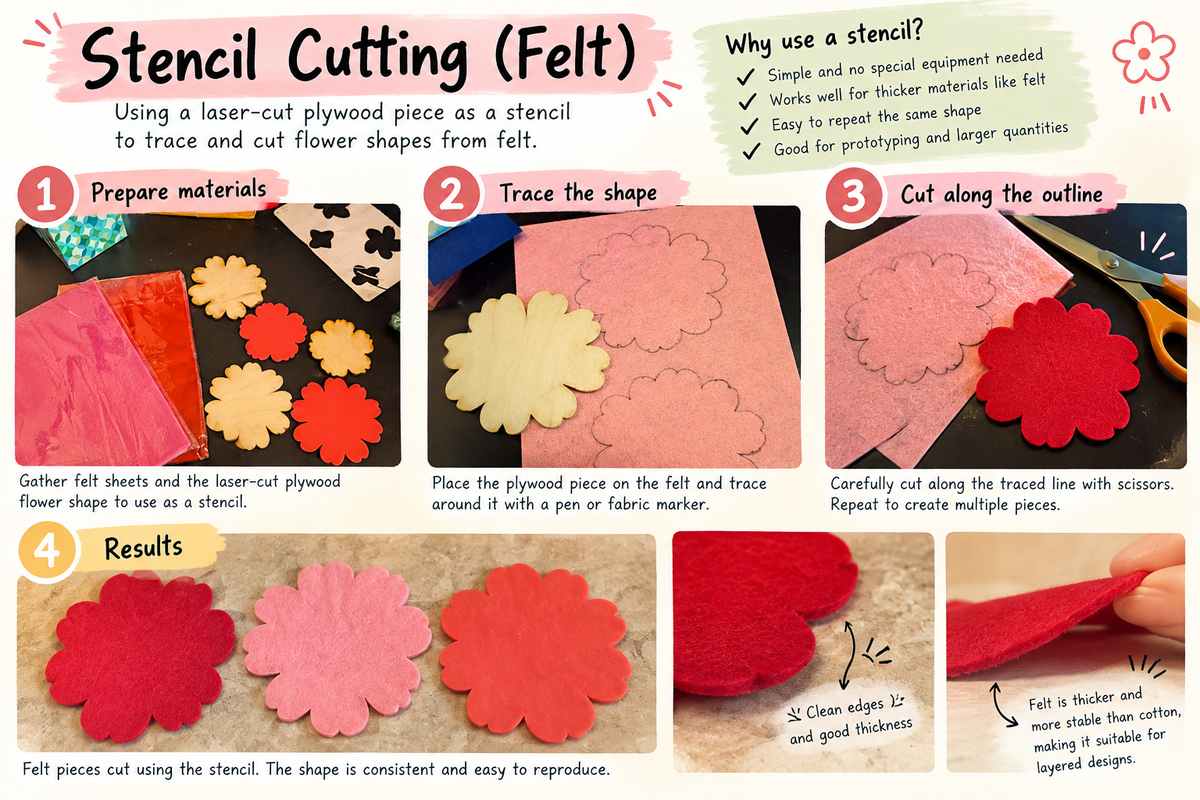
- Laser cut plywood and acrylic for stencil, so I can then use the stencil to cut out felt
- Laser cut silk fabric (real constructable material)
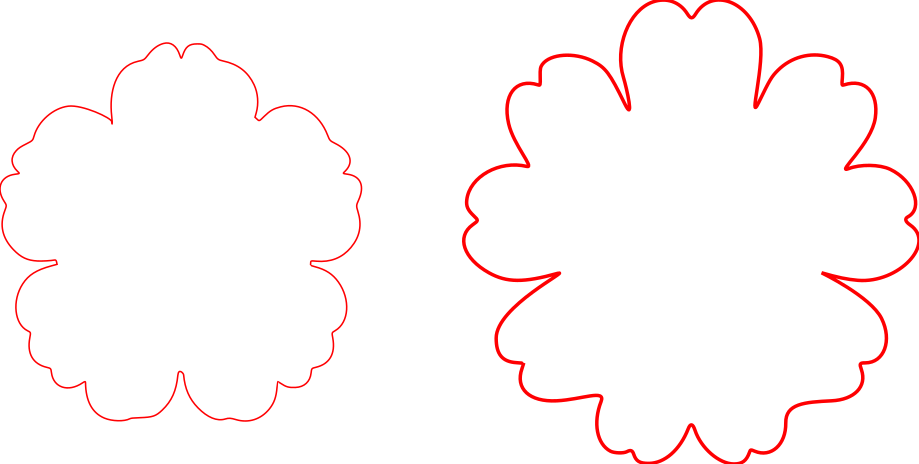
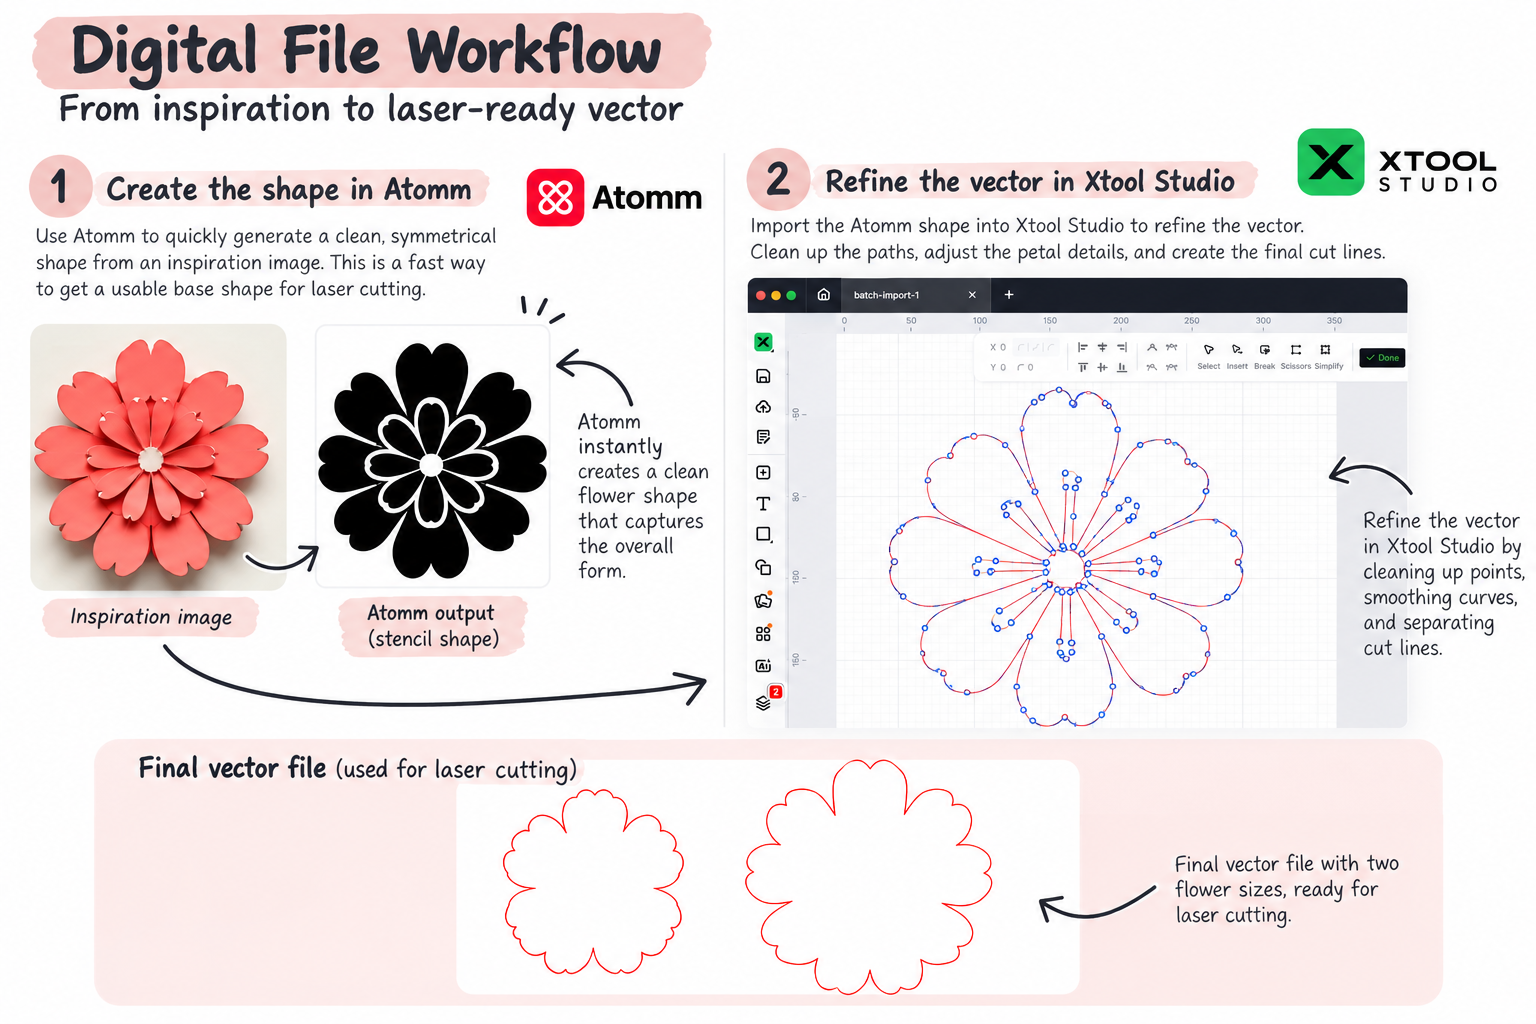
Preparing the digital file to send to laser cutter, I used Atomm and Xtool Studio again. I used Atomm to quickly translate a reference image into a simplified shape, then imported the result into xTool Studio to refine individual vector points and simplify the geometry. The final output consists of two clean flower outlines at different scales, ready for laser-cutting experiments.
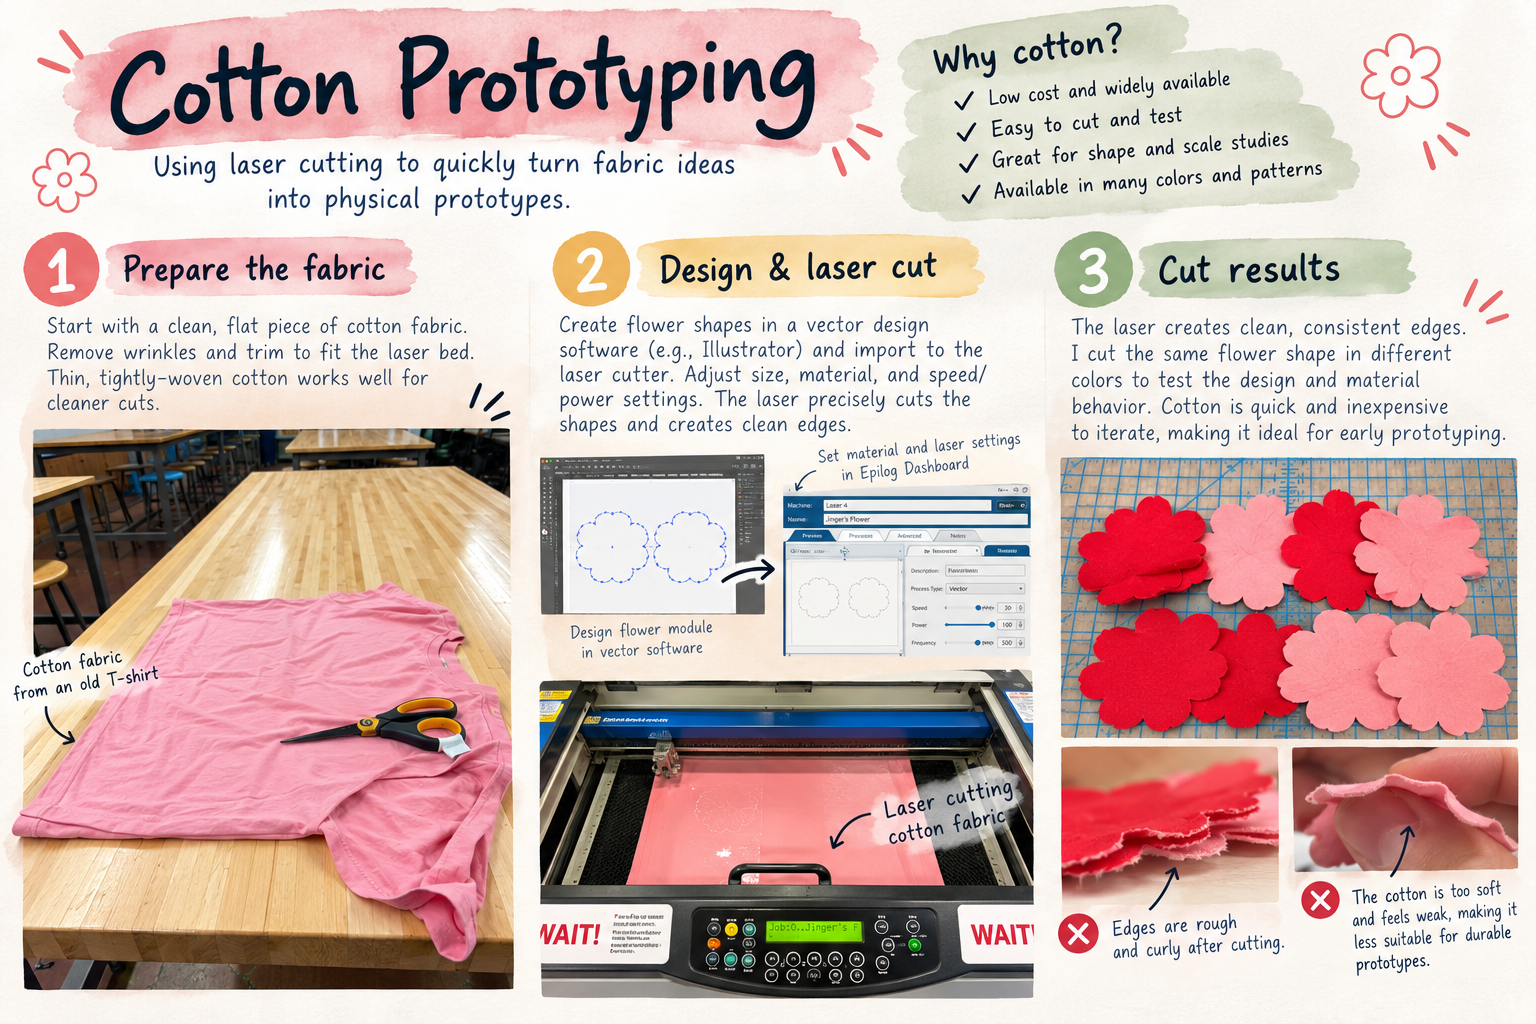
Then I tested how the flower geometry would translate from a digital vector into a physical textile module. I used an old cotton T-shirt as a readily available prototyping material. This was useful because I could test the scale, silhouette, cutting process, and repetition of the flower modules without using the more valuable final fabric.
However, this experiment revealed some important material limitations. The laser-cut edges were not as clean as I expected. Because the cotton fibers curled, and slightly distorted after cutting. The sample feels too soft and weak, so the flower shapes did not maintain their form particularly well.
This became an important part of the prototyping process rather than simply a failed material test. It showed me that the geometry itself worked, but that the material needed more body, stiffness, and edge stability.
Then I moved on to explore a fabric that had more structure, visual richness, and a cleaner finish. I chose a patterned silk fabric whose floral motifs complemented the geometry of my digital flower design.
Using the same vector files from the previous prototype, I prepared the shapes in the Epilog laser cutter software and tested them directly on the silk. Compared with cotton, the silk responded much better to laser cutting. The heat slightly sealed the synthetic fibers along the cut line, producing cleaner, more stable edges with significantly less fraying and curling. (For laser cutter setting, move speed to very high at 95%, and power very low at 5%)
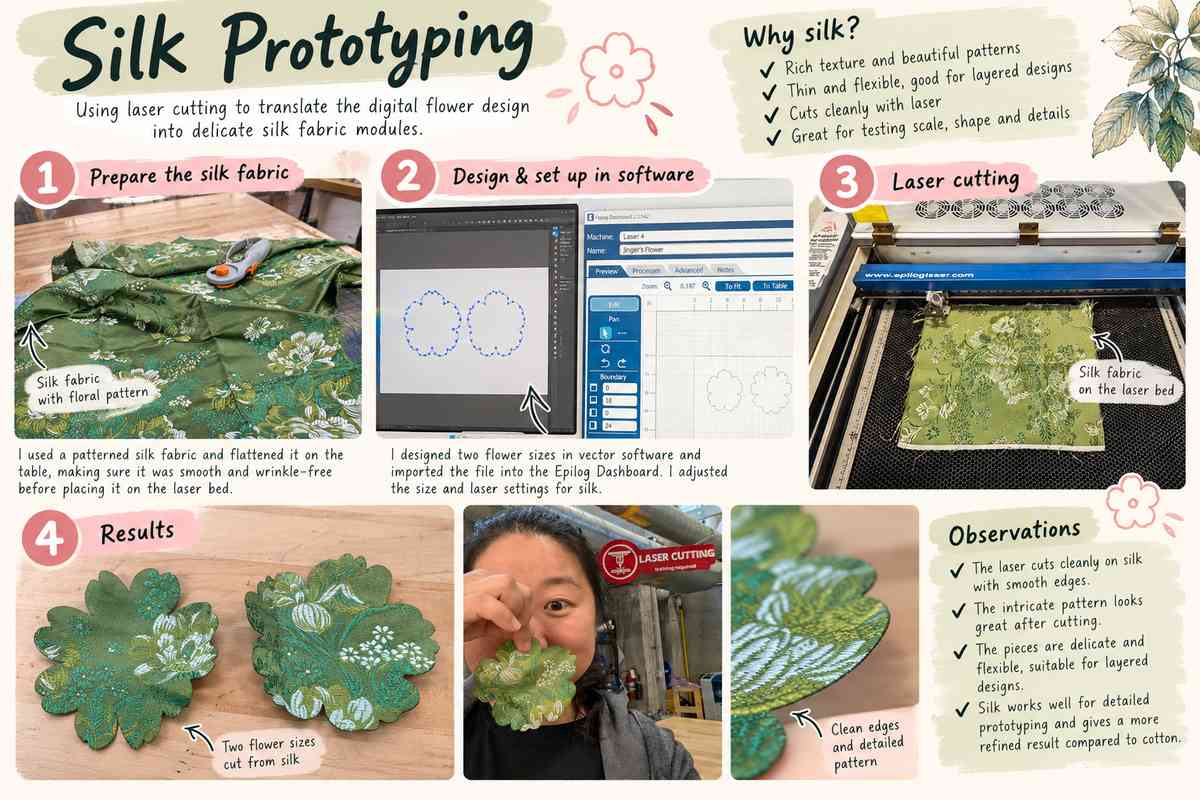
The material also held the flower geometry more clearly while remaining lightweight and flexible. The woven floral pattern added another visual layer to the digitally fabricated shape—each flower became slightly different depending on where it was positioned on the textile.
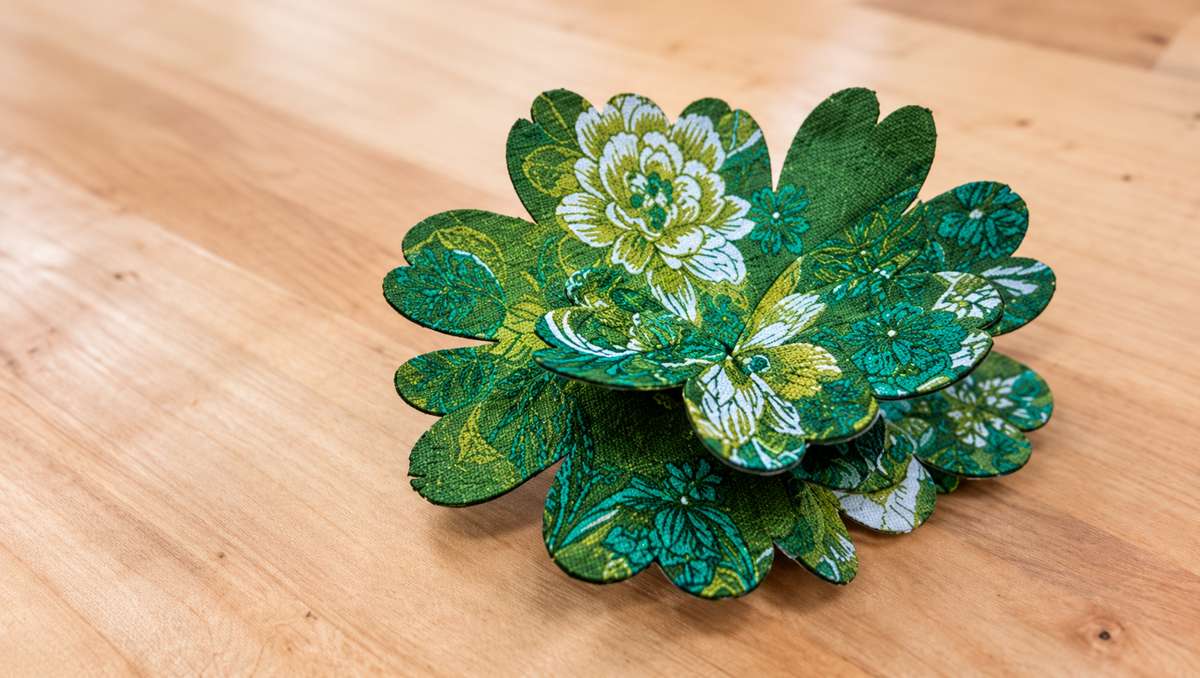
This experiment helped me understand that material choice can completely change the behavior of the same digital geometry. The cotton prototype felt soft and structurally weak, while the silk produced a more refined and intentional module. This makes it much more promising for building layered textile structures, modular garments, or larger three-dimensional floral compositions.
Finally, I made a few stencils for felt-cutting, using both Plywood and Acrylic,and scissor cut out felt.
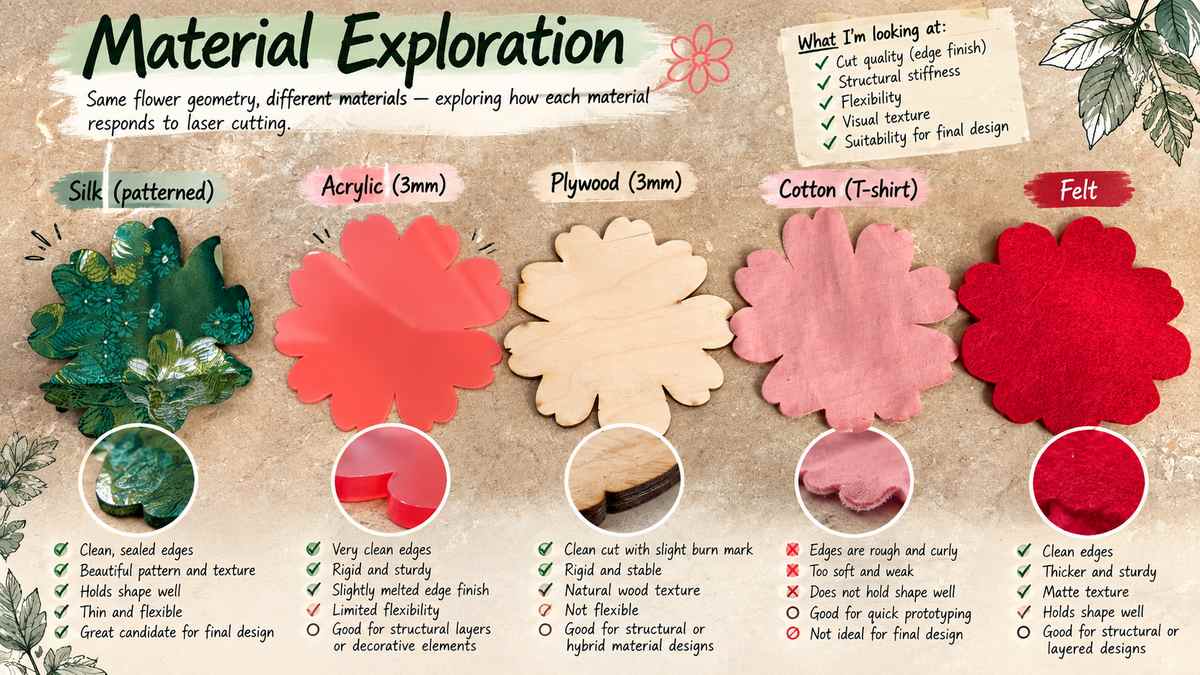
Here is a comparison of all the materials I tested out during this process and as part of the process. This comparison helped me move from thinking about laser cutting simply as a way to reproduce a vector shape toward thinking about material behavior as part of the design itself.
3. Assembly & Wearable Test
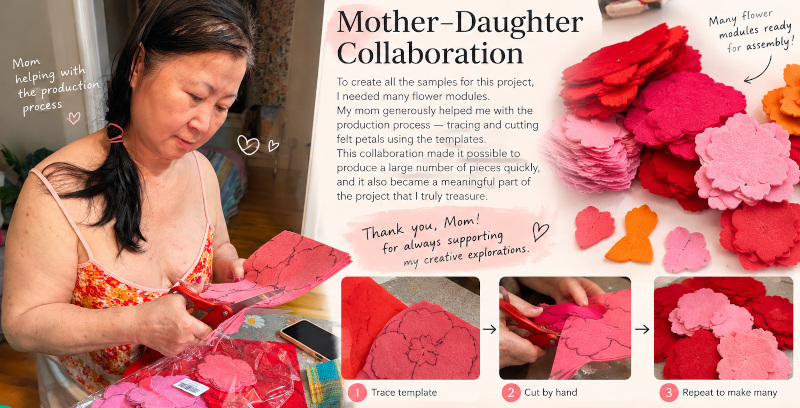
Since I need many floral samples to make the assembly, and I mainly want to prototype the assembly on felt - I needed a lot of manual labor - and mom came to rescue. She was able to hand cut the flowers out for me using the stencils.
Once I have made a good amount of felt sample pieces, I started to apply my learnings of the male/female connector via paper/scissor exercise.
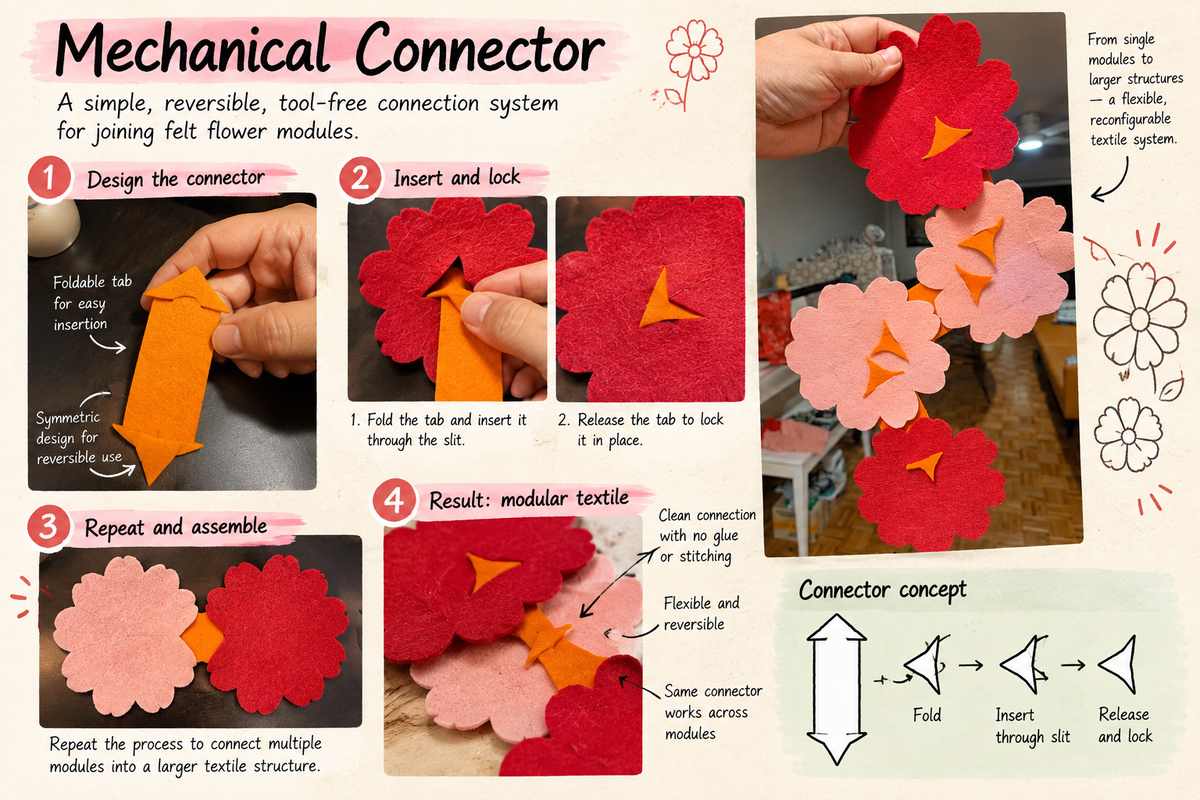
I developed a simple mechanical connector made from felt,with triangle edges as tabs at each end as male side, and cut through slits in the flower pedal as female. Because felt is flexible, the tabs can be compressed and pushed through a slit in the flower module. Once released, the tab opens again and mechanically locks the pieces together.
By repeating this connection, I was able to join multiple flower modules into a larger flexible structure. More importantly, the connection remains reversible: individual flowers can be removed, replaced, or rearranged without damaging the other components.
I tested this out on mom as first wearable piece that goes around he front neck/chest. And it works!
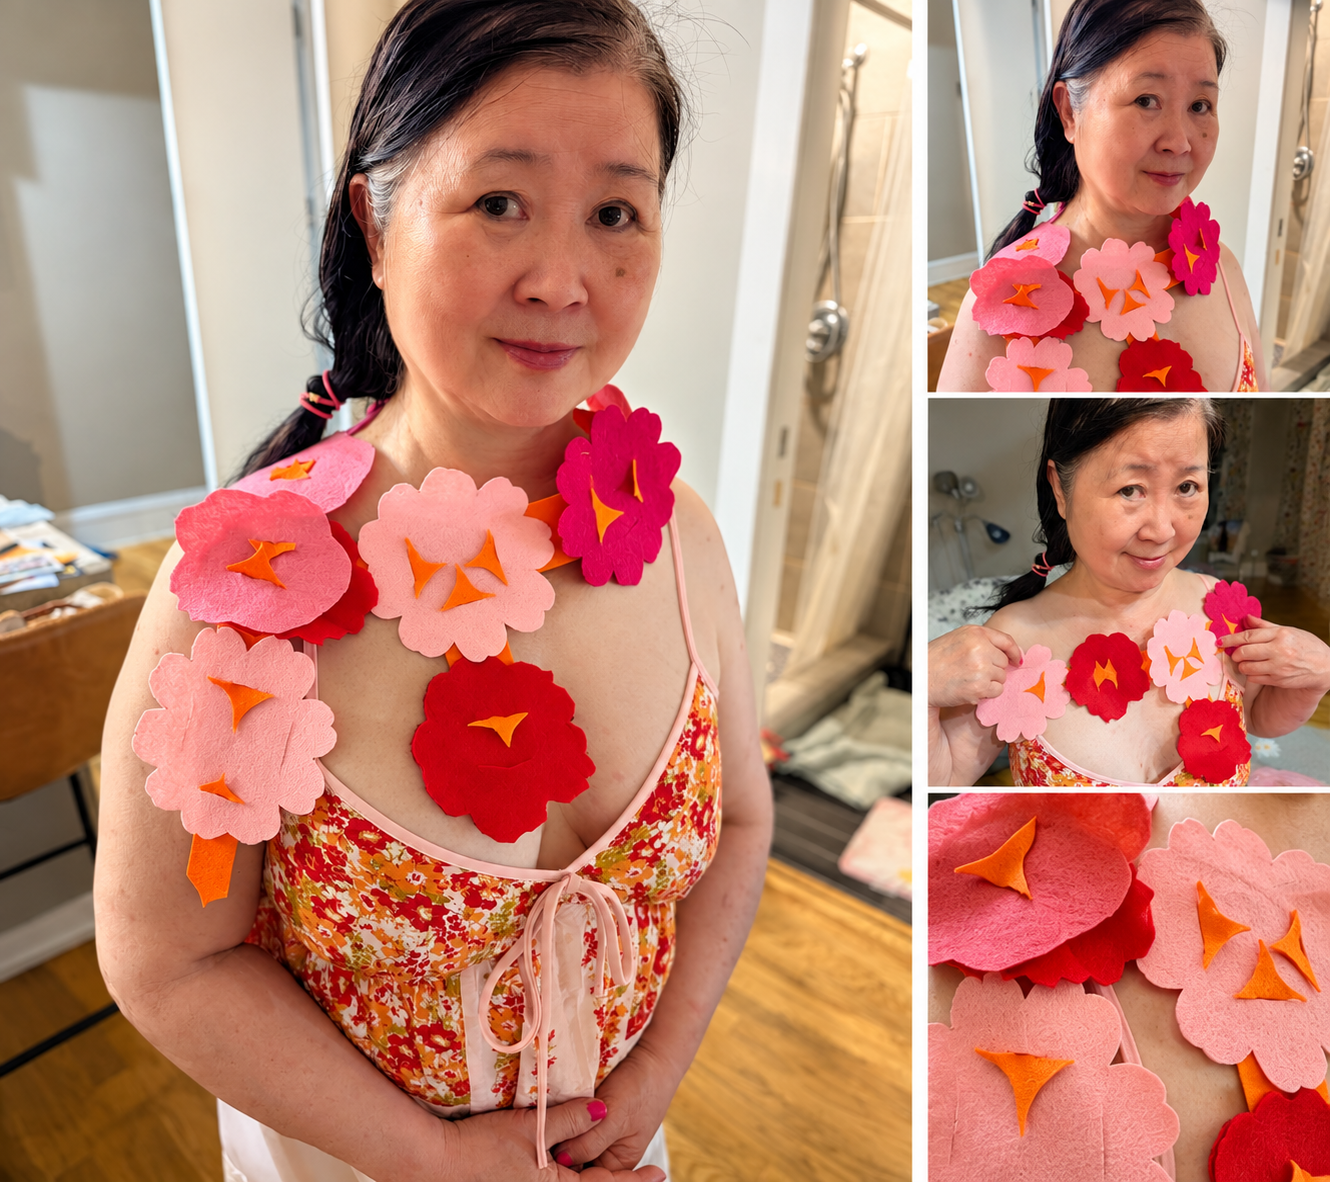
This test immediately revealed how the connected modules respond to the curves of the shoulders, chest, and neckline. Because the flowers are connected through flexible felt strips rather than sewn into a fixed garment, the structure can naturally shift and rotate as it is positioned on the body.
I was able to experiment with different arrangements, moving individual flowers and changing the overall direction of the piece.
I also noticed that the current connectors are visually quite prominent. While they successfully demonstrate the mechanical principle, they still look like connectors rather than an integrated part of the flower.
This fitting helped me see the project evolving from a collection of individual modules into a wearable, reconfigurable system. The same pieces could potentially become a collar, shoulder piece, necklace, garment surface, or larger body structure simply by changing how the modules are connected.
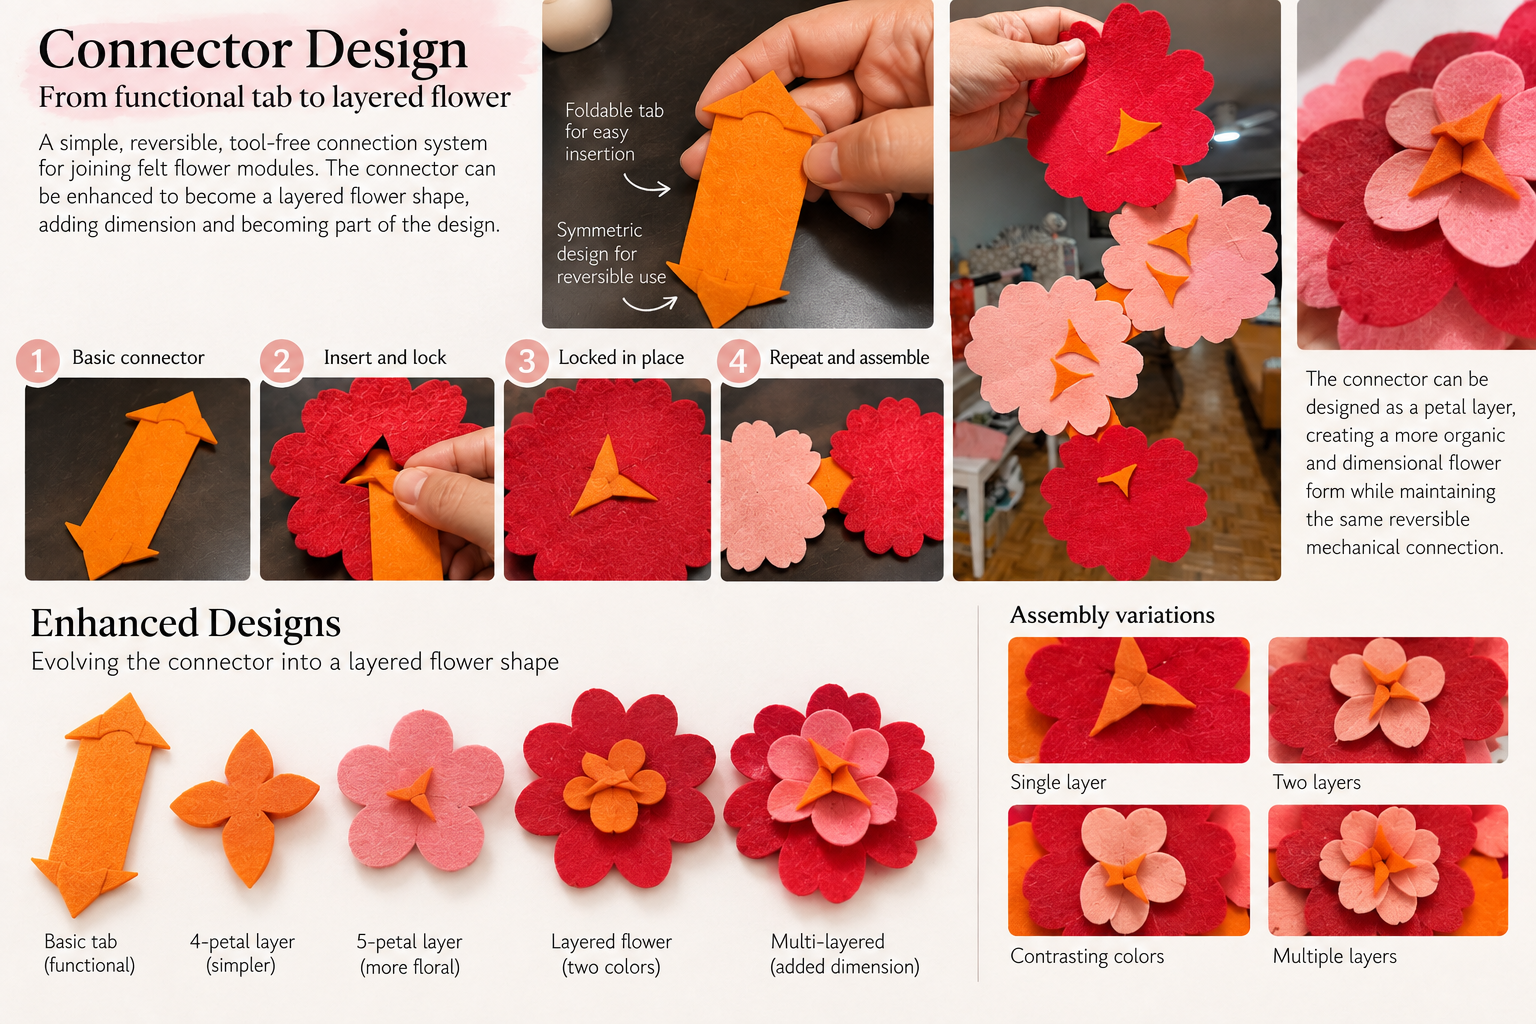
I will keep on iterating and reorganize this system into an entirely new garment or textile structure. While the connector successfully joins the modules together, I think its current shape still reads primarily as a functional fastening component. For the next iteration, I want the connector itself to become part of the visual language of the flower.
During the prototyping phase, I realized where the tab cut-out (male) and where the slits are made inside the flower pedal can all be optmized and adjusted. So I am playing with different placements and shapes so far for the connector.
Also, instead of a simple arrow-shaped tab, I am also thinking of redesign the exposed section as a smaller flower or petal layer. When inserted through the center of the larger flower module, the connector would sit on top of the surface and create a layered effect—almost like the inner petals or center of a flower.
This would allow the connector to perform several functions simultaneously: joining the modules, adding dimensionality, introducing color contrast, and creating a more complex floral form. By varying the size, number of petals, rotation, and color of the connector, the relatively flat modules could begin to develop more depth and three-dimensional volume.
4. Design for Zero-Waste
I had to backtrack a bit in terms of waste materials after I finished the first assembled piece.And through this process, I also immediately saw how zero-waste fashion design addresses one of the most immediate and measurable forms of inefficiency in the apparel industry: material loss during garment production.
"By shifting attention to the cutting and patternmaking stages, this approach challenges conventional manufacturing logic and reframes waste as a design problem rather than a production inevitability."
I am deeply inspired by Holly McQuillan as a zero-waste designer. Her progression from zero-waste pattern cutting → Make/Use → multimorphic textile-forms → whole-garment weaving shows how zero waste can evolve from a cutting optimization problem into an entirely different way of thinking about clothing systems. Her current textile-form research even explores garments and textiles being conceived as one integrated object rather than designing a textile first and cutting a garment from it afterward.
Fashion designer Yeohlee Teng is another inspiring artist. Her practice has incorporated resource-efficient and zero-waste thinking for decades. "‘Zero waste’ is mentality of those from small island. When you come from a tiny island you understand that resources are finite. You learn to value what you have and to appreciate the real value of things surrounding you in the situation where resources are finite (seldom endless) and you never have enough time."
For my project, since the flowers currently I have are round - placing identical flowers side-by-side inevitably creates gaps. Only if I can design the flower geometry so the negative space of one flower becomes part of the neighboring flower. That is what can turn the motif into a true zero-waste tessellation.
So I tried Tiled Art from Claudia's tutorial, and was able to almost get a flower tessalation from hexagon.
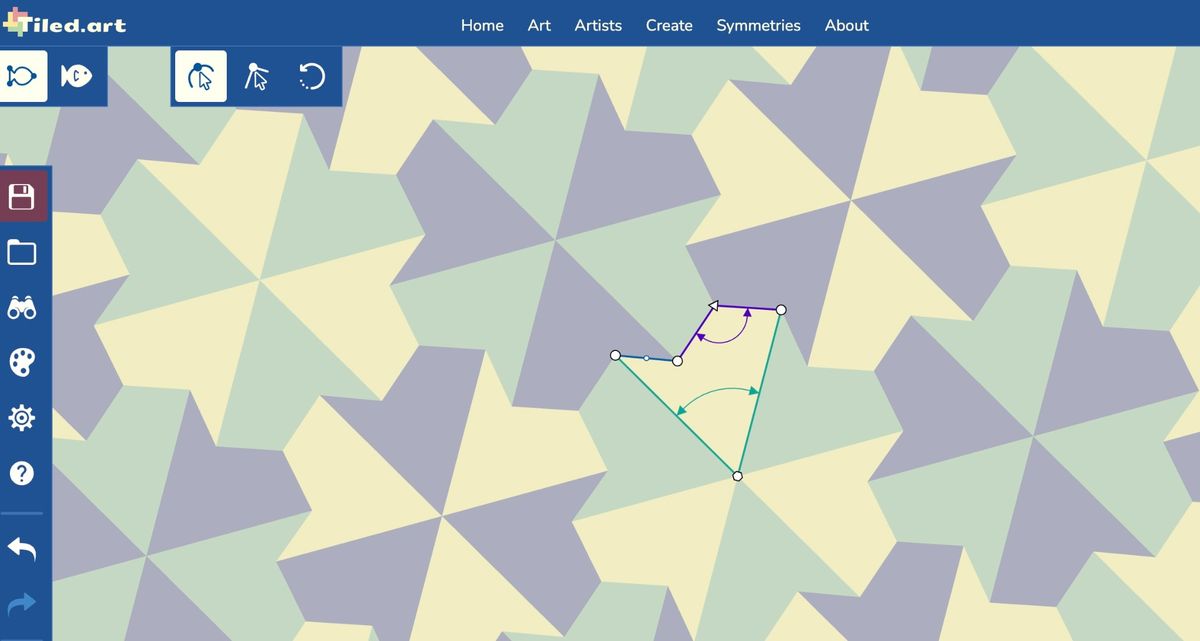
SVG Output from Tile.Art
SVG: Tessalation Cropped

After generating the initial tessellation in Tile.Art and exporting it as an SVG, I brought the vector file into xTool Studio to further work with the geometry for fabrication. The exported SVG contained the complete repeating pattern, so my first step was to isolate a single tile and understand how its individual paths formed the larger tessellation.
The geometry required some cleanup before it could become a reliable laser-cut file. I removed unnecessary or overlapping lines and refined the paths to create a cleaner individual module.
Once I had a cleaner tile, I experimented with xTool Studio's tiling function and the Touching Mosaic Pattern option. This automatically repeated and packed the geometry edge-to-edge, allowing me to quickly explore how the module could form a continuous field.
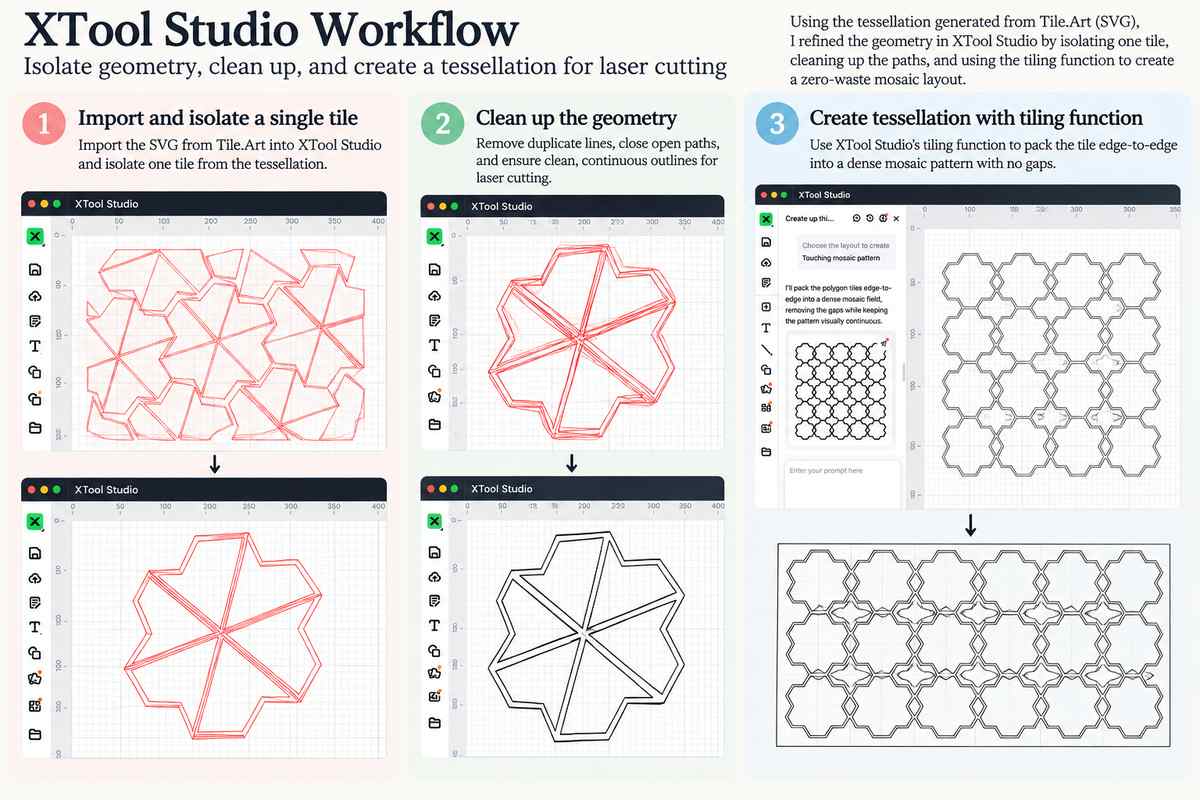
What is also interesting, is that the gap in between the tiles almost look like the previous mechanical connector I designed, so by using those pieces, I actually created my zero-waste design successfully! - The tessellation naturally creates negative spaces between four neighboring flower petals. Instead of treating these areas as waste, I redesigned the negative space as a four-way mechanical connector. This means that the flower petals and connectors can potentially be cut from the same sheet: the geometry left between the larger flower modules becomes a functional component rather than discarded material.
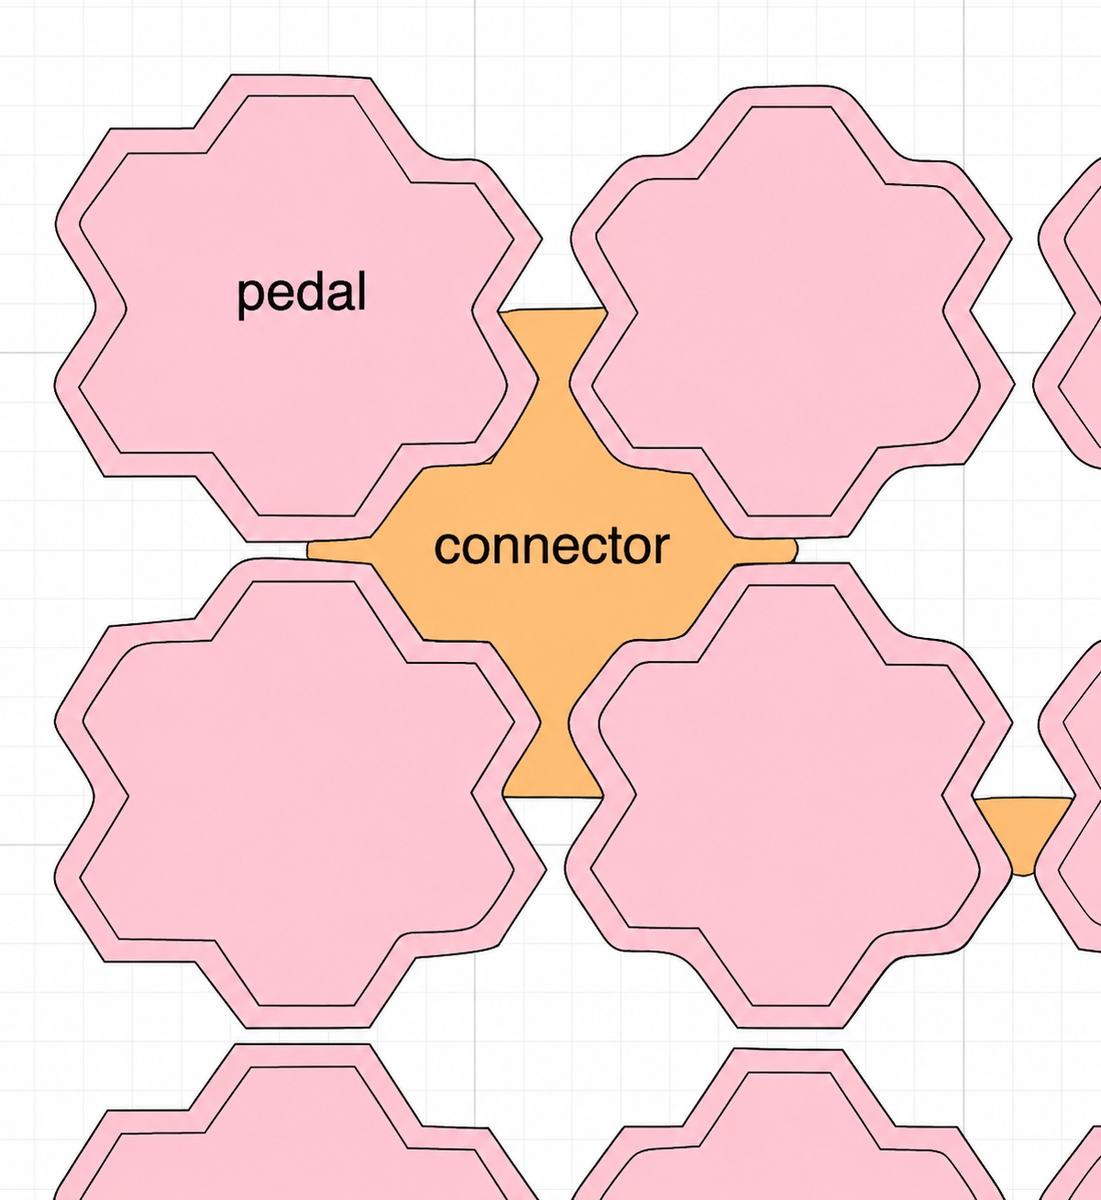
This was an important development in the project because the tessellation is no longer only about efficiently arranging shapes. The negative space itself becomes part of the modular construction system. The pink areas represent the primary flower/petal modules, while the orange geometry represents the connector generated between them.
The design therefore begins to connect three ideas within one system: Tessellation → Zero-Waste Cutting → Mechanical Assembly
The next step will be to prototype this geometry in felt and other fabrics.
Fabrication file
PNG: Tessalation Fab File

5. Reflections
-
Material choice changes the behavior of the same geometry. Testing the flower design across cotton, felt, silk, acrylic, and plywood showed me that a digital shape does not have a single physical outcome. Soft materials such as cotton struggled to maintain the geometry, while felt provided enough structure while remaining flexible. This made material testing an important part of the design process rather than something to decide at the end.
-
A connector can become part of the design language. Initially, I treated the mechanical connector as a separate functional component. Through prototyping, I realized that the connector itself could become a decorative element—almost another layer of the flower. This led me to think about mechanics and aesthetics together instead of hiding the fastening system.
-
Tessellation changed how I thought about waste. My first flower shapes produced significant negative space when arranged on a sheet. Exploring tessellation made me consider the entire sheet as part of the design problem. Instead of asking only, “What shape do I want to cut?”, I started asking, “What does the space between my shapes become?”
-
Negative space can become a functional material. One of my most important discoveries was that the space between four flower modules could become the geometry of the mechanical connector. Rather than treating these areas as scraps, I could potentially turn them into useful components. This connects zero-waste pattern cutting, modular design, and mechanical assembly within the same geometric system.
-
Digital fabrication can work together with handcraft and collaboration. Although I used digital tools such as Tile.Art, SVG workflows, xTool Studio, and laser cutting to develop the system, hand processes remained important. Using stencils made it possible to reproduce modules manually, and my mom helped me cut the large number of flower petals needed for experimentation. That experience reminded me that fabrication does not have to be purely machine-driven. The project became a collaboration between digital design, hand-making, and people, which made the process personally meaningful as well as technically interesting.
6. Some other thoughts about flowers
From Flower as Geometry to Flower as Practice
This week, I also participated in an Ikebana exhibition by Sogetsu Montegomery (my local Ikebana group) at a local public library.
Ikebana (生け花), literally “living flowers” or “giving life to flowers,” is the Japanese art of flower arrangement. Unlike conventional floral decoration, which often emphasizes abundance, color, and fullness, Ikebana pays close attention to line, structure, balance, asymmetry, negative space, and the relationship between the materials and their surroundings.
Traditional Ikebana arrangements are often structured around a small number of carefully positioned elements. Classical systems use principal lines such as Shin, Soe, and Hikae/Tai, creating relationships between height, direction, and space. The empty areas are not simply gaps waiting to be filled; they are an active part of the composition.
What I find particularly meaningful in practicing Ikebana is its emphasis on process rather than simply producing a beautiful result. The practice begins with learning structure and established forms. Through repetition and variations, those rules gradually become embodied knowledge, creating the freedom to make more intuitive compositions. In this sense, structure comes before decoration, and mastery of fundamentals creates the possibility for individual expression.
There is also a philosophy of using flowers sparingly but generously. A single branch, its direction, or the relationship between two flowers can carry more meaning than filling every available space. Harmony is therefore not achieved by adding more, but by understanding what is necessary and what can remain empty.
This connects unexpectedly well with my current digital fabrication work. In Ikebana, I am learning to recognize the importance of 間 (ma)—the space and interval between things. In my zero-waste flower tessellation, I encountered a similar idea physically: instead of seeing the negative space between flower petals as waste, I began designing that space to become the mechanical connector.
For me, Ikebana is therefore becoming more than inspiration for the flower motif. Its ideas of restraint, structure, repetition, asymmetry, spatial relationships, and learning through practice are influencing how I approach my life.
Participating in a flower exhibition this week also made this relationship more tangible: while I was arranging living flowers by hand, I was simultaneously abstracting the flower into repeatable digital geometry. These two processes—one traditional and ephemeral, the other computational and reproducible—have started to become part of the same design journey.
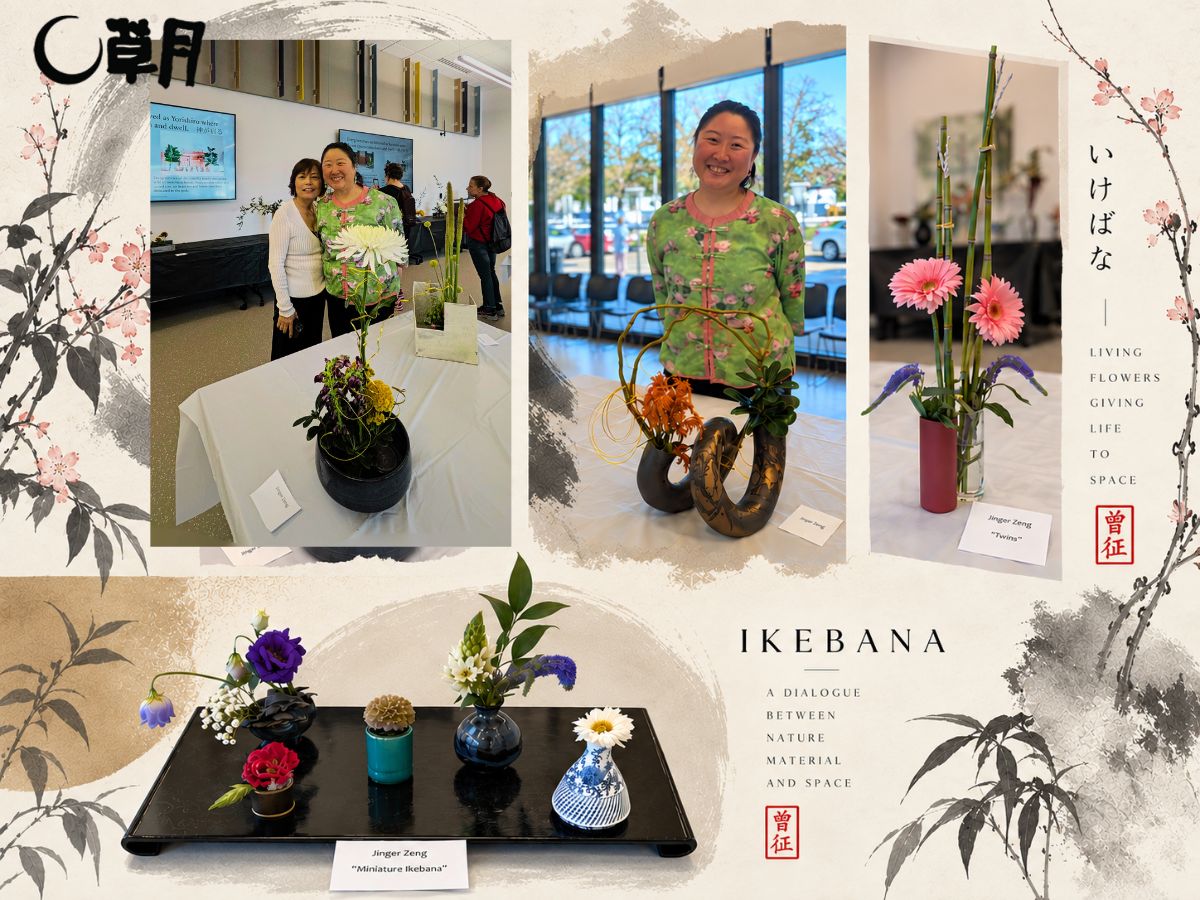
Working with living flowers while simultaneously abstracting flowers into digital geometry made me think differently about what I was designing.
Living flower → observation → arrangement → abstraction → geometry → fabrication → modular assembly
For me, this became one of the unexpected themes of the week: learning to design not only the object, but also to embody the experience of materials - both living and digital.
Ikebana beginner tips
I really love these philosophies of ikebana: these teachings are ostensibly about flower arrangement, but they are actually a philosophy of learning, creativity, and even leadership.
Do not be over-concerned about the result at the beginning of your studies. (初めから、結果を心配しすぎぬ稽古
Kakei styles are a collection of useful experiences. (You will find all the Kakei diagrams in your textbook.)(役に立つ経験を、集めたのが、花型法
Variation styles are based on the basic styles. (基本花型法の、応用花型法)
Variation No.1 ikebana extends from front to back. (前後に広げる、第1応用)
The main branches switch positions in Variation No.2 (主枝の交換が第2応用)
Variation No. 3 is to be viewed from three sides. (3面正面の、第3応用)
Variation No.4 is a style without the Soe. (副を使わぬ、第4応用)
Variation No.5: The main stems are divided into two units. (主枝の分列が、第5応用)
Variation No.6 is to be viewed from all angles. (四方正面の、第6応用)
Variation No. 7 floats on water, spreads, or is placed on a tabletop. (置く、敷く、浮かべる第7応用)
Variation No.8 is the combination of all Kakei styles. (花型の併合、第8応用)
Free creation is born out of the practice of basic and variation styles. (基本、応用の練習から自由創作は生まれる
The Shushi (main stems) constitute the structure, while the Juushi (subordinate stems) flesh out the structure. (主枝は骨組み、従枝は肉づけ)
Order of practice: from Moribana to Nageire. Use branch materials for the Shin and Soe and stem flowers for the Hikae. (安全な順序、盛花から投げ入れへ。真副に木、控に草)
The basic upright and slanting styles are the basis for all the Kakei styles. (立真、傾真の二基本が、あらゆる花型の母体)
Use flowers sparingly but generously when necessary. (花は大切にすること、花は惜しまぬこと)
In class, the Hikae is more often corrected than the Shin or Soe. (クラスでは、真、副よりも、控を直される)
Whether the number of branches is odd or even is not so important as the tone and harmony of the arrangement. (枝数の奇数、複数より、調子や釣り合い)
Make yourself as experienced in arranging Nageire as in Moribana. (投げ入れにも馴れる、盛花のように)