BioChromes
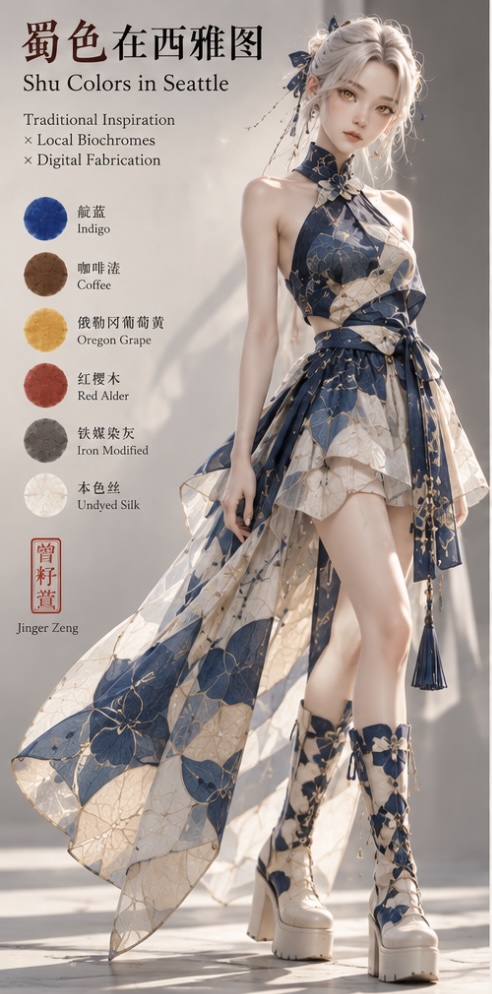
1. Color Explorations in Seattle
This week I explored color not simply as a visual finish, but as a material process: how color originates, how it interacts with fibers and surfaces, and how it changes through extraction, mordanting, modifiers, and binders.
My starting inspirational point was the historical color culture of Sichuan - my hometown province and bio region in China, especially to create Shu brocade (蜀锦) and Shu embroidery (蜀绣).
And since this week I was away in Seattle, away from my home lab, I was able to also explore and implement my "make anything from anywhere" nomadic style of "making" practice and philosophy. Which, I ended up unfolded a week of busy experiments and rich community participation.
2. References, research & inspiration
2.1 Traditional Chinese Dyes
China has a rich history of natural dyeing, with colors extracted from plants, flowers, roots, and other organic materials. These dyes have been used for centuries in silk production, traditional clothing, and textile crafts.
The following are seven historically significant natural dye sources in Chinese textile traditions.
| Natural Dye | Color | Traditional Use & Characteristics |
|---|---|---|
| Indigo (靛蓝 / 蓝草) | 🔵 Deep Blue | Derived from plants such as Strobilanthes cusia (马蓝), Persicaria tinctoria (蓼蓝), and Isatis indigotica (菘蓝). Used in traditional 蓝印花布 (blue-and-white resist-dyed textiles). |
| Safflower (红花) | 🌺 Pink / Red | Produces red and pink dyes. Traditional processing removes the water-soluble yellow components to isolate the red colorant. |
| Madder (茜草) | 🧱 Brick Red | An ancient source of red dye, producing orange-red, brick-red, and reddish-brown tones depending on the dyeing conditions. |
| Gardenia (栀子) | 🟡 Golden Yellow | A historically important yellow dye obtained from gardenia fruit, commonly associated with traditional Chinese yellow dyeing. |
| Sophora Flower (槐花) | 🌼 Yellow / Yellow-Green | Flower buds of the pagoda tree, rich in flavonoid colorants, traditionally used to produce yellow tones. |
| Chinese Gallnut (五倍子) | ⚫ Black / Gray | Rich in tannins. When combined with iron mordants, it produces dark gray, charcoal, and black shades. |
| Sappanwood (苏木) | 🔴 Crimson / Purple-Red | A versatile red dye whose shades range from red and crimson to purple-red and brown depending on mordants and pH. |
2.2 Chengdu's Dyeing Workshop Street (染坊街): A Legacy of Color
Chengdu, the capital of Sichuan Province (my hometown) has a long history of textile production, dyeing, and craftsmanship. One reminder of this heritage is Ranfang Street (染坊街), whose name literally translates to Dyeing Workshop Street.
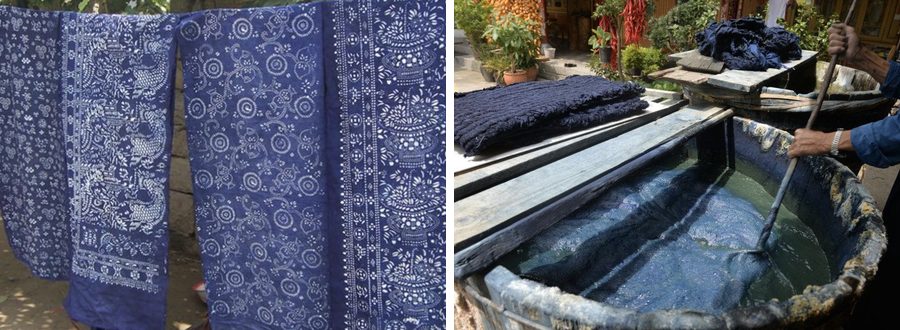
The street's name evokes an earlier urban landscape in which traditional craft workshops were closely connected to everyday commerce. Dyeing was an important part of textile production: artisans transformed undyed fibers and fabrics into colorful materials for clothing, household textiles, and decorative purposes. Before synthetic dyes became widespread, textile colors were often derived from plants, minerals, and other natural sources.
Chengdu's textile heritage is particularly associated with Shu brocade (蜀锦), celebrated for its intricate woven patterns and rich colors, and Shu embroidery (蜀绣), known for its refined silk needlework. Although these traditions involve different techniques, both reflect the cultural and artistic importance of color in Sichuan.
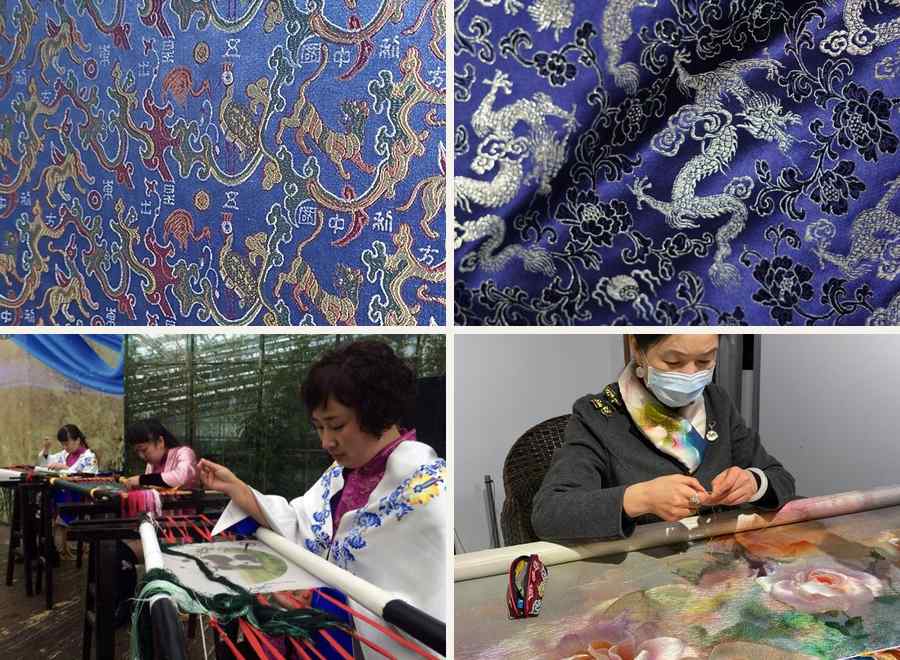
Growing up with the cultural heritage of Chengdu, I am interested in how the city's historical relationship with textile color can be reinterpreted through contemporary natural dyeing. How to embrace Sichuan's rich textile traditions, while modernize the experience.
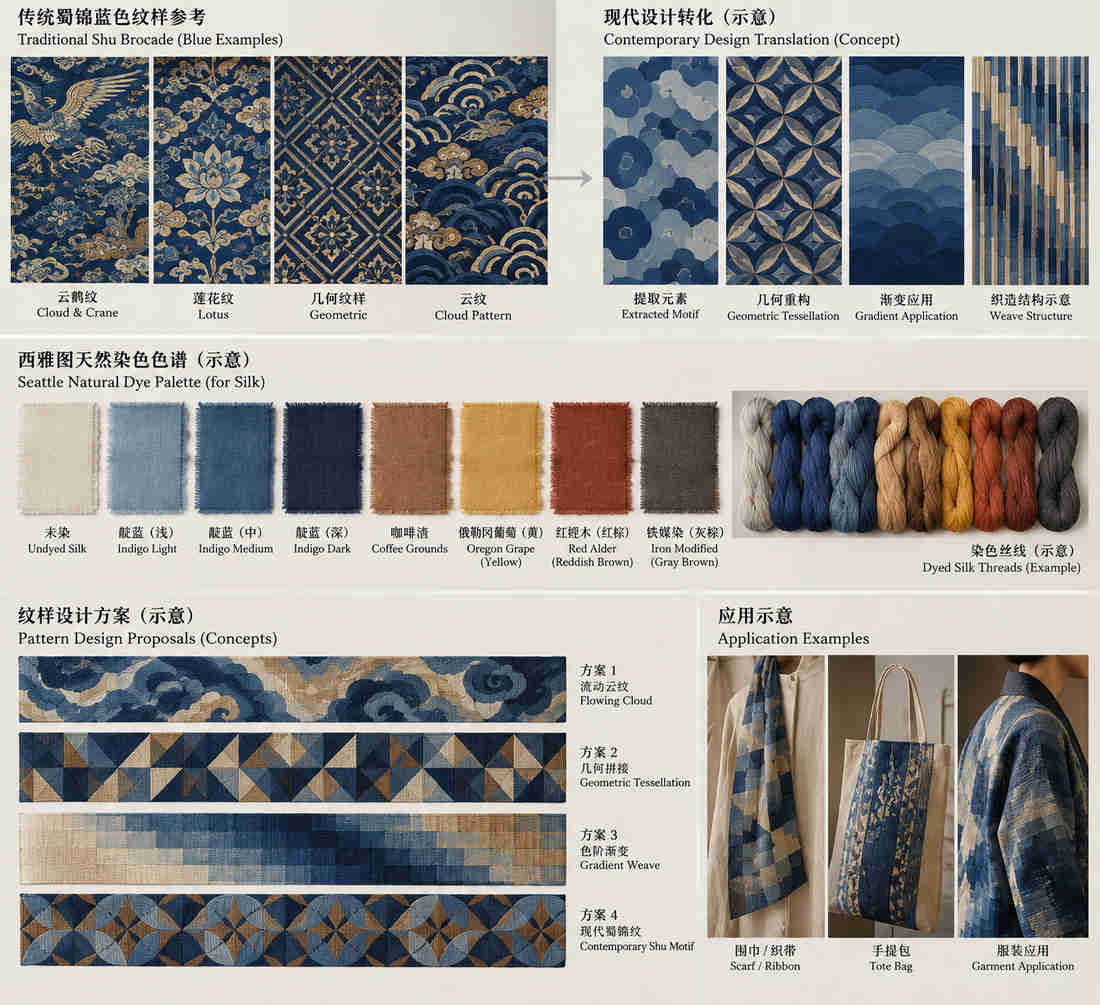
2.3 Bhutan Future Fabrics inspirations
My interest in natural dyeing actually was seeded from the fab conference trip in Bhutan in 2023, where I encountered vibrant textile traditions, intricate handwoven fabrics, and local craft communities - and Chinese silk that I do not see modern Chinese wear anymore, but worn proudly in Bhutanese daily lives and streets.
During my visit, I had the opportunity to explore traditional textiles and observe natural dyeing practices firsthand. Seeing how plant materials could be transformed into colors for textiles made me appreciate the relationship between nature, craftsmanship, and cultural heritage.
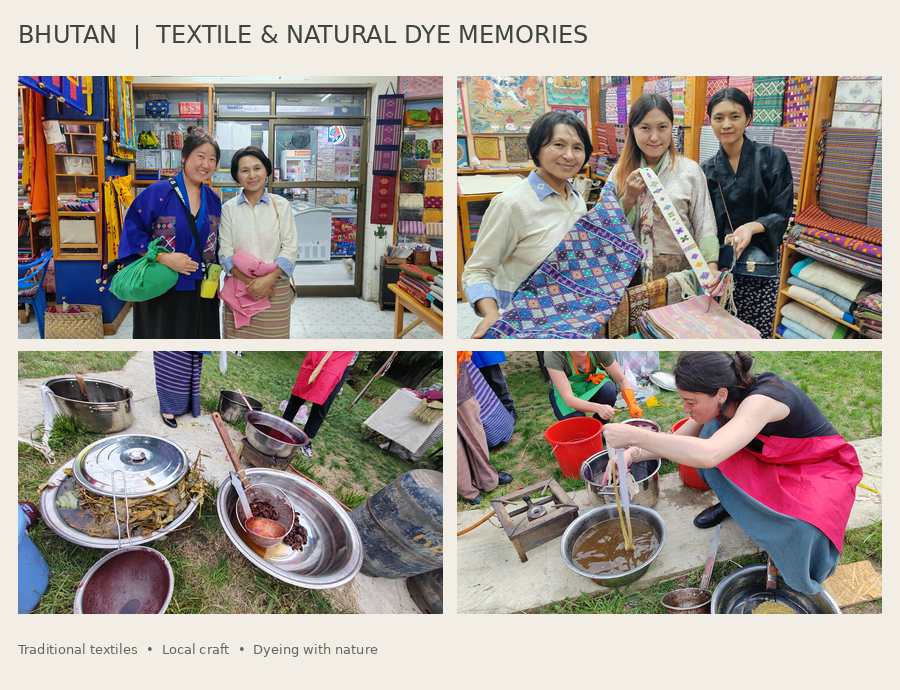
That's when I first got to know of Fabricademy community, and was so inspired by the research group "Future Fabrics"
Future Fabrics Bhutan 2023
https://fabricademy.fabcloud.io/fabevents/fab23-textile-challenge/
2.4 Mexico Future Fabrics inspirations
In 2024, I participated as a member of the Future Fabrics research group in Yucatan Mexico, and had another transformative experience working with local Mayan artisan communities to explore how emerging technologies and traditional craftsmanship could support cultural preservation and sustainable textile production.
One particularly meaningful aspect of the project was researching traditional Mayan natural dyes. In the Yucatán Peninsula, artisans have used locally available plants, bark, roots, flowers, and seeds to produce textile colors for generations. Our collective research explored materials such as annatto (achiote), hibiscus, avocado pits and skins, and tzalam bark. And one of the outcomes was the Yucatecan Natural Dye Manual, an open resource documenting regional dye materials, experimental recipes, and color possibilities for local artisan communities.
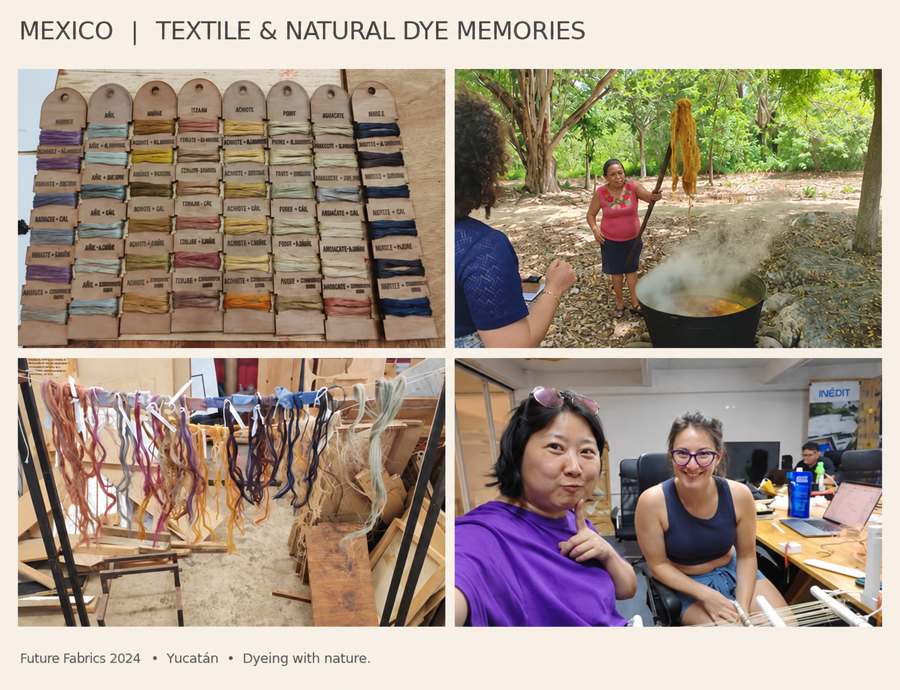
Future Fabrics Mexico 2024
https://fabricademy.fabcloud.io/fabevents/fab24-textile-challenge/Design/Dyes/
3. Natural Dye Experiments — Exploring Color Across Fibers
3.1 Finding Natural Colors in My Neighborhood
For this week's project, working in Seattle, I began by exploring locally available botanical materials and natural pigments.
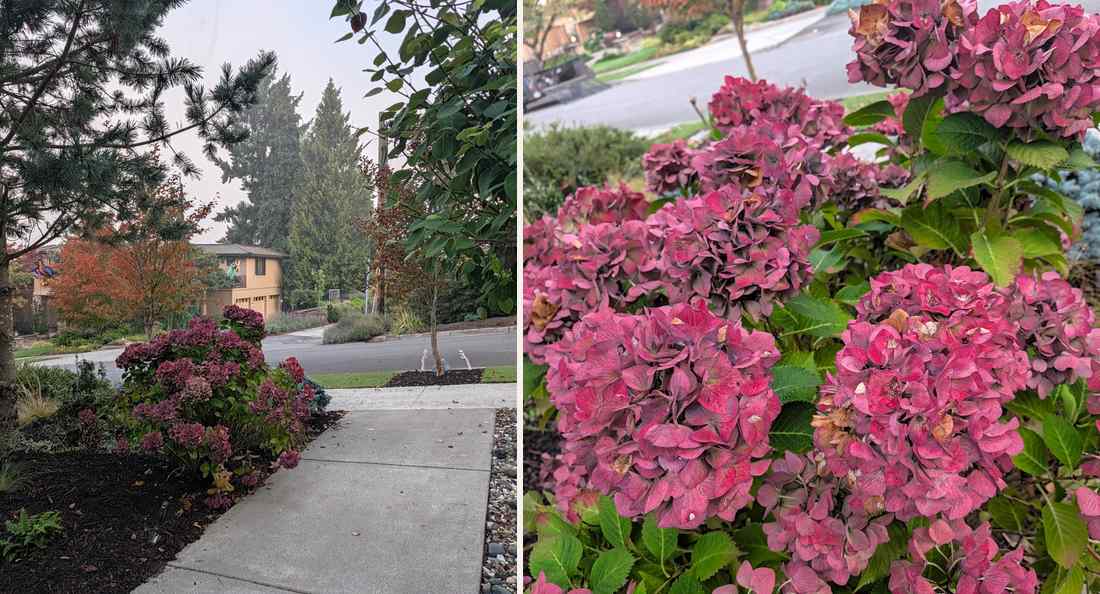
For botanical material - I decided to go with the abundant Autumn Hydrangea. They are all over people's front yards, and currently they are just changing color into this beautiful pink-purple for the autumn season.
I was curious if this burgundy would be able to become a bio pigment.
3.2 Preparing Fibers
Since I needed chemicals, I looked online for local natural dye resources, and found Earthhue - who sold mordants and assists, as well as dye kits. I was very fortunate to find this store as it came with extensive natural dye step-by-step instructions (from founder Michele's life-long research and work), and the owner Andro became my mentor.
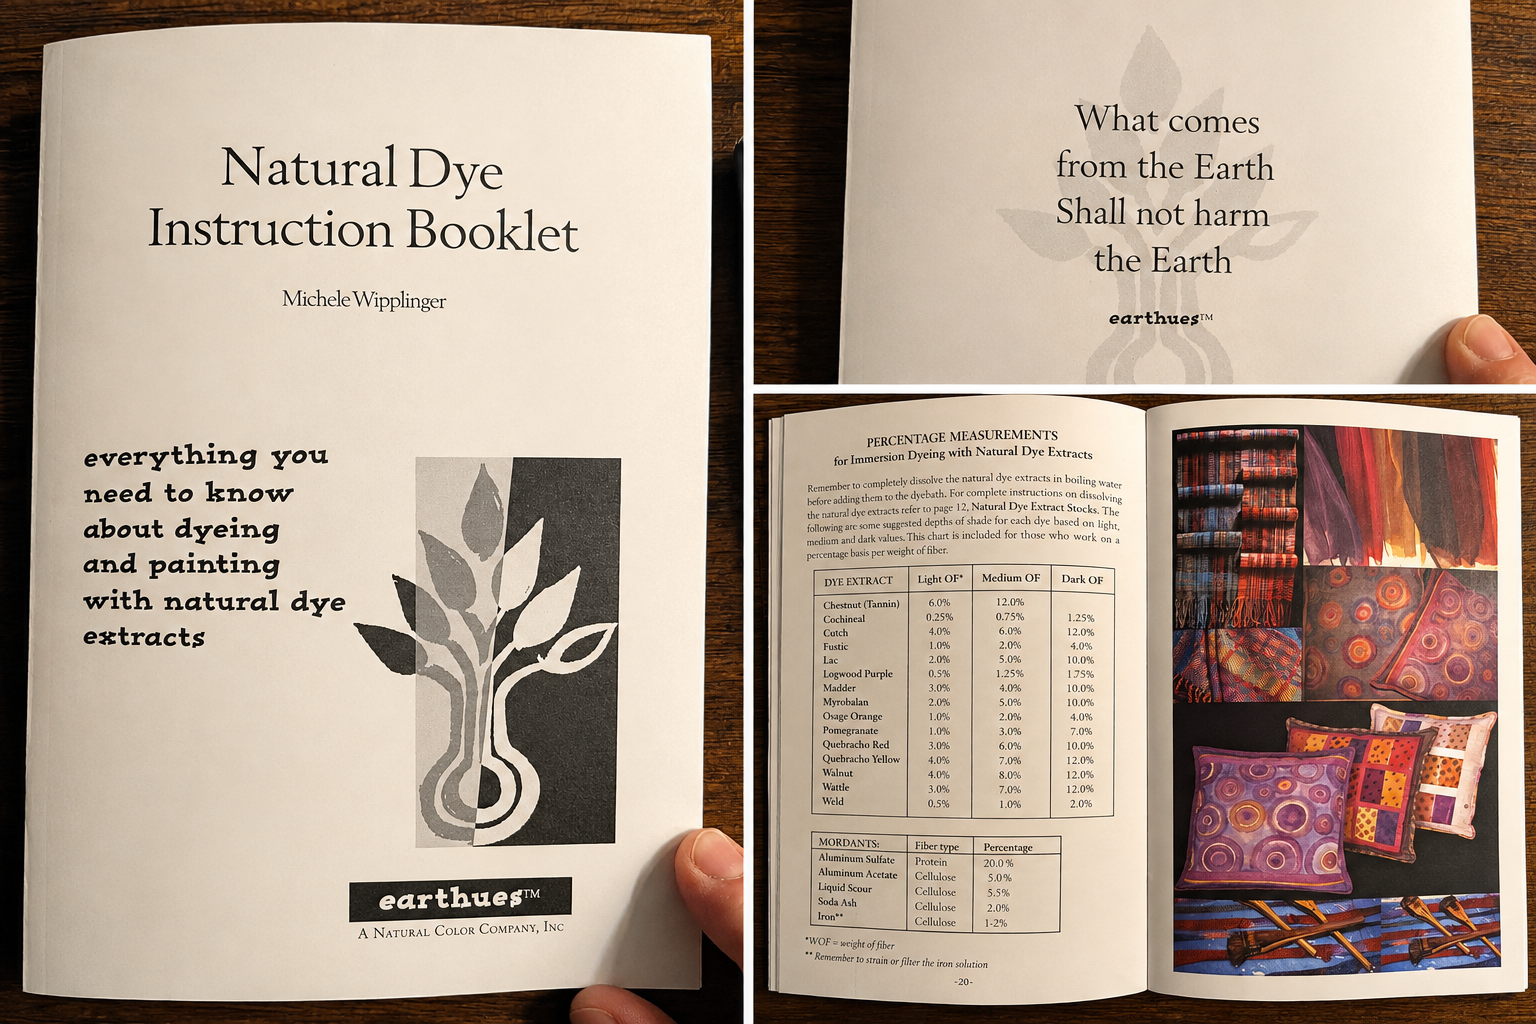
So for preparing fibers to receive colors, whether protein fibers or cellulose, they both have 2 stages:
Stage 1 Scouring: Cleaning the fibers using liquid scour and soda ash. Stage 2 Mordanting: Treating the fibers with appropriate "mordant" to improve natural dye absorption, color depth, and lightfastness. Alum is the primary mordant recommended by Earthues for fixing natural dye extracts to fibers.
This preparation step is extremely important (the most important step) - highlighted how fiber chemistry influences natural dyeing results and why selecting an appropriate mordant is essential when working with different textile materials.
Protein Fibers (silk & wool)
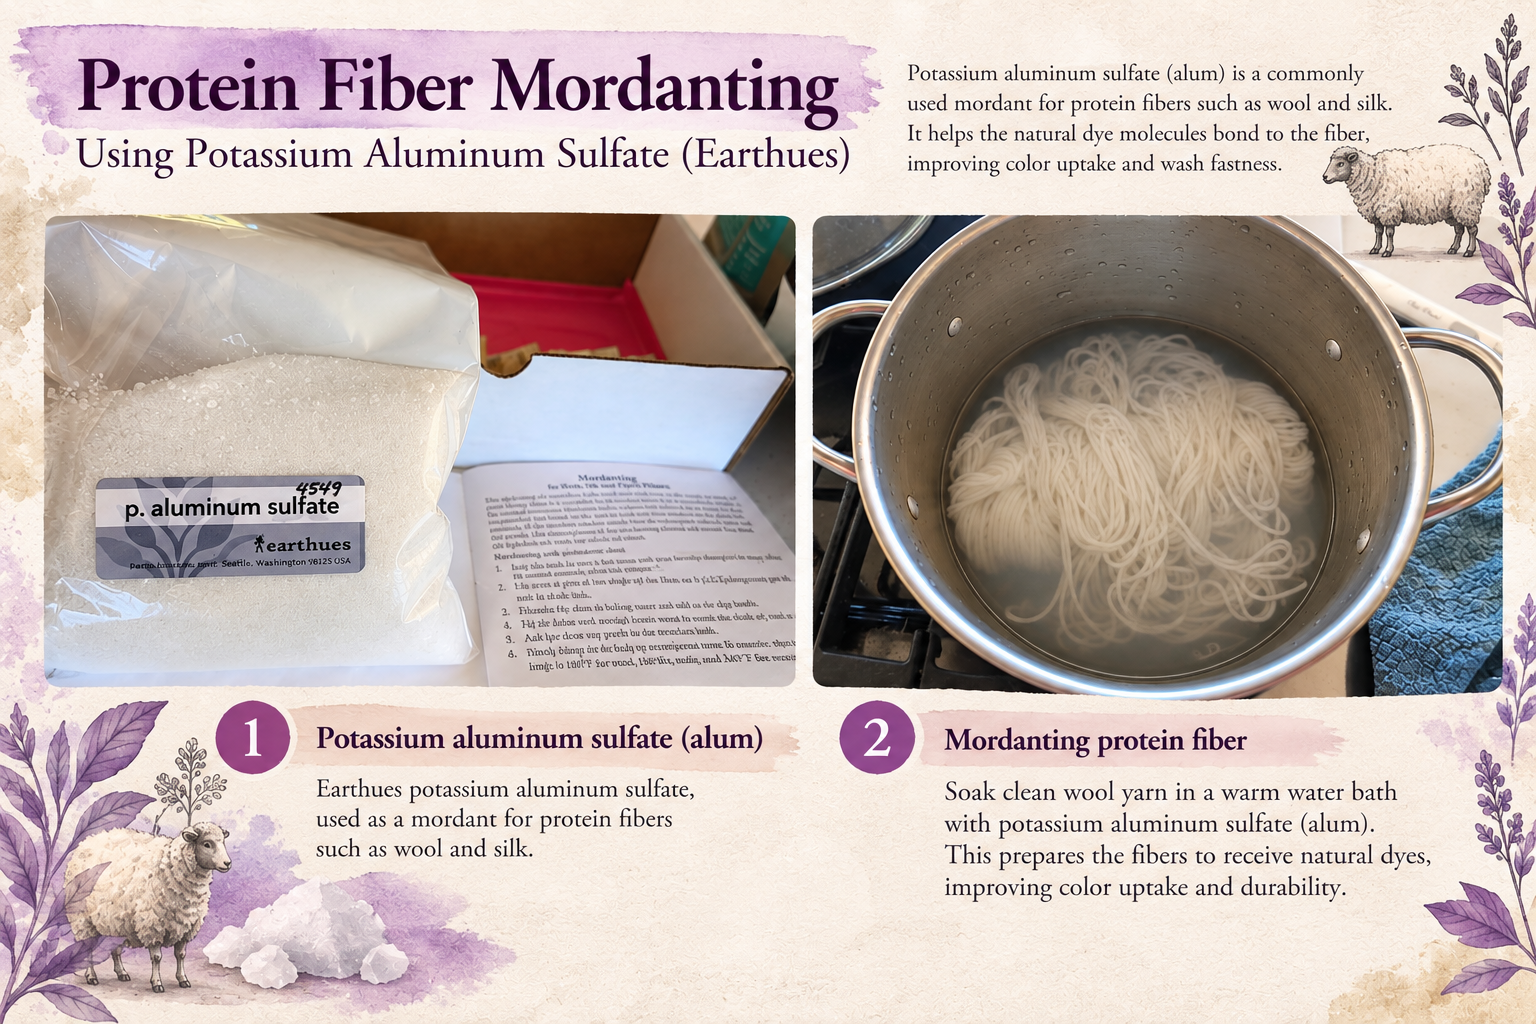
Potassium aluminum sulfate is preferred mordant for wool, silk, and leaf fibers because it is effective and economical.
My Process
Step 1 — Scouring the Fibers
Soak the wool yarn in hot water with a gentle soap for 30 minutes to remove dirt, oils, and impurities. Rinse thoroughly and gently squeeze out excess water.
Step 2 — Measuring the Alum
Following Earthhues's recommended alum ratio of 20% Weight of Goods (WOG), I measured approximately 4 tablespoons of alum for my 1 lb (454 g) of wool yarn, according to the guide.
Mordant Calculation
Alum = Fiber Weight × 20%
454 g wool × 0.20 = 90.8 g alum
Note: Tablespoon measurements are approximate. Measuring alum by weight is more accurate.
Step 3 — Dissolving the Alum
Dissolve the measured alum in a small amount of boiling water, stirring until completely dissolved. Add the solution to the mordanting vessel.
Step 4 — Preparing the Mordant Bath
Fill the kettle with enough warm water to fully submerge the wool yarn. Add the dissolved alum and gently distribute the fibers throughout the bath.
Step 5 — Heating and Mordanting
Slowly heat the mordant bath to approximately 200°F (93°C) over 45 minutes.
Maintain the temperature for 1 hour, then turn off the heat and allow the fibers to cool naturally in the mordant bath.
Step 6 — Preparing Dye Samples
After mordanting, I divided the wool yarn into individual samples of approximately 10 g each.
I arranged the samples on my kitchen counter, ready for the next stage of natural dye experiments.
Key Process Parameters
| Parameter | Value |
|---|---|
| Fiber | Wool yarn (protein fiber) |
| Fiber weight | 1 lb / 454 g |
| Mordant | Alum |
| Mordant ratio | 20% WOG |
| Calculated alum weight | 90.8 g |
| Scouring time | 30 minutes |
| Heating time | 45 minutes |
| Mordant temperature | 200°F / 93°C |
| Holding time | 60 minutes |
| Sample weight | ~10 g each |
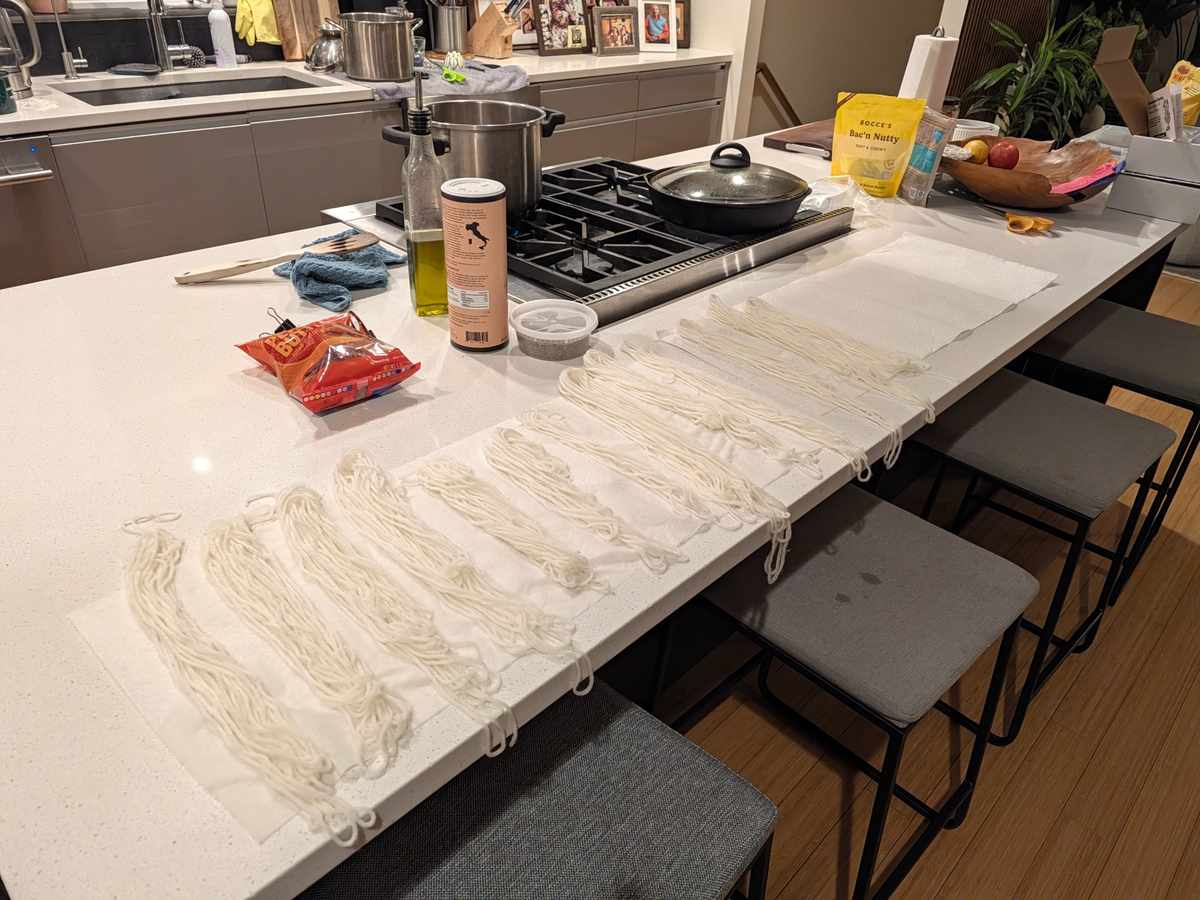
I wouldn't complain too much about the untangling effort of 3 hours - that's off the book.....any tips for untangling is very welcome and needed
Cellulose (cotton, linen) - Plant Fibers
Unlike protein fibers such as wool and silk, cellulose fibers—including cotton, linen, and hemp—require different mordanting considerations due to their molecular structure.
Use aluminum triformate to prepare cellulose fabric.
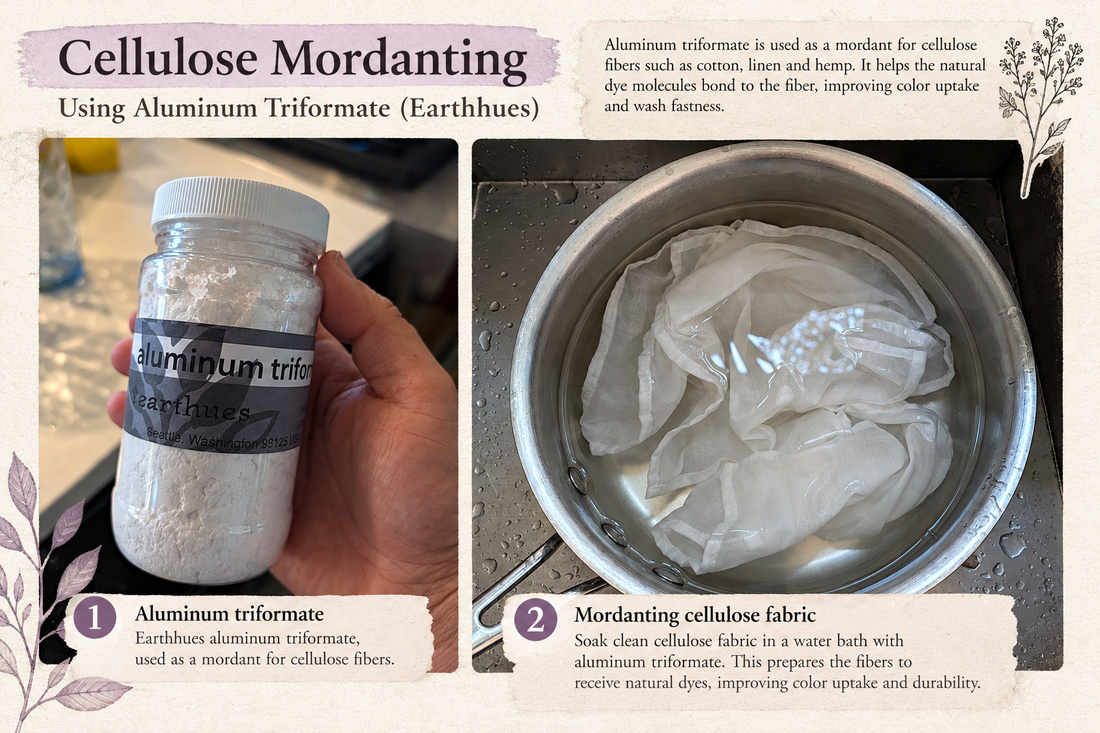
Bath 1 - Gather liquid scour (bought from earthhue) + soda ash - Add enough water to the dye pot to fully cover the fibers. Begin at approximately 100°F (38°C). - Add liquid scour at 5.5% WOF (1 cap), approximately 2 tablespoons. - Dissolve soda ash at 2% WOF in boiling water, then add it to the scouring bath. - Slowly increase the bath temperature over approximately 20 minutes. - Maintain 180°F (82°C) for 30 minutes, moving the fibers regularly. - After scouring, rinse the fibers briefly in warm water. - Gently remove excess water and proceed to the second bath.
Bath 2 - Prepare a fresh bath with enough water to cover the fibers at 100°F (38°C). - Measure aluminum acetate at 5% WOF, approximately 4 tablespoons per pound of fiber. - Dissolve the aluminum acetate powder in boiling water before adding it to the mordant bath. - Add the dissolved alum triformate to the bath. - Submerge the scoured fibers. - Maintain the bath at 100°F (38°C) for 1 hour, moving the fibers regularly. - Rinse the fibers briefly in warm water after mordanting. - Gently remove excess water. - Keep the fibers damp in plastic bags until ready for dyeing.
3.3 Brew Flowers to Prepare Dye Bath
I collected autumn hydrangea flower heads and separated the colorful, papery flower parts for dye extraction. Then I placed the hydrangea material in water and heated it gently just like brewing a tea, allowing the soluble color compounds to enter the liquid. The dye bath gradually developed a reddish-brown color. Then after removing the cooked materials, I used a strainer to filter out the remainder small pieces of fragments , leaving a clearer dye solution ready for further experimentation.
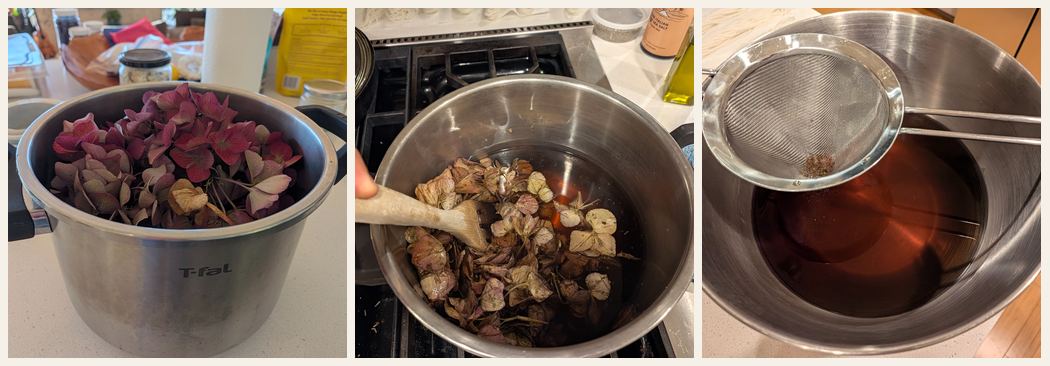
One interesting observation was that the vibrant pink-purple hydrangea flowers produced a reddish-brown extract rather than retaining their original color. This demonstrates that the visible color of a plant does not necessarily predict the color obtained through dye extraction. The final color can also change with pH, mordants, and subsequent chemical processing.
3.4 Adding pH modifiers
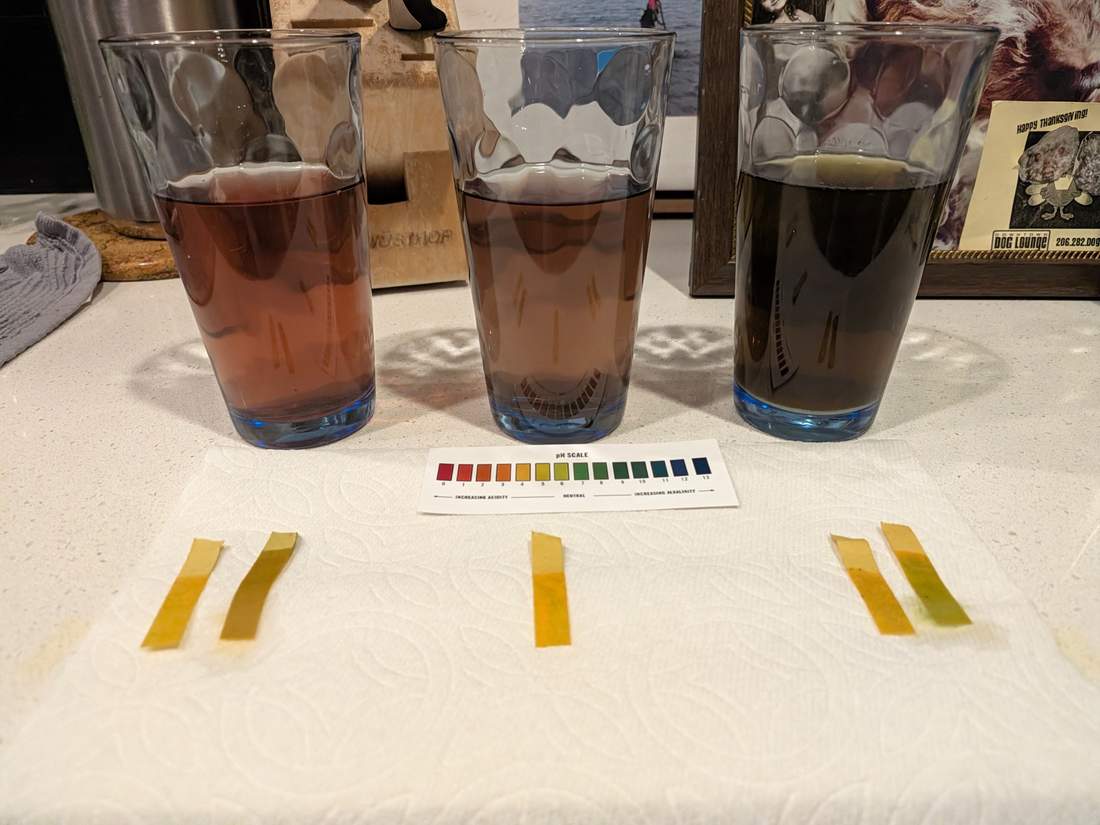
I explored how changes in pH influence the colors extracted from autumn hydrangea flowers. I used vinegar and soda ash to change the pH from acidic to alkaline.
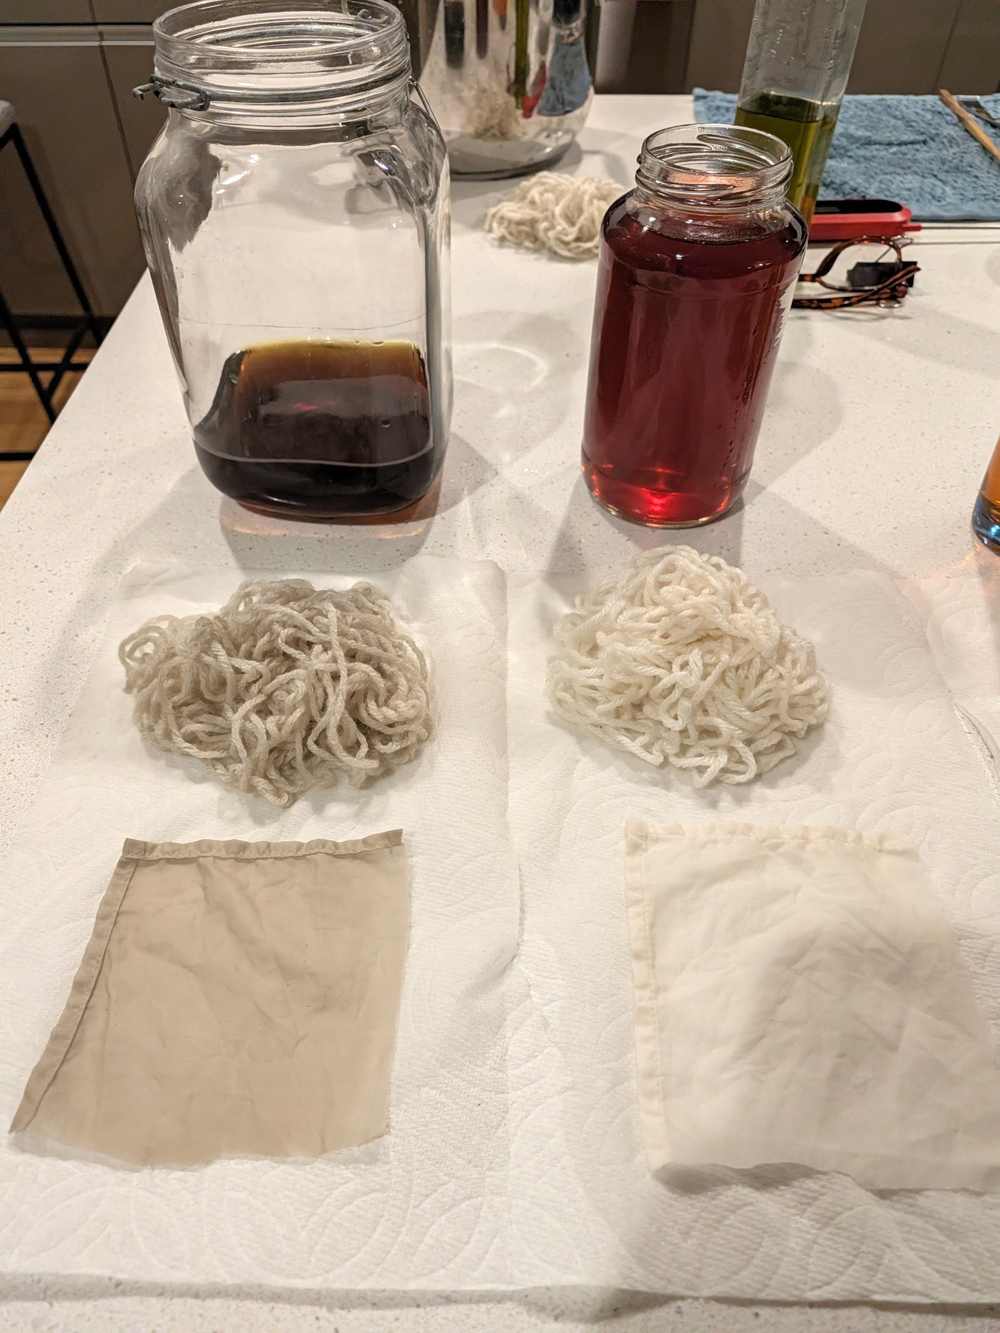
I compared three samples of hydrangea dye extract, observing variations from reddish-pink (acidic) and warm brown to a much darker (without modifier), then muted almost greenish tone (alkaline).
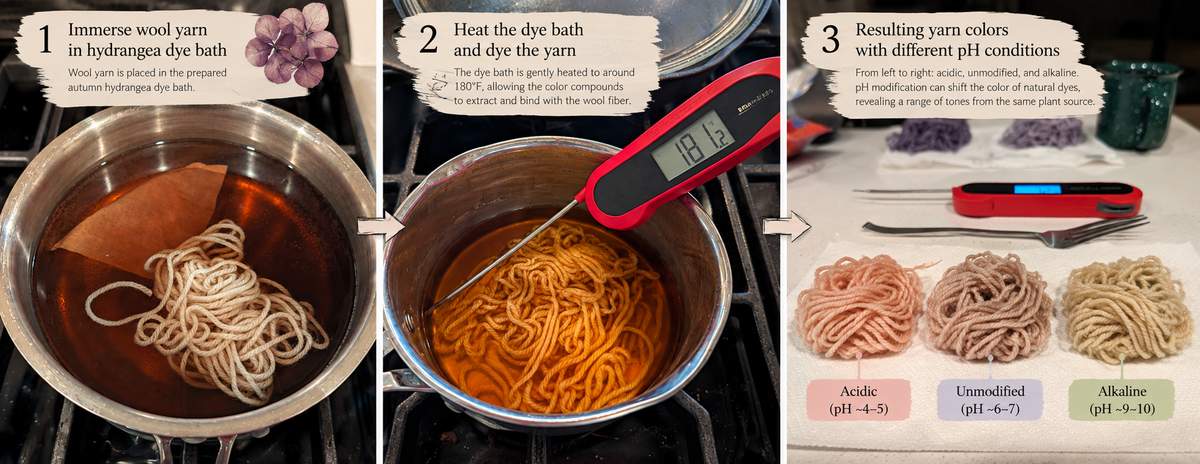
These three photographs document my natural dyeing experiment using autumn hydrangea extract, from immersing wool yarn in the dye bath to controlling temperature and comparing the final results under different pH conditions. The final photograph shows three samples arranged from left to right: acidic, unmodified, and alkaline. This comparison explores how pH modification can influence the color of natural dyes and their interaction with wool fibers.
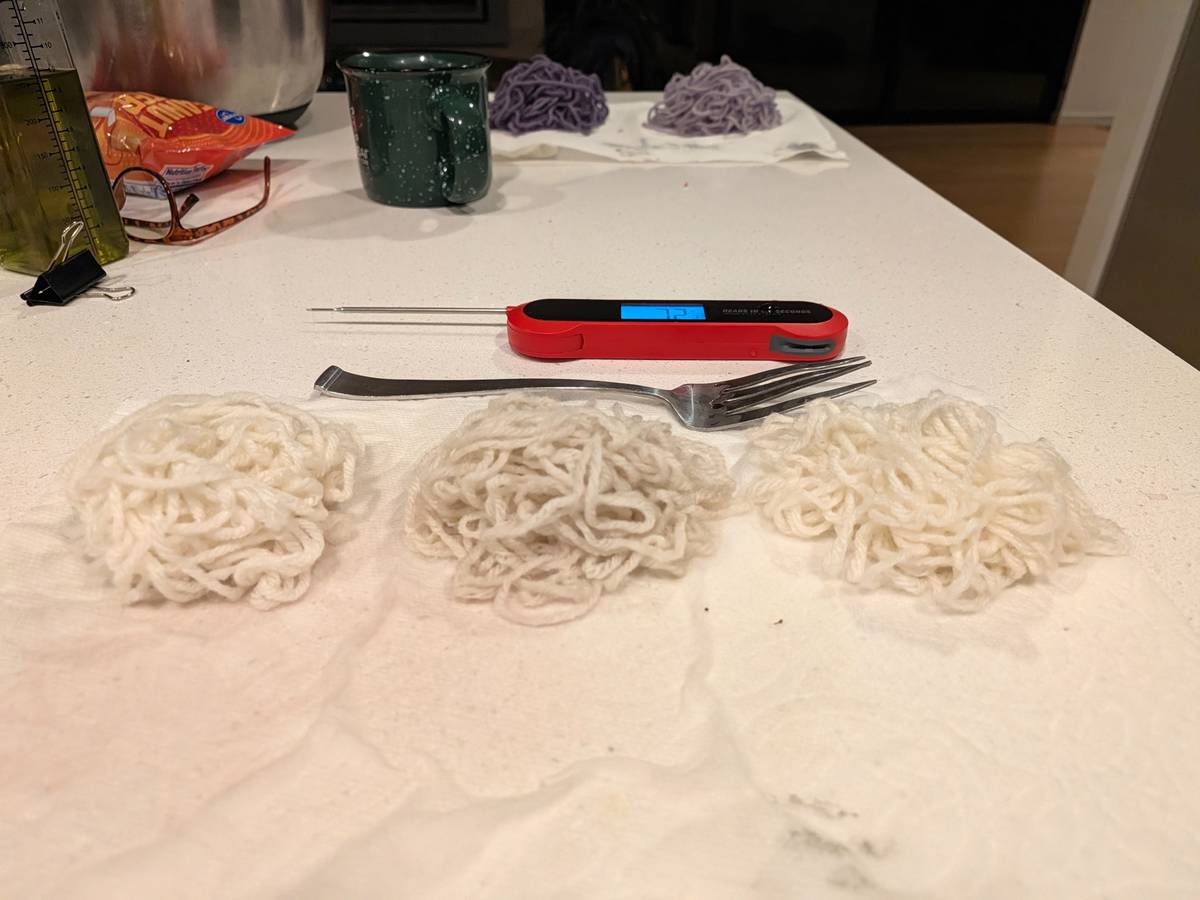
Results after washing though was kind of surprising to me - both modifiers bath didn't dye, the origin had a slight grey hue, but very light.
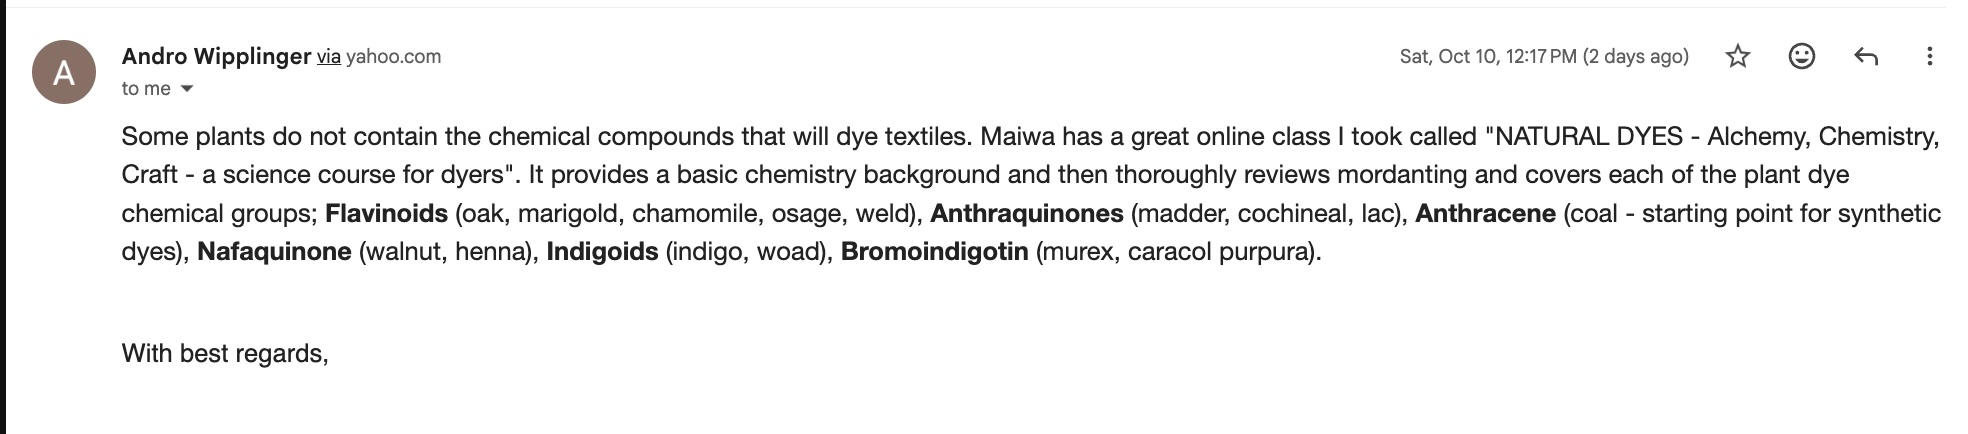
So I asked Andro from Earthhues about the result, and his response led me to into thinking just the depth of knowledge in natural dying, and it's a facinating world out there.
I also tried it again on cotton to see if cellulose would be different, and the result return same.
3.5 Exploring metal modifiers
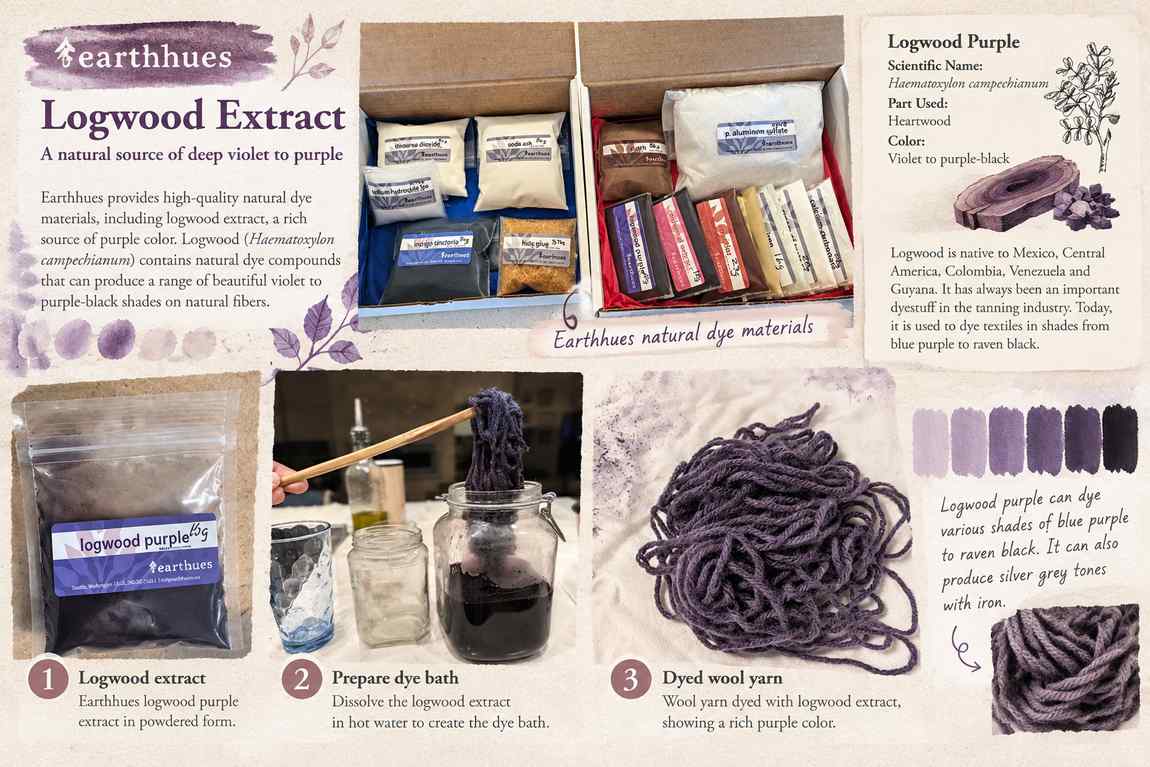
I was a bit bummed out about the result from hydrangea, so I decided to use the natural dye extracts from earthhue that came in my kit. And the result is stunning! The color is so potent!
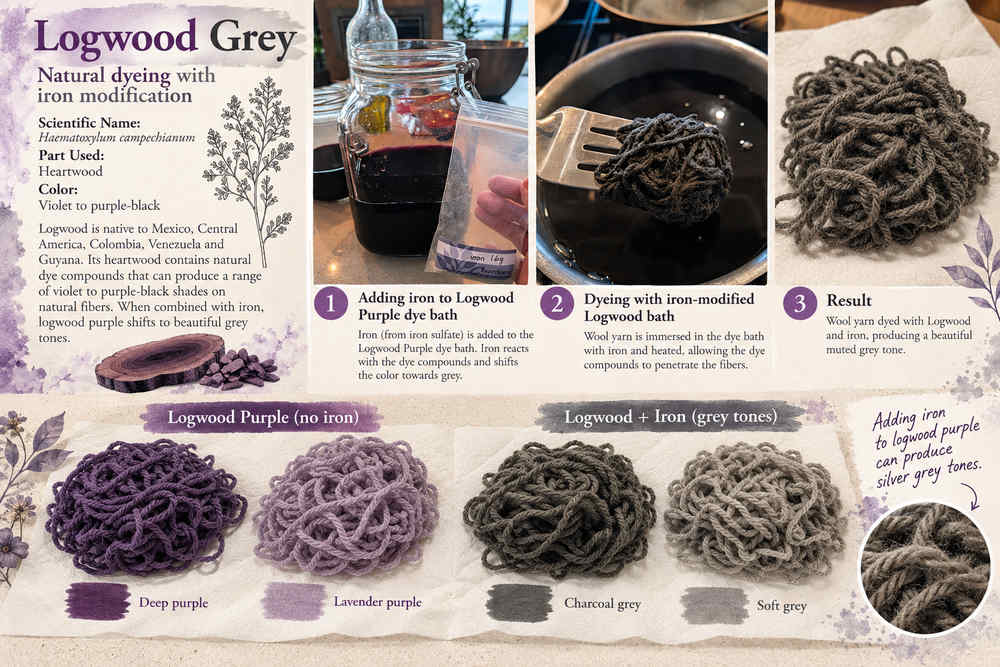
So then I proceeded to use the iron that came with the kit to see about turning Purple into Grey
3.6 Colors, More Colors
Once I discovered how easy it was to use the extracts, I started to play with more colors using the same procedure to "brew" dyes. I ran each color with a 45min simmer, with both yarn and fabric samples.
THe 5 dye extracts from Earthues I used are: Madder, Weld, Cochineal, Cutch, and Pomegranate.
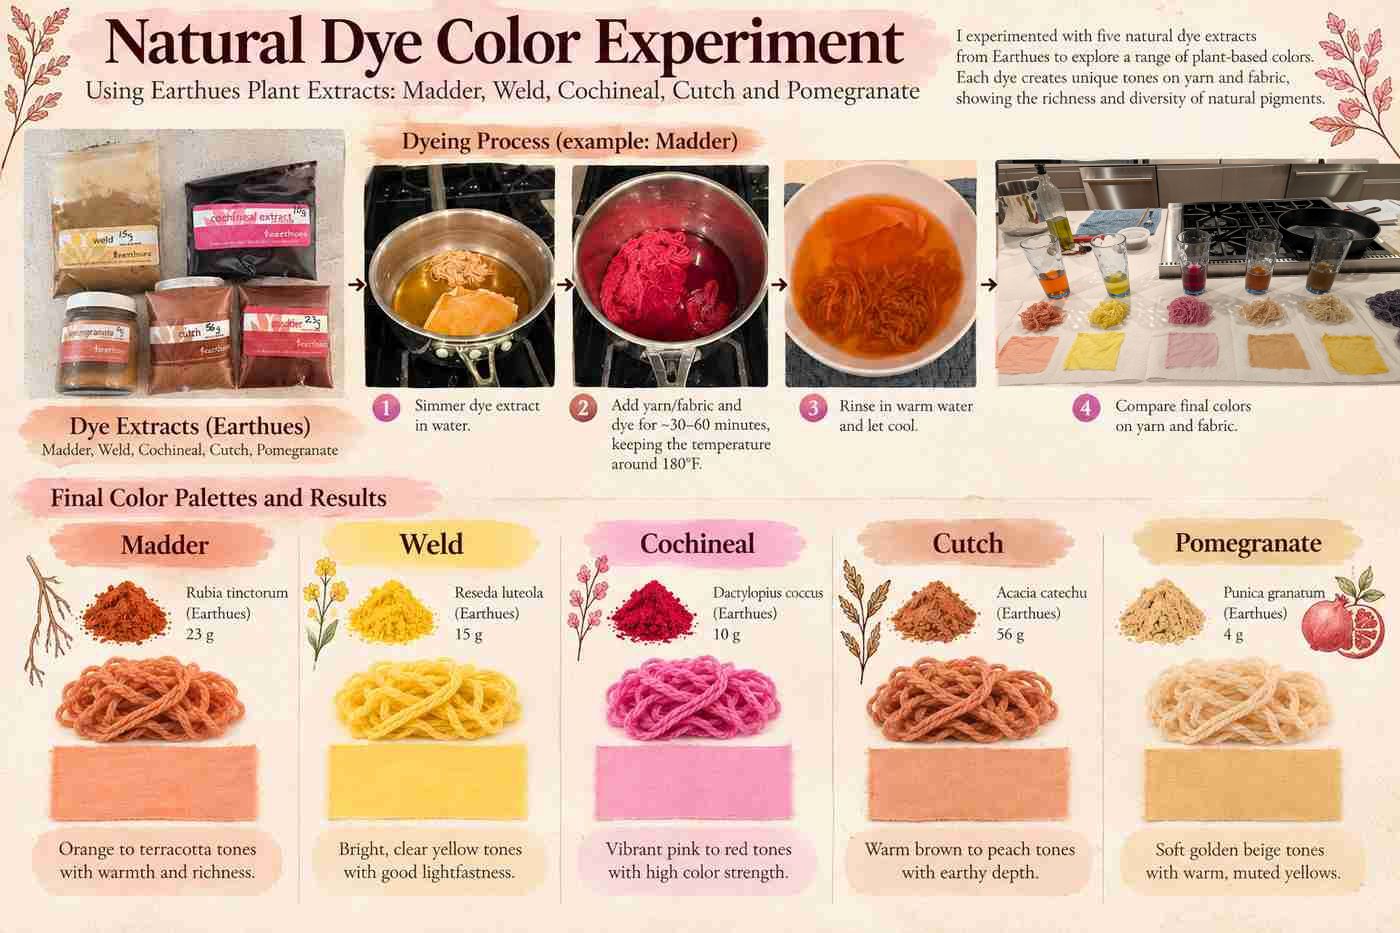
I really like how "natural" the earthhues come out to be. Each color has a warmth tone to it that I can't describe with words its beautiful essence.
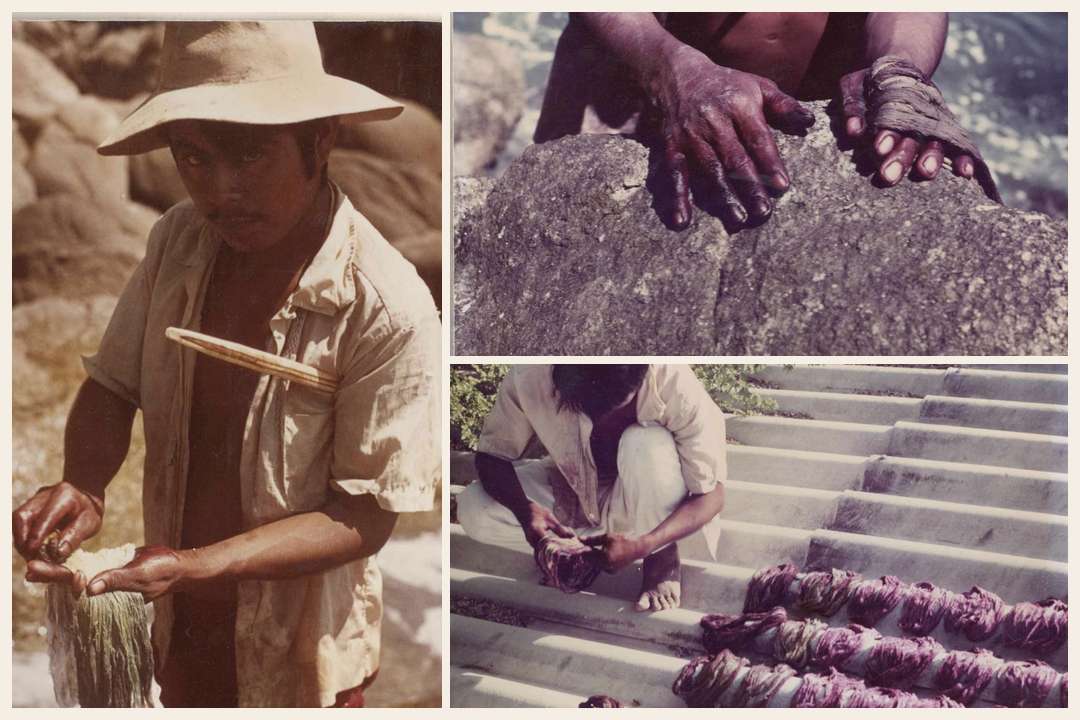
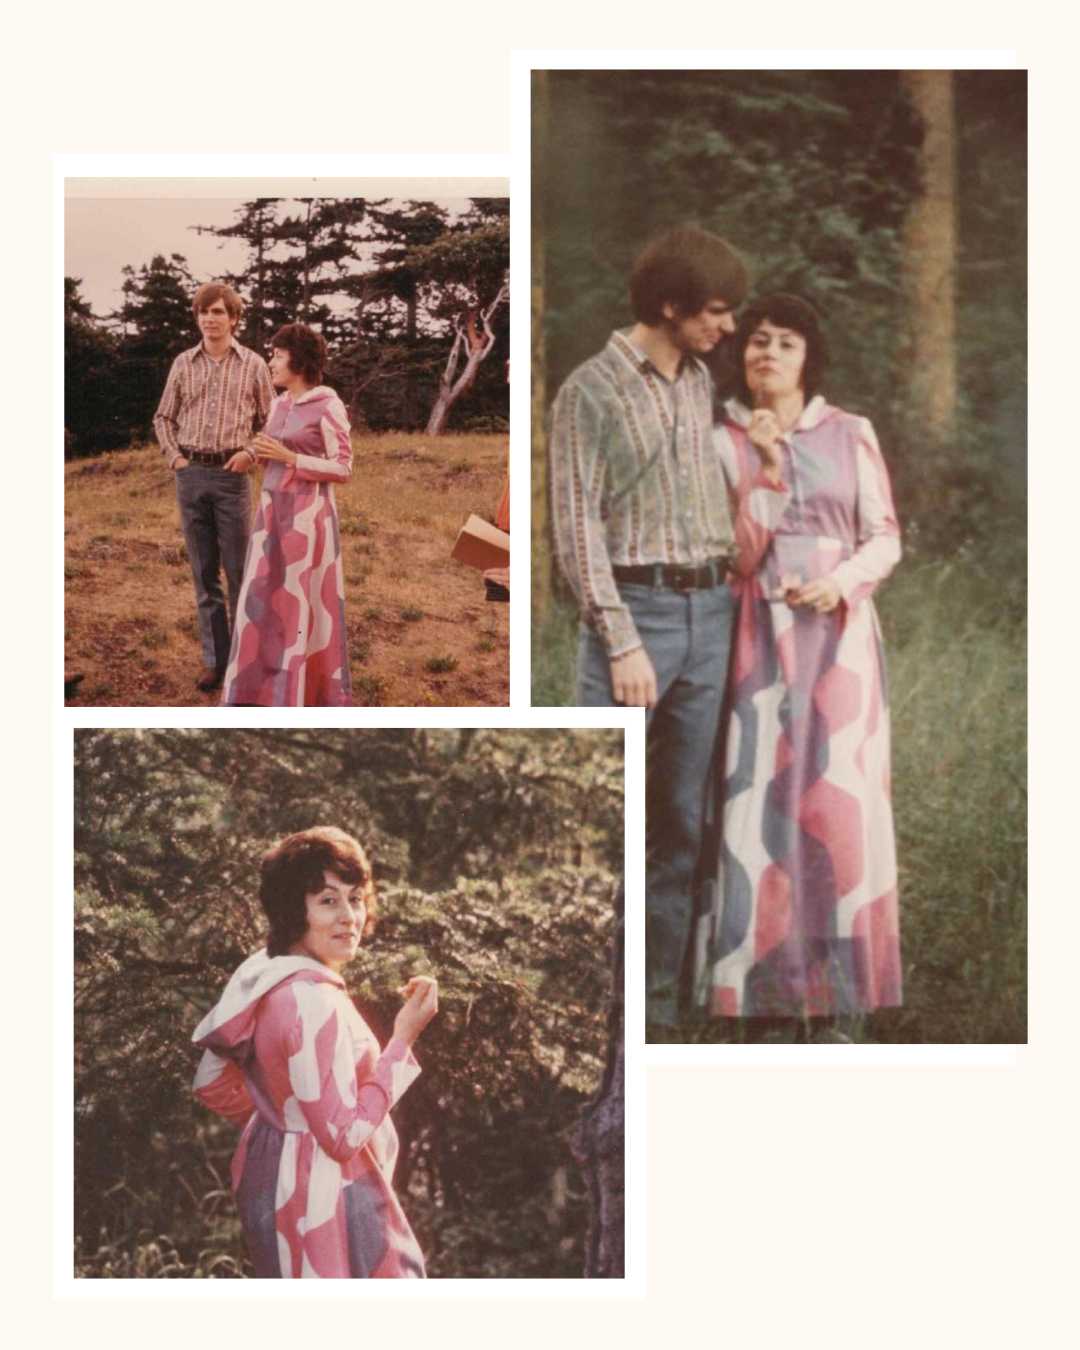
But I also realized that these extracts are the founder Michele Wipplinger's life-long research and work. I am very fortunate that I have the permission from her husband to share some of these old photographs from 70/80s when she visited indigineous communities from around the world and learned about different natural dying techniques.
4. Exploring Living Color at SoundBio Lab — A Community Bio Makerspace
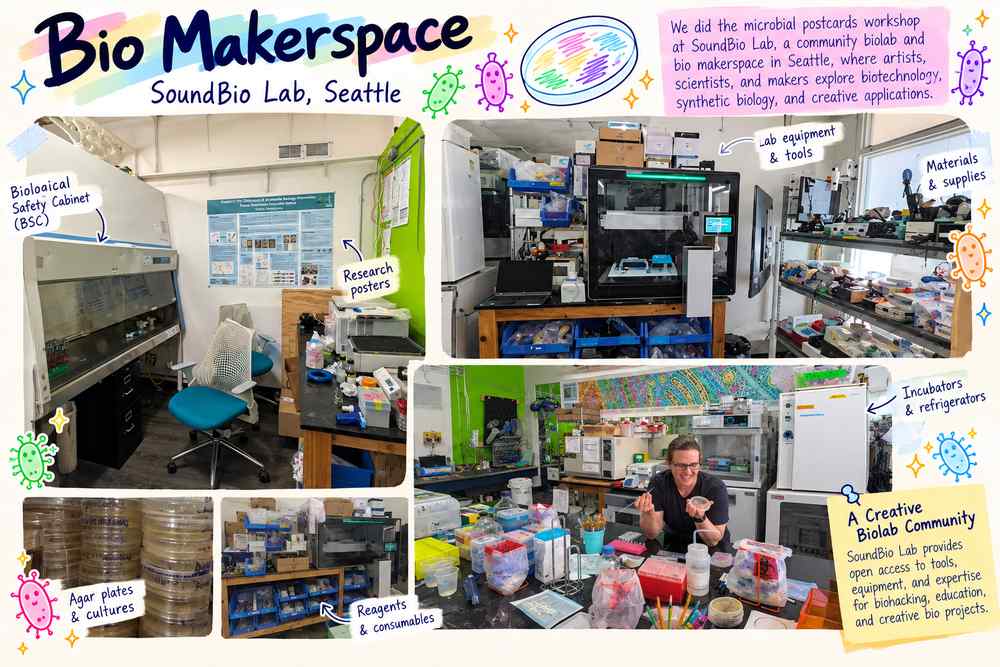
As part of my exploration of BioChromes, I visited SoundBio Lab, a community biology makerspace in Seattle, to participate in its 2026 ASM Agar Art Contest & Workshop.
The event introduced me to agar art, a creative practice that uses living microorganisms as an artistic medium. Rather than extracting pigments from plants or applying conventional dyes to textiles, we explored how different bacterial cultures can create visible colors and patterns on agar plates.
I was especially fascinated by the Bio Makerspace itself. Surrounded by laboratory equipment, biological safety cabinets, research posters, and shared experimental tools, I could see how a community laboratory makes biotechnology more accessible to artists, designers, makers, and curious learners.
The workshop began with an introduction to microbiology and synthetic biology, including bacterial plasmids, fluorescent proteins, and the relationship between genetic information and color expression.
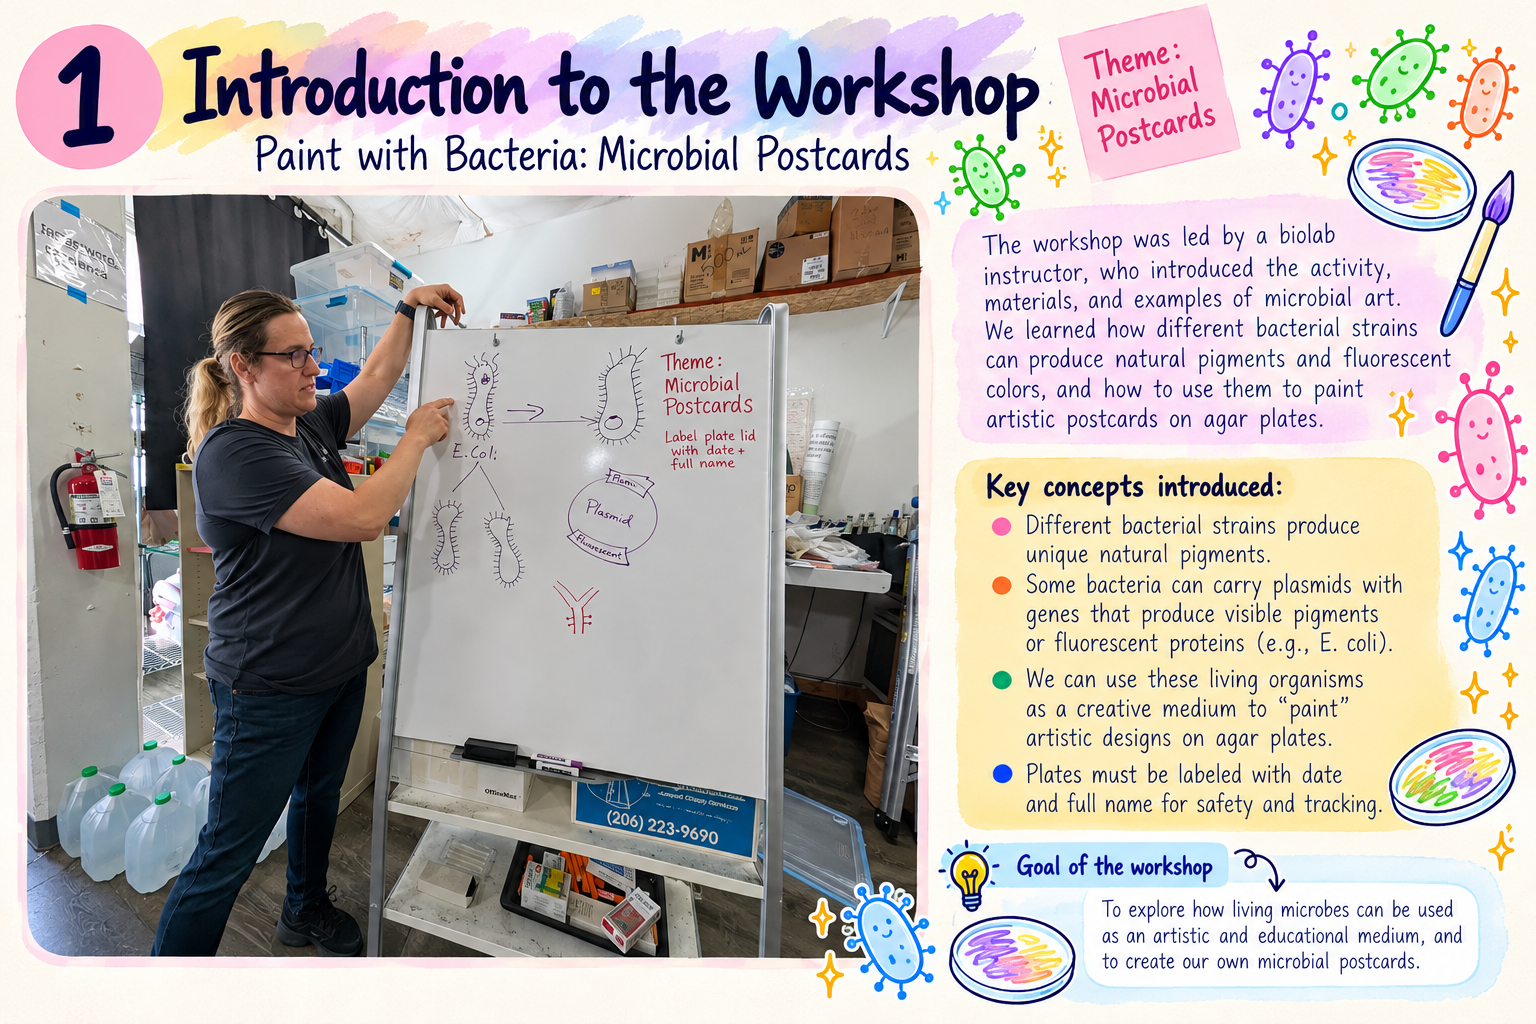
The facilitator had prepared the bacterial cultures and laboratory materials in advance, allowing us to focus on designing and creating the microbial artwork.
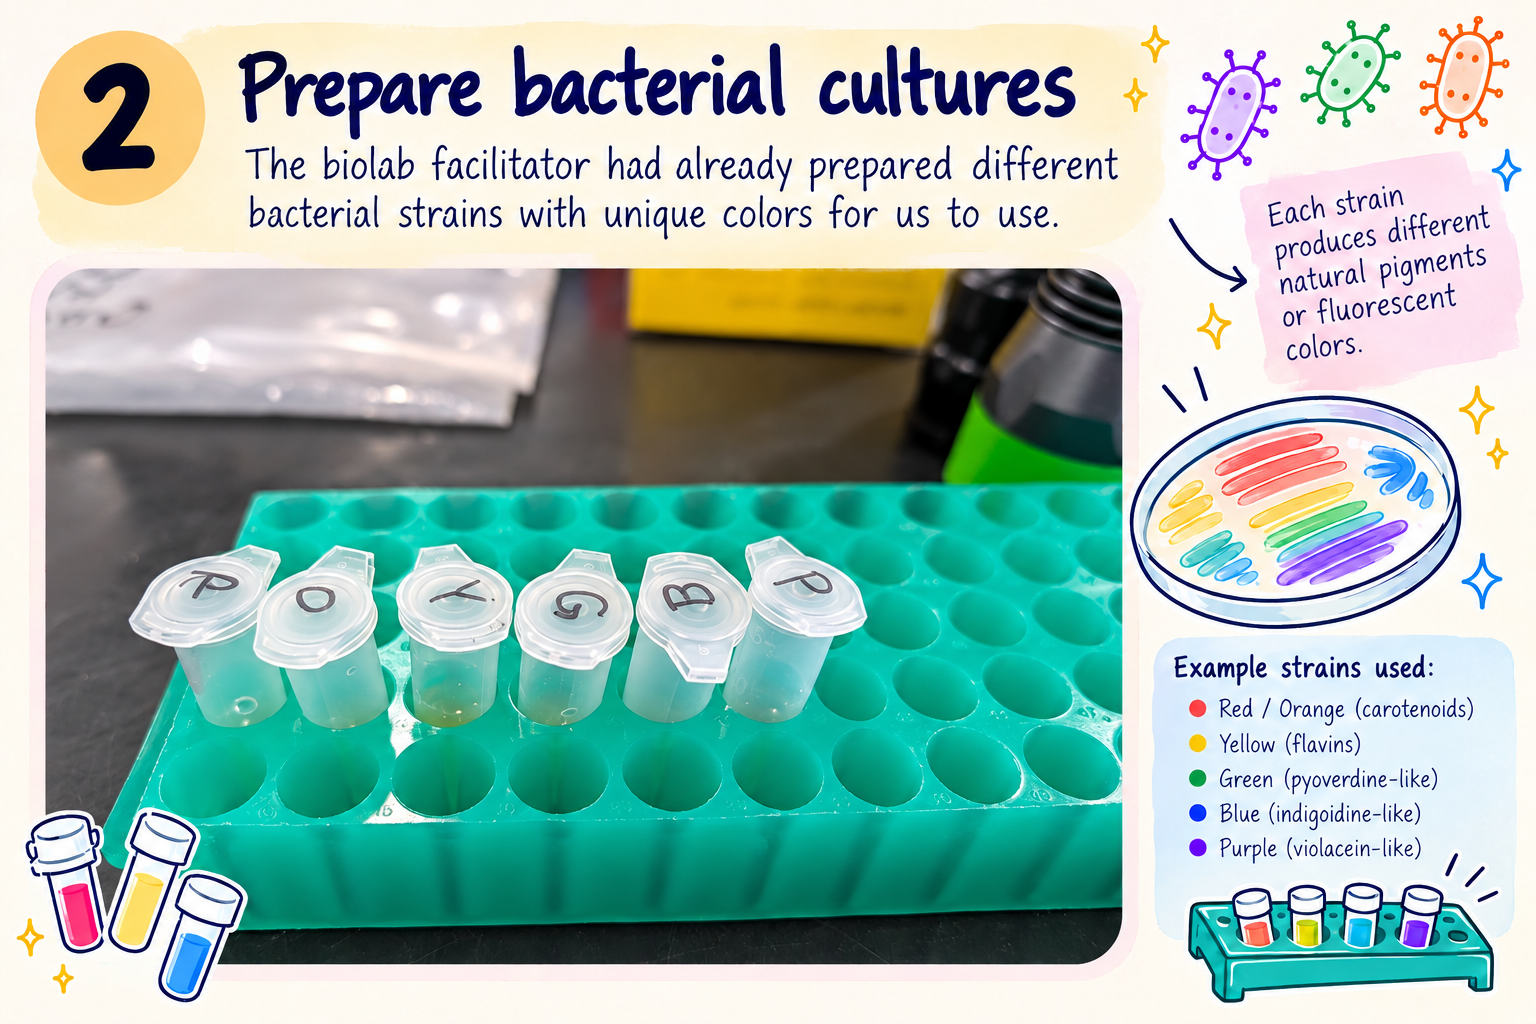
We can observe the color palette with the sample provided
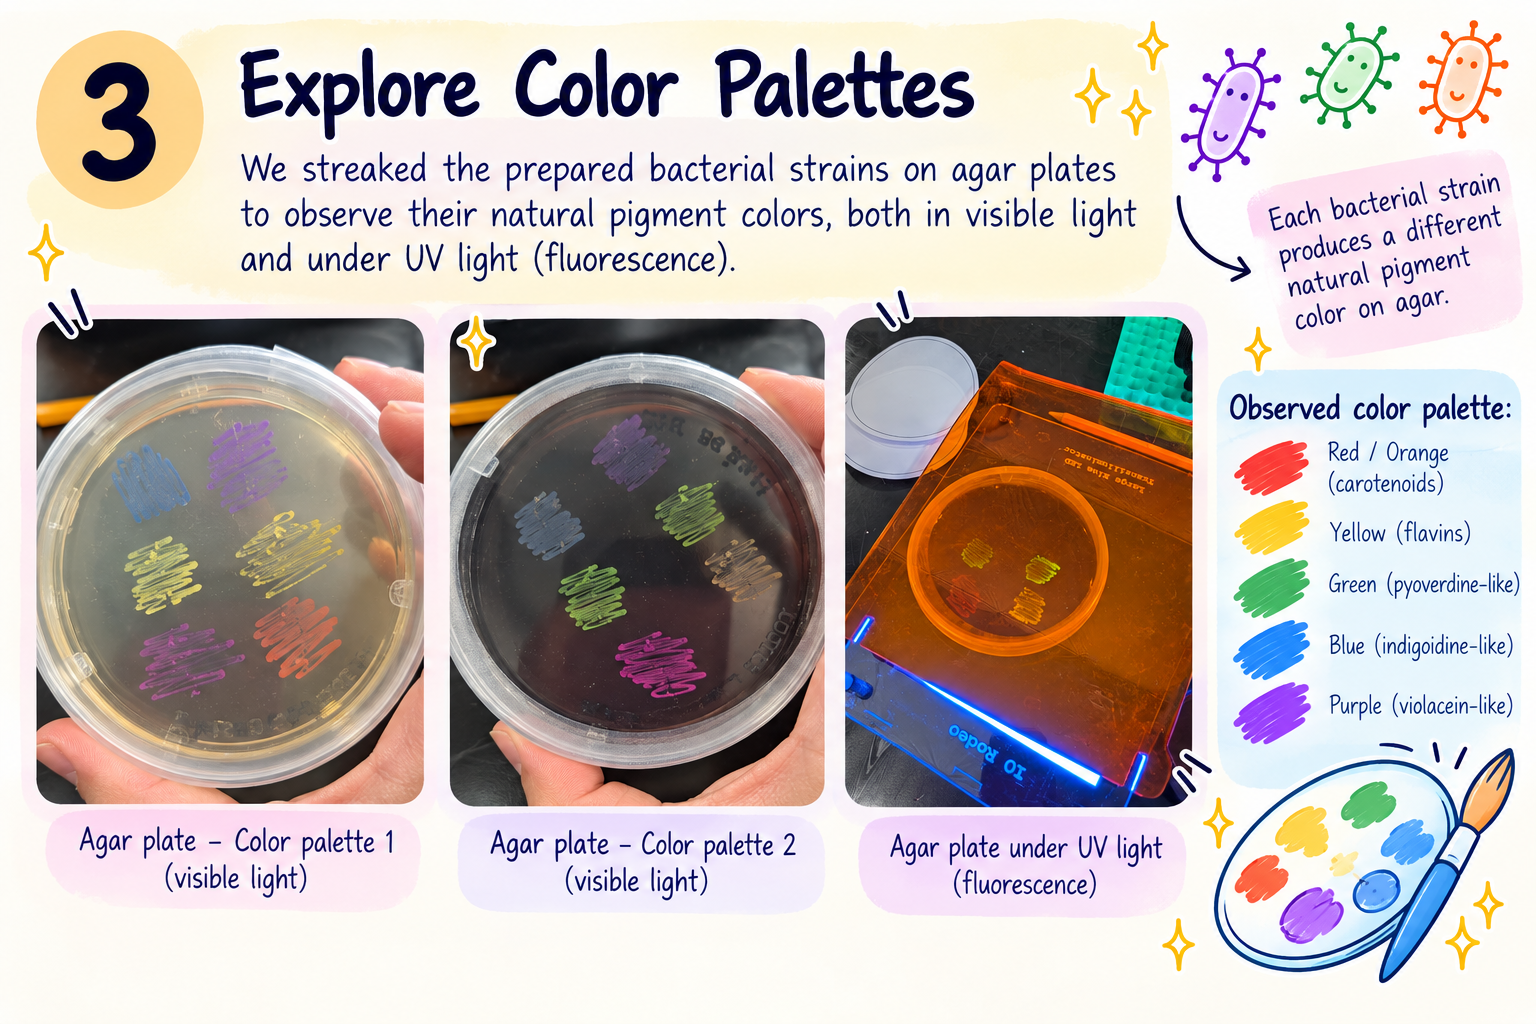
I created a design with my name "曾征“. There were 2 kinds of agar background that was provided. 1 light and 1 dark. And under the UV light, we can tell how different "color palettes" would show up.
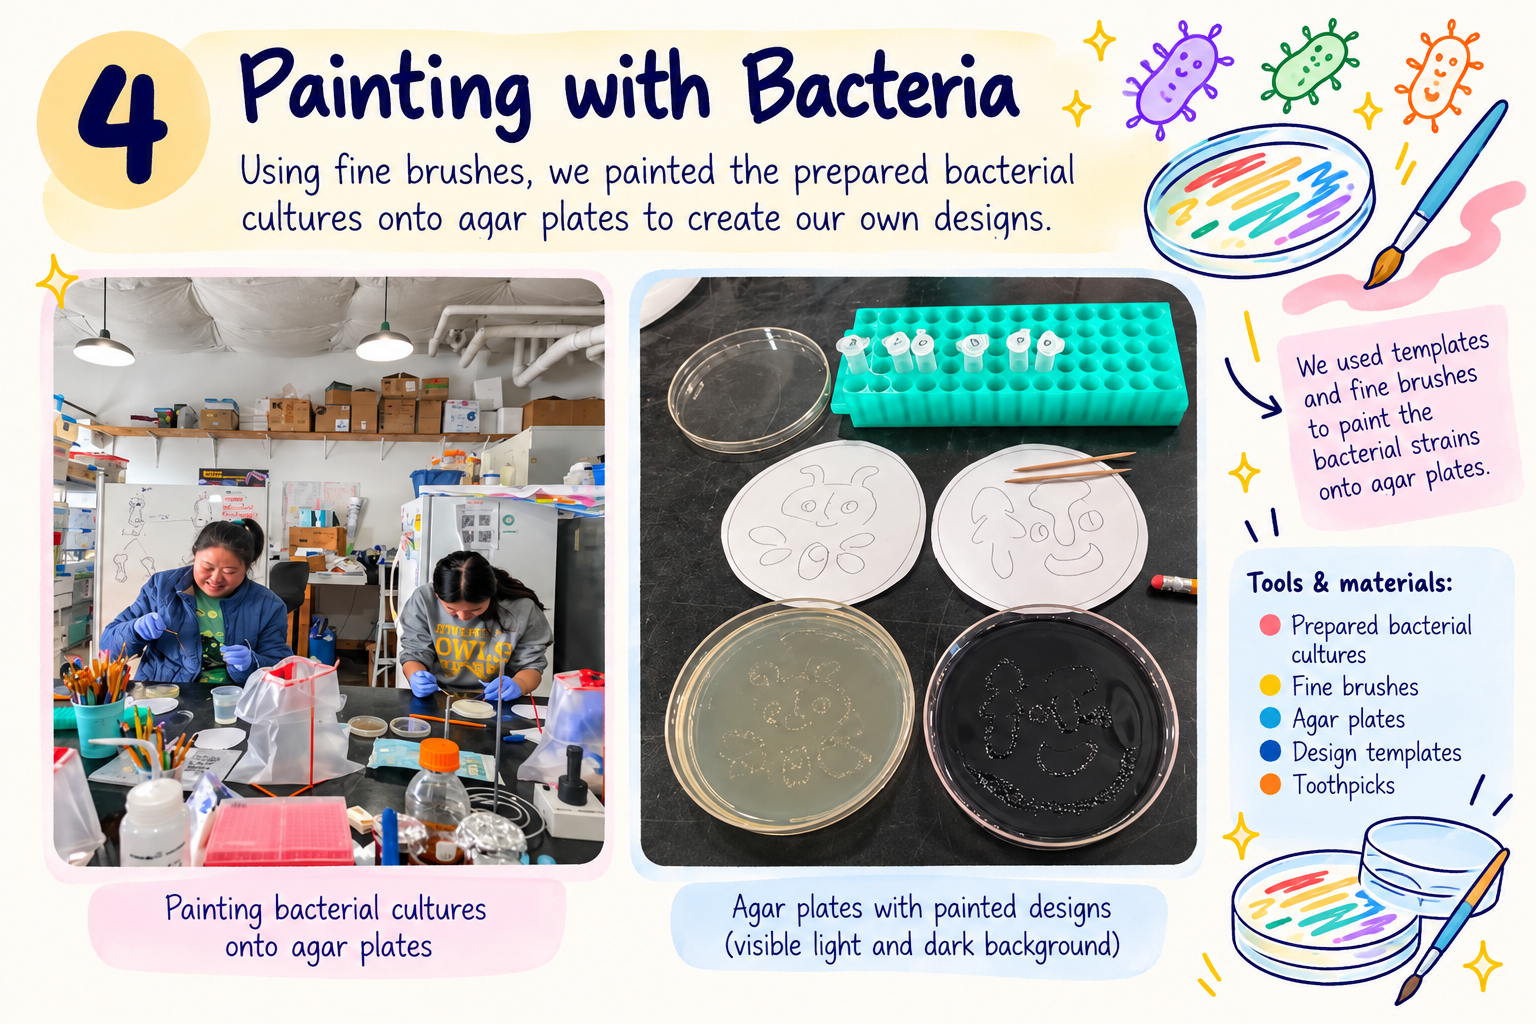
According to the Lab
Agar Used
-
Clear plate (after 2 p.m.): Luria-Bertani broth, Miller formulation, with Bacto agar and kanamycin (selective for bacteria carrying a kanamycin resistance gene; not differential).
-
Black plate: Luria-Bertani broth, Miller formulation, with Bacto agar, kanamycin, and activated charcoal (4 grams per liter). Selective for bacteria carrying a kanamycin resistance gene; charcoal darkens the agar to increase color contrast and is not differential.
Microbes Used
- Escherichia coli with pIDMv5K-RED plasmid expressing Echinopora forskaliana Chromoprotein [eforCP] — Red
- Escherichia coli with pIDMv5K-ORANGE plasmid expressing Yukon Orange Fluorescent Protein [YukonOFP] — Orange
- Escherichia coli with pIDMv5K-YELLOW plasmid expressing Dasher Green Fluorescent Protein [DasherGFP] — Yellow
- Escherichia coli with pIDMv5K-GREEN plasmid expressing Free-Use Green Fluorescent Protein [fuGFP] — Green
- Escherichia coli with pIDMv5K-BLUE plasmid expressing Actinia equina Blue Petunia optimized [aeBlue Petunia optimized] — Blue
- Escherichia coli with pIDMv5K-PURPLE plasmid expressing Tinsel Purple [tsPurple] — Purple
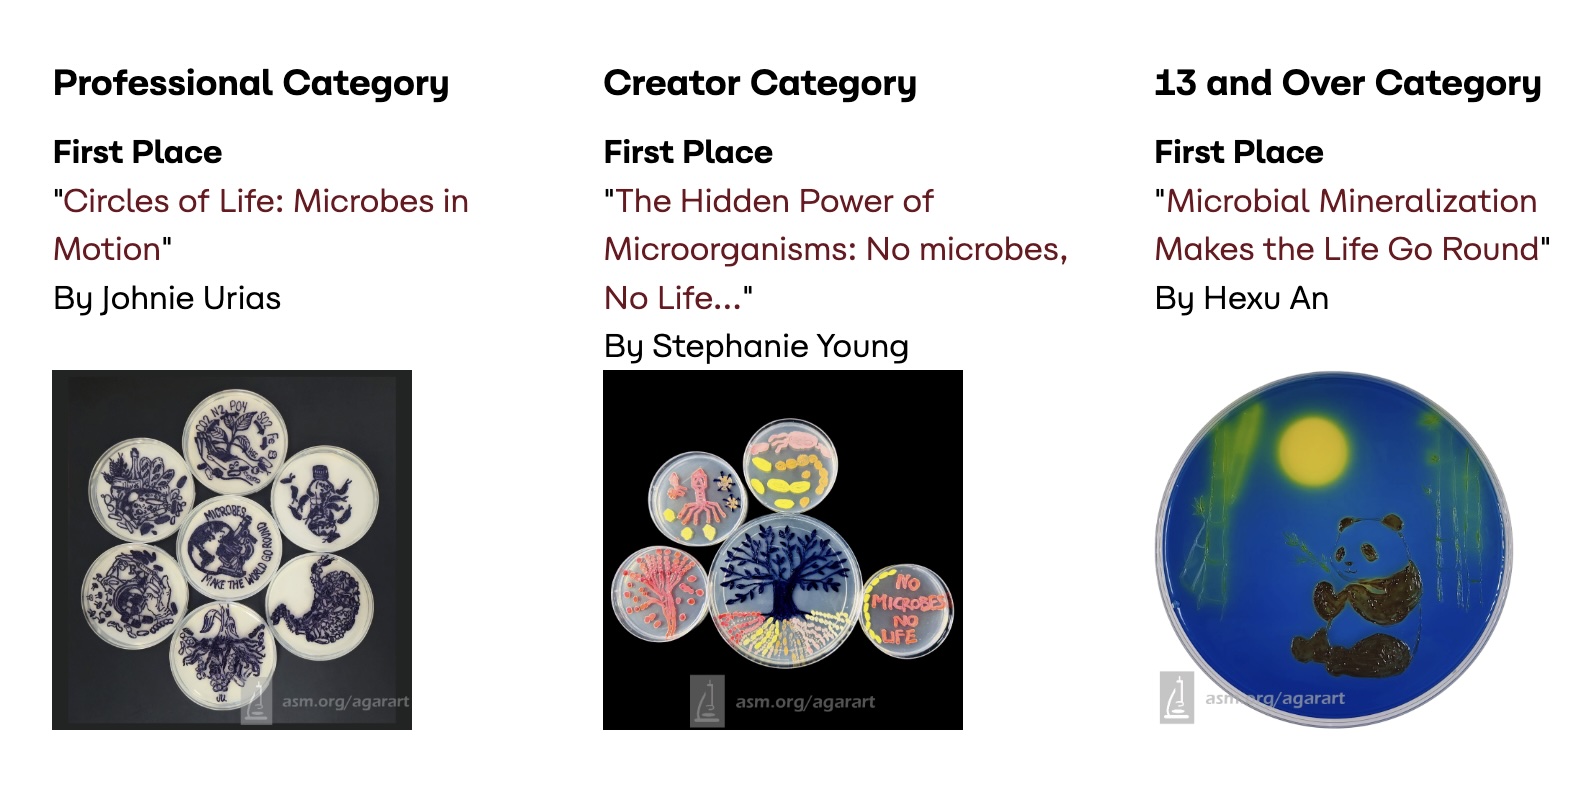
The bacteria will grow for 24-48 hours till it's ready, so I'm still waiting on my artwork. But these are some images from other participants.
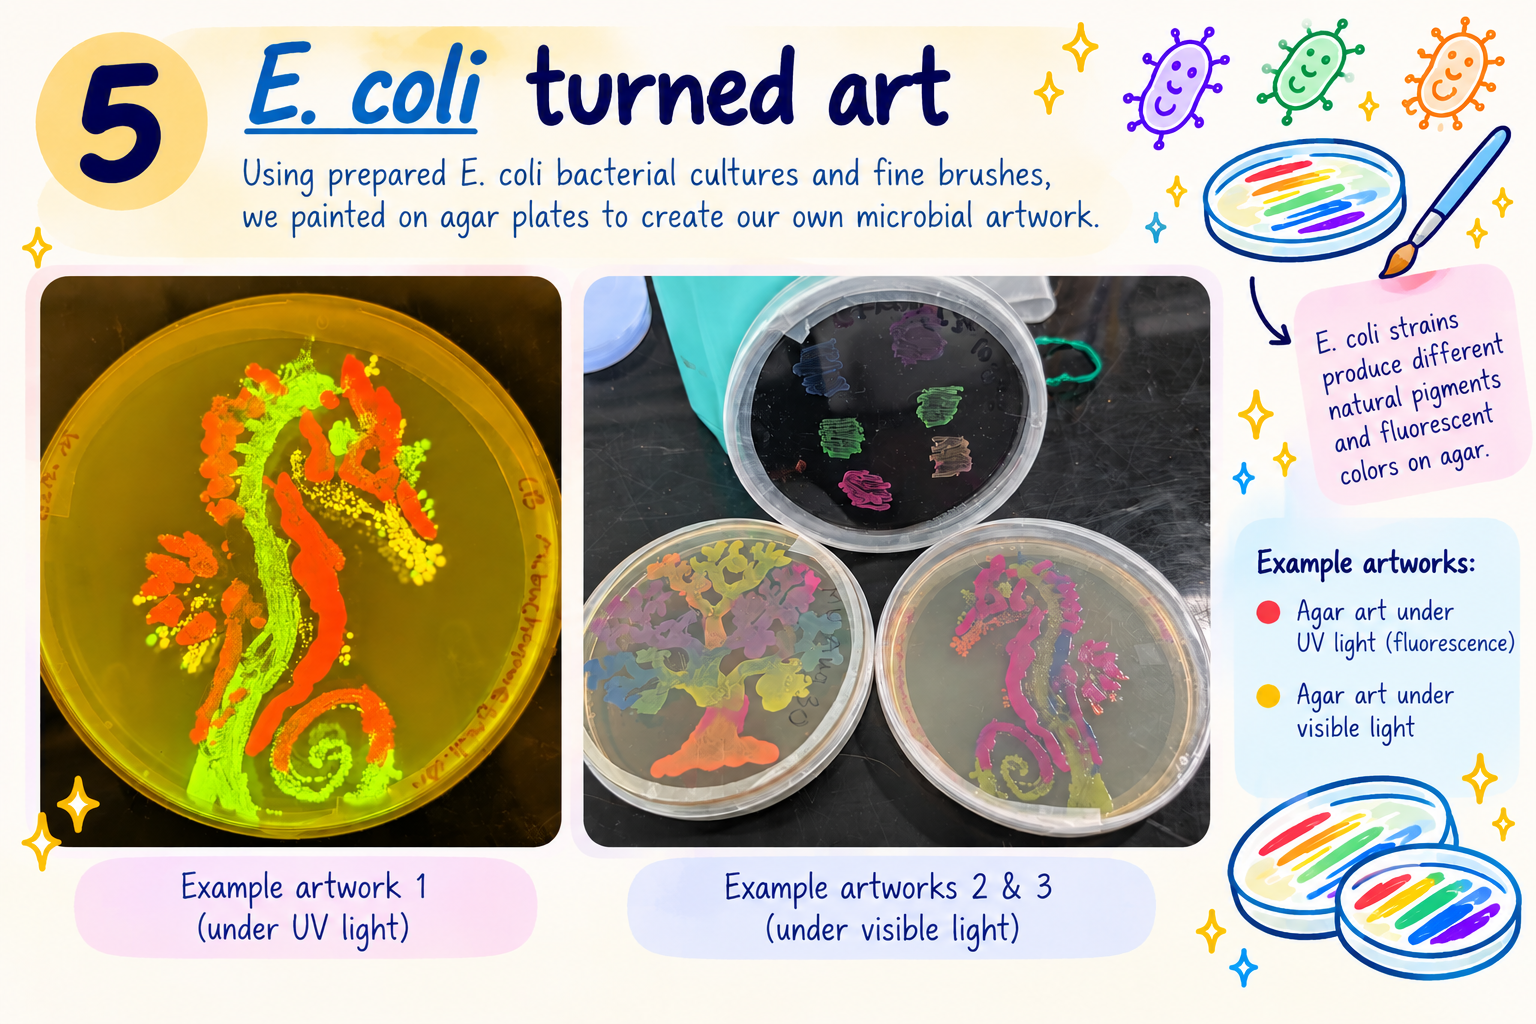
These are some previous winners stunning bacteria dye artworks from food fermentation to antibiotic production.
5. Lake Pigment and Ink Demo
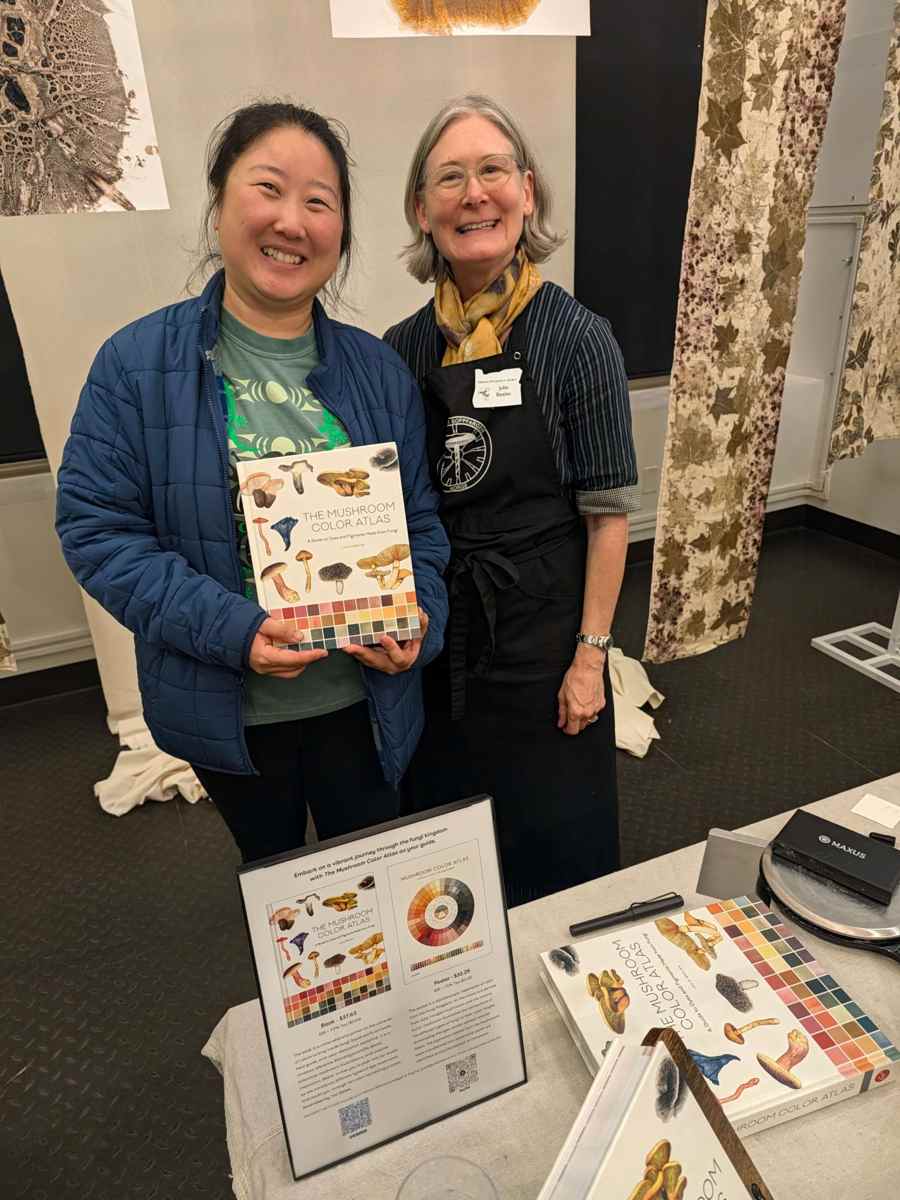
I was very lucky that Julie Beeler was in town this week in Seattle at Scarabajo Botanical Studio doing a mushroom pigment demonstration.
Julie is an artist, designer, and educator whose work bridges mycology, natural dyeing, textile art, and visual design. She is the creator of The Mushroom Color Atlas, a fascinating project documenting the diverse spectrum of colors that can be extracted from fungi, ranging from warm yellows and oranges to purples, blues, and greens.
Lake Pigment
During the event, Julie demonstrated how natural dyes extracted from mushrooms can be transformed into lake pigments, allowing water-soluble colorants to become solid pigments suitable for watercolor painting and other artistic applications.
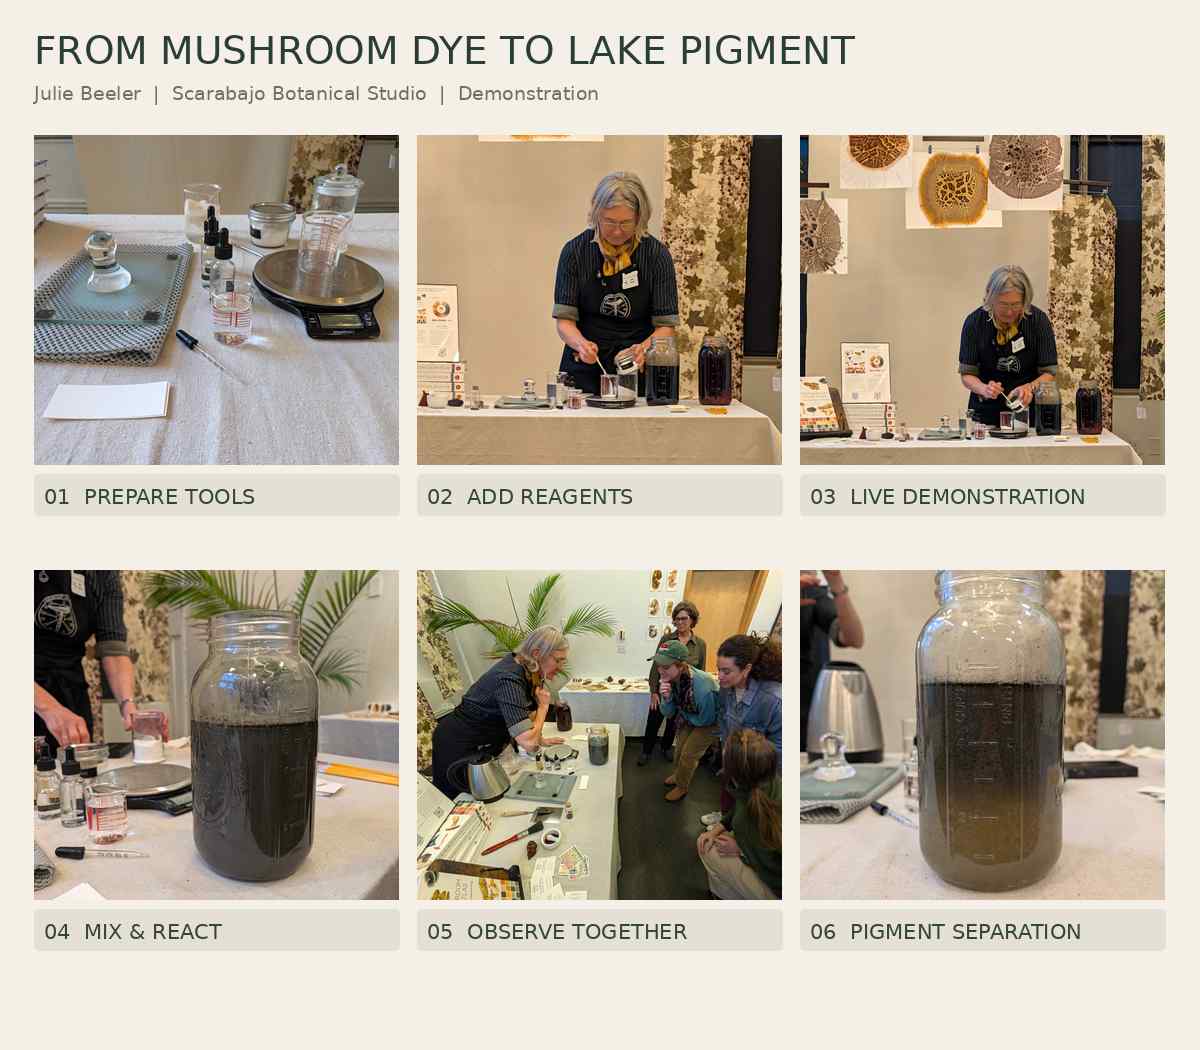
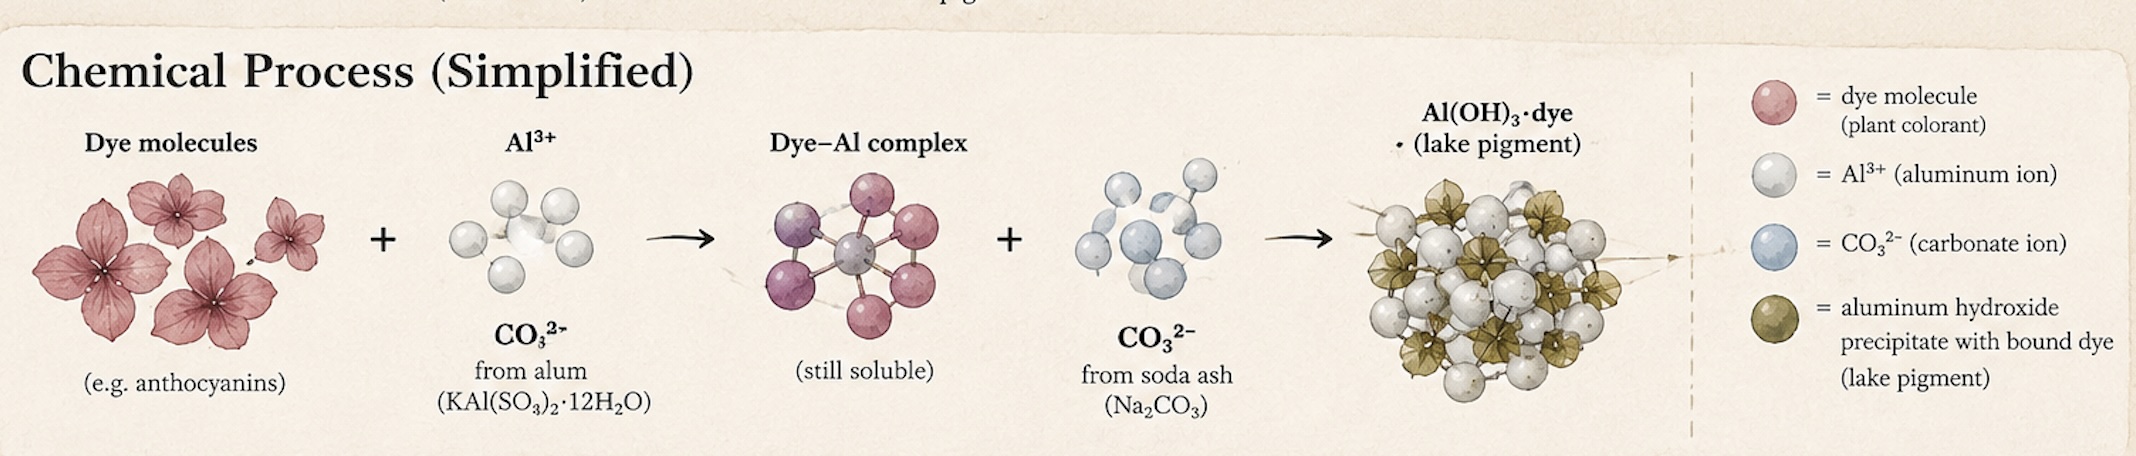
Unlike conventional natural dyeing, where color is transferred directly onto fibers, lake pigment making involves converting dissolved colorants into insoluble particles through chemical reactions. She explained the chemistry behind lake pigment production that alum + soda ash will seperate the color molecules, and we were able to observe together live when the seperation happens.
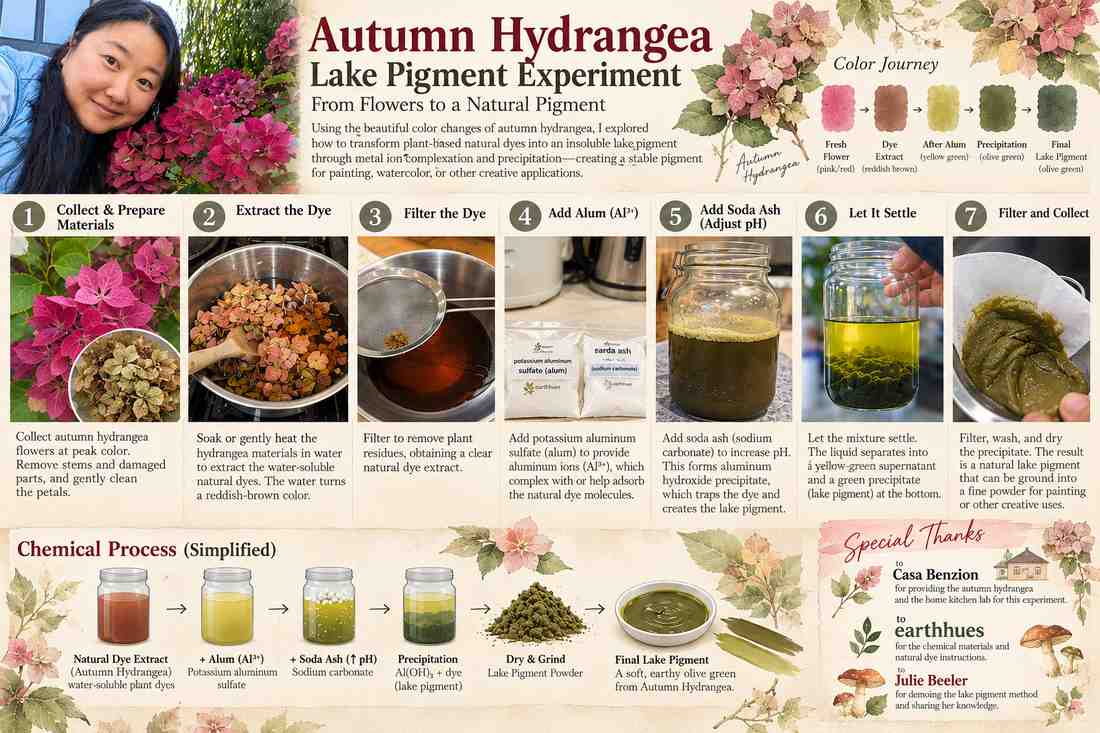
The general process of making lake pigment
Dye Extraction: Extracting water-soluble colorants from natural materials.
Metal Ion Complexation: Introducing aluminum ions through alum, which can interact with natural dye molecules.
Precipitation: Adding soda ash to increase pH, encouraging the formation of aluminum hydroxide precipitates that capture or bind the colorants.
Separation and Filtration: Allowing the pigments to settle, then filtering and washing the precipitate.
Drying and Grinding: Processing the collected pigment into a powder that can be mixed with a suitable binder for painting.
And this is Julie's recipe:
Lake Pigment Formula — The 10:5 Rule
Easy to Remember: 1 Liter → 10g → 5g
💧 1,000 mL Water
➕ 10 g Alum
➕ 5 g Soda Ash
Quick Reference
| Water | Alum | Soda Ash |
|---|---|---|
| 250 mL | 2.5 g | 1.25 g |
| 500 mL | 5 g | 2.5 g |
| 1,000 mL | 10 g | 5 g |
| 2,000 mL | 20 g | 10 g |
Scaling Formula
Alum (g) = Water (mL) ÷ 100
Soda Ash (g) = Water (mL) ÷ 200
Remember the 10:5 Rule
For every 1 liter of water, use 10g alum and 5g soda ash.
Ink
She also demonstrated how to make ink with gum arabic addition to dry powder
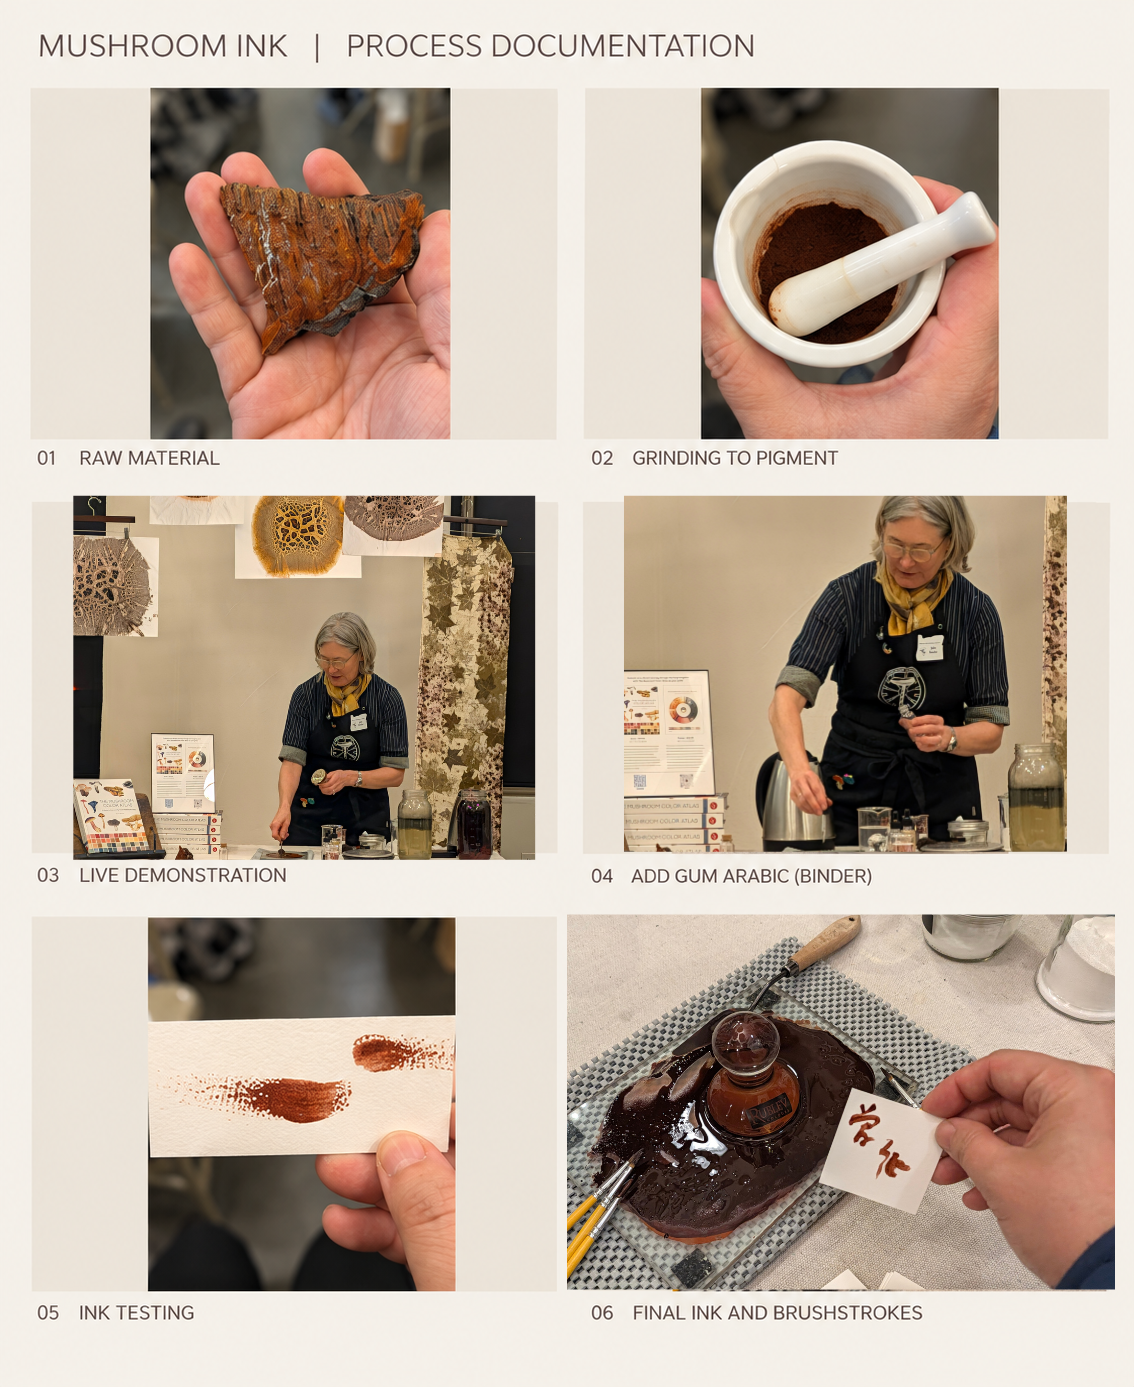
I really like this method, as I think this is very applicable for Chinese calligraphy. Everyone enjoyed using the ink to create a quick note or postcard.
6. Making My Own Lake Pigment
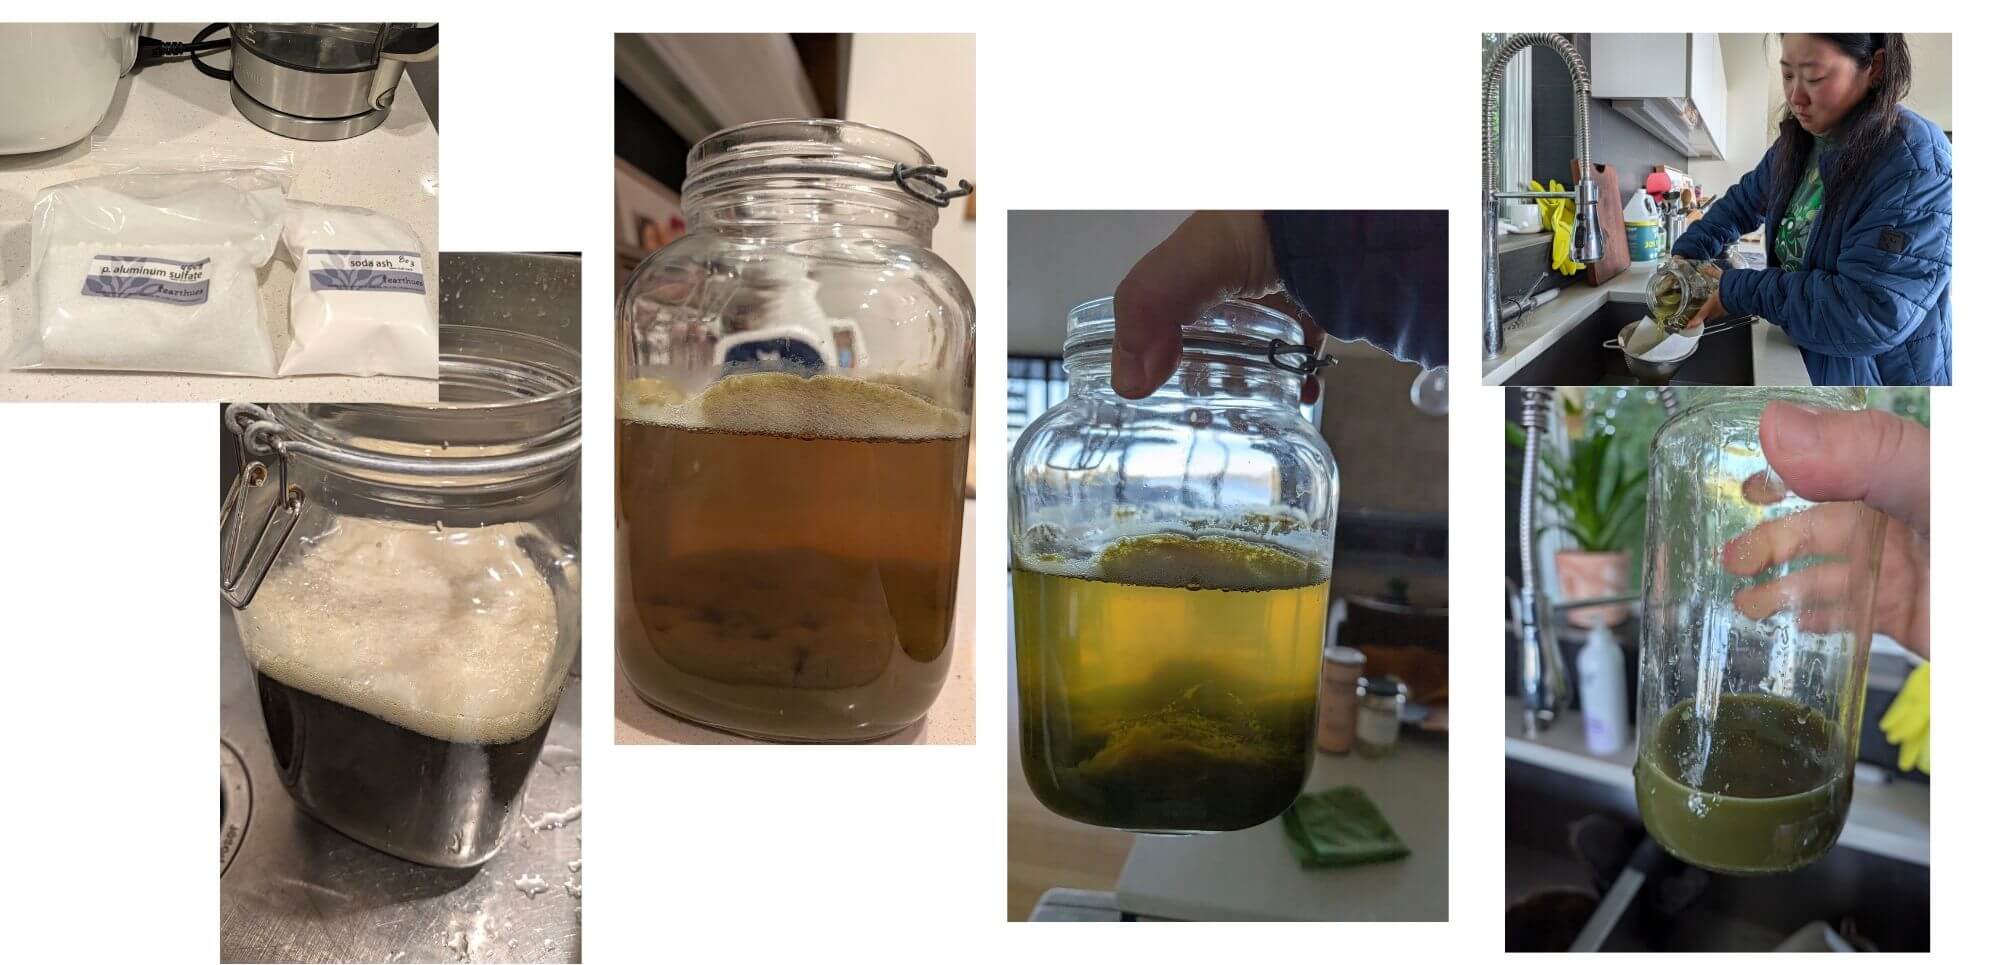
Applying what I learned from Julie, I was able to create a lake pigment out of the hydrangea dye bath that couldn't dye with before. After the evening event I went home and used the exact formula. The dye bath bubbled showing chemical reaction, then I let it sit overnight. The next morning, I was so happy to see the full seperation.
And now I also understand this is the chemical reaction that happened
So my full process now would be like this:
7. Reflections
1. Color Is Chemistry, Not Just Aesthetics
One of my biggest takeaways this week was discovering how much chemistry influences natural dyeing. The same dye material can produce dramatically different colors depending on the fiber, mordant, pH, temperature, and processing conditions. Experimenting with logwood, cochineal, madder, weld, cutch, and pomegranate helped me understand that natural color is not simply extracted from a plant or insect — it is developed through a series of chemical interactions. I became particularly fascinated by how small changes in the process could transform the final color.
2. Fiber Preparation Is Just as Important as Dyeing
Before this assignment, I had underestimated how much preparation goes into natural dyeing. Scouring and mordanting protein and cellulose fibers required different approaches, and these early steps significantly influenced the final results. Interestingly, preparing the fibers reminded me of cooking, especially kneading and preparing noodles. Both processes involve working with natural materials, understanding their physical properties, and following sequences of preparation. This connection made me appreciate dyeing as both a scientific and sensory craft.
3. From Natural Dyes to Lake Pigments: Expanding the Possibilities of Color
One of the most exciting discoveries was learning that natural dyes can also be transformed into lake pigments. By experimenting with aluminum sulfate and soda ash, I observed precipitation, sedimentation, and the separation of pigment particles from liquid. The process helped me understand how soluble colorants can become solid pigments that may be used in other creative applications. I will also try out natural ink making in the future, including grinding pigment, adding gum arabic as a binder, and testing brushstrokes on paper. This opened up new possibilities beyond textiles, connecting natural dyeing with painting, illustration, and material experimentation.
4. Natural Color Connects Science, Culture, and Living Systems
This week's research reminded me that natural color has a rich cultural and ecological history. Reflecting on my previous experiences with natural dyes in Bhutan and Mexico, I began to see how local materials, traditional knowledge, and cultural practices shape different approaches to color. Participating in an agar art workshop also introduced another fascinating dimension: using microorganisms and synthetic biology to produce colors. These experiences made me think about color not only as a visual property, but also as something that can emerge from living systems, cultural knowledge, and biological processes.
5. Embracing Unpredictability and Experimentation
Unlike digital color, where I can specify an exact HEX value, natural dyeing involves a certain degree of unpredictability. Colors shift during extraction, mordanting, drying, and changes in pH. Sometimes the results are completely different from what I expected. Rather than treating these variations as failures, I am learning to embrace them as part of the material's character. This connects strongly with my interest in wabi-sabi and the beauty of imperfection. Moving forward, I would love to explore how natural dyes, pigments, and biofabricated colors can become part of wearable art, interactive textiles, and other digitally fabricated designs.
6. Beyond the Colors: The Power of Community, Legacy, and Knowledge Sharing
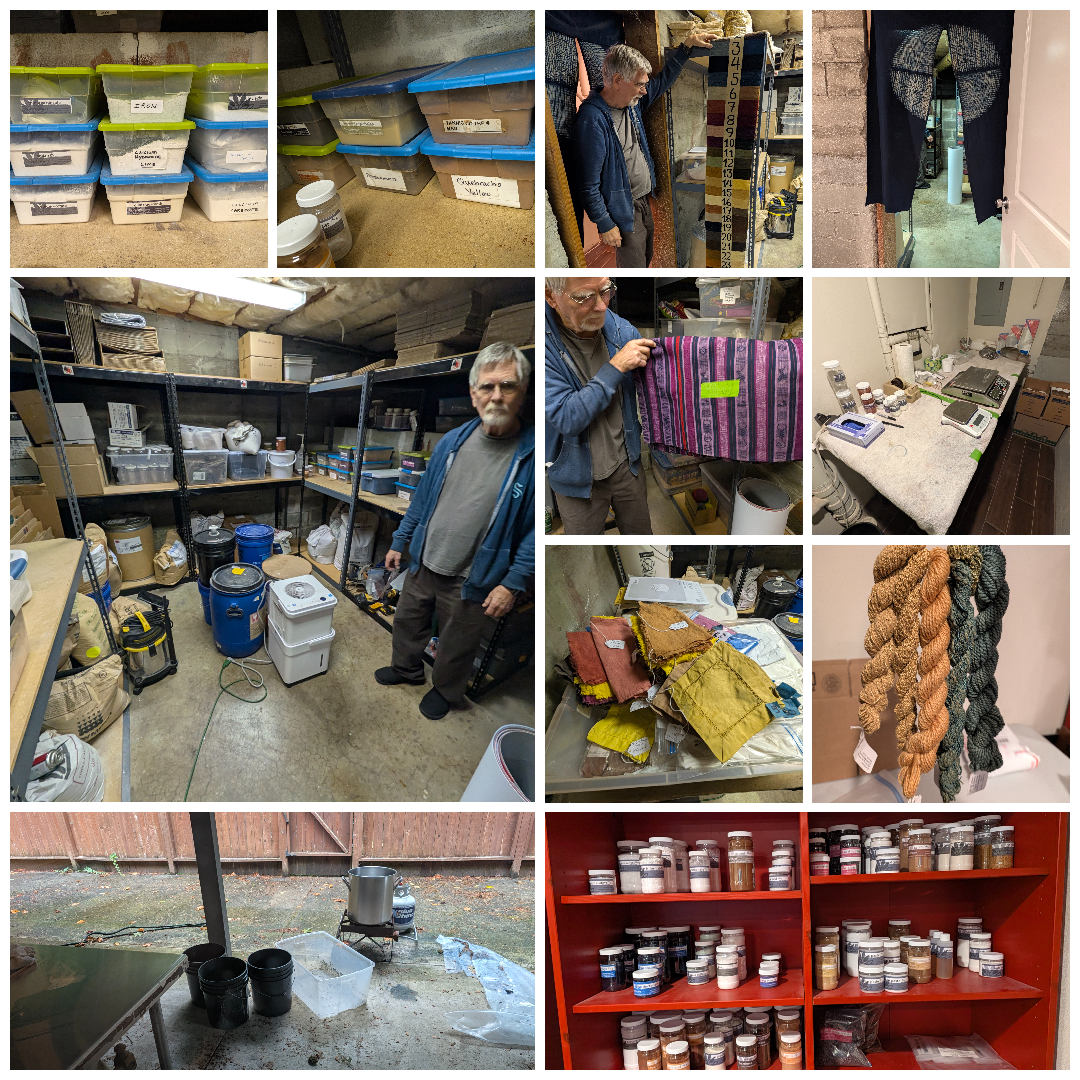
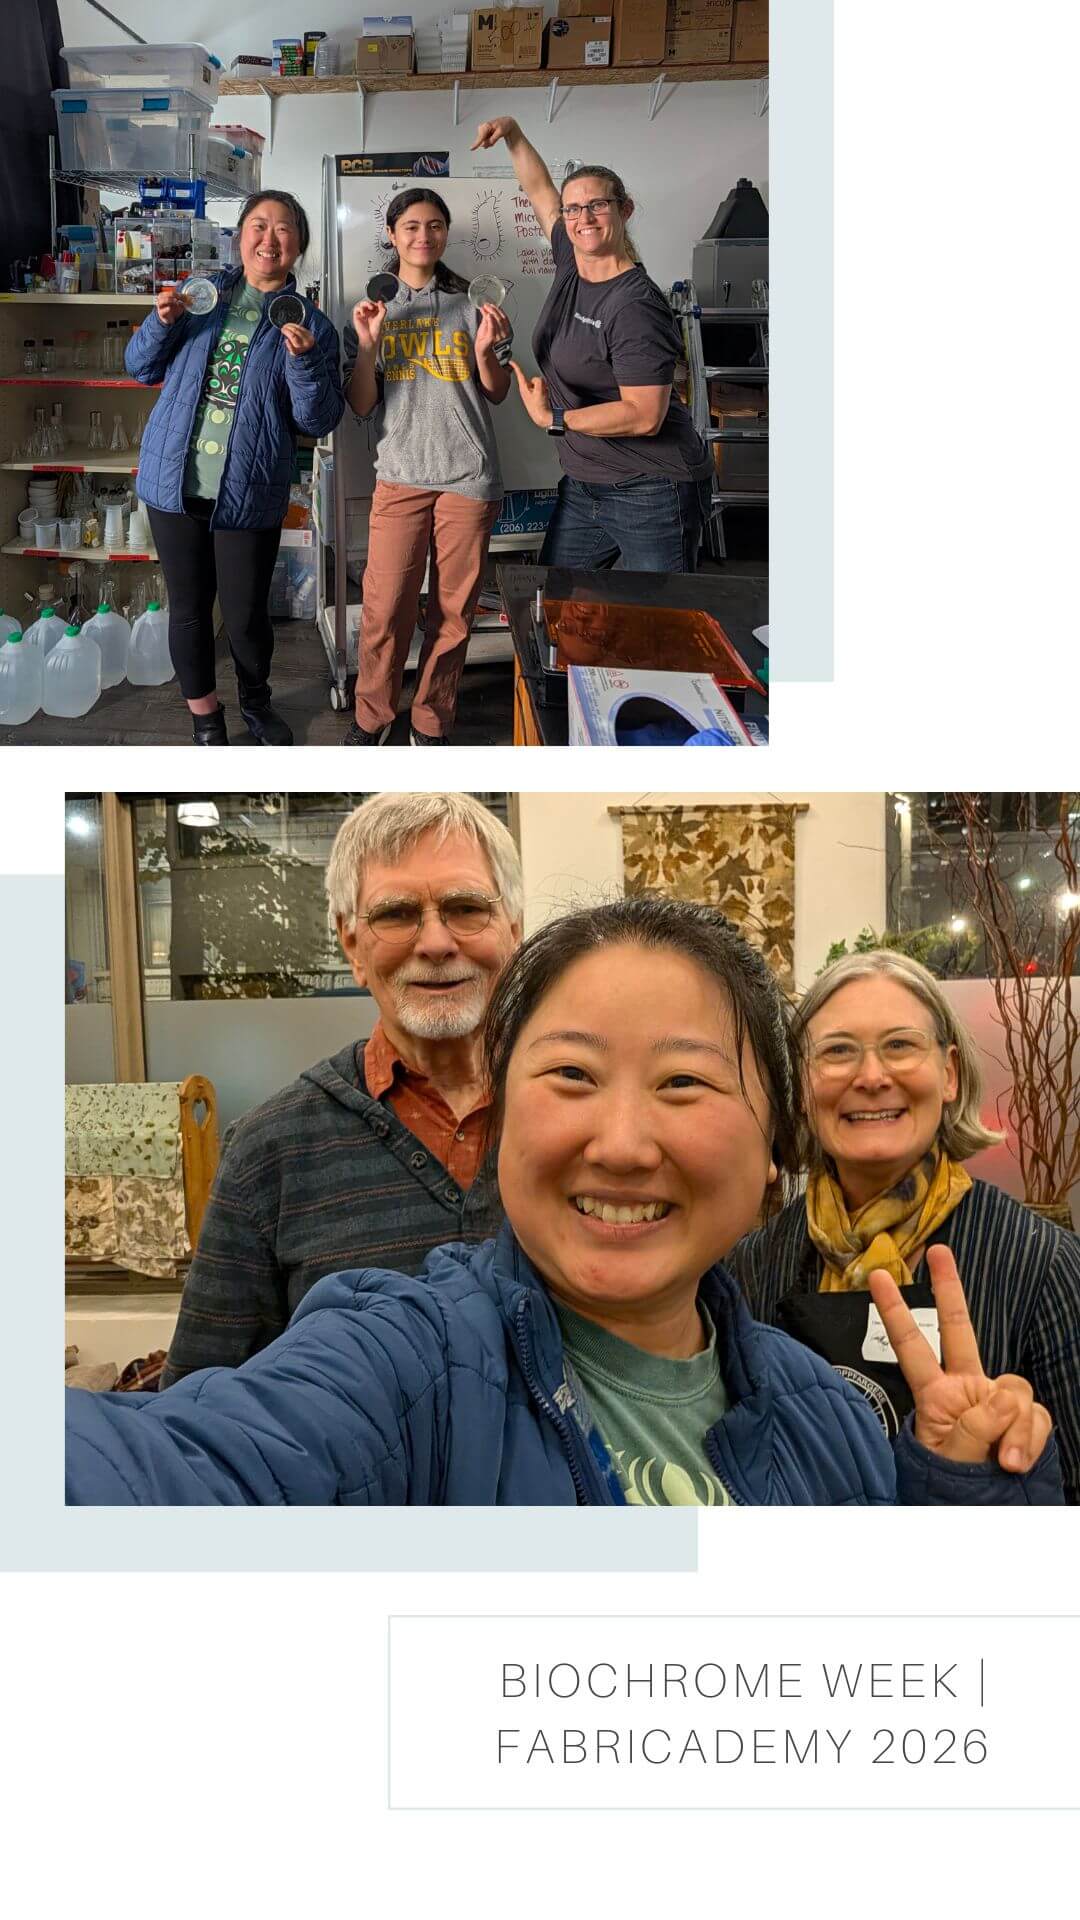
Perhaps the most touching experience of this week was visiting Andro, Michelle's husband, and learning about their lifelong dedication to natural dyeing. Seeing their home and workspace, surrounded by the materials, tools, and memories of a lifetime devoted to this craft, was incredibly heartwarming. I was deeply moved by how Andro continues to carry forward Michelle's legacy, preserving not only her knowledge and techniques but also the passion they shared for natural colors. It reminded me that craftsmanship is not simply about mastering a technique — it is also about the people, relationships, and stories behind it.
Attending Julie Beeler's workshop reinforced this feeling. Seeing artists, makers, and curious learners come together to openly share experiments, discoveries, and knowledge reminded me of the incredible power of community. So much of what we know about traditional crafts has been passed down through generations of people willing to teach and learn from one another. These experiences made me realize that knowledge is most valuable when it is shared, and a craft stays alive through the people who continue practicing and passing it on. Beyond all the beautiful colors I created this week, it was these human connections that left the deepest impression on me.
8. References
-
Natural Dye Instruction Booklet | Author: Michele Wipplinger ↩