BioFabricating Materials
00 Assignment
- Research and document inspiration from artists, projects and scientific references exploring biomaterials, local ingredients and waste resources.
- Create samples of at least one crafted and one grown biomaterial.
- Experiment with different recipes, ingredients and variations to explore material properties.
- Document the ingredients, quantities, preparation, processing and drying or growing conditions step by step.
- Record observations, modifications, unexpected outcomes and experimental results.
- Compare the resulting materials in terms of flexibility, strength, texture and potential applications.
- Name and classify the materials and present the samples in a systematic material chart.
- Contribute samples to the lab's physical material library where possible.
01 Inspiration & Research
For this week's research, I looked at how biomaterials can be made from leftover resources or grown with living organisms. I was particularly interested in flexible sheets and composites made from food waste, paper and textile fibres, as well as root-based materials whose shape can be influenced by a designed structure.
One of the most fascinating approaches for me was using plant roots to grow new materials. As plants grow, their roots spread, branch out and intertwine, creating a dense network that can hold together even after the plants have been harvested and dried. By guiding this growth through specially designed moulds, meshes or three-dimensional structures, it is possible to influence the shape and pattern of the resulting material.
Projects such as Diana Scherer's Interwoven and Vestigia show how roots can form intricate, lace-like patterns and textile structures. Depending on the growing conditions, the type of plant and the design of the mould, the resulting materials can have different textures, densities and levels of flexibility.
03 VESTIGIA – Giovanna Usai & Yutong Wei
04 ROOT PATTERN MOULDS – Barbara Rakovska
I find this particularly interesting because the material is not simply manufactured into a shape but actually grows into it. This opens up possibilities for biodegradable textiles, decorative surfaces, fashion accessories, packaging and even experimental structural elements.
02 First Ideas
Bioplastics were completely new territory for me. I had never worked with these materials before, and at first, I found it difficult to imagine what I could actually create with them. Unlike previous weeks, where I often had a specific project or application in mind, I was missing that initial spark of inspiration.
Instead of forcing an idea, I decided to approach bioplastics with curiosity and experimentation. My plan was to start with some basic, well-established recipes, understand how the different ingredients interact, and see what happens.
What fascinated me much more from the beginning was the concept of grown materials, especially structures created through root growth. The idea of using natural growth processes as part of the fabrication process feels like a completely different approach to making things. Instead of producing every detail myself, I could design a structure or framework and let nature contribute to the final result.
I was particularly interested in whether roots could grow through a predefined pattern and eventually form a connected material. Combining digital design with biological growth seemed like an exciting direction to explore.
For this reason, I definitely wanted to include a root-growing experiment this week, alongside my first explorations with bioplastics. While the bioplastics would be more about learning the fundamentals, the grown materials offered an opportunity to explore a concept I was genuinely excited about.
03 Crafted Biomaterials
After looking through the different recipes, I decided to choose one as my standard base recipe and use it for further experiments. Instead of following several completely different recipes, I wanted to start with a consistent mixture and explore how changing individual ingredients or adding other materials would affect the final result.
Bio-Plastic 2
Ingredients:
- 2 g agar
- 6 g glycerine
- 100 mL water
Procedure:
- Mix the water and agar in a pot.
- Start by making sure the agar is fully dissolved in the water.
- Add the glycerine and stir well.
- Cook the mixture for about 15 minutes at around 80°C.
- Pour it into a mold or onto a flat surface.
- Let it dry completely.
Experimenting with Waste Materials
For my biomaterial experiments, I wanted to use as many leftover materials as possible instead of buying new ingredients. I started by looking at what I still had from previous Fabricademy weeks.
I found some of my homemade ink from the natural dyeing week, as well as the paper balls I had made from recycled paper pulp. Both seemed interesting to incorporate into my new materials.
I also looked around our home to see what other waste materials were available. One thing we have in huge quantities is lint from our tumble dryer. I collected lint from a load of cotton laundry to keep the material composition as consistent as possible. However, even though the laundry consisted of cotton, the lint could still contain small amounts of other fibers, as well as dyes and textile finishes from the fabrics and lint.
Another source of materials was my kitchen. We had recently made fresh orange juice and cooked a meal with potatoes, leaving me with orange and potato peels.
Bioplastics from Orange and Potato Peels
While researching possible uses for these food scraps, I came across the idea that orange peels might be suitable for making bioplastics because of their natural pectin content. Potatoes, on the other hand, contain starch, which can also act as a natural binder.
I was curious whether I could create a cohesive material using just the peels and water and Glycerin, without adding agar, gelatine or other binding agents.
So I decided to give it a try.
Unfortunately, neither experiment worked particularly well. Both mixtures failed to form a stable, connected material after drying.
In the case of the potato peels, I suspect that the amount of available starch was not sufficient to bind the material together. Although potato peels contain starch themselves, the concentration varies, and simply processing them with water does not necessarily release enough starch or create the conditions needed to form a cohesive material.
The orange peels also failed to form a cohesive sheet on their own. Although they naturally contain pectin, its ability to form a stable material depends on factors such as concentration, temperature, pH and processing time. Under my experimental conditions, simply blending the peels with water was not sufficient. However, this does not mean that orange peels cannot form bioplastics without additional binding agents.
Orange Peel Bioplastic with Agar Agar
For my next experiment, I decided to combine the orange peels with agar agar as an additional binding agent.
I tested two different variations:
- Orange peel purée mixed with agar agar, keeping the solid particles of the peels in the material.
- Filtered orange peel liquid mixed with agar agar, removing the larger solid particles to create a more homogeneous mixture.
This time, both approaches worked, and I was able to create cohesive materials.
It was interesting to see how adding a binder changed the result completely. I also wanted to compare how the solid peel particles affected the texture and appearance of the final material compared to the version made with only the filtered liquid.
Experiments with Different Casting Surfaces
I also experimented with different surfaces for casting my bioplastic. Unfortunately, this did not work quite as well as I had hoped.
As you can see in the pictures, the material was not distributed evenly and became too thin in some areas. This resulted in weak spots where the bioplastic was more fragile and could tear easily.
Another issue was that the plate itself was not perfectly level. Because of this, the liquid mixture flowed unevenly during casting, making it thicker in some places and thinner in others. This made it even harder to achieve a consistent material thickness across the whole sample.
For future experiments, I would need to use a flatter and more level surface and make sure the mixture is spread more evenly so that the material has a more consistent thickness throughout.
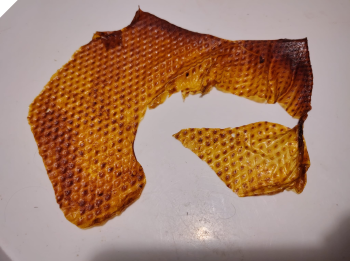
Material Comparison
For all my bioplastic experiments with additional materials, I used the Bio-Plastic 2 recipe as a starting point.
| Sample | Image | Added Material | Amount | Color | Thickness (mm) | Tear Resistance (1–5) | Flexibility (1–5) | Shrinkage (%) | Drying Time | Texture |
|---|---|---|---|---|---|---|---|---|---|---|
| 01 | 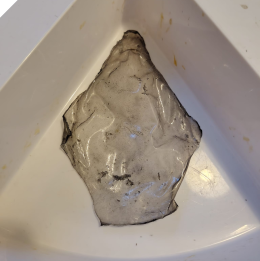 |
None | None | Cabbage Ink | 0.2 mm | 3 | 5 | 25% | 48 h | None |
| 02 | 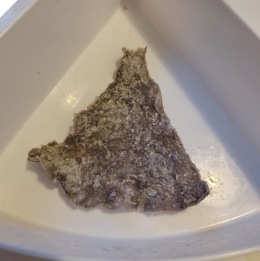 |
Paper Pulp | 100 g | Cabbage Ink | 1,5 mm | 2 | 4 | 44% | 48 h | None |
| 03 | 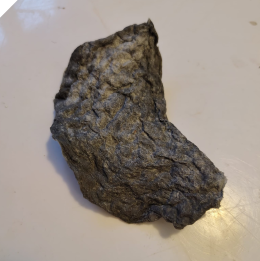 |
Paper Pulp | 100 g | Cabbage Ink | 1 - 3 mm | 2 | 4 | 44% | 48 h | None |
| 04 | 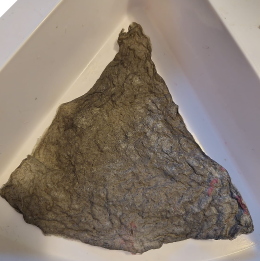 |
Lint | 100 g | None | 1 mm | 4 | 5 | 25% | 48 h | None |
| 05 | 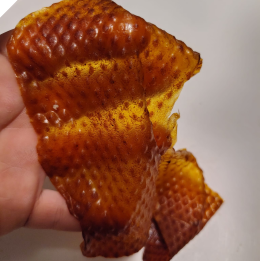 |
None | None | Curcuma | 0.1 - 1 mm | 1 | 5 | 25% | 72 h | Vacuum Formed |
| 06 | 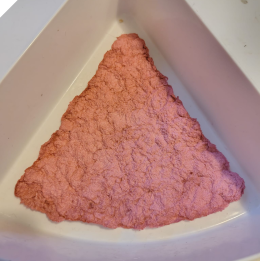 |
Torn Cotton Muslin – Large Pieces | 20 g | Pink Food Coloring | 3 mm | 2 | 4 | 25% | 48 h | None |
| 07 | 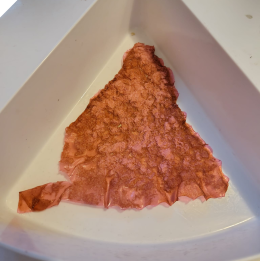 |
Torn Cotton Muslin – Large Pieces (Less) | 10 g | Pink Food Coloring | 1 mm | 3 | 4 | 30% | 48 h | None |
| 08 | 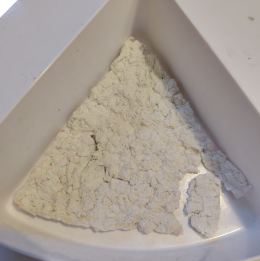 |
Torn Cotton Muslin – Small Pieces (More) | 40g | None | 3 - 5 mm | 1 | 3 | 14% | 48 h | None |
| 09 | 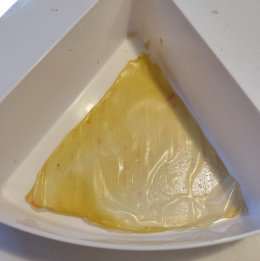 |
Orange Peel | None | None | 1 mm | 5 | 5 | 19% | 48 h | None |
| 10 | 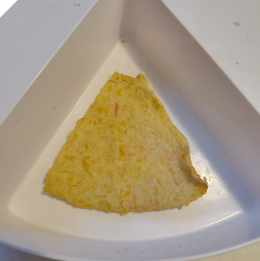 |
Filtered Orange Peel Liquid | 100g | None | 2 - 3 mm | 2 | 2 | 46% | 48 h | None |
Evaluation Criteria
- Tear Resistance: 1 = tears very easily, 5 = very difficult to tear
- Flexibility: 1 = rigid and brittle, 5 = very flexible
- Shrinkage: Percentage reduction in length or width after drying
- Thickness: Measured after drying
- Texture: Smooth, rough, sticky, rubbery, brittle, etc.
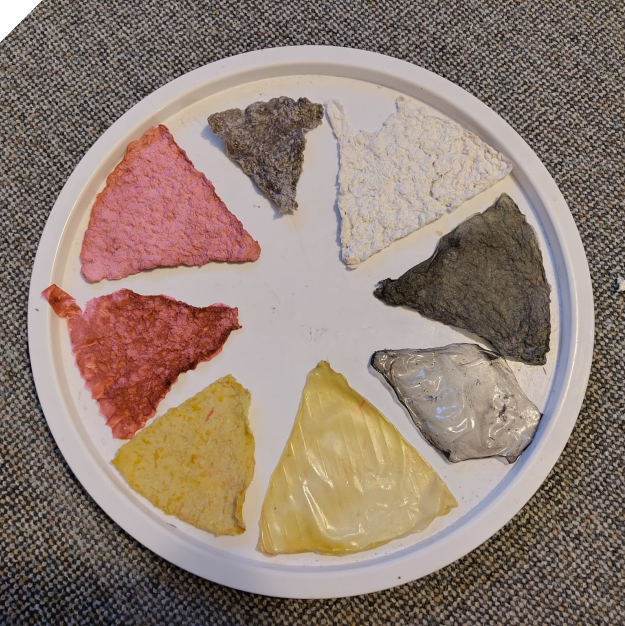
Here you can see an overview of all the different biomaterial samples I created during this week's experiments.
Moving Video
Bio-Plastic
I also experimented with another bioplastic recipe that is specifically designed for creating composite materials.
Ingredients:
- 48 g Gelantine
- 12 g glycerine
- 240g mL water
- 240g papper pulp
Procedure:
- Add the water and gelatin to a pot.
- Allow the gelatin to hydrate in the water, then gently heat the mixture while stirring until fully dissolved.
- Add the glycerine and mix well.
- Keep the mixture warm at approximately 50–60°C until everything is evenly combined. Avoid boiling.
- Add the paper pulp gradually and stir until it is evenly distributed throughout the mixture.
- Pour or spread the mixture into a mold or onto a flat surface, distributing it evenly.
- Allow the composite to cool and solidify.
- Let it dry completely before removing it from the mold.
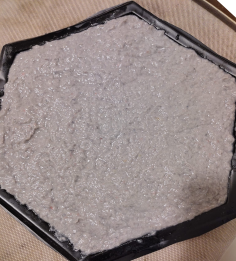
| Sample | Added Material | Amount | Color | Thickness (mm) | Tear Resistance (1–5) | Flexibility (1–5) | Shrinkage (%) | Drying Time | Texture |
|---|---|---|---|---|---|---|---|---|---|
| 01 | papper pulp | 240 g | None | 5 mm | 3 | 0 | 0% and 60% | 72 h | None |
For this experiment, I made a thicker sample with paper pulp, approximately 1 cm high. Due to its thickness, the material took a very long time to dry.
Since I left the sample inside the mold throughout the drying process, it mainly shrank vertically while maintaining its original shape.
The final result is a very hard and rigid material with almost no flexibility. This might be caused by the high amount of paper pulp or the relatively low proportion of glycerine. Further experiments would be needed to determine which factor has the greatest influence on the material's properties.
04 Grown Biomaterials
For the grown materials, I decided to experiment with two different approaches: growing plant roots and growing mycelium from fungi.
I was particularly interested in how living organisms could be used to create materials and structures.
Since I also wanted to display both experiments in our lab afterwards, I decided to create dedicated molds for them. My goal was not just to grow something, but to guide the growth into a predefined shape that would also look interesting as an exhibit.
To achieve this, I first designed the shapes and then used vacuum forming to produce the molds. These would provide the space and boundaries for the roots and mycelium to grow into their intended forms.
Vacuum Forming
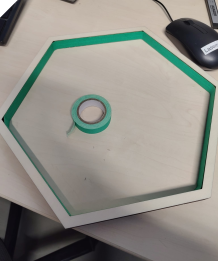
Creating the Vacuum Forming Mold b nng Instead of creating a traditional solid positive mold, I decided to try a different approach: I used the laser cutter to cut only the outline of my design, creating a simple frame.
This approach had several advantages:
- Less material: Since I only needed the outer frame, I could significantly reduce the amount of material required.
- No draft angle: Normally, vacuum forming requires a draft angle of around 10° to make it easier to remove the formed plastic from the mold. In my case, I could simply cut the frame free afterwards, so I did not have to consider this restriction when designing the shape.
- No vacuum holes: Unlike a solid mold, my open frame did not require additional holes to allow the air to escape.
This gave me much more freedom when designing the shapes, especially for the detailed patterns I wanted to create for my grown materials.
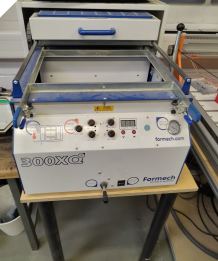
Vacuum Forming Machine
Machine Formech 300XQ
Company Formech
Working Area 430 × 280 × 160 mm
Sheet Size 450 × 300 mm
Material Thickness Up to 6 mm
Type Vacuum Forming Machine
Heating and vacuum forming thermoplastic sheets over molds to create custom shapes, prototypes and reusable molds.
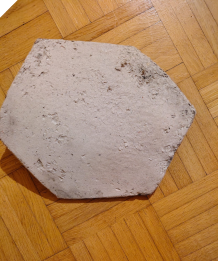
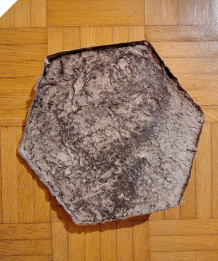
Here you can see my first attempt at vacuum forming with this method.
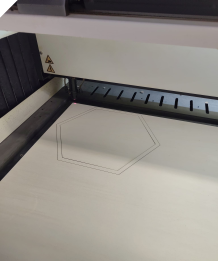
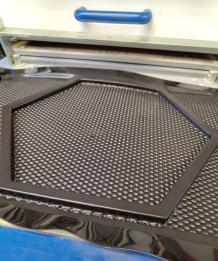
The textured surface visible in the last picture was created by the grid inside our vacuum forming machine. During my first attempt, I actually thought this was a nice bonus, as it automatically transferred an interesting pattern onto the plastic.
However, I also needed a mold with a smooth surface, so I decided to remove the grid and try again.
Unfortunately, I had overlooked one important detail: the grid was not just there to support the material. It also played an essential role in distributing the airflow underneath the plastic sheet.
Without the grid, the vacuum could only pull air through the opening directly connected to the pump. As a result, the plastic was only drawn down in that area instead of forming evenly around my frame.
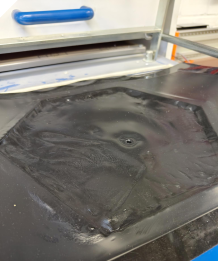
After the failed attempt, I had to find another way to achieve a smooth surface while still allowing the vacuum to work properly.
My first idea was to create a perforated plate with lots of small holes. However, this would still leave tiny marks on the plastic, and I would also need to make sure that air could flow freely underneath the plate.
Then I remembered how we handle vacuum suction on our CNC machine. We use an MDF spoilboard on top of the vacuum table. Since MDF is porous enough to allow air to pass through, it distributes the vacuum across the surface while providing a smooth, even working area.
I realized that the same principle might work for vacuum forming.
So I simply cut a piece of MDF to fit the machine, replaced the original grid with it, and tried again.
And it worked.
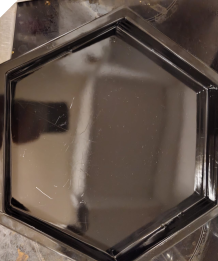
Refining the Mold with 3D-Printed Inserts
To give the roots a more defined growth structure, I continued refining my mold using 3D printing.
With Grasshopper, I designed an insert that fit exactly into the vacuum-formed shape. I reused the same sunflower pattern that I had already explored in last week’s fabric experiments. This insert could simply be placed into the thermoformed mold and gave the roots a more specific structure to grow through.
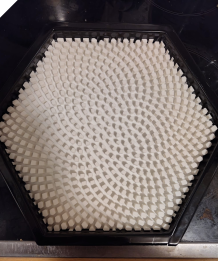
One advantage of this modular approach was flexibility. If I want to repeat the experiment in the future with a different pattern, I do not need to produce the whole mold again. I can simply exchange the insert while keeping the rest of the setup.
In addition, I designed and 3D-printed a top frame that holds a mesh fabric. The seeds could then rest on this mesh layer above the mold. Here, I made use of the knowledge from last week and directly printed onto the fabric so that the mesh became part of the printed structure.
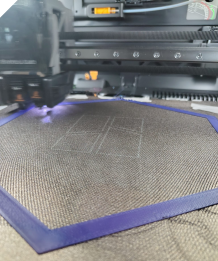
After filling in the seeds, I noticed that the mesh was still slightly too loose and could sag a little under the weight. For a future version, it would make sense to add a few supporting ribs to the printed frame in order to stabilize the mesh and give the whole setup a bit more rigidity.
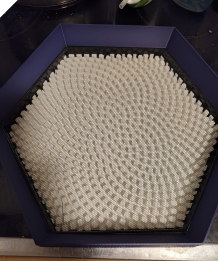
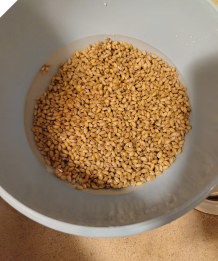
To prepare the root-growing experiment, I first soaked the oat seeds in water for 20 minutes. This allowed them to absorb some moisture before being placed into the mold.
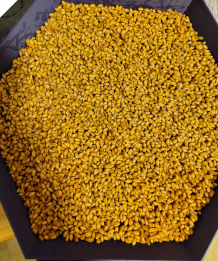
After soaking, I distributed the seeds onto the mesh fabric of my 3D-printed frame, ready for the roots to start growing through the mesh and into the patterned structure underneath.
Previous Root-Growing Experiments
I had already started experimenting with growing root structures a few months ago because I found the concept incredibly fascinating. Although these early tests were not entirely successful, they taught me several useful lessons that I could now apply to my current design. In fact, many of the decisions behind my new mold were based on what I had learned from these experiments.
My first attempt unfortunately became a meal for the local birds. Since the weather was nice, I had placed the experiment outside on our terrace, but the birds discovered the seeds before they had a chance to grow.
For my second attempt, I chose a different location where the seeds would be safe from birds. However, after three days, I forgot to water them, so this experiment was unsuccessful as well.
The third attempt finally showed some promising results. This time, the oats grew and developed a network of roots. However, I had not included a raised edge around the growing area, so the seeds and roots slipped down along the sides. As a result, I only achieved a really good, connected root structure in the center.
I also suspect that I harvested the material a little too early, before the roots had enough time to form a fully interconnected structure.
Nevertheless, this was my first successful result and showed me that the concept could actually work.
These experiences directly influenced my current setup: a raised frame to keep the seeds in place, a protected growing environment, and a defined structure to guide the roots.
The images below show the results of my earlier experiments. I will add pictures of my current experiment once the roots have grown sufficiently.
Growing Mycelium
For my second grown material experiment, I wanted to explore growing mycelium into a predefined shape.
For this experiment, Julia and I worked together again. I especially benefited from Julia's experience with mushrooms, as I had only tried growing mycelium once before, also under Julia's guidance.
We decided to use a ready-to-grow Reishi mushroom culture that was already fully colonized with mycelium. This allowed us to skip the initial colonization phase and hopefully achieve visible results much faster.
Preparing the Mold and Workspace
Just like in my root-growing experiment, we started by preparing a vacuum-formed mold that would define the shape of the final material.
Since contamination can be a problem when working with fungi, we paid particular attention to hygiene. We disinfected our workspace and our gloved hands and carried out the process directly in front of a laminar flow hood to reduce the risk of contamination.
Preparing the Mycelium
Our Reishi culture came as a solid block of substrate that was already colonized by the fungus. Since the culture was a little older, the outside had become particularly dense and completely covered with mycelium.
Getting the block apart required quite a bit of force!
Once we had broken it into smaller pieces, we crumbled the material further until it was loose enough to distribute evenly inside our mold.
We then filled the vacuum-formed mold with the mycelium-covered substrate and gently pressed everything down to create a relatively compact and even layer.
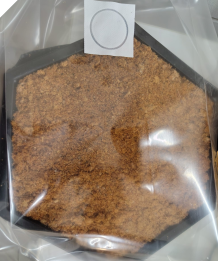
Finally, we placed the entire mold inside a special mushroom cultivation bag and heat-sealed it.
First Observations
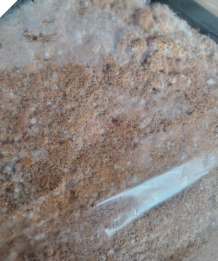
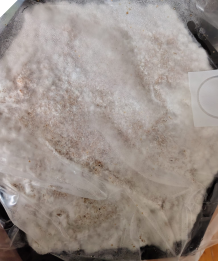
I placed the sealed cultivation bag in a cabinet, where the mycelium could continue growing through the material.
Surprisingly, after just two days, the first visible signs of growth had already appeared!
Now I am curious to see how well the mycelium will connect the individual pieces of substrate and whether it will eventually form a stable structure that can be removed from the mold.
Day 00 28.10.26
Day 02 30.10.26
Day 04 01.11.26
10 Fiels
stl
99 Waste of the Week – Biodegradability & Compostability
This week, I tried to turn waste into new materials by using paper pulp, cotton scraps, dryer lint and kitchen waste. But it also made me question how sustainable these experiments really are. While my agar-based bioplastics and natural fibres are potentially biodegradable, this does not automatically mean they are compostable. Dryer lint, for example, may contain synthetic fibres and microplastics.
The same applies to my root-growing and mycelium experiments. Although the grown materials are naturally biodegradable, producing them required plastic moulds, 3D-printed structures and cultivation bags. Hopefully, some of these can be reused.
And what happens to all my experimental samples afterwards? Some might become useful materials, while others will simply become waste again. This made me realise that biofabrication is not automatically sustainable. Perhaps the more important question is not just whether we can grow or create a material from waste, but whether we actually need it and what happens to it at the end of its life.