6. BioFabricating Materials
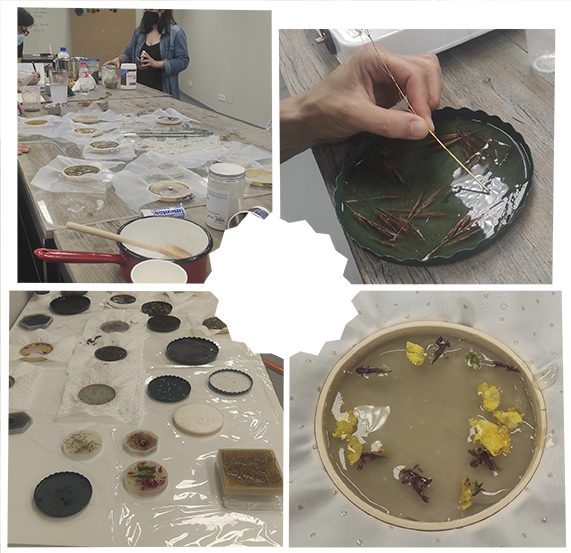
This week is BioFabricating Week so it started with a lecture by Cecilia Raspanti. For this week we have to made a research about different ways and techniques of BioFabricating Materials. We worked as a team to grow our own Kombucha, create a beautiful Sculpture on Mycelium and made alginate BioYarn. For my own research, as I am a ceramist, I wanted to try some recipes to make BioPlatics with clay and see what happened.
First Touch With BioMaterials
At the BDCamp, in June, I got in touch with BioMaterials as the first time. We had an intensive course about BioPlastic creation with Lara Campos. Here you have some photos of that day:
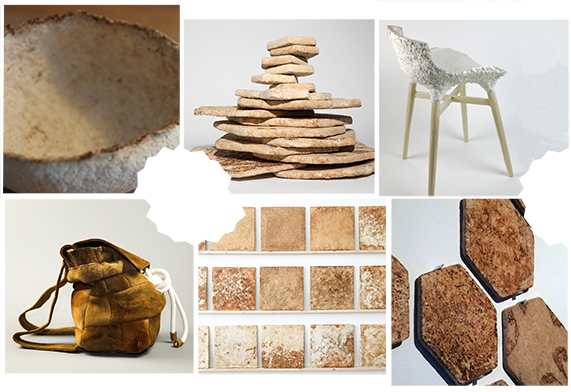
Inspiration: Officina Corpuscoli by Maurizio Montalti
In this week's lecture we saw lots of amazing work from different people, but one of them caught my attention and was this bag below. So I just searched the designer's page, whose name is Maurizio Montalti from Officina Corpuscoli, and felt amazed by all his amazing work such as you can see in the collage below.
This week's Team Work
This week we worked a lot as a team: we learnt the workflow of growing a Kombucha, learnt the workflow of working with Mycelium by creating a sculpture with our coursemate Elsa, also create Alginate BioYarn for weaving with it, and of course, had a lot of fun!
I'll explain all the processes we followed down below:
• Kombucha: Kombucha Growth at the BDC
· What Is Kombucha?
"Kombucha is a fermented tea with a symbiotic colony of bacterial yeast (SCOBY).
Bacteria feeding on a liquid medium of sugars and tea, start creating an acidic environment which allows them to thrive and spin cellulose layers.
It grows best between 25-30 degrees Celsius, at lower temperatures the kombucha pellicle will grow, but slowly. There are hundreds of different strains of kombucha."
KOMBUCHA FILM, FOIL, LEATHER
"Kombucha can be grown at different thicknesses.
Kombucha matererial is a layered cellulose, where the grown material is washed and the dried, either flat or in shape. To preserve the material, it must undergo a port-grown treatment to soften, make elastic or dry the kombucha pellicle. Different growing mediums and recipes create different colours or textures, while the different treatments change the properties of the material."
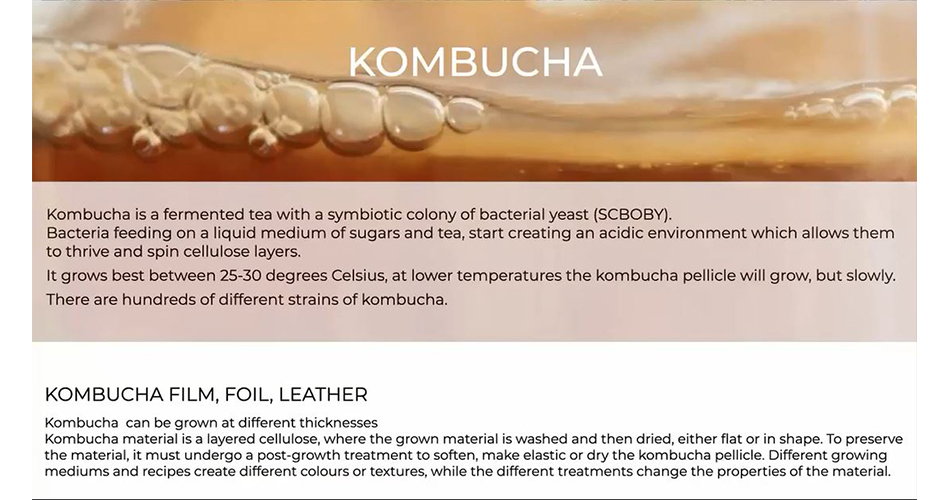
This information is from Cecilia Raspanti's amazing lecture.
· Kombucha Growth at the BDC
Here at the BDC we had 2 kombucha growing: Fermina and Shiro. Fermina is a 1-month Kombucha and last week, we followed a recipe to make Shiro grown. This week, we put our Fermina out from the container where she was growing, since she was already super big.
This was the recipe we followed to produce more SCOBY:
- 1. Black tea bag (4 per 7 cups of water)
- 2. Sugar (1 cup per 7 cups of water)
- 3. Water (depending on the quantity by recipe, 7 cups at list)
- 4. A Kombucha which was bought at a store (simple, raw / unpasteurized, unfiltered - 1:5 ratio to sweet tea)
- 5. Pyrex plates or glass containers to store the kombucha while it grows.
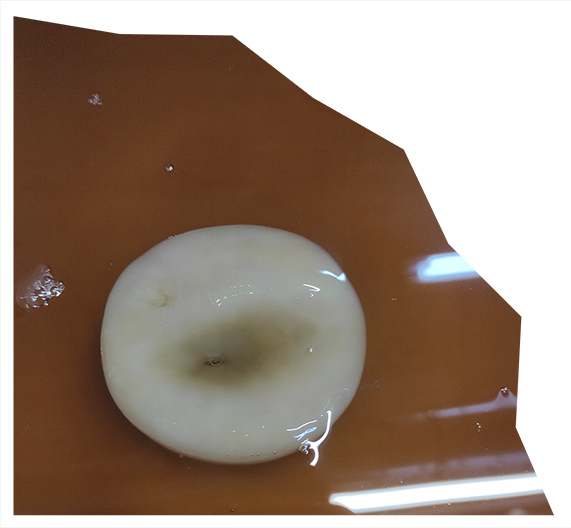
This is the SCOBY we used, and named it Shiro:
For growing it, you need to follow these steps:
- 1. Esterilize the container you are going to use to reduce the chances of contamination.
- 2. Boild the water to infuse the tea, add the sugar and dissolve it in the water.
- 3. Wait until the liquid gets cold before introducing the SCOBY on it.
- 4. Cover the container with a fabric, it needs to be tensed so that it doesn't touch the liquid (the optimal temperature is between 25º-35º).
- 5. So now, you need to let it grow and control it. It is going to grow in the surface, so you need to control the amount of liquid, and in case there is a little amount, you need to feed it with the proportions of sugar and water of the recipe above.
The Steps we followed when our Kombucha Fermina was ready:
- 1. Took her out of her container after 1 month and she was 1.5cm thick.
- 2. Washed her until the water started to be so clear.
- 3. Lay her on a wooden surface and sticked her pressing with the hands.
- 4. Let her dry in the sun at 45º.
- 5. Some sunny days later she was completely dry.
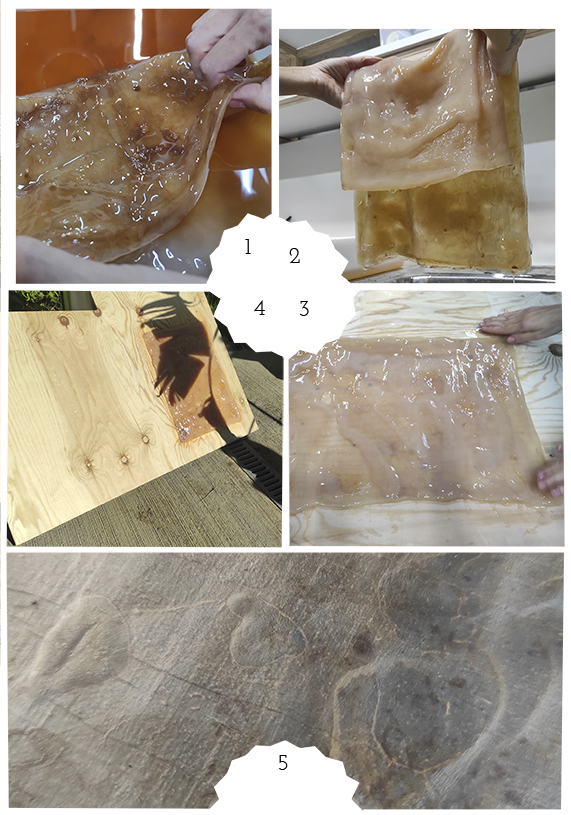
As you can see we did the whole process altogether, and it was a really nice experience since it was my first time working with kombucha. The final result when it was dried was really amazing, unfortunately I dind't work with the fabricated sheet because I wanted to focus deeper on my own research involving clay.
• Mycelium: MicoMaterials Workshop With Elsa
· What Is Mycelium?
"Mycelium is the vegetative part of fungus.
Mycelium looks like strings often white or cream coloured that grow in long fibres called hyphae. This structure, as a whole, is the vegetative structure of fungi.
This is why mycelium is able to colonise other materials, like a substratum, think of straw or coffee for example, but also liquid nutrients. This colonisation fosters the creation of a new material."
MYCELIUM BRICK, LEATHER
"Mycelium can be grown in many different ways, on a large variety of substratum.
Mycelium grown materials are often fireproof, waterproof or sound isolating. They are also completely compostable and organic."
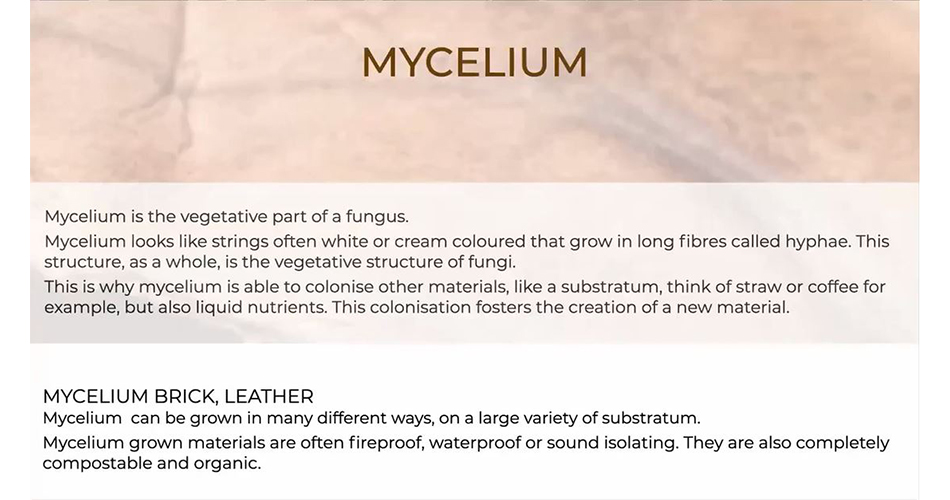
This information is also from Cecilia Raspanti's amazing lecture.
· MicoMaterials Workshop With Elsa
On Wednesday morning we had a MicoMaterials course based on Mycelium by our classmate Elsa. She knows a lot about Mycelium since she worked a lot with it, so she showed us how the workflow when working with mycelium is. We used some molds that belong to her for creating a sculpture named "Ma-Ka".
These are the steps we followed to work with this material:
- 1. First, we smashed the Mycelium into so small pieces.
- 2. We mixed the pieces with flour on a 30g/Kg of Mycelium (amount?).
- 3. We put the Mycelium in a Ma-Ka mould (which is the mould which Elsa used for her project).
- 4. We sanitated a garbage bag and put the mould inside and then in our BioLab crop storage.
- 5. We waited for 2 days.
- 6. Took the Mycelium away from the mould, and verified that it grew. Then assemble it whit the wanted shape.
- 7. Left the pieces into the bags again for more days.
- 8. Finally we left it dry under the sun.
- 9. We will see what happens next.
This is a collage that shows the process we followed:
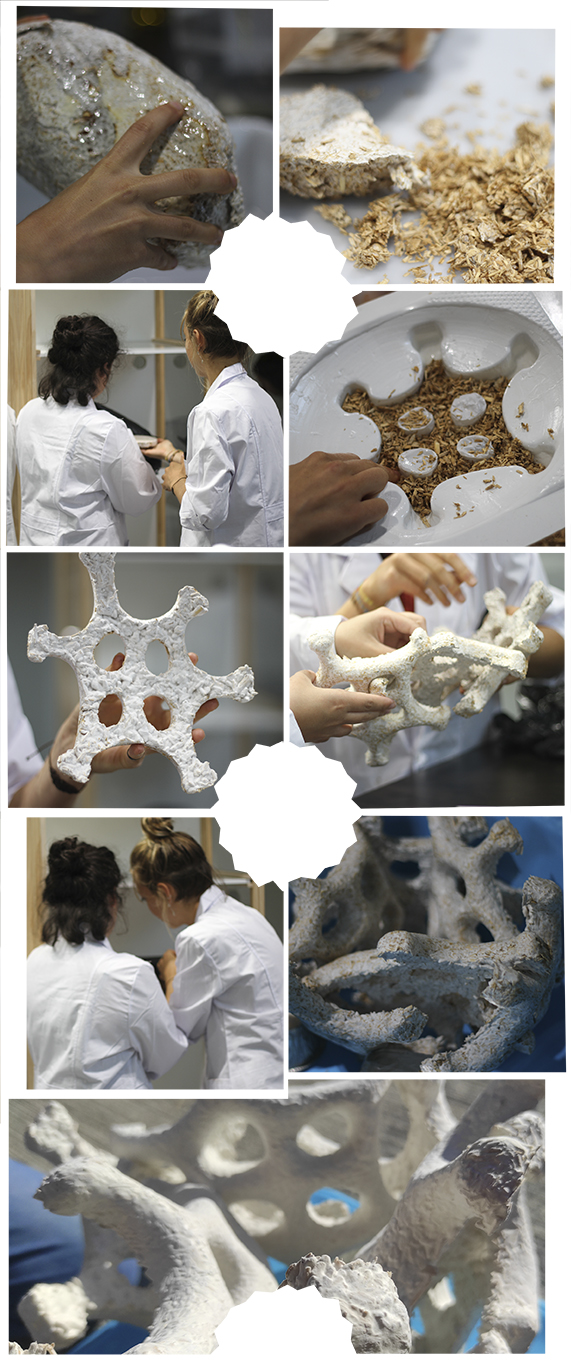
Finally, our "Ma-Ka" looked really beautiful. The result is been showed to all people who visited the BDC as our teamwork, among all the other results we had during this Fabricademy journey.
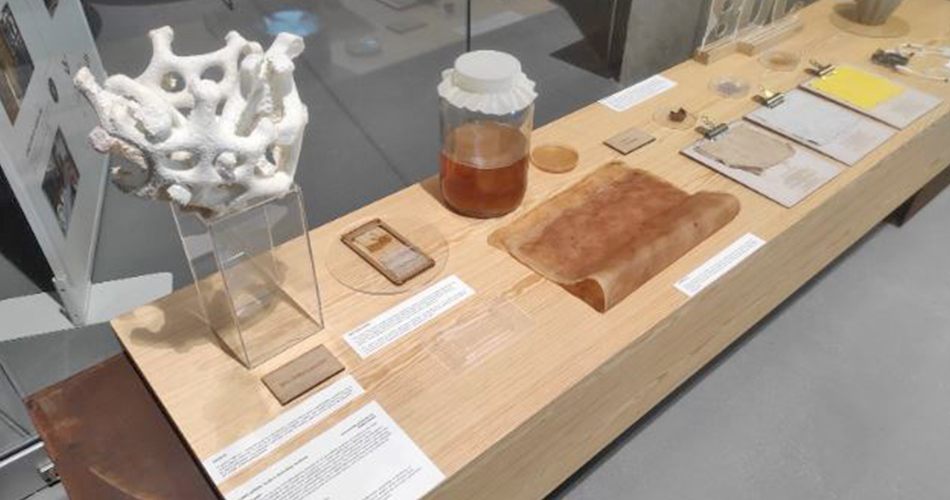
This is the final result of "Ma-Ka" in one of our BDC exhibitions:
• Alginate BioYarn - BDC Tiny Loom
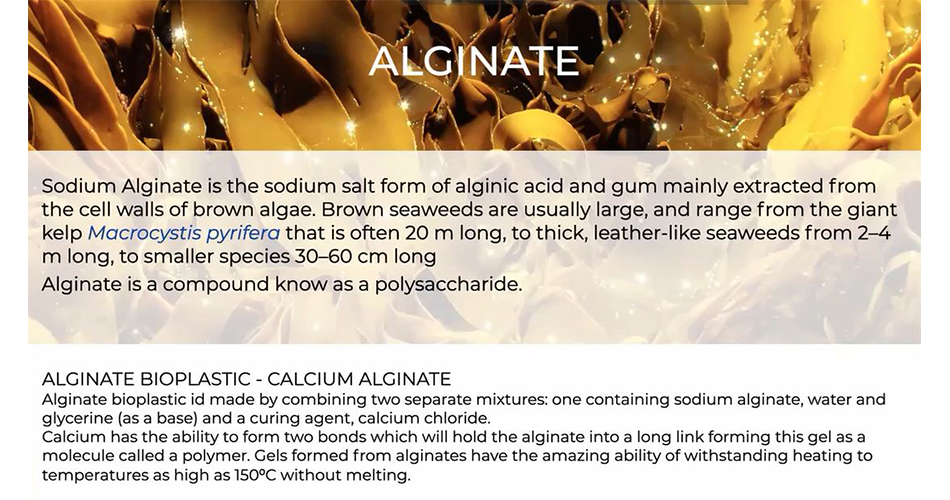
· What Is Alginate?
"Sodium Alginate is the sodium salt form of alginic acid and gum mainly extracted from the cell walls of brown algae. Brown seaweeds are usually large, and range from the giant lep Macrocystic pyrifera that it is often 20m long, to thick, leather-like seaweeds from 2-4m long, to smaller species 30-60cm long.
Alginate is a compound know as a polysaccharide."
ALGINATE BIOPLASTIC - CALCIUM ALGINATE
"Alginate bioplastic is made by combining two separate mixtures: one containing sodium alginate, water and glycerine (as a base) and a curing agent, calcium chloride.
Calcium has the ability to form two bonds which will hold the alginate into a long link forming this gel as a molecule called a polymer. Gels formed from alginates have the amazing ability of withstanding heating to temperatures as high as 150º without melting."
This information is also taken from Cecilia Raspanti's amazing lecture.
· Alginate Strings
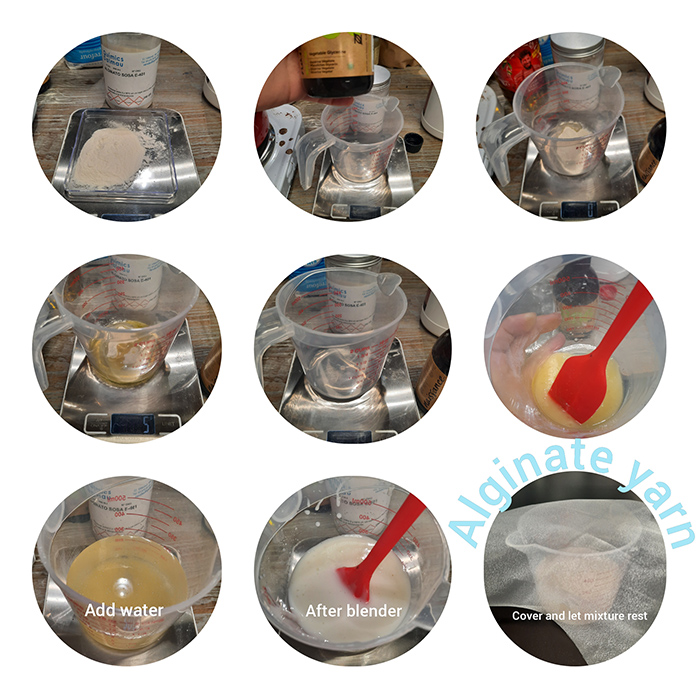
We worked as a team also to create Alginate Strings. The recipe we followed to make them was taken from here, which is a page of a previos year Fabricademy student called Loes Bogers, and also died the strings with turmeric, purple corn and cinnamon, among others. We change the workflow a little just on the drying step, so I'll write the actual steps we followed, always inspired but her recipe and process:
This is the recipe we followed:
· INGREDIENTS:
- Sodium alginate powder 6gr
- Glycerine 10gr
- Water 200gr
- Sunflower Oil 5gr
- Calcium Chloride solution 10% 300ml (30gr to 300gr water)
· TOOLS:
- Scale
- Spoon
- Blender
- A bowl or jar of min. 300ml
- 60cc (or more) syringe
And these are the steps we followed taken from Loes Bogers recipe:
· METHOD:
· Preparation:
- 1. Weight your ingredients for the alginate plastic (alginate, glycerine, water, sunflower oil). Optional: use a diluted natural dye instead of water in the same amount for a colored plastic.
- 2. Put the oil, alginate and glycerine in a blender and add a dash of the water. Blend into a thick and homogenous paste. Then add the rest of the water and blend again (this is to avoid lumps).
- 3. Leave the mixture overnight to allow the bubbles to come to the surface and pop. After this step, we added the turmeric, purple corn and cinnamon for dyeing our strings and stir until dissolved into the mixture.
- 4. Make the calcium chloride solution by dissolving 30 gr in 300 gr hot water. Put some in a spray bottle and store the rest in a jar: this is your calcium chloride bath.
· Extruding:
- 5. Prepare the work space by putting out your calcium chloride bath and spray, a syringe and your alginate mixture.
- 6. Fill the syringe with about 50 ml alginate plastic.
- 7. Extrude the alginate plastic into the calcium chloride bath, try to extrude continuously and uninterupted to created an even, long string. Repeat this process to make more strings.
· Curing & Drying:
- 8. Leave the string in the bath for a few minutes and then rinse in some tap water.
- 9. Put the strings into a non-stick surface and let them cure until totally dry.
This is an image taken from my peer Marisa Satsia's page that shows the first part of the process explained before:
And this is another image taken from Marisa's documentation too, that shows the process of creating the BioYarns:
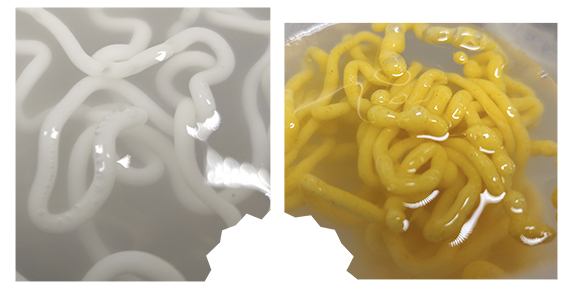
This is how my alginate strings looked like:
And this is a video from Loes Bogers student page, where she shows how her own alginate strings look like:
· BCD Tiny Loom
We were given a Tiny Loom here at the BDC, so I tried to weave with the Alginate Strings. Just as a try, I did it with both, the alginate strings wet and dried.
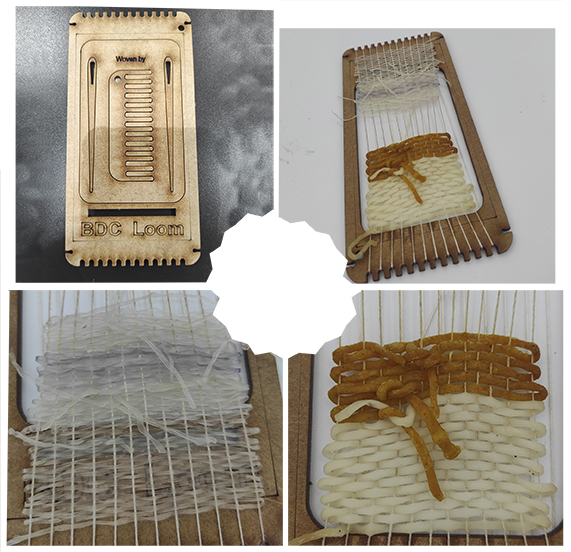
Also, I need to tell that I didn't know how to weave, so I learnt from these super well explained tutorials:
How to Weave on a Tiny Loom
How to Finish the Miniature Weaving:
· Alginate Strings BOM
This is the BOM (Bill Of Materials) of the alginate strings:
| Qty | Description | Price | Link |
|---|---|---|---|
| 1 | Sodium Alginate Powder | 9,80€ | https://www.amazon.es/ALGINATO-SODIO-POLVO-espesante-gelificante/dp/B09GG926TR/ref=asc_df_B09GG926TR/?tag=googshopes-21&linkCode=df0&hvadid=561346709433&hvpos=&hvnetw=g&hvrand=2226297560982061913&hvpone=&hvptwo=&hvqmt=&hvdev=c&hvdvcmdl=&hvlocint=&hvlocphy=1005440&hvtargid=pla-1462487388473&psc=1 |
| 1 | Glycerine | 13,95€ | https://www.amazon.es/Glicerina-Vegetal-1L-1kg-25/dp/B07ZKXBP4R/ref=sr_1_5?crid=3FBEV10FD4VU3&keywords=glicerina+1kg&qid=1643642044&sprefix=glicerina+1kg%2Caps%2C73&sr=8-5 |
| 1 | Sunflower Oil | 3,59€ | https://www.google.com/shopping/product/12557387249679810734?q=aceite+de+girasol&rlz=1C1PRFE_enES644ES644&biw=1707&bih=821&sxsrf=ALiCzsbwpYJWFk1DdDp2SVo8RH3vMP3TPA:1654018157642&oq=aceite+de+girasol&gs_lcp=Cgtwcm9kdWN0cy1jYxABGAAyCwgAEIAEELEDEIMBMgUIABCABDIFCAAQgAQyBQgAEIAEMgUIABCABDIFCAAQgAQyBQgAEIAEMgUIABCABDIFCAAQgAQyBQgAEIAESgQIQRgAUABYgglgyxloAHAAeACAAYMHiAGFF5IBBzMtMS42LTOYAQCgAQHAAQE&sclient=products-cc&prds=eto:11414856516237012870_0,rsk:PC_12061988867833841498&sa=X&ved=0ahUKEwjH1vz8oYr4AhVu8rsIHe_XB-sQ8wII5Qc |
| 1 | Calcium Chloride | 13,90€ | https://www.cetamar.com/es/aditivo-marino/2700-calcium-chloride-454g-fritzpro.html |
| 1 | Turmeric | 9,99€ | https://www.amazon.es/Carefood-Ecol%C3%B3gica-Procedente-Superalimento-Ecol%C3%B3gico/dp/B07N6J5KZG?source=ps-sl-shoppingads-lpcontext&smid=A23LNRH59ZSX2A&th=1 |
| 1 | Cinnamon | 5,40€ | https://www.dieteticacentral.com/oferta-flash/323032323035333150524f445543544944363334353153544f524531?gclid=Cj0KCQjw-daUBhCIARIsALbkjSbmZMzB0TB7i1aBk-4wqQakAHZFayHRowRnA6gG1bdgv_eYeGvCWKgaAsa0EALw_wcB |
| 1 | Purple Corn | 3,92€ | https://www.dieteticacentral.com/oferta-flash/323032323035333150524f445543544944363239313553544f524531?gclid=Cj0KCQjw-daUBhCIARIsALbkjSbCKS2z3z4735m6QM-OylyFcNqDIPK2Ft45ZhVxdBBLXEXfB9OJhg4aAmcMEALw_wcB |
My Own Research
For my own experimentation, I looked for some recipes and found by chance some with Clay. I completely loved the idea of trying to do BioPlastic with clay so I took all the recipes I found on that book that contained that material. The book's name is "Bioplastic Cook Book" and you can find it here.
· Clay BioMaterials Recipes
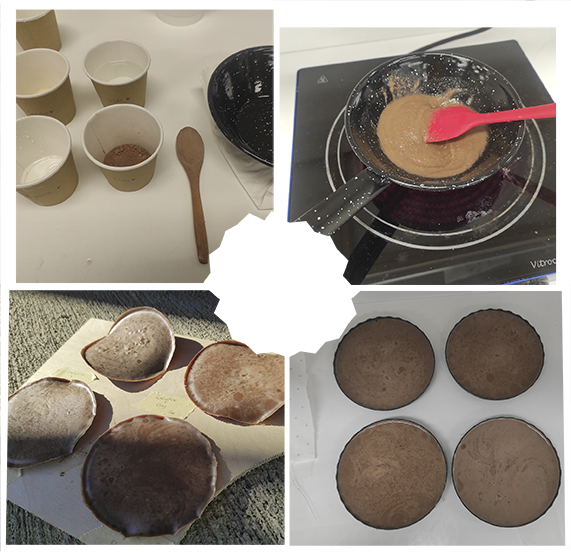
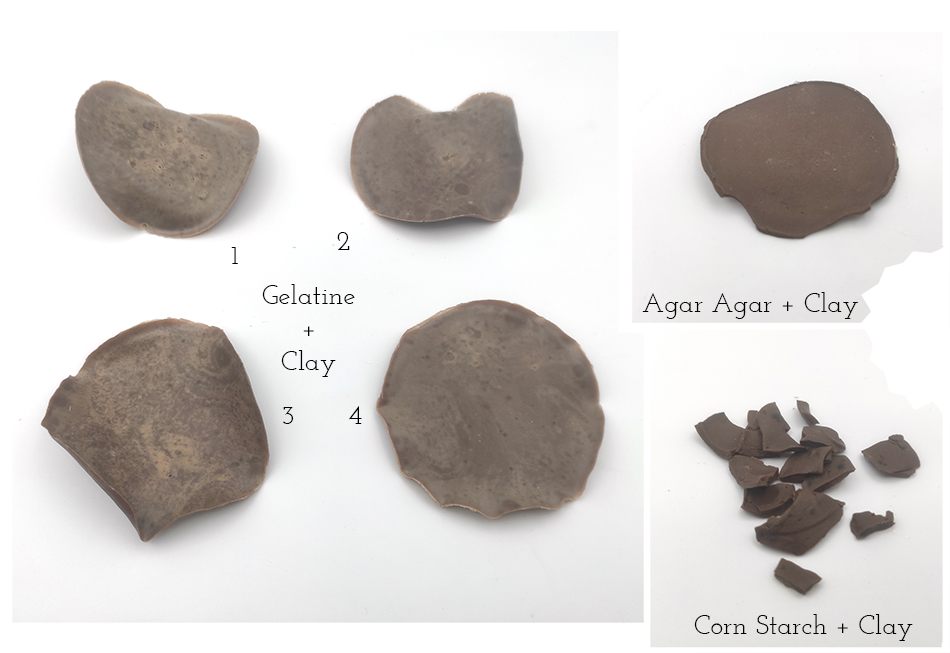
I finally found three different recipes with Gelatine, Agar Agar and Corn Starch, and used not the red regular clay but another different one. So the results are not the same as the ones you can find in that book, but I think they are beautiful too.
These are the recipes I used with Clay:
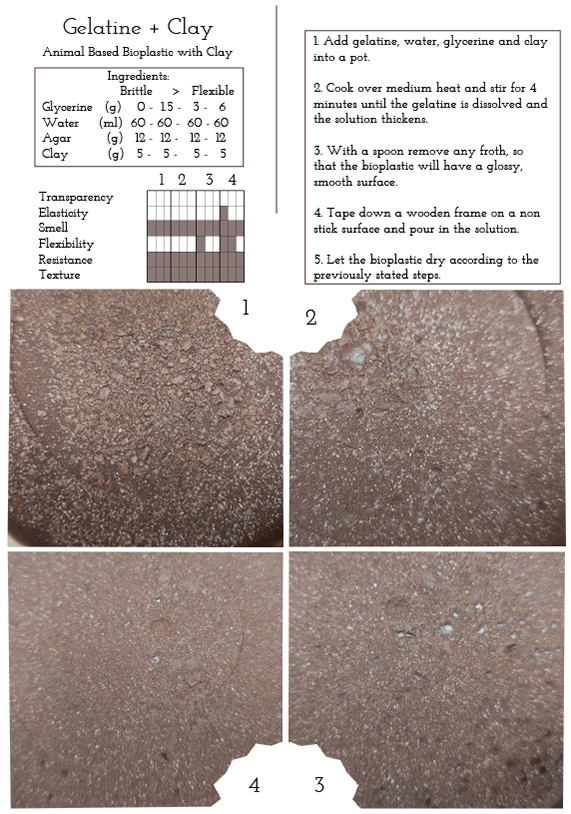
• Gelatine + Clay: Animal Based Bioplastic with Clay
Regarding Gelatine, the book shows 4 different recipes depending the amount of glicerine used, so I tried all of them to see the difference between them.
This is the process I followed to make the bioplastic following the recipes:
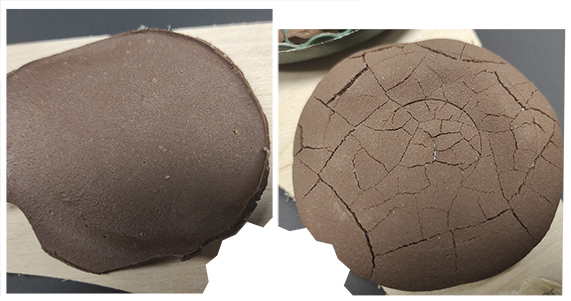
• Agar Agar + Clay: Plant Based Bioplastic with Clay
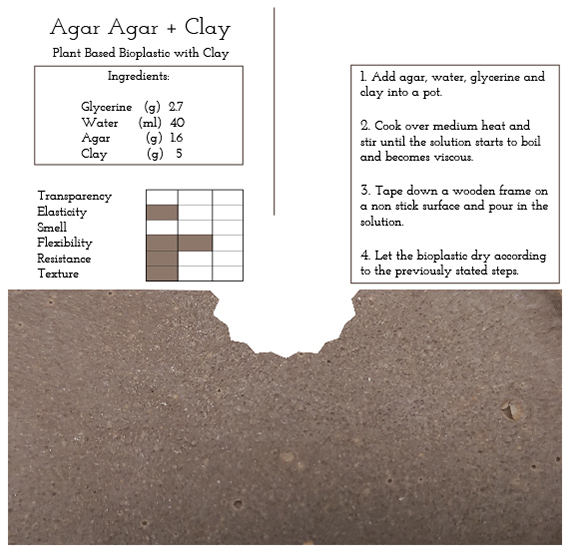
With Agar Agar I made two attemps, depending on the pot where I cooked it, one cracked and the other one didn't.
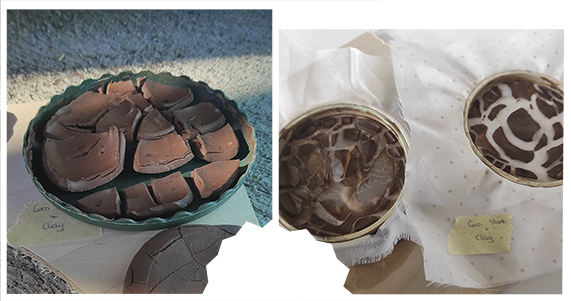
• Corn Starch + Clay: Plant Based Bioplastic with Clay
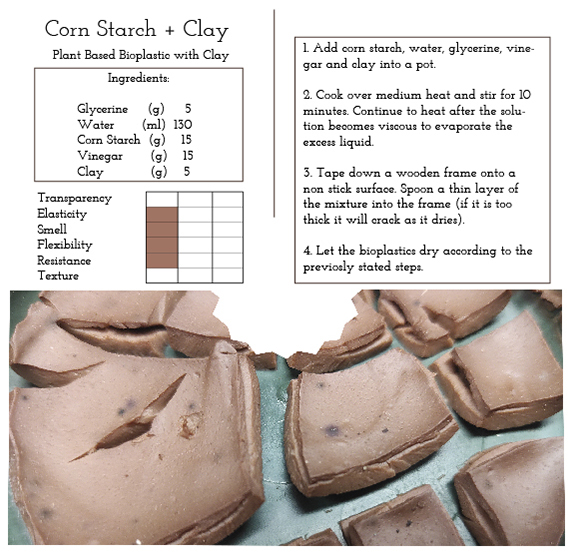
As the recipe says, if you make a thick sample it will crack, so I did three samples with different thinknesses to see what happened, and finally the three of them cracked.
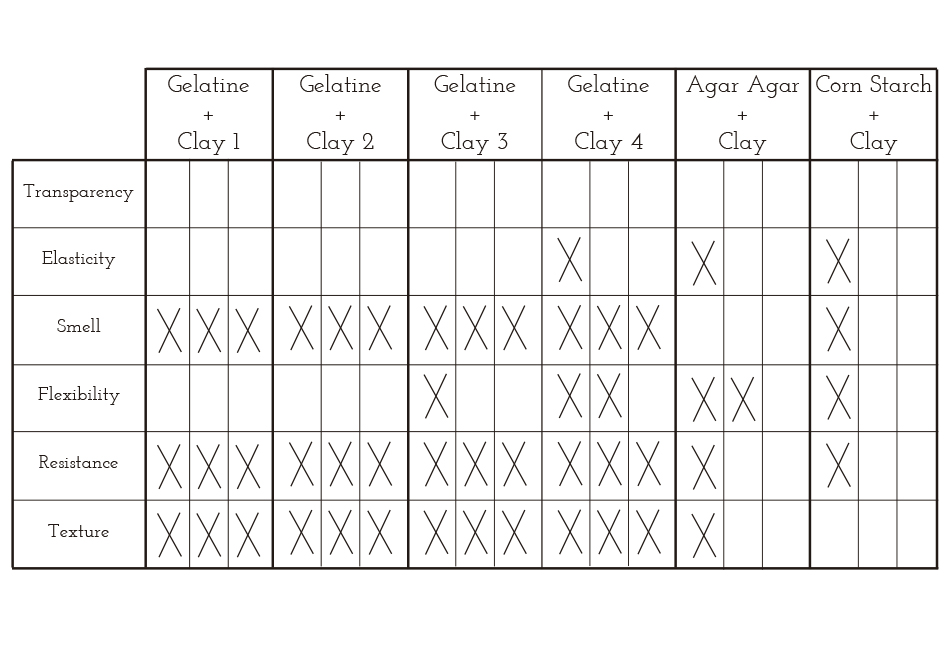
· Final Results
These are all my final results:
And this is a Comparative Chart between them:
· Clay BioMaterials BOM
This is the BOM (Bill Of Materials) of these Clay Biomaterials:
| Qty | Description | Price | Link |
|---|---|---|---|
| 1 | Gelatine | 21,80€ | https://www.amazon.es/Gelatina-granulada-grado-profesional-neutro/dp/B087N96LF5/ref=sr_1_4?crid=4K3MCKB6WCW4&keywords=gelatina+1kg&qid=1643641858&sprefix=gelatina+1k%2Caps%2C171&sr=8-4 |
| 1 | Agar-Agar | 25,90€ | https://www.amazon.es/Agar-polvo-500g-123GELULES/dp/B06XK9HYSW/ref=asc_df_B06XK9HYSW/?tag=googshopes-21&linkCode=df0&hvadid=297850370121&hvpos=&hvnetw=g&hvrand=18018814127134400804&hvpone=&hvptwo=&hvqmt=&hvdev=c&hvdvcmdl=&hvlocint=&hvlocphy=20271&hvtargid=pla-603273362157&psc=1 |
| 1 | Corn Starch | 15,44€ | https://www.amazon.com/-/es/Polvo-almid%C3%B3n-org%C3%A1nico-starwest-bot%C3%A1nicos/dp/B004A9XHWK/ref=sr_1_8?crid=32GS5SNWBAAGI&keywords=maizena+corn+starch&qid=1654017835&sprefix=maizena%2Caps%2C494&sr=8-8 |
| 1 | Glycerine | 13,95€ | https://www.amazon.es/Glicerina-Vegetal-1L-1kg-25/dp/B07ZKXBP4R/ref=sr_1_5?crid=3FBEV10FD4VU3&keywords=glicerina+1kg&qid=1643642044&sprefix=glicerina+1kg%2Caps%2C73&sr=8-5 |
References & Useful Links
This previous year's student inspired us:
Useful Links
- Bio-Fabricating Materials Lecture by Cecilia Raspanti
- Biomaterials Tutorial Part 1 by Beatriz
- Biomaterials Tutorial Part 2 by Beatriz
- Microbial Cellulose Tutorial by Lorena Trebbi
- Officina Corpuscoli
- Bioplastic Cook Book
- How to Weave on a Tiny Loom
- How to Finish the Miniature Weaving