12. Soft Robotics
This week started with the super interesting Recitation by Bruna Goveia and then the Lecture by Lily Chambers and Adriana Cabrera. For this week's assignment, we were asked to create and experiment with different materials our Soft Robots samples. This week seems that is going to be funny!
First Touch With Soft Robotics
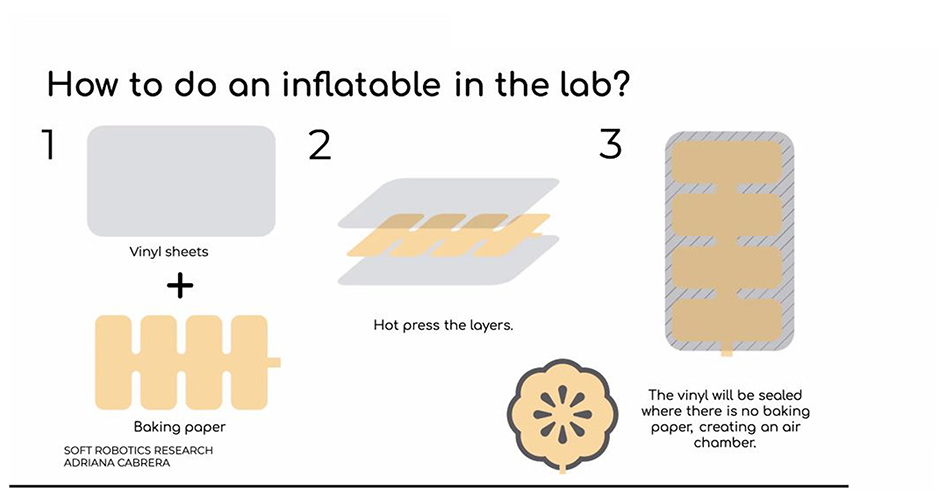
At the BDCamp we had an amazing intensive course on Soft Robotics with Anastasia Pistofidou. It was so so funny and really interesting, and we create in an easy way our first inflatable with only three materials: Baking paper, Vinyl and the Hot press. We also learnt how to prepare the molds for filling them with the silicone.
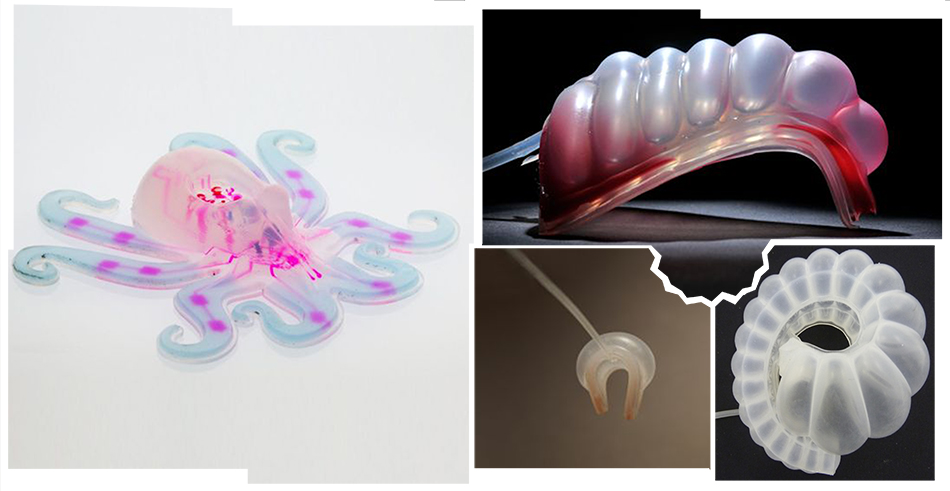
Inspiration
This Week's Practice
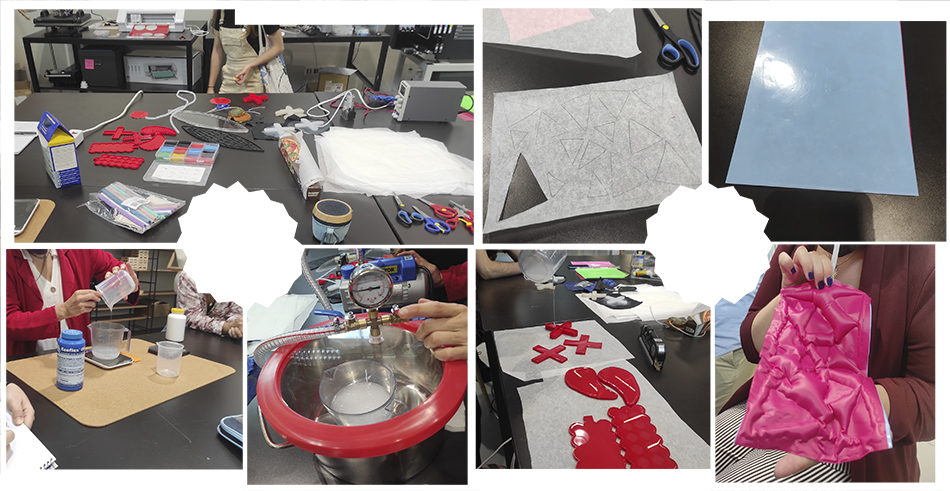
This week has been a bit strange for us. It had been raining here for 3 weeks without stopping, so we had a flood risk in the town our center is so we could not go to work there for several days. Due to that, we worked as a team in one of our peer's houses for a whole morning: We made inflatables with vinyl and also tried the biosilicone recipe in some 3D printed molds that we already had available in the lab.
· Inflatable With Vinyl
These are the steps we need to follow to create a vinyl inflatable:
- 1. You need 2 pieces of vinyl sheets a 1 sheet of baking paper.
- 2. Cut the baking paper with the shape of your wish.
- 3. Put the baking paper in between the 2 sheets of vinyl.
- 4. Use an iron or a hot press for hot pressing the layers.
- 5. The vinyl will be sealed where there is no baking paper, creating an air chamber.
Here is an image taken from Adriana Cabrera's tutorial:
And this is the tutorial where she sowed us the process:
· Handmade Vinyl inflatables:
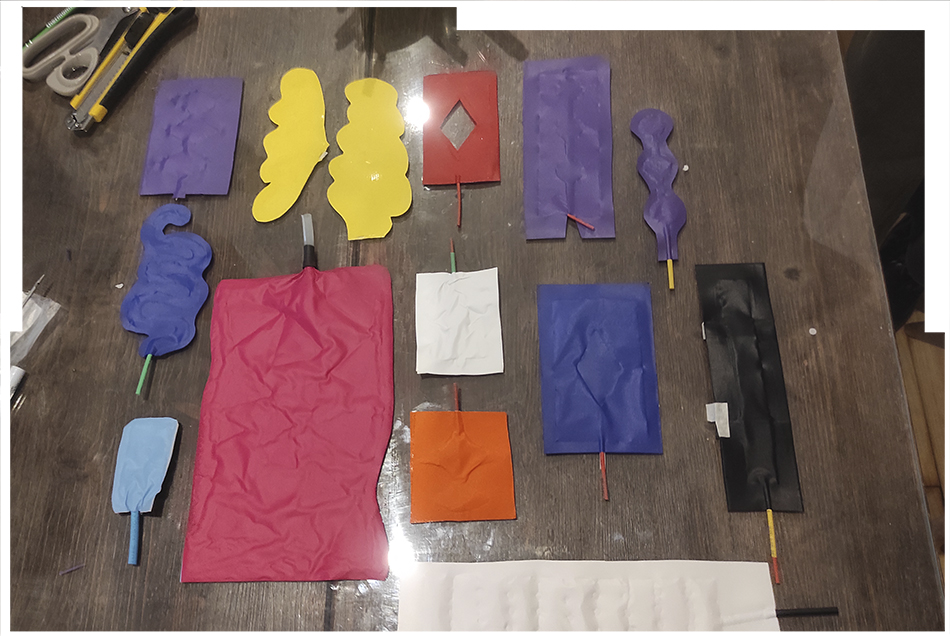
We worked all together on Friday and did a lot of inflatables. We followed the steps explained before for doing all of them.
This is the result of all the inflatables we did:
These are some videos of the ones I created:
This handmade vinyl inflatables are so easy to do, we did a lot of tries in some hours and got really varied results and also had a lot of fun when doing them of course!
· Laser Cut Vinyl inflatable:
I also wanted to try one with laser cutting the baking paper on the inside. So I designed one simple shape, for trying with both the vinyl and also for making a mold with silicon with it.
This is the process I followed:
- 1. First I designed a simple shape in in Rhino and exported as a ".dxf" file.
- 2. I Cut the baking paper on the laser cutter.
- 3. I put the baking paper in between 2 small pieces of vinyl.
- 4. I used the hot press for sticking both layers.
This is a collage of the process:
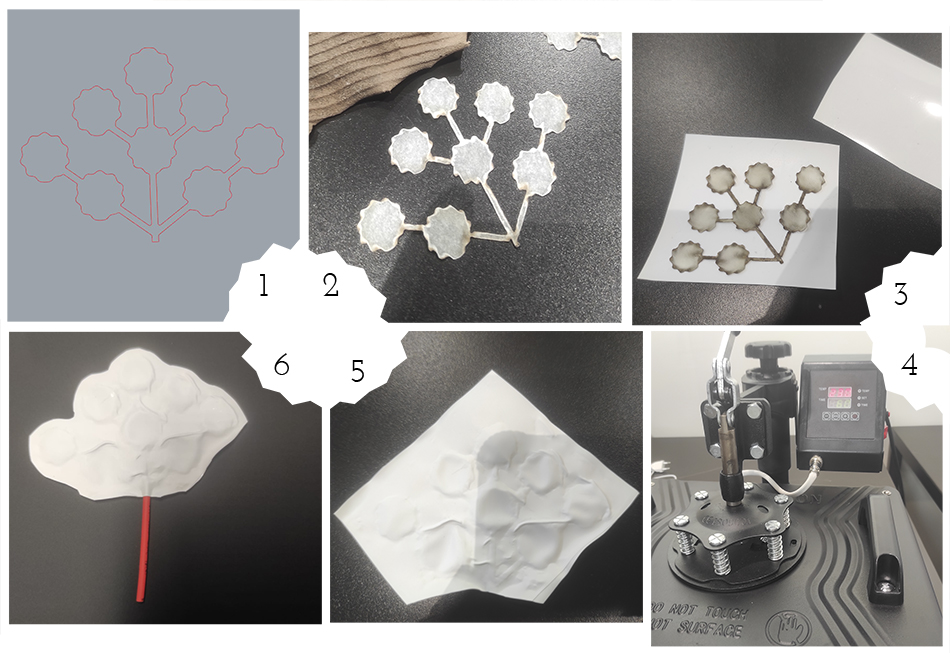
These were the settings for laser cutting the baking paper:
- Material: Type: Baking paper; Thickness: 0,5 mm
- Machine Settings: Cut: Speed: 75 / Power: Min.:25, Max.:26,5;
These were the settings for the hot press:
- Temperature: 230º
- Time: 1 minute
And this is the result:
I really liked this try because the baking paper is perfectly cut with the laser, and the shapes are perfect. I would love to try this shape in a bigger size in the future.
· Vinyl Inflatables BOM
This is the BOM (Bill Of Materials) of these inflatables:
| Qty | Description | Price | Link |
|---|---|---|---|
| 1 | Vinyl Sheets | 16,20€ | https://www.amazon.com/-/es/55-hojas-vinilo-adhesivo-permanente-colores/dp/B07WF92V2G/ref=sr_1_8?__mk_es_US=%C3%85M%C3%85%C5%BD%C3%95%C3%91&&crid=3VXGKKI1OZEZA&&keywords=adhesive+vinyl&&qid=1653576346&&sprefix=vinilo+adhesivo,aps,236&&sr=8-8&language=es_US¤cy=EUR |
| 1 | Baking Paper | 2,39€ | https://www.carrefour.es/supermercado/papel-de-horno-albal-8-metros/R-521001379/p?ic_source=portal-y-corporativo&ic_medium=search-empathy&ic_content=ns |
| 1 | Thermo-Retractable Cable | 6,28€ | /www.amazon.com/560-tubos-termorretráctiles-aislamiento-termorretráctil/dp/B07P11GJMG/ref=sxin_14_pa_sp_search_thematic_sspa?content-id=amzn1.sym.bdb62de4-4445-472f-a46c-4743abbcf384%3Aamzn1.sym.bdb62de4-4445-472f-a46c-4743abbcf384&crid=2YENCN6DZRQ9P&cv_ct_cx=thermo-retractable+cable&keywords=thermo-retractable+cable&pd_rd_i=B07P11GJMG&pd_rd_r=c487cef2-16f5-46bf-ba9c-be93d0fcb1ef&pd_rd_w=kCnRZ&pd_rd_wg=Tq3sv&pf_rd_p=bdb62de4-4445-472f-a46c-4743abbcf384&pf_rd_r=ZN5V54M3QQWRC5KMHAG2&qid=1653576548&sprefix=termoretractil%2Caps%2C310&sr=1-1-8acce81c-1022-4788-a21d-98553f7388f3-spons&psc=1&spLa=ZW5jcnlwdGVkUXVhbGlmaWVyPUExM0hUWjFSRDdNOVpBJmVuY3J5cHRlZElkPUEwMTc0MTYxU0FHVEhURDhDSkVHJmVuY3J5cHRlZEFkSWQ9QTA2NTUyODYyMFNBUlgzQUFSNlBDJndpZGdldE5hbWU9c3Bfc2VhcmNoX3RoZW1hdGljJmFjdGlvbj1jbGlja1JlZGlyZWN0JmRvTm90TG9nQ2xpY2s9dHJ1ZQ== |
| 1 | Portable Air Pump for Inflatables | 6,19€ | https://www.amazon.com/-/es/TONUNI-extensi%C3%B3n-baloncesto-waterpolo-ejercicio/dp/B07FR65S9G/ref=sr_1_7?__mk_es_US=%C3%85M%C3%85%C5%BD%C3%95%C3%91&crid=16J06WGIJCZSH&keywords=small+air+pump+for+inflatables&qid=1653576598&sprefix=small+air+pump+for+inflatables%2Caps%2C351&sr=8-7 |
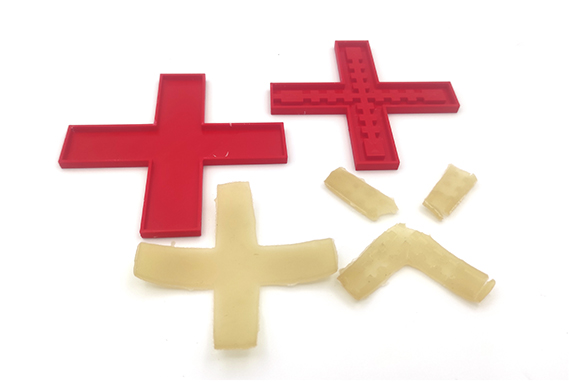
· Silicone Mold for Soft Robot
These are the steps you need to follow for working with silicone:
- 1. Design your mold in Rhinoceros, in my case the mold has 3 parts that need to be glued together after the laser cutting process.
- 2. Laser cut your pieces in the laser cutter.
- 3. Glue them together with a suitable glue for acrylic.
- 4. Let then dry well (I waited overnight for being completely sure).
- 5. Grease up your mold with some oil.
- 6. Measure the volume of your mold by pouring some water into it and then measure it on a measure container.
- 7. Measure the volume or your mold (the silicone we were using was a 2 part silicone with a 1/1 ratio), so used the same amount of both parts depending on the volume of your own mold.
- 8. Mix up the mixture well.
- 9. We used a pressure chamber to degas the silicone.
- 10. Cast the silicone in the mold.
- 11. Wait until the silicone is ready to be removed from the mold.
- 12. Remove the pieces from the molds and stick them together with more silicone and a brush (make sure that you don't use too much silicone for doing so, it might close the pathways).
- 13. Wait until it dries.
- 14. Your Soft Robot is ready! :)
· Designing a mold in Rhino
I wanted to try the silicone so I desgined a simple mold in Rhino for laser cutting it.
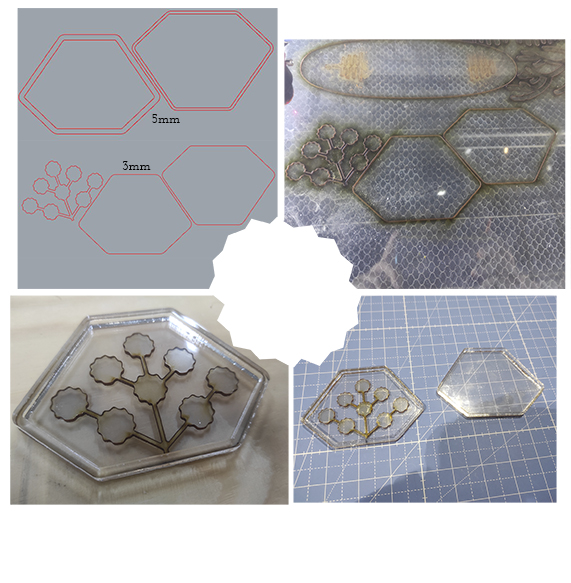
These are the parametters to cut both designs in Acrylic
· 5mm: - Speed/15 - Min. Power/70 - Max. Power/74
· 3mm: - Speed/30 - Min. Power/68 - Max. Power/72
· Trying the Mold With Silicone
Following the previous steps explained, we tried casting our molds with silicone.
This is the silicone we used:

This is a 2 part silicone rubber with a mix ratio of 1A:1B by volume or weight.
This is a collage about the process we followed:
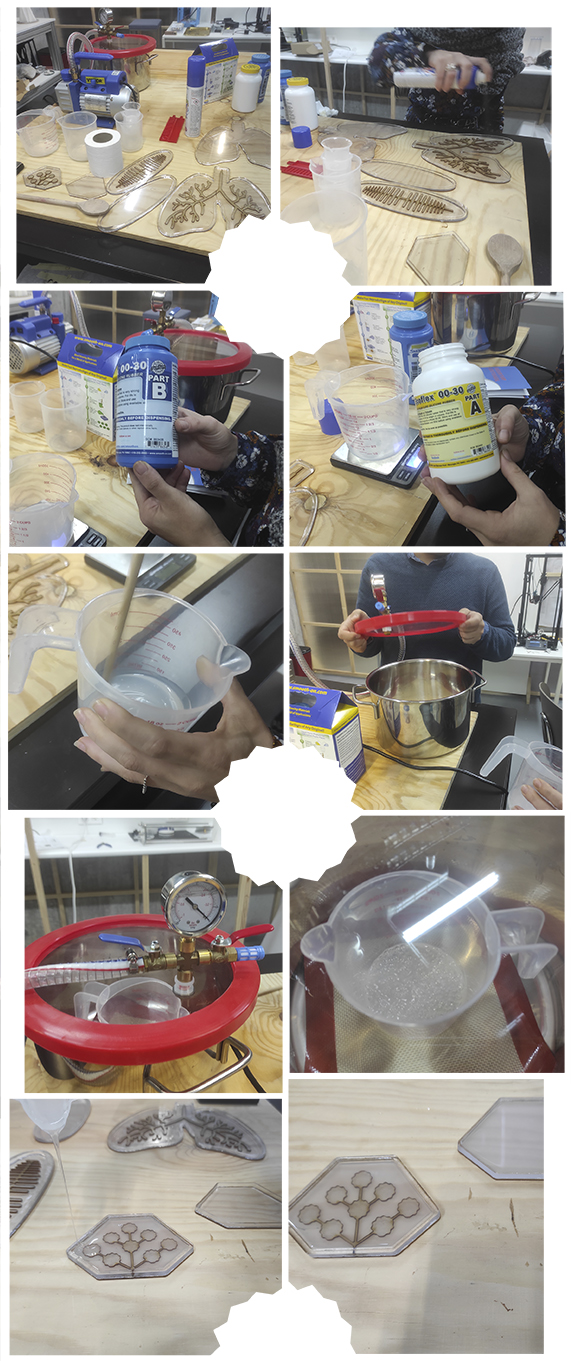
This video shows the process of pouring the silicone into the mold:
This is the result of my both parts out of the mold:
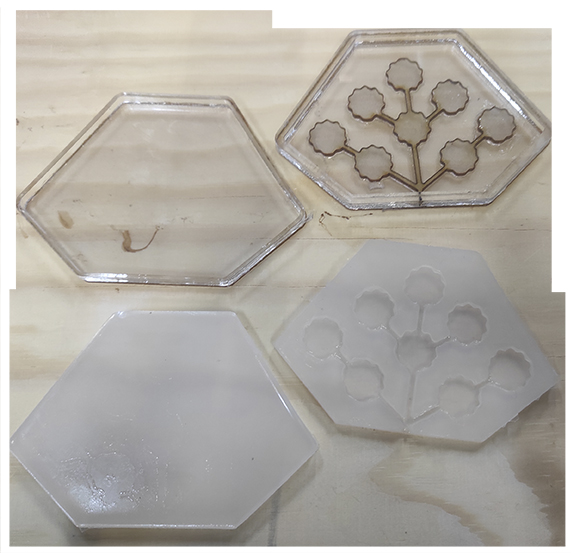
And this is the result after sticking both parts together:
Unfortunately, something went wrong when sticking both parts together and the channels dissapeared, sadly.
· Silicone Soft Robot BOM
This is the BOM (Bill Of Materials) if you work with silicone:
| Qty | Description | Price | Link |
|---|---|---|---|
| 1 | Ecoflex 00-30 Silicone Rubber | 42,68€ | https://www.amazon.com/-/es/Ecoflex-Silicona-Platino-Prueba-unidad/dp/B00CA5VY3U/ref=sr_1_2?__mk_es_US=%C3%85M%C3%85%C5%BD%C3%95%C3%91&crid=2VF9MNAC14W93&keywords=silicone+ecoflex+00-30+silicone+rubber&qid=1653643497&sprefix=silicone+ecoflex+00-30+silicone+rubber%2Caps%2C924&sr=8-2 |
| 1 | Thermo-Retractable Cable | 6,28€ | /www.amazon.com/560-tubos-termorretráctiles-aislamiento-termorretráctil/dp/B07P11GJMG/ref=sxin_14_pa_sp_search_thematic_sspa?content-id=amzn1.sym.bdb62de4-4445-472f-a46c-4743abbcf384%3Aamzn1.sym.bdb62de4-4445-472f-a46c-4743abbcf384&crid=2YENCN6DZRQ9P&cv_ct_cx=thermo-retractable+cable&keywords=thermo-retractable+cable&pd_rd_i=B07P11GJMG&pd_rd_r=c487cef2-16f5-46bf-ba9c-be93d0fcb1ef&pd_rd_w=kCnRZ&pd_rd_wg=Tq3sv&pf_rd_p=bdb62de4-4445-472f-a46c-4743abbcf384&pf_rd_r=ZN5V54M3QQWRC5KMHAG2&qid=1653576548&sprefix=termoretractil%2Caps%2C310&sr=1-1-8acce81c-1022-4788-a21d-98553f7388f3-spons&psc=1&spLa=ZW5jcnlwdGVkUXVhbGlmaWVyPUExM0hUWjFSRDdNOVpBJmVuY3J5cHRlZElkPUEwMTc0MTYxU0FHVEhURDhDSkVHJmVuY3J5cHRlZEFkSWQ9QTA2NTUyODYyMFNBUlgzQUFSNlBDJndpZGdldE5hbWU9c3Bfc2VhcmNoX3RoZW1hdGljJmFjdGlvbj1jbGlja1JlZGlyZWN0JmRvTm90TG9nQ2xpY2s9dHJ1ZQ== |
| 1 | Portable Air Pump for Inflatables | 6,19€ | https://www.amazon.com/-/es/TONUNI-extensi%C3%B3n-baloncesto-waterpolo-ejercicio/dp/B07FR65S9G/ref=sr_1_7?__mk_es_US=%C3%85M%C3%85%C5%BD%C3%95%C3%91&crid=16J06WGIJCZSH&keywords=small+air+pump+for+inflatables&qid=1653576598&sprefix=small+air+pump+for+inflatables%2Caps%2C351&sr=8-7 |
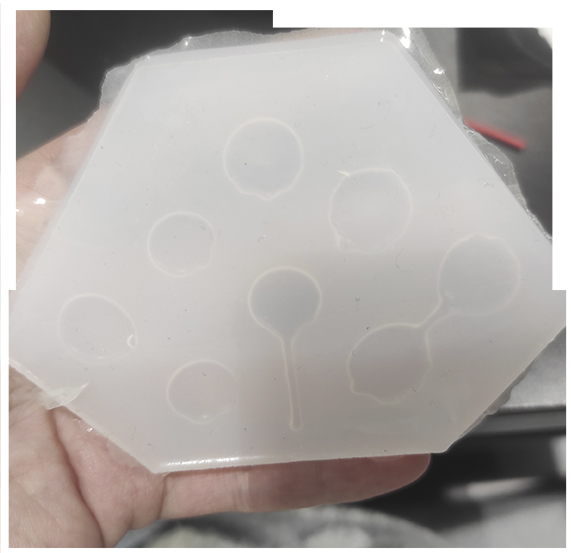
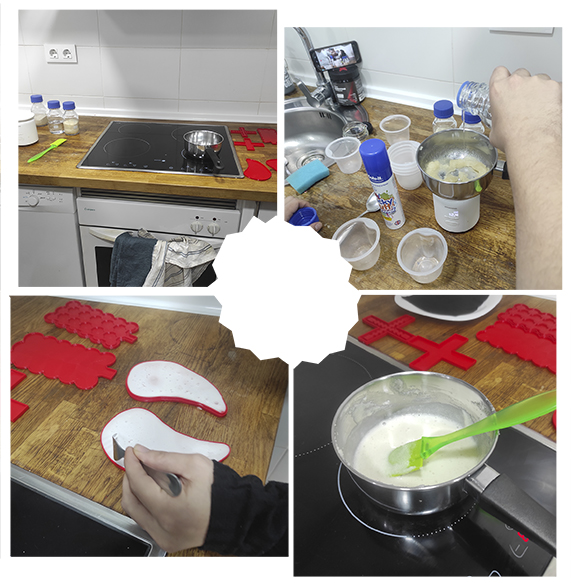
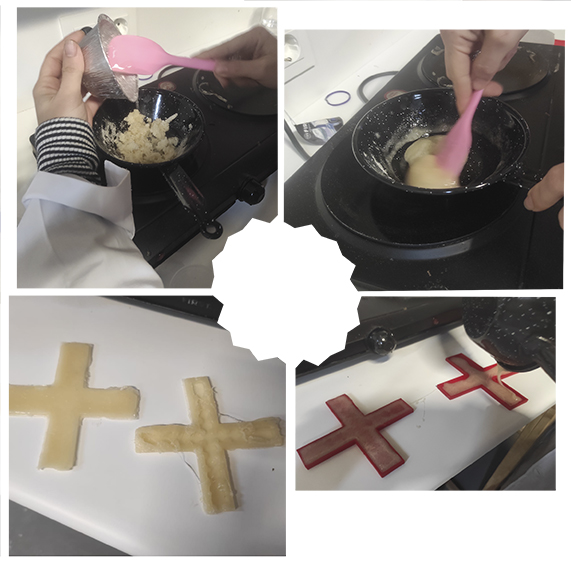
· Trying molds With BioSilicone
The day we worked together at my peer Edu's house, we really wanted to try a mold with BioSilicone. The molds that we used for doing so were taken from the lab (we didn't create them) since because of the problem with the floods we couldn't work there that week. Even though, we tried as many recipes as we could:
· GELATINE:
This is the Recipe we used: 1-2-2
- 2 Water
- 1 Gelatine
- 1 Glycerine
And these are the steps:
- 1. Mix all the ingredients together and warm up the mixture.
- 2. Put the biosilicone in the mold.
- 3. The silicone will dry almost instantly.
- 4. Prepare a little bit more of the biosilicone to glue the 2 parts.
This is a collage that explain the process we followed:
And these are the results we got:
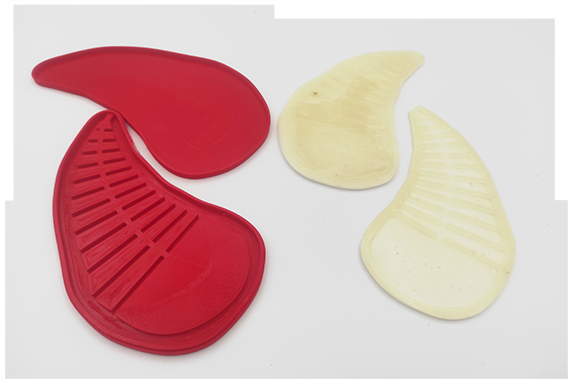
With this recipe we weren't capable of sticking both parts together, so we couldn't see any result.
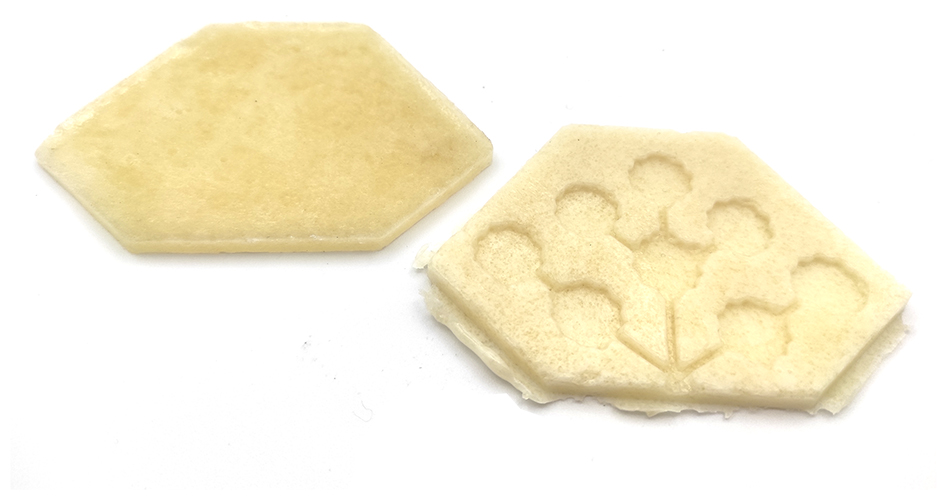
· AGAR:
This is the Recipe:
- 250 ml Water
- 25 ml Glycerine
- 25 gr Agar
And these are the steps:
- 1. Mix all the ingredients together and warm up the mixture.
- 2. Put the biosilicone in the mold.
- 3. Wait until the silicone dry.
- 4. Prepare a little bit more of the biosilicone to glue both parts.
These were the results of this try:
As you can see this try didn't work either, it dried too much, and of course, we couldn't sticked both parts together.
We did another last try with this different recipe:
· GELATINE:
This is the Recipe: 1-2-2
- 1 Water
- 2 Gelatine
- 2 Glycerine
And these are the steps:
- 1. Mix all the ingredients together and put the mixture in the microwave for about 10 sec.
- 2. Put the biosilicone in the mold.
- 3. The silicone will dry almost instantly.
- 4. Prepare a little bit more of the biosilicone to glue the 2 parts.

You can find this recipe in Amaya de Yavorsky's documentation page.
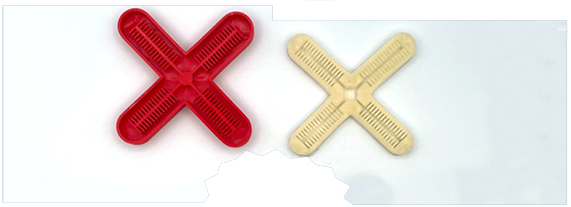
Here you can see the process that we followed:
I also wanted to do a try with my own laser cut mold and the biosilicone and this was my result, but again, I couldn't stick both parts together:
· BioSilicone Soft Robot BOM
This is the BOM (Bill Of Materials) if you work with Biosilicone:
| Qty | Description | Price | Link |
|---|---|---|---|
| 1 | Gelatine | 21,80€ | https://www.amazon.es/Gelatina-granulada-grado-profesional-neutro/dp/B087N96LF5/ref=sr_1_4?crid=4K3MCKB6WCW4&keywords=gelatina+1kg&qid=1643641858&sprefix=gelatina+1k%2Caps%2C171&sr=8-4 |
| 1 | Agar-Agar | 25,90€ | https://www.amazon.es/Agar-polvo-500g-123GELULES/dp/B06XK9HYSW/ref=asc_df_B06XK9HYSW/?tag=googshopes-21&linkCode=df0&hvadid=297850370121&hvpos=&hvnetw=g&hvrand=18018814127134400804&hvpone=&hvptwo=&hvqmt=&hvdev=c&hvdvcmdl=&hvlocint=&hvlocphy=20271&hvtargid=pla-603273362157&psc=1 |
| 1 | Glycerine | 13,95€ | https://www.amazon.es/Glicerina-Vegetal-1L-1kg-25/dp/B07ZKXBP4R/ref=sr_1_5?crid=3FBEV10FD4VU3&keywords=glicerina+1kg&qid=1643642044&sprefix=glicerina+1kg%2Caps%2C73&sr=8-5 |
| 1 | Thermo-Retractable Cable | 6,28€ | /www.amazon.com/560-tubos-termorretráctiles-aislamiento-termorretráctil/dp/B07P11GJMG/ref=sxin_14_pa_sp_search_thematic_sspa?content-id=amzn1.sym.bdb62de4-4445-472f-a46c-4743abbcf384%3Aamzn1.sym.bdb62de4-4445-472f-a46c-4743abbcf384&crid=2YENCN6DZRQ9P&cv_ct_cx=thermo-retractable+cable&keywords=thermo-retractable+cable&pd_rd_i=B07P11GJMG&pd_rd_r=c487cef2-16f5-46bf-ba9c-be93d0fcb1ef&pd_rd_w=kCnRZ&pd_rd_wg=Tq3sv&pf_rd_p=bdb62de4-4445-472f-a46c-4743abbcf384&pf_rd_r=ZN5V54M3QQWRC5KMHAG2&qid=1653576548&sprefix=termoretractil%2Caps%2C310&sr=1-1-8acce81c-1022-4788-a21d-98553f7388f3-spons&psc=1&spLa=ZW5jcnlwdGVkUXVhbGlmaWVyPUExM0hUWjFSRDdNOVpBJmVuY3J5cHRlZElkPUEwMTc0MTYxU0FHVEhURDhDSkVHJmVuY3J5cHRlZEFkSWQ9QTA2NTUyODYyMFNBUlgzQUFSNlBDJndpZGdldE5hbWU9c3Bfc2VhcmNoX3RoZW1hdGljJmFjdGlvbj1jbGlja1JlZGlyZWN0JmRvTm90TG9nQ2xpY2s9dHJ1ZQ== |
| 1 | Portable Air Pump for Inflatables | 6,19€ | https://www.amazon.com/-/es/TONUNI-extensi%C3%B3n-baloncesto-waterpolo-ejercicio/dp/B07FR65S9G/ref=sr_1_7?__mk_es_US=%C3%85M%C3%85%C5%BD%C3%95%C3%91&crid=16J06WGIJCZSH&keywords=small+air+pump+for+inflatables&qid=1653576598&sprefix=small+air+pump+for+inflatables%2Caps%2C351&sr=8-7 |
Downloadable Files
In this Downloadable Files Folder you can find all the files of this assigment.
References & Useful Links
These Previous Year's Students Inspired Me:
Useful Links
- Soft Robotics Lecture by Lily Chambers & Adriana Cabrera
- Recitation Embroidered Inflatables by Bruna Goveia
- Soft Robotics Tutorial Part I by Adriana Cabrera
- Soft Robotics Tutotial Part II by Adriana Cabrera
- SOFT MOTION AND LIQUIDS
- Feu et Bois