13. Skin Electronics
This week, we were introduced to Skin Electronics: yes, electronics on the skin - using the human as a base to conduct electricity and, for example, light up LED's. Some examples seem to be more for the daredevils amongst us such as conductive eyeliner:

Conductive eyeliner to control lights with a wink, credit: Katia Vega, lecture Fabricademy 2020
E-skin's are the next generation of wearables which can be used to monitor people's health concerning for example heart failure or diabetes:
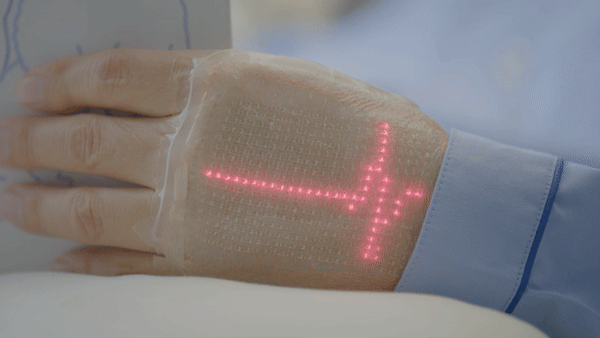
E-skin, Takao Someya group at the University of Tokyo, source vid & information:CNN
It's also possible to use yourself as your own human chip card as alumni Loes Bogers demonstrated last year:
13.1.1 Gemma
As we already learned how to control neopixels during Wearables week, it's just one step further to control them on the skin. For that, we need a small microcontroller such as the Gemma from Adafruit which is designed specifically to be incorporated into wearables projects, powered by an Attiny85 which can be controlled with the Arduino software using an usb. After that, you can apply the electronics to the skin using the same liquid latex as used by professional make up artists or use skin safe silicone or any other wearable construction you thought of.
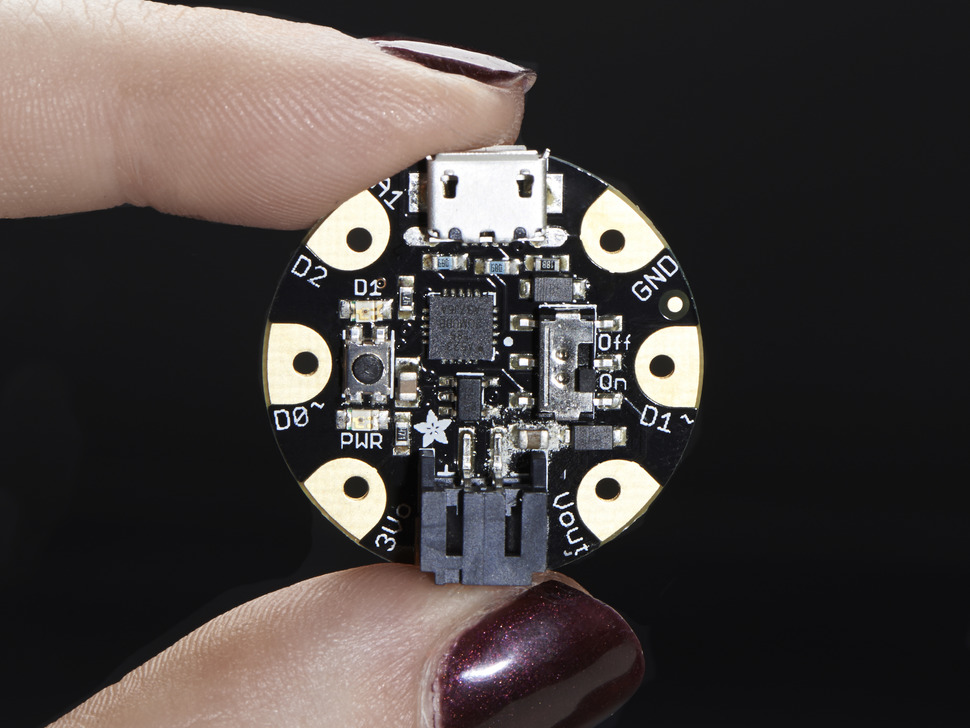
Gemma V2 by Adafruit, source:Adafruit
Controlling the Gemma proved to be tricky at the first attempts to connect to my laptop to try a simple Neopixel script. No matter what I tried, bootloader issues came up and the Arduino software did not register the Gemma. Read more about this issue here. Searching on Google, this problem seems to be a very common problem and is even explained on the product page:
"Deprecation Warning: The Gemma bit-bang USB technique it uses doesn't work as well as it did in 2014, many modern computers won't work well. So while we still carry the Gemma so that people can maintain some older projects, we no longer recommend it. Please check out the Gemma M0. It has built-in USB, more capabilities, and is comparable in price!"
It turned out that, because of compatibility issues, a 3.0 usb port doesn't work with the Gemma, so you have to work with a 2.0 usb port, meaning, you either have to use an older computer or switch to using a 2.0 usb hub. Isn't technology great? :')
After several attempts, I gave up and discussed with Cecilia to do a collective workshop in January to achieve better understanding and results for this week. Unfortunately, later that week, we went into total lockdown due to COVID measures which made it impossible to do a workshop at De Waag, amongst other reasons.
Update: I ordered the Flora instead and if I get around to it, I might do another attempt
Useful links
Code Example
Use the three backticks to separate code.
// the setup function runs once when you press reset or power the board
void setup() {
  // initialize digital pin LED_BUILTIN as an output.
  pinMode(LED_BUILTIN, OUTPUT);
}

// the loop function runs over and over again forever
void loop() {
  digitalWrite(LED_BUILTIN, HIGH);   // turn the LED on (HIGH is the voltage level)
  delay(1000);                       // wait for a second
  digitalWrite(LED_BUILTIN, LOW);    // turn the LED off by making the voltage LOW
  delay(1000);                       // wait for a second
}
Gallery

Video
From Vimeo
Sound Waves from George Gally (Radarboy) on Vimeo.