Documentation
▪️ What I made??
🗹 Learn how to upload images, videos, references and how to use markdown and gitlab
🗹 Customize my website and document how you did it
Learning about Mkdocs and GitLab
I followed the tutorials from Julian and read the information from the Gitlab Documentation Tutorial with that I made my first changes on the structure of the page. Then I got inspired by the documentation from Diane Walkin,she also has some really useful tips to personalize your theme.
I have to say that it was easier than I think it would be. Buuuuut.... I had some problems that I didn't know how to fix at the beggining. If you want to learn more you can to look for other's documentation and some tutorials and don't worry because you can always ask your local instructor or ask anything on the chat of Mattermost. In this page, I'm sharing the things I learned that helped me to create my documentation.
▪️ Building the page with Mkdocs
After some tries this is how my final code looks like:
# Replace the text below to customize your site
site_name: MICHU FLORES
site_description: MICHELLE FLORES Fabricademy site
site_url: https://class.textile-academy.org/2022/michelle-flores/
repo_url: https://gitlab.fabcloud.org/academany/fabricademy/2022/students/michelle-flores
site_author: Michelle Flores
copyright: 2021 - 2022 / by MICHELLE FLORES

nav:
  - <font size="4" color="#05F2F2"> About Me </font>: index.md
  - <font size="3" color="#80278C"> 1 | State of Art </font>: assignments/week01.md
  - -Documentation: assignments/documentation.md
  - <font size="3" color="#80278C"> 2 | Digital Bodies </font>: assignments/week02.md
  - <font size="3" color="#80278C"> 3 | Circular Fashion </font>: assignments/week03.md
  - <font size="3" color="#80278C"> 4 | Biochromes </font>: assignments/week04.md
  - <font size="3" color="#80278C"> 5 | E-textiles </font>: assignments/week05.md
  - <font size="3" color="#80278C"> 6 | Biofabrication </font>: assignments/week06.md
  - <font size="3" color="#80278C"> 7 | Computational Couturing </font>: assignments/week07.md
  - <font size="3" color="#80278C"> 8 | Wearables </font>: assignments/week08.md
  - <font size="3" color="#80278C"> 9 | Textile Scaffold </font>: assignments/week09.md
  - <font size="3" color="#80278C"> 10 | Fibers to Fabric </font>: assignments/week10.md
  - <font size="3" color="#80278C"> 11 | Implications/Aplications </font>: assignments/week11.md
  - <font size="3" color="#80278C"> 12 | Soft Robotics </font>: assignments/week12.md
  - <font size="3" color="#80278C"> 13 | Skin Electronics </font>: assignments/week13.md
  - <font size="4" color="#F21365"> Final Project </font>: 'projects/final-project.md'
  - -Storytelling: projects/about.md
  - -Ideation + References: projects/ideation.md
  - -Design + Development: projects/development.md
  - -Prototyping: projects/prototyping.md
  - -Project log: projects/projectlog.md
  - -Extensive documentation: projects/electronics.md
  - -Next Steps: projects/future.md


theme:
  features:
  - navigation.section
  - navigation.top

  name: material
  font:
    text: 'handlee'
    code: 'ubuntu mono'
  icon:
    logo: material/creation

  # try other colors
  palette:
    primary: "cyan"
    accent: "deep purple"

  highlightjs: true

extra_css:
  - 'stylesheets/extra.css'

markdown_extensions:
  - admonition
  - codehilite:
      guess_lang: false
  - toc:
      permalink: false
Useful links:
▪ Guide to creating and distributing custom themes
To change the font I used Google Fonts page. Also I changed the icon that is located on the left top of the page. I selected the colors for the bar above. Read about icons
Extra CSS
I added one stylesheet CSS, in docs/stylesheets/extra.css. This file is then referenced at mkdocs.yml file using the following lines:
extra_css:
  - 'stylesheets/extra.css'
Here are useful mkdocs-material that I added to my stylesheet.
p { font-size: 18px }

ul { font-size: 17px }

.md-grid {
  max-width: 1080px;
  text-align: left;
}

h1{
  font-weight: 600;
  text-align: center;
}

h2{
  font-weight: 400;
  text-align: left;
  font-weight: bold;
}

.callout{
    background-color: #f8d363;
    padding: 1em;
    border-radius: 5px;
    margin: 2em 0;
    display: flex;
}

.callout2{
    background-color: #852c916c;
    padding: 1em;
    border-radius: 5px;
    margin: 2em 0;
    display: flex;
}

.callout3{
    background-color: #e6eceed7;
    padding: 1em;
    border-radius: 5px;
    margin: 2em 0;
    display: flex;
}

.highlight{
    font-weight: 600;
}
⬇️ This are the lines you need to create the purple block above.
<div class="callout2">
    <div>
      <strong> Callouts </strong>
    </div>
</div>
HTML lines - They are useful when your are writting inside the callouts. For example to list items:
*   Bird
*   Magic
this will turn into:
<ul>
<li>Bird</li>
<li>Magic</li>
</ul>
Markdown treats asterisks (*) and underscores (_) for example:
*single asterisks*

_single underscores_

**double asterisks**

__double underscores__
this will turn into:
<em>single asterisks</em>

<em>single underscores</em>

<strong>double asterisks</strong>

<strong>double underscores</strong>
Useful links for HTML:
▪ Máster en desarrollo web - Neetwork (Spanish)
Adding content for each assignment
I checked the necessary syntax for writting, as well for paragraphs as for tables, images, links and so on. There's also how to write in the HTML output
I always use a palette for making my moodboards or any other visual content, so I decided to use the colors that are in the image below, I got them from the Adobe Color tool
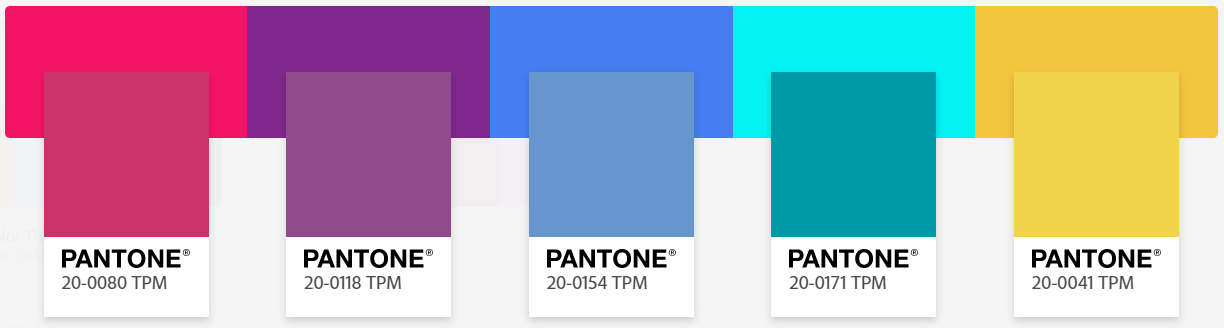
Also you can look for the #code for each color so you can use it to change the color of the font in your documentation. Just like this:
<font size="3" color="#05F2F2"> water </font>
I didn't want to work locally by cloning the repository, I prefer to keep building my documentation on the website. There are two ways for editing your assignments' documentation:
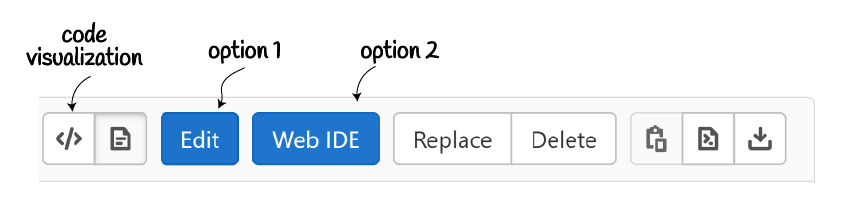
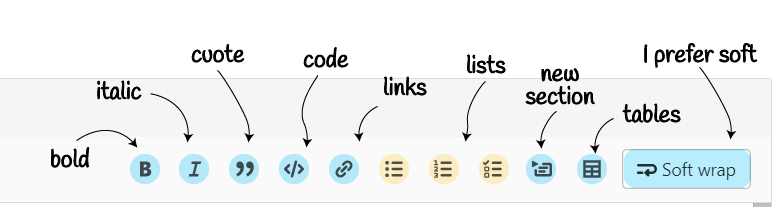
The first option is more directly and, to start, is easier to put bold font or italic font and also tables. Here you have all this ⬇️ options, then you just add the information and voila!
And there's a second option to do it. The important thing is that here you are able to move through the other assignments and edit different files in only one commit. Also you can updload images and other files that you want (except videos).
After adding content, images or editing anything, you have to commit the changes on the main branch and then you can see the changes on the website.
In each week it's necessary to upload lots of photos or videos in order to show everything you did and learned during the week. So here I describe the tools/codes that I use.
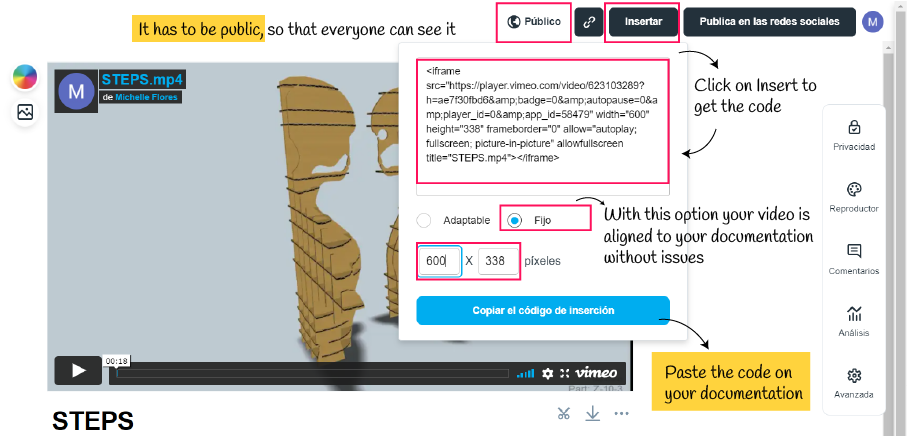
▪️ 📹 Upload Videos
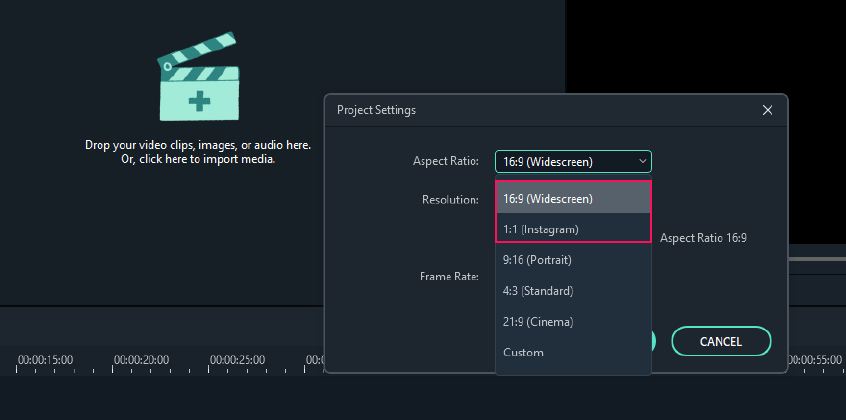
I use Wondershare Filmora and Clipchamp to edit my videos easily. The aspect radio I usually set up is 1:1 but is kind of better to use 16:9, anyway you should always record your videos horizontally.
Then I upload the video first to Vimeo and with few steps you can get the code to paste it on your documentation (when is necessary I use Video Smaller to compress the videos).
▪️ 🔄 Upload GIFs
I make GIFs also in Filmora but on the web there are many pages where you can make you GIFs using videos, photos and adding more content to it. I like this one called Gifmarker.me. Then you need to copy the insert code as done with vimeo, but you get the link directly from the web page.
▪️ 📷 Upload images
For almost everything I use Adobe Illustrator to add information to the photos, create vectors and I use a template with weight = 1080 px, this is really useful because you don't waste time trying to find the perfect size for the content you're gonna upload to you documentation and I only change the height of it.
This is how I organize every week on Illustrator (or you can do it with Adobe Photoshop, Canva or any other digital tool).
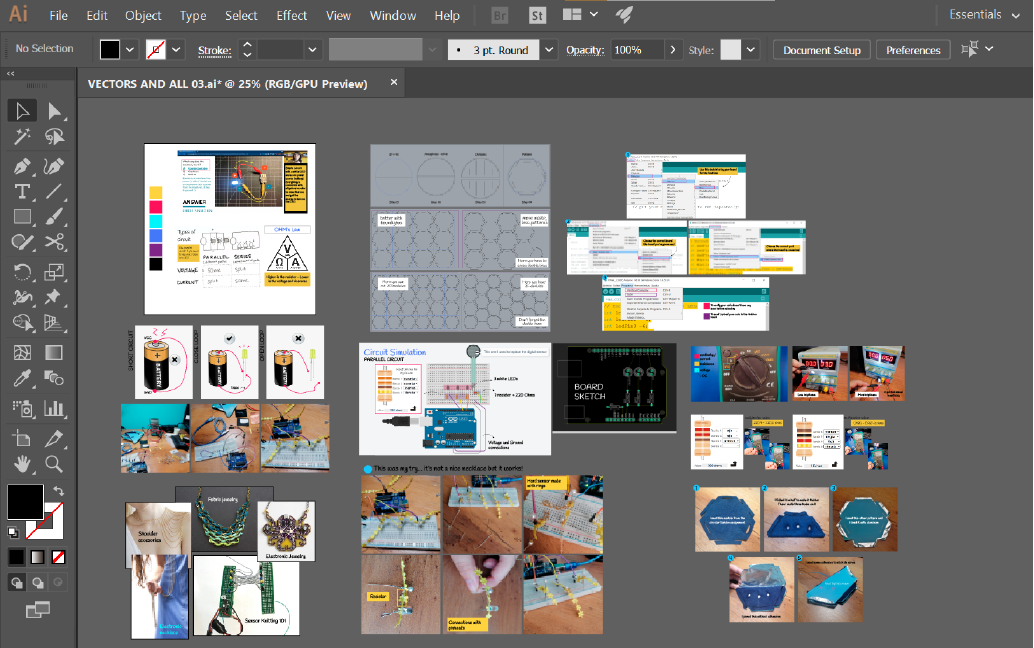
Also it's important to take the pictures of your work and save it on the cloud while you're still working. And to be sure you don't lose the resolution of the content I recommend to import the photos directly from Illustrator. Before uploading, if it's necessary, I compress the content using TinyPNG
Want some tips?
If you make more folders to organize your images and documents, you'll have to say the code that you want to access to the file in that specific folder. I made a folder for the homepage and others for each week

Use this code ⬇️ when you want to look your photos on the page of each week (adding the two dots at the beggining)

If you only add the image like this ⬇️ it won't appear

▪️ 📁 Upload files
I made folders for each week (when I needed) and after uploading the file I got the insert code by doing a right click on the download button and then clicking on copy link.
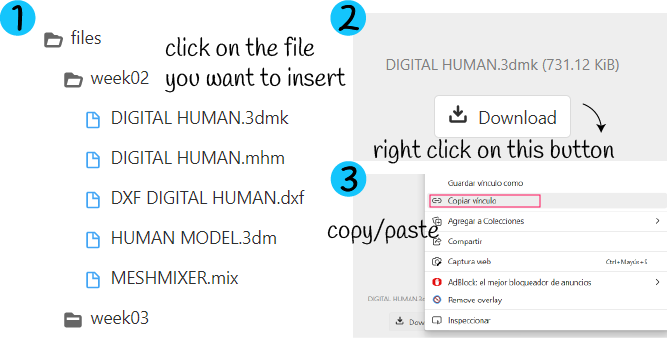
This file is added in the documentation just like this:
[Name of the file](paste here the link)
▪️ Emojis
I was looking forward icons from Bootstrap but I didn't get them. Instead, I used this link to copy/paste emojis