BioFabricating Materials
📅This week started on October 25th with the recitation from MaterialDriven given by Adele Orcajada. This week we're talking a lot about plastics, bioplastics, bioresins and more materials.
▪ What I made?
🗹 Produce crafted materials and grown materials
🗹 Document the recipes, the ingredients and process
🗹 Name the materials, classify them by typology
First, what are plastics? They are actually polymers and they consist on a chain of monomers (poly=many monomers), so there are several combinations and ways to obtain polymers with different properties. Buuut... Which is the problem with traditional plastic?
We had the class from Cecilia Raspanti and this week is full based on material experimentation. There were mentioned 8 issues:
- It never goes away
- Spoils out groundwater
- Threathens wildlife
- Posions our food chains
- Affects human health
- Attracts other pollutants
- Piles up in the environment
- Costs billions to abate
🗒️ Notes from the class
▪ Gelatine is more elastic than Agar
▪ Agar melts almost inmediately when is in touch with heat
▪ Alginate is more resistant to heat and this is water proff but is more tricky to do this. The more water you have the more diificult to mantein the shape because then water evaporates and the size decrease
▪ BIO materials
BIO plastic/resins/foam and other BIO materials are on trend actually but all of them are as controversial as the usual plastic and other industrial materials. As in circular fashion week, I think this topic is highly controversial specially because the bio/compostable/degradable plastics aren't the full solution for the issues of plastic/contamination in the industry. Anyway, neither type of plastic can win this battle, but I find interesting that you can take advantage of waste and other resources that are clearly forgotten and it's amazing what you can generate using that waste. Also it's a big field for exploring the properties of the material using alternative raw materials.
Important glosary ❗
| BIO BASED | BIO DEGRADABLE | BIO COMPOSTABLE |
|---|---|---|
| that are just made with natural resources but it doesn't mean it has a trazability | degrade in an specific context | they're fully made with nature sources and has trazability |
This assignment I want to refresh my last experience with biofabrication, and I'm also expecting to explore more the agar that I haven't use before. I looked through all the ingredients and materials needed, and went to buy/find them at home or at local places.
▪ My first try with BIO Materials
Months ago I was making some BIO plastics for my plastics class at University. These were made from gelatine recipes, gelatine is made with recycling pig skin of the meat industry (is that really sustainable?) and the plasticizer that is really important is the glycerine which is mostly used as a vegetable sugar that you can find easily in a drogstore.
According to the amount of the ingredients in each recipe you can see different properties and behavior of the polymer. The materials I used ⬇️
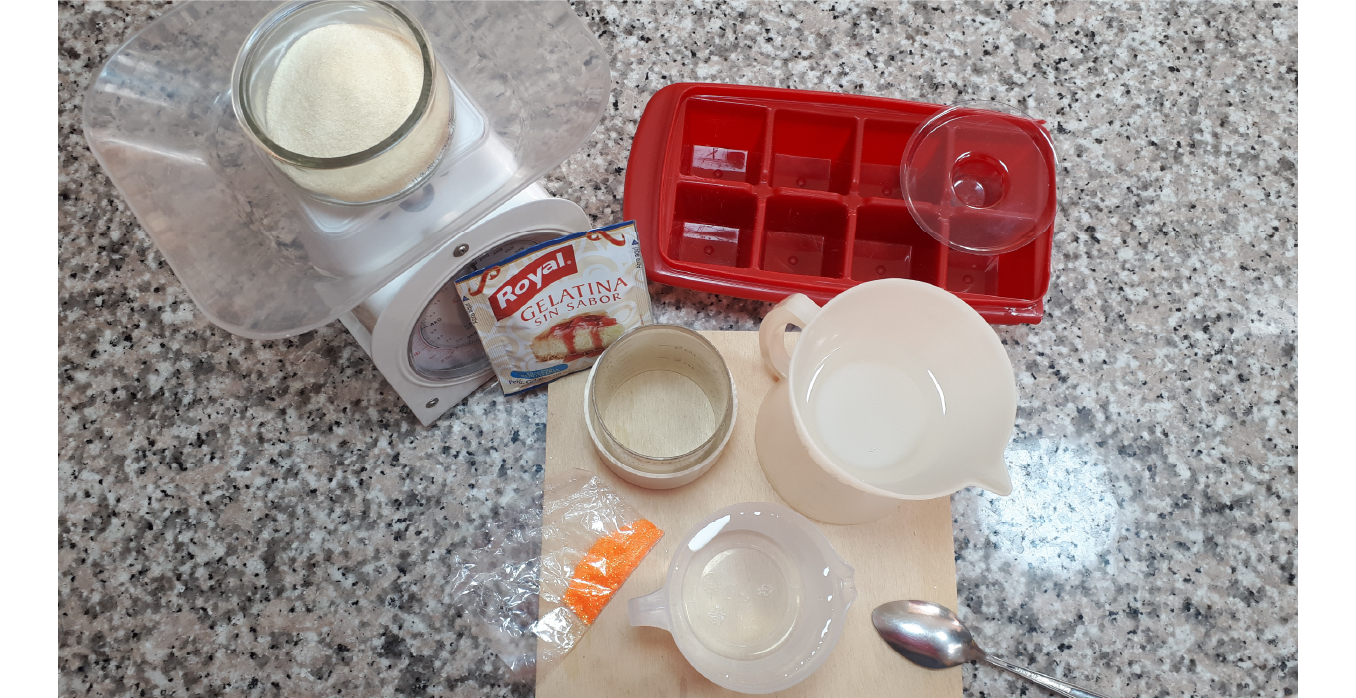
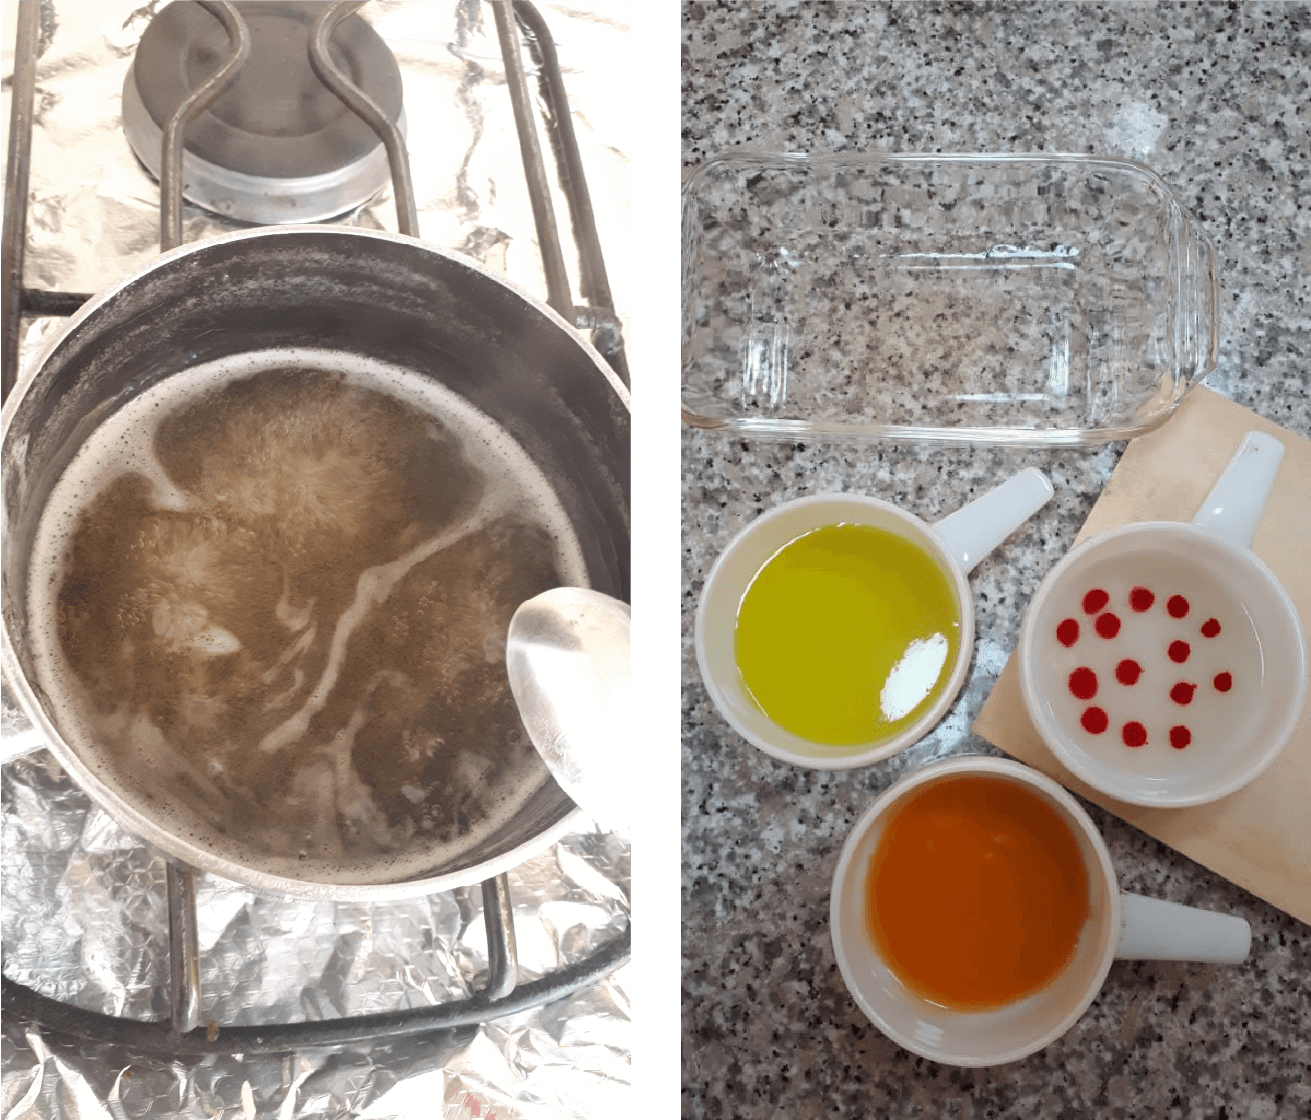
Steps I followed:
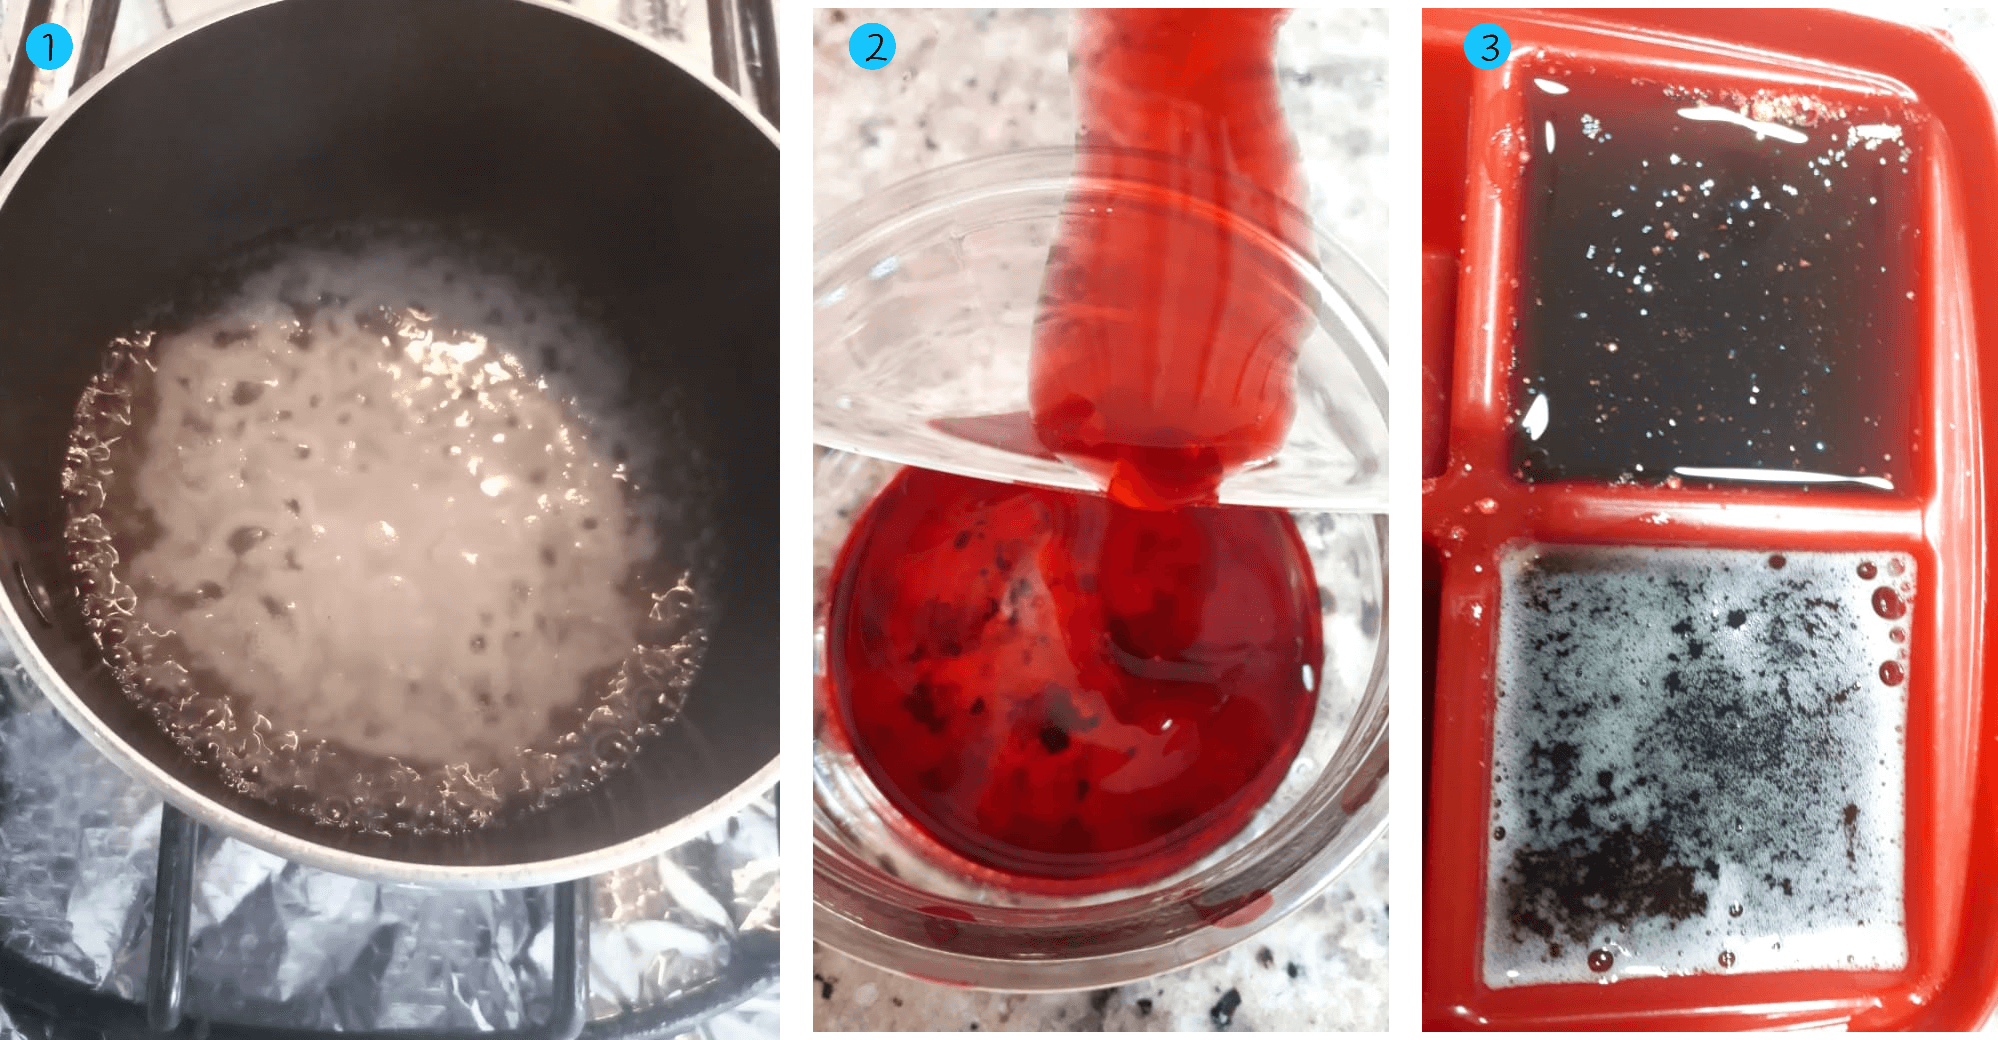
- Heat the water, until it is warm
- Add the glycerine and stir slowly
- Add the polymer and stir slowly during 5 minutes or until it starts to make bubbles (don't let it boil). Disolve very well de polymer and then add the pigment (in case you want a color)
- Revome from heat and stir for 2 minutes
- Pour the mixture in the mold, try not to make bubbles by pouring from a high position and without moving the pot from the center of the mold
- Let the recipe dry in a place without moving it
- Unmold when it is not cold to the touch
Recipes I followed:
| Polymer | Plasticizer | Solvent | Additive | Notes |
|---|---|---|---|---|
| 48 g gelatine | 12 g glicerine | 240 ml tap water | blackberry ink | I added the link in a small amount of the mixture |
Outcomes
| Surface sight / touch | Properties | Resistance | Notes | ⌛ dry |
|---|---|---|---|---|
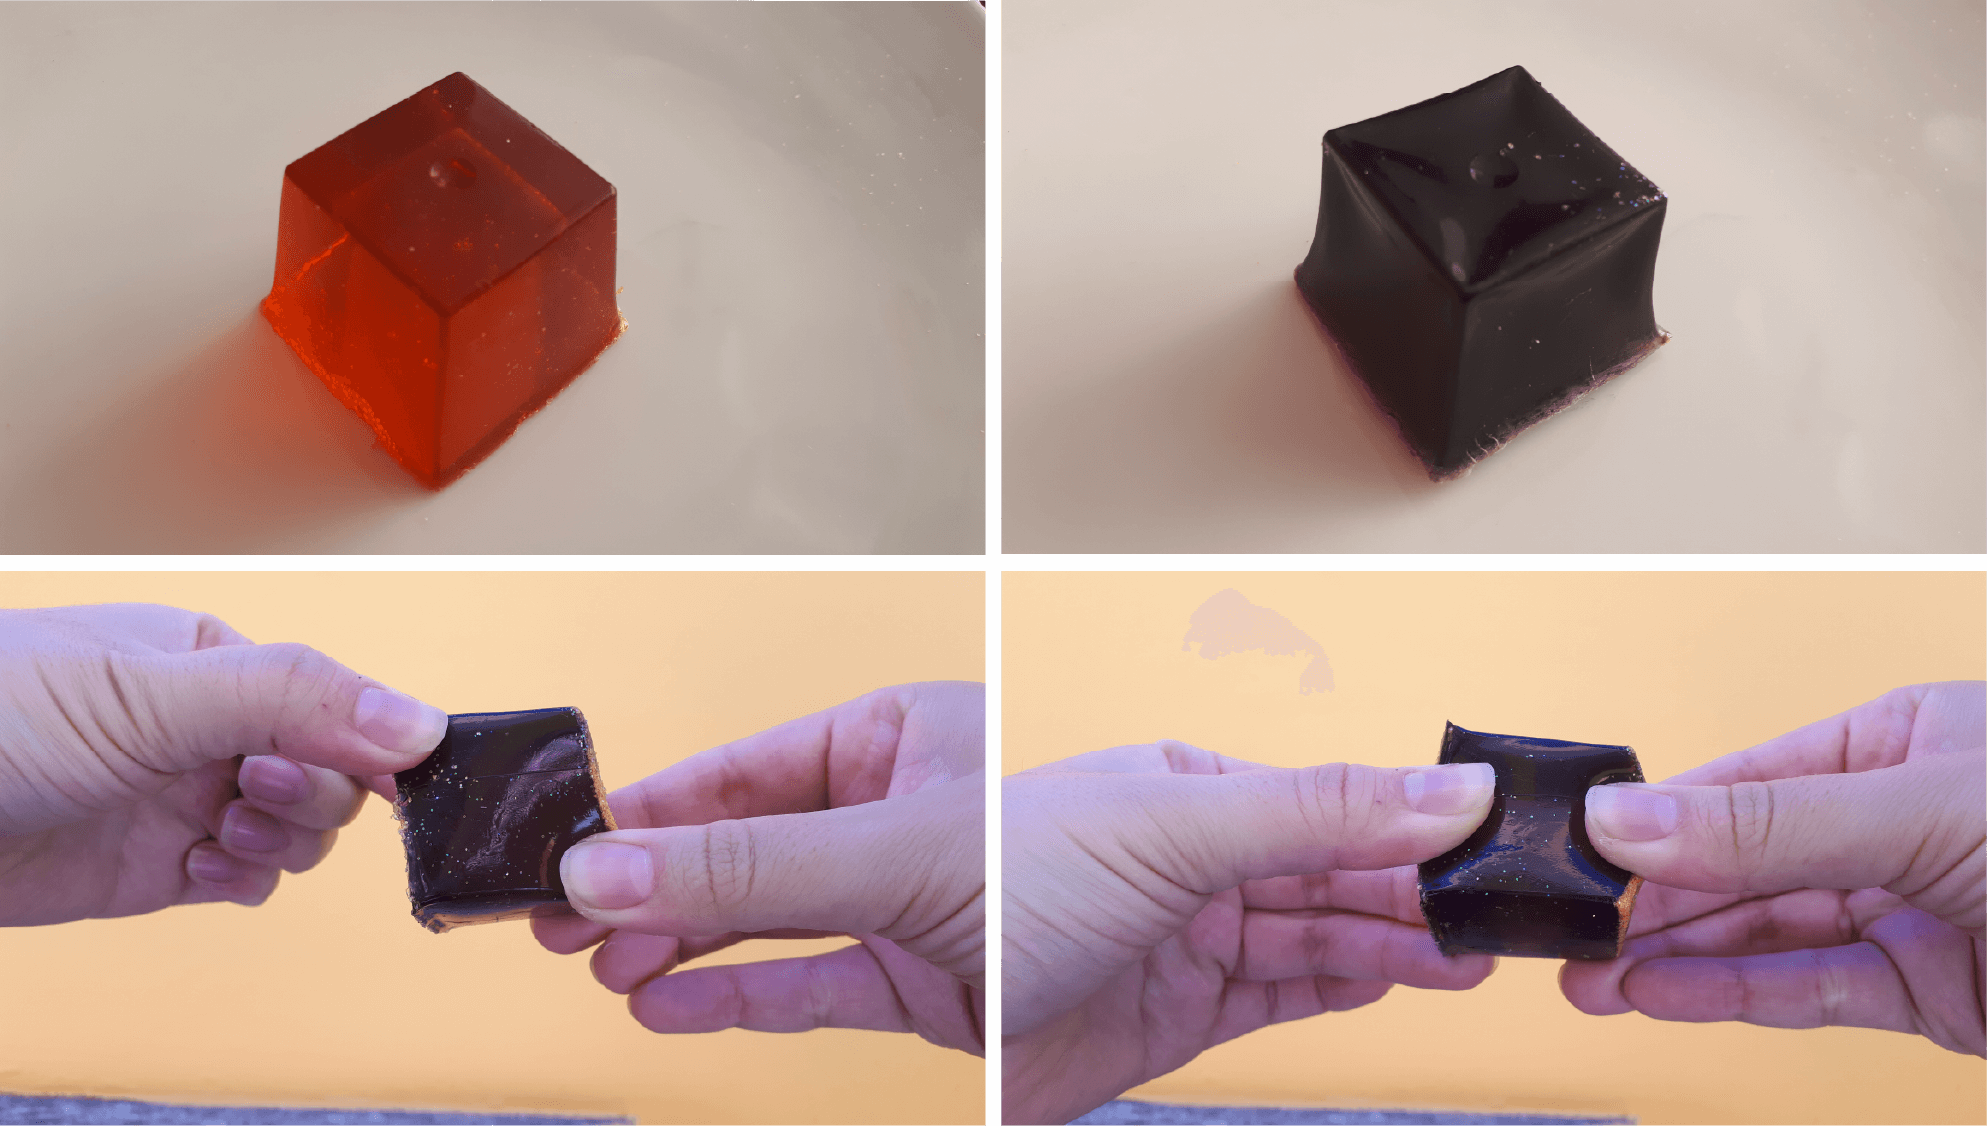
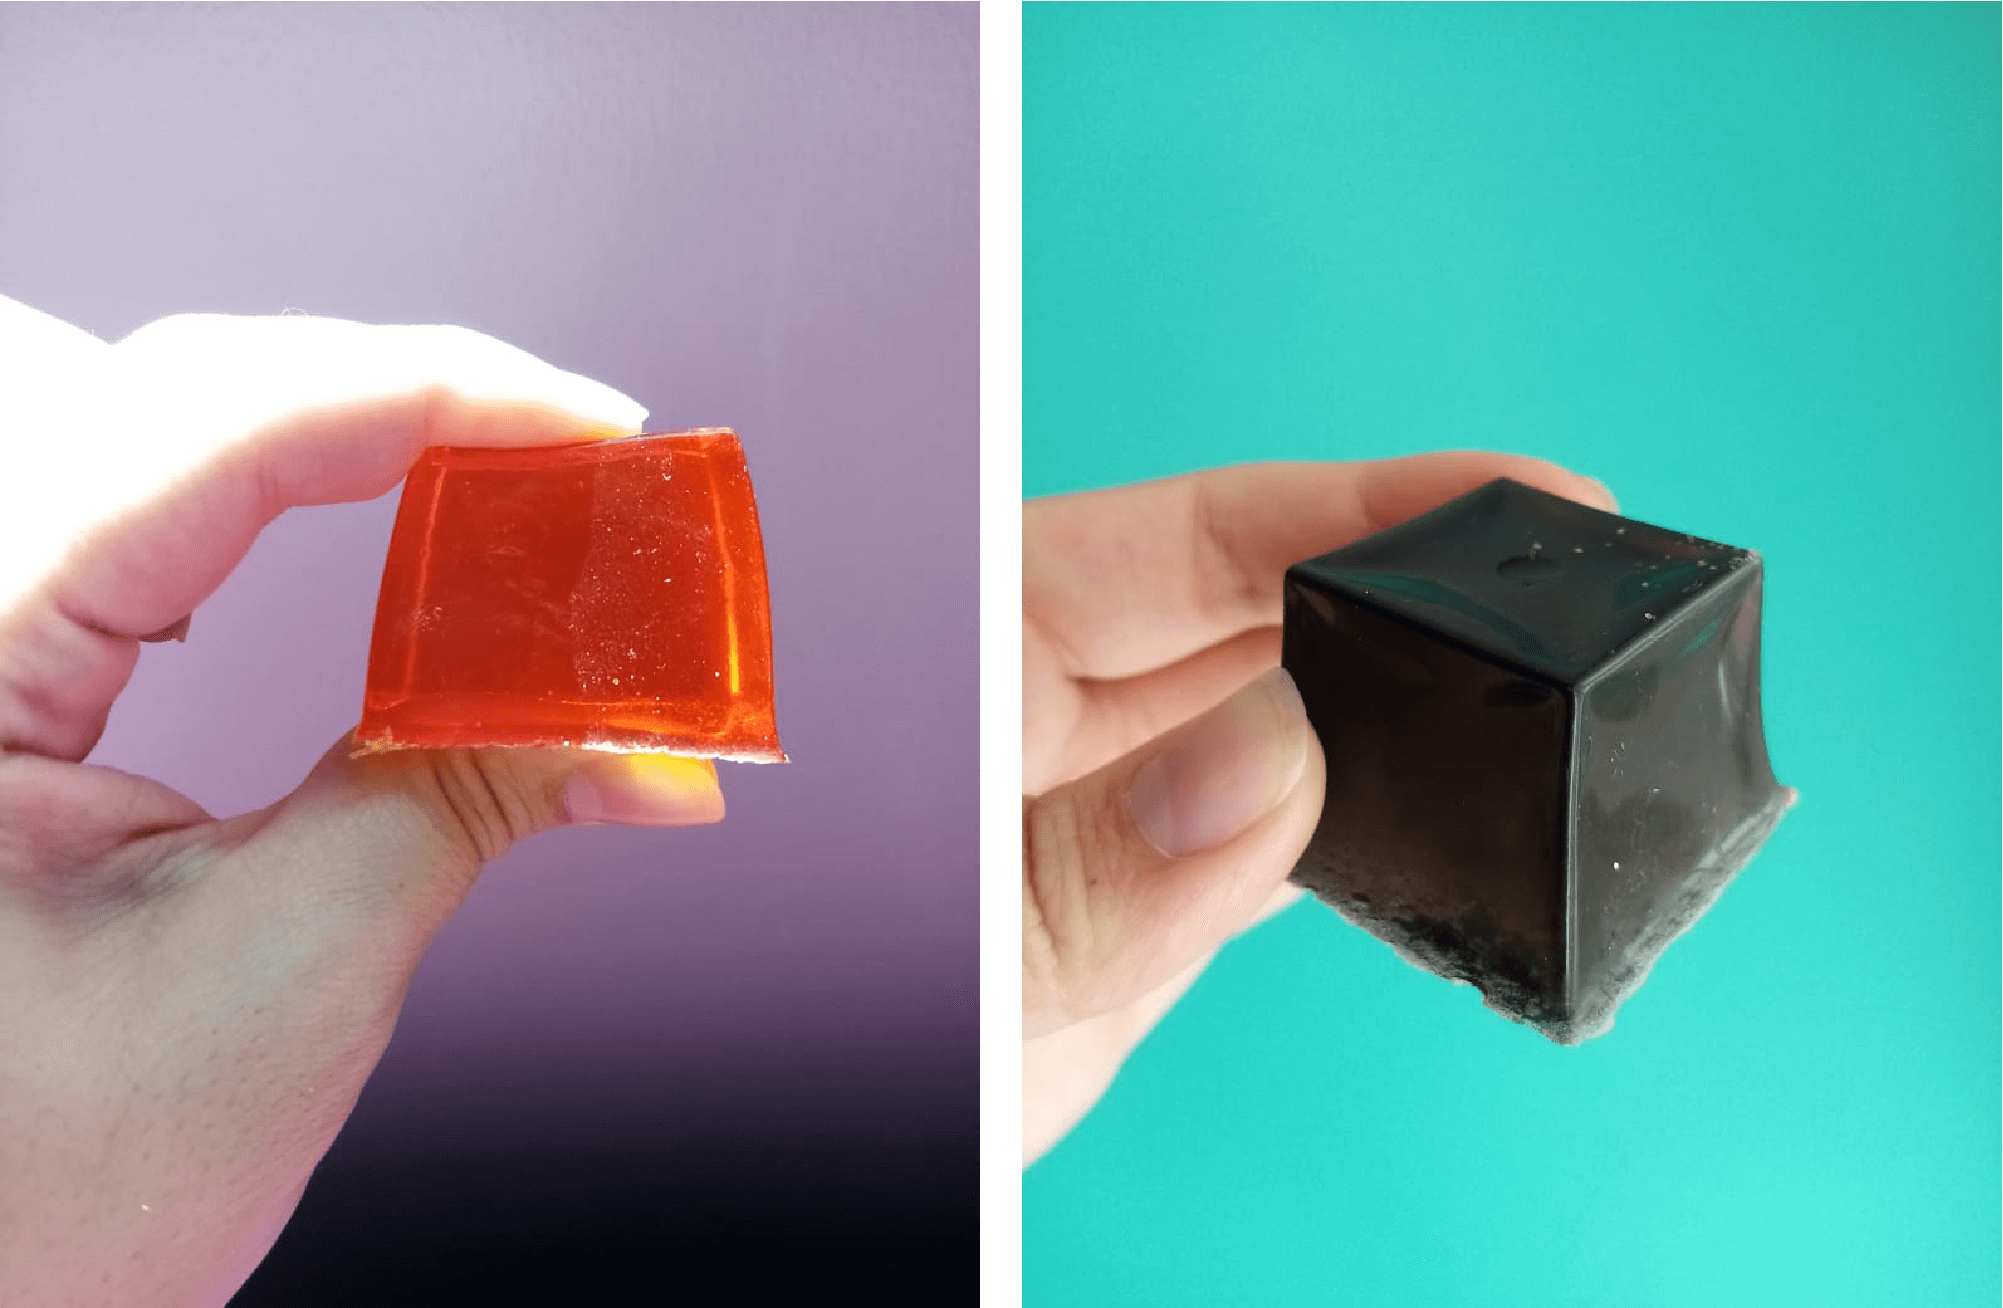
| smooth/traslucent/shiny | kind of rigid/no stretch/strong/ kind of heavy/compression | not tested | eventually it starts to get hard and becomes very rough | 2 days |
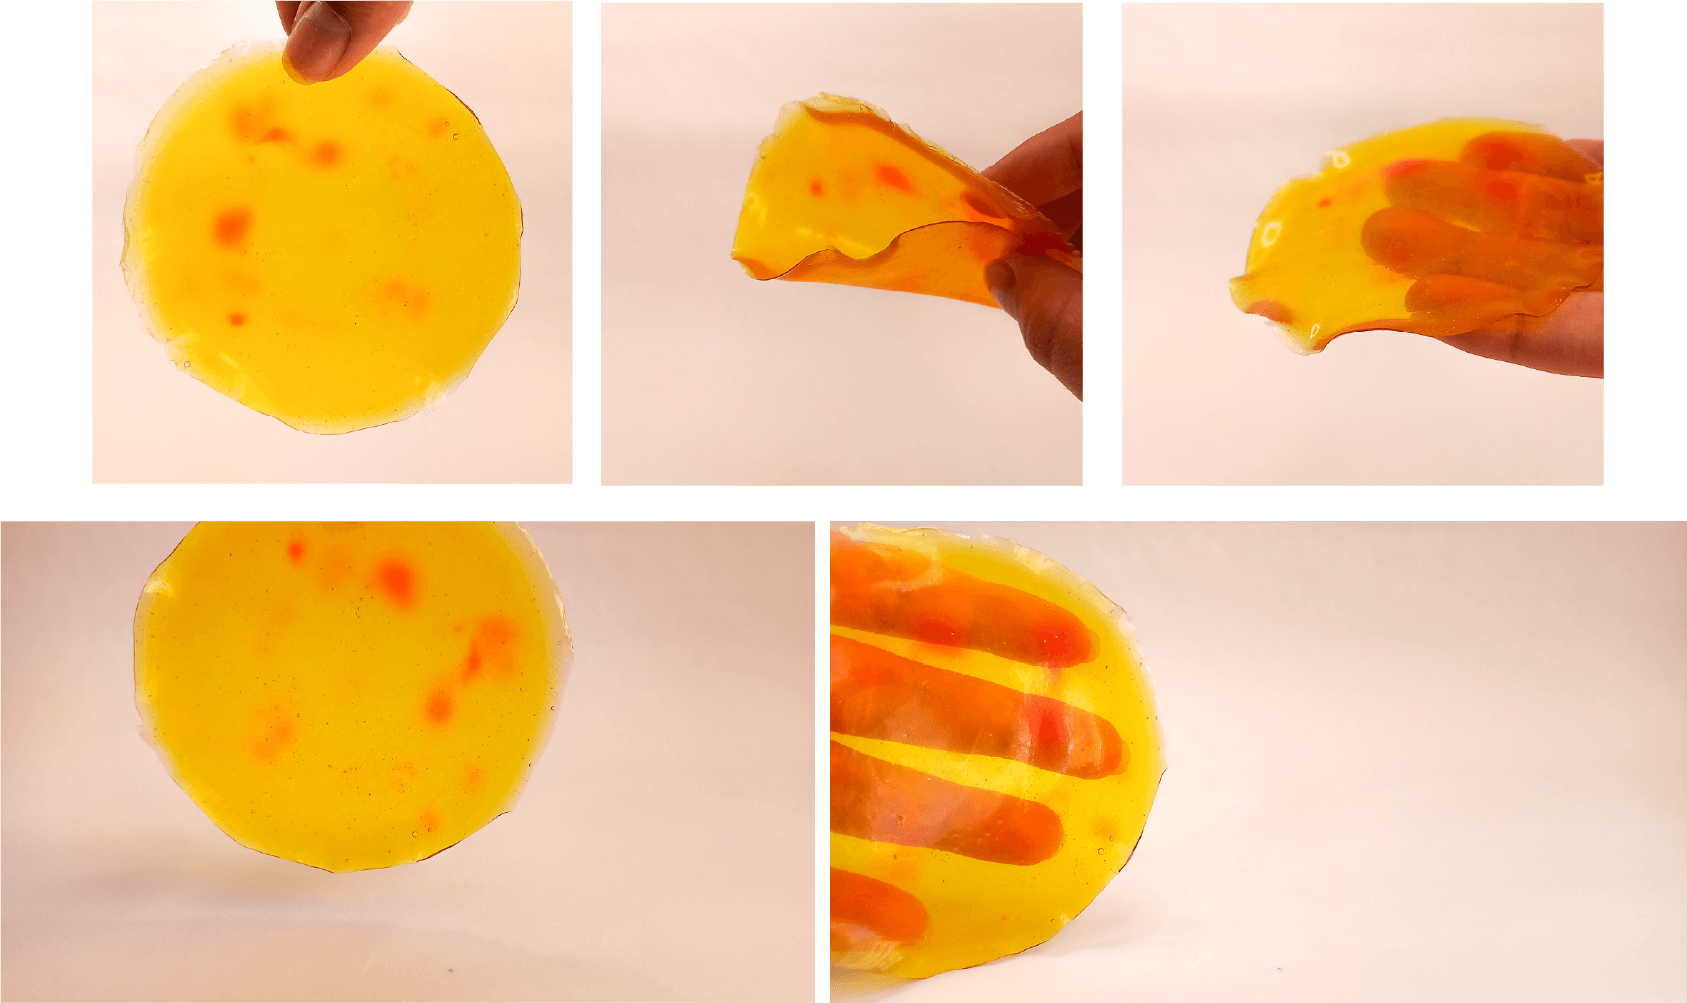
| Polymer | Plasticizer | Solvent | Additive | Notes |
|---|---|---|---|---|
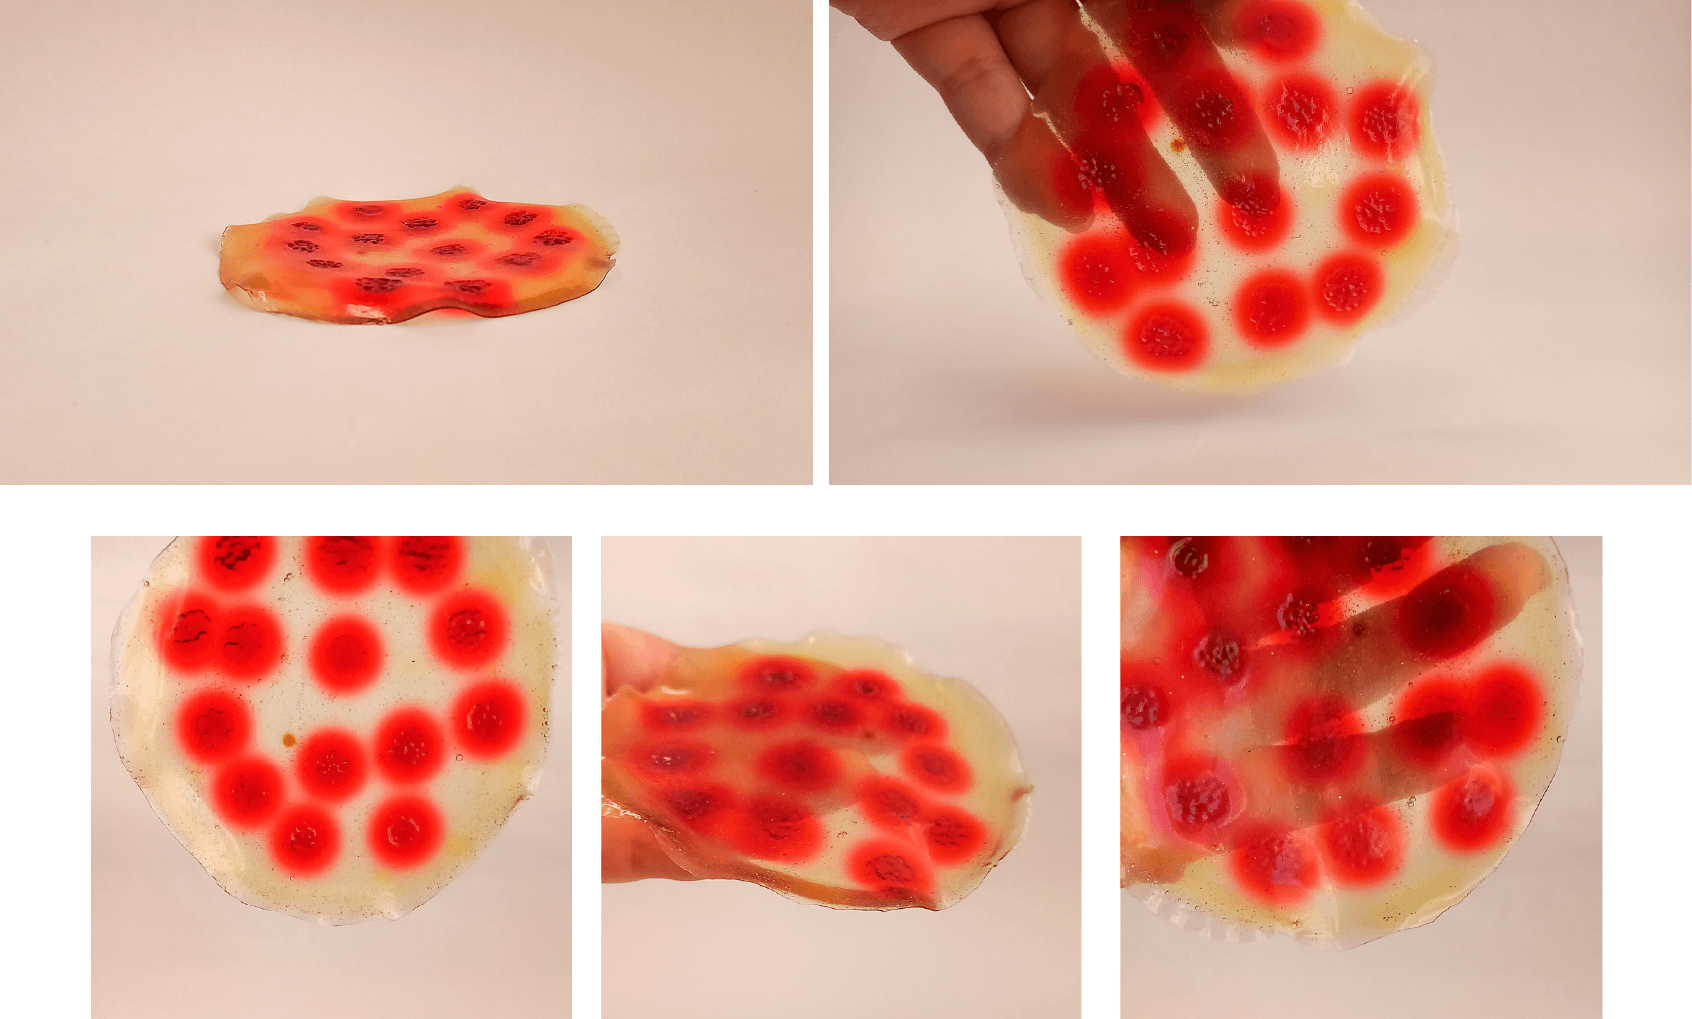
| 48 g gelatine | 24 g glicerine | 240 ml tap water | food colorant | when adding the colorant before pouring into the mold it remains as droplets in the mixture and can no longer be dissolved |
Outcomes
| Surface sight / touch | Properties | Resistance | Notes | ⌛ dry |
|---|---|---|---|---|
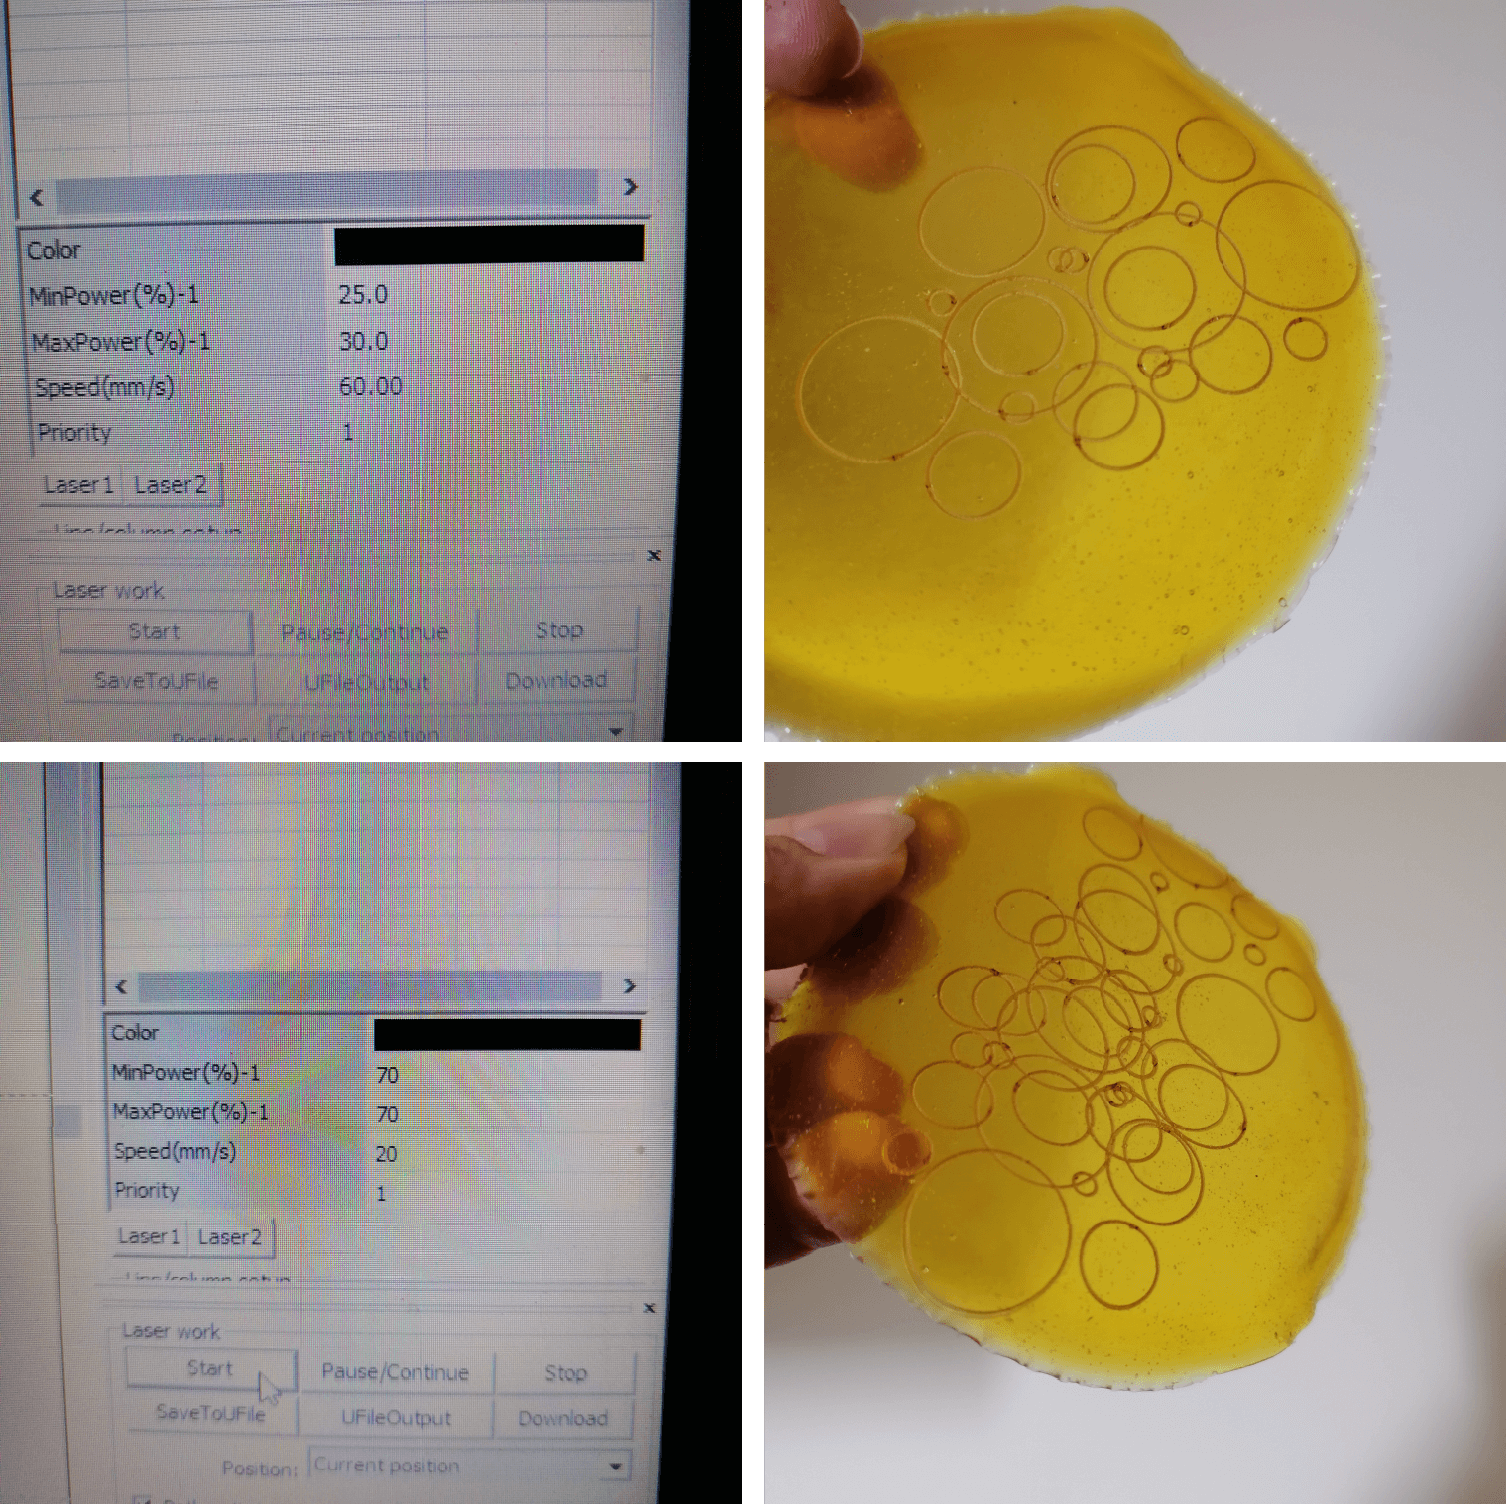
| smooth/texture/translucent/shiny | bendable/stretch/ligth weigth | 💧 no / 🔥 laser cutter | the edges were reduced by a 10% | 2 days |
Some months later...
I kept both materials together and one of them was stained with dye, the properties are still the same as when they were first dried
🗒️ Pros
- You can put the mixture in many surfaces with different shapes and textures, but be careful when you put it over wood, paper and some textiles.
- You will get different performances by changing the dosages of the ingredients, this is by nature of the polymers
- You can get different transparencies
- Doesn't take too long to get completely dry
🗒️ Cons
- It smells particularly bad, especially while preparing the hot mixture
- Don't resist too much heat and when you cut in with the laser cutter it also smells bad
- While it dries it tends to shrink
- It takes a "long" time to dry, so be patient
About the facility for it to dissolve in water I am not sure if it is an advantage or disadvantage because: to be sustainable in the long term it should be durable and not be able to dissolve. by dissolving, it could still be used to form a material again thougth
▪ Inspiration
▪ Materiom
New recipes 🧫
After the final project presentation I finished this assignment by doing some new recipes that I've not try before. This time I'm principally using agar to make the different materials
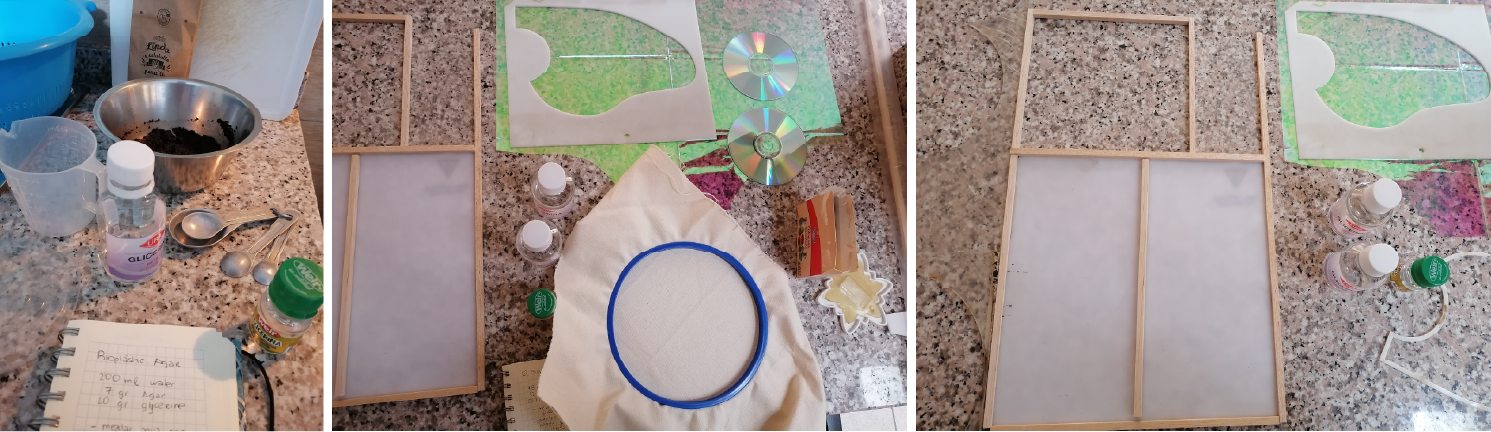
Tools ⬇️
I'm using different kinds of molds and surfaces like textiles, acrylic, wood and marble. I'm reusing some materials from others assignments and I made some frames with balsa sticks.
▪ Gelatine
Steps I followed:
- Mix the water + glycerine (before heat)
- Start heating and add the polymer
- Whisk it for 5 minutes
- Add the pigment and stir slowly
- Pour the mixture in the mold after 1 minute
- Let the recipe dry in a place without moving it
- Unmold when it is not too cold to the touch
| Polymer | Plasticizer | Solvent | Additive | Notes |
|---|---|---|---|---|
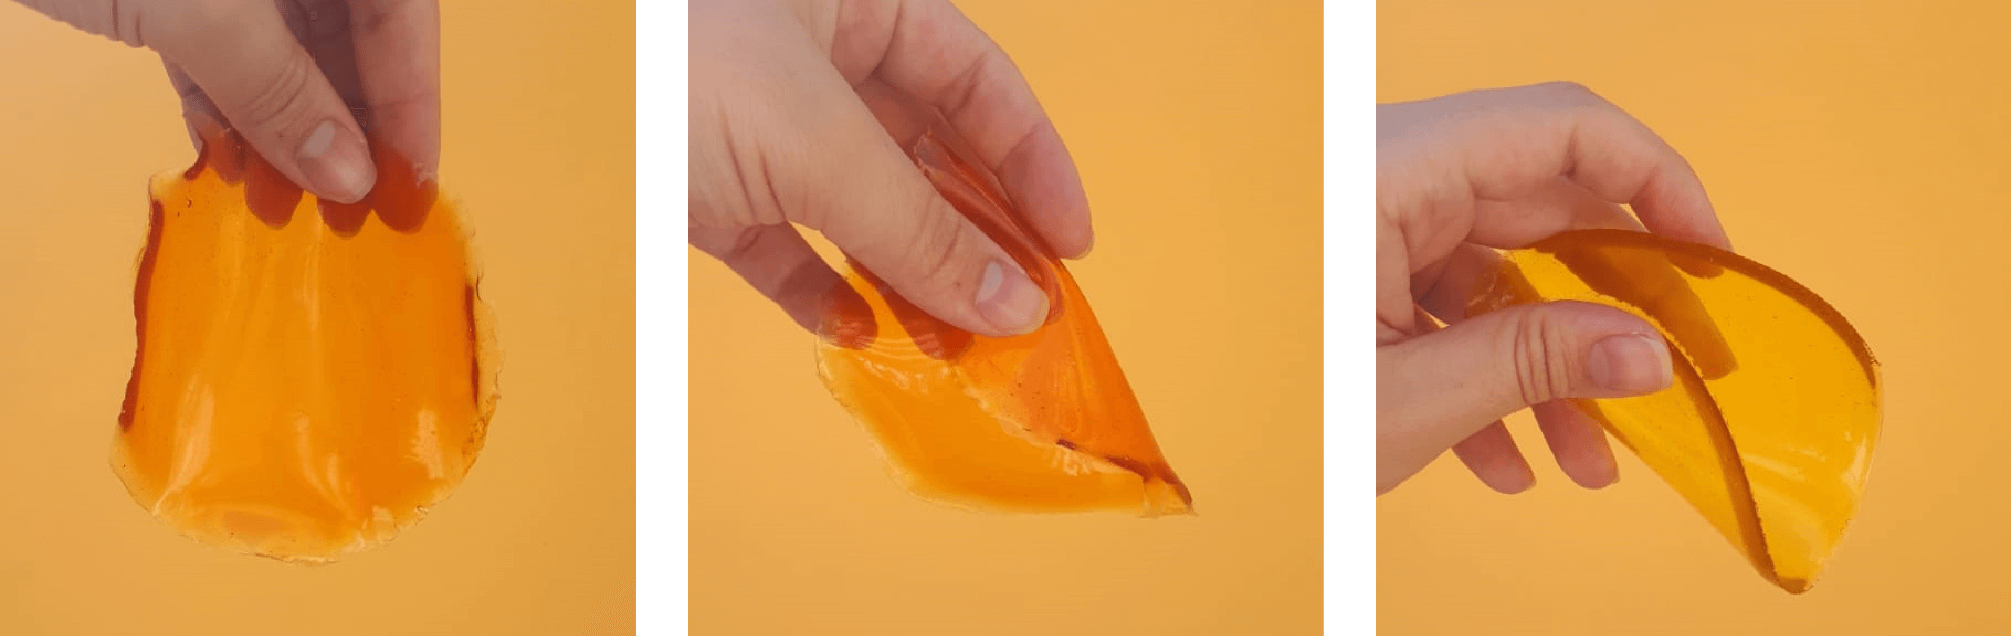
| 48 g gelatine | 12 g glicerine | 240 ml tap water | yellow | - |
Outcomes
My favourite recipe so far, I like this one that is really simply and easy to get
| Surface sight / touch | Properties | Resistance | Notes | ⌛ dry |
|---|---|---|---|---|
| texture/translucent/matt | rigid/no stretch/strong/ligth weigth | not tested | - | 2 days |
Steps I followed:
- Heat the water in a pot and add the polymer + glycerine. Stir
- Still mixing it during 20 minutes or until getting a syrup
- Add the soap and stir
- Stil whisking it until creating bubbles (for 4 minutes)
- Pour the mixture in the mold
- Let the recipe dry in a place without moving it
- Unmold when it is not cold to the touch (didn't do this)
| Polymer | Plasticizer | Solvent | Additive | Notes |
|---|---|---|---|---|
| 12 g gelatine | 12 g glicerine | 150 ml tap water | 1 tsp natural soap | - |
I used a natural soap 🧼 made out of activated charcoal, this gave the foam a nice gray color with some small black dots in it.
Outcomes
The result was not exactly a foam because it was very thin, next time I should put it in a bigger 3d mold. So, this one is more like a texture
| Surface sight / touch | Properties | Resistance | Notes | ⌛ dry |
|---|---|---|---|---|
| smooth/texture/opaque | bendable/fragile/ligth weigth | 💧 no / 🔥 not tested | - | 4 days |
▪ Agar Agar
Agar is a jelly substance got from red algae. I searched it locally and surprisingly it was really easy to get in a in a health food store, this product is more expensive than gelatine.
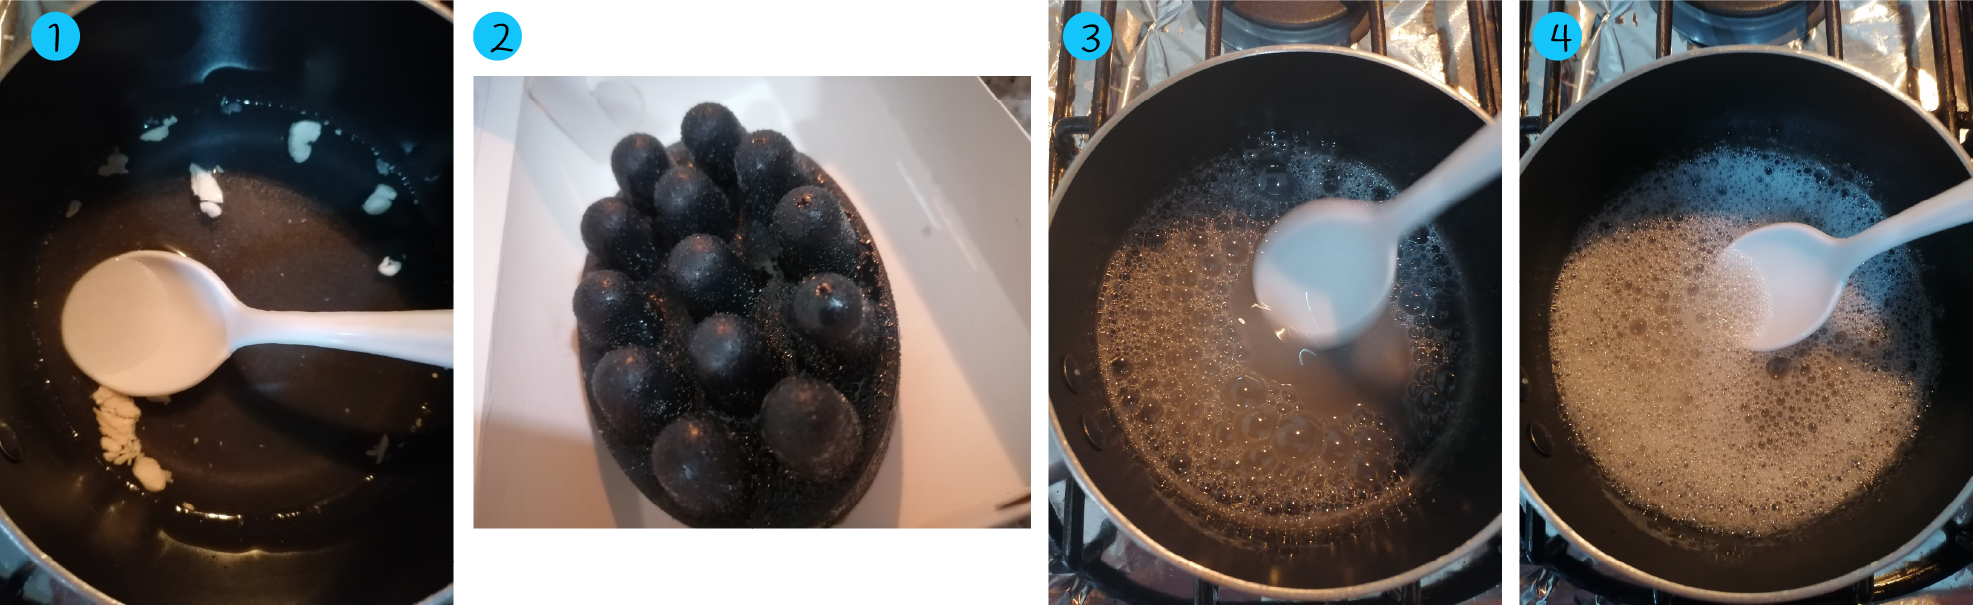
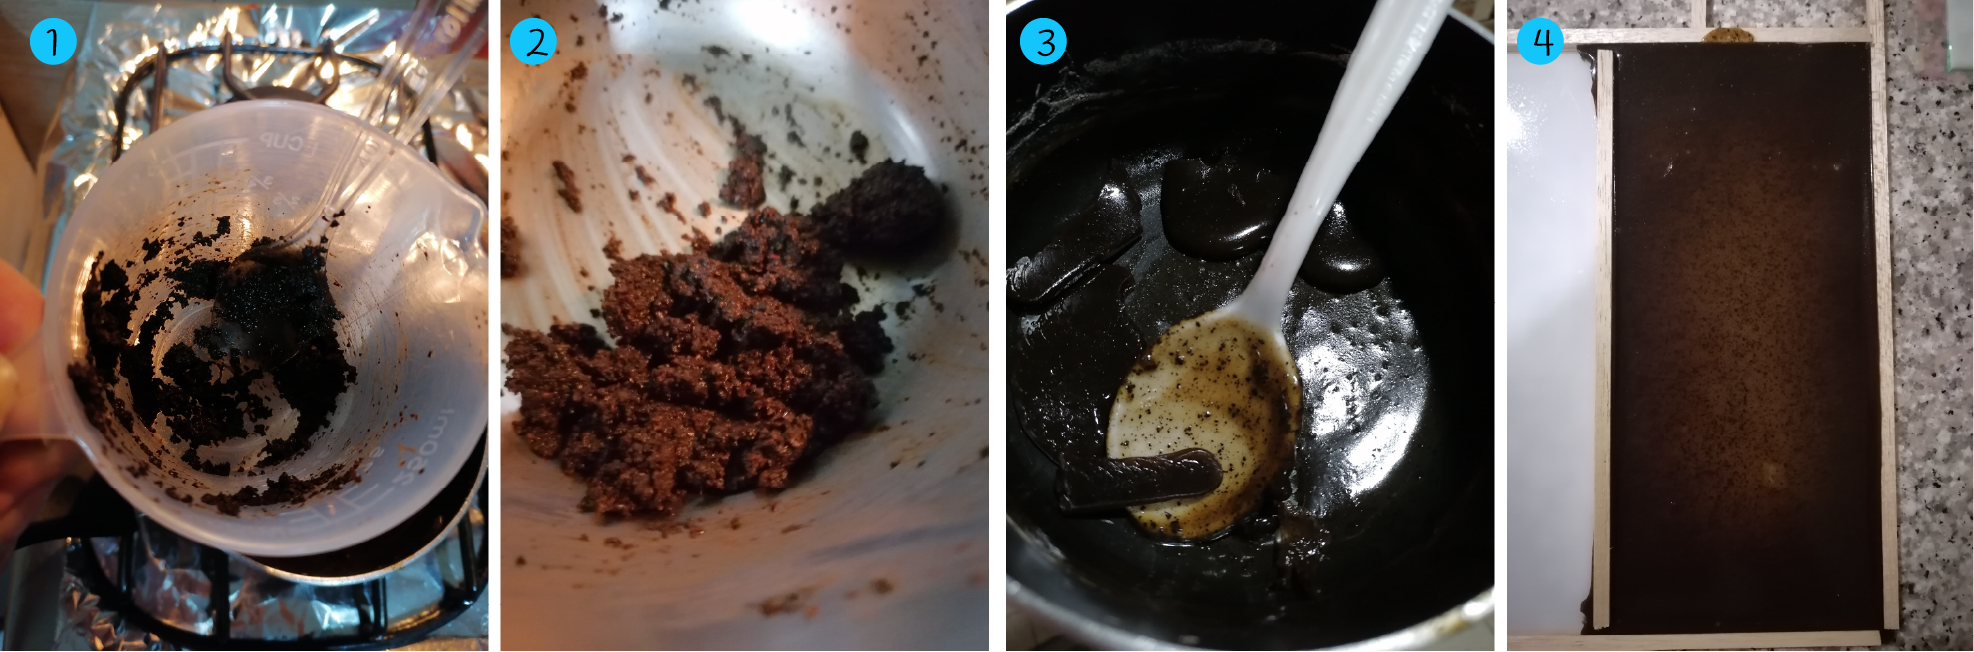
I’m following the Materiom recipe that adds coffee chaff or husks to the mixture, but instead I'm using the waste from the coffee maker because it is the most wasted product in my house. First I collected like 1 cup of the coffee and let it dry for 3-4 days before using it.
Steps I followed:
- Mix the polymer + water + glycerine (before heat)
- Start heating to disolver the agar. Stir slowly
- Heat the mixture until it starts to boil and turns into a syrup
- Remove from heat and add the coffee waste. Mix it well
- Pour the mixture in the mold inmediately
- Let the recipe dry in a place without moving it
- Unmold when it is not cold to the touch (didn't do this)
| Polymer | Plasticizer | Solvent | Additive | Notes |
|---|---|---|---|---|
| 1.5 g agar | 2.5 g glicerine | 40 ml tap water | 7 g coffee waste | - |
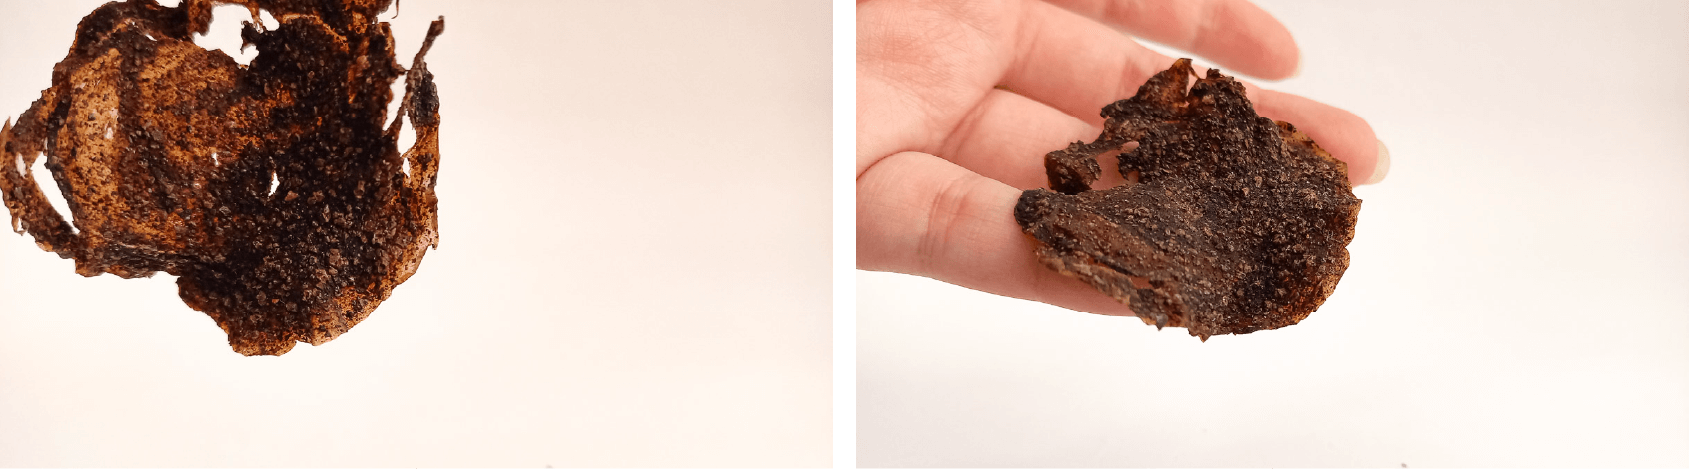
Outcomes
It has a diferent behaviour when it's completely dry. It took almost 4 days to get dry, but before that I unmolded it and that's why it suffered a reduction in size
| Surface sight / touch | Properties | Resistance | Notes | ⌛ dry |
|---|---|---|---|---|
| smooth/texture/opaque/shiny | no stretch/fragile/rubbery | not tested | - | 4 days |
I’m following this other useful recipe from Materiom that uses coffee waste for the mixture
Steps I followed:
- Mix the water + glycerine (before heat)
- Add the polymer and the coffee waste (almost dry)
- Start heating to disolver the agar. Stir slowly
- Heat the mixture until it starts to boil and turns into a syrup (better with a whisk)
- Remove from heat after 15 minutes
- Pour the mixture in the mold inmediately
- Let the recipe dry in a place without moving it
- Unmold when it is not cold to the touch (didn't do this)
| Polymer | Plasticizer | Solvent | Additive | Notes |
|---|---|---|---|---|
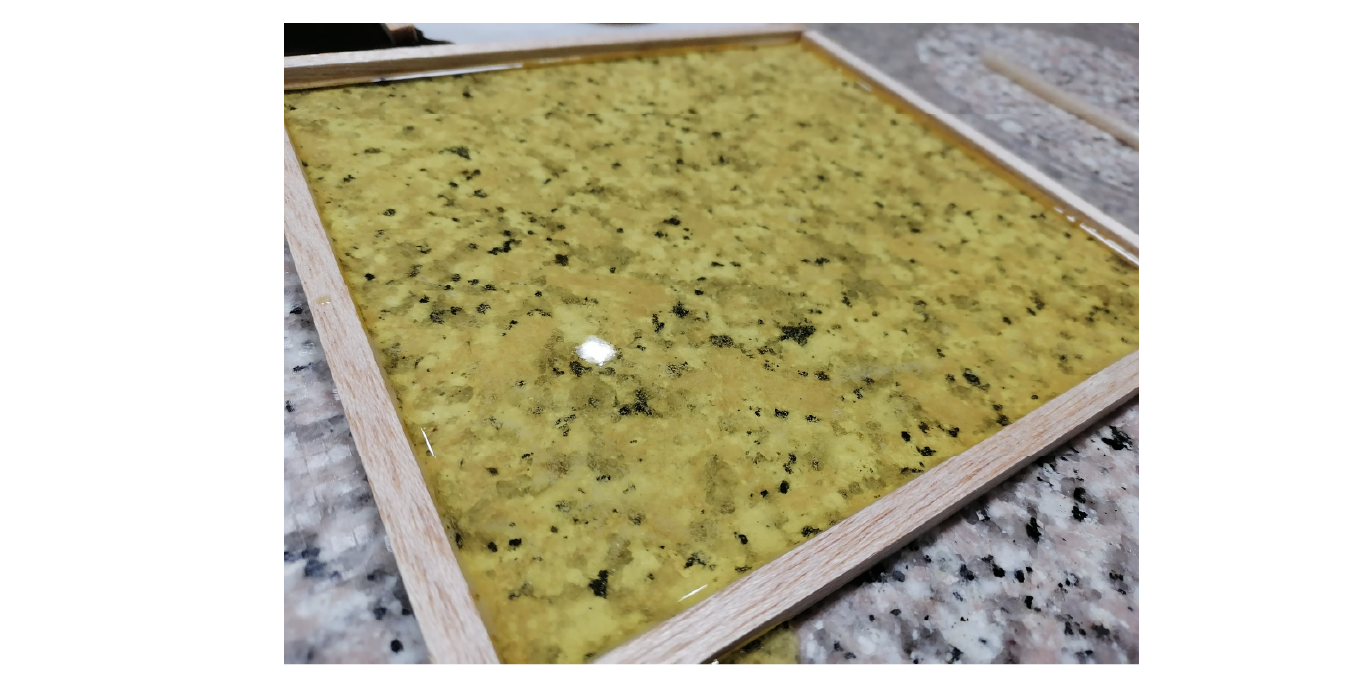
| 15 g agar | 5 g glicerine | 250 ml tap water | 50 g coffee waste | - |
I spread some of the mix on the table, this dried out after a while and was very thin but I noticed that it had an interesting texture so I poured the rest of the mix into a larger mold but with a thinner layer.
I pretty like the next result I had with this large example. I think it would be better to to grind more coffee before using it thougth
Outcomes
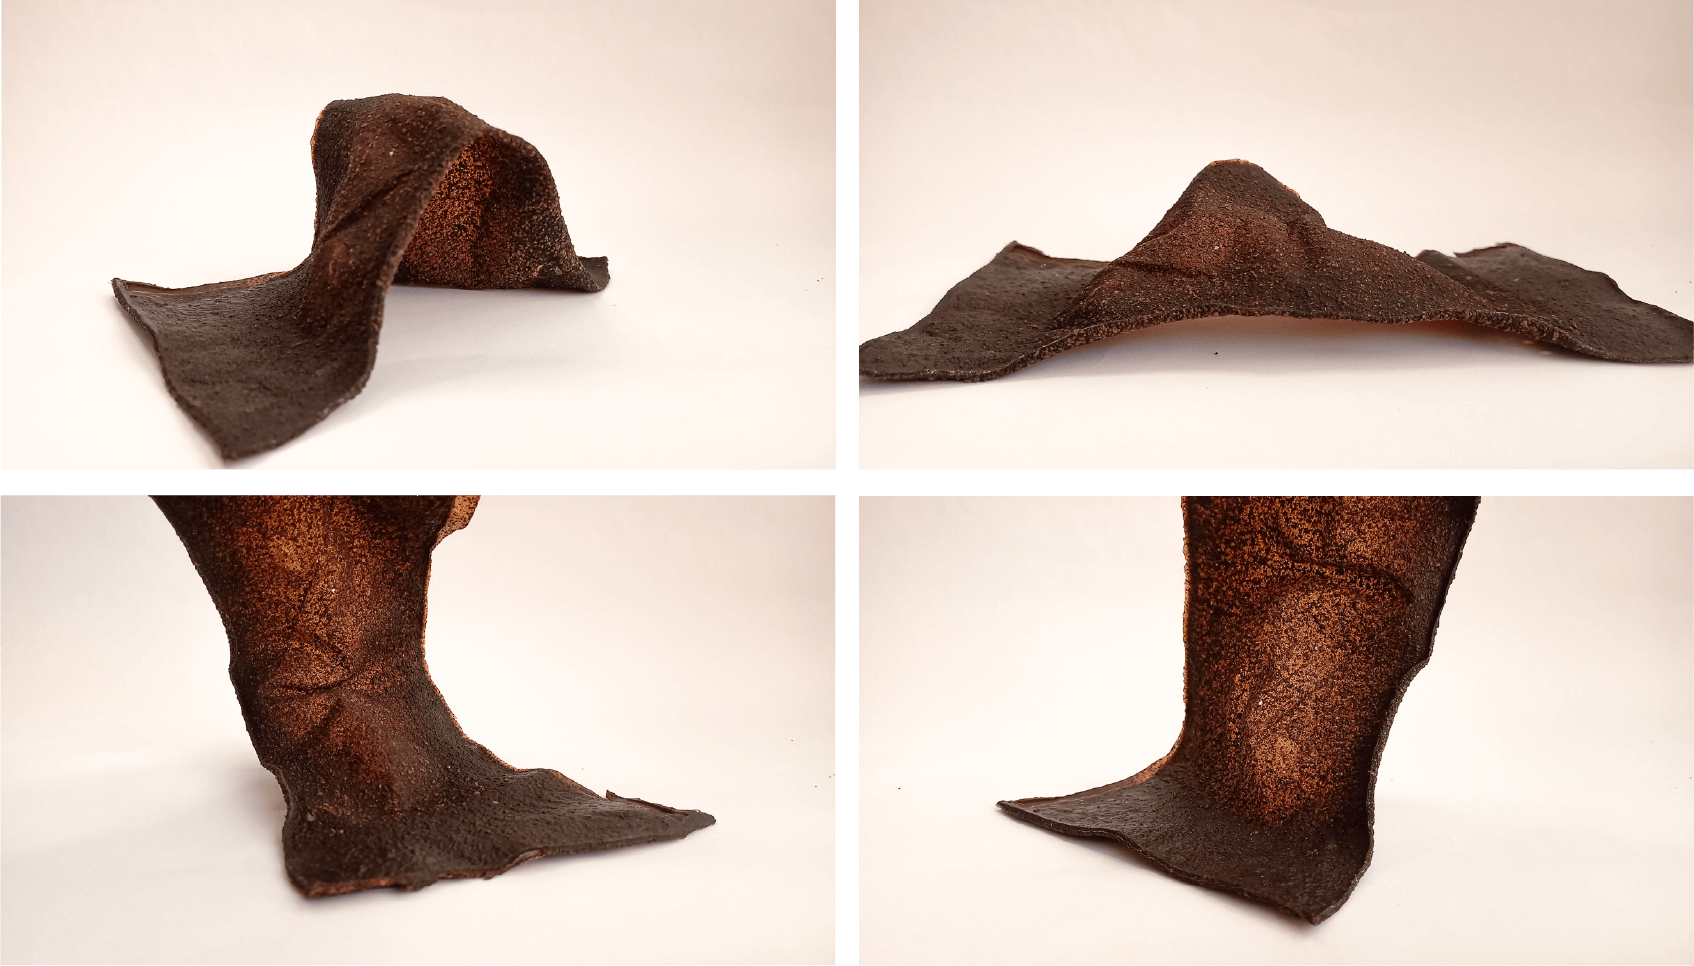
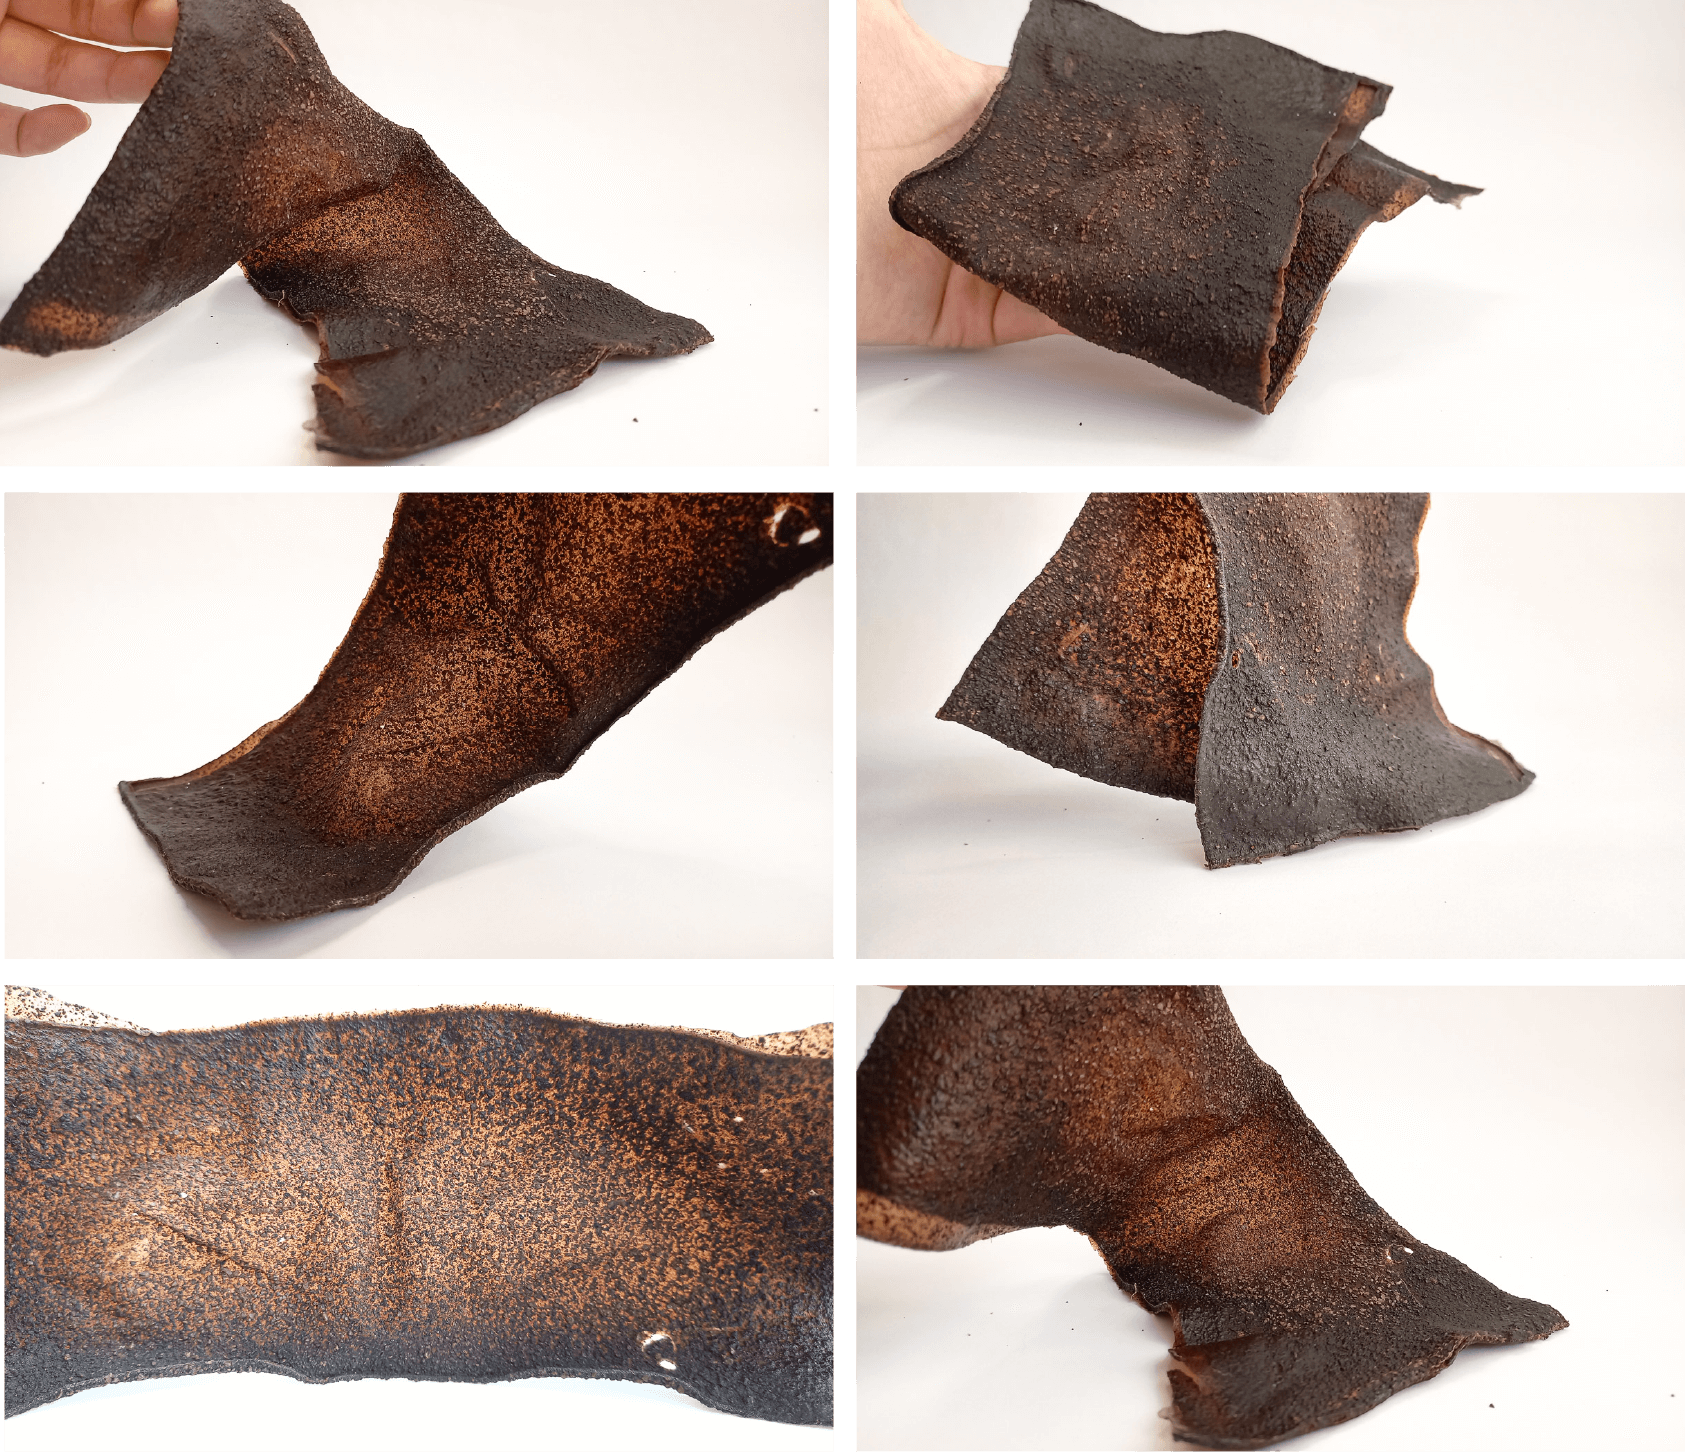
| Surface sight / touch | Properties | Resistance | Notes | ⌛ dry |
|---|---|---|---|---|
| texture/layered/matt | rigid/no stretch/ligth weigth | not tested | don't remove it from the mold before it's completely dry | 4 days |
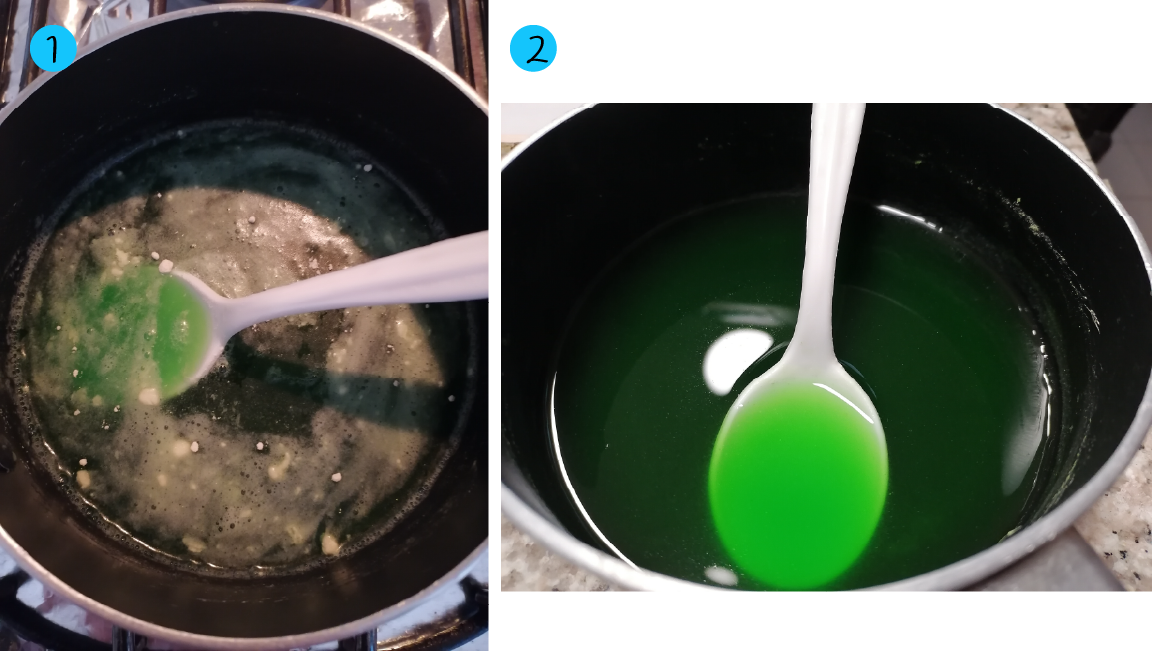
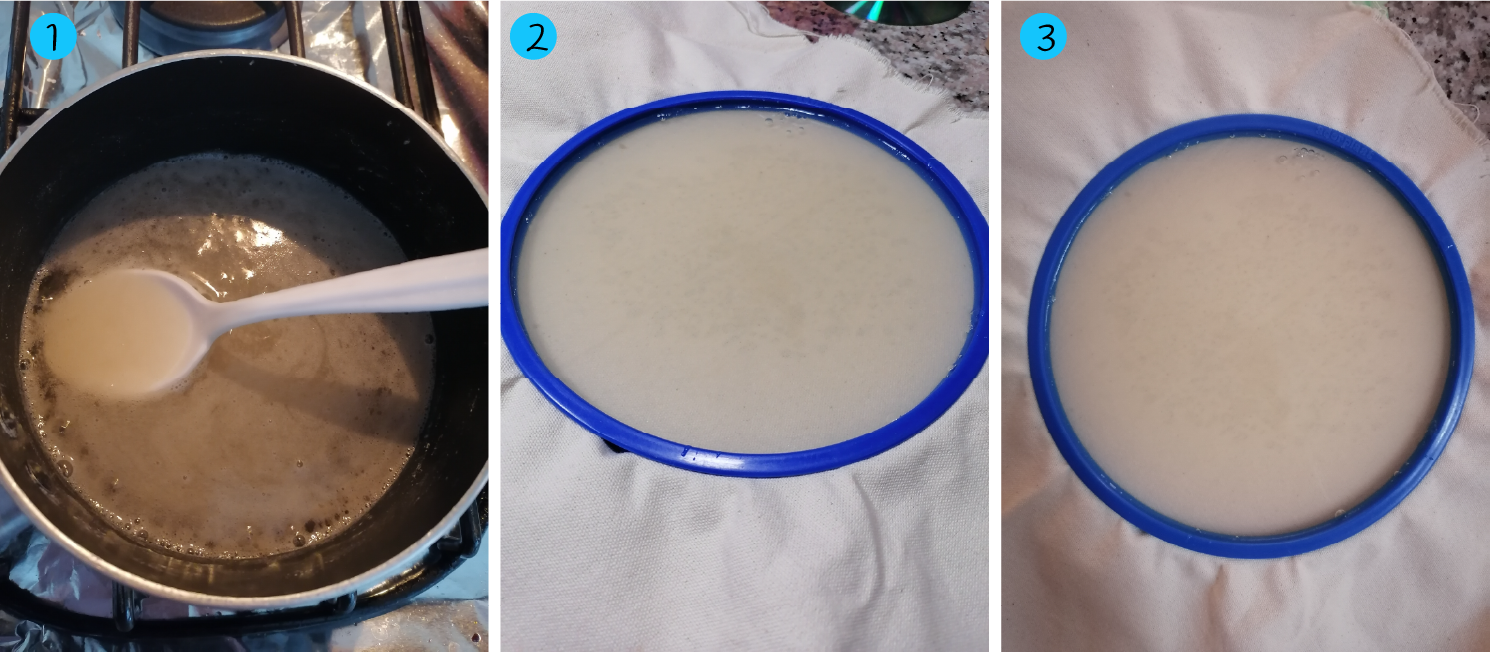
I took this recipe from Loes Bogers documentation
Steps I followed:
- Put the water in a pot and heat until it's warm
- Add the pigment
- Add the glycerine and stir
- Add the polymer and stir
- Boil it (without bubbles)
- Remove from heat and stir for 2 minutes
- Pour the mixture in the mold, try not to make bubbles by pouring from a high position and without moving the pot from the center of the mold
- Let the recipe dry in a place without moving it
- Unmold when it is not cold to the touch (didn't do this)
| Polymer | Plasticizer | Solvent | Additive | Notes |
|---|---|---|---|---|
| 5 g agar | 15 g glicerine | 250 ml tap water | green food colorant | don't add too much colorant |
Outcomes
I realized that this was taking too much to dry and it was accumulating a lot of moisture on the surface so I waited until it didn't feel so cold to the touch and unmolded it, but there were parts that were still very jelly-like and it couldn't come off the surface well
| Surface sight / touch | Properties | Resistance | Notes | ⌛ dry |
|---|---|---|---|---|
| smooth/kind of opaque/shiny | bendable/no stretch/fragile | 💧 no / 🔥 not tested | try in other enviroment and surface? | 5 days or more |
Recipe from Remix El Barrio
Steps I followed:
- Put the water in a pot and add the polymer. Stir it before heating
- Heat the water and add the glycerine (stir for 5 minutes)
- Still mixing it for 5 minutes more or until you get a syrup
- Revome from heat and stir for 1 minute
- Pour the mixture in the mold, try not to make bubbles by pouring from a high position and without moving the pot from the center of the mold
- Let the recipe dry in a place without moving it
- Unmold when it is not cold to the touch
| Polymer | Plasticizer | Solvent | Additive | Notes |
|---|---|---|---|---|
| 7 g agar | 10 g glicerine | 200 ml tap water | any | make sure you're using a waterproof textile |
Outcomes
This one failed ❌, I let it dry for more than 3 days but I saw it wasn't drying at all and mold 🧫 started to appear! I had to throw again everything because it was almost imposible to take it from the textile (I'm not pretty sure that it was waterproof)
▪ Gelatine + Agar Agar
Steps I followed:
- Mix the water + glycerine (before heat)
- Start heating and add the polymers
- Whisk it for 5 minutes
- Add the pigment and stir slowly
- Pour the mixture in the mold after 1 minute
- Let the recipe dry in a place without moving it
- Unmold when it is not too cold to the touch
| Polymer | Plasticizer | Solvent | Additive | Notes |
|---|---|---|---|---|
| 25 g gelatine + 25 g agar | 50 g glicerine | 250 ml tap water | any | - |
Outcomes
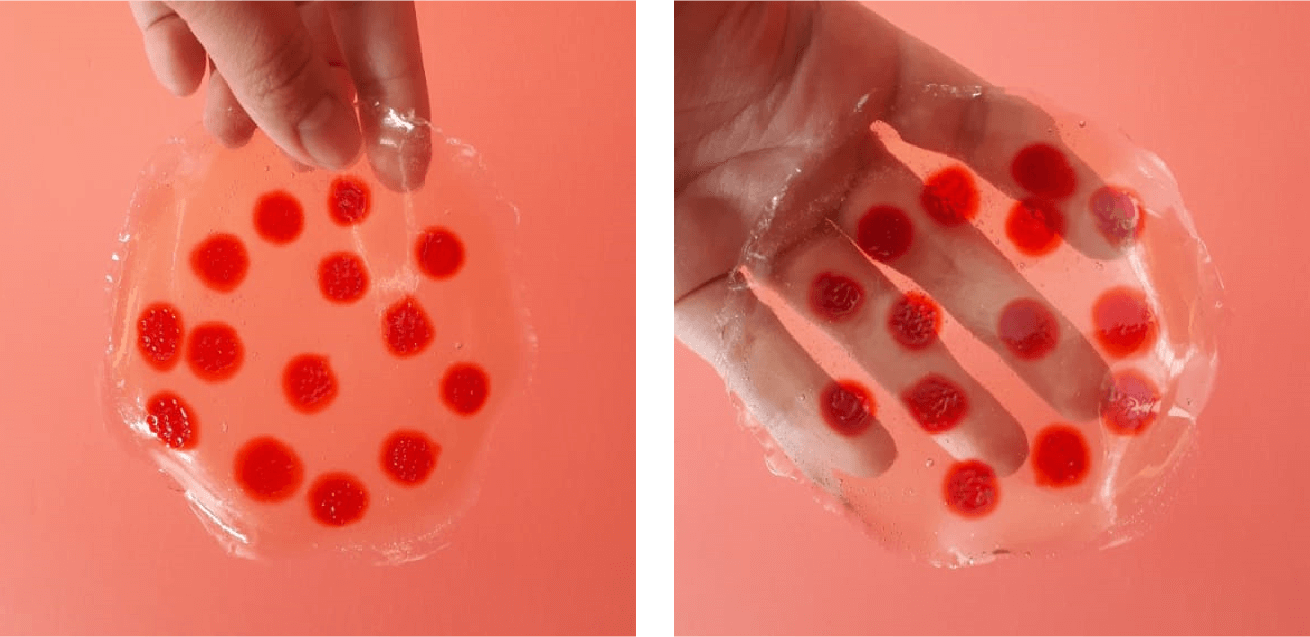
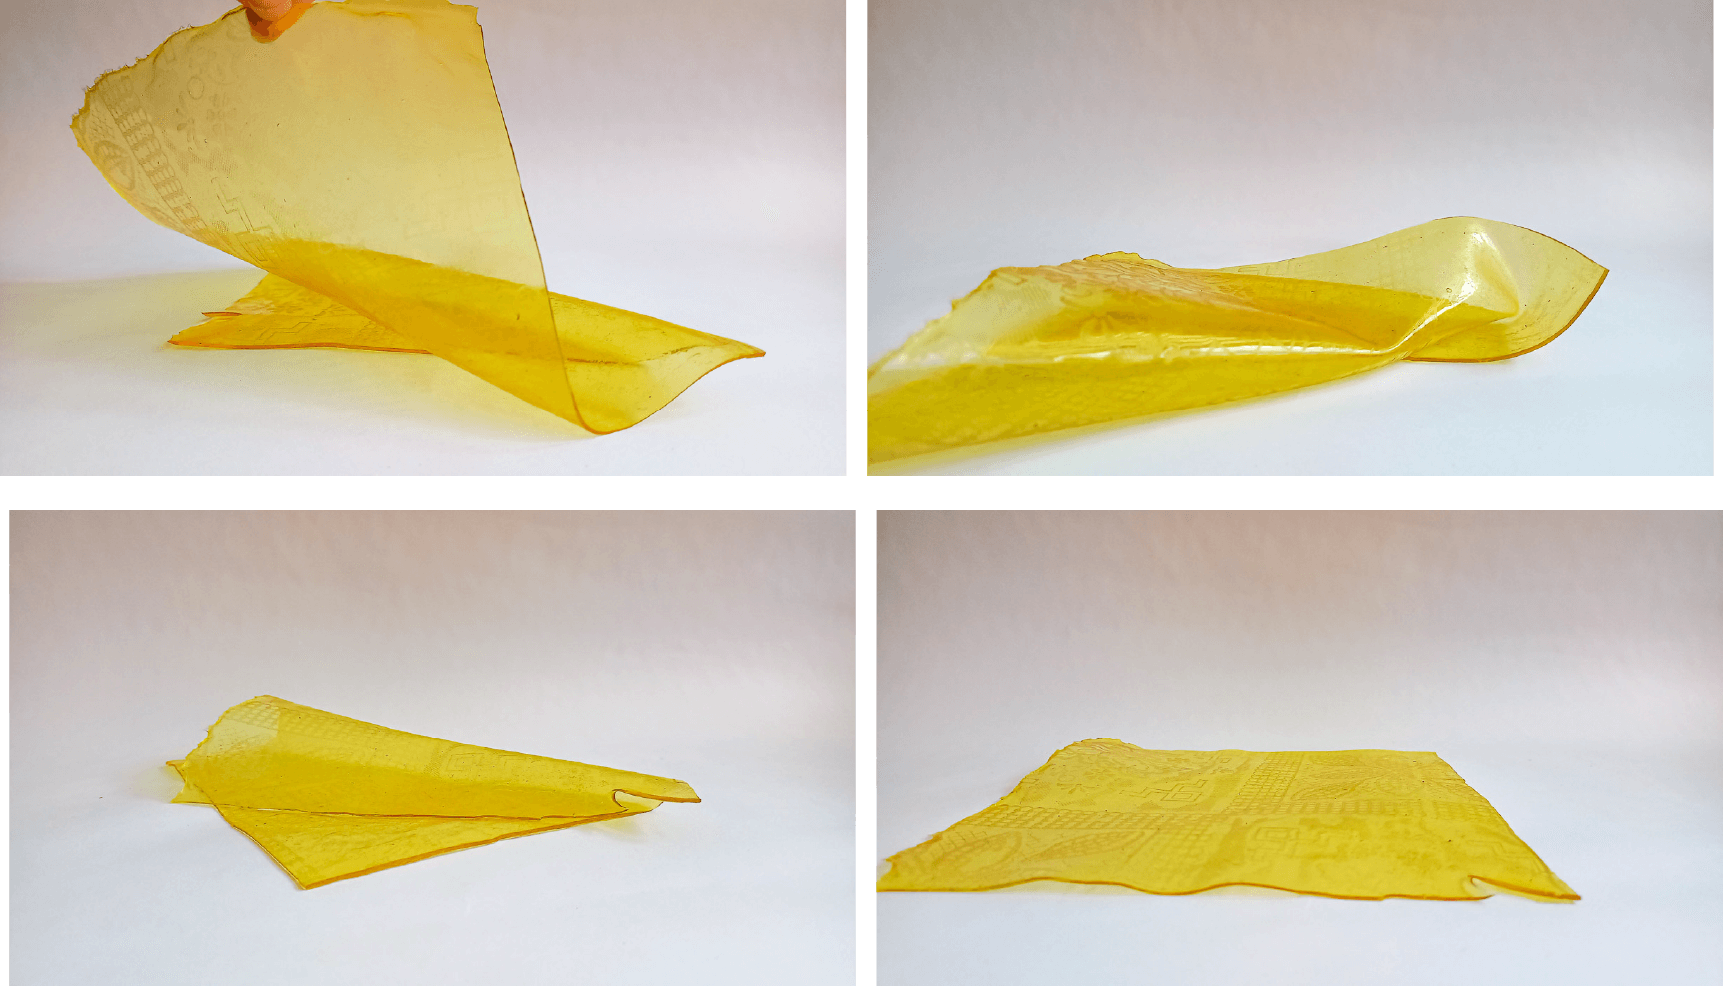
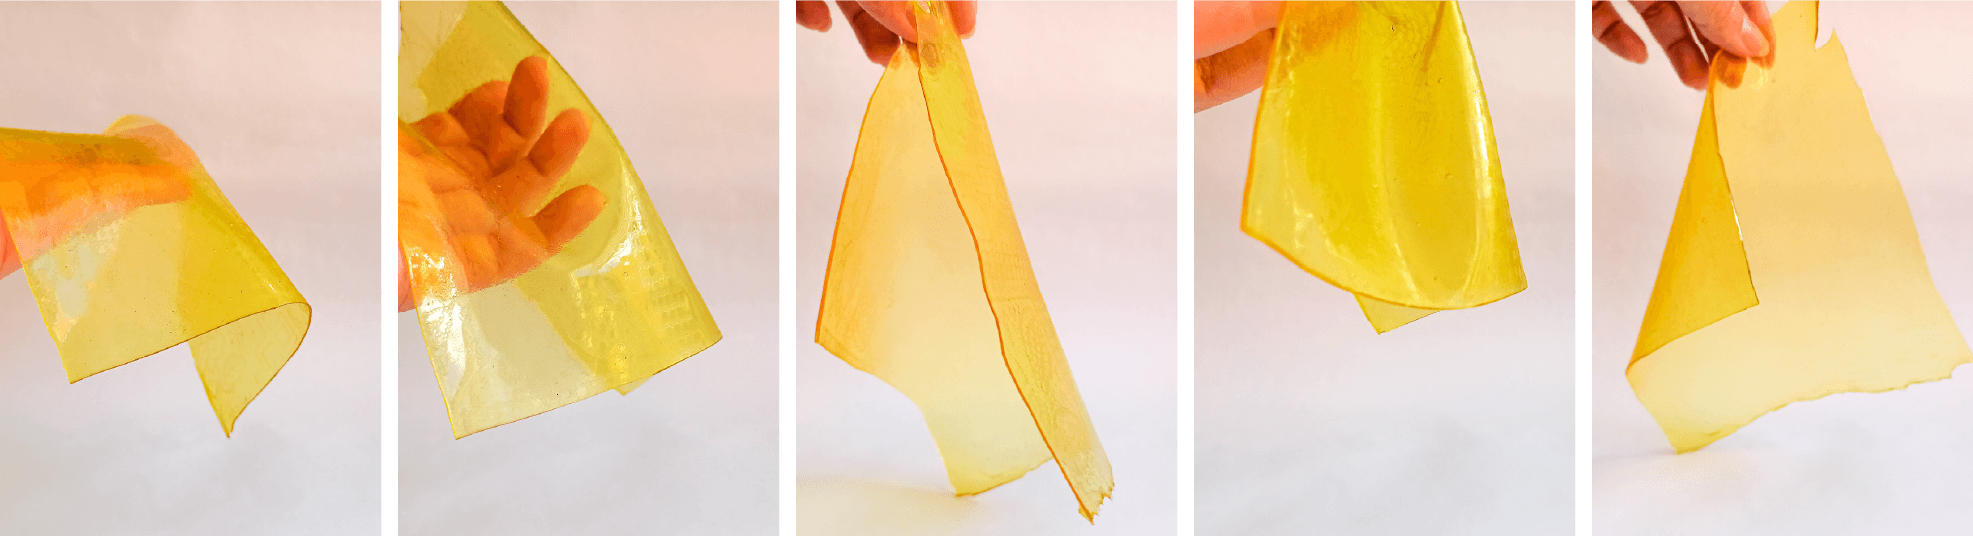
In contrast to the recipes that only use agar and no other additives, this result came out much better.
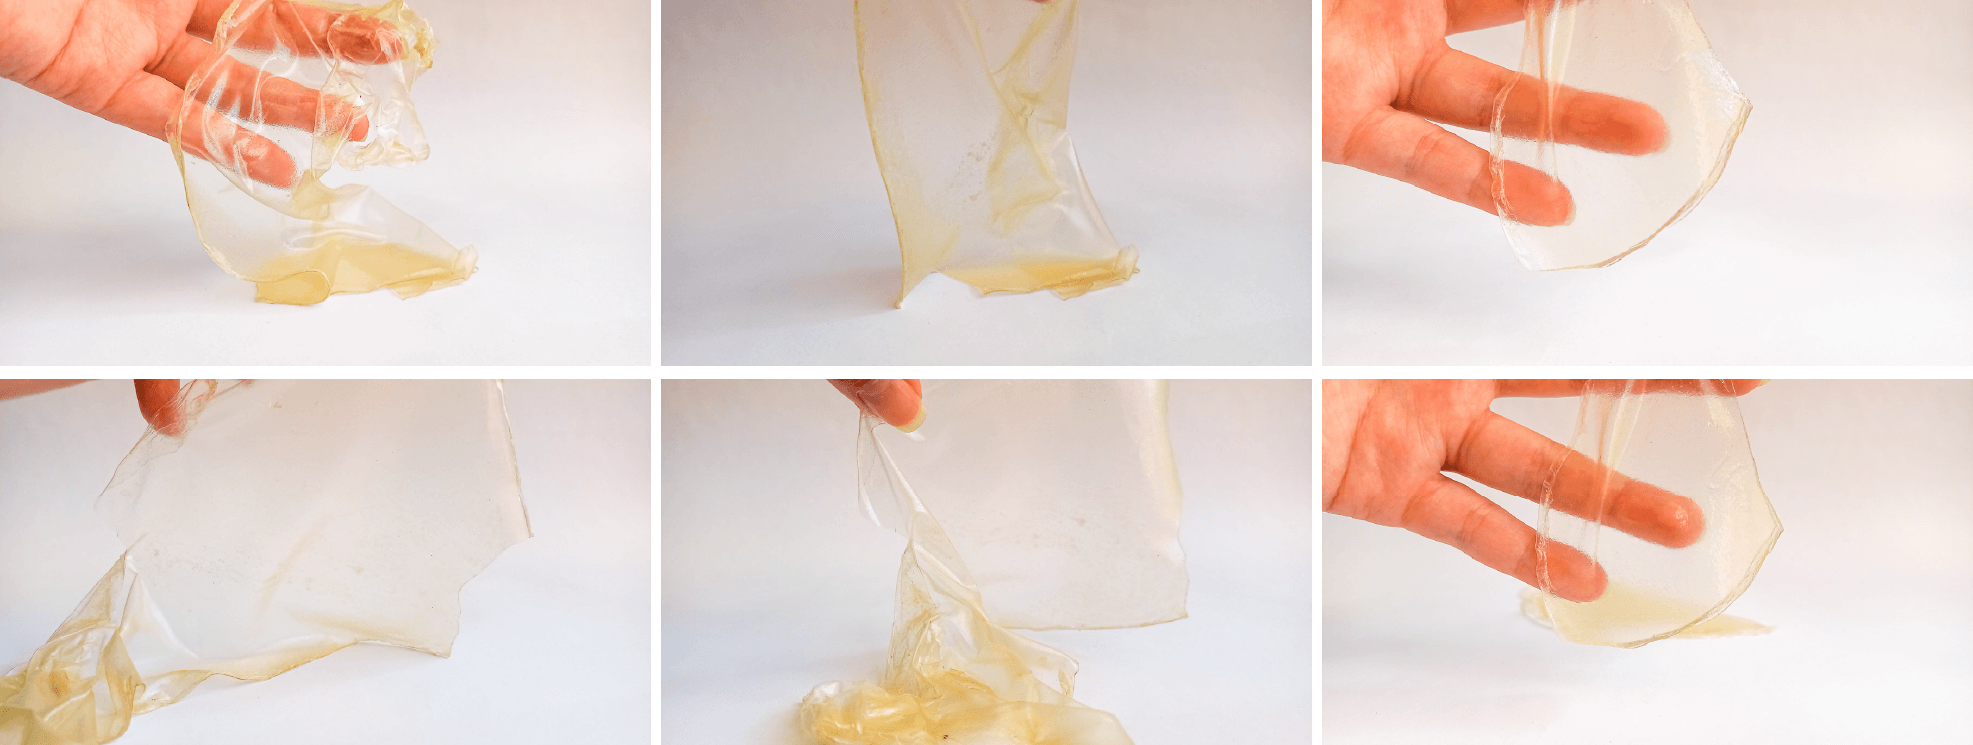
When it's really dry it doesn't stick and is more easily handled, I would use it as a plastic wrap for fruit as well as in supermarkets
| Surface sight / touch | Properties | Resistance | Notes | ⌛ dry |
|---|---|---|---|---|
| smooth/traslucent/ | bendable/strecth/fragile/ligth weigth | 💧 no / 🔥 not tested | - | 4 - 5 days |
▪ Things that should be analized
- standardization: It should be analyzed how to achieve the same result over and over again.
- sustainability: which other materials are we using to get this materials? is everything sustainable?
- manufacturability: according to the resistant of each material, how can I produce garment or other products with it?
▪ Fruit based materials
I was curious abour biomaterial made from organic waste that can be easily find at home, so I decided to take the two most common types of waste at my home: oranges and banana peels. Orange production generates approximately 5 million tons of waste while a large proportion of bananas are thrown away. In terms of overall food waste, 1/3 of banana fruit consists of the peel.
I took this recipe from Elsa's documentation :)
Ingredients:
▪ 75 grams of banana peel pulp (I used three banana peels)
▪ 2 tablespoons of honey or 1 teaspoon of glycerin
▪ 20 ml vinegar (optional)
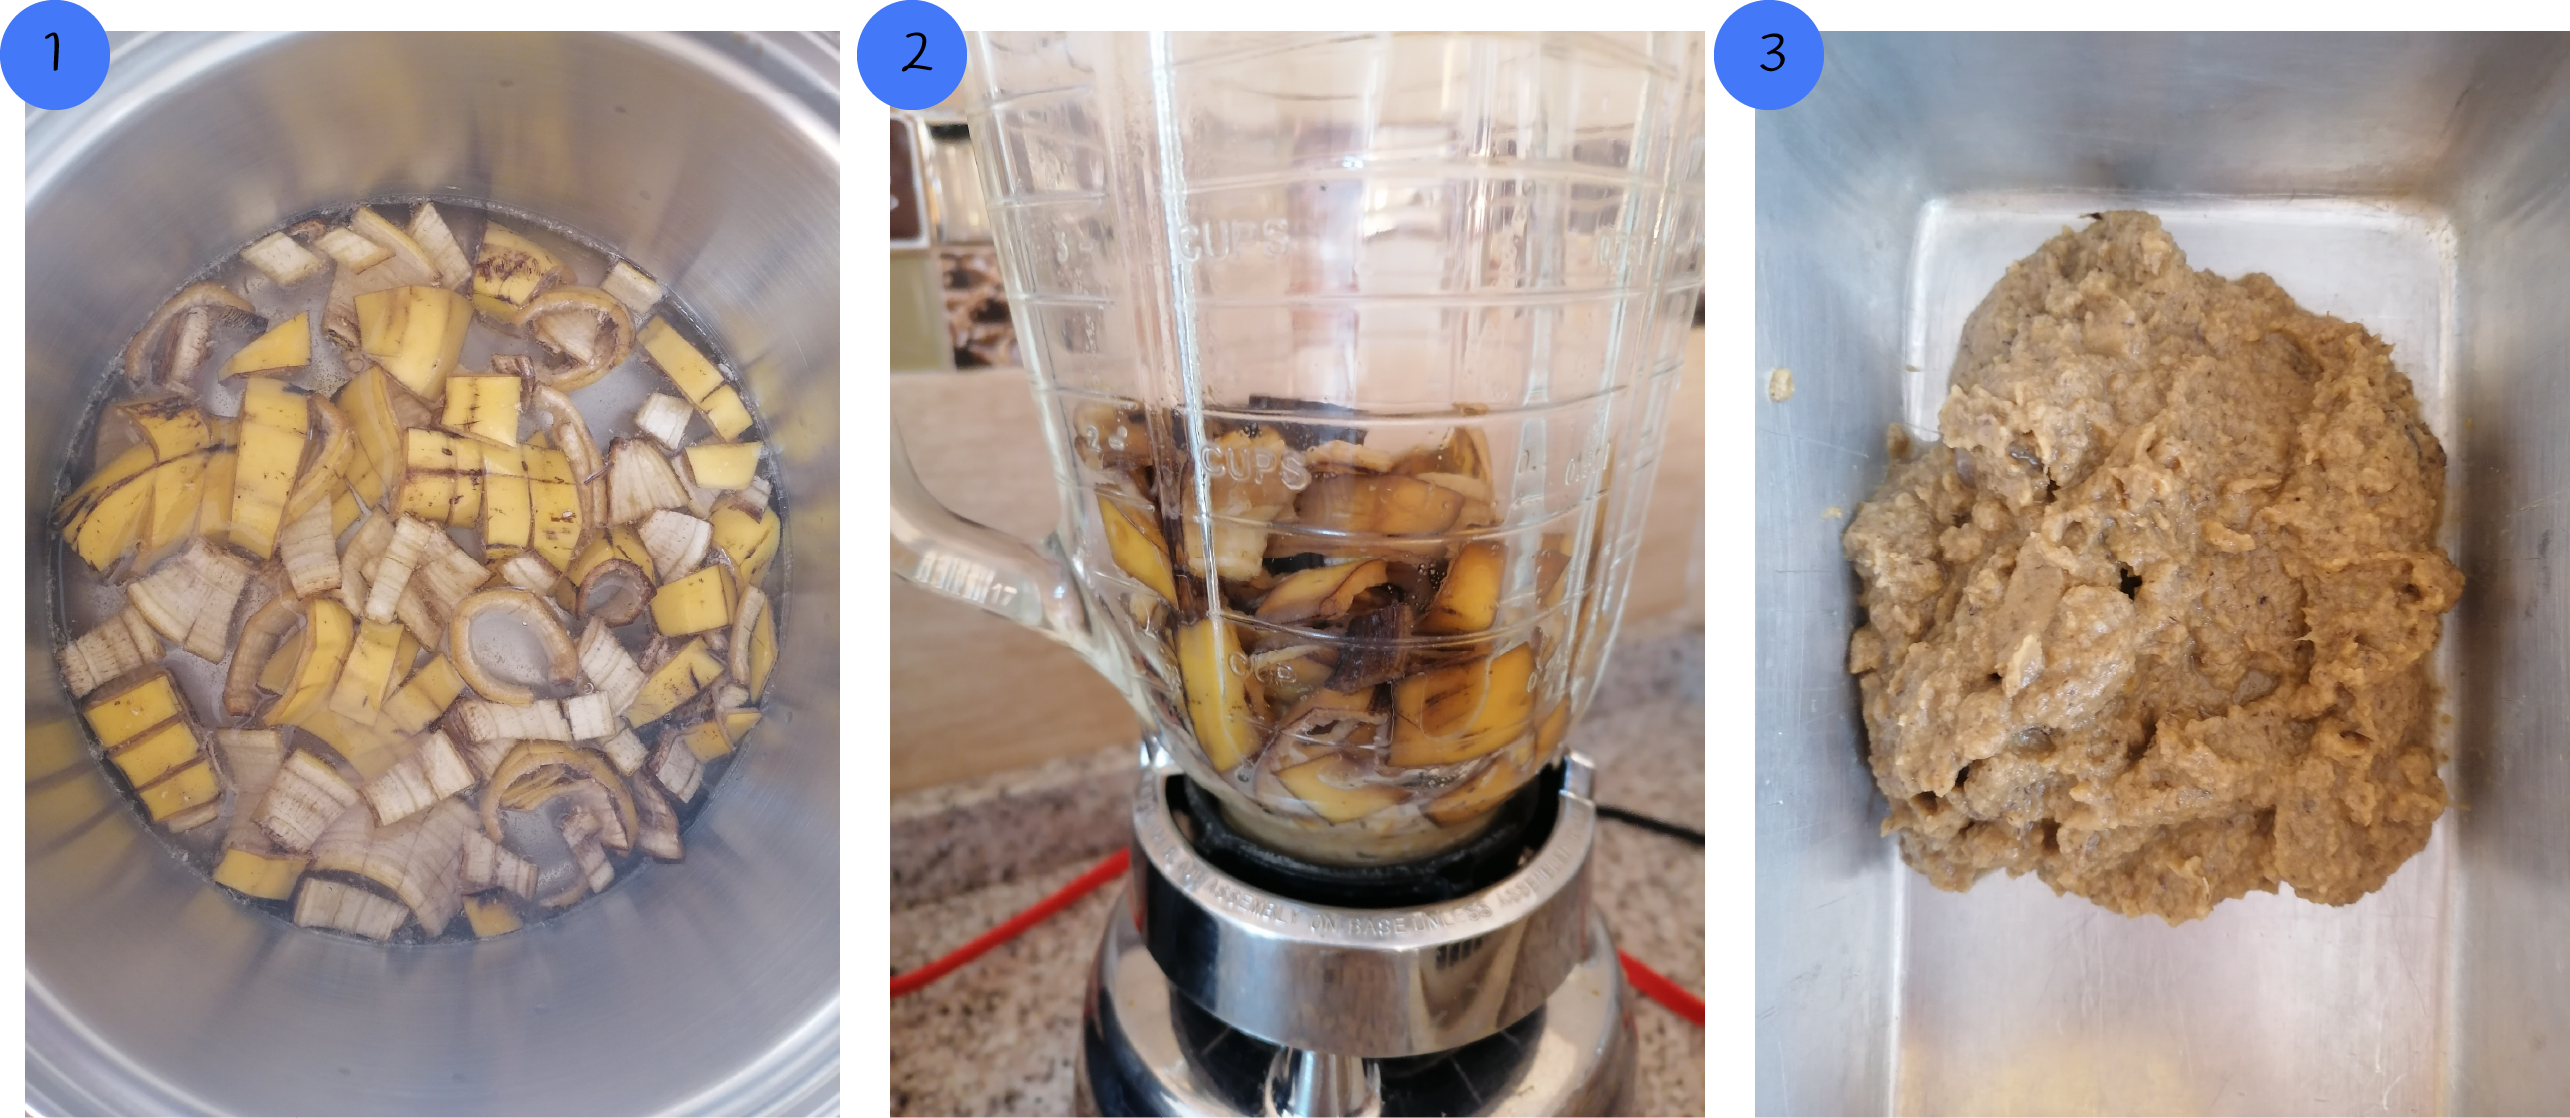
Basic steps I followed:
- Soften the peels (boil it) and process them to obtain a pulp
- Dry the pulp to eliminate the water on it (it get similar to plastiline)
- Mix with honey (or glycerin) and add vinegar
- Mold with your hands and flatten over a surface
- Let it dry (you can use an oven)
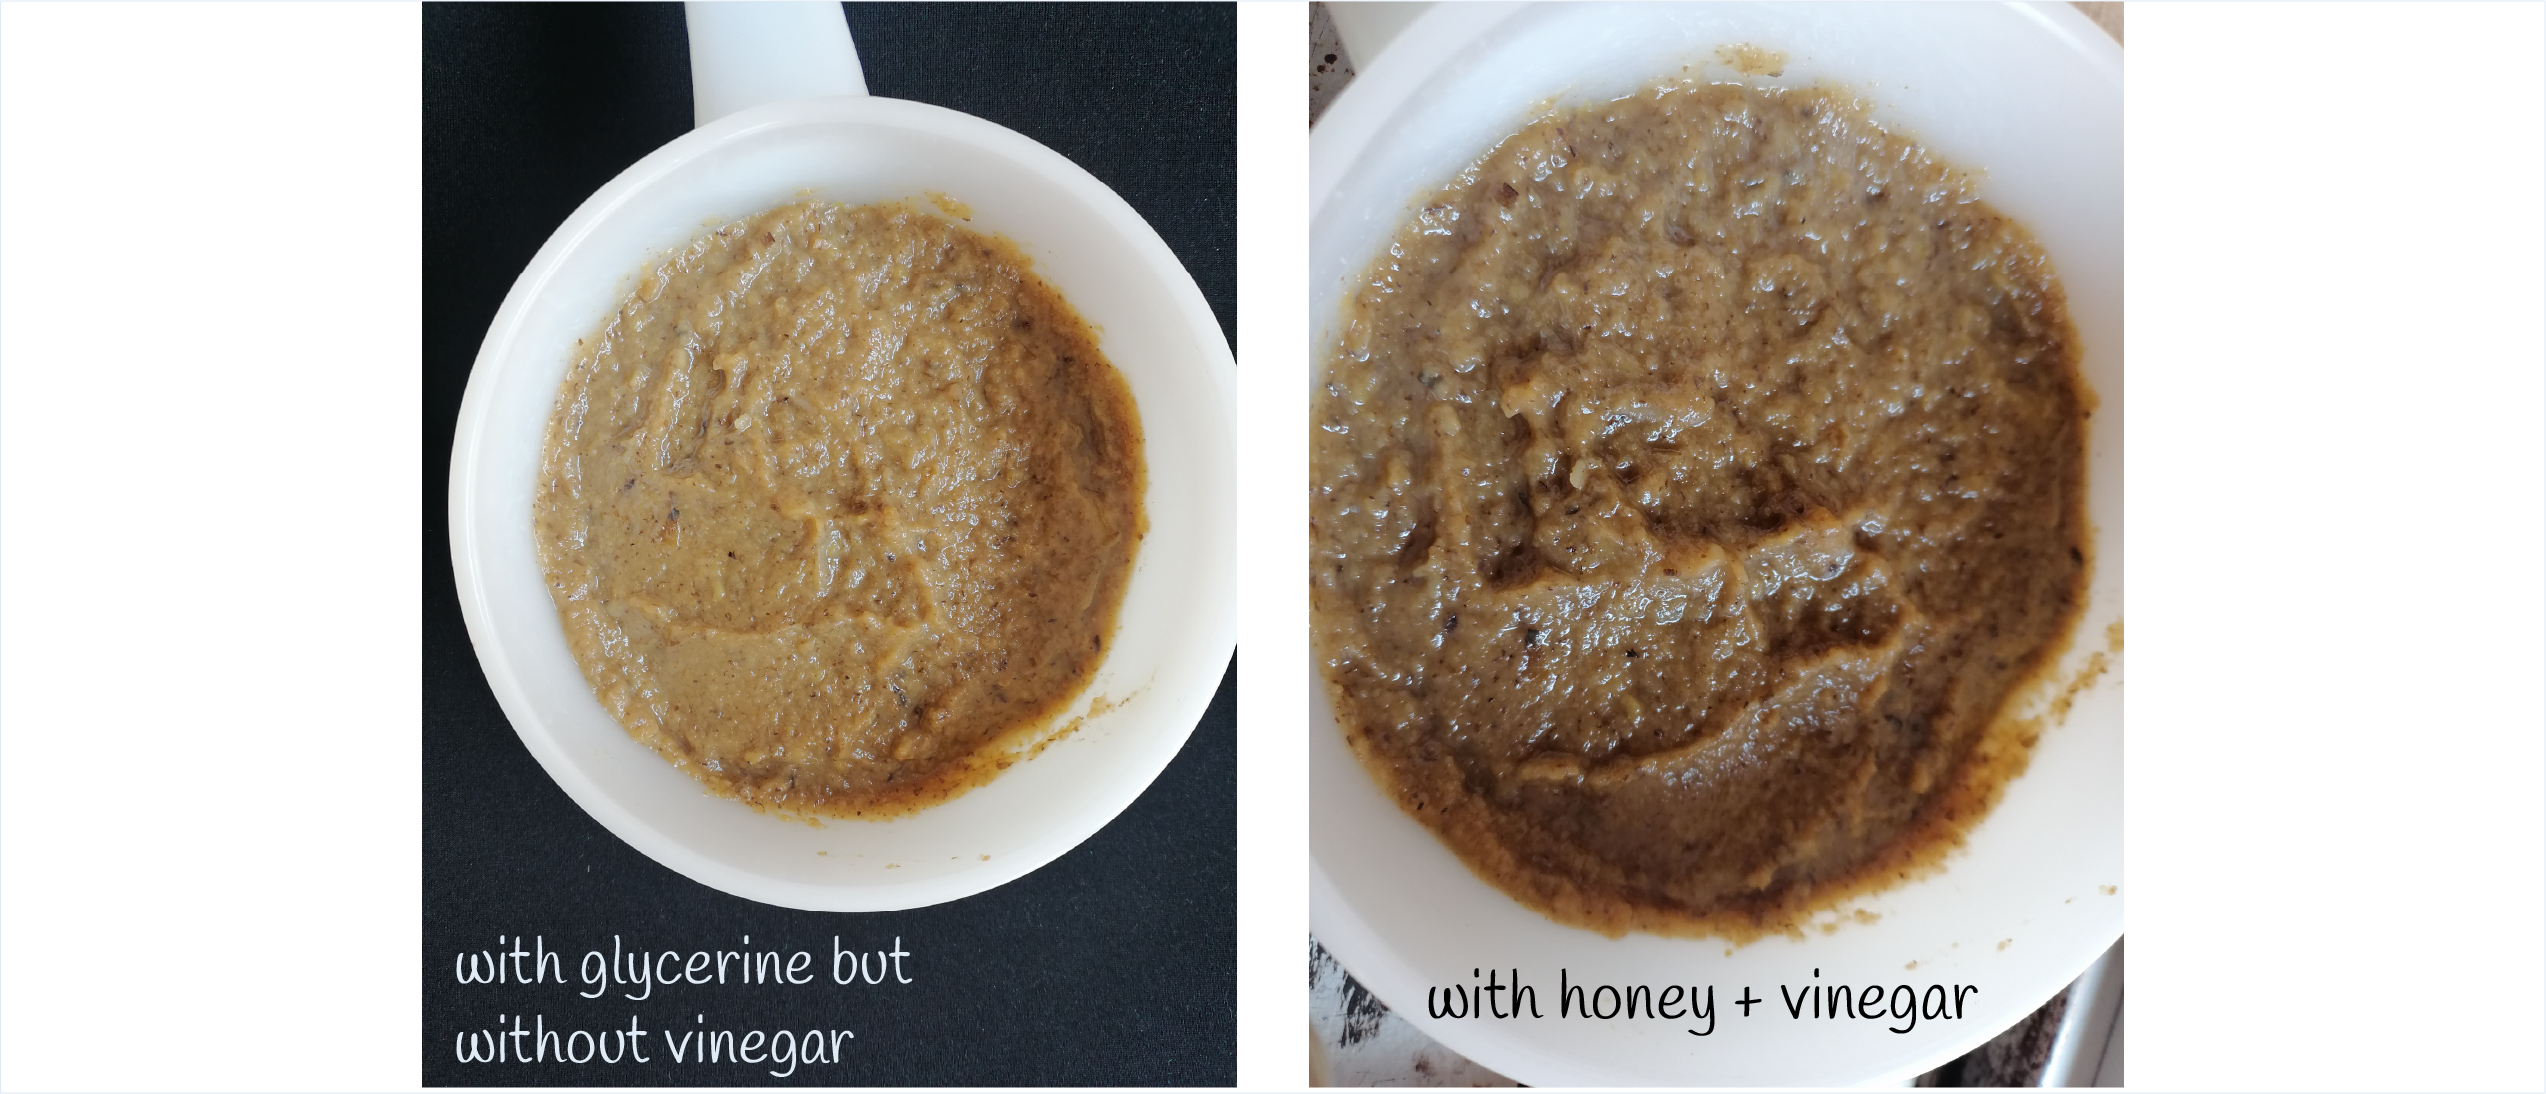
In both I made a thinner mold in order to get a more flexible material but depending on the additives the final properties changed. Also I used an oven in both cases to acelerate the process of drying. I dry them in the oven for about 4 hours and then I let them dry in a closed place for 24 hours.
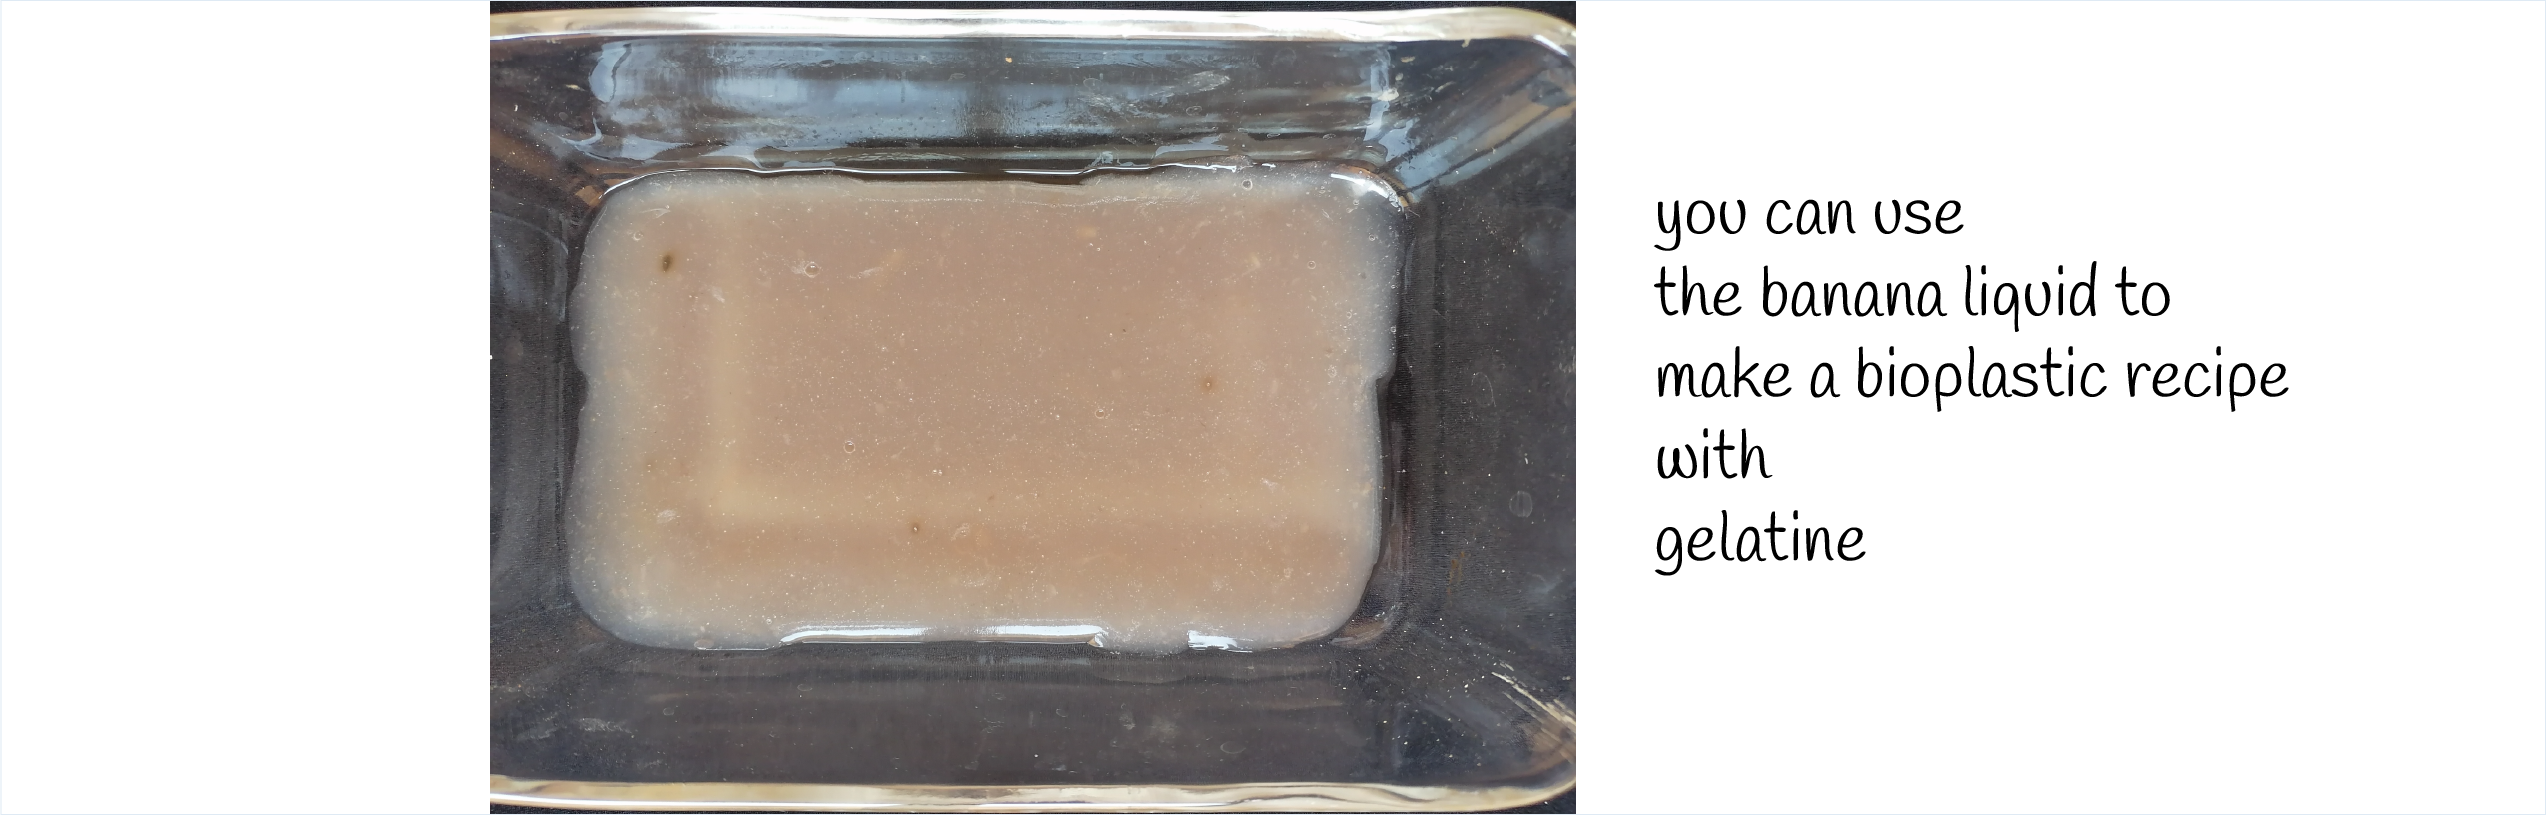
I saw that Elsa reused the water from the banana peels so I think that would be nice to used in other recipes that I tried before to see the difference of the final properties too
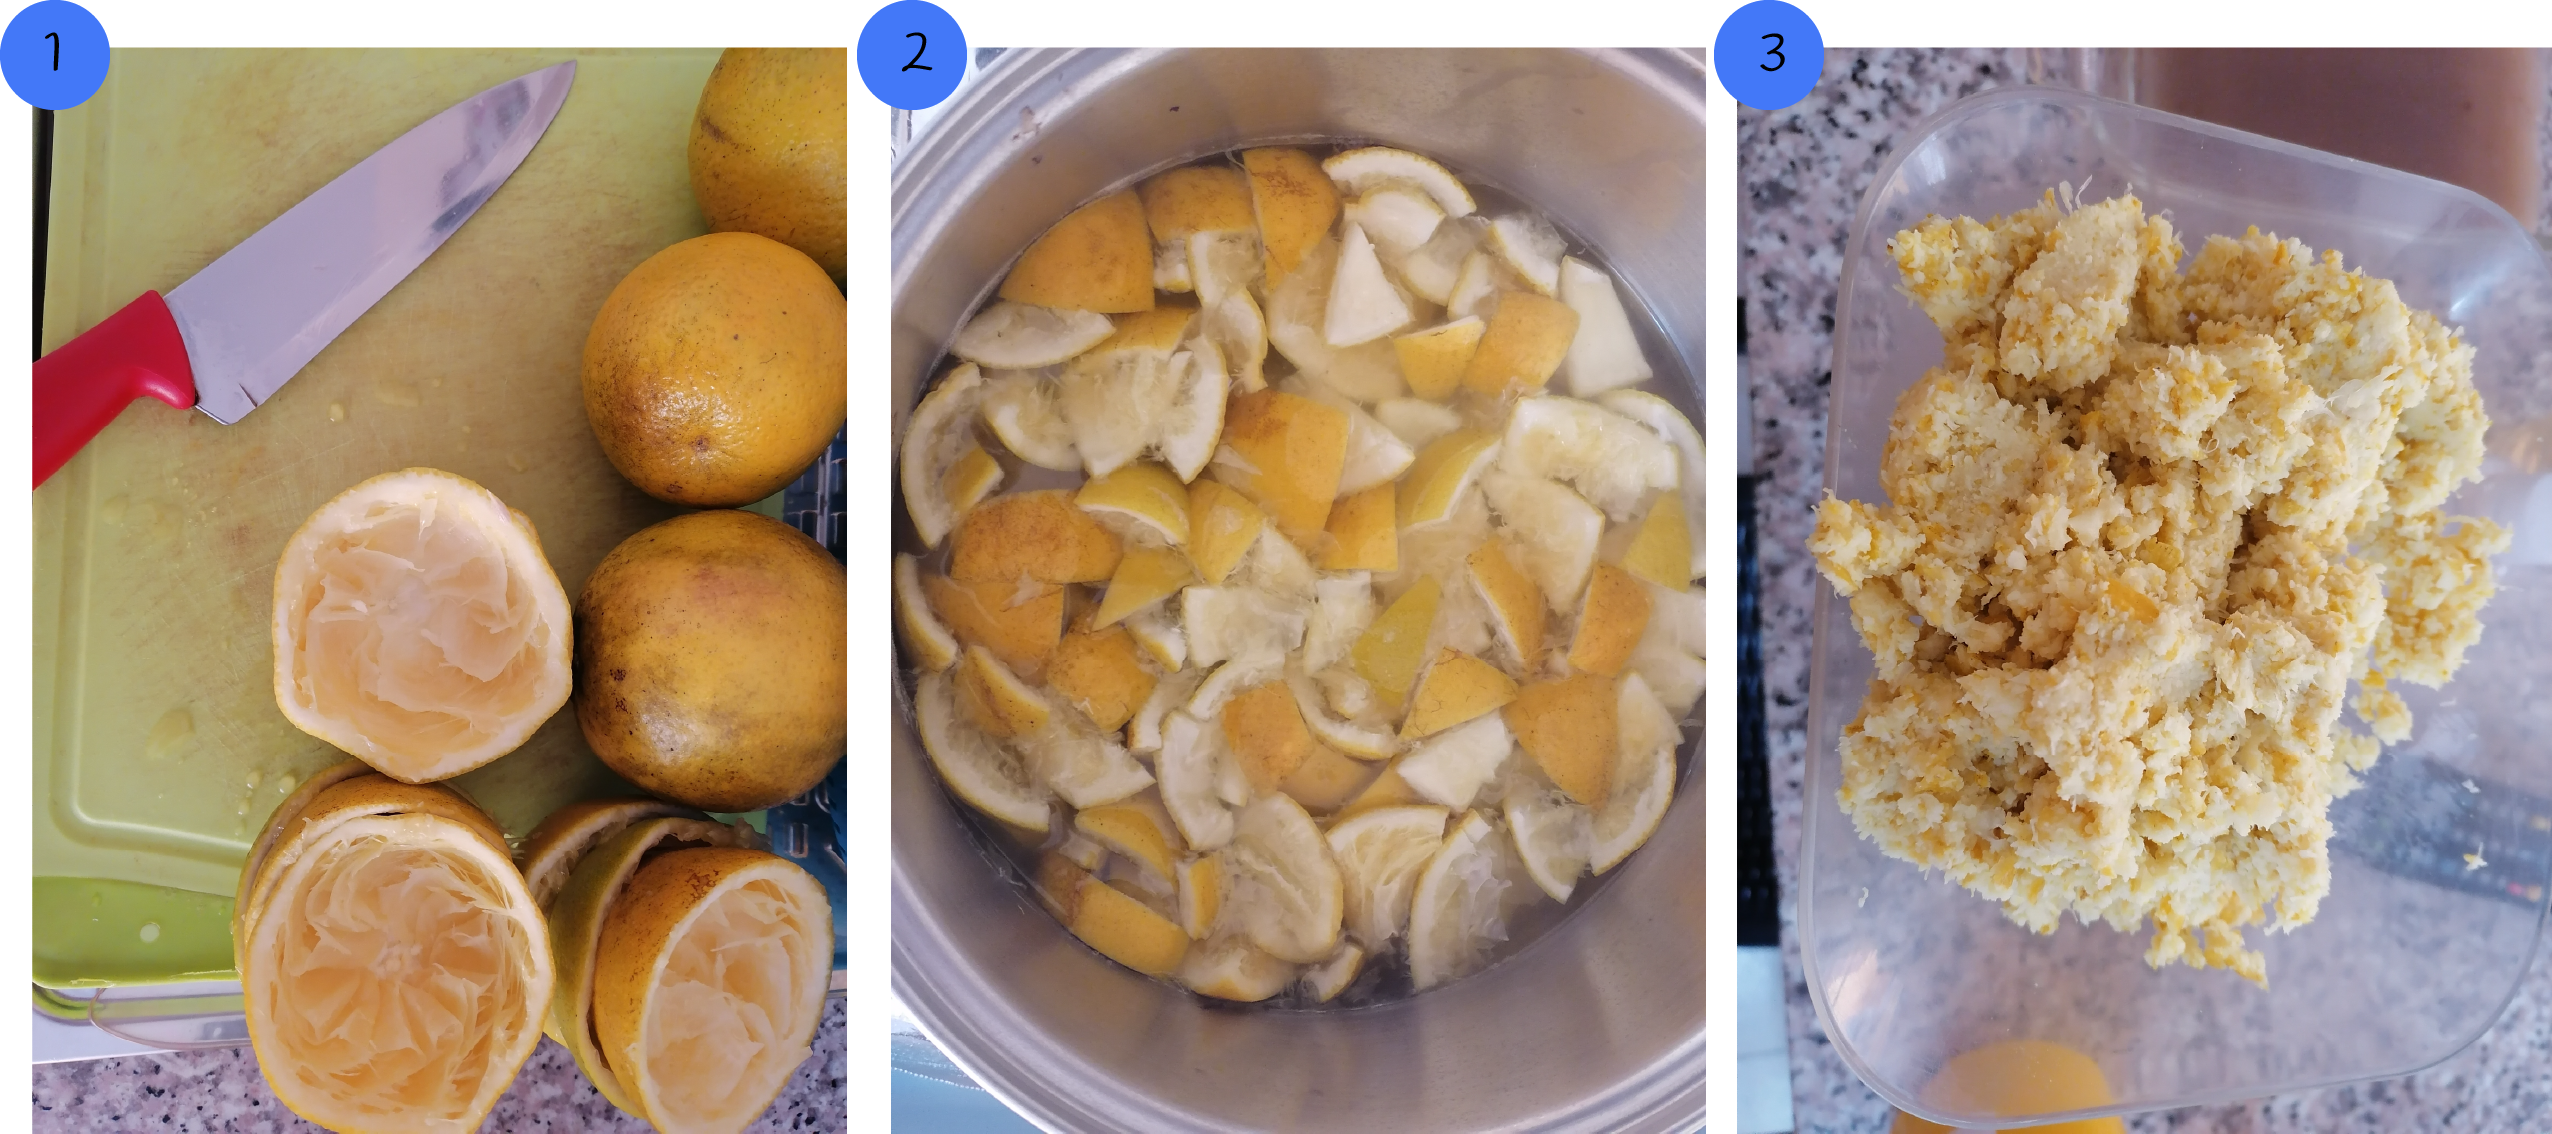
The banana based material took a longer time during the elaboration process because I waited until the biomass was completely dry but this material took more time to obtain the pulp because the orange peel was harder to process and to clean. But here once I obtained the biomass I put the other additives and mix them all.
Ingredients:
▪ 200 g of orange peel pulp
▪ 33 g gelatin
▪ 20 ml of glycerin
Steps I followed:
- Soften the peels, per 100 grams of pulp is 100 ml of water.
- Process the peels until a cream is obtained.
- Place the biomass + glycerin + gelatin in a pot.
- Stir over medium heat until it thickens. Pour into a mold
- Let it dry (you can use an oven)
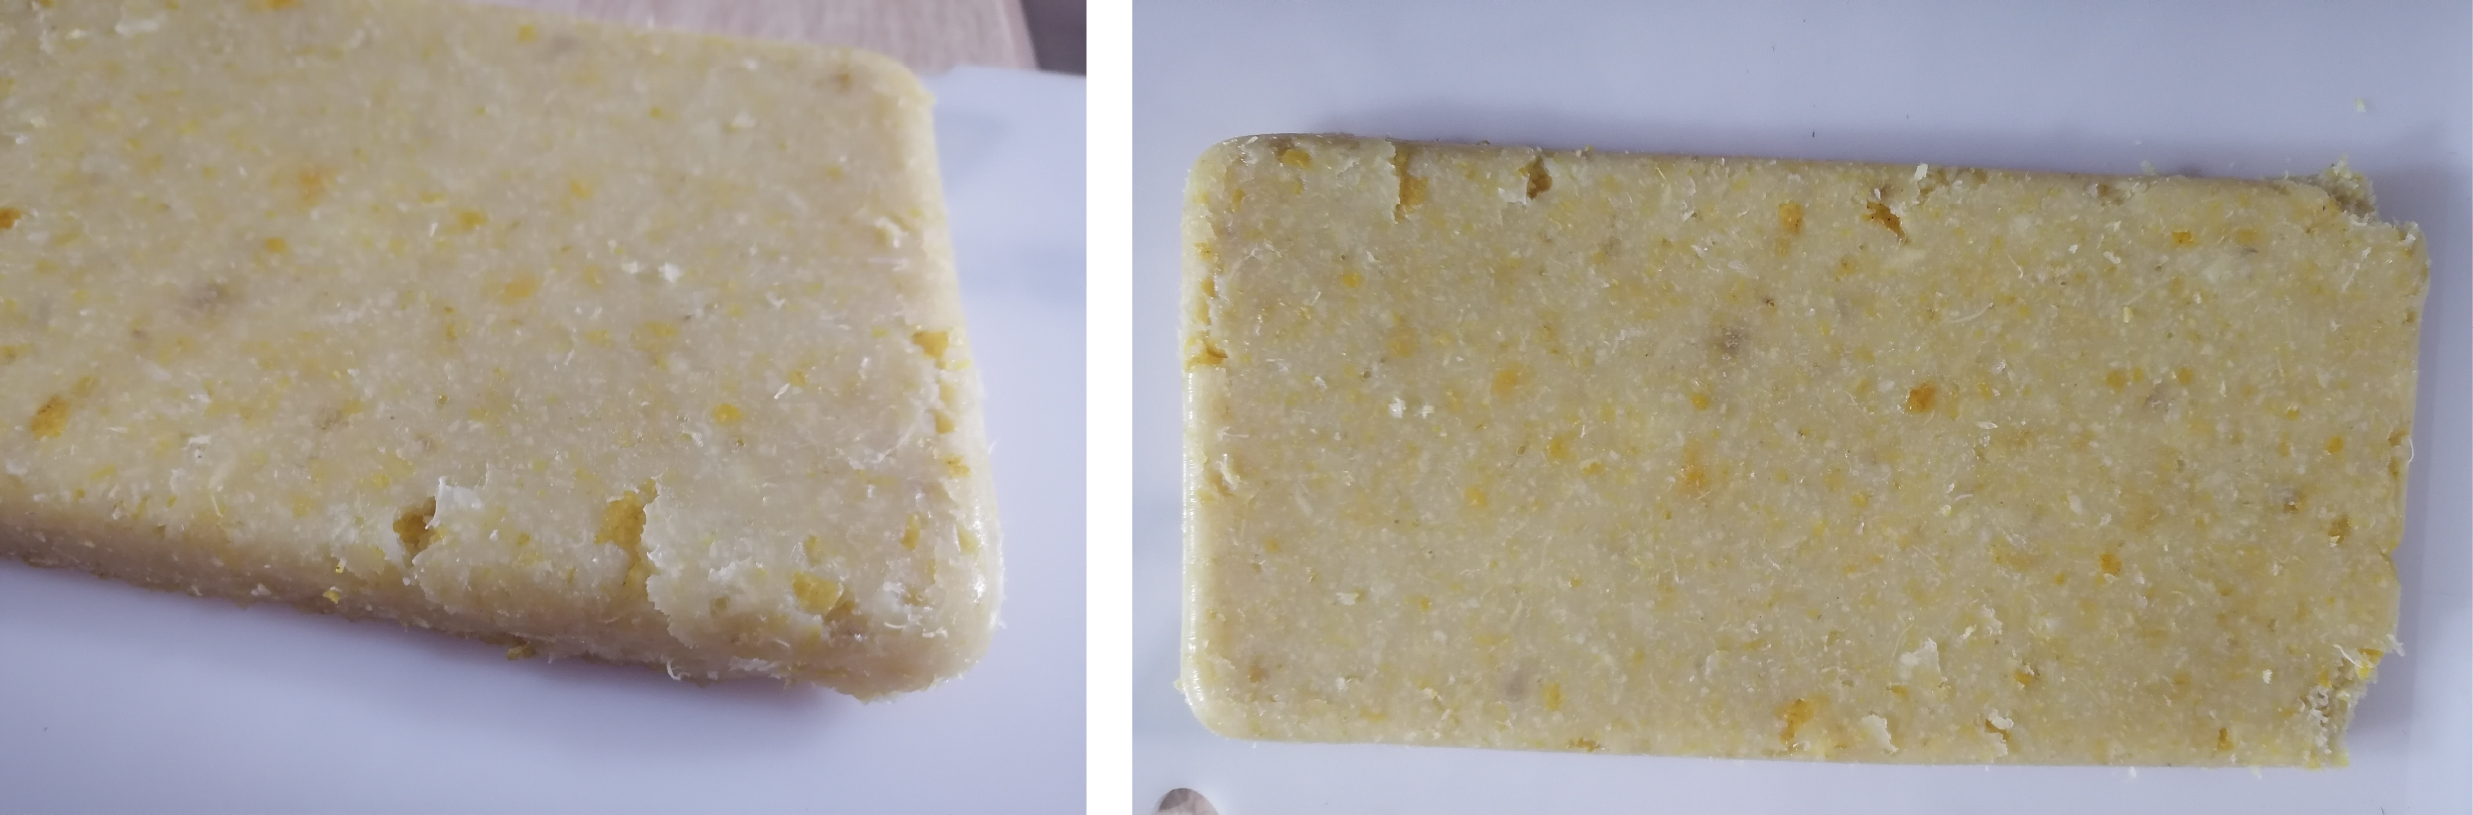
I loved the final result, it turned into an strong material and very resistant. The only thing I want to improve is the texture because in one side it is very smooth but the other side is rough and you can feel a little bit the hardness of the peels. Surprisingly, the smell is really good in this one
More research - Useful links
▪ Fruitleather and Peelsphere
▪ Research book Bioplastic and Bioplastic cookbook
▪ EFL_material databases & comparison sheet
▪ Microbial leathers
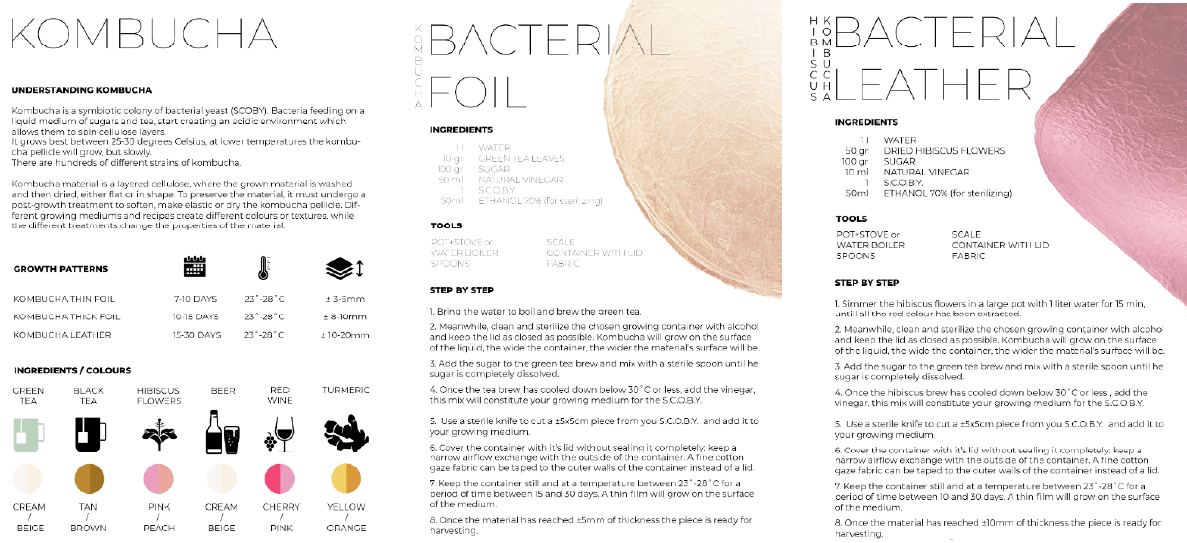
Hipster tea sludge is being transformed into a wonder material
I didn't know almost anything about growing biomaterials, so after the help from my local lab I searched more about the kombucha that was catching my attention a lot. Kombucha is a trendy fermented drink, but it can be more than that! To brew it, you start with sugared tea and add a rubbery mat called a SCOBY(Symbiotic Culture Of Bacteria and Yeast). Brew Dr summarizes this concept, saying: “when certain bacteria and yeast are put together and cultivated in the right environment, you get SCOBY. It’s a living culture that grows and evolves, consuming sugar as its fuel.” Some of the bacteria in this floating ecosystem naturally manufacture cellulose. If you dry out a scoby, you get a tough, versatile, and Earth-friendly material.
In summary: appart from being a sweet beverage, by growing Scoby in tea, vinegar and sugar, you can get a gelatinous substance on the surface of the drink. This substance consists of strands of cellulose woven together. When dried and put through different aftertreatments it can act like a new vegan leather.
To make the Kombucha from scratch I first saw this video and followed this recommendations. You can get the recipe from the slides, Materiom or from the Open Source Kombucha
Recipe I followed
- 8 cups of water (regular chlorinated tap water can be used for the tea, boiling the water evaporates the chlorine)
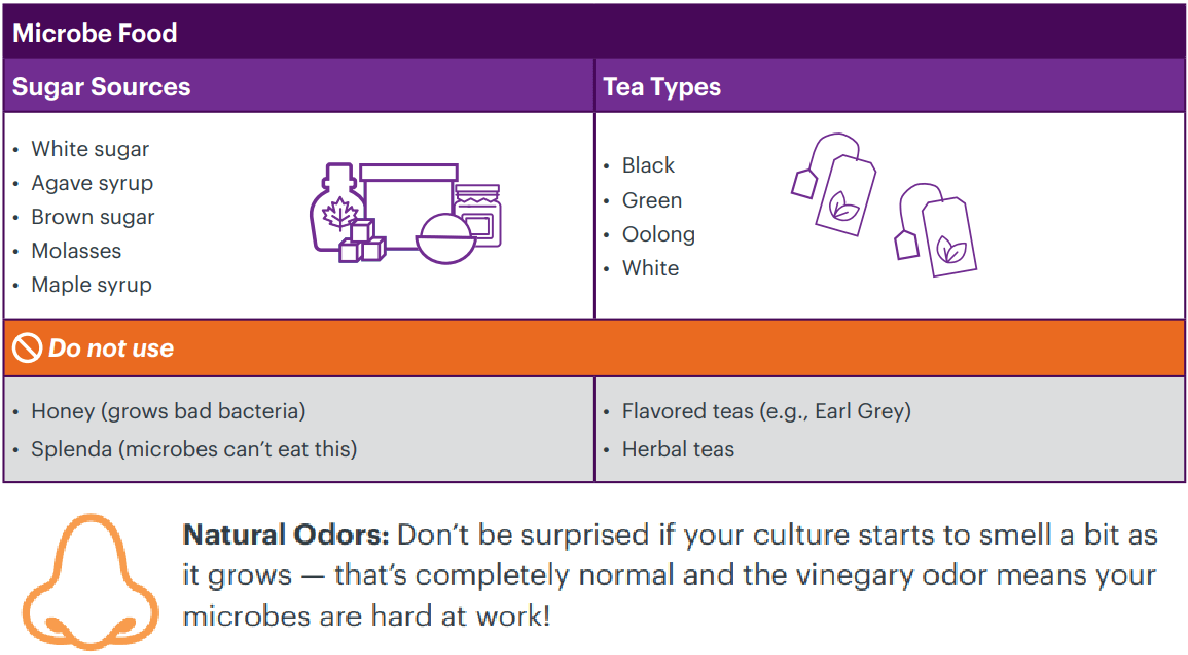
- 1 cup of granulated sugar
- 100 ml of vinegar
- 100 gr of SCOBY
- 8 teabags of green or black tea
Materials
▪ gloves and mask
▪ crystal jar (must be sterilized)
▪ a piece of paper towel or light fabric (it's important to let the gaseous exchange happen but we need to avoid culture contamination)
▪ rubber band
Also you need a warm (not too warm or you will kill the bacteria) and dark place for this bacteria to thrive. Avoid placing the container next to a window and dot leave it withouth the fabric.
Scoby is the mother of Kombucha, so first you need to get this to star with the larger process of getting the Kombucha leather
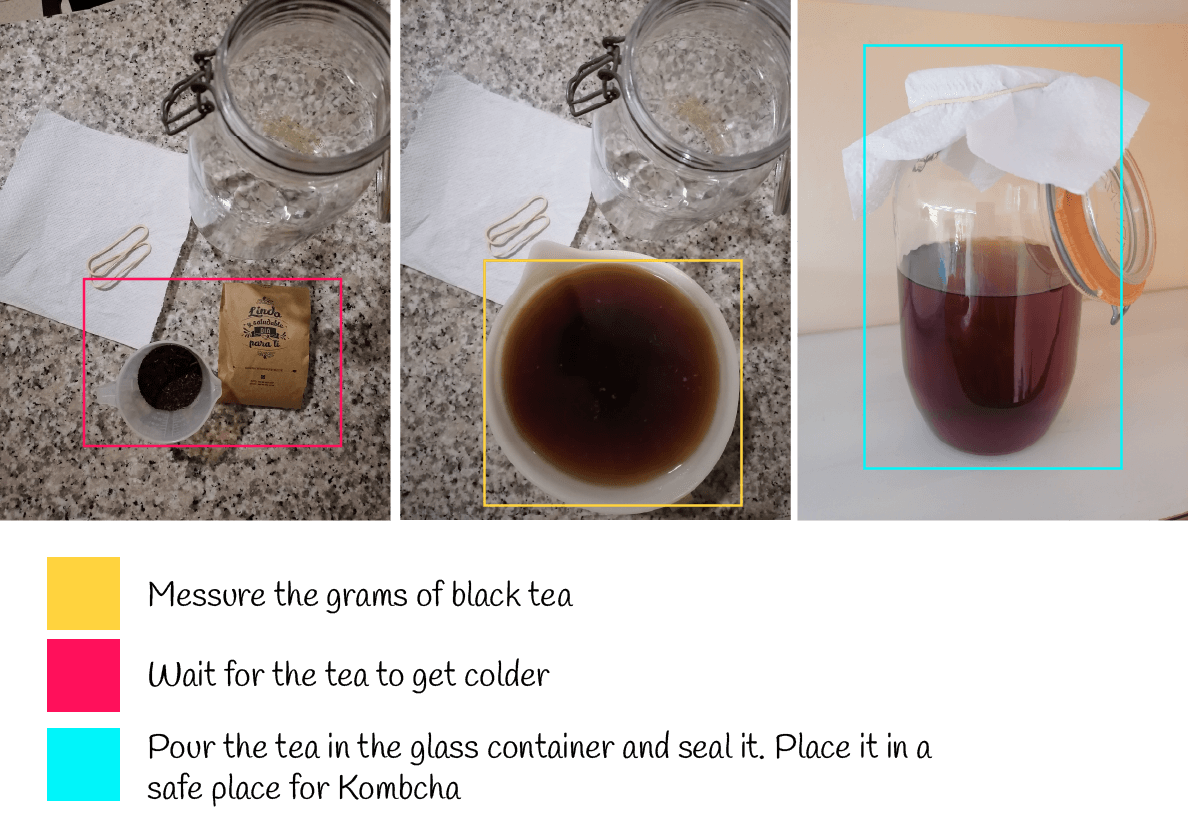
Steps I followed
- Sterilize the container and prepare a safe space to work - I made the sterilization with hot water
- Boil the water for the tea. Add the sugar and disolve.
- After boiled, remove from heat and add the tea. Infuse for 5 - 10 mins
- Pour the cooled tea in the container (I almost filled all the jar). Let it cool to below 30° celsius, do not use hot tea in the preparation, as it can kill the starter bacterial culture
- Cover the container (I used paper towel) and secure with a rubber band
- Let it grow for about two weeks or until its about 1/2 to a 3/4 inch thick
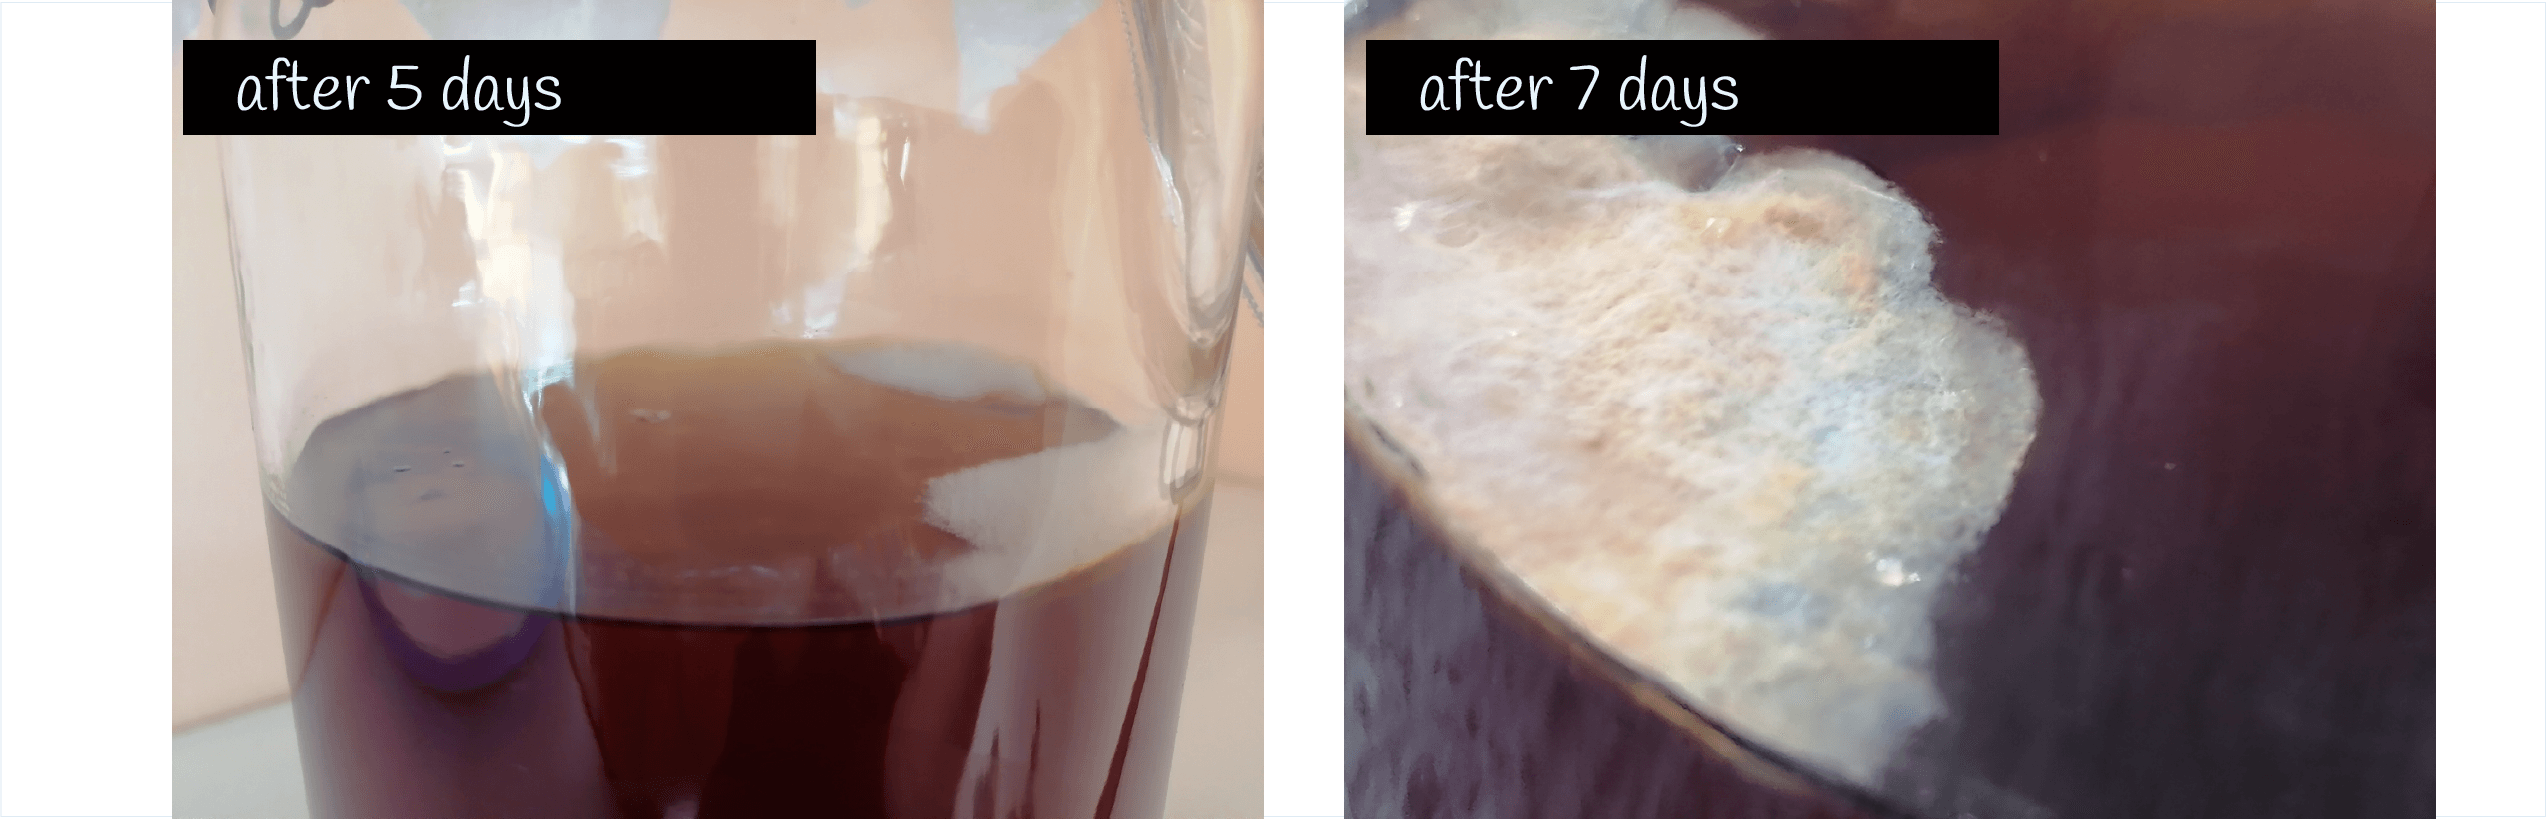
Obs:
-The first five days: the tea starts acting more like a gelatine than water, the density is changing and scoby it's growing but it was very tiny that I couldn't get a photo of it
-8 days later: some white dots appeared in the jar and they keep growing. I think that shouldn't happen but I'll wait a few more days
-11 days later: SCOBY got sick, I had to prepare another one :c
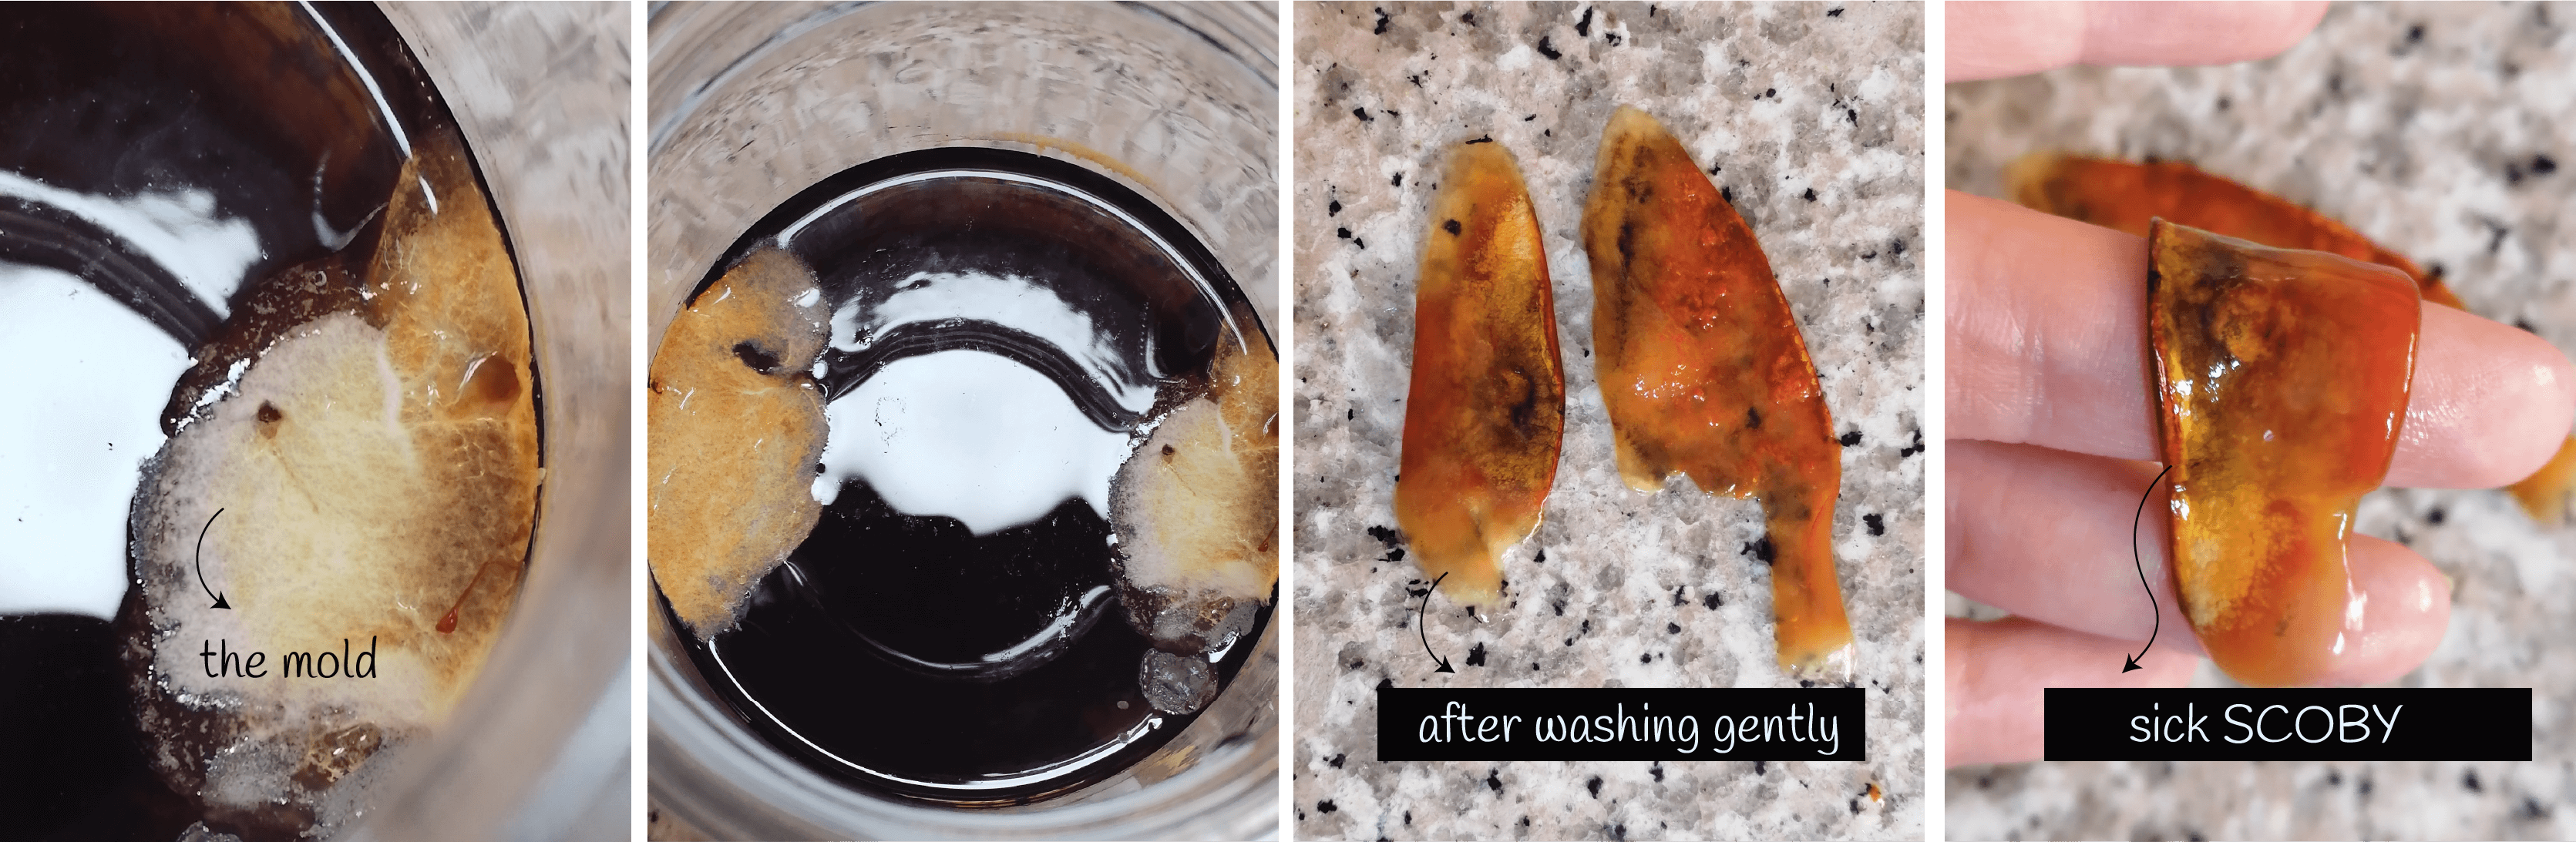
Mold in Kombucha
I knew it was not growing properly because some little white dots started to grow after the fourth day. But I decided to wait more days to see whats happens. Then I noticed the SCOBY was growing behind all that white mold but after day 11 it stopped growing and I just removed it from the jar. I washed this two little pieces of material that was kind of a thin gelatine and I cleand the mold but SCOBY was stil looking sick. It was pretty dark, almost black and I searched about this to know if I could use it or not. I found out that this was not properly to continue using so I had to make another SCOBY rigth from the start.
This time I was more careful with the sanitary requirements and also tried a different recipe. Last time I completely forgot the vinegar and I have a belief that adding it can prevent mold growth. The recipe:
- 1lt. of water
- 100 gr. of sugar
- 100 ml. of vinegar
- 2 bags of black tea
Steps to follow
The first three steps are the same first 3 steps from above ⬆️ but this time I'll use a plastic container that it's bigger to get a bigger piece of material.
- Once you prepared the tea, let it cool and while that, pour the last preparation (the previous liquid tea) in the new container and the live piece of SCOBY (it should be on the bottom of the container)
- Cover the container (this time I'll use a piece of fabric) and secure it. Keep it covered and away from direct sunlight
- Let it grow until it reaches the thickness you want
- Remove the material from the container and wash it with cold water (eliminating the yeast (brown strands))
- Place on a piece of wood or other type of surface where it will dry (avoiding direct sunlight).The drying time will depend on the weather and temperature.
Useful links and readings
▪ Microbial Cellulose by Lorena Trebbi
▪ Understand Kombucha Tea Fermentation
▪ Week's outcomes and learning 📌
In general, this field of biomaterials has a huge potential to change the way materials are produced, but there's missing how we can craft and grow materials in finished sheets without following lots of steps in the production value chain. I mean: how all of this can be manufactured for an industry. I think that even if we think about a change in the way we buy things (slow fashion) and so on, there's more to do to keep growing cities.
Moreover, I have a love-hate relationship with this work, because I can't stand the smell of the gelatine but I really like the results that came out of those recipes, while the smell of the agar was not disgusting at all but it was more difficult to control in order to get the final results. I would say that I found the agar more sensitive to temperature and environment, making all of this affect its composition and drying. Many of the agar recipes took a long time to dry and accumulated humidity depending on the surface on which I placed them.
Notes and recommendations for crafted materials:
- Agar takes more time than gelatine to dry and is not very elastic unless we mix it with other materials like gelatine
- For every recipe it should not feel cold to the touch, then it's still drying and you shouldn't remove it from the mold
- It's better to use wood for the frames of the mold, this avoid the material to reduce it's size a lot because it sticks to the frame
- Add the color pigments during boiling and mix it, if you add it later it migth not be the result you want (try to use natural pigments)
Notes and recommendations for grown materials:
- soon