Soft Robotics
📅This week started on Monday 6th (december) with the recitation about Embroidered Inflatables by Bruna Goveia.
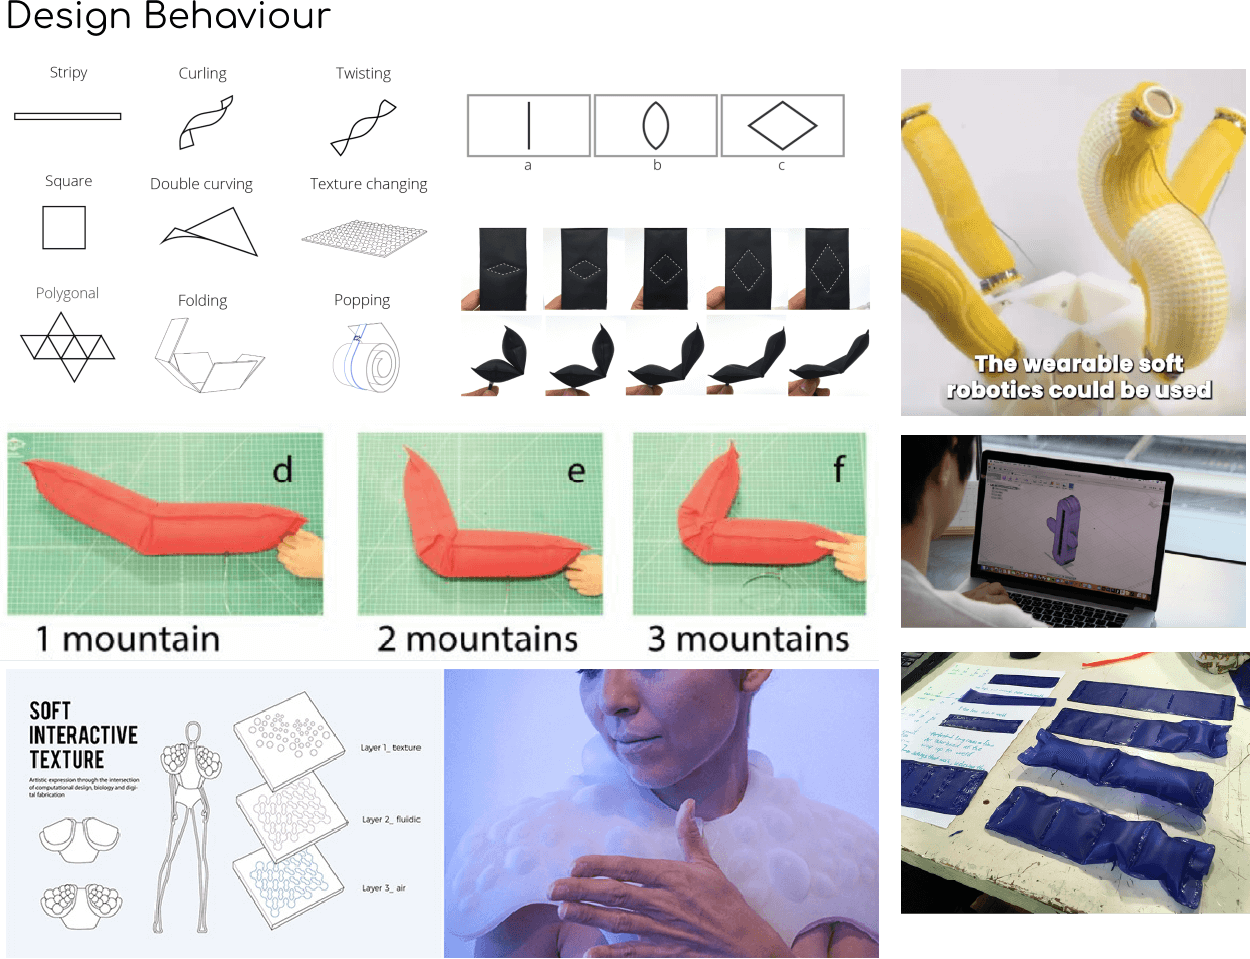
And here are some important things to know about artifical muscles and inflatables - By Lily Chambers and Adriana Cabrera. I find really interesting the inflatables, specially for the ones focused in industry applications. So, in this assignments I want to explore more the basic inflatables, with different shapes and just understand correctly it's fabrication.
▪ What I made?
🗹 Design: 2D and 3D modeling
🗹 List the files for the assignment
- Is the project assembled, functioning and complete
Here's how they work:
The muscle consists of a rubber tube that is surrounded by a tubular braided fiber mesh sleeve. When the tube is inflated the mesh expands radially and contracts axially, shortening the overall length of the muscle and subsequently producing a pulling force.
Air muscles can contract up to 40% of their length, depending on the method and materials of construction. One thing to remember is that the air muscles must be under tension to function properly.
📝 Notes:
The muscle's efficiency and longevity will vary according to several parameters concerning its construction:
▪ Muscle length
▪ Muscle diameter
▪ Type of tube used
▪ Type of braided mesh used
Useful links:
▪ Wikifactory Artificial Muscles
| Inflatables | The essential rules |
|---|---|
 |
(1) You have to connect all the chambers for the air/ fluid circulation (3) All the channels must be connected to the entrance of the air and the tube (2) Consider in your design the sealing allowance, to isolate well the inflatable |
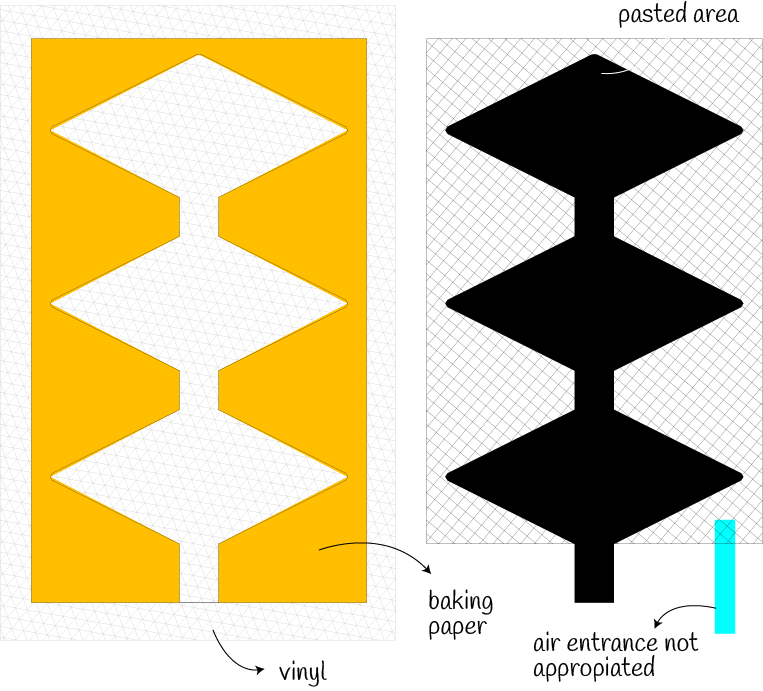
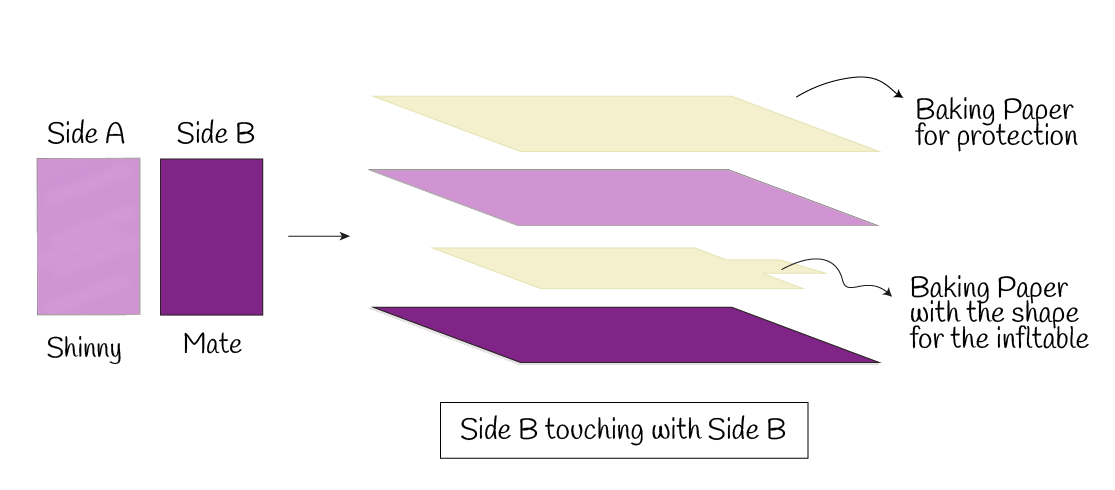
✔️ Steps I followed:
- Preheat the iron depending on the temperature of the vinyl. For the vinyl I had I used the max.temperature of the iron (120 degres aprox.)
- Cut rectangles about 15 x 10 cm of vinyl. Or you can use the vinyl cutter to cut delicate pieces that require more precision or natural nice looking (I tried it but it failed). Don't use the laser cut for this because it releases chlorine!
- Cut the shapes on the baking paper and make sure there is a thin piece of baking paper in the center for the air tube inlet. This material is appropiated to cut in the laser cutter so you can get any shapes you want.
- Once I had the sandwich, I put one sheet of baking paper between the vinyl and the hot surface of the iron to avoid damaging the material.
- Press the material for 20 seconds and wait some seconds for it to cool.
- Remove the sheets of the protective material carefully for the vinyl pieces making sure not to break the vinyl.
- Insert the tube into the inflatable and insulate it using a shrink tube and a lighter or heat gun.
- Proceed to inflate and have fun.
Useful links:
▪ Laserweld Your Own Inflatables
References
Useful alumnis works for references and workflow
Vinylcutting
I designed different patterns, based on the slides from Adriana. I wanted to see the behavior of each example.
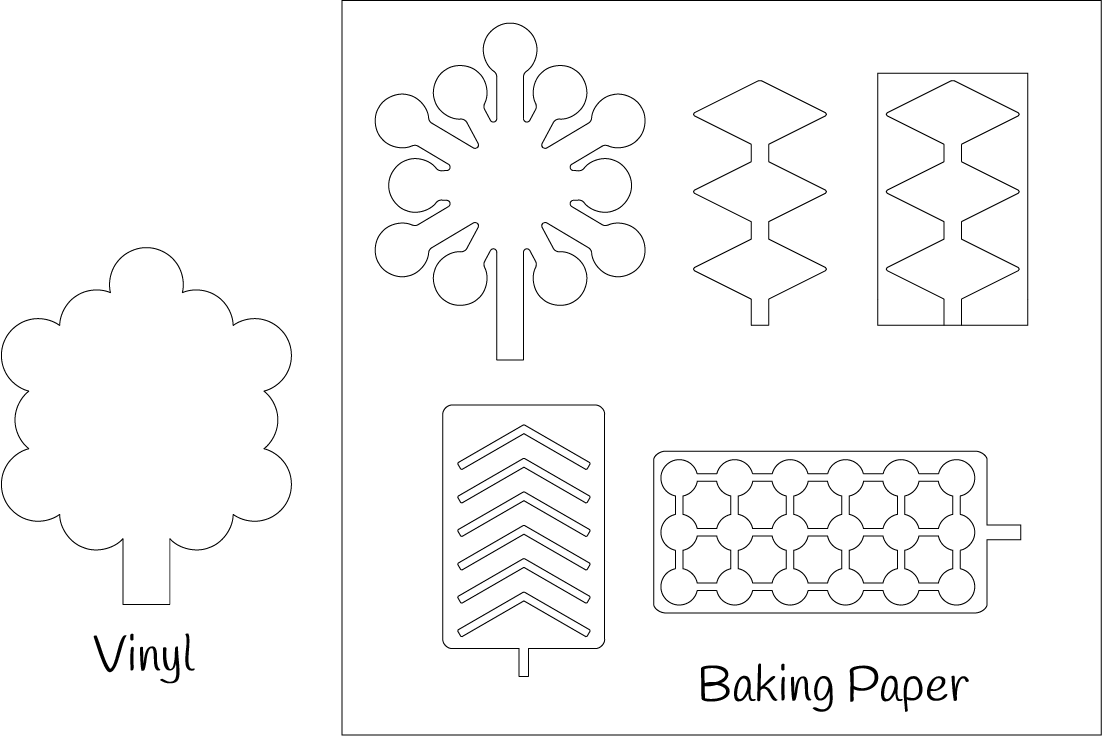
The first thing I realized is that you need textile vinyl and not sticker vinyl. Which is the difference? The main thing is that the textile vinyl has an adhesive that is activated by heat, and therefore is perfect for use on fabrics.

After knowing this, I made the patterns using Rhino. I wasn't sure about the size of the channels and the model so I decided to try this patterns with an sticker vinyl. I made three diamonds in a row, with a center channel of 6mm and the separation between each diamond is about 7mm.
With this handmade and quick prototype I noticed few important things:
▪ When the adhesive paper is not yet removed, the inflatable lifts up and after removing the support it retracts.
▪ If the air flow is not well distributed, it may be because there is a part that still needs to be heated to get it right.
▪ You need to leave some space (like 7mm) from the edge.
▪ It's important how you cut the baking paper because the air flow depends on that.
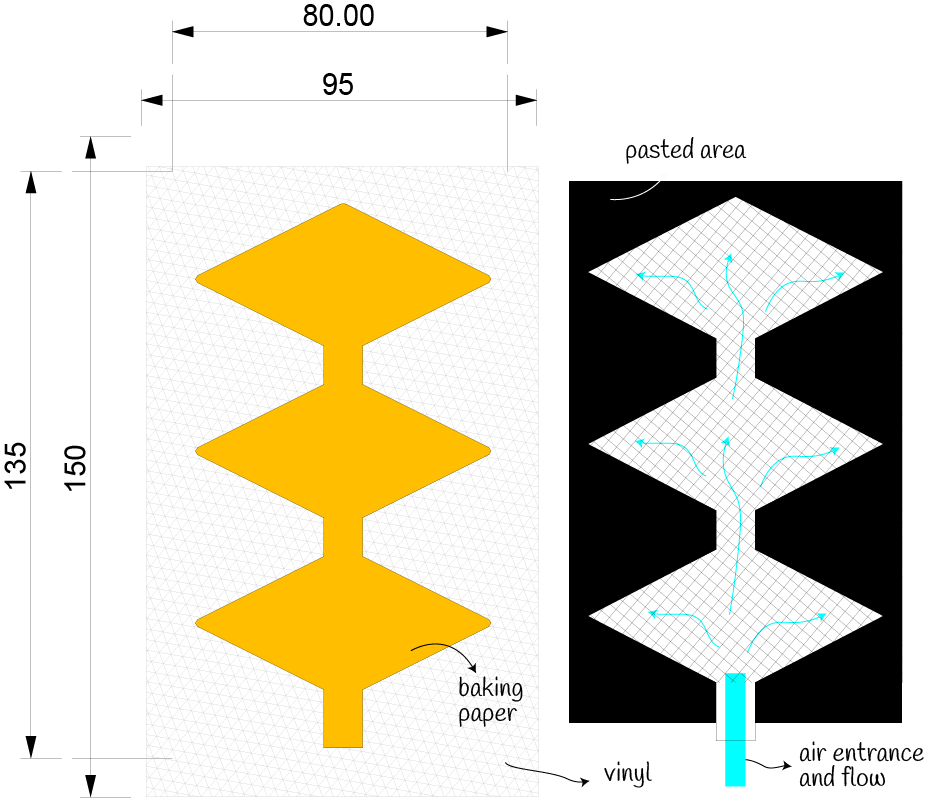
Now I improved some things for this new inflatables. First, I'm usign the appropiate vinyl and I made bigger shapes for the baking paper. This time I made variations in the size of the inflatable and I used an plastic tube of 4mm diameter.
For cutting the vinyl I tried to used the Silhouette but for some reason it wasn't cutting well. I put the shiny part of the vinyl facing upward but the roller on the right made the vinyl move too much and didn't move parallel to the roller on the left. So, I changed the material settings again and put the matte side up. The same thing happened! I didn't know why and that day my instructor was not at the lab. At that time I decided to put more masking tape to stick better to the base sheet so it would move better when cutting. I could see that putting the matte side up was the right thing to do and that the cutting parameters were right because I was able to get the shape out of the vinyl, but in the end I ended up damaging a lot my piece of vinyl. Very sad :c
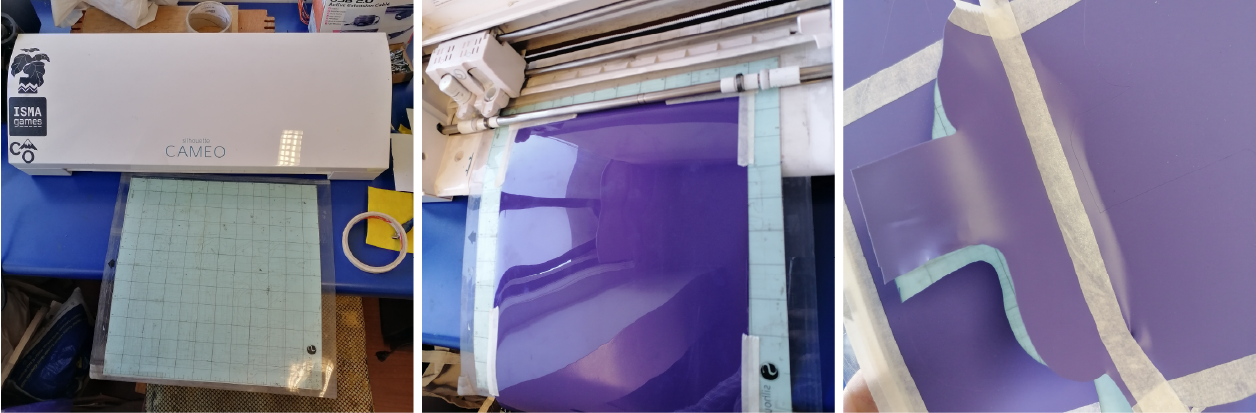
I ended up cutting the shape I had with scissors, as similar as possible to the shape I wanted, and this was the result
Then (too late) I watched this video that explain how to cut the vinyl using the Silhouette and I think the reason of my issue was that I was sticking the viniyl on the mat, but the protective plastic sheet of the textile vinyl works as a support as well as a mat for the Silohuette machine. And it also serves as a carrier to adhere the design to the textile. So next time I will place it without the other mat to check if this is what was wrong.
How to make a mold
First I downloaded an example mold from Open Soft Machines that has 3 parts:
- one part is the one that has the air channels
- other part is the one that closes the open part of the channel.
- and the last part is the base of the mold
Then I designed a mold from scratch using Fusion 360 (based on the example), it was a little tricky but I got it, and after making that I was really clear of how the channels need to be and where to place them.

▪ 3D Printed molds
| Filament | Layer height | Infill | Temperature | Printing speed | Adhesion |
|---|---|---|---|---|---|
| PLA | 0.26mm | 20%/grid | 200º | 60mm/s | Skirt |
Casting
You need a mixture - I used Ecoflex 0030 and for that specific material I needed xxml of the component A and the same amount of the component B. Ratio 1:1 is the key. Then I stir the mixture slowly (always slowly to avoid bubbles) and then I put it in the mold. The ecoflex 0030 tends to create bubbles that may cause problems to the soft robot, that's why is recommended to pour the mixture homogeneously and not so close to the mold, rather from a higher position. And if stills have some bubbles you should tap the mold to release the air (like when you make a cake mixture and then tap the mold before putting it in the oven)
Important note 📝
Be sure that the surface where the mold is placed is completely flat and leveled, because if it is tilted, the mold may not fit properly and this will make the soft robot useless. - Why? because the air flow depends not only on the design of the channels but also on the thickness of the material in the mold. The air is going to flow more towards the thinner areas (with less material) and those areas will inflate before the others, and that might not be what you are looking for in your design. As well, the thinner the layer, the easier and larger it becomes.
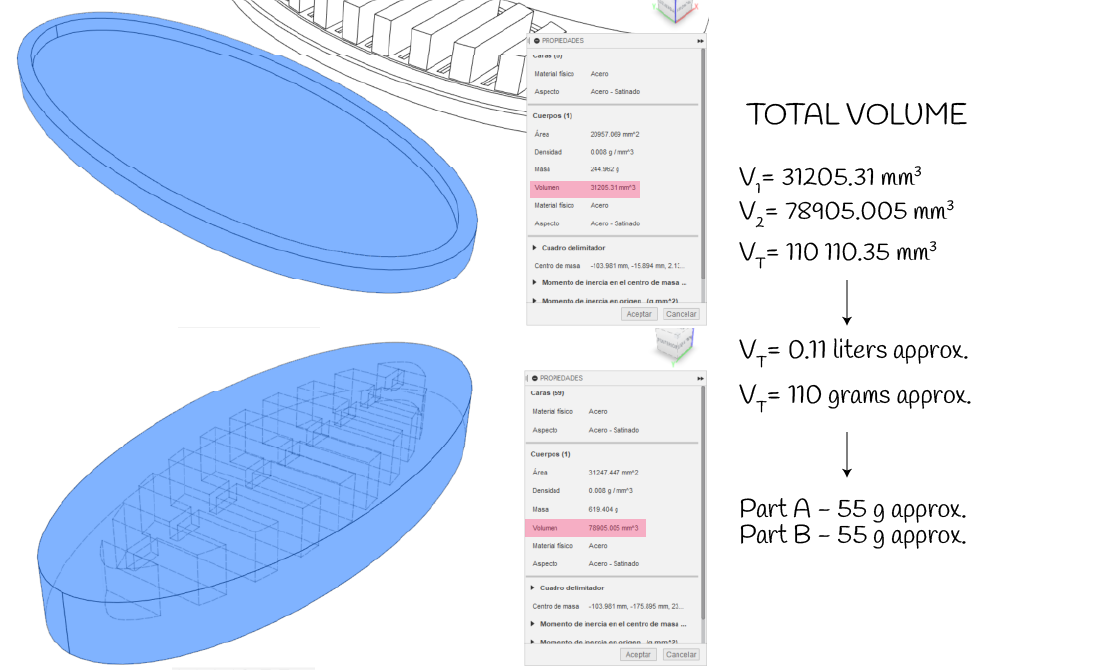
Materials I used
▪ 110g (depends on mold size) Ecoflex silicone rubber 00-30 (Smooth-on, Inc.)
▪ Disposable mixing spoon + Disposable gloves + Plastic cups
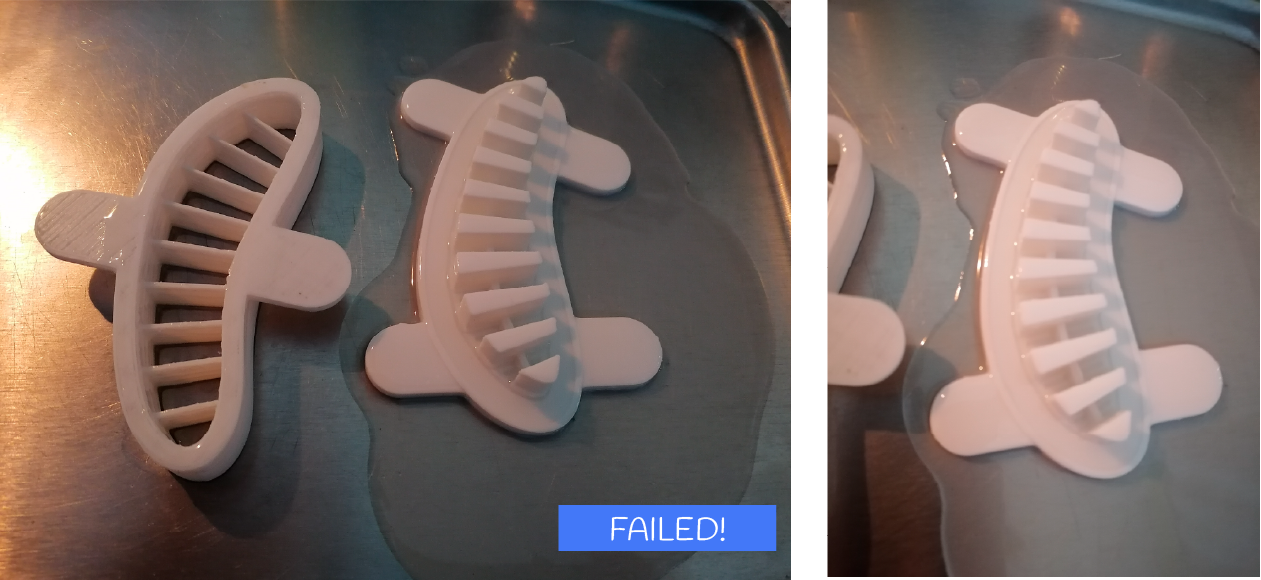
Molding and Casting
I calculated the amount of mixture using the volume of the molds, Fusion 360 is very useful to get this values and with that I put the exact ammount of silicone. I mixed 55g of part A and B for the 4 molds, in total 110g. Another way is to pour first some water in the mold to check the amount of silicones that you need.

I pour the mix in the molds and at first everything was okay, but then in the first mold, the silicone started to leak everywhere, while the other molds were still fine, so I decided to wait to see what was going on. After 30 mins I saw that the second mold also started to spill all the silicone. Too bad! and I was hoping that it wouldn't happen with the other two molds that are the bases, but yes, it did! I don't know why... so I was very disappointed and tried to clean the first mold but it was a disaster. I waited for everything to cure well and came back 5 hours later. It was a very nice silicone, no bubbles, but they were not in the mold. I removed the silicone and cleaned the molds and the table with acetone.
I recommend to use disposable things for making this, because the silicone rubber it's not too easy to remove (until it's completely curated). When I wanted to clean my molds and cups I used water, and it got worst! because the silicone has some oil and if you want to clean it quickly you'll need some acetona, but anyway, I prefered to wait until the silicone curates and then it's really easy to clean everything.
Clearly, I wanted to make another attempt and get my inflatable, and I remembered that I had to spray the mold with a liquid (which I don't have and didn't ask if there was at the lab or not). I decided to try spraying oil into one of the molds and see what happened this time. I just prepared the mixture for one mold. And I pour it... minutes later... it all spilled out. Maybe I have to wait a few minutes until it is not too liquid? I don't know. But it didn't work and I let it dry to clean it up again. And my last attempt was with the biosilicone because the advantage of this is that if it goes wrong, I can reuse it in something else..
Recipe
Ratio 1:1:2 1:glicerine + 1:gelatine + 2:water

The advantage of using this recipe is that you can reuse it many times but the big disadvantage is that is makes lots of bubbles on the mixture and you have to be really careful with that. And something to never forget is to take out the mold very carefully because it could break.
Once you have the mold out, it's time to glue the base. For this I heated the remaining mixture again and placed it on the edges of the base, so that it would not get into the channels. I let it cool for a moment and then introduced the plastic tube and put a little mixture in that area again so that it would not be completely open.
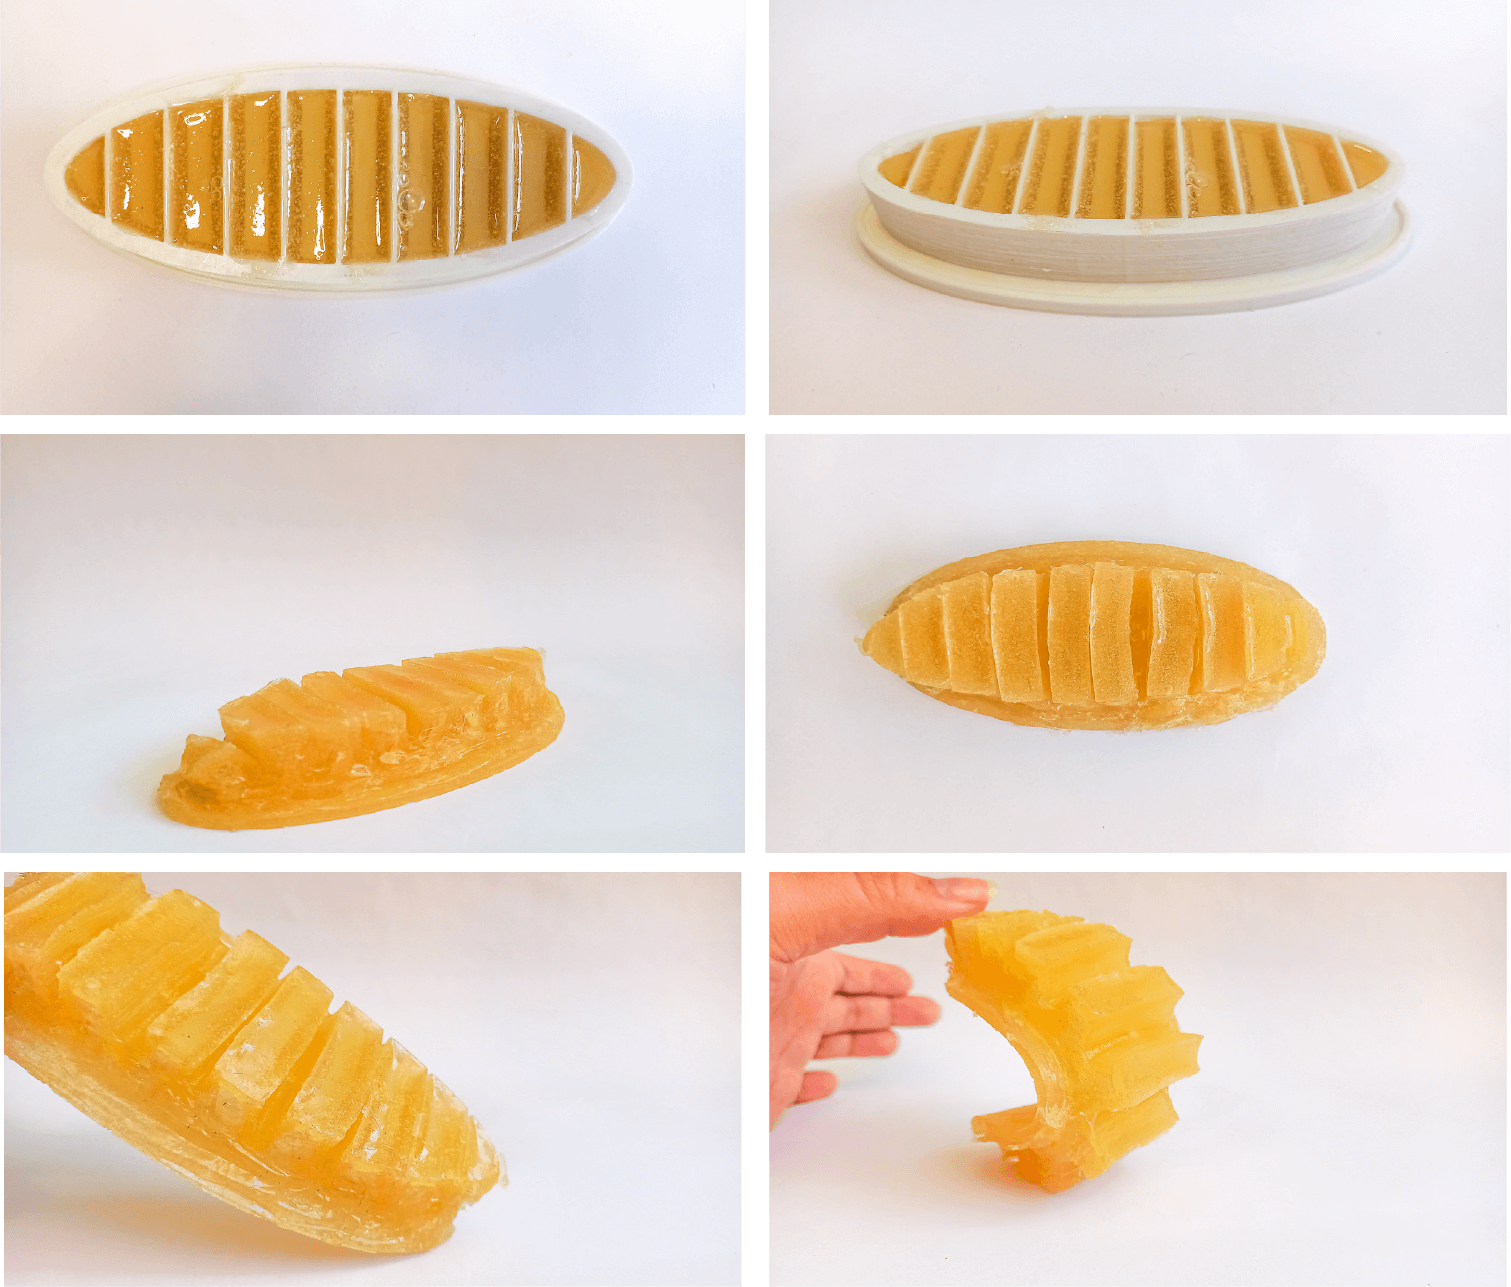
Taking it out of the mold was really hard, after aprox. 20 minutes, a little stiletto and force to remove it, but a piece of the mold broke off and got very chipped, I don't know if it can be used again
| Try 01 | Try 02 | Try 03 |
|---|---|---|
 |
 |
 |
- It's working but it doesn't infltable as much as I wanted
- I sealed some holes that were leaking the air out
- There were some little holes that I fixed
Final try
I was finally able to seal the base so that not too much air is released, however I think the base is too thin and the airflow is not 100% fine
▪ List of files 📁
▪ Shapes for vinyl inflatables
▪ Week's outcomes and learning 📌
I learn about the uses of textile vinyl and I liked it's multiple uses to make ont only design for textile but also for the inflatables. I'll realy like to try other techniques to seal the vinyl and make beautiful inflatables. Also I was asking myself how I can use this in a garment and after the final projects I saw the use of inflatables in Amanda's porject which I really loved and it's so gorgeous and beautiful to see.
I still need to improve the inflatable but with the exercise I made, starting from the design of the mold I was able to understand the workflow of it and that is useful to make any other inflatable. I also need to check the 3d printer parameters I used because maybe that's the reason why the ecoflex silicon just didn't worked on that.