Troubleshooting
Last Update: Jan 26, 2022
Week 1: State of the Art
Git Repo Issue
Problem
Oct 24, 2021
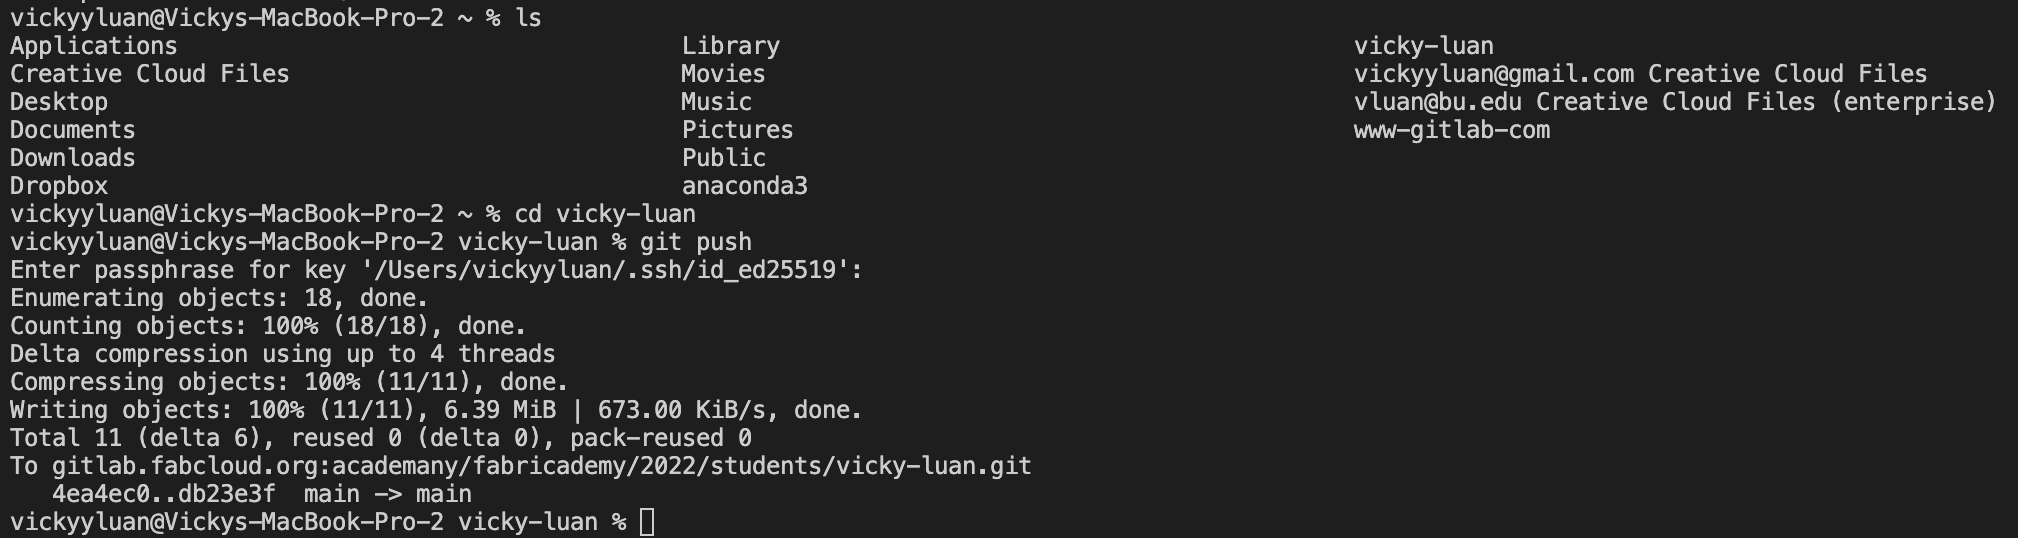
One day, my laptop crashed and when I opened Visual Studio Code again and tried to push my latest updates through the terminal, I received an error.
vickyyluan@Vickys-MacBook-Pro-2 ~ % git push
fatal: not a git repository (or any of the parent directories): .git
Solution
I first checked my directory by typing in 'ls' in the terminal.
ls
I then changed the directory to the folder containing all my git files by typing in
cd vicky-luan
This fixed the git push issue immediately.
Git Push Fail
Problem
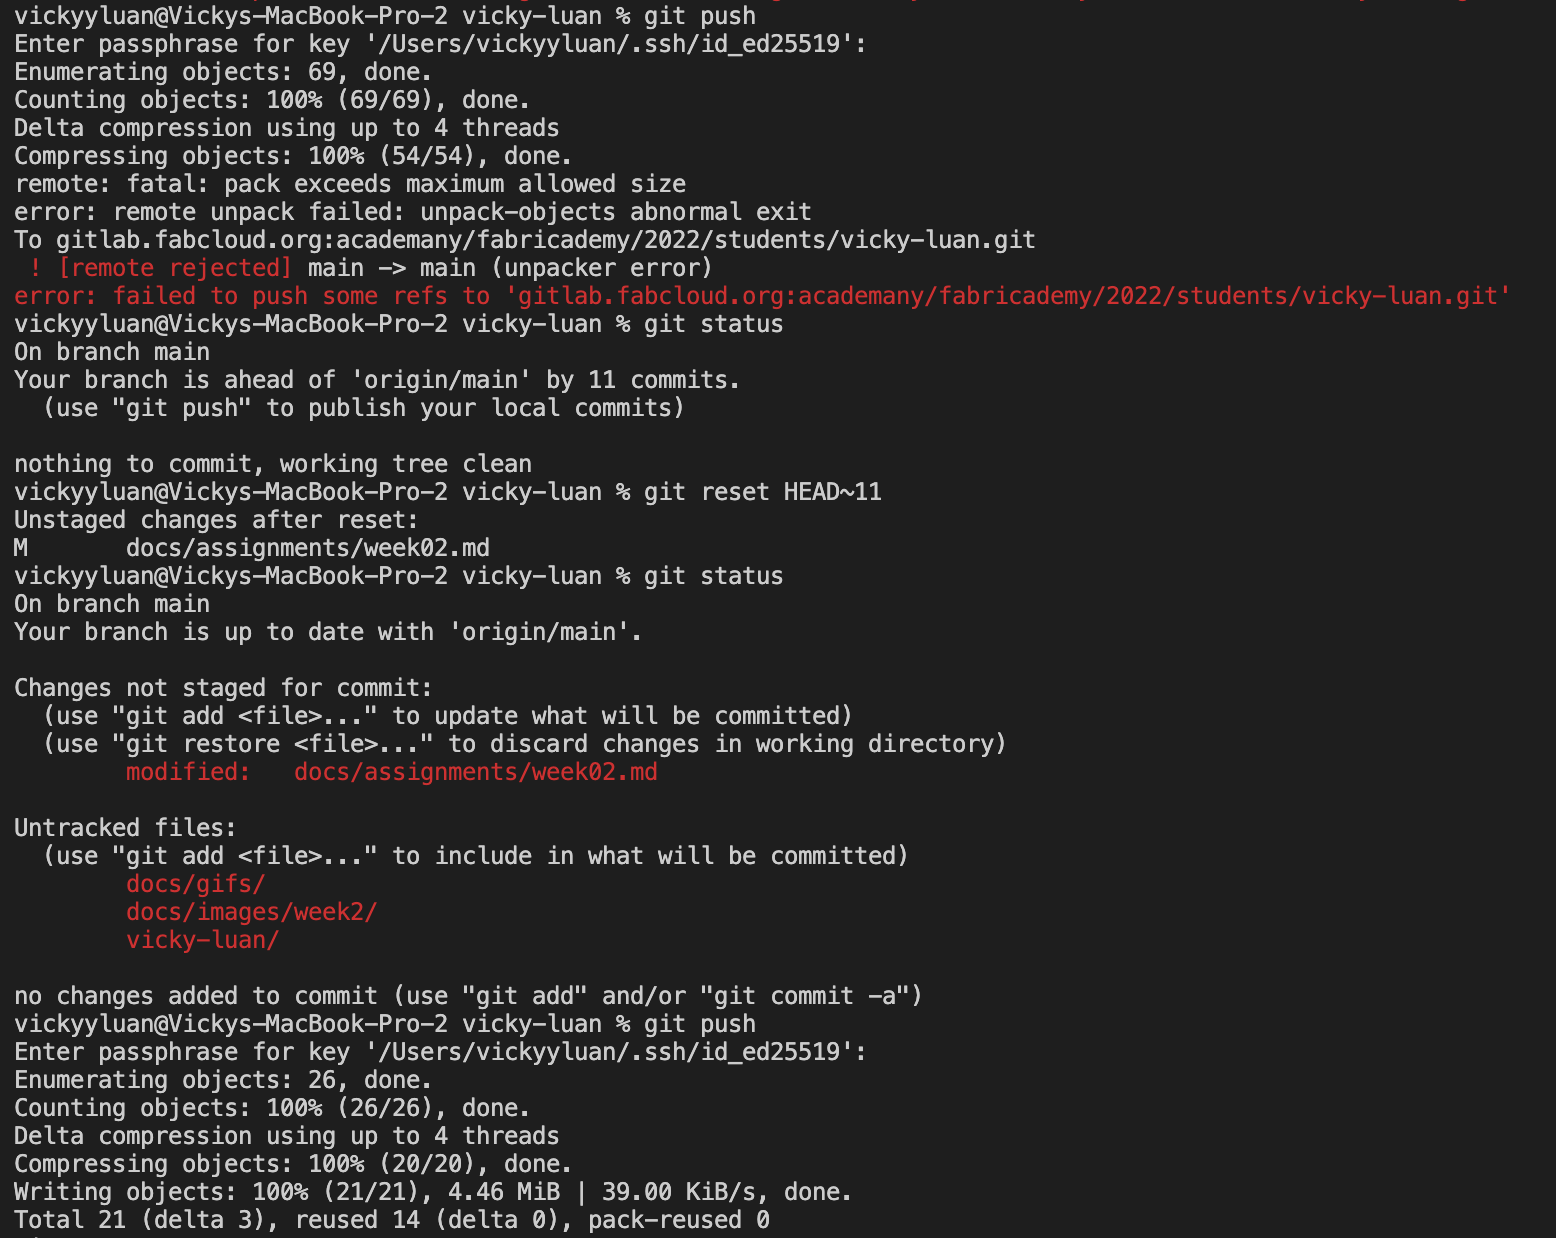
When I got too ambitious documenting this week, I committed and pushed too many changes that exceeded the combined total size. As a result I received the error:
remote: fatal: pack exceeds maximum allowed size
error: remote unpack failed: unpack-objects abnormal exit
To gitlab.fabcloud.org:academany/fabricademy/2022/students/vicky-luan.git
 ! [remote rejected] main -> main (unpacker error)
error: failed to push some refs to 'gitlab.fabcloud.org:academany/fabricademy/2022/students/vicky-luan.git'
Solution
1) I checked the git status
git status
and received an output of
On branch main
Your branch is ahead of 'origin/main' by 11 commits.
  (use "git push" to publish your local commits)

nothing to commit, working tree clean
2) New input:
git reset HEAD~11
3) Retried git push and solved the issue
Week 2: Digital Bodies
Slicer Pieces
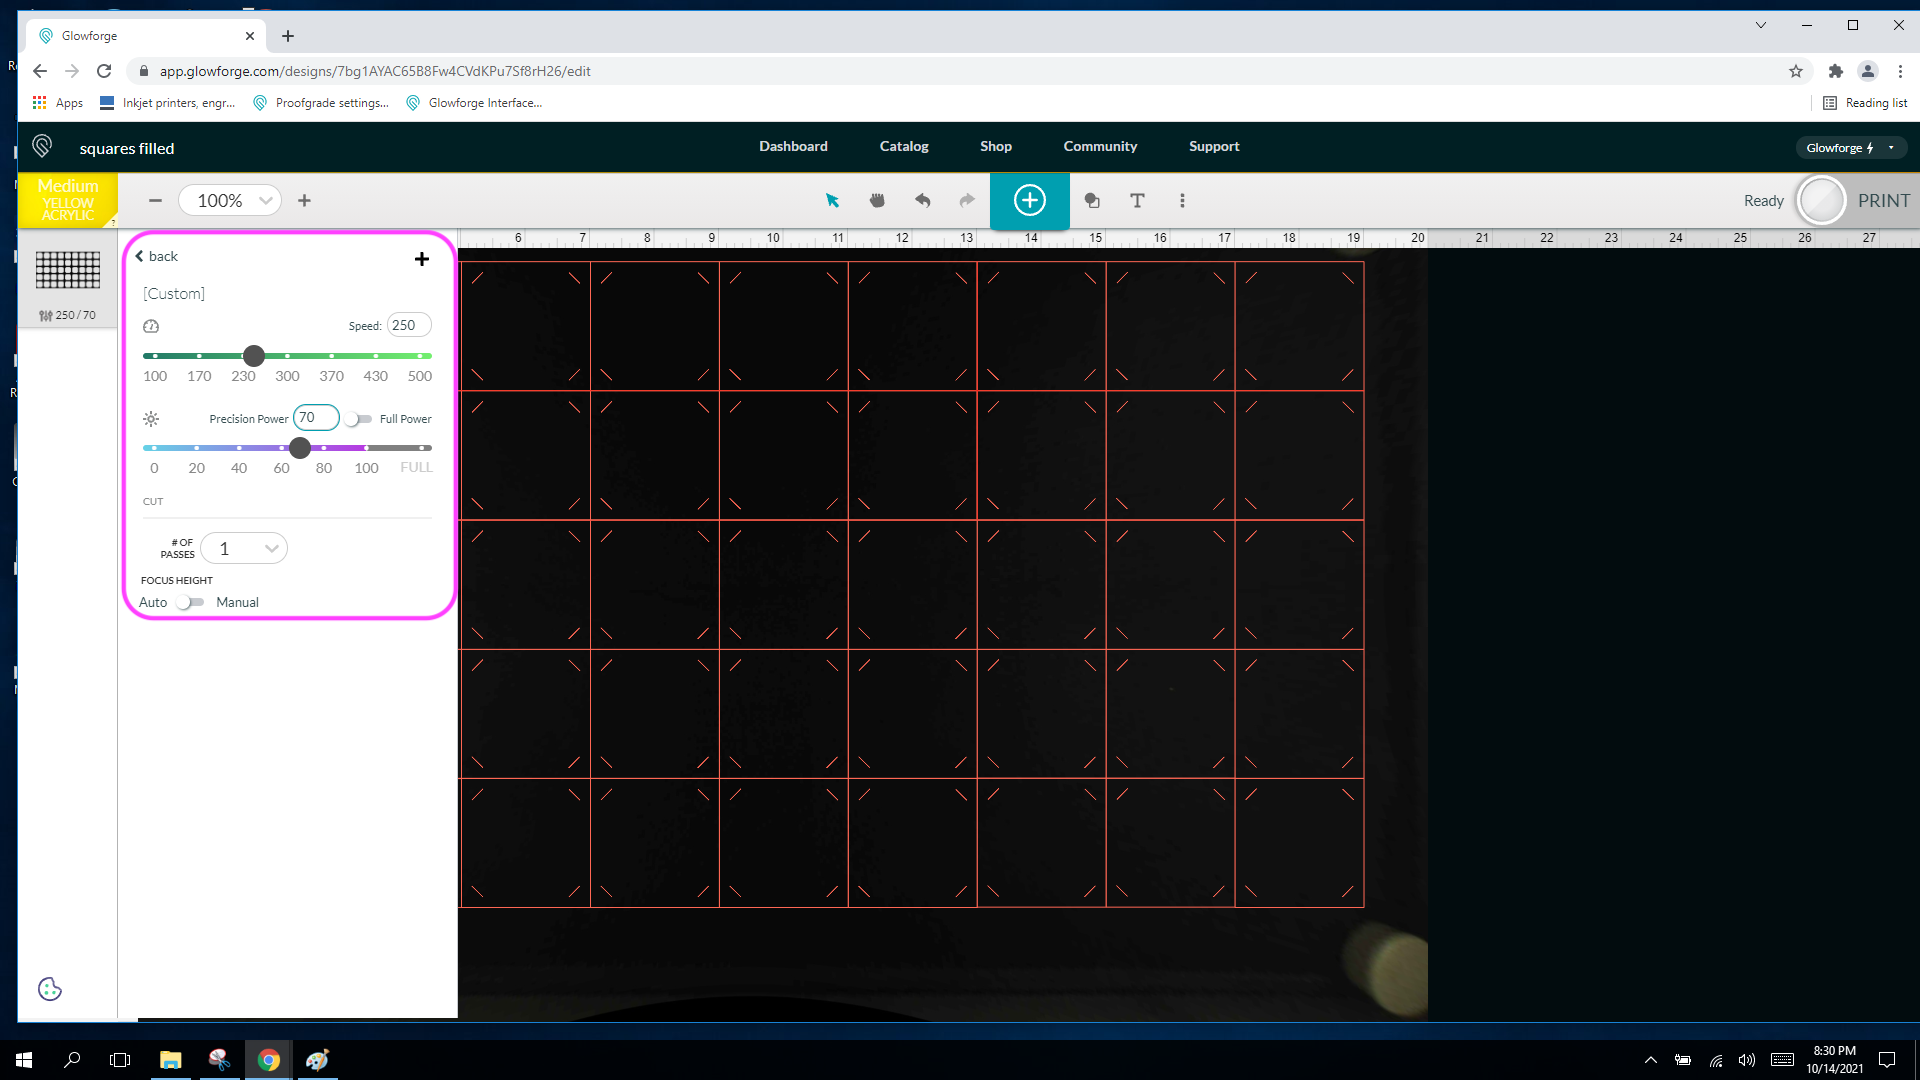
Problem
When interlocked slices turn red, it's usually an indicator of some connection error.
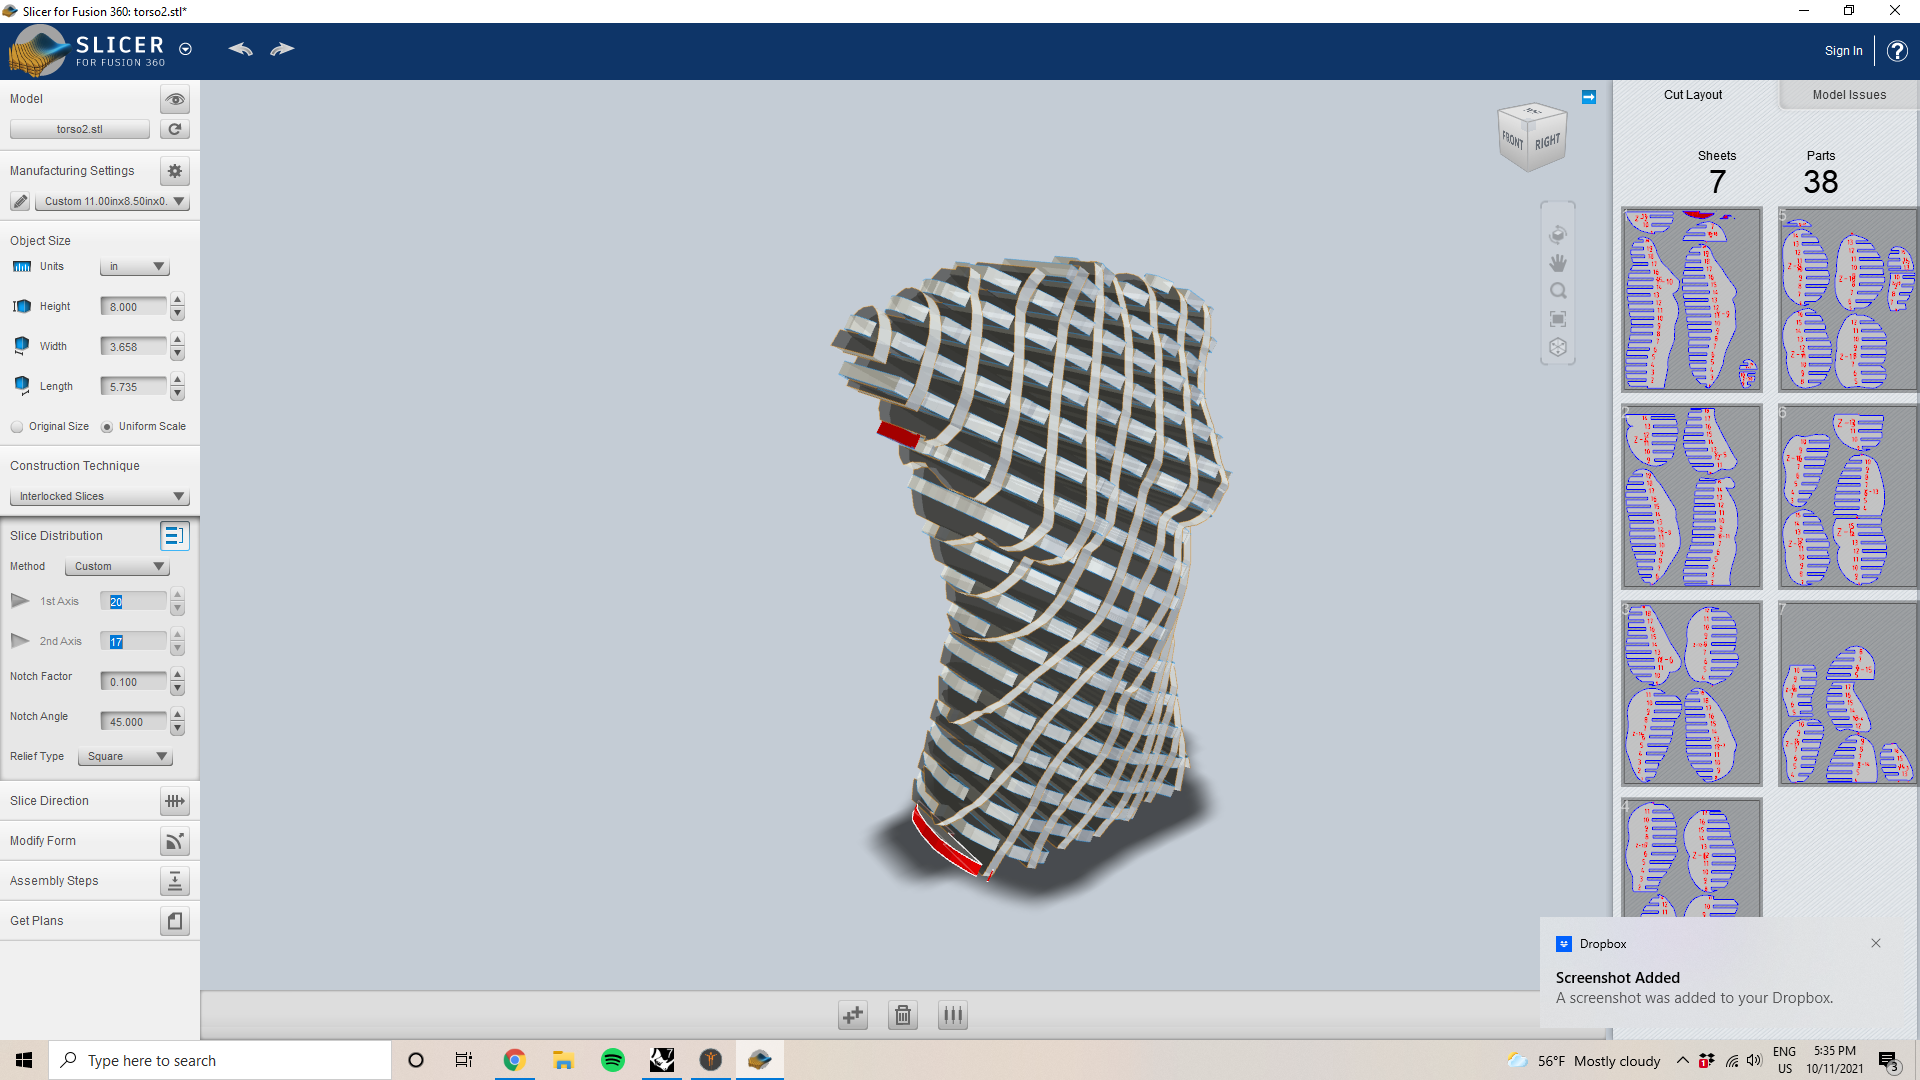
Solution
This can be easily corrected by using the mouse cursor to move the error piece around until the red highlight is gone.

Week 3: OS Circular Fashion
Laser Cutting Settings
Problem
Before going straight for the arrays, I made a quick test file to cut on extra felt I had to make sure the settings were correct. Good thing I did this because I realized that I hadn't adjusted the settings to what they should have been and as a result, the edges of the shapes got scorched harsher than they should have.
Solution
Learning the hard way, this forced me to remember to correct the settings manually prior to each print.
Material Placement (Laser Cutting)
Problem
Another problem that occurred during laser cutting was not properly pressing out some kinks/folds in the felt before cutting. As a result, some pieces that were cut out were flipped out of the sheet and began standing up. The ventiliation system also moved these pieces out of their original positions.
Solution
The solution was simple: TRIPLE CHECK the flatness of the material. I used my hands press the fold out and sometimes even folded the felt the opposite direction to even out the kink. After these moves, the problem never occurred again.
Week 4: Biochromes
Rinsing after Mordanting
Problem
I didn't realize until the moment I started doing it but I started rinsing the fibers for the avocado pit dye after the mordanting process. As a result, the fibers didn't bind with the dyes as well as it could have.
Solution
I shouldn't have done it. It was pure human error and the moment I finished rinsing the linen and muslin and put it in the avocado pit dye stuff, it was too late. As a result, the dyes weren't as deep as it probably could have been.
Week 5: E-Textiles
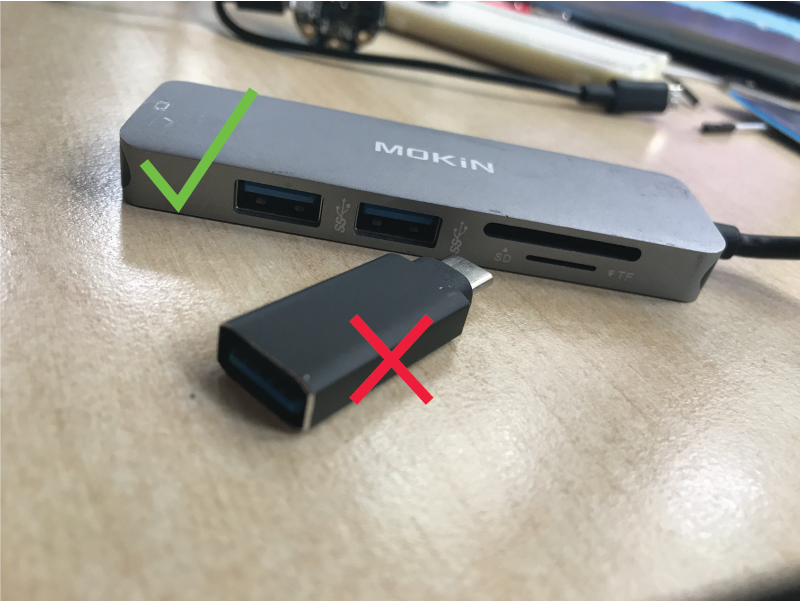
Adafruit Gemma Connection Error
Problem
At some point I wanted to make a swatch that integrated a smaller board than the Arduino and came across the Adafruit Gemma. To set up I followed Arduino's link
Unfortunately, when uploading a Sketch through Arduino IDE, an error continued to pop up.
Error: Could not find USBtiny Device (0x1781/0xc9f)
According to learn.adafruit.com, this error required for the Gemma to have a pulsing red light when connected.
However, no matter how many times I pushed the button or restarted the Gemma, I couldn't get that light.
Solution
First, make sure that the cable being used is a Micro-USB to USB 2.0 cord. Second, since I'm using a Macbook Pro with only 2 Thunderbolt ports, I found that the best adapter was a hub, as opposed to a single/direct adapter for USB to USB-C.
Week 6: Biofabricating
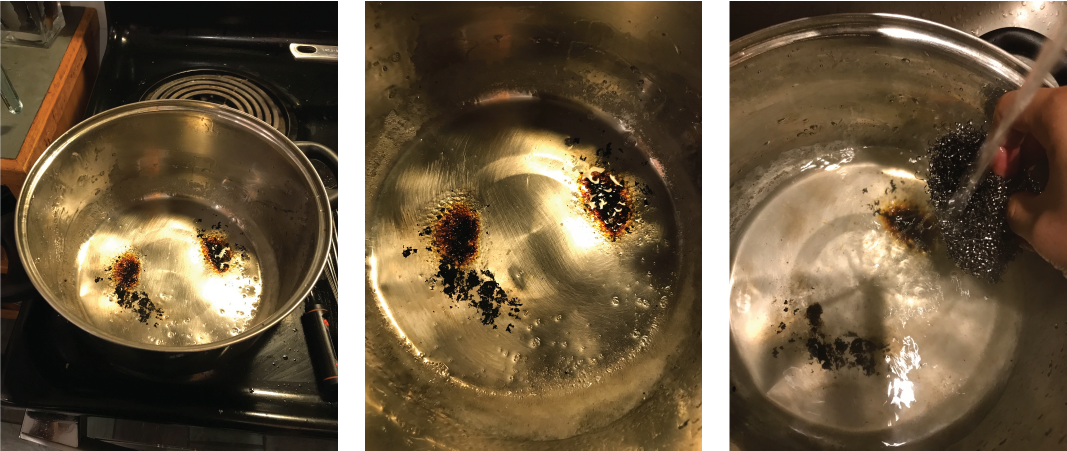
Burn flakes in mixture
Problem
The pot I was using had old burn marks on its bottom surface that was previously hard to clean off. Because of this, I assumed it was fine to use for this project. However, as I started stirring and whisking the gelatine mixture, the burn marks started to flake off the surface of the pot and got into the mixture.
Solution
Or be okay with it acting as a filler... 
Burned Glycerin
Problem
The pot I was using didn't have a flat bottom surface and was rather bumpy. As a result, some of the glycerin collected in the deeper dents and burned. The mixture was unaffected by this but the cleanup was tougher.
Solution
Use a better pot... perhaps
Bubbles in Mixture
Problem
As evident in the initial prototypes, tons of mini bubbles accumulated and remained in the biomaterial samples.
Solution
As suggested by my instructor Nuria, in the future, I can tap the bottom of the container to let the bubbles rise and pop away.
Moldy Kombucha
Problem
Update: December 2, 2021
In my foolish state of mind, I thought I could keep the kombucha brewing for another week to reach the max limit of 30 days (I went to 32 days). When I checked up on it again, mold had started to grow on the top layer. :sad:
Solution
Therefore this batch was scrapped, the bowl was cleaned and I started over again.
Note: given the crazy schedule I was faced with in December, I wasn't able to start this part of the assignment again until January 5
Week 7: Computational Couture
Rhino Crashing
Problem
At first I thought it wouldn't be a problem to download all the required libraries and just store them in the Grasshopper components folder - Windows and MAC files. Unfortunately this caused Rhino to crash everytime I tried to launch Grasshopper
Solution
Delete any and all library files that are Windows-only from the Components Folder on my Macbook.
3D Printing on Tulle
Problem
When I printed PLA on a single layer of tulle (no pausing in between prints), some pieces stayed on and some other didn't.
Solution
Method #1: Print a thinner layer (lower thickness)
Method #2: Pause the print one or two layers in, lay another layer of tulle on top and continue print
3D Printing on 2xTulle
Problem
Unfortunately, after applying the second layer of tulle, which took a lot of time and effort, something may have shifted but the second print did not align with the first layer.

Solution
I'm not totally sure what caused this, but I must have accidentally shifted the bottom layer of tulle (even though it was glued down?) while applying the second layer. I believe this method of printing could still be successful if it was an open printer rather an enclosed one... but there must be a way... TBD.
Week 8: Wearables
Arduino IDE Error 1
Problem
Seeing this error in the Arduino IDE after attempting to upload a code to an Arduino Uno board.
avrdude: ser_open(): can't open device "/dev/cu.usbmodem141301
Solution
Method #1: So far, the only solution that has worked best for me was to make sure that "/dev/cu.usbmodem141301" was checked under Tools > Port.
Method #2: The other solution was to change the adapter between the USB cable and the computer I was using.
Arduino IDE Error 2
Problem Seeing this error in the Arduino IDE after attempting to upload a code to a Gemma Board.
avrdude: Error: Could not find USBtiny device (0x1781/0xc9f)
Solution
First, make sure that the cable being used is a Micro-USB to USB 2.0 cord. Second, since I'm using a Macbook Pro with only 2 Thunderbolt ports, I found that the best adapter was a hub, as opposed to a single/direct adapter for USB to USB-C.
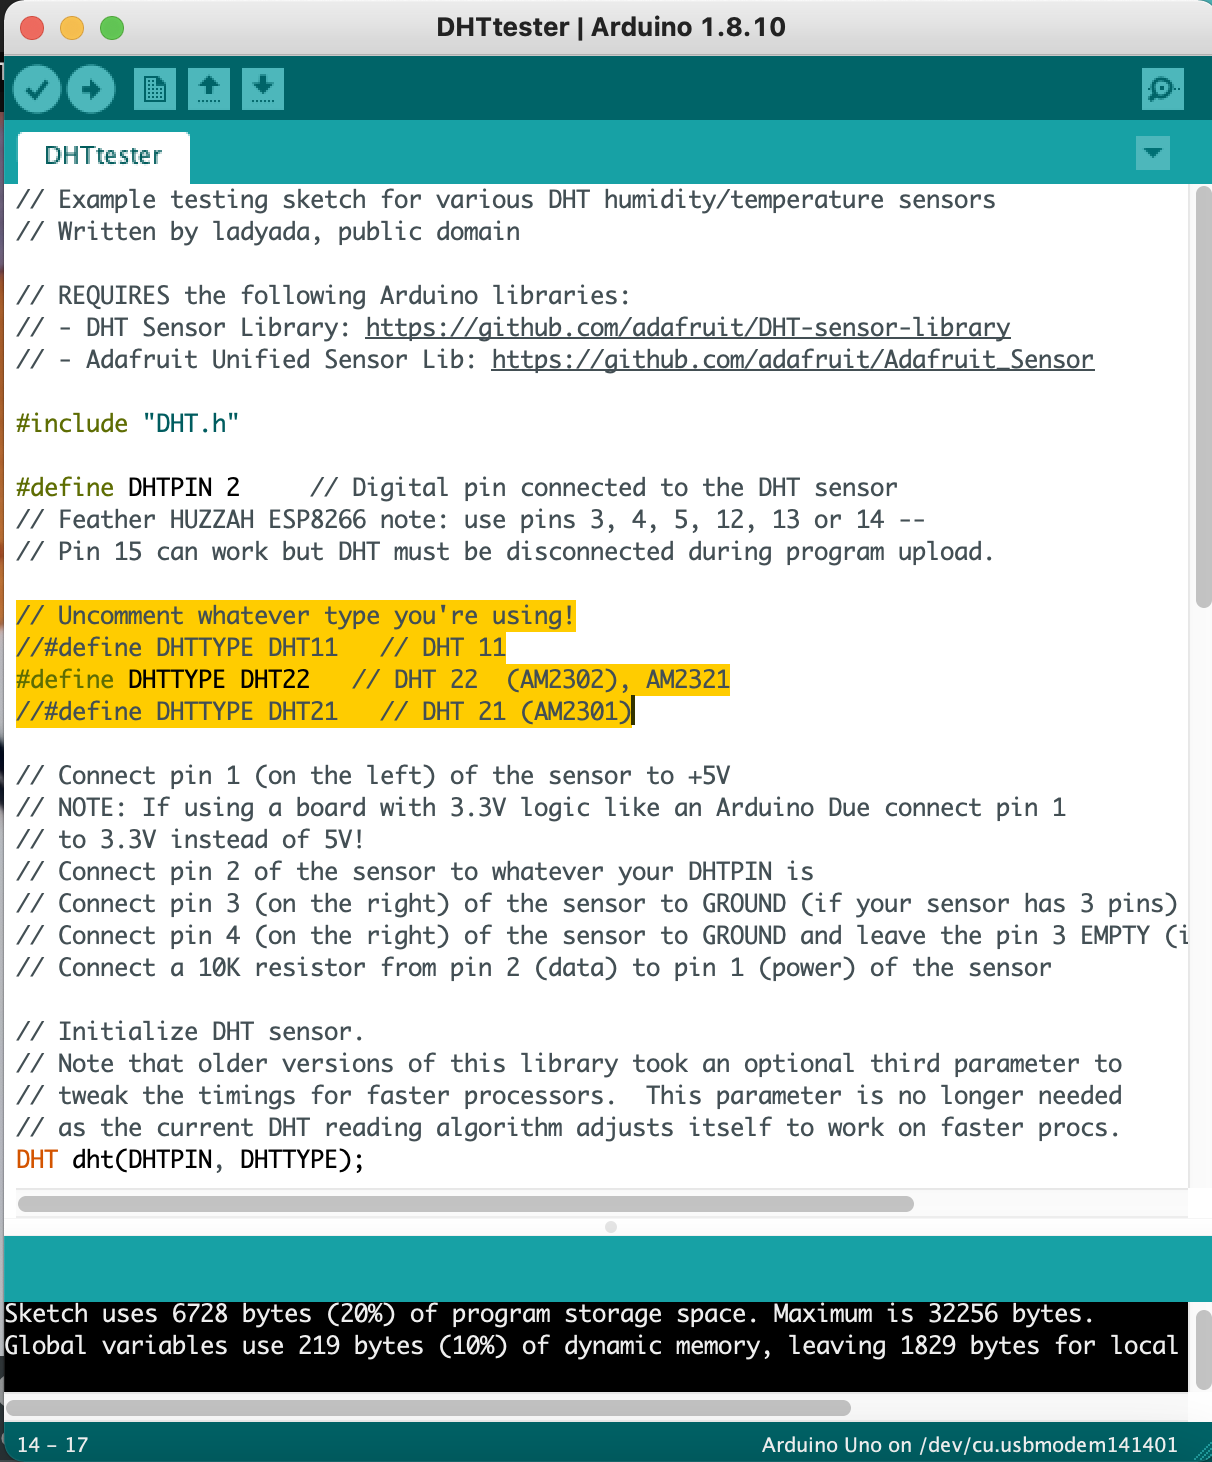
Failed to read DHT sensor
Problem
When trying to gather data and see them on the serial monitor, this error showed up.
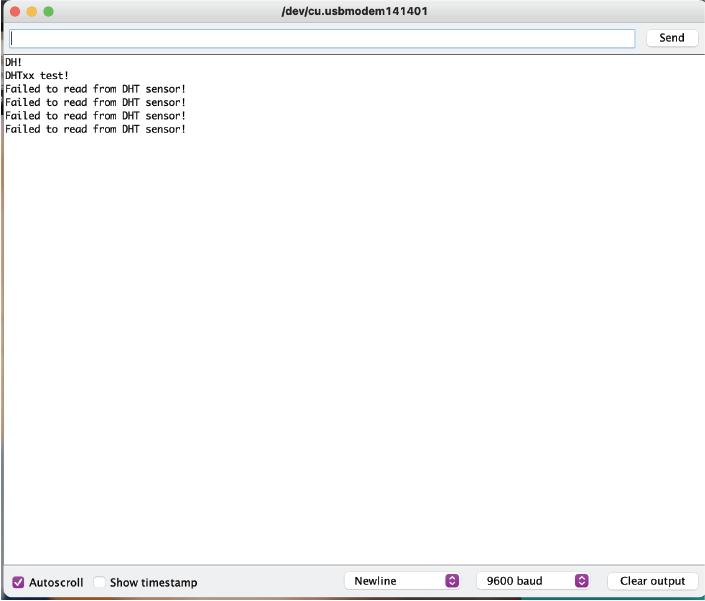
Solution Inspired by Random Nerd Tutorials, the solution to this problem - at least in my case - was to make sure that my specific DHT sensor was the only one commented.
Week 9: Textile Scaffold
Lighting the LED String
Problem
For what felt like the longest time, I could not figure out how to get the LED string to light up when connected to either a 3V, 6V (2x3V coin batteries in series) or 9V battery.
Solution
After playing around with the wiring and trying multiple batteries, I realized the real solution was cleaning the ends off of the LED string to be connected to the alligator clips. I did this by taking a lighter and quickly burning off the coating of the wire to expose the inner layers. Safety Note: I did this outside because the fumes smelled extremely bad and were probably very toxic lol
Photo Editing Issue
Problem
When dragging my purple LED photos into Illustrator the photo quality seemed to go drastically down, along with the saturation
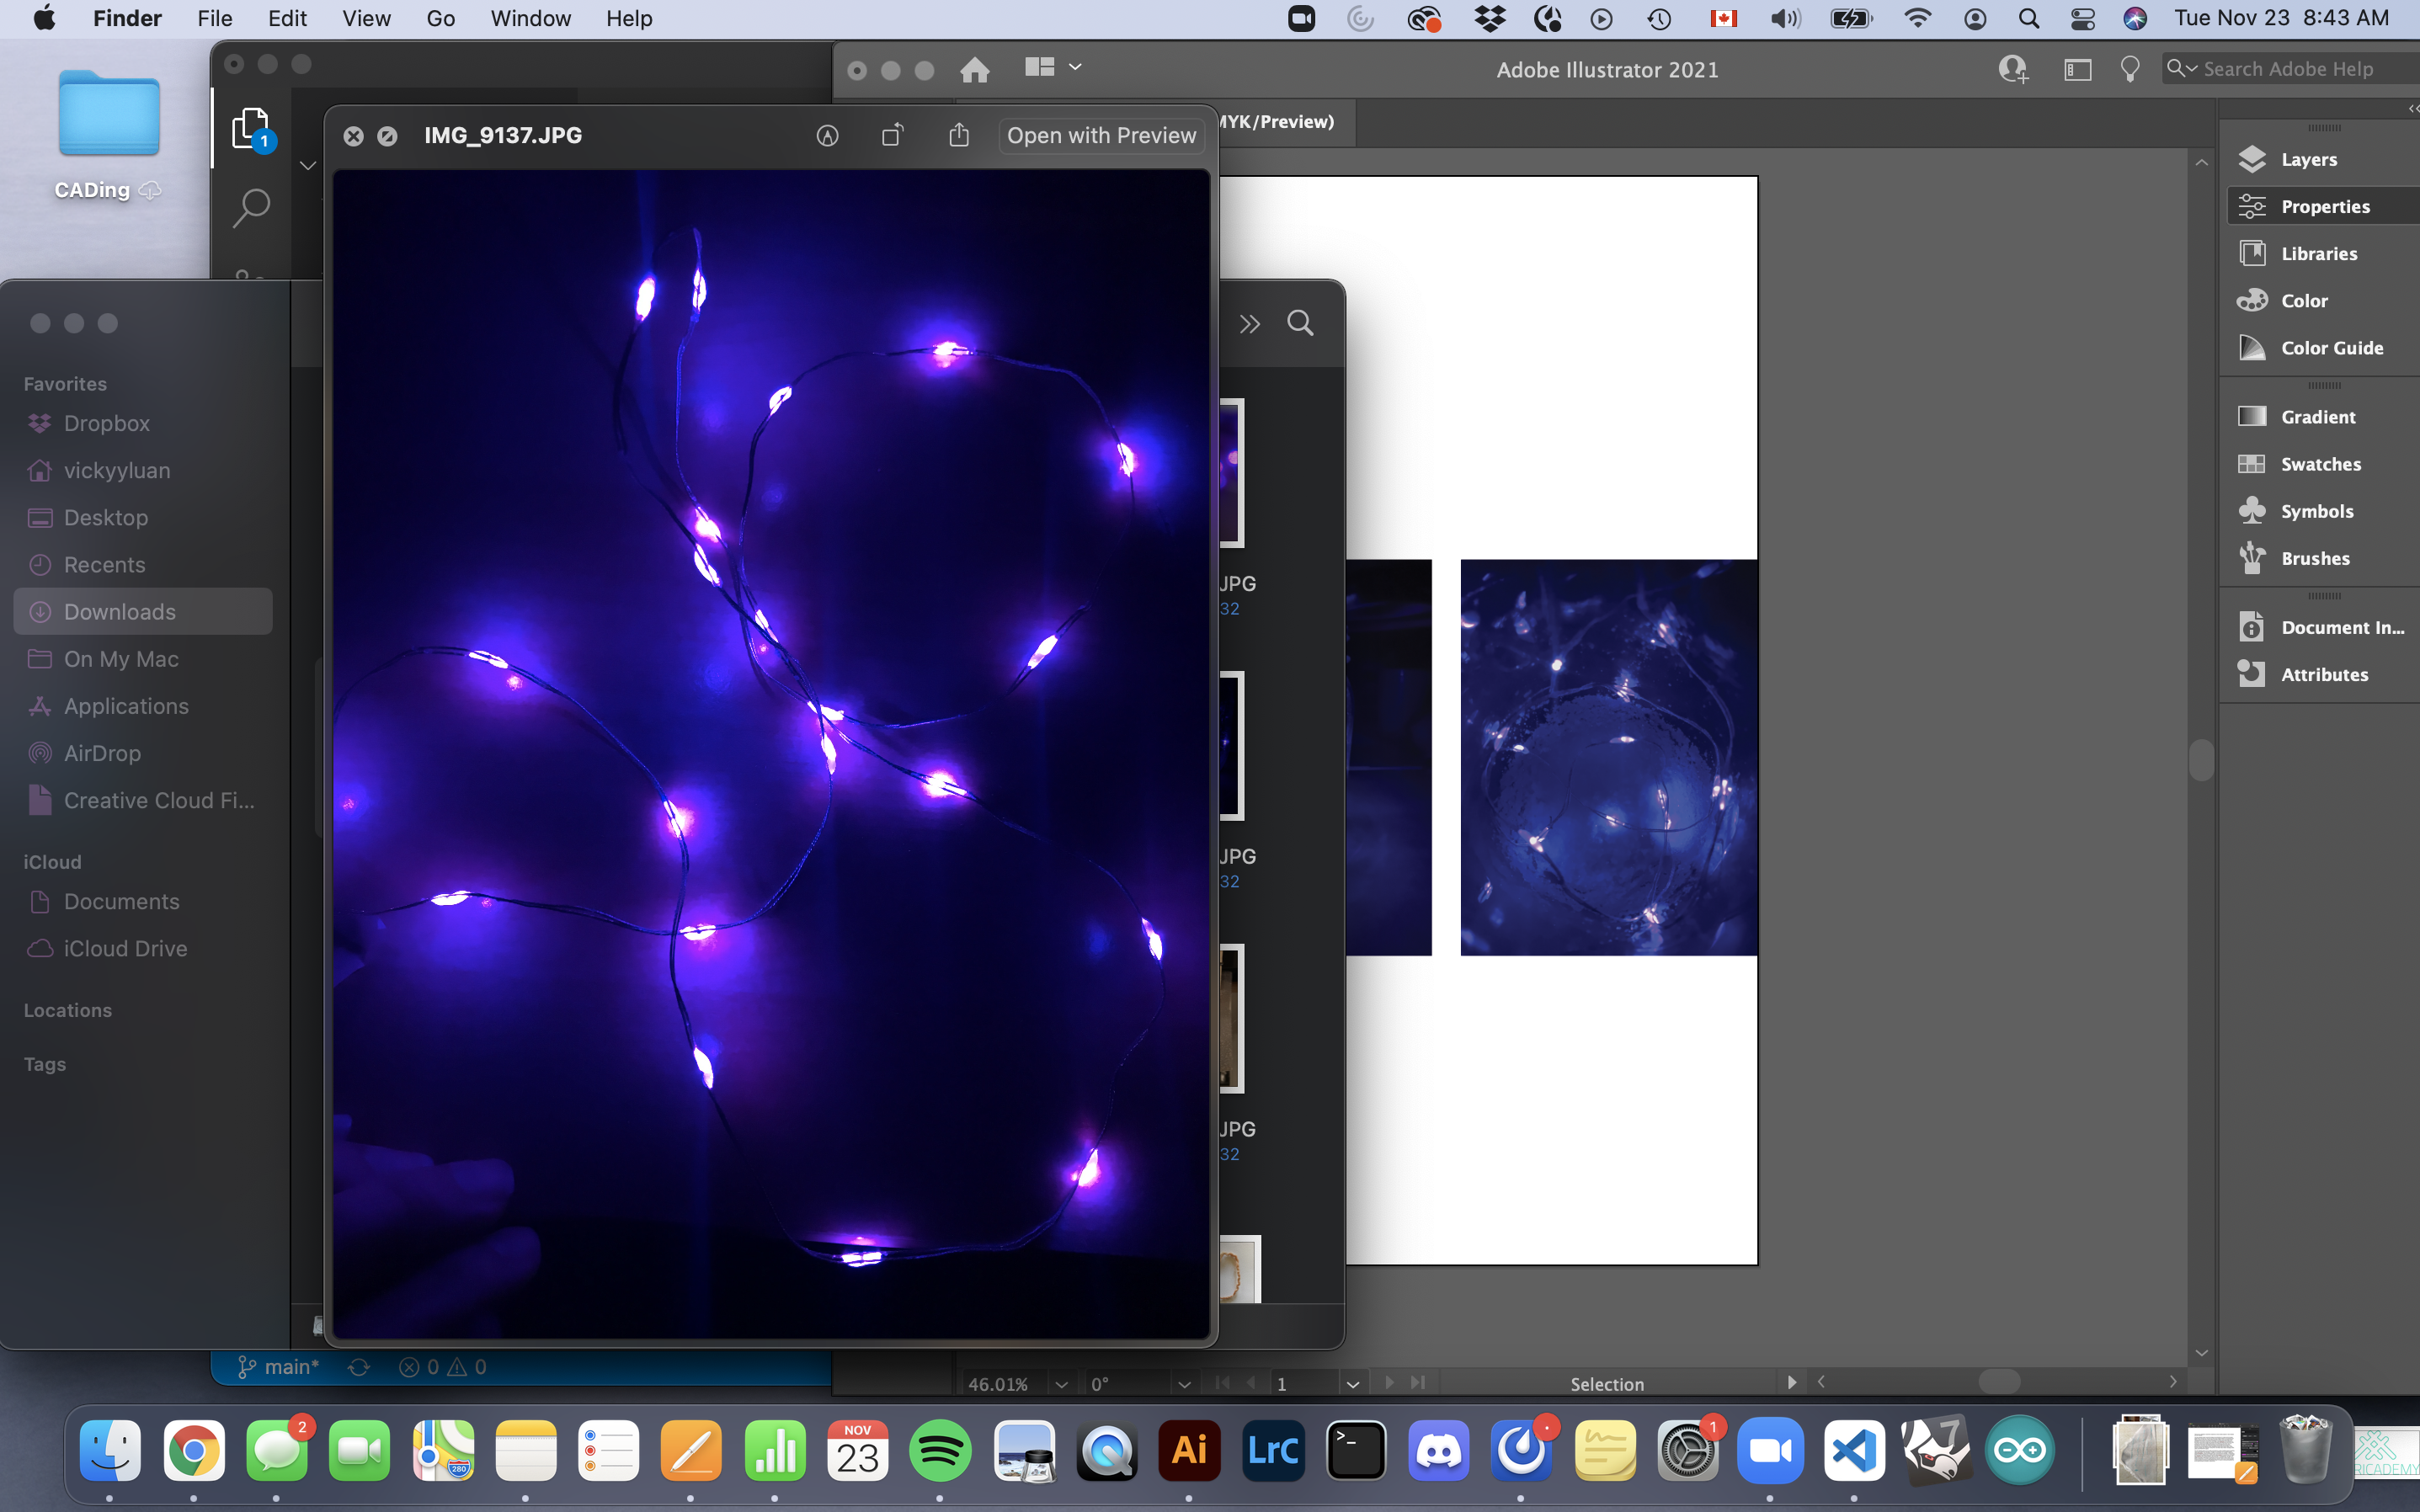
Solution
TBD
Week 10: OS Hardware
Securing the bobbin
Problem
Sliding the bobbin onto the wire terminal shaft directly led to instability when spun and did not hold the bobbin securely.
Solution
Attaching some masking tape to the shaft of the blue wire terminal helped this right away! I cut some to match the width of the narrowest part of the shaft and wrapped it around 2-3 times.
Cord Weaving
Problem
Perhaps it was my inability to read or understand the instructions that came with the box... lol but I could not for the life of me get the cord started correctly in the beginning
Solution 1
The area I had to pay attention to was the latch that caught the yarn the first time and find the stitch that needed to slip off of the latch.
Anyway this Youtube video helped me a lot
Solution 2
I also switched from a medium weight yarn to a light weight yarn that I think helped a lot.
Week 11: Implications
N/A
Week 12: Soft Robotics
Print Warping
Problem
For the first couple of prints, the edges of the legs began to warp and curve up above the surface of the bed.
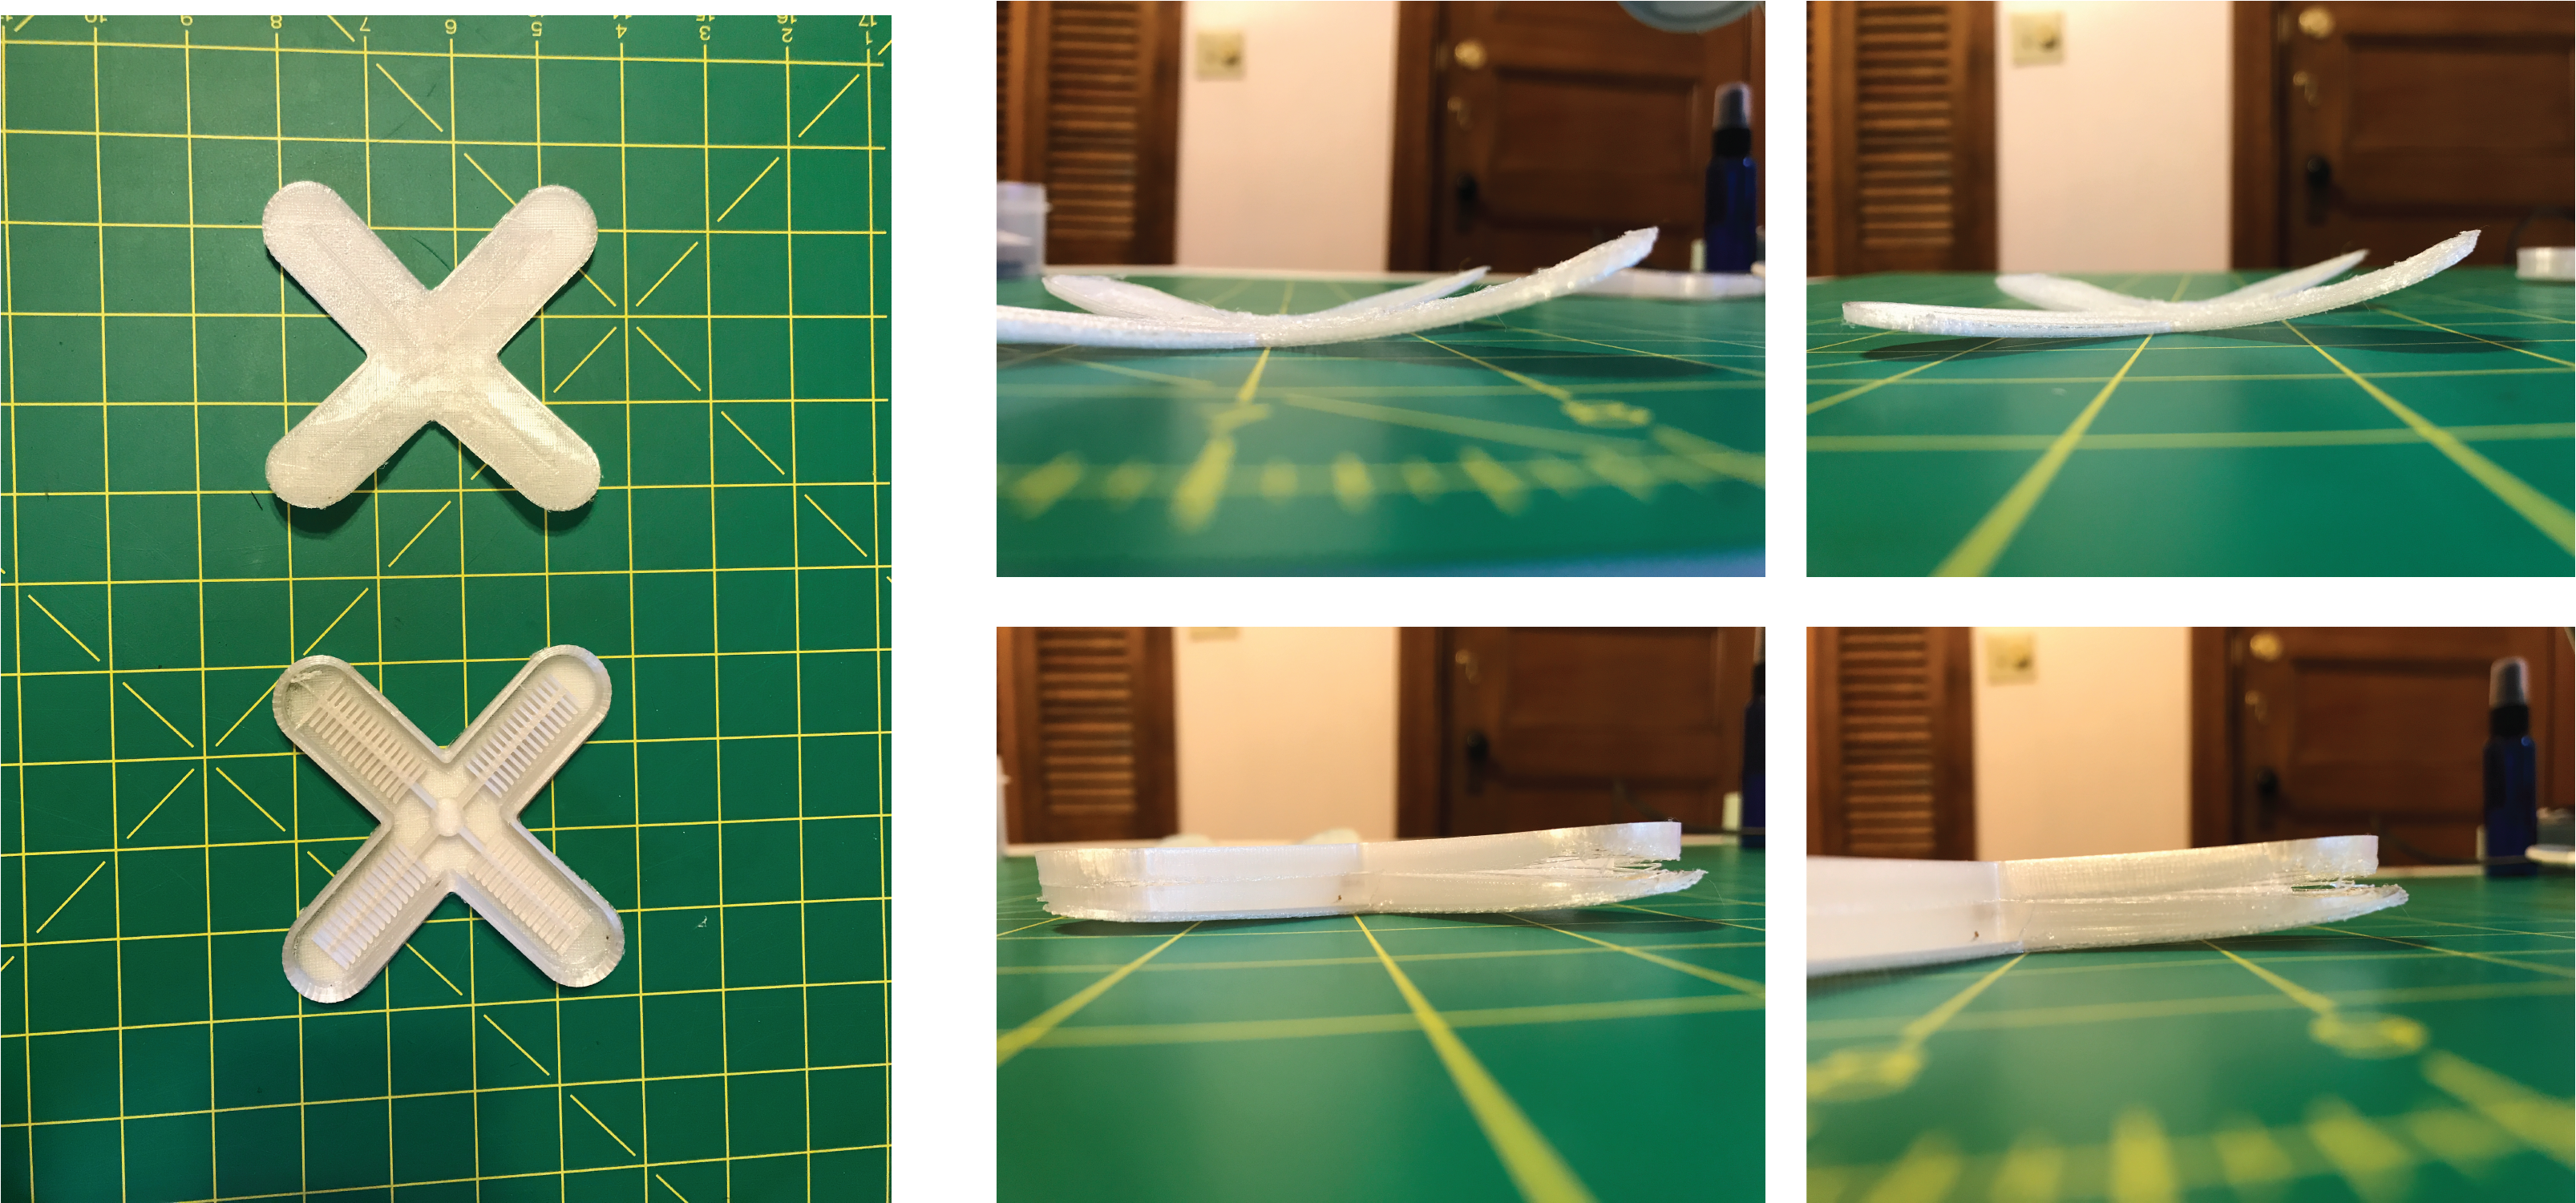
Solution
Inspired by All3DP and a Ultimaker Support Forum, there were several things I did to alleviate this:
- turned up the temperature of the room from 65 deg F to 70 deg F
- increased the temperature of the bed from 30 deg F to 50 deg F gradually over the first 5% of the print (roughly 2 hours)
- changed the bed adhesion from Skirt to Brim
All of these solutions put together was intended to keep the material adhered to the bed for longer and more stable. The temperature changes helped maintain the material integrity so it didn't shrink from the cold.
Inaccurate Silicone Curing
Problem
Surprisingly (and luckily?) it was my 2nd attempt to cure a 4-leg gripper that failed. The part had bigger gaps in the legs and did not accurately transfer the "bones" of it.
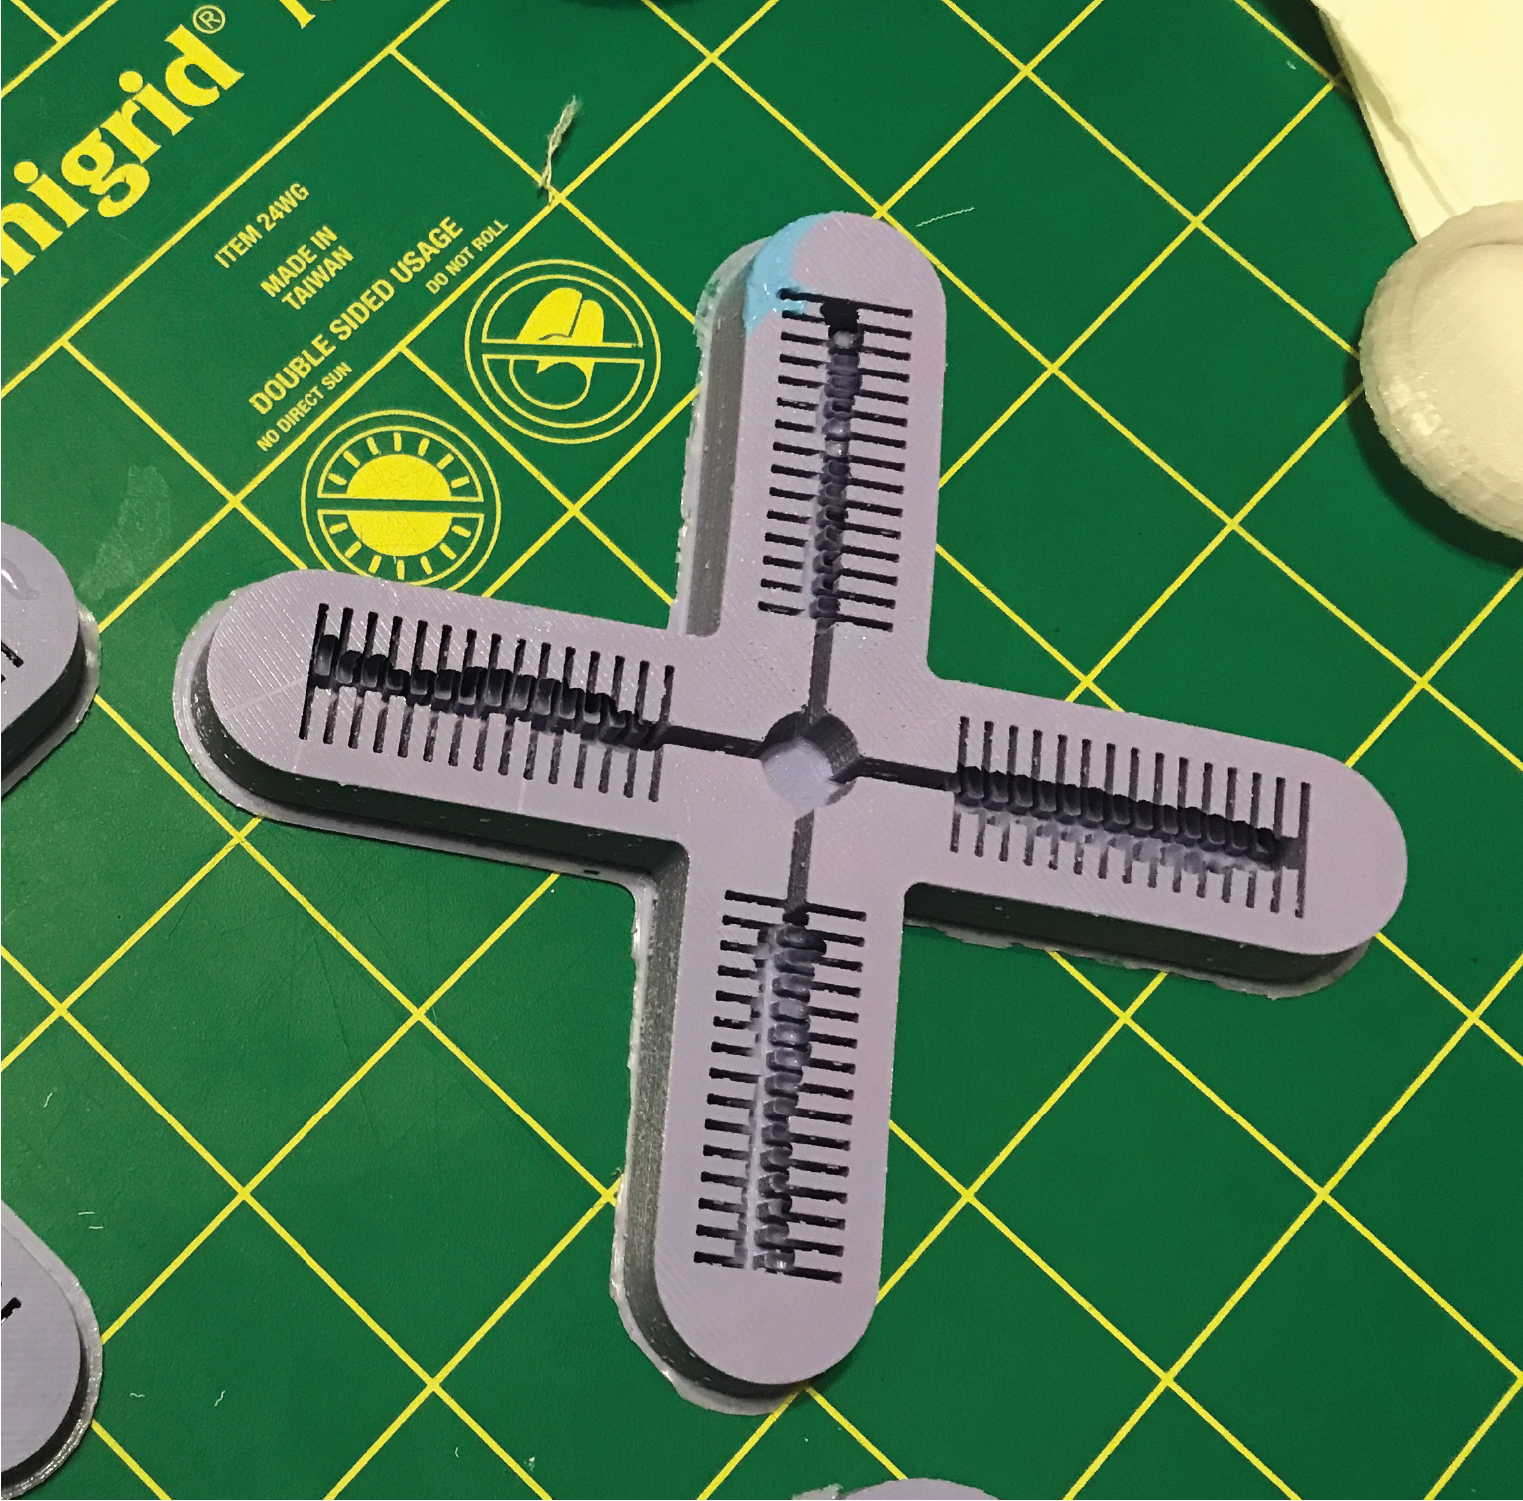
Solution
Thinking back to my first attempt, I think I poured the silicone slower and directly onto the lowest point of the mold, rather than directly onto the "bones" of the mold and hoping it'll pour down correctly and fill the gaps.
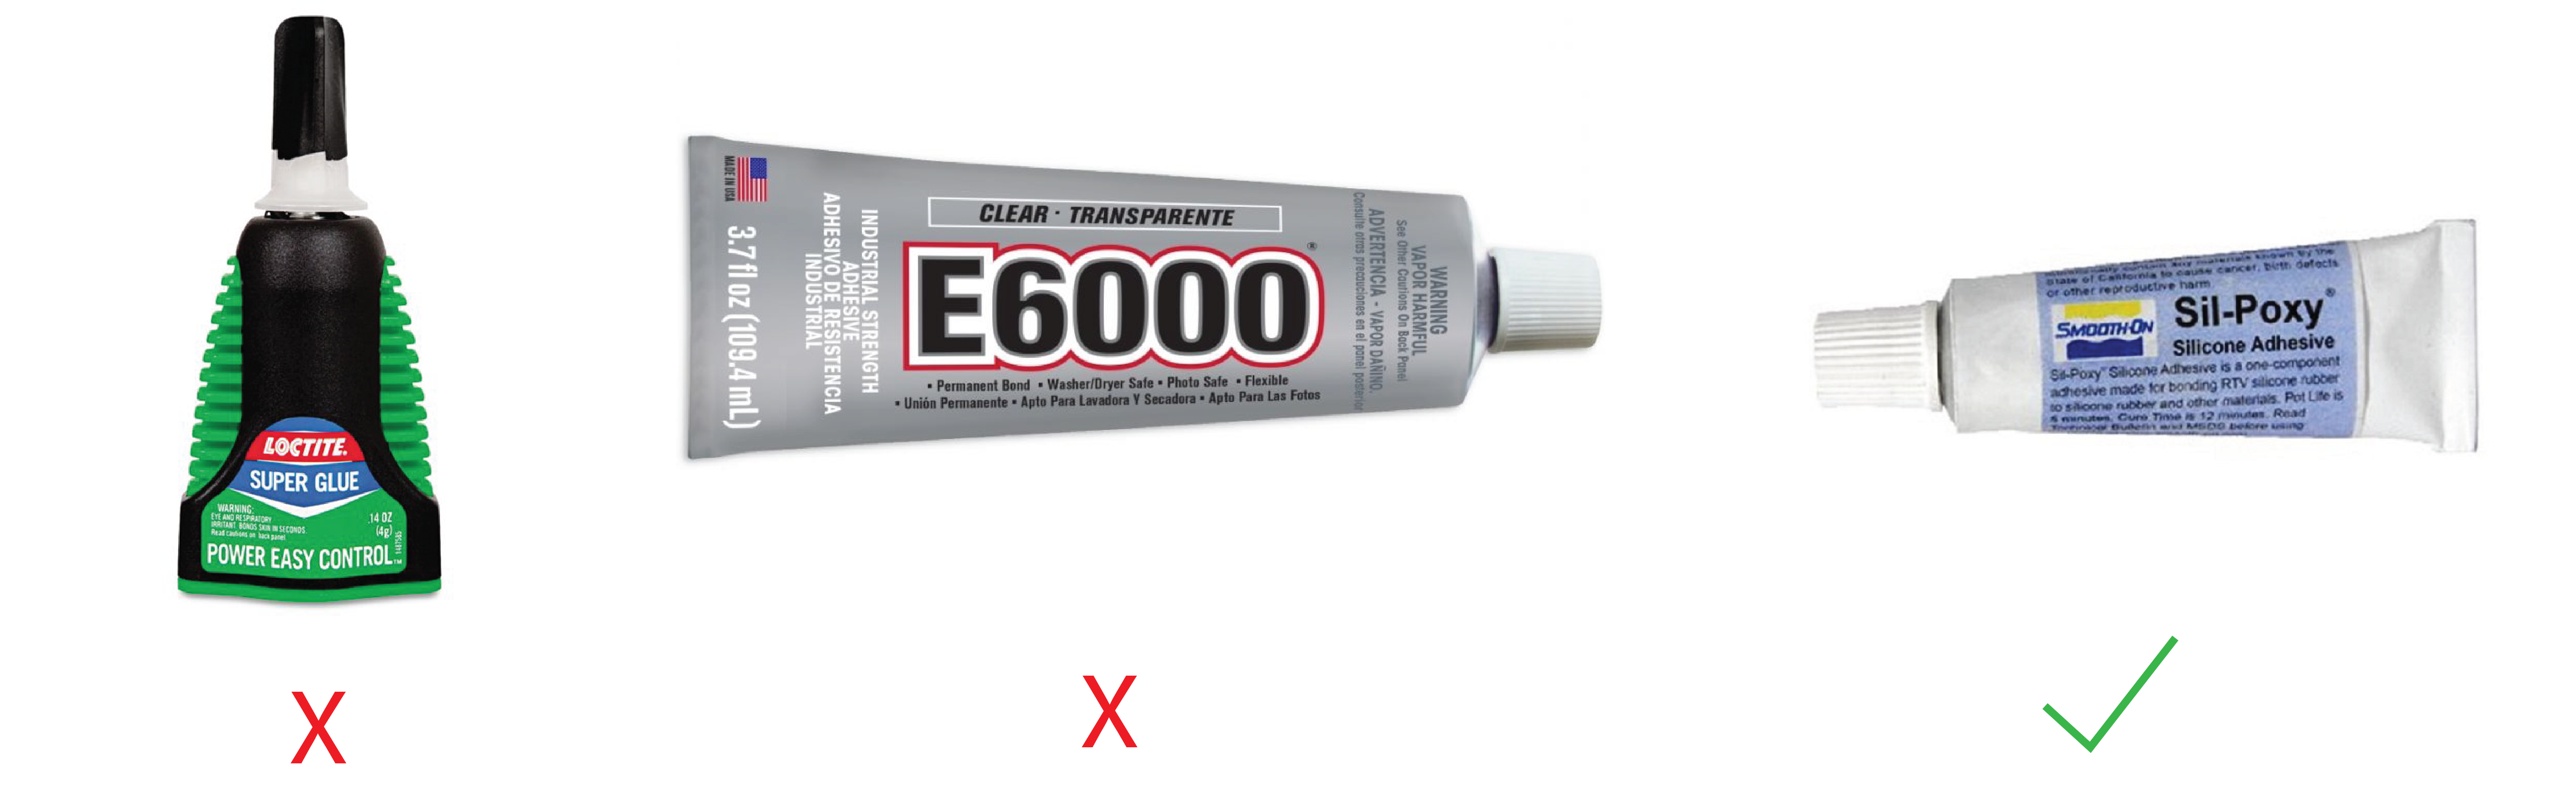
Gluing Silicone
Problem
Attaching two parts of cured silicone together is very challenging with just adhesive products.
Solution 1
Attach one cured part to the second part while the latter is still curing. Silicone helps silicone attach.
Solution 2
If you do need an adhesive, I highly recommend Silpoxy - after trying two others that failed on me.
Week 13: Skin Electronics
TBD
Final Project
Nano Board
Problem
Connecting the Nano 33 BLE Sense Board to the computer, trying to upload the code but receiving this error:
Arduino: 1.8.19 (Mac OS X), Board: "Arduino Nano 33 BLE"

Sketch uses 93496 bytes (9%) of program storage space. Maximum is 983040 bytes.
Global variables use 45672 bytes (17%) of dynamic memory, leaving 216472 bytes for local variables. Maximum is 262144 bytes.
Device       : nRF52840-QIAA
Version      : Arduino Bootloader (SAM-BA extended) 2.0 [Arduino:IKXYZ]
Address      : 0x0
Pages        : 256
Page Size    : 4096 bytes
Total Size   : 1024KB
Planes       : 1
Lock Regions : 0
Locked       : none
Security     : false
Erase flash

Done in 0.001 seconds
Write 93504 bytes to flash (23 pages)
[==============================] 100% (23/23 pages)
Done in 3.665 seconds
processing.app.SerialException: Error opening serial port '/dev/cu.usbmodem141201'.
    at processing.app.Serial.<init>(Serial.java:152)
    at processing.app.Serial.<init>(Serial.java:82)
    at processing.app.SerialMonitor$2.<init>(SerialMonitor.java:132)
    at processing.app.SerialMonitor.open(SerialMonitor.java:132)
    at processing.app.AbstractMonitor.resume(AbstractMonitor.java:132)
    at processing.app.Editor.resumeOrCloseSerialMonitor(Editor.java:2126)
    at processing.app.Editor.access$1300(Editor.java:116)
    at processing.app.Editor$UploadHandler.run(Editor.java:2095)
    at java.lang.Thread.run(Thread.java:748)
Caused by: jssc.SerialPortException: Port name - /dev/cu.usbmodem141201; Method name - openPort(); Exception type - Port not found.
    at jssc.SerialPort.openPort(SerialPort.java:167)
    at processing.app.Serial.<init>(Serial.java:141)
    ... 8 more
Error opening serial port '/dev/cu.usbmodem141201'.


This report would have more information with
"Show verbose output during compilation"
option enabled in File -> Preferences.
Solution #1
Unplugging the USB cable and reconnecting, then reuploading
Solution #2
Typing the following into Terminal:
ls /dev/cu*
Check the ports provided then go with the usb one
e.g.
Last login: Thu Mar 24 19:16:52 on console
vickyyluan@Vickys-MacBook-Pro-2 ~ % ls /dev/cu*
/dev/cu.BLTH            /dev/cu.mifo_O5PLUS
/dev/cu.Bluetooth-Incoming-Port /dev/cu.usbmodem141301
/dev/cu.BoseColorIISoundLink
vickyyluan@Vickys-MacBook-Pro-2 ~ % lsof | grep "/dev/tty.usbmodem141301"
Problem
LED/Digital output of Nano board responds when connected to computer but not when working remotely with external power supply
Solution
Remove or comment out the following line from the setup portion of the code:
while(!Serial);
Reference: https://forum.arduino.cc/t/nano-ble-sense-bluetooth-not-working-on-battery-powersupply/641959
Git Push Error: Jinja
Problem
The commits were failing after some time in March 2022
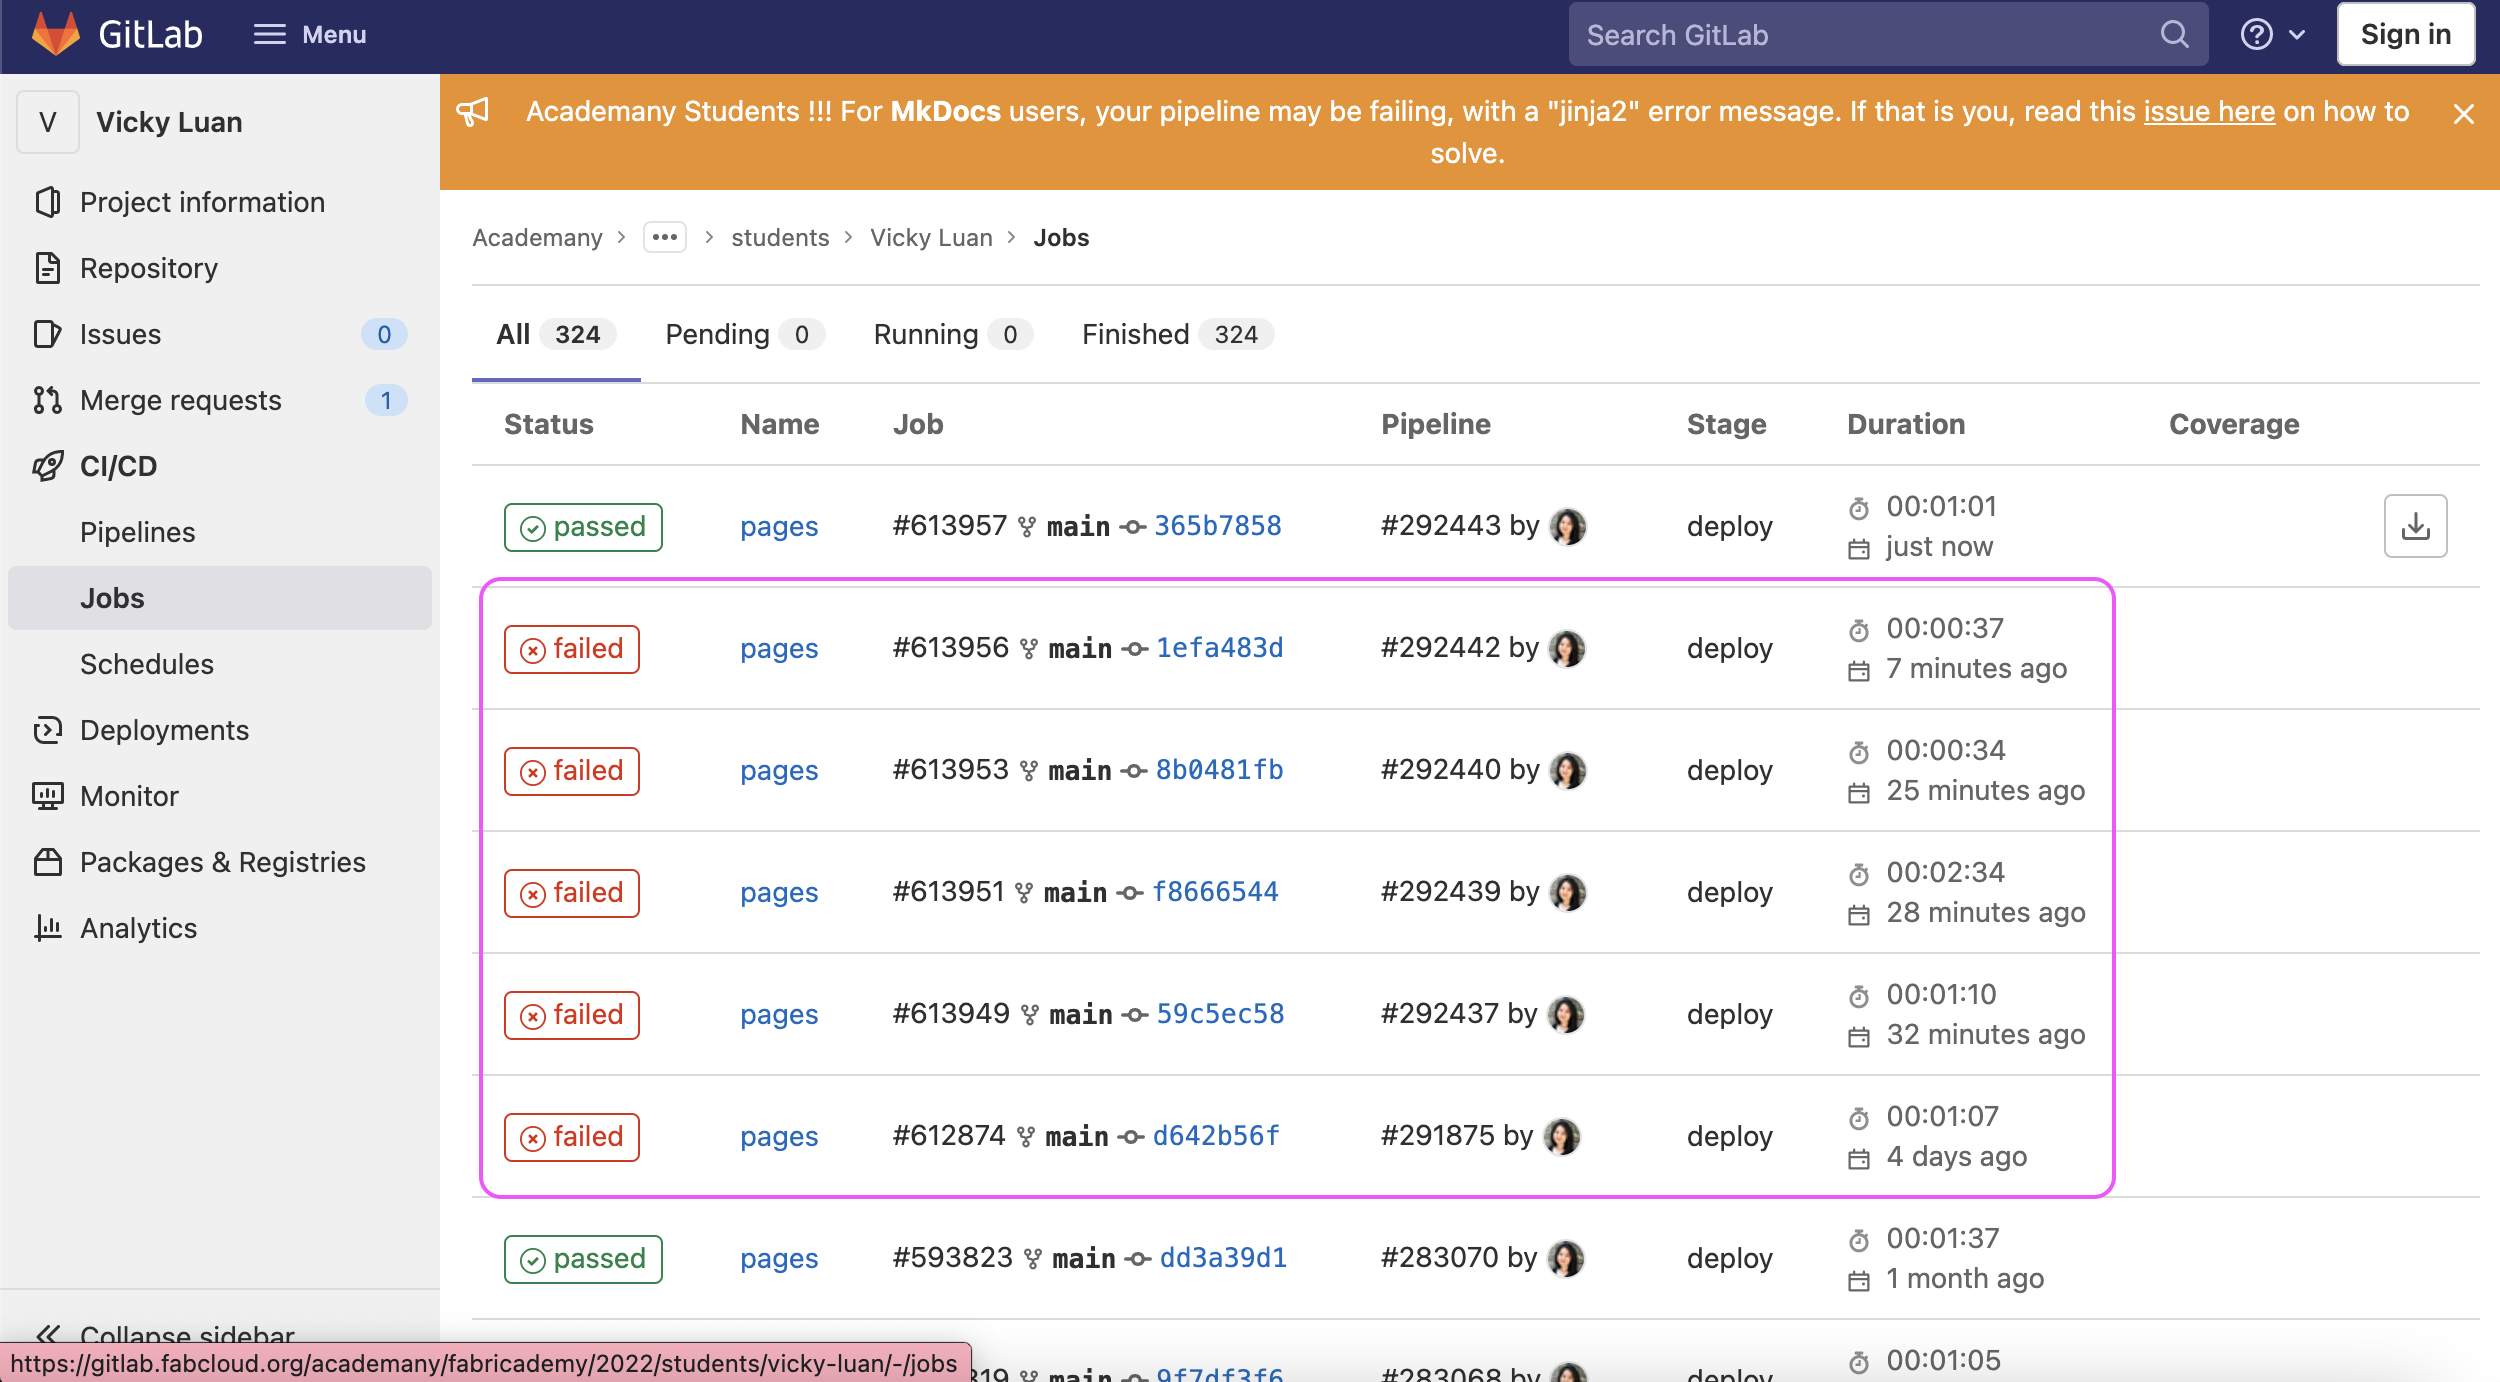
As an example, when I click on one of those fails, the last few lines of the code are:
  File "/usr/local/lib/python3.9/site-packages/mkdocs/config/defaults.py", line 1, in <module>
    from mkdocs.config import config_options
  File "/usr/local/lib/python3.9/site-packages/mkdocs/config/config_options.py", line 7, in <module>
    from mkdocs import utils, theme, plugins
  File "/usr/local/lib/python3.9/site-packages/mkdocs/theme.py", line 6, in <module>
    from mkdocs.utils import filters
  File "/usr/local/lib/python3.9/site-packages/mkdocs/utils/filters.py", line 11, in <module>
    @jinja2.contextfilter
AttributeError: module 'jinja2' has no attribute 'contextfilter'
real    0m0.305s
user    0m0.256s
sys 0m0.032s
Cleaning up project directory and file based variables
00:00
ERROR: Job failed: exit code 1
Solution
Thanks to the heads up posted by Julian when I pushed my latest updates, I noticed that the commits were failing due to a required update. Following his advice posted in this link, the issue was solved by changing one line of code in the requirements.txt file
from
mkdocs >=1.1.2, ==1.1.*
to
mkdocs >= 1.2.2