BioChromes
Week04: Students checklist
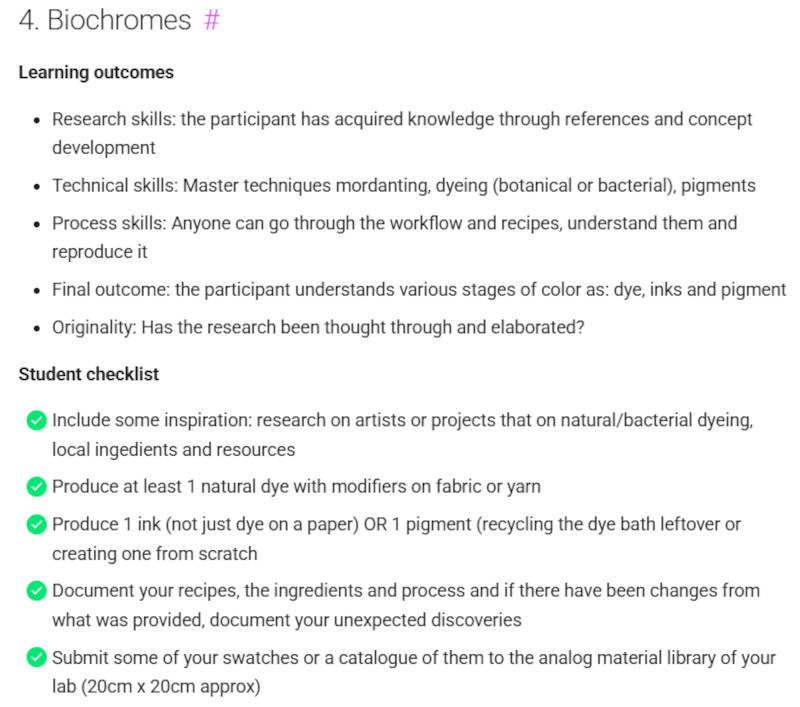
Image Source: Fabricademy Handbook
1. Objective
This is the week I have been looking forward to. This week, my goal is to explore the world of biochromes by reconnecting with the natural dye heritage of the Faroe Islands. I will be experimenting with my own foraged collection of local lichen, Sólja (Marsh Marigold), Reinfann (Tansy), and indigenous copper sourced from a local quarry.
During our inspiring lesson by Cecilia Raspanti, she introduced us to the "world of colors," encouraging us to slow down and notice the plants and shades along our usual route to the lab. Interestingly, I had already taken this exact approach a step further: throughout the summer, I have been out foraging and collecting local flowers and lichen across the the island, preparing for this exact exploration.
Historically, The Faroe Islands relied heavily on nature to dye the local Faroese wool. By bringing my gathered sólja, reinfann, and lichen into the lab, I am tapping into this cultural lineage. Sólja and reinfann are known for yielding beautiful, vibrant yellow tones, while local lichens historically provided deep, earthy shades.
Note: In my documentation, I will maintain this record like a logbook on a ship's navigation bridge, meticulously noting precise times, temperatures, and relevant data throughout each shift (Days work). In this way, I can always return to my notes and data observations to reliably replicate and evaluate the results in the future.
2. References, research & inspiration
Werner’s Nomenclature of Colours (1814)
As a conceptual anchor for my BioChromes research, I am looking back at Werner’s Nomenclature of Colours—the historic color classification system famously used by Charles Darwin during his voyage on the HMS Beagle to document the natural world before synthetic dyes. This book maps colors entirely through three categories: animal, vegetable, and mineral. I will use this historic taxonomy as a comparative baseline for my own contemporary experiments. By contrasting Werner's system with the shades I extract from the wild plants and lichens of the Faroe Islands, I aim to bridge the gap between historic color-mapping and hands-on bio-fabrication.
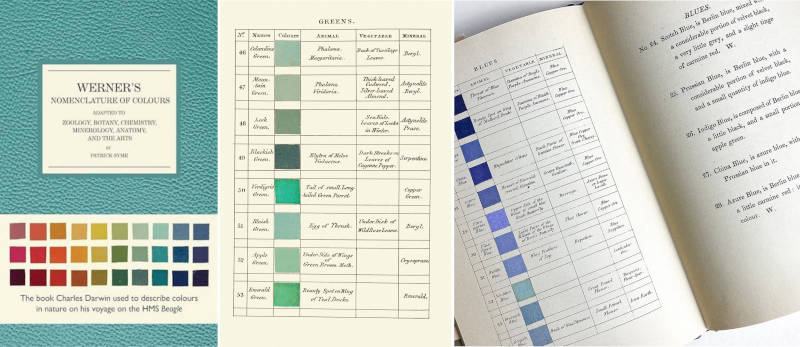
Image source: Book: By P.Syme Werner´s Nomenclature of Colours
Data Collection: From Ocean Weather Stations to the Bio-Lab
My inspiration for using "Werner’s Nomenclature of Colours" stems from a deeply personal place rooted in my background as a maritime navigator. When sailing across the Atlantic or Pacific Ocean, generating a detailed meteorological report was a strict, daily scientific duty during the bridge watch.
Every single day, at the exact same time, we recorded and transmitted empirical data back to land stations. We read the barometer for atmospheric pressure, the hydrometer for fluid density, measured the physical height of the waves, and classified the exact formations of the clouds using maritime guides. Part of my observational duties involved logging cloud formations across different atmospheric layers—specifically, the various cloud types visible over the ocean during bridge watch, such as cumulonimbus, which appear as fair-weather clouds carrying rain. These raw numbers and observations were critical; they were fed directly into global meteorological models to generate the world's weather forecasts.
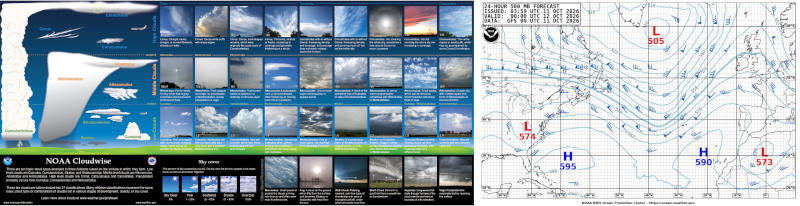
Image source: Ocean Prediction center
This taught me the value of structured, daily datalogging and standardized observation. Without precise numbers, the weather cannot be predicted. Similarly, without precise numbers, botanical color cannot be replicated or understood. This strict, methodical approach to documentation is not just a personal preference—it is the core methodology of the textile lab. In our lecture yesterday, Cecilia Raspanti strongly emphasized the critical importance of a rigorous, systematic workflow when working with biochromes. This message was reinforced by Svetlana Khachatryan in her lecture, who helpfully shared the invaluable insights and hands-on experiences from her own Fabricademy journey last year. Seeing Svetlana’s precise documentation of recipes, WOF (Weight of Fiber), and extraction workflows made it clear that successful bioChromes requires the exact same discipline as navigating an ocean.
Just as weather stations systematize meteorology, our practice in the bio lab transforms nature’s fluid variables into an empirical dataset. By applying this disciplined navigator’s approach to Week 04: BioChromes, I am treating the Faroe Islands as my research vessel. Foraging for local botanical sources like Sólja and Reinfann, alongside tree and stone lichens, directly continues my background in data collection. In the lab, my digital scale acts as my barometer, pH-strips as my hydrometer, and textile swatches as my cloud logs. Guided by Cecilia’s academic framework and Svetlana’s practical blueprint, I am using my maritime training to map and document the shifting color taxonomy of my environment.
Local Color Palette with a Famous Twist
Another key inspiration is a co-creative community art project developed three years ago by visuel artist Eva Bullens and Floortje Zonneveld at Fab Lab Vágur. This project served as an intersection of local identity, pedagogy, and digital fabrication, demonstrating how color and physical making can translate human emotion and regional heritage into tangible art. The project engaged the local community across generations, bringing in a group from our local sports and Outdoor Collage (Ítróttarháskúlin) as well as 2nd and 7th-grade classes from the local school where the Fab Lab is located, allowing them to explore the surroundings and recreate shapes from nature. (See the brief photo series of the 2nd grade and sports high school groups below).
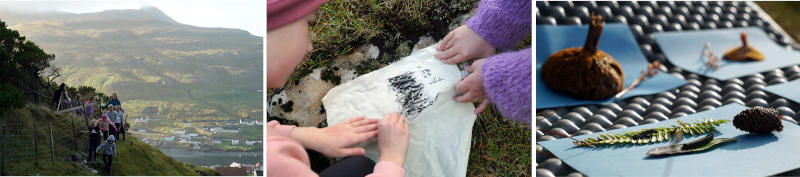
Image source: 2nd graders, photos by ijsblink
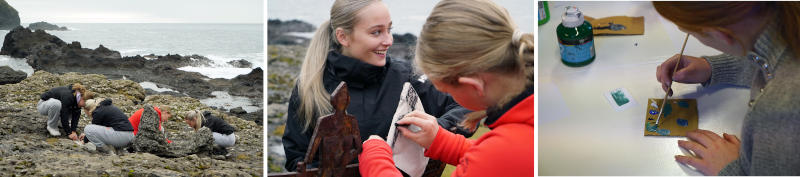
Image source: Students from local Sports- and Outdoor Collage, photos by ijsblink
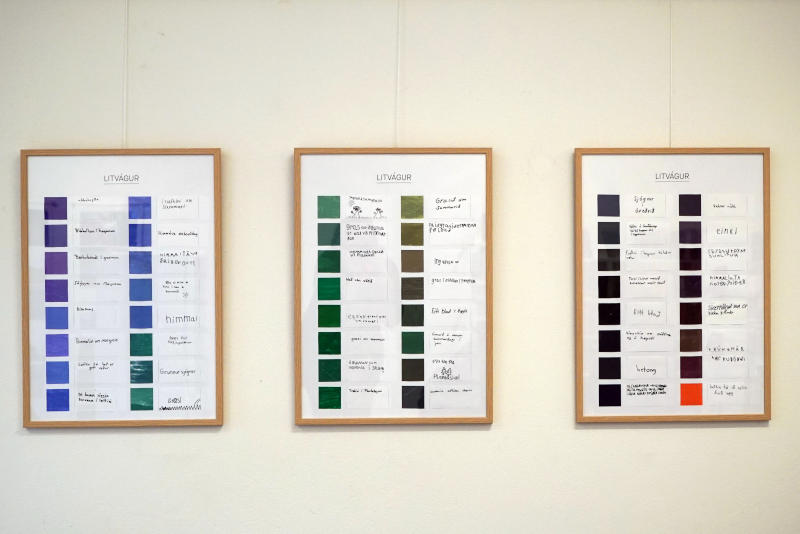
Image source: Colours of Vágur, as seen from a kids perspective, photos by ijsblink
Working with a 7th-grade class from the local school, the learning objective was to have the students emotionally map their hometown. They identified specific geographical locations connected to their fondest and most meaningful memories—spanning everything from the local football field to the harbor site. To anchor this project in both global design theory and regional community identity, the visual artists established a dedicated color palette adapted directly from Le Corbusier's 63 architectural colors (via Les Couleurs®) and carefully modified with the official branding colors from our local municipality logo of Vágs Kommuna.
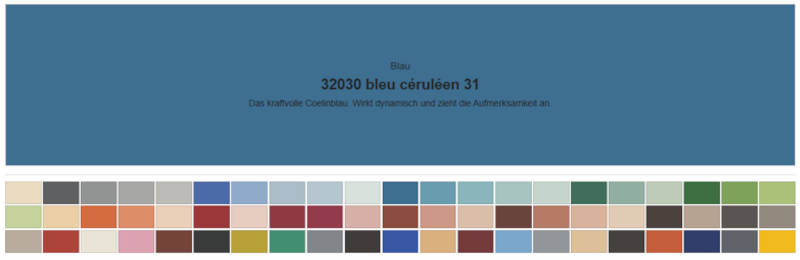
Image source: https://www.lescouleurs.ch/the-colours
The students’ personal stories were translated into a collective storytelling installation through a beautiful bridge between analog craft and digital tools. The students first drew the figures on paper and cut them out by hand. These physical shapes were then digitized and laser-cut out on wood, capturing key elements of their shared local narratives—including footprints walking through the town, the roaring flames of the traditional Faroese New Year’s bonfire (nýttársbálið), and local fishing boats and many mores. Finally, these pieces were assembled and color-coded using our custom Vágur-Le Corbusier palette, telling a tangible story. The art piece is now haning at the local doctors facilities for visiters to see. (See the extended photo series of the 7th-grade process below).
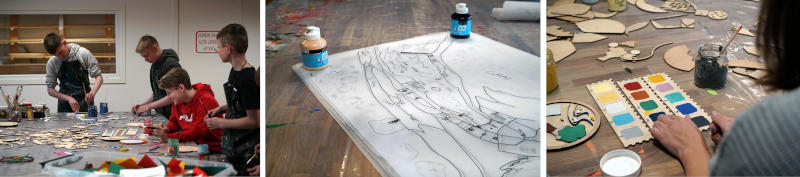
Image source: 7nd graders working at the Fab Lab, photos by ijsblink
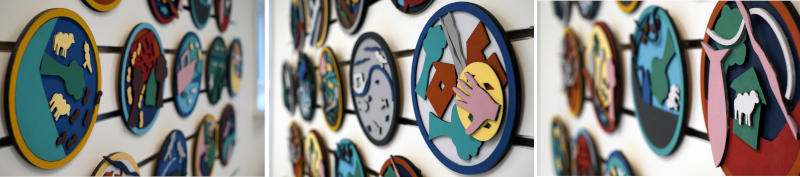
Image source: Final result of the shapes, photos by ijsblink
3. Tools
Equipment & Materials List
Dyeing & Lab Equipment
- Stainless steel pots (for extractions and dye baths)
- Stainless steel bowls (for temporary liquid storage)
- 4 hot plates / burners
- Infrared thermometer (for precise temperature tracking)
- Mesh strainer
- pH test strips (for balancing the laking process)
- Wooden spoons (for stirring and mixing)
- Stainless steel teaspoons
- Precision digital scale (for accurate WOF measurements)
- Glass jars (for lichen soaking and copper liquor)
- Labeling materials (Post-its and markers for shift documentation)
- Paper coffee filters (for laking and straining)
- Tablecloth and tea towels (for cleaning and absorbing fiber moisture)
- Mortar and pestle (used to crush the oak galls to maximize surface area)
Scouring Equipment & Chemicals
- Washing tubs (for rinsing fibers)
- Soda ash (Sodium carbonate — for alkaline cotton scouring and laking)
- Note: No pH-neutral textile soap was available locally, so clean water was used for wool scouring.
Tannins, Mordants & Modifiers
- Oak galls (High-tannin botanical source for cellulose pre-treatment)
- Alum (Potassium aluminum sulfate — primary mordant and laking substrate)
- Household vinegar (for copper liquor oxidation)
- Table salt (1 tsp used as a catalyst for copper liquor)
-
Raw Faroese copper (48.3 grams of local scrap copper sourced from the mountain tunnel project)
-
Google Gemini (AI Assistant): Utilized as a digital co-navigator to translate my notes (from danish and Faroese), refine, and synthesize my raw laboratory logs and field notes into a more coherent, fluid English description for this documentation.
4.Process and workflow
Day 1: Fiber Preparation (Scouring) & Plant Material prepping
Faroese BioChrome Archive: The Preliminary Palette
The beginning of my local biochrome archive, cataloging the shifting palette of the Faroe Islands through wild botanical sources
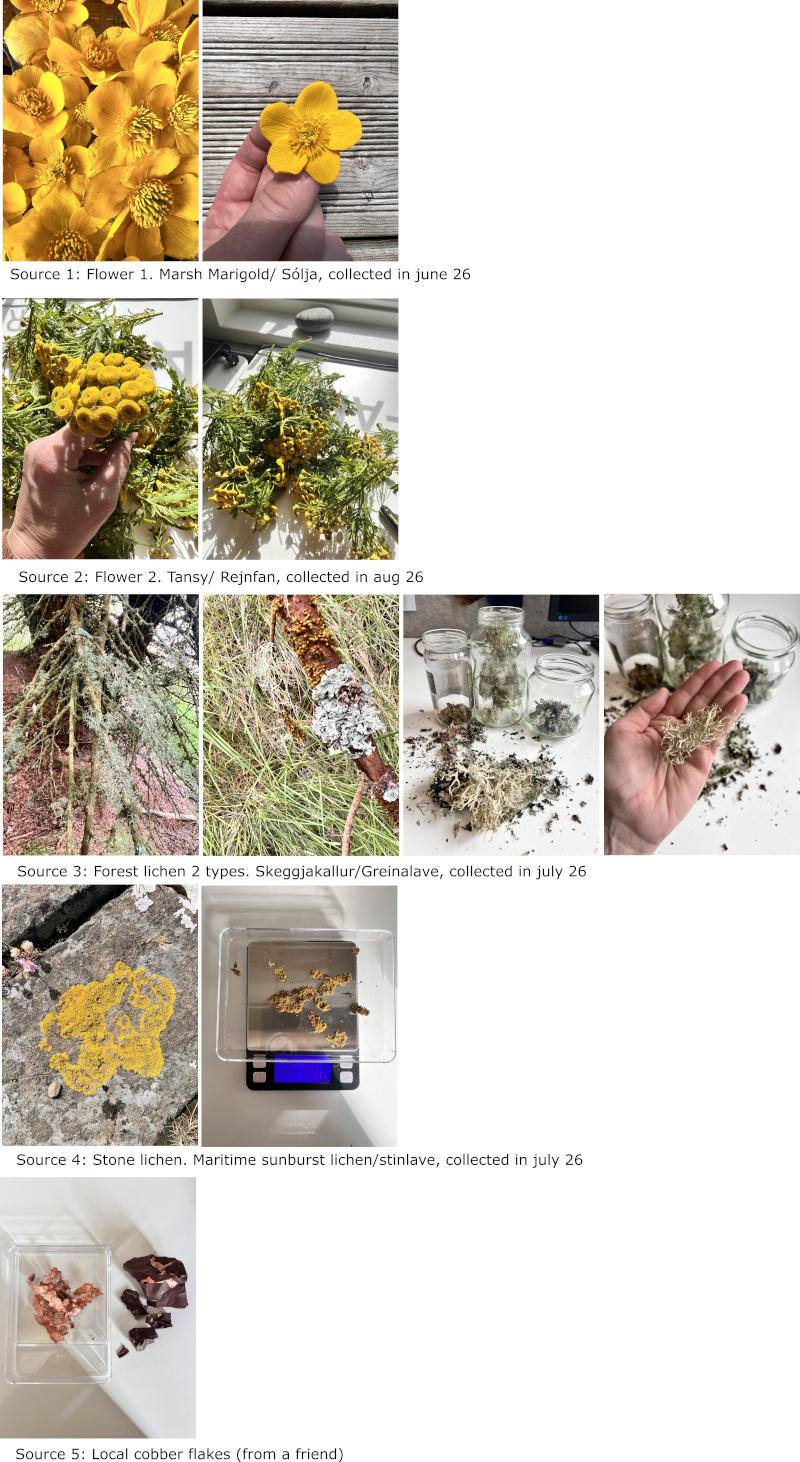
Image source:Photos by Tina Grønbech
Local Copper Liquor (Future Work)
During a local tunnel excavation on the island's mountainside, a friend managed to source some raw, local copper for me. In my free time, I am an avid beachcomber with a large personal collection of rocks and stones, which sparked the idea of utilizing this raw material to create a "copper water" or metal liquor. I was deeply inspired by Cecilia Raspanti's presentation to explore this method.
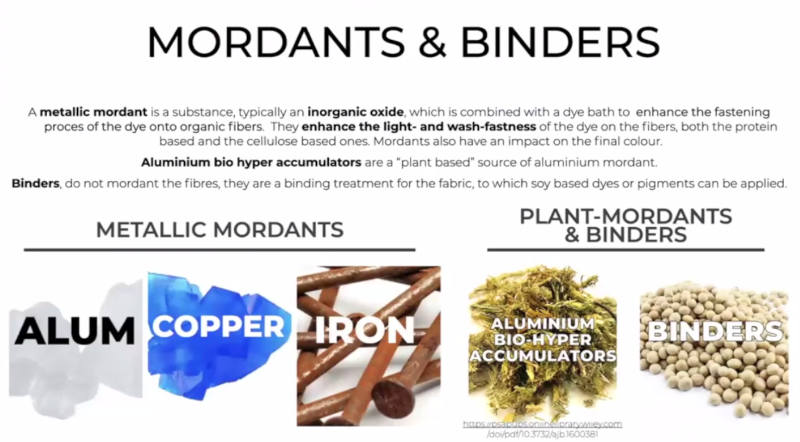
Image source:Screen shot from presentation
While this copper liquor will not be ready in time for this week's immediate experiments, it will be integrated into my upcoming work with BioChromes. The chemical extraction method for this copper-acetate solution is adapted from traditional mineral modifier formulations, utilizing vinegar and salt as catalysts to oxidize the raw Faroese copper.
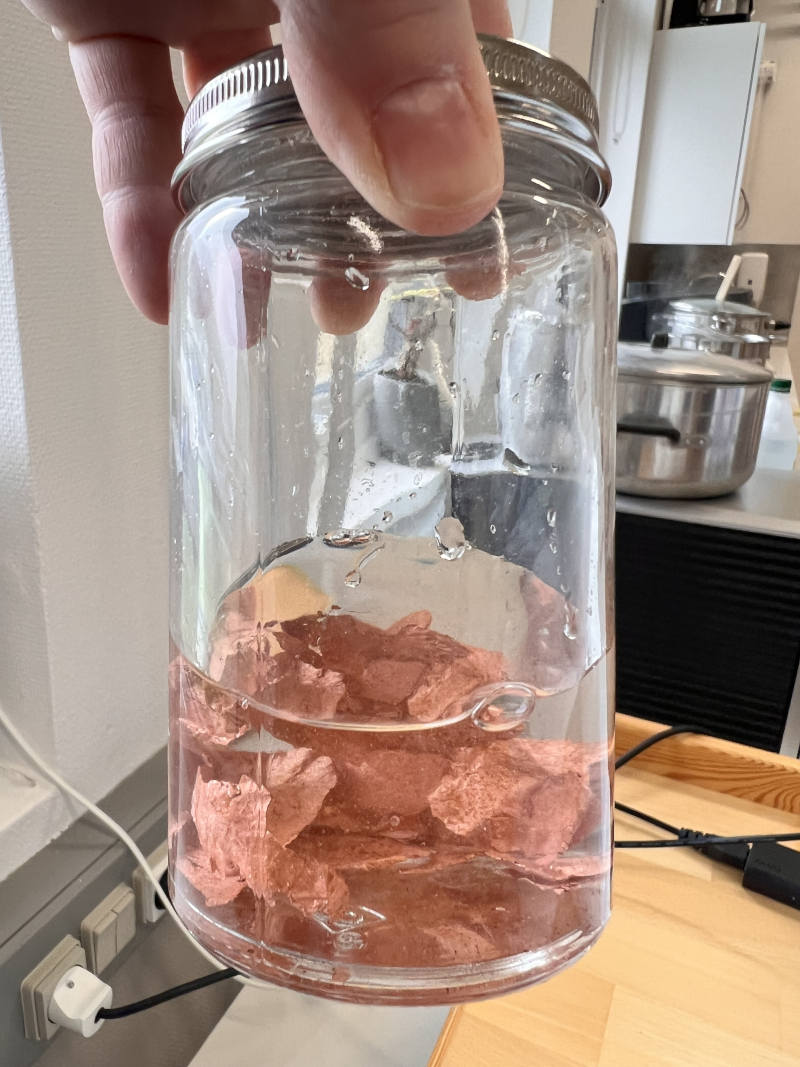
Image source:Photo by Tina Grønbech/ The copper is turning pink, starting the process
A copper liquor (copper acetate solution) is a highly versatile tool in natural dyeing, acting either as a mordant (pre-mordanting) or as a modifier (post-dyeing).
- Copper Liquor as a Modifier (Post-modification / "Saddening")
- Process: The fibers are first dyed normally in a Tansy dye bath to achieve a bright yellow. The wet fibers are then transferred to a warm after-bath containing water and a few spoonfuls of copper liquor for 10–15 minutes.
- Chemical Reaction: The copper ions alter the light refraction of the pigment molecules already bound to the textile fibers. This shifting technique is traditionally known as saddening.
-
Result with Tansy: The bright, sun-yellow color instantly shifts into a deep olivaceous green, military green, or dark mustard tone.
-
Copper Liquor as a Mordant (Pre-mordanting)
- Process: Un-dyed fibers are simmered in a water bath with the copper liquor for about an hour at 60–80°C prior to dyeing, then rinsed and moved to the dye bath.
- Chemical Reaction: The copper acts as a chemical bridge (mordant), anchoring itself permanently to the fiber structure. When the mordanted fiber meets the plant dye, the pigment molecules lock tightly onto the copper.
- Result with Tansy: The resulting color shifts toward a muted, earthy green hue. Because copper forms a highly stable bond, this method yields excellent lightfastness and washfastness.
The Recipe: * 48.3 grams of raw Faroese copper. * Covered with household vinegar and 1 tsp of salt in a glass jar. * Placed on a warm radiator to steep and oxidize.
Reference: Synthesis of traditional copper-acetate modifier recipes, generated via AI Assistant (2026), based on standard open-source textile lab formulations for metal liquor extractions.
Fiber Selection & Scouring
To save time, I have four types of local Faroese wool types that are pre-treated with alum mordant, making them ready for dyeing ( I will get back to these later on). To really start my BioChrome experiments, I selected two fibers from the official Fabricademy material list: Sample 5 (pure white felted wool) and a cellulose fiber sample the (organic cotton).
To remove industrial residues and oils, the fibers underwent a scouring process:
- Protein Fibers (Wool Samples): Total WOF (Weight of Fiber) = 107.2 grams. Placed in a scouring bath of clean, lukewarm water (no textile soap was available locally). The temperature was brought up slowly and maintained at 60°C for 2 hours.
- Cellulose Fibers (Organic Cotton): 4 pieces measuring approximately 10x10 cm. Placed in a scouring pot with approximately 4 liters of lukewarm water and 2 tsp of soda ash to create an alkaline scouring environment. Maintained at 80–85°C for 2 hours.
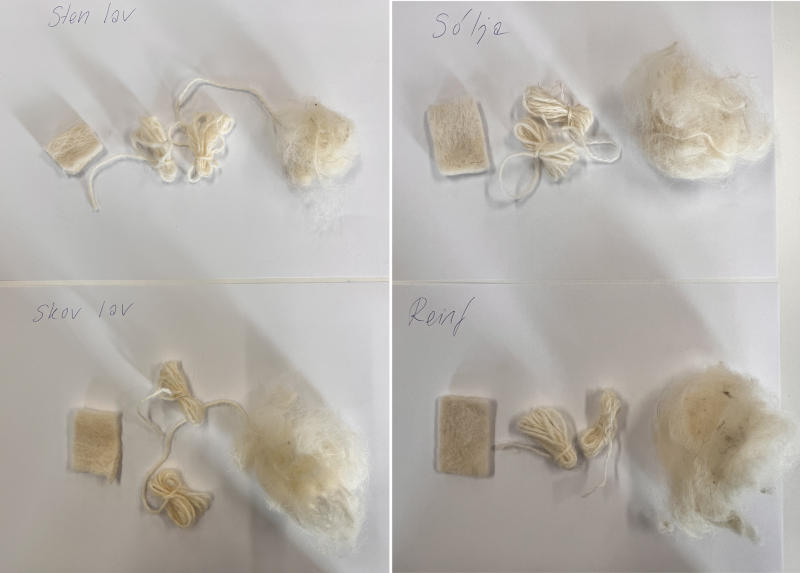
Image source: Photo by Tina Grønbech, Woolsamples from 1-4
Botanical Profiles & Raw Materials
The final task of Day 1 was weighing and preparing the local Faroese raw materials for the upcoming dye baths:
1. Sólja (Marsh Marigold / Kingcup)
- Danish: Engkabbeleje | Latin: Caltha palustris
- Profile: The Faroese national flower, famous for its vibrant yellow petals blooming in June.
- Expected Dye Color: Yields soft, bright yellow tones on alum-mordanted wool.
2. Regnfana (Tansy / Golden Buttons)
- Danish: Rejnfan | Latin: Tanacetum vulgare
- Profile: A historic dye plant used for centuries in the Faroe Islands to dye wool, recognizable by its aromatic, button-like yellow flower heads.
- Expected Dye Color: Yields strong, vibrant, and highly durable sun-yellow to deep gold shades.
3. Skellalovtur (Maritime Sunburst Lichen / Common Wall Lichen)
- Danish: Stenlav | Latin: Parmelia / Physcia spp.
- Profile: A rock-growing lichen well-known in Faroese dyeing traditions.
- Expected Dye Color: Traditionally yields beautiful, warm peach, soft orange, or rusty terracotta shades on wool.
4. Woodland Lichen Mix (Beard Lichen & Tube Lichen)
Due to pot capacity limits, I chose to combine two distinct local tree lichens into a single dye bath: * Species 1: Skeggjakallur (Beard Lichen) * Danish: Skovlav | Latin: Usnea * Profile: A hanging, thread-like green/grey lichen sourced via an older Faroese woman who noted its historical use in wool dyeing. * Species 2: Greinlava (Tube Lichen / Shield Lichen) * Latin: Hypogymnia physodes * Profile: A flat-growing lichen found on tree trunks and branches. * Expected Dye Color: Lichens from the Usnea and Hypogymnia genera traditionally yield soft, earthy yellow-green, beige, or warm tan/brown shades when boiled (boiling method).
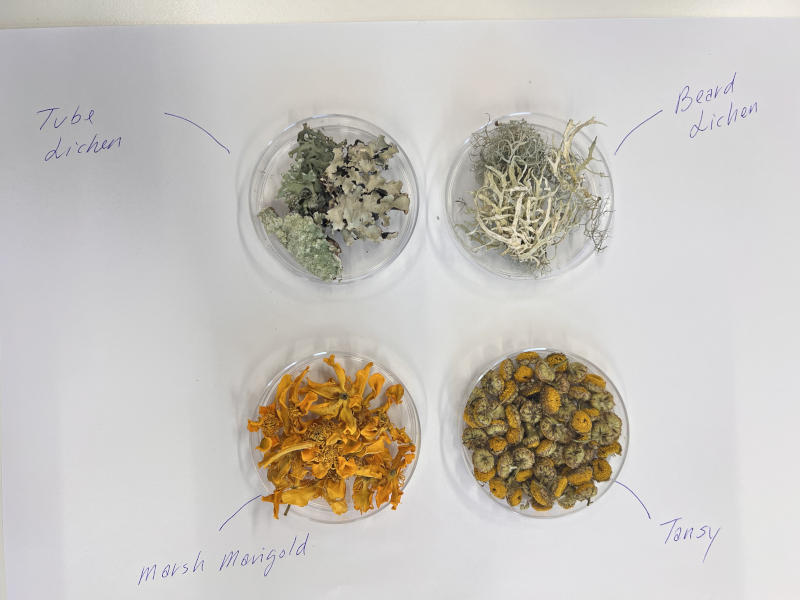
Image source: Photo by Tina Grønbech (Stone linchen is missing, i forgot taking a picture with all of the botanical sources together)
Fiber Selection & Characterization
For this week's experiments, I compiled a total fiber mass of 342 grams. Samples 1–4 consist of local Faroese wool pre-mordanted with alum. Samples 5 and 6 were selected from the official Fabricademy inventory.
- Sample 1: 100% Faroese spun wool yarn from Navia.
- Sample 2: 100% Faroese spun wool yarn from Snældan.
- Sample 3: Pure Faroese raw wool (washed locally with neutral soap).
- Sample 4: Pure washed Faroese wool, felted using a needle loom (feltloom).
- Sample 5: Pure white felted wool (Fabricademy stock) — 27.8 grams.
- Sample 6: Organic cotton cellulose samples (4 pieces of approx. 10x10 cm) — 58.0 grams.
Note Wool samples 1–4 weigh a combined 256.2 grams and were separated manually by eye, then weighed individually to balance the plant ratios.
Scouring Process
To remove industrial residues, spinning oils, and natural lanolin, all fibers underwent a thorough scouring process before entering the dye baths:
- Protein Fibers (Wool Samples 1–5): Combined Weight = 284 grams. Placed in clean, lukewarm water (no textile soap was available locally). The temperature was increased slowly and maintained at 60°C for 2 hours.
- Cellulose Fibers (Organic Cotton Sample 6): Total Weight = 58 grams. Placed in 4 liters of lukewarm water with 2 tsp of soda ash to create an alkaline environment. Maintained at 80–85°C for 2 hours.
Botanical Profiles & WOF Ratios
My goal for the extraction is a 1:1 WOF (Weight of Fiber) ratio, matching the weight of the dry plant material to the weight of the dry fibers. Because some local materials were scarcer than others, I adjusted the fiber distribution to match the available botanical mass.
| Botanical Source (Local Faroese) | Plant Weight (g) | Assigned Fiber Weight (g) | Expected Dye Color |
|---|---|---|---|
| Sólja (Caltha palustris / Marsh Marigold) | 86.0 g | 99.6 g | Soft, bright yellows |
| Regnfana (Tanacetum vulgare / Tansy) | 86.0 g | 97.0 g | Strong, vibrant sun-yellows |
| Skellalovtur (Parmelia/Physcia / Wall Lichen) | 51.3 g | 45.7 g | Warm peach, soft orange, terracotta |
| Woodland Lichen Mix (Usnea & Hypogymnia) | 77.2 g | 71.9 g | Earthy yellow-greens, beige, warm tans |
Specific Material Notes & Pre-Treatments:
- Skellalovtur (Maritime Sunburst Lichen): Lichens are extremely slow-growing organisms, often expanding by only a few millimeters per year. Large colonies can take decades or centuries to establish on the Faroese rocks. Foraging must be done mindfully by harvesting small amounts across multiple locations to protect the ecosystem. Because scraping it off the stones is difficult, I gathered a smaller yield (51.3 g) and upscaled the Woodland Lichen collection to balance the total weight.
- Alkaline Soaking (Lichen): To assist the pigment extraction, the 51.3 g of yellow wall lichen was placed in a glass jar overnight with lukewarm water and 1 pinch of soda ash to create a slightly alkaline soaking environment.
- Woodland Lichen Mix: Due to limited pot capacity, I combined two distinct tree lichens: Skeggjakallur (Usnea / Beard Lichen), a hanging grey-green species traditionally used in old Faroese wool dyeing, and Greinlava (Hypogymnia physodes / Tube Lichen), a flat species growing on branches.
Day 2: Mordanting & Tannin Bath
The scouring pots were left to steep overnight and have cooled down to 20.5°C.
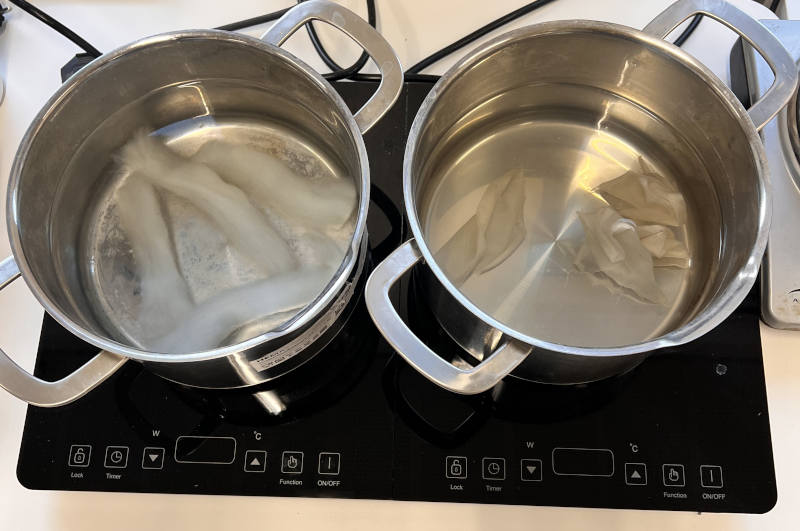
Image source: Photo by Tina Grønbech
Step 1: Rinsing the Scoured Fibers
First, I removed wool sample no. 5 and organic cotton sample no. 6 from their respective pots and rinsed them gently under clean, running water to remove any remaining industrial oils or residues. The scouring water in both pots looked relatively clean, indicating that only minimal impurities were released from the fibers.
Step 2: Tannin Pre-treatment for Cellulose (Pot A)
To mordant the organic cotton cellulose fibers effectively, a two-step tannin-alum process is required. I weighed out 7.5 grams of oak galls, matching a standard 13% WOF ratio for the cotton (Calculation: 58g cotton WOF × 13% ≈ 7.5g). This amount corresponds to roughly one large, whole oak gall. I crushed the oak gall using a mortar and pestle to maximize the surface area for extraction.
For the decoction, I measured 1 liter of water into Pot A, added the crushed oak gall, and brought it to a boil for 30–40 minutes until the liquid transformed into a rich, tea-colored tannin bath.
- Method Reference: Traditional gallo-tannin extraction for cellulose fibers, which provides the necessary chemical anchoring sites for aluminum ions on plant-based materials.
Step 3: Preparing the Alum Mordant Bath (Pot B)
- Recipe: 15% WOF based on the combined weight of the wool and cotton samples (Wool 27.5g + Cotton 58g = 85.5g total fiber mass). Calculation: 85.5g × 15% = 12.8 grams of Alum.
I prepared the mordant bath in Pot B by dissolving the 12.8 grams of alum into 2 liters of clean water. This bath was left ready on the side while the cotton completed its tannin treatment.
Step 4: Tannin Application
Once the oak gall decoction was finished, I strained the remaining plant particles out using a coffee filter. The organic cotton was submerged in the warm tea-colored tannin bath for 1 hour. Because the liquid was initially too hot for the fibers, I allowed the pot to cool down in the window sill for 10–15 minutes beforehand to prevent thermal shock. Afterward, I removed the cotton pieces and gently squeezed out the excess liquid without twisting or wringing the fabric too harshly.
Step 5: Alum Mordanting (Pot B)
Finally, the tannin-treated cotton was combined with wool sample no. 5 and submerged together into Pot B with the alum solution. I turned on the burner and gradually increased the temperature to 60°C. Once this temperature was reached, the fibers were left to mordant at a constant simmer for 1 hour.
- Pot Overview:
- Pot A: Oak Galls (Tannin treatment for cotton cellulose)
- Pot B: Alum Mordant (Simultaneous mordanting for Wool 5 and Cotton)
- Instructor Reference: Methodology adapted from Svetlana Khachatryan (Fabricademy BioChromes workflow).
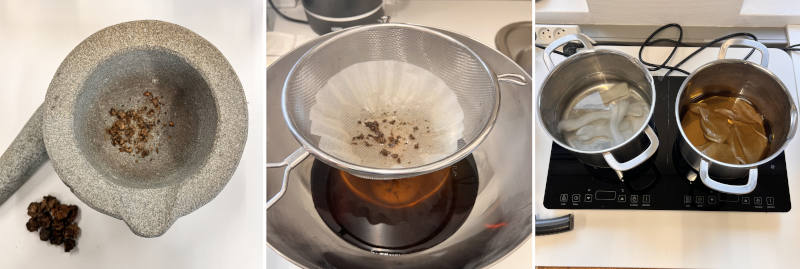
Image source: Photo by Tina Grønbech
Pot Allocation Overview (Morning)
- Pot A: Oak Galls (Tannin treatment for organic cotton cellulose)
- Pot B: Alum Mordant bath (Simultaneous mordanting for Wool 5 and Organic Cotton)
Preparing the Dye Baths (Extraction)
Step 1: Lichen Extractions (Pots C & D)
- Pot C (Skellalovtur / Wall Lichen): I measured 3.5 liters of water, added the pre-soaked wall lichen, and brought the pot to a gentle simmer under a lid at 100°C for 2 hours to extract the pigments.
- Pot D (Woodland Lichen Mix): Prepared identically to Pot C, using 3.5 liters of water and the combined tree lichen mix, simmering at 100°C for 2 hours.
Step 2: Sólja Dye Bath Preparation (Pot A)
Once the tannin treatment in Pot A was complete, the pot was freed up for the first flower extraction. The remaining oak gall tannin liquid was strained into a stainless steel bowl and set aside (to be saved for future iron gall ink experiments).
I then filled Pot A with 3.5 liters of clean water and added the Sólja (Marsh Marigold) flowers. The bath was heated gradually to a maximum of 70°C and left to extract for 45 minutes once the target temperature was reached. Because this flower extraction requires less time and lower heat than the lichens, this dye bath was completed first.
Step 3: Reinfan Dye Bath Preparation (Pot B)
After completing the alum mordanting process in Pot B, the mordant solution was poured out into a separate stainless steel bowl. I then added the Reinfan (Tansy) flowers into Pot B along with 3.5 liters of clean water. The bath was heated gradually to a maximum of 70°C and extracted for 45 minutes.
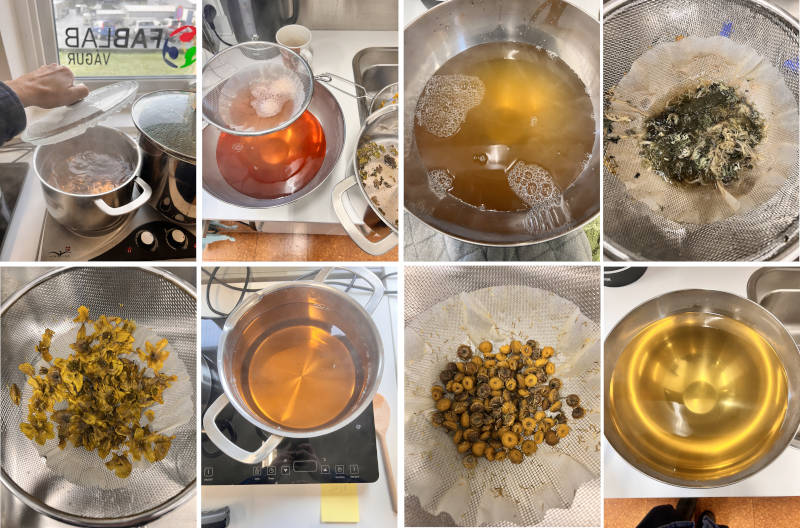
Image source: Photo by Tina Grønbech
• Top row (left to right): Stone lichen (images 1 & 2), woodland lichen mix (images 3 & 4). • Bottom row (left to right): Sólja (images 1 & 2), the resulting color from reinfann (images 3 & 4).Dyeing the Fibers
The final task of Day 2 was the actual dyeing process (as time did not permit further steps). The fibers, which had been previously balanced into 4 separate piles corresponding to each plant's WOF, were submerged into their respective dye baths.
Workstation Discipline & The Bridge Watch Method
Managing four simmering pots simultaneously, along with a log of vast amount of data and raw materials, requires strict organizational discipline at the workstation. Just as during a maritime bridge watch, Cecilia strongly emphasized the importance of logging everything continuously to maintain a clear overview of the workflow. To ensure accuracy during the shifts, I recorded all data on paper in real-time, creating a raw logbook to be meticulously transcribed into this digital documentation later.
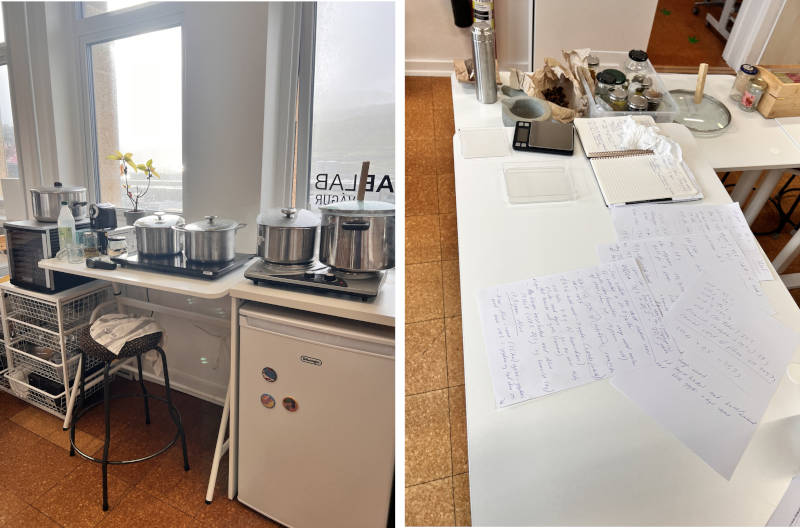
Image source: Photo by Tina Grønbech
- Reference for Dyeing Times and Temperatures: The parameter of maintaining the dye baths at 60–70°C for exactly 1 hour is based on the standard Fabricademy BioChromes manual by Cecilia Raspanti. For protein fibers like Faroese wool, keeping the temperature strictly under 70°C prevents the wool fibers from felting or losing their elasticity, while providing enough thermal energy for the plant and lichen pigments to bond permanently with the alum mordant.
All four pots followed a unified dyeing method, maintaining a temperature between 60–70°C for exactly 1 hour:
- Pot A (Sólja): Dyed from 12:30 to 13:30 at approx. 60–70°C.
- Pot B (Reinfan): Dyed from 13:19 to 14:19 at approx. 60–70°C.
- Pot C (Skellalovtur / Wall Lichen): Dyed from 12:30 to 13:30 at approx. 60–70°C.
- Pot D (Woodland Lichen Mix): Dyed from 12:45 to 13:45 at approx. 60–70°C.
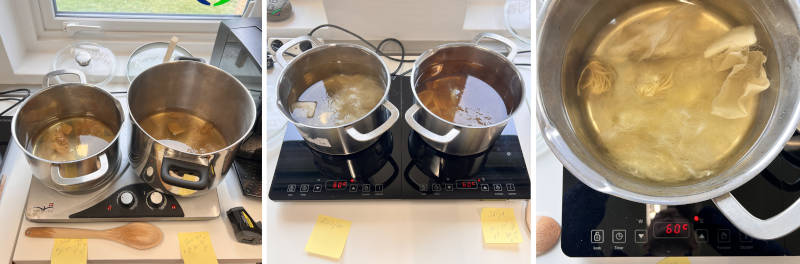
Image source: Photo by Tina Grønbech
After 1 hour of active dyeing, the heat was turned off on all four burners. The lids were kept on, and the fibers were left to steep in the cooling dye baths overnight to maximize color absorption.
Day 3: Evaluating the Dyeing Results & Pigment Extraction
It is now Friday morning. I am very excited to see how the natural pigments have bound to the fibers after soaking in the dye baths overnight.
Step 1: Evaluating and Drying the Fibers
I removed the fibers from the pots and gently squeezed out the excess water. To dry them safely, I placed the fibers onto a clean towel and rolled it up into a cylinder. This is the traditional hand-washing technique I always use for hand-knitted sweaters, as the towel effectively absorbs heavy moisture without putting mechanical stress on the fibers.
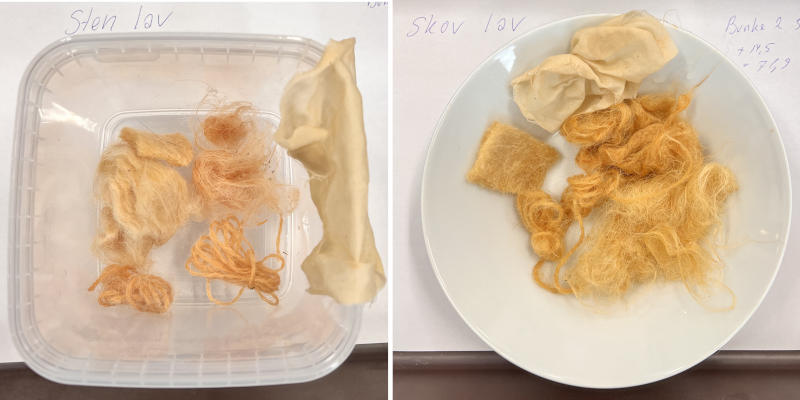
Image source: Photo by Tina Grønbech
Lichen results after dyeing (before drying): The samples have just been removed from the final dye baths, showcasing lovely pastel nuances. The stone lichen reveals light peach and warm brown shades, while the wool took the woodland lichen mix incredibly well, turning into warm, earthy yellow-greens. It is surprising and highly interesting to observe how uniquely each fiber type reacts to the pigments after dyeing.Afterward, I laid the samples flat on a dry towel in a dark room, where they will leave to dry until Monday.
- Why avoid direct sunlight and UV light? Naturally dyed fibers are highly photoreactive, meaning the chemical bonds between the plant pigments, the mordant, and the protein/cellulose fibers are still unstable while wet. Exposure to ultraviolet (UV) radiation breaks these delicate organic bonds, causing rapid fading, shifting, or bleaching of the colors before they have fully set.
Step 2: Lake Pigment Extraction (The Laking Process)
Following the chemical extraction methodologies introduced during Cecilia Raspanti's lecture—and building directly on the hands-on experience I gained while participating in her workshop at the Fabricademy Bootcamp in May—I initiated the laking process to transform the remaining dye baths into lake pigments. This chemical precipitation reaction forces the soluble plant dyes to bind to an insoluble metal salt substrate (aluminum hydroxide), allowing the color to settle out of the liquid. The quantitative formulas used to calculate the alum-to-soda ash precipitation ratios are based on standard chemical procedures for natural dye analysis and lake pigment synthesis (Schweppe, 1988)Lake pigments
Quantitative Calculations & Ratio Verification
The standard laboratory formulation requires an Alum-to-Soda Ash ratio of 2:1, calculated at 25% of the original raw plant weight (Weight of Material / WOM).
The Target Formulas: * Standard Alum Weight = Plant Weight × 0.25 * Standard Soda Ash Weight = Standard Alum Weight × 0.50
| Material Source | Plant Weight (g) | Standard Alum (25%) | Standard Soda Ash (50% of Alum) | My Manual Dosage (Alum / Soda Ash) | Liquid Volume & Notes |
|---|---|---|---|---|---|
| Sólja | 86.0g | 21.5g | 10.8g | 27.0g / 13.5g | 2.5L. Adjusted dosage fully captured the rich pigment concentration. |
| Reinfan | 86.0g | 21.5g | 10.8g | 25.0g / 12.5g | 2.5L. Provided a strong extraction for this matted volume. |
| Skellalovtur (Wall Lichen) | 51.3g | 12.8g | 6.4g | 12.0g / 6.0g | 1.2L remaining. Perfectly matched the standard liquid ratio. |
| Woodland Lichen Mix | 77.2g | 19.3g | 9.6g | 20.0g / 10.0g | 2.0L remaining. Perfectly targeted the remaining volume. |
The Extraction Process:
Because the dye baths had cooled down to room temperature overnight, I dissolved and added the alum and soda ash directly into the cold liquids. Initially, no effervescence (bubbling) or chemical reaction occurred. However, as I slowly heated the pots up to 60–70°C and stirred briefly to homogenize the chemicals, the thermal energy activated the acid-base reaction. The liquid instantly turned turbid and cloudy as the lake pigment particles began to precipitate and separate from the water.
The pots were maintained at this temperature for 2 hours to allow the chemical reaction to reach completion.
- Methodology Reference: Cecilia Raspanti (Fabricademy Textile Lab Amsterdam), BioChromes: Co-producing color with living organisms and natural extractions.
Decanting and filtering
While the four pots were simmering, I prepared a filtering station consisting of four glass jars, each fitted with a funnel and a standard paper coffee filter.
Shift Log: pH Monitoring, Correction, and Intermediate Conclusion
Before initiating the filtration, I used pH test strips to carefully monitor the chemical balance across all four dye baths. The measurement log showed the following values: * Sólja Bath: pH 7 (Perfect neutrality) * Reinfan Bath: pH 7 (Perfect neutrality) * Woodland Lichen Mix Bath: pH 7 (Highly alkaline / basic)** * Skellalovtur (Wall Lichen) Bath: pH 9 (Highly alkaline / basic)
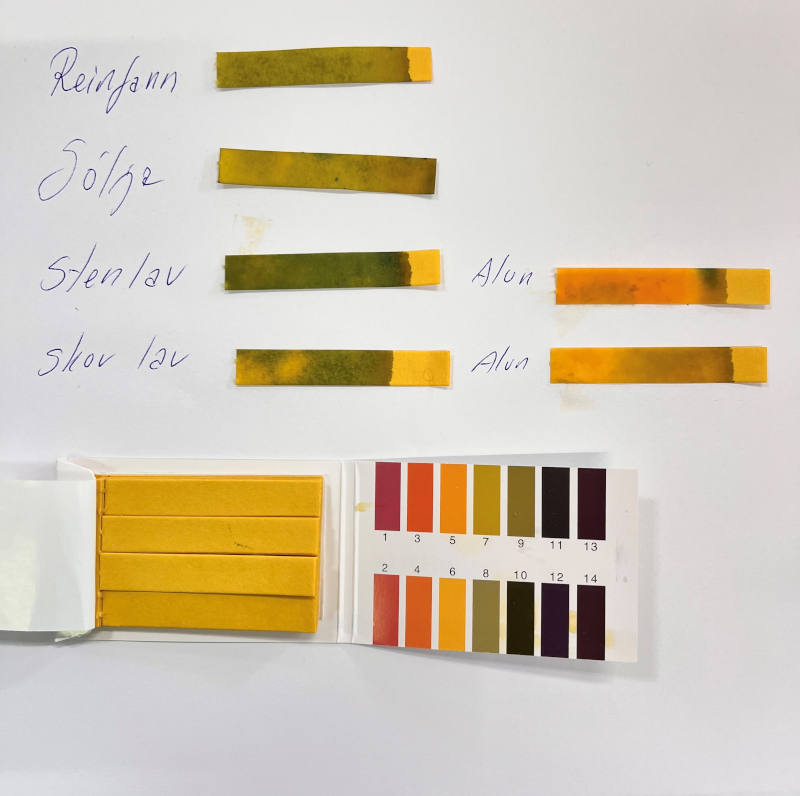
Image source: Photo by Tina Grønbech
Discovering that the Lichen baths was far too basic was a critical turning point. At pH 9, natural organic pigments often remain locked in a soluble state and refuse to precipitate. To correct this, I manually titrated the solution using dissolved alum, intentionally shifting the environment from basic down to a slightly acidic state of pH 5–6.
Intermediate Conclusion on Lichen Precipitation: During the filtration process, this chemical intervention yielded a highly significant result. Despite the Skellalovtur (Wall Lichen) bath having the lowest initial botanical mass, it unexpectedly produced the highest amount of accumulated lake pigment in the coffee filter out of all four pots. This confirms that lowering the pH was absolutely vital; the slightly acidic environment successfully triggered the precipitation reaction, allowing the aluminum hydroxide substrate to fully capture and collapse the lichen dye molecules out of the liquid. Without this active correction, a large portion of the pigment would have been lost in the spent top-water.
Once the precipitation was complete and the pots sat briefly to cool, I carefully decanted (poured off) the clear, spent top-water into the sink, stopping right before the heavy color-sludge reached the rim. I then poured the remaining dense pigment "mud" into the coffee filters. I quickly noticed that this capillary filtration process takes a significant amount of time!, and some of my local funnels struggled to drain efficiently due to the fine particle density blocking the paper pores.
Intermediate Conclusion: The Effect of pH on Lichen Precipitation
During the filtration process, I made a significant observation regarding Pot C (Skellalovtur / Wall Lichen). Initially, this specific bath had an alkaline pH value of 9, which I manually adjusted down to an acidic pH of 5–6 using dissolved alum.
Surprisingly, despite the wall lichen bath having the lowest initial botanical mass, it yielded the highest amount of accumulated lake pigment in the coffee filter out of all four pots. This proves that shifting the pH from a basic to a slightly acidic state was absolutely critical. The acidic environment successfully triggered the chemical precipitation, allowing the aluminum hydroxide substrate to fully capture and bind the lichen's organic dye molecules, which would have otherwise remained fully dissolved in an alkaline solution.
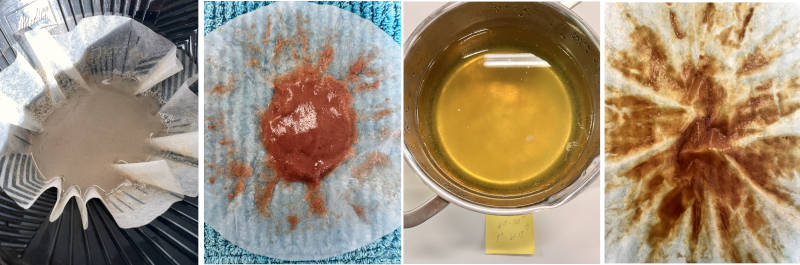
Image source: Photo by Tina Grønbech
Laking Process: Preliminary Evaluation
This mixed outcome provides valuable insights for the extraction process. Choosing to reuse the spent dye baths was a deliberate decision to optimize the supply chain, minimize resource waste, and work within the constraints of our limited time frame.
While the pH-adjusted wall lichen (Pot C) demonstrated excellent precipitation, the other pots resulted in a very low pigment yield. This indicates that using a spent dye bath—where the wool fibers have already absorbed the primary color compounds—is less effective for full pigment recovery when working with the naturally subtle concentrations of wild Faroese flora.
For future iterations, I will balance these supply chain efficiencies against pigment density by adjusting the initial botanical mass, while continuing to utilize the critical pH shifts observed in Pot C.
Vaporation Note
Before leaving the lab for the weekend, I transferred the wet coffee filters containing the stable lake pigment paste into the dark room to air-dry flat on towels alongside my fiber samples, protected from any UV light.
However, as noted in my shift logs, ** (Woodland Lichen Mix)** completely clogged the paper pores and refused to filter. Due to time constraints, I left this specific filter standing upright in its funnel and glass jar out on the kitchen table. This will allow gravity and natural surface evaporation to slowly draw out the remaining liquid over the next two days. I will evaluate the dry, crystallized pigment crusts when I return on Monday morning.
- Reference for Laking Times and Temperatures: The 2-hour duration at 60–70°C for the precipitation reaction follows the Textile Lab Amsterdam protocols. Maintaining a steady, moderate heat ensures that the sodium carbonate (soda ash) and aluminum sulfate (alum) react completely to form the insoluble aluminum hydroxide substrate, capturing all active dye molecules from the liquid without burning or oxidizing the delicate natural colors.
Day 4: Modifier Trials, Final Dyeing Results & Pigment Processing
Final Processing of Lake Pigments (From Paste to Powder)
After leaving the wet coffee filters to air-dry in the dark room over the weekend, the aluminum hydroxide substrate had fully collapsed and crystallized into hard, colorful crusts.
To transform these stable crusts into raw pigment powder, I carefully scraped the dry material out of the coffee filters and transferred it into a mortar and pestle. I ground the crystallized chips thoroughly until they turned into a fine, feather-light pigment powder. This raw powder is now stored in glass vials, ready to be integrated into future work as a bio-ink substrate or textile screen-printing paste.
Preliminary Evaluation:
The final extraction resulted in a very low pigment yield across the filters. This confirms my earlier observations that utilizing a spent dye bath—where the wool fibers had already absorbed the primary color compounds—is insufficient for heavy pigment precipitation. Due to the tight time constraints of this week, reusing the baths was necessary to optimize our resources. However, as part of my future work, I plan to dedicate fresh, highly saturated botanical extractions solely to lake processing in order to produce substantial pigment quantities for my expanding material library.
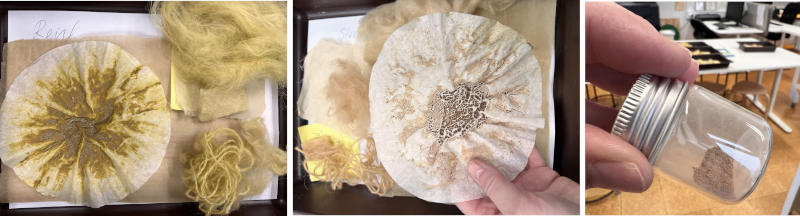
Image source: Photo by Tina Grønbech
Experimental pH Modifier Trials & Preliminary Evaluation
Since modifiers were omitted from our official course material list, and my homegrown Local Copper Liquor is still maturing, I conducted two rapid pH modifier trials using accessible kitchen chemistry. This allowed me to test how the volatile local Faroese plant and lichen pigments react to different chemical environments.
I selected pre-dyed wool yarn samples (Sampel 2) from my extraction baths and exposed them to two distinct variables:
- Trial 1: Acidic Modifier (Vinegar & Lemon Juice): Shifting the environment to an acidic state caused the natural botanical pigments to weaken, resulting in noticeably softer, paler pastel shades than the original dyeings.
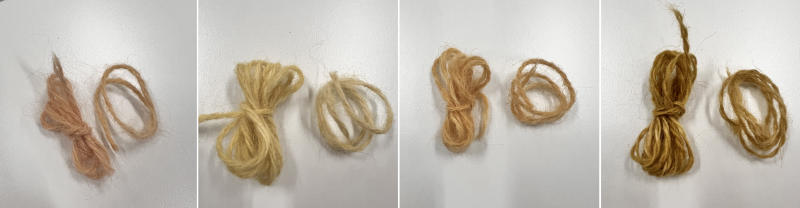
Image source: From left to right: Stone lichen, reinfann, woodland lichen, and finally, on the far right, sólja.The short-cut piece of yarn has been treated with a modifier. Photo by Tina Grønbech
- Trial 2: Alkaline Modifier (Sodium Bicarbonate / Baking Soda in Lukewarm Water): Shifting the environment to a basic state had the opposite effect, intensifying the pigments and shifting the plant nuances into significantly stronger, deeper variations.
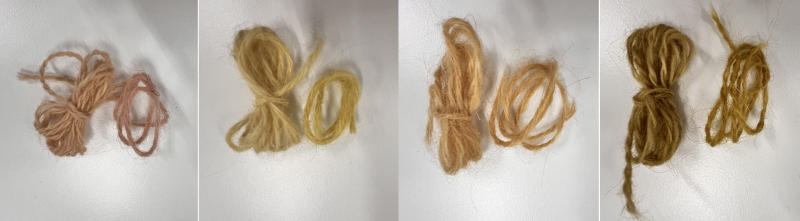
Image source: From left to right: Stone lichen, reinfann, woodland lichen, and finally, on the far right, sólja.The short-cut piece of yarn has been treated with a modifier. Photo by Tina Grønbech
Update: By the end of Day 4, the homemade copper liquor has finally started to change color, turning into a beautiful, light blue shade. This distinct blue hue confirms that the vinegar and salt have successfully begun to oxidize the raw Faroese copper, signaling the formation of active copper acetate.
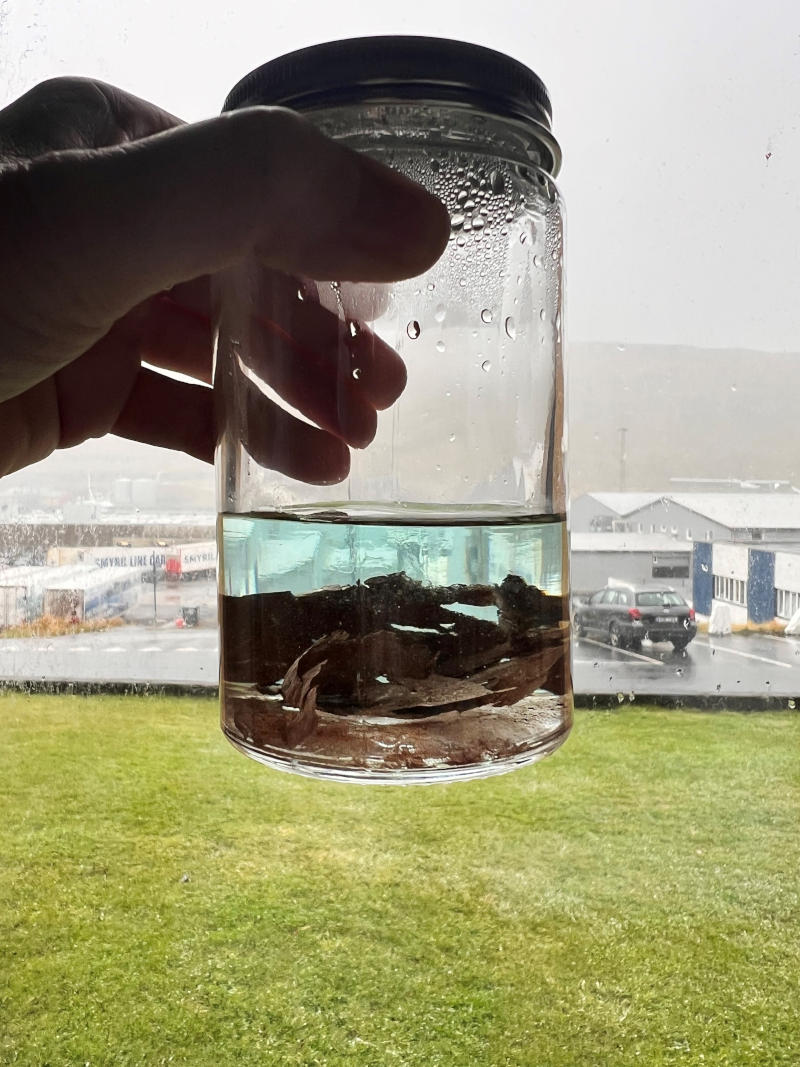
Image source: Photo by Tina Grønbech
Preliminary Evaluation:
These trials successfully fulfilled the modifier criteria on the student checklist. The experiments clearly demonstrate that while wild Faroese flora yields delicate initial palettes, the pigments are highly volatile and chemically sensitive. Shifting to an alkaline environment provides a viable method for darkening and strengthening the color depth of local bioregional dyes, while acidic environments soften them.
...
5. Results
The next image showcasing the complete collection of all dyed samples: From top to bottom: Stone lichen, sólja, woodland lichen, and reinfann
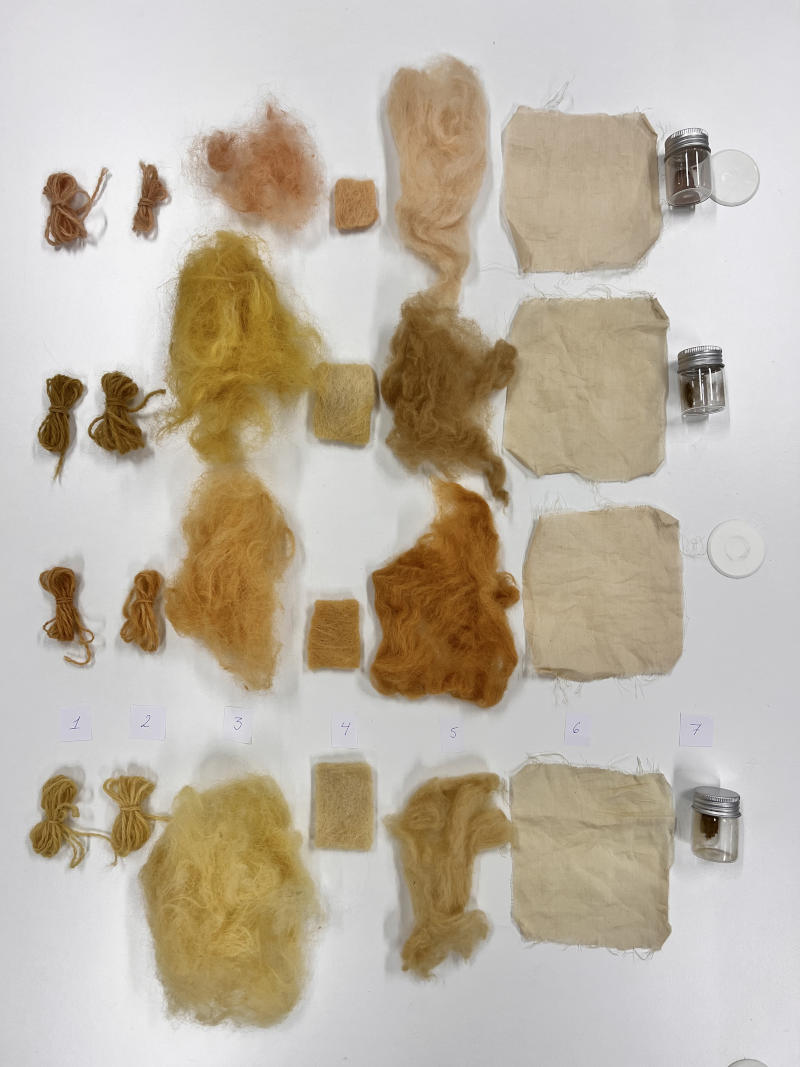
Image source: Photo by Tina Grønbech
- Sample 1: 100% Faroese spun wool yarn from Navia.
- Sample 2: 100% Faroese spun wool yarn from Snældan.
- Sample 3: Pure Faroese raw wool (washed locally with neutral soap).
- Sample 4: Pure washed Faroese wool, felted using a needle loom (feltloom).
- Sample 5: Pure white felted wool (Fabricademy stock) — 27.8 grams.
- Sample 6: Organic cotton cellulose samples (4 pieces of approx. 10x10 cm) — 58.0 grams.
- Sample 7: Ink from lake pigment.
Source 1: Botanical Conclusion - Sólja (Marsh Marigold / Kingcup)
The experimentation with Sólja (Marsh Marigold / Kingcup) successfully demonstrates the rich, vibrant color potential embedded within traditional Faroese summer flora. While the fresh, iconic petals display a brilliant and intense golden yellow in nature, the extracted pigments delivered a beautiful spectrum ranging from clear lemon-yellows to deep, earthy golden straw tones and warm wool-brown nuances on the protein fibers. These exceptional results anchor themselves directly into Werner’s Nomenclature of Colours, closely aligning with historical references such as Lemon Yellow, Kings Yellow, and Straw Yellow.
- Extraction & Volatility: Utilizing a high initial botanical mass of 86.0g in a 2.5L volume yielded a deeply saturated dye bath. The carotenoid and flavonoid compounds in the petals showed a high affinity for the pre-mordanted wool, allowing the fibers to fully lock in the warmth of the local landscape before any subsequent modification or precipitation trials.
- Fiber Affinity & Circularity: The local Faroese wool types and yarns responded beautifully to the Sólja extraction. By practicing a zero-waste supply chain mindset and exhausting the dye bath through multiple fiber dips, the primary color compounds were heavily captured by the texturized wool, leaving a clear and lasting record of the seasonal flora.
- Future Trajectory: This trial establishes Sólja as an incredibly reliable and high-yielding local source for establishing a regional color database. Future explorations will focus on harvesting strictly within seasonal limits during peak bloom to compare pigment concentrations, while evaluating how dedicated fresh extractions can be optimized to increase the dry lake pigment density.
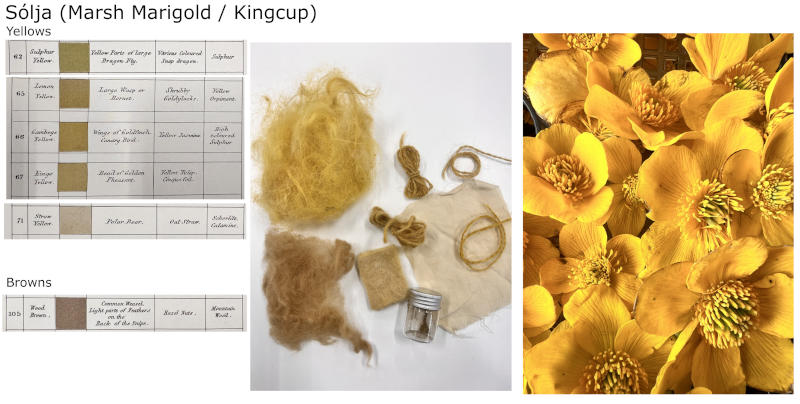
Image source: Photo by Tina Grønbech
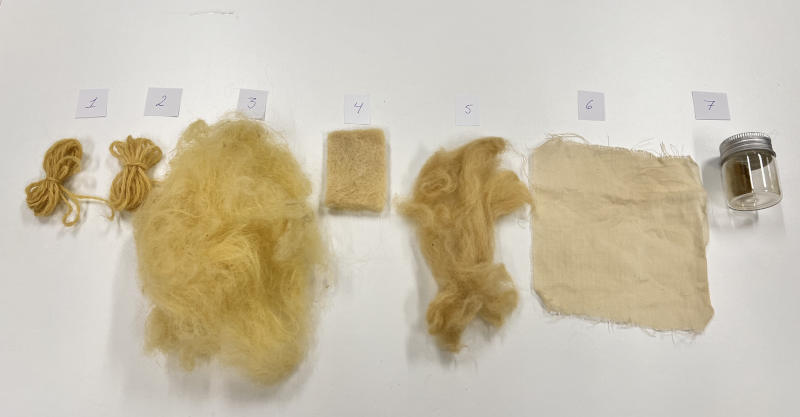
Image source: Photo by Tina Grønbech
Source 2: Botanical Conclusion - Regnfana (Tansy / Golden Buttons)
The experimentation with Regnfana (Tansy / Golden Buttons) highlights a historic pillars of North Atlantic wool dyeing, deeply rooted in Faroese cultural lineage. The prominent, aromatic flower heads yielded a rich, warm spectrum of vibrant sun-yellows, deep ochres, and sophisticated brass tones on the fibers. These lightfast and durable tones align extraordinarily well with the historical classifications in Werner’s Nomenclature of Colours, corresponding closely to Sulphur Yellow, Gamboge Yellow, and Ochre Yellow.
- Extraction & Color Stability: Utilizing 86.0g of material in a 2.5L volume, the extraction successfully unlocked the dense flavonoid compounds concentrated in the button-like flowers. The resulting dye bath proved to be highly stable and potent, infusing both the protein yarns and the local felted wool with a distinct, sun-drenched permanence that reflects the historic importance of this species.
- Fiber Affinity & Circularity: The pre-mordanted Faroese wool types displayed a remarkable affinity for the Regnfana pigments. Adhering to the zero-waste supply chain ethos of this project, the exhausted dye bath left an even, high-saturation imprint across all texturized swatches, maximizing resource utilization within the constrained timeframe.
- Future Trajectory: Regnfana stands out as a foundational cornerstone for the expanding regional color library. Future research will explore the potential of using fresh, unexhausted extractions to increase the lake pigment density during chemical precipitation, while investigating how post-dye metal modifiers can turn this bright palette into deep olivaceous greens.
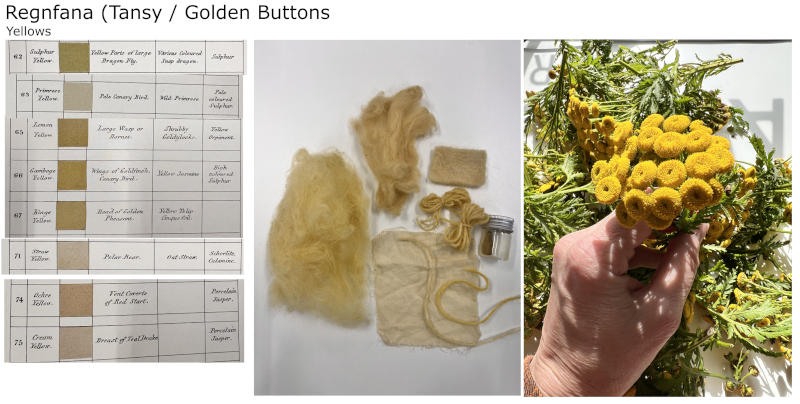
Image source: Photo by Tina Grønbech
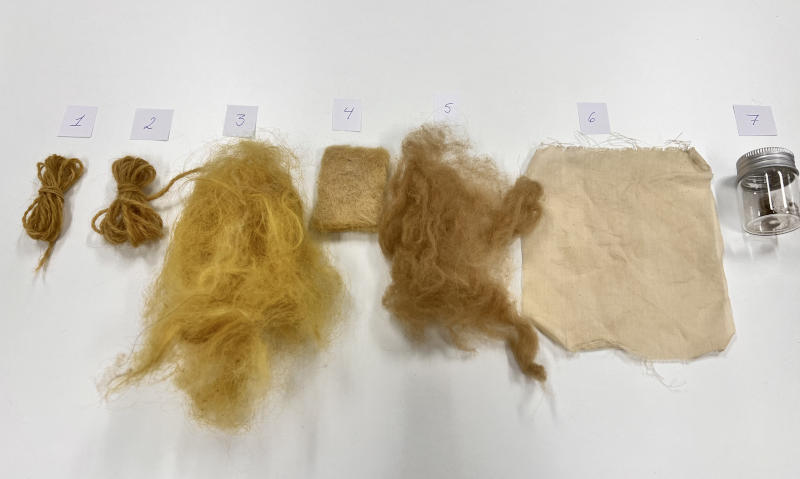
Image source: Photo by Tina Grønbech
Source 3: Botanical Conclusion - Woodland Lichen Mix (Beard Lichen & Tube Lichen)
The experimentation with the Woodland Lichen Mix—combining Skeggjakallur (Beard Lichen / Usnea) and Greinlava (Tube Lichen / Hypogymnia physodes)—successfully documented the rich, complex dye potential of Faroese tree-dwelling organisms. The boiling extraction method yielded a sophisticated, organic spectrum ranging from warm, earthy yellow-greens and soft beige to deep golden-tan and rich wool-brown nuances on the fibers. These complex shades link directly back to the historical references in Werner’s Nomenclature of Colours, matching taxonomies like Sulphur Yellow, Honey Yellow, and Straw Yellow.
- Extraction Dynamics & Lichen Acids: Combining 77.2g of the mixed lichen mass into a 2.0L volume provided a dense and highly reactive dye bath. Unlike the rapid extraction of the flower petals, the lichen acids required sustained thermal energy during the 2-hour simmer, allowing the complex, slow-releasing color compounds to fully saturate the liquor.
- Fiber Affinity & Material Response: The pre-mordanted Faroese wool yarns, loose raw fibers, and needle-felted swatches demonstrated an exceptional affinity for this specific bath composition. By ensuring the exhausted dye bath was fully utilized to reduce resource waste, the texturized protein fibers captured the shifting, rustic taxonomy of the woodland environment with great permanence. • The Laking Limitation & Observation: Unlike the other samples, I was unable to produce a dry lake pigment from the woodland lichen mix for today's review. Upon arriving in the lab this morning, the coffee filter was still completely wet, as the fine liquid density failed to strain through properly. Because the overall pigment concentration in this specific spent bath was already very low after dyeing the wool, the filtration process yielded no usable sediment to grind into powder.
- Future Trajectory: This trial establishes the combined tree lichen mix as a crucial asset for expanding the bioregional material database. Future work will investigate isolating the two species to map their individual pigment behaviors, while continuing to utilize the zero-waste supply chain mindset to document how seasonal variations affect the density of the final lake pigment powder.
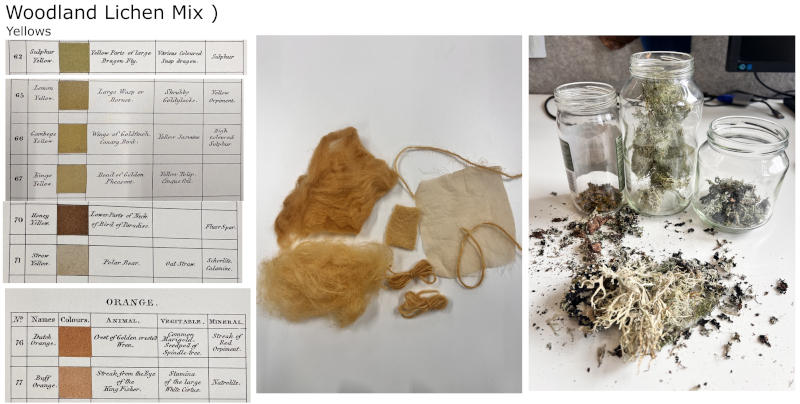
Image source: Photo by Tina Grønbech
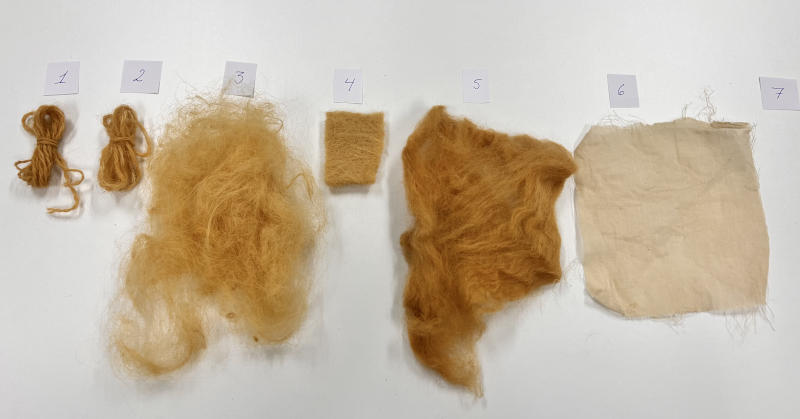
Image source: Photo by Tina Grønbech
Source 4: Botanical Conclusion - Skellalovtur (Wall Lichen)
The experimentation with Skellalovtur (Wall Lichen) successfully established a direct bridge between historical color-mapping, chemical optimization, and bioregional foraging. While the living organism presents a brilliant, intense yellow on the Faroese stone, the extracted pigments yielded a sophisticated palette of soft peach, warm tan, and delicate buff-orange tones on the fibers. These tactile results align beautifully with the natural taxonomies cataloged in Werner’s Nomenclature of Colours, closely mirroring historical shades like Cream Yellow and Buff Orange.
- The Power of pH Shifts: Despite having the lowest initial botanical mass (51.3g), this bath provided the most critical scientific insight of the week. Adjusting the alkaline extraction from pH 9 down to a slightly acidic pH 5–6 using dissolved alum successfully triggered the precipitation reaction, fully capturing the organic dye molecules and delivering the highest relative yield of stable lake pigment.
- Fiber Affinity & Circularity: The local Faroese wool yarns and felted swatches demonstrated an excellent affinity for the lichen acids. By intentionally reusing the spent dye bath to optimize the local supply chain and reduce waste, the fibers effectively absorbed the primary color compounds, leaving a subtle but stable print.
- Future Trajectory: This trial proves that Skellalovtur is a highly volatile but deeply rewarding source for regional color taxonomy. Future work will focus on harvesting mindful, small-scale batches across multiple locations to protect the slow-growing colonies, using fresh extractions solely for lake processing to maximize dry pigment quantities.
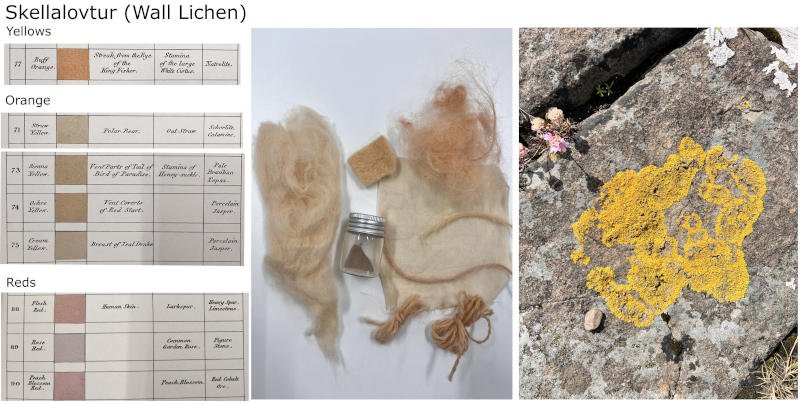
Image source: Photo by Tina Grønbech
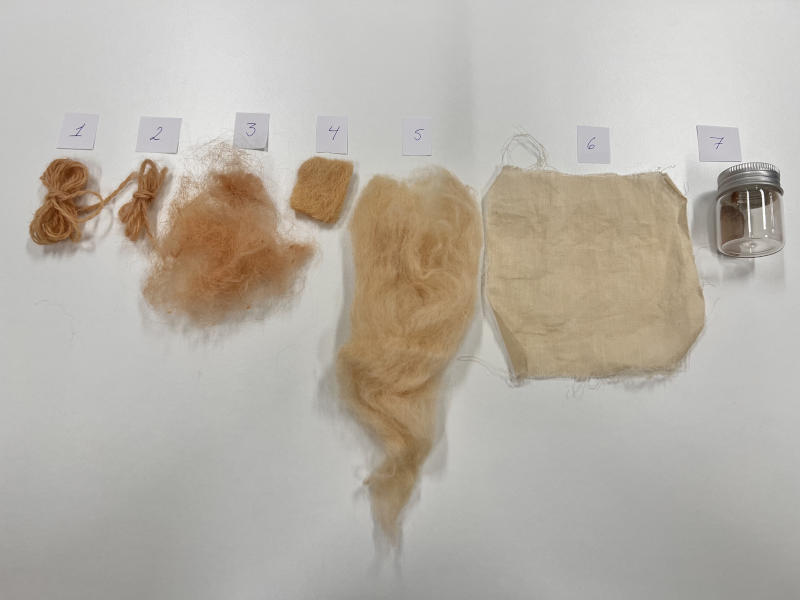
Image source: Photo by Tina Grønbech
5.1 Documenting experiments in a table for comparison
Below is the comprehensive comparison table for the Week 04 BioChrome extractions. It documents the material properties, color shifts, and practical outcomes for each bioregional source found across the Faroe Islands landscape.
| Botanical Source | Fabric / Fiber Composition | Original Color Result (Post-Dyeing) | Acidic Modifier (Vinegar/Lemon) | Alkaline Modifier (Baking Soda) | Lake Pigment Yield & Notes |
|---|---|---|---|---|---|
| Sólja (Marsh Marigold) | Faroese wool (yarn/felt) & Organic cotton | Clear lemon-yellow, golden straw, and rich wool-brown | Weakened to a softer, paler pastel shade | Intensified into a significantly stronger, deeper variation | Low yield. Wool fibers absorbed most primary pigments from the spent bath. |
| Regnfana (Tansy / Golden Buttons) | Faroese wool (yarn/felt) & Organic cotton | Vibrant sun-yellow, deep ochre, and brass tones | Weakened to a softer, paler pastel shade | Intensified into a significantly stronger, deeper variation | Low yield. Saturated bath requires unexhausted extraction for heavy precipitation. |
| Skellalovtur (Wall Lichen) | Faroese wool (yarn/felt) & Organic cotton | Soft peach, warm tan, and delicate buff-orange | Weakened to a softer, paler pastel shade | Intensified into a significantly stronger, deeper variation | Highest yield. Shifting pH from 9 down to 5–6 successfully triggered full precipitation. |
| Woodland Lichen Mix (Usnea/Hypogymnia) | Faroese wool (yarn/felt) & Organic cotton | Earthy yellow-greens, soft beige, and golden-tan | Weakened to a softer, paler pastel shade | Intensified into a significantly stronger, deeper variation | Mixed outcome. Fine particle density completely clogged the pores of the filter. |
6. Weekly reflection & critical thinking
-
What did I learn & what surprised me? I learned that navigating a multi-pot textile lab requires the exact same structured discipline, datalogging, and steady observation as keeping a maritime bridge watch. What surprised me the most was the powerful impact of chemical pH-shifts; discovering that manually lowering the alkaline Wall Lichen bath from pH 9 to pH 5–6 would successfully trigger the precipitation and deliver my highest lake pigment yield was an incredible scientific insight. Additionally, I was deeply surprised and fascinated by the beautiful, rich colors the wool samples achieved simply from using stone and woodland lichens for the dyeing process.
-
What would I do differently? While reusing my spent dye baths was a deliberate decision to optimize the local supply chain and minimize resource waste, it resulted in a very low pigment yield for the other samples because the wool fibers had already captured the primary color compounds. In the future, I will dedicate fresh, highly saturated botanical extractions solely to the laking process to maximize my raw powder volume. Furthermore, if I had been granted more preparation time prior to starting Fabricademy, I would have prepared my copper liquor weeks in advance so it would have been fully matured and ready for deployment during these trials.
-
How does this connect to my final project or learning trajectory? This week perfectly connects my background in empirical data collection with my future path in the world of BioChromes and bio-fabrication. It proves that textile innovation and science rely on the exact same foundation of careful, daily observation. The experience of collecting data on temperatures, WOF ratios, and chemical reactions builds a solid methodological framework for my upcoming assignments. Based on this experience, I am strongly considering focusing my final graduation project within the realm of creating a regional biochromes library and exploring deeper bio-fabrication methodologies. On a personal level, I would love to formulate my own watercolor palette by producing dedicated Faroese lake pigments; as an avid watercolor painter, my greatest joy is capturing nature's motifs, such as local fish, birds, and beachcombed shells, through this medium. It holds even greater value to me if I have personally created the colors from scratch beforehand.
-
What are ethical & environmental implications? Working with slow-growing organisms like Skellalovtur highlights the critical importance of mindful, bioregional foraging. Because these lichens take decades to grow on the Faroese stones, harvesting must always be done on a micro-scale across multiple locations to protect the local ecosystem. This zero-waste mindset and respect for seasonal limits will be a foundational cornerstone of my sustainable design practice.
Checklist Evaluation & Outcomes
Reflecting upon the official Fabricademy Student Checklist for Week 04: BioChromes, I have successfully achieved and documented all the required learning outcomes through my research and laboratory experimentation:
• Include some inspiration: I established a strong historical baseline by researching Werner’s Nomenclature of Colours and its connection to Charles Darwin. Additionally, I anchored my project in regional design methodologies by evaluating the co-creative community art installation developed at Fab Lab Vágur with Eva Bullens and Floortje Zonneveld. • Produce at least 1 natural dye with modifiers on fabric or yarn: I extracted natural dyes from four local Faroese sources (Sólja, Regnfana, Skellalovtur, and a Woodland Lichen Mix) and applied them to wool yarns and felted swatches. I expanded on this by conducting rapid pH-modifier trials using acidic (vinegar/lemon) and alkaline (baking soda) environments to evaluate the shifting taxonomy of the colors.
• Produce 1 ink OR 1 pigment: I executed the chemical laking process by recycling the spent dye baths. After a successful precipitation reaction (most notably in the pH-adjusted Pot C), I air-dried the aluminum hydroxide crusts and ground them using a mortar and pestle to create a stable, raw lake pigment powder.
• Document your recipes, ingredients, and unexpected discoveries: Every step of the workflow—including weights, fluid volumes, chemical ratios, and manual adjustments—has been meticulously recorded and structured into a comparison table, as well as exported into a downloadable laboratory datasheet in PDF format. My unexpected discovery regarding how critical the pH drop from 9 to 5–6 was for triggering full lichen precipitation is fully documented.
• Submit swatches or a catalogue to the analog material library: All the physical wool yarns, raw fiber bundles, and needle-felted swatches produced during these trials will be compiled, cataloged, and archived. As the manager of this Fab Lab, it is my long-term plan that this research will serve as the foundational cornerstone for our lab's permanent, regional material library moving forward, inspiring future local makers and international bio-designers alike.