Soft robotics
Students checklist week08
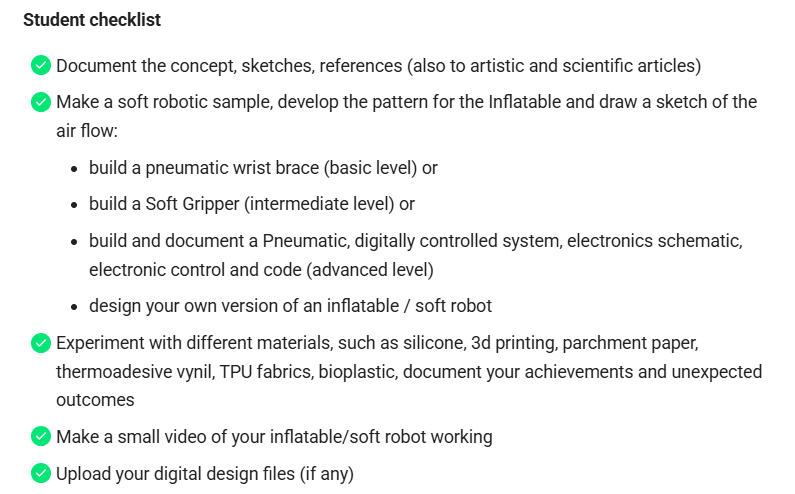
Image Source: Fabricademy Handbook
1. Objective
This module focuses on the principles of Soft Robotics, utilizing an academic approach to examine how flexible materials can replicate the behavioral loops found in natural organisms. Guided by lectures from Lily Chambers and Adriana Cabrera, the objective is to unpack the Sense, Think, and Act paradigm through biomimetic design. Nature offers unparalleled blueprints for soft automation, from the inflation and deflation cycles of octopuses to the structural efficiency of spider silk and plant deployment. To translate these concepts into artificial systems, this week's exploration bridges theoretical biology with concrete fabrication methods. Moving past guided tutorials, the final objective of this module is to demonstrate technical autonomy by designing and fabricating exactly two distinct 3D models: one utilizing vinyl shaped with a heat press, and the other employing silicone cast into a 3D-printed mold, to test vacuum and pneumatic actuation.
2. References, research & inspiration
The core motivation behind developing soft robotic actuators for this project stems from the field of marine biomimicry and delicate ecosystem exploration.
Soft Robotics in Deep-Sea Exploration
Traditional deep-sea exploration utilizes Remotely Operated Vehicles (ROVs) equipped with rigid, heavy-duty metallic claws designed for industrial subsea infrastructure. However, as highlighted in reporting by Futurism, these overpowered mechanical grippers routinely crush and destroy fragile marine specimens—such as deep-sea corals, sponges, and soft-bodied organisms—during sampling attempts.
To solve this ecological disruption, researchers at Harvard's Wyss Institute and various robotic labs have pioneered modular, low-cost soft robotic grippers. By utilizing flexible materials and pneumatic actuation, these soft grippers can grasp delicate underwater structures with the sensitivity and dexterity of a human diver, allowing scientists to harvest or study organisms without harming the surrounding marine ecosystem.
Personal Motivation
This intersection of marine biology and soft robotics is very interesting. Because I care deeply about the sea and its diverse marine life, the ability to develop technology that can interact with, study, and protect these fragile aquatic ecosystems—rather than disrupting them—is incredibly meaningful. This project allows me to combine digital fabrication with my personal interest and respect for the marine environment, exploring how soft, biomimetic structures can pave the way for more sustainable and respectful scientific exploration.
Architectural and Functional Connection to My Project
This balance between flexibility and structural function directly inspired the iterations of my pneumatic actuators:
- Biomimetic Geometry: The choice to model the internal pneumatic architecture after a sea urchin shell and later a lion's mane jellyfish (Cyanea capillata) connects directly to the concept of using soft, organic structures to interface with biological surroundings.
- Low-Cost Material Prototyping: Aligning with the research objectives outlined in the soft robotics field, my project explores how accessible, inexpensive lab materials—such as flexible thermo-adhesive vinyl and porous neoprene textiles—can be bonded together to create airtight, flexible air channels capable of uniform mechanical expansion.
The core inspiration for this week’s work stems from biomimicry—the practice of learning from and mimicking nature's strategies to solve complex human design challenges. In soft robotics, nature acts as the ultimate blueprint. Unlike traditional robotics that rely on rigid metals, natural organisms utilize soft, compliant structures to navigate, survive, and interact with their environments through seamless Sense, Think, and Act loops.
Personal Inspiration & Beachcombing
My design process is heavily rooted in a personal passion for beachcombing, connecting my roots in Denmark with my life on the Faroe Islands. Collecting and studying organic remains, fossils, and minerals offers a firsthand look at nature’s structural genius, intricate patterns, and functional geometries.
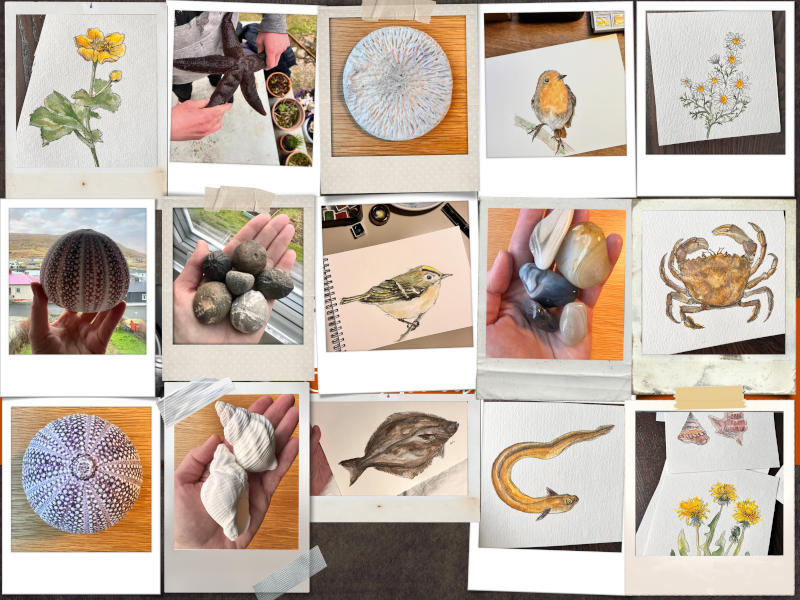
Image Source: Moodboard combining Faroese beachcombing finds, fossils, and organic material studies with personal watercolor illustrations. Tina Grønbech
To visually anchor my research, I created a visual moodboard combining my local finds with my own watercolor studies and drawings, analyzing the textures, silhouettes, and radial symmetries of the local ecosystem: • Natural Form Studies: A series of hand-drawn watercolor illustrations exploring local wildlife and flora, including marine life like crabs and fish, coastal birds, and regional botanical specimens. • Fossilized Sea Urchins: Found in my homeland, Denmark, acting as a historical and geometric point of reference. • Faroese Agate: Found on the local coast and polished in a rock tumbler, showcasing the intricate, fluid, and layered line-patterns created by natural mineral deposition. • Whale Intervertebral Disc: A natural round bone disc found on local stone beaches, which serves as the physical base for my sea urchin lamp. • Modern Sea Urchin Shells: Cleaned and studied for their geometry. These sea urchins thrive in the dense kelp forests close to the Faroese shore; they are incredibly abundant locally, making them a highly sustainable resource to harvest and study as they feed on the kelp, they negatively impact the density of the kelp forests, which are already under pressure in crowded harbor areas.
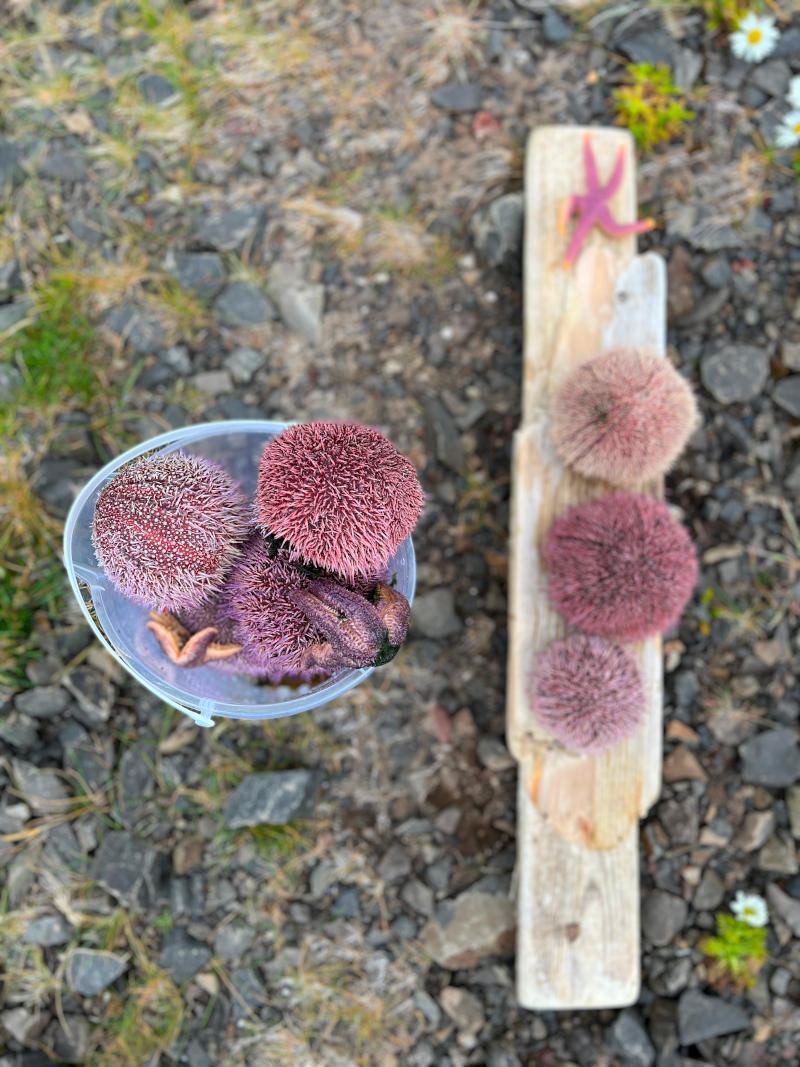
Image Source: Harvesting Sea urchin locally, Tina Grønbech
A rare, ocean-polished whale intervertebral disc. These are incredibly hard to find on the Faroese beaches, making this discovery feel like winning the lottery.
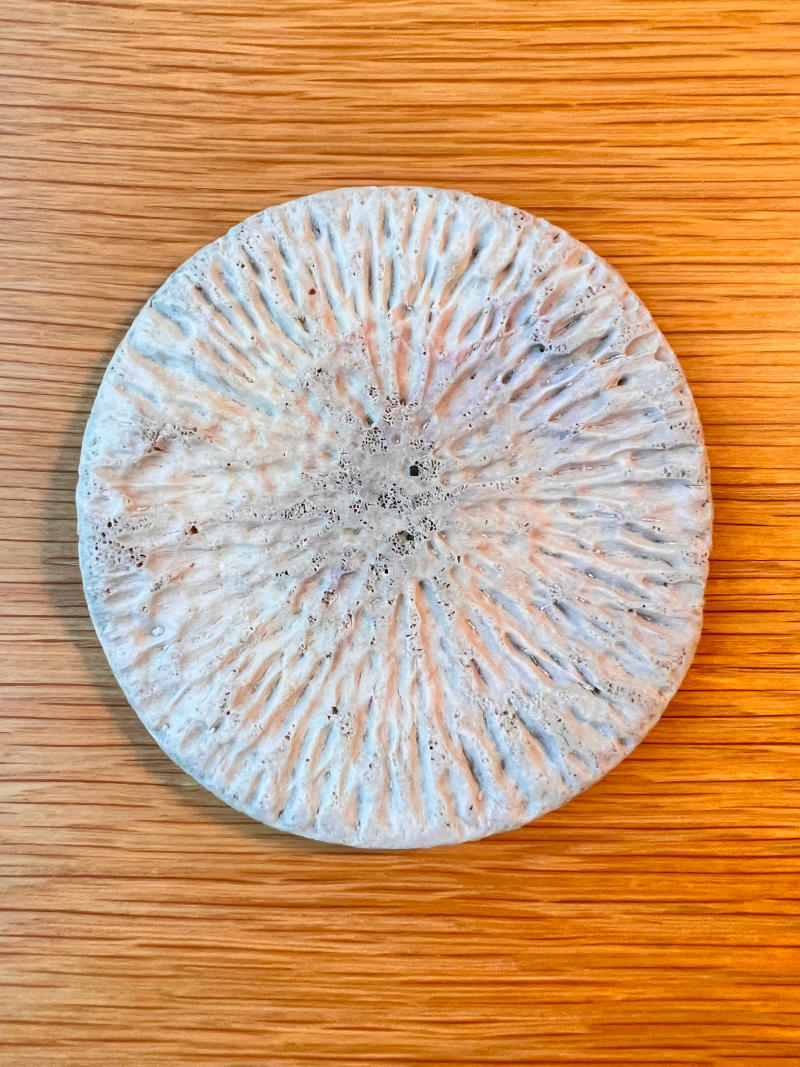
Image Source: whale intervetebral disc, Tina Grønbech
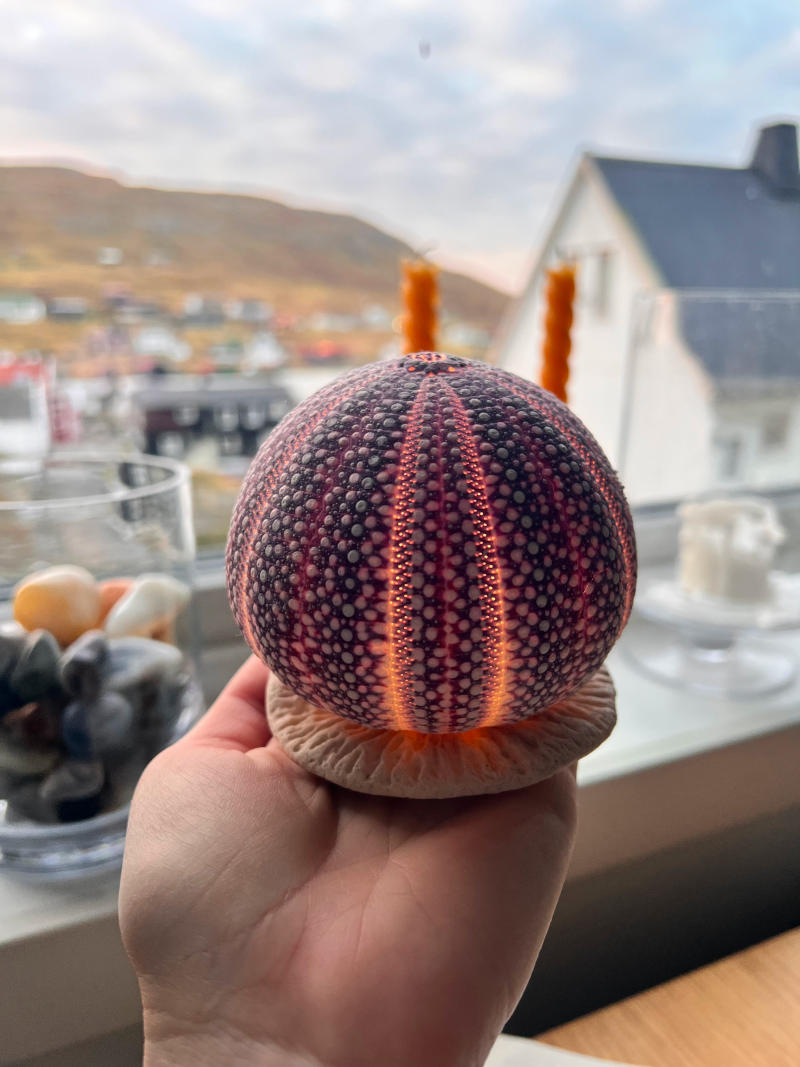
Image Source: Homemade Sea urchin lamp, with a simple replaceble LED tealigth Tina Grønbech
• Handmade Common Limpet candle Holders: Gathered along the sandy beaches in the Faroes, exploring how hollow organic structures can act as protective layers and natural chambers. This sustainable project uses 100% upcycled materials: broken, rounded remnants of limpet shells with natural holes in the center form a stable base, allowing an intact shell to rest perfectly on top. The wax is melted down from old candle scraps, making the new wicks the only brand-new component.
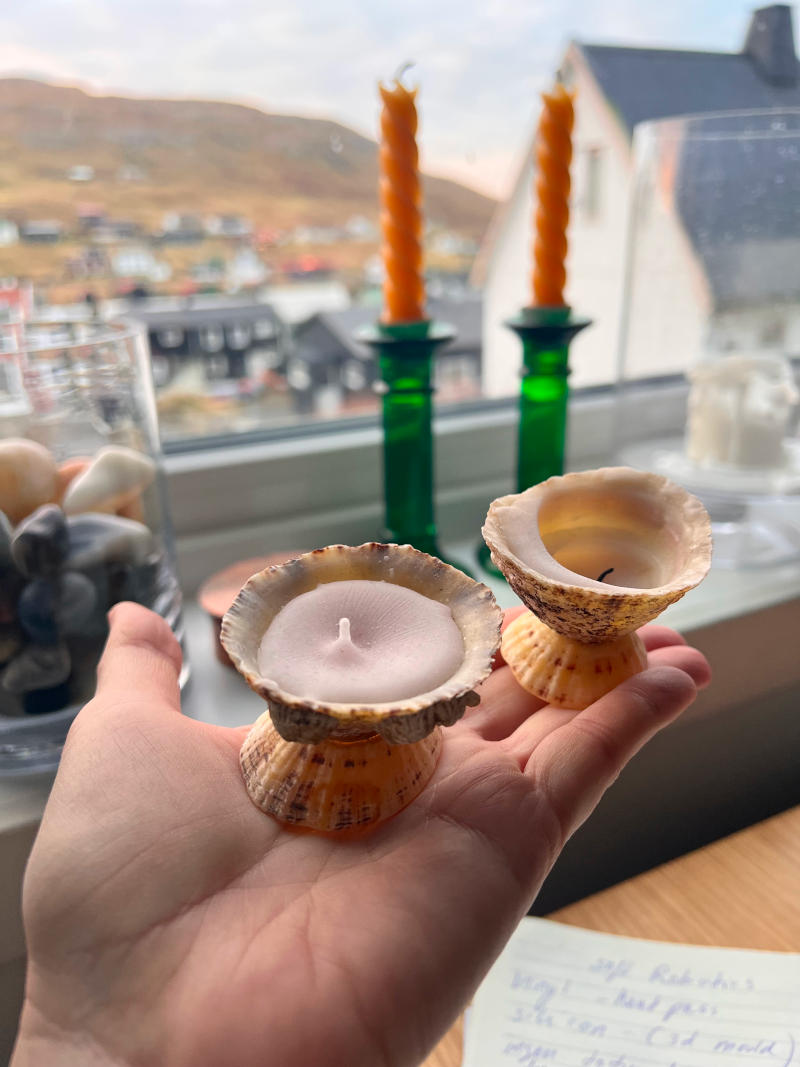
Image Source: Homemade candles using broken limpet shells, Tina Grønbech
From Natural Pattern to 2D Actuation
The radial segments of the sea urchin shell are a perfect example of natural structural efficiency. In Inkscape, I am translating the top-view pattern of the sea urchin into a precise vector design. This graphic pattern will guide the air channels for my vinyl heatpress project, allowing the 2D material to inflate into a three-dimensional shape that mimics the organic volume of the living organism.
The Octopus as a Biological Blueprint
Beyond coastal textures, the octopus stands out as the ultimate inspiration for soft robotics—a fascination that aligns perfectly with the academic insights presented by Lily Chambers. Lacking a rigid skeleton, the octopus possesses unparalleled flexibility, dexterity, and strength. Its ability to inflate, deflate, alter its shape, and manipulate its environment using fluid pressure represents the exact potential of pneumatic and fluidic actuation in artificial systems.
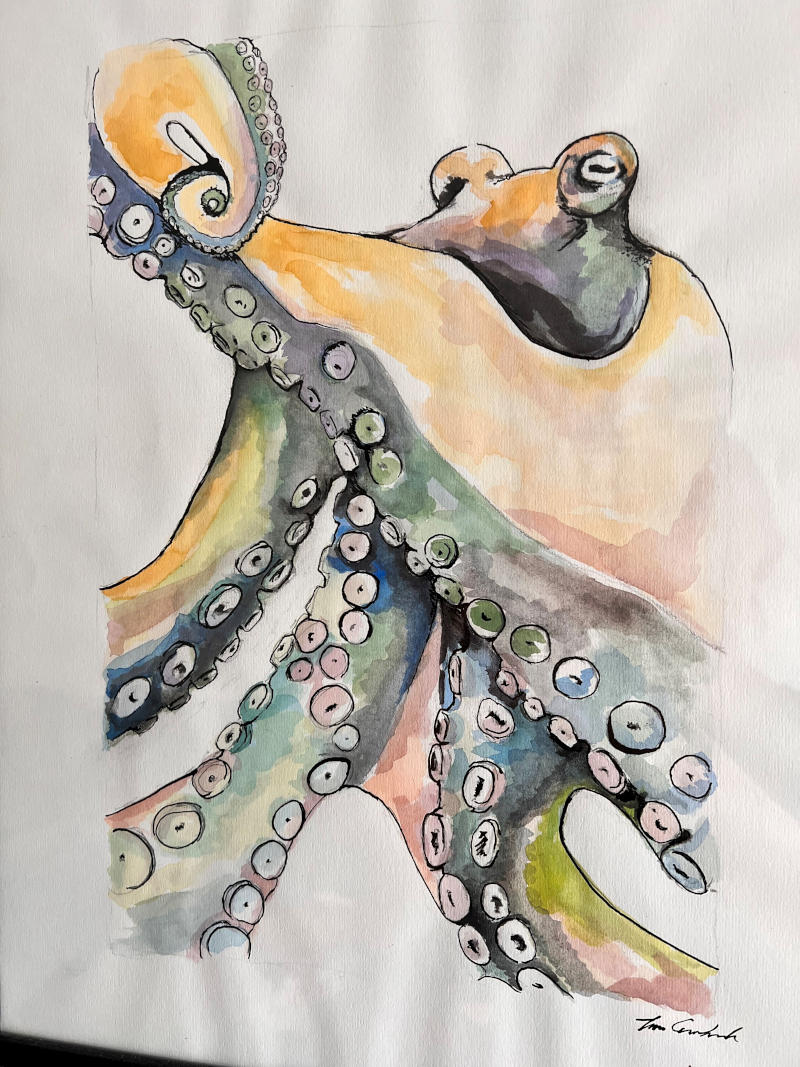
Image Source: sketch, Tina Grønbech
This fascination is something I often express through my watercolor paintings. I was even lucky enough to experience this incredible creature firsthand when an octopus came up with our fishing net during a boat trip. We spent time closely studying its fascinating, bone-free movements and brilliant biology. We observed how it rapidly shifts colors as camouflage to hide from natural predators like sharks and moray eels. When I attempted to interact with it, its skin turned stark white—a clear defense mechanism signaling that it felt exposed without a hiding spot and was uncomfortable. Despite its caution, it still displayed an incredible sense of curiosity toward my touch. After our short study, we safely released it back into the sea.
Academic Lectures & Framework
This personal and biological research is directly anchored in the weekly academic lectures from the Fabricademy Soft Robotics Lecture:
- Lily Chambers: Provided the foundational research on biological actuation loops (Sense, Think, Act), highlighting how plant mechanisms and marine organisms navigate and deform successfully without the need for rigid bone structures.
- Adriana Cabrera: Inspired the sustainable and flexible material approach, demonstrating how discarded everyday items—such as old raincoats and flexible layers—can be repurposed into functional pneumatic prototypes.
3. Tools
Tools and Equipment (Part 1: Vinyl Actuator)
The fabrication and development of the vinyl-neoprene hybrid actuator required a combination of digital design software, manual tools, and laboratory hardware available at Fab Lab Vágur.
Digital Design & Documentation Tools
- Inkscape: Used for the 2D vector design process. It was utilized to trace the organic sea urchin blueprints, modify node structures using the "Break path at selected nodes" function, and widen the final jellyfish-inspired pneumatic channels to a precise scale of 184.6 mm by 236.6 mm.
- Adobe Acrobat / PDF Reader: Used to handle the exported vector layout files, ensuring accurate 1:1 scaling on a standard white A4 background for physical printing and manual replication.
Hardware & Machinery
- Roland GS-24 Vinyl Cutter: A reliable laboratory standard used to precision-cut the flexible outer vinyl sheets. The system was utilized with specialized blades calibrated to the thickness of the thermo-adhesive vinyl layer.
- Pneumatic Heatpress: Used for thermal bonding and curing. It provided the controlled downward pressure and high temperatures needed to fuse the vinyl permanently around the perimeter of the neoprene base.
- High-Pressure Laboratory Air Compressor: Utilized during the pneumatic testing phase of the second iteration to force air through restricted channels, which ultimately served as a destructive testing tool.
Manual Tools & Lab Utilities
- Size 3 Knitting Needle: Used as a manual troubleshooting tool to carefully separate fused layers and clear internal blockages within the narrow air inlet channels of the second prototype.
- Drinking Straw & Manual Hand Pump: Used as the low-pressure pneumatic inputs to test the functional inflation and airflow distribution of the third prototype.
- Pencil and Scissors: Used for the manual craft alignment steps—specifically for placing parchment paper over the printed PDF blueprints to trace and cut out the internal masking layers by hand.
Tools and Equipment (Part 2: Silicone soft Robotics)
The casting and assembly of the silicone-based soft robotic actuator utilized the following hardware, software, and laboratory utilities from this weeks materials inventory list Fabricademy and what I could find:
Digital Design & Fabrication Tools
- 3D Printer: Used to fabricate the multi-part rigid plastic mold shared by the remote instructor in pla filament.
- Mattermost: Used as the communication platform to receive the 3D-printable mold files and assembly tutorials from the remote instructor.
Hardware & Laboratory Equipment
- Laboratory Scale: A precision digital scale used to accurately measure Part A and Part B of the liquid silicone in a strict 1:1 weight ratio.
Materials & Manual Tools
- Ecoflex 00-30: A two-part liquid silicone platinum cure kit (Part A & Part B) from the official Fabricademy material list, chosen for its high flexibility and durability.
- Rigid Plastic Balloon Tubing: Sourced from a household birthday balloon pump; used as a rigid workaround inlet to successfully pierce and guide air through the soft silicone body.
- Soft Plastic food Tubing: Food grade silicone tube 3mm; diden´t get it to work.
- Size 3 Knitting Needle / Sewing Needle: Used as a manual troubleshooting probe to inspect the internal air channels and test for post-cure adhesive blockages between the legs.
- Large Plastic Syringe: Sourced from the school's physics lab; used for manual pneumatic testing because the standard syringes on the official material list were too small to supply a sufficient volume of air.
- Custom Syringe Nozzle/Adapter: A specific attachment where the inner diameter perfectly matched the rigid plastic balloon-pump tubing, ensuring an airtight seal during inflation tests.
4. Process and workflow
Vinyl Actuator: 2D Design & Fabrication
2D Vector Design Process in Inkscape
To translate the biological blueprint of the sea urchin into a functional soft robotic actuator, I used Inkscape to map out the organic patterns. Because the internal expansion layer needs to be cut from baking paper to prevent the vinyl from fusing, the vector design directly dictates the physical handling and inflation performance. My sea urchin design measures 184.6 mm in width and 236.6 mm in height, drawn on an A4-sized white background in Inkscape. I exported the vector file as a PDF to print it out on a normal copyprinter, allowing me to place the baking paper on top and manually trace the design with a pencil.
- First Iteration & Challenges: My initial approach focused on tracing individual design elements directly over a top-view reference image of the sea urchin shell using the Freehand / Pen tool with B-spline paths for smooth, organic strokes. However, I realized that creating disconnected internal patterns would make cutting and manually placing the baking paper fragments nearly impossible.
- The "Tentacle" Solution: To optimize the workflow for physical fabrication, I decided to restart the internal design while keeping my original outer perimeter and inflation neck. I resized the reference image to accurately trace the natural "flower" pattern found at the top of the sea urchin shell.
- Connecting the Vectors: I duplicated, grouped, and modified the node structures, using the "Break path at selected nodes" function to open up the shapes. By connecting these lines, I systematically fused the outer radial channels directly onto the central flower structure. By deleting the restrictive inner circle, the final internal vector transformed into a single, cohesive "octopus-like" geometry where all components are interconnected.
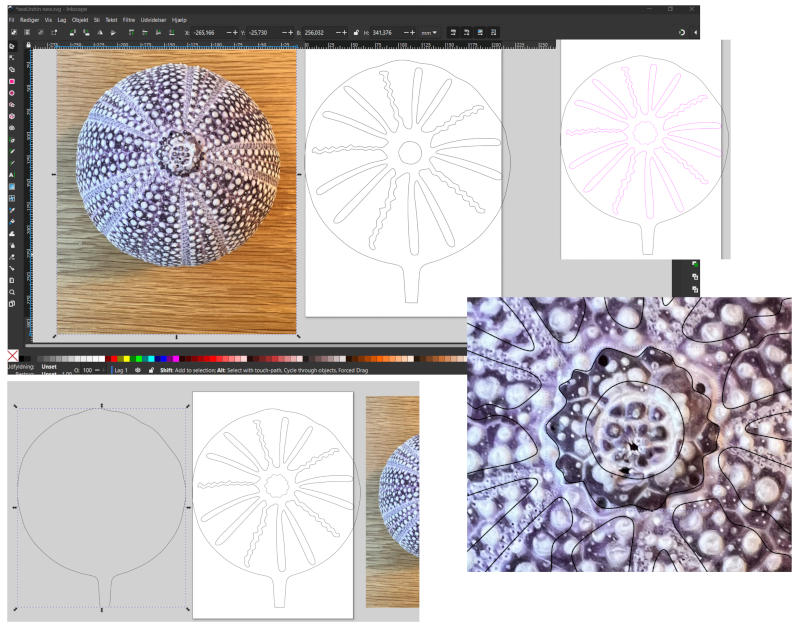
Image Source: The iteration process in Inkscape, transitioning from isolated paths to a unified, interconnected radial network modeled after the sea urchin anatomy,Tina Grønbech
Figure 2: The iteration process in Inkscape, transitioning from isolated paths to a unified, interconnected radial network modeled after the sea urchin anatomy.
Fabricating with the Vinyl Cutter & Heatpress
Having a single, continuous inner geometry makes the transition to physical prototyping highly efficient:
- Prepping the Air Inlet: The outer perimeter includes an extended, tapered channel. This serves as the dedicated air inlet designed to fit a manual hand pump, straw or tube for pneumatic testing.
- Vinyl Cutting & Baking Paper Insertion: Since the internal paths are fully connected, the continuous baking paper mask can be easily cut out as a single piece, eliminating the risk of misaligned channels. The outer layers are then mirrored and cut from flexible vinyl using the lab's vinyl cutter.
- Heatpressing: The baking paper mask is sandwiched perfectly between the two vinyl sheets. When heatpressed, the vinyl fuses permanently around the perimeter, while the paper-protected "tentacles" remain open, creating seamless internal air channels ready for inflation.
To cut and assemble the soft robotic components, the digital fabrication tools at Fab Lab Vágur were utilized. * Roland GS-24 Vinyl Cutter: This machine has been a reliable standard within the laboratory infrastructure for 9 years, yet it still performs as flawlessly as the day it was installed. Maintenance is straightforward, primarily requiring periodic blade replacements. The system supports a wide range of specialized blades, which can be interchanged depending on the specific density and thickness of the material being cut. The driver for the machine is open source, as long as you have a serialnumber for the hardware. * Laboratory Heatpress: This thermal equipment was utilized to permanently bond the flexible vinyl sheets and fuse the hybrid neoprene-vinyl layers. It provides the exact temperature, duration, and downward pressure control needed to seal the outer perimeters of the actuators.
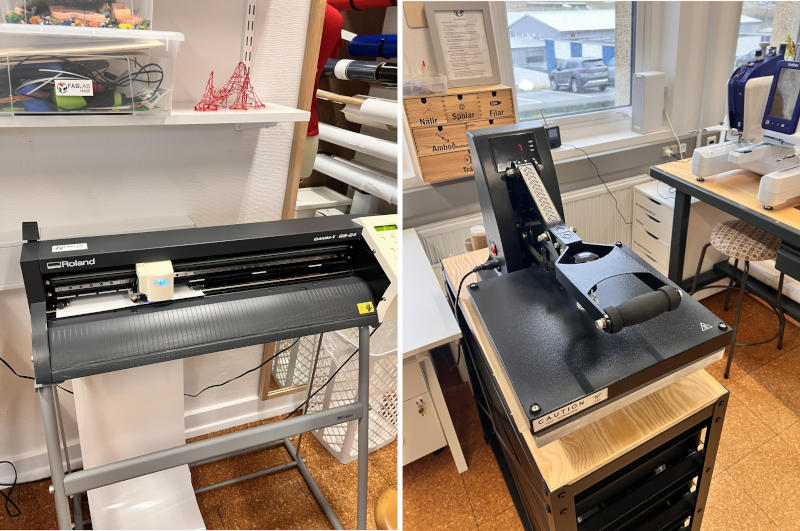
Image Source: Roland GS-24 and heatpress,Tina Grønbech
Fab Lab Vágur Equipment Directory.
Testing the First Prototype & Design Limitations
As this was my first experience fabricating a soft robotic actuator, determining the exact pneumatic clearance and channel width required for successful inflation was a challenge. I decided to scale small, and work from that. Testing the first physical iteration revealed two critical design flaws:
- The Air Inlet Omission: Due to a simple oversight during the rapid design phase, the initial vector layout lacked a restricted, tapered neck at the air inlet point. To bypass this and perform a functional inflation test without recutting, I manually sliced one of the vinyl arms open to create an makeshift air entry point.
- Pneumatic Restriction in Narrow Channels: The inflation test demonstrated that the air channels within the "octopus-like" pattern were far too narrow. Specifically, the tight zigzag patterns along the arms severely restricted the airflow. The core volume was insufficient to create any noticeable pneumatic expansion or mechanical movement.
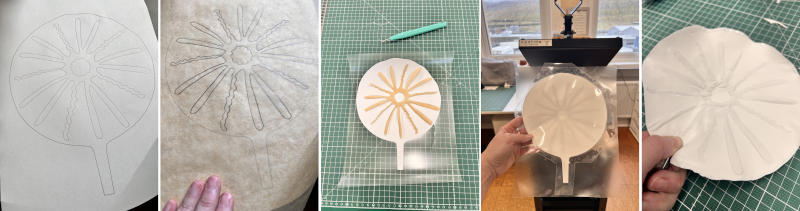
Image Source: First prototype vinyl,Tina Grønbech
These findings clearly show that the internal paths require wider clearances and smoother transitions to allow the air to distribute evenly throughout the structure.
Second prototype: Material Hybridization and Channel Optimization
For the second prototype, the design was optimized to improve both the physical assembly process and the pneumatic performance.
- Material Innovation (Neoprene-Vinyl Hybrid): Aligning two flexible vinyl sheets perfectly during heatpressing proved difficult in the first attempt. To solve this, a hybrid material approach was introduced using a sheet of neoprene from the weekly material list as the base layer, with only the top layer cut from vinyl.
-
Heatpress Parameters for Neoprene Bonding: Bonding vinyl onto a porous textile like neoprene requires precise temperature control to prevent adhesive bleed-through. The heatpress parameters were calibrated to 140 °C for 15 seconds.
-
Vector Redesign in Inkscape: The vector artwork was modified using the Pen tool to significantly widen all internal air channels, including the restricted zigzag sections. Visually, the geometry transitioned from the original sea urchin anatomy into a pattern resembling a lion's mane jellyfish (Cyanea capillata)—the infamous "brandmand" common along the coastlines of my home country, Denmark. While these organisms are beautiful to look at, they are famously avoided by summer swimmers due to their painful sting mechanisms, which rely on pressurized microscopic harpoons to inject toxins into the skin, as explained in scientific reporting by videnskab.dk. This organic, branching structure directly inspired the wider internal pathways needed for improved pneumatic air distribution.
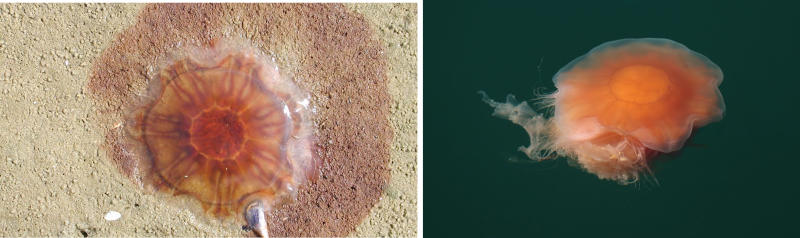
Image Source: lion's mane jellyfish (Cyanea capillata)—the infamous "brandmand" common along the coastlines of my home country, DenmarkVidenskab.dk
Fabrication Challenges & Pneumatic Testing
Despite the structural improvements, testing prototype nr. 2 highlighted several mechanical and manual troubleshooting steps:
- Adhesive Bleed-Through: Even with a lower heatpress setting, some adhesive escaped into the internal channels, partially fusing the layers and restricting airflow in several of the jellyfish tentacles.
- Air Inlet Blockage: The redesigned inflation neck proved too narrow for the manual hand pump nozzle. To clear a passage, a size 3 knitting needle was carefully inserted to separate the fused layers. However, the clearance remained too restrictive for either the pump nozzle or a straw.
- Compressor Inflation and Structural Failure: To bypass the restricted intake, a high-pressure laboratory air compressor was utilized. This successfully forced air through the channels, achieving the intended inflation mechanism. However, during the documentation phase, an accidental surge of pressure from the compressor caused a sudden over-inflation, resulting in a critical structural rupture where the vinyl split.
After it ruptured, I cut open prototype number two—as shown in the last image on the right—to study how much the adhesive glue bled through, due to the excessive heat exposure
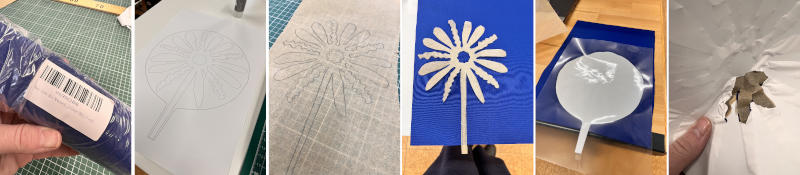
Image Source: Second prototype attempt,Tina Grønbech
Third Iteration: Successful Assembly and Calibration
To achieve a fully functional actuator for the final demonstration, a third prototype was developed. This iteration built upon the lessons learned from the previous structural failures and material limitations.
- Design and Air Inlet Optimizations: The vector layout from the second design was modified to further widen the internal channels. Crucially, the air inlet neck was expanded to comfortably accommodate either a standard drinking straw or the nozzle of the manual hand pump, eliminating the need for high-pressure tools like the compressor.
- Material Selection & Layering: The neoprene-vinyl hybrid approach was retained using materials from the Fabricademy toolkit. A solid neoprene sheet formed the durable base layer, a custom-cut baking paper mask acted as the central pneumatic barrier, and a white flexible vinyl sheet formed the top layer.
- Refining Heatpress Parameters: To completely prevent the adhesive bleed-through experienced in the second attempt, the dwell time on the heatpress was reduced while keeping the temperature stable. The final parameters were calibrated to 140 °C for exactly 10 seconds.
Evaluation & Inflation Testing
This slight adjustment to the fabrication parameters proved highly successful. The reduced heat exposure prevented the adhesive from flowing into the open channels, ensuring that all internal paths remained completely clear.
When pneumatically tested using a straw, the actuator inflated smoothly and consistently across the entire radial network, performing exactly as designed without any air leaks or structural tearing. The only issue was that I did not align the vinyl perfectly on top of the baking paper, so the intake mouth did not turn out flawless, but the final result worked completely as intended. See images and video. Here are the working settings for the heatpress and also a video of the Inflation testing third sample.
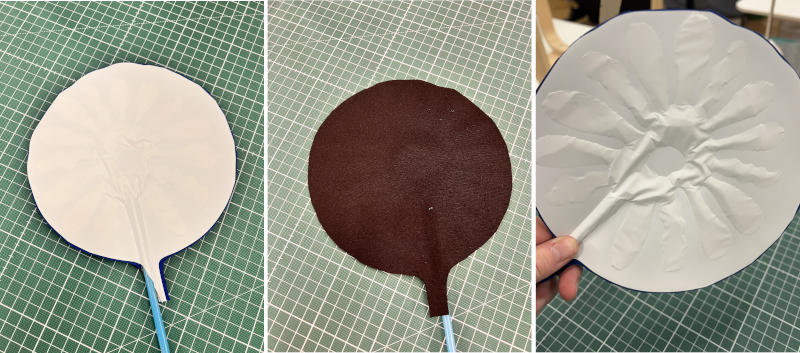
Image Source: Third working prototype attempt. As the saying goes, third time's a charm (Danish: tredje gang er lykkens gang), Tina Grønbech
Heatpress Parameters neoprene and vinyl sandwitch
| Material | Temperature (°C) | Time (Seconds) | Pressure |
|---|---|---|---|
| Vinyl | [140] | [10 sek] | [medium manuel Pressure] |
Silicone Actuator
Soft Robotics: Cast Molding with Ecoflex 00-30
For the second part of this week's assignment, the focus shifted to creating a soft robotic actuator using liquid silicone elastomers to explore differences in flexibility, durability, and airtightness compared to the vinyl prototypes.
Fabrication Process
Mold Preparation
The fabrication process utilized a 3D-printed mold design shared by my remote instructor. The design forms a four-legged "octopus" structure.
Material Preparation & Mixing
- Material: Ecoflex 00-30 (from the official Fabricademy material list).
- Ratio: Part A and Part B were measured on a laboratory scale in a strict 50:50 weight ratio.
- Volume: A total of 100 grams of combined mixture was prepared.
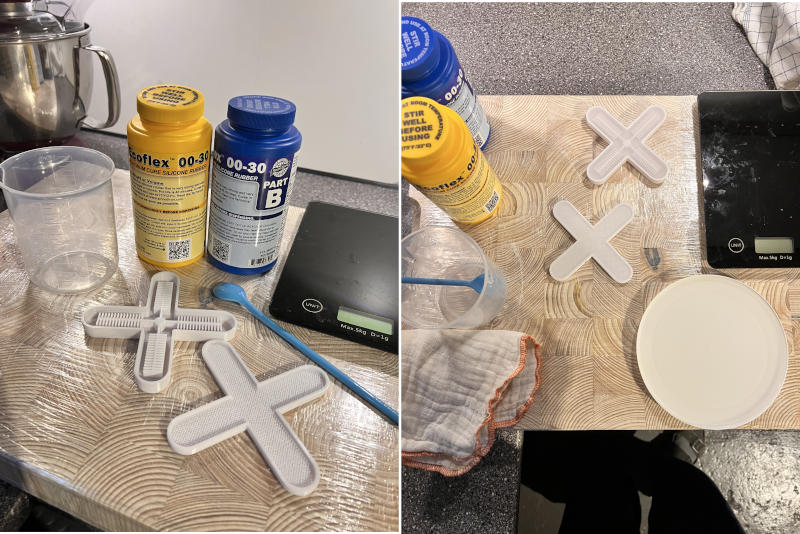
Image Source: preparation for making the silicone, Tina Grønbech
Pouring & Troubleshooting Excess Volume
The mixed liquid silicone was carefully poured into the small 3D-printed molds at 09:00 AM. Because the 100-gram batch yielded more material than the primary mold capacity required, the excess silicone was repurposed and poured into a plastic container lid to create an auxiliary testing sheet and prevent material waste.
Curing, Demolding & Assembly
- Initial Cure: Following a 4-hour ambient curing window, the two silicone structures were successfully demolded at 01:00 PM.
- Glueing: To bond the two halves together, a new batch of 20 grams of silicone was mixed (10g Part A + 10g Part B) to act as an adhesive.
- Secondary Cure: The assembled component was left to cure for another 4 hours.
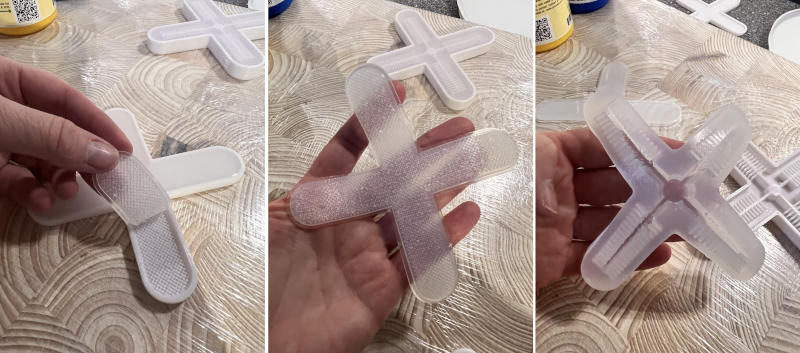
Image Source: Demolding the silicone from the 3d printed moulds, Tina Grønbech
Air Inlet & Inflation Setup
Following the tutorial provided on Mattermost, an air inlet was created from the side between two of the legs to insert the tubing into the center of the actuator. * Challenge: The tubing supplied from this week's material list was too soft and flexible to be pushed into the side of the silicone structure. * Solution: A rigid piece of plastic tubing from a birthday balloon pump was used instead, which successfully bypassed the soft silicone walls.
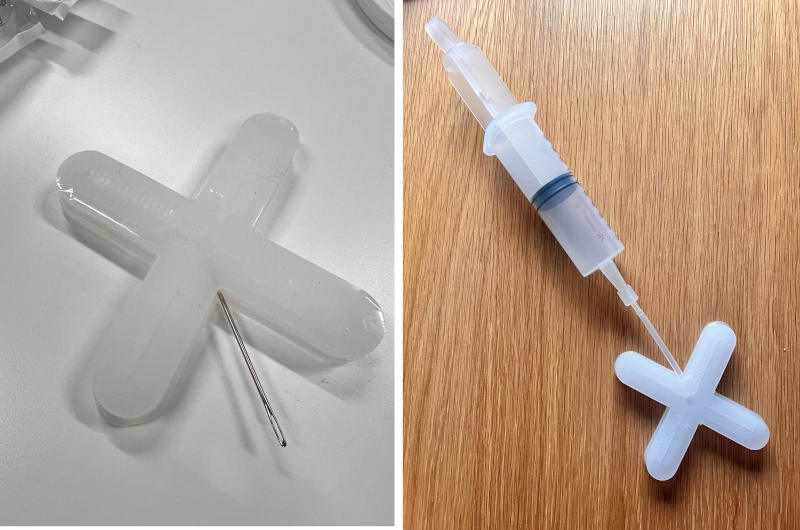
Image Source: Silicone actuator asamble Setup, Tina Grønbech
Observations & Results
During the inflation test, the actuator did not perform as expected: * Leg 1: Inflated successfully and expanded with air. * Legs 2, 3 & 4: Received very little to no airflow, failing to actuate properly.
Troubleshooting & Technical Analysis
Based on the fabrication steps, the uneven air distribution is likely caused by one of the following mechanical issues:
1. Internal Channel Blockage (Most Likely)
Because Ecoflex 00-30 has a low viscosity before curing, applying a 20-gram batch of glue between the two halves creates a high risk of excess silicone being squeezed into the thin internal air channels. If the glue flowed into three of the channels, it would completely block the air from reaching those legs.
2. Tube Misplacement
Since the air inlet hole was pierced manually from the side, the rigid balloon tubing might have been pushed too far into the central chamber. If the tip of the tube is resting directly against the entrance of the other three channels, it will block them and force all the air into a single leg.
3. Path of Least Resistance
Silicone expands where the structural resistance is lowest. If the glue layer is slightly uneven, or if one leg has marginally thinner walls from the 3D mold, the air will naturally escape into that single leg, causing it to balloon up while leaving the others inactive.
Lessons Learned & Future Recommendations
Even though a second iteration was not performed due to time constraints, the first prototype provided valuable insights into working with liquid silicone elastomers:
- Adhesive Control: In future projects, a micro-layering technique should be used when glueing halves together. Applying the silicone with a fine spatula or roller will prevent excess material from sealing the internal airflow channels.
- Pre-Cure Verification: Passing a thin wire through the air inlet while the glue is still tacky (as tested with the needle in the photo) is a crucial quality-control step to ensure all internal chambers remain open.
- Integrated Air Inlets: Instead of puncturing the cured silicone post-mold, embedding the rigid inflation tube directly into the mold structure during the pouring or glueing phase would create a more reliable and airtight connection.
...
5. Results
5. Results & Checklist Compliance Summary Vinyl Actuator part 1.
This section summarizes the achievements and documentation for the vinyl-based soft robotic actuator, fulfilling the primary criteria outlined in the weekly checklist:
- Concept & References: Documented the biomimicry concept based on sea urchin anatomy, which transitioned into a jellyfish-inspired configuration. Scientific references regarding the morphology and mechanics of the jellyfish (Cyanea capillata) were integrated using data from Videnskab.dk.
- Design & Airflow Mapping: Designed a custom pneumatic soft robotic actuator from scratch using Inkscape. The evolution from individual vector paths to a unified radial "tentacle" network (measuring 184.6 mm by 236.6 mm) was fully documented to map out the internal airflow.
- Material Experimentation: Explored hybrid material fabrication by combining thermo-adhesive flexible vinyl with porous neoprene sheets from the Fabricademy toolkit, using custom-cut baking paper masks as internal pneumatic barriers.
- Unexpected Outcomes & Technical Iterations: Calibrated heatpress parameters across three distinct iterations to resolve adhesive bleed-through (reducing dwell time from 15 to 10 seconds at 140 °C). Documented initial manufacturing oversights (omitted air inlets), restricted narrow channels, and a high-pressure compressor over-inflation that led to a material rupture, followed by a post-failure analysis of the internal layers.
- Functional Demonstration: Successfully built a fully operational third prototype ("Third time's a charm") that inflates uniformly via manual pneumatic testing using a straw, without structural tearing or air leaks. A video demonstration and process photographs have been embedded to verify performance.
- Digital Files: The 2D vector design files, PDF layout sheets for manual tracing, and media assets have been uploaded directly to this repository.
5. Results for Silicone Actuator Exercise part 2.
The evaluation of the Ecoflex 00-30 soft robotic actuator yielded the following results regarding casting, material assembly, and inflation performance:
- Curing and Material Quality: The 3D-printed mold casting was highly successful. The Ecoflex 00-30 cured perfectly within the 4-hour window at room temperature, creating a very flexible and durable silicone structure. The secondary 20g bonding layer also cured fully, sealing the two halves together.
- Inlet Modification: The default soft tubing from the material list was too flexible to pierce the actuator. Replacing it with a rigid piece of plastic tubing from a balloon pump successfully established a functional and secure air inlet into the silicone body.
- Pneumatic Performance: During the inflation test, full actuation was not achieved. Air flowed successfully into one leg, causing it to inflate properly, but the remaining three legs received little to no airflow and failed to expand.
Conclusion & Evaluation
The exercise successfully demonstrated the high flexibility and durability of liquid silicone elastomers compared to earlier methods. However, the pneumatic test highlighted a classic challenge in soft robotics fabrication: the 20-gram bonding layer likely suffered from internal overflow, where excess liquid silicone blocked the thin air channels leading to the three inactive legs. Even without a second iteration, the prototype successfully validates the material's properties and defines clear parameters for adhesive control in future work.
6. Weekly reflection & critical thinking
Working with both vinyl-neoprene hybrids and liquid silicone elastomers this week provided a steep learning curve regarding the physical realities and constraints of soft robotics fabrication.
What did I learn & What surprised me?
I learned that while CAD software and digital vectors offer perfect geometric symmetry, manual post-processing and thermal bonding introduce highly unpredictable physical variables. I was surprised by how a tiny variation in heatpress dwell time (reducing it from 15 to 10 seconds) could mean the difference between a completely blocked channel and a flawless inflation. Similarly, with the silicone actuator, I discovered that the secondary bonding phase is just as critical as the primary casting phase; if liquid adhesive enters the thin internal channels, the intended pneumatic logic is completely altered.
What would I do differently next time?
If I were to tackle the silicone fabrication again, I would definitely print multiple 3D molds simultaneously. This would allow me to run several casting experiments and iterations parallel to each other, increasing my chances of successfully getting all four legs to inflate at the same time. I know my boys would have found it absolutely awesome to watch the complete four-legged octopus actuate!
Technically, I would also experiment with alternative airflow placements. Instead of puncturing the silicone manually from the side between the legs, I would try routing the air intake directly through the top center of the actuator to see if that provides an easier, more reliable path with less risk of blocking the internal channels. Additionally, during the bonding phase, I would apply a micro-layer of Ecoflex strictly along the outer edges using a fine spatula to minimize adhesive overflow.
Connection to my final project & learning trajectory
Although I do not plan to incorporate soft robotics or pneumatic components into my final project, this module has been highly educational. The experience of translating organic structures into expanding 2D and 3D networks has expanded my overall understanding of digital fabrication. It has taught me to design with strict material tolerances and physical constraints in mind from the very first vector node in Inkscape—a spatial and analytical mindset that will undoubtedly benefit my future design trajectory and creative practice.
Implications and potential applications (Ethical & Environmental)
As highlighted by the research into deep-sea exploration, soft robotics offers a gentle, non-destructive alternative to rigid machinery. In delicate marine ecosystems, these compliant structures allow us to study, handle, and protect fragile organisms without crushing them. By utilizing low-cost lab materials like vinyl and upcycled ideas, we can develop sustainable, modular scientific tools that can be modified or repaired directly in the field, minimizing industrial waste and reducing our ecological footprint during environmental research.
Fabricademy Checklist Verification
Below is the status of the required deliverables for this week's assignment:
- [X] Designed and fabricated at least two distinct 3D models: Successfully explored multi-material workflows by building both a 2D vinyl/neoprene hybrid actuator and a 3D-molded silicone actuator.
- [X] Explained the fabrication steps (Casting, Molding & Heatpressing): Documented the precise heatpress parameters (140 °C for 10 seconds for the vinyl sandwich) and the casting steps for the Ecoflex 00-30 (50:50 weight ratio mix with a 4-hour ambient curing window).
- [X] Documented the inflation and pneumatic testing phase: Embedded process photographs and video evidence showcasing the successful uniform expansion of the third vinyl prototype and the partial inflation outcomes of the silicone actuator.
- [X] Included a comprehensive troubleshooting and critical reflection section: Conducted an in-depth analysis of structural failures (the over-inflation rupture caused by the high-pressure compressor and the internal channel blockage from the silicone adhesive), outlining clear future parameters for material control.
- [X] Uploaded original digital design files: Vector paths, layout sheets, and media assets have been properly organized and integrated into the repository.
