BioFabricating Materials
Students checklist week07
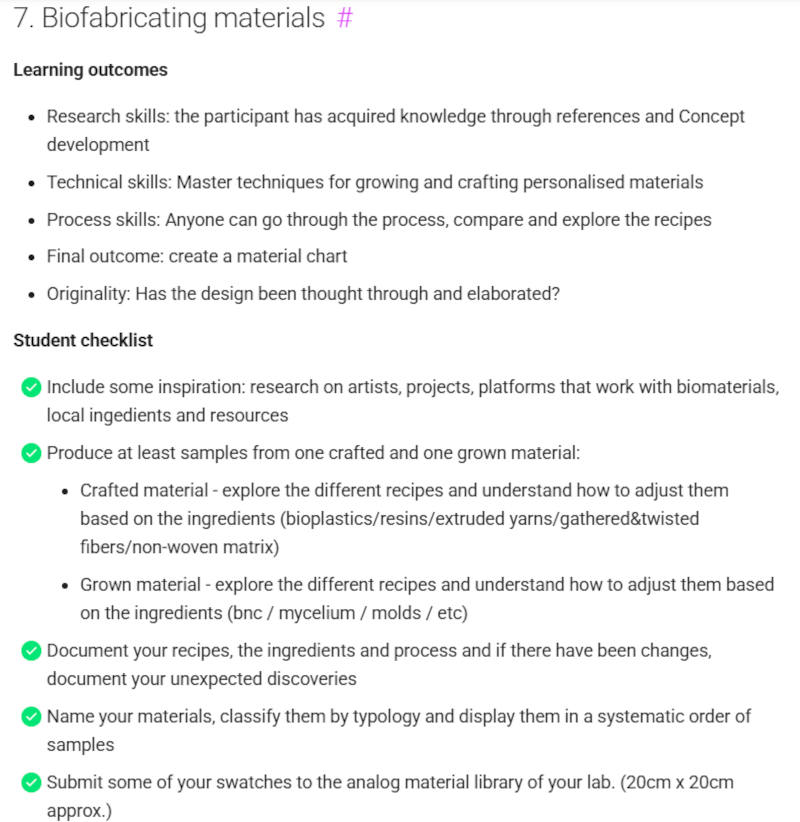
Image Source: Fabricademy Handbook
1. Objective
BioFabrication – Material Exploration & Archiving The primary objective of this week is hands-on material experimentation, driven by the core principles of sustainability, local sourcing, and rigorous scientific documentation. Following the inspiring lecture by Cecilia Raspanti, the goal is not only to produce biomaterials but to establish a structured, long-term archive of what we create. This involves capturing quantitative data, environmental variables, and tracking how the materials adapt and alter their properties over time.
To complete this week's assignment, I am dividing my research into two main parts: 1. The Grown: Using a living biological system to grow a structure (Mycelium). 2. The Crafted: Mixing, casting, and shaping bio-based materials using local harvesting of seaweed and algae.
Context & Local Relevance
This week’s research is deeply anchored in local content and regional ecology, amplified by an invaluable collaborative exchange. For the third time, I am being visited by Alberte Holmø Bojesen, a danish textile designer and former Fabricademy student year 22/23.* Source: Alberte Bojesen - Fabricademy 2023
Together, we have been exploring and mapping the rich, pristine kelp forests and local seaweed populations along the coastlines of Suðuroy, Faroe Islands, where I have lived for the past 23 years.
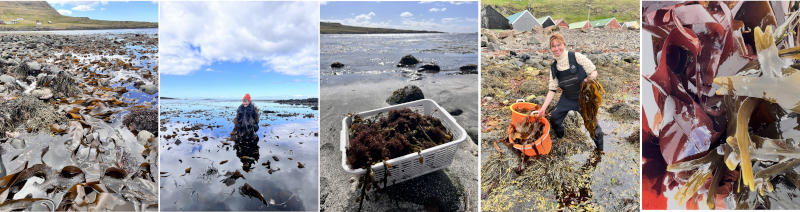
Image Source: Harvesting local materiels for futher research, Tina Grønbech
This image collage documents our fieldwork and material gathering on the wild west coast of Suðuroy, Faroe Islands.
- 1. Dense Seaweed Forests (Far left): A close-up view of the rich marine flora revealed at low tide. When the tide recedes completely, it is possible to venture up to 25 meters from the shoreline into the crashing waves where the Oarweed (Laminaria digitata) thrives.
- 2. Our Seaweed Queen (Second from left): Alberte draped in freshly harvested Sugar Kelp (Saccharina latissima), showcasing the raw material in its natural state.
- 3. Truffle Seaweed Harvest (Center): A basket filled to the brim with Pepper Dulse / Truffle Seaweed (Osmundea pinnatifida), which grows in vast abundance here along the coast of Famjin.
- 4. Half a Year of Harvesting (Second from right): A snapshot of me out in the intertidal zone. This reflects my weekly/monthly work over a six-month period, harvesting and supplying diverse seaweed species to fuel Alberte’s biodesign research.
- 5. Marine Palette (Far right): A final look at the striking aesthetic textures and vibrant colors of the red and brown algae that form the core foundation of this biomaterial exploration.
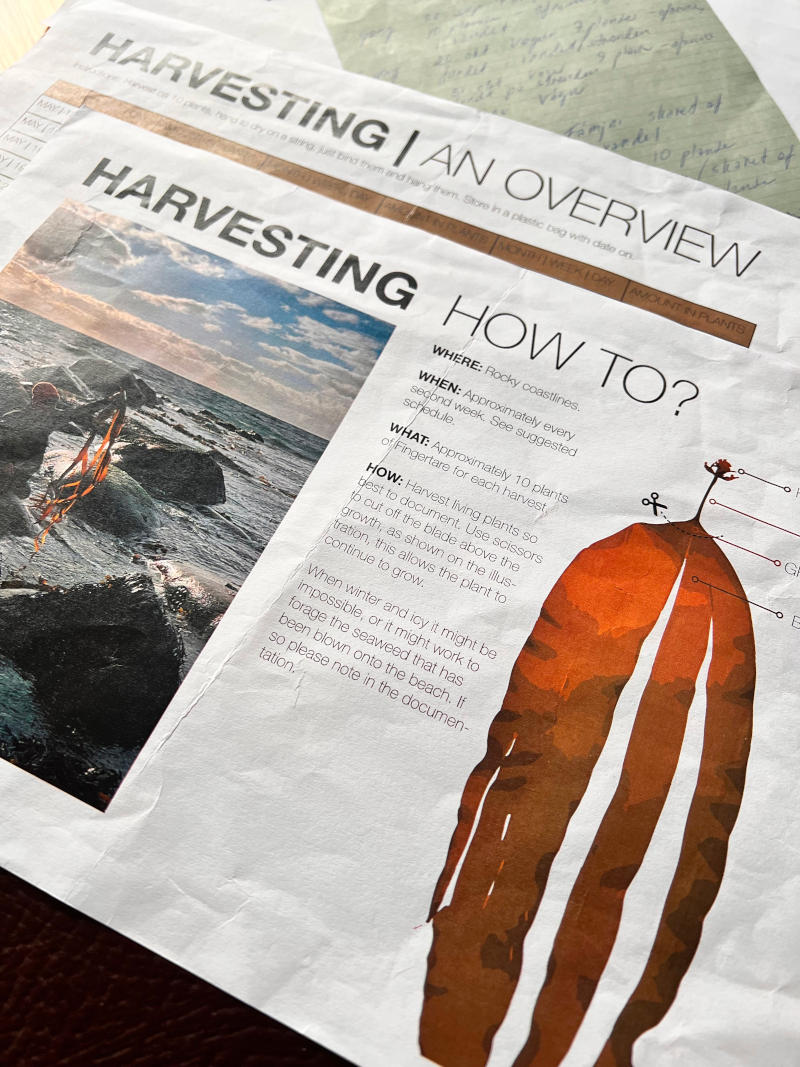
Image Source: Harvesting of seaweed documentation scheme, Tina Grønbech
Given the abundance and unique structural properties of this marine resource, local seaweed and algae will serve as the core foundational element for the "crafted" part of my week's bio-based material research. By bridging localized foraging with bio-fabrication, this project aims to explore the tangible potential of Faroese marine biomass in sustainable design.
Documentation Protocol & Methodology
In accordance with the criteria emphasized by Cecilia Raspanti, a strict documentation standard is maintained throughout this week. Material exploration is highly dynamic, making the recording of environmental metadata crucial for future reproducibility.
The following parameters will be continuously monitored and logged within this repository: * Environmental Data: Daily ambient temperatures (°C) during curing phases. * Material Deltas: Systematic tracking of physical transformations, including shrinkage ratios, color shifts, flexibility variations, and structural texture changes over time. * Material Characterization: Comparative analysis between the behavior of the living biological systems (Mycelium) versus the structural integrity and setting of the crafted biopolymers (Seaweed).
2. References, research & inspiration
Inspiring Alumna: Alberte Holmø Bojesen
My primary inspiration for this week's bio-fabrication work is my good friend Alberte Holmø Bojesen, a textile designer and Fabricademy alumna (Class of 2022/23). Her final graduation project focused heavily on bio-fabrication using algae and seaweed from Iceland:
However, it is her continued work right here in my local environment on Suðuroy, the Faroe Islands that has truly driven my curiosity and interest for seaweed through our collaboration. Over the past few years, Alberte has expanded her original recipes and created an extensive written and physical documentation archive focused specifically on the wild local Faroese kelp forests—developed and partly tested directly inside our local Fab Lab here in Vági. For a closer look at the methods, recipes, and scientific framework behind Alberte’s work at Fab Lab Vágur, her research has culminated in a beautiful document that we are excited to share with anyone interested! At the bottom of these documentation, you will find a link to a pdf booklet.
From Vágur to Cambridge: Nano-Material Research
A critical turning point for this research occurred during Alberte's recent internship at a nano-material lab in Cambridge. She brought samples of the local Faroese seaweed, which I had harvested for her over a period of 8 month, into the lab for advanced scientific analysis.
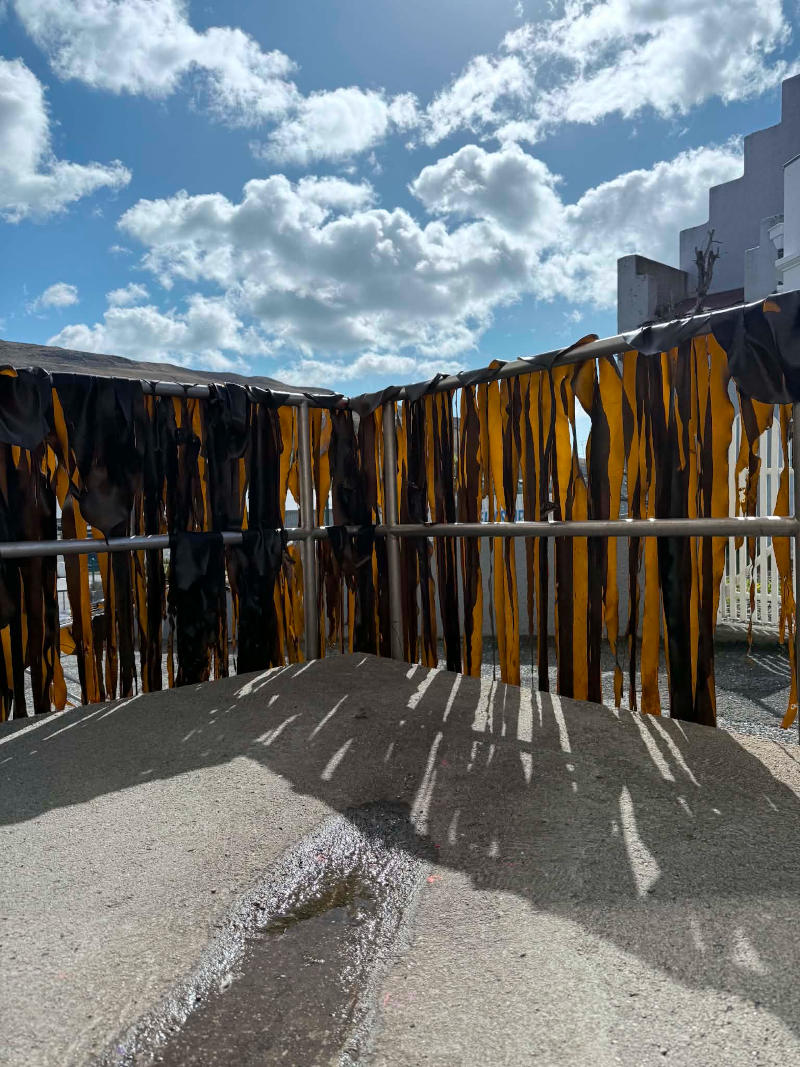
Image Source: Beutiful specimens of Laminaria hyperborea/ Tarablað - drying in the wind and faroes spring sun outside Fab Lab Vágur
During this internship and residency in Cambridge, she analyzed the intrinsic material properties of our local seaweed and refined her recipes. Her major breakthrough involved boiling the seaweed to break down its cellular structure into a refined biomasse. This process solubilizes the essential biopolymers, transforming the raw marine kelp into a highly versatile pulp perfectly suited for creating sustainable bio-paper. Expanding on her scientific research, Alberte has recently integrated advanced biochemical methods into her workflow. She has been exploring ways to isolate and extract natural alginate directly from the raw seaweed biomass and chemically convert it into sodium alginate.
The goal of this research is to create a fully circular, high-performance bio-binder (natural glue/matrix). Instead of relying on commercially manufactured binders, this method stabilizing polymers directly from the local resource, allowing us to bind bio-paper, composites, and bioplastics using nothing but the seaweed itself. This work has not yet been publish.
For more insight into Alberte's work with algae and marine materials, watch this feature video with her on Instagram: Watch the video feature on Instagram
The Evolution of "The Forest" Project in Vágur
Our collaboration began in March 2024, when Alberte first visited Vágur to conduct research and host her first seaweed bio-material workshops for local primary school children through Listaleypin [the Faroese school arts and culture program] (https://www.listaleypurin.fo/english) together with Floortje Zonneveld, with use of Fab Lab technology.
Since that first visit, I have been deeply involved in the groundwork: * Field Research & Foraging: From March to September across 2024, 2025, and 2026, I have helped Alberte harvest local seaweed 2 to 3 times every month from the shores around Suðuroy. Drying and storaging the harvest at home and in the lab. * Lab Development: Bringing these harversted, analyzed and boiled marine resources straight into the Fab Lab to experiment with paper-making and casting bio-material recipes based on the Cambridge findings with Alberte as a mentor. * The Forest Around My Island: Through this intensive local harvesting and material testing, Alberte, alongside external partner Floortje Zonneveld, co-developed the community and material research project "The Forest Around My Island". Here is a video from "The forst around my island" from april 2025, made by filmmaker and visial artist, Floortje Zonneveld:
Current Context: "The Forest Between Us"
Alberte and Floortje have returned to Vágur this october to evolve the project further. This week, they are hosting a new series of advanced workshops tailored for biology students at the local high school on the Island.
This current iteration, titled "The Forest Between Us: It Tangles Around My Foot", acts as both a perfect backdrop and a direct catalyst for my own bio-fabrication exploration this week. Utilizing my own Fab Lab as the hub for this research allows me to bridge local marine biology with crafted material design, directly informing my choice to archive the local kelp biomass alongside my grown mycelium experiments.
3. Tools & materials for Mycelium leather Processing
A variety of tools and equipment has been used doing this week.
- Mycelium Kit: 3L Small GIY Kit from GROWN bio (Pre-inoculated hemp substrate + sculpting mix powder).
- Hygiene: Nitril gloves and 70% surface disinfectant alcohol.
- Mixing Tool: Stainless steel bowl used to mix the substrate.
- Molds: One deep oven baking tray (metal/enamel) and one round reuse plastic cookie container.
- Ventilation: A sterilized sewing pin.
- Covering: Plastic wrap (cling film).
- Covering: Strong yellow tape.
Tools & Materials for Seaweed Biomaterial Processing
To replicate these experiments and process the macroalgae into bio-textiles and 3D-molded structures, the following materials and equipment are required:
Materials & Ingredients
- Alum (Alun): Used as a mordant to prep the local wool before dyeing, ensuring the spirulina pigment binds effectively to the fibers and achieves a lasting color.
- Seaweed Varieties: Freshly harvested local specimens including Sugar Kelp (Saccharina latissima), Oarweed (Laminaria digitata), Knotted Wrack (Ascophyllum nodosum), and Bladderwrack (Fucus vesiculosus).
- Alginate Powder: Used as the primary binding agent to create the structural pulp mass and alginate yarn.
- Spirulina Powder: Used as a natural bio-chrome pigment to dye local Faroese wool and test coloration variations.
- Cross-Linking Activator Spray: A curing spray (typically calcium chloride solution) used to chemically bind the polymer chains, increasing durability and mold resistance.
- Preservation Sheets: Baking paper used for layering, drying, and separating wet seaweed specimens.
- Wool yarn and local faroese wool prewashed: For dyeing samples.
Equipment & Hardware
- 3D-Printed Texture Molds from Fabricademy toolkit: frames used for casting the pulp mass into structured sheets (e.g., circular bubble patterns for Sugar Kelp and wavy patterns for Oarweed).
- High-Power Blender / Food Processor: Essential for breaking down the harvested seaweed mass into a smooth, workable pulp.
- Dehydrator: Used to completely dry harvested truffle seaweed or samples to convert them into a fine seasoning or dry archive pieces.
- Freezer / Air-Tight Plastic Containers: Used for the long-term preservation and wet archiving of collected seaweed samples between baking paper layers.
- Plastic Trays & Bakeware: Flat trays utilized during the growth, casting, and flipping stages to ensure uniform setting.
- Hand Blender: Crucial for blending the seaweed mass thoroughly after it has rested in the refrigerator; a rigorous blend at this stage is vital to achieve a completely smooth, workable, and homogeneous pulp the next day.
Recipes
For a complete and detailed overview of the specific recipes, volume adjustments, and material mixtures developed during Alberte’s time in the Faroe Islands, please refer to the PDF document linked at the very bottom of this page under the References section.
I have also worked on translating Alberte's recipes into user-friendly instructions that anyone can follow, through my own hands-on participation in the process documented in section 4. Process and workflow.
4. Process and workflow
Guide: Growing Mycelium Leather with a GIY Kit
This guide outlines the process for transforming a 3-liter DIY Kit (GROWN bio) containing pre-inoculated hemp substrate into a flexible, biological mycelium leather.
Because the kit is already fully colonized and active, the substrate does not require sterilization or inoculation. The process focuses strictly on hygiene, shaping, secondary growth, and post-processing.

Image Source: Day1, prepping the mycelium leather, Tina Grønbech
Weekly Focus: Exploration and Experimentation
In line with the methodology recommended by Cecilia for this week's assignment, the core objective of this project is exploration and experimentation. To observe and analyze how mycelium behaves, binds, and grows in different environments, the 3-liter substrate has been divided into two distinct mold types and materials: 1. Metal/Enamel: A deep oven baking tray with high edges for a larger, rectangular sheet. 2. Plastic: A round cookie container to test circular geometry and plastic surface release properties.
Materials and Equipment for making the mycelium leather
Included in the kit
- 3 liters of pre-inoculated hemp substrate (living mycelium)
- 1 packet of Sculpting Mix / Flour (starch powder for extra nutrition and structural binding)
Used equipment
- Hygiene: Nitrile gloves and 75% rubbing alcohol (pharmacy grade) for surface disinfection.
- Molds: One deep oven baking tray and one round plastic cookie container.
- Ventilation: A sterilized sewing pin used to puncture air holes precisely.
- Covering: Plastic wrap.
For post-processing (Softening and waterproofing)
- Glycerin (Vegetable glycerin).
- Water (Preferably boiled and cooled down).
- Beeswax or leather conditioner.
- Heat-press after lecture with Catharine Euale, she suggested to try this method.
- Dehydrator after lecture with Catharine Euale, she suggested to try this method.
⚠️ Critical Prerequisites & Material Status
- Storage Note (10 Days on Cool): The kit used for this project was obtained via Sweden and stored unopened in a refrigerator at 1–7 °C (34–45 °F) for 10 days prior to activation (exceeding the manufacturer's recommended 5-day window).
- Pre-flight Health Check (PASSED): Upon opening the original packaging, a visual and olfactory inspection was performed. The bag emitted a clean, fresh scent of forest floor and mushrooms, with no sour, yeasty, or rotten odors, and showed no signs of green or black mold contamination. The mycelium is confirmed healthy but may require 1–2 additional days to "wake up" from dormancy during the initial growth phase.
- Extreme Hygiene: Mycelium can easily lose the battle against mold if foreign bacteria or spores are introduced. Disinfect all tools and surfaces continuously.
Step-by-Step Process
Day 1 - morning on the 28th of october
Step 1: Preparation and Mixing
- Put on your nitrile gloves and spray them thoroughly with the 75% alcohol.
- Disinfect your workspace and the outside of all product bags with alcohol.
- Open the large 3-liter bag of hemp substrate and pour the enclosed packet of "flour" (Sculpting Mix) directly into the substrate.
- Close the bag tightly and knead/shake it vigorously for a couple of minutes until the mix is completely and evenly distributed throughout the hemp substrate.
Step 2: Shaping the Leather Sheets (The Experiment)
- Thoroughly disinfect all inside surfaces of both the deep baking tray and the round plastic cookie container.
- Divide and pour the mixed hemp substrate into the two different molds.
- Press the material down firmly and evenly using your hands in both containers until it reaches a uniform thickness of approx. 1–1.5 cm. Compressing it tightly helps the mycelium bind the hamped fibers effectively across both the metal and plastic surfaces.
Step 3: First Growth Phase (3–7 days)
Note: Due to the 10-day refrigeration period, this phase might take slightly longer than the standard 3–5 days as the mycelium reactivates. 1. Cover both containers tightly with plastic wrap to lock in the moisture. 2. Take a sterilized sewing pin and poke 10–15 small holes into the film of each container to allow precise, controlled oxygen flow for the fungus. 3. Place both molds in a dark, warm place (ideally 21–25 °C / 70–77 °F), such as a closet or a bathroom. 4. Leave them completely undisturbed until the hemp substrate binds together and becomes covered in a solid, white layer. Observe during this phase if the growth rate differs between the metal tray and the plastic container.
Day 2 - morning on the 29th of october
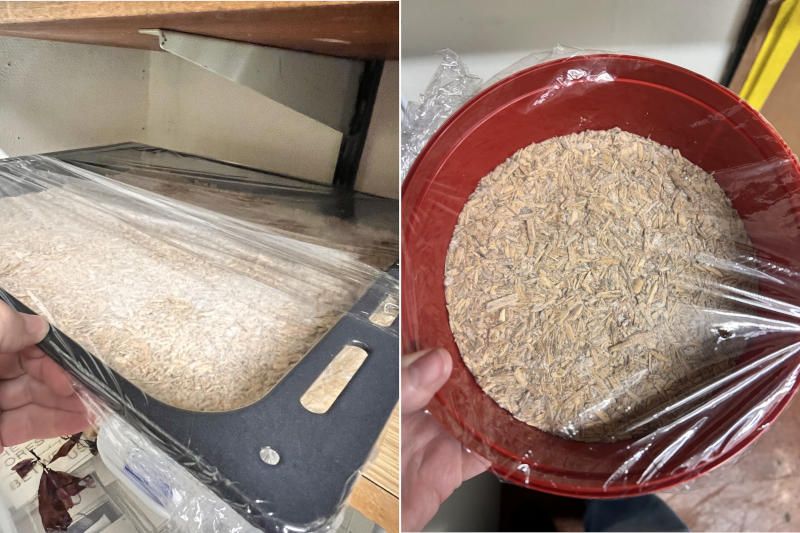
Image Source: Day2, 1 day of growing time in the dark server room (mycelium leather), Tina Grønbech
Day 3 - morning on the 30th of october
Step 4: Key Tips from Catherine Euale & My Process Optimizations
Following yesterday’s lecture, I integrated several key cultivation tips from Catherine Euale into my workflow to optimize the growth process:
- Sterilization: It is crucial to sterilize the needle used to poke breathing holes in the plastic film. While fire is recommended, I successfully used rubbing alcohol for disinfection.
- Temperature Control: Maintaining a stable temperature for the mycelium trays is essential arround 21-25°C. The server room, which sits at a consistent 24.4°C (75.9°F) due to the heating pipes running from the school's boiler room.
When I come back to work next monday: 3. Flipping the Mass: Once a fine, white mycelium layer has fully formed on the top surface, the wet mass should be removed from the mold and flipped over. The side facing the bottom of the mold cannot breathe or grow efficiently without being rotated. 4. Drying and Curing: The total growth time for this pre-made kit is approximately 5 to 7 days (depending on the specific fungal species Catherine explained). Once fully grown, the material can be dried in a food dehydrator if it fits, or placed next to a radiator to cure into leather. Or as Catherine puts it, "Find a happy place". The material will shrink by about 10% in size, but the most significant loss during dehydration will be its weight. 5. Finishing: To achieve a durable leather-like finish, the material can either be processed in a heat press (like the one used for the vinyl cutter) or treated with wax afterward.
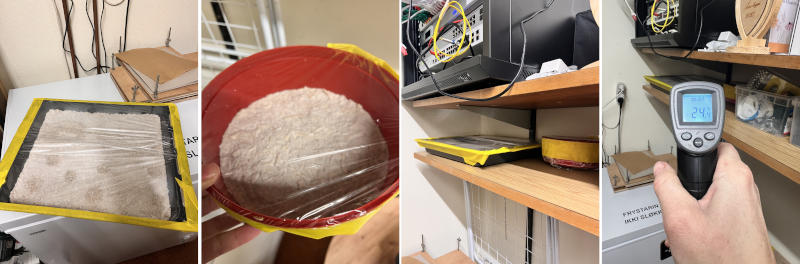
Image Source: Day3, 2 day of growing time in the dark server room, white spores can now be detected, Tina Grønbech
Personal Reflection: Mycelium and Regenerative Design
As someone deeply connected to nature, I find it incredibly fascinating that we can use technologies like bio-3D printing and laser-cut molds to cultivate mycelium structures. These can act as small, natural habitats for insects and microorganisms—serving as a direct step toward helping nature move back in a regenerative direction.
A massive advantage using 3D printing (even FDM can beused/ or clay printer etc) or utilising lasercutting in cardboard with its build volume limits is the ability to slice a model into smaller components, stack them on top of one another, and simply let the mycelium act as the natural binder that fuses all the pieces into a single, cohesive form.

Image Source: photos from Catherine Euales lecture on Thursday, Tina Grønbech
Another point Catherine made that made a lasting impression on me is the current use of mycelium in marine installations, where it has proven to be completely water-resistant. This immediately made me think of the fishfarmsindustry here in the Faroe Islands, specifically the heavy use of Styrofoam inside the salmon farming rings across our fjords. It makes me wonder if a sustainable, mycelium-based material could replace styrofoam. Just a thought, but a highly inspiring one.
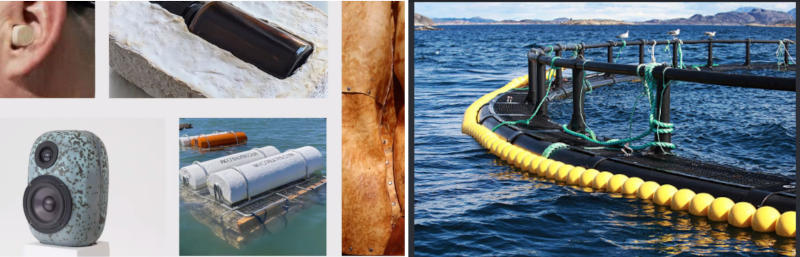
Image Source: (left): Documentation from Catherine Euale’s lecture (Thursday, October 29, 2026), picture 2 (right): Plastic rings utilized in salmon fish farms across multiple countries (https://www.istockphoto.com/photos/salmon-farm-norway)
Future Research & Inspiration from Catherine Euale
- Mycobuoys: Investigating mycelium-based buoys for marine applications.
- Koz Surfboards: Looking into how they use mycelium for sustainable surfboard cores.
- Sam Shoemaker: Exploring his work (he has an available PDF guide on mycelium cultivation).
- Catherine Euale: Checking out her projects and platforms under @slimy_futures and @fungal_matters.
Step 5: Secondary Growth and "Leather-Skin" Development (explained by Catharine Euale)
To achieve a smooth and durable surface, the mycelium needs to form a pure fungal skin outside of the mold constraints. 1. Once the sheets feel solid and hold their shape, gently remove them from their respective molds. Document how easily the material releases from the metal vs. the plastic. 2. Place the white sheets directly onto a baking rack or a piece of parchment paper. 3. Cover the sheets loosely with plastic wrap again so they retain moisture but can still breathe along the edges. 4. Leave them in a dark, warm place for another 2–4 days. The surfaces will now develop a dense, thick, and rubbery white layer of pure mycelium.
Day 6 - Afternoon on the 2nd of november
Mycelium Growth Observations & Experiments The progress of the mycelium growth across different containers, tracking how the fungal network binds the substrate.
- Plastic Container (Far left): The mycelium has developed a strong, dense white layer on the top surface. Because this container is deeper, it is still uncertain if the root network has fully penetrated the bottom layer. It will be left for another day before flipping to ensure it is completely bound together.
- Baking Tray Experiments: These samples have been successfully flipped into the baking tray to allow uniform growth on both sides. The mycelium is holding the rectangular shape beautifully and forms a tight, cohesive mat. They remain covered with plastic wrap to maintain the necessary moisture levels for the final growth phase.
Current Strategy: The sample in the flat tray are growing exactly as planned. For the plastic bucket, I will inspect the sides and bottom tomorrow; if white threads are visible throughout, it will be flipped to finalize its growth.
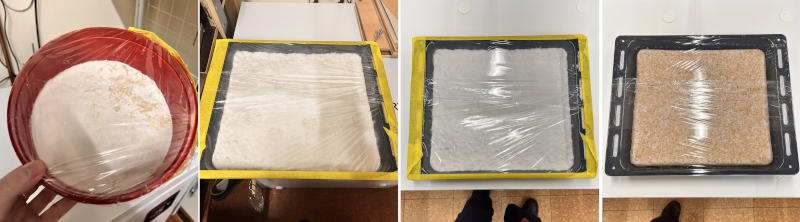
Image Source: Day6, turning the mycelium leather in the baking tray, Tina Grønbech
Day 7 - Midday on the 3rd of november
Flipping the Round Mold & Finalizing Growth Today, I inspected the round plastic container. The mycelium network has successfully colonized the substrate and bound the mass together. I chose to demold and flip its contents today, placing it alongside the rectangular sheet on the baking rack in the server room. Now, both specimens are undergoing their secondary growth phase in the stable 24.4°C environment, developing a dense "leather-skin" and tracking toward full maturity for post-processing.
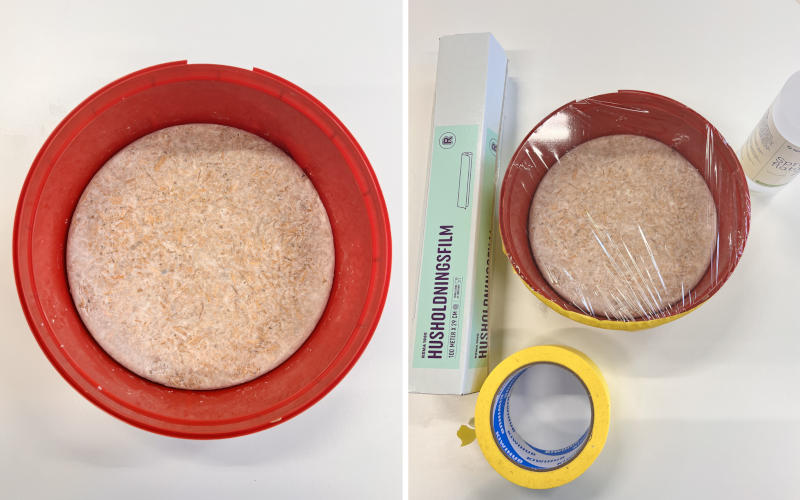
Image Source: Day7, turning the mycelium leather in the plastic container, Tina Grønbech
Day 8 - Midday on the 5th of November: Drying and Curing Protocol
Following the secondary growth phase, the mycelium samples have been removed from the server room environment to initiate the final drying and curing stage.
Initial Observations upon Removal
- Moisture Accumulation: Significant condensation and moisture were present underneath both the metal baking tray (rectangular sample) and the plastic container (round sample). This high moisture level is a positive indicator that the mycelium network established a healthy, active, and properly humid microclimate during its growth phase.
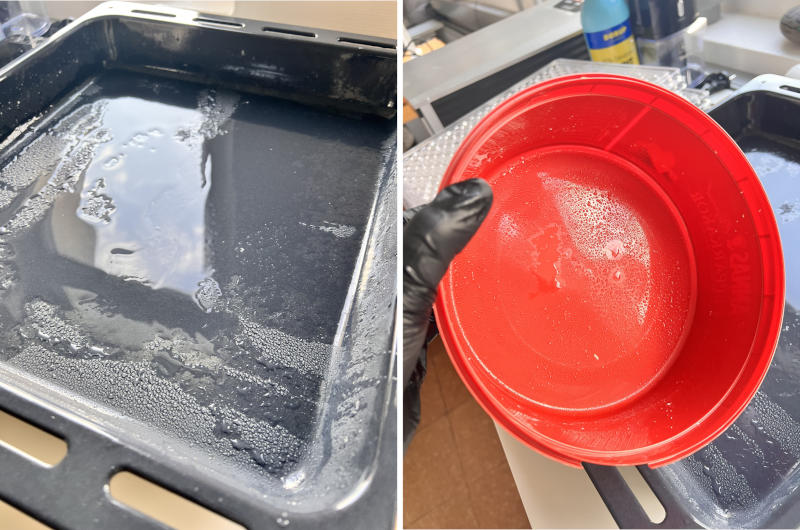
Image Source: Day8, moisture in trays, Tina Grønbech
Drying Setup & Environmental Control
To evaluate different curing behaviors, the two samples have been split into separate, controlled drying environments:
1. Rectangular Sheet (Ambient Air Drying)
- Setup: The large rectangular sheet has been placed onto a wire baking rack. To maximize uniform air circulation across both the upper and lower surfaces, the rack is elevated from the table using four glasses placed at the corners.
- Environmental Management: The window blinds have been pulled down to shield the sample from direct sunlight and prevent UV degradation of the living structure. The room radiator has been turned up to increase the ambient temperature and facilitate steady evaporation.
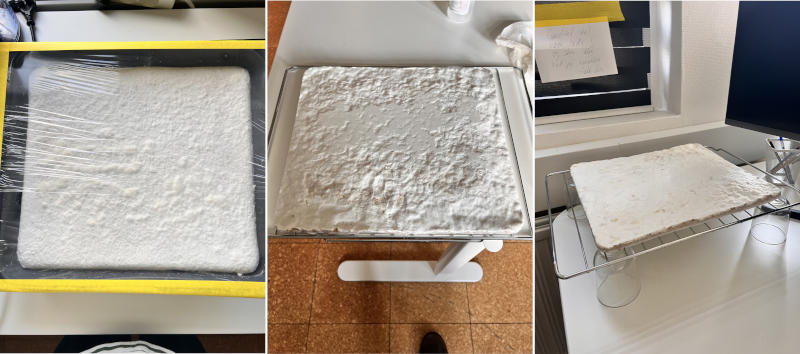
Image Source: Day8, heat source, open room temperature on a elevated baking rack, Tina Grønbech
2. Round Disc (Controlled Dehydration)
- Setup: The round sample has been positioned in the center of a plastic tray inside the food dehydrator.
- Parameters: The device has been programmed for a 6-hour drying cycle at 30 °C (the lowest temperature setting available) to ensure a gentle, low-heat moisture extraction without compromising the structural integrity of the fungal network.
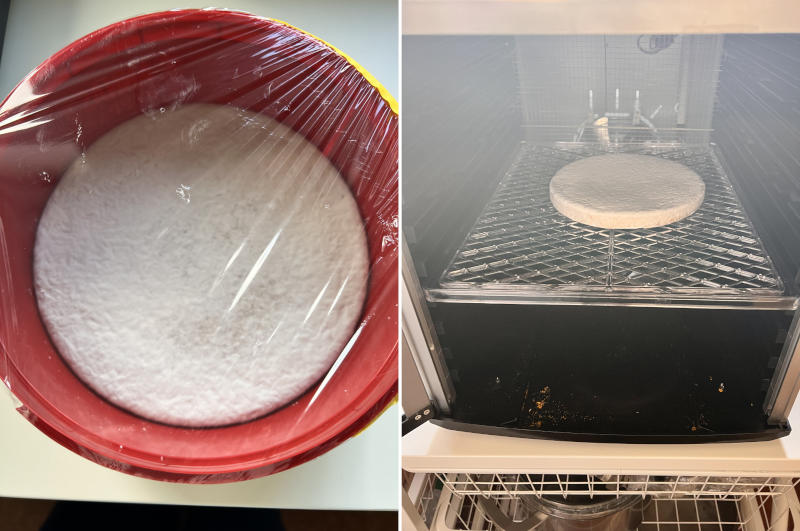
Image Source: Day8, placed on a plastic tray in the middle of the dehydrator, Tina Grønbech
Day 9 - Morning on the 6th of November: Post-Drying Evaluation and Weekend Storage Protocol
A status check was conducted this morning to evaluate the progress of the drying phase and to transition the samples into weekend storage due to upcoming activities in the lab over the weekend.
1. Round Disc (Dehydrator Evaluation & Storage)
- Status: The controlled 6-hour dehydration cycle at 30 °C is complete.
- Observations: The sample feels significantly lighter, firm to the touch, and thoroughly dry. It has achieved a stable initial cure.
- Action: The round disc was kept on its plastic rack and transferred to a shelf inside the server room to maintain a stable, dark environment for the weekend.
2. Rectangular Sheet (Ambient Drying Evaluation & Storage)
- Status: Still curing. The ambient air drying by the radiator has progressed but has not yet reached the same dry, firm level as the dehydrated sample.
- Action: To clear lab space for weekend activities while keeping the drying process active, the rectangular sheet was moved into the server room.
- Setup Change: It is now placed on top of the freezer inside the server room to access better overall air circulation. The setup remains identical to before, elevated on a wire rack using four glasses underneath to ensure continuous airflow across both surfaces.
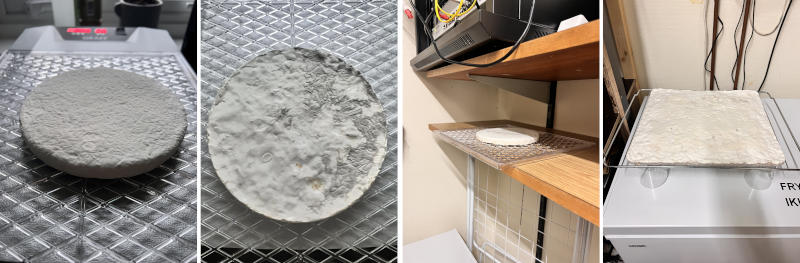
Image Source: Day9, round one ready, the rectangular sheet is not, curing over the weekend in the server room, Tina Grønbech
Next Steps
The samples will rest in the server room over the weekend. The post-processing leather treatment and tanning process will officially begin on Monday.
Day 15 - Morning on the 11th of November
Post-Processing Experiment: Heat-Pressing & Glycerin Softening (Rectangular Sheet)
Following Catherine Euale’s recommendations, I began post-processing the large rectangular sheet from the baking tray using a heat press followed by a glycerin softening bath.
- Heat-Pressing: I placed the large rectangular sheet into the heat press. Because the mycelium was already completely dry prior to pressing, no steam escaped during the process. A slight brownish coloration and the beginnings of a smooth, leather-like grain became visible in the center of the sheet where heat and pressure were most concentrated.
- Softening Bath (Glycerin & Water): After compressing the fibers in the press, I prepared a softening solution using vegetable glycerin and boiled, cooled water (1:3 ratio) and treated the pressed sheet using a pensel to reintroduce moisture and flexibility into the dense fiber network.
- Next Step: Allow the glycerin-treated sheet to dry thoroughly on a rack until it becomes supple, then seal and waterproof the surface using beeswax or leather conditioner.
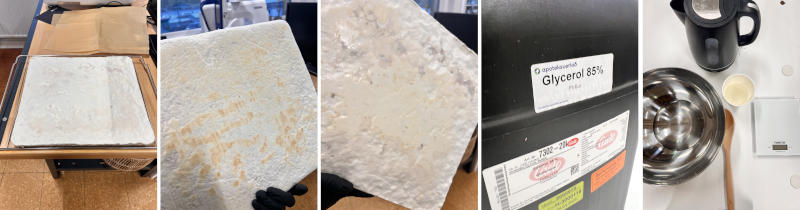
Image Source: Day15, Heat pressing the big plate, and treated both with a solution of water and glycerin, Tina Grønbech
Day 16 - Morning on the 12th of November
This morning, I checked on the mycelium sheets, which have started to change colors. Brown tones are emerging. I treated them with another round of water and glycerin and am leaving them alone until tomorrow.
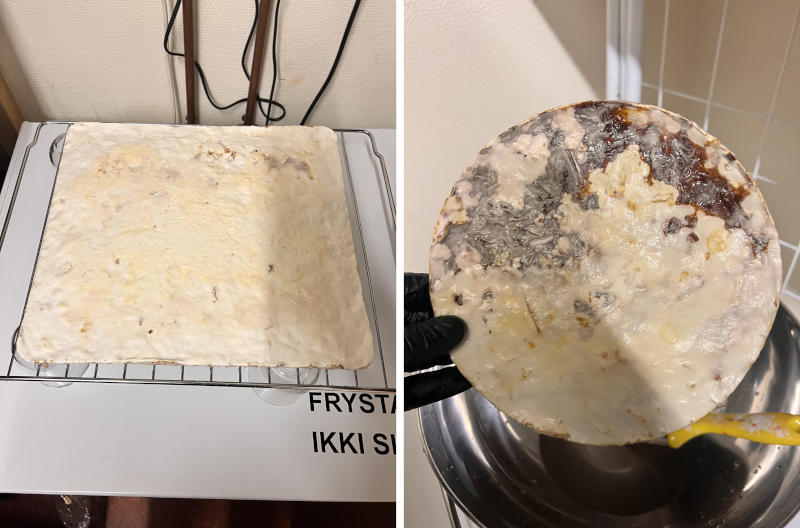
Image Source: Day16, I treated both with a solution of water and glycerin,for the second time Tina Grønbech
Seaweed Materials & Exploration Archive (April Harvest)
During Alberte's second laboratory residency in April, we executed another major local harvesting expedition arround the island. The biomass was collected using strict sustainability protocols. This included foraging fresh seaweed washed ashore after storms, as well as harvesting directly from the wild kelp forests at low tide. We carefully collected only parts of the biomass without uprooting or damaging the living organisms, protecting the local ecosystem of Suðuroy.
This research focuses on archiving and documenting physical samples to analyze material variations, temperature changes, and setting characteristics over time (Alberte's Research Notes), while establishing a material archive and experimenting with different forms of expression.
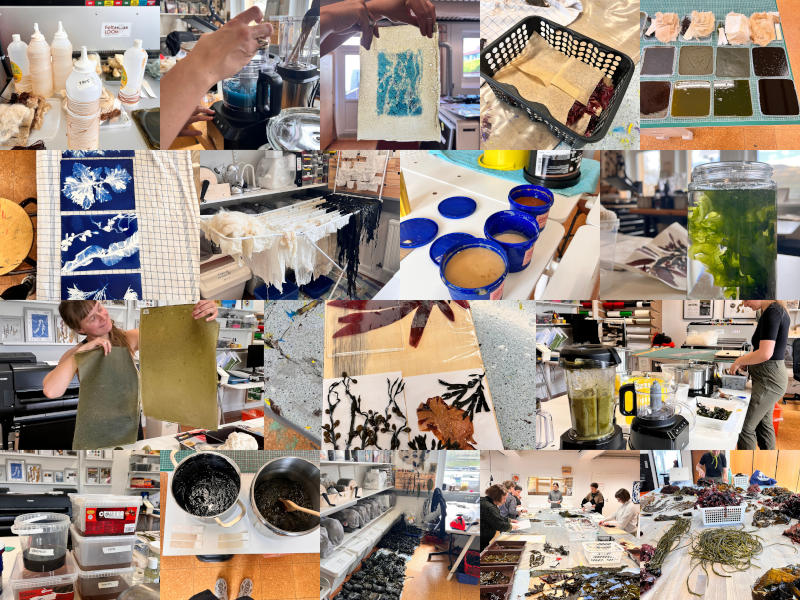
Image Source: pictures from Albertes second residency at Fab Lab Vágur in april 26, Tina Grønbech
From Research to Hands-on Instructions: Demystifying the Science
As a researcher, Alberte works in great depth and in her own mind, which can sometimes make it difficult for outsiders to fully grasp the scientific context and the raw data in her recipes. Because of this, I have worked on translating her research into user-friendly instructions that anyone can follow, through my own hands-on participation in the process. In the following section, I will provide a clear insight into these recipes through volume and quantity adjustments, as well as practical, hands-on exercises through this week.
Phase 1: Fiber Mordanting & Algae Dyeing
Pre-Treatment (Mordanting)
- Substrate: 100g of local Faroese raw wool (Suðuroy washed wool and Navia wool), along with various other test fibers.
- Mordant Recipe: 20% Alum (\(KAl(SO_4)_2 \cdot 12H_2O\)) calculated based on the weight of the wool.
- Process: Heated to 90 °C (194 °F) for 1 to 1.5 hours.
Dye Bath Matrix
| Dye Bath Component | Standard Formulation | Notes / Variations |
|---|---|---|
| Mordanted Wool | 100 g | Hand-washed local Suðuroy & Navia yarn |
| Seaweed Biomass | 200 g | Fucus vesiculosus (Bladderwrack) or target species |
| Water | 3 Liters | Clean, soft local water |
Local Seaweed Archive Variants (April Samples)
Step 1: Selection of Regional Marine Biomass for BioFabrication week07
The primary samples for this weeks material trial consist of local seaweed species harvested from the coastal environment of Suðuroy in the spring of 26, keept in the fryser/or dried storage:
- Knotted Wrack / Egg Wrack (Dansk: Grisetang / Færøsk: Knøttatari / Latin: Ascophyllum nodosum)
- Forest Kelp (Dansk: Palmetang / Færøsk: Tonglatarablað / Latin: Laminaria hyperborea)
- Sugar Kelp / Sea Belt (Dansk: Sukkertang / Færøsk: Sukkertari / Latin: Saccharina latissima)
- Oarweed (Dansk: Fingertang / Færøsk: Tarablað – Daglig tale: Fingartara / Latin: Laminaria digitata)
- Bladderwrack (Dansk: Blæretang / Færøsk: Bøllatara / Latin: Fucus vesiculosus)
Field Guide: Double-Sided Laminated Seaweed Reference Cards
To support our community workshops and field research, we brought these durable, double-sided laminated seaweed cards. This portable reference guides can be carried directly into the wild coastal environment of Suðuroy. It serves as a practical, tool for identifying local species during low-tide foraging expeditions, ensuring that students and participants can easily recognize biomass like Fingartara, Sukkertari, and Fjørugrøs directly on the shore.
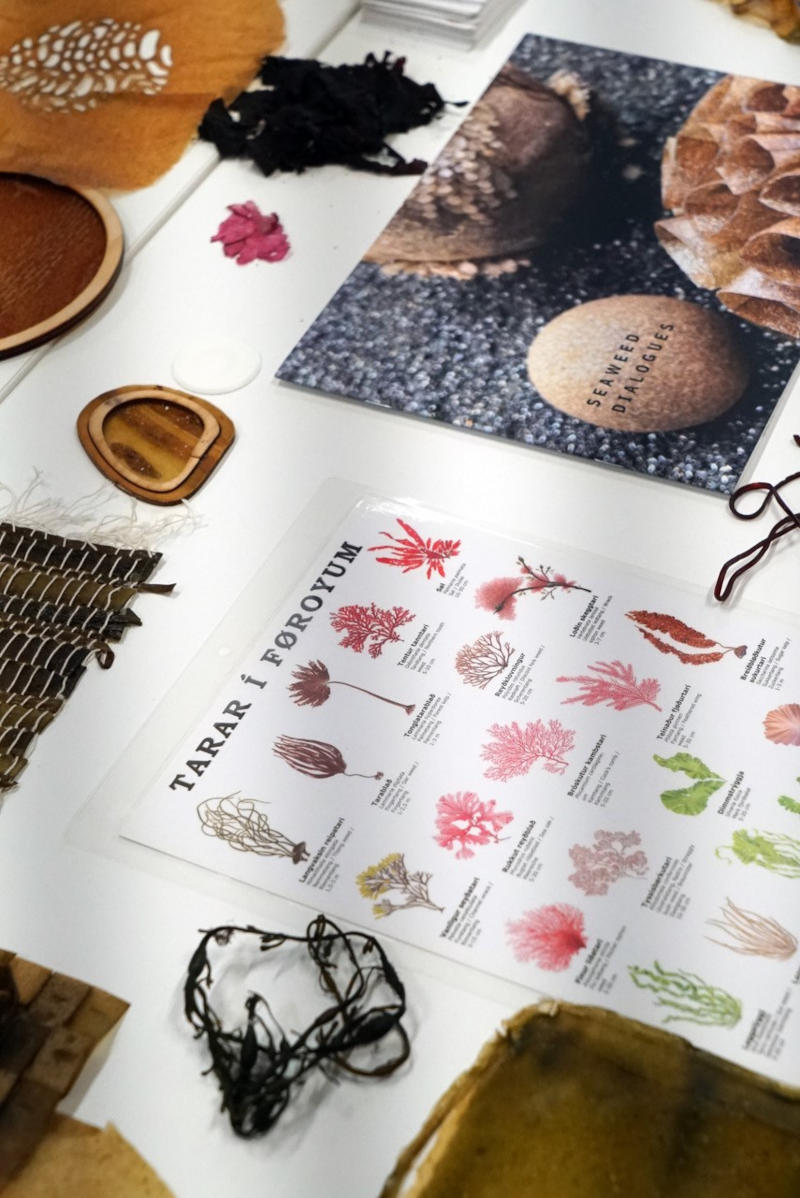
Image Source: Floortje Zonneveld
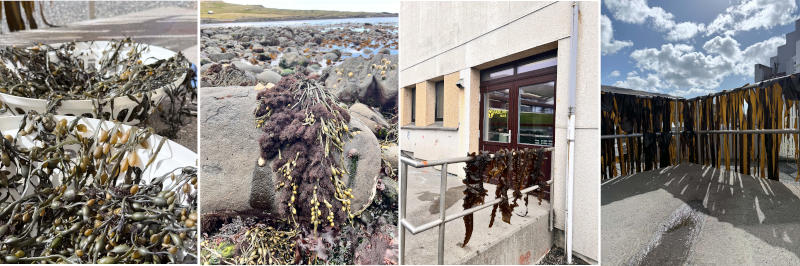
Image Source: Tina Grønbech
- Image 1 (Far left): Channeled Wrack (Pelvetia canaliculata).
- Image 2 (Second from left): Truffle Seaweed (Osmundea pinnatifida) growing directly on the Channeled Wrack. Although it acts as a parasite, it is highly prized as a culinary delicacy due to its intense, rich umami flavor. For preparation, rinse it thoroughly in cold water and dry it in a dehydrator to create a delicious, savory seasoning.
- Image 3 (Third from left): Sugar Kelp (Saccharina latissima).
- Image 4 (Far right): Oarweed / Finger Kelp (Laminaria digitata).
Here is an image of the last one, the bladderwrack. Unfortunately, I couldn't find a picture from the harvesting.
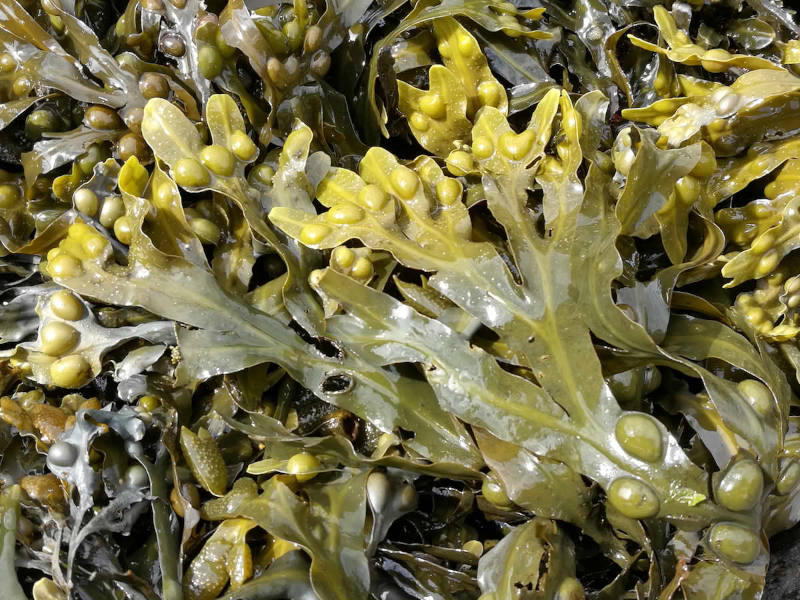
Image Source:Bladderwrack
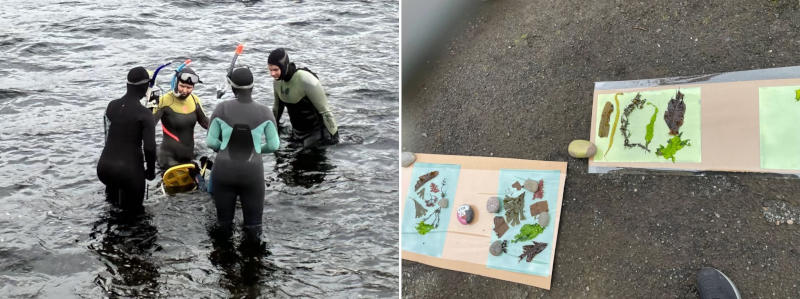
Image Source: Day 1 workshop with biology students from the local high school. Going to the shorelines in Vágur, for a differnet, but hopefully fun schoolclass! learning and collecting local alges and seaweed, Miðnám
Phase 2: Algae Yarn Synthesis (Alginate Filament)
We recycle the residual byproduct liquids from the textile dye baths to spin synthetic alginate yarn, a technique originally practiced during our BioChrome research phase. Here are the recipes for makring alginate yarn:
Alginate Yarn Formulation
| Ingredient | Weight / Quantity | Technical Specification / Notes |
|---|---|---|
| Sodium Alginate | 12 g | Gelling agent |
| Spent Dye Bath | 100 g – 200 g | Recycled liquid from Phase 1 |
| Water | 300 g – 400 g | Balanced against dye bath volume |
| Baby Oil | 20 g | Plasticizer / flexibility agent |
| Glycerin (85% Concentration) | 26 g | Humectant |
| Essential Oil | 4 drops | Fragrance and preservation |
Filament Preparation Workflow
- Emulsion Base: Combine the sodium alginate powder, baby oil, and glycerin in a clean vessel.
- Initial Hydration: Add exactly 50g of water. Blend thoroughly using a hand mixer until a thick, uniform paste forms.
- Gradual Dilution: Slowly pour in the remaining water and recycled dye bath liquid while maintaining continuous, aggressive stirring.
- De-airing & Settling: Seal the container and place it in the refrigerator overnight. This allows the mixture to fully hydrate and eliminates trapped micro-air bubbles before extrusion. we use recycled plastic containers from candy, any foodprof plastic can be used.
Pop-up Workshop for Curious Minds
This week, we hosted an extra pop-up workshop on Sunday at Fab Lab Vágur. Local residents were invited to join us in exploring biomaterials firsthand. During the workshop, participants experimented with creating alginate yarn and natural dyeing. We used spirulina to dye local Faroese wool; although spirulina is not native to the Faroe Islands, it yielded a beautiful, vibrant blue color. Furthermore, the citizens were invited to help shape a mold for the upcoming installation that will be displayed at the local high school.
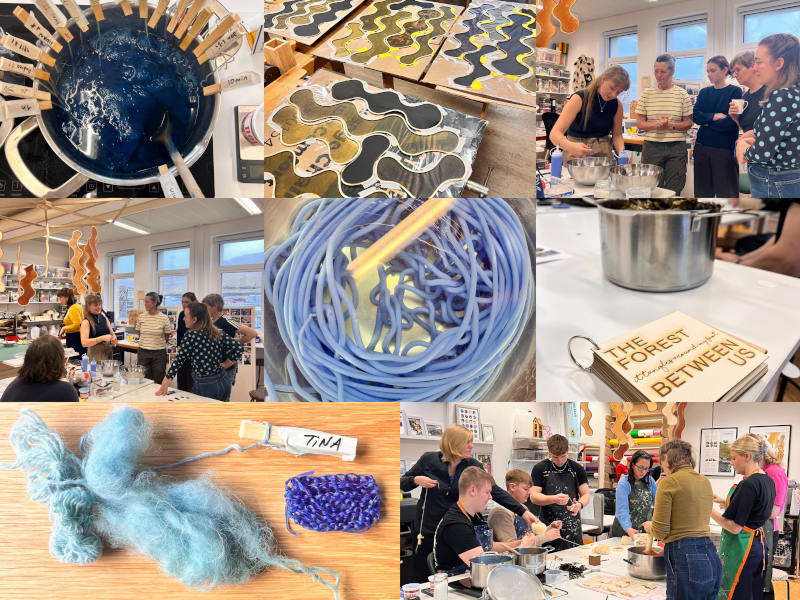
Image Source: Pop-up sunday, Tina Grønbech
Phase 3: The Seaweed Pulp Method (Bio-Paper & Composites)
This protocol generates a high-density, versatile marine pulp suited for 3D casting and surface application in lasercut files and as sheets for lasercutting samples. One full production batch yields enough material to fill a 3.5-liter boiling pot.
Pulp Step-by-Step Protocol
Step 1: Thermal Cell Breakdown
- Ingredients: 1 kg of wet seaweed biomass (fresh or thawed from the freezer) combined with approximately 3 liters of water.
- Process: Bring the pot to a boil. Simmer steadily for 1 hour to dissolve the cell walls and release embedded polysaccharides.
- Ventilation Note: This process releases a pungent marine odor; run an exhaust hood or open windows for active ventilation. Remove from heat, cover with a tight lid, and let it steep overnight.
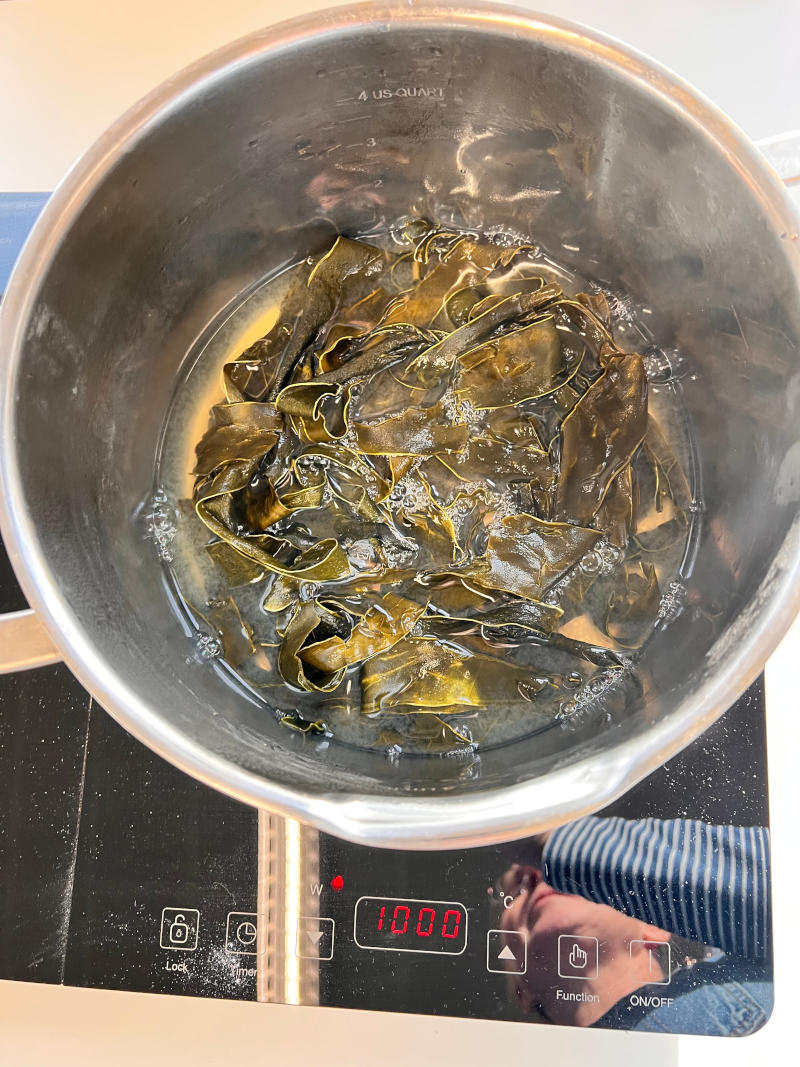
Image Source:Day1, boiling pulp, Tina Grønbech
Step 2: Liquid Fractionation & pH Balancing
- Process: The following morning, separate the liquid extract from the solid pulp mass.
- Application: The liquid can be diverted into textile dye baths or processed into alginate yarn.
- Critical pH Calibration: If the saved liquid is destined for alginate yarn extrusions, test its pH value. If it tests acidic, add small increments of sodium carbonate until the target range of pH 7–8 is established to ensure stable cross-linking.
Step 3: Pulp Formulations
The remaining solid seaweed mass is homogenized with additives using the standard matrix below:
| Matrix Component | Proportion per Blender Batch (approx. ⅓ pot) | Notes & Sourcing Specs |
|---|---|---|
| Concentrated Seaweed Pulp | ~1.1 Liters | Boiled, strained solid fraction |
| Glycerin (85% Concentration) | 80 g | Note: If using 100% pure glycerin, reduce to 60g. |
| Sodium Alginate Powder | 1 tablespoon | Serves as an internal binder agent |
| Water Adjustments | As needed | Add gradually to achieve a smooth, creamy texture |
Additive Adjustments: When processing Fucus vesiculosus (Bladderwrack), Laminaria digitata (Oarweed), or Pelvetia canaliculata (Channelled Wrack), increase the glycerin concentration slightly to offset structural brittleness. Blend the mixture down into a completely smooth, creamy texture mimicking structural paper pulp.

Image Source:Different alge pulp made in the lab this week, Tina Grønbech
Blending Tip When blending your pulp mass, you can compare it to making homemade paper (if you have ever tried it); sometimes it requires more liquid than other times, making it a truly sensory experience.
Step 4: Casting & Spatial Design Applications
The refined pulp is cast into the preprinted 3D-printed molds from the Fabricademy tool kit provided by remote instructor. These 3 printed pieces form structural "seaweed window panes" for this weeks practice.
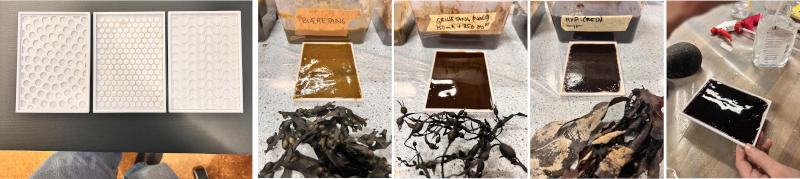
Image Source:Day1, prepping the mycelium leather, Tina Grønbech
Storage tips for your seaweed
- Storage Tip for raw pulp: Raw pulp can be frozen long-term in sealed plastic bins. To reuse, thaw completely, re-homogenize using an immersion blender until creamy, and add small amounts of water if necessary.
- Color-Grading Tip: To adjust color values or reduce color saturation, dilute the pulp with clean, clear alginate glue. Pelvetia canaliculata naturally processes into an intense, nearly black hue.
Tips for preserving seaweed samples: If you want to save your collected specimens for later use, you can layer them between sheets of baking paper in a plastic container and place them in the freezer. They keep well for a long time and can easily be soaked in water when you are ready to use them for cyanotype printing or creating dried specimens on watercolor paper.
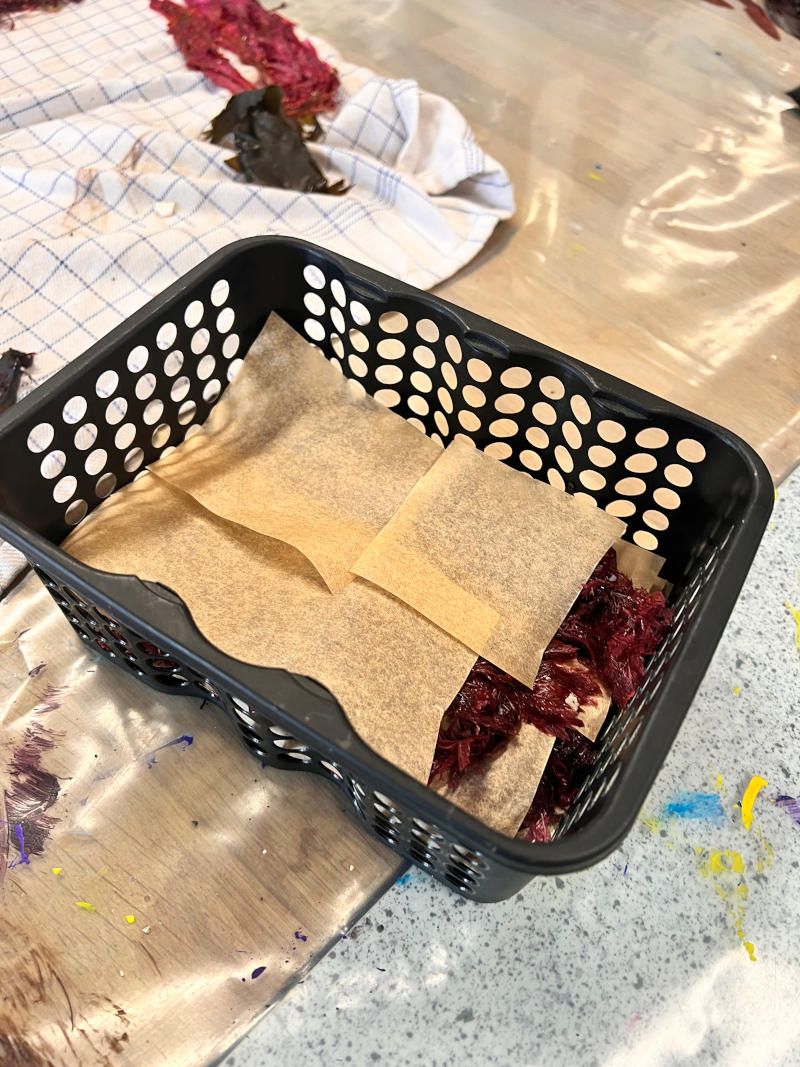
Image Source: Tina Grønbech
Alternative tip: If you are short on freezer space, you can dry your seaweed completely and store it in a plastic box or basket. It will preserve perfectly for a long period as long as the environment remains dry.
Auxiliary Recipe: Structural Alginate Glue (2-Liter Batch)
| Material Component | Quantity | Notes |
|---|---|---|
| Sodium Alginate | 50 g | Primary binder |
| Water | 2 Liters | Hydration liquid |
| Glycerin (85% Concentration) | 60 g | Reduce to 40g if using 100% pure glycerin. |
Process and storage: Blend all ingredients until homogenous. Store sealed in the refrigerator for multiple days of active shelf-life.
Phase 4: 3D Mold Casting Trials & Material Deltas
Samples On the first day of testing, the initial three pulp samples were cast into the 3D-printed molds to evaluate their raw setting behavior and material traits. This first experimental batch consisted of: Mold 1 containing Bladderwrack (Færøsk: Fjørugrøs / Latin: Fucus vesiculosus), Mold 2 containing Knotted Wrack (Skandinavisk: Grisetang - Færøsk: Knøttatari / Latin: Ascophyllum nodosum), and Mold 3 containing Forest Kelp (Færøsk: Tonglatarablað / Latin: Laminaria hyperborea).
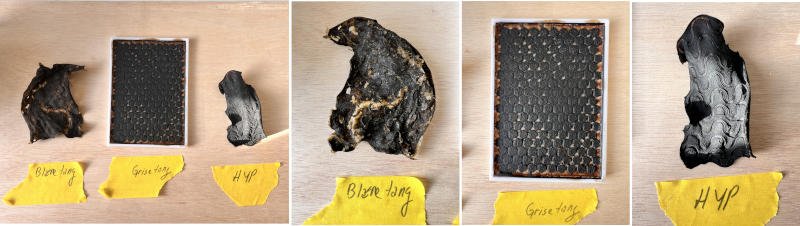
Image Source:Tina Grønbech
The Chemistry of Cross-Linking (Double Substitution Reaction)
Following Alberte's suggestion, one selected cast (hyperborea, sample 3) was treated with a calcium salt spray to trigger an immediate metathesis (double replacement) reaction.
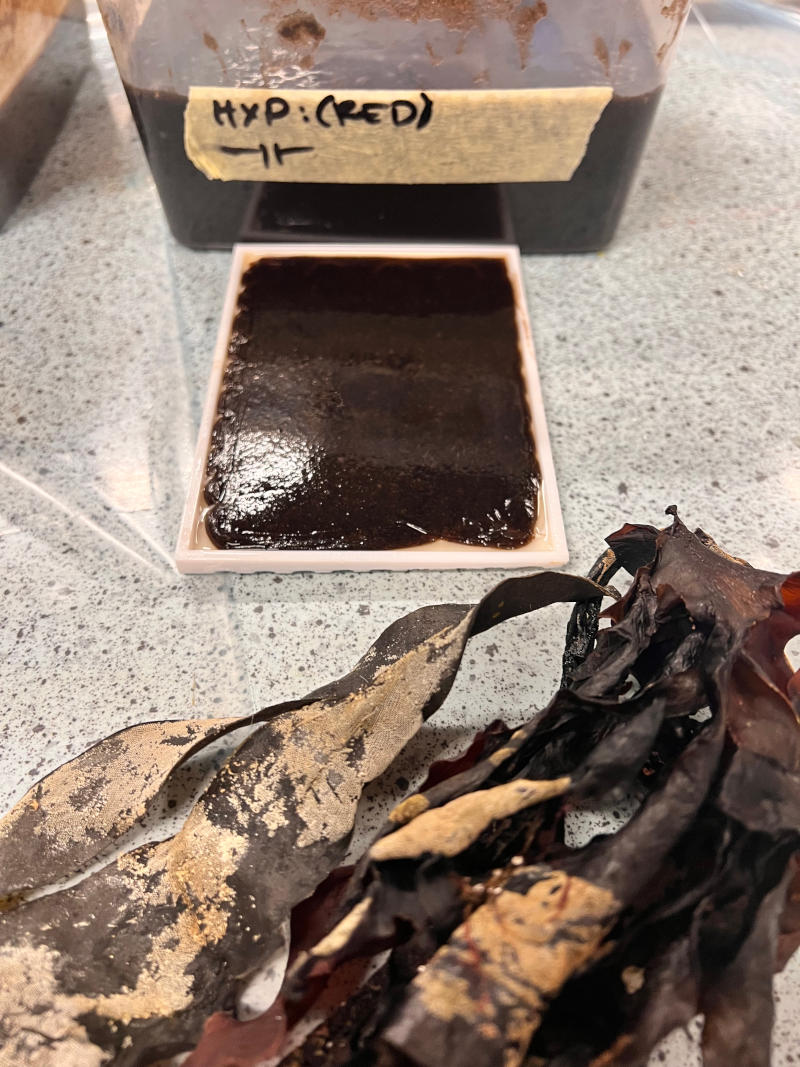
Image Source:Tina Grønbech
When the sodium alginate embedded within our pulp comes into contact with dissolved calcium chloride ($\(\text{CaCl}_2\)\(), the divalent calcium ions (\)\(\text{Ca}^{2+}\)\() displace the monovalent sodium ions (\)\(\text{Na}^+\)\(). The calcium ions cross-link the polymeric alginate chains, binding them together to form a tough, water-insoluble calcium alginate gel matrix, while common salt (\)\(\text{NaCl}\)$) remains in solution.
Cross-Linking Activator Spray Recipe
| Compound | Mass | Volume |
|---|---|---|
| Calcium Chloride ($\(\text{CaCl}_2\)$) | 20 g | 1 Liter of Water |
Methodology Note: Spraying the wet cast prior to dehydration allows us to observe initial gel boundary transformations. This treatment increases structural durability. It is recommended to spray/dyp the cast samples in a bath once it has completely dried.
Analysis of the Dehydration & Curing Process (Batch 1)
The initial casting trial revealed significant insights into the shrinkage ratios, moisture loss, and surface interactions of the different marine pulps when drying under ambient room temperature (\(21{-}22\ ^\circ\text{C}\)) with low-velocity air circulation:
- Sample 1: Bladderwrack (Færøsk: Fjørugrøs / Latin: Fucus vesiculosus) As the water evaporated, the pulp experienced extreme volume reduction and directional tension. Without any chemical cross-linking or physical weights, the rapid loss of moisture caused the structure to warp severely, curling inward and detaching completely from the mold flat geometry.
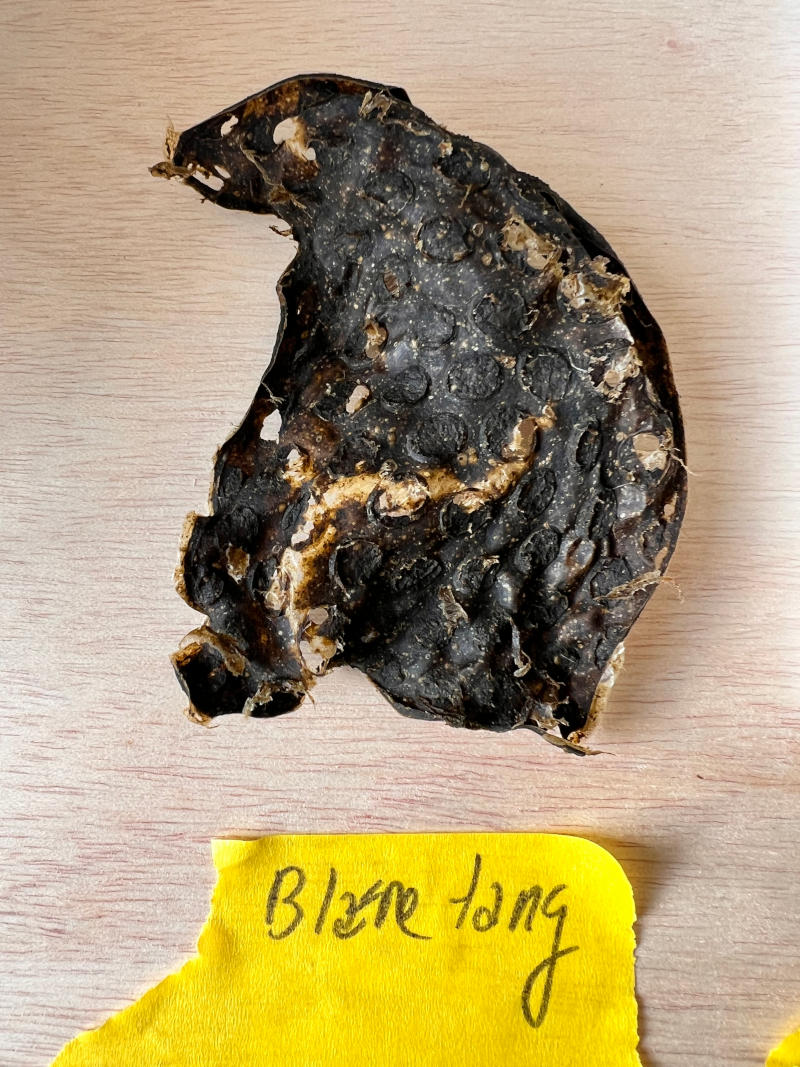
Image Source: Tina Grønbech
- Sample 2: Knotted Wrack (Skandinavisk: Grisetang / Latin: Ascophyllum nodosum) This specimen remained remarkably flat and stable within its rectangular 3D-printed matrix, showcasing high dimensional fidelity to the honeycomb surface pattern. To compensate for the natural thickness reduction caused by water loss, a secondary layer of fresh Grisetang pulp was cast directly over the first layer on Day 2. The multi-layer casting technique proved highly successful; the layers bonded seamlessly overnight without peeling or triggering any edge-warping.
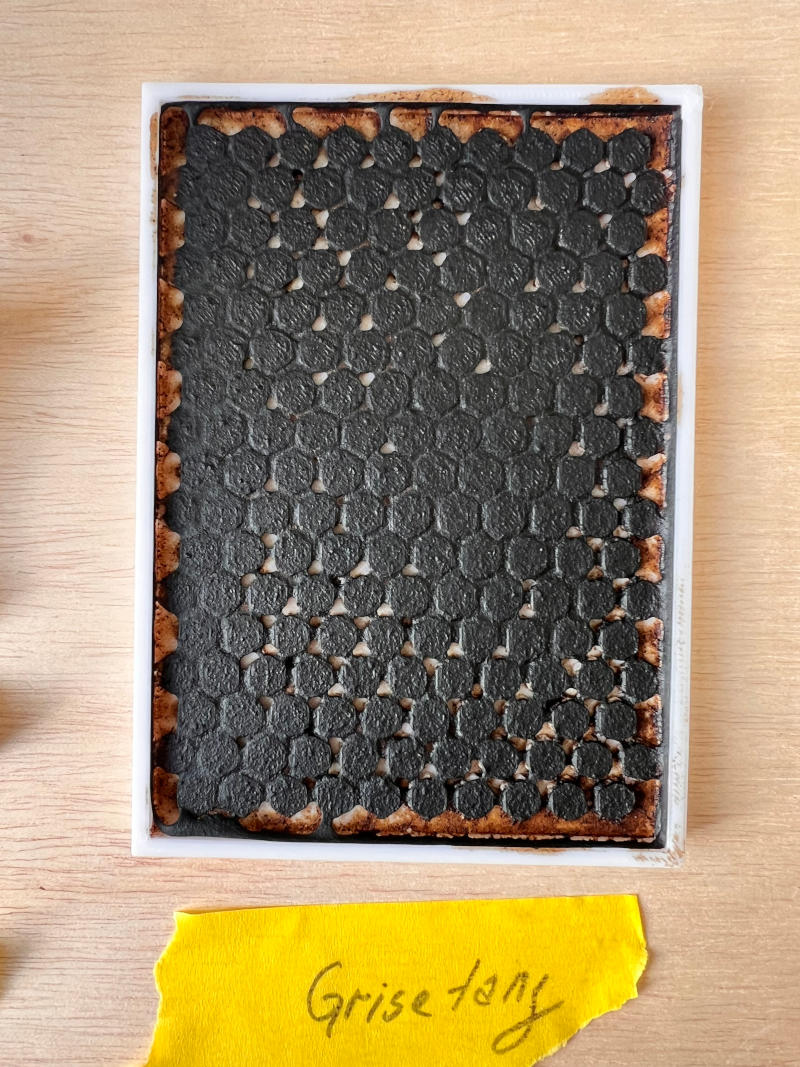
Image Source: Tina Grønbech
- Sample 3: Forest Kelp (Færøsk: Tonglatarablað / Latin: Laminaria hyperborea - Labeled as 'HYP') This sample was experimentally sprayed with a \(1{-}5\%\) Calcium Chloride (\(\text{CaCl}_2\)) solution immediately after casting while the pulp was still wet, in order to observe the instantaneous cross-linking reaction. The spray triggered an immediate chemical transformation, binding the surface alginates into a rubbery calcium-alginate gel membrane. However, as the core moisture evaporated during the overnight drying process, the sheer shrinkage force overcame the matrix, resulting in a highly distorted, structural shell that beautifully displays the textured imprints of the 3D-printed mold lines.
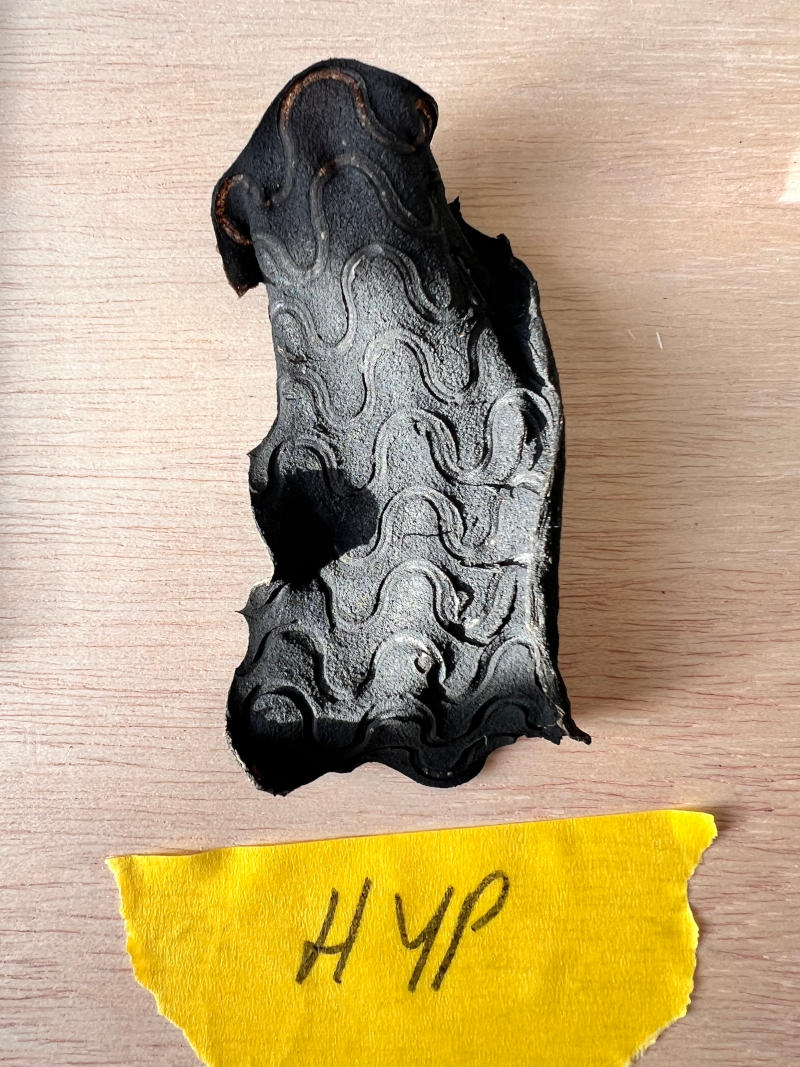
Image Source: Tina Grønbech
Day 2: Re-Casting Trials & Multi-Layer Experiments (Batch 2)
Following the initial drying observations, Sample 1 and Sample 3 were carefully demolded from their 3D-printed matrices to make room for new material variants. The molds were cleaned with water and a brush, and a second batch of testing was initiated to analyze the behavior of two new kelp species alongside a multi-layer composition with sample 2:
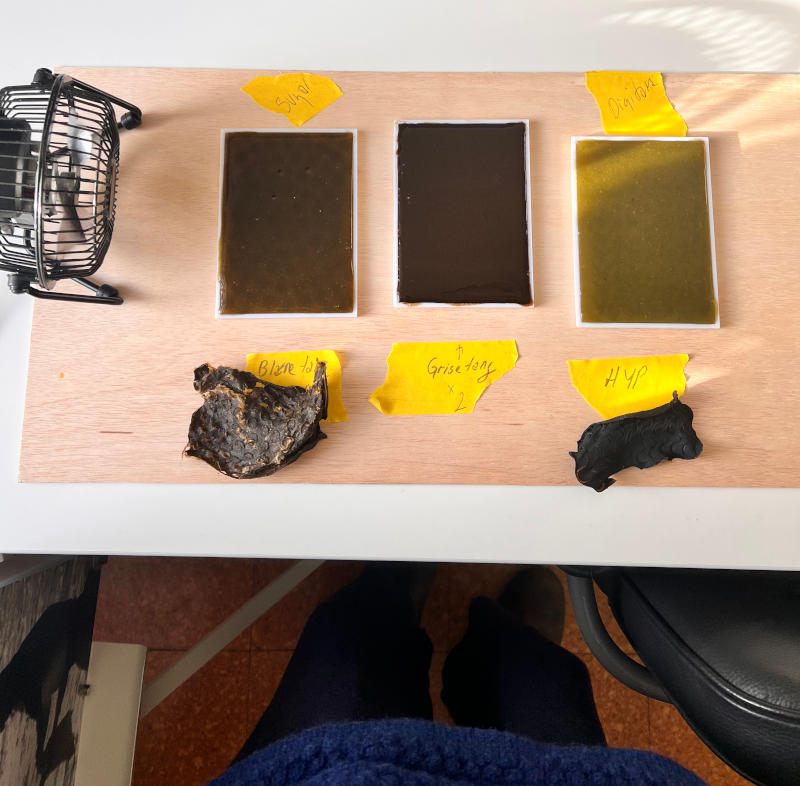
Image Source:Tina Grønbech
-
Sample 4: Sugar Kelp (Færøsk: Sukkertari / Latin: Saccharina latissima) Fresh Sugar Kelp pulp was cast into the newly vacated Mold 1 to observe its structural properties and curing delta compared to the previous Bladderwrack trial.
-
Sample 2: Knotted Wrack - Layer 2 (Skandinavisk: Grisetang / Latin: Ascophyllum nodosum) Instead of demolding, the original cured Grisetang layer was kept inside the mold. Fresh pulp was poured directly on top to fill the volume loss caused by shrinkage and test the structural bond between individual material layers.
-
Sample 5: Oarweed (Færøsk: Tarablað / Fingartara / Latin: Laminaria digitata) Fresh Oarweed pulp was cast into the newly vacated Mold 3 to document its specific texture, color transition, and curing properties.
Controlled Curing Setup
To accelerate the dehydration process and ensure consistent testing conditions, all specimens were set to cure in a dedicated room maintained at standard ambient temperature (\(21{-}22\ ^\circ\text{C}\)). A small low-velocity ventilation fan was positioned to provide continuous, gentle air circulation across the surfaces, helping to speed up the evaporation of core moisture.
3D Mold Evaluations: Layer Adjustments & Shrinkage Observations
This image documents the samples upon returning to the lab the next day to check their progress and track how the different seaweed mixtures settle and dry within the 3D-printed frames.
- Sample 2 (Knotted Wrack / Grisetang - Center): Stable and cohesive after its two initial layers, forming a very solid, dark, and smooth sheet.
- Sample 4 (Sugar Kelp / Sukkertang - Left): No additional layers were added to this sample. It has shrunk slightly during the drying process but remains relatively intact, beautifully preserving the circular bubble texture.
- Sample 5 (Oarweed / Digitata - Right): Based on its thickness and shrinkage, this was the only sample to receive an additional layer today. Adding this layer helps fill out the frame and ensures the stability of the wavy pattern once fully dry.
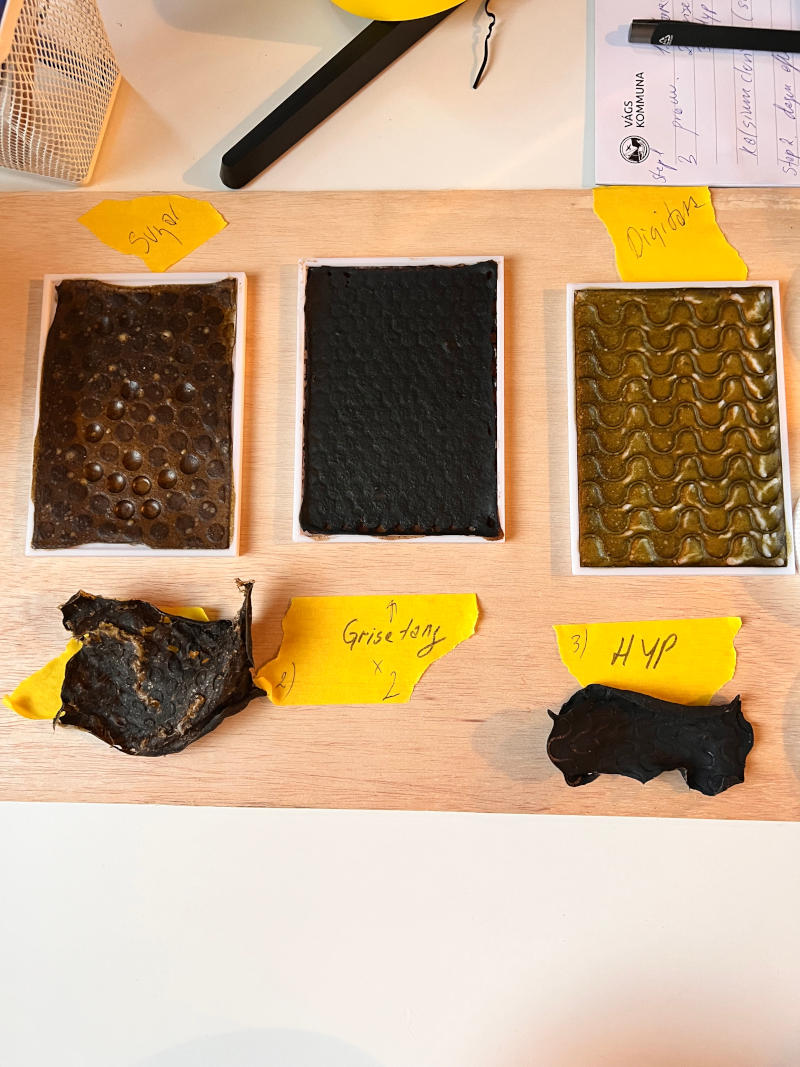
Image Source: Tina Grønbech
Final Day: Cross-Linking & Material Preservation
On the final day, all five seaweed samples are fully set, dry, and ready for the post-treatment process.
To complete the curing, all samples are treated with the mentioned Cross-Linking Activator Spray giving them a bath. This step is crucial for the stability of the biomaterials, as the activator chemically binds the polymer chains together. This process significantly enhances the durability of the samples, making them more resilient and highly resistant to mold and moisture over time.
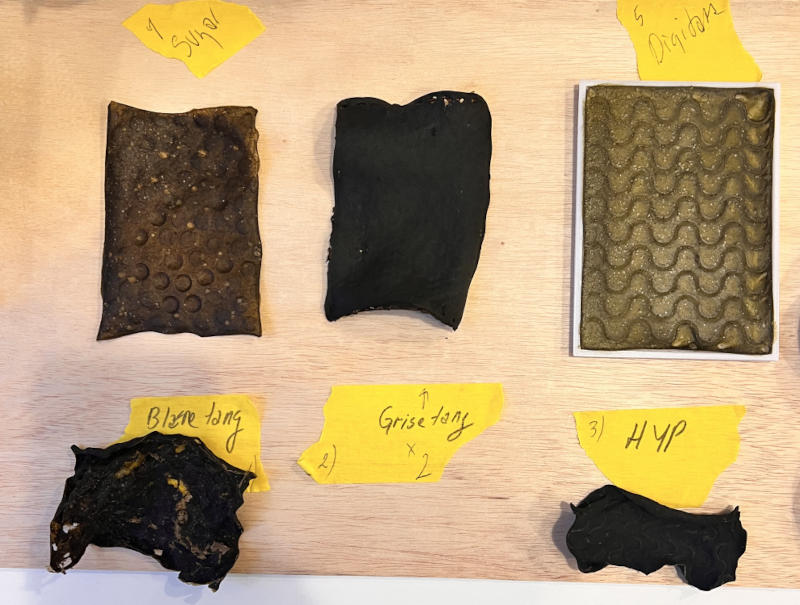
Image Source: Tina Grønbech
Sample 4 & 5 - Sugar Kelp (Saccharina latissima) & Oarweed (Laminaria digitata): These specific seaweed varieties prove to be the most suitable for creating solid structural forms, while remaining remarkably soft and flexible. Both varieties dry into beautifully fine, translucent layers, with the Sugar Kelp ultimately feeling incredibly soft and pliable, almost like a piece of soft leather.
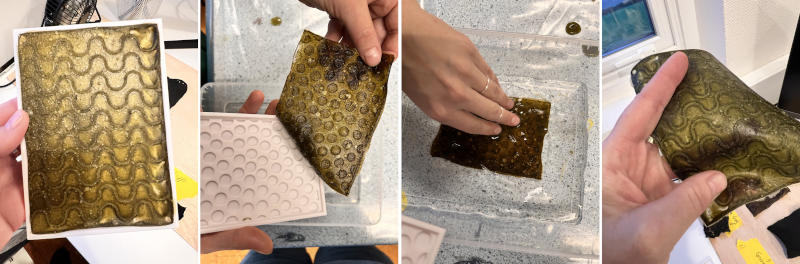
Image Source: Tina Grønbech
Sample 2 - Knotted Wrack (Ascophyllum nodosum): This sample had to be carefully loosened from the mold using a bit of the activator spray. The final material feels more like genuine leather than paper and is significantly thicker than both the Oarweed and Sugar Kelp, which conversely dried into beautiful, fine, and translucent layers you can see right through.
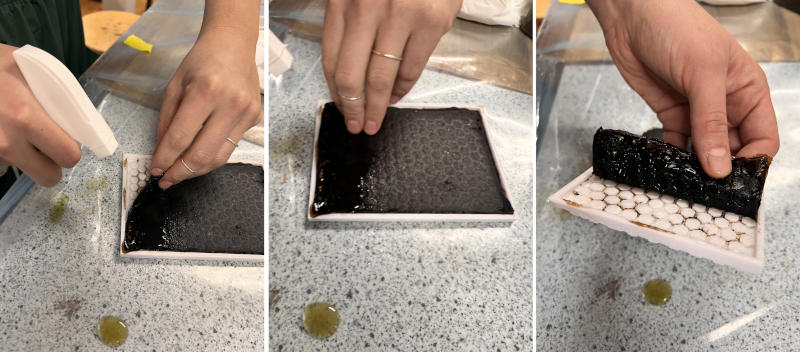
Image Source: Tina Grønbech
Last day og The Forest Between Us: It Tangles Around My Foot
Today, Thursday, marks our final day in the Fab Lab after an absolutely incredible week with the biology class from the local gymnasium! It has been a true pleasure working alongside these wonderful and dedicated young people.
The week has been fully dedicated to seaweed, offering a sea of creative and biological experiments under the guidance of Alberte and Floortje, and in close collaboration with the students' regular teachers. We kicked off the week in wetsuits in Vágsfjörður to harvest local seaweed, which has since been studied up close and completely transformed.
The students have tackled a wide variety of complex tasks: * Microscopy & Biology: Examining the harvested seaweed under microscopes together with their regular teachers to understand its structures in deep detail. * From Sea to Material: Preparing the seaweed into pulp and experimenting with algae yarn using spirulina as a base. * Digital Fabrication: Creating digital drawings in Inkscape, which were brought to life through laser cutting and engraving. * Design & Craft: Folding circular modular designs using algepaper, beautifully dyeing Faroese wool with spirulina, and using a field loom to create custom wool samples from the dyed yarn. * Alternative Photography: Experimenting with cyanotype printing to capture unique photographic prints using the harvested seaweed and natural light. * Collective Artwork: Creating seaweed art by pouring pulp into custom laser-cut molds.
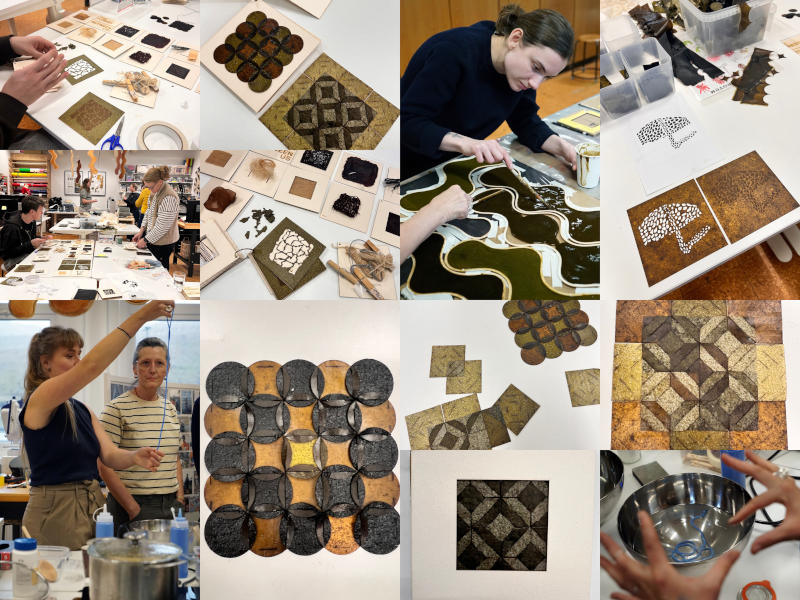
Image Source:Tina Grønbech
Collective artwork display in the making at the local high school Miðnám í Suðuroy
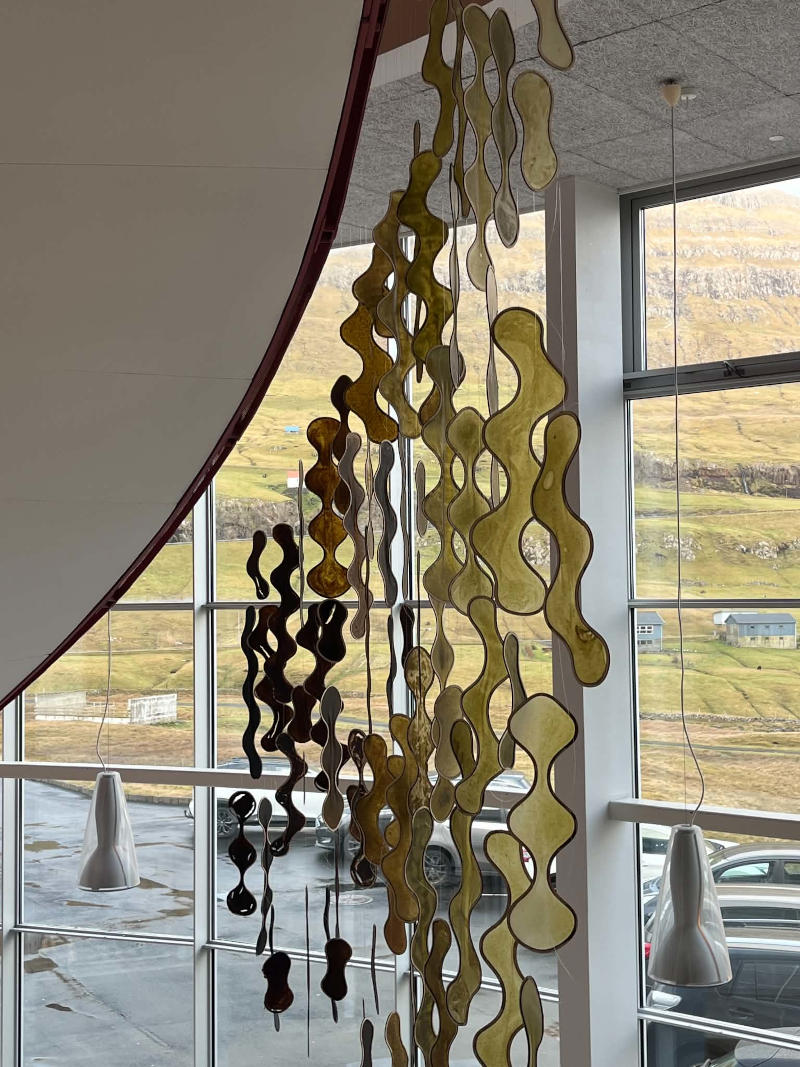
Image Source:The Forest Between Us: It Tangles Around My Foot, art instalation made by pupils and local islanders, caption by Floortje Zonneveld
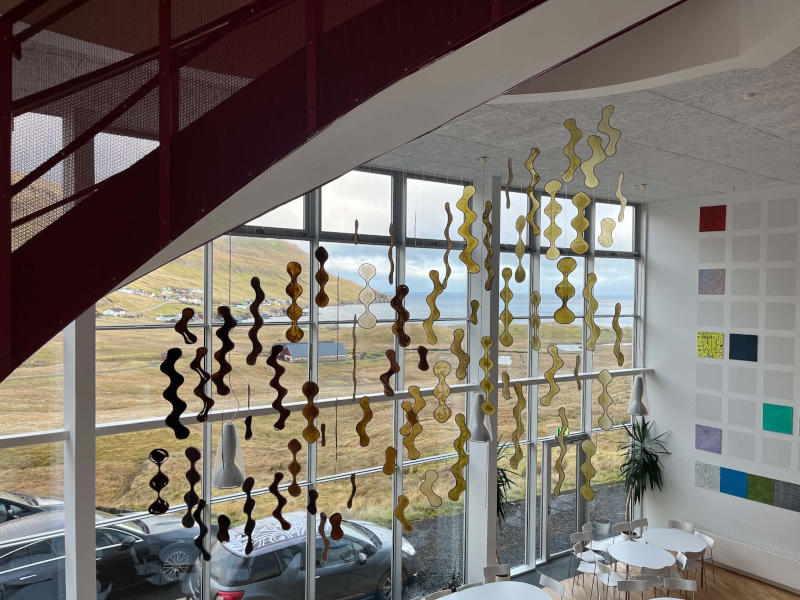
Image Source:Floortje Zonneveld
Archiving and the Sample Booklets
This concept was inspired by my participation in the bootcamp back in May in Irland, where I was on Cecilias team working with biochromes, and we created a sample box for each of us to bring home. Reflecting on that experience, I sent the file we used to Alberte, and we agreed to create an archive of all our collective samples from this workshops. However, we completely underestimated the massive volume of samples we would end up generating during our collaboration. Additionally, each student from the Biology class, is going home with their own sample booklet containing there various samples they have worked on throughout the past 14 days.
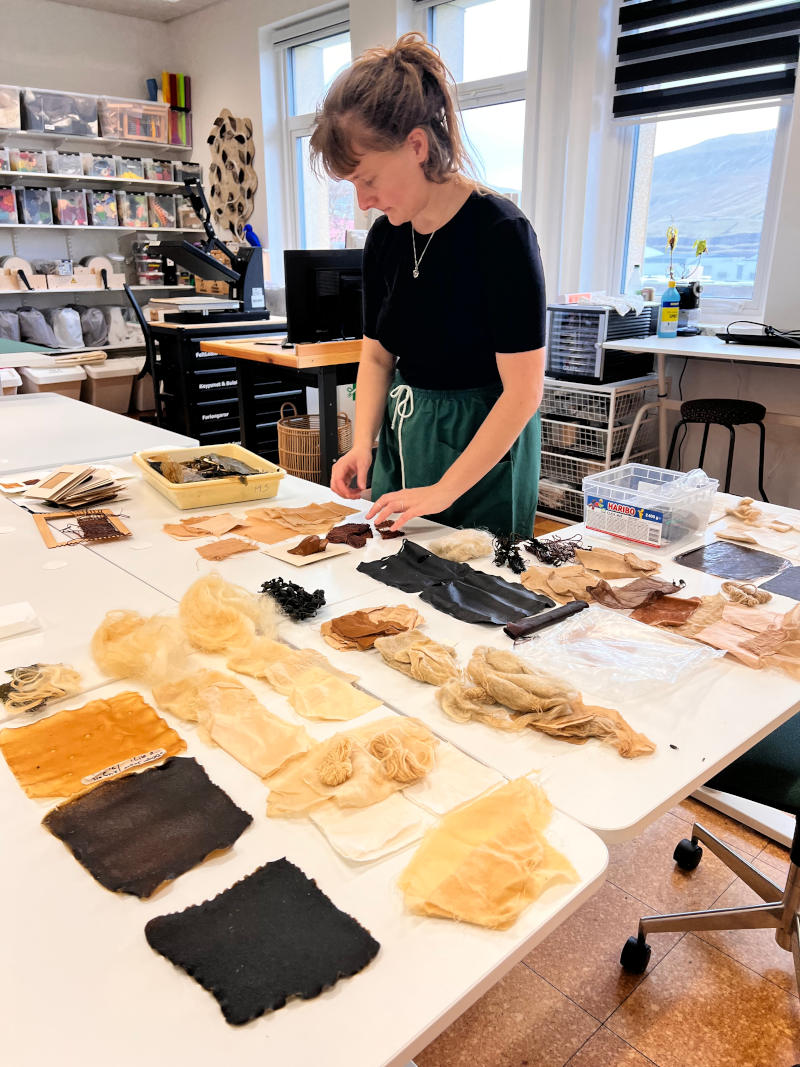
Image Source: Alberte Holmø Bojesen sorting dyesamples from April, Tina Grønbech
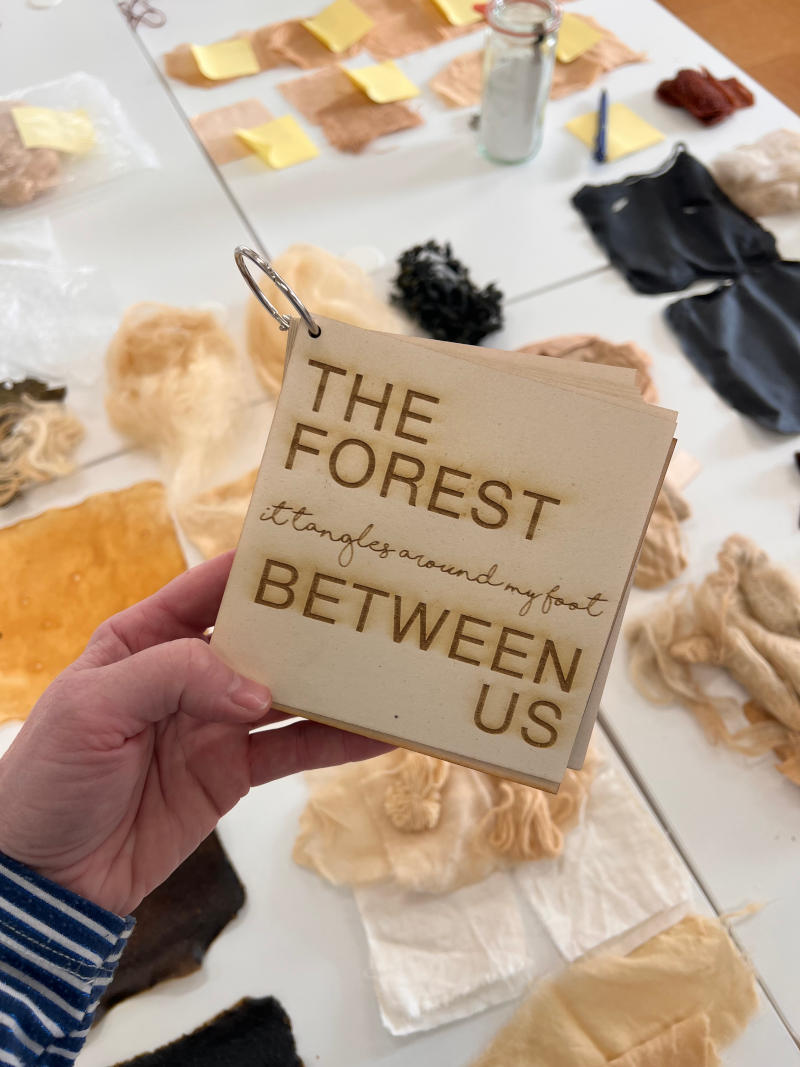
Image Source:Tina Grønbech
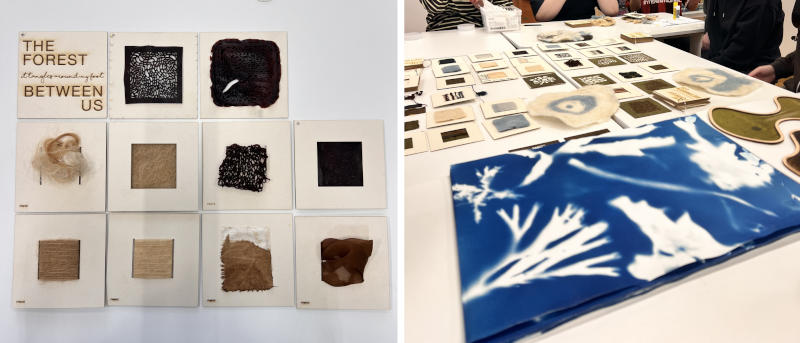
Image Source: Sample booklet and evalueting the workshop with students, Tina Grønbech
All of their shapes from the workshops is now being gathered into a large, beautiful collective installation that will permanently decorate the local gymnasium.
A huge thank you to both the fantastic students and their teachers for your curiosity, energy, and amazing drive this week! It has been incredibly inspiring to see natural science, technology, and art merge together so beautifully.
Laser-Cut Fish Design from week02
I also took the opportunity to share with the others my fish design from Week02 circular Open Source Fashion of Fabricademy and lasercut it using Albertes seaweed paper. It was amazing to see how the digital design translated onto this organic, sustainable material, perfectly connecting my previous work with the techniques we explored this week.
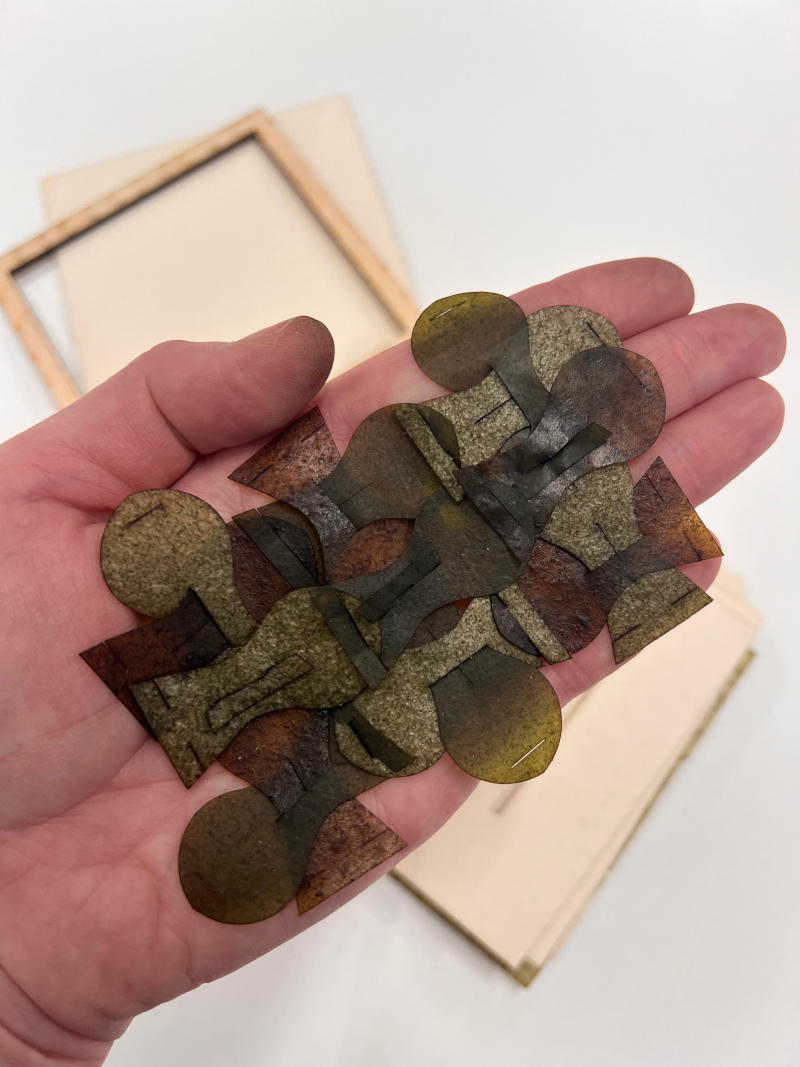
Image Source:Tina Grønbech</p
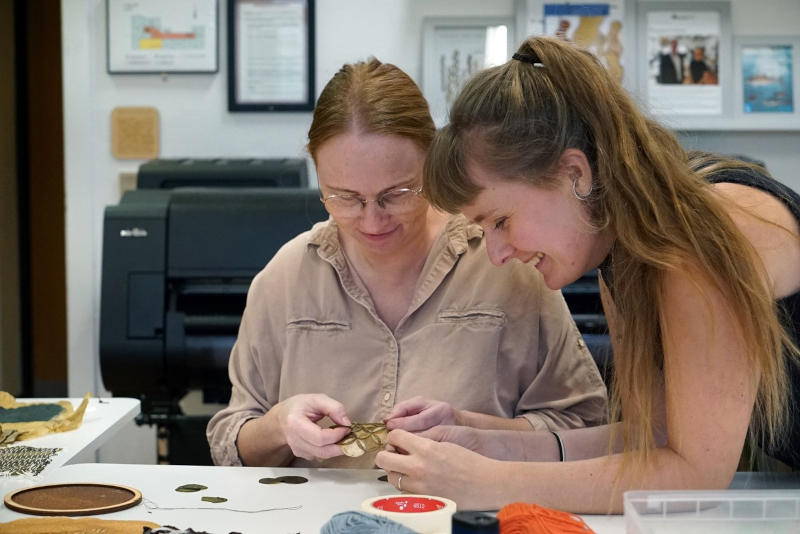
Image Source: Fhoto taking by Floortje Zonneveld doing an open workshop/pop-up lab event last sunday. On the picture: Alberte Holmø Bojesen and Tina Grønbech
...
5. Results
This week’s work successfully bridged deep material research with school- and community engagement, culminating in a comprehensive material archive and successful post-treatment preservation experiments.
3D Mold Evaluations & Material Archive (Samples 1–5)
The structural development and final traits of the seaweed samples processed in the 3D-printed texture frames yielded distinct material deltas over the course of the week:
- Sample 1: Bladderwrack (Fucus vesiculosus): Dehydrated with severe volume reduction and edge-warping due to the rapid loss of moisture, curling inward and detaching from the mold geometry.
- Sample 2: Knotted Wrack (Ascophyllum nodosum): Proved to be the most robust and stable specimen. It required a secondary layer to fill out moisture loss and had to be carefully loosened from the mold with activator spray. The final material is thick, dark, and feels remarkably like genuine leather rather than paper.
- Sample 3: Forest Kelp (Laminaria hyperborea): Experimentally cross-linked while wet, forming an instant rubbery surface membrane. The core moisture shrinkage ultimately created a distorted, textured structural shell.
- Sample 4 & 5: Sugar Kelp (Saccharina latissima) & Oarweed (Laminaria digitata): Both kelp varieties proved to be the most suitable for creating solid structural forms while remaining remarkably soft and flexible. They dried into fine, translucent layers, with Sample 4 ultimately mimicking the feel of a soft leather piece.
Material Preservation: On the final day, all dry samples were treated with a Cross-Linking Activator Spray bath. This step successfully bound the polymer chains together, significantly increasing their structural durability and long-term resistance to moisture and mold.
Here is a short video showing my 3D printed samples, numbered from 1 to 5 in sequential order.
Pop-up Workshop for Curious Minds
Our Sunday pop-up event at Fab Lab Vágur successfully translated scientific material research into an accessible, hands-on community experience: * Alginate Yarn & Dyeing: Local residents experimented with extruding bio-based alginate yarn and used local Faroese wool preprepped with a mordant to dye (Alum). Utilizing spirulina powder, the process yielded a beautiful, vibrant blue color. * Community Installation: Citizens actively participated in shaping the physical mold that will form the foundation for the upcoming material installation to be displayed at the local high school.
Mycelium Growth (Work in Progress)
The mycelium cultivation experiments are currently still ongoing (7 days in), as the fungal network requires more time to fully mature and bind the substrate. While these samples are not yet finalized, this ongoing status is aligned with the project timeline and fully noted by the instructor. Continuous monitoring of the growth density and container variations will proceed into the coming week.
Inspiration & References
For more context on Alberte’s material research across the Nordic region, you can check out this short video feature by @grow.objects on Instagram, highlighting her work transforming seaweed into future materials and textile installations: ▶️ Watch the feature on Instagram
You can also view further project documentation here: ▶️ Watch the video "Seaweed Textiles" on Youtube
For a detailed look at the methods, recipes, and scientific framework behind Alberte’s work at Fab Lab Vágur, her research has culminated in a comprehensive document that we are excited to share with anyone interested below:
📄 Download Alberte's newest Seaweed Research PDF
6. Weekly reflection & critical thinking
What did I learn? What did I personally find interesting or surprised me?
This week provided a profound understanding of how different macroalgae species react to dehydration and chemical cross-linking. I was surprised by the vast material deltas between the species; while the Bladderwrack warped severely under tension, the Knotted Wrack (Grisetang) remained dimensionally stable and produced a thick, leather-like texture that far exceeded my expectations. On a personal level, the sensory experience of blending the pulp mass—constantly gauging whether it needed more liquid, much like making homemade paper—highlighted that working with biomaterials requires an intuitive, tactile understanding alongside scientific data.
What would I do differently? If something "failed" do I know how else to tackle it now?
The severe warping of Sample 1 (Bladderwrack) and the distortion of Sample 3 (Forest Kelp) showed the limits of fast ambient drying without physical restraints or premature cross-linking. Next time, I would test alternative drying strategies for these sensitive species, such as placing weights on the molds during dehydration or adjusting the thickness of the initial pour. Furthermore, managing Alberte’s deep, highly detailed research recipes required significant translation on my part. Experiencing this taught me the value of creating standardized, step-by-step quantity adjustments early in the process to prevent workflow bottlenecks.
How does this connect to my final project or my learning trajectory?
This week marks a major milestone in making complex science accessible through hands-on practice. Through this intensive process, I have discovered that I truly love engaging in research-based work centered around natural raw materials and local resources. This combination of scientific inquiry and regional ecology is something I fully intend to carry forward, both as the core foundation of my final project and in my future professional practice.
By translating Alberte's raw scientific data into user-friendly recipes, I am developing my own methodology for archiving and documenting physical samples over time. The successful multi-layer casting of the Grisetang and the flexibility of the Digitata directly advance my trajectory toward building a robust material archive. Additionally, hosting the Sunday pop-up workshop at Fab Lab Vágur allowed me to test how these abstract bio-fabrication methods can be communicated effectively to a wider audience.
What are implications and possible applications, think also from the ethical or environmental aspect, how it could connect to your practice and project?
Utilizing local, abundant Faroese kelp and non-toxic additives like spirulina highlights the massive potential for regenerative regional design. These materials offer a completely biodegradable alternative to synthetic textiles and plastics, which heavily pollute marine ecosystems. From my technical perspective as a marine engineer and navigator, I find the integration of mycelium into marine installations particularly compelling, as it bridges structural viability with ecological restoration. Culturally and ethically, involving the local citizens of Vágur to help shape the mold for the upcoming high school installation shifts the practice from a closed-lab experiment to a collaborative, community-driven narrative. It fosters ocean literacy and empowers coastal communities to actively participate in building sustainable, circular materials from their own immediate environment.
7. Recipe files, Booklet and References
-
Booklet with recipes: download Alberte Holmø Bojesens Faroese kelp recipe booklet here ↩
-
Catharine Euale lecture: Fabricademy Fungal fungal_matters lecture 26 ↩
-
Reference: Alberte Holmø Bojensen; Title; Seaweed Dialogues Source;Fabricademy class Archive year: 2023 ↩