V. Crafting, cultivating and fabricating care
Why did I chose these processes and techniques to carry on my project and what do they have to do with care?
Crafting and cultivating materials require a certain amount of trial and error, care, caution, patience, time, exploration and craftmanship. For my project I want to focus on the care aspects and practices of creating new open materials, protocols, equipment through the use of digital fabrication, biochromes, biofabricating materials and open source hardware.
These processes allow us to care for more than human others but they also allow us to disseminate the care through open source principles, open protocols, open designs, and DIY Biology processes and methods. When we talk about care in this project we do not only mean that care is disseminated through open source principles and new technologies and processes but also in the crafting, cultivating and fabricating process. Through these processes we become creators and innovators of our own biotechnologies and not just mere users of technologies that somebody else created for us. These processes allow us to become more autonomous in our own health and care but not only for ourlselves, but also for our symbionts, either we are speaking about humans and more than humans that are microscopical and invisible to the eye at the same time.
Crafting care
BIOCHROMES
Learning how to make natural and botanical dyes during the past few months has been amazing experience so I decided to further practice this skill. I knew I wanted to work with pH indicators and combine them with crafting biomaterials with agar agar and alginate so I can create sort of wearable materials that act as an interface or a visual actuator when they react with bodily fluids.
Advantages of Natural Dyes 1) Natural dyes have pharmacological effects and possible health benefits. 2) They are obtained from renewable sources. 3) Natural dyes cause no disposal problems, as they are biodegradable.
The classification of natural dyes is divided into 3 parts. 1) On the basis of Chemical Constituents
These are:
Indigoid Dyes, Anthraquinon, Alpha-Naphtha, Flavones, Dihydropyrans, Anthocyanidins, Carotenoids
2) On the basis of Mineral colorants
These are: Red color, Blue, brown and black dye, yellow color.
3) On the basis of Applications
These are:Acid dyes, basic dyes, direct or sustantive dye, mordant dyes, reactive dye, disperse dye, azoic dye.
Natural dyes and health
It is said that in older times people used to dye their clothes in natural dyes that are rich in antioxidants and that is very beneficial for our health. Antioxidants prevent the spread of free radicals in our cells that cause cancer.
Spirulina Dye
Spirulina was super hard to make for me since I started off by doing it completely wrong and putting the powder in hot water on the stove. DON'T DO WHAT I DID. You have to use normal water and not boiling just make sure it is not ice cold so the powder dissolves after thousands of times of stirring haha. Also you have to filter it a lot I guess. I was planning to use it as a pH sensitive dye embedded in my bioplastics or kombucha but the experiment stayed there for now.
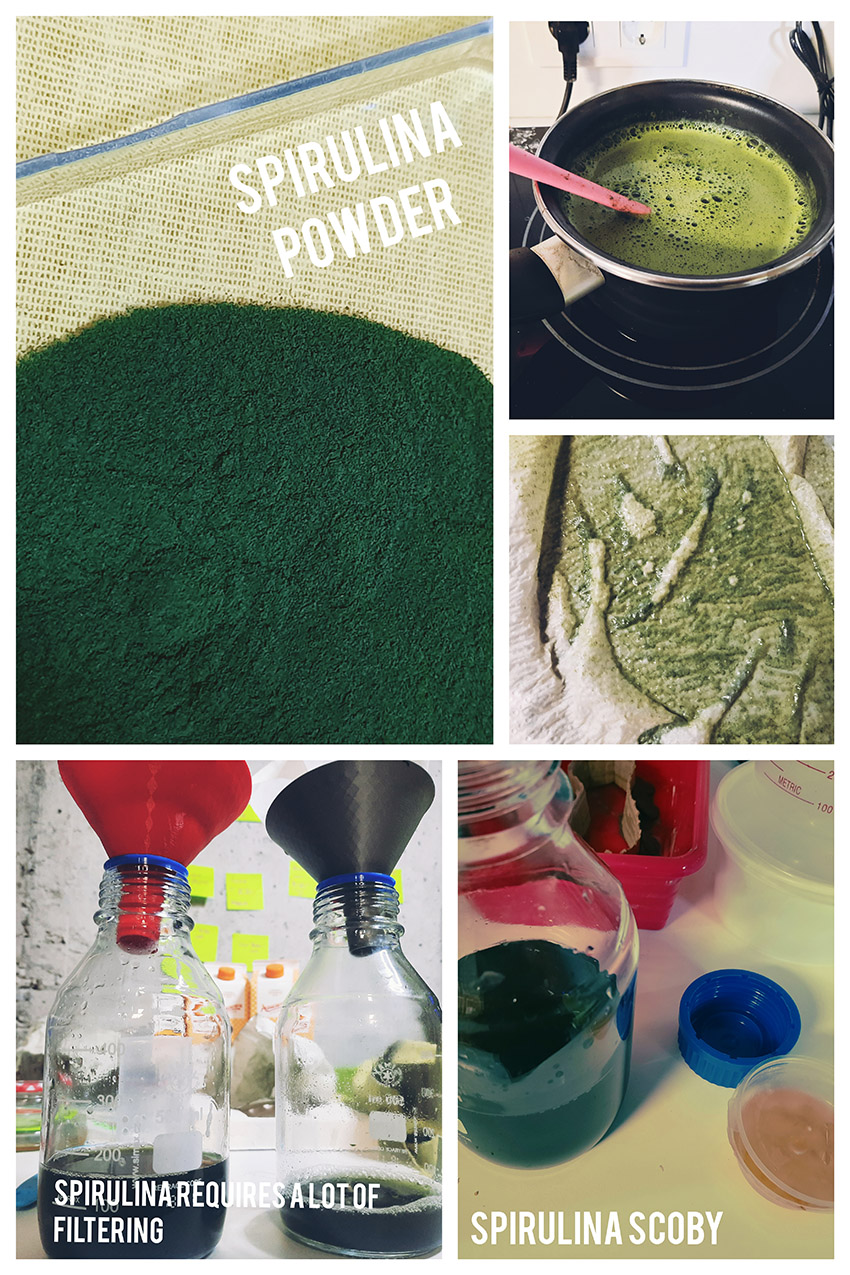
I made some Spirulina scoby with this dye and then I observed it.
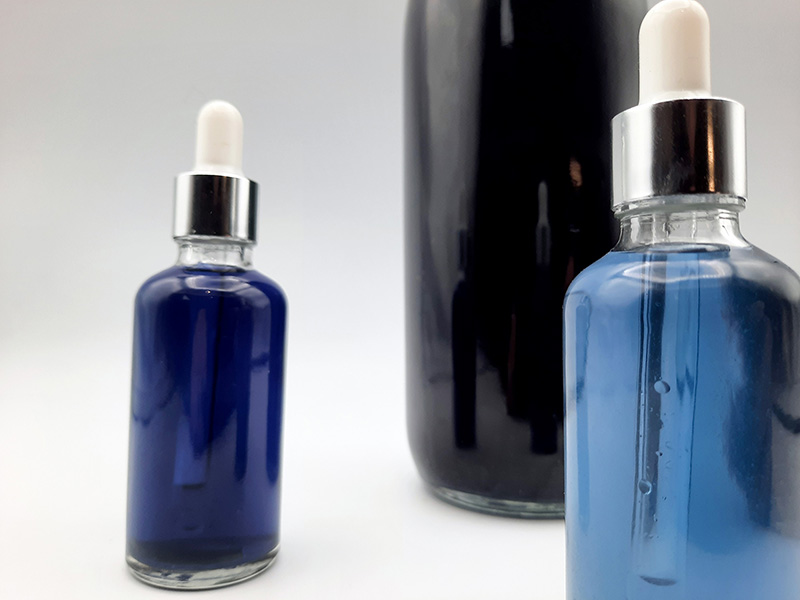
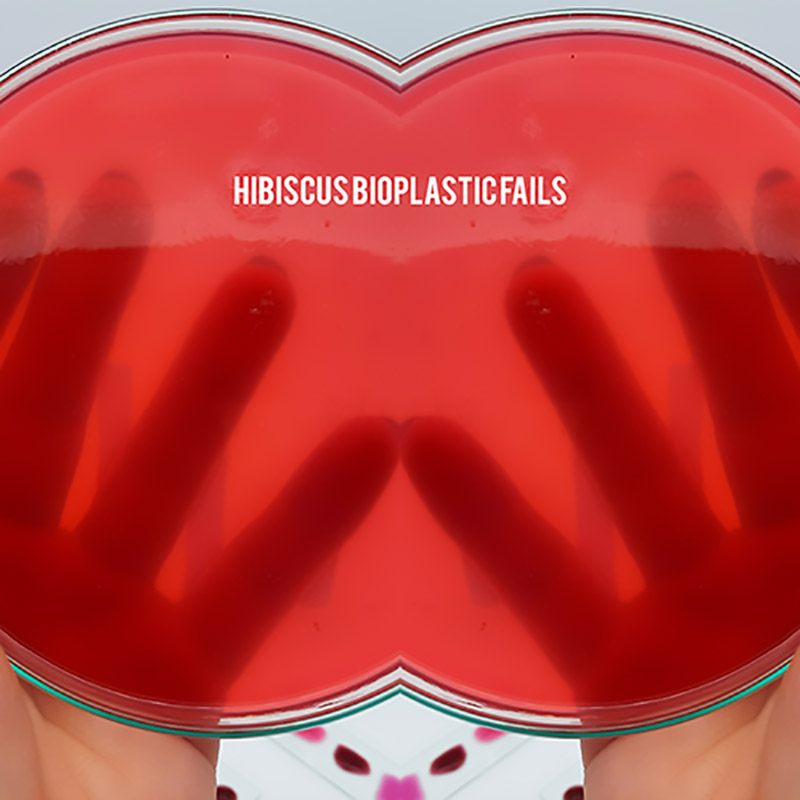
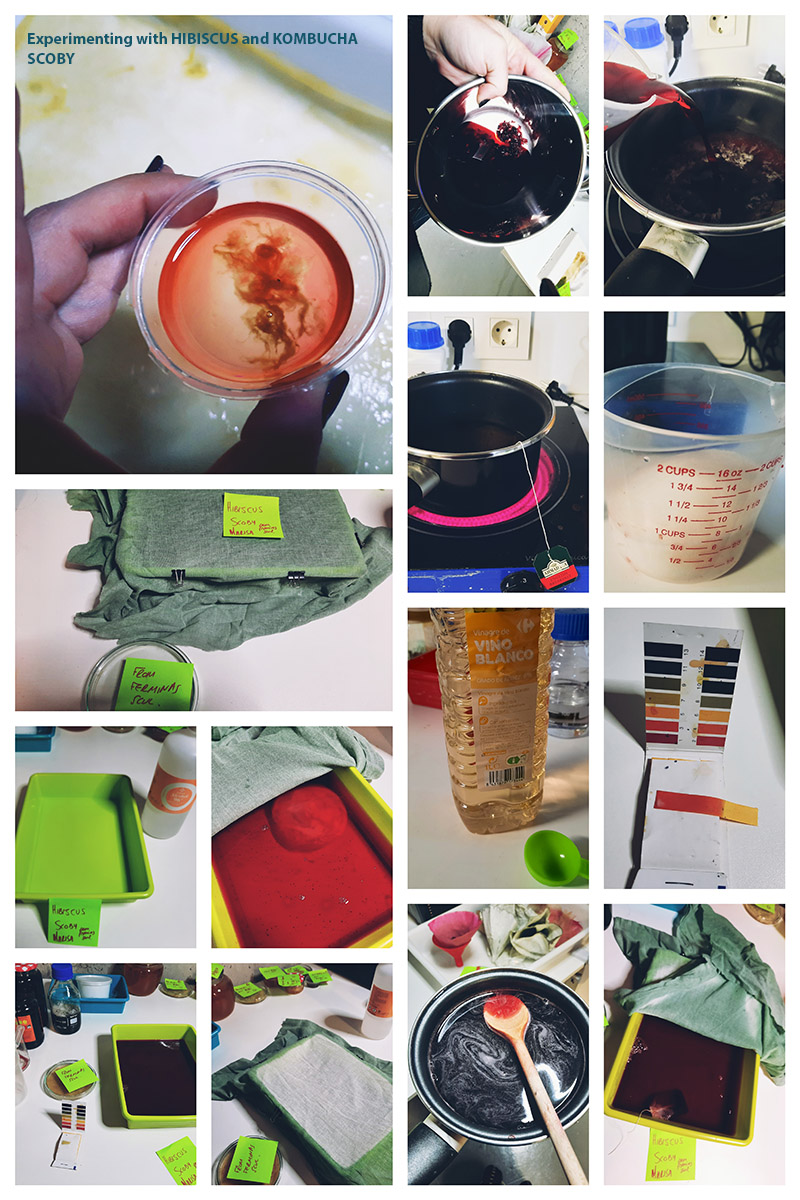
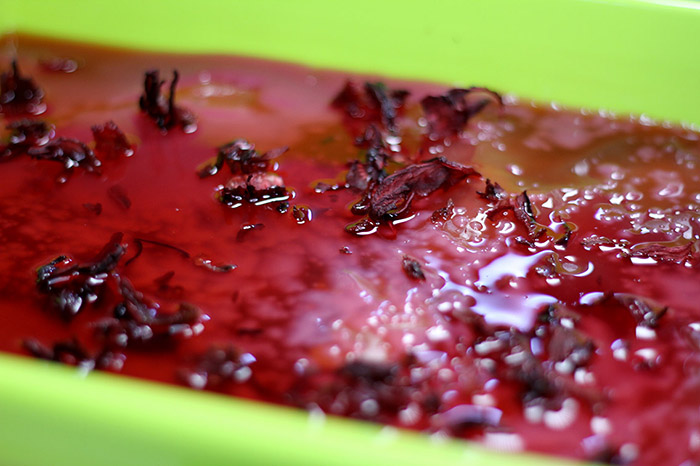
The vaginal microbiome and detecting pH changes
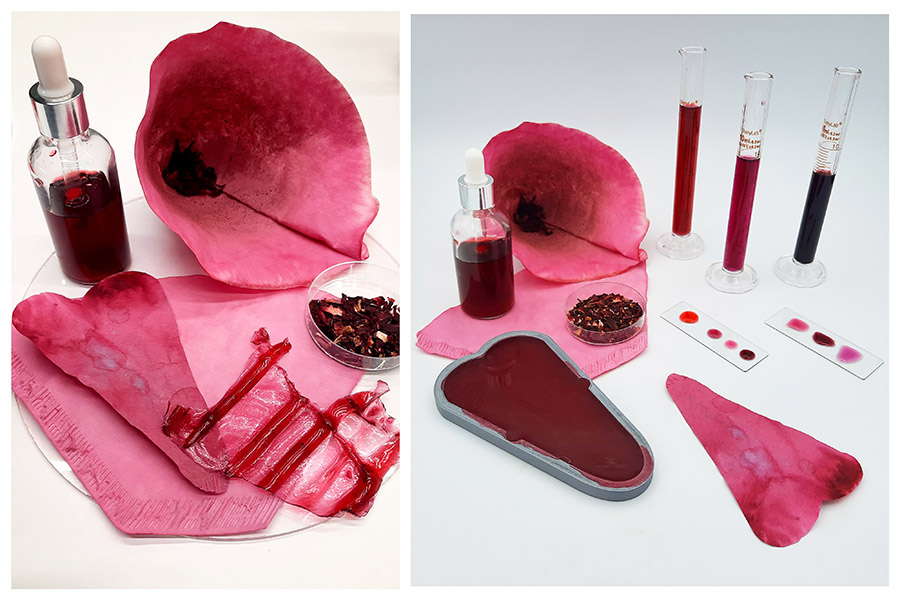
So these are my Hibiscus dye experimentations after 2 weeks. I am working with Hibiscus because its a pH indicator and I am making my own pH strips and bioplastics to check vaginal and other bodily pH levels. Some people constantly use vaginal soaps with probiotics or other solutions neutralise the vaginal pH because they experience microbiome dysbiosis in their vaginas. Others also constantly use pH strips to check the acidity of the vaginal fluids because a lot of people suffer from an imbalanced vaginal microbiome which essentially is dysbiosis between the microbiota of the specific body area. The vaginal microbiome consists of many microorganisms bur it is said that a healthy vaginal microbiome means Lactobacillus-dominated vaginal microbiota.
The golden question though is if this methods can assist us in preventing vaginal infections and microbiome dysbiosis. There are no over-the-counter medications for treatment of an elevated vaginal pH (fda.gov) so what about trying to find our own way through biofabricating materials and biochromes?
In this website we can find suggestions on how to use a home-use test kit to measure the pH of your vaginal secretions. It is given by a number on a scale of 1-14. The lower the number, the more acidic the substance.
You hold a piece of pH paper against the wall of your vagina for a few seconds, then compare the color of the pH paper to the color on the chart provided with the test kit. The number on the chart for the color that best matches the color on the pH paper is the vaginal pH number.
Is the home test similar to your doctor’s test? Yes. The home vaginal pH tests are practically identical to the ones sold to doctors. But your doctor can provide a more thorough assessment of your vaginal status through your history, physical exam, and other laboratory tests than you can using a single pH test in your home.
Hibuscus dyes and Anthocyanin research
Hibiscus flowers contain Anthocyanins that are natural colorants which have extensive range of colors and occur widely in nature. Anthocyanins are the most important dye ranging from orange, pink, red, violet to blue in the flowers and fruits of the vascular plants. They are harmless and water soluble which makes them interesting for their use as natural water soluble colorants. Another significant property of anthocyanins is their antioxidant activity, which is known to play a vital role in the prevention of neuronal and cardiovascular illnesses, cancer, and diabetes.
Antioxidant activity of the anthocyanin extract seemed to have contributed to enhance the fastness properties of the dyed fabrics. Info taken from here.
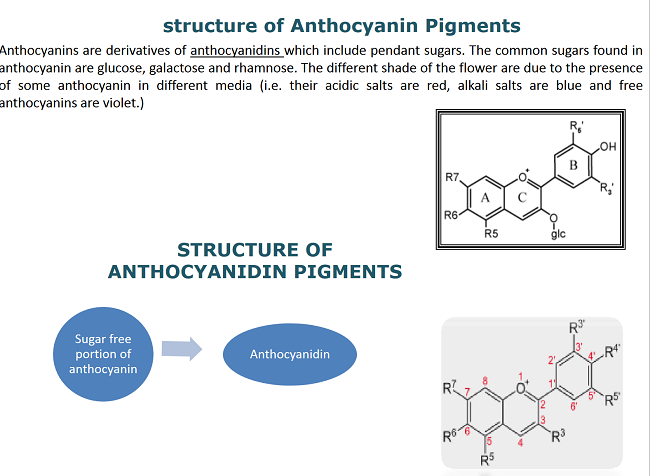
Despite the great potential of applications that anthocyanins represent for food, pharmaceutical, and cosmetic industries, their use has been limited because of their relative instability and low extraction percentages. Their use in textile is negligible as they lack affinity for the fiber and cannot sustain washing. Nevertheless, anthocyanins are good food colorants, because in those applications color fastness properties do not play such an important role as for the textile applications. Currently, most investigators are engaged in solving the problems that are associated with isolation and stability of anthocyanins, their purification, identification and their end uses. In this article, anthocyanins from Hibiscus flowers have been extracted by an advantageous technique of using citric acid with methanol instead of hydrochloric acid. Presence of citric acid in the anthocyanin extract was found to be safe for textile dyeing particularly silk using different mordants, instead of hydrochloric acid.
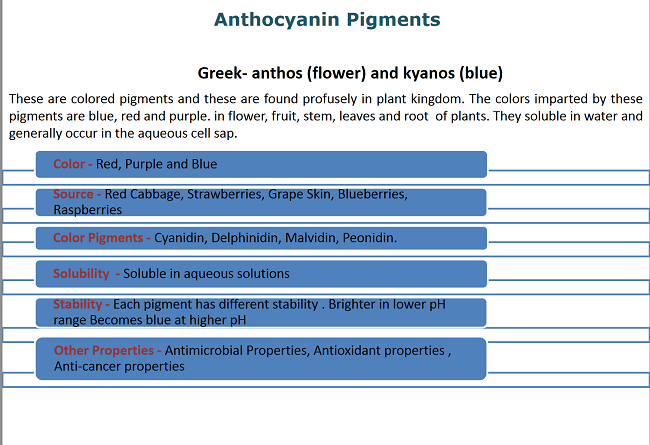
Image taken from here.
Potential of Hibiscus aqueous extract as a pH indicator
Aqueous hibiscus extract as a potential natural pH indicator incorporated in natural polymeric film paper found here.
It is not very common for Hibiscus to be used as pH indicator, however I found this paper that uses it as a potential indicator.The paper highlights that:
-Films containing aqueous hibiscus extract were developed as a natural pH indicator.

-Natural polymers (chitosan, gelatine and starch) were used for the film production. The gelatine polymer in the film deemed to make the dye more UV resistant.

-Great colour change from pink (pH = 2.0) to yellow (pH = 13.0) were observed.

-The pH indicator is associated with intelligent packaging.

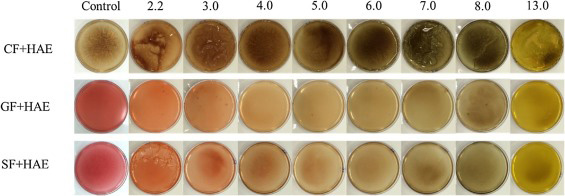
Image from this research paper discussing the potential of Hibiscus aqueous extract as a pH indicator
Hibiscus and washing soda
Hibiscus and Alum
Here are some photos to show you what happend to the pH (change of colour means change of pH) when I add Alum liquor and Sodium Carbonate (washing soda) to the Hibiscus dye.


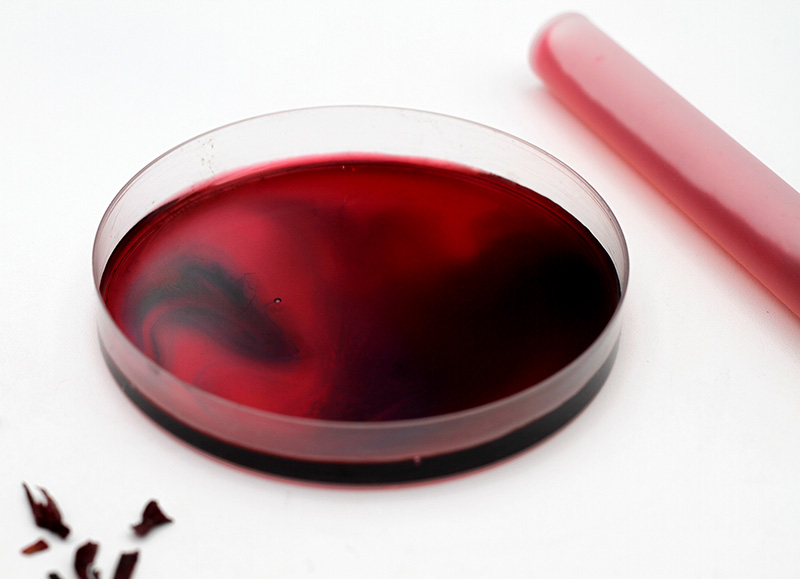
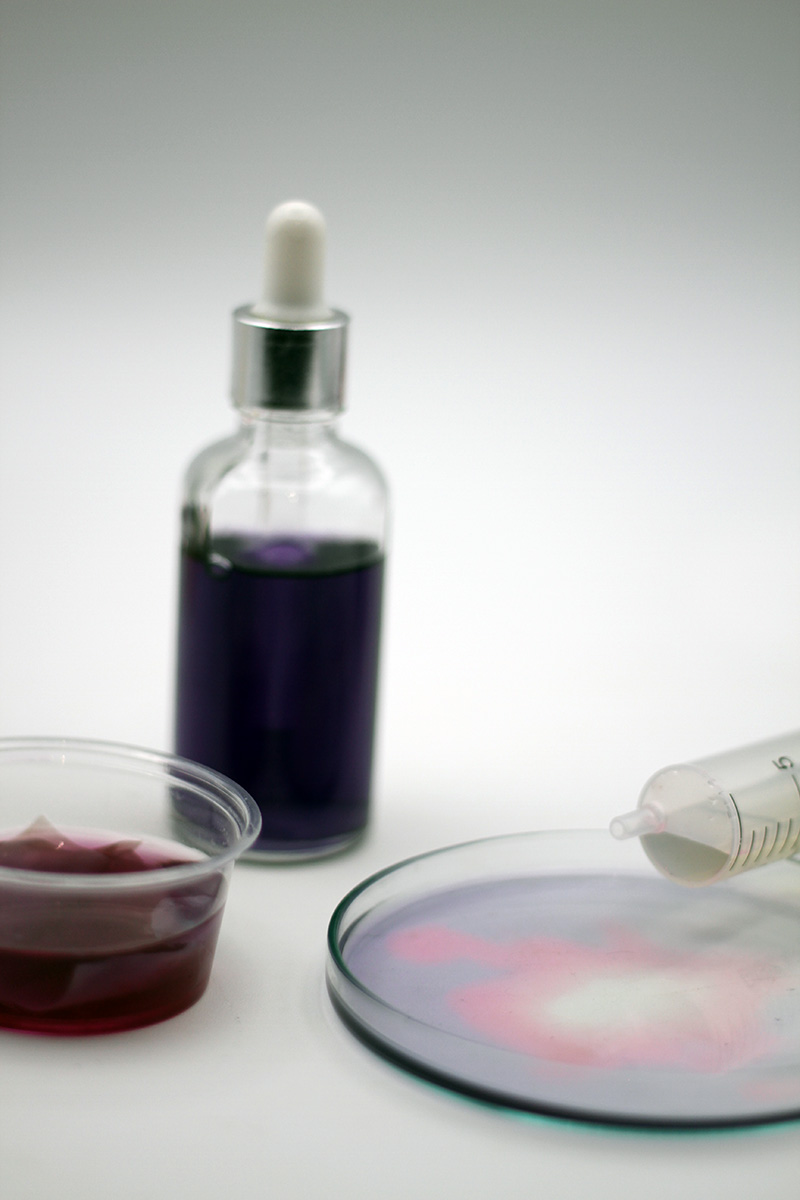
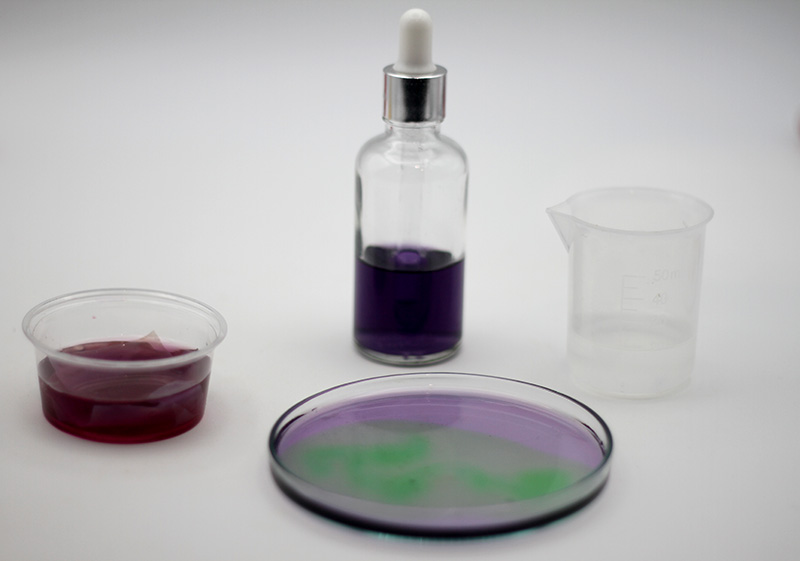
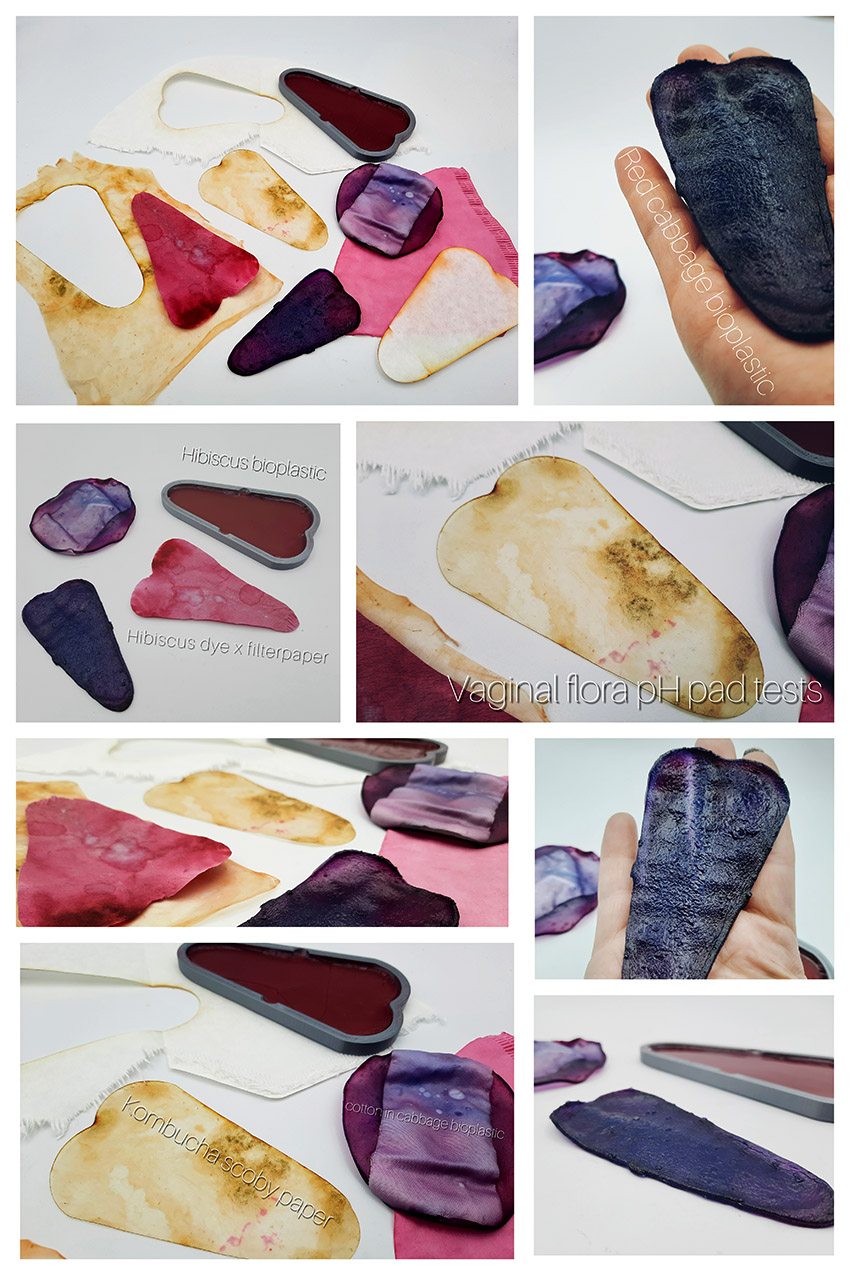
Red cabbage Dye
I really enjoyed playing with this dye even though the smell is not very pleasant. I would suggest keep this in the fridge after you make it. This dye is so sensitive that from blue turned to purple while filtering and pouring into a glass bottle.
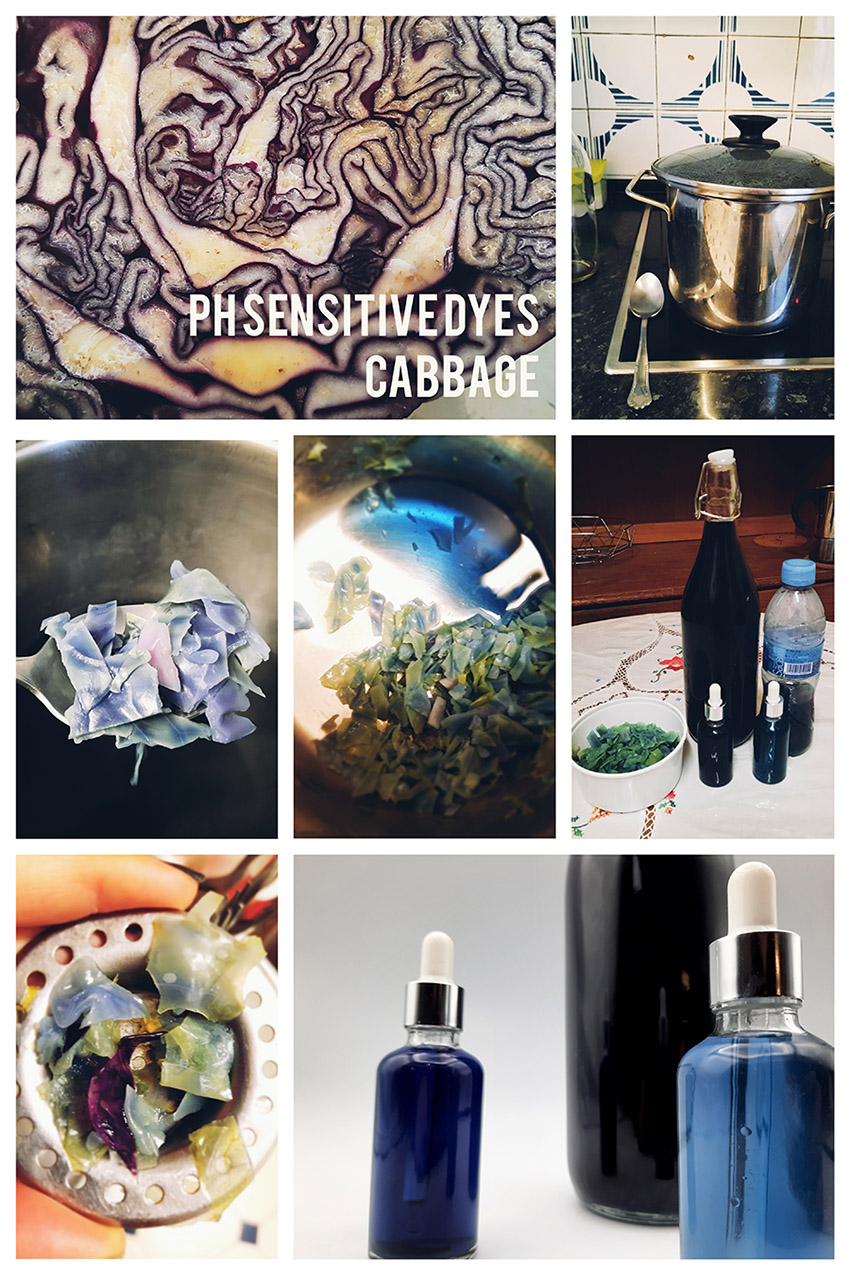
Red Cabbage dye is more commonly used as a pH indicator and it also contains Anthocyanins. Stephanie Jolly(Feb 2009) proposed that Red Anthocyanin Pigments in Cabbage turn Color with Changes in pH. Red cabbage juice contains anthocyanin pigments that change color when mixed with alkaline or acidic ingredients.
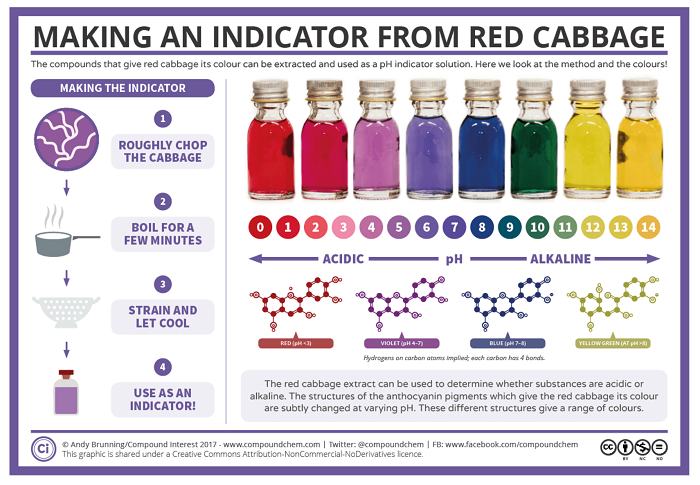
Photo from here.
Notice how the pH and colour of the red cabbage dye changes on its own without modifiers. Here we have values of pH 7-8 without even adding ANYTHING! If you dont keep the dye in the fridge it will become pink, and more acidic!!!
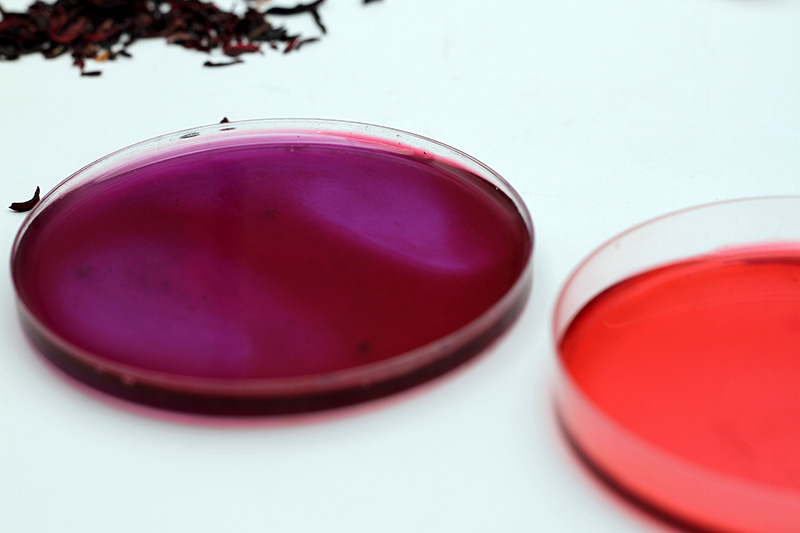
Modifying the colour with vinegar
Modifying the colour with washing soda/alum
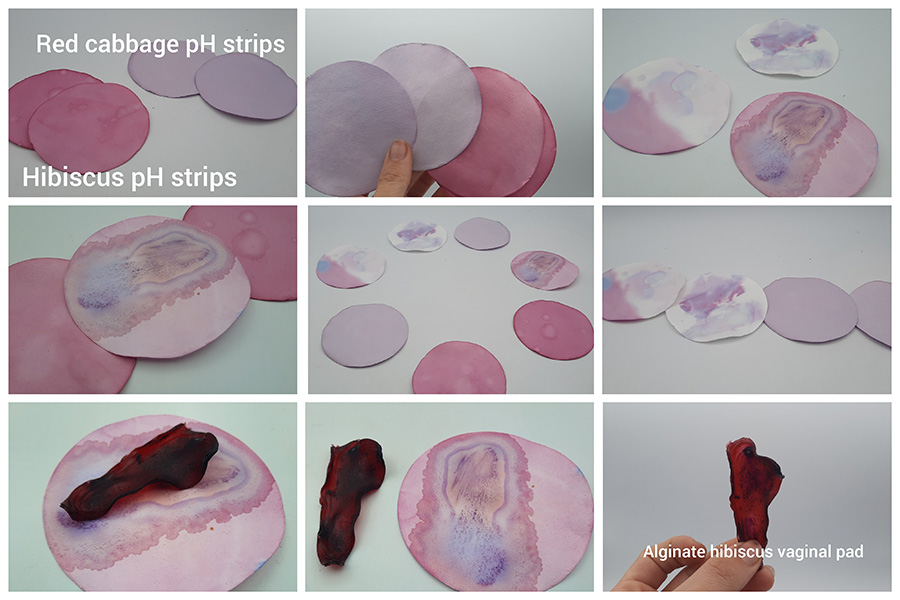
Red Cabbage and Hibiscus acid-base pH strips
How to make your own pH strips step to step guide
First you need to make dye from the dried Hibiscus petals or the Red Cabbage and then you have to use the dye to replace the water in the recipe!
To do that you will need these ingredients:
-Dried Hibiscus petals or tea sachets

-Fresh Red cabbage (the fresher the better)
Materials
-A pot and a stove

-Precision scale

-Filter paper and funnel

-Knife
Step-by-step process
-First you have to make dye from the dried Hibiscus petals or the Red Cabbage.

-Weigh 5gr of the petals and add 500ml of water into a pot and place on the stove on medium fire.

-For the red cabbage dye you have to wash the red cabbage well and chop it off with a good knife. Chop it off finely and place enough of the red cabbage inside the pot that it gets completely covered.

-Let the petals simmer in the pot for half an hour until you get a more concentrated solution of the dye.

-The red cabbage requires more simmering in order to extract a good concentration of the dye since the cabbage is a tough vegetable. After 45 mins of simmering you will notice that the leaves are getting softer and are now also getting decolorised.

-After you are done you can filter and strain the solution into a clean glass container and store your dye in the fridge if you are not going to use it immediately!

> Materials for pH strips

-Filter paper, cotton napkins or a sheet of bacterial cellulose

-A glass dish or pyrex

-A spray container

-pH modifiers like vinegar or lemon (Acid), a base (water, use as a control) and an alkaline solution (washing soda).

-Put your filter paper or other interface of your choice in a glass dish or pyrex and spray the paper until it is fully covered.

-Let your paper dry in a dry and well ventilated place.

-Once the paper is dry you can cut it in thin strips or use [this .dxf file](https://drive.google.com/file/d/1WpLHBF8y-0B7LEaKfqvFMLaMNsmN6Txt/view?usp=sharing) to lasercut your interface in the shape of the pad that I designed.
TIPS
-It is preferable that you use the strips in a short period of time because after some time the strips are not accurate or usable.
-Make sure your glass container is clean before you place the filter paper in order to spray it with the indicator dye to prevent contamination and mistakes in the pH reading.
-You can place the strips for a few seconds in any area of the body and in the vaginal area in order for the fluid to have contact with the strip of the pH surface.
Hibiscus flower alchemy from Marisa Satsia on Vimeo.
DIY pH strips and pH monitoring x biomaterials
In using the biochrome technique I figured out and asked my self:
Can I use botanical stains to replace methylene blue that is being used to stain samples for microscopy? This is one of the things I would like to explore in the future. For the time being I am speculating and testing and playing with different dyes.
I have also made Hibiscus Bacterial cellulose as a possible bodily fluid interface but I also tried to soak and spray pH sensitive dyes into dried pieces of cellulose.
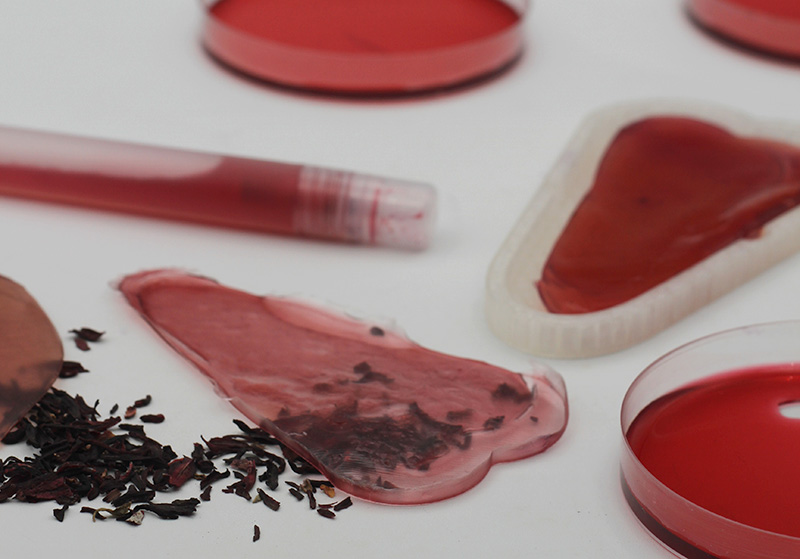
Crafted BIOMATERIALS x BIOCHROMES
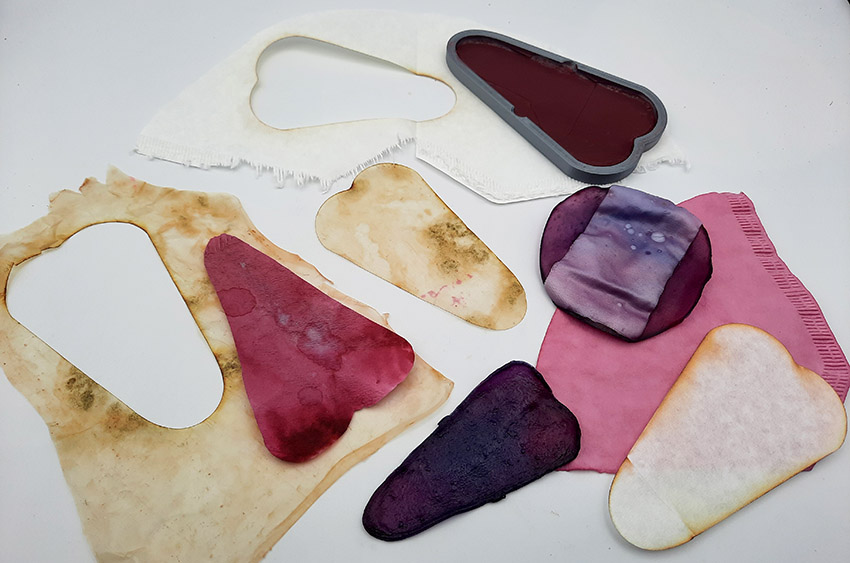
I tried combining my dyes with 3 types of interfaces just to try out different things.
-filter paper [lab grade filter paper]

-bacterial cellulose [either fermented with the Hibiscus or soaking and spraying the bacterial cellulose in biochromes such as Red cabbage dye and Hibiscus dyes]

-bioplastic [with agar agar and alginate]
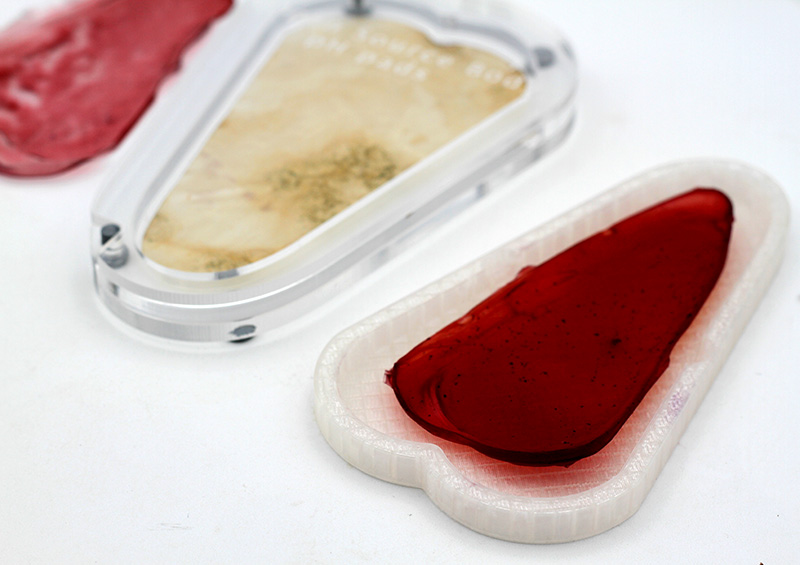
All of the material recipes are gonna be placed in the cookbook in the final page as well but I will start by placing them here! I did not use any fancy recipes, I used some standard recipes from the biofabricating materials week 5 and I experimented with the biochromes and my digitally fabricated molds. In the future I am planning to experiment more with biomaterials.
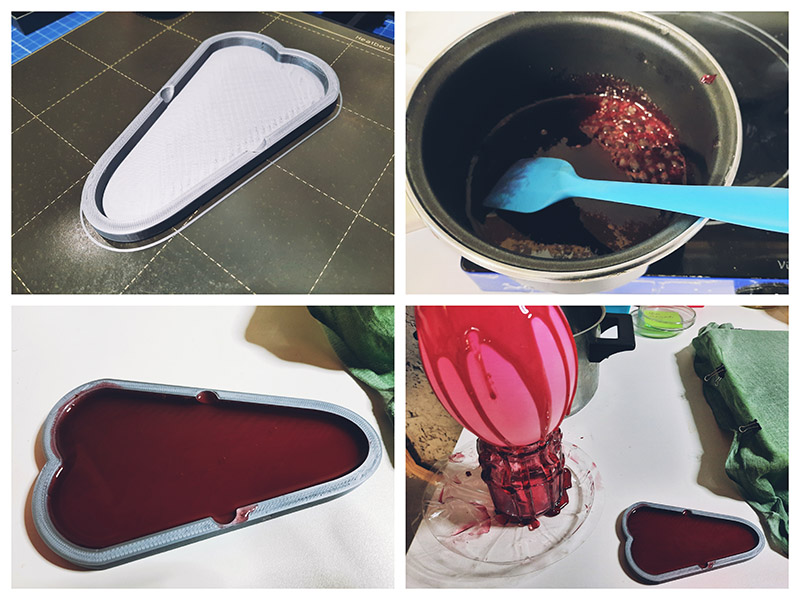
In this section you can find recipes for making the pH pads for bodily fluids such as the Red Cabbage and Hibiscus agar bioplastic 1 and 2 and the Hibiscus Alginate flexible biosheet pad.
Red Cabbage and Hibiscus agar bioplastic 2 recipe

Make your dye first just like I explained in the previous part :)
Tools
-Hibiscus dried petals

-Pot

-Stove

-Precision scale

-Moulds
Recipe
-4gr agar

-25gr Glycerine

-400ml of Hibiscus dye
Step-by-step
-Make your dye and filter the contents and keep 400ml aside to make the bioplastic

-Heat up the dye a little bit in the pot on the stove

-Add the Glycerine (plasticizer, it gives flexibility to the material)

-Add the Agar (the polymer)

-Slowly mix everything together and keep in mind that agar takes longer to dissolve.

-Heat in 60 degrees celcius to make sure the ingredients mix.

-Simmer in 80 degrees MAX for 20 mins.

-Prepare your mould.

-When the mixture's consistency is like a syrup and the mixture has thickened pour the mixture slowly into the mould.

-Let me material dry in the mould for as long as needed in a dry and well ventilated area. The material will shrink both in size and thicknes due to the large volume of water to agar ratio.
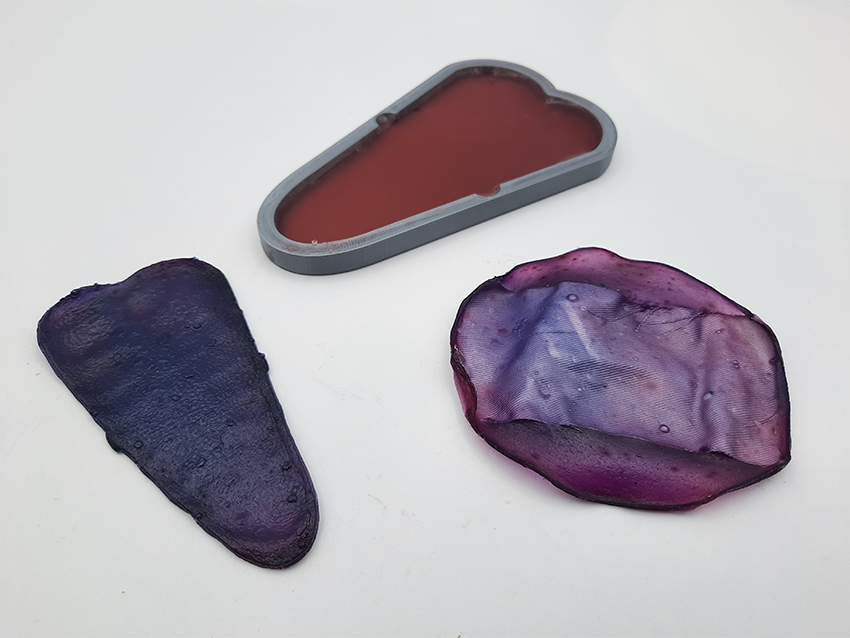
I had many fails with the agar bioplastic even though I tried all of the recipes below. Unfortunately I did not have enough time to perfect this material however I found out that with the Hibiscus dye it is better to do a medium thickness foil and not a thick one or a thin one. Too thick and it will crack, too thin and it will fall apart. In my case I left the material in the mold and it kept cracking. The mold was 3D printer with PLA filament.
When I left it in the pot and I peeled the rest of it off I managed to get a nice sample. You can always make a big sheet of the bioplastic and then lasercut the pad shape. Or you can cut the bioplastic in strips and use it directly on your body or for other home chemicals that you want to test for example!
For the Red Cabbage bioplastic use the recipe and step to step process from above but replace with Red Cabbage dye!!!! Just to note that I also embedded a piece of cotton textile inside the bioplastic too and it did not shrink as much. Another thing I want to try in the future is to coat fabrics in this material and see how I can make a different interface like that.
Hibiscus ALGINATE flexible biosheet pad
Ingredients/recipe
-12gr Alginate

-40gr Glycerine

-400ml water (in our case we will use 400ml of Hibiscus dye)
Materials
-Precision Scale to measure the ingredients

-Pot or any container to mix the ingredients

-Hand blender

-Small spatula

-Your 3D printed pad mold (downloadable [here](https://drive.google.com/file/d/1pFx-vSQY094Gwf-2ep_1BvXBMc7Shw5H/view?usp=sharing)
To cure the material (optional)
-10ml Sodium Chloride hydrate dissolved in 100ml of water
Step-by-step
-Pour the 400ml of Hibiscus dye in the pot or a container .

-Weigh the rest of your ingredients with a precision scale.

-Add the 40gr of Glycerine.

-Add the 12gr of Alginate slowly and try and slowly try to stir at the same time.

-Blend the mixture with the hand blender and make sure all the Alginate is completely mixed and you have a uniform and consistent mixture.

-Make sure you let the mixture sit for a bit before you pour it in the mold and spread it well with a small spatula before you cure it with Sodium Chloride.

-Wash off the Sodium Chloride well if this material is going to be in contact with your skin. Alternatively you can try and avoid the Sodium Chloride.

-Let the biomaterial dry in the mold for 3-4 days. Keep in a well ventilated and dry area to avoid the biomaterial going moldy.

-To make sure the biomaterial is totally dry touch it and feel it. It should not be colder than room temperature.
TIP
-To minimise the chance of the biomaterial going moldy you can remove it from the mold on the 2nd day provided that it has taken the overall form and has slightly shrinked. You can then place the biomaterial in the dehydrator around 30-40 degrees celcius for 5-6 hours and keep an eye an it if you wish.
-If you are planning to use this as a way to measure vaginal fluids or if they come in contact with sensitive areas make sure you keep the pad clean preferably in a small case. You can see and download the case I designed and fabricated here

Trying the balloon technique with the Hibiscus agar bioplastic
I was obsessed with sugar blowing for so long and I wanted to see whether I can try something similar for my bioplastic. I wanted to make a hollow shape and I used the balloon as a mold and covered it with agar bioplastic with Hibiscus. It was fun however it was a fail. I used the recipe above but I added a lot of sugar to make it thicker I guess.
Here is a video on sugar blowing which is a technique used by confectioners. These kinds of techniques sometimes use similar tools and equipment as we are when we are biofabricating materials which to me is fascinating!

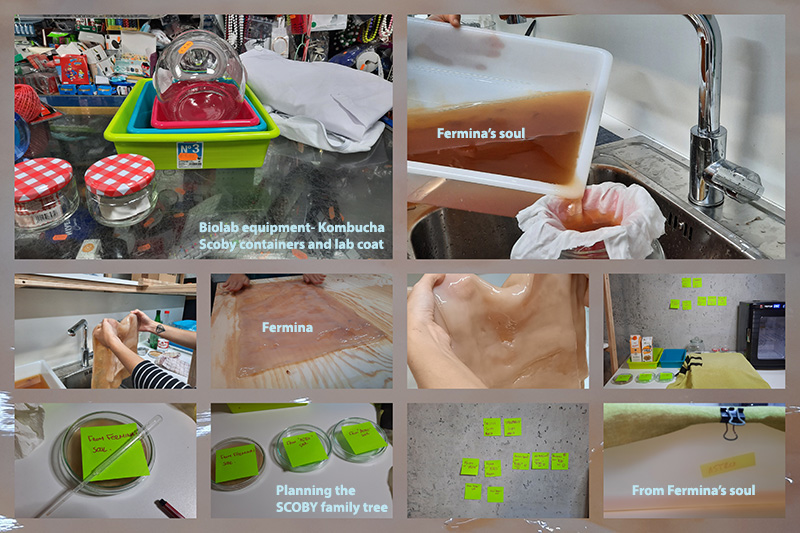
Cultivated materials- My Bacterial Cellulose family

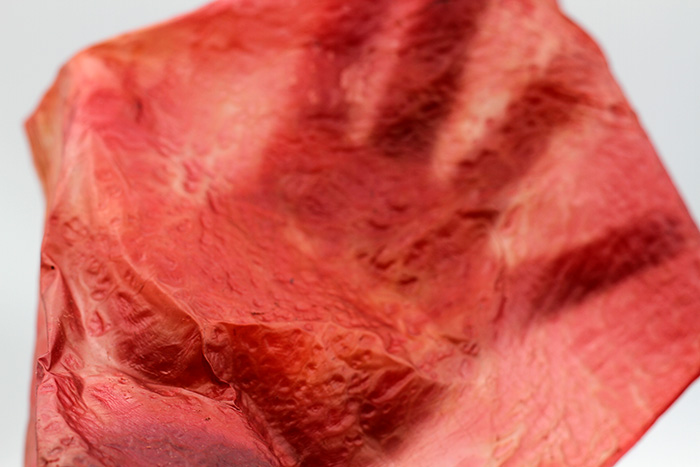
I ended up creating a whole little family from Fermina, our first Bacterial girl. The bacterial leather below are all her family members and each of them has its own character! I started making mothers in November and in early December I cultivated a transparent bacterial cellulose, or otherwise known, Astros! From my very first introduction to Kombucha and bacterial cellulose, I was a little bit wowed with how much it looks like human skin and how the mother looks like an organ that is regenerating from the sugar.
What if we can use the bacterial cellulose as a second healing skin? Can I change the colour of the bacterial cellulose? The texture? The form? Can I make organ like forms with this material? Do I make the hollow organ form while the bacterial cellulose is forming? Or do I have to cultivate the cellulose first and then let it dry in a mould? What kind of mould? How do I take care of my bacterial yeasty babies and what can I learn from that? SOOOO amany questions!

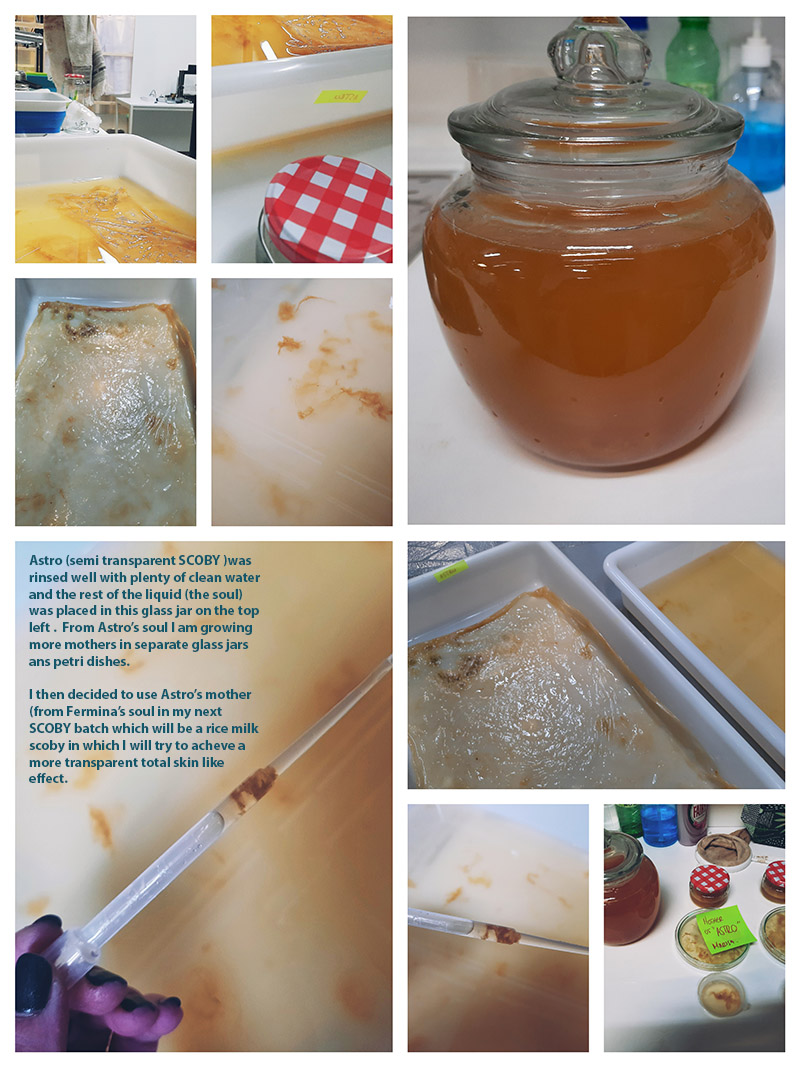
Astro
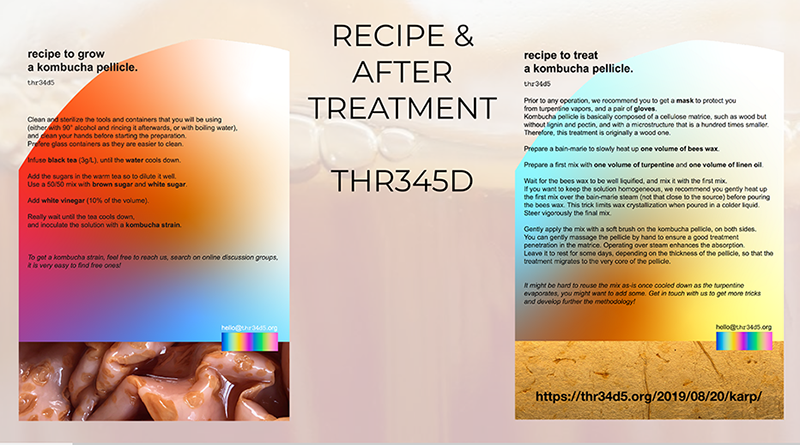
To achieve a more transparent bacterial cellulose I tried to use less concentration of black tea because that is what gives the bacterial leather its pinkish-yellow colours. At the end of the project I found out that you can just use sugar and coconut milk or this other mix that look like gelatinous cubes which in fact are a mix of coconut water and sugar.
Semi transparent SCOBY RECIPE- Astro from fermina's soul
Materials
-A plastic tub or a glass pyrex like container. Make sure there is enough depth in the container. The container can be any shape you like as bacterial cellulose takes up as much surface area you offer it to grow.

-Water kettle to boil the water.

-A SCOBY mother (starter culture for fermentation process)
Recipe
-1.5 litres of water

-100gr white sugar

-2 black tea teabags
Step by step instructions
-Make sure your container is very clean. If not, wash with soap and water or wipe with vinegar or alcohol.

-Boil the water in the kettle and then add it to your container.

-Add the sugar and stir it well to dissolve.

-Once it is dissolved aff the tea bags in your container and let them brew for 5-6 minutes.

-Remove the tea bags and let the liquid's temperature drop to normal room temperature.

-Make sure your hands are clean or you are wearing gloves so you can then add your SCOBY and make sure it floats in the liquid and does not sink.
HOW TO TAKE CARE OF YOUR BABY
-Cover your baby with a breathable fabric so you can protect it from contaminants. In this way it will have its oxygen supply that really needs to grow and it will also remain clean.

-Make sure you keep it still during the whole time and in a well ventilated and dry area like a  cupboard that has air inlets or some holes. The temperature should be from 23-30 degrees max.
AFTERCARE
-Remove from the container and wash with neutral soap in the sink and let it in there for 5-10 mins. Keep the leftover liquid from the process in a jar or new container and place the mother/s inside. This liquid is the soul and it is rich in these symbiotic cultures of bacteria and yeast.
-Rinse the leather with fresh water and place in a clean surface. Massage the surface and if you have more than 2 layers fold the ends to make the material stronger.
-To make the material more durable and softer you need to post treat it with honey, hand cream or even olive oil, to keep the pellicle elastic and condition it.
Slide from biofabricating materials week on bacterial cellulose aftercare
TIP/s
-You can keep the liquid and the process going for as long as 7-8 weeks if you wish but you have to make sure that there is enough liquid and food for your baby. If you want, you can add more liquid but that usually affects the growth of the bacterial cellulose, because anything that comes in contact with the surface of the liquid will affect the smoothness and texture of the material.
-Metal is not suitable for cultivating bacterial cellulose or just drinkable kombucha because it might affect the growth of your material. Bacterial cellulose likes to grow into plastic or glass.
-You can try drying it in different areas and see how it affects the texture and shape!
Frozen SCOBY from Marisa Satsia on Vimeo.
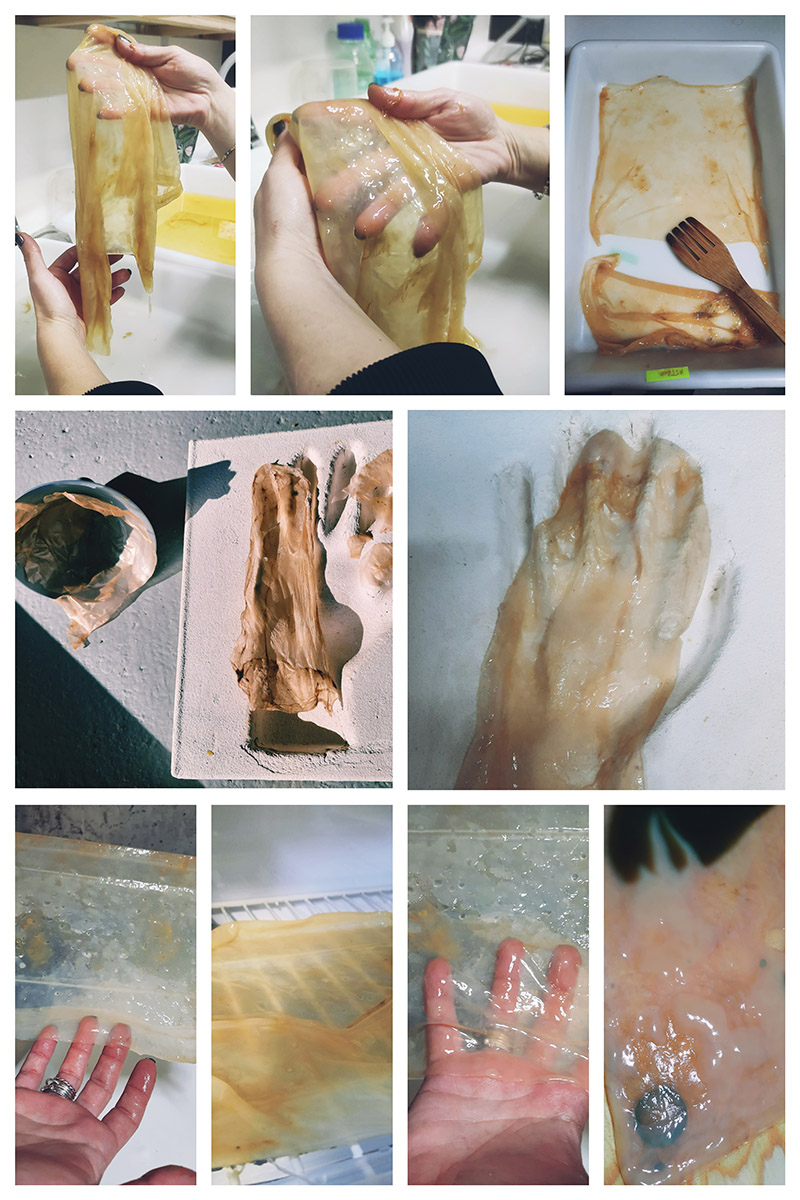
Second skin from Marisa Satsia on Vimeo.
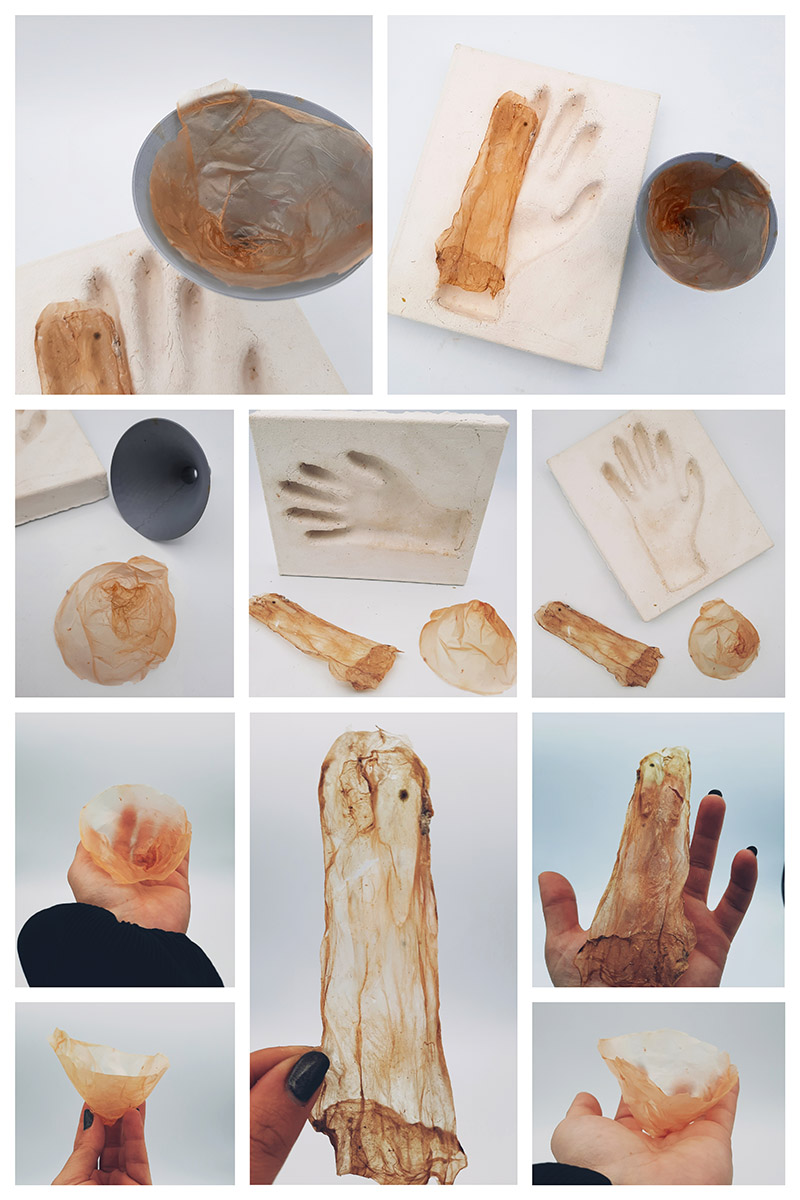
I used a plaster mold in the shape of a negative hand mould that I made during the week of textile as scaffold. I wanted to change the shape of my material so I tried a variety of different techniques to shape my material as you can see below! I also used a funnel to try and make some filter papers like forms. Make sure your material is thick and you take extra good care while the material is drying and after too!
Bacterial Cellulose band aids
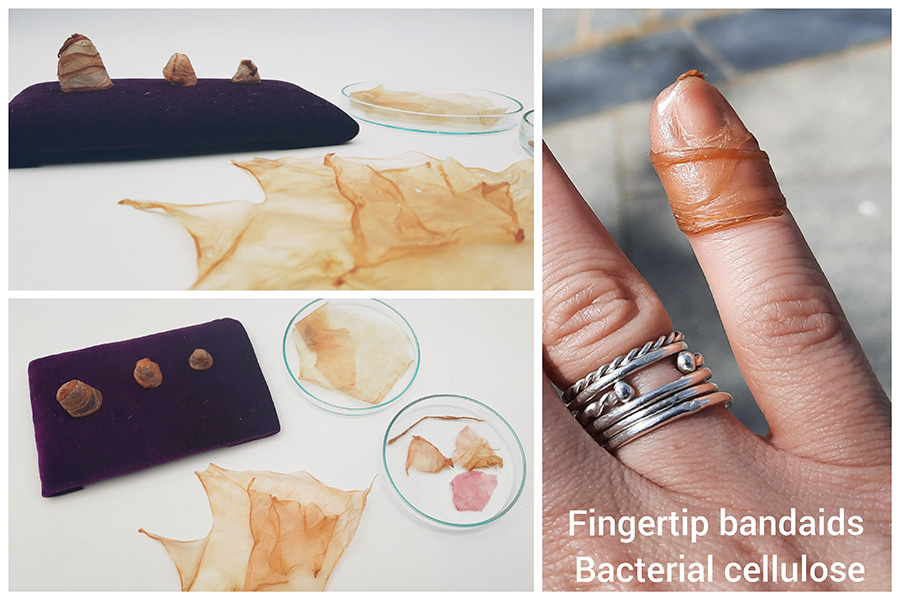
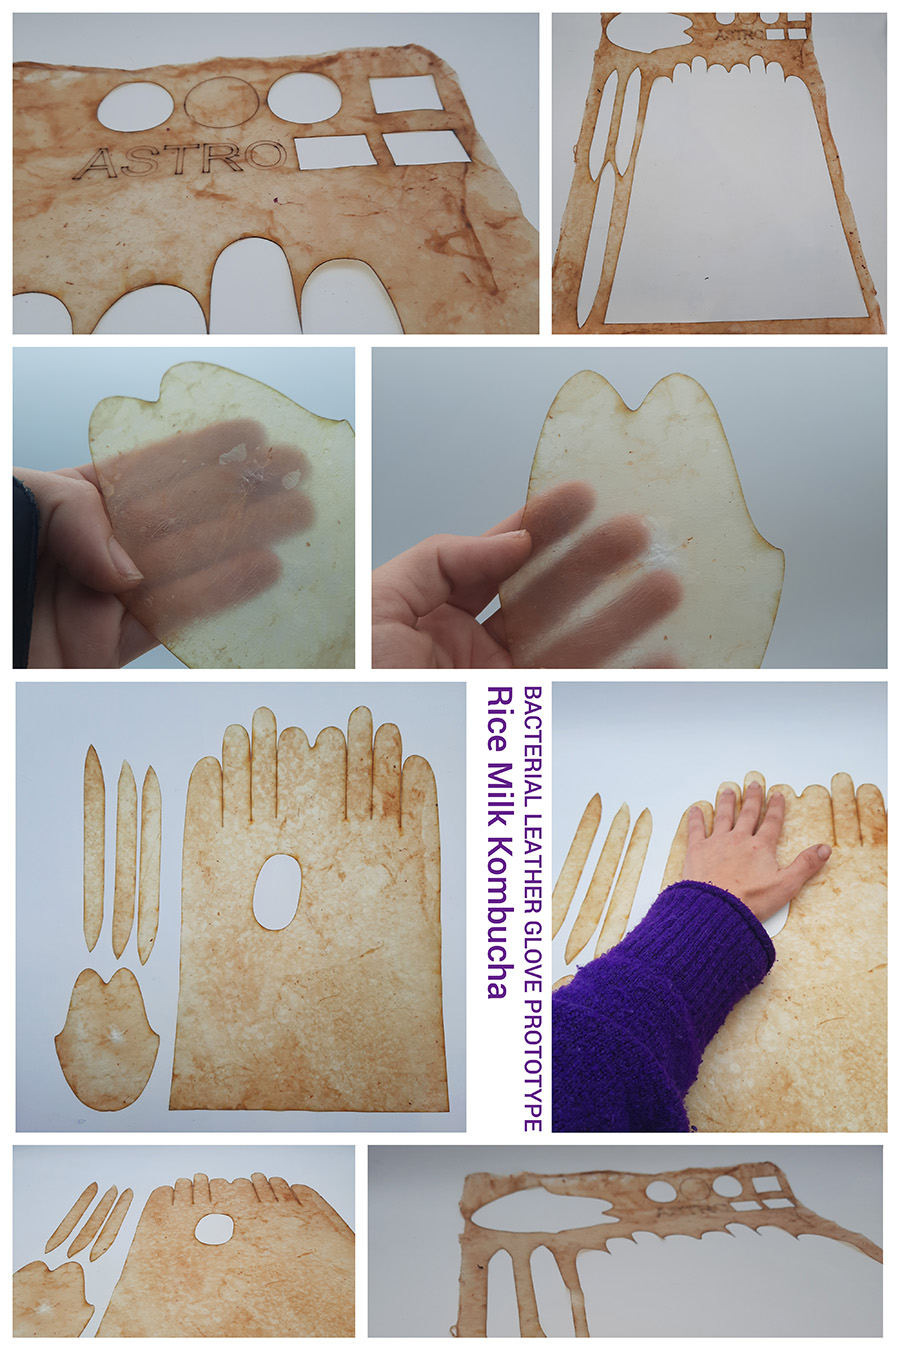
PELEKI the TRANSLUSCENT BACTERIAL CELLULOSE
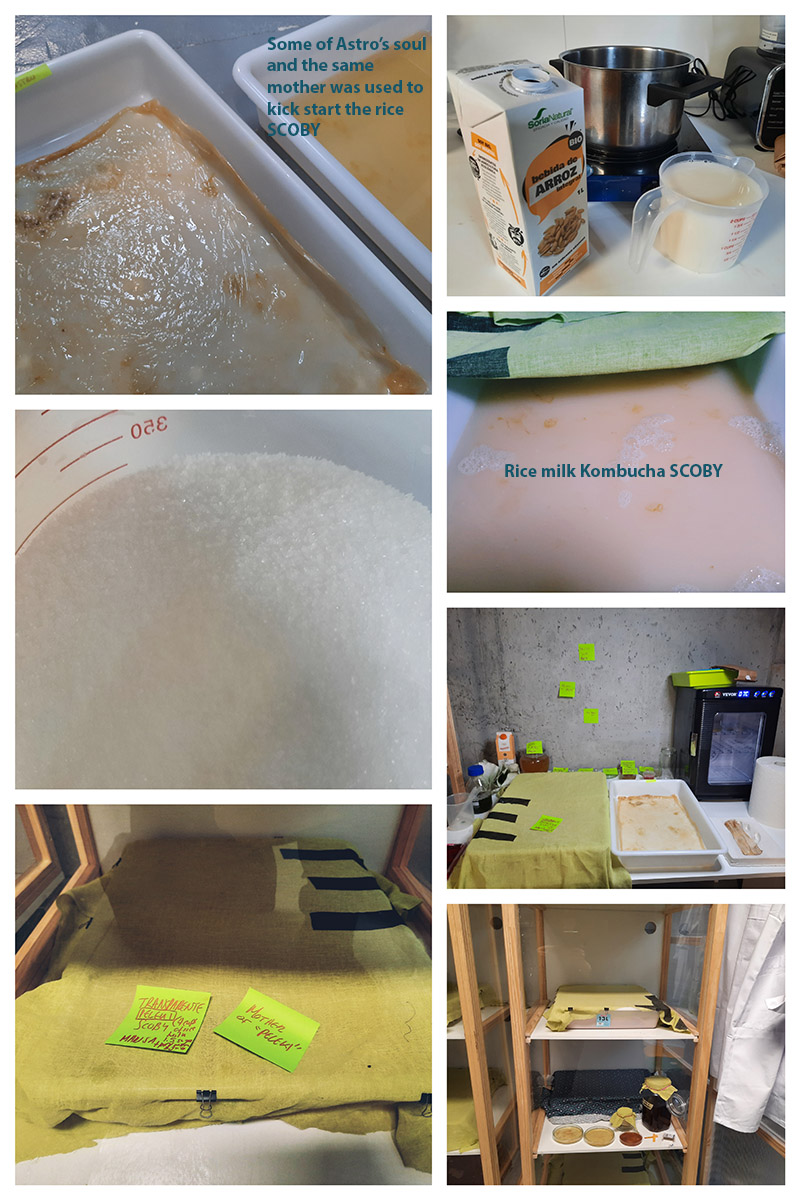
The only thing I did different in this recipe is that I added 500-600 ml of Rice Milk and 500ml of water with 2 tea bags again the PELEKI ended up being more transluscent than ASTRO. There was this weird separation of the rice milk into the liquid like little clots but after 6-7 weeks of growing the material had 2 and 3 layers of cellulose forming and I was able to nicely shape the ends and massage the material this time.
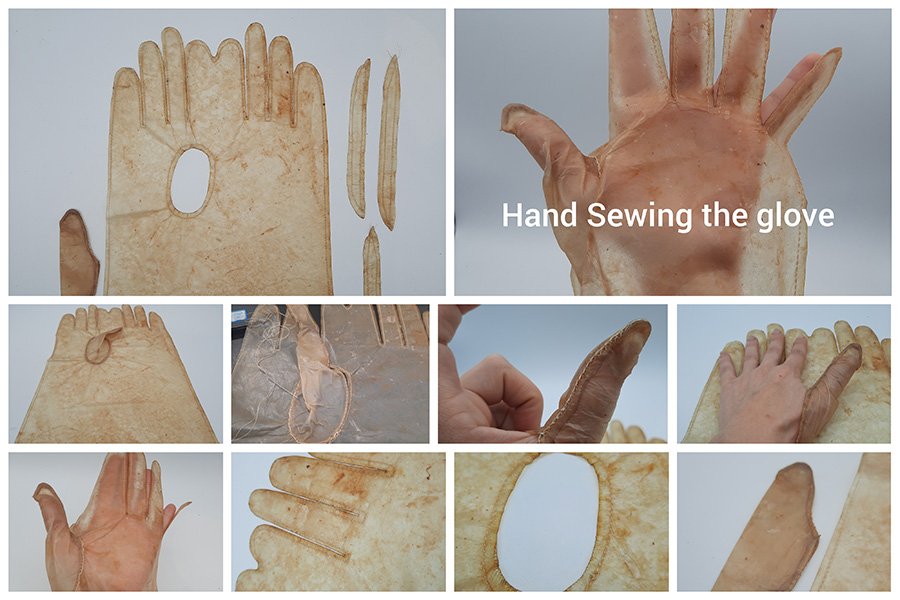
Prototyping BACTERIAL CELLULOSE gloves (PELEKI)
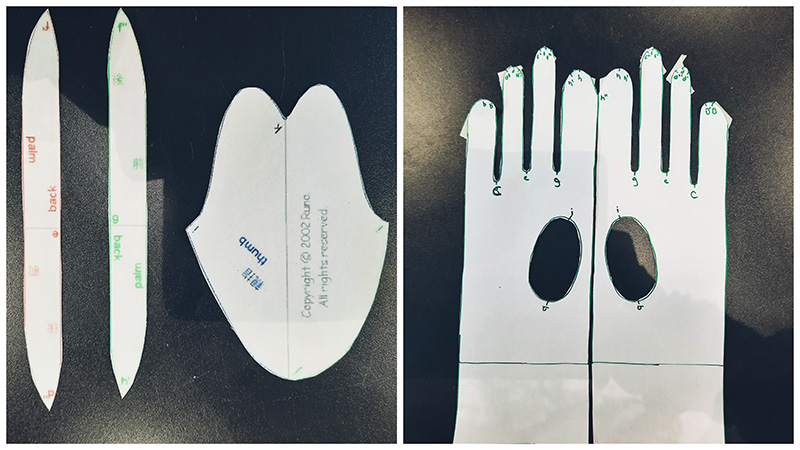
My baby PELEKI as you can see it here in the video was dried on a piece of wood and when it dried completely I turned it into a biocouture bioleather glove! First I did a test on paper with the pattern that my colleague Eduardo gave me and then I modified the pattern and the size because I wanted a longer glove. I made the pattern on Rhinoceros. After a few tries with different scales and designs I got it somewhat right.
Here is the pattern Eduardo gave me below and this is how I modified it. I made the whole glove with 5 separate parts instead of 6 and because we could not turn the pattern inside out because of the nature of my material we went with this pattern!
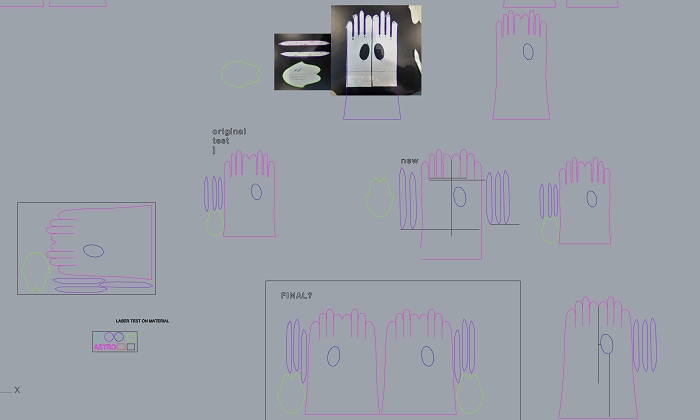
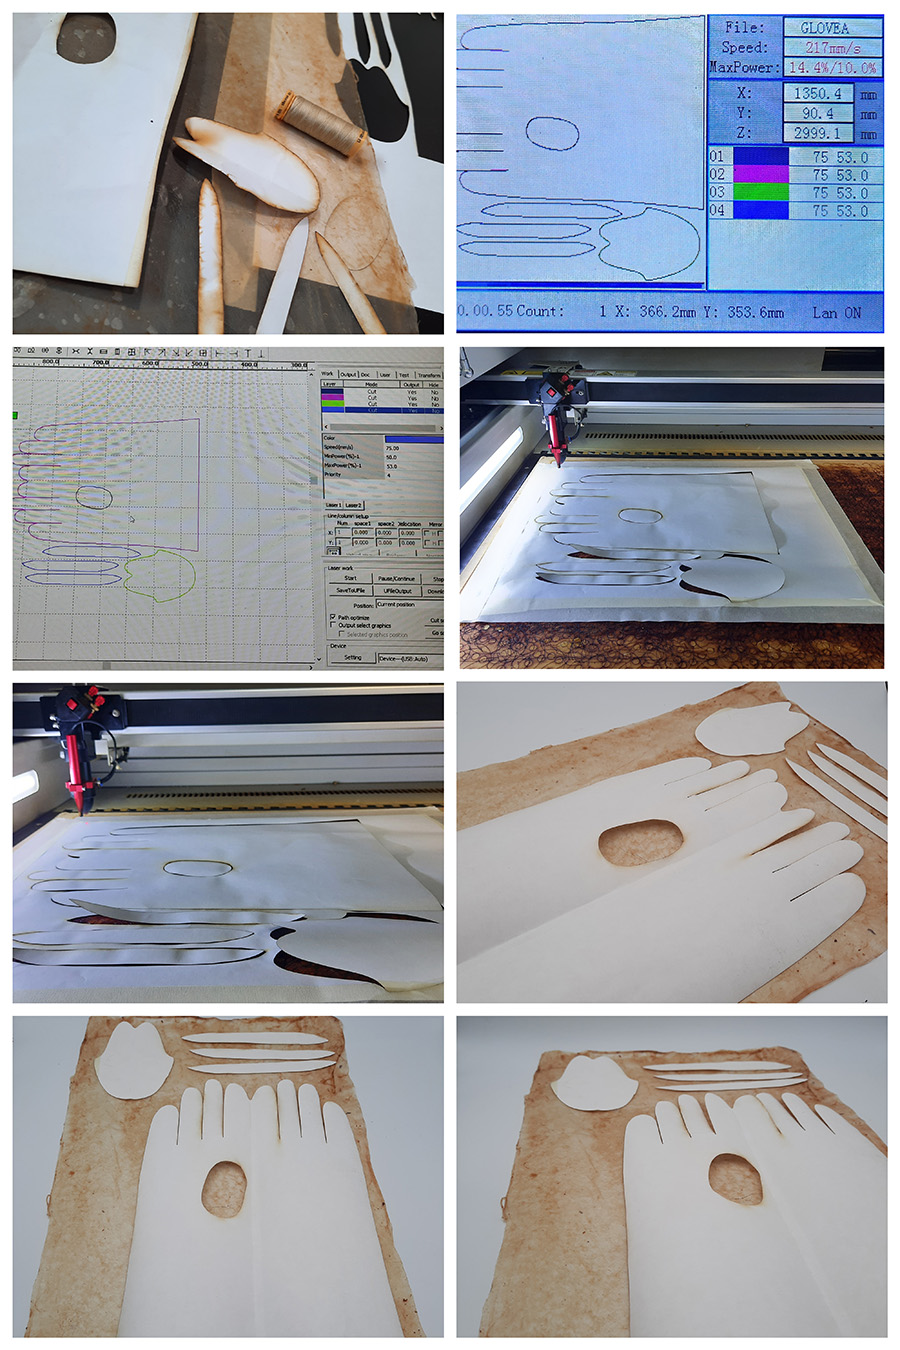
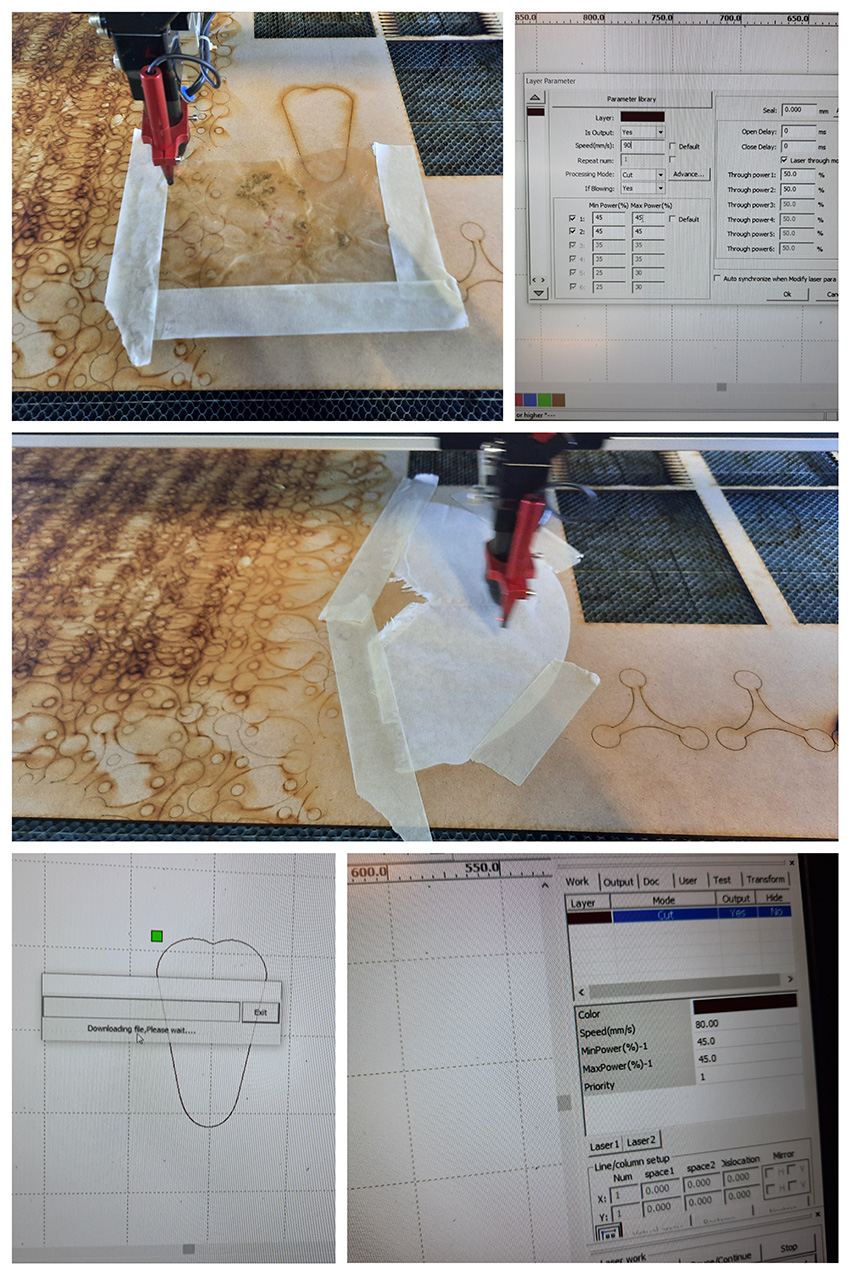
For the paper test we used the paper parameters to cut on the lase cut which as you can see in the photo are:
-Speed: 75
-Power: 50-53
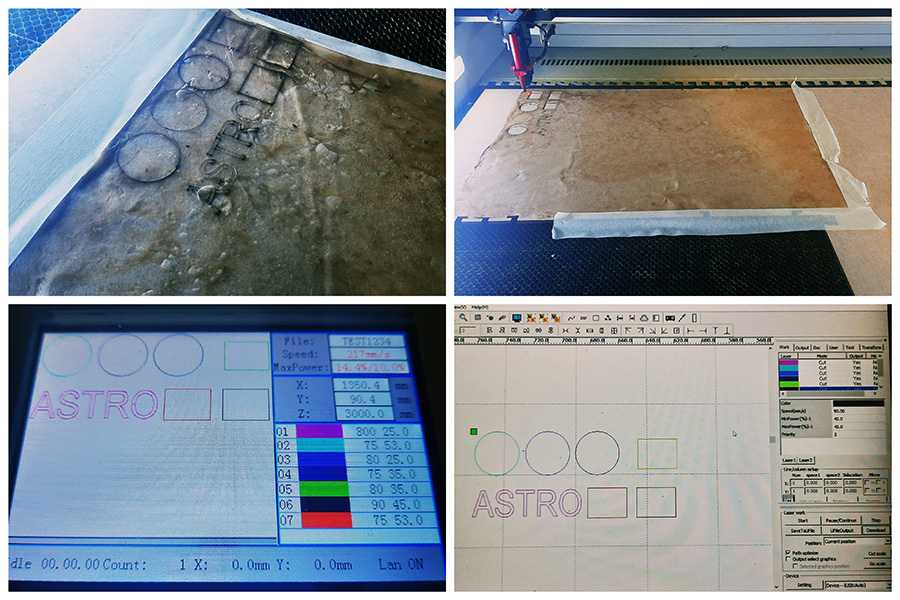
After this I proceeded with testing the laser parameters on a small area on my material so make sure that the material will be cut properly. After looking at the tests I decided that the paper parameters above work well with my material!!!!
I then proceeded to cut the actual pattern on the laser cut. Here are some photos and a gif from the process below.
Before I proceed to handsew all the pieces together with some cotton thread, my colleague Eduardo showed me how to use the sewing machine and advised me on how to put the glove together. He sew around the pattern with the machine in order to create a double sided spine so that I can come later and put my thread through these lines and with a know I secured my joints so I can fuse the pieces together.
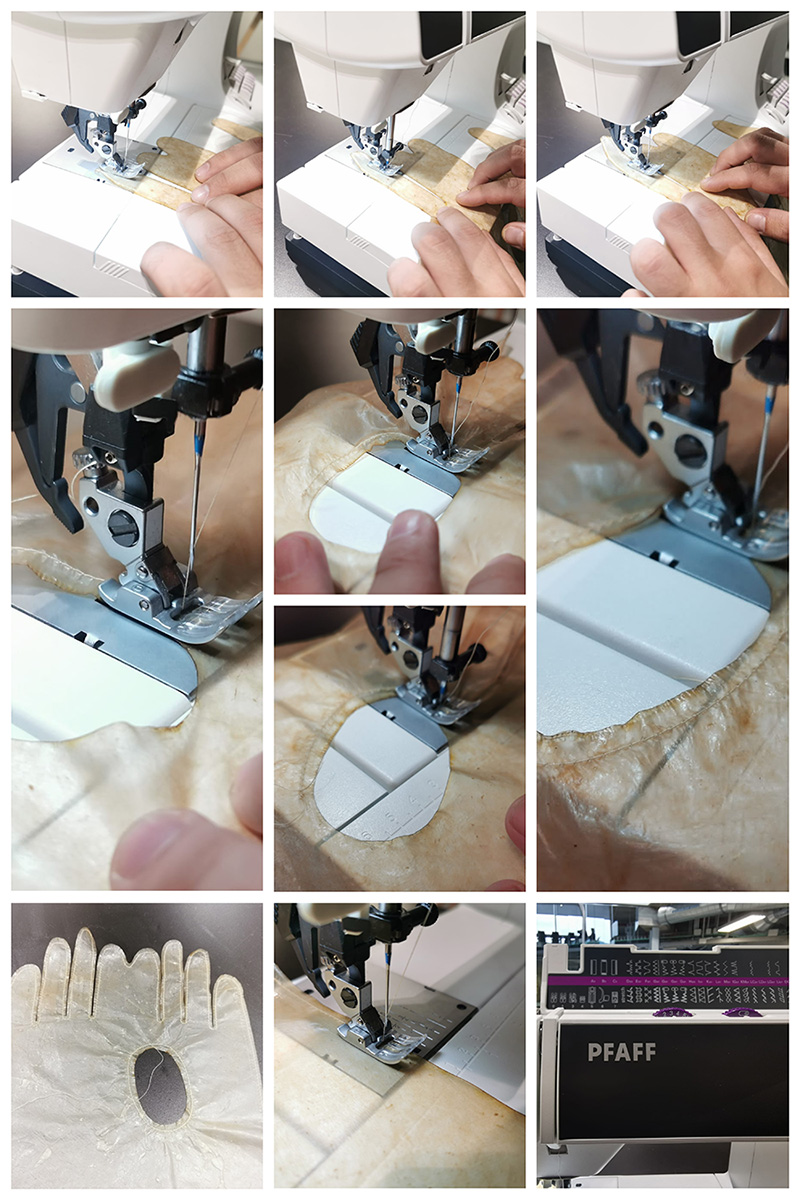
I never made a pattern before this and I never used the lasecutter for this before either. I must say I am totally hooked now and I will defintely doing more biocouture things in the future as I love collaborating and learning new things :) You can find my file here if you wish to recreate it.

HIBI the Hibiscus Bacterial Cellulose
Tools
-Pot and stove/water kettle

-Spoon

-Precision scale

-Plastic or glass container with some depth in any shape or size you like!

-Cotton or other natural fabric to cover your Kombucha

-Ethanol to sanitise your container (after you wash it with soap and water)
Recipe
-30-50gr of dried Hibiscus flowers (or 1 ltr of Hibiscus dye)

-If you do not have the dye ready, use 1 ltr of water

-100gr of white sugar

-10ml of natural vinegar
Step-by-step instructions
-Simmer the Hibiscus flower in the pot in 1 ltr of water for 15-20 minutes until your water becomes concentrated like a dye. If you already have the dye just warm it up slightly in the pot.

-While that is simmering you can wash your container with soap and water and/or sanitize it with alcohol.

-Add the vinegar in the dye and then sugar and stir well until the sugar is dissolved.

-When you can no longer see bits of sugar in the liquid, turn off the stove and once the liquid reacher 30 degrees celcius.

-If you used the pot and stove to simmer everything, pour the contents of the pot into your container. If you do not have a pot and a stove just do all the above in your growing container.

-You can now go on and place your SCOBY mother (starter culture) in your growing liquid and make sure it floats. If not, remove it with clean hands and put it upside down and observe if it floats.

-Choose a secure but well ventilated are to put your container and preferably somewhere where it will remain still throughout the whole cultivation process. Moving around the container affects the growth of the bacterial cellulose on the surface of your liquid.

-Cover your container with a piece of fabric to protect the contents but in that way we also ensure that there is enough oxygen exchange.

-Keep your cultivated material in 23-30 degrees celsius for 10-40 days. Once the material is around 1 cm thick, take it out from the container and wash it well.

-Place it on a smooth plastic surface in an angle to dry or on a piece of wood. The surface will affect the texture of the material.

I let her dry on a piece of wood and then I noticed that since she is full of moisture, she leaves a residue of the dye on the surface too :)

I also made some tests with soaking the bacterial cellulose in Hibiscus and Red Cabbage dye. I also tried spraying the dye on the material and it seemed to be able to retain the colour very well even like that
AGAPI, rice milk Kombucha with human hair
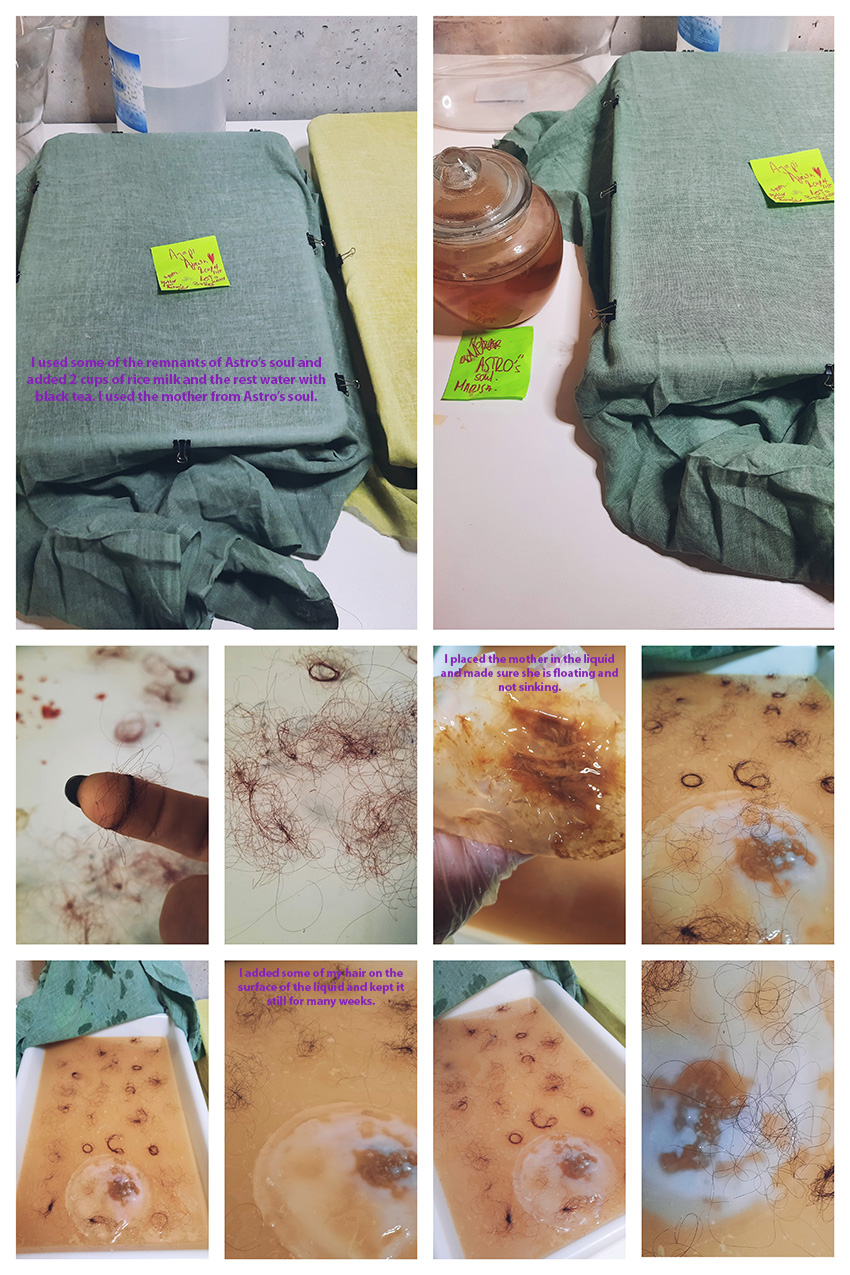
Here I only used 2 cups of rice milk and the rest water. I only added 2 tea bags again and a lot of the soul of PELEKI. I then had this bizare idea to use embed my hair onto the surface.
Materials needed
-Same as before plus human hair, or anything else you wish to embed, like wool fibres or other cellulose kind of fibres.
Recipe
-Analogy rice milk to water (1:3)

-Only 2 cups of rice milk, 400 ml  (1 part, approximately)

-600ml of water, or almost 3 cups of water (2 parts water)

-If you have any leftover from the soul or fermenting liquid of a previous Kombucha add a little bit in there (it speeds up the process a bit as that liquid has already been used and probably contains a higher contenctration of SCOBY bits)

-2 black teabags

-100gr of white sugar
Step by step
-Same as before but in the end, place your container the place where you will keep it still for the next weeks.

-Add your human hair, wool fibres, or any other material on the surface of the liquid.

-Alternatively, you can also add the material when the bacterial leather has started forming.
Observations
-If the material contains cellulose, the leather will start taking it in and will create an impression in the growing material.

-This material is hydrophilic, yet insoluble in water and whatever comes in contact with the growing surface will create an impression or change in texture.

-Sometimes the embedded material desticks in the drying process. You can also experiment with folding the material when its drying and embedding fibres inside it with this method too.
Papier mache empty organ shape experiments
I had this weird idea to use a balloon as a base and place a lot of small pieces around it to create an empty vessel that looks like an organ. This was just an experimentation but I would like to experiment more with the molds and the texture for bacterial cellulose.
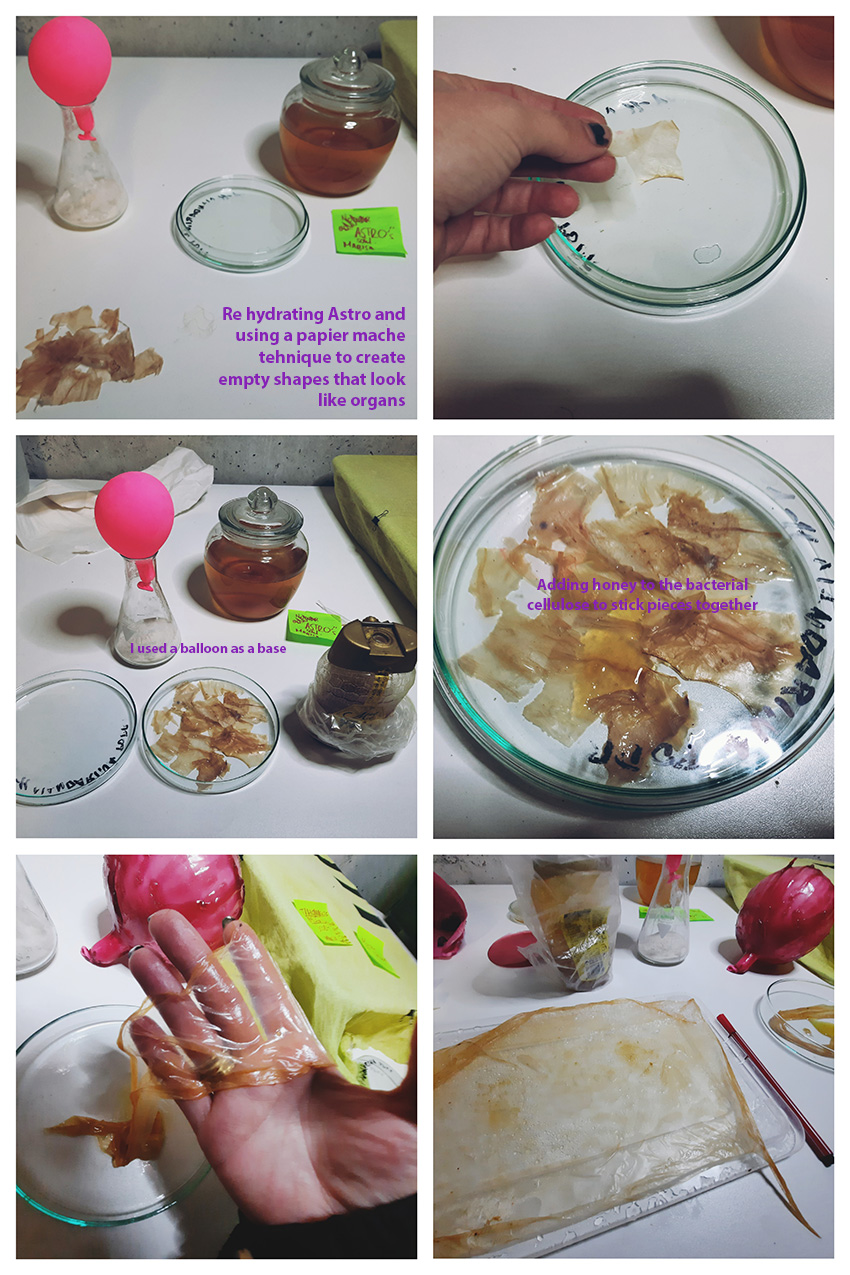
I then left the balloon to dry and tried to remove the air from inside to get my shape. I then tried to inflate the shape with the balloon still inside!
Biomaterials as cultivating scaffolds
I am sure if you ever tried to make a biomaterial of any sort you would know that while the biomaterial is drying, if it is not placed in a well ventilated and dry area it will beging to grow mold of all sorts! The truth is that this phenomenon is quite fascinating sometimes because the results can be quite beautiful. However, this situation is not ideal if you want to make a nice sample of a biomaterial or if that biomaterial will become some sort of an interface or wearable for your body.
Have you ever noticed how oranges and other fruit end up growing this green type mold? Usually because biomaterials can contain biochromes or agar agar or alginate. In our case the mold that grew on our bioplastic samples were types of

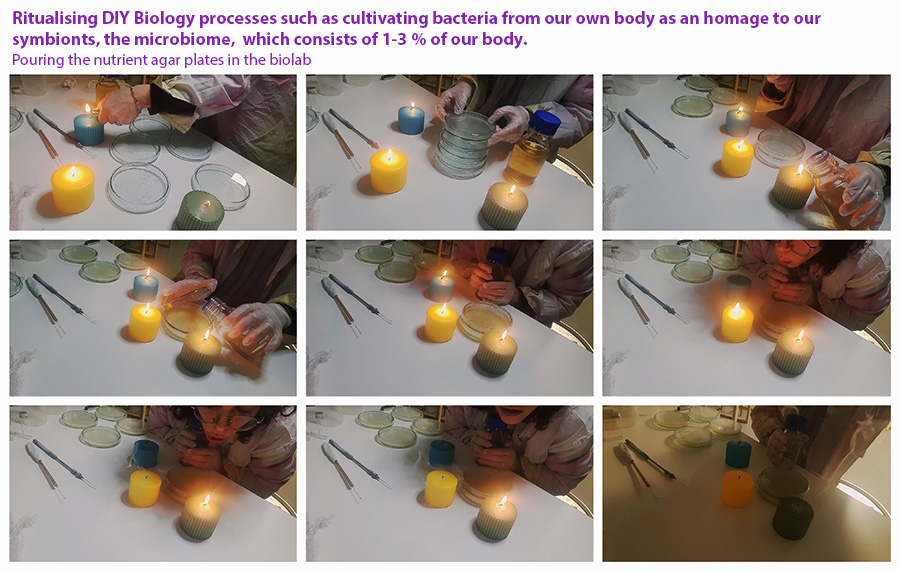
Microbiome experiments
What is the microbiome?
-It is the collection of all microbes, such as bacteria, fungi, viruses, and their genes, that naturally live on our bodies and inside us. Although microbes are so small that they require a microscope to see them, they contribute in big ways to human health and wellness.
In this experiment I am ritualising diy biology processes of cultivating my symbionts through nurturing them and giving them a hospitable and healthy environment to grow! :) I am making the invisible visible by cultivating and amplfying my microbiome. I call it some sort of microphilia (In greek Μικροφιλία:μικρό/μικροσκοπικὀ = small/microscopic and φιλία = friendship) or making kin with more than human-others as inspired by Donna Haraway's writings.
The process is similar to the bacterial dying process on the next section with the only difference that here you only need solid agar medium and not the liquid broth. You can use your own agar recipe(S) as I will provide in the cookbook otherwise get a labgrade nutrient agar from a specialist shop/laboratory company. I used the DARWIN BIOLOGICAL NUTRIENT AGAR. You need to sterilise the petri dishes, sterilise the agar medium in a flask with a half closed top so they don't explode in the pressure cooker and then you need to make sure you wipe things with alcohol and surround your dishes with a camping gas flame or some candles. The flame sterilises the air around you and prevents contamination.
In this experiment I am contaminating the sterilised medium with my own bodily matter in a way. I kept everything sterile so I can contaminate with my own matter which is something that in microbiology we want to avoid because contaminations are not good for our lab, our health and the work we do in there. In my case I contained the contamination and was super careful. SCIENCE IS FUN BUT PLEASE STUDY THE HEALTH AND SAFETY PROTOCOLS OF YOUR LAB AND ALWAYS FOLLOW THEM.
Once you extract some bodily matter either with a loop or a batonet you can go on and inoculate your microbiome on the petri dishes and next you need to use parafilm to seal your petri's and pop them in the incubator where you are providing another nurturing and cosy environment for the microbial colonies to form.
Here is how to put the parafilm on the petri dish. It is a little tricky in the beggining. It took me some practice to get there. Just peel off the paper and place one end on the dish and hold the end with your thumb or index finger while the other hand is pulling the film around the dish while turning the dish around to secure the contents. TRY IT!
This whole process of exploring the microbiome is not only personal and performative but also requires a certain amount of care, caution and nurturing that unfortunately not all humans acquire. Some people cannot even take care of their plants or themselves.
In this performative process I am aknowledging that I am not the only being that habitates my body and as a human I am in symbiosis with the microscopic entities on my body and around me. I carried out this ritual as a way to practice my nutrient agar plate making with a pressure cooker and in a biolab because I usually do this process in my mama's kitchen back home. The aim behind this was also to try and grow the microbiome on a biomaterial or a textile with the hope that I will get some colour dying effect, however, not all microorganisms produce pigments due to the fact that this reaction is made to protect themselves from UV rays. I will leave this experimentation for another time and for the time being I can try to explore my symbionts in this way!
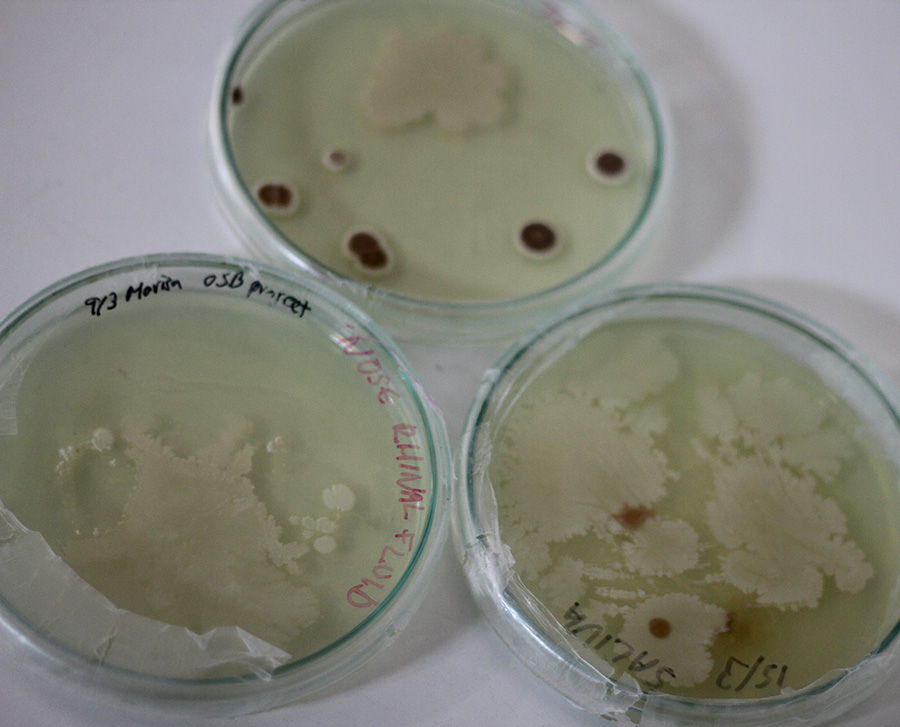
I took a sample from rhinopharyngeal fluid and one from my saliva (just like you do when you get a rapid covid test). The third petri dish was a test in a way to see what is are the fungi and other microorganisms that leave in the lab. It seems this petri dish is a fusion of my microbiome and the biolabs'.
Bacterial dyeing
In order to grow and cultivate bacteria and microorganisms or even probiotics (yes!) you have to provide a hospitable, healthy and nurturing environment for your babies to grow as I mentioned before. You can use bacteria that secrete pigments in order to color textiles. It is less toxic for the environment and for humans etc and more sustainable.
Tutorial, process and instructable
Here is the bacterial dying video tutorials below. I will also provide a step by step guide and some photos documenting and showing how to make agar nutrient plates and some more documentation from when we did the bacterial dying workshop at the Basque Biodesign centre in March 2022.
BioShades by Waag's TextileLab Amsterdam from Makers of Waag on Vimeo.
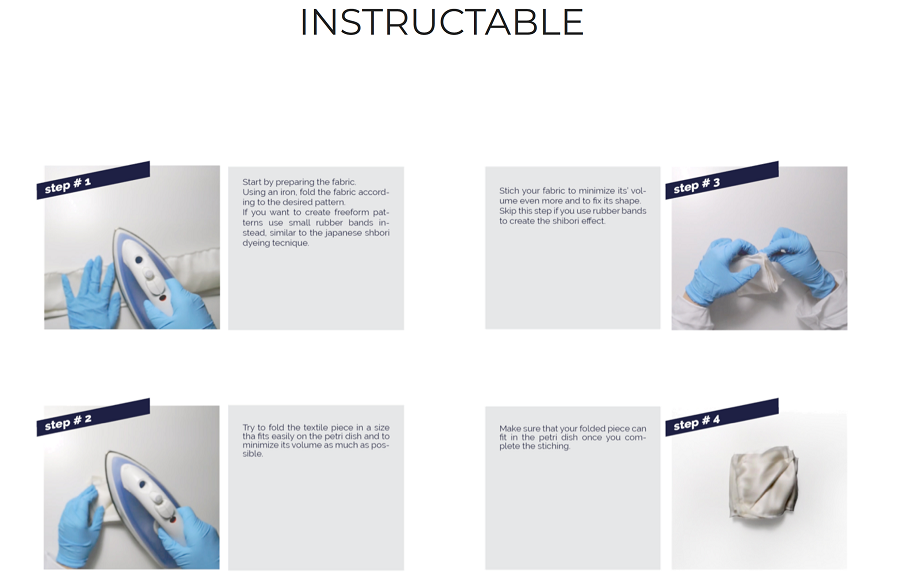
INSTRUCTIONS for PROCESS from bioshases.bio website
THE TEXTILE
-Prepare the textiles [scour and mordant as usual]
-Prepare the textiles in the desired style [use plastic bands to tie your textile]
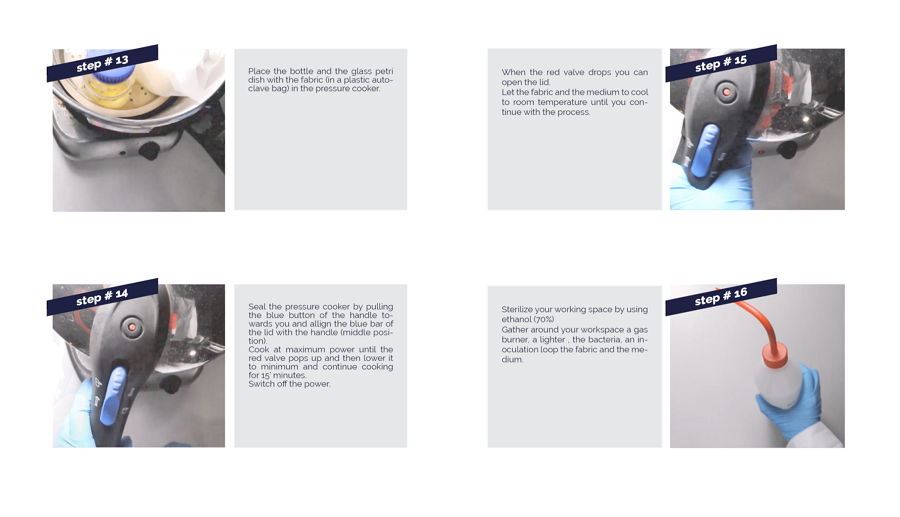
-Place them inside a plastic disposable autoclave bag
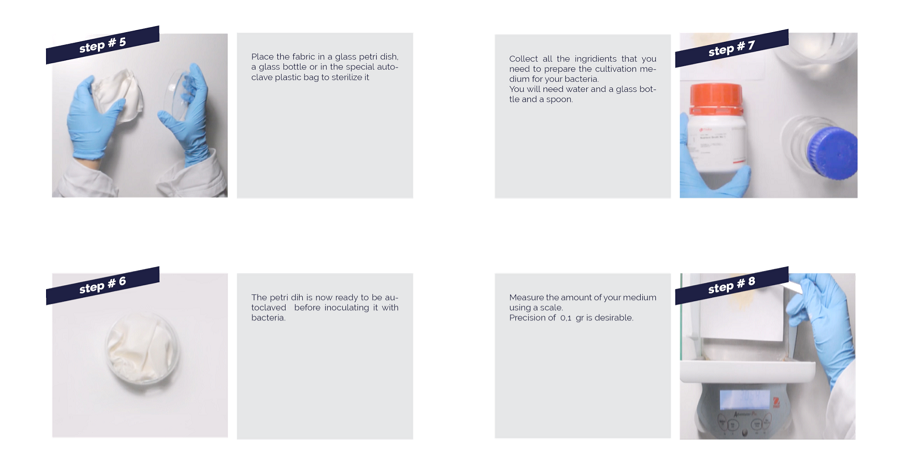
THE MEDIUM*
-Preparing Nutrient Agar - (for the bacteria production)
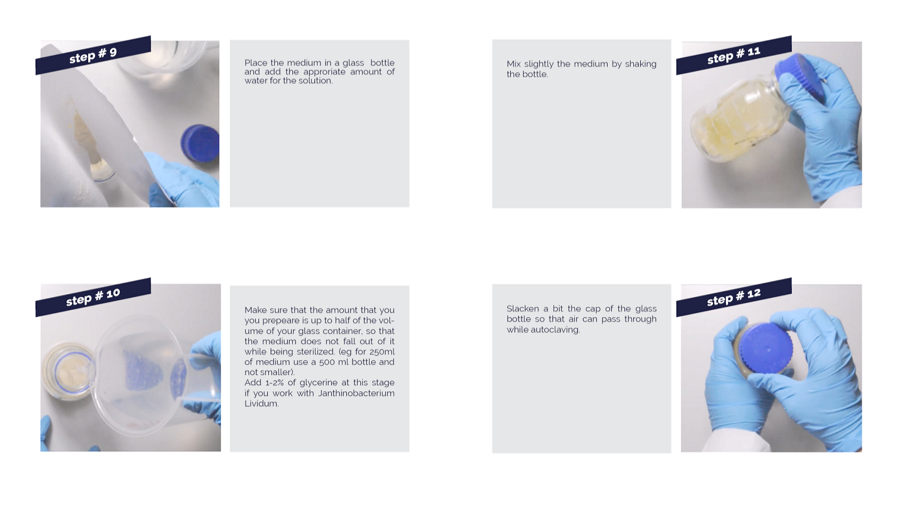
-take the 500 ml bottle and fill it up to 250 ml with (distilled if available) water
-Dissolve 5 gr of nutrient agar (dosage is 20gr / liter)
-Add 0,5 ml of glycerine with a pipette
-Close the bottle with the cap and gently mix a little bit
-Unscrew the cap a little bit so that it’s not sealed
Or
-Preparing Nutrient broth nr 1 – (for the textiles)

-take the 500 ml bottle and fill it up to 250 ml with (distilled if available) water

-Dissolve 6,75 gr of nutrient broth (dosage is 25gr / liter)

-Add 0,5 ml of glycerine with a pipette

-Close the bottle with the cap and gently mix a little bit

-Unscrew the cap a little bit so that it’s not sealed
STERILIZING PROCESS
-Sterilize with the pressure cooker

-Add ±1 liter water in the pressure cooker (as reference: less than in the liquid in the bottle you are sterilizing)

-Put the bottle in the pressure cooker (with the cap slightly unscrewed). If planning on dyeing the textiles, add the bag with the prepared textiles.

-Slide the lid of the pressure cooker to close it sealed

-Set the pressure cooker to high pressure/the most sealed (2 out of 2,1,steam,0)

-Set the electric cooker at the highest temperature until it starts steaming

-Now put the electric cooker’s temperature to low heat for ±20 minutes

-At this point turn heat off and wait until the pressure cooker’s pin is down and there is no more steam

-Take everything out
PREPARING THE PETRI DISHES
-Prepare the Petri dishes - without textiles

-Prepare the petri dishes by writing all the information on the back (medium, bacteria name, date and person)

-Poor some alcohol on the table and sterilize area

-Place the camping fire next to the sterile area and turn it on

-Unscrew the bottle’s cap and sterilize the edge of the neck of the bottle on the fire

-Quickly open the petri dish and poor in a layer (a couple of mm) of nutrient agar

-Let it rest until firm/cooled down

-Prepare the Petri dishes - with the textiles

-Prepare the petri dishes by writing all the information on the back (medium, bacteria name, date and person)

-Poor some alcohol on the table and sterilyze area

-Place the camping fire next to the sterile area and turn it on

-Sterilyze the metal pincet/tweezer with some alcohol

-Carefully open the disposable autoclave bag and take out the prepared textile using the pincet

-Place it in the petri dish and close it

-Unscrew the bottle’s cap and sterilize the edge of the neck of the bottle on the fire

-Quickly open the petri dish and poor in a layer (a couple of mm) of nutrient broth over the textiles

-Let it rest until firm/cooled down
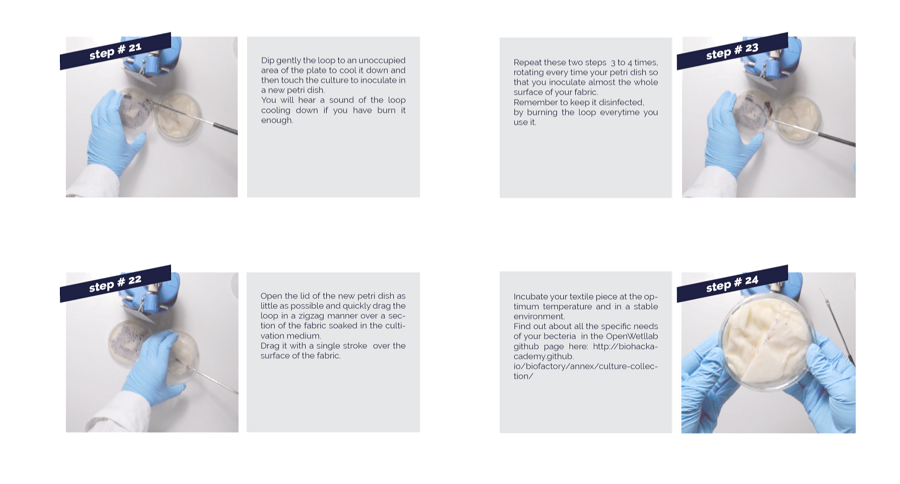
THE INOCULATION
-Poor some alcohol on the table and sterilyze area

-Place the camping fire next to the sterile area and turn it on

-Take the metal inoculation loop and sterilize it by passing it onto the flame (if plastic skip the sterilizing)

-With quick and carefull movements:

1.open slightly the cap of the dish with the bacteria

2.dip the still warm inoculation loop in the medium next to the bacteria (not on bacteria)

3.now swipe gently over the bacteria

-Trasfer bacteria on the new petri dish (or on the textile)

(TIP: always open both the petridishes on the flame/sterile side)

-Now seal the petridish with some Parafilm tape
GROWING

-Now that petri dishes have been inoculated they need to be stored at around 26/30 degrees celsius in an incubator or similar.
A visual INSTRUCTABLE guide as provided by the bioshades website

Another good resource is also this.
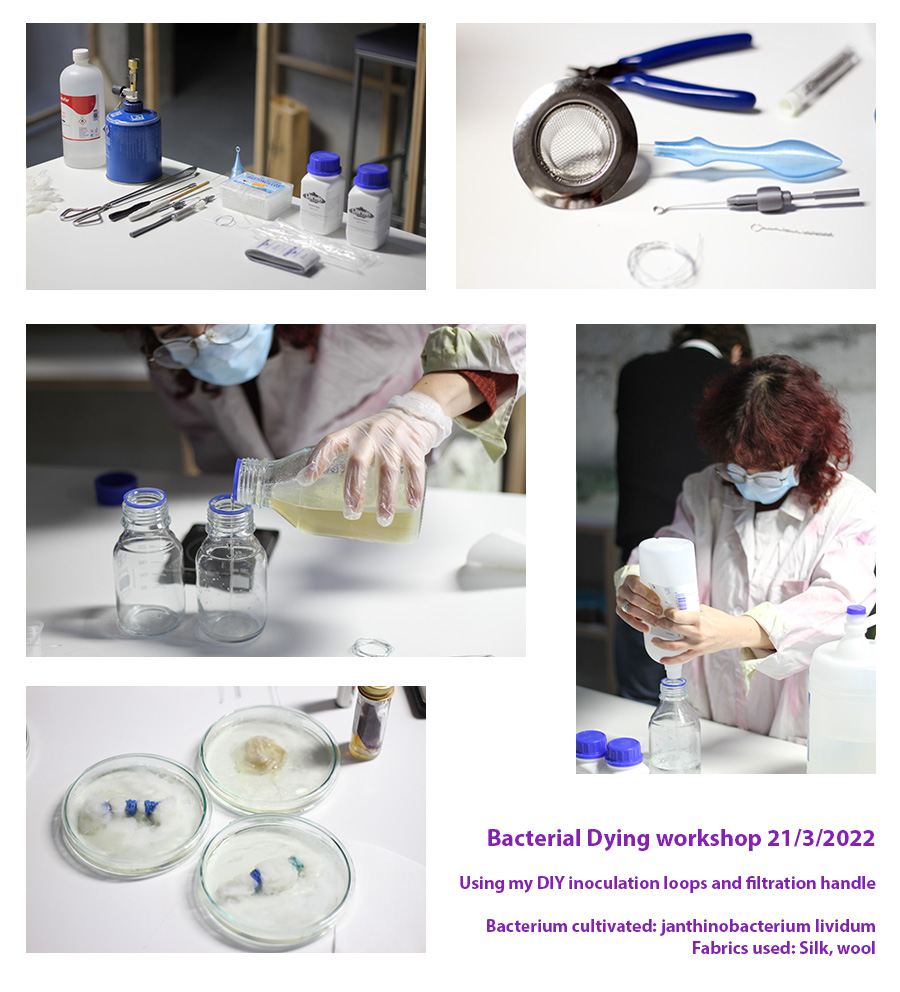
Inoculating Janthinobacterium lividum with my DIY inoculation loop and photos from the process
I designed my own inoculation loops as I mentioned earlier in the fabricating care section. I used Rhinoceros and a 3D printer and some steel wire that I purchased from the hardware store. You can find the design and the downloadable file here along with a guide on how to make the loop from the steel wire.
We used the bacterium Janthinobacterium lividum that we ordered from the University of Reading. We had a hard time getting these babies in Spain. The bacteria came in a little glass jar and they were suspended in some glycerine one mixture as they sat on the top of this.
We first prepared the premade agar mixture as we dissolved it in water and added some glycerine as the protocol above states. We when sterilised our dishes and our agar and poured the plates. After a bit we proceeded to inoculate the bacteria.
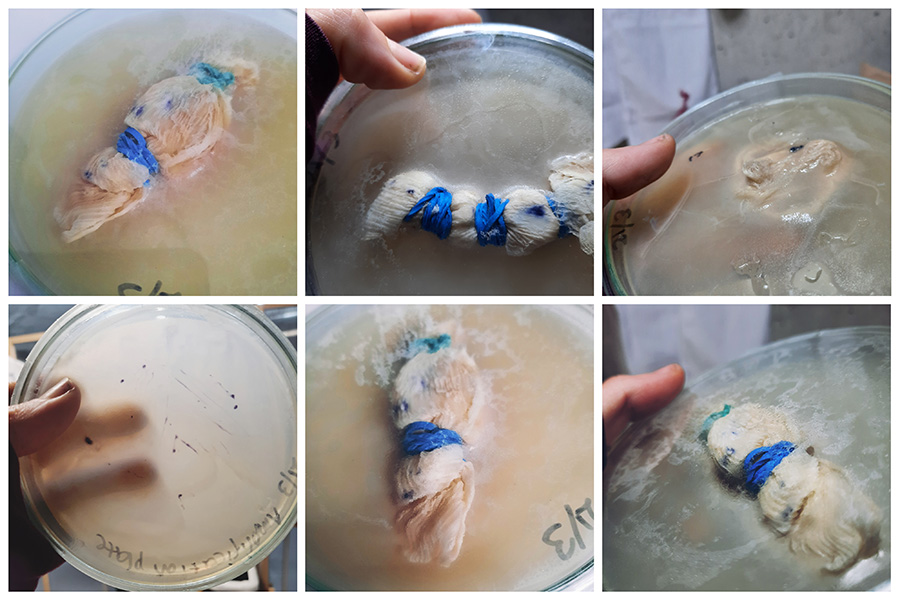
Unfortunately our bacteria did not produce any colour. We put them in the incubator in 32 degrees. We used normal solid agar for this and I suspect that might have to do with it because in the protocol it says to use the liquid broth and not the solid one. The bacteria where kept in a dark and dry place for 3 months before we used them too.
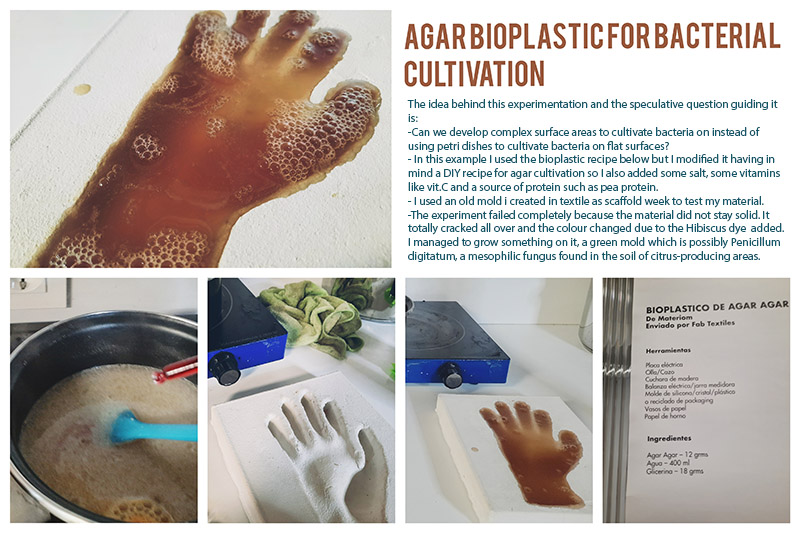
Microbial houses/growing bacteria on complex surfaces.
Unfortunately my experiment with casting nutrient agar has failed! The idea was to try and cast sterilised nutrient agar into a mold of some body part. I used my plaster cast of the hand I made earlier on week 9 Textile as scaffold week.
The agar was too hot for the plaster and it ended up cracking. I did not sterilise the agar because this was just a test to check if the mold would work for such an experiment.
Digital fabrication-Fabricating care
The Careables project really inspired me on this topic. Finding OPEN SOURCE care solutions for everyone's needs through digital fabrication tools but also providing access to marginalised communities and empowering them through technology and to become co-creators and active participants in their own care and health. Regular everyday people can get the chance to co-design and become empowered. Also the OPEN SOURCE elements aplify the care elements due to the fact that sharing is also caring. There is something very powerful in disseminating the tools and knowledge and not mistifying technologies of health and care and I will make it my goal to oopenly document my work so that anyone can replicate and costumise according to their needs.
Another way of caring for our symbionts and the other people around us occured to me when researching about care, health and societal aspects of disease and death. As you know in the Victorian era they used to make memento moris from the deceased persons hair as a way to remember that one day you are going to die too. Weird right?
When thinking about disease, death, health and care we really have to look back in history to try and understand how the sociocultural perceptions were influenced by scientific discoveries and new technologies in visualising and understanding the human body and disease!
Inoculation loops and filtration handles
Apart from the bodily fluid containers I fabricated my own inoculation loops and filtration handles. Inoculation loops allow us to amplify and transfer microorganisms in petri dishes. You have to sterilise it in a blue flame every time you ise it to avoid contaminating your plates.
What is an inoculation loop and why should I care?
Whether you are a material designer or scientist, a biodesigner, a bioartist or a biohacker or biotinkerer and whether you are using bacteria to dye textiles, or you are transferring liquid cultures or amplifying a mycelium petri dish or a petri dish with microbiome experiments or even to transfer small amounts of liquids an inoculation loop is a useful tool to have around!
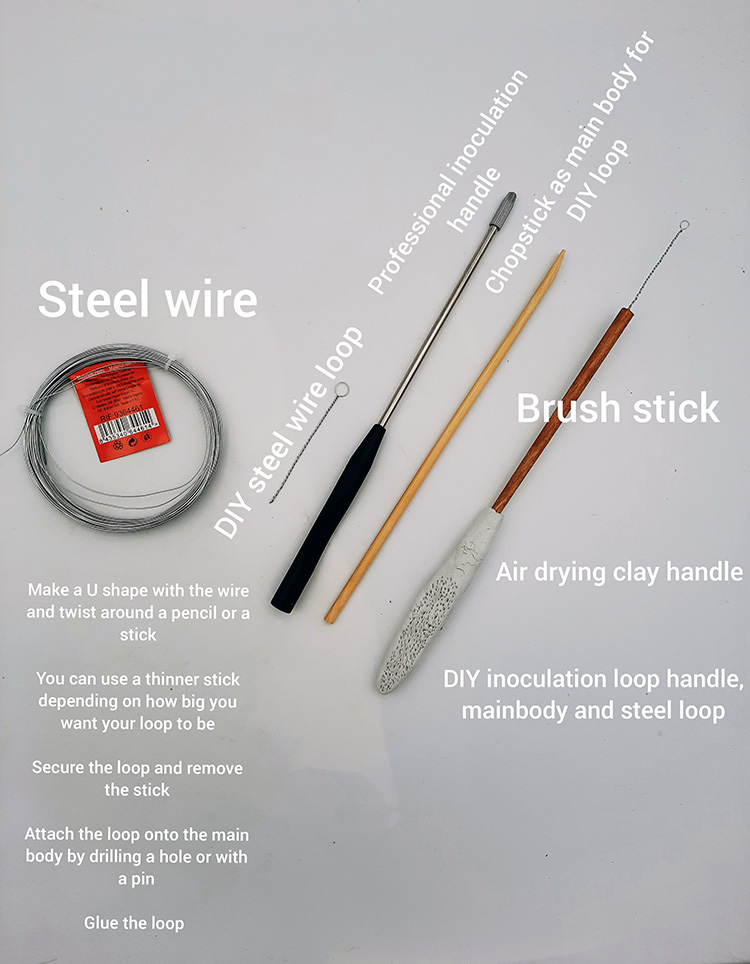
Inoculation loops are tools and instruments used in microbiology and they usually consist the inoculation loop (a loop made out of steel that can vary in sizes), a main body (the loop is attached or secured in that piece) and a handle. Below I am showing you 2 ways to make them, either in a totally DIY rebel way (the bioart coven withy way) or by using digital fabrication such as 3d modeling and 3d printing.
You can either buy the inoculation loop from online or make your own using steel wire. It needs to be steel because every time you use it to inoculate or transfer anything you have you sterilize it with a strong flame. Therefore the loop is detachable from the rest of the instrument so you can also replace it eventually.
The handle of the inoculation loop can be as DIY as it gets and something you can make on your own or it can be something that you can buy. It can me made out of any material that you want such as air drying clay, fimo clay, polymer clay, normal glazed clay or it could be also 3D modelled and 3D printed!
If you choose to go the rebel bioart coven witchy way (welcome to the dark side), the main body of the loop can be a chopstick or the handle from a paintbrush that you can drill with a Dremel or even a pin, in order to fit the steel loop onto the end! Alternatively, it can also be 3D modeleed and printed too.
There 2 ways to make inoculation loops
-the bioart coven rebel way (totally DIY and lowtech way with no digital fabrication)
-the digital fabrication way
I will explain both of these ways!
For the bioart coven withy way way you need:
-A chopstick or a brush stick (this is the main body of your loop where the steel wire loop is attached) -Some steel wire for the loop (top part of the loop) -Some air drying clay or polymer clay to make the handle
All inoculation loops have a handle, a middle part and the steel wire loop on the top!
Now, I have designed some different parts that If you put them together and also make the steel wire loop you have a fully functional inoculation loop :) We tested it and it works great!
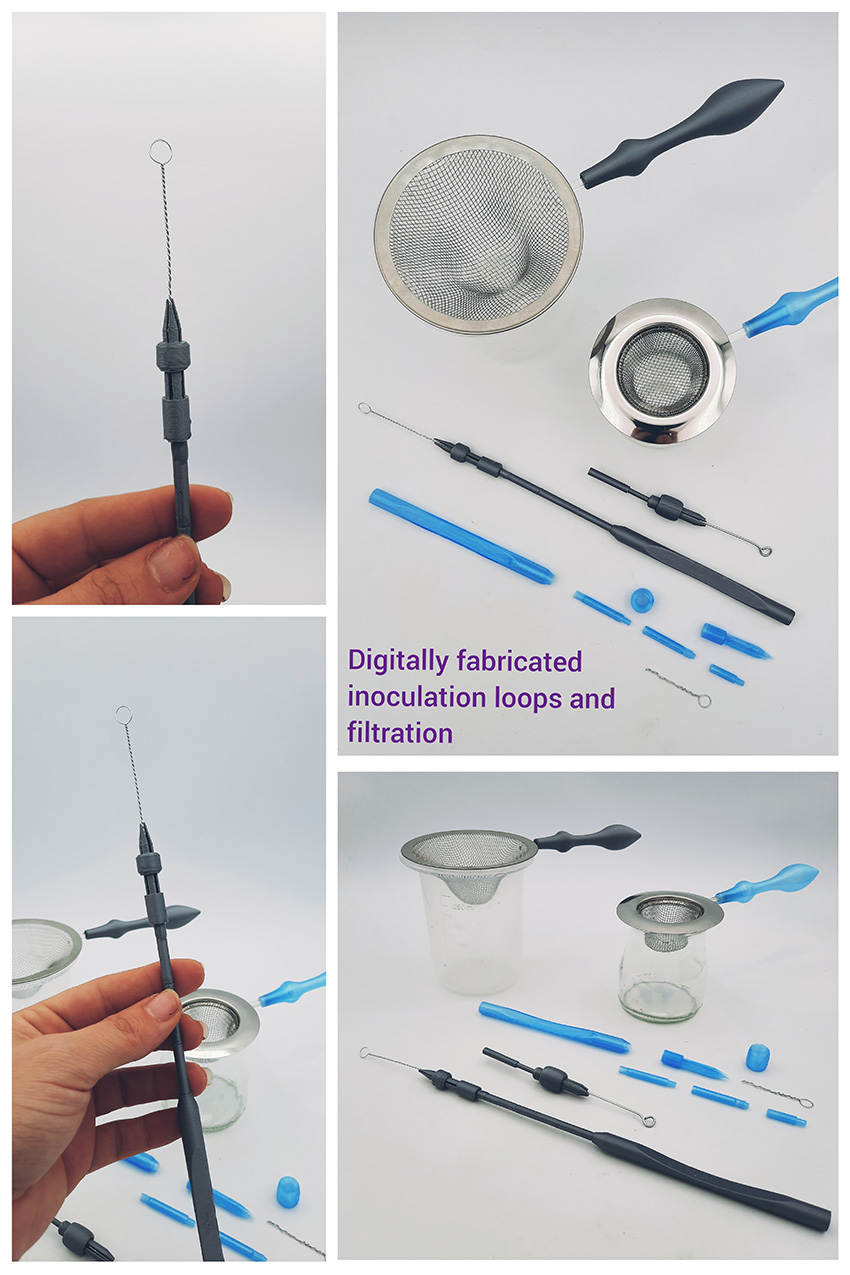
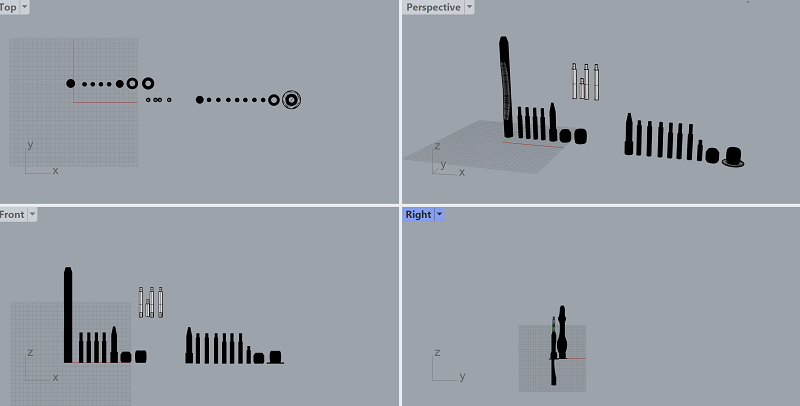
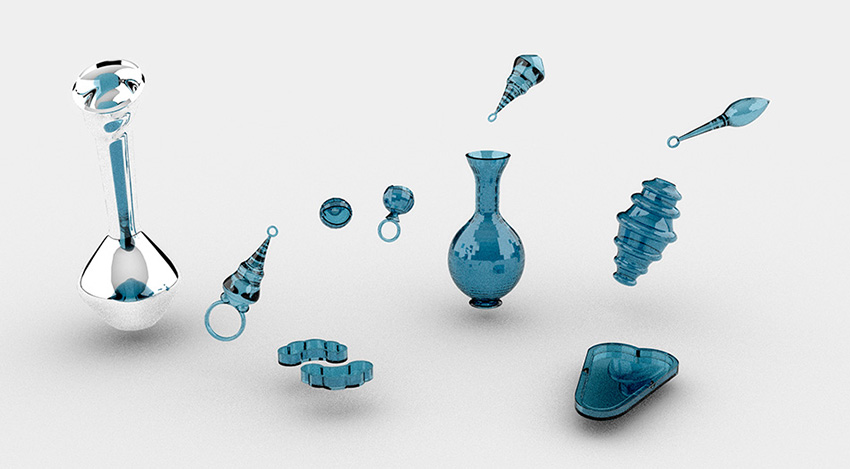
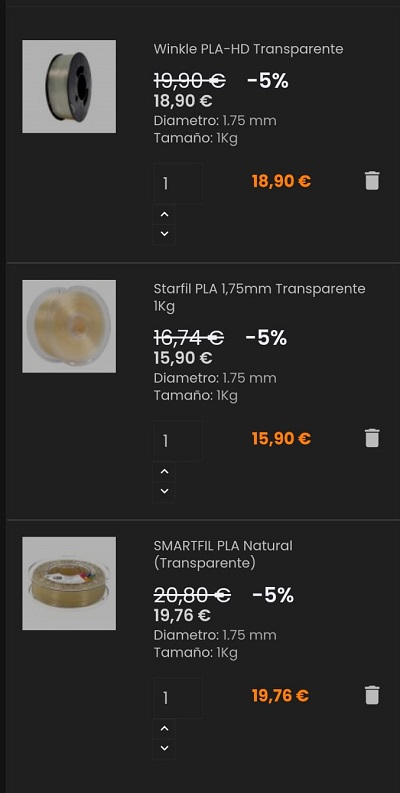
Here is a screenshot of the design in rhino and here you can download the file. We printed with 3 different PLA filaments. The prototype was in silver and the other ones were ice blue and transparent.

3D PRINTING THE PROTOTYPE
Filtration handles
I 3D printed the handle on the Prusa imk3s printer or otherwise known as Neska and then I designed a lasercut piece in metacrilato that would come inside the handle and at the end it would hold a base that I bought at the oriental bazaar that is usually used as a sink declogger to prevent small bits coming down your drains.
I made 2 a smaller one and a big one and I used them to filter my dyes. No filter paper is required but these should not be used to filter huge quantities!
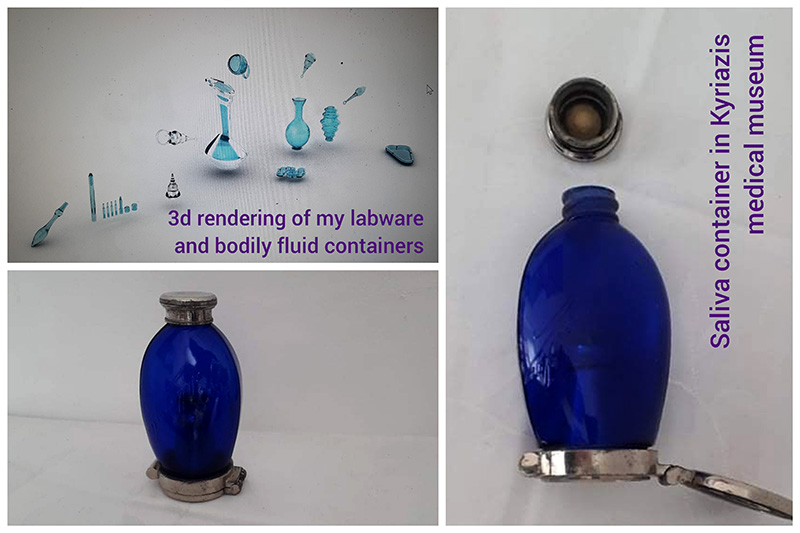
Bodily fluid containers and bodily fluid catcher devices
-Developing tools for sample taking, bodily fluid collection and exploration of the body
-Tools for bodily autoexploration, empowerment and radical self care in the comfort of your own home. They can be personally customised and modified.
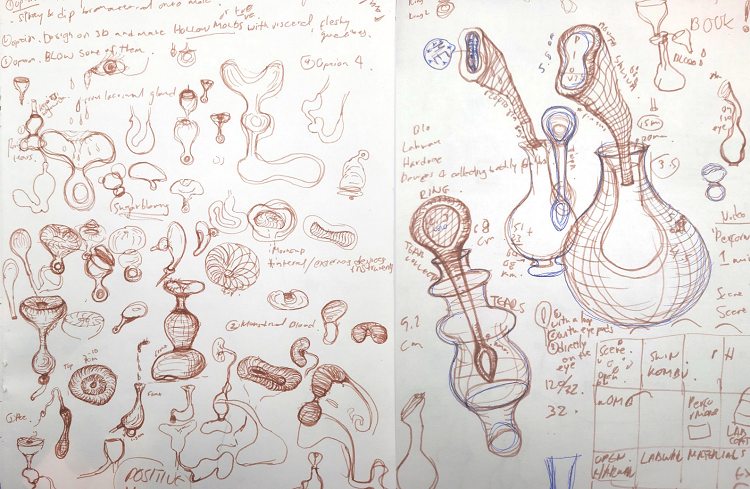
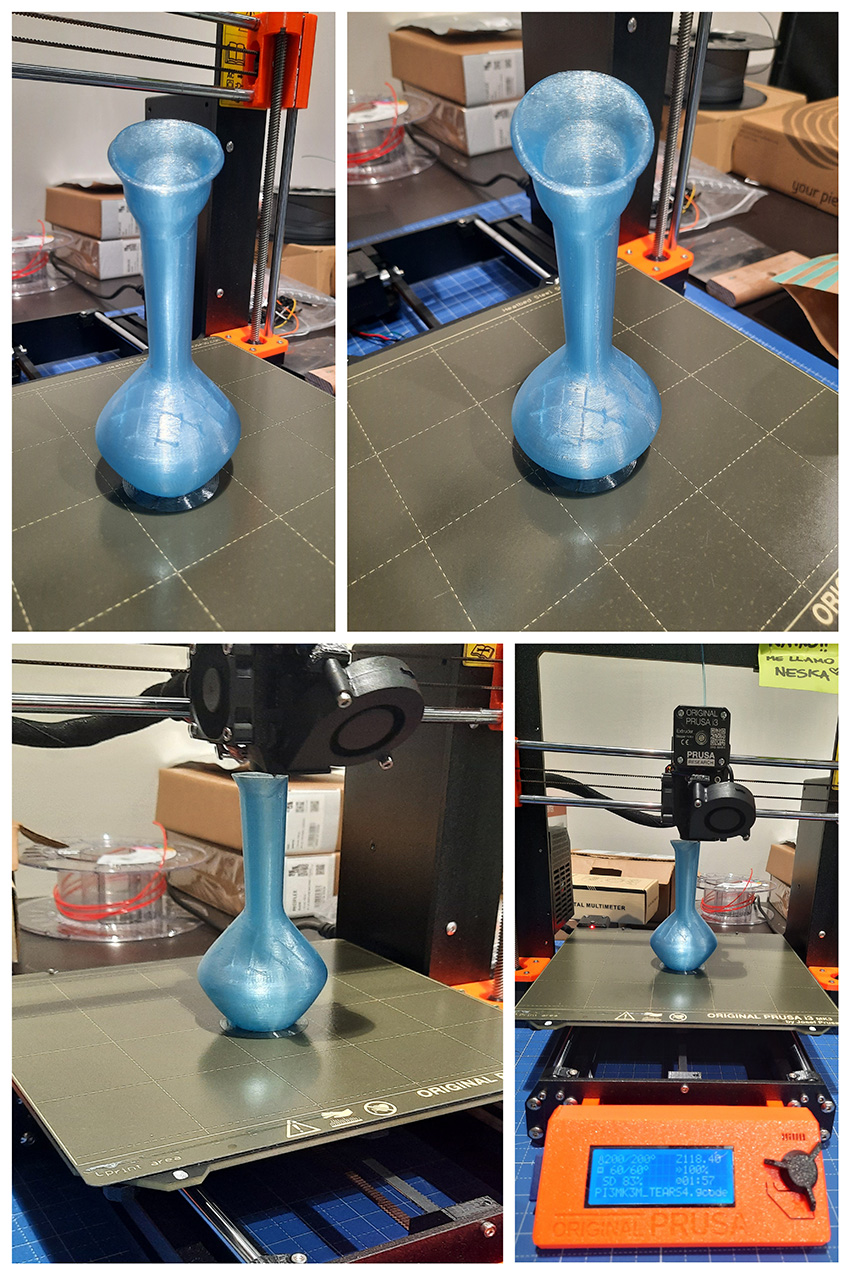
The tear collector
I made a few objects on Rhinoceros that can capture and store certain bodily fluids like tears for example. I made 2 bigger containers, one that fits on the eye, and one that is a more complex shape. For the second one I made a lid as well. For the fluid catchers I was inspired by the inoculation loop used in microbiology but it is made of PLA and it is not suitable for DIY Bio work because they are not sterilazable.
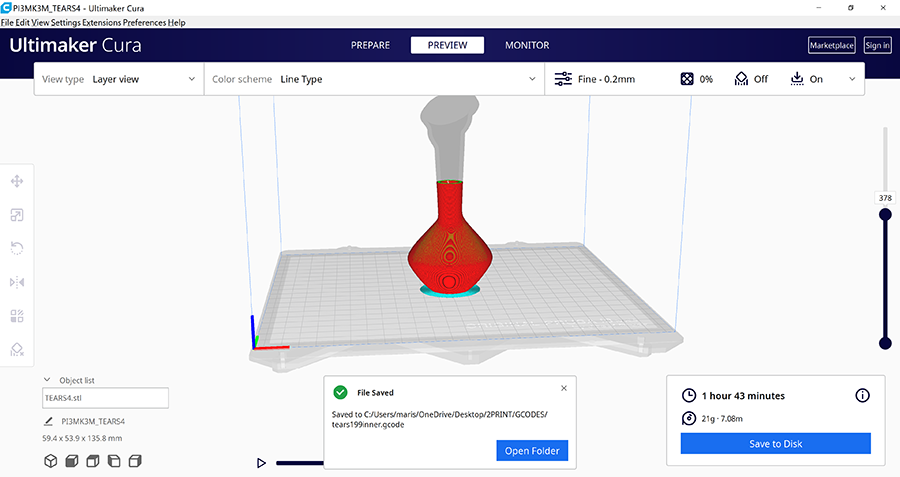
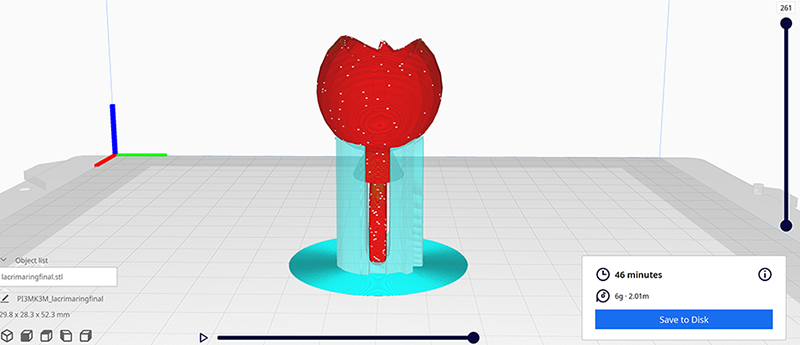
Here is a screenshot of the gcode process on Cura Multimaker for lacrima ring! I had a hard time with this and I redesigned it after all! I need to learn how to make jewellery on Rhinoceros properly in the future but this was once of my favourite pieces. I extracted the eyeball from a makehuman model that I generated and then I remodeled it into a ring! If you explode the model sometimes you can also obtain the inside parts of some of the head!
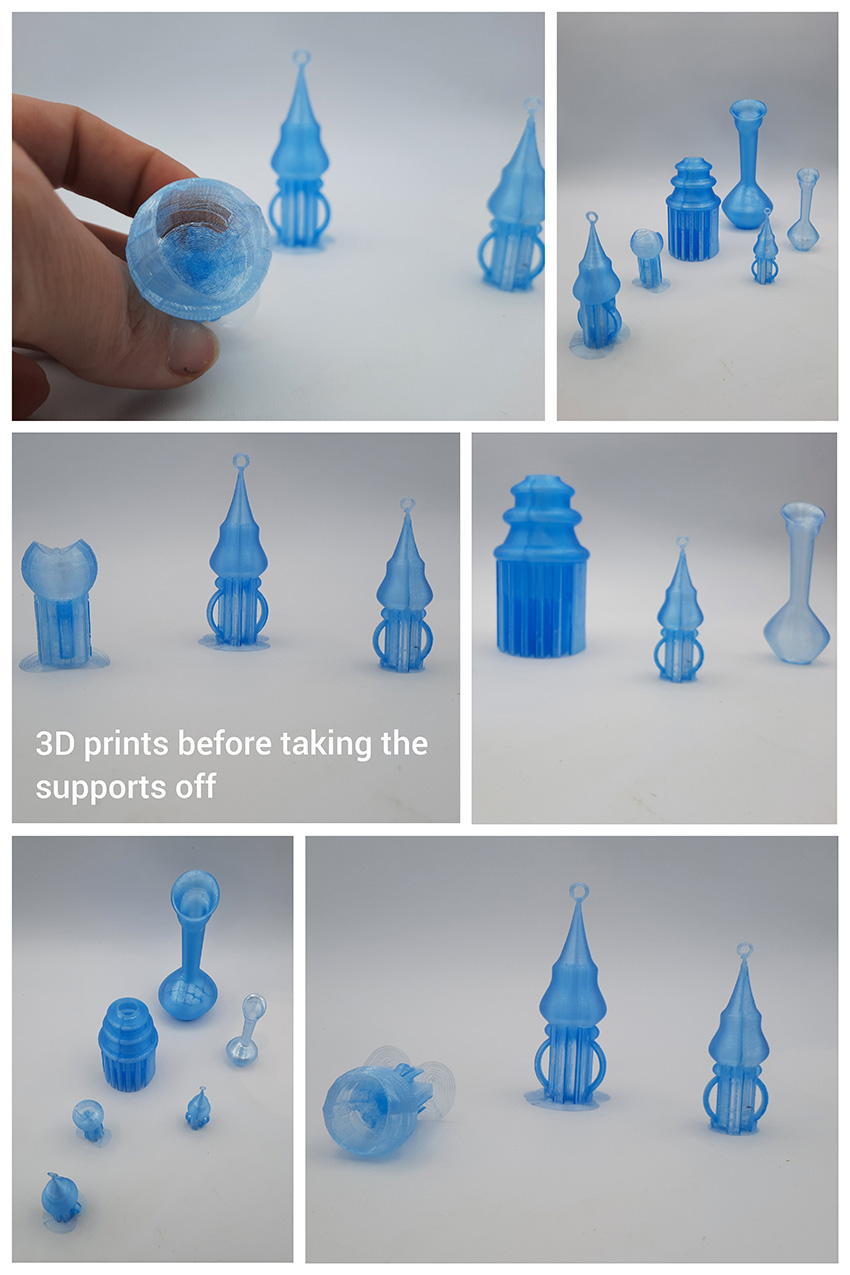
These are all the 3D prints before I removed the filaments.
Inoculation rings/fluid catchers
Bodily fluid ring catcher
With this you can collect body fluids so you can store them in your containers!
3D printing fails!
Here is an EPIC printing fail! I tried to print 2 rings at the same time but our printer Neska has been giving me a hard time lately. As you can see after a point in the print she is dragging both of them together and off the buildplate! It was an issue with the gcode and not enough support. Trial and error works best in this scenario especially is you are a newbie like me!
I had more issues along the way with some pieces for the inoculation loop that were long and vertical. I put more brim to support it but Neska sometimes has her moments. In the end I managed to print everything on time!
3D printed nipples for my labcoat
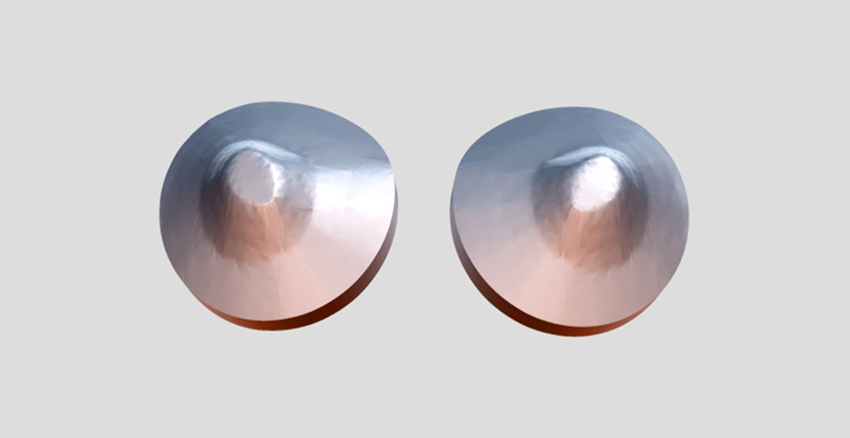
By now, we have learned how to use the makehuman program in order to generate different kinds of bodies with all kinds of characteristics. In my head, human forms and bodies become open source and widely digitally generated for any kind of use. I am not going to go into the ethical and other philosophical implications this time.
There are many kinds of programs that let you download the human anatomy in 3D models like zygotebody, or even invesalius, an open source software for reconsctruction that let's you download ct scans and reconstruct them to get models, animations and anything else you can imagine!!! In this way, someone may reconstruct parts of their body in digital realms and costumise devices and other wearables on their bodies.
I have been thinking a lot about areola reconstructions for people who have underwent masectomies and I found this video that really inspired me.
I included the documentation for this part here where I am talking about the labcoat.
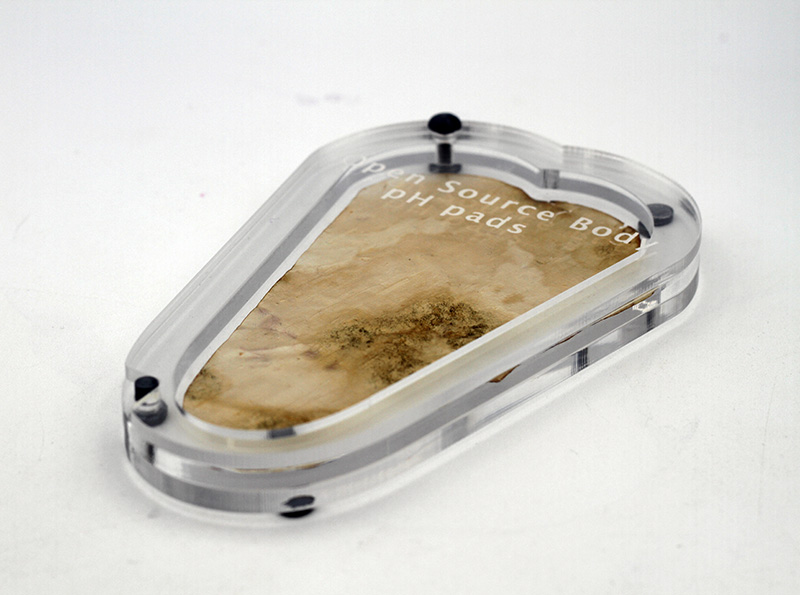
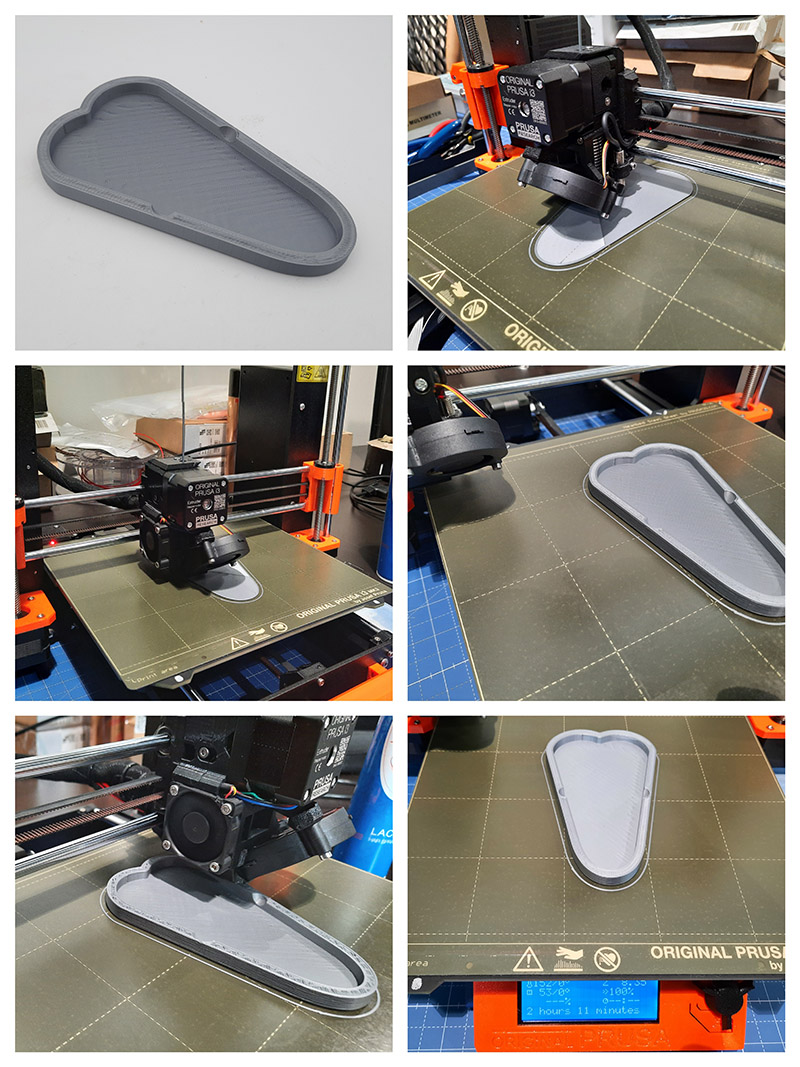
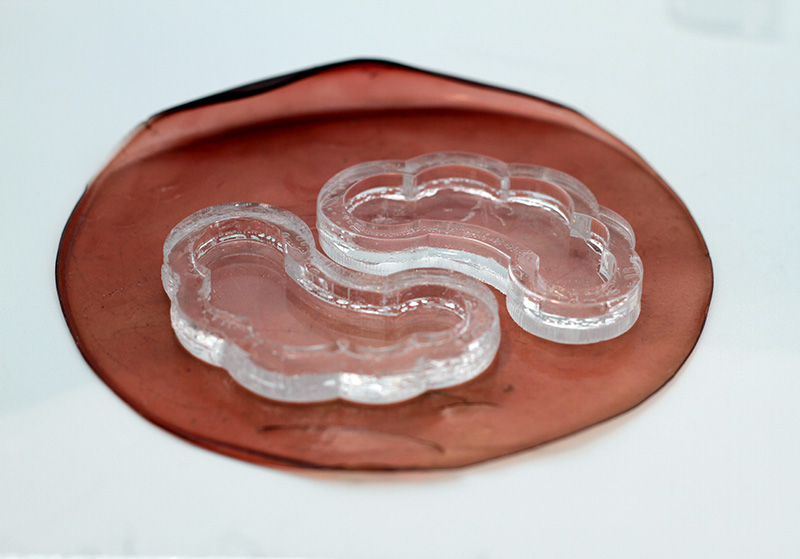
pH pad mould for vaginal fluids and pad case
You can download the pad mould stl. file here.
Lasercut pad case with 3D printed buttons
I think I have left the files on my USB so I will add the dxf. and the file for the 3D printed buttons that hold the case together asap! In the meantime here is a screenshot from the design process, photos of the finished thing and how to put it together!
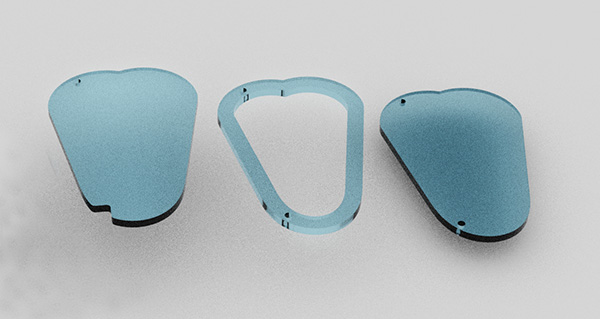
Crafting x fabricating care- Under-eye patch experiment 1
Here I am lasercutting some acrylic molds for my under-eye biomaterial patches. I was going to use them for scoby but then i realised that the way i designed them was not totally watertight so I had to figure out a way to seal the edges with silicone. The mold works well for thicker substances and other biomaterial recipes though!

You will need 3mm and 5mm thickness of metacrilato. I use this technique for soft robotics moulds too. I just cut every slice and layer of the mold and glue them together or secure them together with tape so I can remove the parts.
Here is the .dxf file so you can recreate them.
Under-eye patch experiment 2
This 3D print was intended for a biomaterial of even Kombucha Scoby mothers. It works well for biomaterials but I noticed that for Kombucha scoby the surface area is too small and too shallow and you cannot leave them uncovered. If you leave them uncovered the liquid will evaporate and the symbiotic cultures of bacteria and yeast will form little clots. I am not sure what happeneds to them exactly but it seems like its not working. The PLA material of the 3D printer also does not seem ideal for doing this.
Here you can find the file for 3D printing them. Enjoy.
Research links on dyes, microbiome, materials, and others
-
Handbook of Textile and Industrial Dyeing, Dyes for the medical industry
-
Natural Dyeing with Anthocyanins from Hibiscus rosa sinensis Flowers
-
Composite of polylactic acid and microcellulose from kombucha membranes
-
Skin microbiome transplantation and manipulation: Current state of the art