The Process: How was it done, step by step
In this section I explain in detail how I incorporate the different Fabricademy technologies -and other processes- into the game.
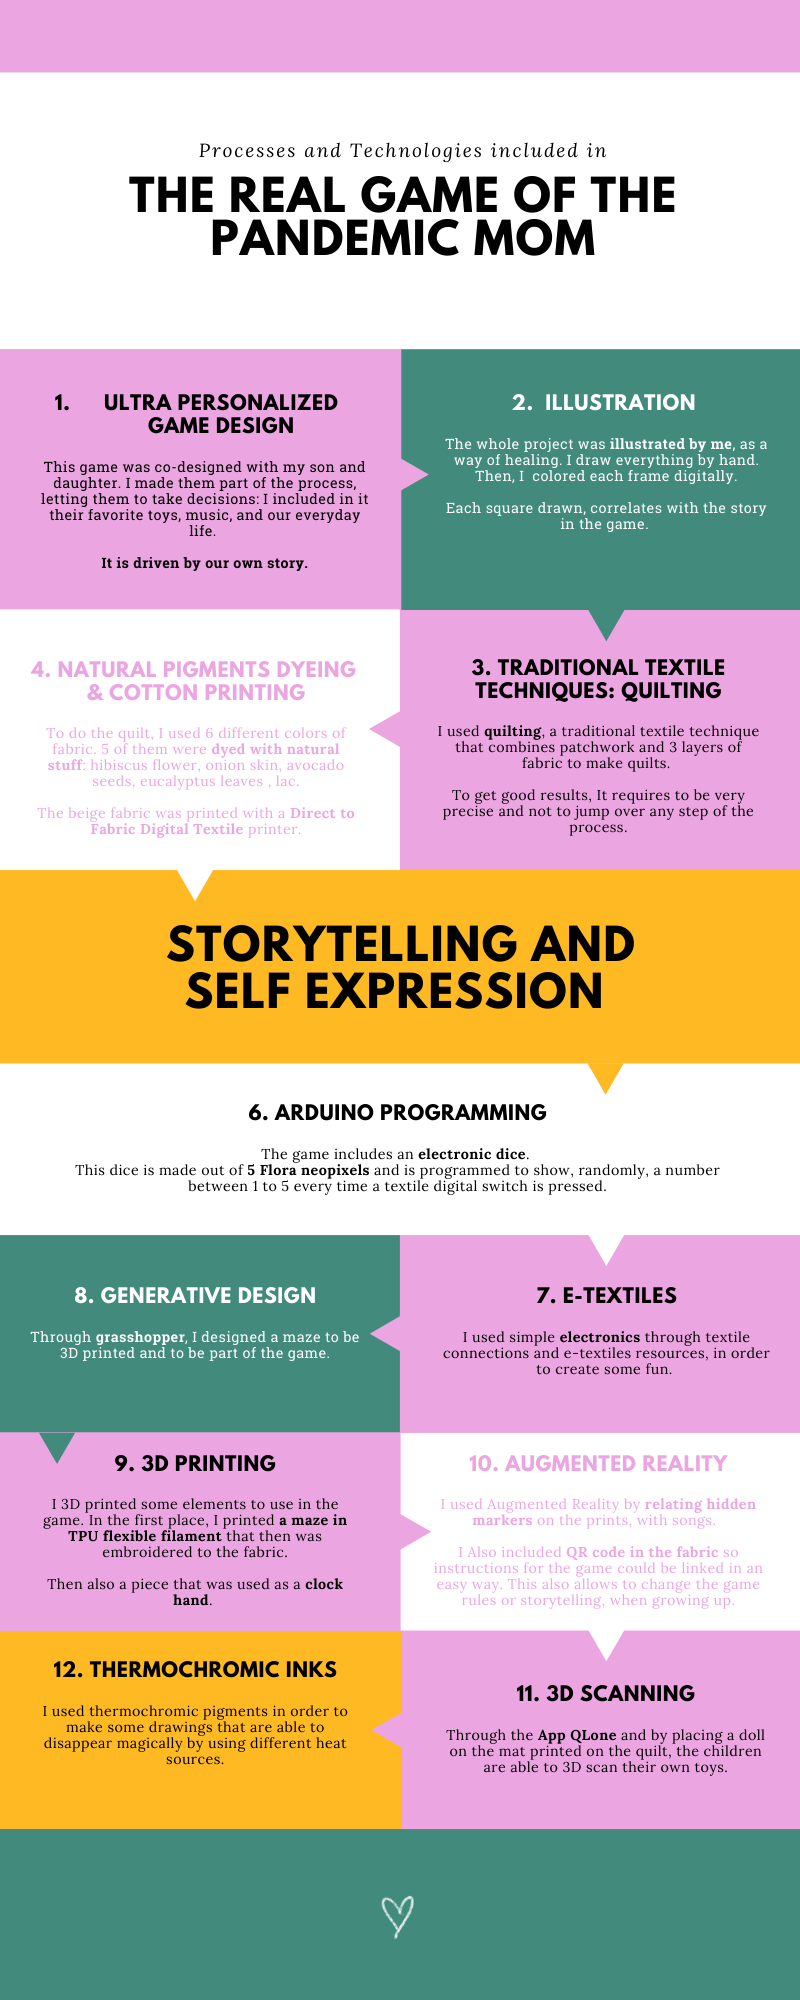
Here there is a diagram that illustrates the sequence during the making.
Right after the diagram, I will go through each process, explaining in detail how everithing was made.
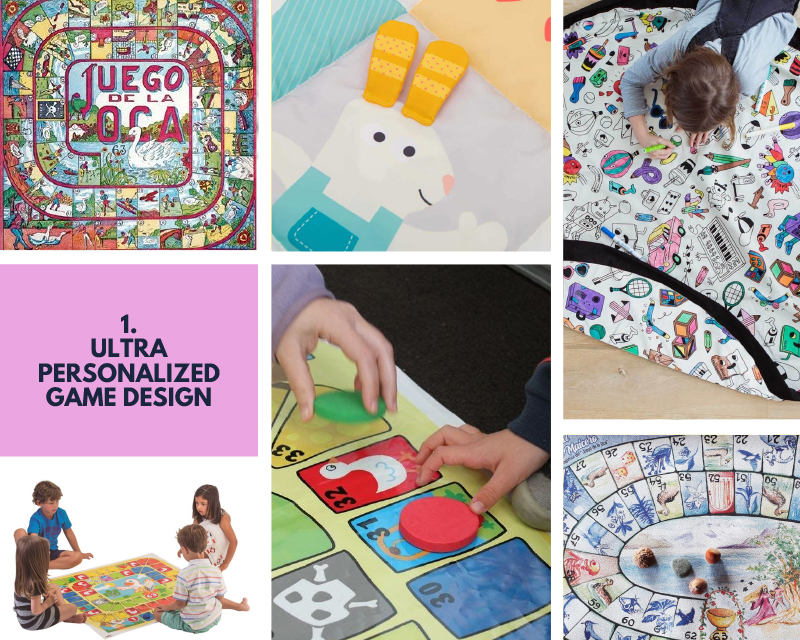
1. Ultra Personalized Game Design
There are several games that have these characteristics: they work going forward and backward as the game logic. This kind of methodology is found in “Ladders and snakes” and “The game of the goose”. This last game was particularly interesting to me because it allowed me to work on the concept from a very personal perspective.
The game of the goose is a board game for two or more players. Each player rolls a dice and moves their piece across a snail-shaped board with patterned squares. Depending on the square in which it falls, it can advance or on the contrary go back, and in some of them a punishment or a reward is indicated. On his turn, each player rolls the dice that indicates the number of squares to advance. The first player to reach the final square wins the game.
The characteristics of the game allowed me to modify / customize it according to the reality I was living, so that I could assign specific activities to each box based on my life.
The length of the game (number of boxes) was made according to the age of my children: most of the board games that I share with them have a similar number of activities: it is what allows them adequate attention at this stage of their cognitive development.
It seemed essential to incorporate the body scale into the game. Children in early childhood work on dexterity mainly from physical movement and not so much from fine motor skills. In this sense, I thought about moving the scale of the game of the Goose, originally on a board, to the scale of little humans.
I also linked the game with a blanket, since it has a semantic symbolism linked to caring, hugging, and the family nest.
The characters, situations and elements expressed in the game are part of my daily reality, my environment and my children. Olivia -at that time of 5 years- illustrated some of the elements that later appear stamped.
The game is called "The REAL game of the pandemic mom" to exert a linguistic relationship with "The ROYAL game of the Goose". In this way, there is a sound link, but also brings this game closer to realism: it gives it a specific bias linked to playing on the field of the REAL LIFE.
Of course I also needed to link the game structure to the different Fabricademy technologies, because indeed it was the main reason for this project.
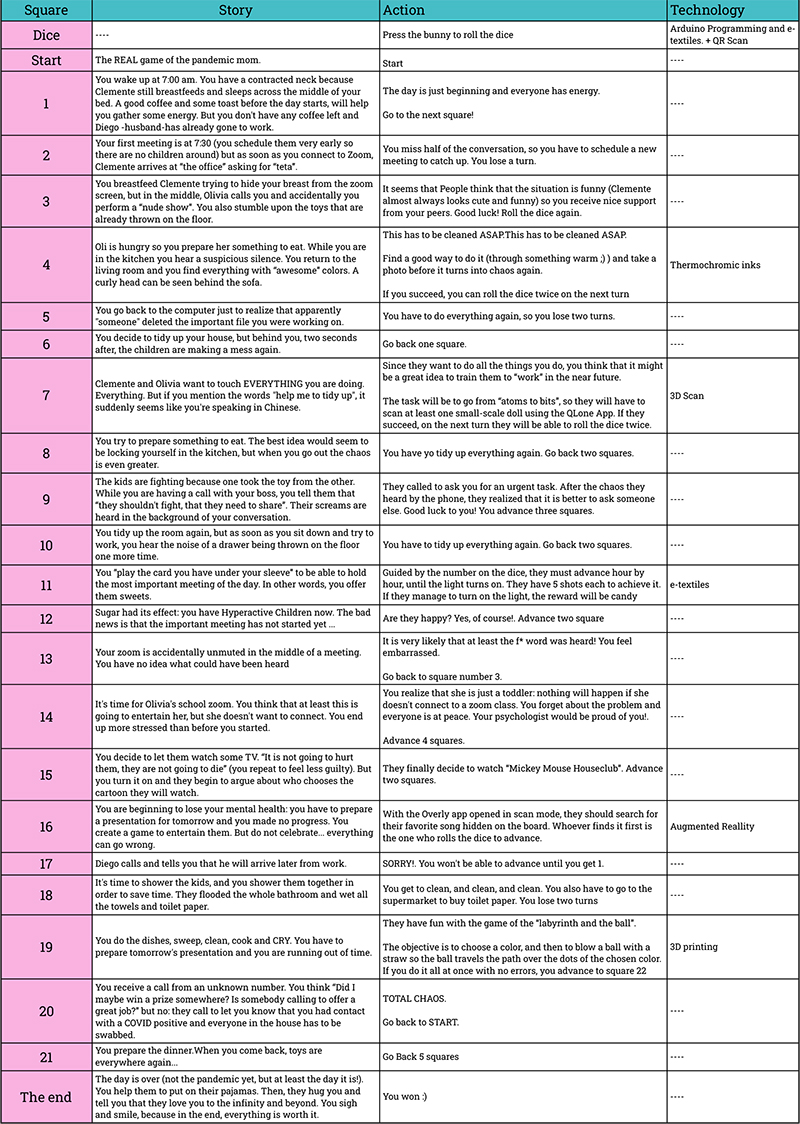
The following table shows the structure of the game that I finally reached after various iterations.
2. Illustration

Once an specific function was designated for each box, I proceeded to assign an illustration to each one. This time I didn't have to develop a character design or specific aesthetic as I decided to go ahead with the characters that I usually use to talk about myself or my family.
Anyway, it was necessary to define what type of numbers would be used (I used the ones I designed for my marriage party because I believed that they had a nice emotional relation with my family). Also I needed to decide what would be the color palette, what would be the color relation in each square, etc. I decided to get closer to a warm color palette since I was thinking of working with raw materials of natural origin.
I tried to convey in the illustrations the chaos of the toys lying on the floor of my house permanently. The toys that appear there - as I mentioned earlier - are mostly my children's toys.
The process of the illustrations was as follows:
-Scan / photo for digitization.
-Draw over the sketches with a Wacom INTUOS Pro in Photoshop.
-COlor every square.
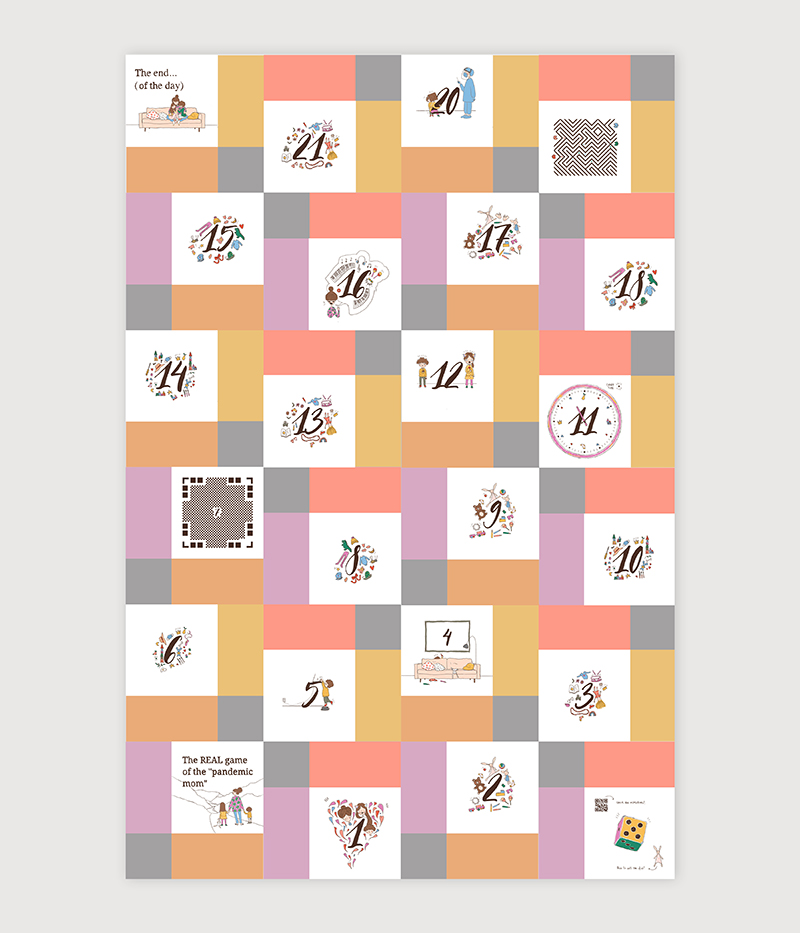
See below the final results of each of the 24 illustrations conforming the game.
 Once the illustrations were ready, I printed them on a textile called (at least locally) “cretonne”. The composition of the material is 100% cotton. I printed it via direct to textile printing method - results similar to sublimation are obtained, only it can be used on natural raw materials.
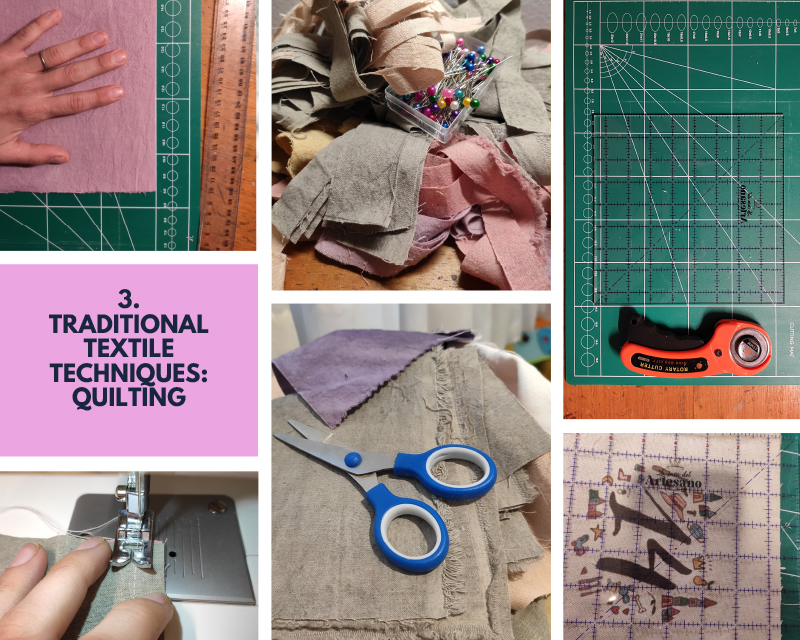
3. Traditional textile techniques: Quilting
As collectively constructed on Wikipedia,
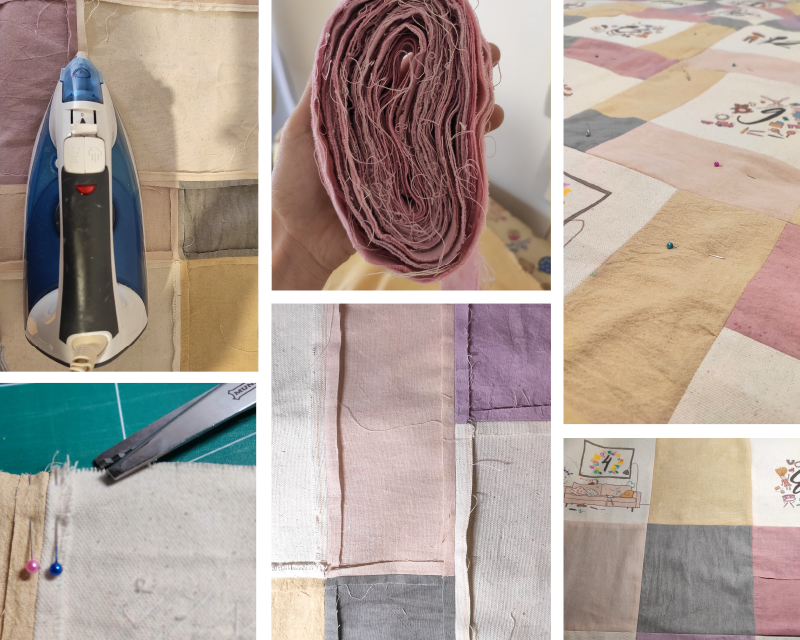
Quilting has its complexity and specificity at the moment of design and elaboration. I did not know the technique before making this quilt, so I had to go through different tutorials to be able to design and then make the blanket. The process that I carried out was the following:
1. Selection of the pattern to be developed.
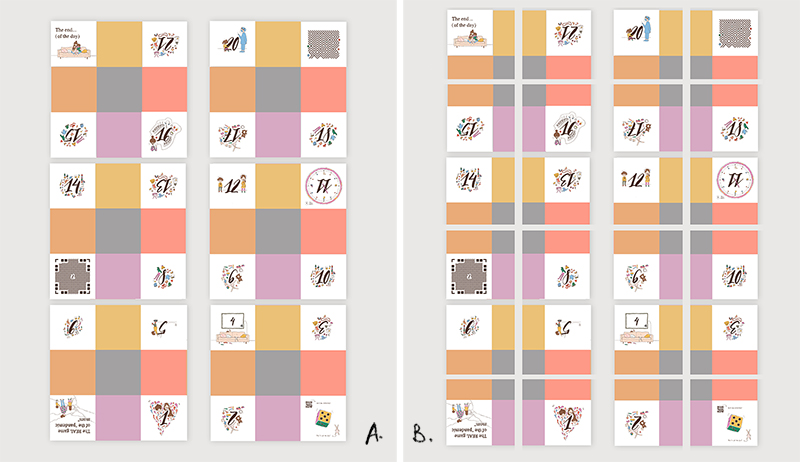
There are infinities of patchwork patterns with different formats (mostly based on rectangles, triangles or squares). As I wanted to reproduce a pattern that would allow me to develop a game of the Goose, it was essential to be able to identify the squares that represented the different boxes. In this sense, after investigating different possibilities, I selected the so-called "Disappearing Nine Patch". In this tutorial of Craft Academy "Quilting for begginers" there is a clear description of how this kind of pattern is assembled and sewn.
Below you will see my sketches.
In image A. it can be seen how each nine square patch should be sown together. Then, in image B. each nine patch must be cut twice in order to get four squares that must be re-arranged in order to get the disappearing effect. Finally in the third image, you get to see the final results sketch.
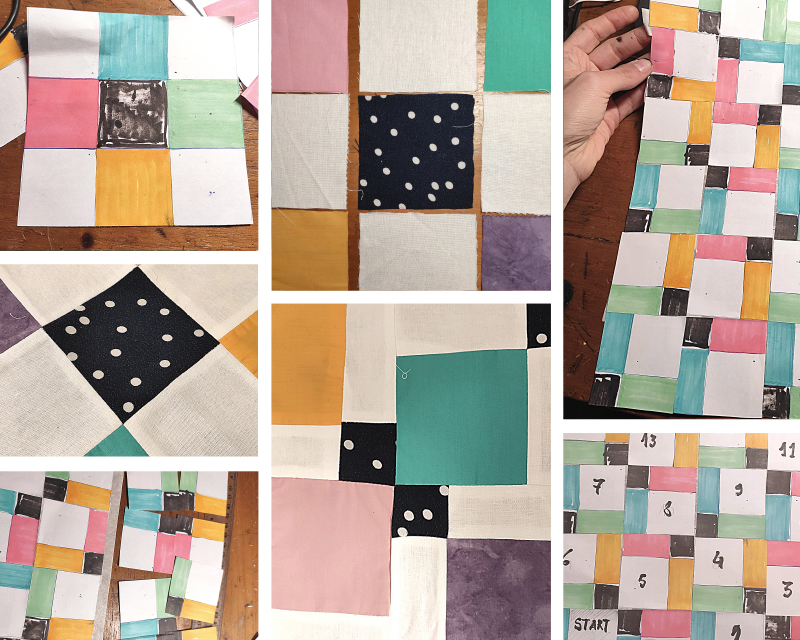
2. Patchwork tests and selection of textiles to be used.
My initial idea was to work with disused textiles. I did some tests with fabrics that had emotional value for me, but due to the different structures and weight of those textiles, I did not obtain good results: good patchwork management requires either textiles of the same weight and weave or a very good technique ability with patchwork. In this sense, I decided to use the same textile (100% cotton canvas) and then achieve different colors through natural dyes.
Here you can se my first tests of the pattern on paper, and then a sketch - also on paper taped together- of the possible location of the squares for the game. Also there are some pictures of my tries with the disused textiles.
3. Textile dyeing and digital printing.
I will go deeper later with color dyeing. Regarding to printing, although I was very satisfied with the results, I had some difficulties. In Montevideo there is only one company that has this technology, so it is a process that is still very expensive and also needs adjustments. Although I asked about the percentage of shrinkage of the textile after printing (they told me that it had not shrinkage) the fabric got reduced 10 to 15%. In this sense, I had difficulties to achieve an adequate cut of the squares for the patchwork, which resulted in having to repeat the printing of some drawings.
4. Cut and assemble the quilt.
This particular step requires the handling of some fundamental tools: cutting plate, square patchwork strip (30 x 30 cm) and a rotary cutter. I had to acquire them and learn how to use them. In this tutorial made by MADE Everyday Youtube Chanel, the step by step is very well explained, it has some amazing tips.
5. Quilting and finishing of the quilt.
Quilting is not common in the Uruguayan market, and therefore it was not easy to get a guatina filling (a thin and flat wadding, usually made of cotton) which was what I needed to achieve a blanket without a very bulky appearance. I finally got it in “La Casa del Artesano”, but ... at a price of gold!
Finally I got to finish the quilt with a nice binding. This Tutorial of Jordan Fabrics has very nice tips on how to do this.
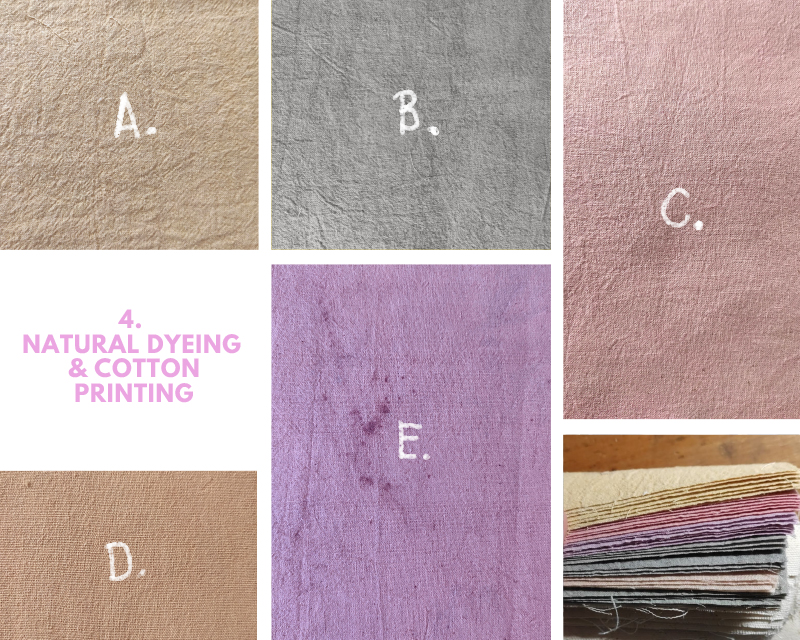
4. Natural Dyeing and cotton printing
 I turned to Lucía, an entrepreneur from the network of contacts that my children have given me (mother of a friend from Oli's garden). She has an enterprise based on products developed with natural dyes, Papaiona. I asked her if she had scraps that she could sell: As I was going to work with patchwork I did not need large pieces. I was absolutely open to the color chart that fate offered me. Lu agreed the exchange, so we did it.
The textiles
The palette that I used in the quilt was achieved by means of the following dyes:
B. Eucalyptus leaves
C. Lac
D. Avocado pits
E. Hibiscus flower
All of these dyes were part of Lucía's production leftovers, except for the binding ones, which I dyed myself with Hibiscus flower. As the base material used, the recipe, the space (and the experience in the subject!!!) were absolutely different, the results also were. Anyway, the subtle difference of natural dyes, generates a beautiful convivial palette which I personally love.
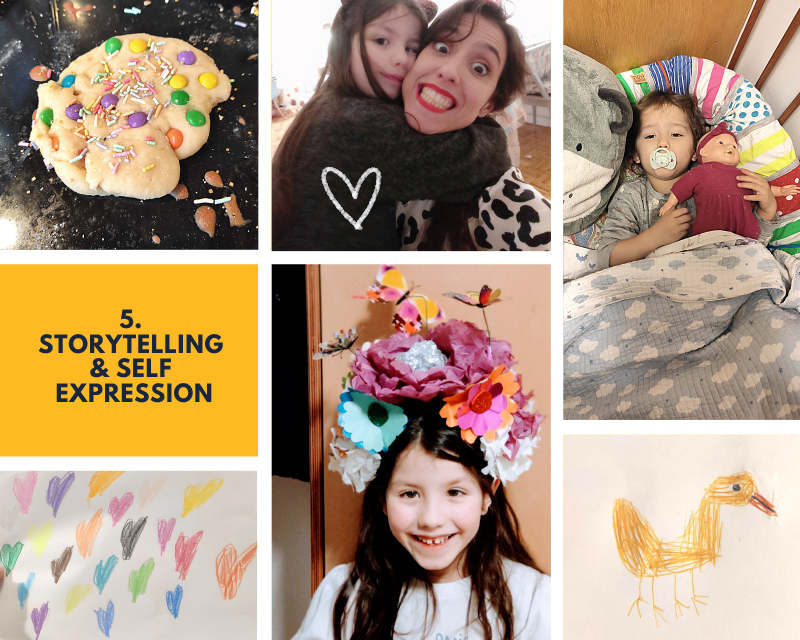
5. Storytelling and Self-expression
It's me with my children.
It is me with my children, in my life.
It is, therefore, what I show.
It will be whatever it is.
But avobe all, it is genuine.

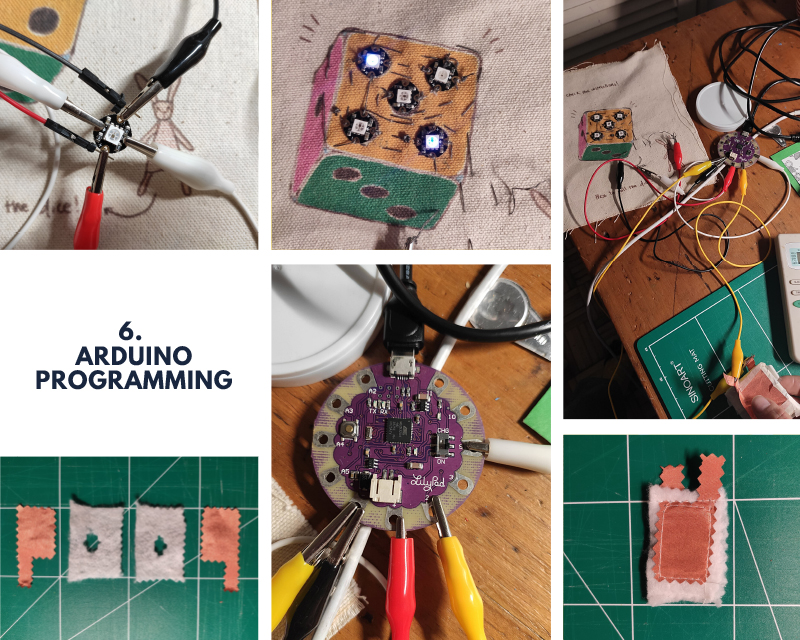
6. Arduino Programming
 It seemed essential to involve an e-textiles proposal with Arduino programming in the development of the quilt. During the course it had been a challenge for me to be able to go deep into programming with such a limited time so I wanted to investigate a little more about the subject.
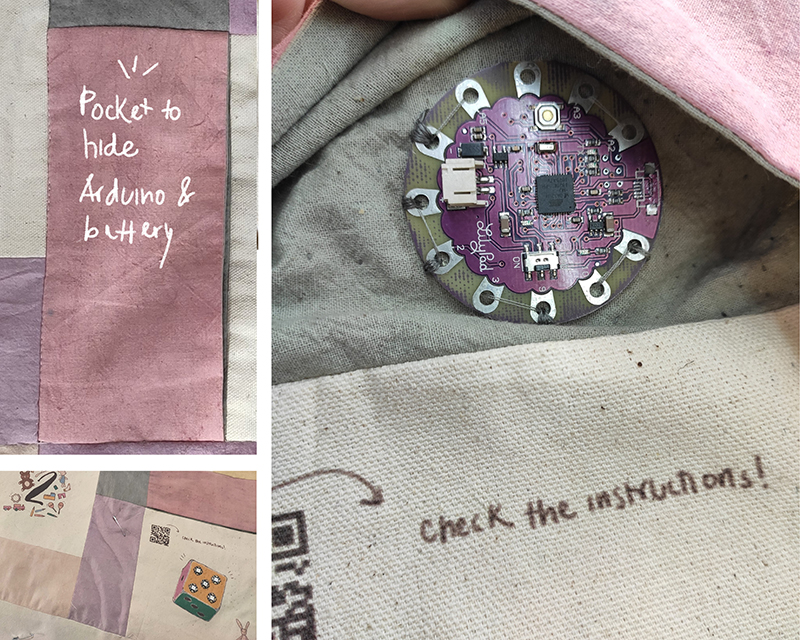
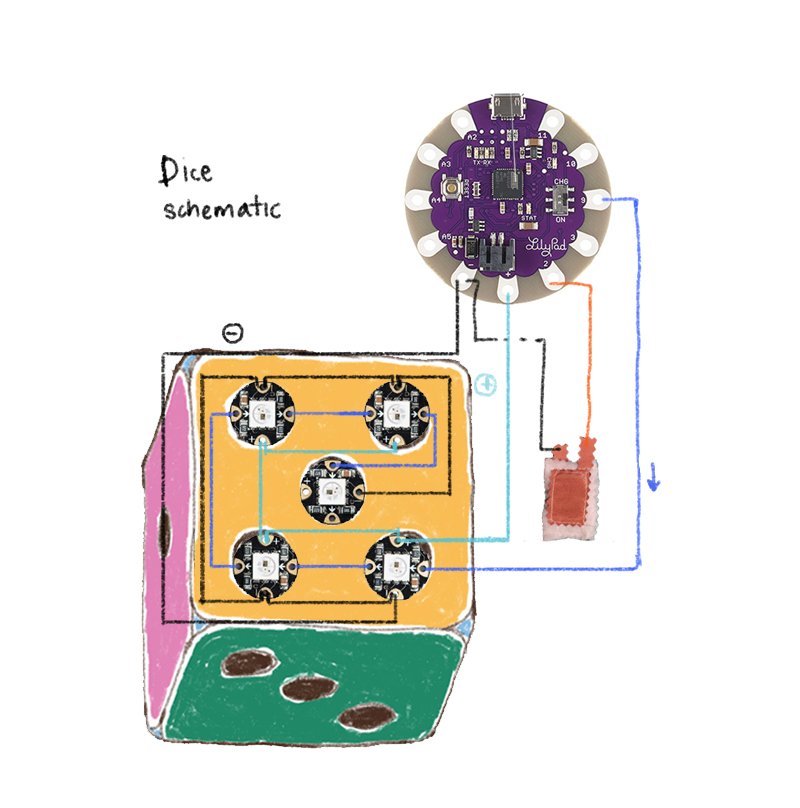
In this sense, I defined that the launch of the dice would be by programming 5 neopixels with an Arduino Lilypad that could be sewn to the product. I decided that dice had 5 elements instead of 6 in order to respect the positioning structure of the numbers and not generate visual confusion: as it is a small board, counting with 5 numbers is adequate.
The programming was developed after reading countless arduino and neopixels tutorials and combining different pre-existing examples. I also had Diego (my husband) hands, who had the patience to help me achieve the visual effect I wanted through programming while "shaking" the dice.
The idea is that, each time the digital switch is pressed, a random number appears on the dice, allowing children to practice simple additions and moving across the board. To achieve this, I used the following components:
1 Arduino LilyPad ATMEGA32U4
Conductive Thread- Stainless Steel -60 grams
LiPo Battery 3.7V - 500mA
 I had quite a bit of difficulty getting my prototype to function "systemically". First of all, I bought this specific model of Arduino, to be able to load the sketch directly from the computer with a microUSB and also to be able to insert a battery directly on the board: I wanted to avoid possible error situations.
The first chaos happened once I loaded the design - working - and decided that I wanted to modify it. When I wanted to reconnect the cable to the port on the Lilypad, I was left with the connection for the micro USB cable in my hand. Of course I took it to the supplier where I bought it, who, after breaking THREE MORE OTHER in front of me, was finally convinced that the quality of those LilyPads - produced in china - was very bad. To solve the problem I bought one produced in the US which was three times more expensive but worked perfectly.
Later, I had the following big problem: LiPo batteries between 3 and 5 volts that had a JST connector that would allow me to power the Arduino once disconnected from the computer were not available in the local market. In addition to this, I also could not get a JST connector to solder myself. Finally, luckily, I was able to contact someone who had specific batteries for drones and I got a 3.7V and 500mA with a JST connector. Hallelujah!!!
Below you can find my final codding and Schematic :)
// Switch-activated electronic dice using NeoPixel shield

#include <Adafruit_NeoPixel.h> // Include the NeoPixel library

#define PIN            9  // Define pin connecting the NeoPixels array
#define NUMPIXELS      5 // Define pixel array size
#define bright         10 // Define pixel brightness

// Define colours
#define white          127,127,127
#define green          0,127,0
#define red            127,0,0
#define blue           0,0,127
#define yellow         127,127,0
#define bluey          127,0,127
#define purple         0,127,127
#define off            0,0,0

// Setup the NeoPixel library
Adafruit_NeoPixel pixels = Adafruit_NeoPixel(NUMPIXELS, PIN, NEO_RGB + NEO_KHZ800);

const int buttonPin = 2;     // the number of the pushbutton pin
int buttonState = 0;         // variable for reading the pushbutton status
int delayVal = 5000;         // Delay in milliseconds between changing displayed number
int randNum;                 // Variable to store the random number

// Define pixel arrays used to display numbers
int num1[] = {4};
int num2[] = {0, 2};
int num3[] = {0, 2, 4};
int num4[] = {0, 1, 2, 3};
int num5[] = {0, 1, 2, 3, 4};

// Define sizes of arrays used above
int pixelCount1 = 1;
int pixelCount2 = 2;
int pixelCount3 = 3;
int pixelCount4 = 4;
int pixelCount5 = 5;

void setup() {
  pixels.begin(); // Initializes NeoPixel library.
  pixels.setBrightness(50);
  pixels.show();
  pinMode(buttonPin, INPUT_PULLUP); // Enabled internal pull-up resistor
}

void loop() {
  buttonState = digitalRead(buttonPin); // Set the button state
  delay(100);                           // Debouce the switch
  randNum = random(1, 6);               //selects the number to display

  if (buttonState == LOW) {

    theaterChase(pixels.Color(127, 127, 127), 40); // White, half brightness
    theaterChase(pixels.Color(0,   127,   127), 40); // Purple, half brightness
    theaterChase(pixels.Color(  0,   0, 127), 40); // Blue, half brightness
    theaterChase(pixels.Color(127,   0,   127), 40); // Bluey, half brightness
    theaterChase(pixels.Color(  127,   127, 0), 40); // Yellow, half brightness

    pixels.clear();

    //#1
    if (randNum == 1) {
      for (int thisPixel = 0; thisPixel < pixelCount1; thisPixel++) {
        pixels.setPixelColor(num1[thisPixel], white);
        pixels.show();
      }
      delay(delayVal);
      for (int i = 0; i < NUMPIXELS; i++) {
        pixels.setPixelColor(i, pixels.Color(off));
        pixels.show();
      }
    }

    //#2
    if (randNum == 2) {
      for (int thisPixel = 0; thisPixel < pixelCount2; thisPixel++) {
        pixels.setPixelColor(num2[thisPixel], blue);
        pixels.show();
      }
      delay(delayVal);
      for (int i = 0; i < NUMPIXELS; i++) {
        pixels.setPixelColor(i, pixels.Color(off));
        pixels.show();
      }
    }

    //#3
    if (randNum == 3) {
      for (int thisPixel = 0; thisPixel < pixelCount3; thisPixel++) {
        pixels.setPixelColor(num3[thisPixel], red);
        pixels.show();
      }
      delay(delayVal);
      for (int i = 0; i < NUMPIXELS; i++) {
        pixels.setPixelColor(i, pixels.Color(off));
        pixels.show();
      }
    }

    //#4
    if (randNum == 4) {
      for (int thisPixel = 0; thisPixel < pixelCount4; thisPixel++) {
        pixels.setPixelColor(num4[thisPixel], green);
        pixels.show();
      }
      delay(delayVal);
      for (int i = 0; i < NUMPIXELS; i++) {
        pixels.setPixelColor(i, pixels.Color(off));
        pixels.show();
      }
    }

    //#5
    if (randNum == 5) {
      for (int thisPixel = 0; thisPixel < pixelCount5; thisPixel++) {
        pixels.setPixelColor(num5[thisPixel], bluey);
        pixels.show();
      }
      delay(delayVal);
      for (int i = 0; i < NUMPIXELS; i++) {
        pixels.setPixelColor(i, pixels.Color(off));
        pixels.show();
      }
    }

  }
  else {
    for (int i = 0; i < NUMPIXELS; i++) {
      pixels.setPixelColor(i, pixels.Color(off));
      pixels.show();
    }

  }
}

// Theater-marquee-style chasing lights. Pass in a color (32-bit value,
// a la strip.Color(r,g,b) as mentioned above), and a delay time (in ms)
// between frames.
void theaterChase(uint32_t color, int wait) {
  for (int a = 0; a < 5; a++) { // Repeat 10 times...
    for (int b = 0; b < 3; b++) { //  'b' counts from 0 to 2...
      pixels.clear();         //   Set all pixels in RAM to 0 (off)
      // 'c' counts up from 'b' to end of strip in steps of 3...
      for (int c = b; c < pixels.numPixels(); c += 3) {
        pixels.setPixelColor(c, color); // Set pixel 'c' to value 'color'
      }
      pixels.show(); // Update strip with new contents
      delay(wait);  // Pause for a moment
    }
  }
}
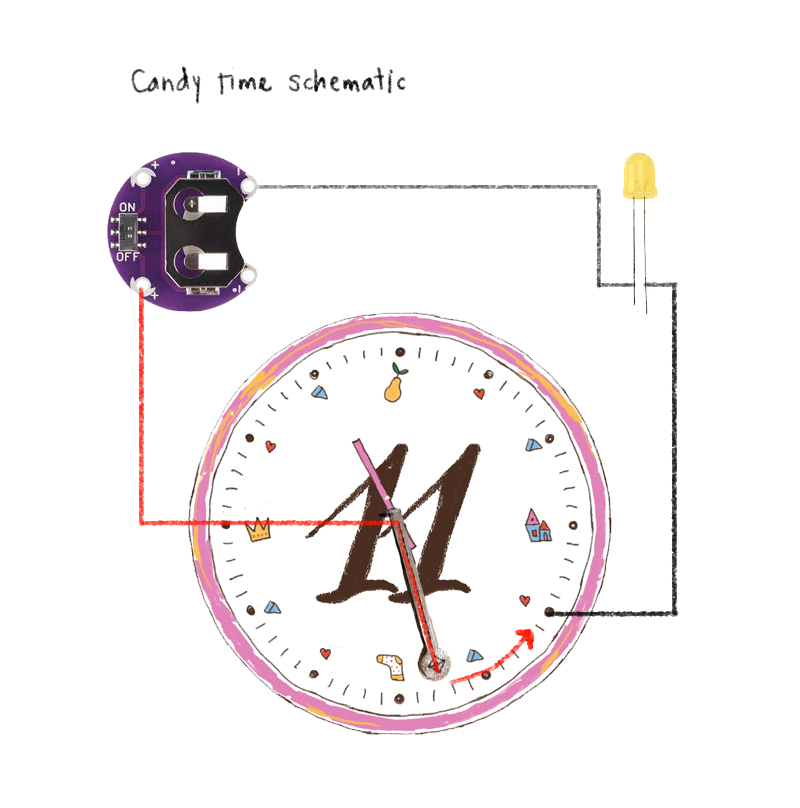
7. e-textiles
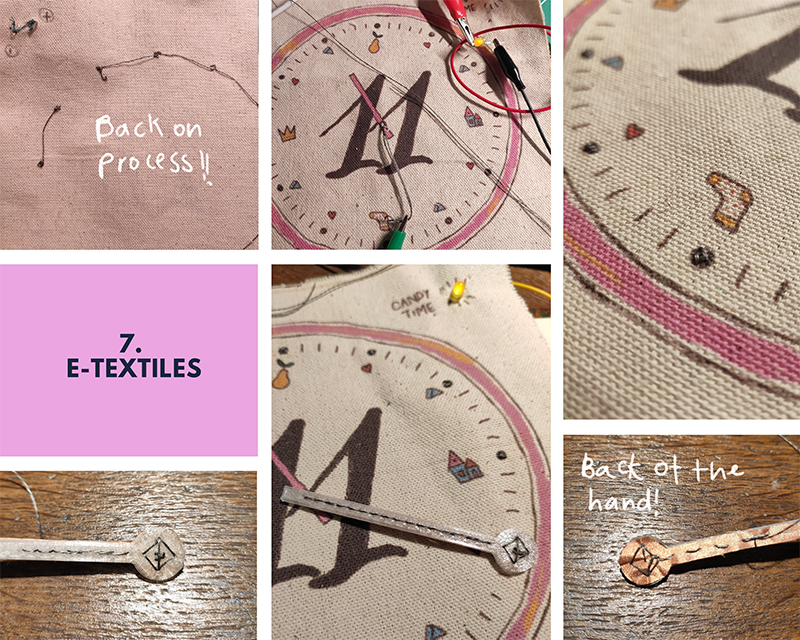
This process, while very easy to develop and implement, adds a fun touch to the game. How does it work? All sharp hours are embroidered with conductive thread, but only one of these hours gives continuity to the circuit. Thus, placing the minute hand at 4 o'clock closes the circuit and turns on the light.
To make the clock hand, I developed a simple morphology on Rhino that then was 3D printed with PTU filament to allow flexibility so that it is less likely to break under the impact of use that a blanket can have. This piece has conductive fabric on the back that is attached to the piece (it has holes to enable easy sewing) by conductive thread. This same thread is the one that connects the piece to the blanket, and continues the circuit by means of invisible stitches on the back of the print.
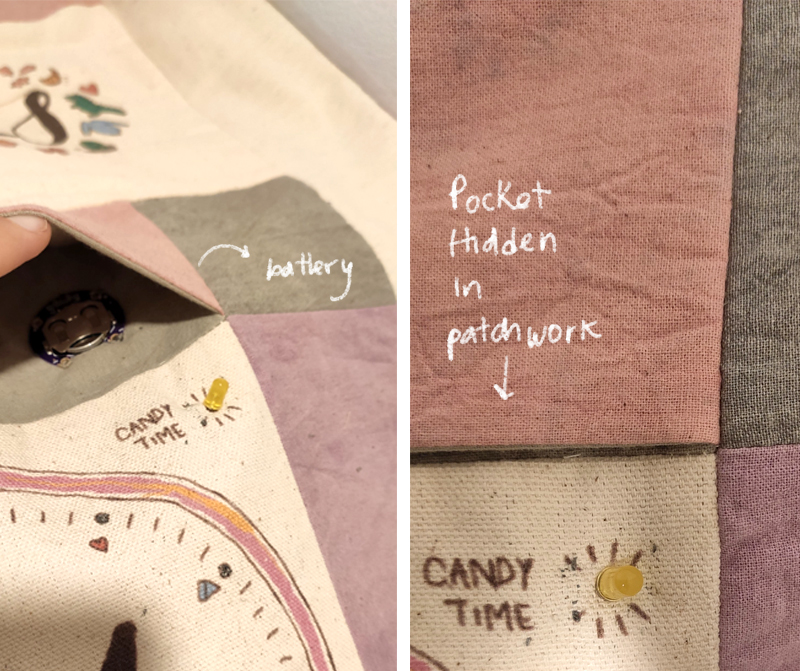
The circuit is powered by a 5V battery housed on a LilyPad battery holder. In the same way as in the dice circuit, the battery is hidden in a pocket that is camouflaged between the patchwork cuts, allowing the source to be replaced / turned off / on when necessary. Bellow, you can check out the circuit schematic.
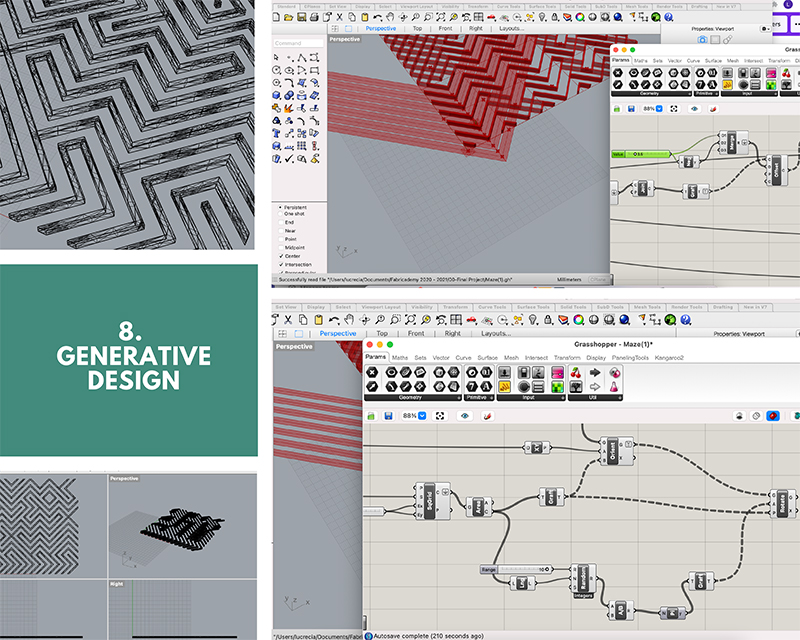
8. Generative Design
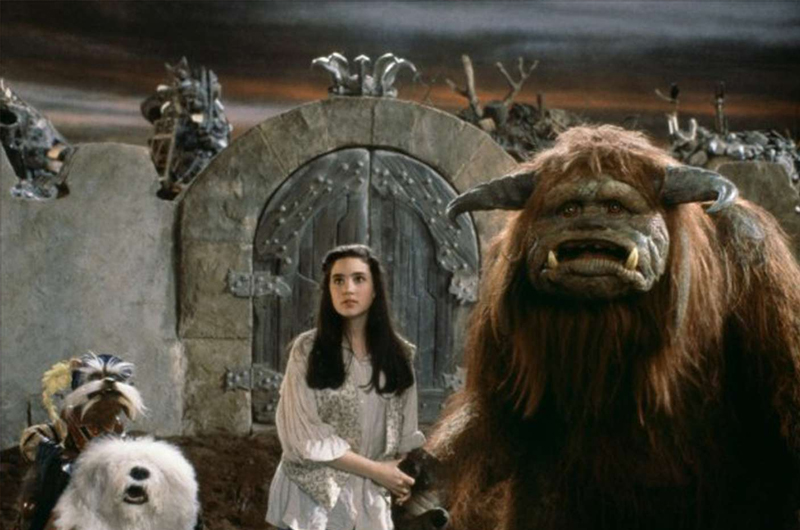
In addition to the beautiful emotional memory generated by the mazes in this film, the characters particularly remind me of my children: the protagonists are a baby and a rebellious girl :) all of them immersed in a fantasy world.
 Mazes stimulate logical thinking and executive functions, while improving visuospatial skills and psychomotor coordination. They also train problem-solving strategies, while enhancing critical analysis and creativity. Given this context, it seemed an interesting element to include one in the game and especially to do it in three dimensions, to be able to involve 3D printing on textiles in the process.
To make it, I decided to go ahead with Grasshopper, to get a little more familiar with the tool, and to arrive at the ideal dimensions for printing. This allowed me to modify the scale of the walls, the corridors, and the complexity of the labyrinth easily through a “number slider” until I achieved the desired dimension.
In this sense, I came to a maze tutorial made by Junichiro Horikawa Youtube channel that was quite useful to materialize the process. I will share it below. Once developed, I converted it to a .stl file and printed it. I will detail the printing process in the next section.
9. 3D Printing

I used 3D printing on two squares of the game. As I mentioned earlier at square 11 through the clock hand, and at square 19, through the maze.
The labyrinth serves as a "track" for little balls that must be moved through it by blowing a straw. This part of the game has the complexity of finding the path of the selected color (the ball has to pass over the polka dots of a given color) and also managing to take the path with the blow.
Initially, the labyrinth was made to be printed directly on the textile. As it was a very thick cotton canvas, it was very difficult to get the print to stick to the fabric so I made the decision to sew it by hand, embroidering it. I was satisfied with the results as it looks and feels very firm and solid and there is no possibility of it coming off.
The print was made with 1.75mm transparent colored TPU. I would have LOVED to use another color but transparent and white were the only two colors I could find in the whole local market!
Here you can download the files of the labyrinth and the clock hand.
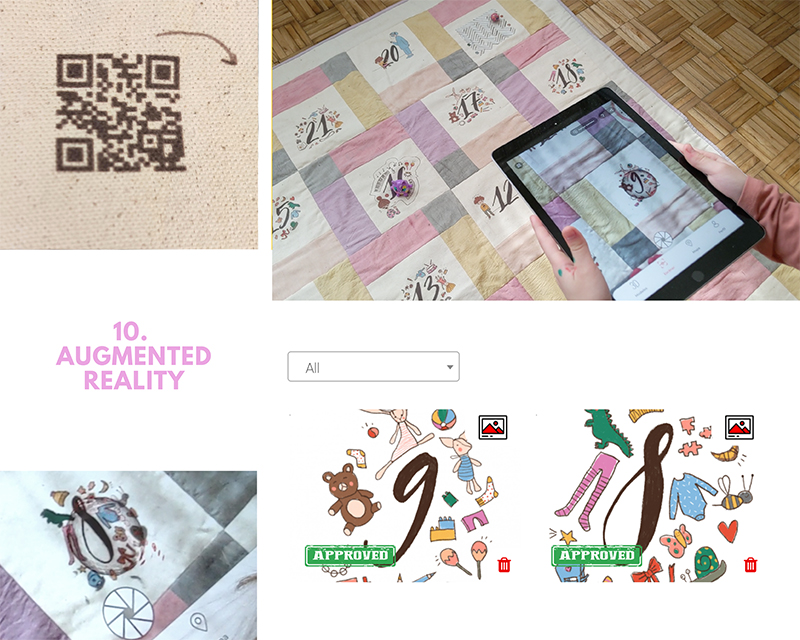
10. Augemented Reality
Augmented Reality as a specific technology was not particularly worked on in Fabricademy, but I still found it a lot of fun to link it to this project, and I certainly think it is one of the great seasonings of the game.
From the beginning I wanted the quilt to play music. I valued different possibilities, but none of them convinced me because it gave the product a complexity that didn't make so much sense: I thought about developing a textile speaker, embedding a non-textile speaker, making the quilt to communicate via Wi-Fi and turn on another device... and many other options.
Finally I began to explore possibilities in relation to Augmented Reality. AR is the term used to describe the set of technologies that allow a user to visualize part of the real world through a technological device with graphic information added by it. The device adds virtual information to existing physical information so a virtual part appears in reality. In this way, tangible physical elements are combined with virtual elements creating an augmented reality in real time.
There are many applications that explore AR, but the vast majority either do not work very well -at least for the functionality I wanted to provide- or require a very expensive paid subscription.
What I wanted to do was to work through the markers assigned to the textile so that once the device screen identified a certain marker, it would play a song.
The great difficulty was given in the recognition of the marker in the textile, since the great majority of the applications work with very precise images, printed on a paper. Because of the fabric texture, the vast majority of programs did not recognize the markers.
After many tests I managed to materialize the results I wanted through Arloopa Studio. This application has a platform that allows you to determine markers, assign them a specific resource and then reproduce each of them. This one was the only platform where I could easily detect markers in the textile. Here you can see a video of what I achieved.
One of the markers is associated with Olivia's favorite song and the other with Clemente's. The objective is that they, without knowing what these markers are, can find them by exploring by moving the device across the blanket. These markers and their songs can vary infinitely, allowing renewal in the game and therefore its evolution over time.
It is important to mention that another resource used is the QR code. Although it is not AR, through a QR code printed on the textile, you can visit a web page that I developed for the game, where you can find the instructions to play it. The code is dynamic code and not static, which allows you to change the address of the site to which the code directs, preventing it from becoming obsolete.
11. 3D scanning
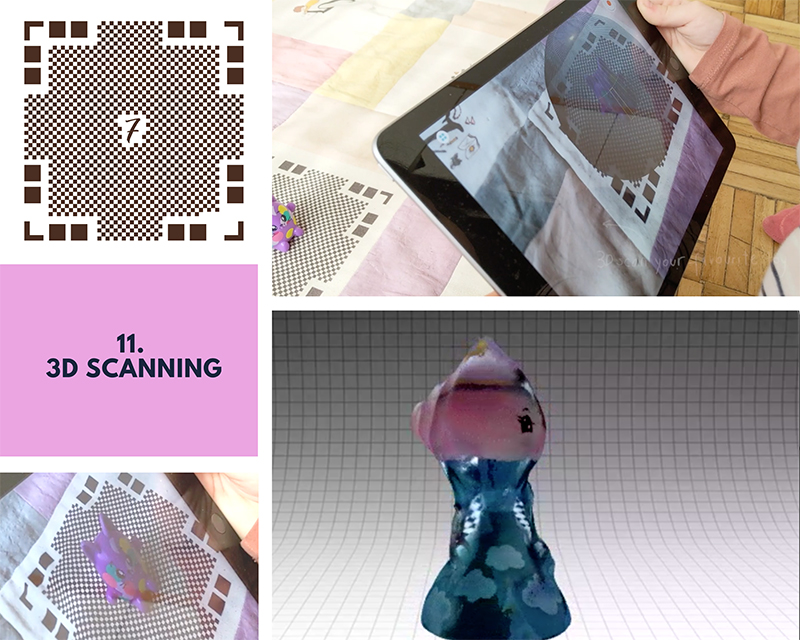
That phrase came from Oli, the second week of Fabricademy while I was doing “Digital Bodies” assignments and when we were at home trying to scan objects. In this sense, I realized that it would be entertaining for them to have their own "base" for scanning toys.
What I developed in this case was very simple: the QLone platform, through which objects can be scanned, offers the free download of this grid that allows a correct scanning of small products. I printed the grid on the blanket so that it would allow them to scan their own dolls.
To be honest, it has some difficulties in detecting the grid on the textile (same difficulties as those generated by augmented reality) but it still allows scanning.
12. Thermochronic Inks
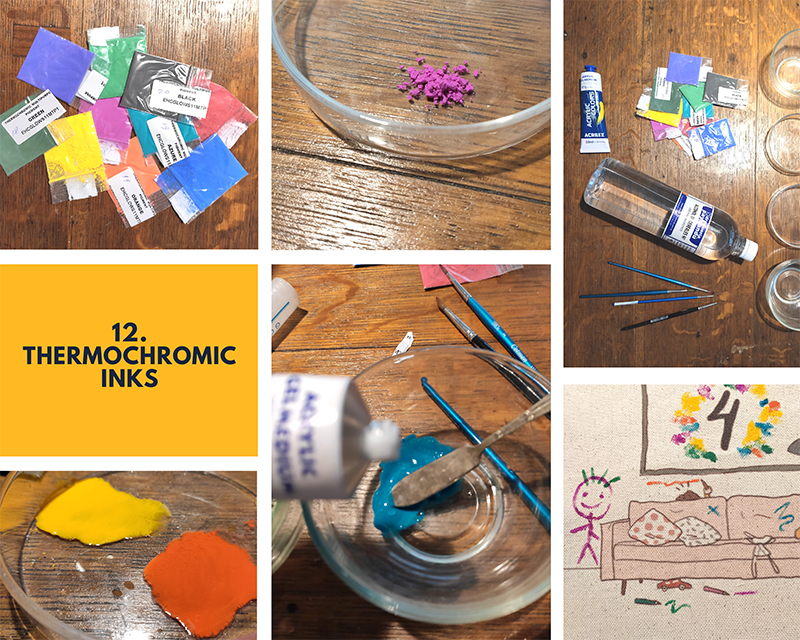
So why shouldn't I make it happen in this game? That is why I invite my children to, through the magic of the heat, have the opportunity to clean, even for a little while, the chaos that exists in my house.
What I did, then, was to work with thermochromic pigments on a fabric previously printed with the drawing of my living room. Then I painted with the pigments, which activate and lose color at approximately 36 degrees. With an iron, a bag of seeds or a dryer, the stains and drawings go away and everything is flawless.
To achieve a paint that ranged from color to full transparency, I had to work with a clear acrylic gel / medium. This one worked for me in Uruguay. Although I did not achieve an absolutely colorless mixture, it is quite close to what I was looking for, especially when the color layer is very thin.
To materialize the colors, I first diluted the pigments in a few drops of isopropyl alcohol. Immediately, I added a minimal amount of the gel and mixed it. Then I painted with brushes on the canvas.
Ta-daa!