4. Biochromes
This week, we're experimenting BIOCHROMES.
I'm really excited about it, and can't wait to see the results of our experiences !
We gathered in our Oullins's home on wednesday morning to experiment altogether...
Dyeing means organisation
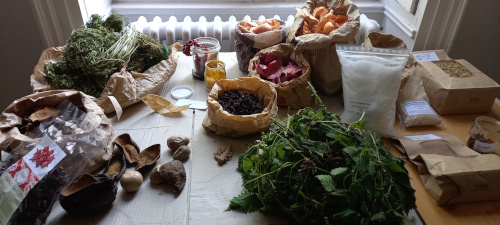
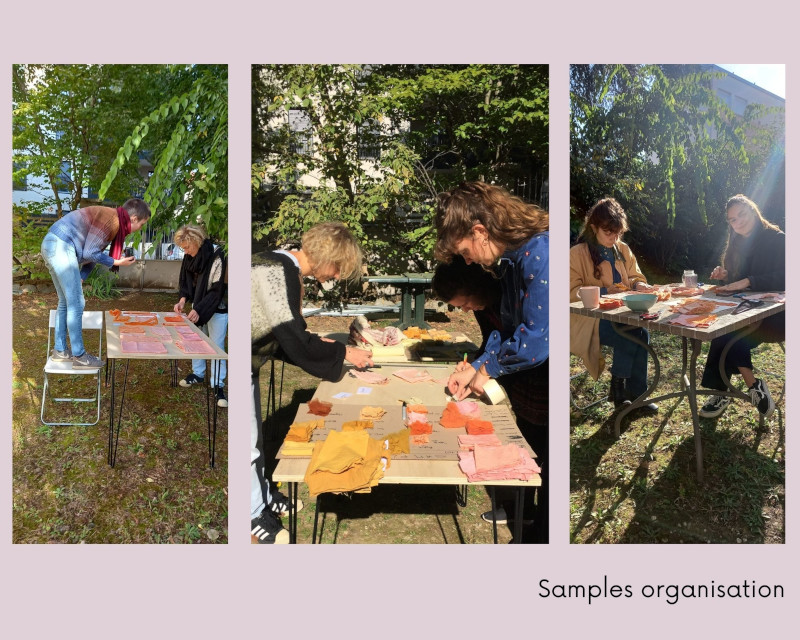
We set up all the materials (fibers and vegetals), and began to make a board to organise the process.
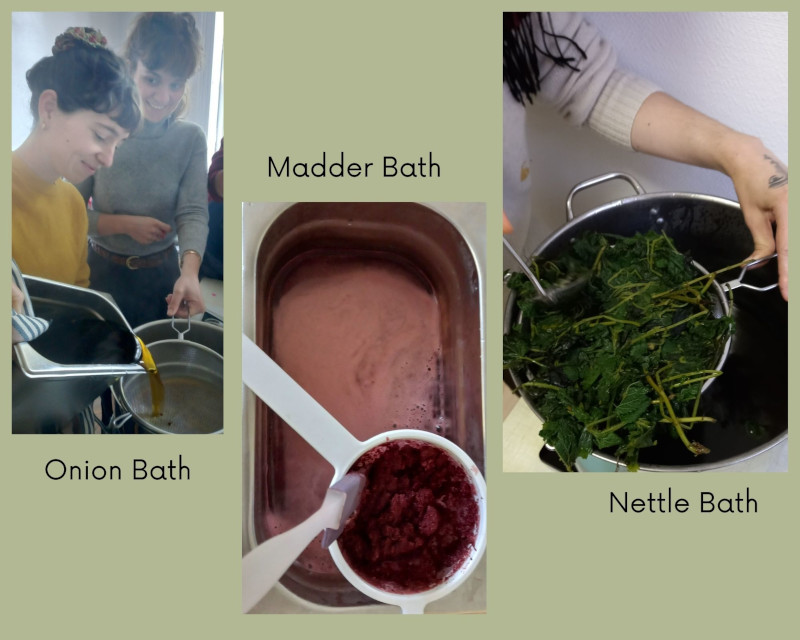
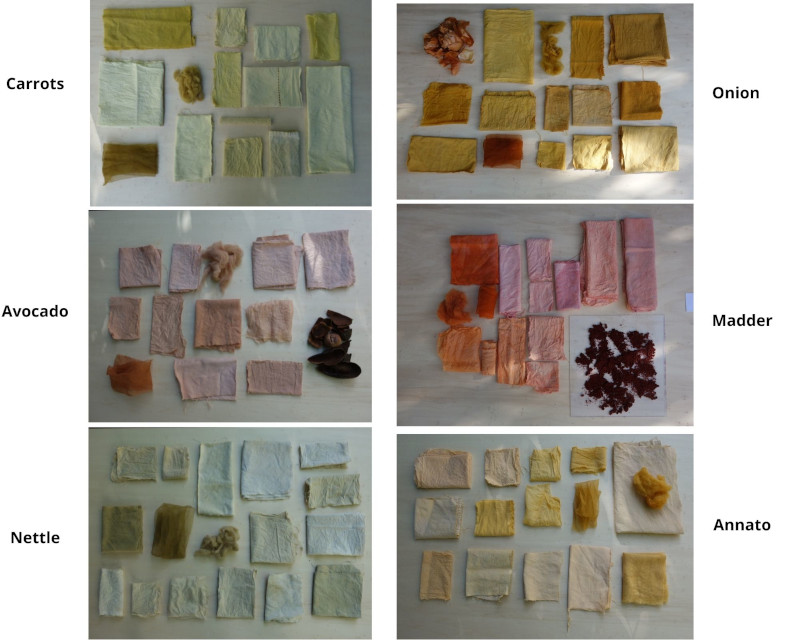
Plants and vegetals we are going to dye with : Avocado, Onions, Annato, Carrots tops, Madder and Nettles.
... on those different plant and animal textiles : silk, silk organza, coton, wood..., which all have different properties, and as a result, don't dye the same way and with the same intensity.
We decided to do 6 baths, with 6 different dying stuff.
We grouped different samples to test in the different baths.
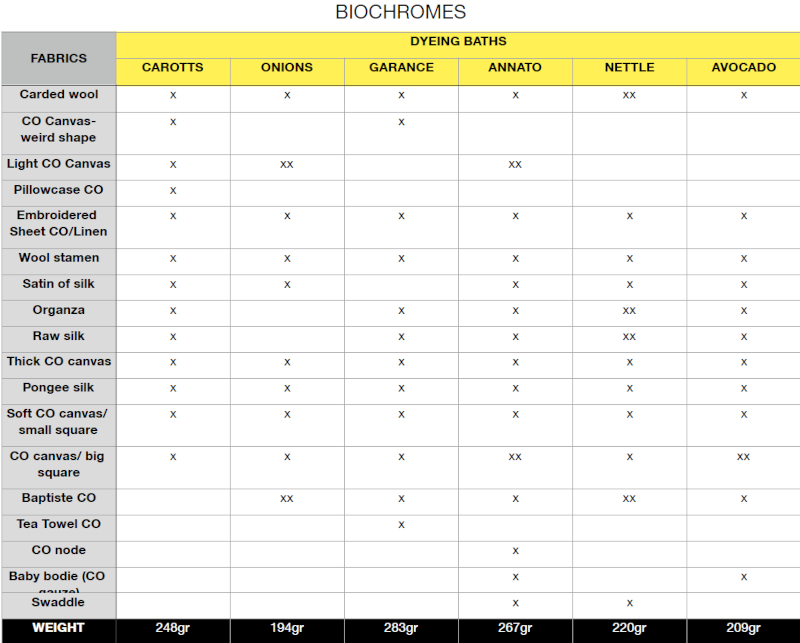
Then, we weighted different sample groups to calculate different ingredients which we needed to do mordanting baths.
- Madder : 283g of fibers
- Onion: 194g of fibers
- Leaf carrot : 248g of fibers
- Avocado : 209g of fibers
- Nettle : 220g of fibers
- Anato : 267g of fibers

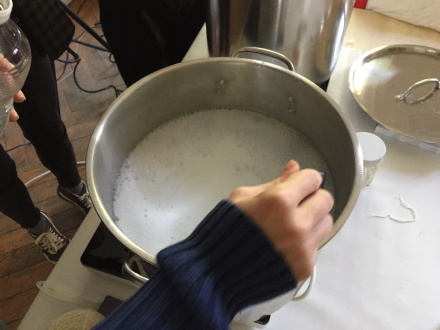
Mordanting fibers
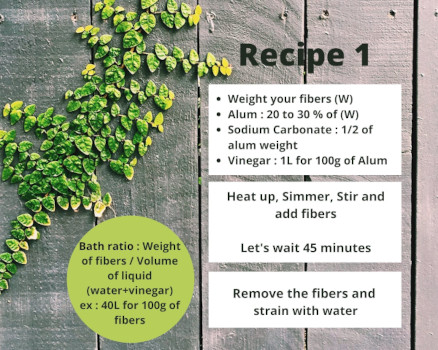
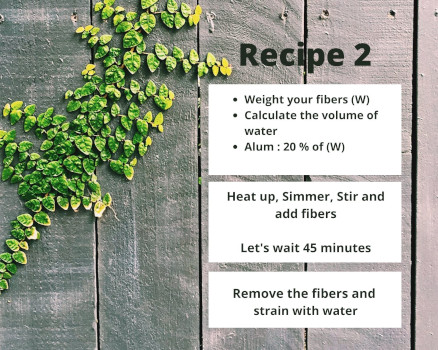
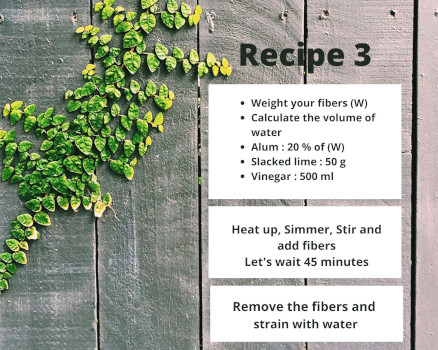
During this step, fibers are immersed in a bath of water with mordant. The aim is to prepare and open the fibers to the dyeing process. As there are many different recipes, and that it can influence strongly the colour, we decided to make 3 different recipies:
Recipes
| Mordanting Bath | |
|---|---|
| Let's cooking ! | |
 |
 |
 |
 |
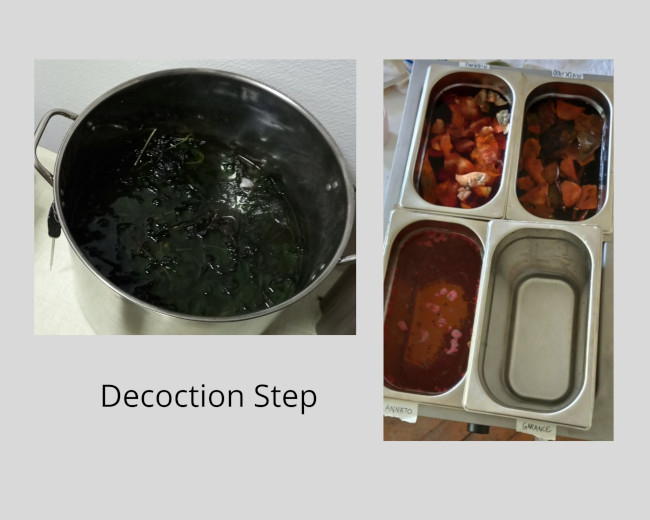
Decoction Bath
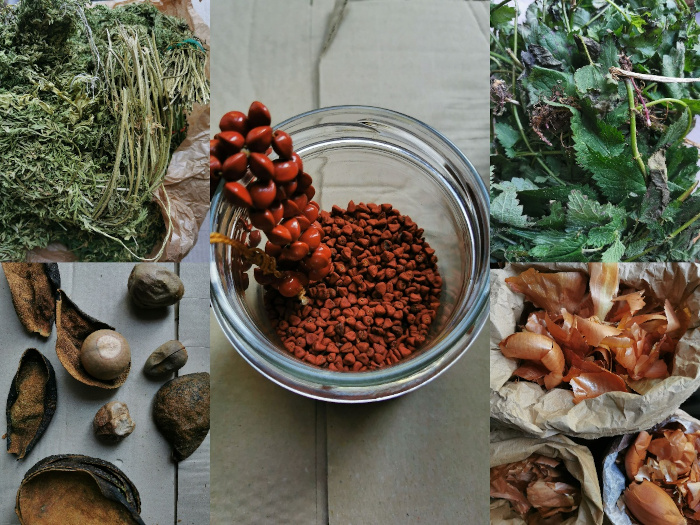
Then we weighed the different dying stuff to prepare and make dyeing baths.
Quantities to add according : - Dry dying stuff : 100% of fiber weight - Wet dying stuff : More of fiber weight - Dying extract : 10% of fiber weight
Weight of different dying stuff for our baths :
- Leaf carrot : 75g wet and 125g dry
- Onion : 44g dry (because colour is very intense)
- Madder : 28,3 g (extract)
- Anato : 100gr dry (total weight of what we have)
- Nettle : 350 g
- Avocado : 210g dry
Except the madder, the different dyeing stuff was immersed in hot water to make the decoction. Baths remained one all night in hot water to activate the dye colour.
1 hour minimum of maceration is needed (the more time the better) In our case we left the baths overnight, except for the madder, which is an extract. That we did the same day. Note: Do NOT boil the decoction/maceration
The Dyeing Process
Once the fabrics rinsed from the mordanting bath, they are ready to be immergerd in the dying bath.
- Filter the decoction.
(it’s possible to add water to the decoction so that the textile are soaked enough)
When filtering the bath we kept the ingredients for future experimentations with inks/pigments - we placed the different ingredients on cardboard and let them dry, we grinded some, as carot’s leaf and nettle, directly before drying.
-
Raise the temperature of the dye to around 45 °
-
Once at 45 °, we put the fabrics into the bath
Textiles should not be too tight in the bath and be easily submerged, so that the dye can spread harmoniously on the fibers and obtain a uniform shade and result.
- Then continue raising the temperature slowly/gradually to around 60/70 °
Stir the textiles regularly in the bath
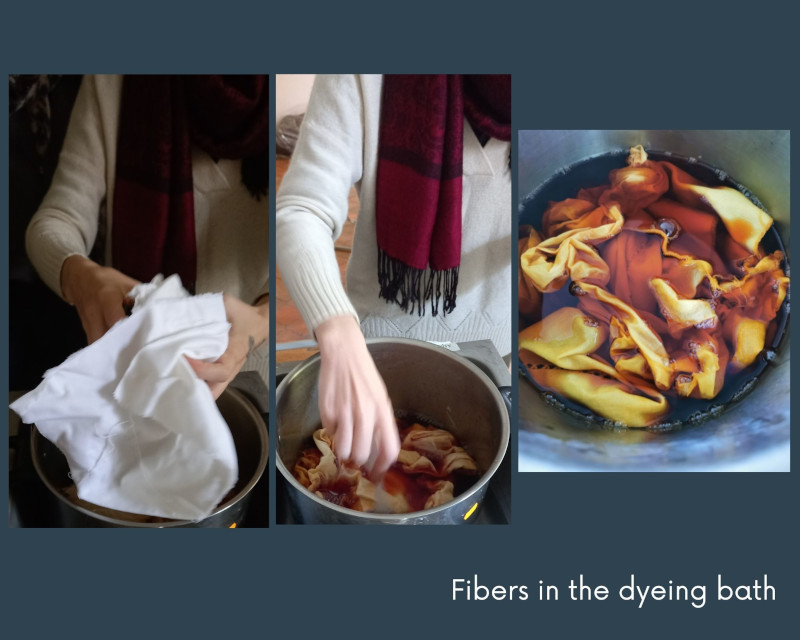
- Once the bath temperature is around 60/70 ° - time/count 45 min before taking off the textiles of the bath
Process and time followed for each bath:
| Time in the dyeing bath | |||||
|---|---|---|---|---|---|
| Ingredient | IN | 70° | Minimum Time (45min) | OUT | TOTAL time in the bath after 70° |
| Leaf carrot | 11:50 | 12:35 | 13:20 | 14:10 | 1H35 |
| Onion | 11:15 | 12:00 | 12:45 | 13:40 | 1H40 |
| Madder | 12:51 (decoction at 11:30) | 13:35 | 14:20 | 15:20 | 1H45 |
| Annatto | 11:00 | 11:45 | 12:30 | 14:20 | 2H35 |
| Nettle | 11:55 | 12:40 | 13:25 | 15:25 | 2H45 |
| Avocado | 11:30 | 12:15 | 13:00 | 13:40 | 1H35 |
Results
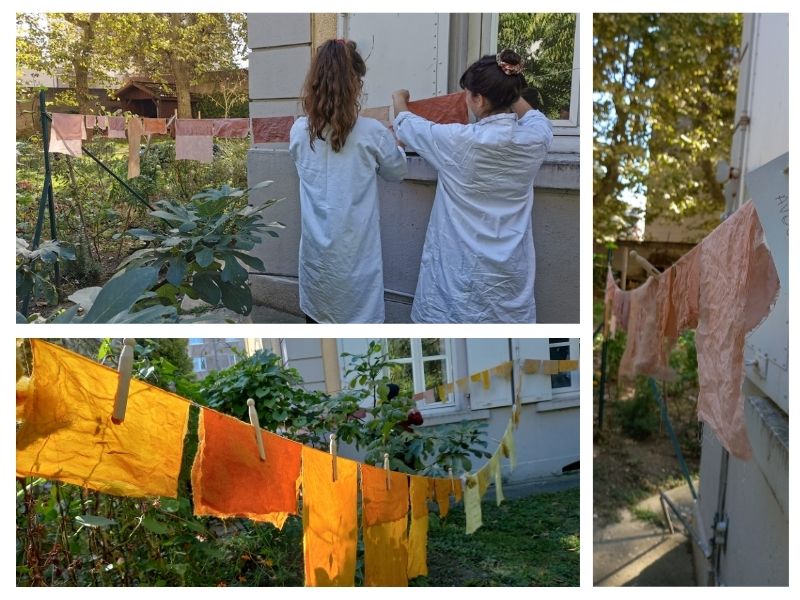
Wool and silk are delicate fabrics so they need to be washed with attention to avoid thermal shock. In general, fabrics have to be well washed with clean and clear water.
We hung dying fabrics outside so they dried super quickly.
Samples
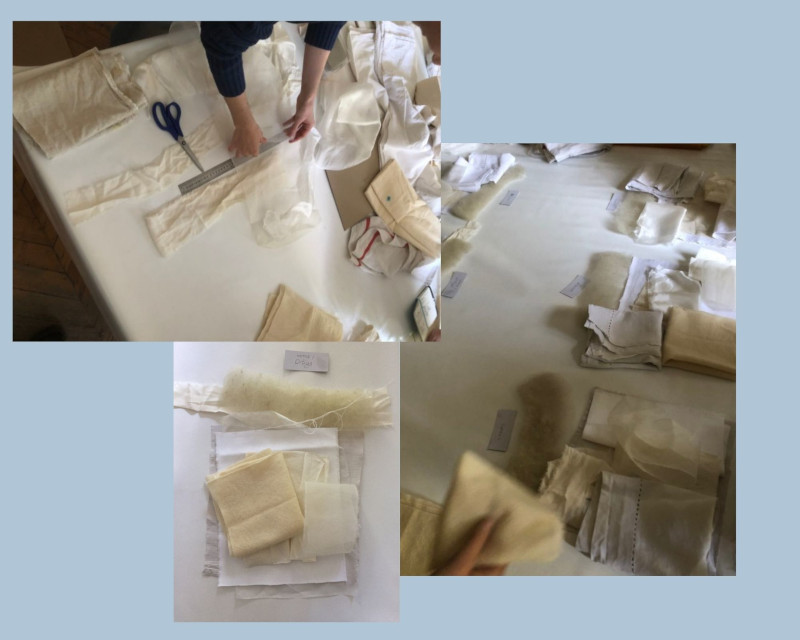
When the fabrics were dry, we took pictures of every pieces, and made compositions out of it.
And then last step was to organise and cut a piece of every fabrics with the different dyes in order to put it on a book : One per fabricacademers and one for the TexileLab.
For not making mistakes we drew our last board: Per dye, Fabrics names (fr/eng:) and piece of fabric
Other experiences
Iron experiments
A way to modify the obtained colours is to modify them with Iron. This will give you beautiful greys and khakis depending on which plant you used first.
Recipe for a solution with 100% Iron:
- 200g Iron (sulfate)
- 2L Vinegar
- 100g Sodium carbonate
To use it for modifying the fibers' colours, you need to dilute this solution and make it with a maximum concentration of 10% Iron otherwise it will damage the fibers. For example, if you made 1L of solution 100% Iron and you want to have 10%, you need to dilute 100mL of Iron 100% in 900mL of water (at room temperature).
Be careful : chemical reaction as you add the Sodium carbonate ! ...You need to do it step by step !
Results of the samples after being immersed in the iron solution :

Vegetal dyeing experience with Louise
Screen Printing
Screen-printing paste = extract + water + gum + oxalic acide (anti-precipitant) + mordanting agent Preparing the gum tragacanth gum : 30g for 1L hot water guar gum: 20g for 1L hot water
Preparing the paste (for 100mL) 1g (2%) to 5g(5%) of extract | 50mL hot water | 5g alum | 0,5g oxalic acide | 50 mL gum
For textiles made of cellulose, you need to add a third of the volume of beaten egg whites to the paste. Then, after screen printing with this paste, you have to fix the screen printed pattern by putting the fabric in steam for at least one hour. Note : If you are working on textiles which are already naturally dyed, you can add Iron to the paste (with the same extract). The screen printed pattern will appear the same colour but darker. Note : this paste isn't opaque ! The chosen colour will blend with the background's colour. For instance, if you screen print blue on a yellow fabric, the screen printed pattern will turn out to be green. Note : the screen printed patterns are printed into the fibers (not only on the surface)
Experimenting Kombucha with Surzhanna
Our Fabricademate Surzhanna shared her experience of making Kombucha. I warmly thank her for her tutorial on that subject that I never heard about before !!
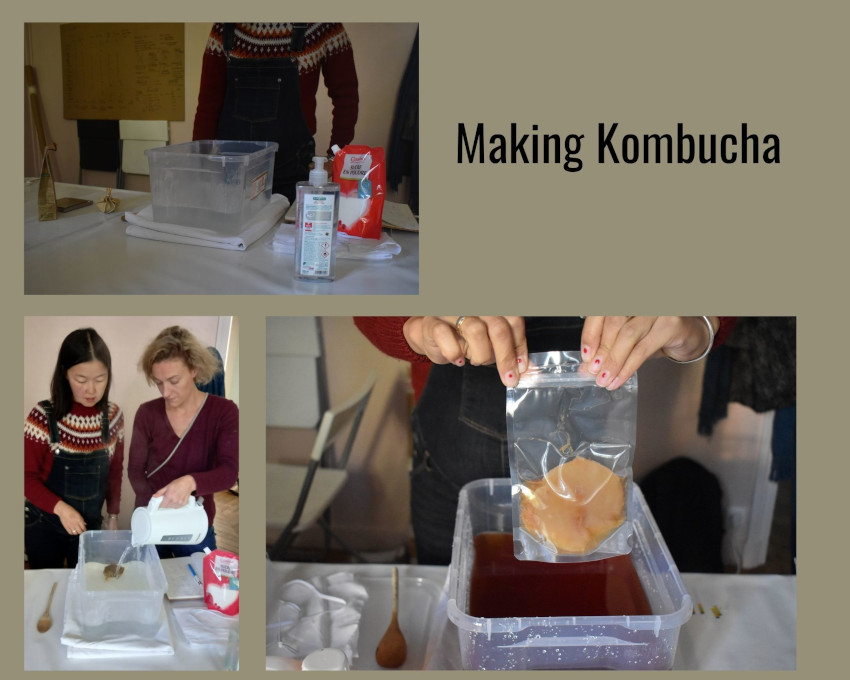
Here is her step by step process, PART 1 (See WEEK 6 for PART2) :
We used a classical recipe with black tea to start with and later on we might make other recipes.
So here is the recipe:
For 1L of water
- 1,5 to 3 gr of tea ( we used black tea,but it can be any tea, depending what color of material you want)
- 100 gr. of sugar
- Vinegar from 0 to 100ml (depending on PH of your liquid)
- Scoby mother
In our case as we want a little bigger of a piece of Kombucha material, so we made 7 L of water.
For 7L of water - 21 gr of black tea (+ filter bag or tissu) - 700 gr of sugar - Vinegar - we added around 100 ml of vinegar untill it got to PH 3 - Scoby mother - 15cm ø
Steps: Prepare all the ingredients, tools, utensils that you need at your workspace.
First we sterilise our equipment, especially the tray where you gonna grow your material and make sure that all is clean as Kombucha can get contaminated by various microorganisms around us.
We boil water in a pot and add tea into it and keep boiling a bit, in our case we didn't have extra pots, so we added boiling water directly in a plastic tray and then we added tea in a coffee filter bag closed with a thread that leaves don't go all over.
And then we add sugar and mix it well until it dissolves, the best to do is to add it while its hot, it will work better.
Now its time to let it cool down until room temperature, for us it took almost 2 hours for 7L of water. If we add Scoby into hot liquid it will most likely kill it, so we better wait.
When our liquid has reached the room temperature we meausure the PH with PH strips or PH meter, french tap water meauseres around PH 7. So we added around 100 ml of Vinegar until it got to PH 3.
And now when we set up good sweet, acicid conditions we can add our Mother Scoby, make sure you do it with gloves or desinfected hands.
We cover it with thin breatable cotton fabric that insects and dust can't get in, put elastic around that its well covered and can be easily open for our weekly check-ups.
Place it in a warm (ideally 30' degrees Celsium) temperature, we put it on a special matrass for germination of seeds. The speed of growth depends on the temperature of the ambiance.
And the last important thing - don't move the tray while the Kombucha is growing, keep it in a dedicated place. The desired Kombucha material will appear in about few days - week as a thin layer. The second part of the Kombucha travel will be later on the Biomaterials week.
Inks and Pigments with Diane and Julie
We made pigments from the red onion dye bath. Pigments can be used for inks, biomaterials, oil paint… Pigments dissolve very well in oil but not in water.
This is the recipe :
Ingredients : 200mL of the dye bath, 20g of alum, 5g of sodium carbonate
put 200mL of dye bath in a jar dissolve 20g of alum in hot water in a pot dissolve 5g of sodium carbonate in hot water in an other pot put the alum solution in the jar (with the dye bath) add slowly the sodium carbonate in the jar, be careful because it may go up let the jar oppen for 2 hours
The solution will separate into 2 phases, one liquid and one solid. After 2 hours, it must be filtered (we used a coffee filter), then dried and grinded. We didn’t have time enough to grind it because it wasn’t dry.
Diane showed us how to make ink from red cabbage. She immersed it and boiled it in hot water for 1h. Then, we took some of the liquid and put it on paper : it gives a purple. Then, we tried to add different elements in the ink to change the colour :

There is another way to make ink with 90% ethanol that we didn’ tried. For instance it works very well with turmeric, we have an example of this ink in Oullins.
We also tried to make screen printing ink with guar gum. We mixed 200mL of madder dye bath with 20g of guar gum and we heated it up. This experiment was not successful : the mixture was too thick and viscous, moreover guar gum didn’t melt properly.

Bacterial Dyeing
We couldn't experiment this week, but this part interests me a lot, so I'll talk about as soon as our bacteries will be ready !
Meanwhile, let's learn about the process with Cecilia's tutorial :
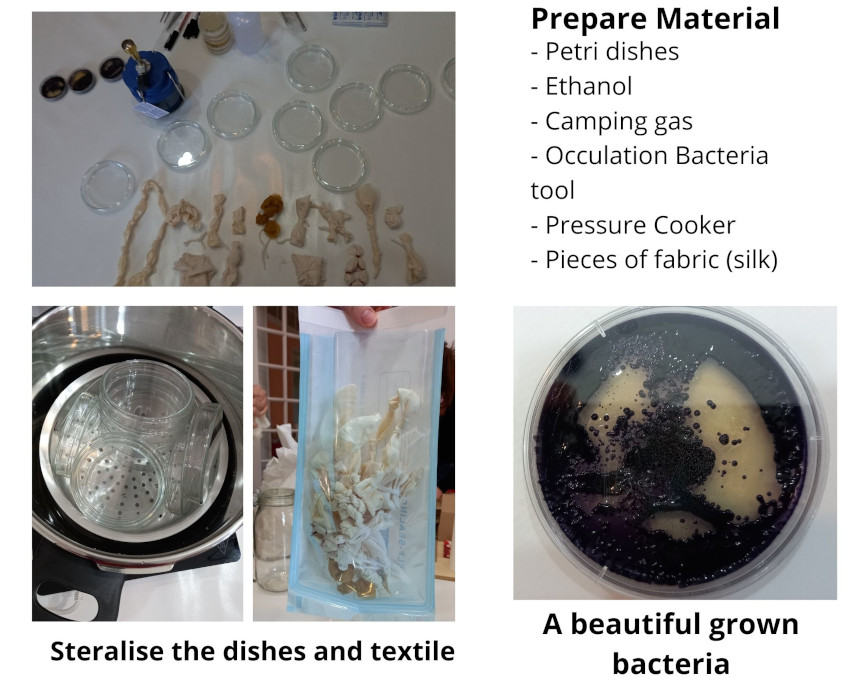
Today, 25th of January, we all gathered in Oullab (Oullins'Lab) to experiment the bacterial dyeing process !!!

After the sterilisation of the textile pieces and of the tools, use the camping gas and the ethanol to sterilise the area and the inocculation tool. Keep the petri dihes and the bacteria near the camping gas, and open the boxes quite quicky. Pour the nutritive solution (here, the liquid ME 001) on the textile, then take a part of the bacteries to spread on your textile, and put the lid on it and close with parafin. Let it
Process
Material needed :
-
A pressure cooker to steralize the tools
-
Fabric : For this experience, we're using a light and aerian silk like chiffon. It works usually well on this kind of fabric because bacteria can spread easily. The piece can be folded in shibori to make beautiful prints.
Useful links
-
Great source of inspiration and recipees Botanical Colors
-
About bacterial dyeing Faber Futures
Videos
Dye cotton with Avocado Pits - REMIX EL BARRIO- Textile Lab Barcelona