8. Wearables
This week is the second part of week 5 on E-Textile.
Once we called our old electricty and physics basics to mind, we can talk about their application in wearables.
I am very impressed by projects that I've been discovering through my researches, to me, it's a kind of MAGIC !!!
This week I couldn't go to Oullins, so that was a "work-on-my-own-week".
I really appreciated the course of Liza and Emma's tutorials which completely changed my mind about electricity : THANK YOU for that !!
First I realised during the tutorials that I absolutely needed to make another digital sensor, mine was the "quick and dirty" one from the week on E-textile and it didn't work that well, and I couldn't experiment correctly which frustrated me a lot ! So I made a new sensor, and took the time to understand better the notions we had seen on week 5. That was my introdction !
Then I experimented the circuits and sketches on Arduino, using sensors and neopixels ( see later on in this page, and made as well the experiments of making a speaker.
Putting sound in textile has been a kind of revelation for me 🤩 : It litterally made my eyes sparkling
In fact, it rassembles my two passion, music and textile, and I 'm just absolutely amazed by what you can quite easily obtain as result !! So I hope I could take more time later to dig more deeply in this subject...
So here is the new Me, after the Wearables' week ...
Research and Inspiration
I talked about lots of artists in Week 5, so for this week, I 'm just going to enlight 2 projects that I really LOVE!
Movimiento
by Maite Sosa Methol, Final project Fabricademy 2020-21,
That is the first "final project" that I came across when I saw a presentation of the Fabricademy program. And I am still deeply moved when I look at this dress that hypnotise me. Congratulations Maite and thank you for the emotion you gave me !
"Equiped with a motion sensor and light, this interactive costume uses the movement of the performer's body to come to life. For this project, light characteristics such as intensity and brightness are used to enhance different qualities of motion."
Movimiento - Fabricademy Final Project 2021 Maite Sosa Methol, FabLab MVD from Maite Sosa Methol on Vimeo.
TextileXY
TextileXY is the second project that stroke me, and more globally, all the work of Maurin Donneaud
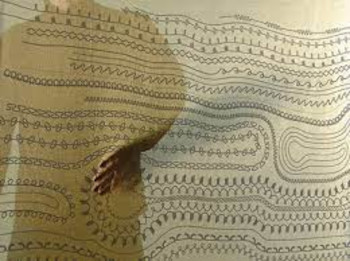
The project is open source, you can find all the process on its website .
TextileXY is a poetic illustration of how the world of weaving and electronics can so perfectly match with one another. Fabrics are given the sense of touch thanks to textile sensors layers put on its surface. This "TextileXY" sends information to the software of the localisation of the fingers, and become a wonderful way of expression to the performer who can interact with the surface, moving its hands to create sounds or a melody.
» » In this video, you can see how the performer manages to play music by caressing the fabric.
When you apply some pressure on the surface of the textile, it creates a contact between the 2 layers of fabric, so that courant can run from the first layer to the second. Depending on where the pressure is made, the courant runs a shorter or longer way, and gives different electrical values corresponding to that position.
...More video about it
WEARABLES PRESENTATION
In this course, Liza and Emma presented us all the different fields of application, showing and explaining how electricity can be implement in a garment. Some approaches are more experimental, artistic or futuristic, but in the end, they're all in the intersection of textile and electric devices.
Here are a shortcoming of what I saw and experimented through this electrical week, bringing some light and poesy in our dailylife !
...Fiat lux et facta est lux "...
1.VISUAL APPROACHES
There are different Visual approaches, through different tools and techniques
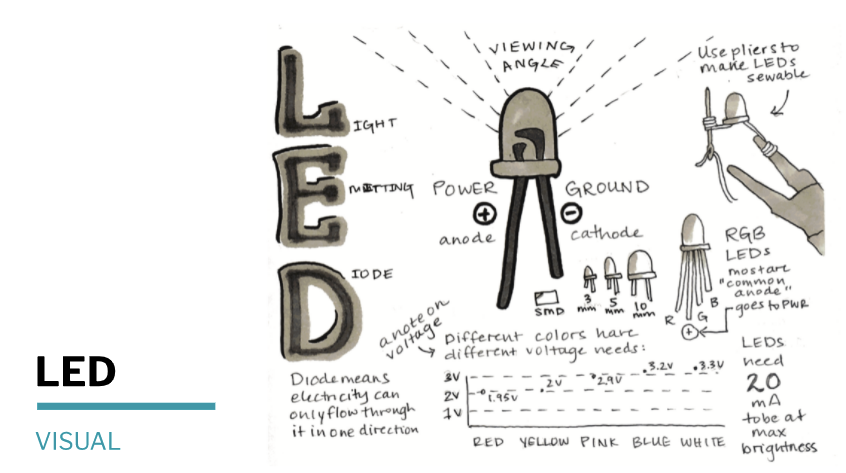
LEDs Experimentation
First, we experimented Arduino and Led :
Remember :
-
Classical Resistor when you work with Arduino and Led is 220 Ohm
-
Led has an orientation, the long led goes to the pin, the short to the GND

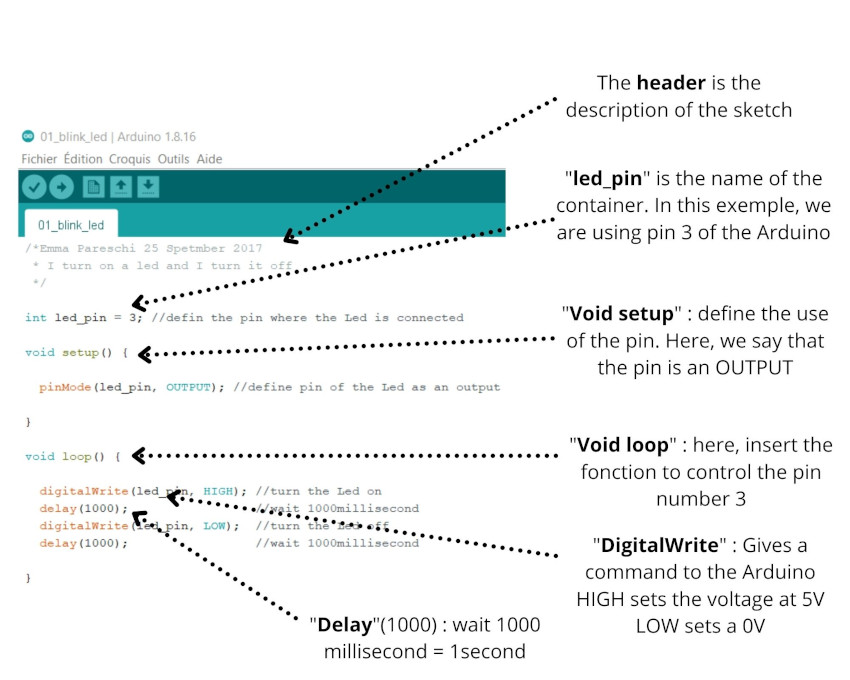
Arduino Sketch : To blink the Led, we are using this sketch of Arduino " 01_blink-led"

Focus on an Arduino sketch
» » Once you're circuit is ready, and your sketch installed, plug the Arduino to the computer
-
Remember that when you connect jumper wires to the Arduino, be sure that the Arduino is not powered, since you might damage components or the Arduino
-
Check that the Board is Arduino Uno
-
Check the Port, selecting the USB modem
-
you can "verify" the sketch before uploading it
-
Then press "upload" to launch the programm
-
Note that Arduino is repeating continuously what is written in "Void loop"
Using a DIGITAL SENSOR
First, let me show you my new digital sensorrrrr !!!

Be careful you can't directly connect the digital sensor to the pin, you need an extra resistor of 10 Kilo Ohm.
To make it easier and use less component, we're gonna use the intern resistor of the Arduino, writing it in the code of the sketck, defining the pinMode as "INPUT_PULLUP", otherwise the reading of your sensor will be wrong.
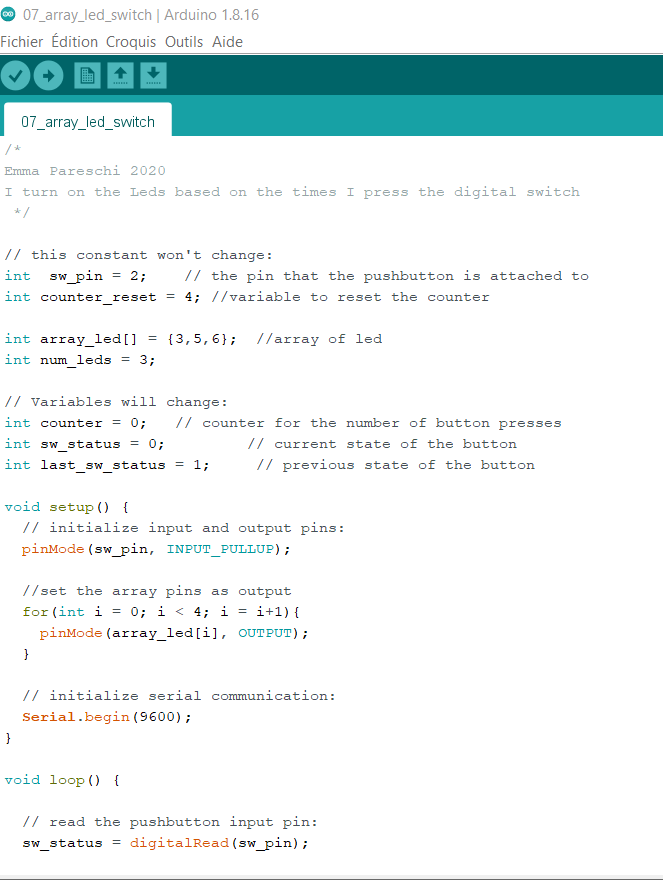
Array Led and control them with Digital Sensor
Here, we're using a three LEDsin serie, which is called an "array"

-
The array is a bloc of variables, inside which I define the pins of the Leds, here Pin number 3, 5 and 6.
-
Define how many Leds you are using, here we have 3 Leds
Here is the sketch correponding :
Transistors
A transistor is like an open switch. You apply a voltage to the gate
![]()
-
A DIODE is an Extra component that is connected with a load. To avoid pics of current, the Diode will protect the Mosfet
-
A LOAD is a speaker, an electro magnet ...
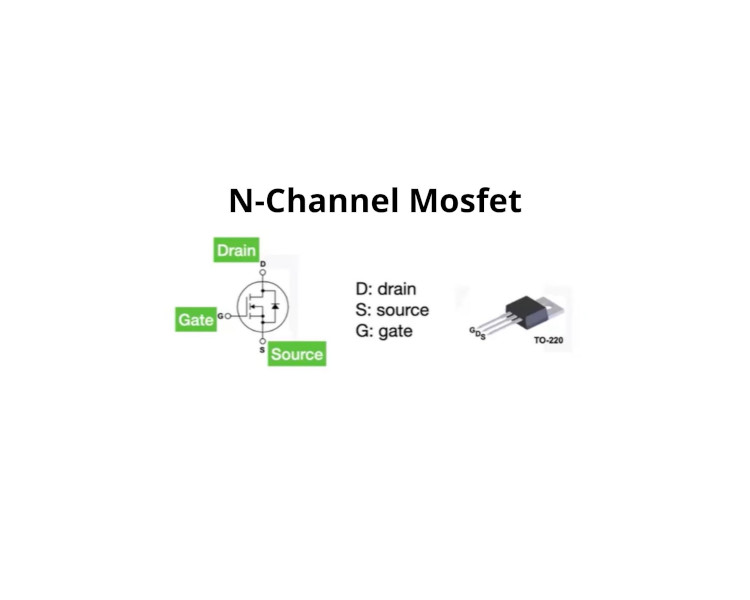
Here, we are using a N-Channel MOSFET, which is a transistor that has 3 terminals :
- D : drain, will be connected to the (-) of the load
- S : source, will be connected to the Ground
- G : gate, will be connected to the Arduino

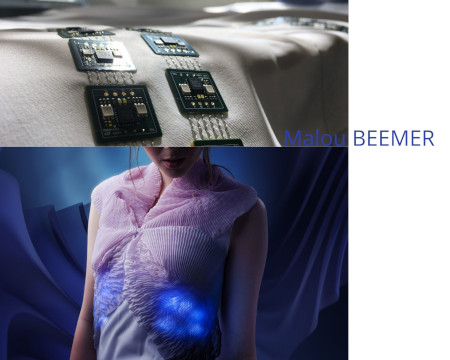
Wearables with LEDs
Here is a project using Leds, Second Skins by Malou BEEMER
NEOPIXELS
What are neopixels and how do you use them ?
![]()
![]()
How do you connect Neopixel and Arduino ?
First, Install the Library to get all the sketches available
Then, check/modify some informations in the sketch :
-
the number of the LED_PIN
-
Define the number of pixels yo have
The sketches
"3_WIPE" : Define the colours you want to use in "Color wipe" in the braquets (0,0,255) and the last number gives the information of how quick the light goes
Then we launched the "Rainbow" one :
Controling the Neopixels with the sensor :
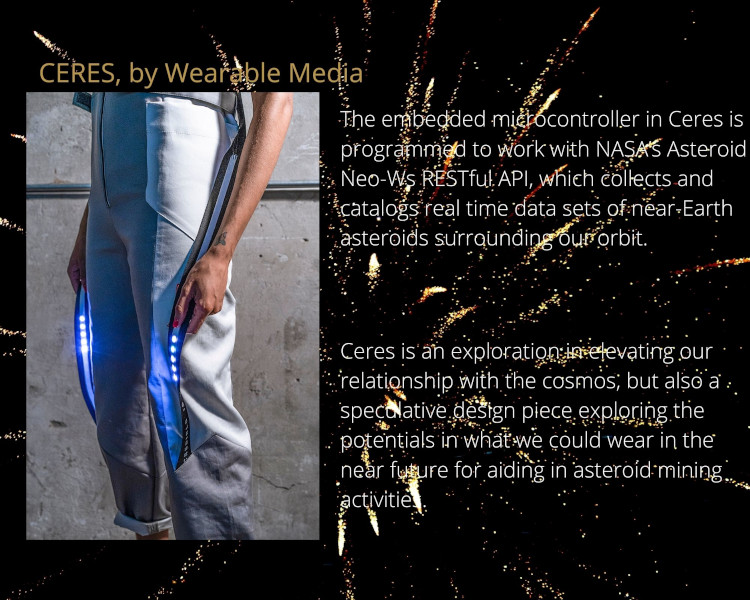
Wearables with Neopixels
Ceres by Wearable Media
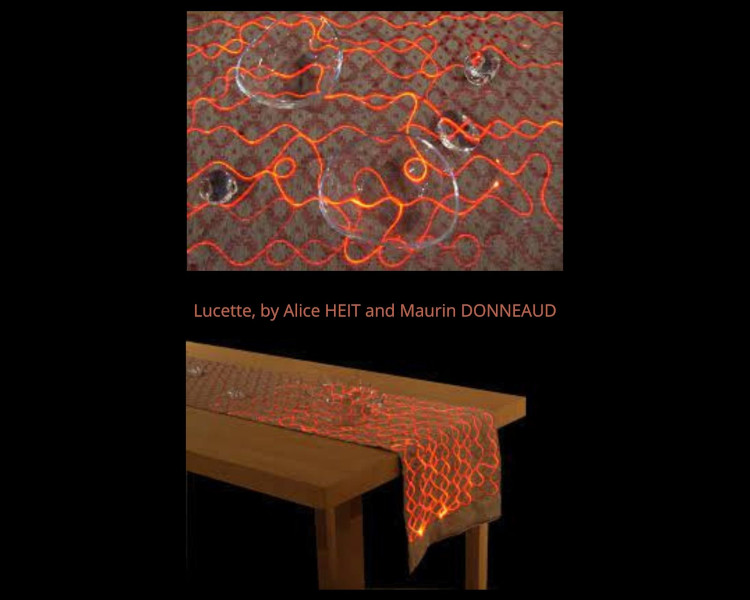
FIBER OPTICS
I couldn't go into this subject this week, but just have a look on Lucette by Alice Heit, in collaboration with Maurin Donneaud (again !!)
THERMOCHROMIC INKS
Unfortunately I didn't have the inks to make tests, but I'll try to later, that seems so incredible !!!
» » Here is a project about, Wi-fi Tapestry : Richard Vijgen has created a colour-changing tapestry from thermochromic yarn that visualises Wi-Fi signals emitted by smart devices.
"Wi-Fi Tapestry is a dynamic wall hanging that visualises the wireless activity of a space," explained Richard Vijgen. "The tapestry visualises the ever-changing landscape of radio frequencies around us."
More information here
2.Sound
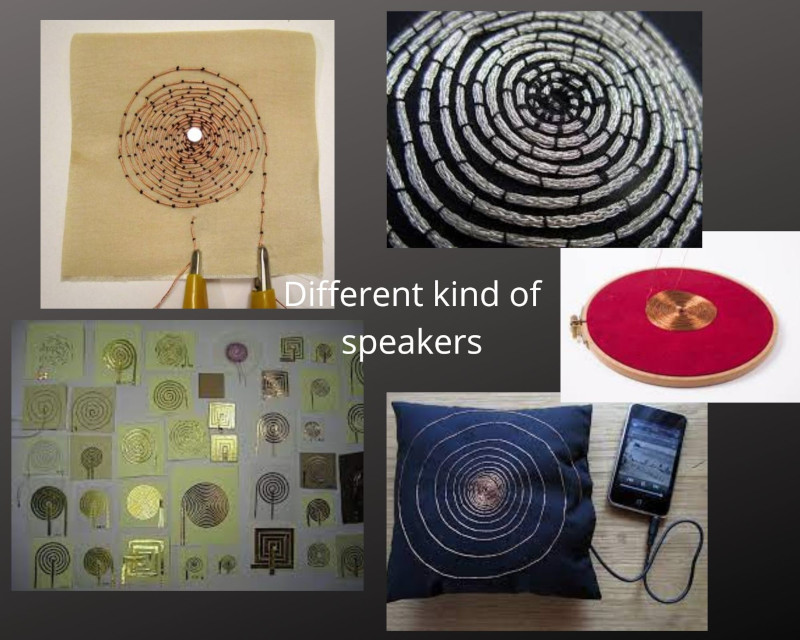
FABRIC SPEAKERS
Technics and experiments
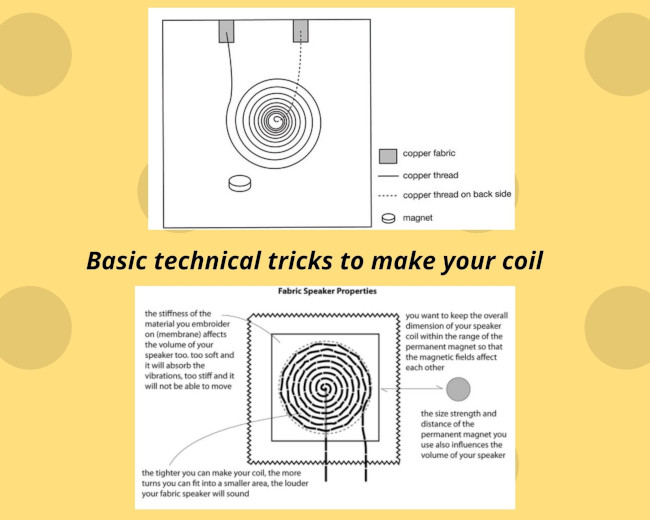
- How works a speaker ?
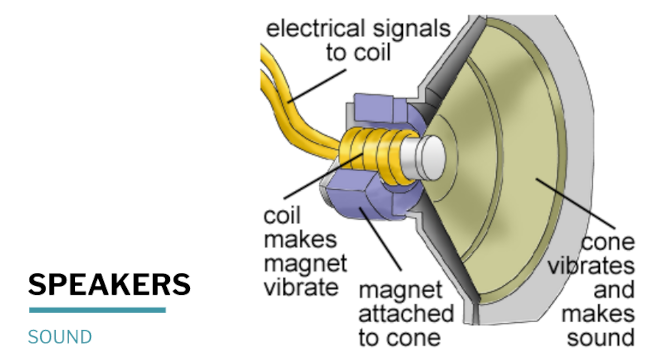
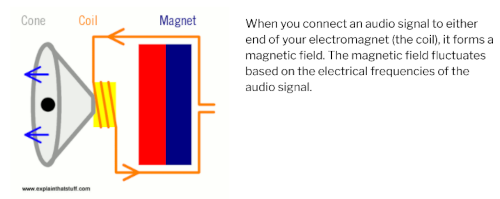
You can go here to understand how an electromagnet works, this site is absolutely fabulous !!!
- How to make it ?
What you need to make a speaker is very simple : first, a membrane, that can be made it either with textile ( quite thin and soft ) with conductive thread, or with paper with copper tape. Then, draw a coil, and make much round or triangles or squares as you can, so that it works better.
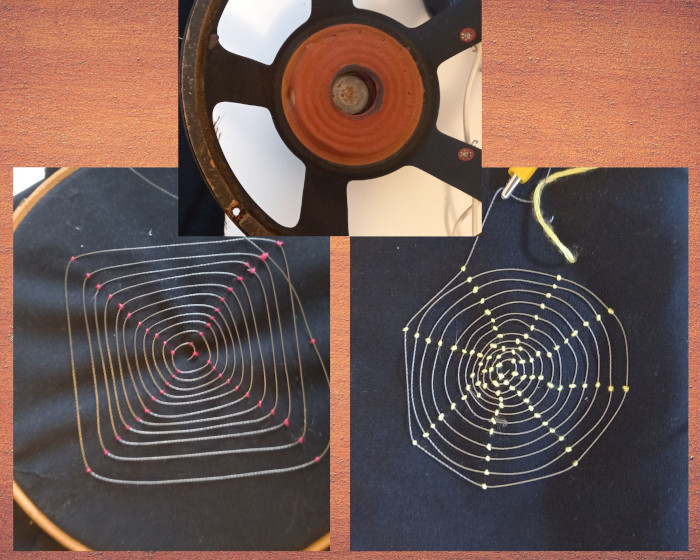
At last, you will need a strong magnet, and clearly, that has been the most difficult to find for me 😅. They are called "Neodyme" magnets, that the one you find in the usual Audio-speaker you buy. As I didn't have time to command one on internet, and that I didn't find anywhere in hardware stores, I went to the nearer recycling center and found an old speaker frame and try to make my experiments with the magnet still inside (I didn't manage to extract the magnet from the frame 😬)
So here it is : I made my embroideries with conductive threads (2 in facts), and I have my magnet:
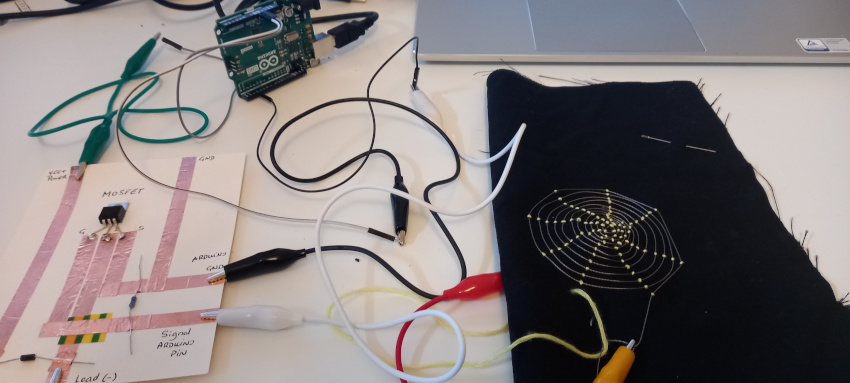
Then of course, you'll need an Arduino, since we'll try to generate the signal thanks to this device !
Otherwise, you can as well send music to the speaker through your computer or phone, or from a SD card.
- Build your circuit with Arduino

Circuit's ready 😀 (I'm about 10 years old at that moment...!!)
IT WORKS !!!! I feel so HAPPY !!!!! Even if you won't be able to hear anything since it was even difficlt for me to hear this little tiny Satrwars melody , I share my video, just for fun, haha !!!
Artistical experimentations
Folding Frequencies by EJ Tech (2019), another brilliant exemple of what has been experimented with sound and textile :
A dance of electromagnetic forces choreographed via frequency fluctuations. The physical force of sound becomes apparent by its >material presence, rather than by its perception via the ear canal. The augmented organza sweeps via sound ripples in ever >incoming waves of time. Folding Frequencies is an ongoing series focused on the exploration of metareality, rooted in a desire to understand the universe >all around us via energy, frequency and vibration.
The Tale Tell Quilt, developped by Liza Stark, that I just discovered thanks to Diane Wakim, is another very inspiring artistic project, using as well speakers in fabric. Here, a blanket divided in squares that yo can open like a window, and whispers a message from each person that used this quilt. Very poetic ♡
Useful Links
3.Motion
SHAPE MEMORY ALLOYS
I can't speak a lot about this technic because I didn't have te material to test it, but I heard that my collegues in Oullins have been able to make an experience with this Flexinol thread. It seems really amazing, can't wait to hear about it !!
Here is an exemple of what is possible to do with it :
FLIP DOTS
Experimenting Electromagnet and driver: the Flip Dot Experience
-
Electricity and magnetism are like brothers and sisters. (I like this concept !!)
-
A magnetic field is a force that we don't see but that the magnet can sense. It is concentrated when the wire is shape in loop / ring.
For this experimentation, we created a coil with copper wire, using the Flip Dot as a power load.
So funny experience !! I could make the dot flipping during the tutorial but didn't make any video. I'll have to make it again !!
You need :
- a coil ring
- a magnet
- an Arduino , here, we'll use the Blink sketch
- A Mosfet
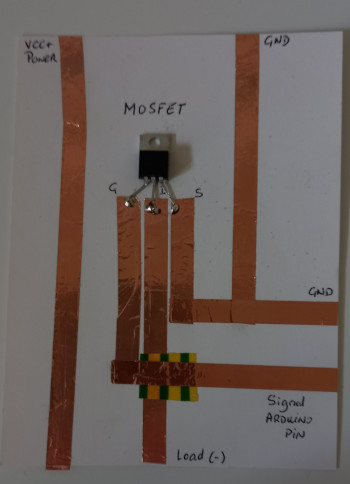
Steps:
1- Make the output
2- Mesure the resistance of the device. Here, I have 1 Ohm
3- Use the Ohm's Law to know with what kind of voltage you're gonna work with :
I = V/R 3 Volt / 1 Ohm = 3 Ampere
4- construct the circuit
5- Download the "Blink_Sketch" of Arduino
See the circuit here :
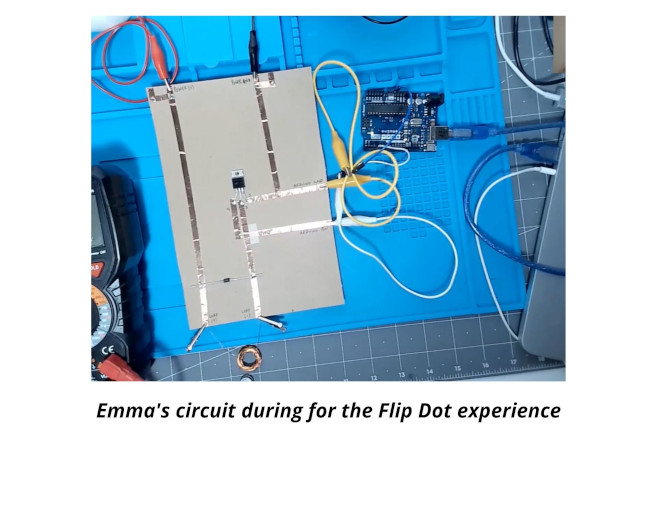
The magnet flips from the coil ring, pushed by the magnetic field that has been created from the circuit !!
FRACTALS - Antennas
Useful links
- Basic Connections
- Hardware goods
- Neo Pixel Code Generator
- Handmade Electronic Music
- Tips to use correctly copper tapes
- Fiber Optic
- Powering Neopixels

Videos about
- Maurin Donneaud's presentation, talking about his different projects
Le Design d’interaction et la programmation d’objets physiques Maurin Donneaud from Mardis de l'innovation on Vimeo.