7. Computational Couture

What does "Computational Couture" means in fact ??
Algorithmic Couture, Data, Softwares, 3D printing, 3D scanning, laser cutting The aim is to design fashion differently, optimizing textile wastes, previsualize your creation, create new patterns etc... This is another tool which offers other possibilities to create a new way of making garments, using new technologies to develop a system that offers the advantage to be quite respectfull of the environment since it reduces the spent of time and fabrics during the research step.
What I find amazing is that it is really possible to bring back poesy into fashion, thanks to the new technologies !!
So let's load all these new data in my sewing skills luggage
Research
Here is a perfect transition between Week 6 and Week 7. On this video, Kazuya Kawasaki shows his process, halfway between bio materials and new technologies
is a multidisciplinary collective focused on research and development in textiles and digital technologies. Founded in 2014, DataPaulette has taken the form of an independent laboratory operating as a hackerspace.l
Here is a short video about their work, absolutely brilliant 😍😍😍
BJORK and her concert face-masks

The masks incorporate tunable physical properties recapitulating, augmenting, or controlling the facial form and movement behind them. Inspired by their biological counterpart, and conceived as ‘muscle textile,’ the masks are bundled, multi-material structures, providing formal and structural integrity, as well as movement, to the face and neck.
Grasshopper
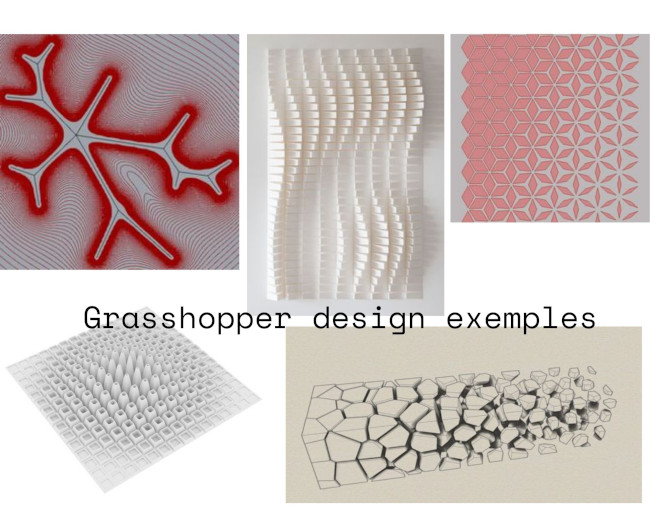

A few things to know about Grasshopper :
-
Grasshopper is a plug-in of Rhino 3D. It is a generative modeling software. In creating algortithm, you can generate geometric objects in Rhino. It is very useful to create or pre-visualize patterns and 3D print them.
-
Grasshopper and Rhino use the same unity of mesure
-
It is composed of a "Canva" on which you set the components that contains different fonctions. Those components will be connected by wires.
-
The programm has to be written and read from left to right
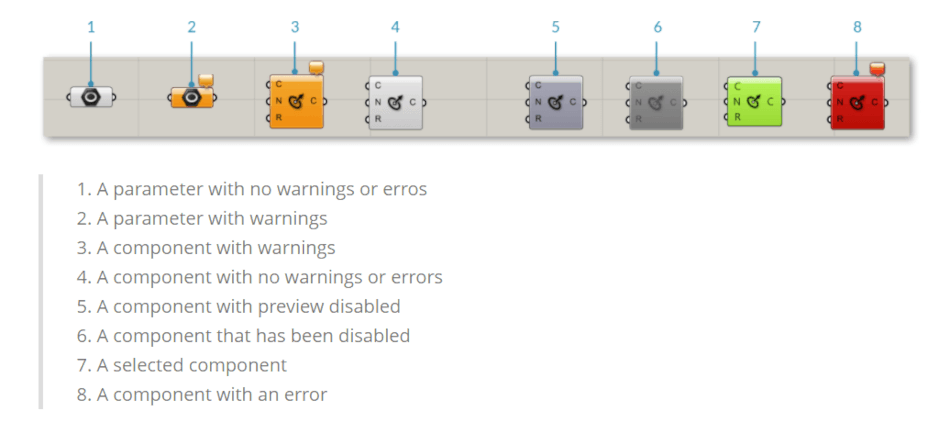
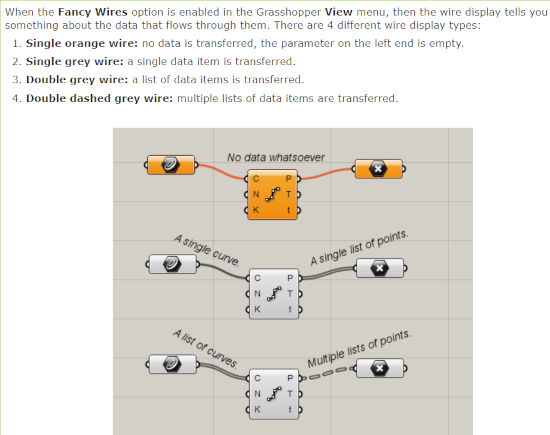
Components Colour Code
Wires legend
A very useful trick :
-
Press SHIFT if yo want to plug a wire that is already plugged in another component
-
Right clic + Disconnect = Disconnect the wire
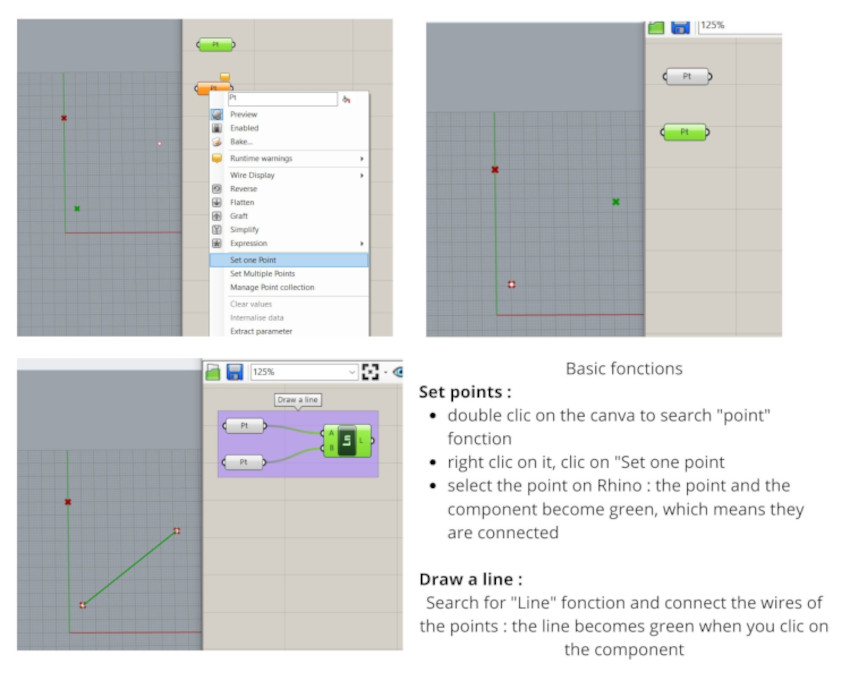
Some exemples of Basic fonctions to make your first steps in Grasshopper :
PLUG-INS
We have installed several folders that, once downloaded, you can find in : File > Special Folders > Components Folders
- Kangaroo
- Bifocals
- Lunchbox
- Weaverbird
- Mesh edit
- Mesh Tools
- Noise 4d
- Bowerbird
- chromodoris
Focus on some useful fonctions
Here are some of the fonctions I've been able to redo on my own so far :
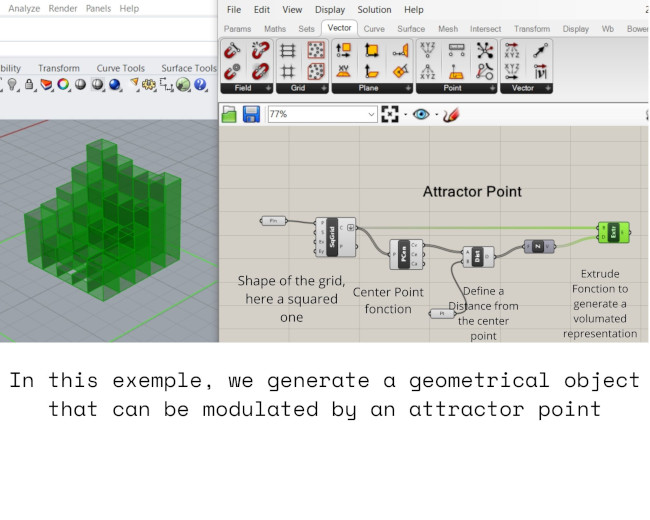
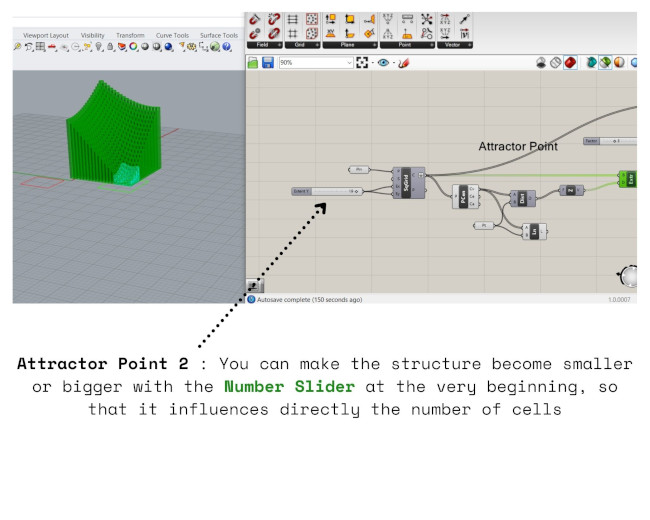
ATTRACTOR POINT
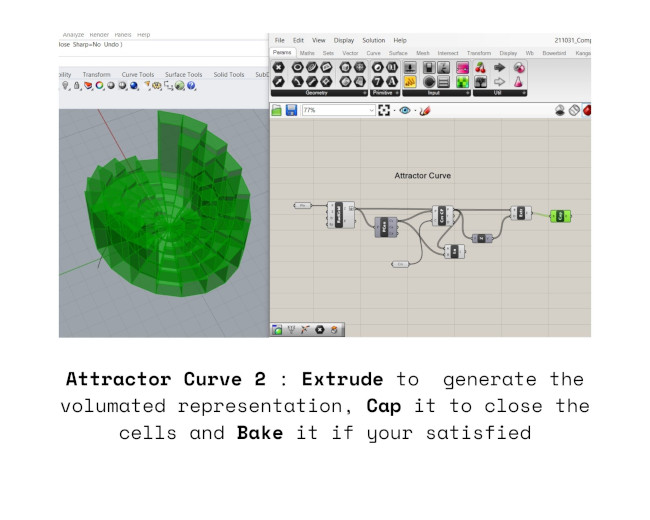
ATTRACTOR CURVE

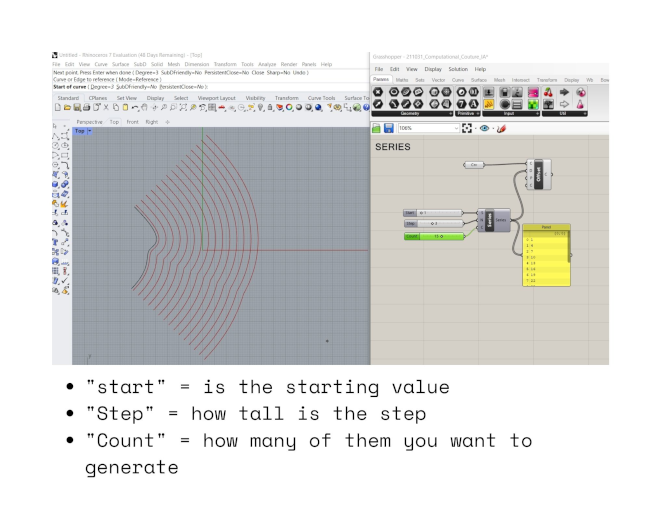
SERIES allows you to generate a notion of stair, in providing numbers in the 3 values with the **Number Slider" component
Draw a curve, and use the Offset Component. By default, the distance value is one, that you can modify with the "Slide Number" Component.
Let's have a look on the effect when you play with the slides number :
RANGE is used when you have values in an interval, for instance between 0 to 1 : this is called a "domain" of values in Grasshopper.
Define also the number of "steps" (results) you want to obtain with the Number Slider.
It is possible to work with a domain that you define, with these fonction:
-
Construct Domain , with Domain Start and Domain End Values, defined with Number Sliders
-
or a Panel, in which you write what is your domain, for exemple "1 to 10"
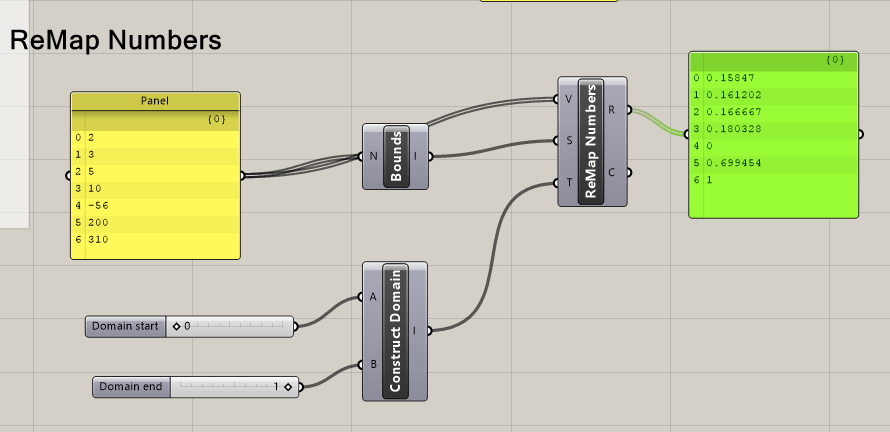
REMAP NUMBERS
Panel + Define different numbers + Right Clic on Multiline Date
Connect to the Bounds Component: it gives you the interval in creating a numeric domain by encompassing a list of numbers from the mini to to the maxi number.
For exemple, to make some holes in a garment, whose sizes will vary in fonction of the distance from a point.
With the Remap Numbers, the distribution between the smallest and the biggest number is maintained, proportionally mapped in the new interval.
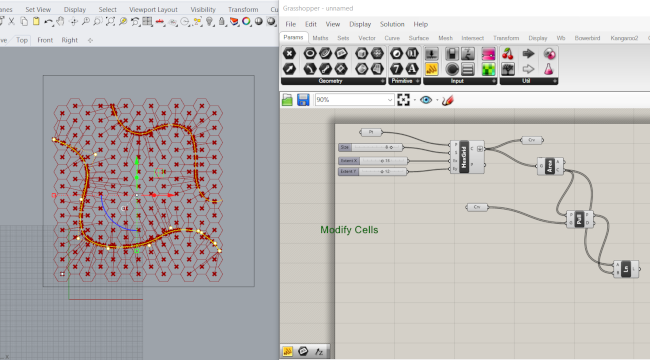
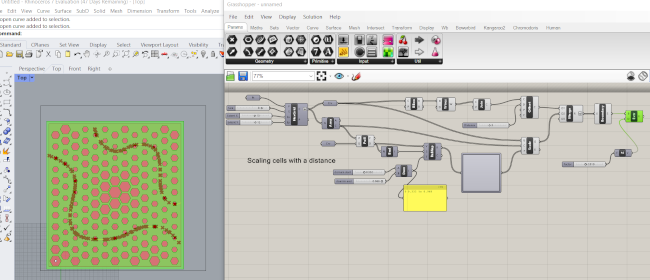
MODIFY THE CELL
(Pattern01) in the tuto 1 part 2 (" 24-36mn")
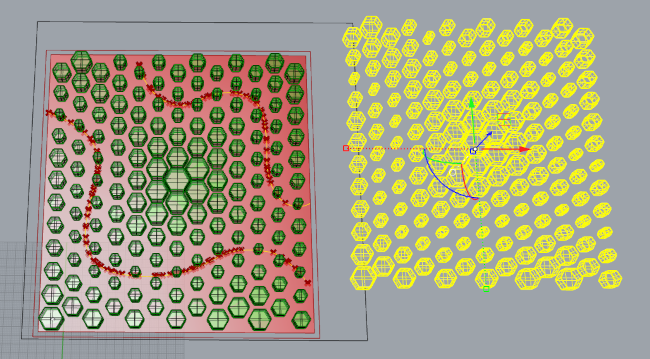
To scale each cell, based on its center, you have to define the scale factor, using a Graph Mapper component (choose and modify the profile of the curve). The result of this definition is : if the cell is close to the curve, the factor of scale is very big, and on the contrary, if the cell is far from the curve, the factor of scale is very small.

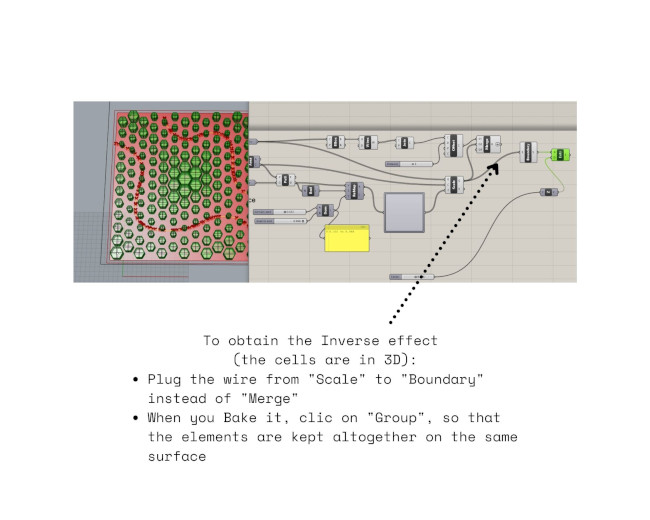
Then, convert the flat object into a 3D object :
- With the bounding box : Generate a frame that contains the geometry + right clic on it to clic on Union Box,
-
with Brep Wireframe: Extract the edge + Join Curves + offset curve to frame it and make it a polyline
-
Merge the outer line + the scaled object (creates a list that contain all the values)
-
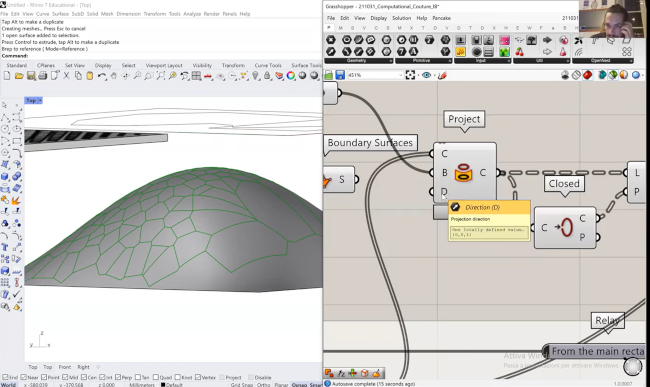
Convert these curves into a flat surface with the Bondary Surface component
-
Extrude to generate a volume
Bake it to obtain a selectable geometry in Rhino:
If you want to obtain the Inverse Effect of the previous definition :
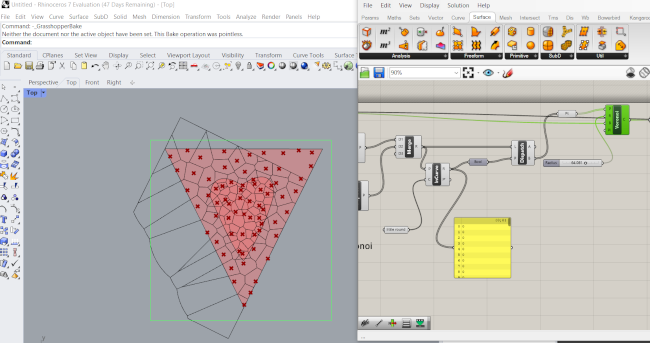
VORONOI -See exercise Pattern 02 ( 48 mn)-
It generates a network of lines, creating connection between elements that will then create cells out of it. (it traces a line between 3 points of interest)


Lost in Voronoi Island ...!!!
Tuto 3
Computational Part 3 MESH
Day 3 : Application on the body
Installed Plug-ins Weaverbird / Chromodoris
BREP Command
3D Printing
Coming soon...
I couldn't manage to go to Oullins this week, so I'll print my Grasshopper file next week !!
Useful links for tutos
Tutos found to help for the basics :
Forums:
- Forum discourse mcneel
- Forum Grasshopper3d
-
Tuto Grasshopper Part 2 by Eugenio:
- Tuto Grasshopper Part 3 by Eugenio:
Video
Self-folding Objects :