08. Wearables
Week Assignment
Weekly Quest
Wearables Week 08 by Michelle & Asli & Emma
Check out the weekly assignment here or login to your NuEval progress and evaluation page.
Learning Outcomes
- Research skills: the participant has acquired knowledge through references and Concept development
- Design skills: the participant has learnt by programming a microcontroller, design a circuit and schematic
- Fabrication skills: the participant acquired skills necessary to integrate inputs and outputs in a microcontroller wearable project
- Process skills: Anyone can go through the process, understand it and reproduce it -Final outcome: Assembled project, functioning and complete -Originality: Has the design been thought through and elaborated?
Student Checklist
- Document the concept, sketches, references also to artistic and scientific publications
- Create a swatch/sample using an ATTiny/Arduino/Adafruit with one input and one output, using hard-soft connection solutions and battery
-
Create 2 actuator swatches and test them with the Arduino or ATTiny, chosing from examples such as:
-
motors / mini vibration
- leds / neopixels
- flip dot / electromagnet
- heat pad / with thermochromic coating
- speaker / mp3 player
- SMA (shape memory alloy)
Learn how to program an Arduino/ATTiny/Adrafruit, documenting your process, the libraries added, power requirements and source code
- Document the schematic and circuit
- Upload a small video of your object working
- Integrate it to a project (extra credit)
INTRODUCTION
What does it mean to be wearable? What factors and variables must we take into consideration?
What are different types of outputs? How do we control them? What are transducers? - Visual - LEDs - Neopixels - Optical fibers - Thermochromic ink + heated circuit/code - Sound - Fabric speakers + amplifier circuits/code - Motion - Shape memory alloy + high load circuit/code - Flip dot - Flapping wing - Mini vibration motors - Powering circuits - ATTINY (50- 60 MIN)# - Intro - miniaturizing, pinout, etc - Programming the ATtiny - Touch/sensor circuit (the same one I did at the workshop) - Sound circuit with stretch sensor - EMF detector / audio / vibration / LED - Antennas-code - Focus here - different ranges of different fractal designs - ETEXTILE TOOLS (10 MIN)# - Why create tools to support your practice - Pin probes - Continuity testers - Measuring resistance
Research & Inspiration
students examples
PAST FABACADEMY STUDENTS
- Diane Wakim Le TextileLab Lyon 2020-21_
- Vicky Luan
- Loes Bogers TextileLab Amsterdam 2019-20_
- Sara Alvarez TextileLab Amsterdam 2020-21_
- Kate Reed
- Laura Carooline
- Emma Shannon
- Elena Rotaru
my inspiration
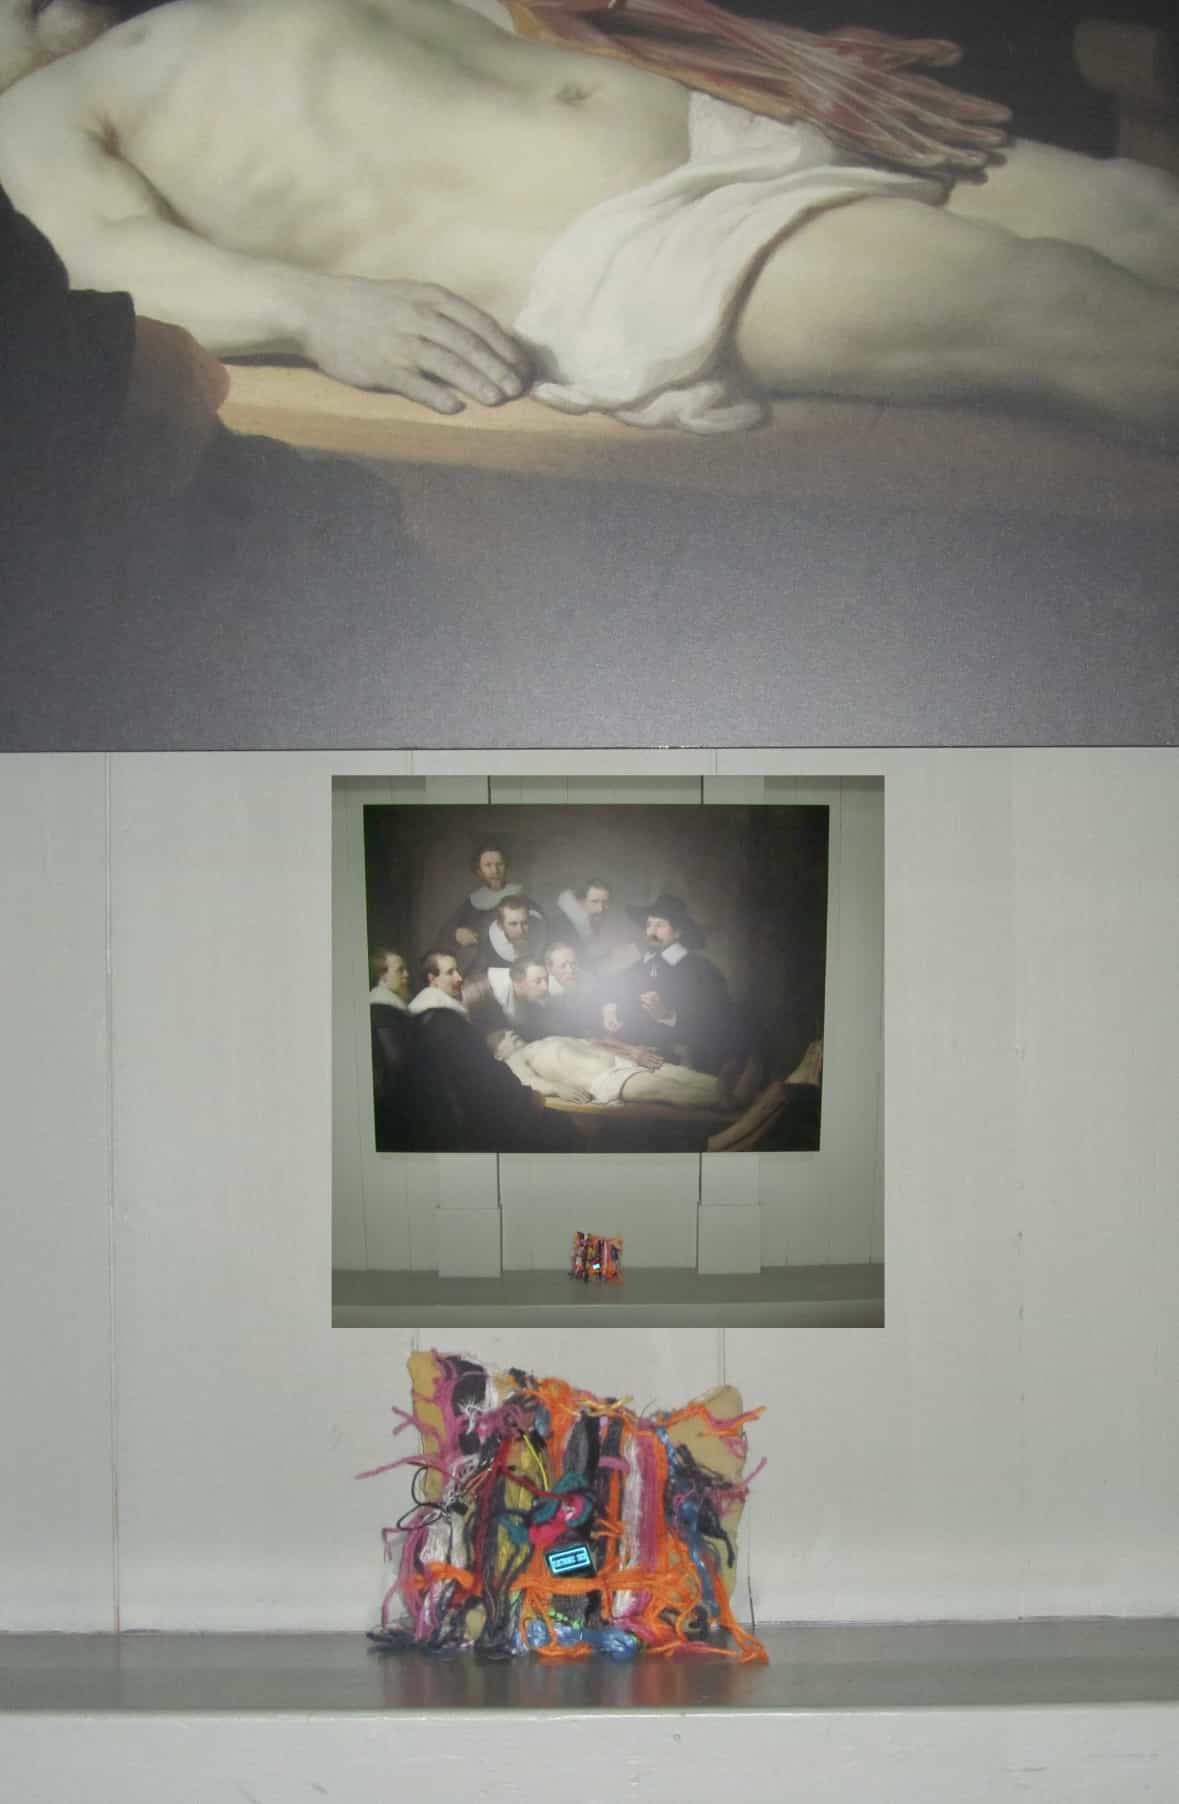
this second week of electronics made me really satisfied, understanding that it's really a world of possibilites in the realm of circuits, now a days we spend most of our time inveted in interacting with circuits but most of us don't know where to start to understand the construction of it.... i humbly understood that in this short amount of time there is only space to learn and try new things without bounderies or limits to my curiosity and journey.
In this second week of delving into electronics, I've gained profound satisfaction, realizing the vast world of possibilities within the realm of circuits. In our modern lives, we are heavily engaged in interacting with circuits, yet many of us lack the starting point to comprehend their construction. Through this brief period, I've come to appreciate the boundless space for learning and experimentation, unrestricted by boundaries or limits, fostering my curiosity and journey. Drawing inspiration from primitive masks and costumes, alongside the influence of brutal webpage design, this week has taken on a unique aesthetic resonance.


Brutalalist Art
"Brutal Art, also known as Brutalist Art, is an artistic movement characterized by raw, unrefined, and bold expressions. It draws inspiration from the architectural style known as Brutalism, which emerged in the mid-20th century. Brutalist architecture is recognized for its use of raw concrete, geometric shapes, and a focus on functionality.
Similarly, Brutal Art embraces unconventional forms, often using harsh lines, intense colors, and a disregard for traditional artistic norms. It seeks to break away from conventional beauty standards and challenges the viewer to confront the raw, sometimes harsh realities that art can portray.
The origins of Brutal Art can be traced back to the mid-20th century, coinciding with the rise of Brutalist architecture. Artists and designers began adopting the principles of Brutalism in various art forms, pushing boundaries and exploring new ways to convey emotions and ideas. The movement gained momentum in the latter half of the 20th century and continues to influence contemporary art.
Brutal Art is a reaction against the polished and refined aesthetics often associated with traditional art. It finds beauty in the unconventional, celebrating imperfections and embracing the visceral impact of art on the viewer. The movement encourages a direct, unfiltered expression of creativity, challenging preconceived notions of what art should be. **brutal design movement. chat btg"
Abstract (research i liked found on diva portal):
The rise of Brutalism and Antidesign: And their implications on web design history Brage, Ellen Jönköping University, School of Engineering,2019
"The background of this study is based on the emergence of web design trends brutalism and antidesign, which have been argued to originate from styles used during early periods of the web’s history. Furthermore, a lack of cultural analysis within web design has been identified. The visual evolution of the world wide web is not sorted into distinct and widely acknowledged periods or categories such as is the case with most other cultural areas like music and art. The emergence and popularity of brutalism and antidesign were identified as potential cases of visual styles returning from the past. They were therefore considered opportunities to examine visual periods in web design and predict where the field is heading in the future.
The study was conducted using the qualitative method of semi-structured interviews. The empirical data was analysed using a thematic analysis and was later compared with theories derived from literature studies.
The study found three reasons behind the rise of brutalism and antidesign in web design; the world wide web’s coming of age, reactions towards the mainstream web and the interest in retro trends. The study also aimed to find the possible implications of their emergence on the aesthetic evolution of web design. It was found that brutalism and antidesign are part of a large number of experimental and retro trends that will continue to emerge. Though they are unlikely to directly affect mainstream web design in its current state, they may be seen as design movements. This may be viewed as a step in the direction of visual categories within web design."
-
manifesto of uselessnss to much technology.. -NATURUAL ELEMENTS INTERACTING WITH TECHNOLOGY...


Q&A
What is ARDUINO
Arduino, an open-source board, serves as a freely accessible platform for constructing robotics, electronics, and automation projects.
Featuring a microcontroller, Arduino is programmable through an integrated software component known as the Integrated Development Environment (IDE). This IDE runs on a computer and facilitates the writing and loading of computer code (primarily in the "C" language) onto the board.
Essentially, Arduino is a compact electronic board housing a central microcontroller, acting as the system's brain, along with a few electronic components. This design simplifies connectivity with various external devices.
HOW WE UTILIZE ARDUINO
Controlling an LED Reading a sensor Modifying LED behavior based on sensor interaction
WHAT IS REQUIRED
Building a circuit (with Arduino) Crafting (using the correct) code for the circuit
INITIAL TESTING WITH ARDUINO
Explaining some technical aspects of Arduino in English remains somewhat challenging for me. Consequently, I will detail the steps I performed during testing. By following these steps, you should navigate the process successfully (or so I hope).
Outlined below are instructions on connecting your Arduino to the software:
Obtain an Arduino board and a USB cable for computer-board linkage. Ensure a secure connection, as readability might vary based on the cable or Arduino model.
Download the Arduino Software; I opted for IDE version 2.1.0. The download link is provided below.
Open Arduino on your computer, navigate to the select board option, and verify that your Arduino is recognized. In some instances, it might not appear immediately, requiring multiple tests for functionality.
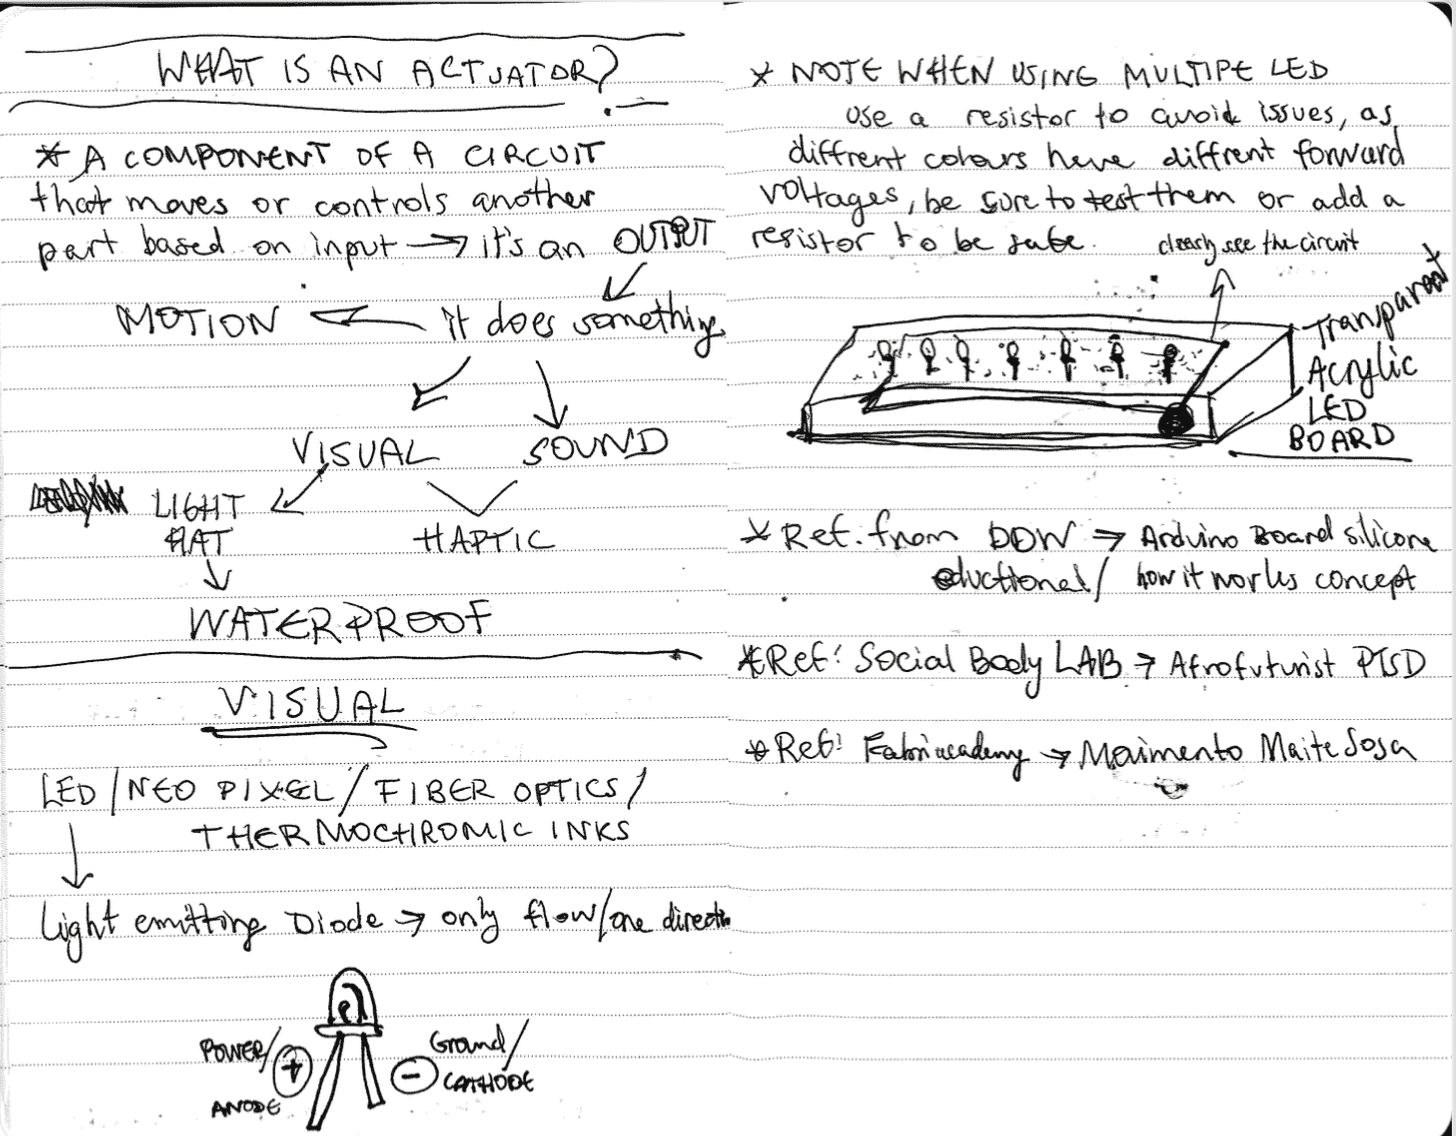
Notes
Vocabulary List
WHAT IS A:
- Neopixel: Red, green and blue LEDs are integrated alongside a driver chip into a tiny surface-mount package controlled through a single wire. They can be used individually, chained into longer strings or assembled into still more interesting form-factors.
- Ohm’s Law: States that electric current is proportional to voltage and inversely proportional to resistance; V = I x R -Package: Refers to the dimension and shape of an electronic component
- Permanent magnet: a magnet that retains its magnetic properties in the absence of an inducing field or current.
- Pin out: a cross-reference between the contacts, or pins, of an electrical connector or electronic component, and their functions.
- Receiver: When the incoming signal (i.e. waves) is too weak for us to do anything useful with it. In order to convert it into sound or otherwise, we need to strengthen the signal through an amplifier.
- Second Skins: idea that wearable technology acts as an augmented “skin” that increases sensing capabilities in collecting information from our bodies and environments then transforming it into data Actuator: a component of a circuit that moves or controls another part based on input. e.g. a motor, LED, speaker, etc
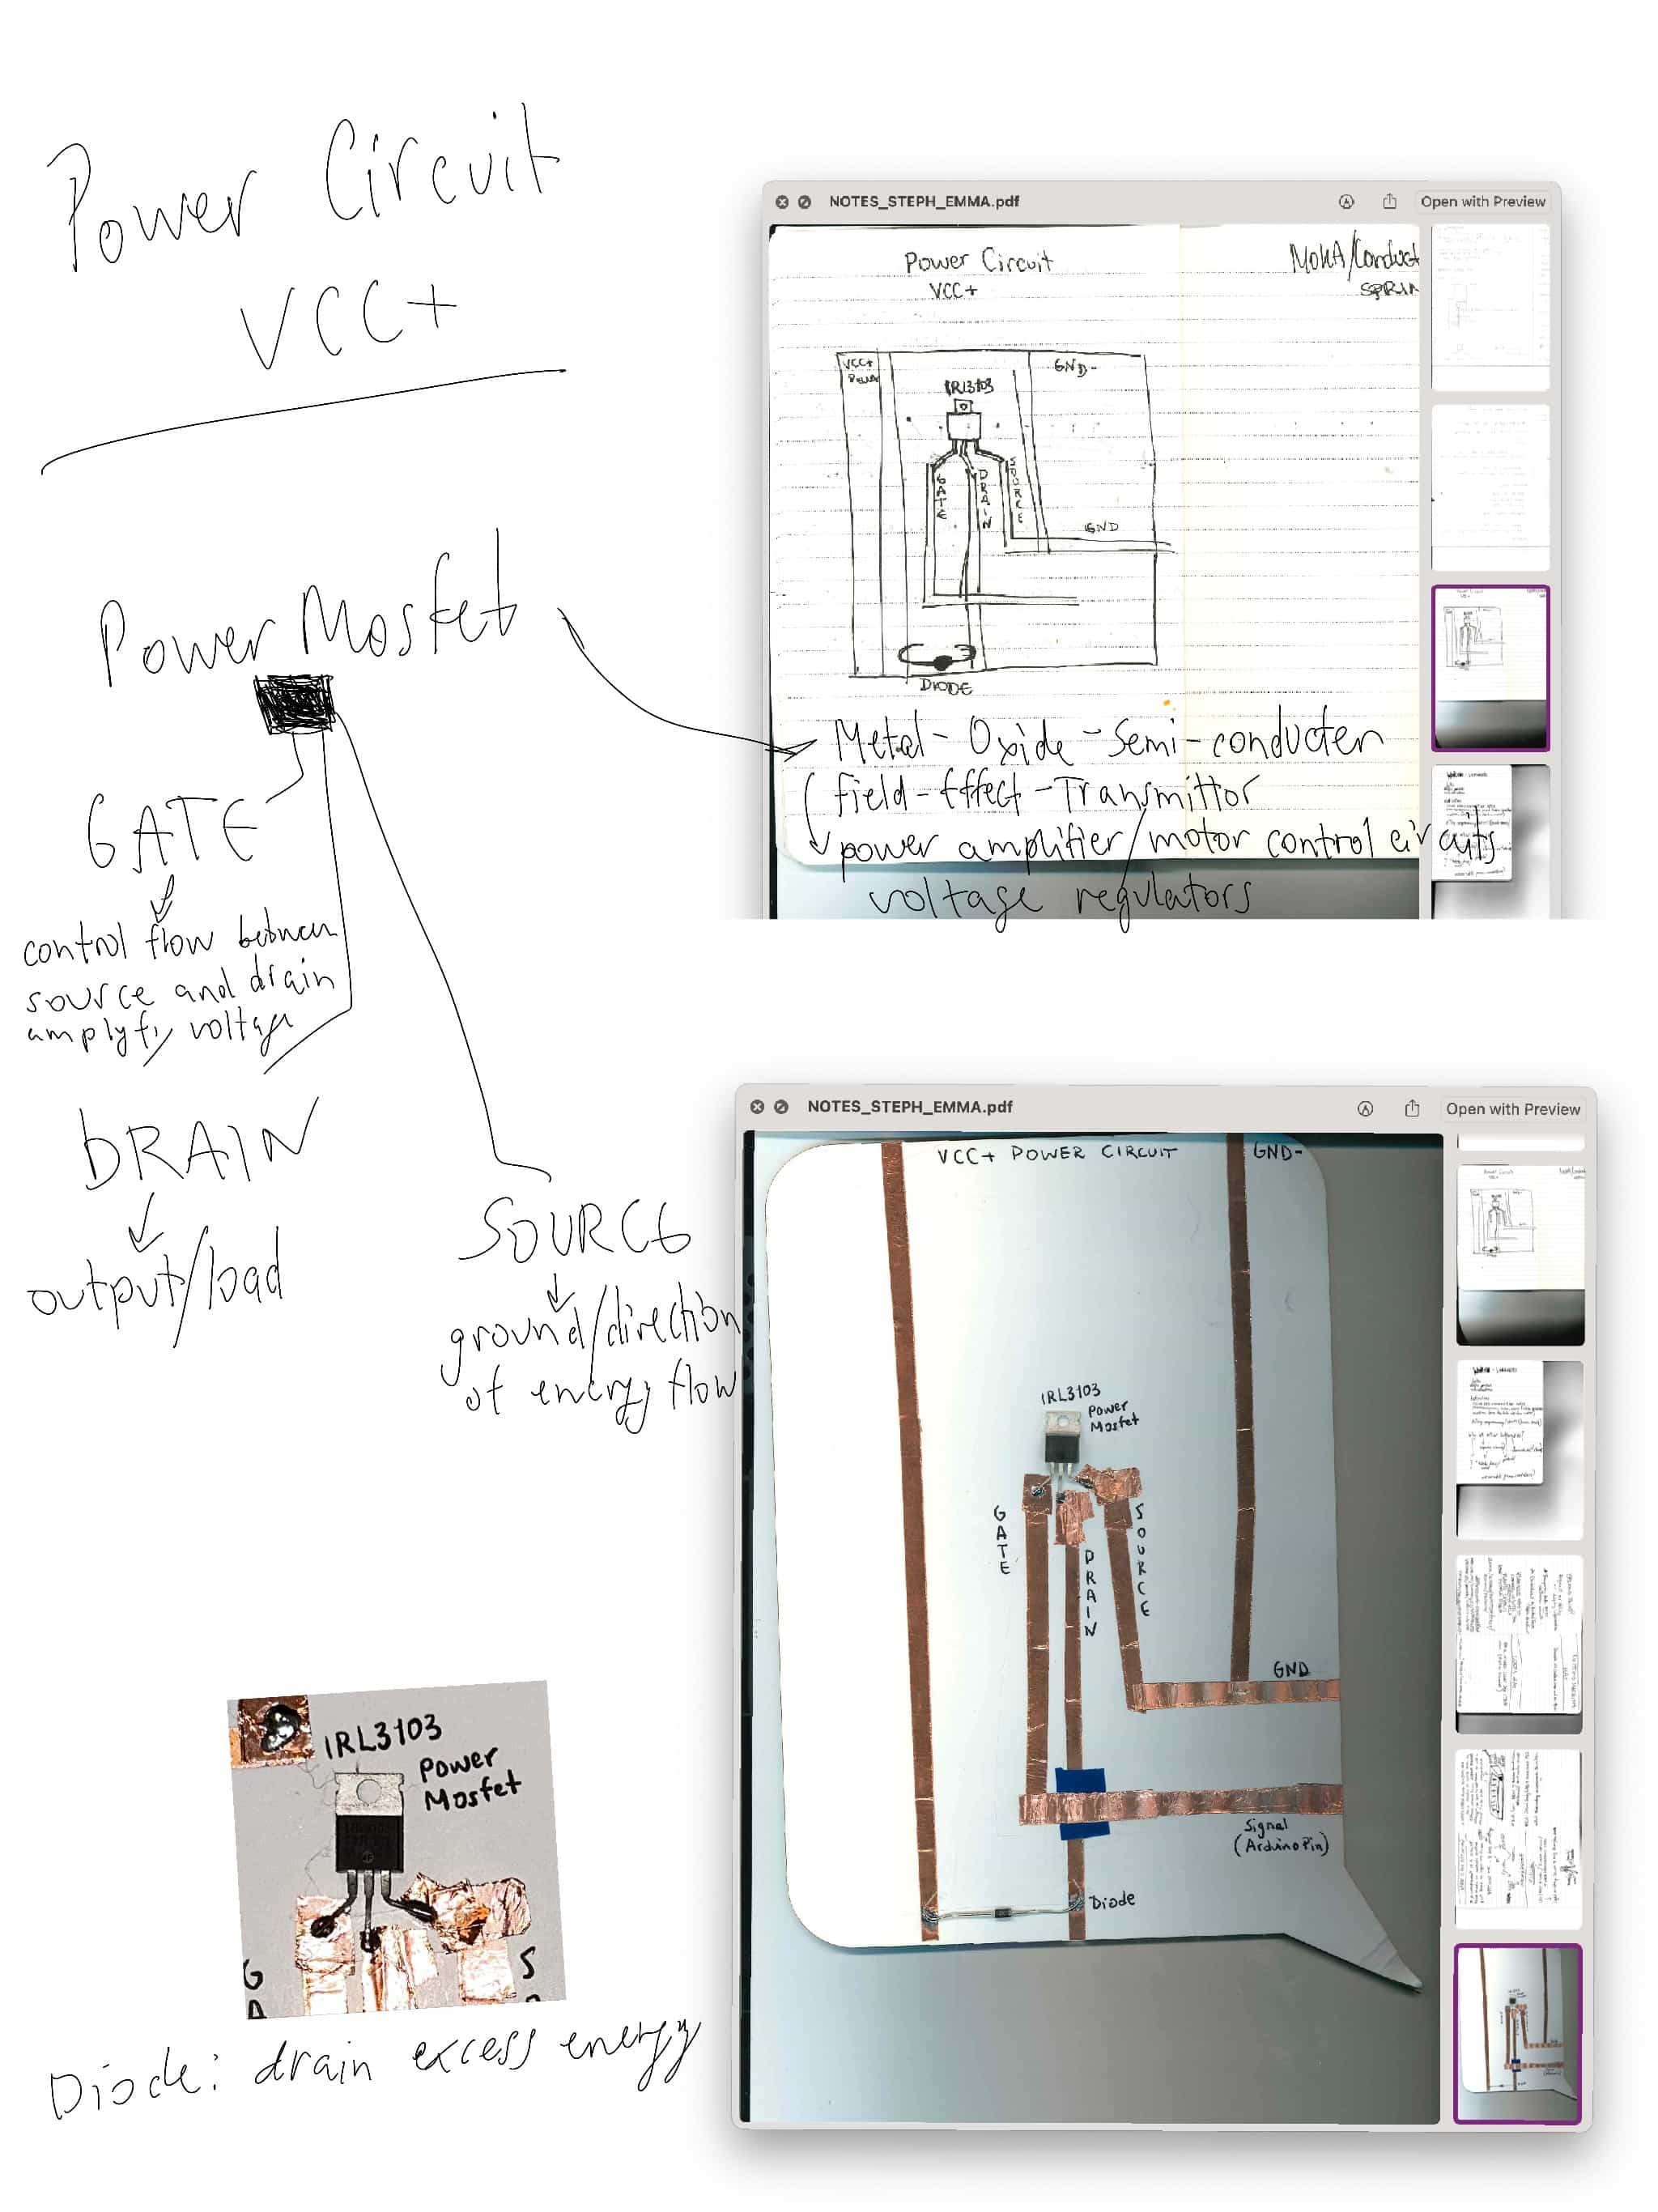
- Thermochromic Ink: pigments change from one state to another in the presence of heat.- Transistor: semiconductor device used to amplify or switch electrical signals and power.
- Transmitter: Generates electrical current at oscillating speed that creates the EMF.
- Fiber Optics: Light shines in one end, travels down the strand, and emerges at the other end. There is a clear internal core and an external coating called cladding. The quality of the fiber determines how much the light will degrade over distance.
- Fractal: By using the property of fractal geometry in antenna design one can increase the electrical length, keeping the volume of the antenna the same. (Psarra)
- Haptics: Refers to “sensing [that] involves both touch and kinesthesia (sometimes referred to as proprioception) which refers to sense of limb positioning and movement.” (Stone 2018); the use of technology that stimulates the senses of touch and motion
- Heat Shrink: Shrinkable plastic tube used to insulate wires. Shrinks in presence of high heat
- ATtiny: An AVR microcontroller that has fewer features, fewer I/O pins, and less memory. Can be programmed with Arduino.
- Coil: winding a material in a sequence of rings or other shapes
-
Diode: a component that allows electricity to flow in one direction only
-
LED: light emitting diode
- Library: A collection of prewritten code that you can use in your programs.
- Magnetic field: the area around a magnet in which the effect of magnetism is felt
- Mosfet: a type of transistor that is useful for high current load circuits, often used for switching purposes.
DEBUGGING
INSTRUBTABLES IS THE PLACE TO GO
-
THE WEBSITE FROM RANDOM NERDS, THEIR OLED DISPLAY WAS DIFFRENT AND SO THEY ALSO PROVIDED (IF YOU READ CAREFULLY THE INSTRUCTIONS) ANOTHER ADDRESS TO COPY&PASTE In case you’re using a different OLED display, you may need to change the OLED address In our case, the address is 0x3C. if(!display.begin(SSD1306_SWITCHCAPVCC, 0x3C))
-
CHECK THE SIZE OF YOUR LIBRARY FILE MINE WAS TOO BIG FOR MY ATtiny85... so i changed design into just text.
DEMO CODE I USED OF FUNNY SHAPES AND STARS
DDW EXAMPLES BREADBOARD MOODBOARD IG EDUCATIONAL...
Workflow & Experiments
Reflection 01
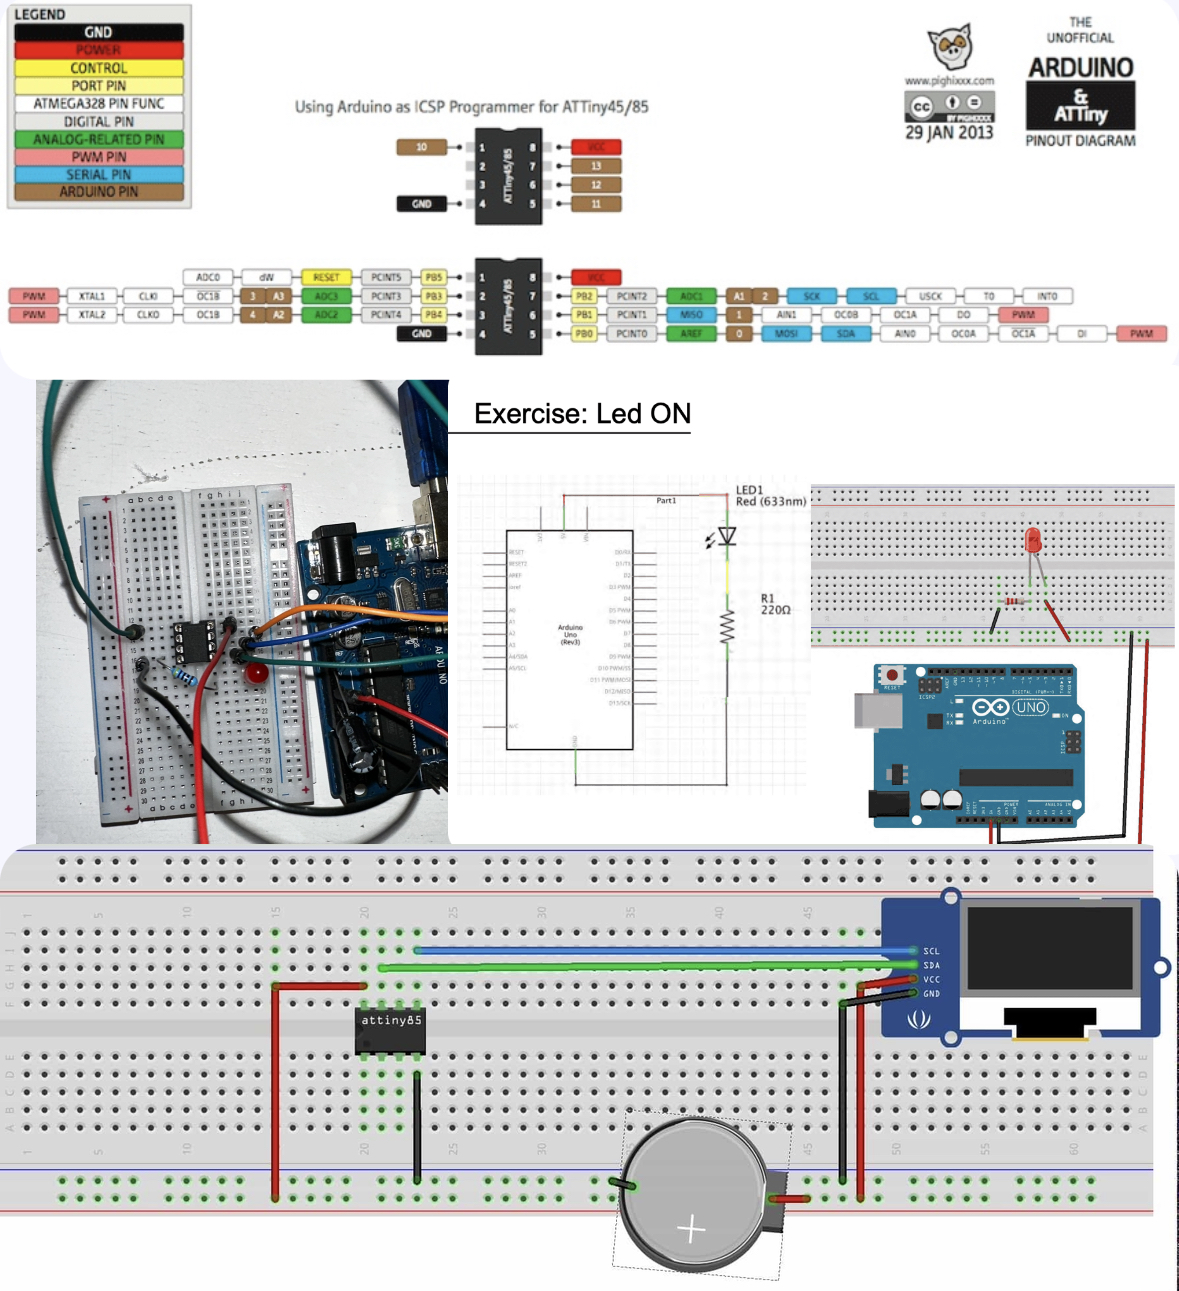
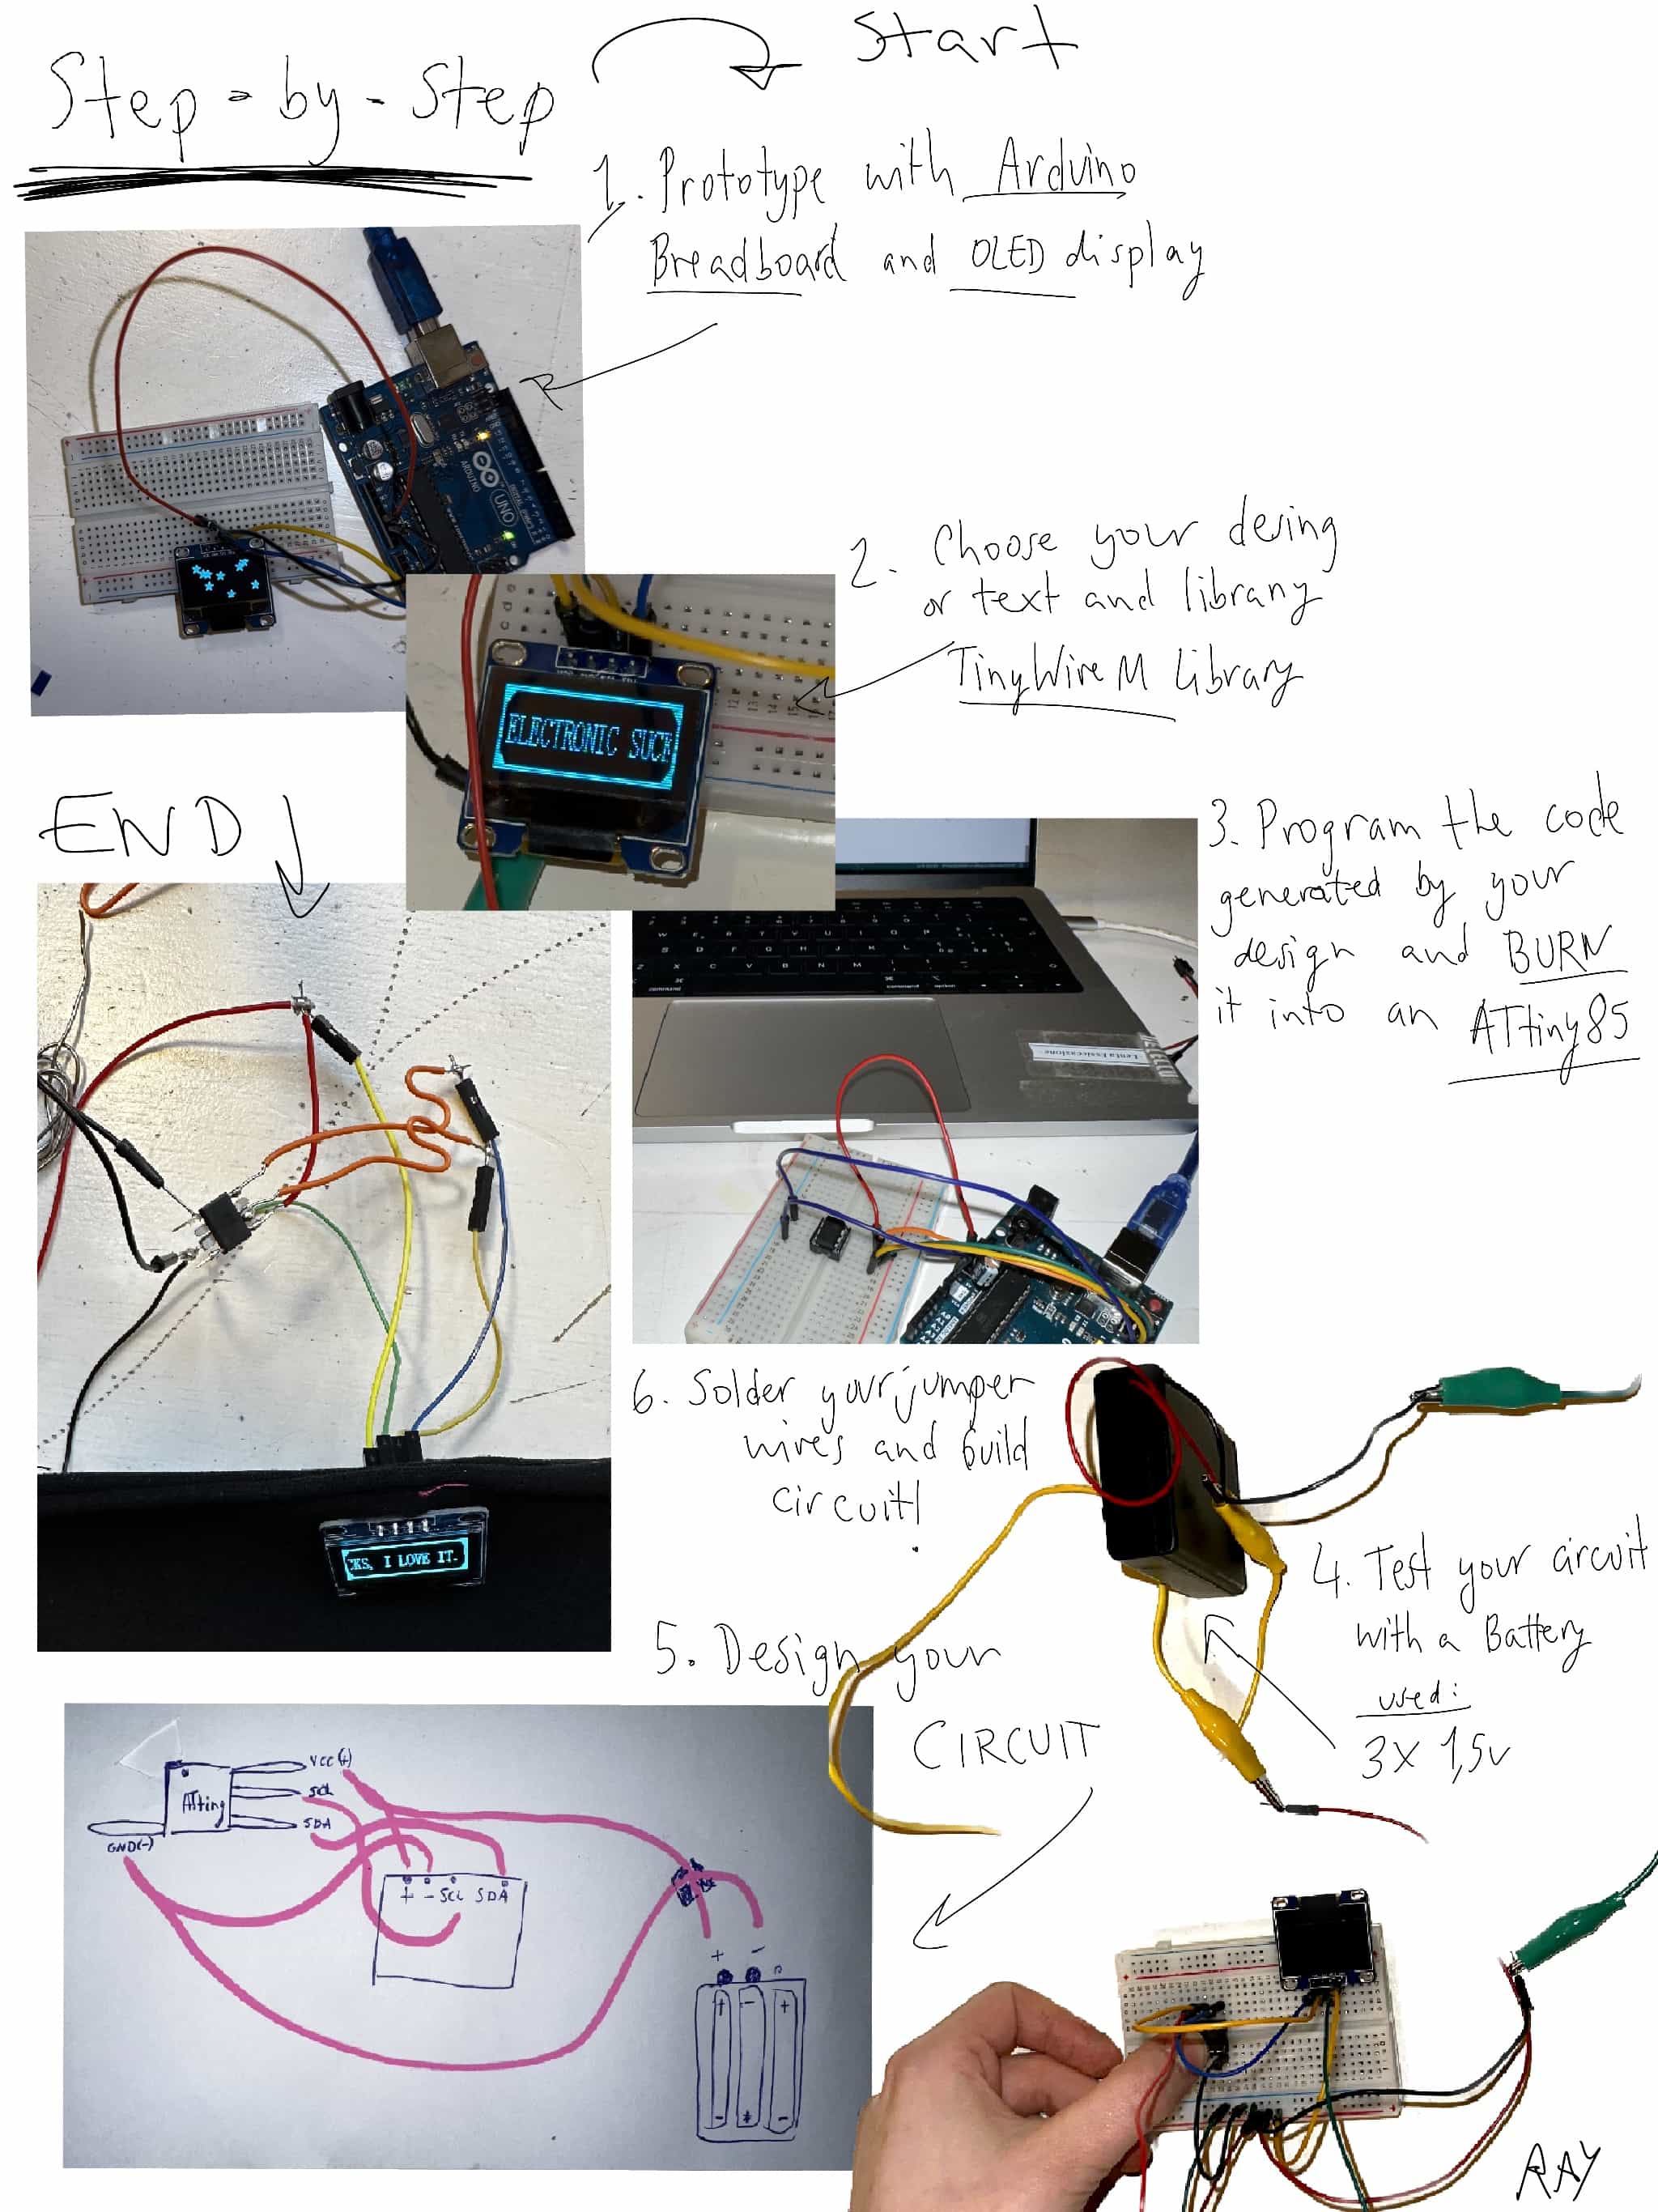
In our collaborative venture, Zee and I embarked on a unique exploration of electronics, specifically programming an ATtiny85 with an LED using an Arduino Uno. Departing from the conventional path, we decided to inject our own creative chaos into the process. Our synthesis of ideas led us to first connect Arduino and ATtiny pins on the breadboard. Subverting the usual sequence, we reversed our approach, achieving a blinking LED by tweaking the Arduino program and employing a microcontroller to tailor the blink delay time.
This unconventional learning journey included experimenting with tools like pens to program the breadboard, challenging our usual methods and fostering an environment of innovative learning. Reflecting on this electronics dive, collaborating with Zee, who shares my visual and manual learning style, proved to be a rewarding experience. The unorthodox methods we embraced not only pushed us out of our comfort zones but also added a valuable layer to our comprehension of the subject.
"we started at step 6 by building the diagram..it looked like we where playing battle ships...then we worked our way backwards...."
ATtiny
Programming an ATtiny with Arduino Uno
* [TUTORIAL WE FOLLOWED](https://www.instructables.com/How-to-Program-an-Attiny85-From-an-Arduino-Uno/)
During this week my partner in crime (Zee) and I have tested, prototyped and programmed an ATtiny 85! In this collage of images you can see the main cirucit diagrams that I follwed to connect all the jumper wires and components...see above and zoom in to each one...
THE FIRST TEST WAS A CLASSIC BLINK LED:

Reflection 02
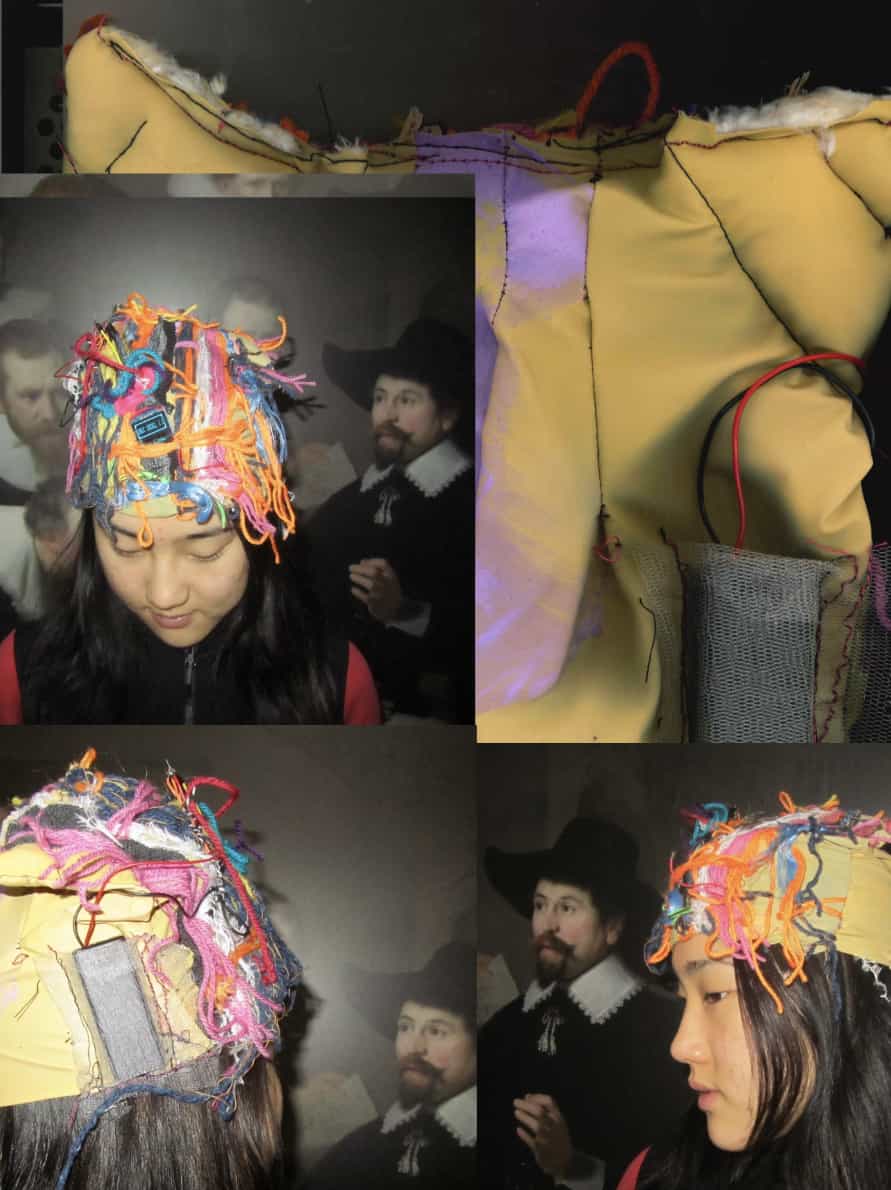
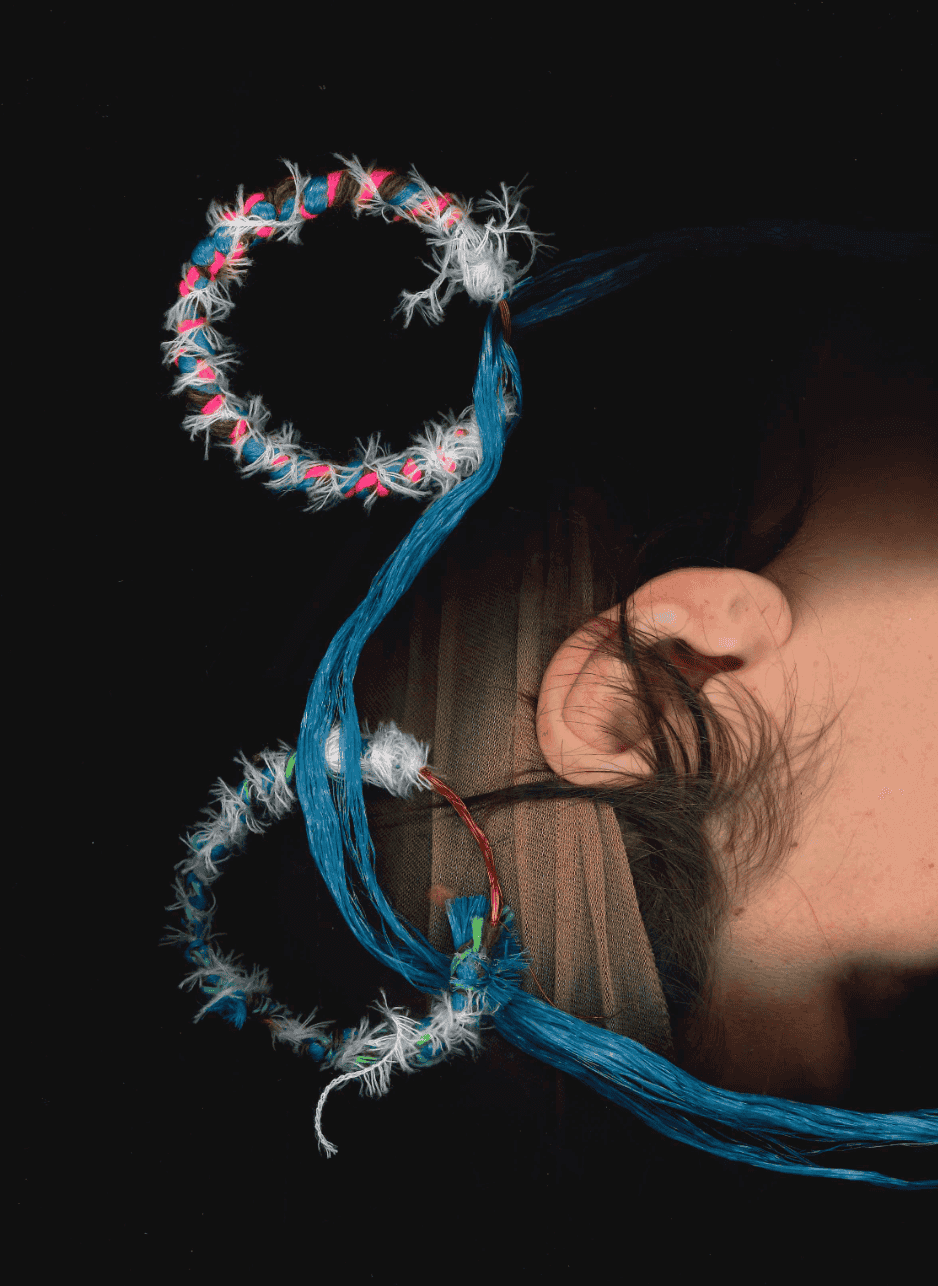
This week, I embraced a more visual approach, expressing both frustrations and determination to learn unfamiliar things beyond my comfort zone. Despite initial disinterest, I found joy in exploring electronics, constructing circuits, and unraveling the mysteries of energy flow. My focus centered on an OLED display, deepening my emotional connection to electronics. On a lighter note, a seemingly pointless hat turned purposeful as it became the canvas for understanding and programming an ATtiny 85.
The design of the "SUCK/LOVEHAT" reflects on the chaotic week and the set of instructions that were definitely a mess for me in the beginning. I really love showcasing all the circuits, jumper wires, and soldering. So, I opted for an open circuit delicately sewn on by hand.
OLED DISPLAY
STEP-BY-STEP VISUAL INSTRUCTIONS: TUTORIAL I FOLLOWED
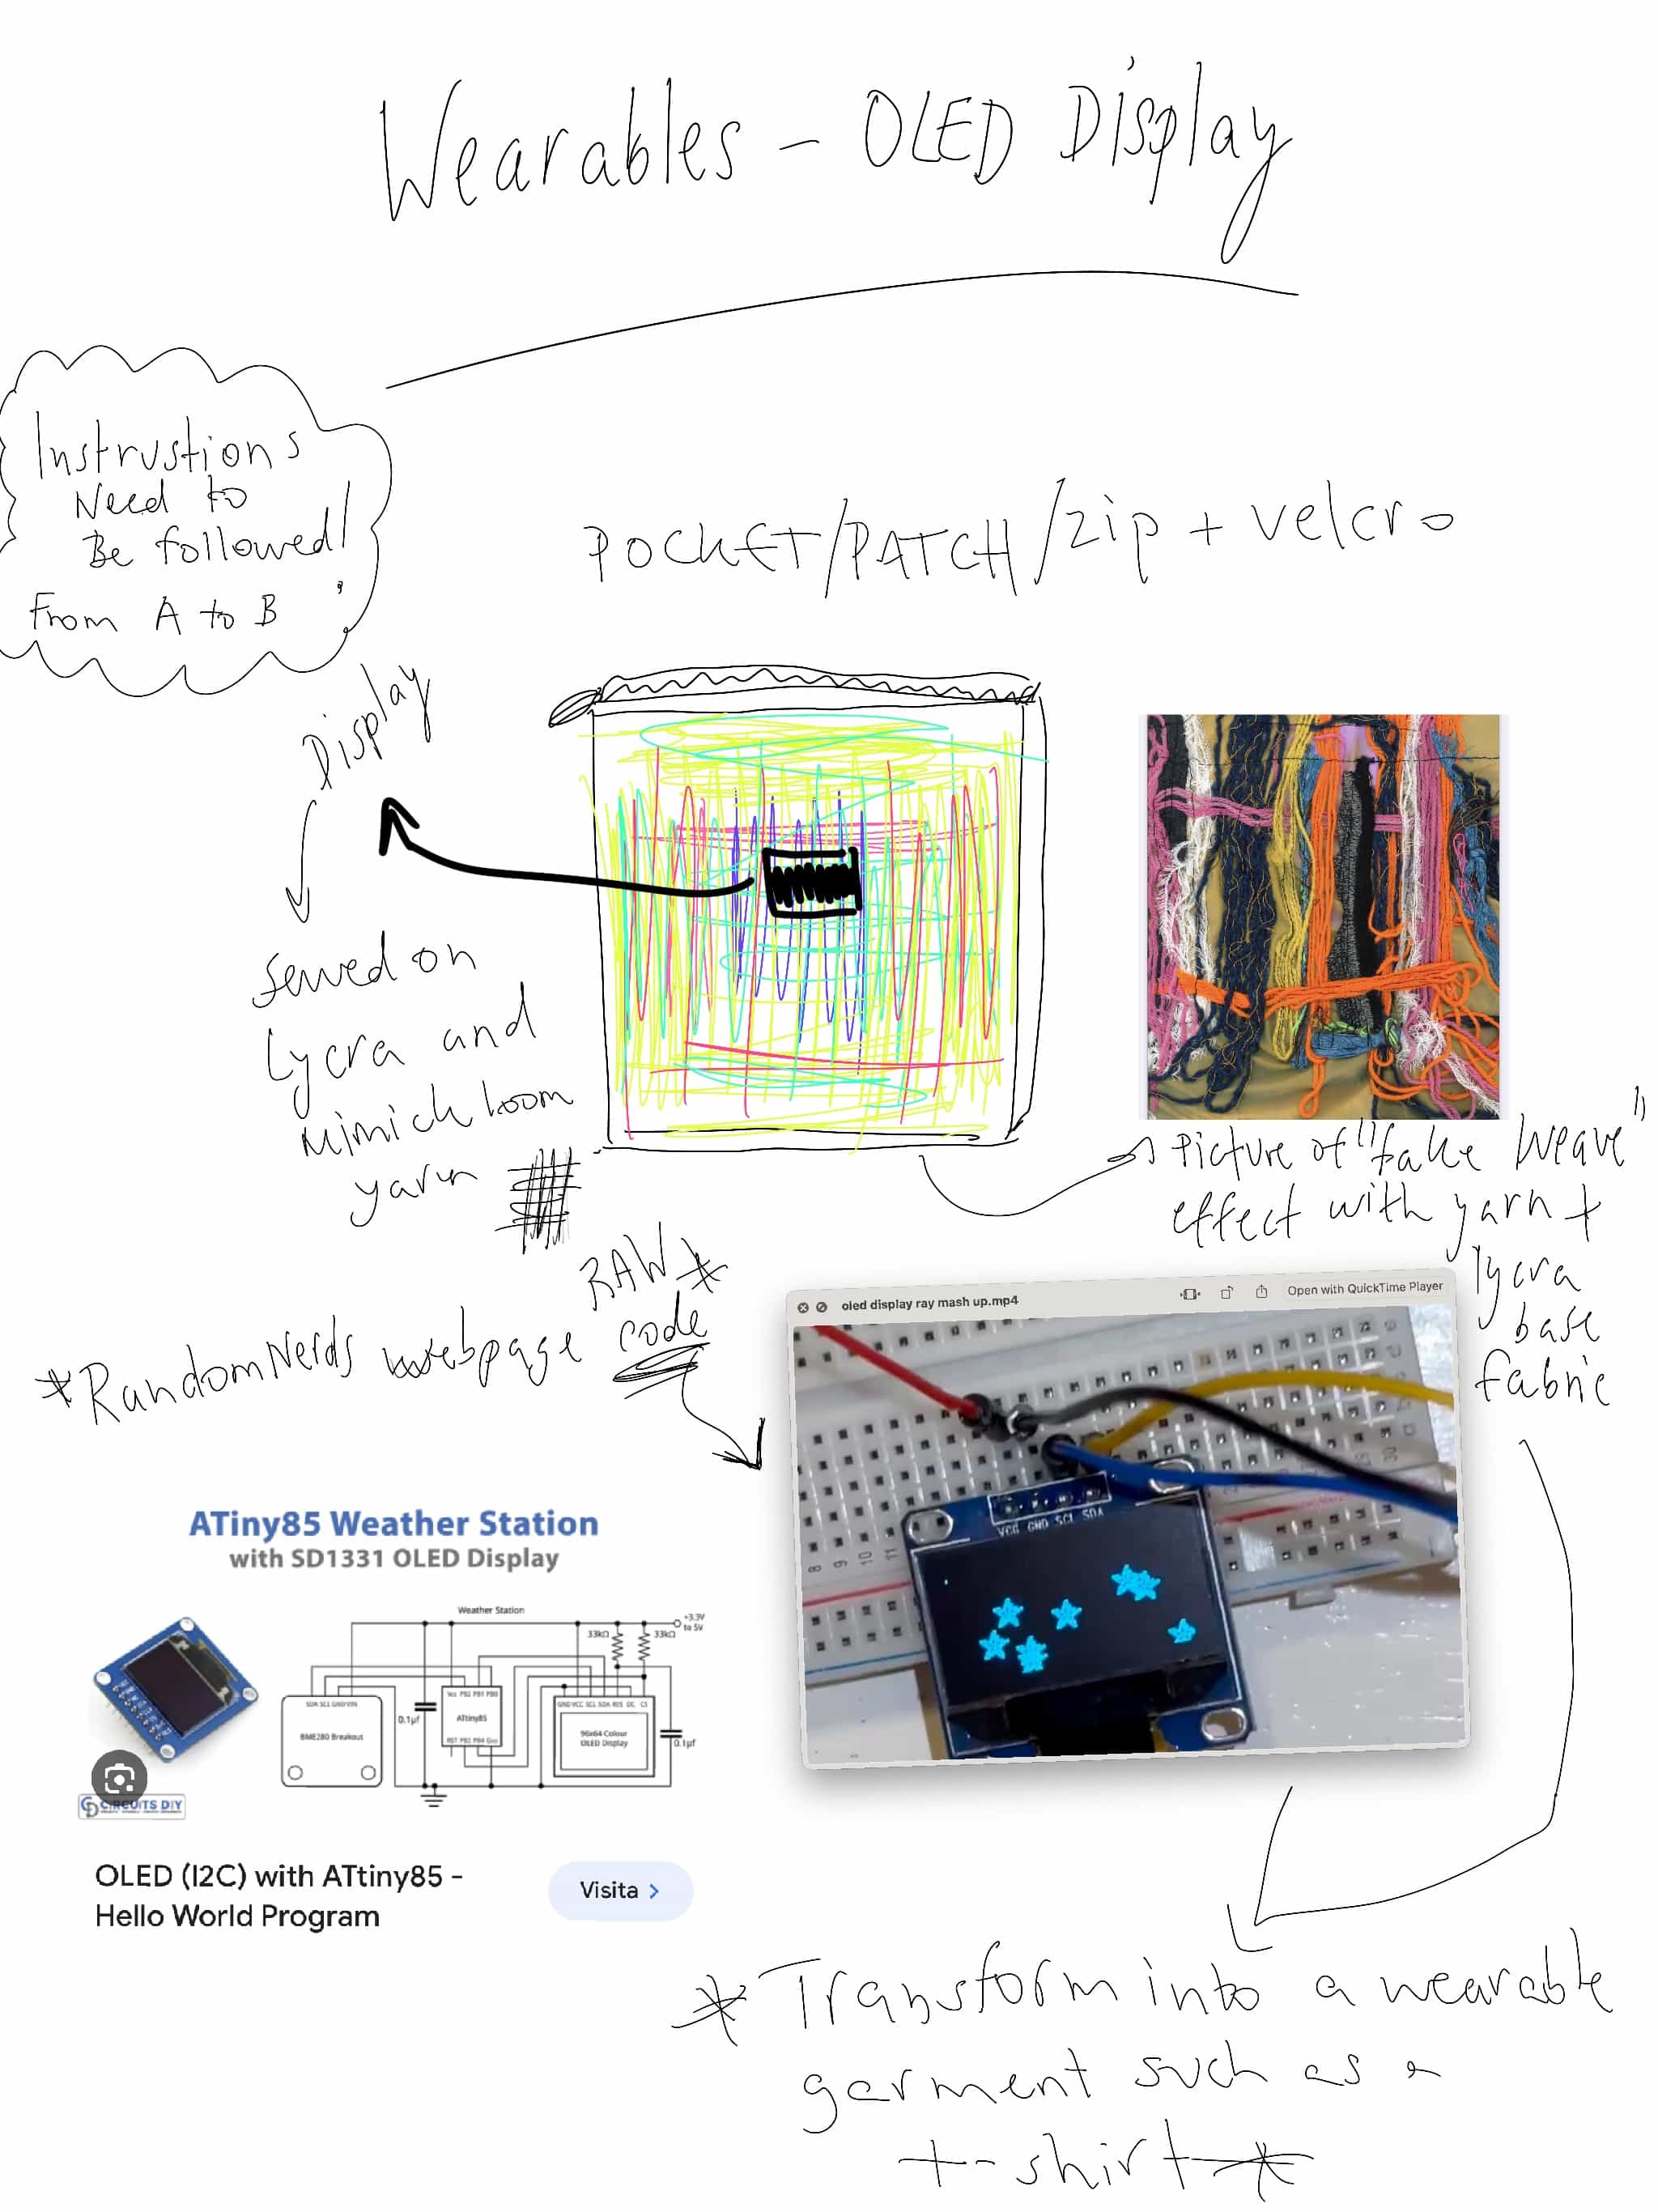


Weewooday 5 Pieces 0.96 Inch OLED Module 12864 128x64 Driver IIC I2C Serial Self-Luminous Display Board Compatible with Arduino/Raspberry PI Tutorial for I2C OLED Display with Arduino
Pin wiring
Because the OLED display uses I2C communication protocol, wiring is very simple. You just need to connect to the Arduino Uno I2C pins as shown in the table below.
OLED DISPLAY (0.96 Inch OLED Module 12864)
| Pin | Wiring to Arduino Uno |
|---|---|
| Vin | 5V |
| GND | GND |
| SCL | A5 |
| SDA | A4 |
Reflection 03
FELIX HAT
This Week of Wearables has been special to me, especially because the idea for my project has been brewing since the Week of E-Textiles. I had this fixed idea: I really wanted to create something tangible and useful in honor of my dear friend Felix, who passed away. So, to kick off this Week of Wearables, I decided to make a torch hat. I hacked a ready-made circuit, added an 80-lumen light, and ta-da! The Felix hat was born.
LED HACKED HAT
“FELIX HAT”
INGREDIENTS:
UPCYLCED: - 1 SOCK “WORK” - BROWN WOOL DOG JUMPER - STIP OF DENIM FABRIC - SCAPRS FROM SILVER SYNTHETIC FIBER - DECATHLON HEAD TORCH HACKED!!
Thermochromatic Paint FAIL
(Thermochromic ink is a specialized type of ink that changes color in response to variations in temperature. This innovative ink contains pigments or dyes that are sensitive to temperature fluctuations, causing them to shift in color when exposed to heat or cold. chat btg)
Speakers/Headphones FAIL
didnt work the cooper coil as i didnt have a bigger magnet ( find an old speacker of headphone and steal the magnet inside...little hack from BRUCO)
Results
Favorite Outcome
**WEARABLE USELESS HAT:** Hacked light, Socks

**WEARABLE USEFULL HAT:** Oled + ATiny85 + Lycra + Wool yarn
Tools
Arduino Libraries

Adafruit
Libraries used:
(DIDN'T USE THIS LIBRARY IN THE END AS IT WAS TOO HEAVY OF A FILE FOR MY ATTINY 85)
TINYWIREM LIBRARY (BANNER TEXT)
Library used:
Arduino
Future References
Dig Deeper
https://www.sociologygroup.com/social-change/ social change
HEATING BLANKET OR PILLOW OR GARMENT MADE FROM BIOBASED MATERIALS AND NATURAL FIBRES
Hacks
- center images and text:
- mp4 in loop:
(((
<source src="../../images/week07/pyramids_class.mp4" type="video/mp4">
)))
© [2023] credit : ray