05. E-textiles
“THE CONSTRUCTION IS MORE IMPORTANT OF THE RESULT"- Nicolas Winding Refn
Weekly Assignmet
-
Week 05 by Liza Stark Topic: E-Textiles
Learning outcomes
Research skills: the participant has acquired knowledge through references or replicating existing projects Design skills: the participant understands how to produce soft circuits, sensors and actuators Fabrication skills: Learn how to embed electronics on fabrics, study soft-hard connections Process skills: Anyone can go through the workflow, understand it and reproduce it Final outcome: The assignment is assembled and either complete or tested Student checklist
- Build at least one digital and one analogue soft sensor, using different materials and techniques.
- Document the sensor project as well as the readings got using the AnalogRead of Arduino
- Integrate the two soft sensors into one or two textile swatches using hard soft connections
- Document the circuit and its schematic
- Document your swatches / samples
- Upload your arduino code as text
- Upload a small video of the swatches functioning
- Integrate the swatch into a project (extra credit)
Inspiration from Past Fablab Students
Marieke Eyndhoven
Alessia Pasquini
Stephanie Floreszopf
- E-TEXTILE (Fablab project 2019 / Conductive bioplastic)
"Materials and methodology
Stretchy auxetic electrodes: woven ripstop conductive fabric laser cut with auxetic pattern Conductive bioplastic*: cornstarch-based bioplastic modified with salt and lemon juice to render it conductive Other ingredients: heat n' bond adhesive, hot glue, and stretchy textile to make it 'wearable'
*Wet ingredients measured out by volume, dry ingredients by mass. Assume 1:1 conversion of g/ml: 53% water, 11% glycerol, 8% cornstarch, 3% vinegar, 5% salt and 20% lemon juice Methodology: Prepare two stretchy auxetic electrodes - use Epilog 40W laser cutter to create auxetic pattern (settings- speed: 80, power: 5, frequency: 500) Prepare conductive bioplastic formulation - - Integrate auxetic electrode onto stretchy textile - Cut out swatch of stretchy textile. Place small squares of heat n' bond to every corner of each auxetic electrode. Adhere each electrode to the stretchy textile by one corner. - Create dam for conductive bioplastic electrolyte - Use hot glue (or some other adhesive that can block absorption of bioplastic electrolyte through the textile Incorporate conductive bioplastic electrolyte - Formulate bioplastic as listed in the aforementioned section. 'Paint' bioplastic in the space between each auxetic electrode and the stretchy textile Secure everything - Iron down the rest of the other corners of the auxetic electrodes"
DESIGN OF FLEXIBLE SUPERCAPACITORS FOR WEARABLE ENERGY STORAGE:
"This project entailed developing a flexible, ionogel electrolyte-based supercapacitor device. The goal was to realize a device prototype that incorporates an ionogel electrolyte and is also safe and durable for wearable use. We explored different avenues of fabricating a flexible device onto textiles — e.g. screen-printing electrode material and ionogels into military textiles (see referenced paper below). The ultimate device involved utilizing silicone packaging material that enabled low device resistance and provided a reliable way to integrate the device to textile."
WEARABLE ENERGY STORAGE PROJECT
SCALED-UP ASSESSMENT OF WATERPROOFED TEXTILES WORK:
This project involved assessing the performance behavior of different waterproof coatings on military textiles. I characterized coated textiles against an array of chemicals, and developed a test method to assess the performance of these textiles in a 3D configuration.
Examples reference ideas by: Manuel Linnet
-
Rachel Freire¶ (Rachel has also created instructables to follow along, how to make circuits on strechy fabrics.)
-
Lynne Bruning¶ (Lynne Bruning has a very nice short series on instructables about e-textiles from conductive threads till conductive fabrics.)
Artists I Like


tools
Credits: Asli Aksan
Textiles, Tools and other materials:
- Conductive thread
- Non-conductive thread
- Non-conductive yarn
- Embroidery fabric (cotton)
- Felt
- Conductive fabric
- Copper tape (sticky on one side)
- Fusing fabric
- Conductive snap button
- Conductive button
- Conductive beads
- Crochet hook
- Needles of various sizes and tips (according to thread diameter and fabric that it goes through)
- Scissors (one for cutting conductive materials and one for cutting the rest)
- Utility knife
- Cutting mat
- Metal ruler
- Pen
- Pom-pom maker
Electronics:
- Multimeter
- LED (various colors)
- Resistors
- Arduino uno board
- Alligator clips
- Jumper wires
Documentation
Day 01: Tutorial - Zoe Stark
Day 02 - Workshop with Michelle Vossen:
On the first day of the textiles class, I had my first tutorial with Michele. It was an exciting and creative start, as I delved into a world of new possibilities. Michele introduced us to a range of new techniques and creative approaches. I was particularly intrigued by the many ways of manipulating fabric fibers especially felt and knitting.
I decided to trust my instincts and began my experimentation by working with felt. I also explored the punching needle technique and incorporated conductive yarn into my project. The goal was to create a watch out of these materials. However, my initial attempt didn't yield the desired results. The circuit I had built simply didn't work as intended.
***Attempting to make my first swatch was a total mess, and I felt pretty lost, but it also got me really excited and inspired to create. Even though I was guessing half the time, it kick-started my creative process. I like to challenge myself, even if it means making things overly complicated at first, because that's where I learn the most from my mistakes.

Notes from Class
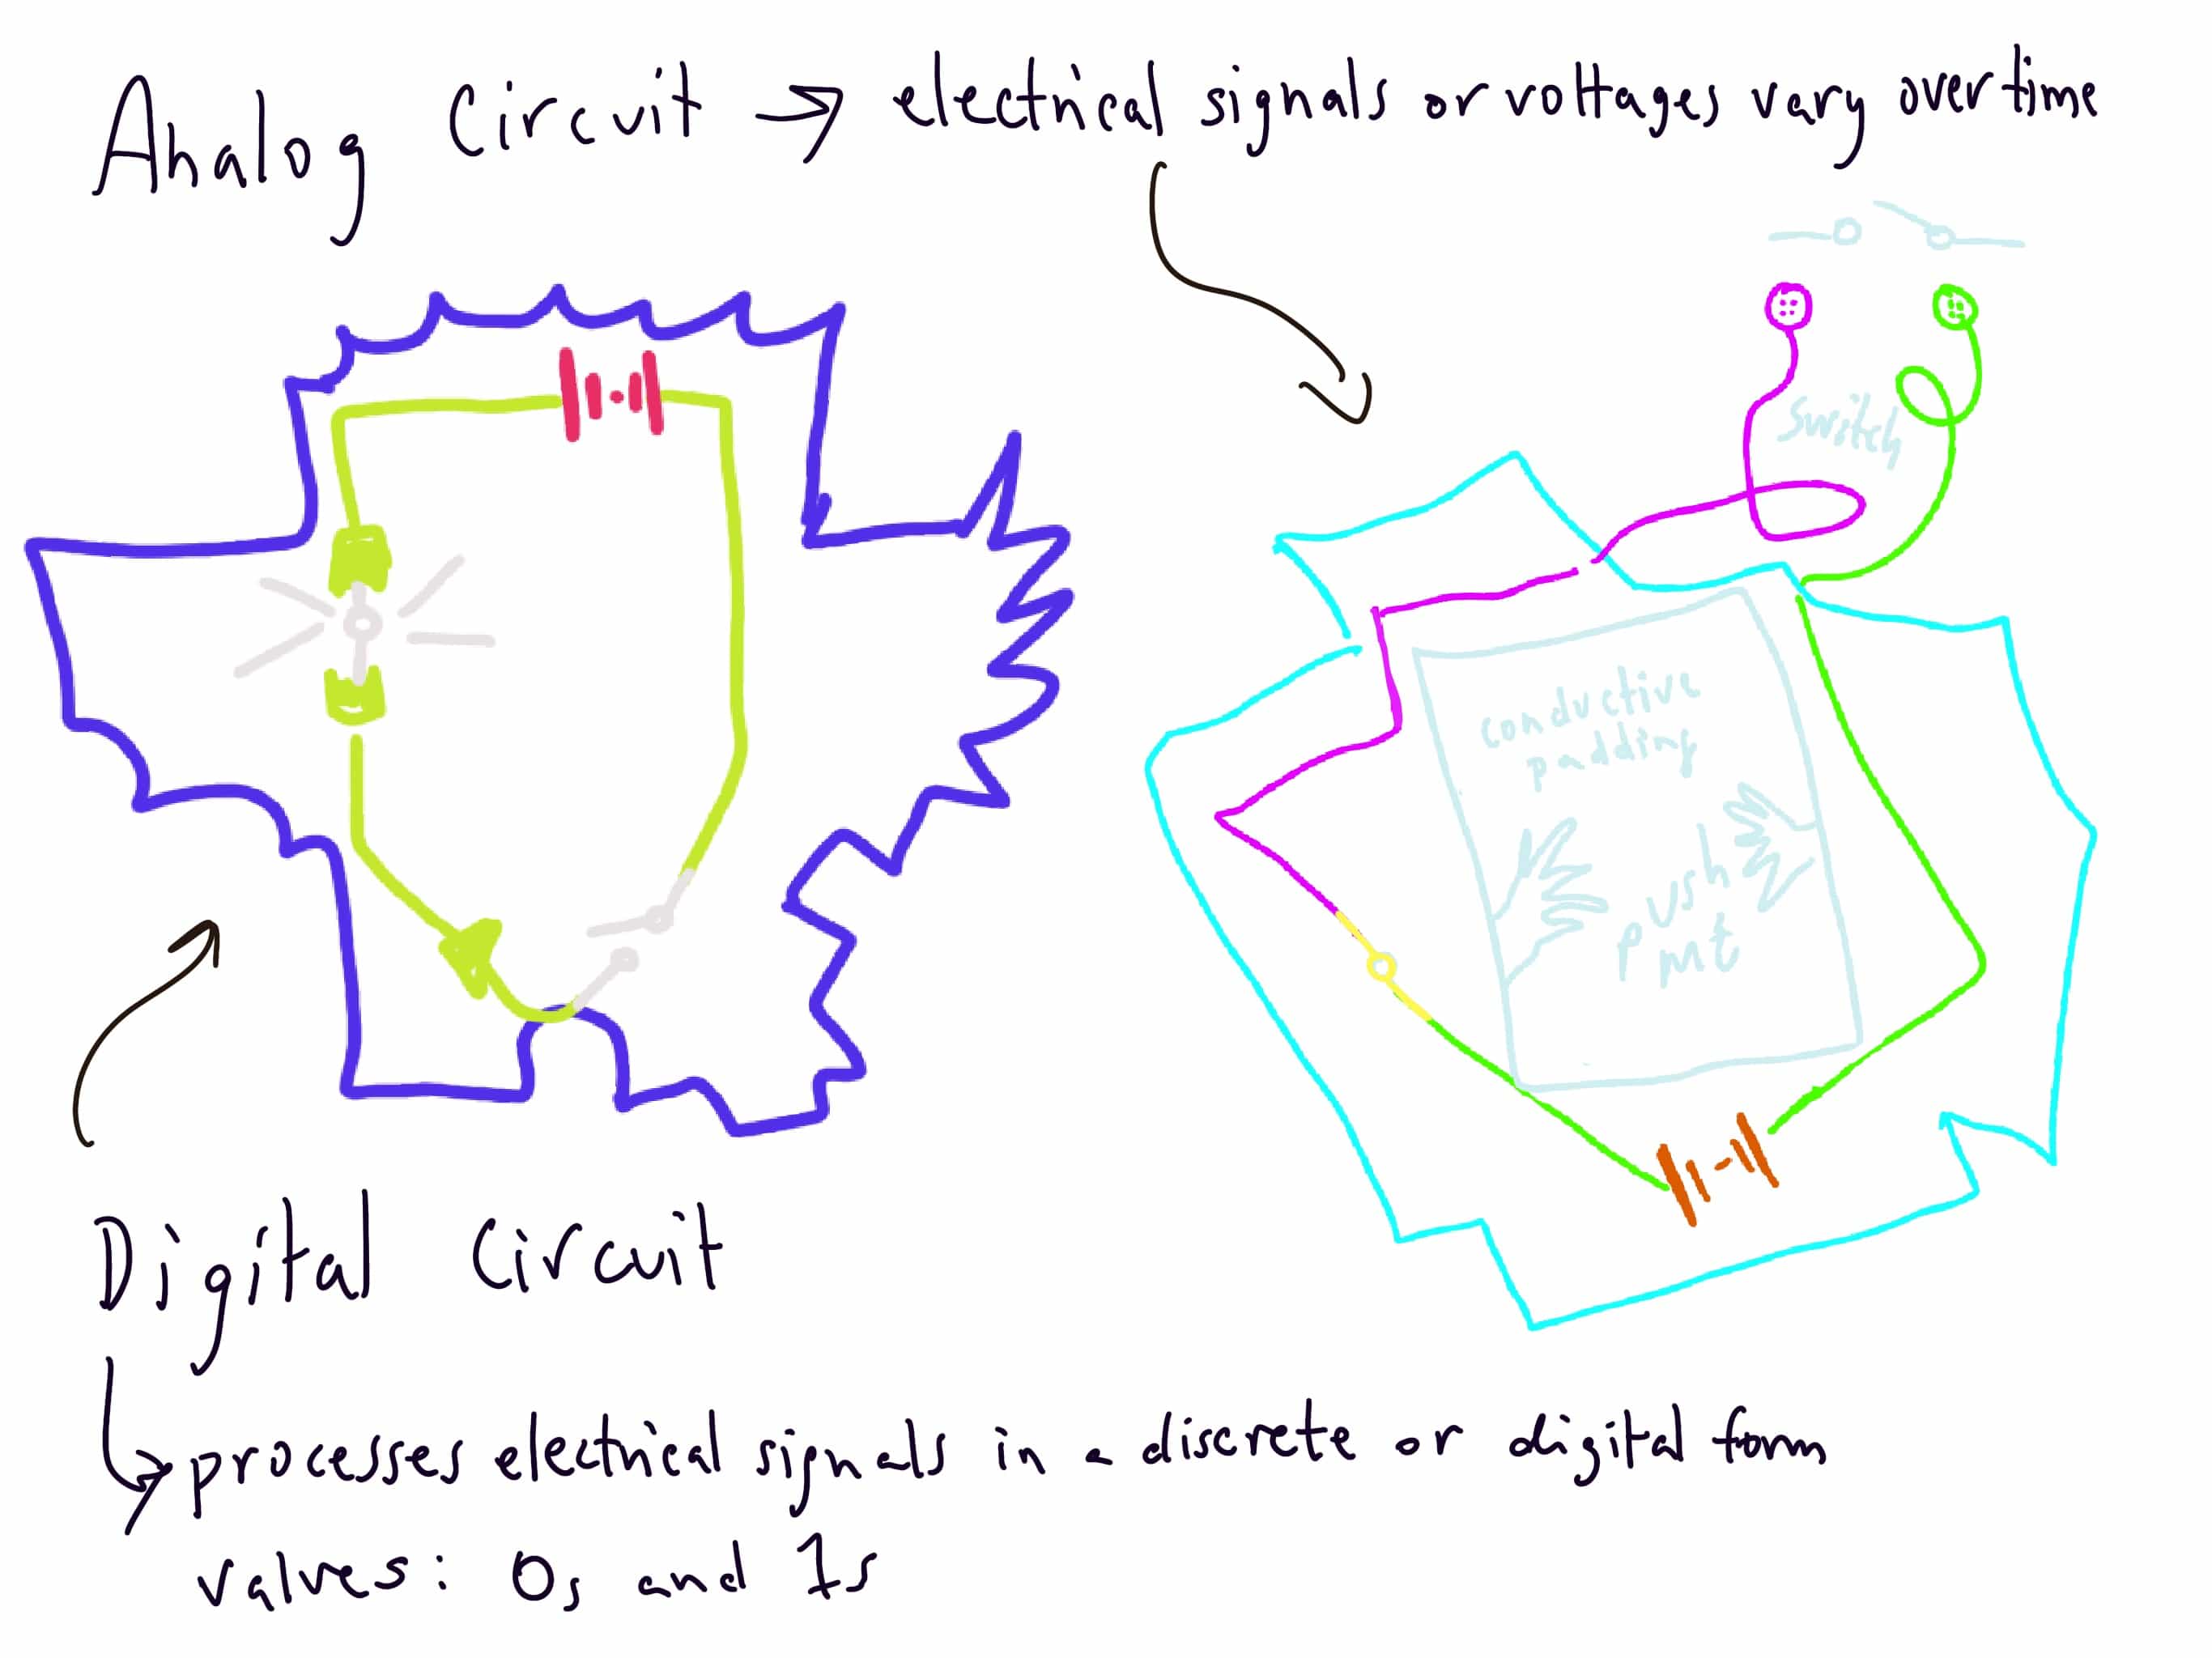
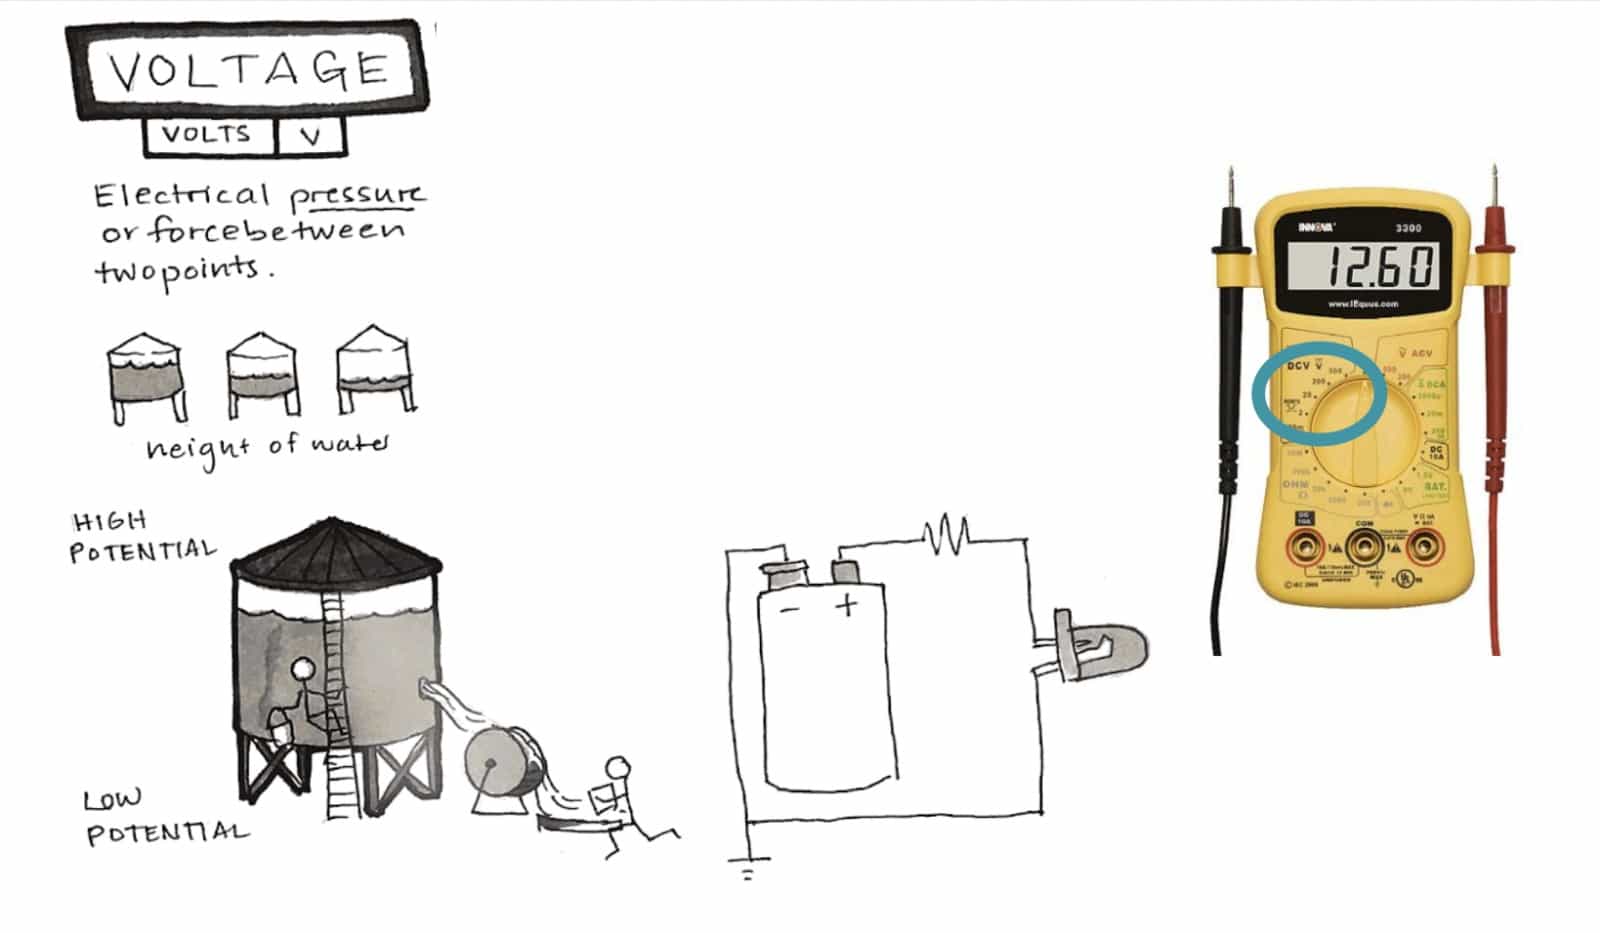
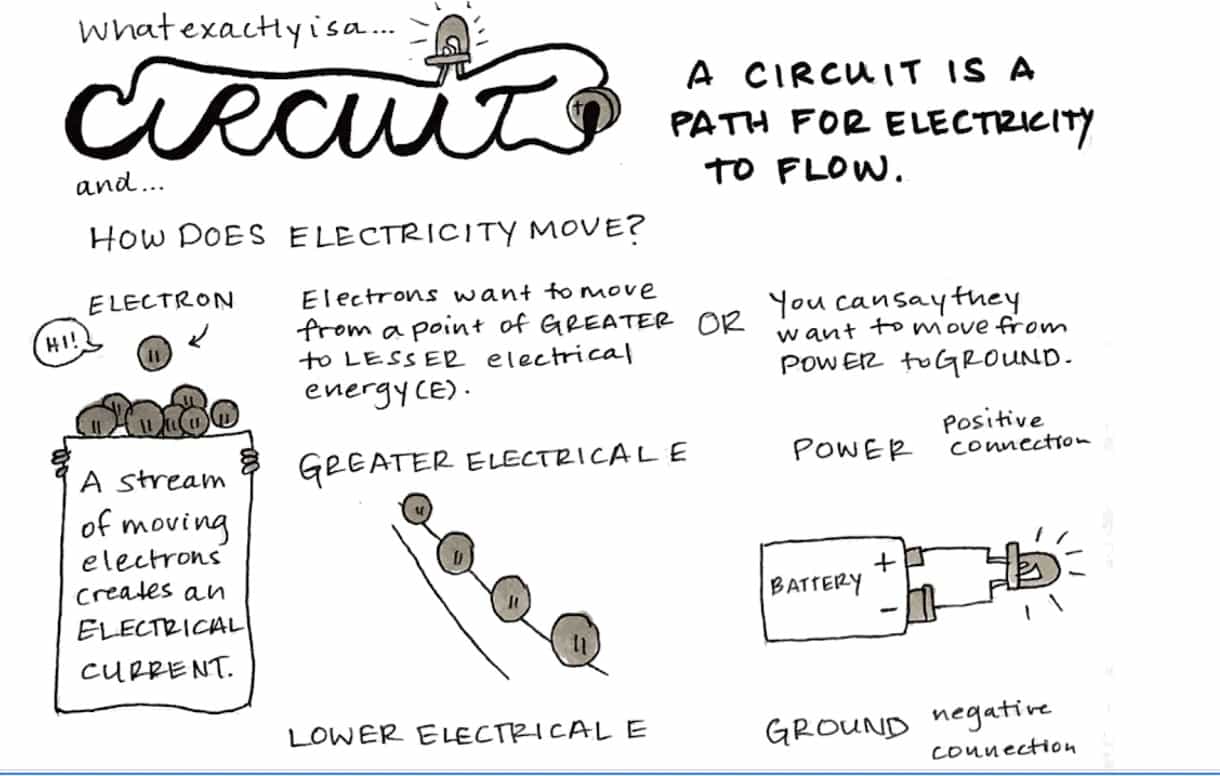
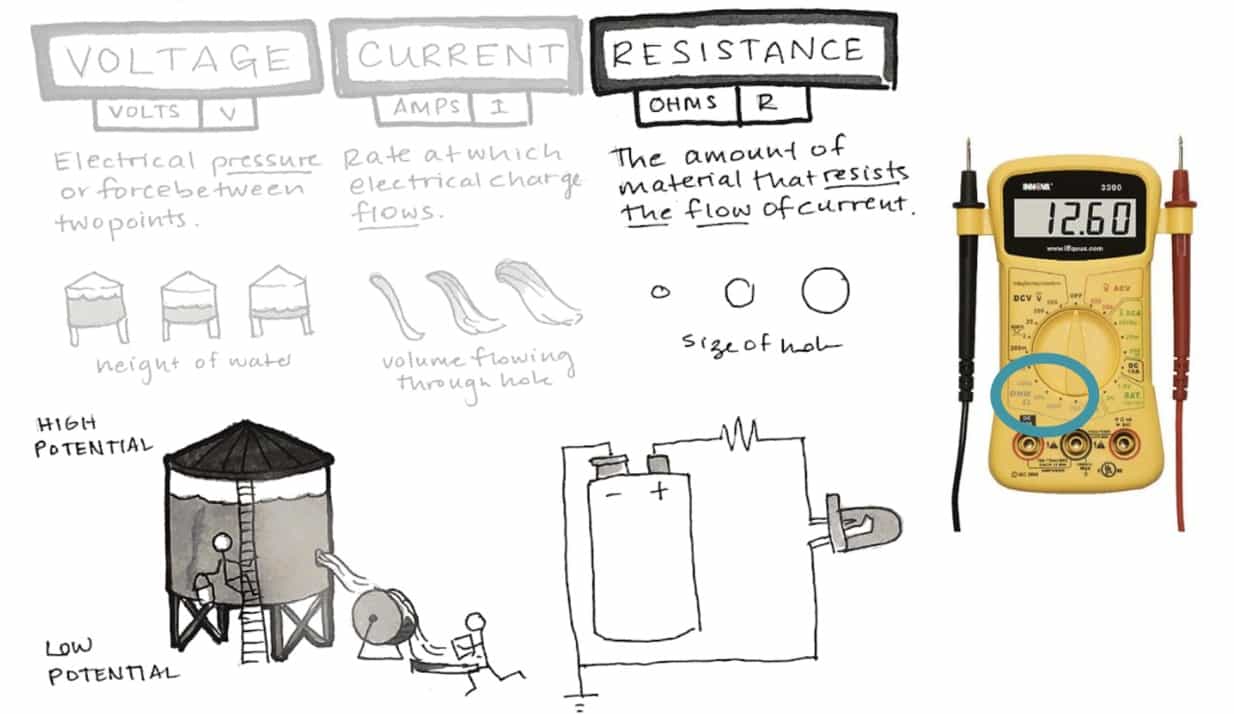
Electricity - What is electricity? - Why soft, why embedding - What is a circuit - How does electricity move - Voltage, Resistance, Current - LEDs
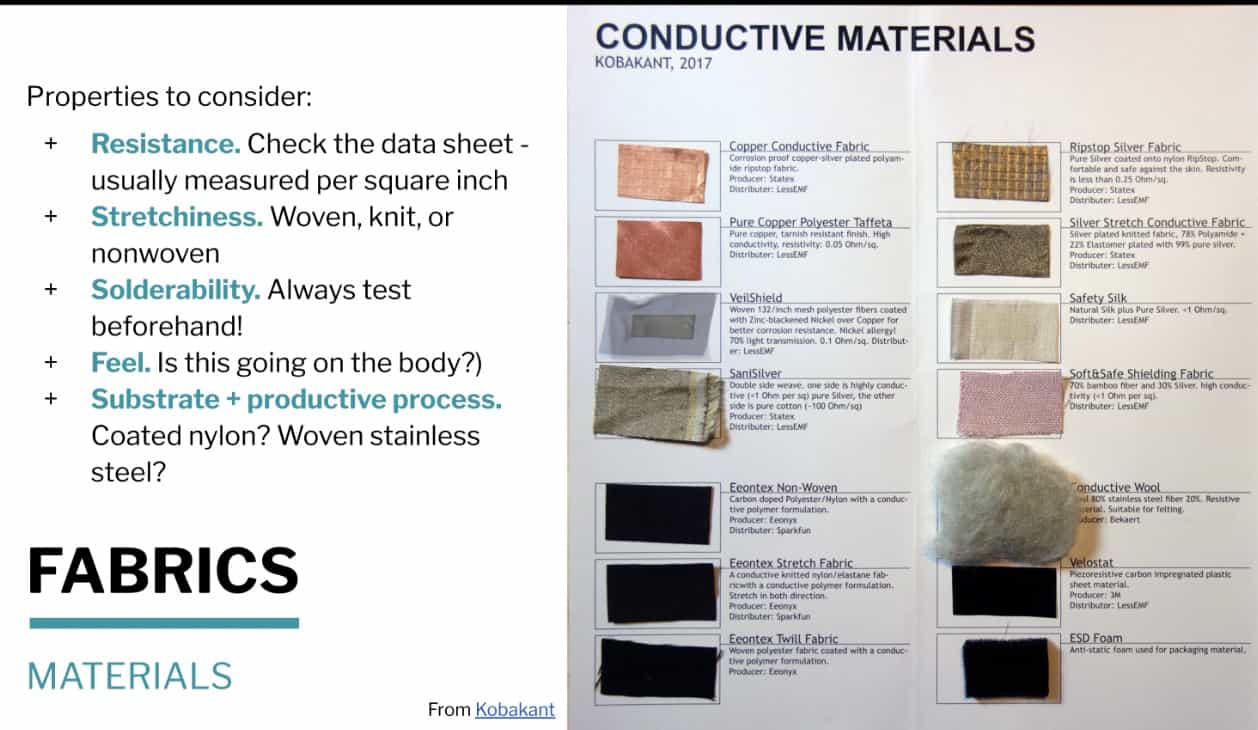
Conductive materials
- Fabrics - resistive/conductive
- Threads - resistive/conductive
- Inks - resistive/conductive
Tools
- Vinyl cutter, laser, embroidery, machine sewing
- Multimeter, soldering iron
- Hard/soft connections (10 min)#
- Machine-sewable Hard/Soft Connections
Soft sensors
- Digital
- Switches - momentary/toggle
- Tilt
- Joystick
- Stroke
- Analog
- Pressure sensor ( analog input example)
- Potentiometers
Stretch sensors - fabric/knit
- Bend sensors
- Accelerometer
Analog Sensor
Credits: Asli Aksan
Analog sensors give variable resistance reads. Resistance in a circuit is important because it affects the voltage that runs in the circuit. There are three ways to manipulate resistance: distance (when distance increases resistance increases too), contact (when contact increases resistance decreases) and surface (when surface increases resistance decreases). I wanted to test the first method of manipulating resistance, by distance. When the button moves along the trace towards the LED, the resistance decreases due to distance decrease. Therefore LED lights up brighter.
{ width=400 align=center }
Mechanical Knitting Machine
On the second day, our tutor Michelle introduced us to a fascinating piece of equipment, a mechanical knitting machine dating back to the 80s. This machine was not only a testament to textile history but also a inspiration for my creativity.
We learned how to combine conductive yarns with "normal" wool yarns, with conductive yarns resulting in beautifully knitted elastic wool swatches, ready to be testes as conductive mediums. These swatches became the canvas for our experiments with analog circuits. It was a captivating experience to see the blend of old and new technologies in action.
Day 03 - Upcycling Pants and Electric Sewing:
As the days progressed, I was feeling more and more excited about the possibilities in this class. On the third day, I decided to upcycle a pair of horseback riding pants. I was eager to turn them into something unique and creative. However, my enthusiasm got the best of me as I went a bit overboard with the electric sewing machine, using conductive thread.
I soon learned an important lesson about the behavior of electricity in circuits. IT'S LAZY it tends to disperse, and I realized that my circuit was not effectively contained. Nevertheless, these challenges were all part of the learning process.


Digital Sensor
check out Asli's documentation to see a swatch in action
Digital sensors give simple feedback with two possible outcomes: ON/OFF, 1/0. I started with this simple sensor type, a digital toggle sensor with a snap button. I embroidered the circuit on embroidery fabric with a conductive thread using cross stitch technique. The snap button here acts as the toggle switch of the circuit. When it is not buttoned, the circuit is open, therefore the LED does not light up. When it is snapped into place, the circuit is closed, therefore the LED lights up.
Who is Arduino by Chatgbt:
is an open-source electronics platform known for its user-friendly hardware and software, making it accessible for makers, students, and hobbyists to create a wide range of electronic projects. The development of Arduino involved multiple individuals and has evolved over time.
iframe src="https://assets.pinterest.com/ext/embed.html?id=525795325260649106" height="421" width="236" frameborder="0" scrolling="no" >
**Stretch Sensor Arduino conductive yarn**
**RAW Code**
Easiest Code for Analog Read:
        // the setup routine runs once when you press reset:
            void setup() {
        // initialize serial communication at 9600 bits per second:
        Serial.begin(9600);
        }

            // the loop routine runs over and over again forever:
            void loop() {
            // read the input on analog pin 0:
            int sensorValue = analogRead(A0);
            // print out the value you read:
            Serial.println(sensorValue);
            delay(100);  // delay in between reads for stability
            }
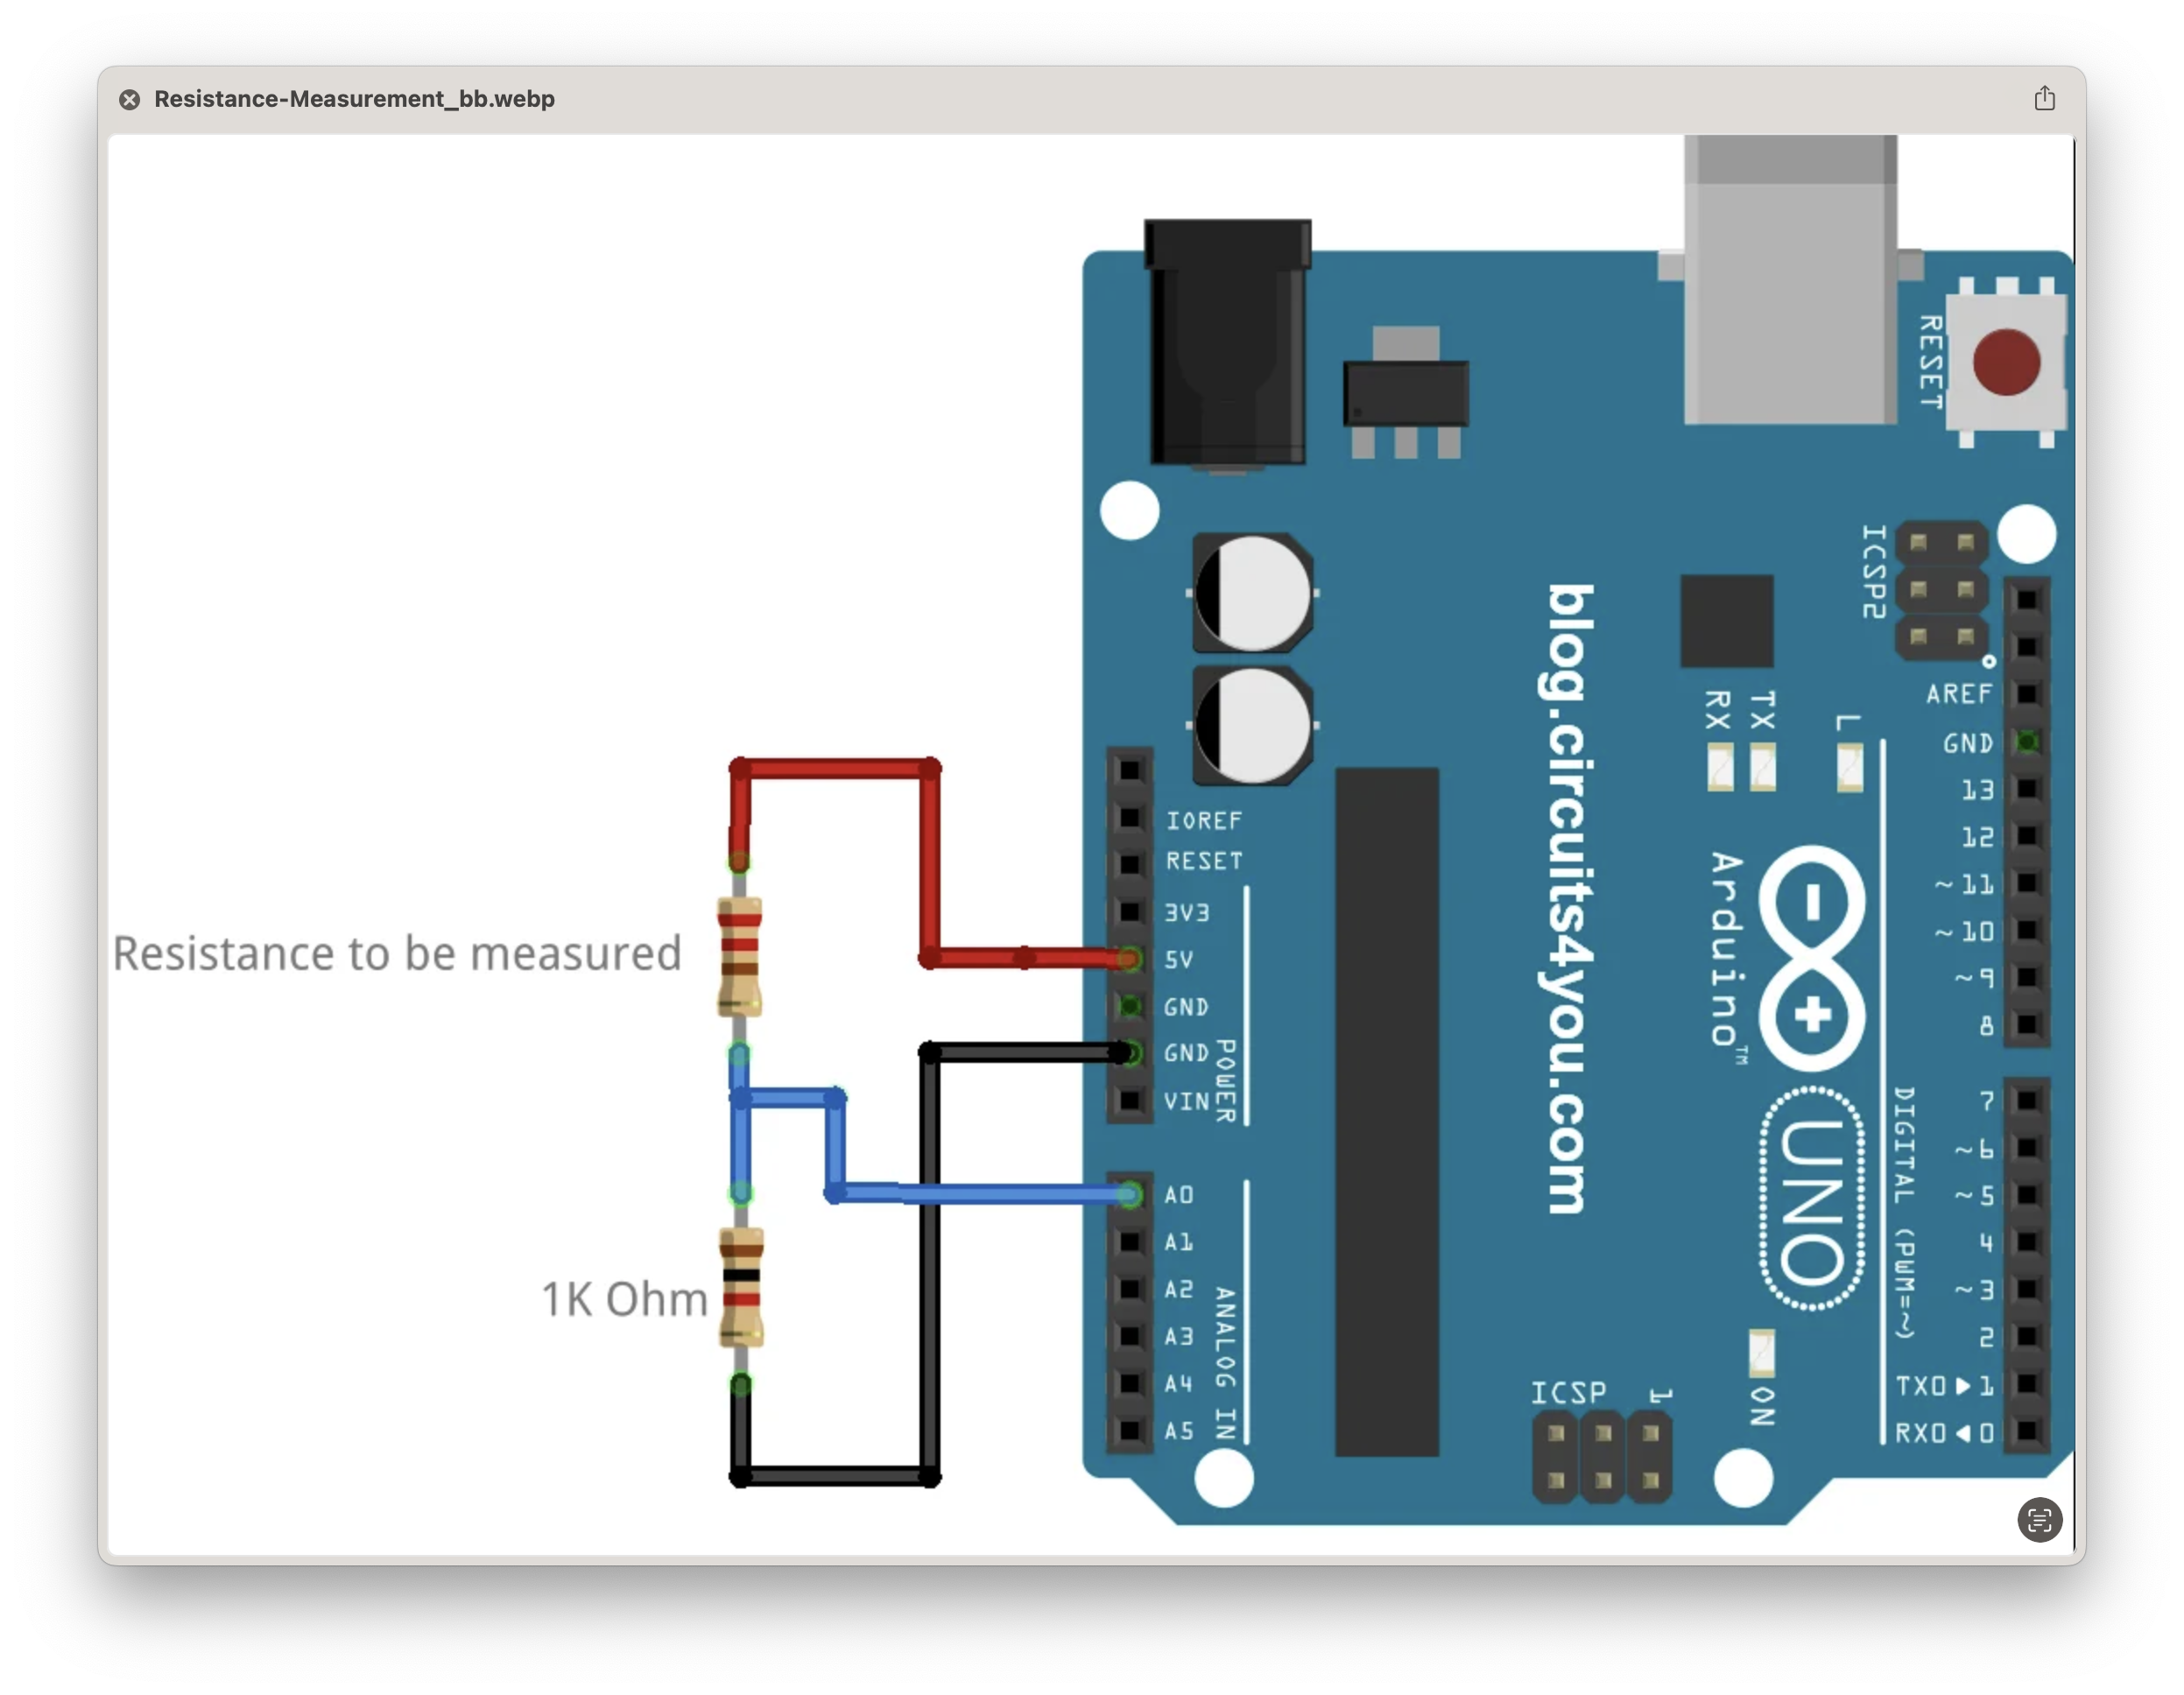
Modified Resistance Measurement Circuit (with a 9.5k ohm resistor and with custom lower and upper resistance range)
    /*
    Resistance Measurement - www.circuits4you.com
    Reads an analog input on pin 0, converts it to resistance, and prints the result to the serial monitor.
      Using a 9,5k ohm resistor as known resistor
    */
    int ledPin = 5;  // LED connected to digital pin 9

        int lowerBoundResistance = 500;
        int upperBoundResistance = 1500;

        // the setup routine runs once when you press reset:
        void setup() {
        // initialize serial communication at 9600 bits per second:
        Serial.begin(9600);
        }

        // the loop routine runs over and over again forever:
        void loop() {
        // read the input on analog pin 0:
        int sensorValue = analogRead(A0);

            // Convert the analog reading (which goes from 0 - 1023) to a voltage (0 - 5V):
            float voltage = sensorValue * (5.0 / 1024.0);

            int resistorvalue = 9500;
            float I = voltage / resistorvalue;
            float VRx = 5 - voltage;
            float Rx = VRx / I;
            Rx = (5 - voltage) / I;

            int mappedValue = map(Rx, lowerBoundResistance, upperBoundResistance, 0, 255);
            mappedValue = constrain(mappedValue, 0, 255);

        // print out the value you read:
        Serial.print("Resistance:");
         Serial.print(Rx);
         Serial.print(" Ohms");
         Serial.print(" and mapped value is ");
         Serial.println(mappedValue);
        analogWrite(ledPin, mappedValue);
         delay(100);
        }
Hacks
major hack: ALL OF MY IMAGES CAN HE HIGH QUALITY NOW!! CREATING PINS ON PINTREST ALLOW YOU TO EASILY MBED CODES AND CHOOSE THE SIZES! MIND BLOWING XD
Software's
Dig Deeper in the Future
https://www.sciencebuddies.org/stem-activities/algae-string
DIY HYDROGEL
Hydrogels deliver moisture to delicate eye areas in a cool gel base. They’re especially nice to use during facial treatments or anytime your eyes are feeling tired. Simply close your eyes and apply hydrogel to each eye and relax for 5-10 minutes. Try different teas for different effects. Hibiscus is rich in antioxidants and helps boost moisture, chamomile is calming, and peppermint is cool and refreshing!
Robotic fibers can make breath-monitoring garments
A new kind of fiber developed by researchers at MIT and in Sweden can be made into cloth that senses how much it is being stretched or compressed, and then provides immediate tactile feedback in the form of pressure or vibration. Such fabrics, the team suggests, could be used in garments that help train singers or athletes to better control their breathing, or that help patients recovering from disease or surgery to recover their normal breathing patterns. (Learn more: https://news.mit.edu/2021/fibers-brea...)
Light up Beanie
Illumino Brainlight: Turn Your Brainwaves Into Light
LED Magician Hat
Reflection
For this project, I crafted a soft digital circuit using purple felt and conductive fabric. This circuit incorporated an LED light and a battery, adding a dynamic element to the fabric. To make it interactive, I included a button for a switch, which I found absolutely fascinating.
Conclusion:
These four days in the textiles class had taken me on a journey of exploration, creativity, and valuable lessons. It was a testament to the exciting possibilities that textile work could offer, and I couldn't wait to see where this newfound knowledge and inspiration would take me in the future.
Keep Updated
Join me on my adventure on Instagram and Pintrest
© [2023] credit : ray