7. BioFabricating Materials
Initial thoughts
Another exciting week is ahead. On my visits to Fab Lab Armenia in Dilijan, I admired Erika's works: purses, boxes, and other examples of bioplastics, and always had the wish to try it myself. Here comes the week and I am so much looking forward to it. After attending the weekly meeting by Cecilia Raspanti, I set my goals for this week:
-
study and learn about bioplastics
-
gain practical knowledge by experimenting in the lab
-
grow mycelium
-
laser cut and make a bioplastic example of my game
-
revive my hobby of jewelry making, this time with bioplastic and not epoxy resin
-
document.
Research & inspiration
Bioplastics are plastic materials that are either bio-based (made from plants or renewable biomass), biodegradable (capable of breaking down naturally by microorganisms), or both—unlike traditional plastics, which are made from non-renewable petroleum or natural gas. Some bioplastics can be recooked and remolded and, decomposed in nature, can break down into natural elements under the right composting conditions, like in high-heat industrial compost.
Here are some of my inspirations based on their artistic approach to bioplastic, as well as their versatility and wearability.

I was highly inspired by Crafting Plastics! Studio - studio is an award-winning design studio based in Slovakia and Germany that is pioneering the use of bioplastics in everyday product design and furniture. Founded by Vlasta Kubušová and Miroslav Král, the studio's primary mission is to prove that sustainable, bio-based materials can match the performance, color variety, and aesthetics of oil-based plastics.
The studio is best known for creating Nuatan, a proprietary material blend developed in collaboration with scientists. Nuatan is a 100% bio-based polymer made from renewable raw materials like cornstarch, potato starch, and used cooking oil. Unlike standard bioplastics that require high-heat industrial composters, Nuatan is designed to be fully home-compostable and can even be consumed by soil microbes without leaving any toxic residues or microplastics behind.
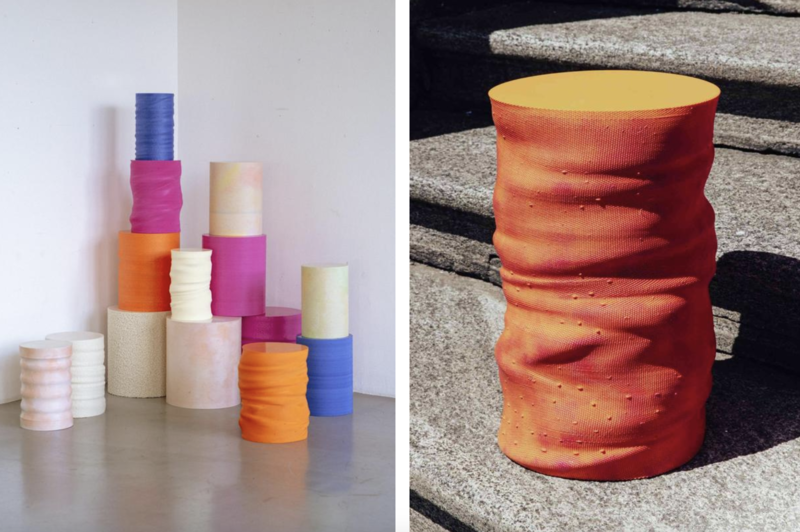
They use a 100% bio-based polymer blend made from cornstarch, potato starch, and used cooking oil to create fully home-compostable stools, eyewear, and interior design products. In each collection, they show a responsible approach to product sustainability, to the customer's health, and thus, to the health of the planet.

Eyewear collection
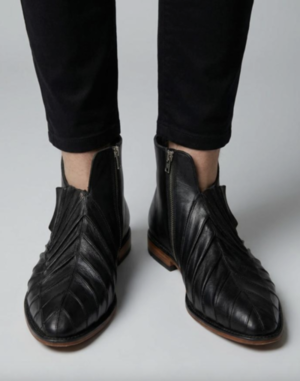
Kinetics collection
My next inspiration is Caroline Zimbalist, a New York–based artist and fashion designer who uses home-cooked bioplastics as her primary creative medium. She began experimenting with non-toxic 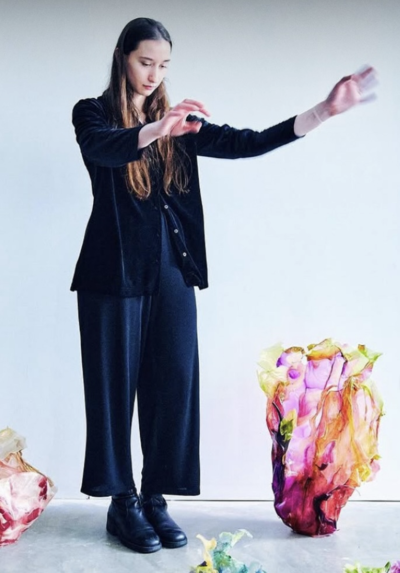 biomaterials while studying textile and fashion design at Parsons School of Design to avoid working with toxic, petroleum-based resins and acrylics after noticing the harmful impact on her own health. Zimbalist treats bioplastics not just as a sustainable packaging alternative, but as a fluid canvas for high fashion, sculpture, and home decor. Her bioplastics contain zero synthetic plastics: she mixes entirely natural, biodegradable, and grocery-store-accessible ingredients like agar, gelatin, cornstarch, tapioca starch, glycerin, and vinegar. She uses her sculpting technique to intervene in the drying process. While the heated mixture is hot and fluid, she pours it onto flat surfaces, fabric backing, or over custom molds. Because the material warps, shrinks, and shifts naturally as it dries over several days, Zimbalist co-creates with the material, letting it "have its own opinions" on the final shape.
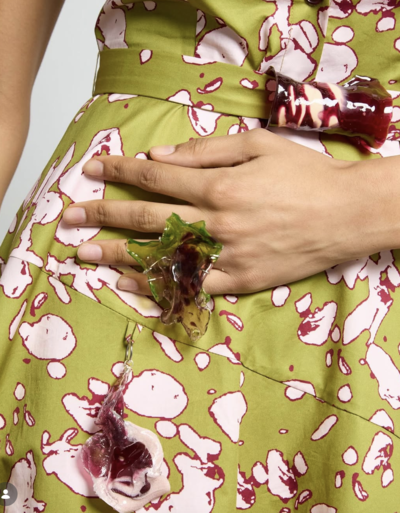
Accessories
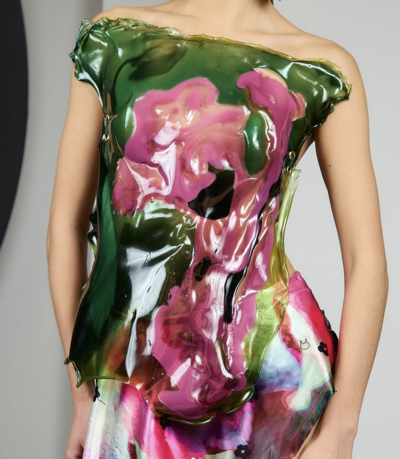
Bioplastic bodice
Tools
- Pots
- Jars
- Whisks
- Tongs
- Spoons
- Scale
- Measuring cups
- Leather for texture
- Wooden frames
- Tweezers
- Spirit (~90%)
Sources
- Bioplastic Cook Book by Margaret Dunne
- Erika Mirzoyan's Fabricademy website
- Annie Ferlatte's tutorial
- "Kick Start Yout Myco-Culture!" by Jessica Dias
Ingredients
- Polymer (agar, alginate, gelatine, corn starch)
- Plasticizer (glycerine)
- Expanding agent (liquid soap)
- Fillers and stiffening agent (powdered nettles and persimmon, clay)
- Binder (gum arabic)
- Color/pigments (avocado dye from BioChrome week)
- Curing agent (calcium chloride hydrate)
- Water
Process and workflow
Recipe 1: Beeswax bioplastic
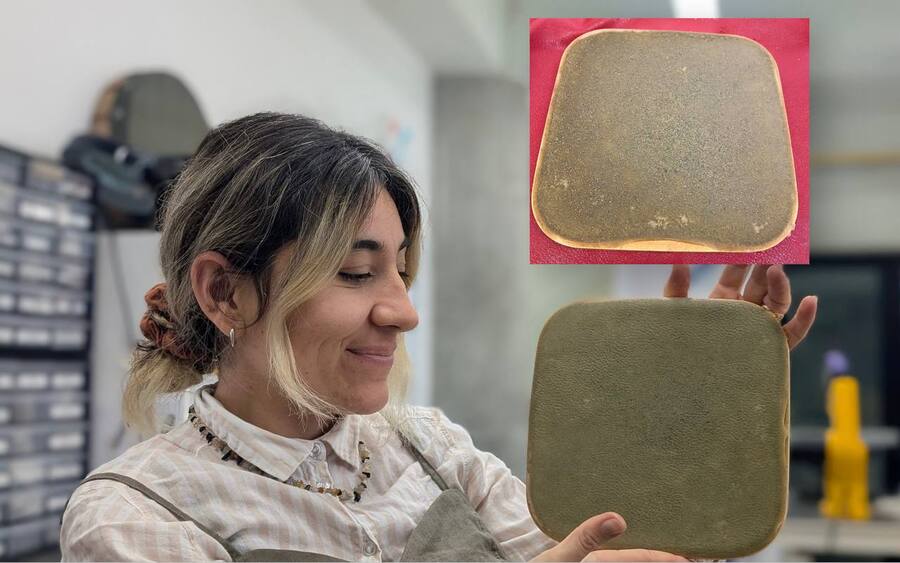 Photo by Anoush Arshakyan
This recipe was created by Erika Mirzoyan as a result of experiments with ingredients and proportions. I am thankful and excited to have learned it, especially personally from her. Below is the recipe that Erika would use for one portion; let's say this is her standard beeswax recipe:
Ingredients
- Water 60 ml
- Beeswax 15 gr
- Gelatine 12 gr
- Glycerine 5-10 gr
- Clay 5 gr
- Liquid soap 1-2 drops
However, since we melted beeswax during OS Circular Fashion Week and still had some left over in the pot, we decided to make use of it. Since it was 35 grams, we adjusted the rest of the ingredients accordingly.
Ingredients (Batch 2)
- Water 120 ml
- Beeswax 35 gr
- Gelatine 24 gr
- Glycerine 16 gr
- Green clay 10 gr
- Liquid soap 4 drops
NOTE
Soap is a must for recipes with beeswax; it helps to dissolve beeswax in water.
-
pour water into the pot and bring to around 60°C on a stove;
-
add the beeswax and soap; stir well;
-
add gelatine and glycerine gradually while stirring continuously;
-
add the clay for color, texture, and properties;
-
pour the mixture into the wooden frame fastened to the leather in advance;
-
make sure it is evenly distributed and touches the wooden frame;
-
leave several hours; touch it slightly, and when it's dry, peel it off carefully with the wooden frame. Hang or lean it tilted on a surface so it can dry from both sides.
-
smells amazing due to the beeswax
-
it is textured like sand due to the clay
-
it is waterproof due to the beeswax
-
it is slightly stretchable giving the pieces an organic feel
Since it turned out to be thick and strong, I decided to lasercut game pieces / play stones with it. Once I do, I will share the pictures and final results.
Recipe 2: Gelatine
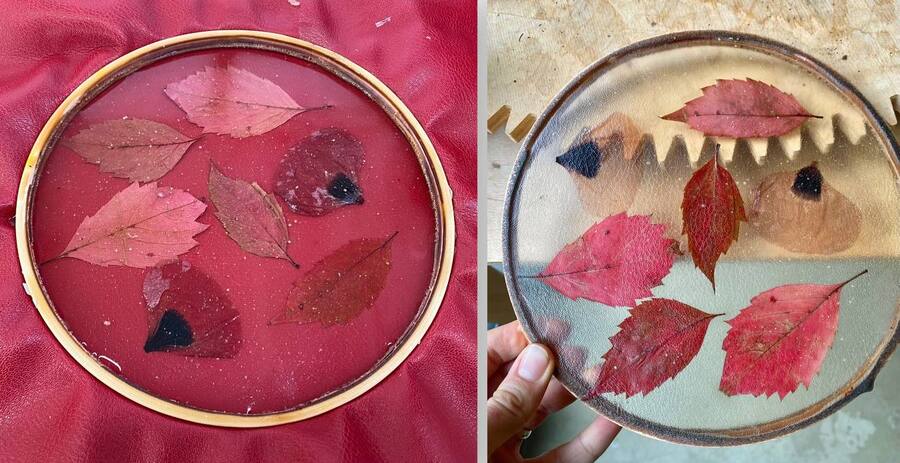 Photo by Luiza Naslyan
Ingredients (Composite)
- Water 120 ml
- Gelatine 48 gr
- Glycerine 15 gr
- Dried leaves and petals To texture
-
pour water into the pot and bring to around 60°C on a stove;
-
add gelatine and glycerine gradually while stirring continuously;
-
pour the mixture into the wooden frame fastened to the leather in advance;
-
make sure it is evenly distributed and touches the wooden frame;
-
add the leaves and petals, submerge them slowly in the mixture;
-
leave several hours; touch it slightly, and when it's dry, peel it off carefully with the wooden frame. Hang or lean it tilted on a surface so it can dry from both sides.
-
smells neutral
-
it is textured like plastic, shiny, relatively smooth
-
it is not stretchable
It is very beautiful, can be laser cut and turned into jewelry pieces, for example. If I do anything with this further, I will share about it.
Recipe 3: Gelatine foam
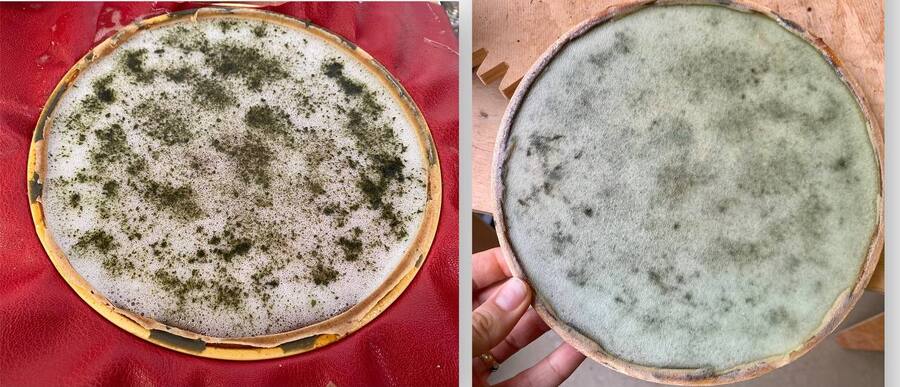 Photo by Luiza Naslyan
Ingredients (Foam/Surface Finish)
- Water 120 ml
- Gelatine 48 gr
- Glycerine 15 gr
- Liquid soap 8 ml
- Powdered nettle On top
-
pour water in the pot and bring to around 60°C on a stove;
-
add gelatine and glycerine gradually while stirring continuously;
-
add liquid soap to the mixture and mix to create bubbles;
-
pour the mixture in the wooden frame fastened to the leather in advance;
-
make sure it is evenly distributed and touches the wooden frame;
-
sieve some nettle powder;
-
leave several hours; touch it slightly, and when it's dry, peel it off carefully with the wooden frame. Hang or lean it tilted on a surface so it can dry from both sides.
-
smells neutral
-
it is textured like a sponge
-
it is slightly stretchable
Frankly, it did not turn out as foamy as I expected. This was my first time, so if I repeat this recipe, I would double the soap, would prolong the mixing time to create more foam and would add more gelatine to make it more stretchy. It is quite thin, at least not thick enough to turn it into game pieces or playstones. Maybe I can leave it as an example or maybe melt and work on it again.
Recipe 4: Agar
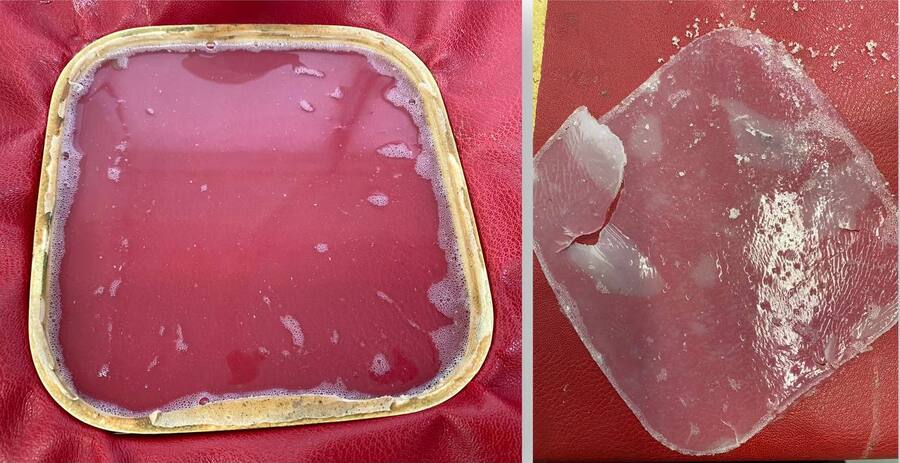
Biomaterial Recipe (Agar Base)
- Water 83 ml
- Glycerine 5 gr
- Agar 1.6 gr
- Corn starch 1 gr
-
pour water into the pot and bring to around 60°C on a stove;
-
add agar and glycerine gradually while stirring continuously;
-
add corn starch;
-
pour the mixture into the wooden frame fastened to the leather in advance;
-
make sure it is evenly distributed and touches the wooden frame;
-
leave several hours; touch it slightly, and when it's dry, peel it off carefully with the wooden frame. Hang or lean it tilted on a surface so it can dry from both sides.
But I made a mistake: I touched it, it felt dry enough, I tried to peel off the leather, but the frame got detached and it cracked. I discarded it but I want to try more recipes with agar and corn starch when I have more time since agar is more heat resistant than gelatine and corn starch gives nice opacity to the mixture.
Recipe 5: Gelatine and alginate bioplastic
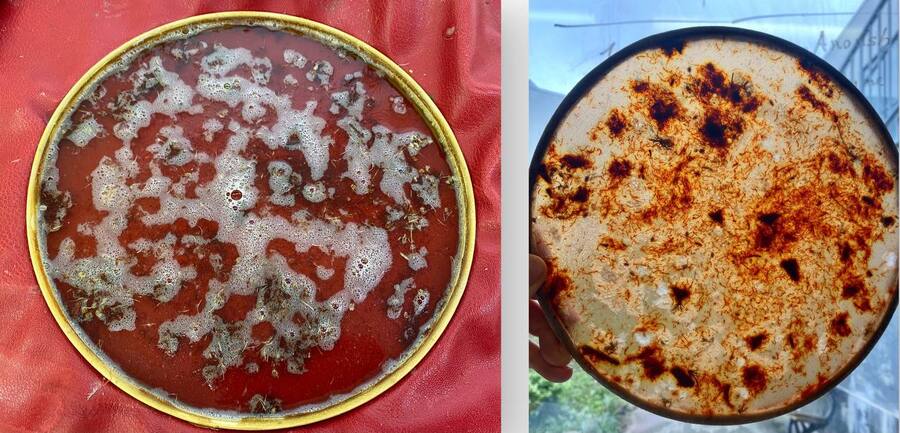
Biomaterial Recipe (Avocado Composite)
- Avocado dye 240 ml
- Gelatine 48 gr
- Glycerine 15 gr
- Alginate 1 gr
- Ground red leather scraps 3 gr
- Dry seeds 1 gr
-
pour water in the pot and bring to around 60°C on a stove;
-
add gelatine and glycerine gradually, meanwhile keep stirring;
-
mix alginate with water separately in advance then add it to the mixture and stir;
-
pour the mixture in the wooden frame fastened to the leather in advance;
-
make sure it is evenly distributed and touches the wooden frame;
-
add the scraps and seeds, submerge them;
-
leave several hours; touch it slightly, and when it's dry, peel it off carefully with the wooden frame. Hang or lean it tilted on a surface so it can dry from both sides.
-
smells neutral
-
it is textured like a bit rough plastic
-
it is slightly stretchable
It is so beautiful! I can just frame it and hang from my wall, or laser cut and turn into some jewelry.
Recipe 6: Alginate bioplastic - super experiment
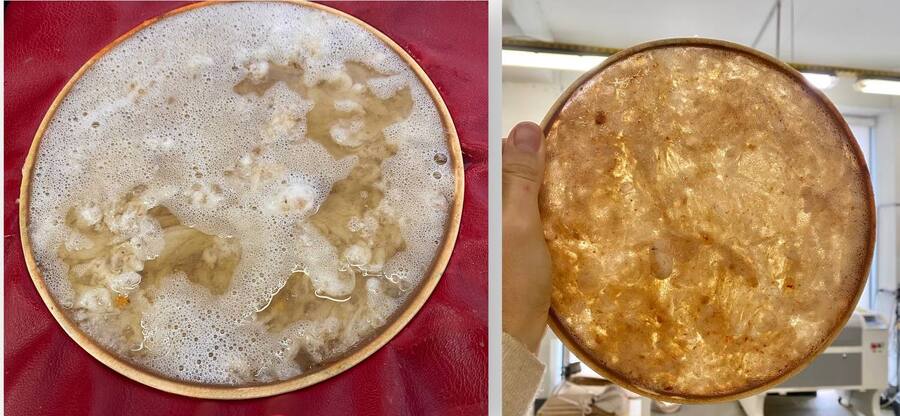
Alginate & Curing Agent Recipe
Two-part mixture formulation
Main Solution:- Water (Main) 400 ml
- Glycerine 20 gr
- Alginate 12 gr
- Sunflower Oil 10 gr
- Powdered Persimmon To color
- Water (Curing) 100 ml
- Calcium Chloride Hydrate 10 ml
-
pour water in the pot and add glycerine, sunflower oil and powdered persimmon, stir the mixture
-
mix alginate and water separately, add it to the mixture and stir
-
mix calcium chloride hydrate and water separately
And... here things went 'wrong'. I mixed calcium chloride hydrate solution into the alginate mixture and started to stir. Of course it started to cure and form bubbles. I panicked. I took parts of the cured alginate and rinsed with water, then placed it in the frame. Then, I had these questions:
1) alginate would shrink, it would not stick to the frame, how to get it to stick to the frame?
I made a simple gelatine recipe (gelatine 24 gr, glycerine 15 gr, water 120 ml) and poured on top of the alginate pieces.
2) How to get it dry?
These two, alginate and gelatine mixtures, have fundamentally different drying systems: gelatine is heat sensitive and can get dry only leaving it to open air or near a fan, while alginate bioplastic is heat resistant and gets dry better in a drier.
I chose the safest option, pilling it the next day off the leather and leaning it hoping for a good outcome.
3) Would alginate shrink within the gelatine and get separated?
For now, it got quite dry and has not been separated.
-
smells neutral
-
it is textured like resin
-
it looks like WOOL composite due to the alginate in gelatine
-
it is slightly stretchable giving the bioplastic an organic feel
This is an amazing failure resulting in something nice and entirely unexpected.
Recipe 7: Beeswax for the game
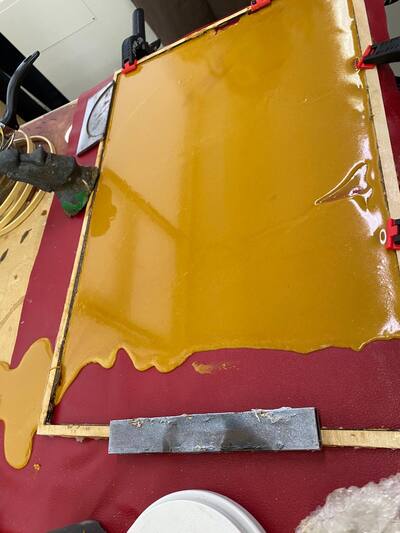
Based on this rich experience and intense learning, the next day I made the 1st recipe in a larger frame to be able to laser cut my game when it is dry. So, I repeated this recipe with ingredients 8 times more and modified a bit:
Scaled & Modified Leather Composite Recipe
- Water 480 ml
- Gelatine 96 gr
- Glycerine 70 gr
- Old beeswax leather scraps 45 gr
- Clay 40 gr
- Beeswax (New) 20 gr
- Saffron 5 gr
- Liquid soap 5 gr
-
pour water into the pot and bring to around 60°C on a stove;
-
add gelatine and glycerine gradually, meanwhile keep stirring;
-
pour the mixture into the wooden frame fastened to the leather in advance;
-
make sure it is evenly distributed and touches the wooden frame;
-
add the leaves and petals, submerge them slowly in the mixture;
-
leave several hours; touch it slightly, and when it's dry, peel it off carefully with the wooden frame. Hang or lean it tilted on a surface so it can dry from both sides.
-
smells amazing due to the beeswax
-
it is textured like sand due to the clay
-
it looks like sand dunes due to saffron and red clay color
-
it is waterproof due to the beeswax
-
it is quite stretchable
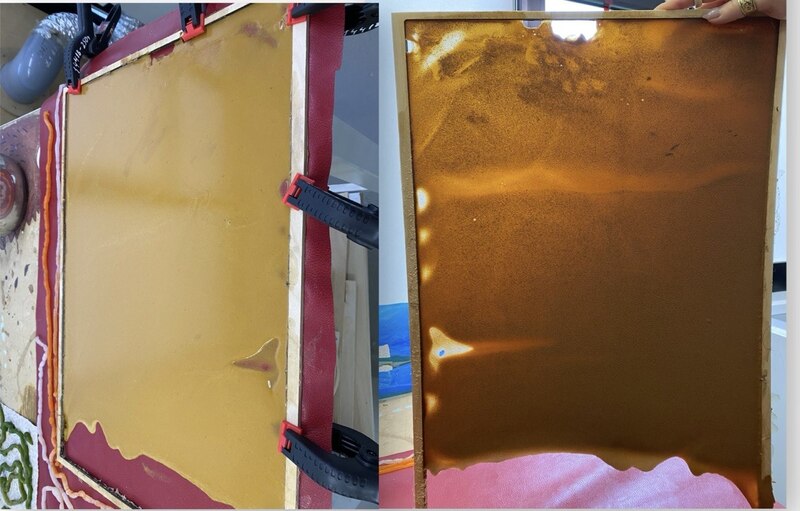
The result is satisfying and this bioplastic can be used to make a modular game.
Recipe 8: Corn starch, gum Arabic
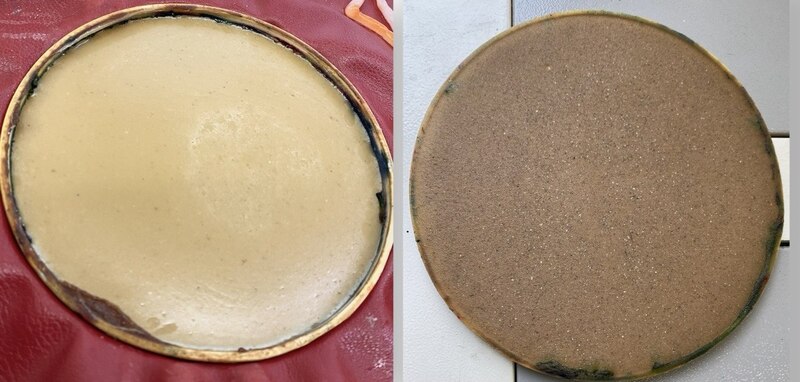
Since I had a leak from the frame, I used the leaked part from the table to melt again, and turned it into 2 more experiments:
1) I recooked the clay and beeswax. I observed that the mixture thickened and color dimmed;
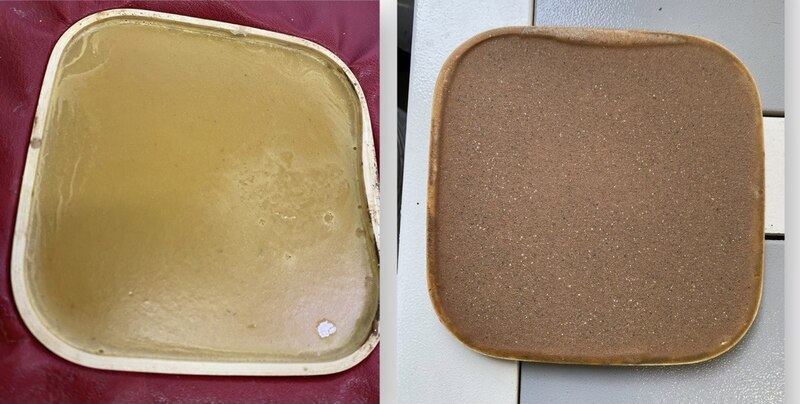
2) I added 2 gr of gum arabic and 1 gr of corn starch.
Recipe 9: Yarn with alginate
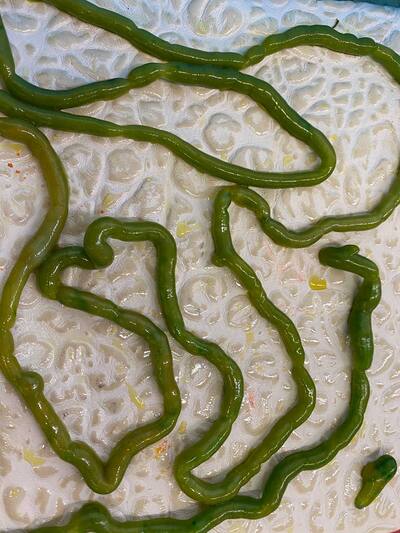
Caption for the right image
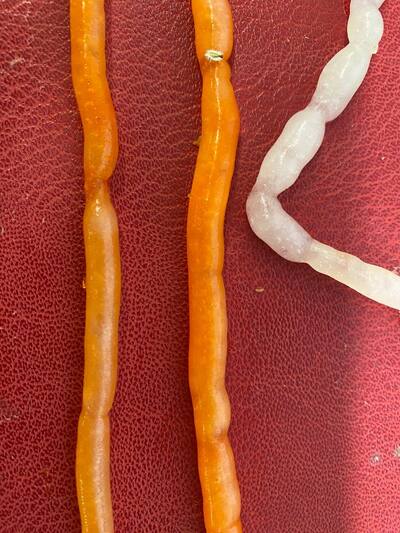
Since I already experimented with the alginate recipe, I doubled it and using a syringe, turned it into a yarn:
Alginate yarn recipe:
Scaled Alginate & Curing Bath Recipe
- Water (main) 800 ml
- Glycerine 40 gr
- Alginate 24 gr
- Sunflower oil 20 gr
Curing Bath (Cross-linking)
- Water (curing) 1000 ml
- Calcium chloride hydrate 100 gr
-
measure and pour water into the pot;
-
add glycerine gradually while stirring continuously;
-
add sunflower oil;
-
add alginate and mix very little to avoid having bubbles; leave it, the water molecules will continue dissolving the alginate; mix very little from time to time until the mixture looks homogeneous.
Make the curing liquid with calcium chloride hydrate and water. Make sure the pot is big and there is enough water for the yarns to float well. Use a big syringe and inject the alginate mixture 2 centimeters above the liquid surface, meanwhile keep moving your hands so the yarns will not end up on top of each other and stick. Once you inject 1 or 2 syringes of alginate, pause, take the yarns out with tongs and gloves on, rinse and put to dry. Make sure the yarns do not intersect.
-
the yarns smell neutral
-
they are textured like plastic or silicone yarns
-
they are waterproof and heatproof
-
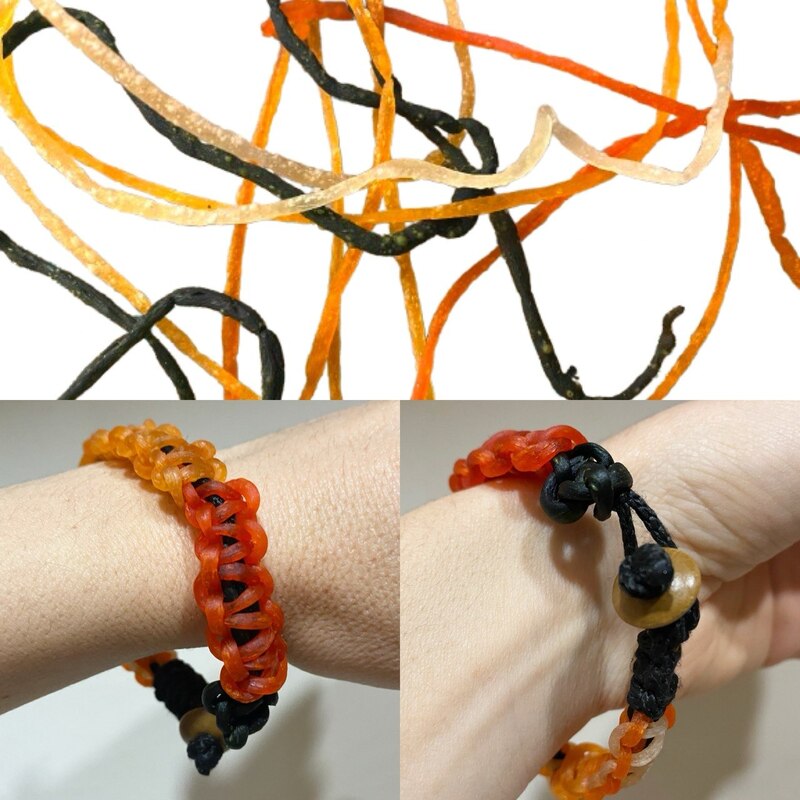
they are strong enough to stretch and weave a bracelet.
They can be used in handcrafts for making bracelets, necklaces, belts, they can be used as package wrapping yarns, and anything else we can think of. I made a bracelet with my alginate yarns, using the same technique as it is shown in this video.
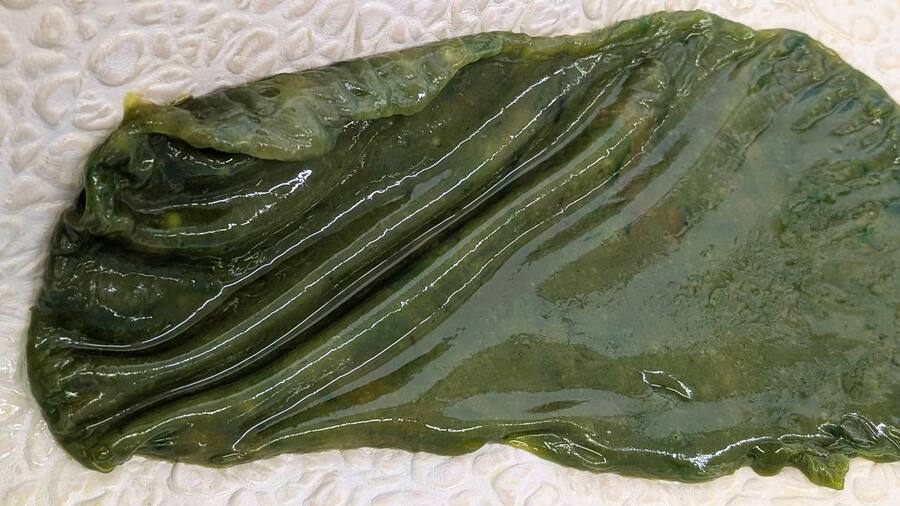
My alginate mixture was quite a lot, so I decided to make an alginate foil, to laser cut later and make game pieces as well. For now, it is quite wet and needs time to dry. Once I make use of it, I will share.
Mycelium
This was the first time to grow mycelium for me and for the Fab Lab Armenia Dilijan team. I did some research by watching Annie Ferlatte's tutorial and read the online book "Kick Start Yout Myco-Culture!" by Jessica Dias. These resources were helpful and gave me confidence to start.
Mycelium:
Grain Oyster Mushroom Mycelium (strain M5) was bought online, and it was shipped to Dilijan.
Substrates:
Two subtrates were chosen: the sunflower seeds that were in the mycelium package, and coffee rests from the coffee making machine. We made three out of them:
Sunflower seeds
Coffee rests from the coffee machine
Mix of both
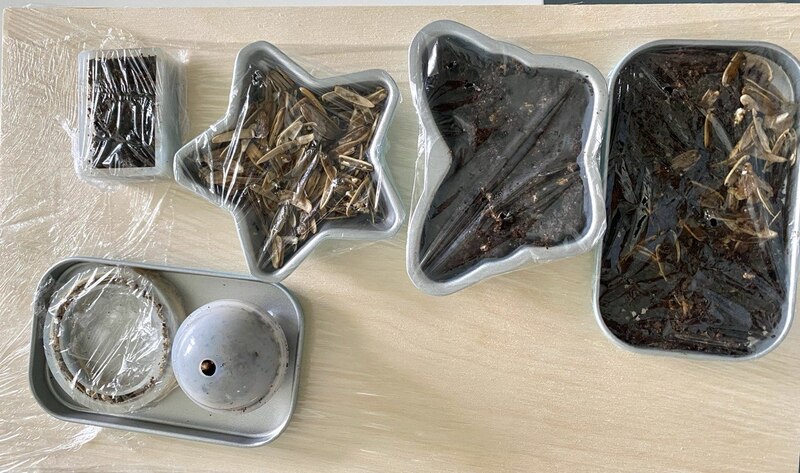 Mycelium growth molds
Growth molds
In total 6 growth molds were chosen for the mycelium:
A rectangle cook tray A butterfly cook tray A star cook tray A rectangle silicone form for jewelry making A spherical silicone form for jewelry making A round bracelet silicone form for jewelry making
First, I wore a new apron and new gloves, disinfected all the molds and working surfaces with 96% spirit and cotton. I added the prepared sunflower seeds and coffee rests from the coffee machine.
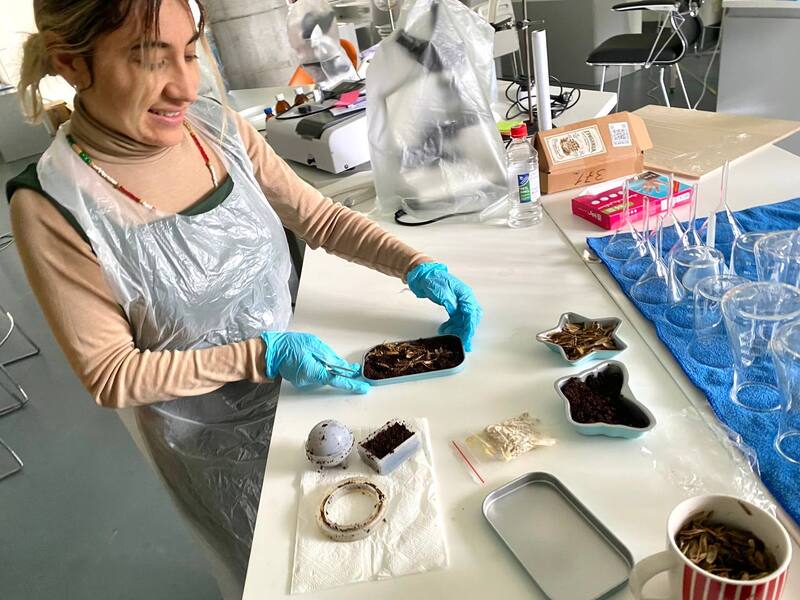
In some containers I added only sunflower seeds, in some only coffee rests and in some I mixed them. The time came! I opened the mycelium package and started to add some into each container with a pair of sterilized tweezers.
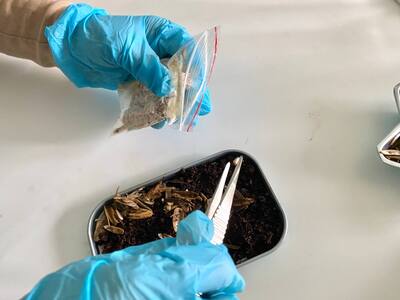
Here are all the forms filled with mycelium:
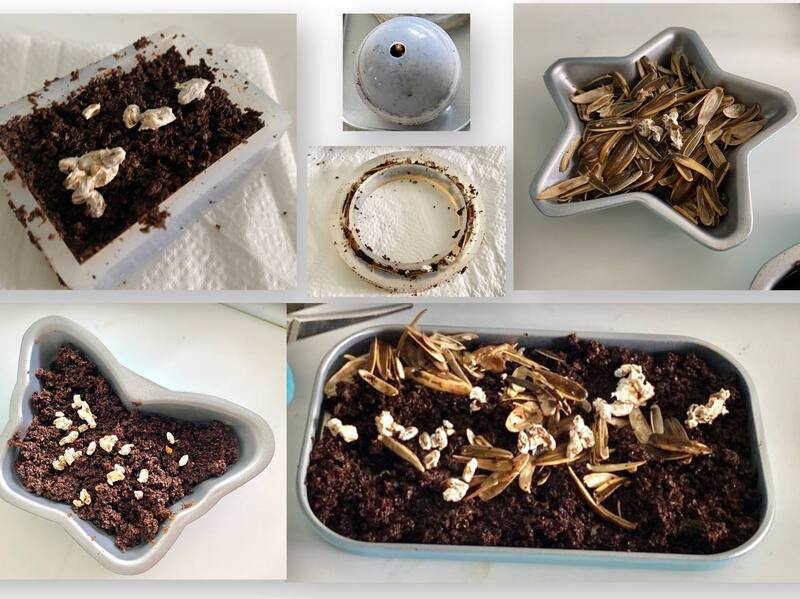
Then, I mixed the sunflower seeds and coffee rests with mycelium in a way that mycelium was covered.
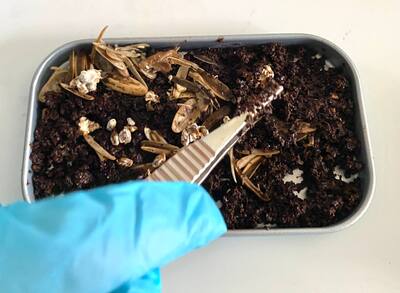
And of course, I secured a humid and safe conditions for mycelium wrapping each container with food wrap.
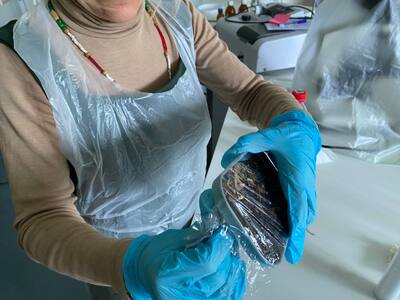
With a pair of tweezers I made some holes so the mycelium can have access to oxygen. Then covered with a clean paper towel and put it up on a shelf in the Fab Lab laboratory.
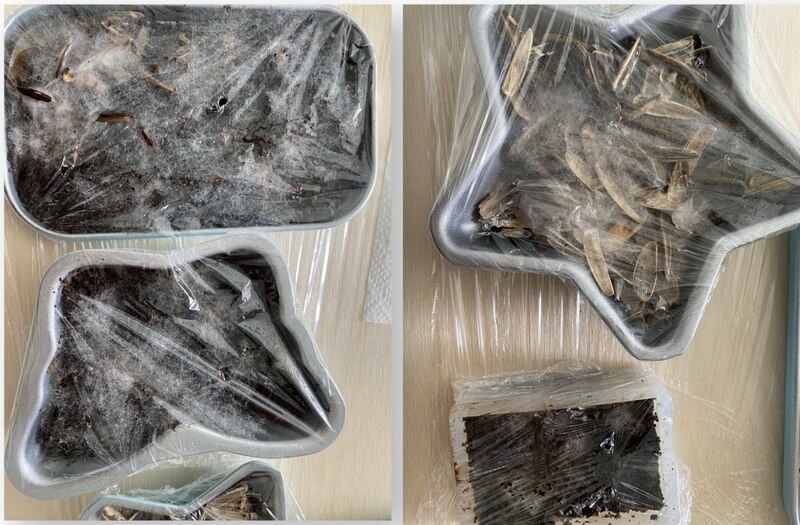
One week later: fighting! All the growth molds are covered with white hyphae, a sign that my mycelium is fighting with another fungi in the same growth mold. I will update further.
Results
Here is my material chart based on my experiments:
Biomaterial Comparison Chart
| Biomaterial Name | Stretchability | Color | Texture |
|---|---|---|---|
| Beeswax resin | HIGH |
green-gray
terracotta
|
sandy |
| Gelatine bioplastic | LOW |
light peach
red
|
plastic |
| Gelatine foam | MEDIUM |
mint green
|
sponge |
| Alginate and gelatine bioplastic | LOW |
peach
|
wool biocomposite |
| Alginate yarns | HIGH |
red
orange
dark green
|
plastic |
Weekly reflection
- I discovered my new passion - making biomaterials! My mind keeps wondering about other possible results, various ingredients, and I have the urge to try my own recipes. Currently, I do not have that time but I will get back to it another quieter time.
- I would grow roots as well along with the mycelium, and turn roots into a piece of couture. But for now, dealing with the mycelium.
- I might use the knowledge of this week too for the dress of my final project: I might make a computational bodice with modules made of bioplastic.