Soft robotics
This week I learned how to make inflatables with different materials and how to connect the Arduino to a pump to automate the pumping process. On this page, you can check out what I did and how I achieved it. Jump to the results if you’re too curious about what I made.
Moodboard & Research
During the lecture by Lily Chambers and Adriana Cabrera, we discussed biomimicry. I already made some nature-inspired samples in the Computational Couture week. This week, I stumbled upon two projects that were inspiring to me.
BLOOM wall light by Georgious1, is a wall light inspired by NASA solar panel technology and the natural beauty of flowers. The light brightens as you turn the wheel and expand the flower. This origami-looking piece got me curious if it’s possible create the expanding and contracting with air pressure.
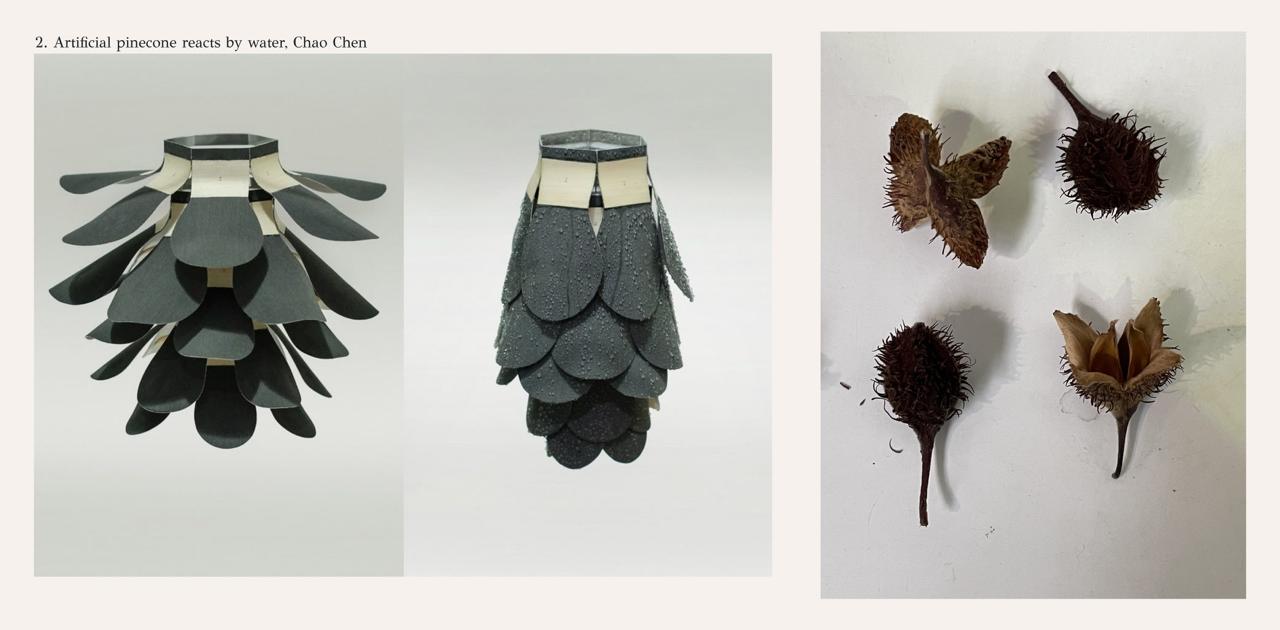
The other project is made by Chao Chen2, who was inspired by the difference between dry and wet pinecones. How the scales open when dry and when wet, and how the scales close to protect the seeds. This reminded me of the nettles we used in the Biochormes week. Also, this project doesn’t make use of air pressure, so here as well I was interested in seeing how that could work.
To start with exploring this week, I decided to use the flower icon seen throughout my site to make some samples and start learning how to work with this technique.
Process
I experimented with three different materials: vinyl, alginate, and silicone. For all of them, I tried using the flower icon. I used the inside and the line as a part where the air can flow.

Vinyl sheets
I started with the vinyl sheets and baking paper, these will form a sandwich. The vinyl sheets will stick together where there is no baking paper. This means where the baking paper is, there will be airflow.

I drew the flower on the baking paper and cut it out. I made sure all the parts where air needs to go are connected.
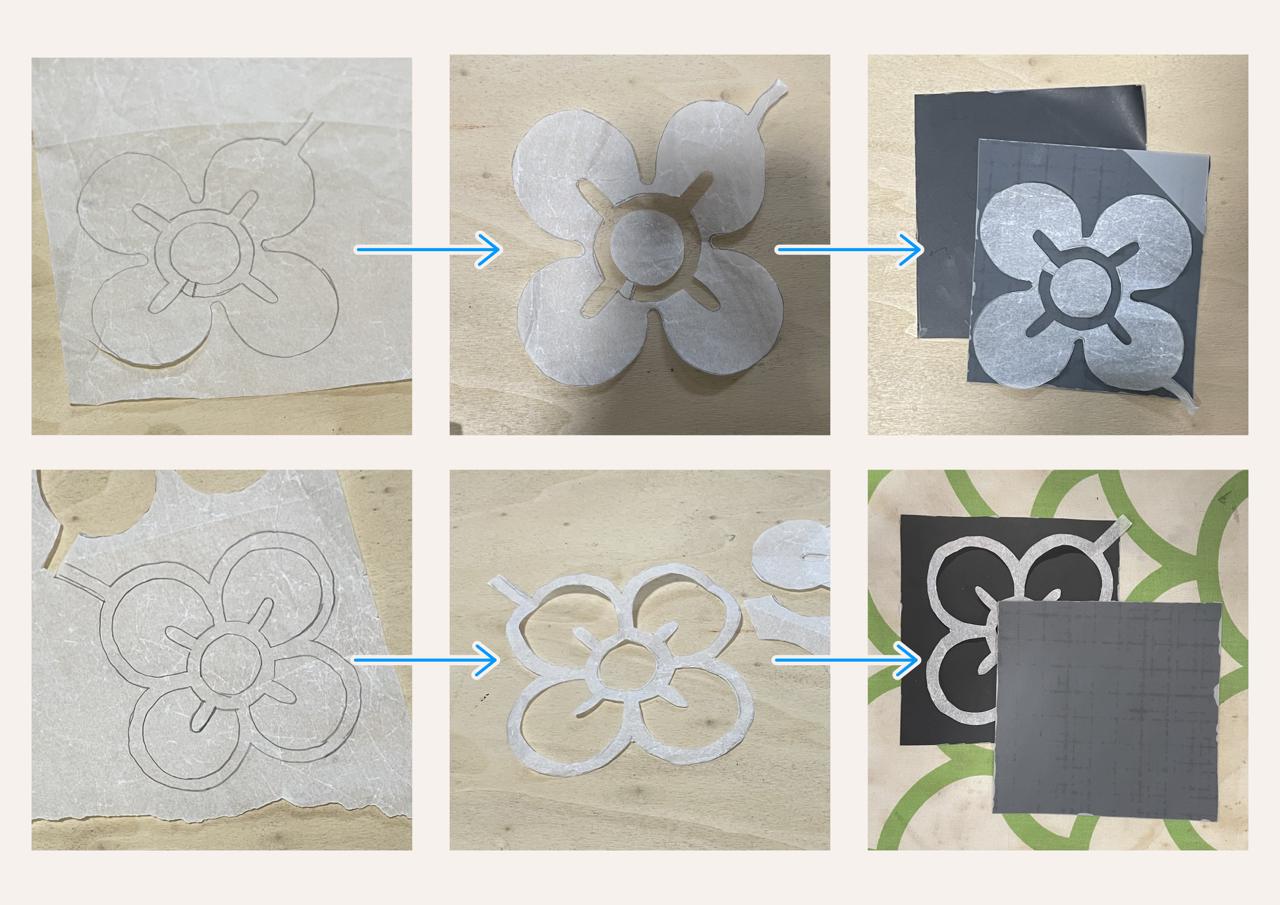
I used an iron to heat the vinyl so it would stick together. The vinyl sheets have a protective layer, that side must be on the outside, otherwise the vinyl will not stick together. Don’t forget to put the cutout baking paper in between, make sure there is a part sticking out where you can insert the pump. When the pieces are stuck together, peel off the protective layer. Now you can test your sample.
Alginate
After last week and the lecture, I was curious if it was possible to make an inflatable by using alginate. In my head, it would work like this:

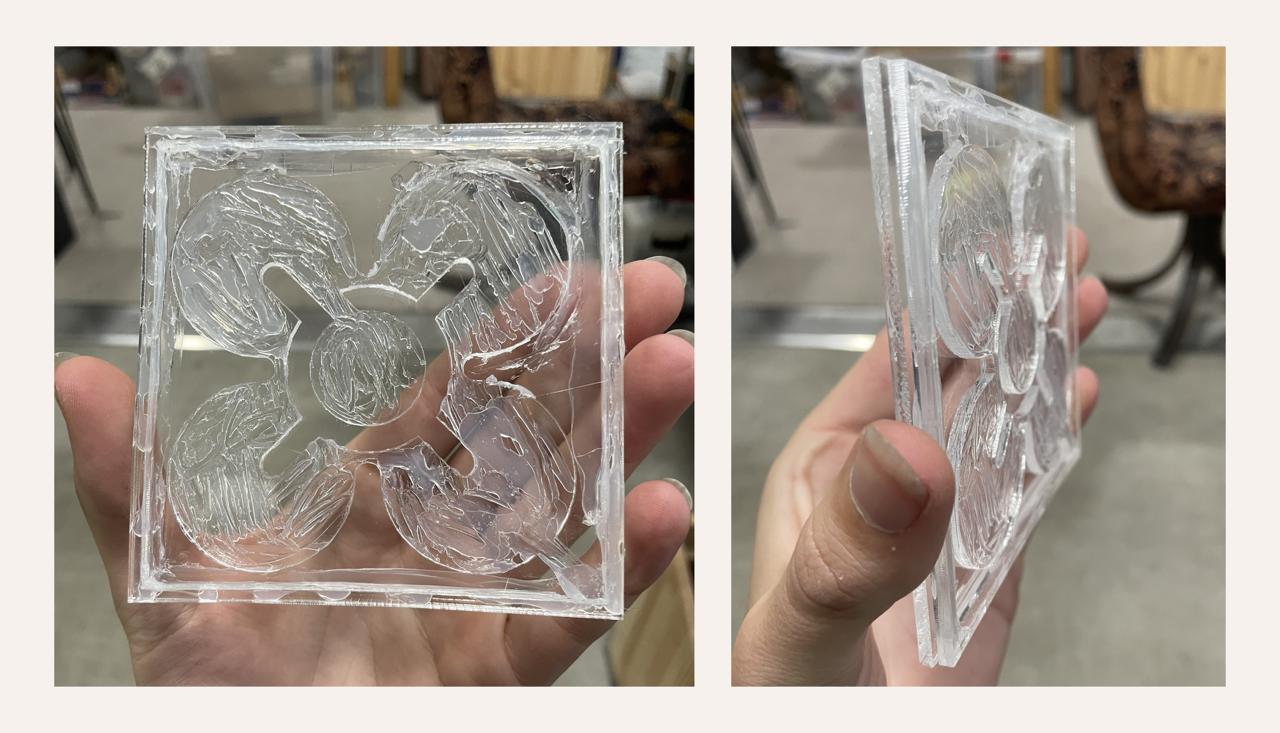
Before I could try that, I needed to make a mold so the flower shape could not be sprayed with the calcium chloride solution. I decided to do this with the laser cutter because this would be the fastest. I prepared the files (here you can download them) and took an acrylic sheet. The settings of the laser cutter were set to power 95 and a speed of 1.20, this went over every line once. I cut all the pieces.
When trying to remove the pieces from the flower, they were still stuck together. So, I decided to cut the flower again and let the laser go over every line twice. I used the hot glue gun to assemble the mold. I saved the outline of the flower to use it for the alginate.
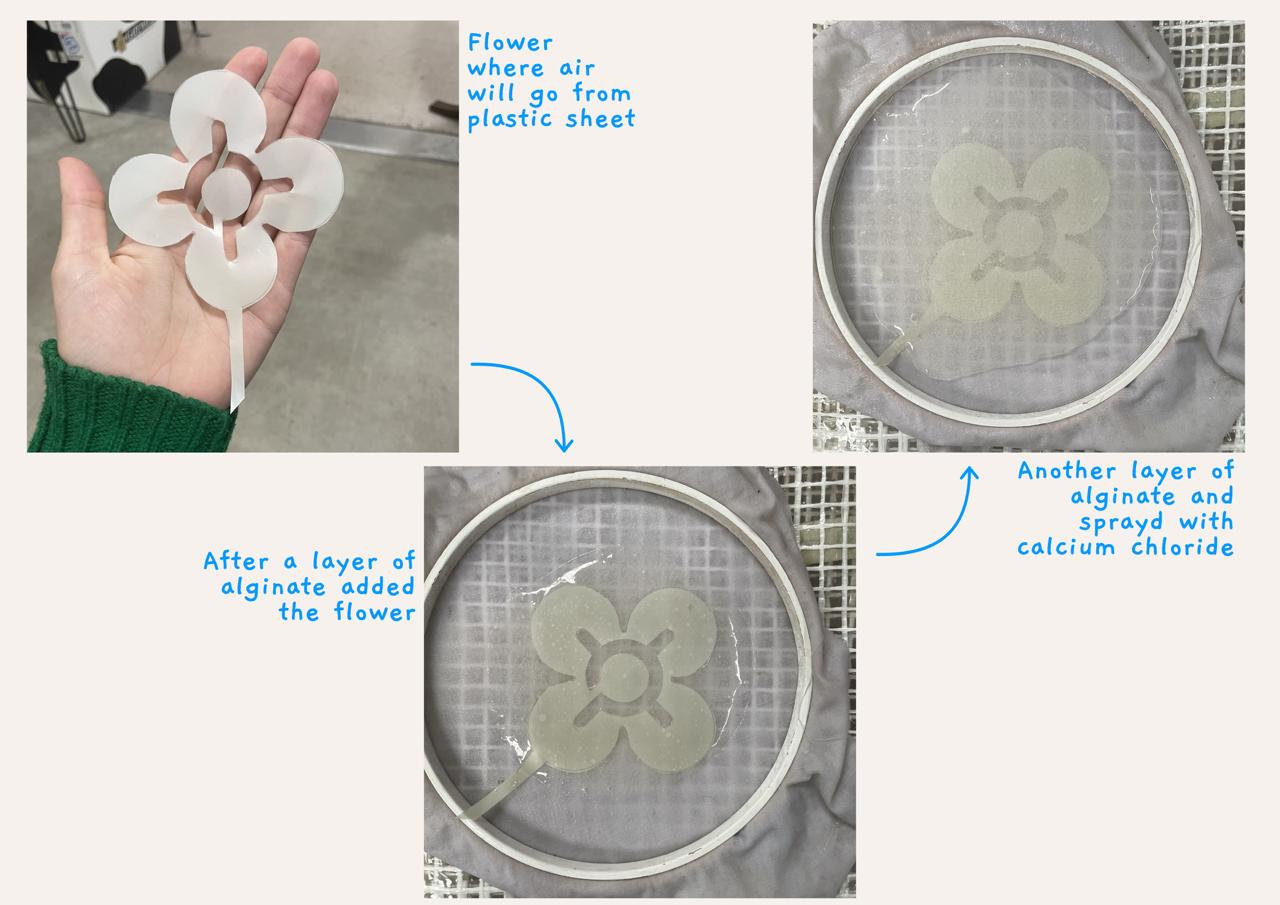
I used the same embroidery rings with fabric and alginate recipe from last week. I sprayed it with the calcium chloride solution and poured a bit of the alginate solution on the fabric. I placed the outline on the alginate and sprayed in the middle of the outline. I took the outline out of the alginate and poured another layer of alginate solution. And sprayed the top with the calcium chloride solution again. Sadly, this created a sort of pocket and not the shape I was after, because the calcium chloride solution went underneath the outline and created places where it could not stick together.
Because this was not working, I tried inflating the alginate as I saw on Flora Houldsworth’s page.
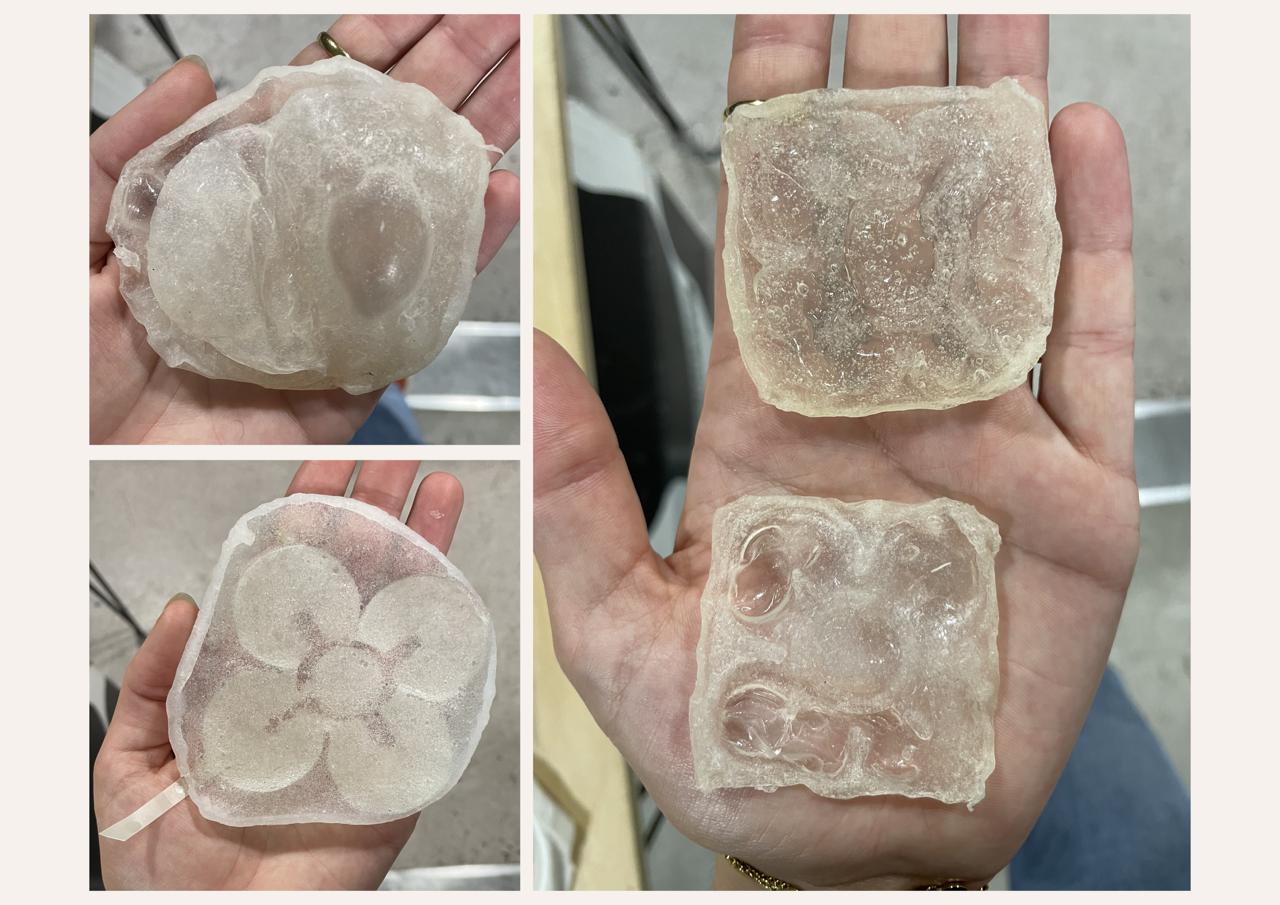
After this fun experiment, I didn’t want to give up on the idea of making the inflatable flower icon from Alginate. So I used the mold I made, I sprayed it with calcium chloride, poured in the alginate solution, and sprayed it again with the calcium chloride solution. I tried one thin layer and one thicker. These would still be open on one side, so I used the embroidery ring to make a flat piece. This needed to dry before I could do anything else with it.
In the meantime, Pauline came to check on me and advised me to try the same technique as the vinyl, not with the baking paper but with a plastic dust sheet. So I cut out my flower piece (the part where I want the air to go). To assemble it, I poured a layer of alginate, added the plastic flower, and poured another layer before spraying it with calcium chloride. This also needed to dry before I could test more.
When I came back after the weekend, the alginate had dried. The first try didn’t change much, the pocket and bubble were still there. The second test shrank a lot, so there was no height difference anymore, what would result in no airflow when added on a flat layer. The third test looked the most promising. I tried removing the sheet, but that was very hard, I finally used a pair of tweezers to get every part of the sheet out. Before I pulled the sheet out, I tried to inflate it, but sadly without success. Even when everything was removed, it wouldn’t inflate. I guess there is a hole somewhere where the sheet was. Another possible cause is all the bubbles in the alginate mix, I should have prepared the mix at least an hour or two before so the bubbles could have disappeared.
Silicone
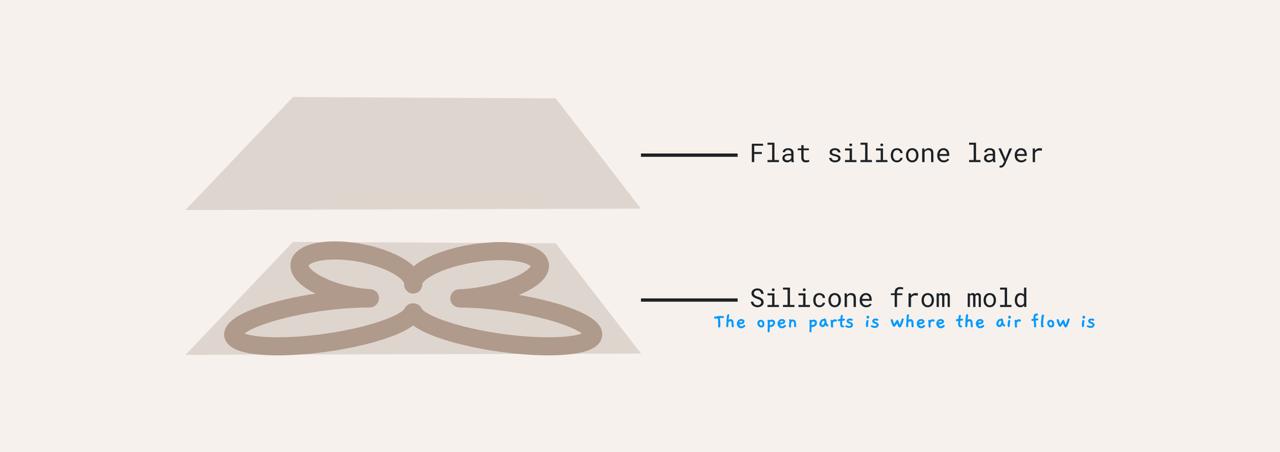
The silicone was an easier process than I was expecting. I used a mold that we have at Le Textile Lab and my own mold. For both molds, I used the lid of a tiny container for the flat part to close the air paths.
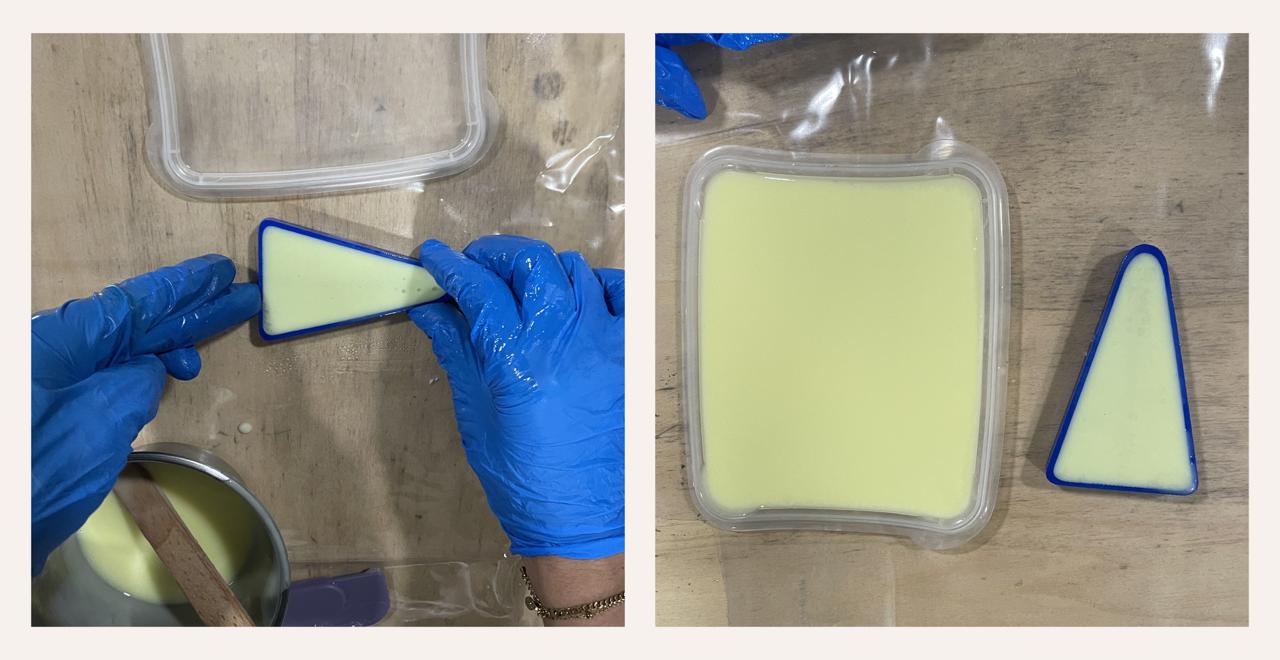
To make the silicone, you need the base (A) and the hardener (B), equal amounts, mixed until the mix has one color. Then it’s ready to pour. Before pouring the silicone, I sprayed the molds and the lid with CoolSlip Anti-Stick Solution so it would be easier to remove the silicone from the mold. I tapped the mold a couple of times on the table so the bubbles would disappear. The bubbles that didn’t want to leave like that were popped with a toothpick.
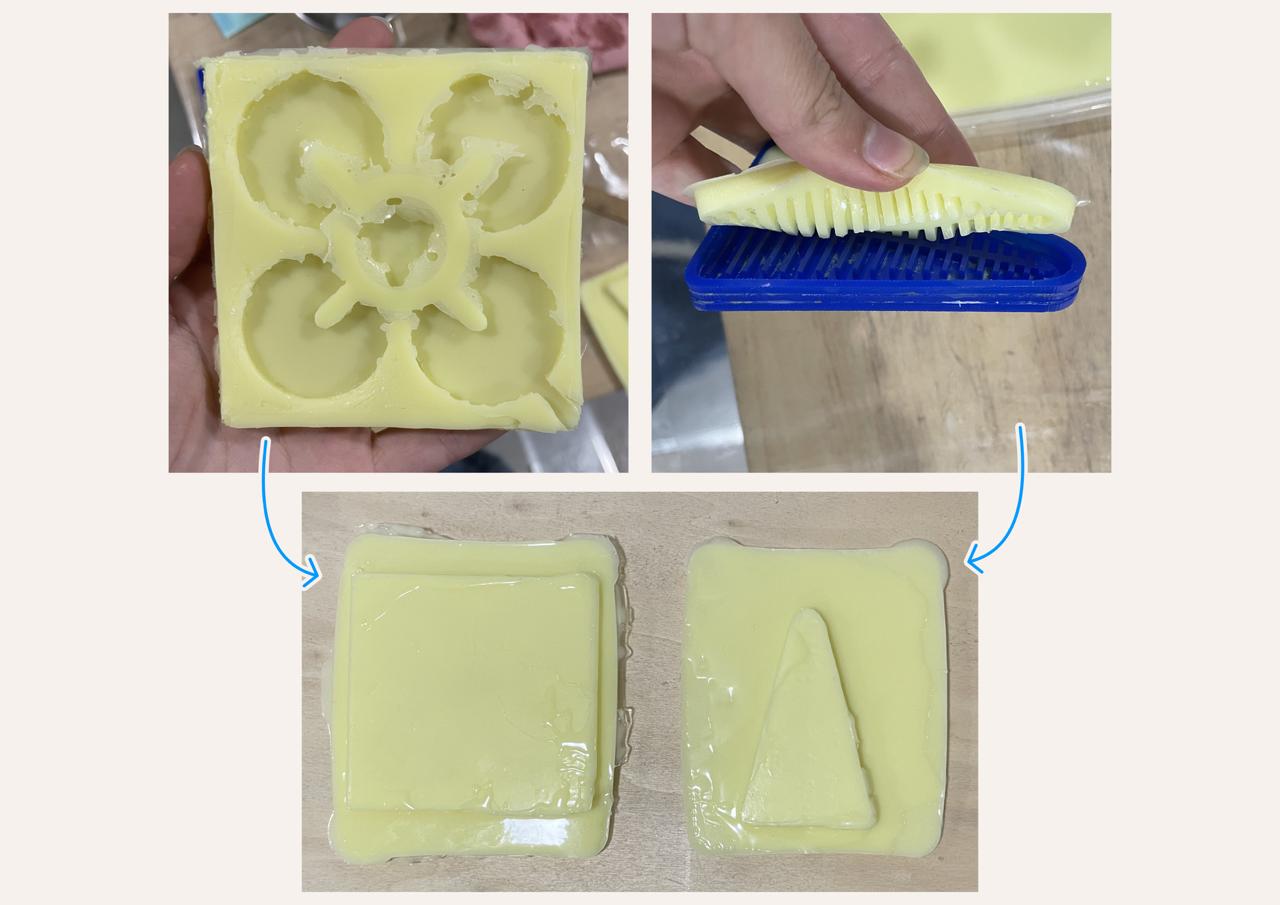
The silicone-filled mold went into the dehydrator for 15 min at 60°C. After that, I unmolded the silicone. I spread a thin layer of the liquid silicone on the silicone in the lid and placed the unmolded silicone on top I poured a bit of the liquid silicone around to it would be well attached before putting it back in the dehydrator for another 15 min.
Arduino
To inflate the silicone, I used the Arduino because the pump was attached to a thin needle that would make a too-big hole. To code and connect the Arduino, I followed what Martina Muroni and Louise Massacrier documented on their page. At Le Textile Lab, we had Martina's cardboard circuit still lying around, so I used that to make this process easier for me.
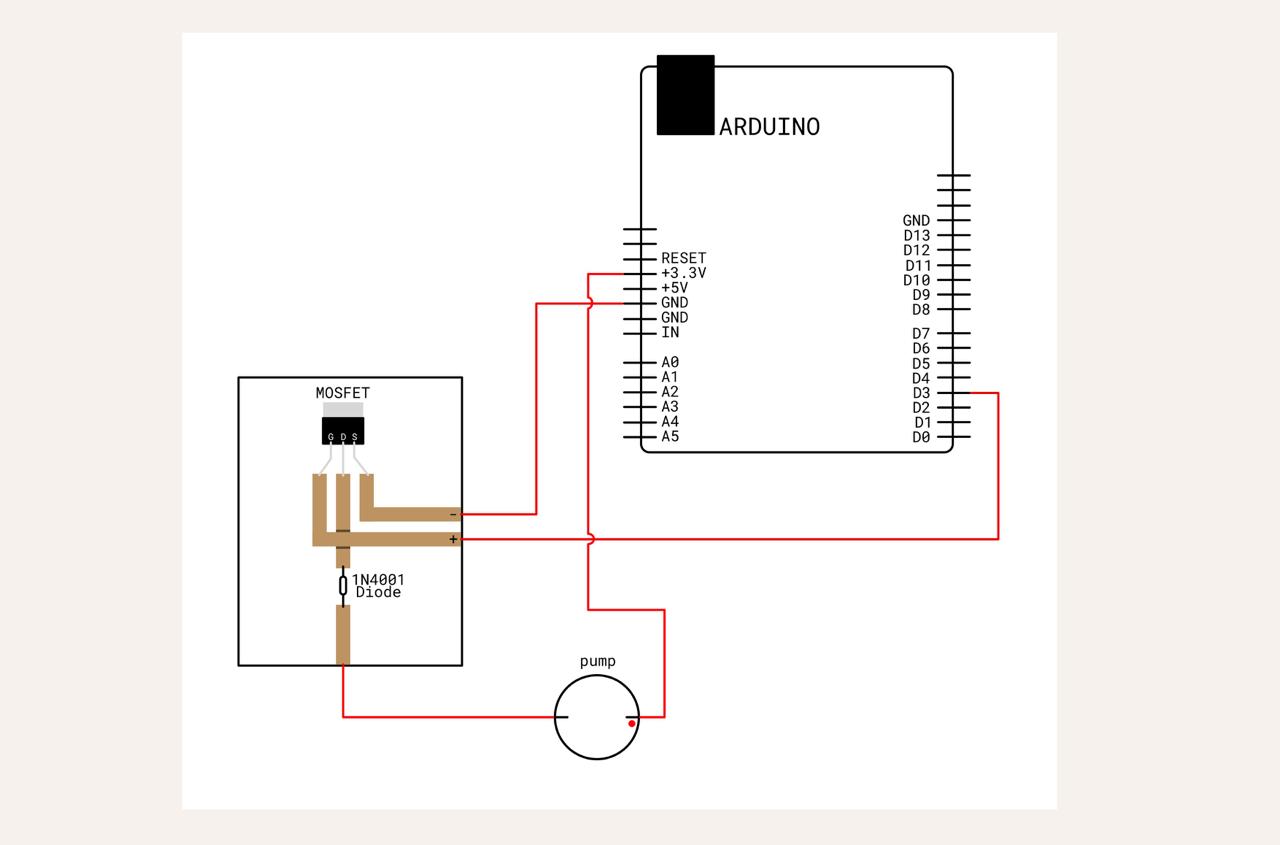
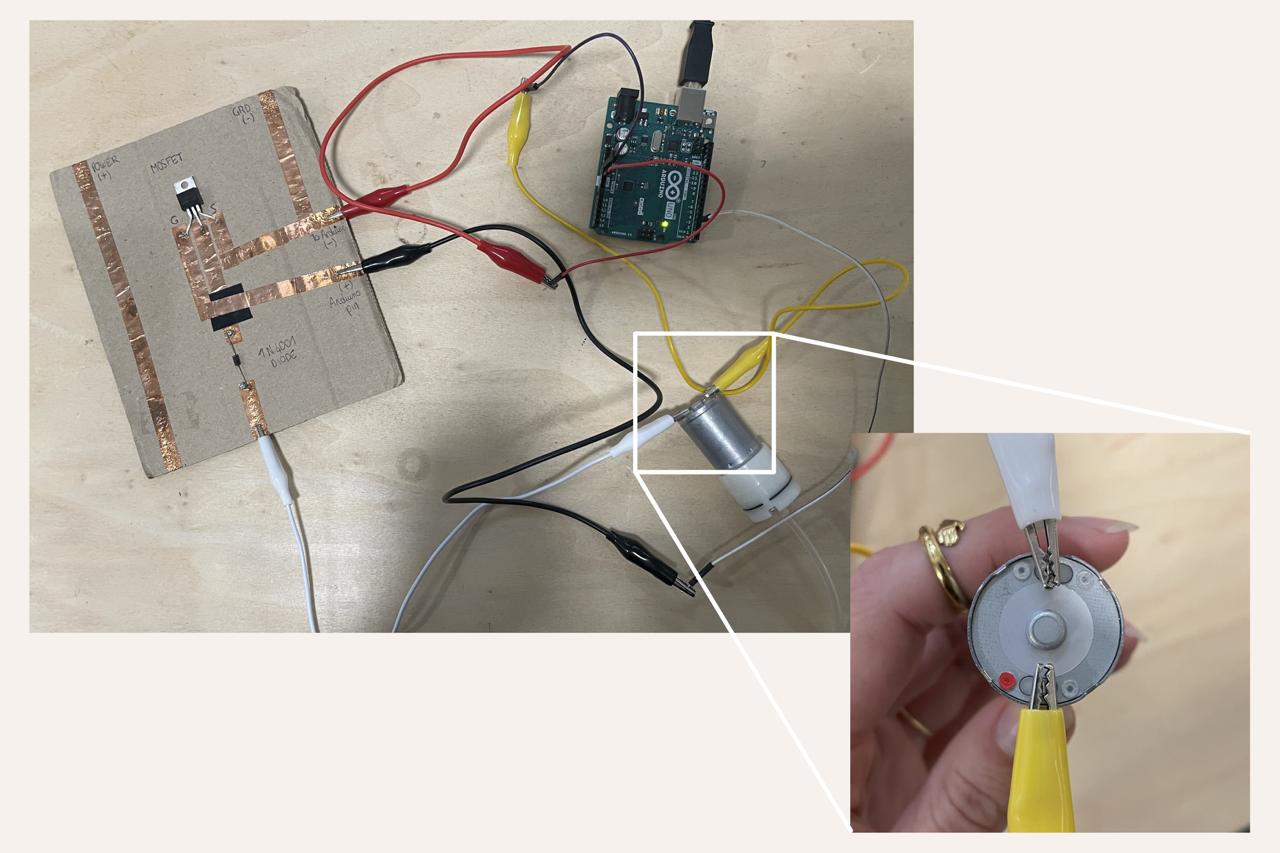
When assembling the circuit, I was doubting a lot about how to attach the pump, and I couldn’t find it on the page of Marina and Louise. So I tried both ways, but it was hard to tell without importing any code. Finally, I discovered the red dot stands for the + side, so you need to attach it to the 3V on the Arduino.
Blinking code for Arduino
int pin_motor = 3;

void setup() {
    // put your setup code here, to run once:
    pinMode(pin_motor, OUTPUT);
}

void loop() {
    // put your main code here, to run repeatedly:
    digitalWrite(pin_motor, HIGH);
    delay(1000);
    digitalWrite(pin_motor, LOW);
    delay(1000);
}
When I imported the code into the Arduino, the pump started to move/buzz. I tried inflating the vinyl swatches, but that was difficult because of the big opening. It would only work when pressing hard on the opening. The one with the inside was working better than the outline. After I was sure the pump was working, I tried inflating the silicone swatches. The triangle one was not inflating at all, and the pump stopped moving as well. Capucine came to help, but we were unsure what was causing this problem. When trying the flower, it inflated the petals lightly, it was hard to see if the light was not hitting the silicone correctly.
After trying with the Arduino, I wanted to see if inflating with the pump would work better. The flower was way more visible after a bit, but when I pumped for more time, the silicone on the inside snapped, and the flower was gone. We tried as well to pump the triangle like this but this as well was not working.
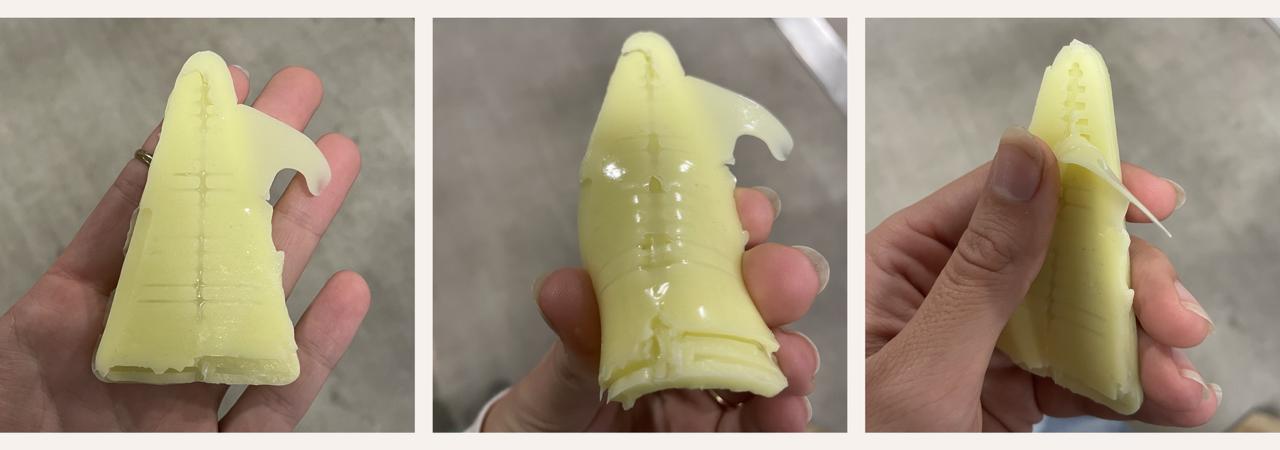
At this point, we were unsure where and how much was blocked, so Capucine cut open the silicone. Here we saw that the full entrance was blocked by silicone. Why it was not working when we inserted the Arduino in other places is unclear, maybe because the layer of silicone is too thick and rigid to inflate.
Results
In my explanation of what I did this week, I showed quite some results already; here is a video of all the results together.