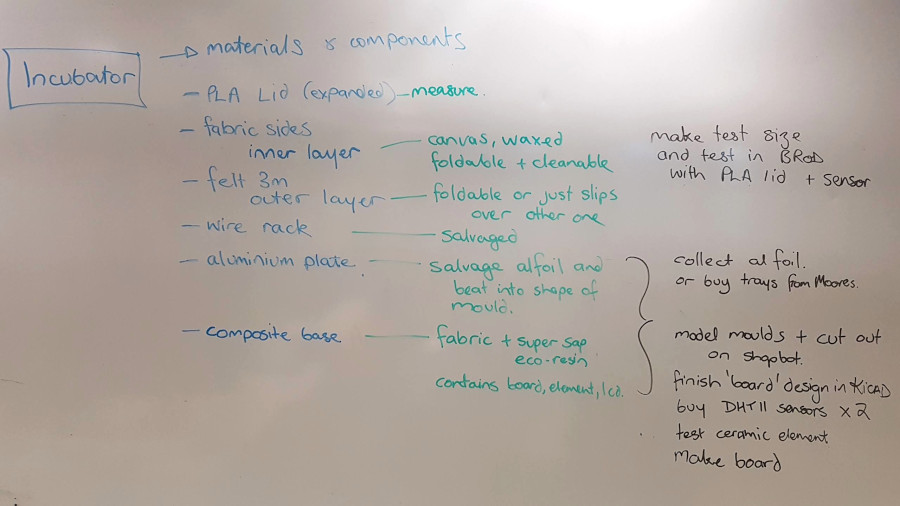
Research: tempeh kit#
I’m most excited about this idea at the moment. Although it’s not especially textile-based, I’m going to pursue it, because I think there’s some real merit to this project as I imagine it so far.
intention#
As you’ll remember, in Textile as Scaffold week, I made my first tempeh. It was an easy process, except for having a warm space to grow it in. I also didn’t like putting it in a ziplock plastic bag. I’ve washed the bag and it’s ready for next time, but I imagine that it may not be as clean as I’d like it to be. The reason that I made it that week is that I thought it could be a good composite material. So, I hope to:
- create an incubator for the tempeh that isn’t a hacked together object, although that was a fun project in Open Source Hardware week that will help me with this project.
- create a container for growing the tempeh that is durable & washable.
- create a material from tempeh that is useful.
interesting websites#
- Jiwei Zhou experimenting with tempeh made from different nuts, legumes and seeds (thanks Irene for pointing out this website).
- GoSun Solar Cookers portable solar ovens (thanks David Ott for gifting me one when I visited Geneva during first half of Fabricademy). You can see a small video of it in action here.
- Multi Processing Machine, our incubator from OS Hardware week.
- 3dbyFlow thanks to Adriana for pointing out this
- the most awesome Naya Peek
material thoughts#
For the tempeh bags, I’m considering a couple of material options. The main qualities of durability and washability are present in:
- lasercut calico infused with beeswax (something that can be sourced locally in many places)
- milled cork agglomerate (restricted to Europe)
- fabric reinforced tempeh + wood shavings material ie. mycelium material, grown in a mould
It’s important that the tempeh bags have airflow - the recommendation is a ~2mm hole at least every 10mm. Designs using the above materials will have to factor this in. Also, if I make the incubator from the material itself, what will I have to do to the growing media to ensure thorough growth throughout the material?
- a crocheted or knitted bag would also be interesting, but sealing it could be a challenge. Maybe pre-waxed yarn? Or pressing the wax onto it afterward to help shape it.
first material tests#
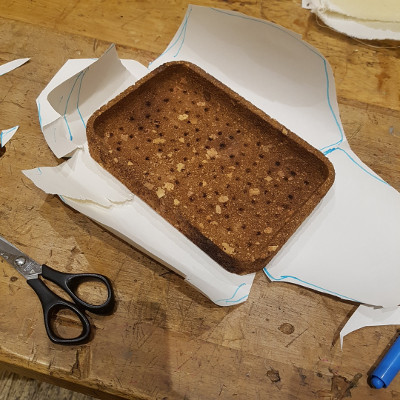
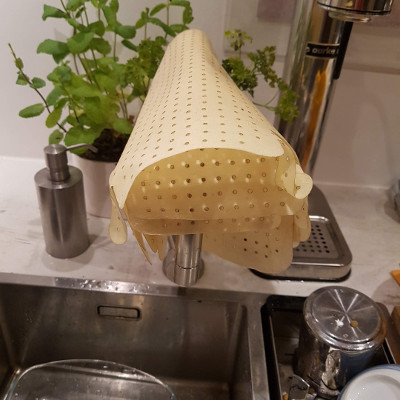
I milled a simple shallow dish from a block of cork on the shopBot and lasercut some calico wraps, both of which I infused with natural beeswax.
I used a heatgun to melt the wax into the cork. I was quite surprised with how much wax I needed for that.
I grated the beeswax, sprinkled it liberally over the calico then covered it with baking paper (I spread about a teaspoon of coconut oil on one side of the baking paper) and ironed it. I started with a low synthetic setting but then cranked it up to linen/wool or high.
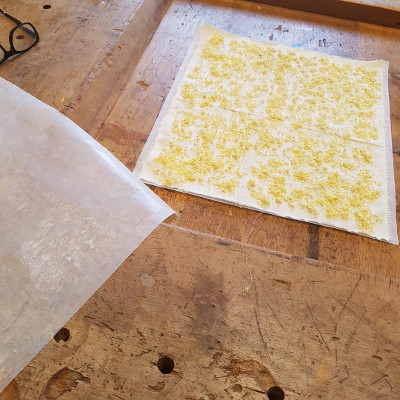
I grated quite a lot of wax, and when it melted it was coating the calico too much, so I used more calico to soak up the excess with the iron, and was able to make 3 full sheets and a 1/4 size piece with that amount of wax. I aimed to have full saturation with no excess and I succeeded.
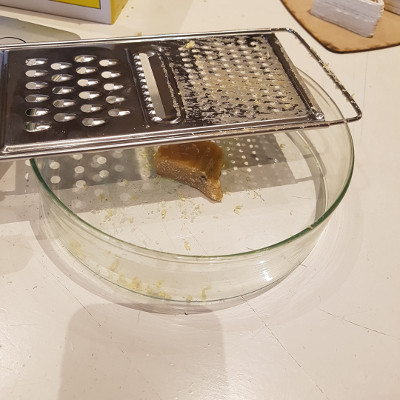
When I say I grated the beeswax - it was about 250m in diameter and 40mm thick, so quite hard to work with. It was from Henk’s beehives, was from last year’s harvest with dead bees and propolis in it. Full of natural authenticity!
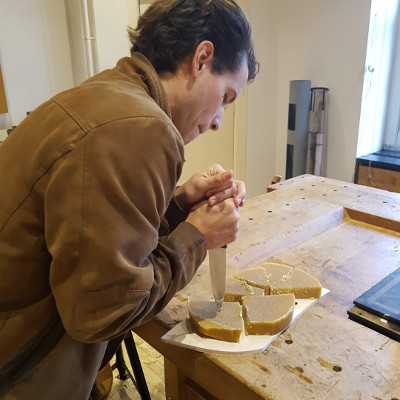
In the first instance, for the cork block, I put it in a vice and used a cheese slicer to slice it off once I’d warmed up the surface with the heatgun. It was fairly time consuming but the shopBot room smelt amazing.
For the second instance, I bought a cheese grater. It was still fairly unwieldy, so Nicolas offered to cut the block into smaller, more manageable pieces. It was much easier then, and you can see below that I was using a giant glass petrie dish to catch the gratings.
I used the shape of the cork dish to work out the size and shape of the calico wraps in paper. I generated a 2D file for the laser cutter, with 2mm holes every 10mm, and cut out the calico lid for the cork dish as well as three wraps. They look like giant bandaids. I thought that they might smell nice in the lasercutter as well, but they mostly smelt like burnt cotton. I was curious to see how the wax would react to the heat, but the laser is so specific and there was no excess wax, so no noticable impact.
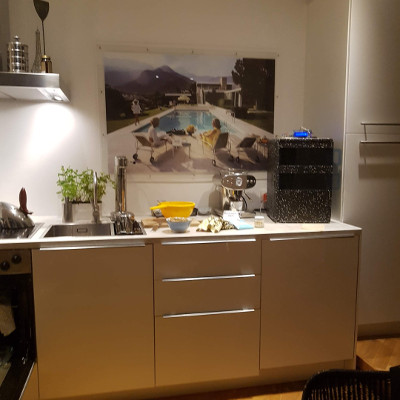
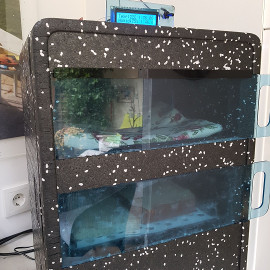
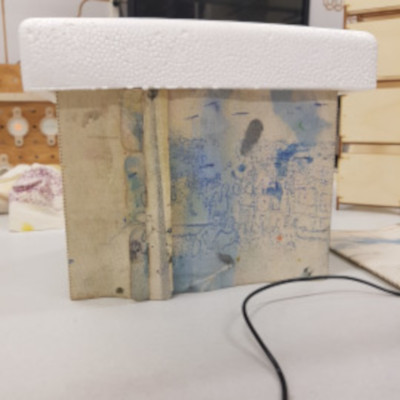
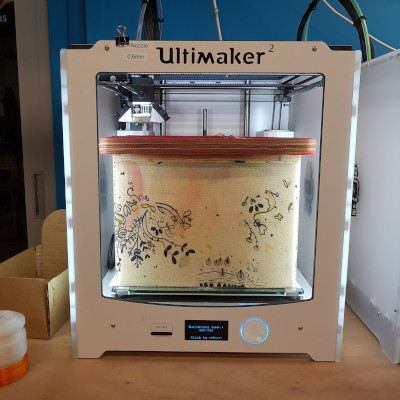
It was Friday evening, and I was ready for the weekend. I wrapped up the incubator we made (just so that the electronics stayed in place) and headed home. Nicolas carried it part of the way until he and Jessica went off in another direction and I carried it the rest. It’s light, a little bit uncomfortable to carry because of the shape and size, but I only stopped for a rest once in 20 minutes. I was pretty glad to get home though… and look how it fits right into the kitchen as though it has always been there, on the right hand side of the kitchen bench.
After cooking dinner, I spent the rest of the evening setting everything up and making tempeh. First I washed the calico wraps in warm soapy water (they have been in the dirty laser cutter after all), rinsed them and dried them in a warm oven with the door open.

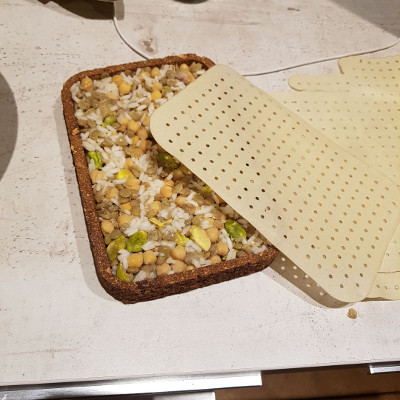
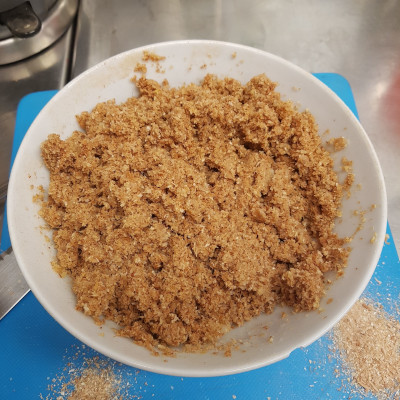
I soaked and cooked up some legumes, rice and nuts. I chose chickpeas, brown lentils, cashew nuts and pecans. I allowed the mix to dry off in the oven for a while, as I’ve read that too much moisture is not helpful to the Rhizopus spores growth.
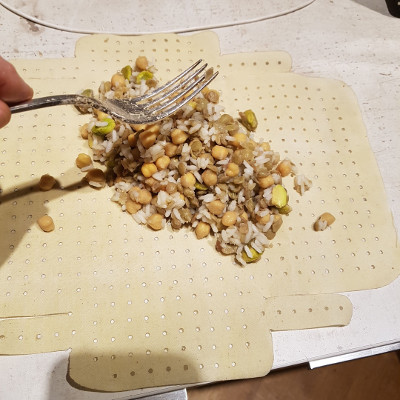
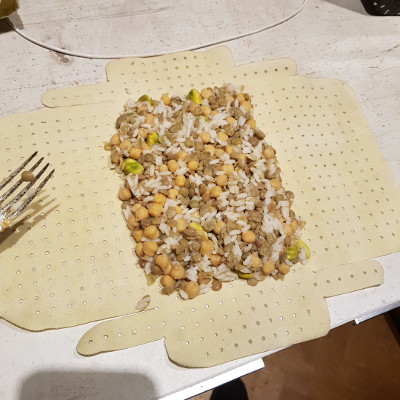
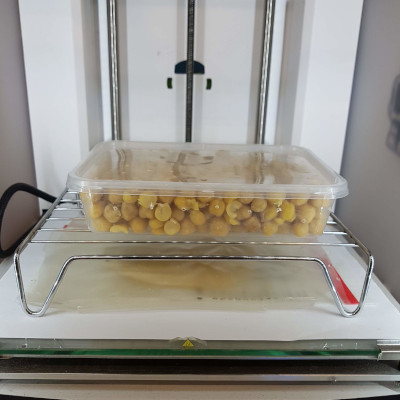
Then filled the wraps and the cork dish with them and placed them in the incubator.
first incubator tests#
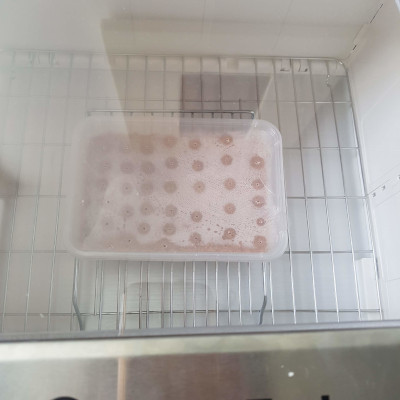
We tested it in perfect conditions (ie. it was empty) at the end of the week that we made it, but now some strenuous field tests.
It turns out that there’s a lot of moisture in the mix and with a bit of heat the moisture evaporates off and condenses on the ceiling of the incubator. Which makes it hard to heat the area of the incubator. The humidity in the incubator sits at about 91% within a few minutes, while the temperature is struggling to get past 23 degrees Celsius.
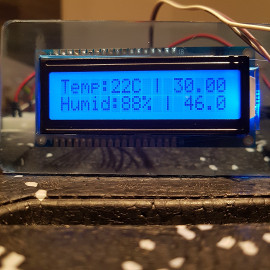
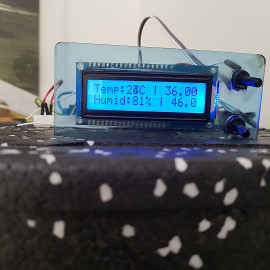
The numbers on the left of the LCD are the measured temperature and moisture levels, the numbers on the right are the target temperature and humidity levels. At present, the only active target is the temperature - we decided that humidity was Phase Two and it needed to have the servo motor attached to the vent so it could open and close it when necessary.
I experiment with opening and closing the vent, but it is as Jessica and I speculated - a fan there drawing out the air from the top is necessary. Also, this will have implications for drying bio-plastics and fruit leathers, so I’ll look into making dessicants from household products. Scarlett looked into it but we didn’t actually test any.
The system glitches. I turn it off.
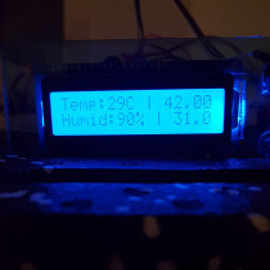
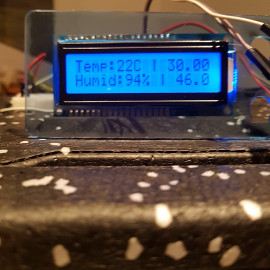
I tweak the situation a bit by removing the tempeh to a warm oven while I try to heat up the incubator some more. I reduce the area that has to be heated by covering the top shelf with fabric and move the temperature sensor lower. Doing this also has the effect of removing a lot of the humidity because I’ve got the whole door open, not just the sliders. The temperature is finally sitting at 29 degrees, and even though the humidity is hovering at 90%, the temperature remains stable. Phew. Will the tempeh survive? We can only wait… I just peeked - it’s looking good!
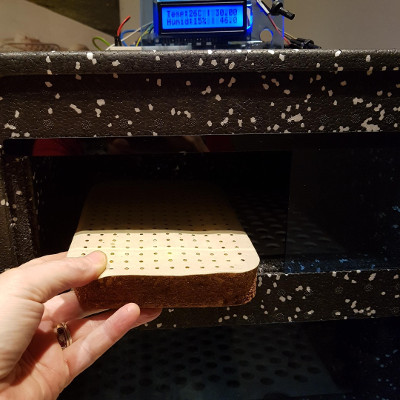
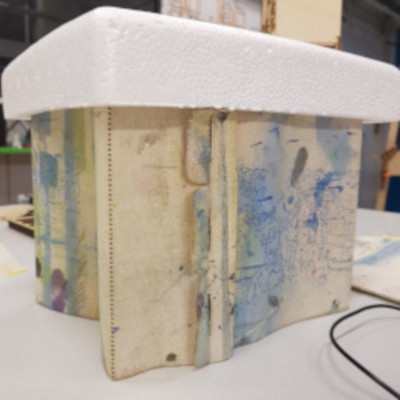
Also, you might notice that I didn’t bring the outer cover with me because I had too many things to carry, but the LCD is sitting in the acrylic holder that Teresa made, and it fits perfectly in the existing handhold.
Feeling totally like a mad scientist, I quietly checked the incubator at 2.15am, because I had just finished updating E-Textiles week. It was up to 35 degrees! So I quickly looked inside and realised that I’d have to remove the tempeh. I turned it off before I remembered to take a photo of the LCD screen, so you’ll have to take my word for it.
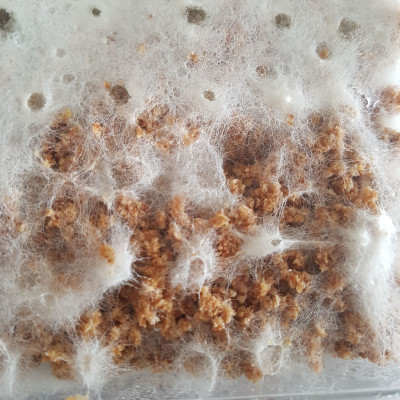
It smells fresh and delicious, though it looks fluffier than the stuff I grew in the plastic bag. I’ll put it in the fridge to stop its growth and check it tomorrow morning. The moisture content is high - I hope it doesn’t go slimy in the fridge overnight.
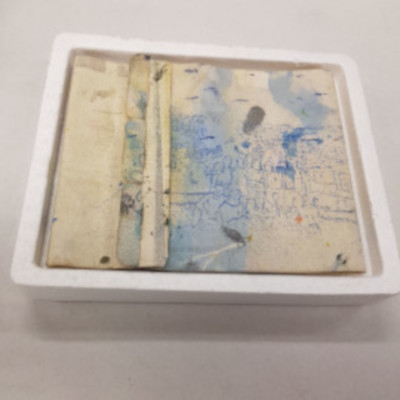
The way it’s growing toward the 2mm holes and the way it’s kind of sticking to the fabric leads me to suspect that growing it as a material is very possible. I really don’t know how I’ll get it out of the cork dish… When I applied the wax I thought it might be like the wax on the banana leaves (what people use in Indonesia instead of plastic bags), creating a resist layer, but it seems it’s not as durable.
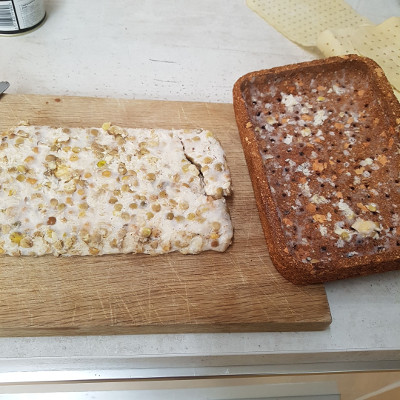
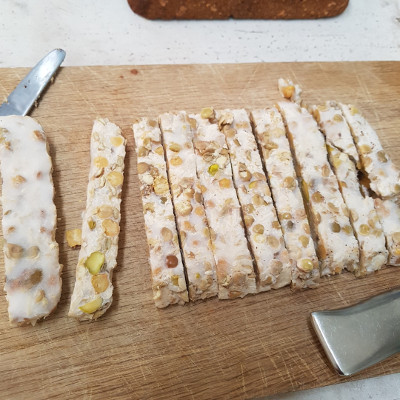
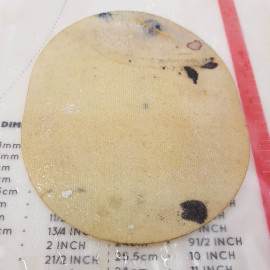
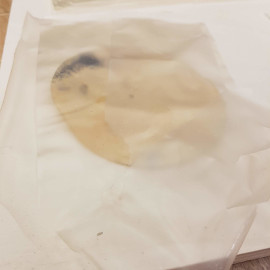
Above the photos show the tempeh that came out of the cork dish. You might be able to see how it stuck to the cork. I’m wondering if the mycelium started to eat the wax. I can also see that the calico is slightly paler where the mycelium stuck to it, even after I’ve washed the calico. Also, the growth of the mycelium is prolific with the mix with pistachios, but is much smaller with the pecan mix. Must check out acidity. And while I was writing that sentence, I realised that I’d forgotten to put vinegar in the second mix!
I poured a tablespoon of vinegar into a saucer and placed the saucer in the incubator just now, instead. This mix is lentils, cashews and cooked green soybeans. I’ve promised tempeh for lunch at the Waag.
videos of unwrapping the first tests#
The tempeh in the cork dish:
The tempeh in the calico wrap:
wood tempeh#
Back in New Zealand, I’ve been growing tempeh in my fabulous Brod incubator, and did a successful test of growing the culture on wood dust from the shopBot. We only use E0 and FSC type plywoods, so we collect the dust and use it for making compost, have used it for growing edible mushrooms and mycelium materials.
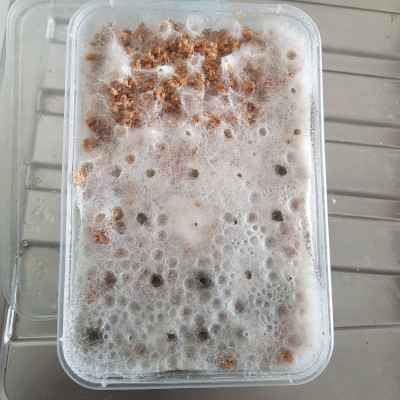

It took a lot longer than the tempeh usually takes, about 10 days, and you can see that it’s starting to spore (the black spots near the airholes) so I took it out of the incubator and zapped it in the microwave to stop it growing further.
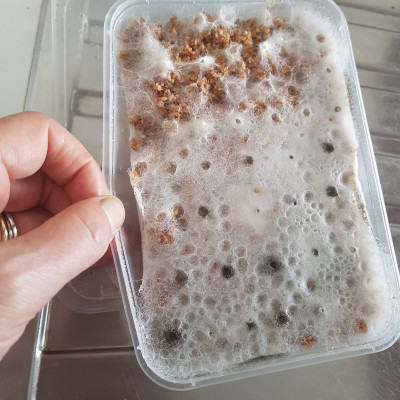
I didn’t pack the wood dust very tightly in this test, and you can see that it didn’t fully grow over the whole block. I’m drying it in the sun, and it’s going well, with no mould growing. The material is quite flexible, and the tempeh growth is much less dense than when I’ve grown it on food. It’s a promising material though… I really didn’t think it was going to grow on the wood dust.

Above you see the moist wood mix before it has gone in the incubator, and below is a video of what the material looks like after being dried out for a few days. It’s physically light, a little crumbly, but holds together due to the network of Rhizopus growth.
the recipe for the wood tempeh is…#
…based on the recipes we used to grow mushrooms on our wood dust - you have to feed the culture with more than wood dust otherwise it will die, due to the ‘hard’ nature of the wood. If you’d like to check out our github repo that documents the mushrooms, it’s here.
- 1 C wood dust (sieved so that the finer dust isn’t included)
- 1 T dried potato flakes
- 1 T natural bran
- 1 t sugar
- 1 t white vinegar
- 1/2 t tempeh starter
- 1 C boiling water
I mixed together the dust, potato flakes, natural bran & sugar together in a bowl, added the boiling water and covered the bowl for 1.5 hours. All the water was absorbed and the mix had cooled down.
I added the vinegar and mixed, then the tempeh starter and mixed again. This is what the new mix looks like in my incubator, which I’ve layered some canvas and calico into as well.
intention update after tests#
-
to create a much smaller, and physically modular incubator - the one we made is too big for a home scale operation, as is the Brod I have. There are things that work in my Brod that I would incorporate into the new incubator design like:
-
a box that opens from the top rather than the front, window in the lid still
- folds down into a smaller unit when not in use, is soft and textile based
- not as sealed as the one we made so there’s no need for a fan, no condensation occurs
- a tray for water
planning the next stage#
I write copious lists, and I’ll soon run out of whiteboards… It’s ‘mid-term’ in Fabricademy and I need to focus on the final items, no matter how much more research I could do. Also, the semester at University is about to begin, so I’m getting Fab Lab Wgtn ready for that as well.
Here is the list that Harry and I had for this week:
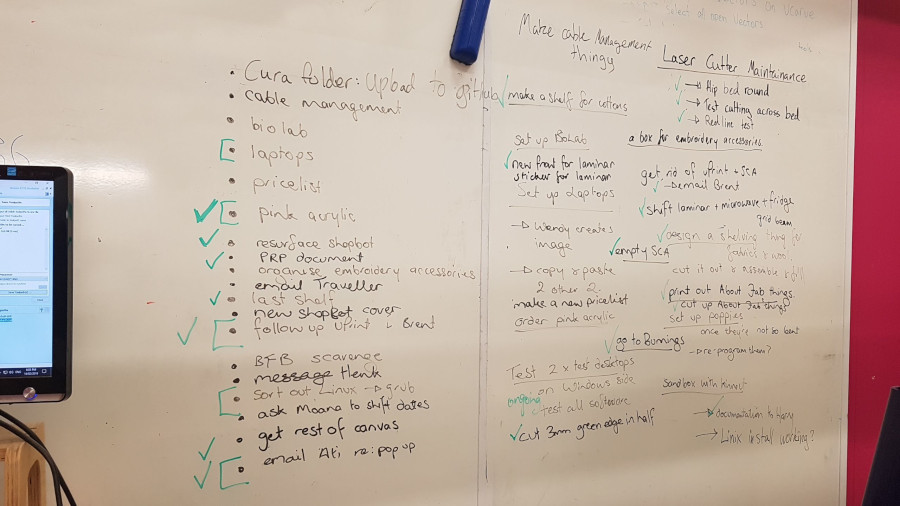
…and after all that, I needed to write up my thoughts, so I started with the incubator. It still needs a bit more detail, but I tend to move to a combination of sticky notes, random bits of paper and notepad++ for the granulated lists.
canvas awesomeness#
I made a folding canvas piece, using the size of the expanded PLA foam lid as a guide. It seems to be the size of a small cooler bag, that you could fit 1/2 a dozen beers in. You can see below, that it folds into the lid - I’ve also allowed enough leeway for a 3mm felt outside cover to fit in as well.

I like the idea of using the PLA Zealafoam lid, but at the same time, I don’t think it’s easy to get others - this was a test piece from a company in NZ, and I’m not sure whether it has actually gone into production. Also, I’d prefer to have a smaller profile for the lid. I will test out some ideas with the 3mm woolen felt I have instead.
Even without infusing the canvas with wax, because of the thickness and the folds I made, it is standing up and supporting the lid with no problems. However, without the wax the canvas is fraying. It won’t last very long, and it won’t repel any bacteria.
I’m testing the sides and the lid at the moment, and testing a new material at the same time. Rather than waiting for the heater element, I thought I’d make use of a machine that we have in the Lab already and I wanted to see how the composite material I made for the sides and the lid work.
The new material consists of an agar plastic sheet wrapped around some waxed canvas. There is a light sprinkling of vinegar and water in there, and it’s resting on a silicon mat.

Although I’ve been able to solve a lot so far, I really need to concentrate on the electronics of this system, which will lead much of the further design developments of the body of the incubator.
incubator circuit#
If you want to find out more about the development of the electronics for this project, please go to my GiYah incubator circuit page.