Previous Experimentation
When I make my bun with a pencil, it can only mean one thing: things are getting serious: Let's get to work!
In this section I will show you all the experiments I have been carrying out: trials, errors, successes, tips..... All about everything.
MOLDS
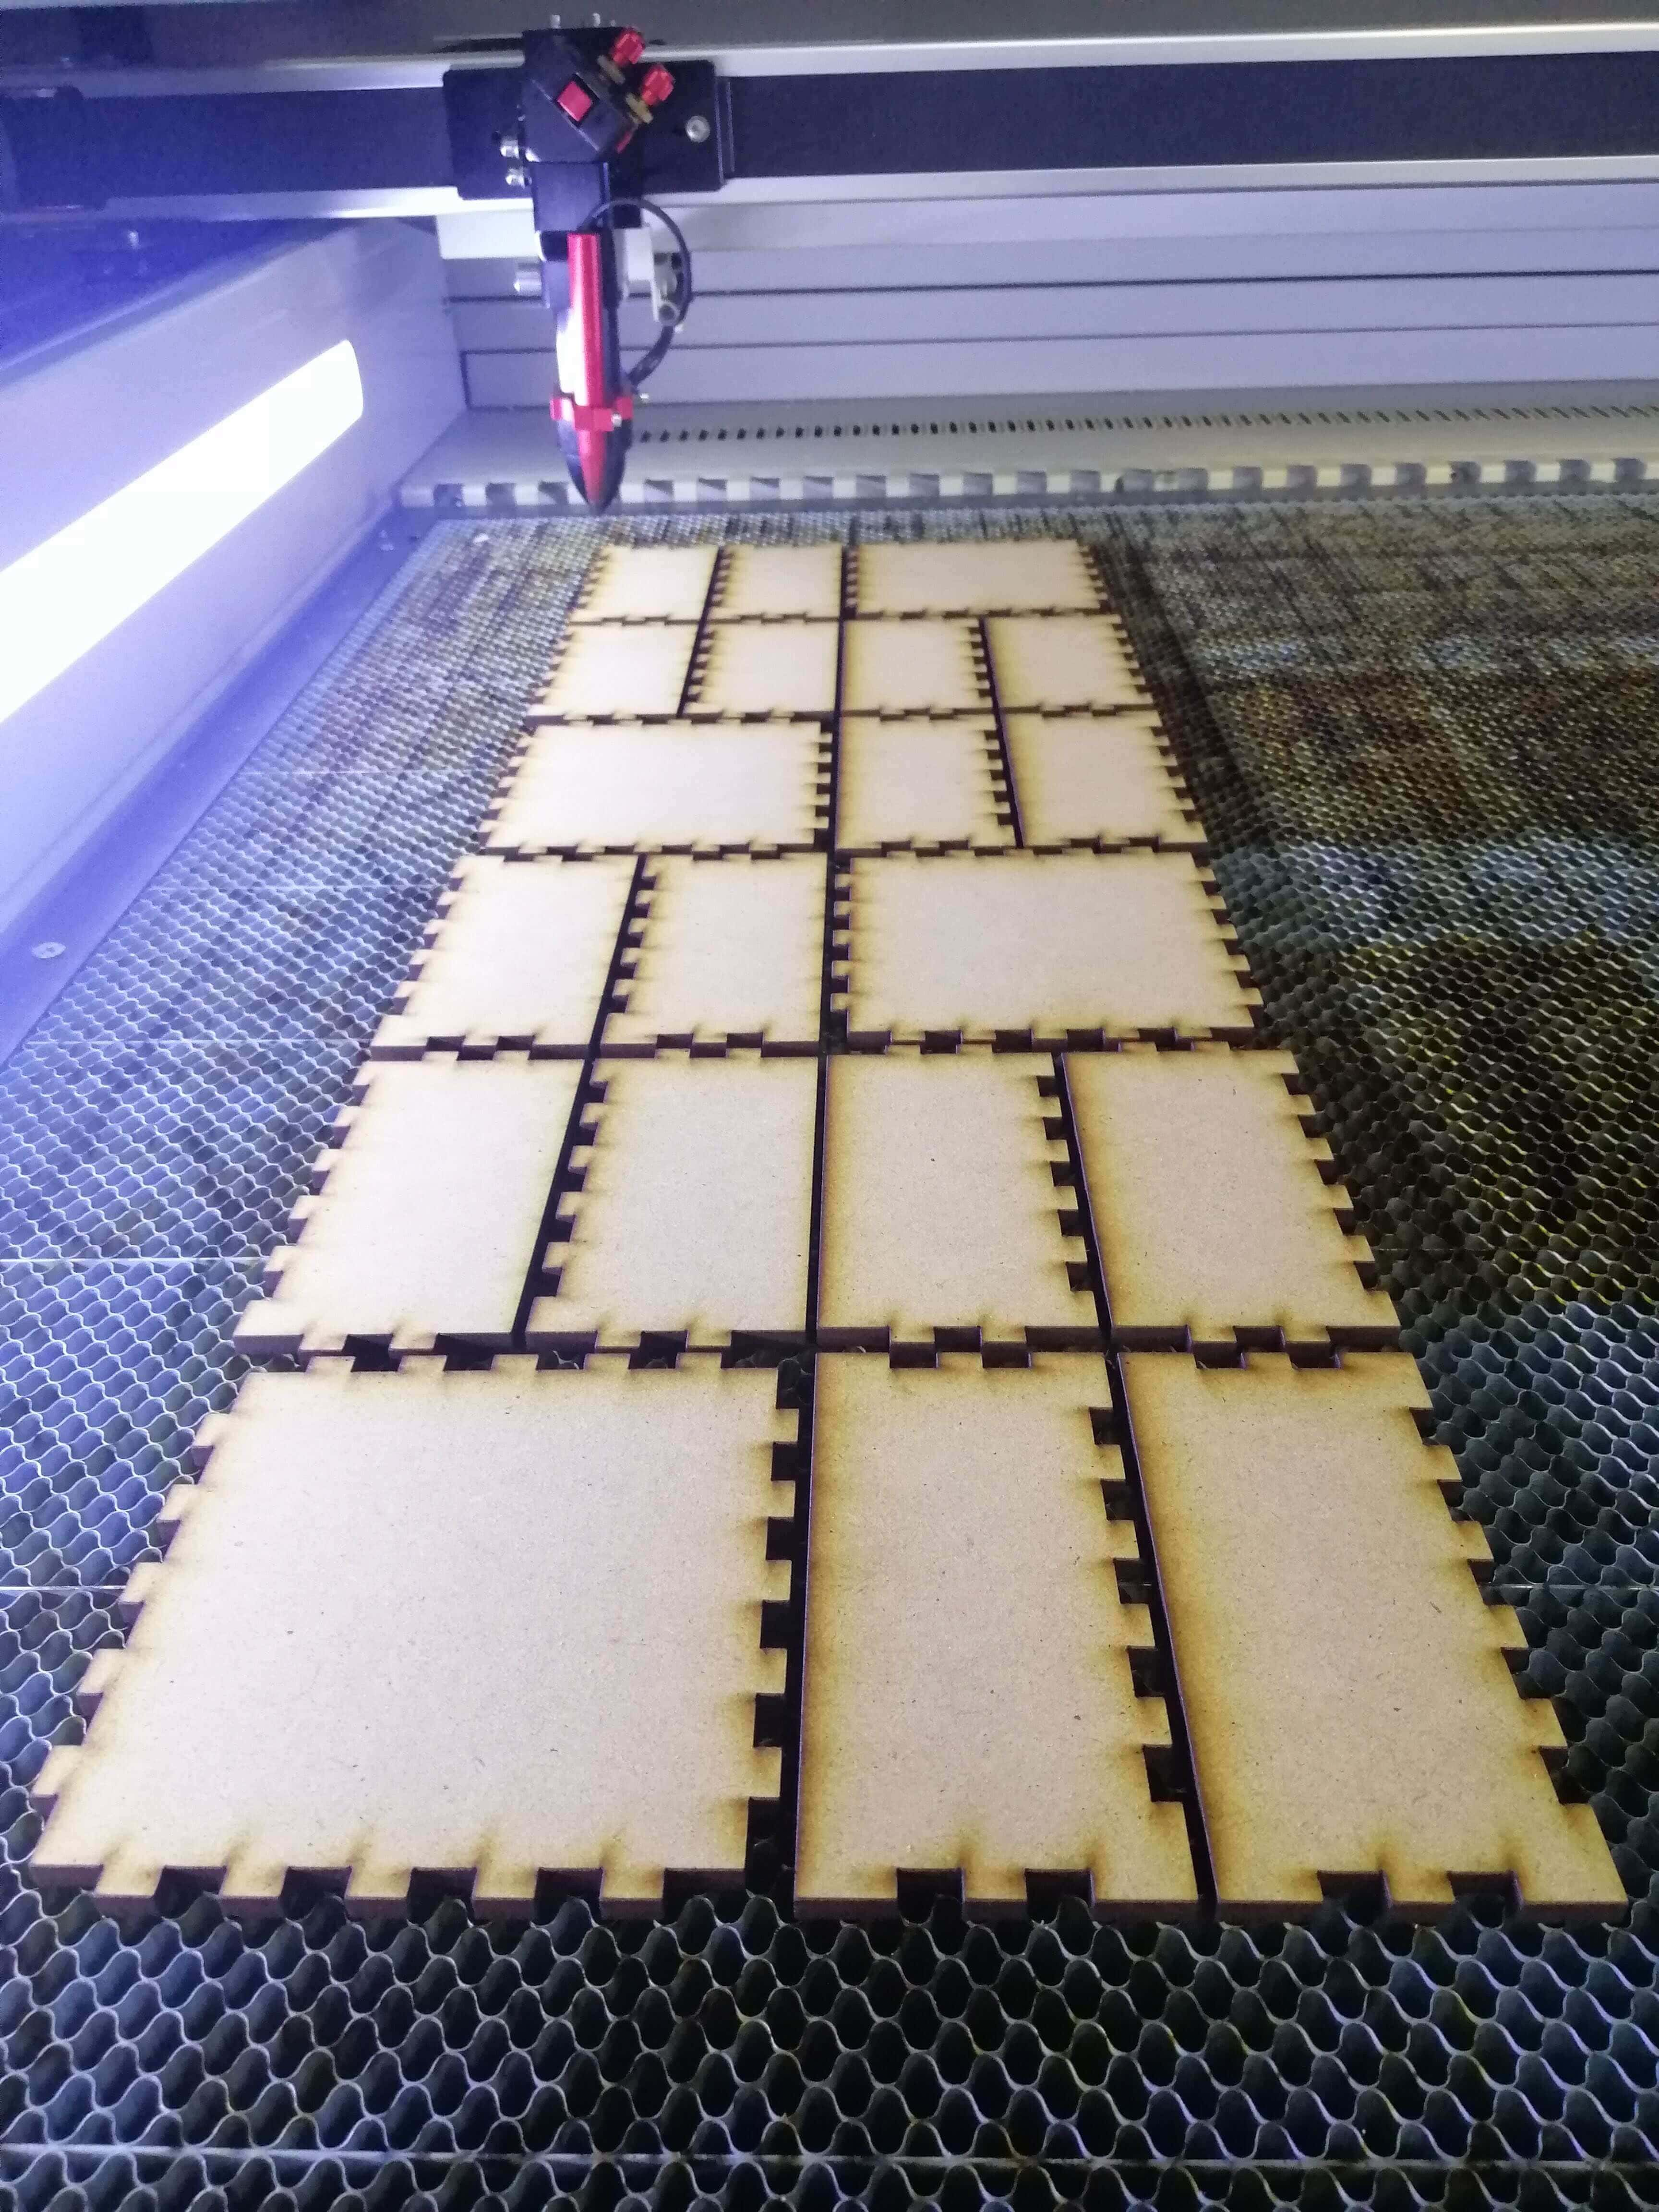
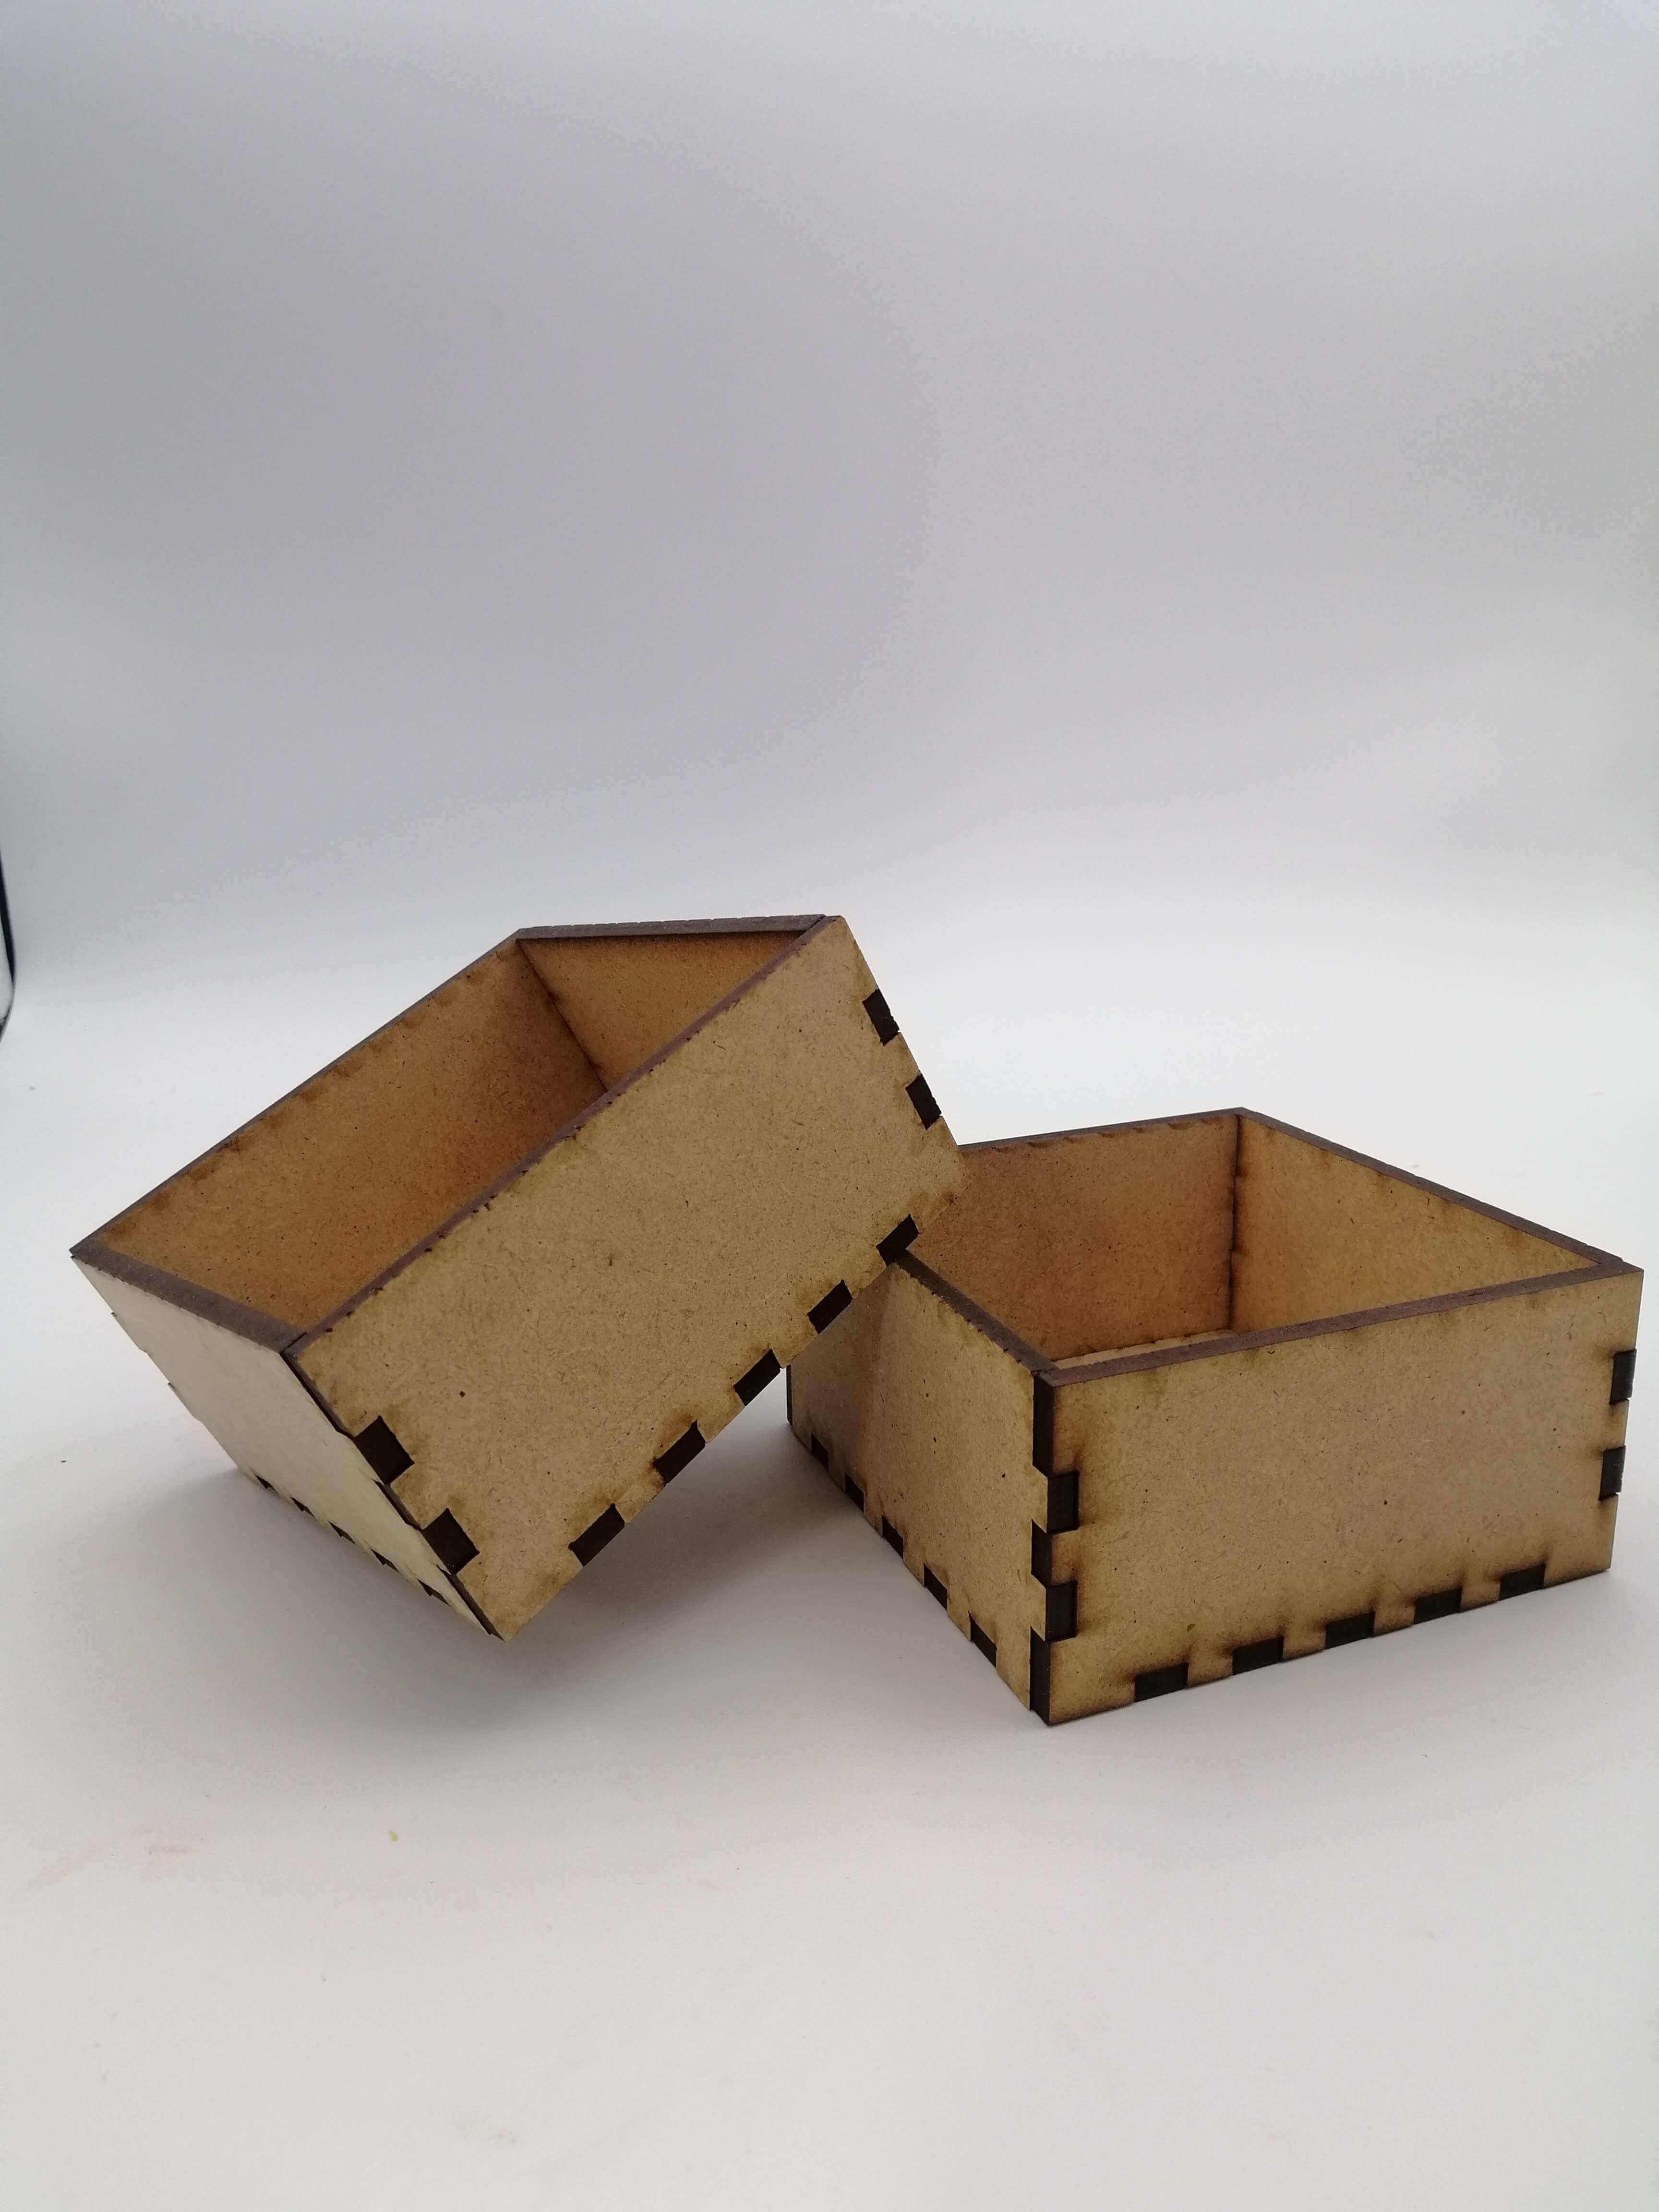
I needed them because I wanted to make some samples in order to test the biomaterials. The idea was to make a block of biomaterial to mill it, that's why I wanted a mold of 100x100x50 mm.
In Open Source Hardware - From Fibers to Fabric week I show you Boxes.py website, which generates assembled boxes. This were the settings:
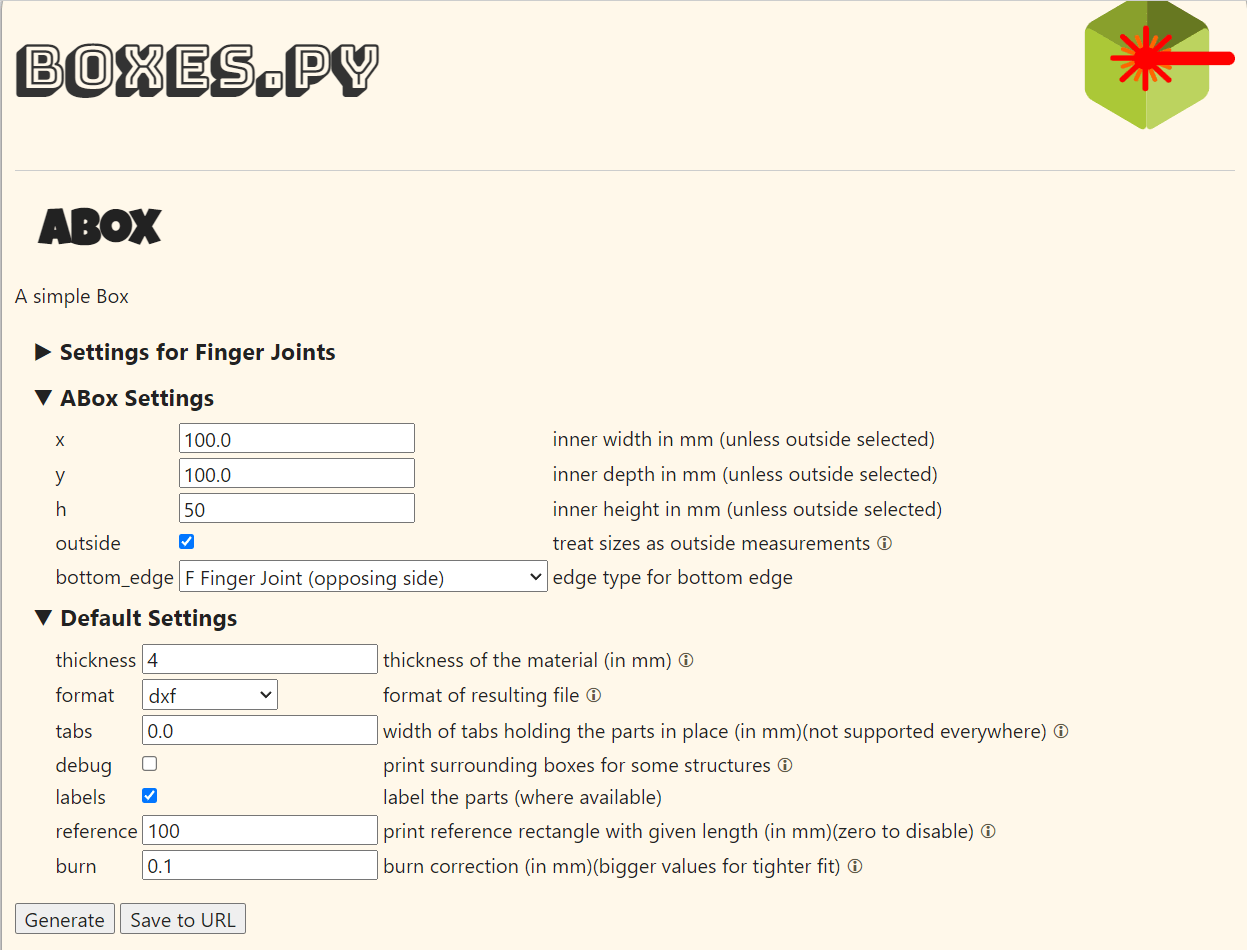
I edited the .dxf file in Rhinoceros so that I could reposition the pieces and not waste so much material. Also, I did ctrl+c and ctrl+v (copy and paste) to have 4 boxes in total.
I used 4 mm MDF wood for laser cutting.
Speed: 25 mm/s
Min. power: 70 %
Max. power: 74 %
HIMALAYAN SALT LAMP
 I wanted to include a Himalayan Salt lamp because doing another project (related with anxiety and stress, too) I read that it has health benefits:
- Purifies the air
- Reduces stress
- Helps you sleep better
- Improves mood and concentration
- Reduces static electricity in the air
- Neutralises electromagnetic radiation
- Reduce allergy and asthma symptoms
For that reason, I wanted to add a handmade salt lamp. I have tried different recipes from the ones we learnt during Textil as scaffold week.
· Crystallization
> Himalayan salt
Ingredients:
| Qty | Description |
|---|---|
| 30g | Himalayan salt |
| 600 ml | Water |
Tools:
- Cooker
- Spoon
- Casserole
- Deep glass container (with its lid)
- Different types of fabrics

Method:
- Put the water in the casserole and boil it.
- Add the salt, spoon by spoon, until the solution is saturated.
- As soon as it happens, put the solution into a deep glass container.
-
Suspend the material inside the container.
It’s important that the material doesn’t touch the container.
-
Cover the top to prevent the entry of any particles.
- Leave the container in a cool place for, at least, 8 hours.
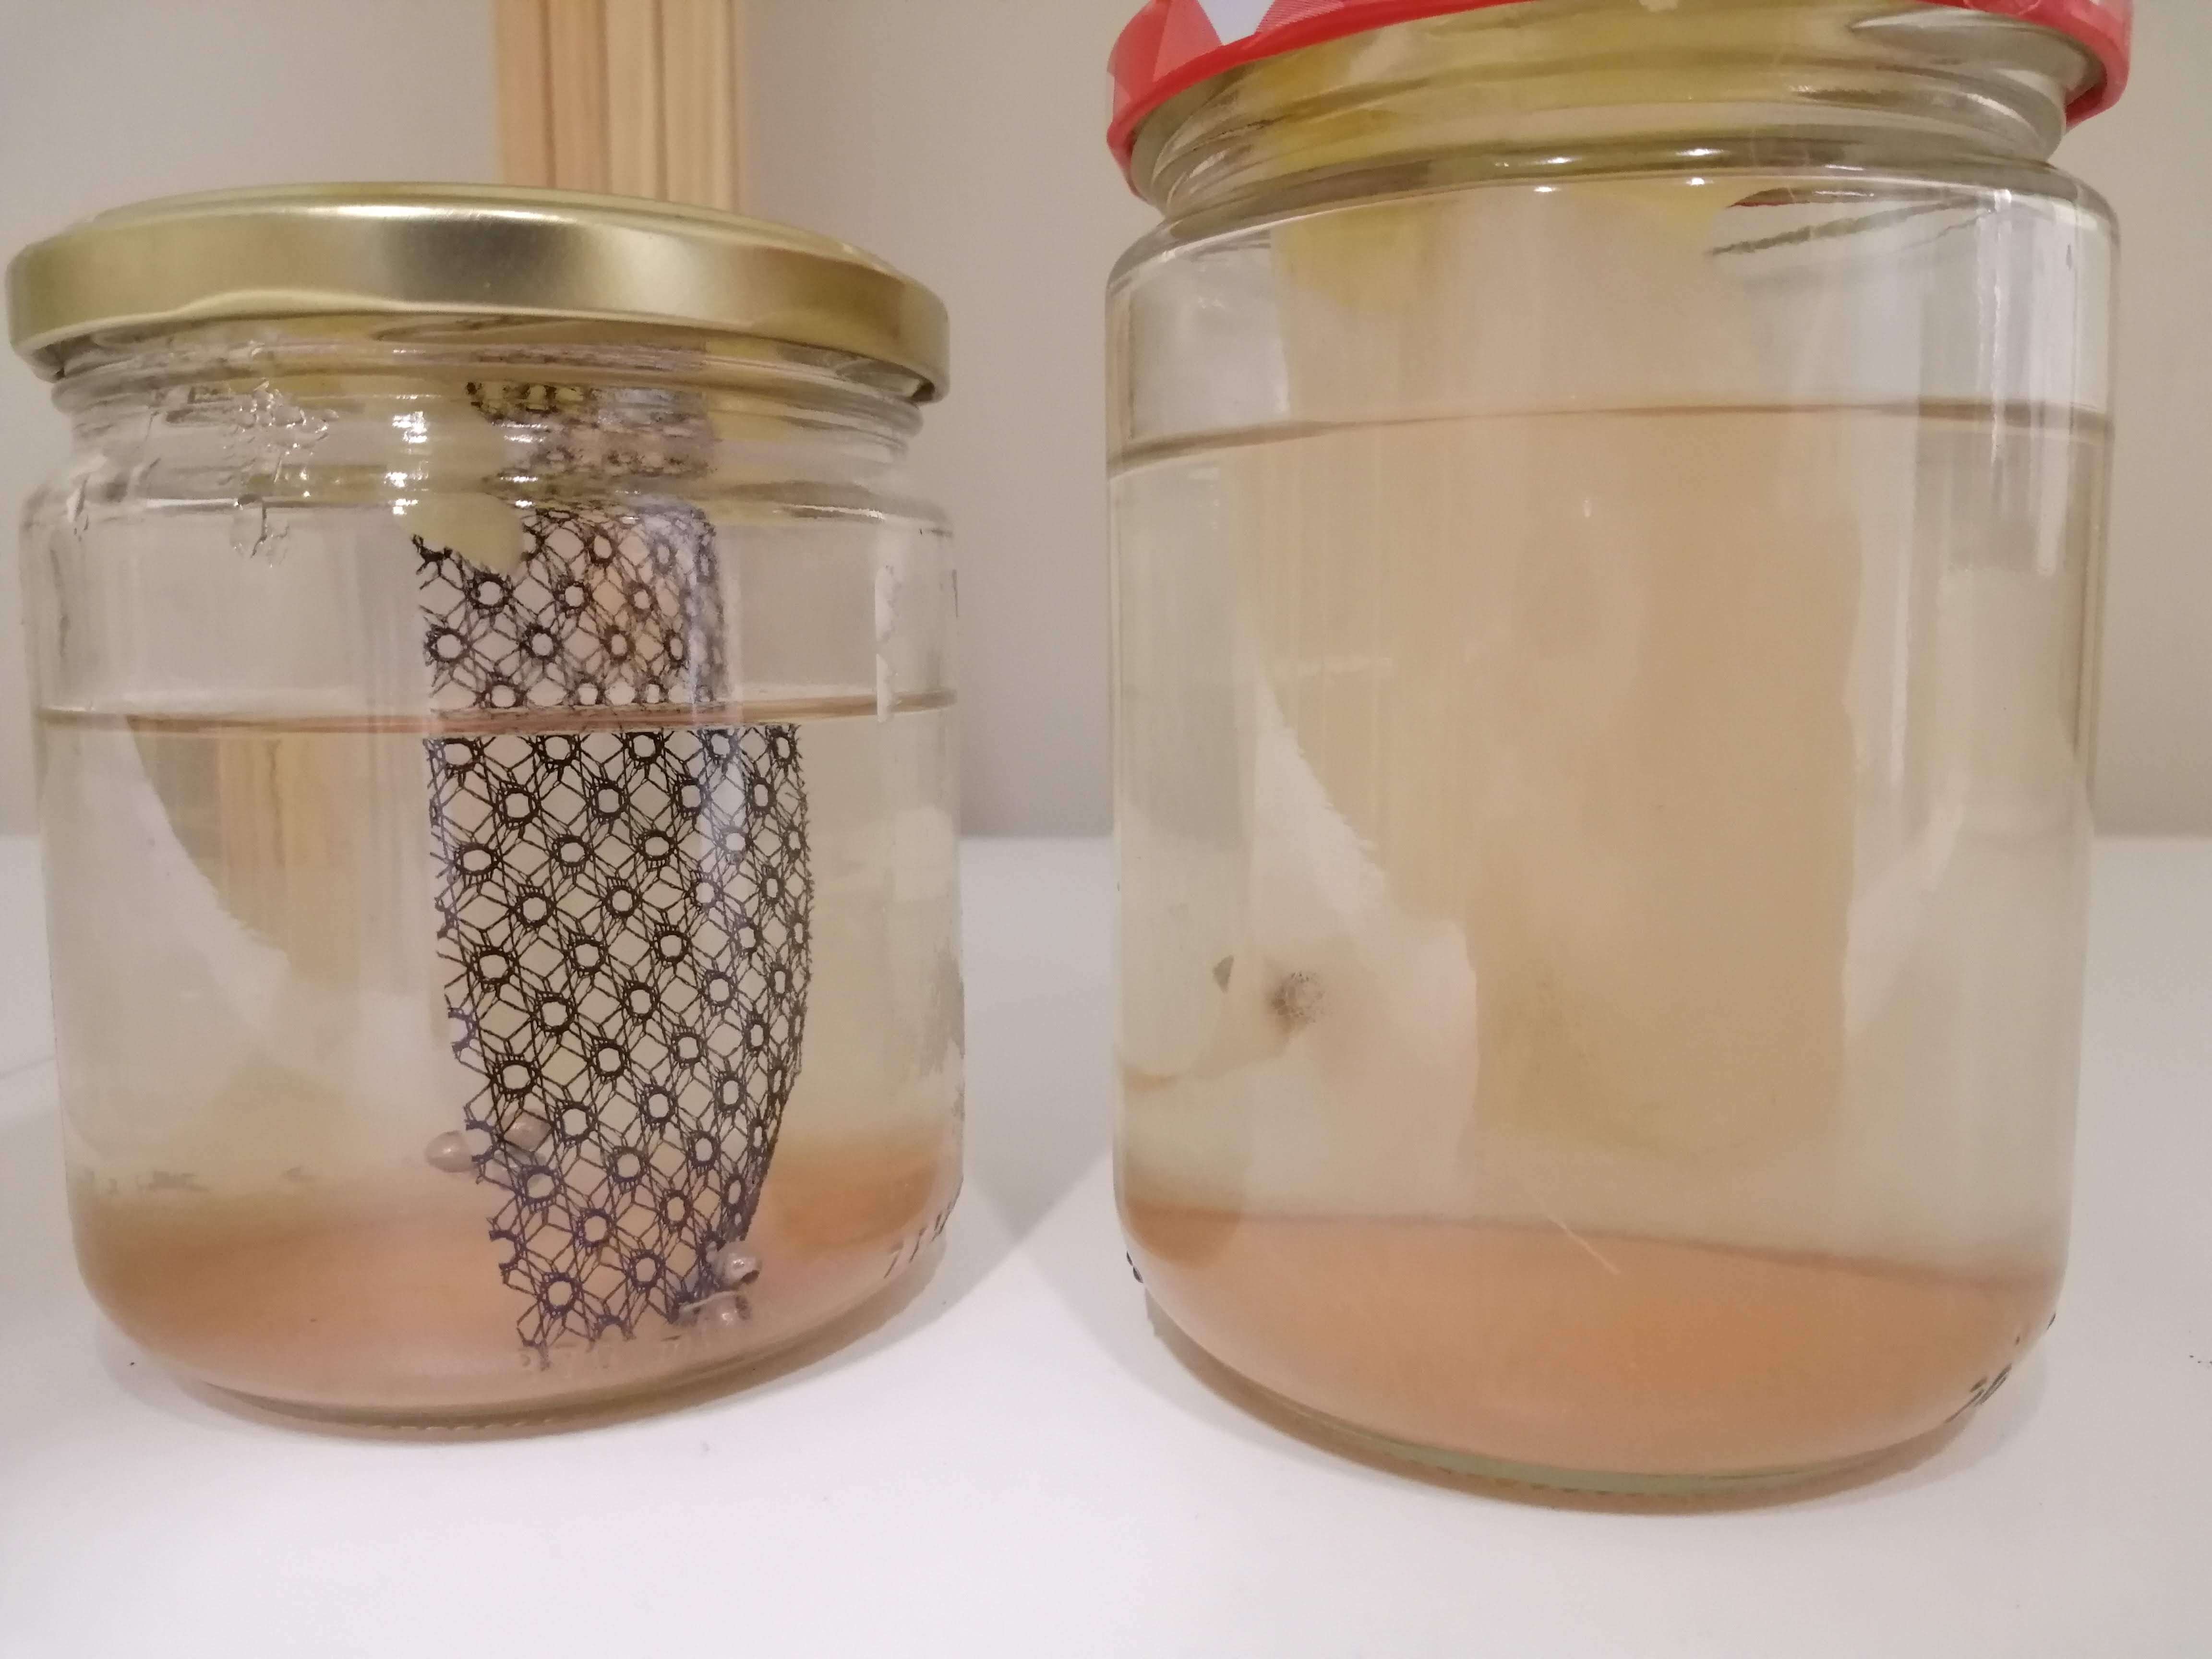
Results: Nothing happened je :)
> Himalayan salt + borax
In this case, I wanted to get just the crystal. Ingredients:
| Qty | Description |
|---|---|
| 70g | Himalayan salt |
| 70 g | Borax powder |
| 300 ml | Water |
Tools:
- Cooker
- Spoon
- Casserole
- Deep glass container (with its lid)
Method:
- Put the water in the casserole and boil it.
- Add the salt and the borax, spoon by spoon, until the solution is saturated.
- As soon as it happens, put the solution into a deep glass container.
- Cover the top to prevent the entry of any particles.
- Leave the container in a cool place.
Results: The results were good, however, it took a considerable amount of material to achieve this.
· Salt technique
Maybe you know this technique to cook fish: salted fish. It consists of creating a kind of coffer made of coarse salt, which will completely cover the fish. At the end of the baking process in the oven, the salt coating will have hardened.
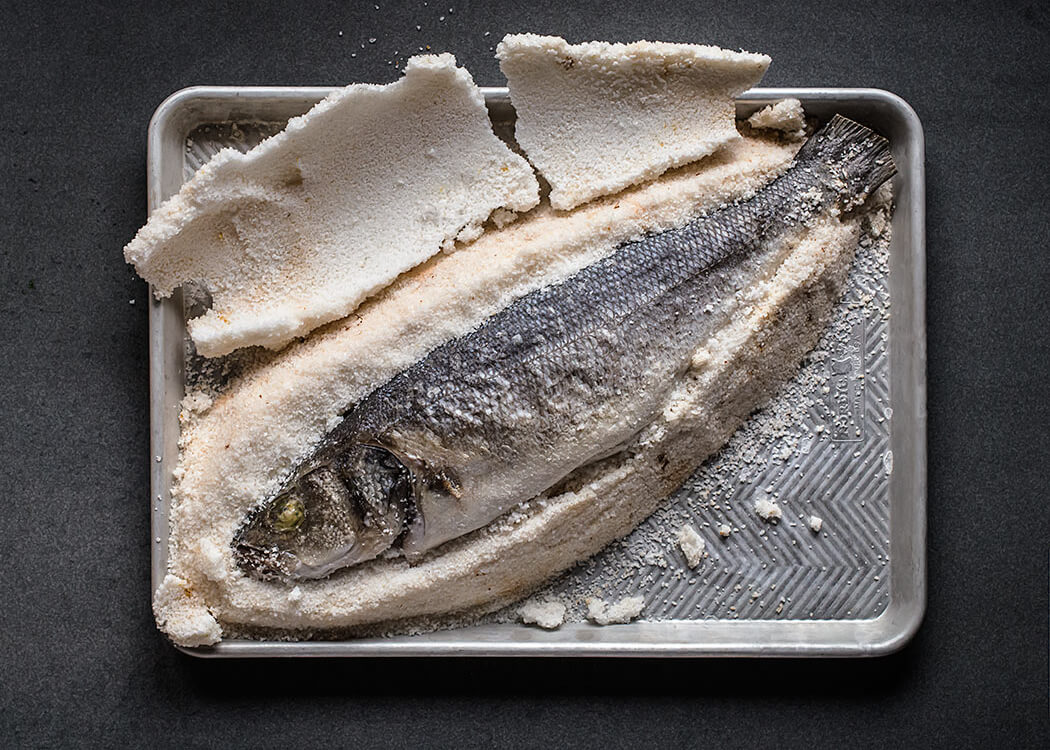
So, what would happen if I did the same process but with Himalayan salt? The objective is to obtain a piece of salt block.
> Himalayan salt
Ingredients:
| Qty | Description |
|---|---|
| 60g | Himalayan salt |
| 15 ml | Water |
Tools:
- Bowl
- Sacle
- Baking paper
- Molds
- Dehydrator
Method:
- Mix the water and the salt (we just want to wet the salt).
- Remove them.
- Put the baking paper into the mold.
- Pour the mixture into the mold .
- Leave to dry for 15 minutes.
- Carefully remove from the mold and place in the dehydrator.
I have put it for 9 hours at 55ºC.
> Himalayan salt + normal salt
I did the same process as the previous one, except that I mixed normal salt with Himalayan salt. Ingredients:
| Qty | Description |
|---|---|
| 30g | Himalayan salt |
| 30g | Normal salt |
| 15 ml | Water |
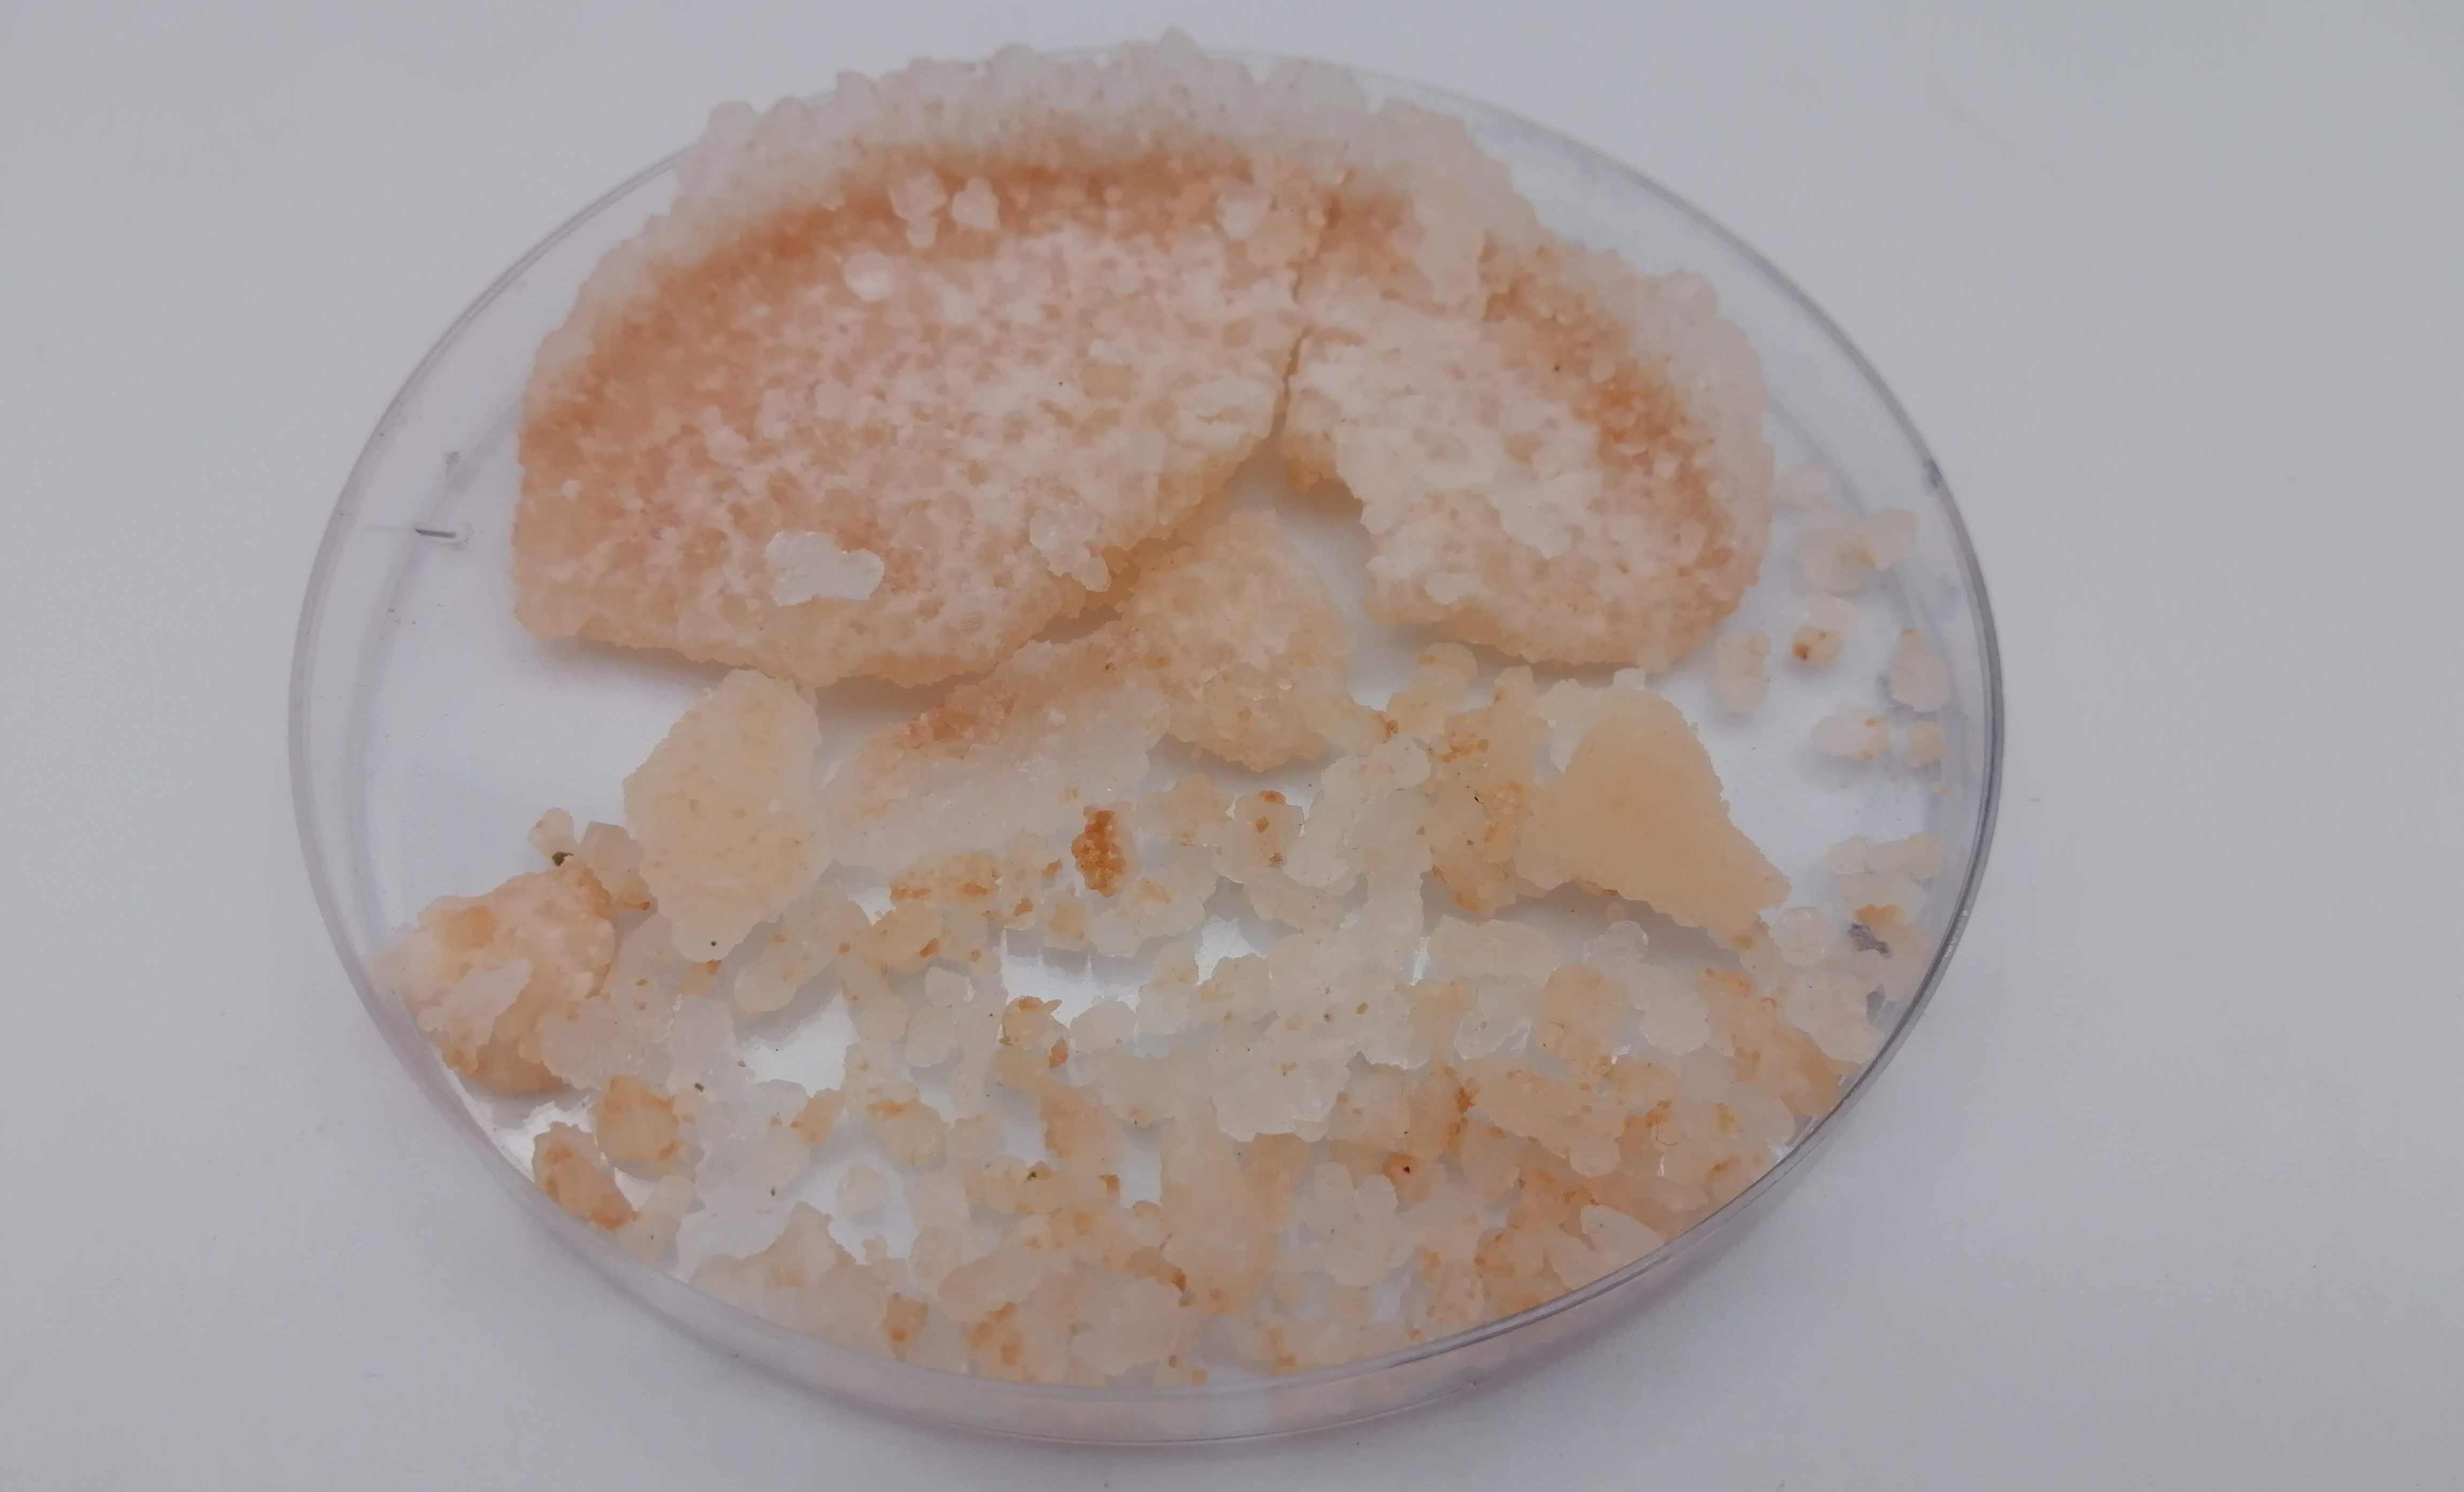
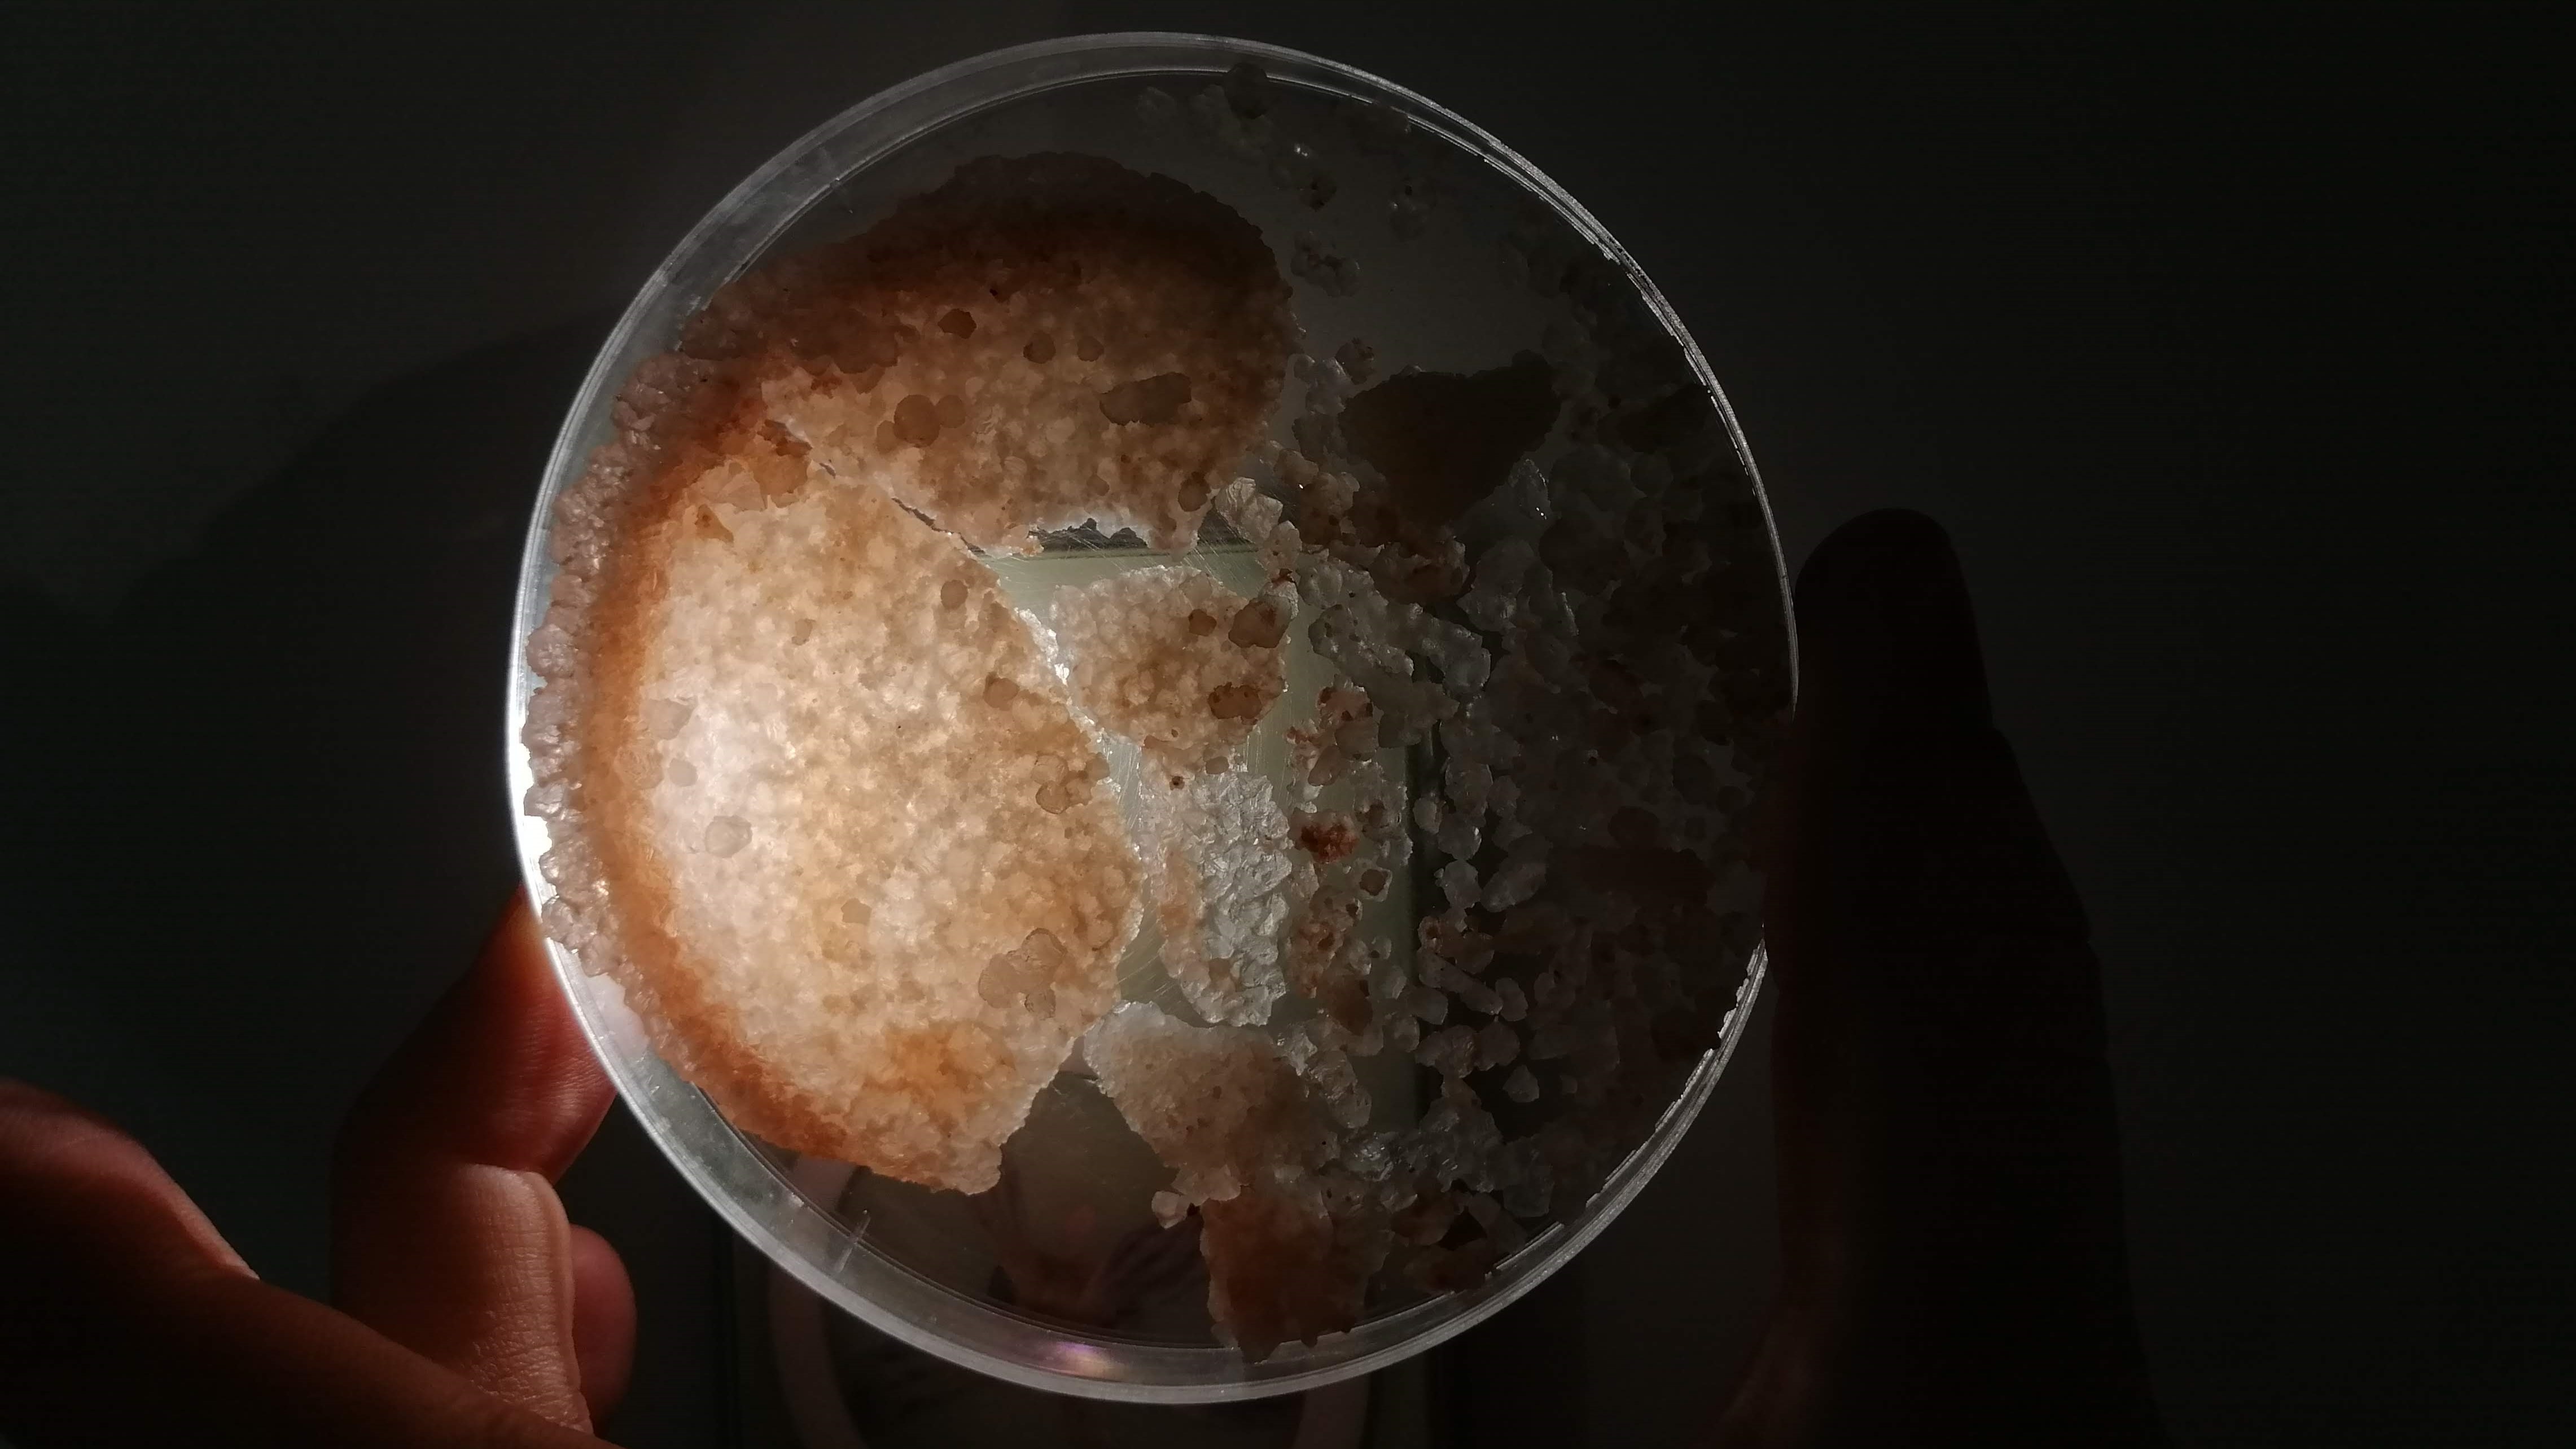
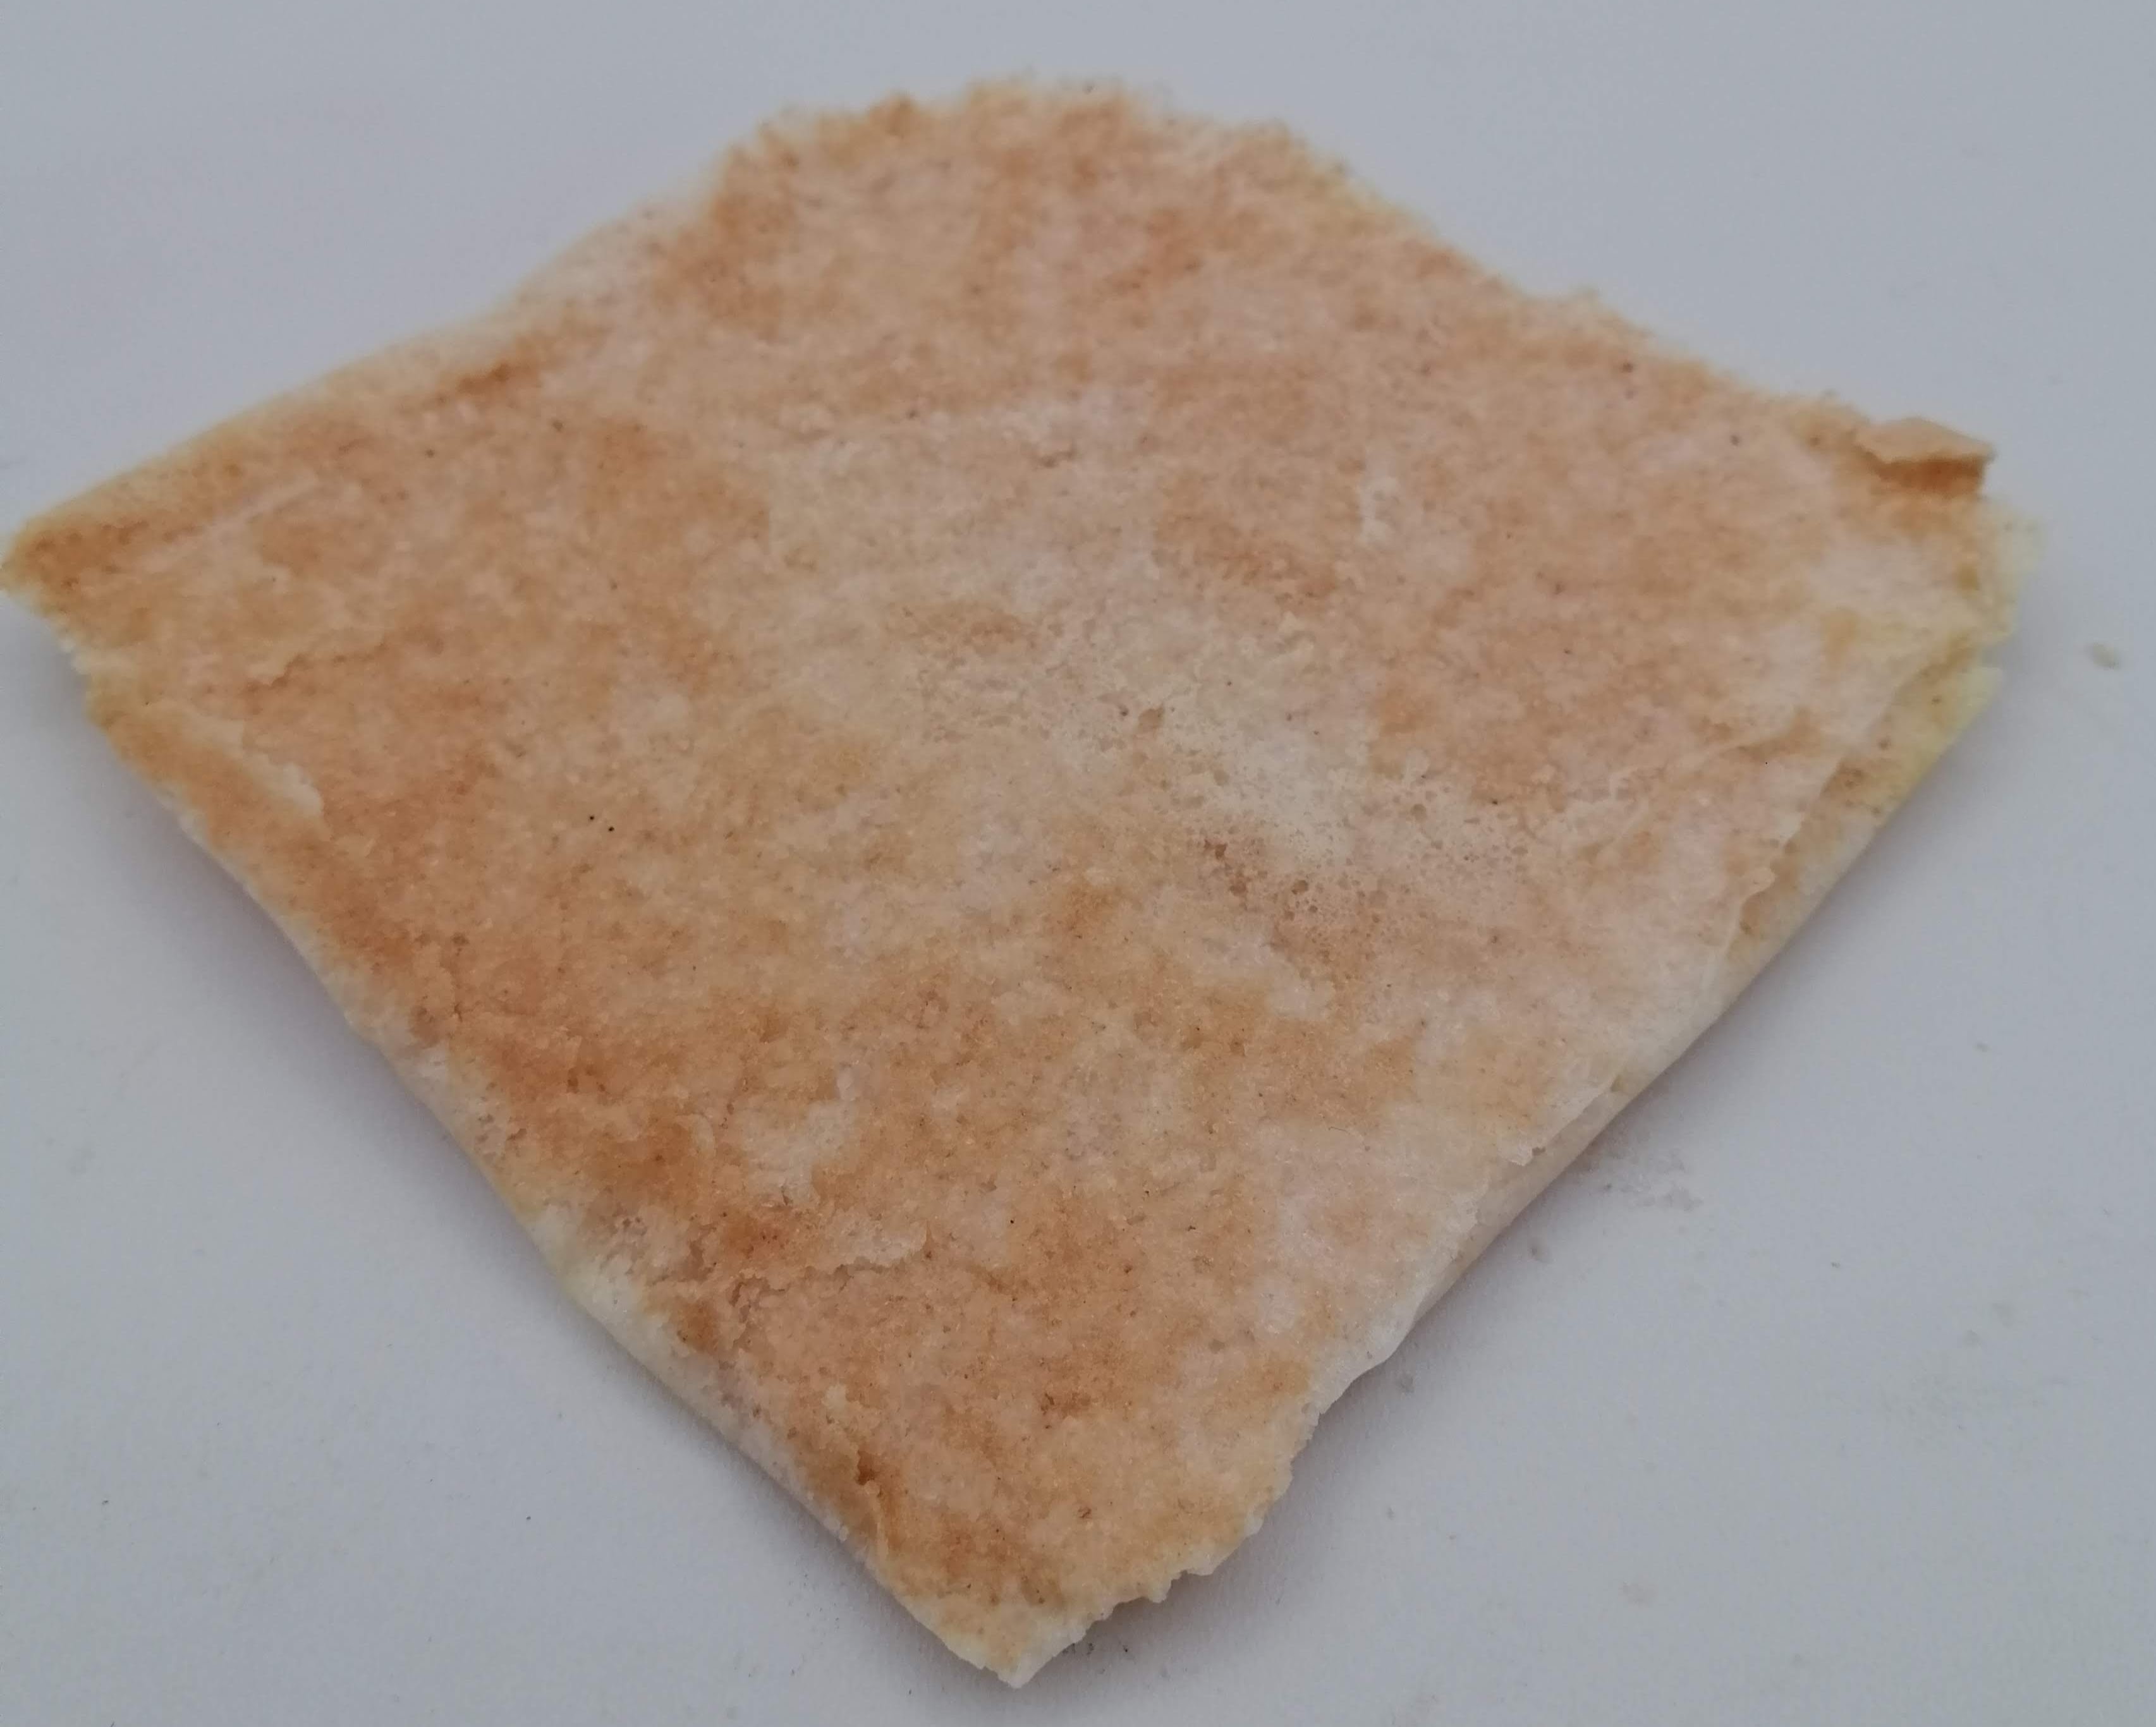
Results: I like how it went. It’s true they are a little bit delicate, but I obtained what I wanted. The one mixed with normal salt is more “translucent” than the one with only Himalayan salt.
> Himalayan salt + normal salt + egg white
The recipe is the same, however, it uses egg-white. I tried because it could be an agglutinant.
| Qty | Description |
|---|---|
| 30g | Himalayan salt |
| 30g | Normal salt |
| 10 ml | Water |
| 1 | Egg white |
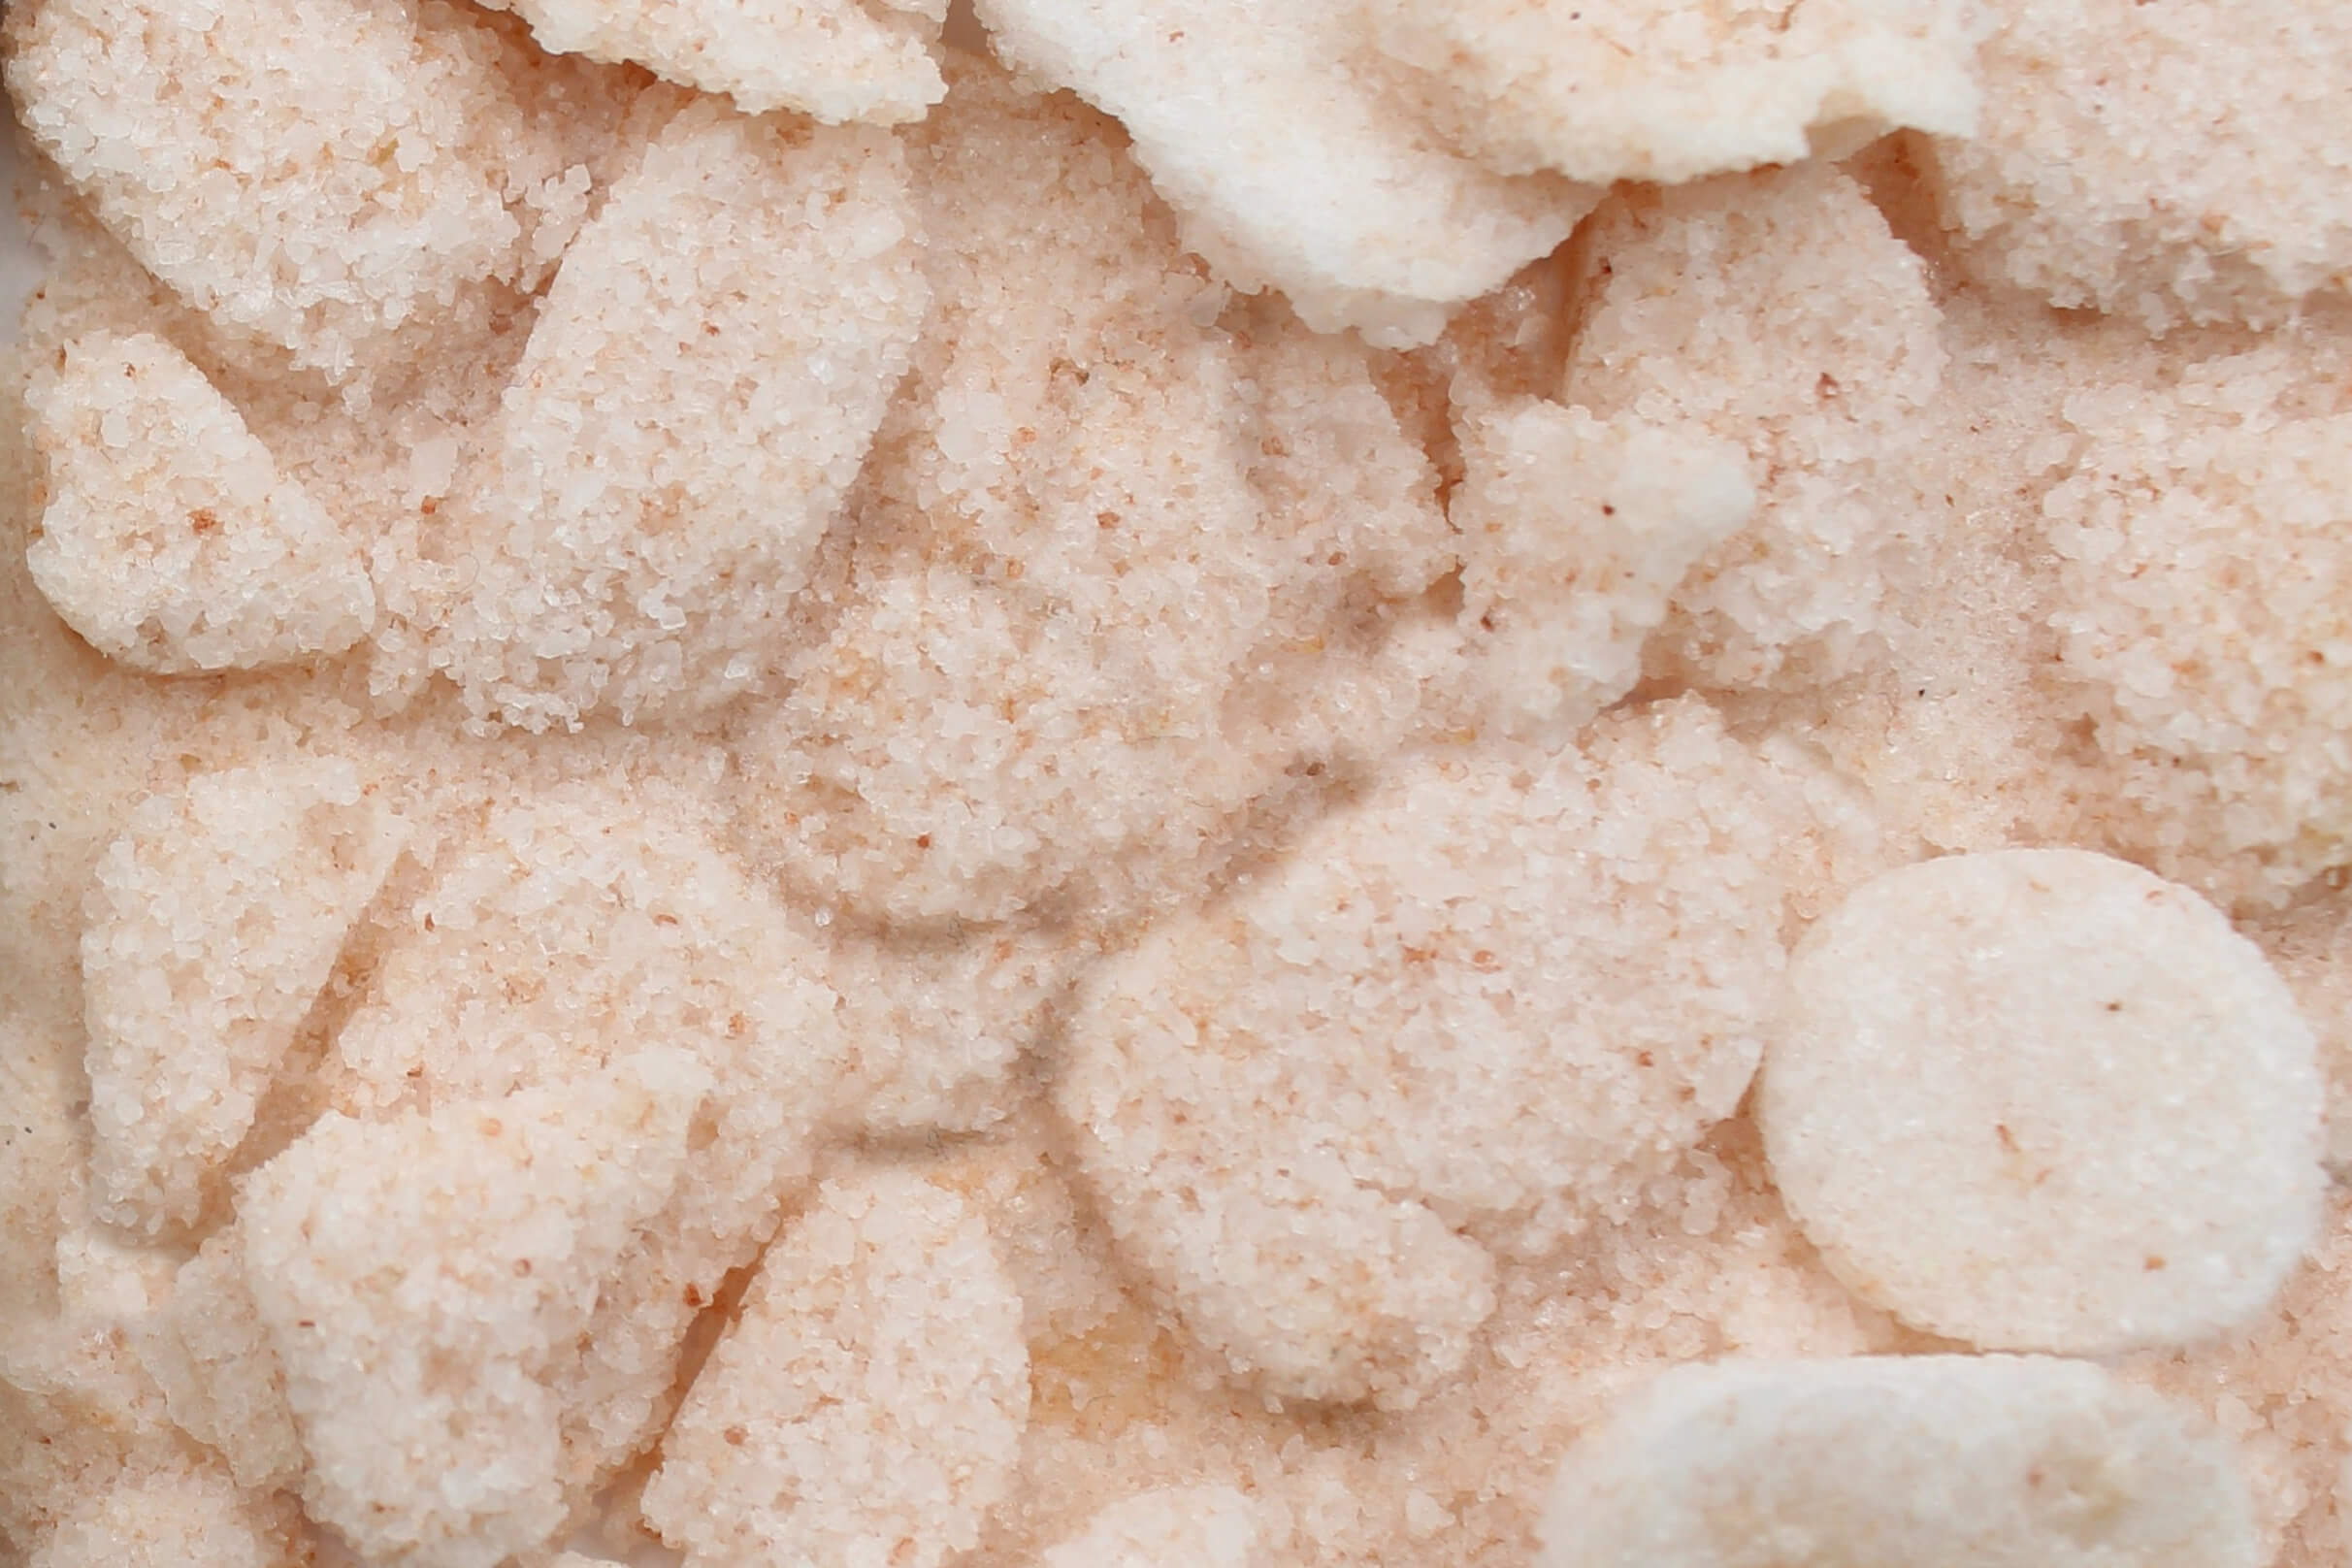
So, I did it and I got this:
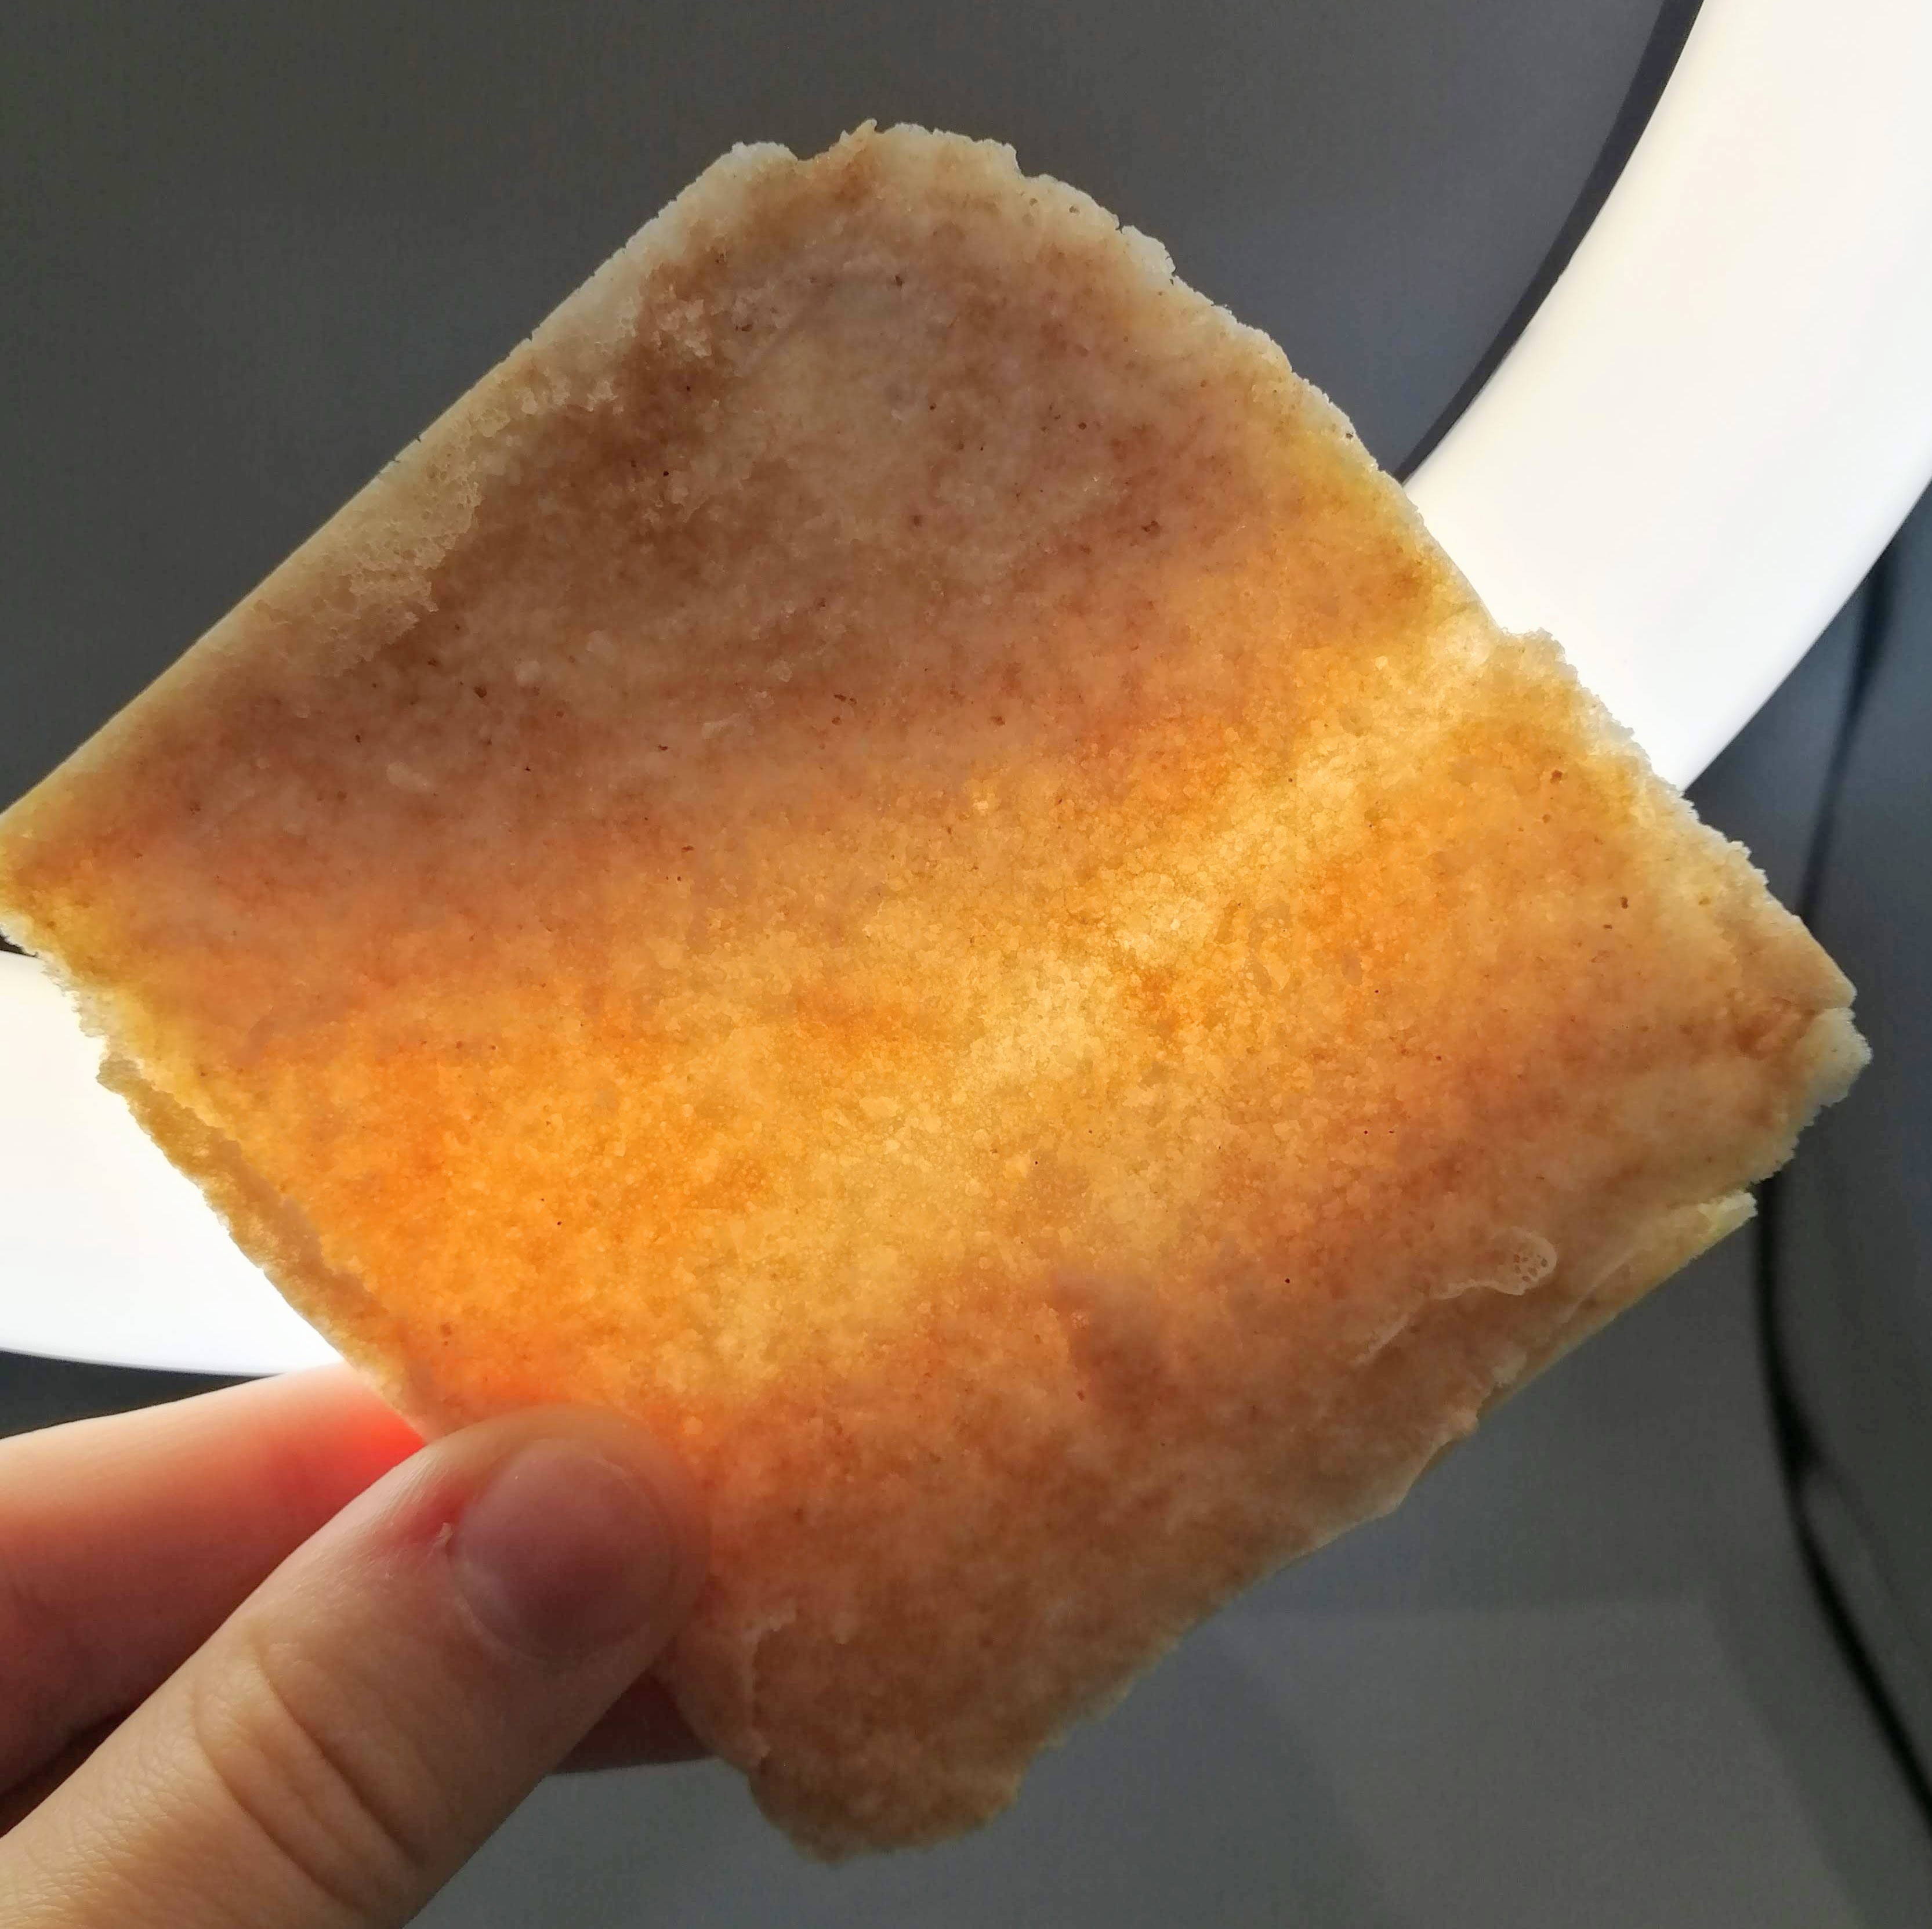
Results: The egg-white acted as agglutinant and it made it more resistant. Moreover, the egg white has helped the salt to be evenly distributed. Definitely, I will use this recipe.
· Results
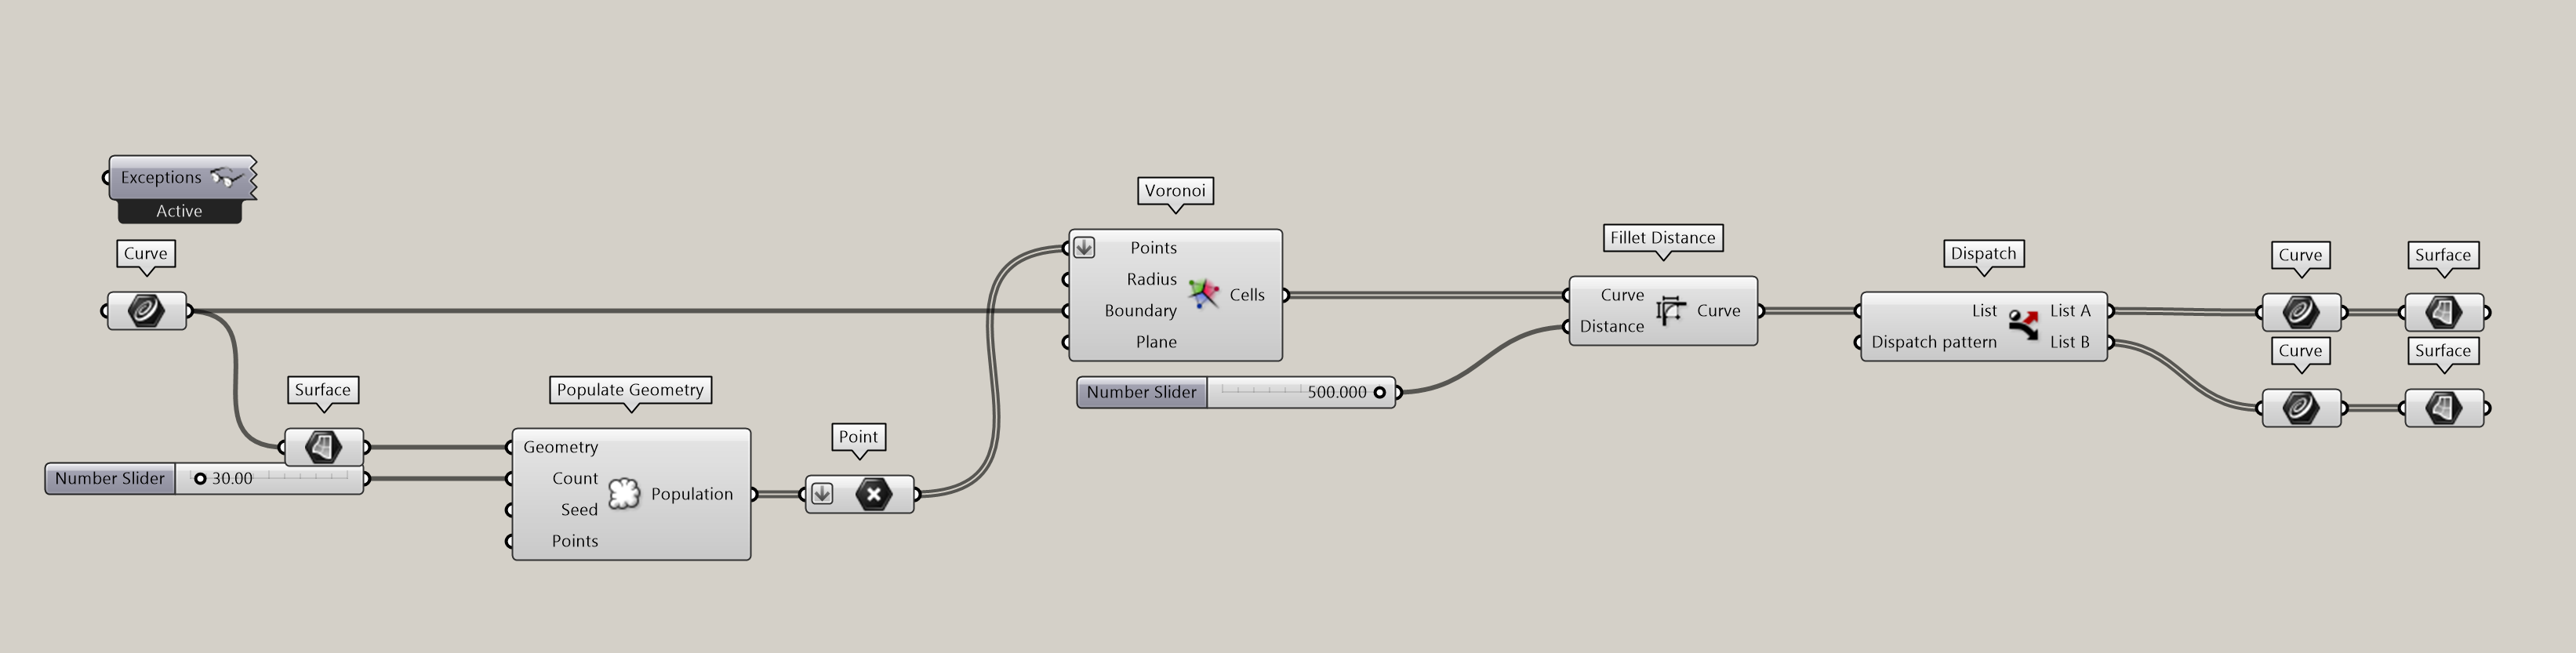
I liked the results and I wanted to play with different shapes that it could have. With a good tutorial, grasshopper and some personal modifications I designed this mold in order to obtain a negative mold, because the rule sais: if you work with a hard (in this case, no flexible) material, the mold has to be soft, and vice versa.
This was the grasshopper I did.
I printed in PLA and I started doing the silicon mold following the same process as when I made the soft robot.
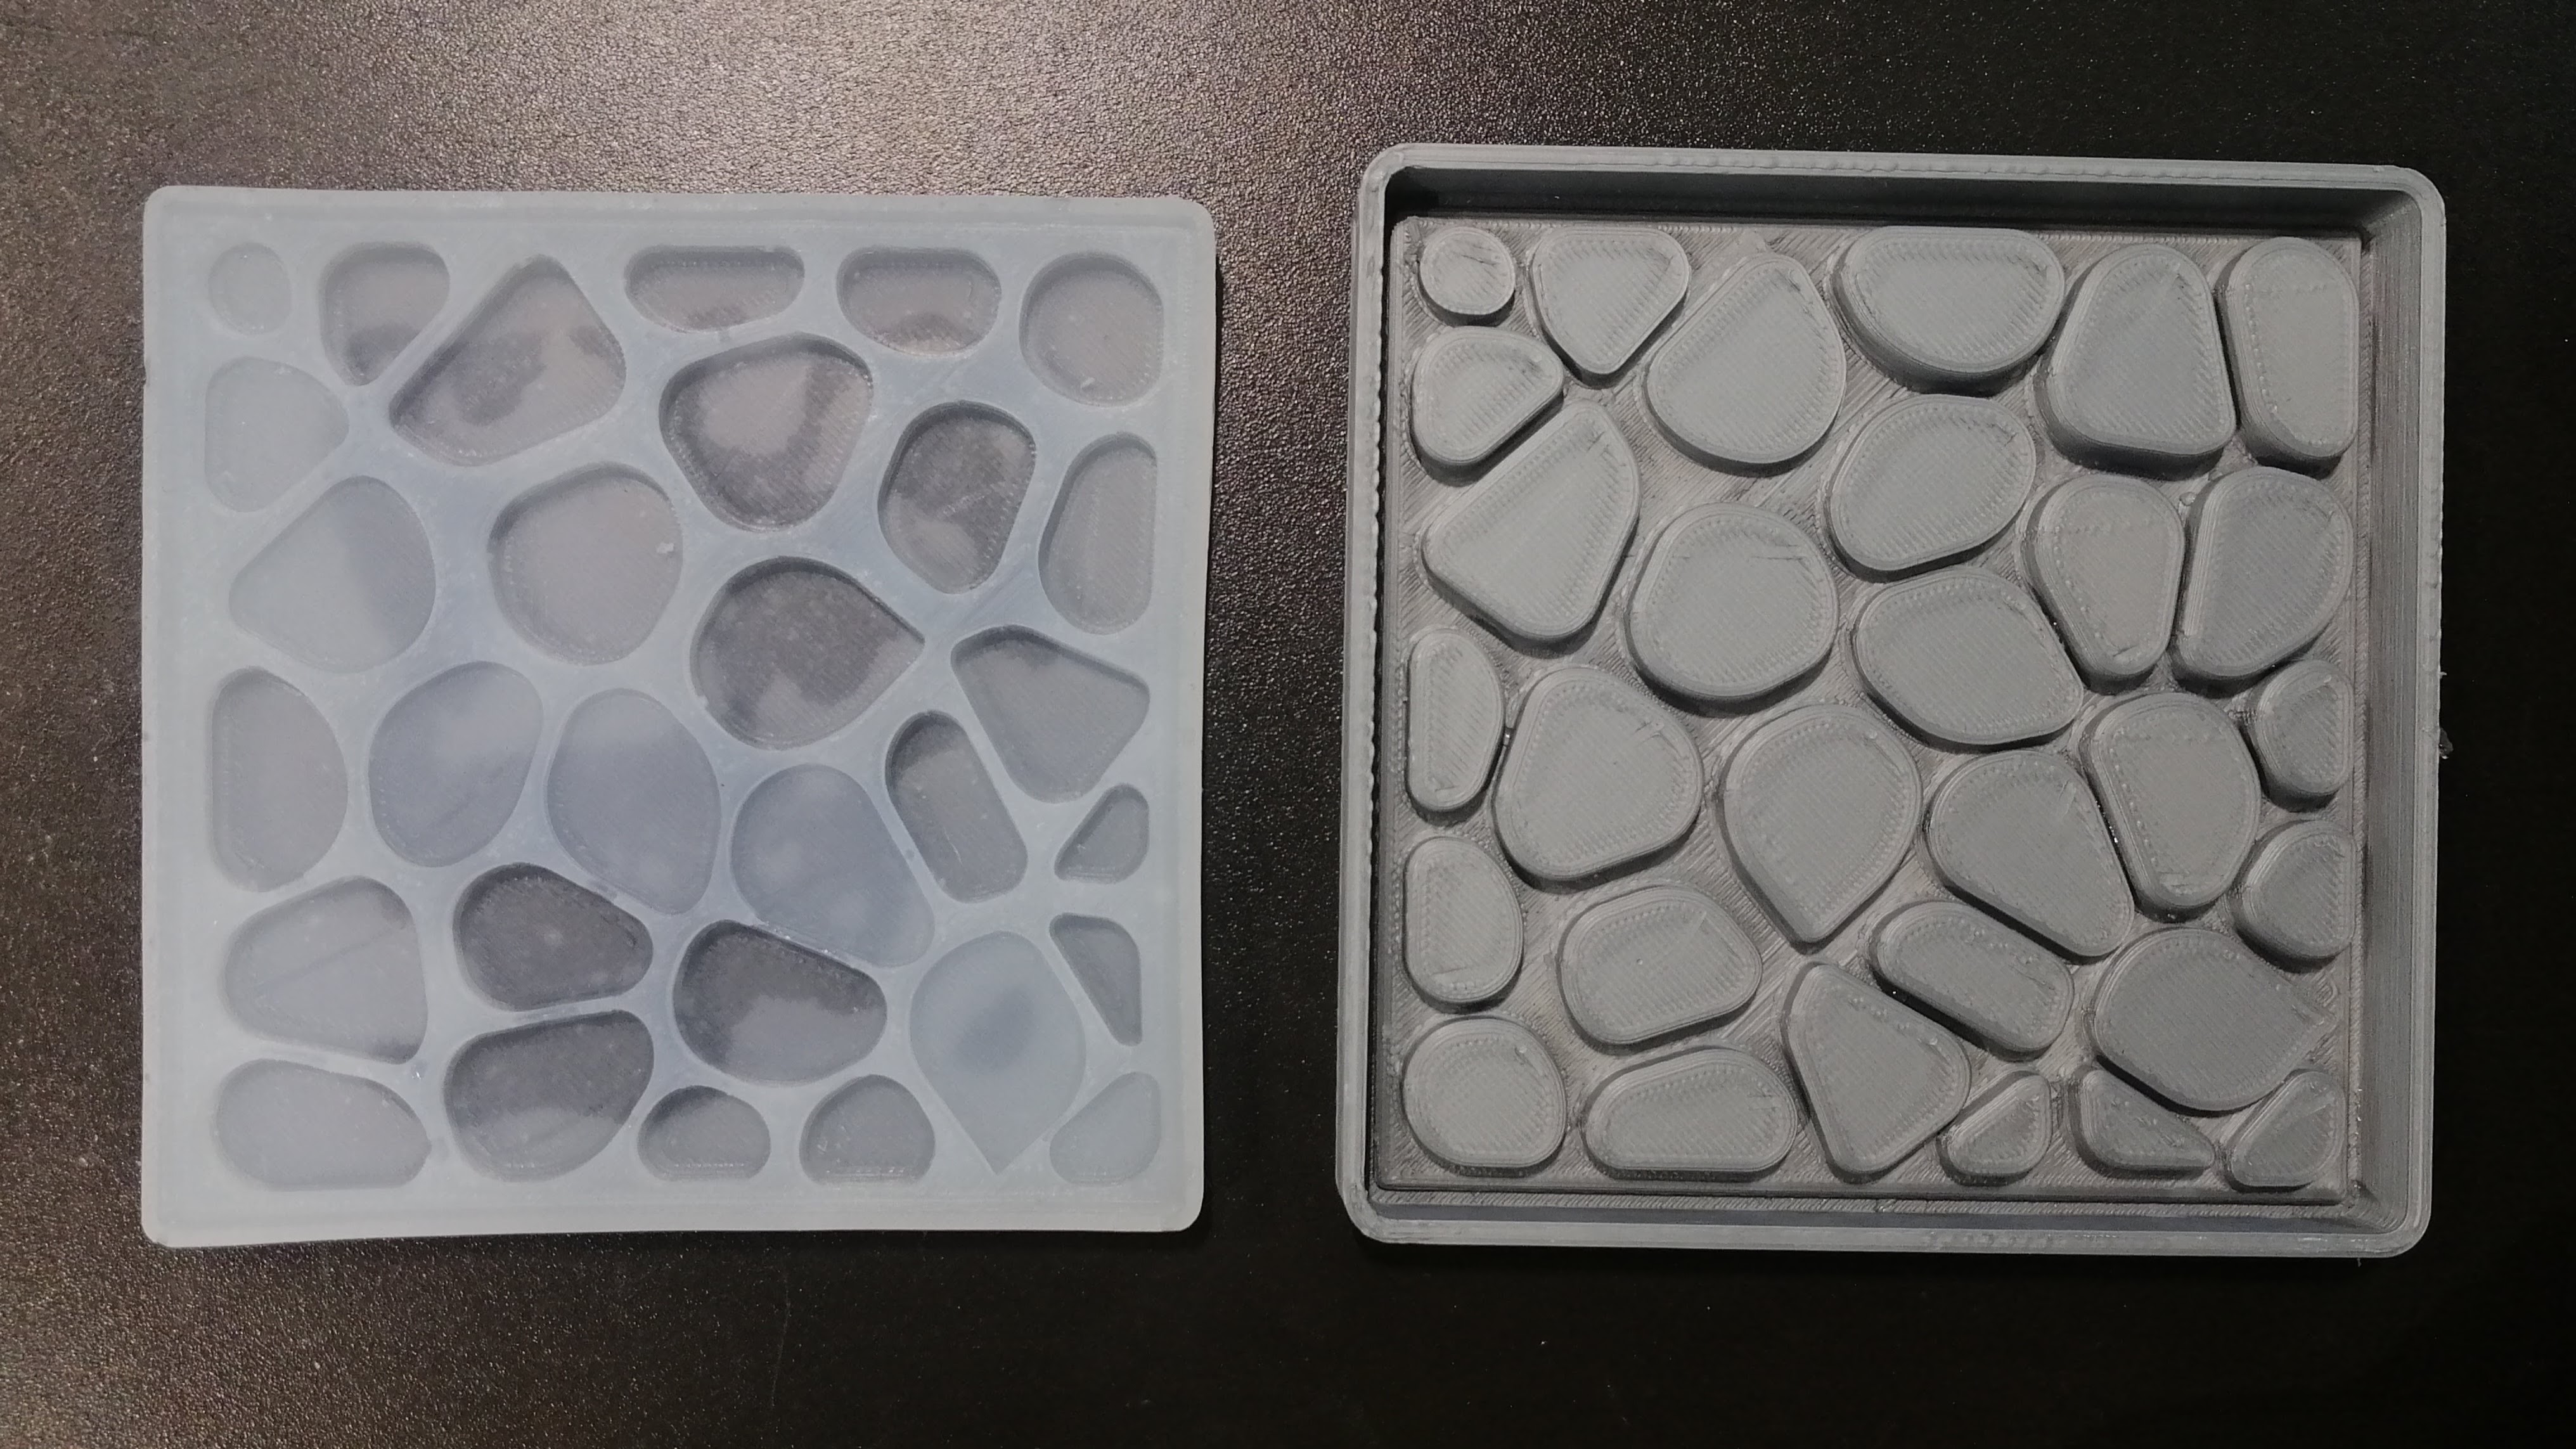
I used the above recipe and poured it into the silicone mold and got this.
BIOMATERIALS
The objective is to achieve a material with enough resistance to milling it. Another objective is that I would like to obtain an white material, or at least neutral/nude color.
I had seen Lara Campos’ work with rosin (pine resin). She obtained strong materials, capables of milling them, with different types of waste. That’s why I tried to mix rosin with different “white” materials.
Before I started, I had to prepare the molds so that they would be ready to pour the final mixture.
· Terraglia Rossa + Rosin
Terraglia Rossa is a low temperature clay (950º-1.000º). It's a classic Colorobbia mixture, made from a mixture of several clays and used to make objects.
Ingredients:
| Qty | Description |
|---|---|
| 100g | Terraglia Rossa |
| 100g | Rosin |
| 15 ml | Water |
Tools:
- Scale
- Cooker
- Baking paper
- 2 casseroles
- Molds
- Wool spoon
Method:
- I picked up the remains of terraglia rossa in the center. The problem is that they were whole pieces and it is better to weigh it in powder form, so ... to crush, crush and crush!
- Melt the resin.
- In the meantime, mix the terraglia rossa powder with water.
- Once the resin has melted,pour in the mixture of terraglia and water.
- Mitx them very well.
- Pour it into the mold (with the baking paper already in place).
- Leave to dry.
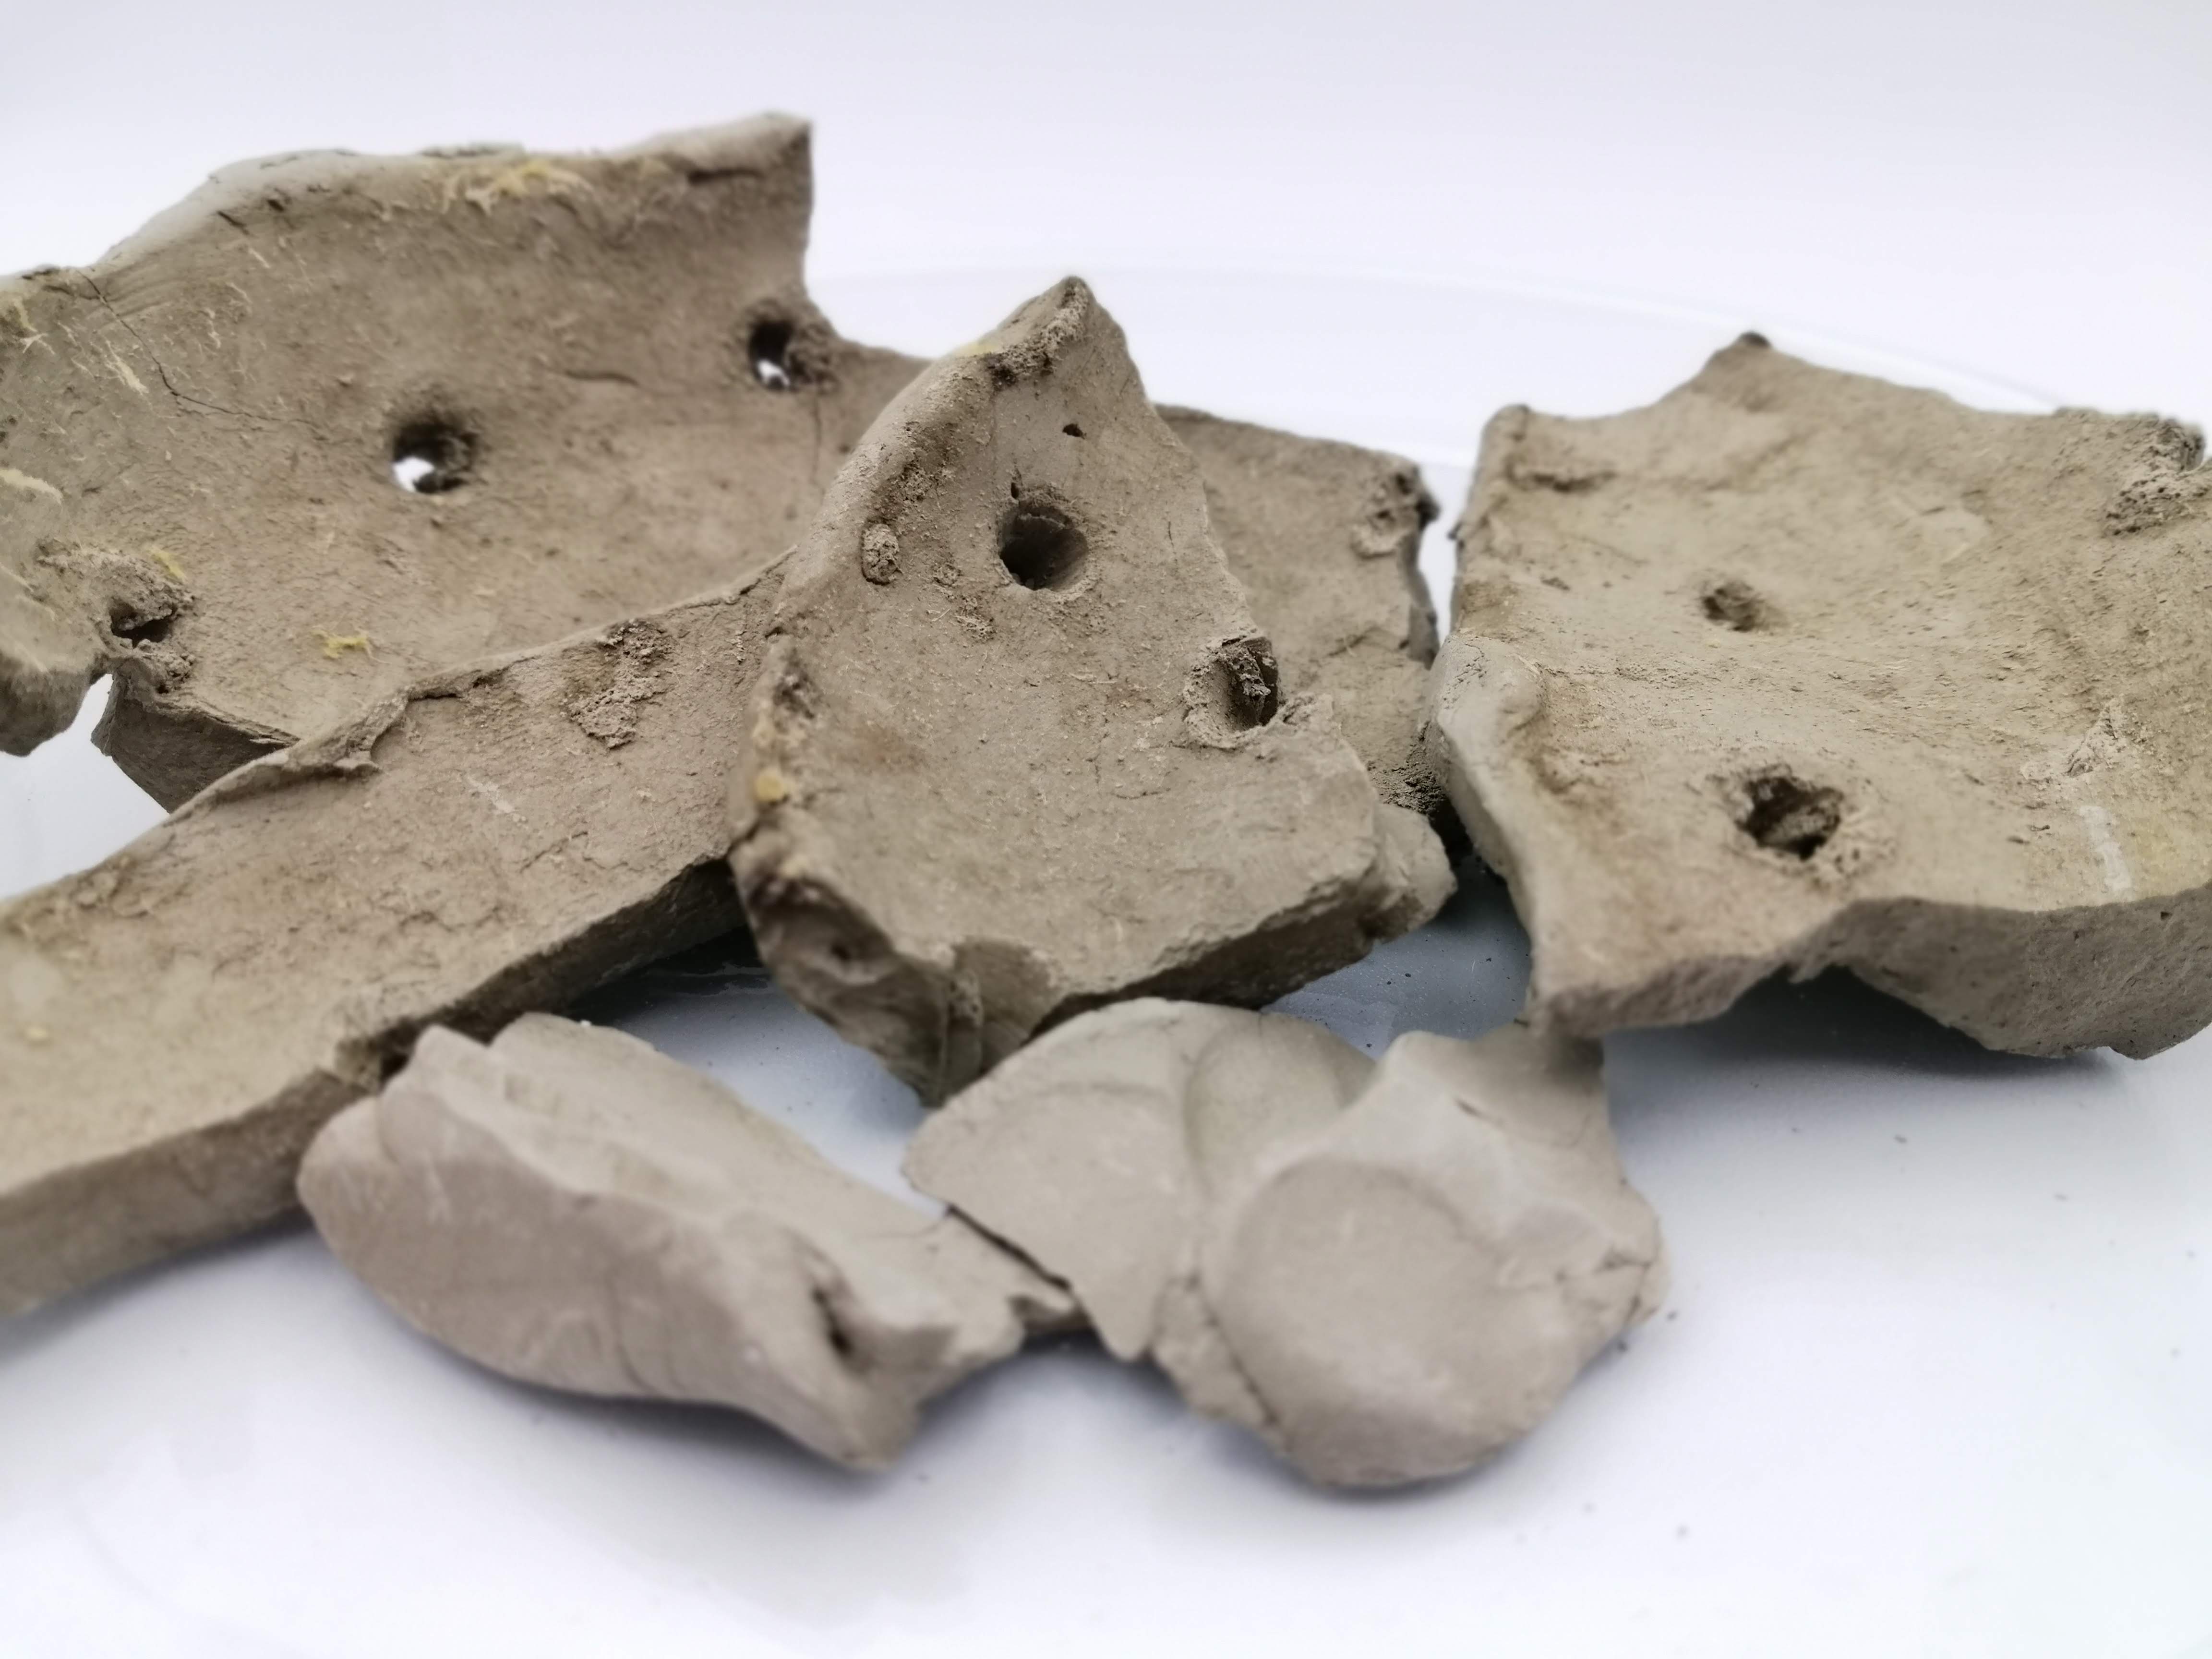
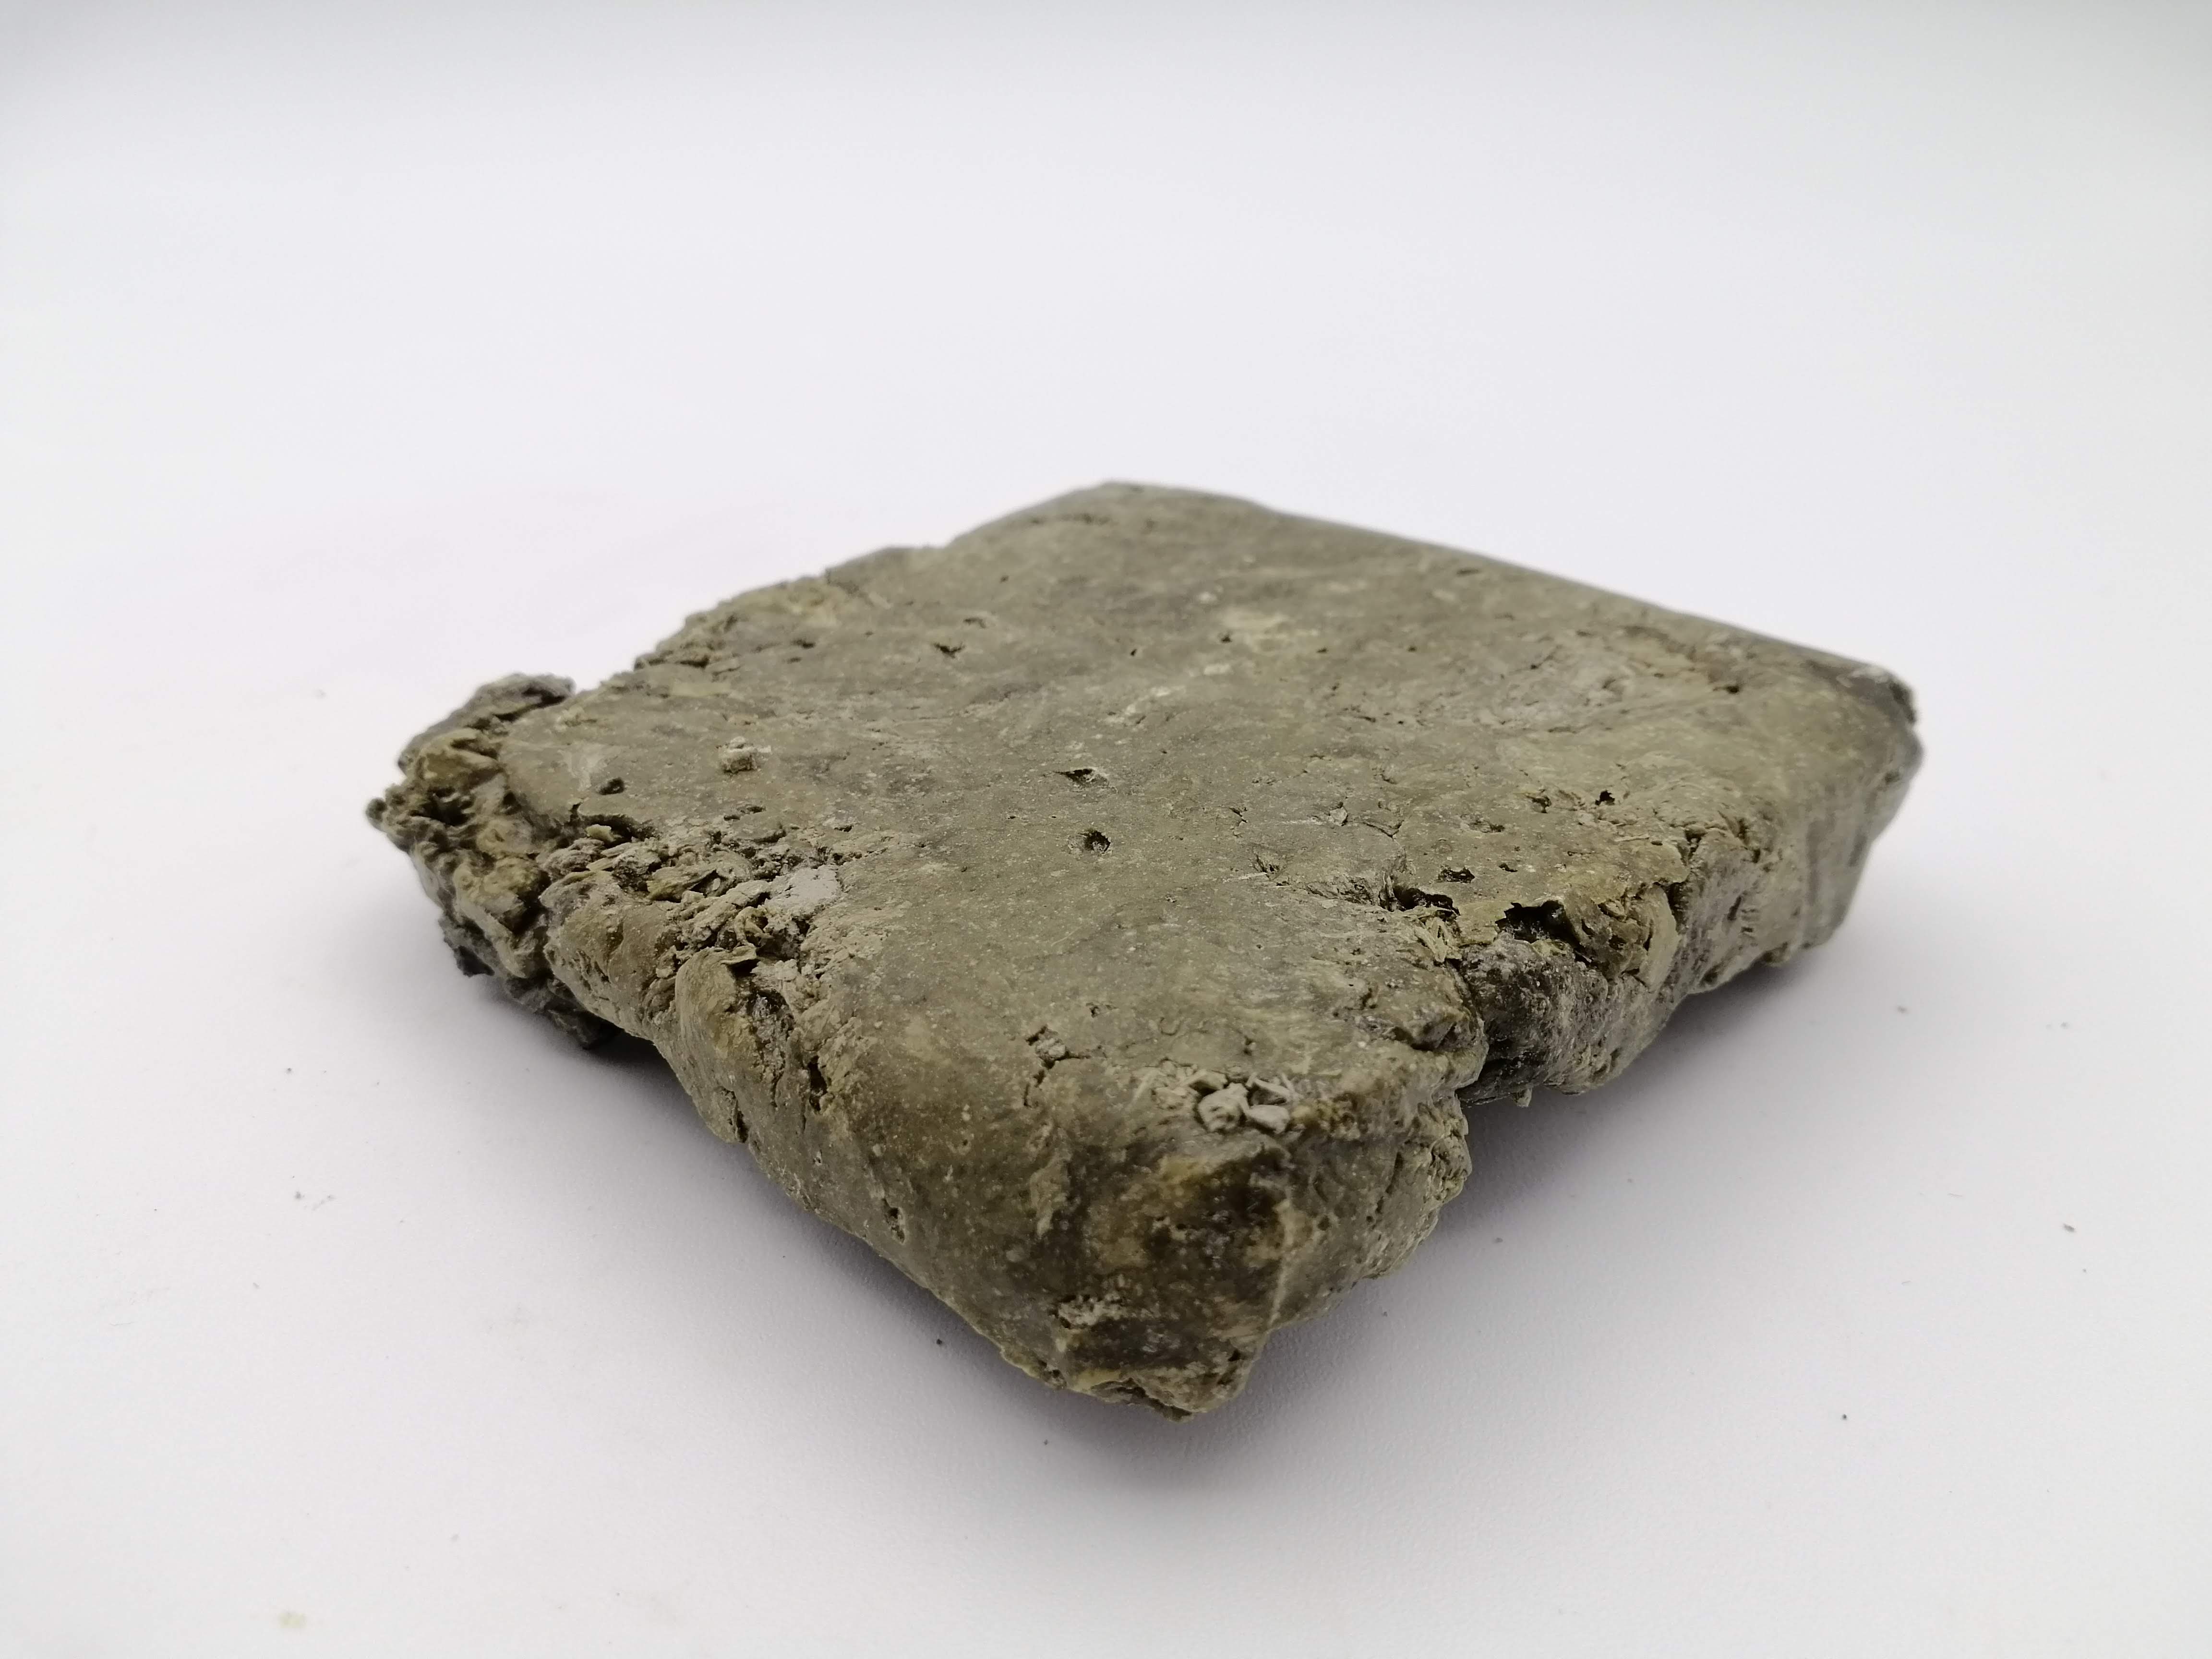
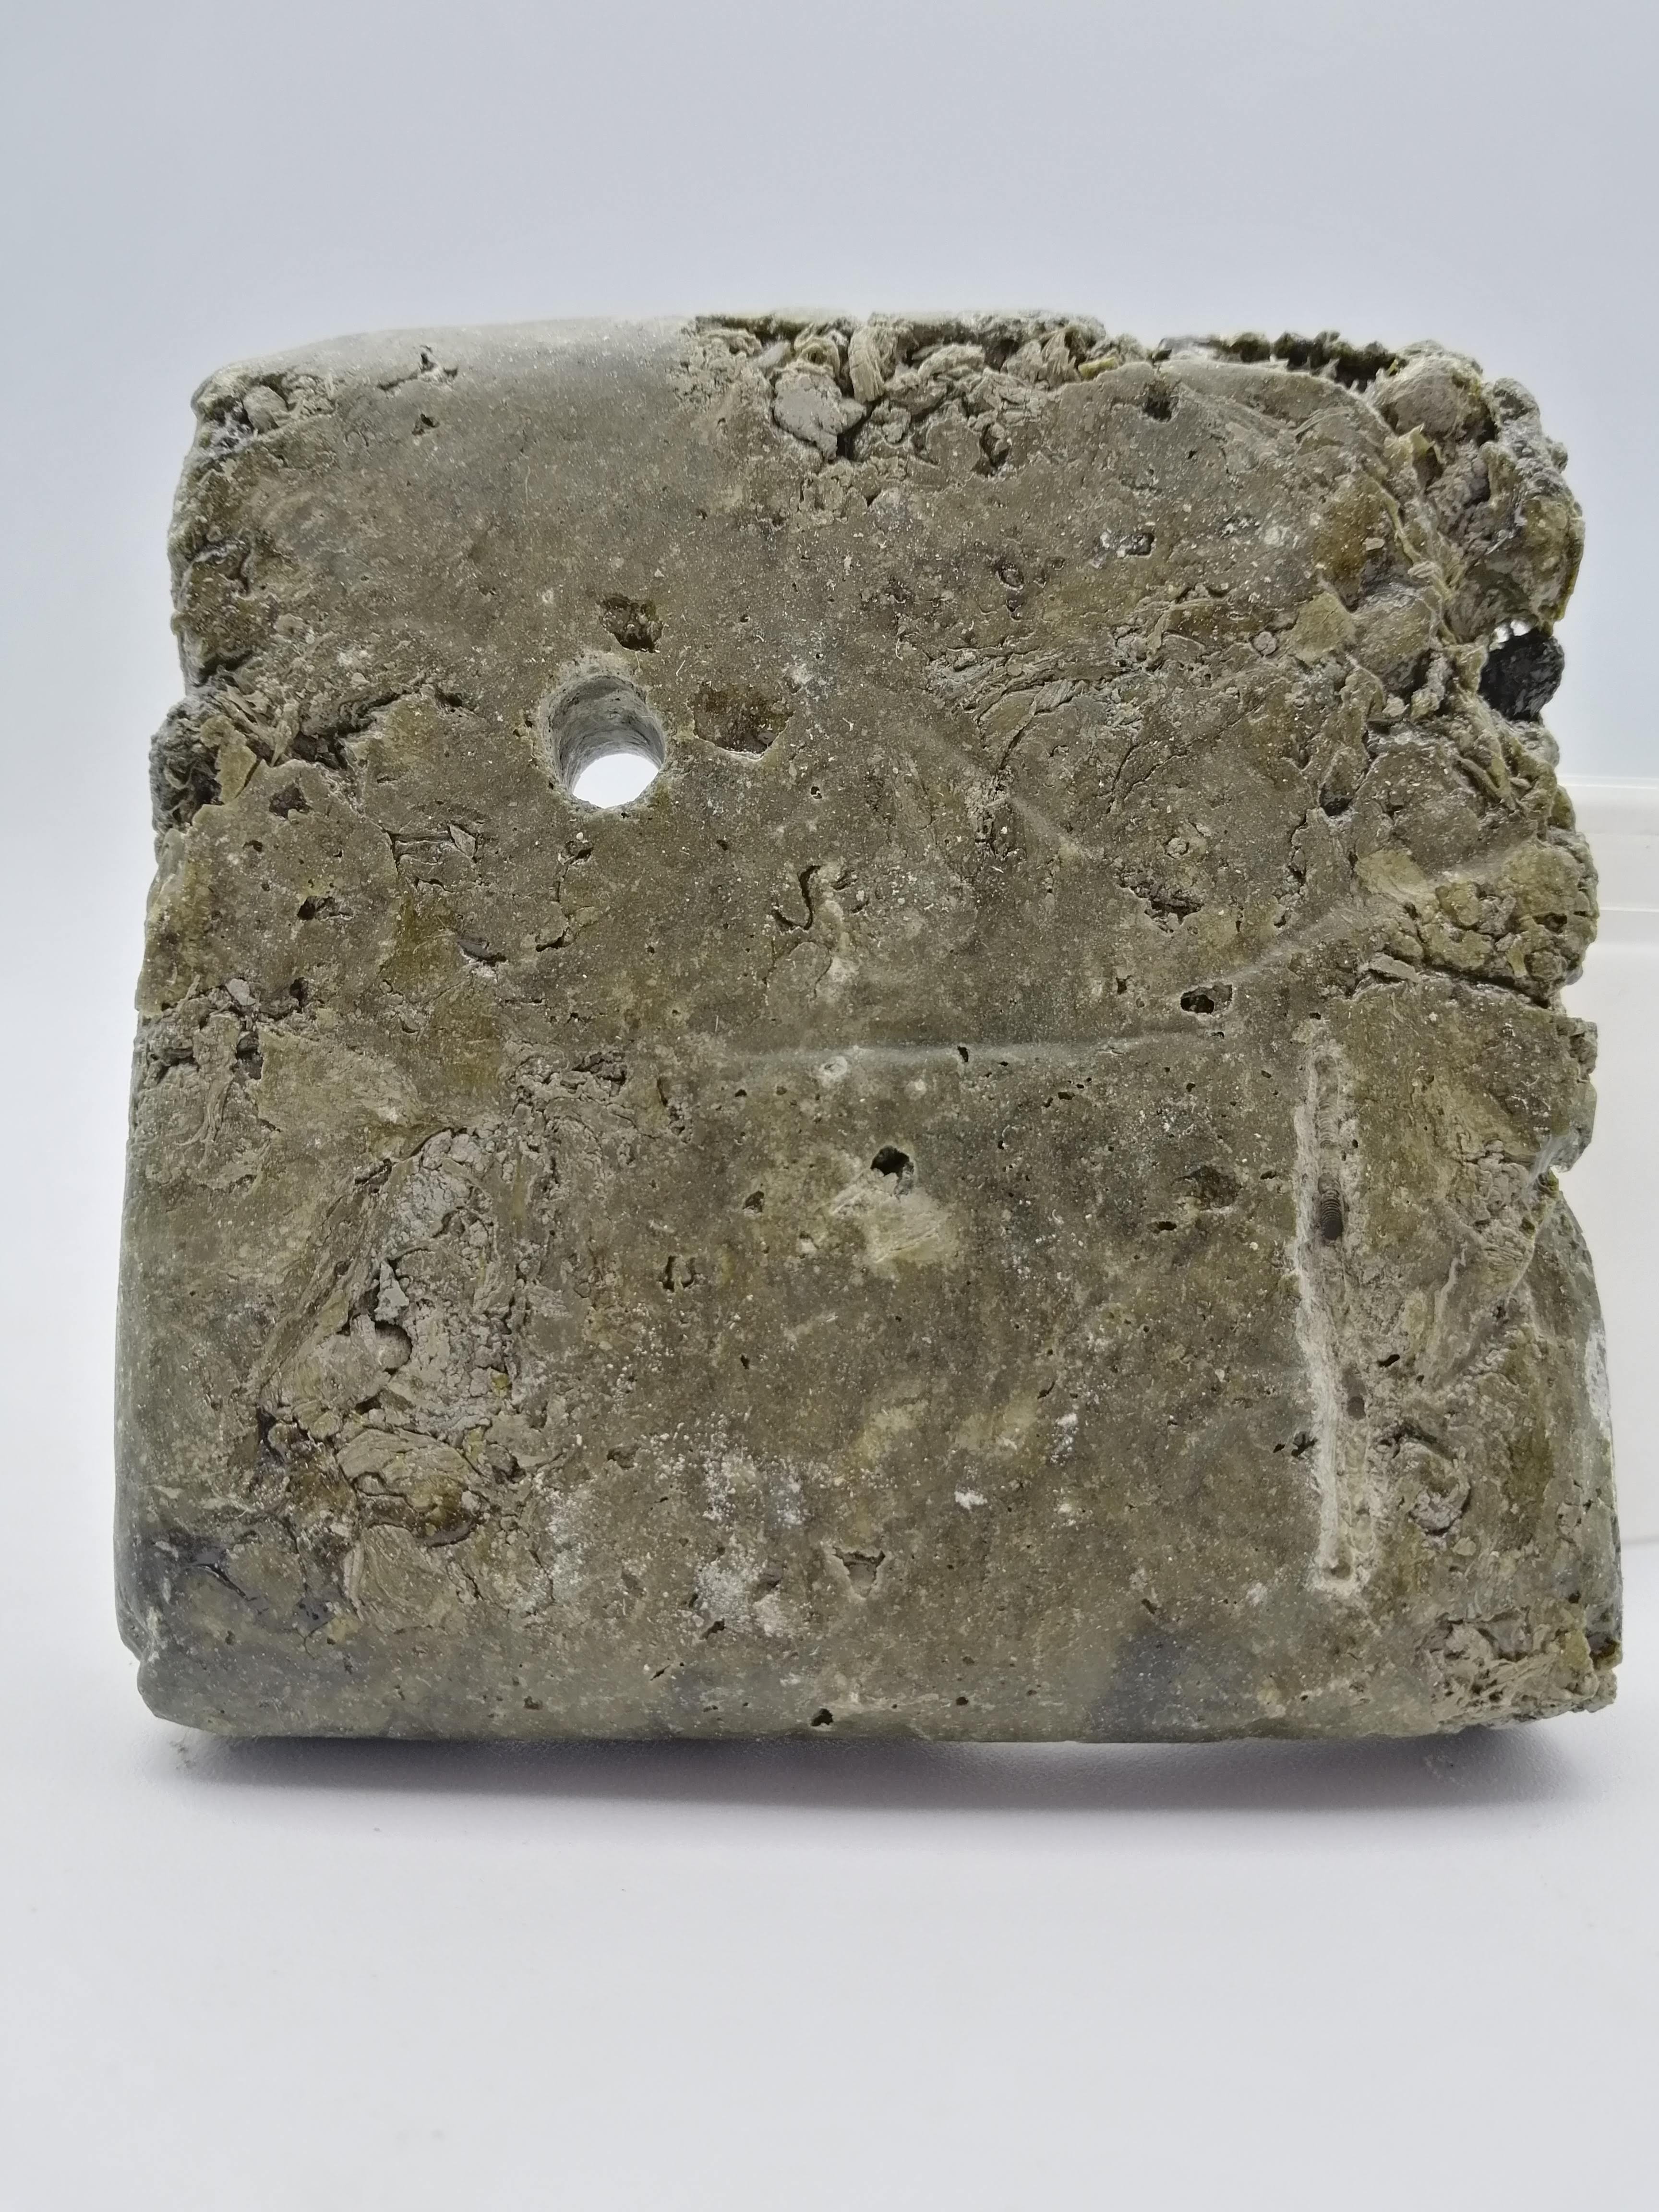
Results:First of all, the colour was not at all what I wanted jajaja. However, The stiffness and hardness was what I was looking for, so I decided to do a mini milling test before machining it.
I used a Dremel with a conical helical cutter with elices for engraving and a drill for a hole.
All of this was done under the supervision of our manager Julian.
· Corn Starch + Rosin
I thought that mixing the cornstarch bioplastic recipe with the resin would have better results. I did 2 recipes changing the proportion, which means that I multiplied the original bioplastic recipe by 4 and by 5 and I used 100 g of rosin.
Ingredients for 5:1:
| Qty | Description |
|---|---|
| 5 tbs | Corn strach |
| 20 tbs | Water |
| 5 tbs | Glycerine |
| 5 tbs | Vinegar |
| 100 g | Rosin |
Tools:
- Scale
- Cooker
- Baking paper
- 2 casseroles
- Molds
- Wool spoon
Method:
- Add the cornstarch to the bowl of water until the starch is completely dissolved.
- Add the glycerine and vinegar and mix again.
- Once you have the mixture, heat it over low heat, stirring constantly.
- Do this process until you obtain a thick, lump-free dough and remove from the heat.
- At the same time, put the resin in another casserole to melt it.
- As soon as the bioplastic is condensed, mix it with the resin.
- Mitx them very well.
- Pour it into the mold (with the baking paper already in place).
- Leave to dry.
Results
- Proportion 4:1 The mixture looked very soft (but very soft, it looked like a cheesecake!), so I decided to repeat the formula but with different proportions.

Ingredients for 4:1:
| Qty | Description |
|---|---|
| 4 tbs | Cornstrach |
| 16 tbs | Water |
| 4 tbs | Glycerine |
| 4 tbs | Vinegar |
| 100 g | Rosin |
The process was exactly the same as before.
Results
- Proportion 5:1 There is a big difference between one and the other, this time the material is much harder, but maybe not hard enough for the CNC.

Notes: The colour is not exactly white, but it is not an "aggressive" one like Terraglia Rossa, so it would work for me.
· Eggshells + Rosin
As I mentioned before, I was inspired by Lara Campos’ work. She managed to mill the biomaterial made of eggshells and rosin, so I decided to try it.
Also, I have still looking for more recipes with rosin and I found this one from Nia Cavalie, a Fabricademy alumni, which made a biocomposite with rosin and Carnauba wax. I fell in love with its texture and colour and hope it is strong enough for machining.
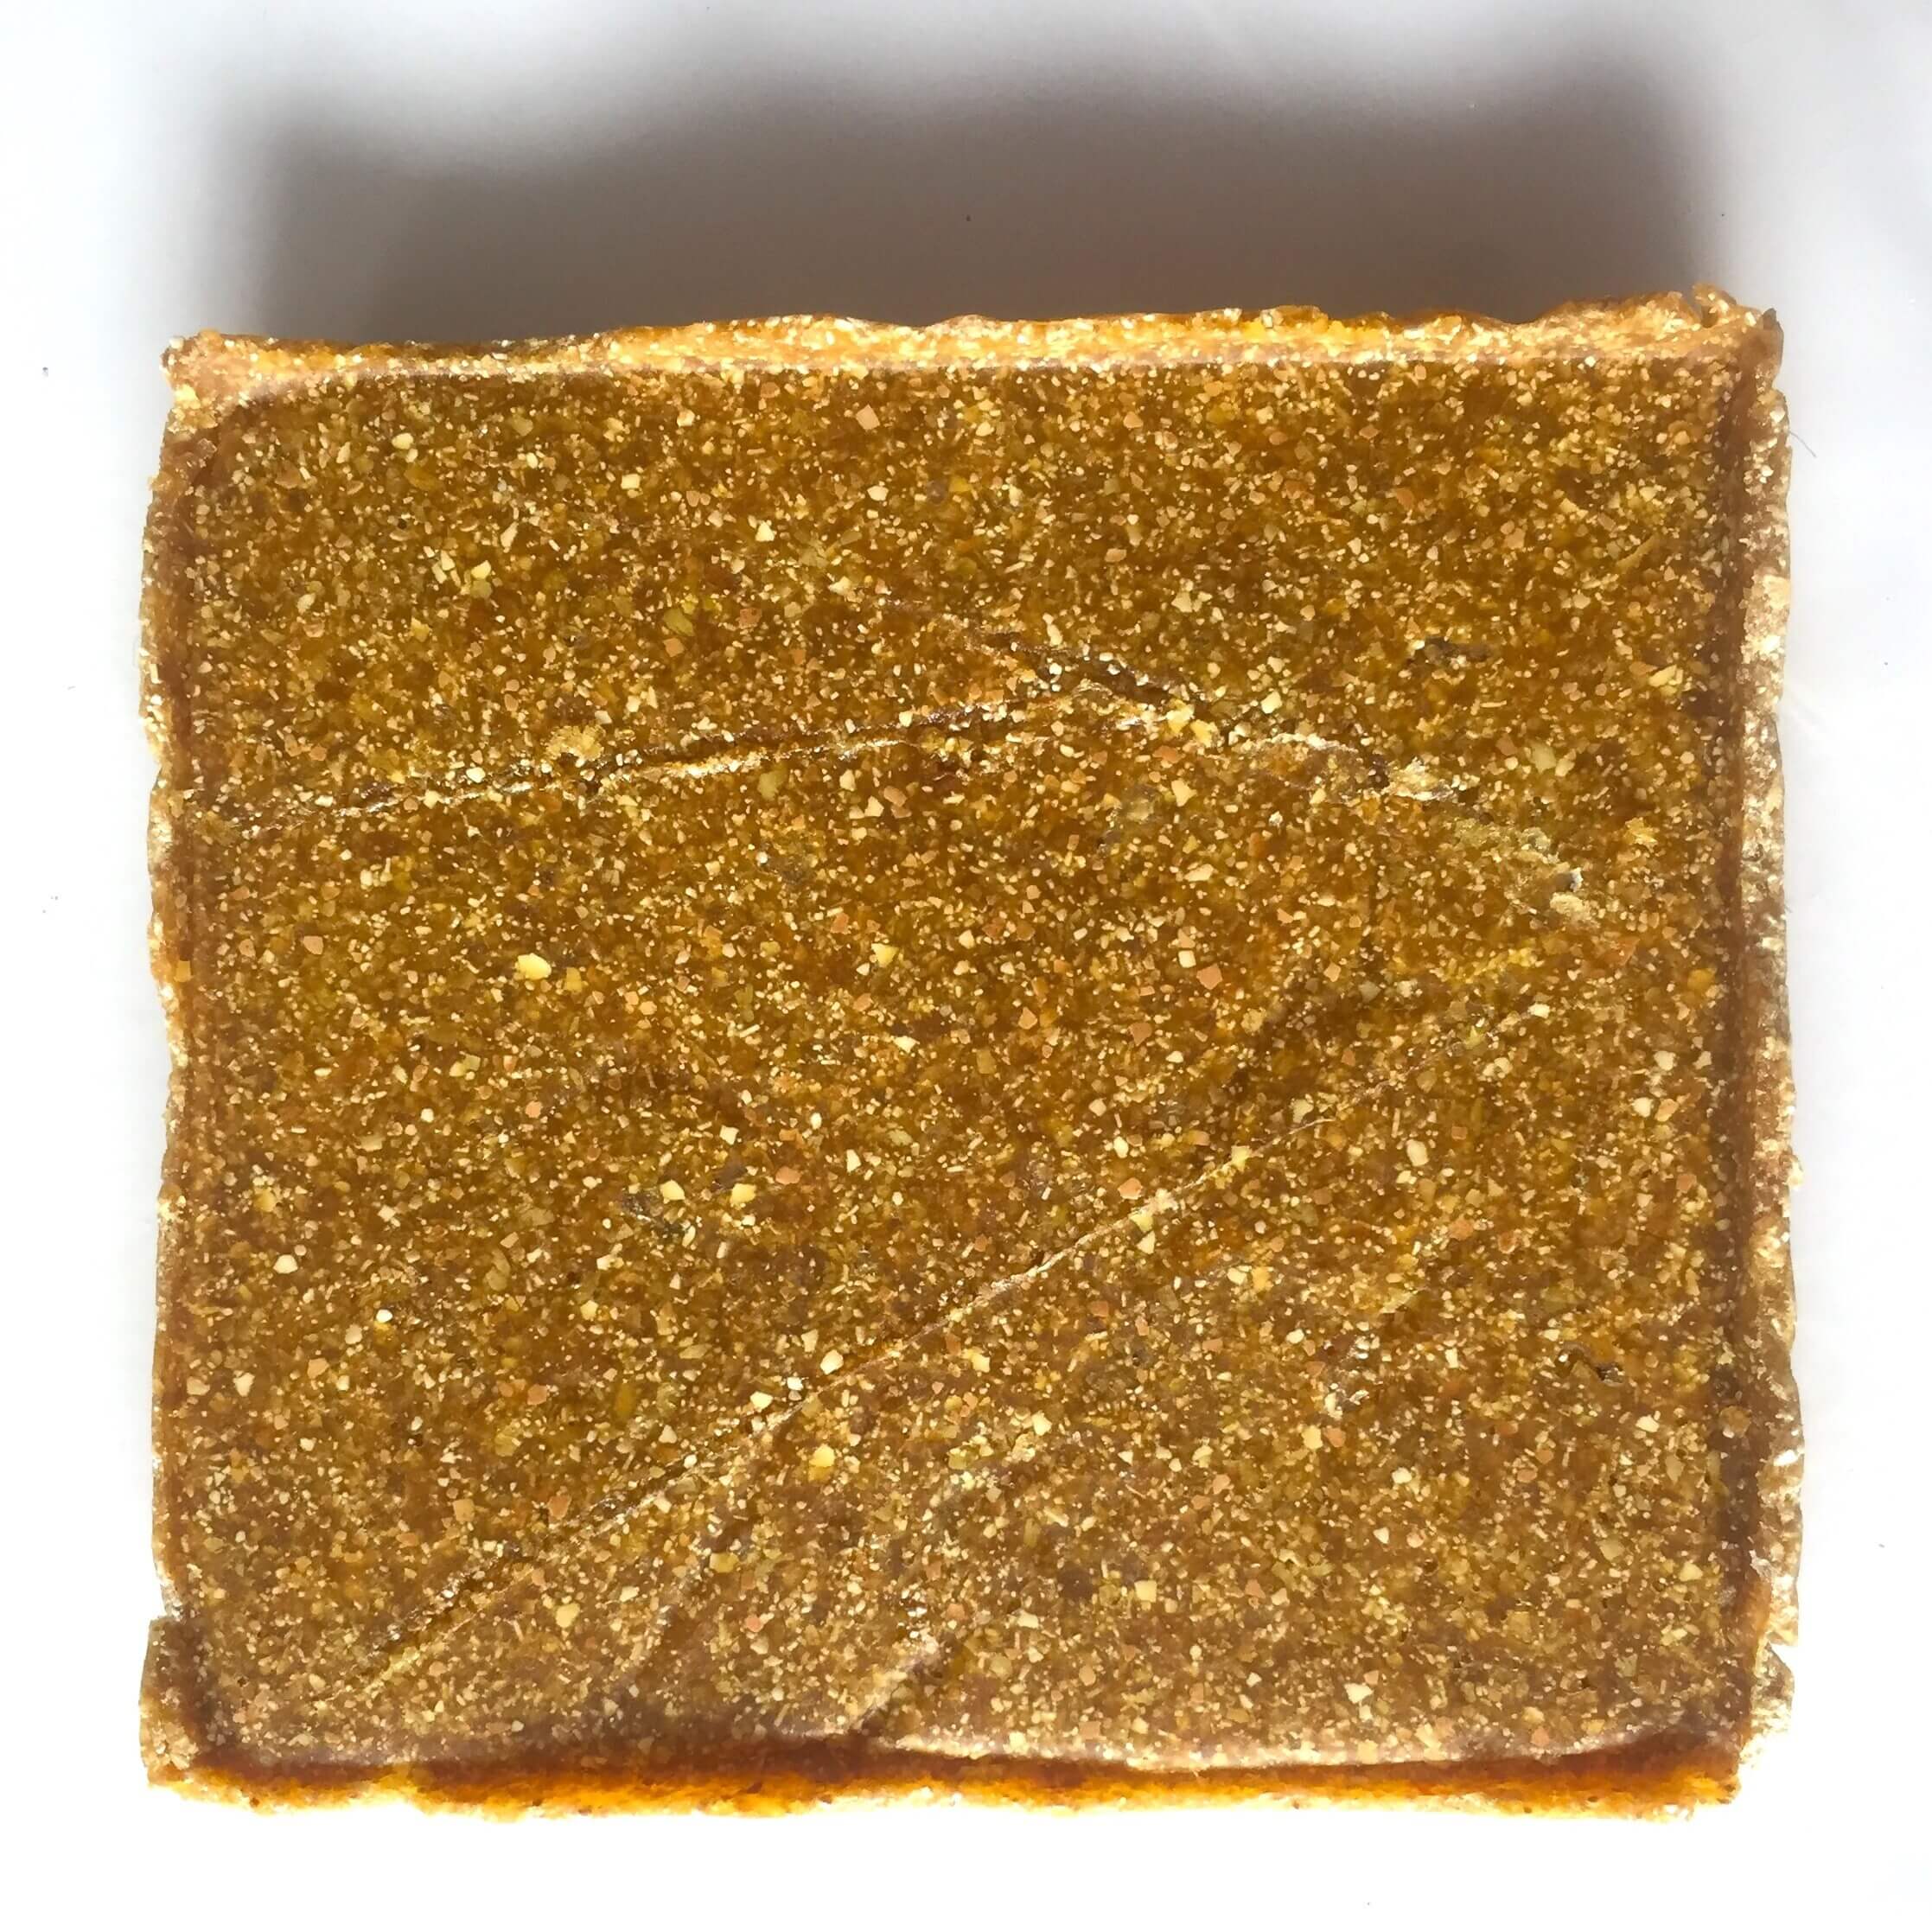 Image from Nia Cavalie's website.
The challenge was to obtain 9054123154011 kg of eggshells, je. Easy! Thanks to my favorite bar INDARTSU, I’ve got sooo many kilos of eggshells! Also my lovely friends supported me and gave me their waste. So thank you guys!
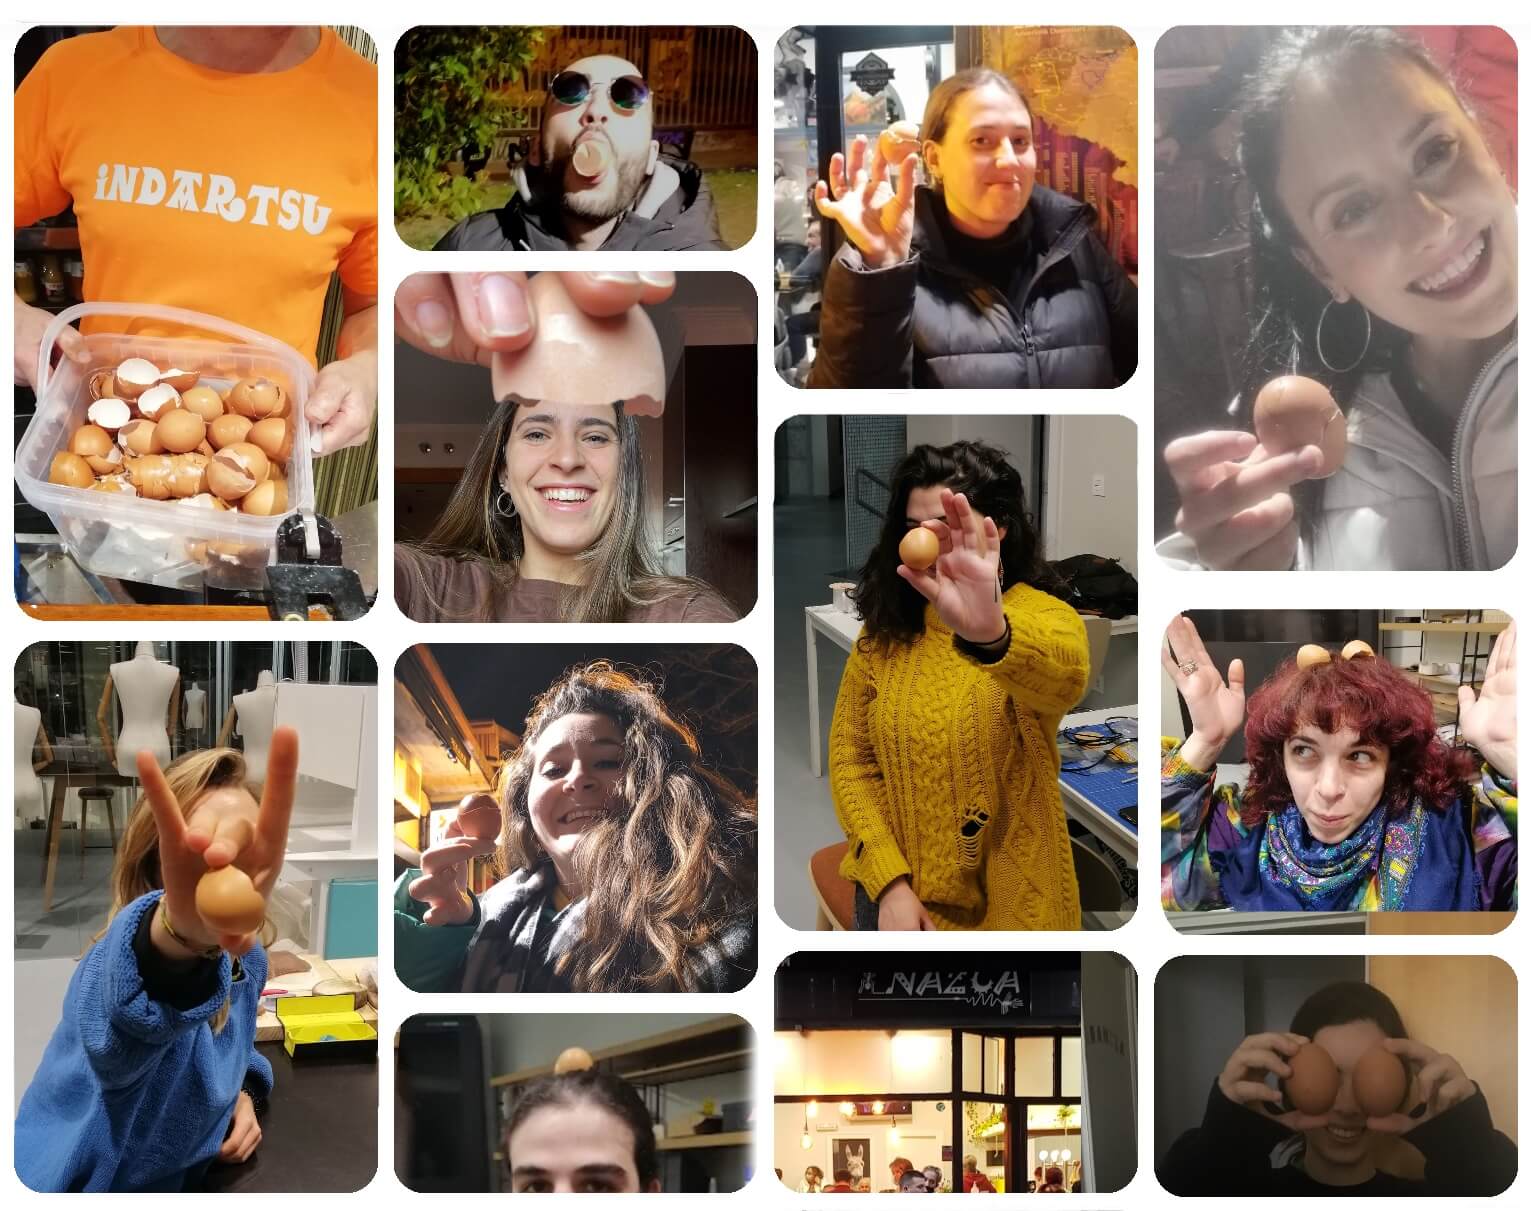
Notes: Before using eggshells, you have to prepare them. You need to clean them with water. During this process, if you remove most of the membrane from the eggshell, then it will be much easier to work with them.
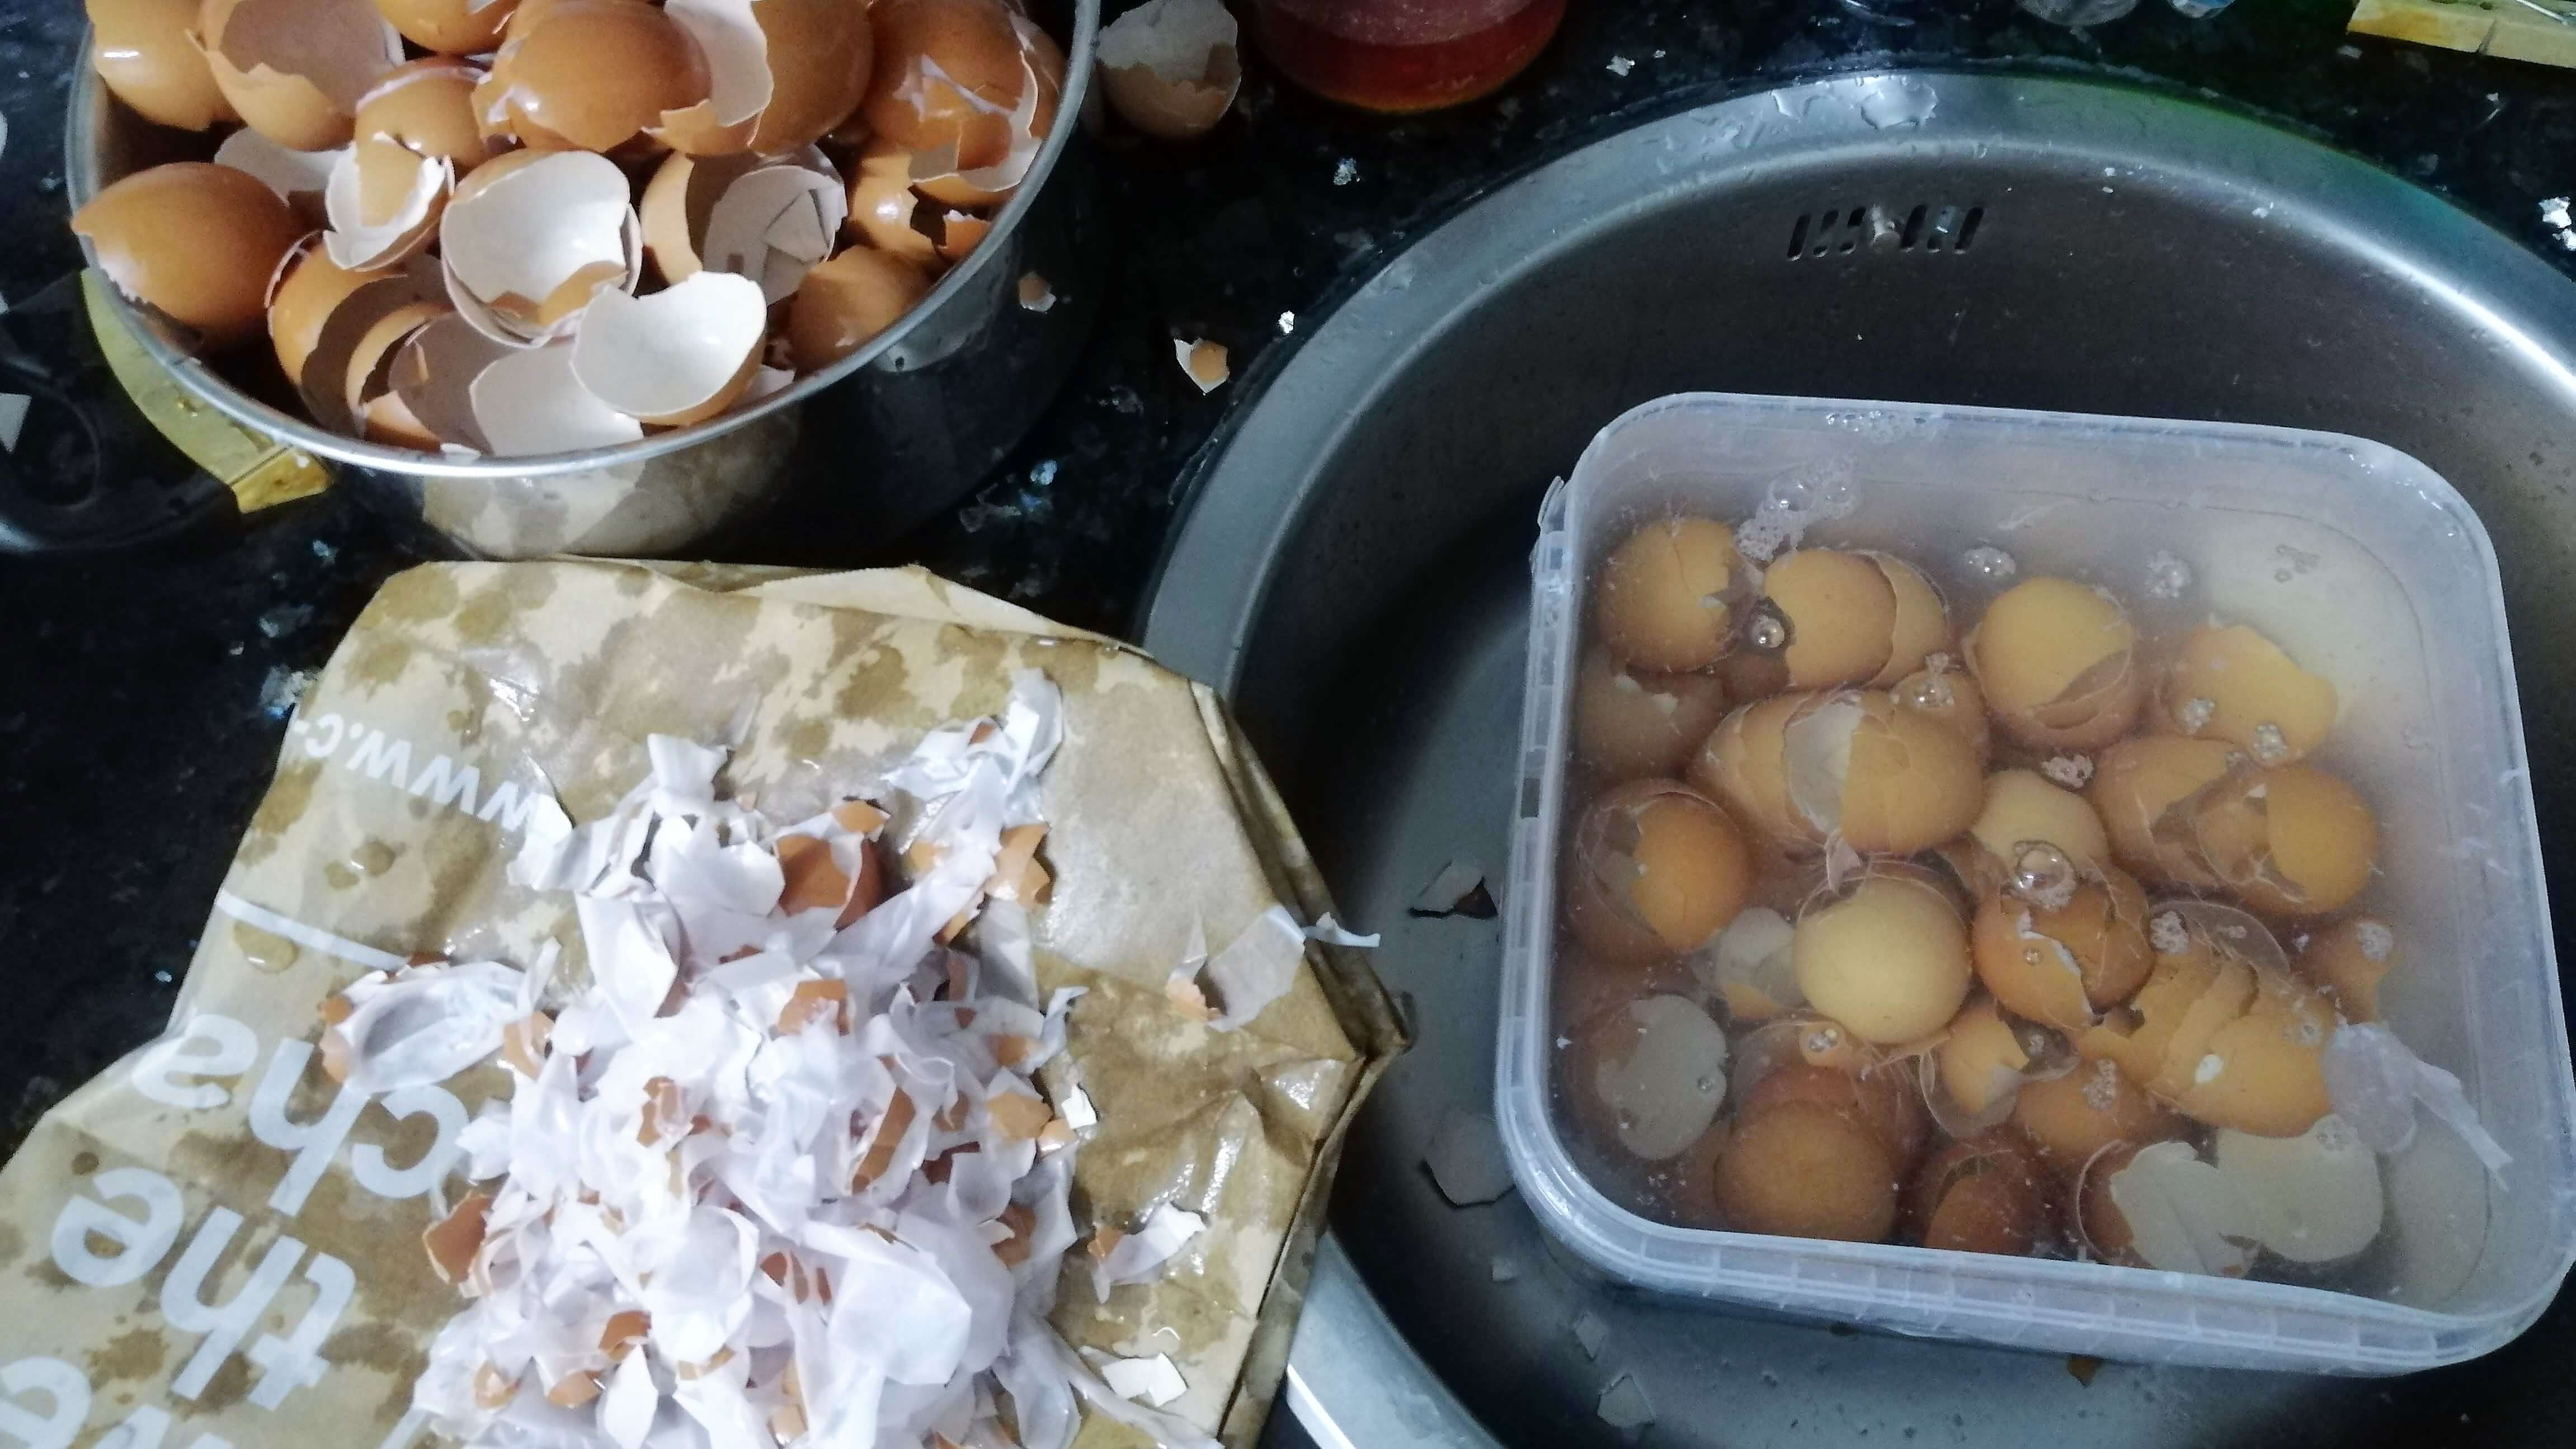
Then, you have to boil them, at least for 15 - 20 minutes.
Then, you have to dry them. I used a dehydrator at 70ºC for 8 hours (I used this setting because there were more materials to dry, so with less temperature and time it will be enough).
Finally, you have to obtain eggshell powder. I did it by hand and used a bag and a rolling pin. As I mentioned before, if you have not removed the membrane when washing, you can remove the large pieces after drying by using a sieve.
- With rosin and wax
Ingredients:
| Qty | Description |
|---|---|
| 150 g | Eggshell powder |
| 112.5 g | Cera Carnauba (wax) |
| 37.5 g | Rosin |
| 112.5 ml | Alcohol |
Tools:
- Scale
- Cooker
- Baking paper
- 2 casseroles
- Molds
- Wool spoon
Method:
-
In one of the casserole, add alcohol and pine resin.
Beware of alcohol fumes when heating alcohol.
-
In the other one, add eggshells and wax.
- Heat them.
- When dissolved, mix them together.
- Pour the mixture into the mold (with the baking paper already in place).
- Leave to dry.
Results

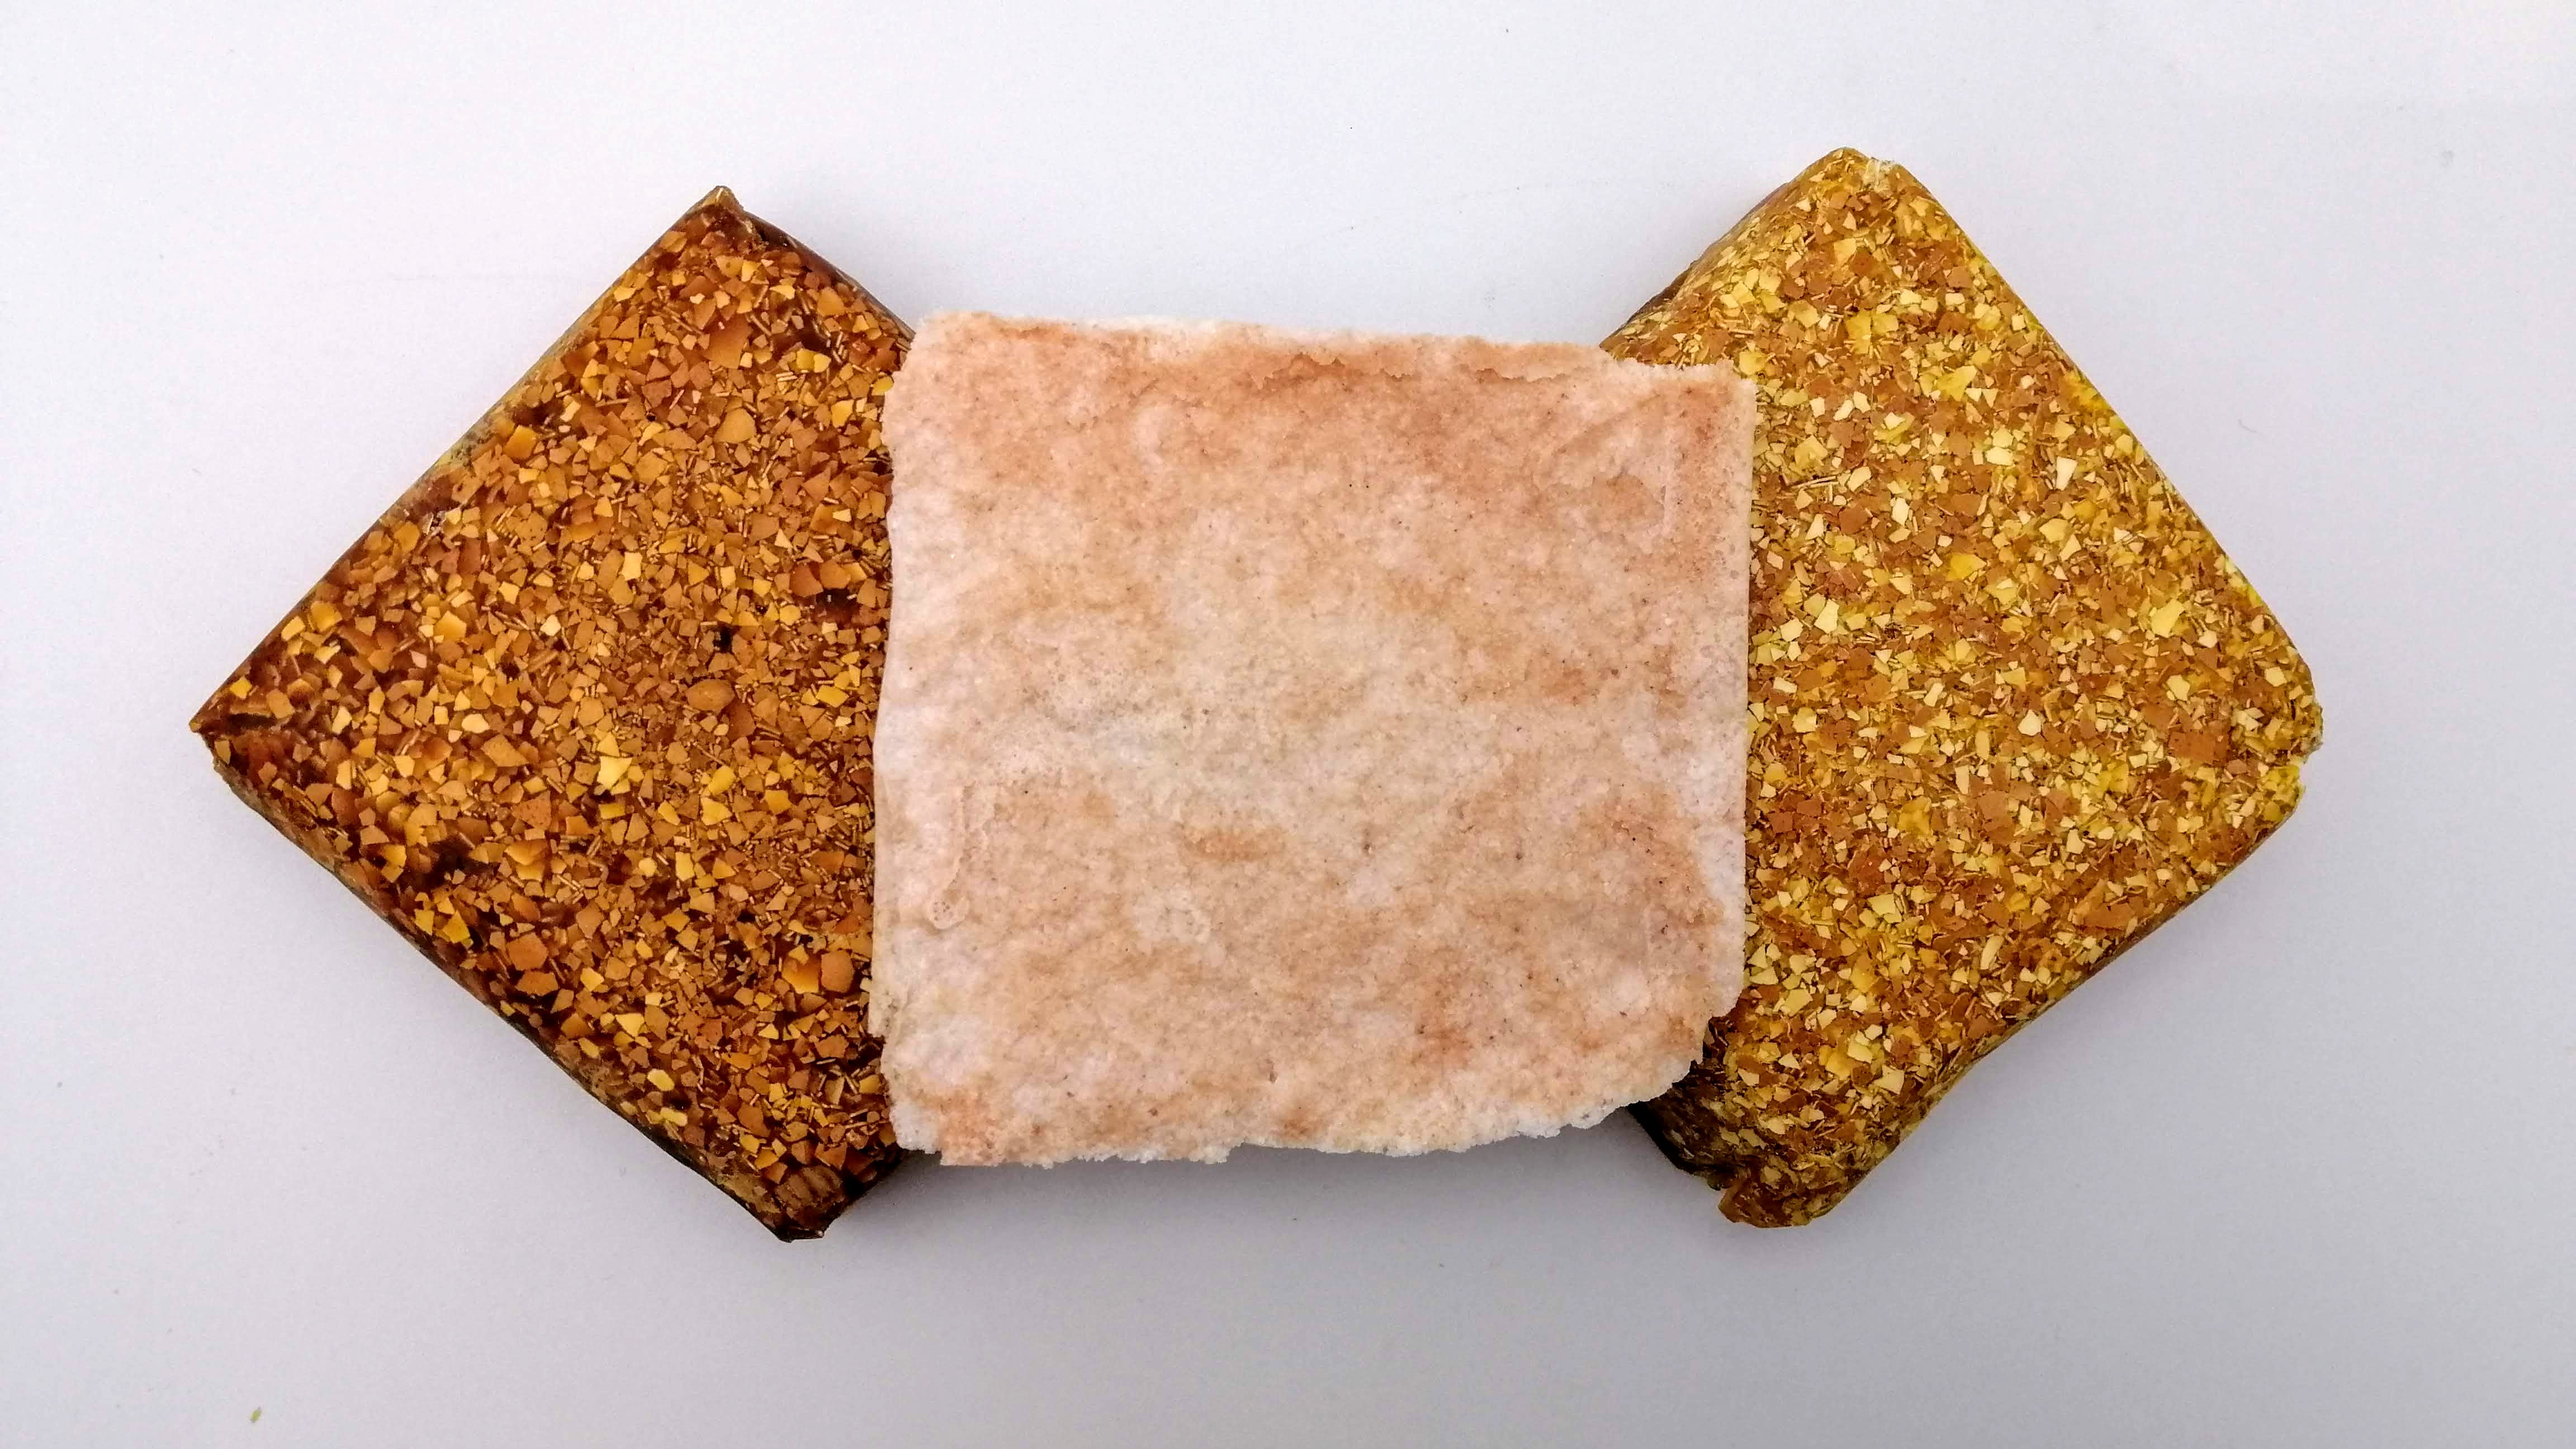
 Sorry, I had to make this comparison because it really does look like a Twix candy jajaja.
- Only with rosin
Ingredients:
| Qty | Description |
|---|---|
| 150 g | Eggshell powder |
| 150 g | Rosin |
Tools:
- Scale
- Cooker
- Baking paper
- 2 casseroles
- Molds
- Wool spoon
Method:
- Melt the resin.
- Add eggshells.
- Mitx them very well.
- Pour it into the mold (with the baking paper already in place).
- Leave to dry.
Results


Comparison of both samples
The colour, texture, consistency and solidity are what I was looking for. Speaking with our FabLab manager, Julian, he believes the material will pass the machining tests, specially the one made with eggshell, rosin and wax.
I was worried that I wouldn't get a neutral colour, but in the end I liked the contrast they make with what will be the salt lamp.
So, it was time to make them a milling test. As you can see, the one made with wax, with the heat generated by the dremel, melted and closed the hole I was making. However, the other one passed the test and I continued to explore with this material.
Eggshells, rosin and wax
 Eggshells and rosin

To optimize the material, Julian recommended me to make the eggshell more powdered and to try different proportions to see how it behaves.
And that's what I did. I did 3 different recipes but exactly the same process. The original recipe was half and half of echa material and in the following ones I increased the amount of eggshell:
- 170g eggshell - 150g rosin
- 190g eggshell - 150g rosin
- 210g eggshell - 150g rosin

All of them passed the test so it was time to mill them, finally!
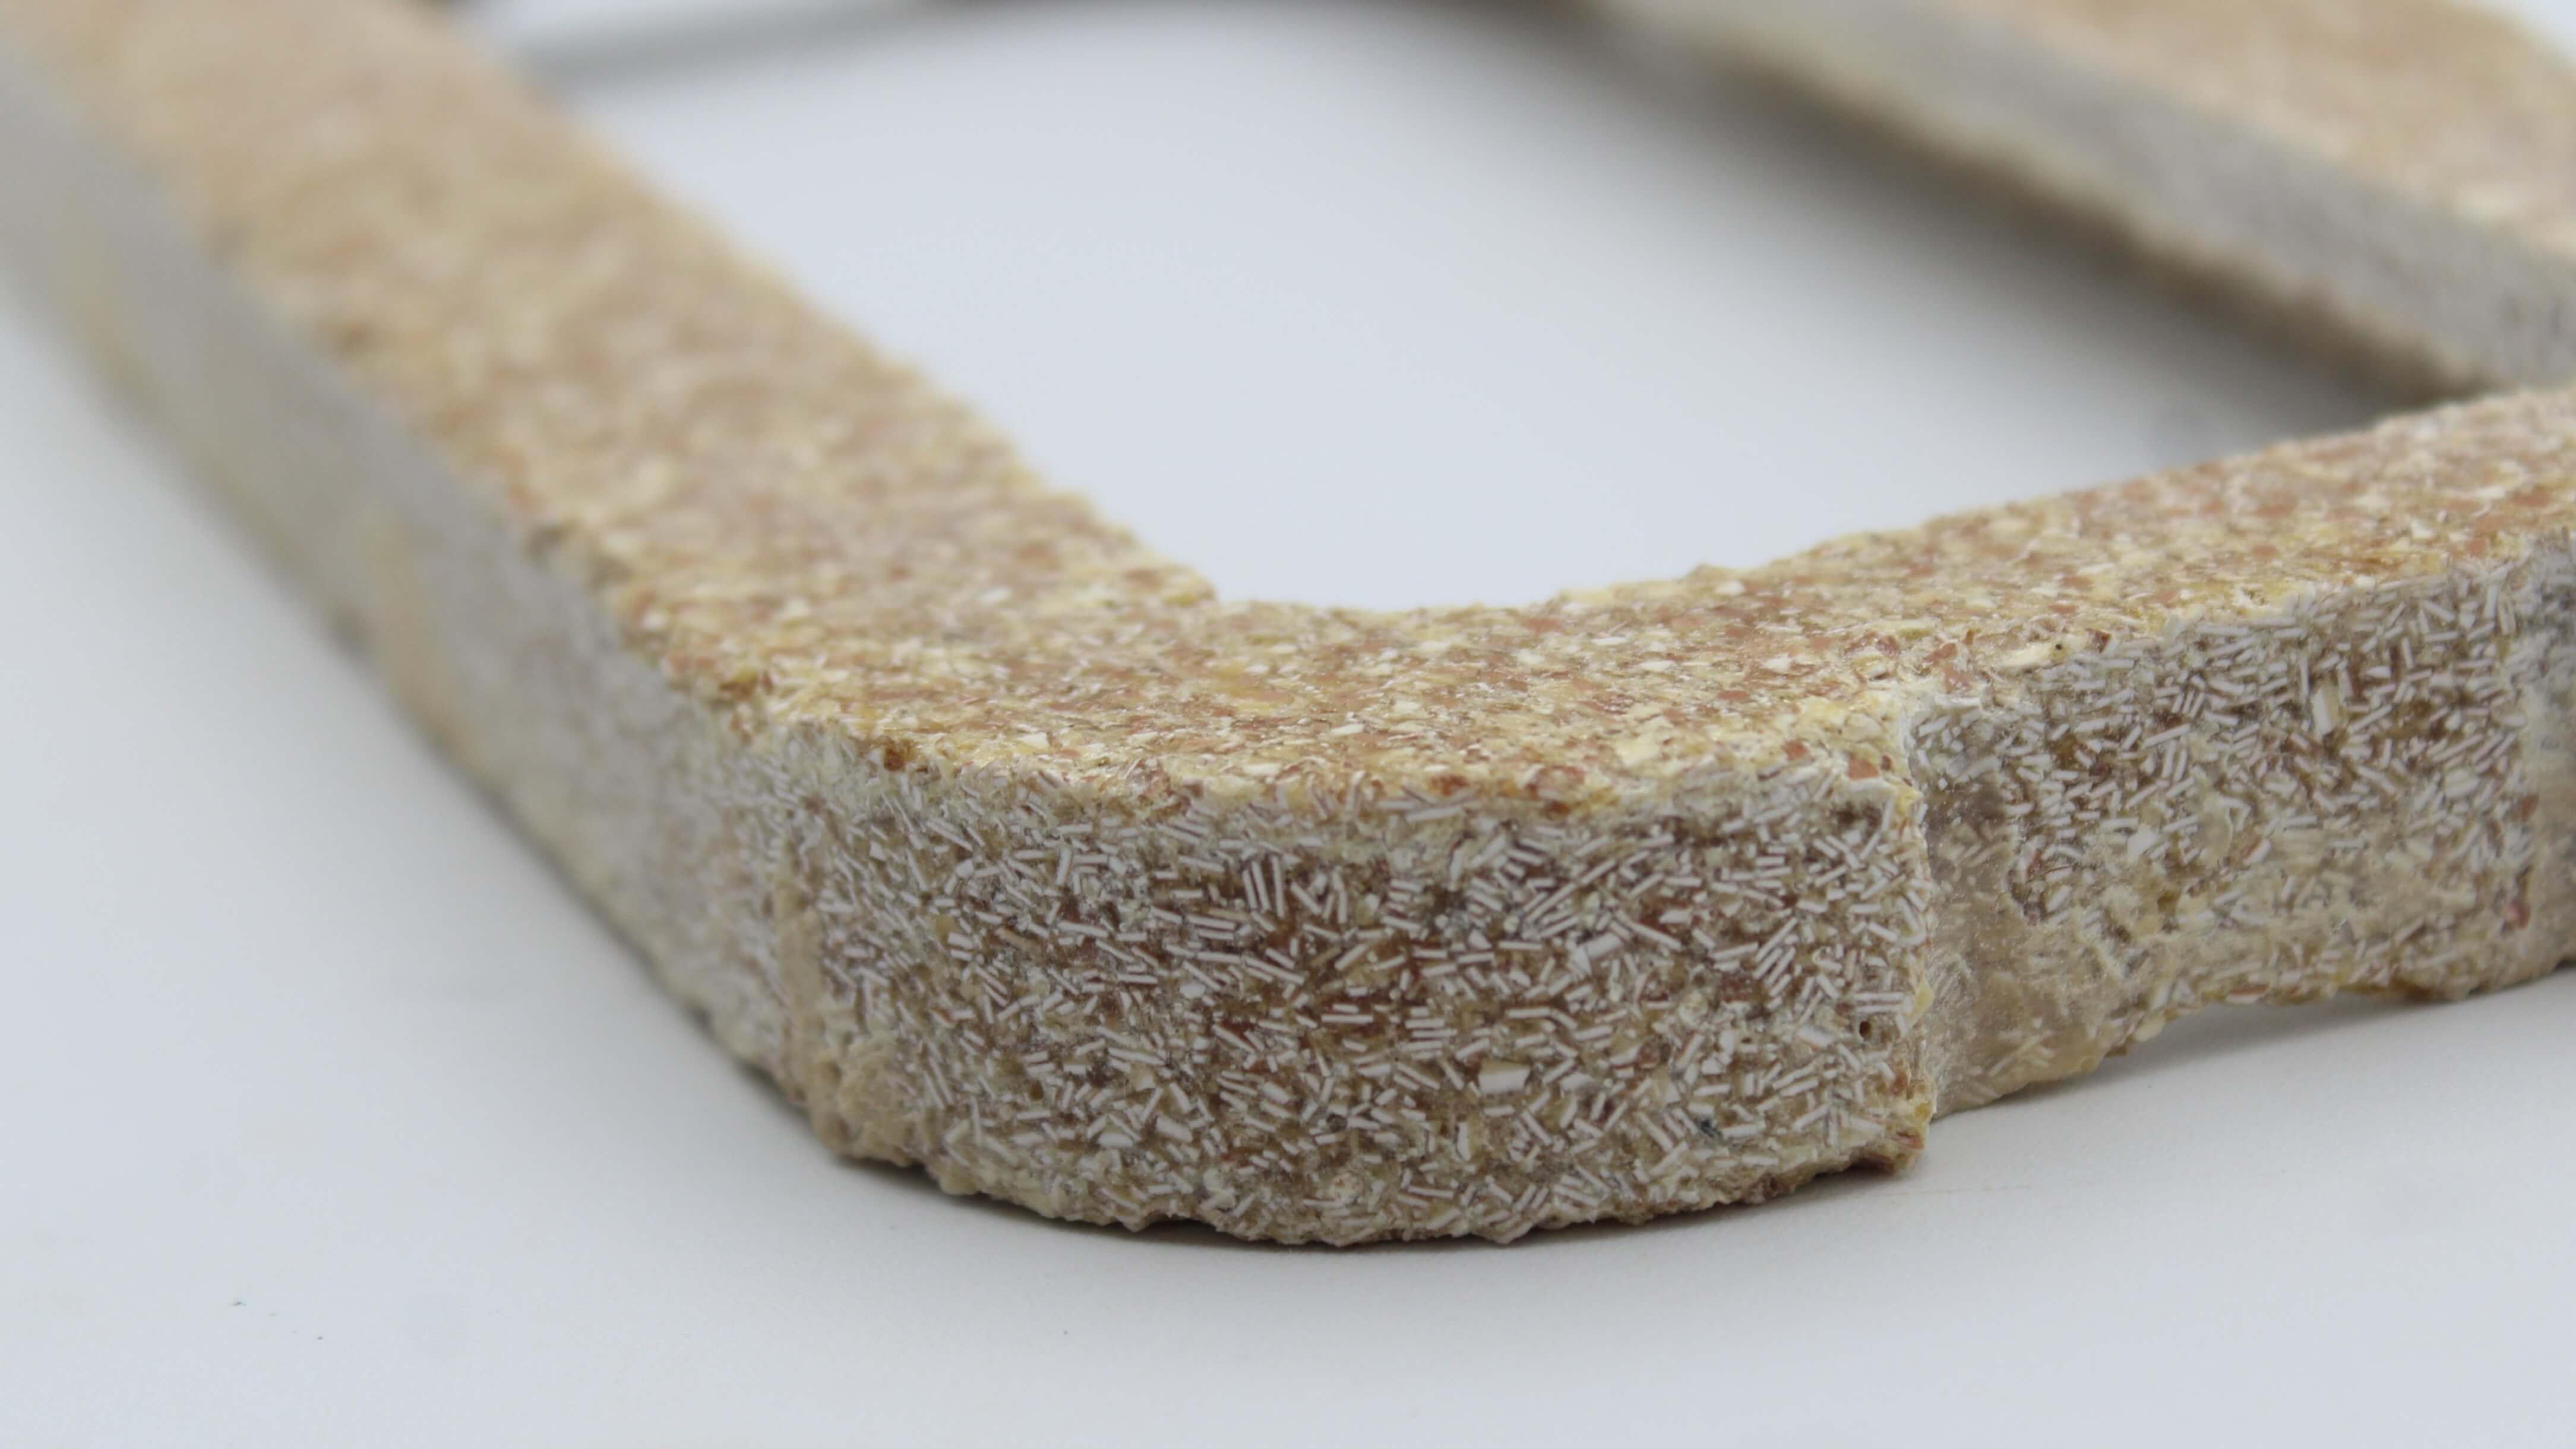
Julian did this process. Honestly, I fell in love with the results, how the material supported the milling and the double color!

· Results
This is the biomaterial milled with the final shape.
ELECTRONICS
The electronic part it can be divided in 3 functions:
- Function 1: Wireless charger
- Function 2: Pressing a button activates various conditions to control the salt lamp:
- Off
- On
- Fading of the light (in order to create a breathing rhythm)
- Function 3: Pressing the other button changes the color:
- Red
- Orange
- Yellow
- Green
- Blue
- Indigo
- Violet
Here is a video explaining how it works.
· Function 2: Off / On / Fade in - fade out
> Off / On / Blinking with a LED
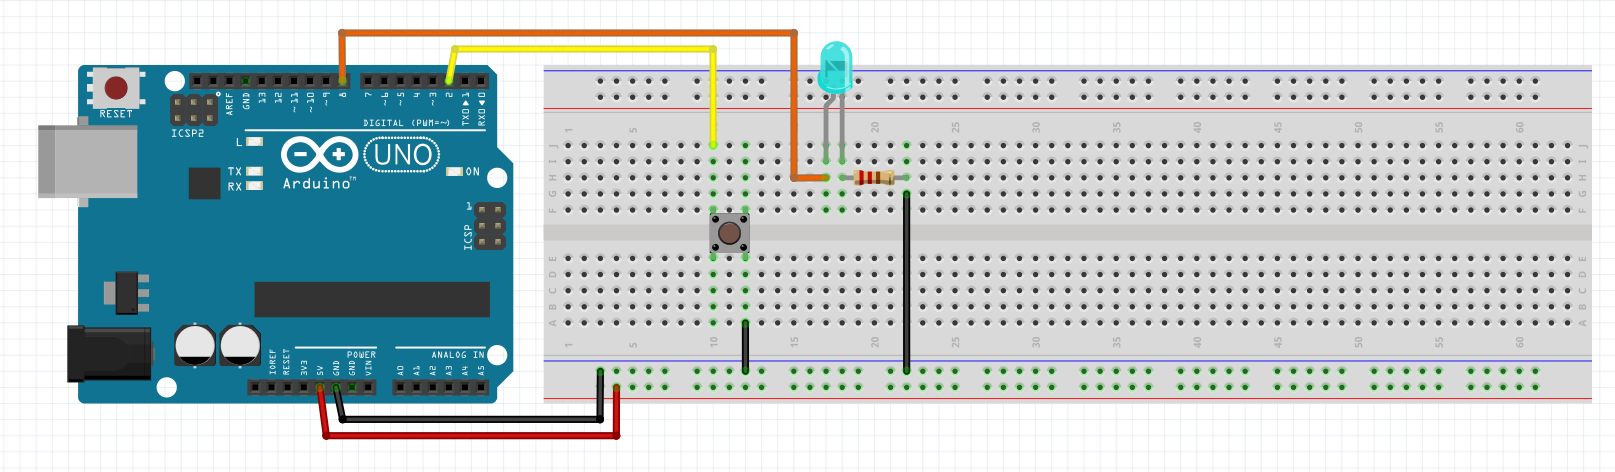
int botonState = 0; //boton variable
int vled;

void setup() {
pinMode (2,OUTPUT); //LED
pinMode (8, INPUT_PULLUP); //boton1
}

void loop() {
if (digitalRead(8)== 0){
    botonState = (botonState + 1) %3;
    delay (200);
    }

switch (botonState){
  case 0:
    digitalWrite(2,LOW);
    break;

  case 1: //
    digitalWrite(2, HIGH);
    break;

  case 2:
    digitalWrite(2, LOW);    // Turn the LED off
    delay(50);
    digitalWrite(2, HIGH);   // Turn the LED On
    delay(50);
    break;
  }
}
> Fade in - fade out with a NeoPixel
#include <Adafruit_NeoPixel.h>

#define PIN 6

Adafruit_NeoPixel strip = Adafruit_NeoPixel(12, PIN, NEO_GRB + NEO_KHZ800);

void setup() {
  strip.begin();
  strip.show(); // initialize all pixels to "off"
}

void loop() {
  brighten();
  darken();
}

// 0 to 255
void brighten() {
  uint16_t i, j;

  for (j = 1; j < 255; j++) {
    for (i = 0; i < strip.numPixels(); i++) {
      strip.setPixelColor(i, j, j, j);
    }
    strip.show();
    delay(10);
  }
  //delay(1500);
}

// 255 to 0
void darken() {
  Serial.begin(9600);
  uint16_t i, j;

  for (j = 255; j > 1; j--) {
    for (i = 0; i < strip.numPixels(); i++) {
      strip.setPixelColor(i, j, j, j);
    }
    strip.show();
    delay(10);
    Serial.println(j);
  }
  delay(1500);
}
· Function 3: Change the color (with a NeoPixel)
#include <Adafruit_NeoPixel.h>
#ifdef __AVR__
 #include <avr/power.h> // Required for 16 MHz Adafruit Trinket
#endif

#define BUTTON_PIN   2

#define PIXEL_PIN    6  // Digital IO pin connected to the NeoPixels.

#define PIXEL_COUNT 1  // Number of NeoPixels

Adafruit_NeoPixel strip(PIXEL_COUNT, PIXEL_PIN, NEO_GRB + NEO_KHZ800);

boolean oldState = HIGH;
int     mode     = 0;

void setup() {
  pinMode(BUTTON_PIN, INPUT_PULLUP);
  strip.begin(); // Initialize NeoPixel strip object (REQUIRED)
  strip.show();  // Initialize all pixels to 'off'
}

void loop() {
  // Get current button state.
  boolean newState = digitalRead(BUTTON_PIN);

  // Check if state changed from high to low (button press).
  if((newState == LOW) && (oldState == HIGH)) {
    // Short delay to debounce button.
    delay(20);
    // Check if button is still low after debounce.
    newState = digitalRead(BUTTON_PIN);
    if(newState == LOW) {      // Yes, still low
      if(++mode > 7) mode = 0; // Advance to next mode, wrap around after #8
      switch(mode) {           // Start the new animation...
        case 0:
          colorWipe(strip.Color(  0,   0,   0), 50);    // Black/off
          break;
        case 1:
          colorWipe(strip.Color(255,   0,   0), 50);    // Red
          break;
        case 2:
          colorWipe(strip.Color(171, 255, 0), 50);    // Orange
          break;
        case 3:
          colorWipe(strip.Color(150,150, 0), 50);    // Yellow
          break;
         case 4:
          colorWipe(strip.Color(0, 255, 0), 50);    // Green
          break;
        case 5:
          colorWipe(strip.Color(0,   0, 255), 50);    // Blue
          break;
        case 6:
          colorWipe(strip.Color(70,   0, 130), 50);    // Indigo
          break;
        case 7:
          colorWipe(strip.Color(60, 0, 60), 50);    // Purple
          break;
      }
    }
  }

  // Set the last-read button state to the old state.
  oldState = newState;
}

void colorWipe(uint32_t color, int wait) {
  for(int i=0; i<strip.numPixels(); i++) { // For each pixel in strip...
    strip.setPixelColor(i, color);         //  Set pixel's color (in RAM)
    strip.show();                          //  Update strip to match
    delay(wait);                           //  Pause for a moment
  }
}
· Arduino NANO
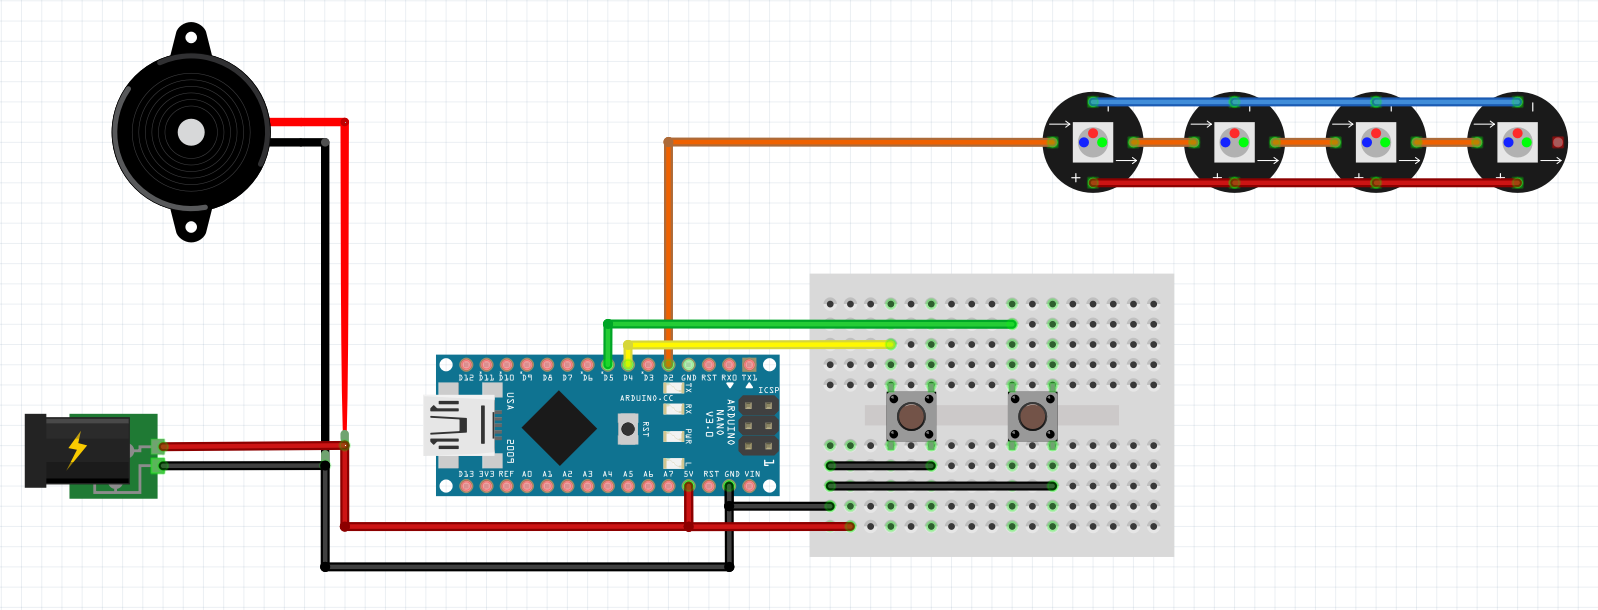
It is time to combine the codes. I had to make changes to make them consistent with each other. Just keep your fingers crossed...
The first attempt did not go as badly as I thought it would. It compiled it for me but it worked by itself hehe. I mean, I didn't need to touch any button because it made a fading in red colour (for "case 2") and changed the colour 3 times: red, yellow, orange. Then, I repeated the same process but with the colours: green, blue and indigo and finally with purple and white.
#include <Adafruit_NeoPixel.h>

#define PIN 6
#define LEDS 1

#define BUTTON1 3 //Illumination control
#define BUTTON2 2 //Color control

//For the color change
#ifdef __AVR__
#include <avr/power.h> // Required for 16 MHz Adafruit Trinket
#endif

Adafruit_NeoPixel strip = Adafruit_NeoPixel(LEDS, PIN, NEO_GRB + NEO_KHZ800);

int oldState_BUTTON1 = HIGH;
int newState_BUTTON1 = LOW;

int oldState_BUTTON2 = HIGH;
int newState_BUTTON2 = LOW;

int counter = 0; // Active the animation
int lighting = 0;

boolean r = 0;
boolean g = 0;
boolean b = 0;

void setup() {
  strip.begin();
  strip.show(); // initialize all pixels to "off"

  pinMode(BUTTON1, INPUT_PULLUP);
  pinMode(BUTTON2, INPUT_PULLUP);

  Serial.begin(9600);
}


void loop() {
 boolean oldState_BUTTON1 = digitalRead(BUTTON1);
 boolean oldState_BUTTON2 = digitalRead(BUTTON2);


 if(oldState_BUTTON1 != newState_BUTTON1){
    if (oldState_BUTTON1 == HIGH) {
      lighting++;
    }
 }

 if(oldState_BUTTON2 != newState_BUTTON2){
    if (oldState_BUTTON2 == HIGH) {
      counter++;
      delay(100);
      Serial.print(counter);
    }
}

  switch (lighting){
    case 0:
      strip.setPixelColor(0, 0, 0, 0);
      break;

    case 1:
      r = true;
      g = false;
      b = false;
      break;

    case 2:
      brighten(r, g, b);
      darken(r, g, b);
      break;
  }

  if(lighting == 3){
  lighting = 0;
  }

  switch (counter){
    case 0:
          colorWipe(strip.Color(  0,   0,   0), 50);    // Black/off
          break;
    case 1:
          colorWipe(strip.Color(255,   0,   0), 50);    // Red
          break;
    case 2:
          colorWipe(strip.Color(171, 255, 0), 50);    // Orange
          break;
    case 3:
          colorWipe(strip.Color(150,150, 0), 50);    // Yellow
          break;
    case 4:
          colorWipe(strip.Color(0, 255, 0), 50);    // Green
          break;
    case 5:
          colorWipe(strip.Color(0,   0, 255), 50);    // Blue
          break;
    case 6:
          colorWipe(strip.Color(70,   0, 130), 50);    // Indigo
          break;
    case 7:
          colorWipe(strip.Color(60, 0, 60), 50);    // Purple
          break;
      }

  if(counter == 8){
  counter = 0;
  }
}

void brighten(boolean red, boolean green, boolean blue) {
  uint16_t i, j;

  for (j = 0; j < 255; j++) {
    for (i = 0; i < strip.numPixels(); i++) {
      if(red == false && green == false && blue == false){
        strip.setPixelColor(i, j, j, j);
      } else if(red == true && green == false && blue == false){
        strip.setPixelColor(i, j, 0, 0);
      } else if(red == false && green == true && blue == false){
        strip.setPixelColor(i, 0, j, 0);
      } else if(red == false && green == false && blue == true){
        strip.setPixelColor(i, 0, 0, j);
      }
    }
    strip.show();
    delay(10);
  }
}

// 255 to 0
void darken(boolean red, boolean green, boolean blue) {
  uint16_t i, j;

  for (j = 255; j > 0; j--) {
    for (i = 0; i < strip.numPixels(); i++) {
      if(red == false && green == false && blue == false){
        strip.setPixelColor(i, j, j, j);
      } else if(red == true && green == false && blue == false){
        strip.setPixelColor(i, j, 0, 0);
      } else if(red == false && green == true && blue == false){
        strip.setPixelColor(i, 0, j, 0);
      } else if(red == false && green == false && blue == true){
        strip.setPixelColor(i, 0, 0, j);
      }
    }
    strip.show();
    delay(10);
  }
}

void colorWipe(uint32_t color, int wait) {
  for(int i=0; i<strip.numPixels(); i++) { // For each pixel in strip...
    strip.setPixelColor(i, color);         //  Set pixel's color (in RAM)
    strip.show();                          //  Update strip to match
    delay(wait);                           //  Pause for a moment
  }
}
This code was the closest to the final one... At least, it worked with the buttons.
#include <Adafruit_NeoPixel.h>


#define PIN 6
#define LEDS 1

#define BUTTON1 3 //Illumination control
#define BUTTON2 2 //Color control

//For the color change
#ifdef __AVR__
#include <avr/power.h> // Required for 16 MHz Adafruit Trinket
#endif

Adafruit_NeoPixel strip = Adafruit_NeoPixel(LEDS, PIN, NEO_GRB + NEO_KHZ800);

bool oldState_BUTTON1 = HIGH; // sw1_state de emma
//bool newState_BUTTON1;

int oldState_BUTTON2 = HIGH;
// bool newState_BUTTON2;

int counter = 0; // Active the animation
int lighting = 0;

void setup() {
  strip.begin();
  strip.show(); // initialize all pixels to "off"

  pinMode(BUTTON1, INPUT_PULLUP);
  pinMode(BUTTON2, INPUT_PULLUP);

  Serial.begin(9600);
}


void loop() {
 bool newState_BUTTON1 = digitalRead(BUTTON1);
 bool newState_BUTTON2 = digitalRead(BUTTON2);


 if(newState_BUTTON1 != oldState_BUTTON1){
    if (newState_BUTTON1 == LOW) {
      lighting++;
    }
 }

  switch (lighting){
    case 0:
      strip.setPixelColor(0, 0, 0, 0);
      break;

    case 1:
      strip.setPixelColor(1,counter);
      break;

    case 2:
      brighten();
      darken();
      break;
  }

  if(lighting == 3){
  lighting = 0;
  }

 if(newState_BUTTON2 != oldState_BUTTON2){
    if (newState_BUTTON2 == LOW ){
      counter++;
      delay(100);
    }
}

  switch (counter){
    case 0:
          colorWipe(strip.Color(  0,   0,   0), 50);    // Black/off
          break;
    case 1:
          colorWipe(strip.Color(255,   0,   0), 50);    // Red
          break;
    case 2:
          colorWipe(strip.Color(171, 255, 0), 50);    // Orange
          break;
    case 3:
          colorWipe(strip.Color(150,150, 0), 50);    // Yellow
          break;
    case 4:
          colorWipe(strip.Color(0, 255, 0), 50);    // Green
          break;
    case 5:
          colorWipe(strip.Color(0,   0, 255), 50);    // Blue
          break;
    case 6:
          colorWipe(strip.Color(70,   0, 130), 50);    // Indigo
          break;
    case 7:
          colorWipe(strip.Color(60, 0, 60), 50);    // Purple
          break;
      }

  if(counter == 8){
  counter = 0;
  }
}

void brighten() {
  uint16_t i, j;

  for (j = 1; j < 255; j++) {
    for (i = 0; i < strip.numPixels(); i++) {
      strip.setPixelColor(i, counter);
    }
    strip.show();
    delay(10);
  }
  //delay(1500);
}

// 255 to 0
void darken() {
  Serial.begin(9600);
  uint16_t i, j;

  for (j = 255; j > 1; j--) {
    for (i = 0; i < strip.numPixels(); i++) {
      strip.setPixelColor(i, counter);
    }
    strip.show();
    delay(10);
    Serial.println(j);
  }
  delay(1500);
}

void colorWipe(uint32_t color, int wait) {
  for(int i=0; i<strip.numPixels(); i++) { // For each pixel in strip...
    strip.setPixelColor(i, color);         //  Set pixel's color (in RAM)
    strip.show();                          //  Update strip to match
    delay(wait);                           //  Pause for a moment
  }
}
· Results
Finally, because of the remaining time and the complexity of the code, I decided to simplify it. Now the functionality would change a little: One button will turn the light on and off and the other button will change the color.

I'll follow this scheme. Here is already shown how the Arduino Nano and a wireless charging base will share the power supply. I’ll use the Function 3: Change the color code.
STRUCTURE
The structure depends on sooo many factors that you have to do tests as well. While learning about the biomaterial and the manufacturing method, the design changed (and radically!).
That's why I made mini prototypes, these were my Frankensteins.
My Frankenstein
· 3D printing
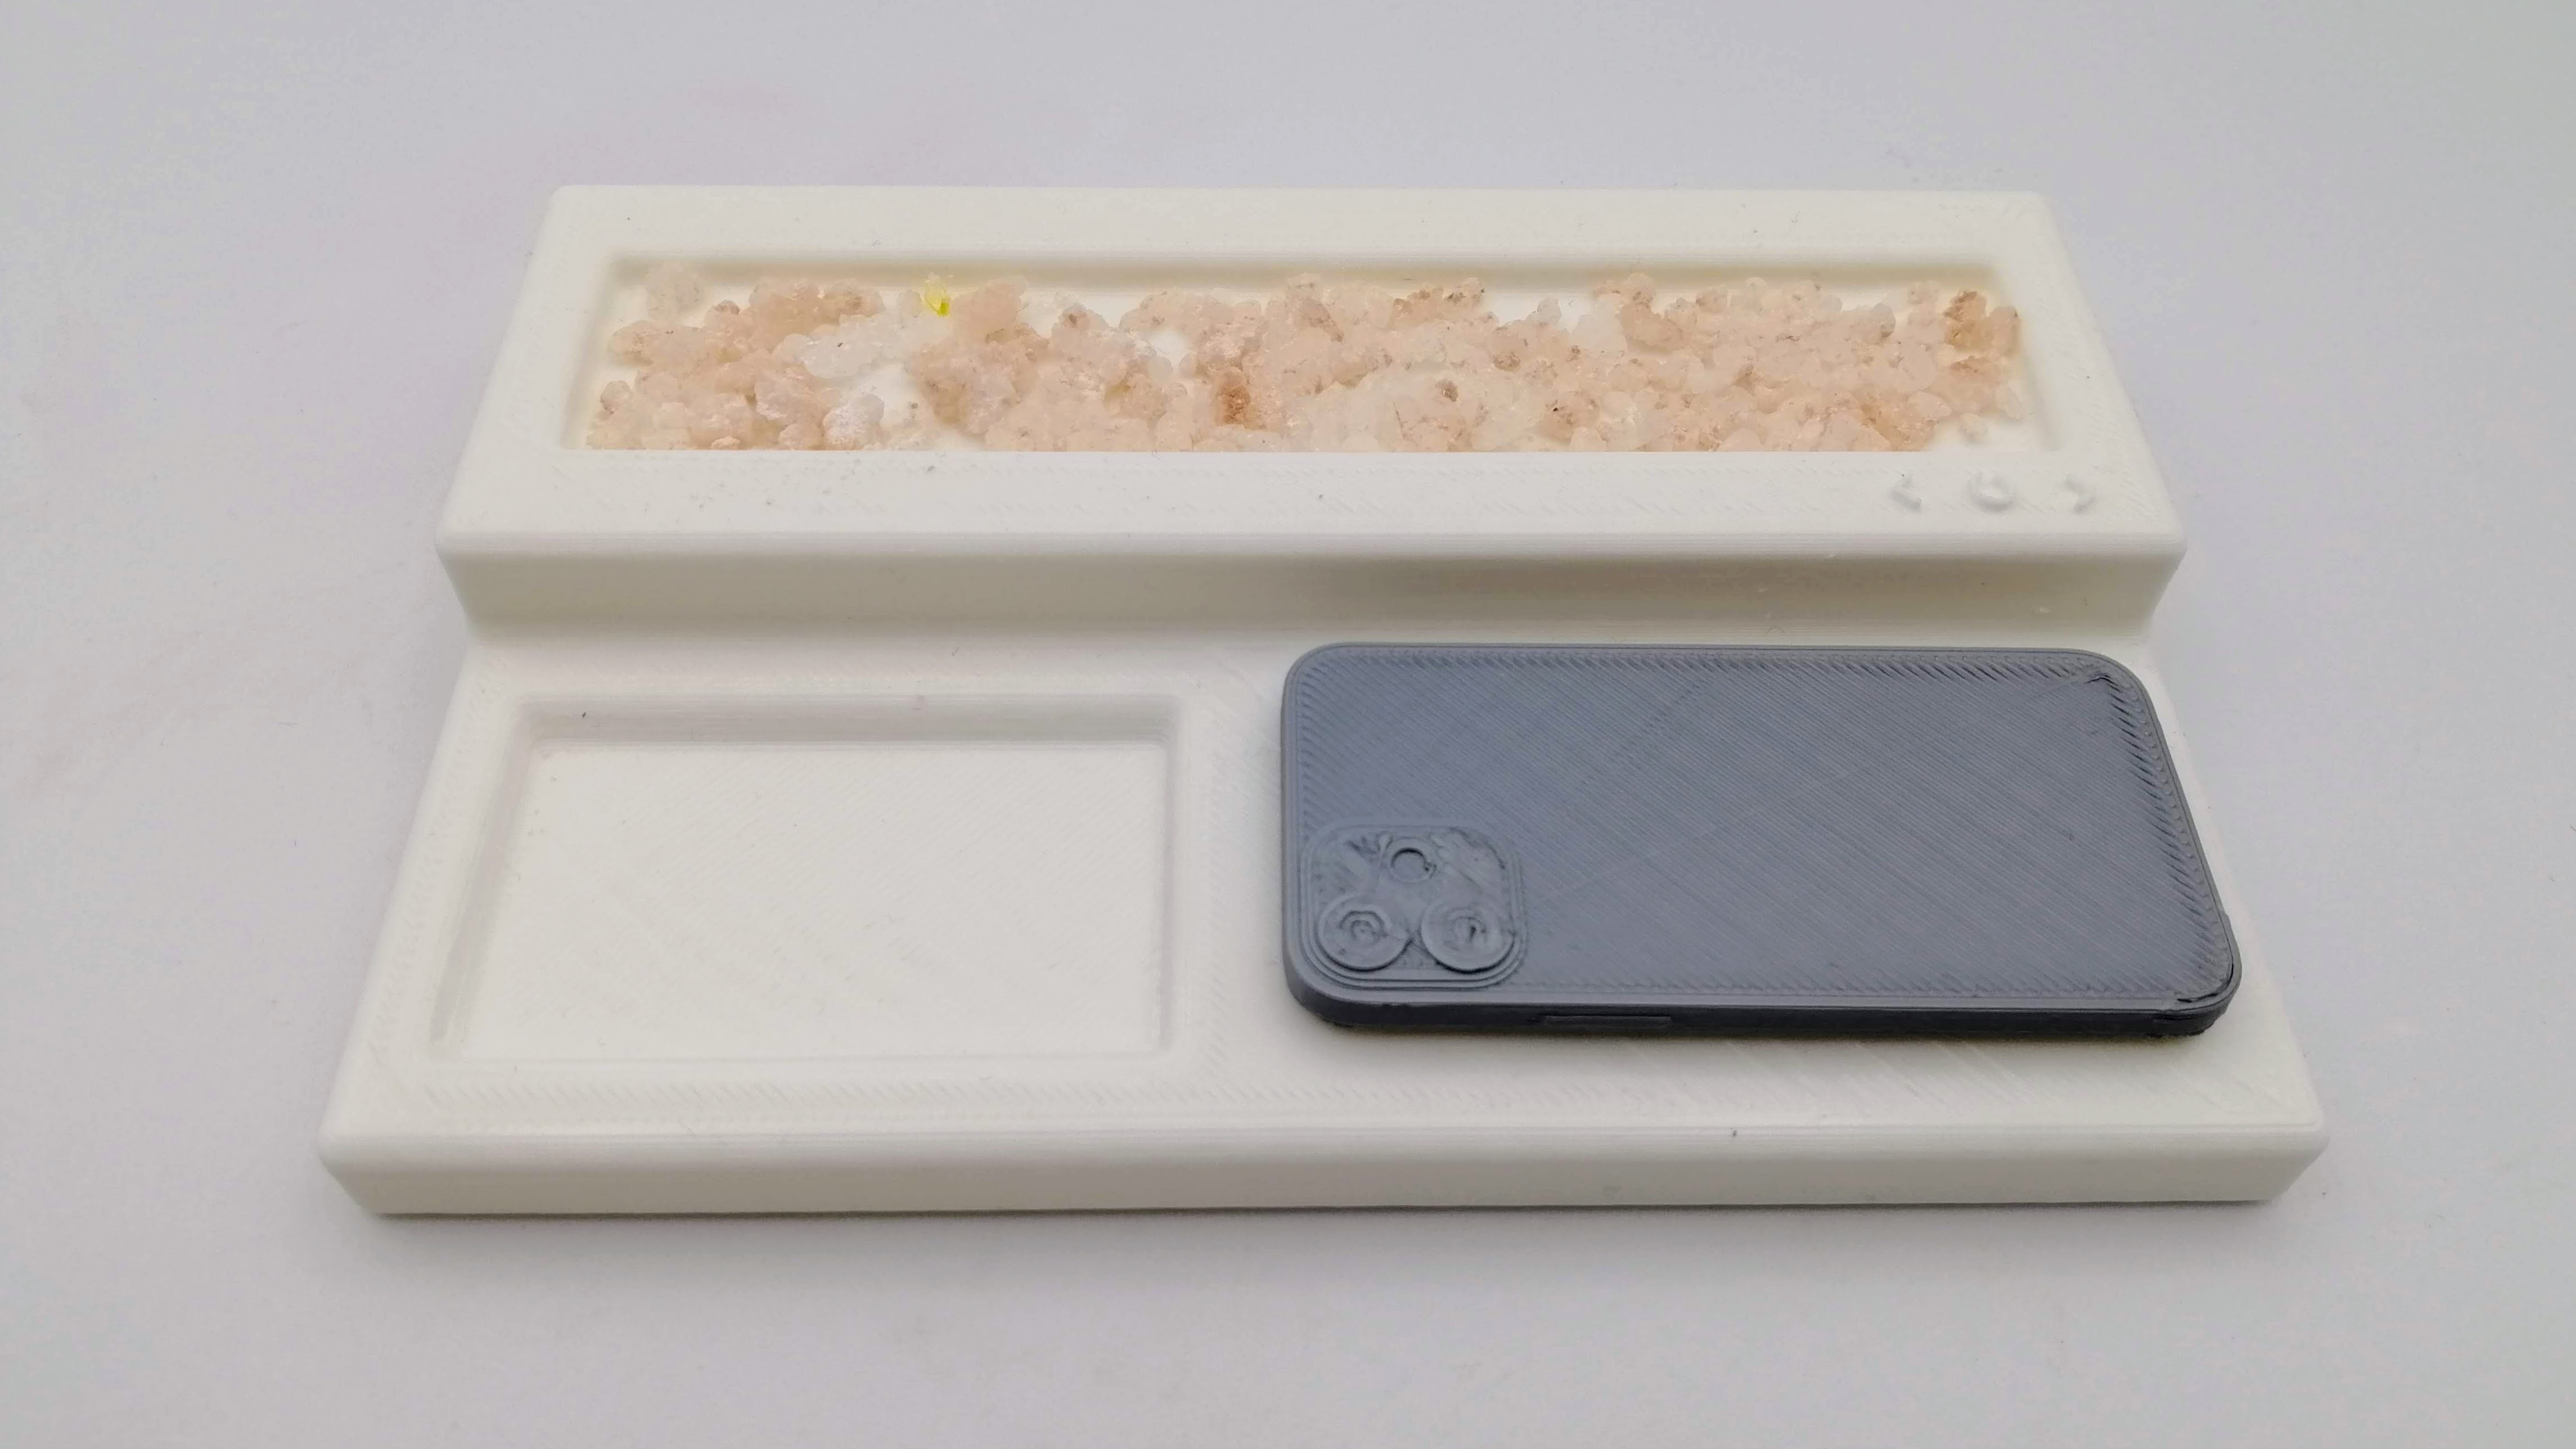
After brainstorming and making decisions, I designed my final idea in Rhinoceros to have a first look. I scaled and printed it in ABS. I included a mobile to better understand its proportion.
The electronics, of course, had to be placed outside the structure because of their size. I connected the neoPixel with some conductive thread.
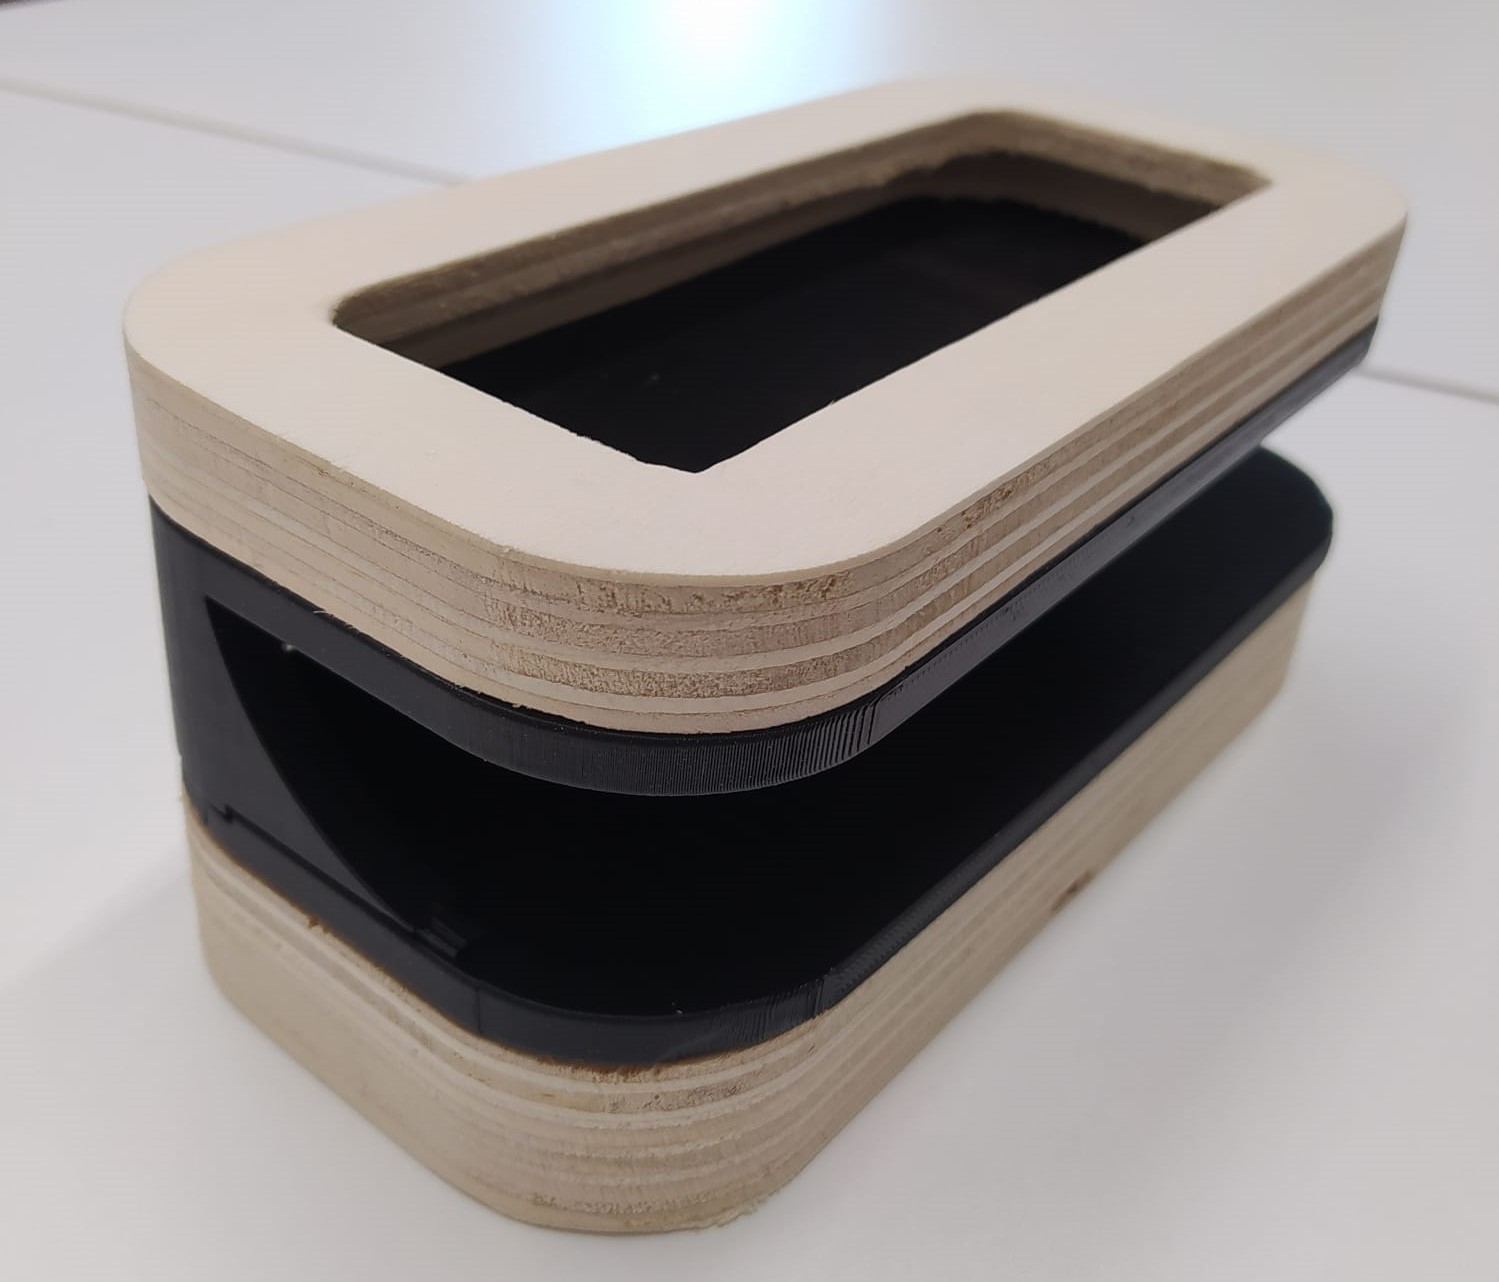
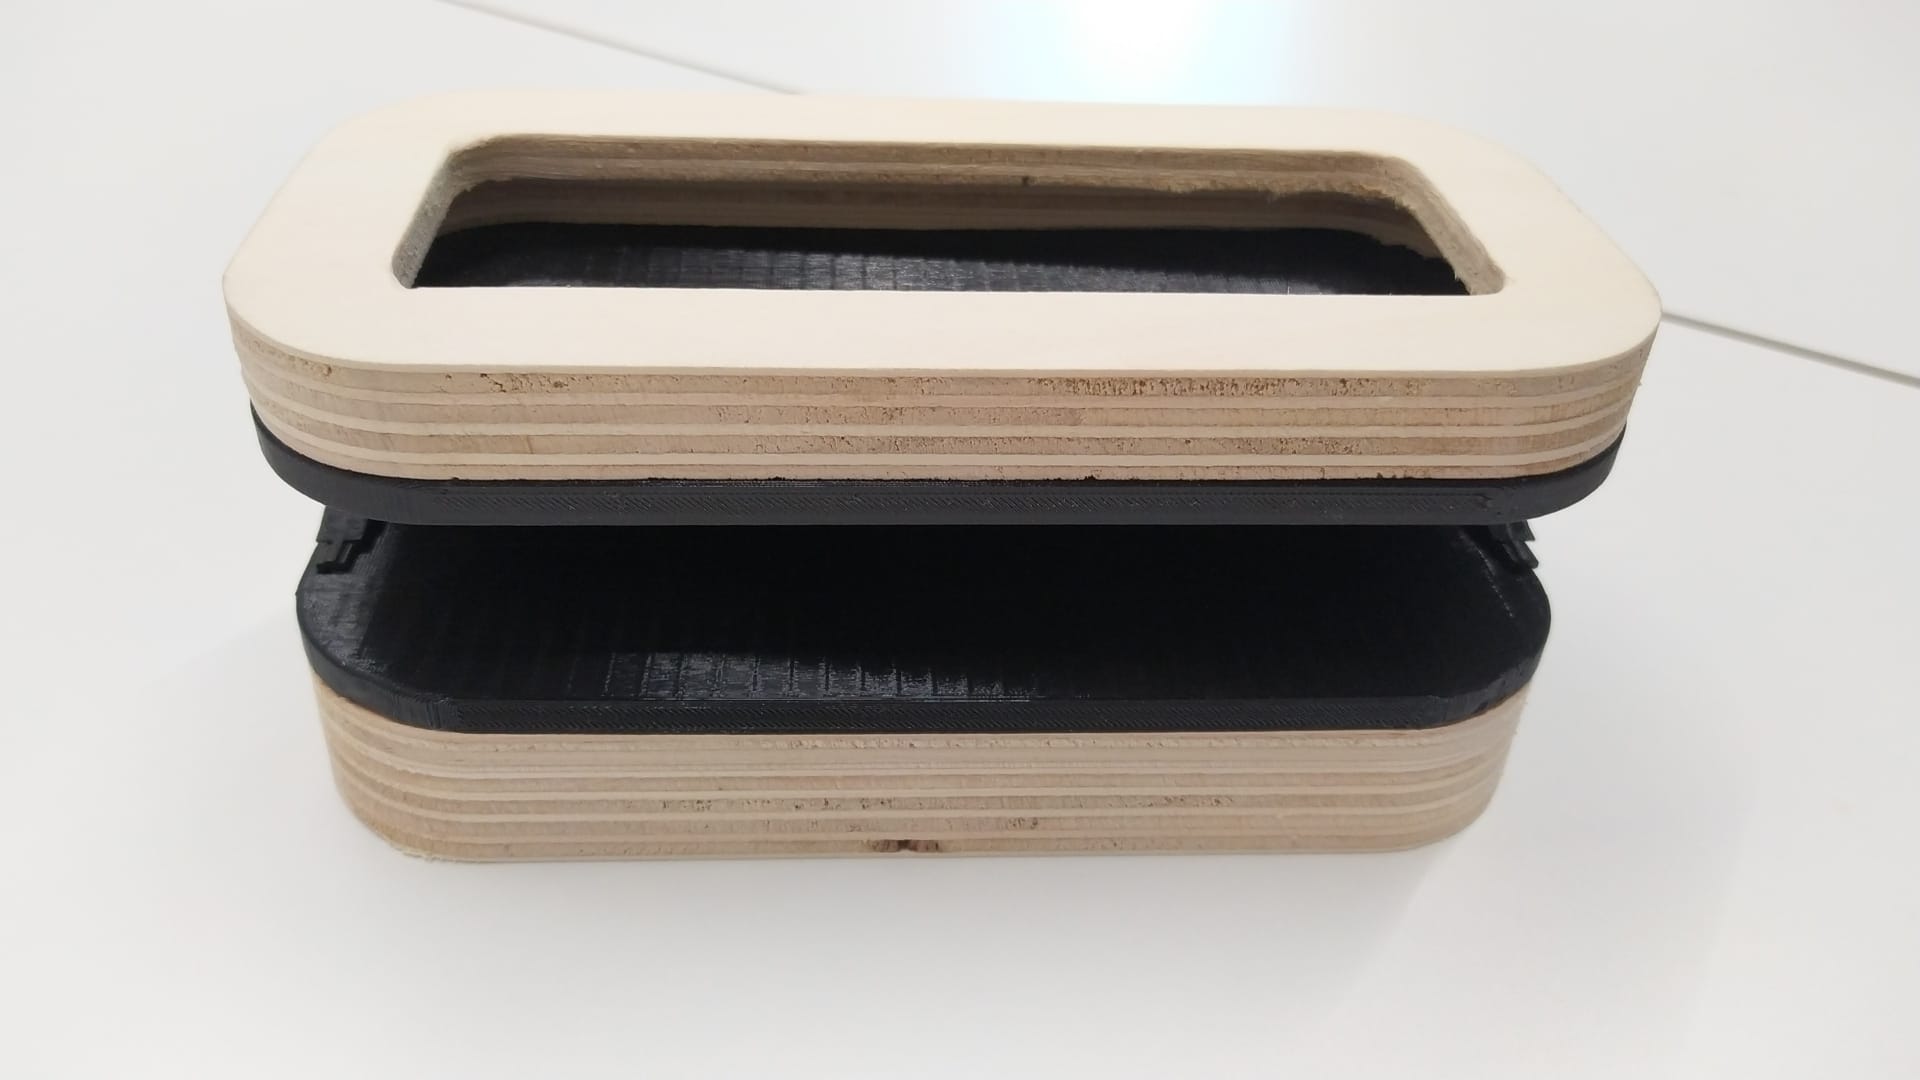
· 3D printing + CNC
I learnt and understood how the biomaterial works and I had to adapt to it. This allowed me to make a more aesthetic design, with coherence in relation to what Aura means and a product that fits the market.
In this new concept, I need to mix two materials/manufacturing techniques. So, I’ll use CNC for the biomaterial made of eggshells and rosin and PLA 3D printing for the joining of both parts. Further on, I will use a more sustainable filament.
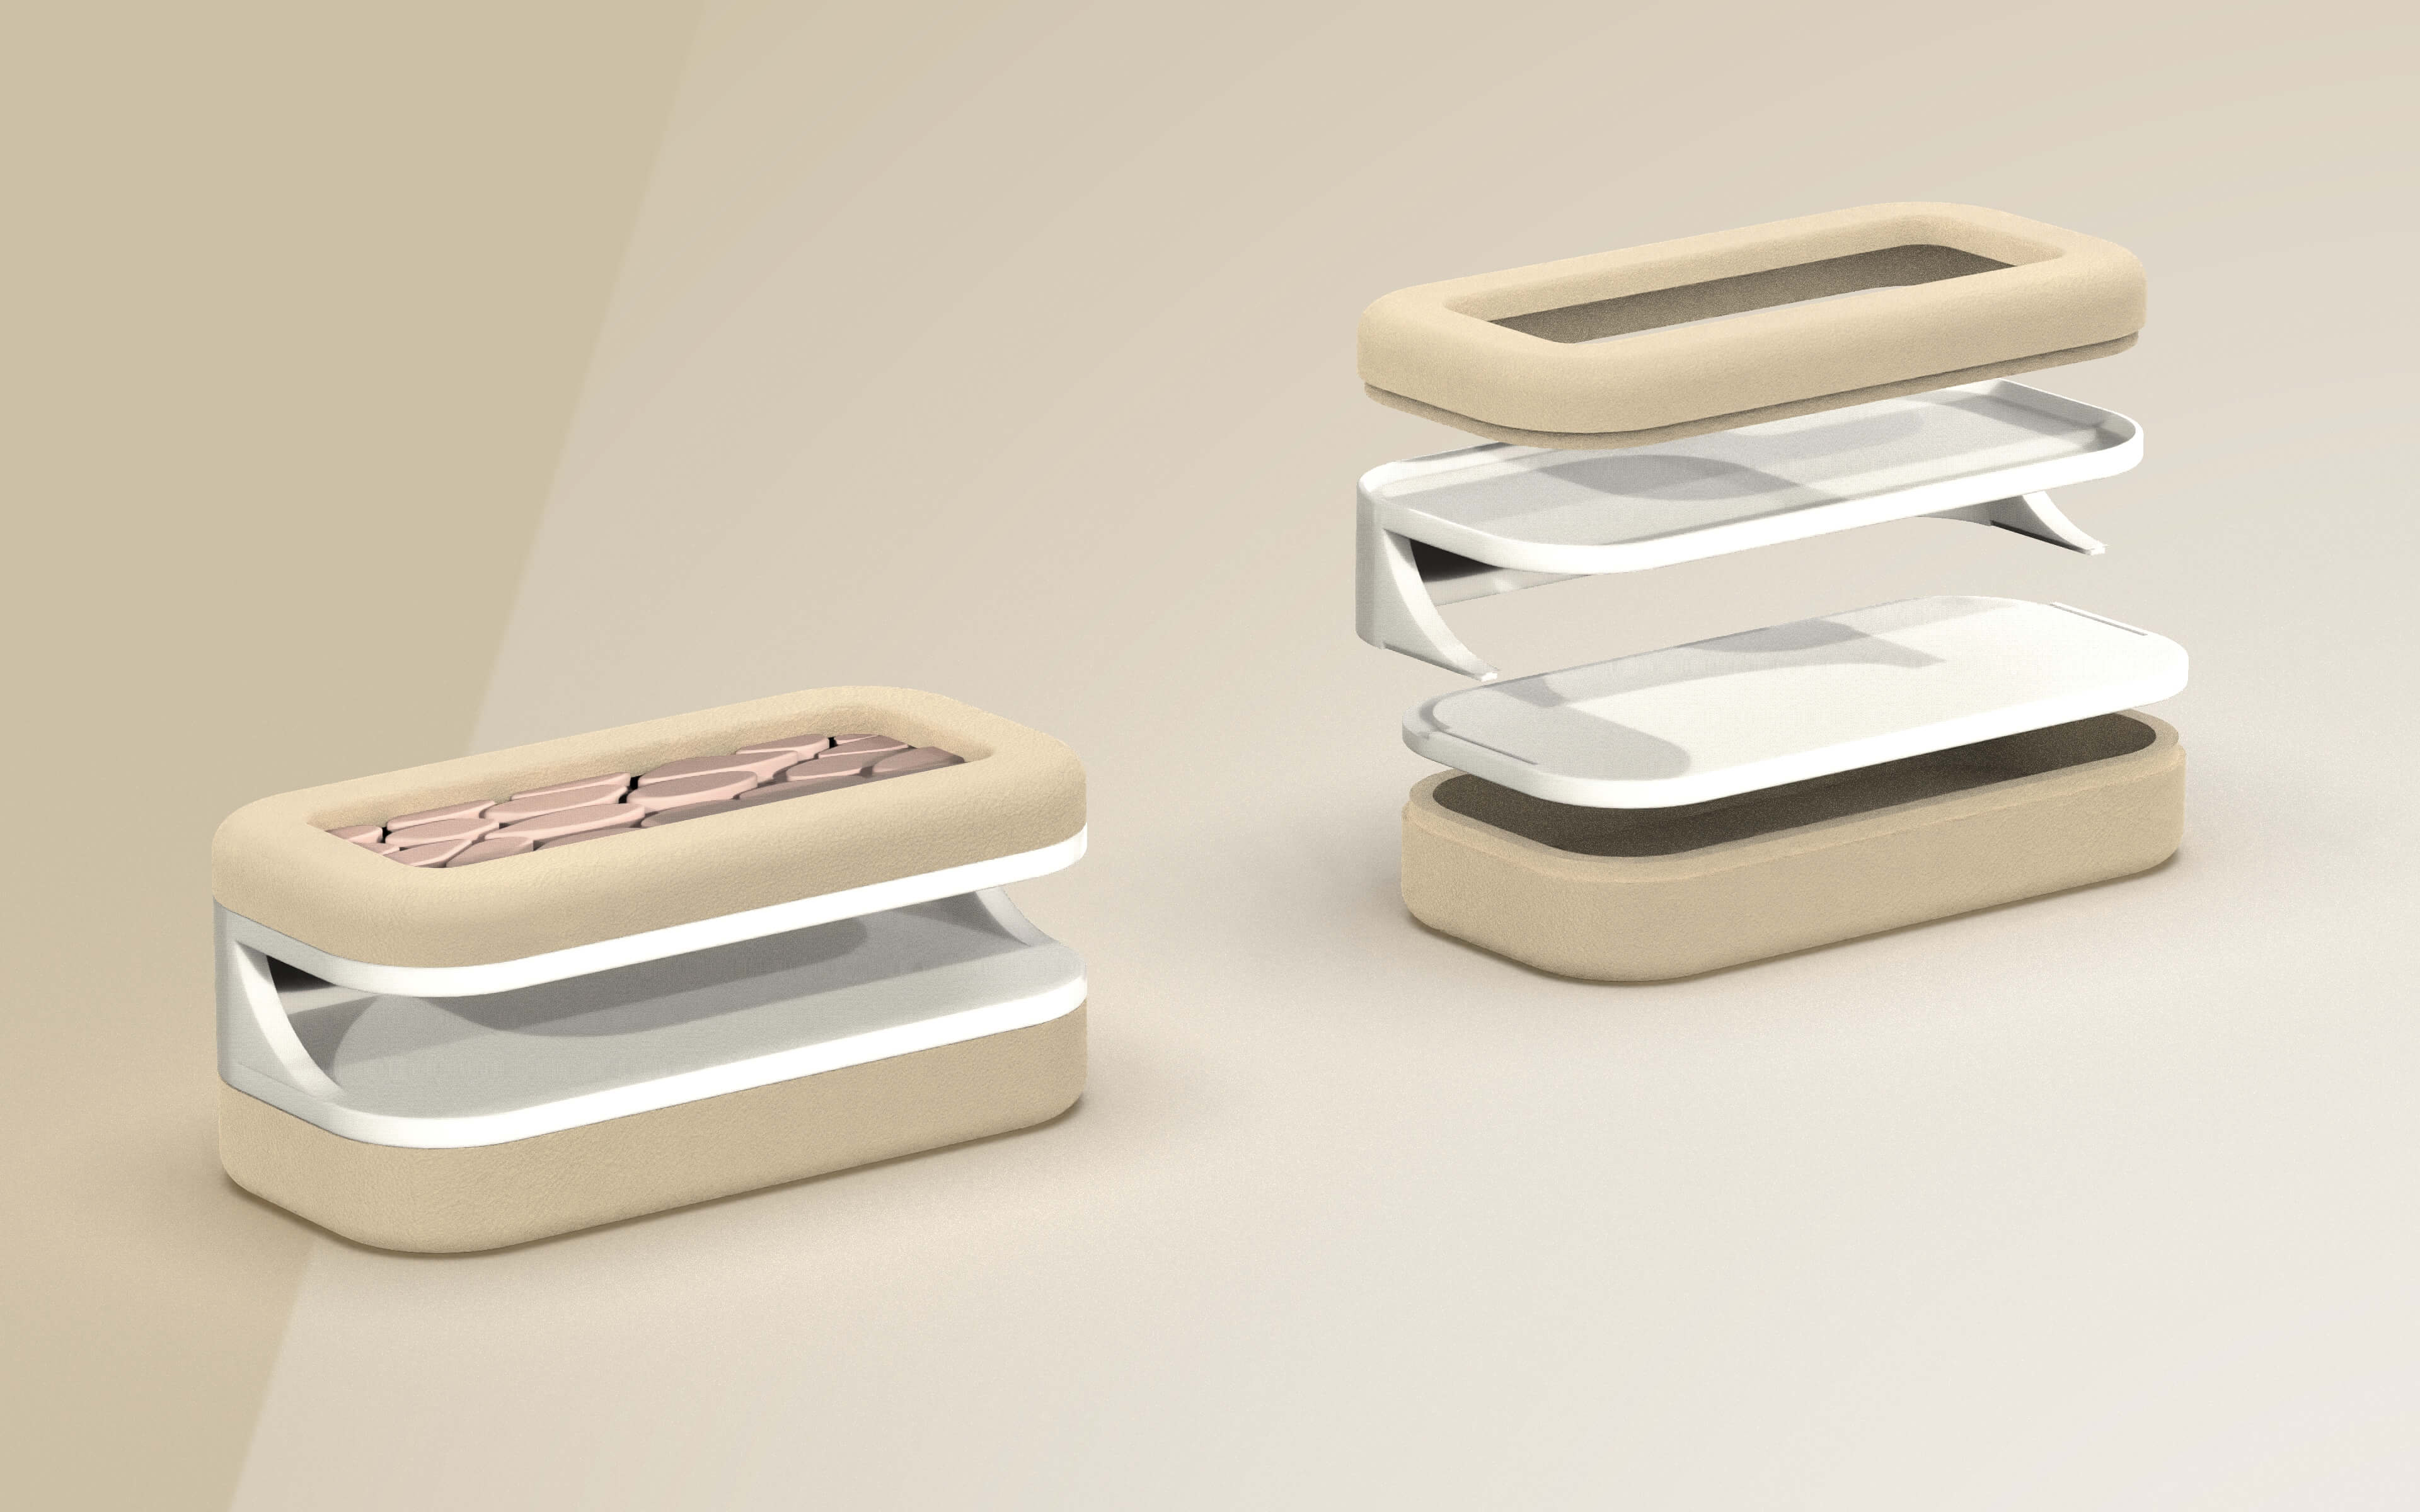
> Assembly
The challenge was how to put all the pieces together and still maintain the aesthetics. I’ll use some screws in the bottom piece to join the biomaterial and the PLA, because there will be the charging base and the Arduino NANO so, It's not enough if they are only engaged by pressure.
To hide the screws, the top part will slide and assemble with the piece below, thus joining both parts.
The sliding part had an inconvenience: the size was too small and not all 3d printers have the required precision. So, I used a vertical assembly. To not waste material printing the whole piece, I only printed a section to ensure a good assembly. I tried different dimensions and shapes.
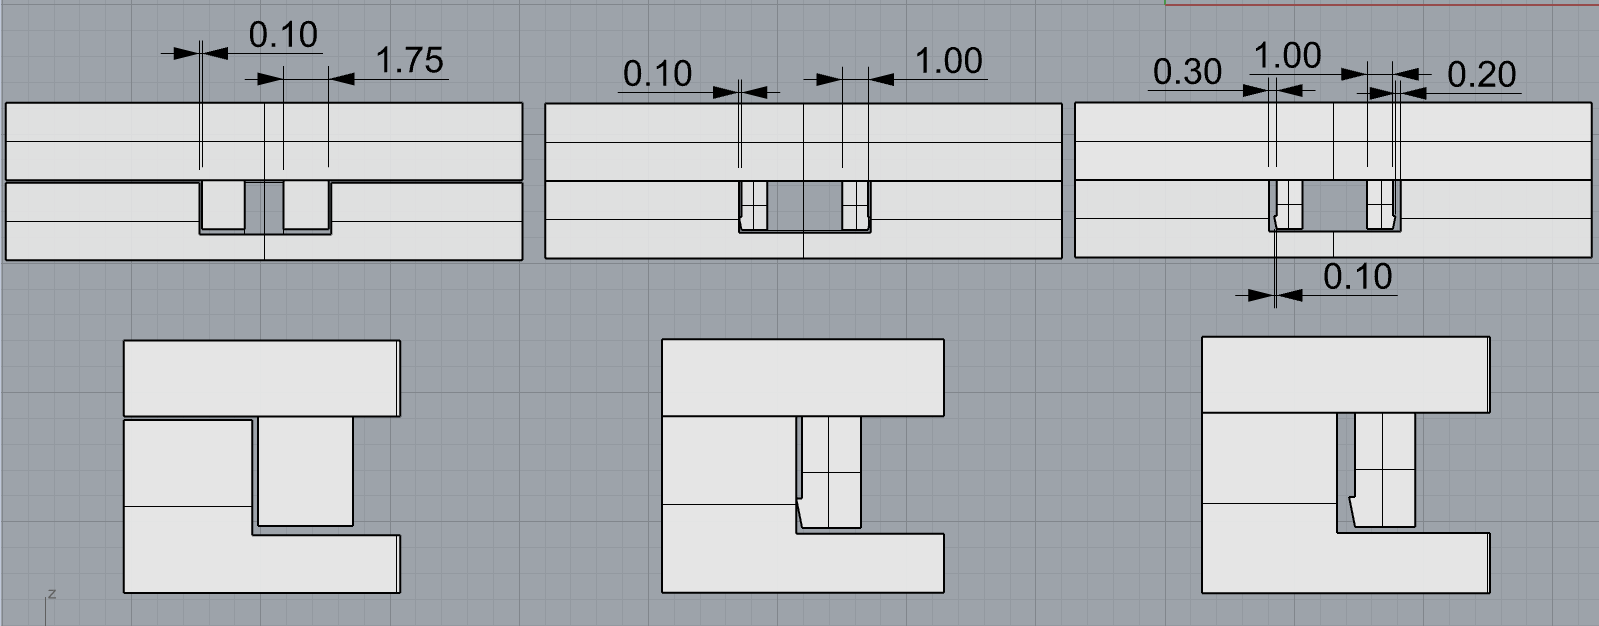
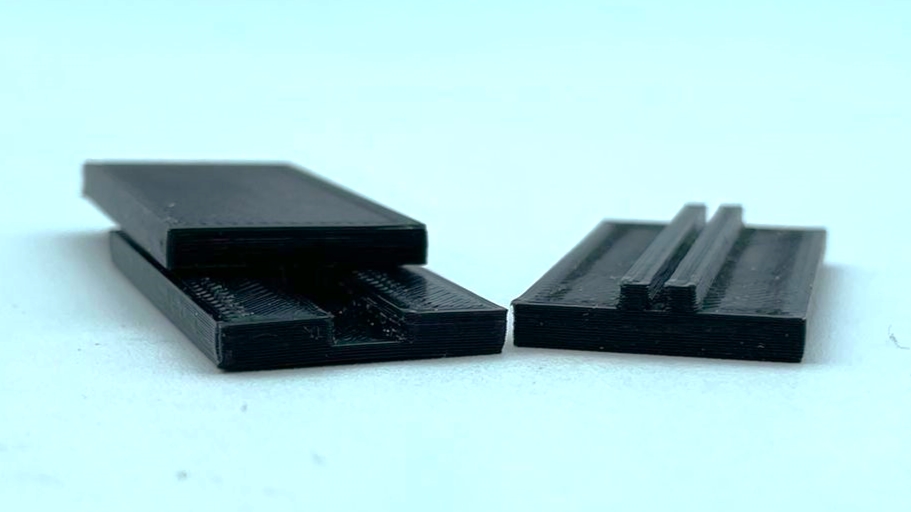
It wasn't a good idea for the pieces to slide because they break easily or are too difficult to disassemble.
· Results
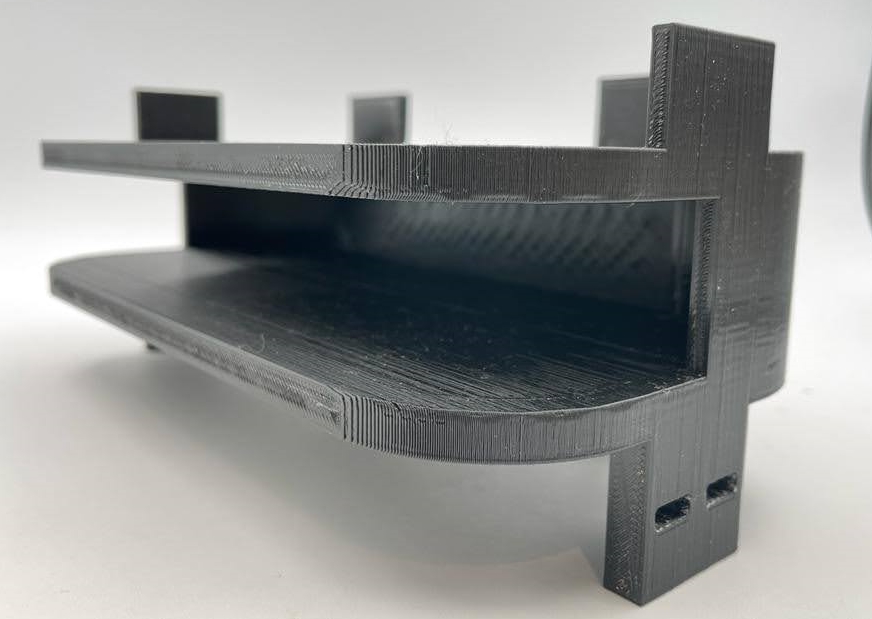
Finally, as I've said before, it is not a good idea for the pieces to slide because they break easily or are too difficult to disassemble. For that reason, I made a single piece. Morover, this structure allows the lamp to be assembled with pieces of different materials.
SUMMARY
This is the mid term presentation:
Aura de Arantza Tamayo
Take a look at the final report summarizing all this information and I hope you enjoy it!