Concept Development
INSPIRATION
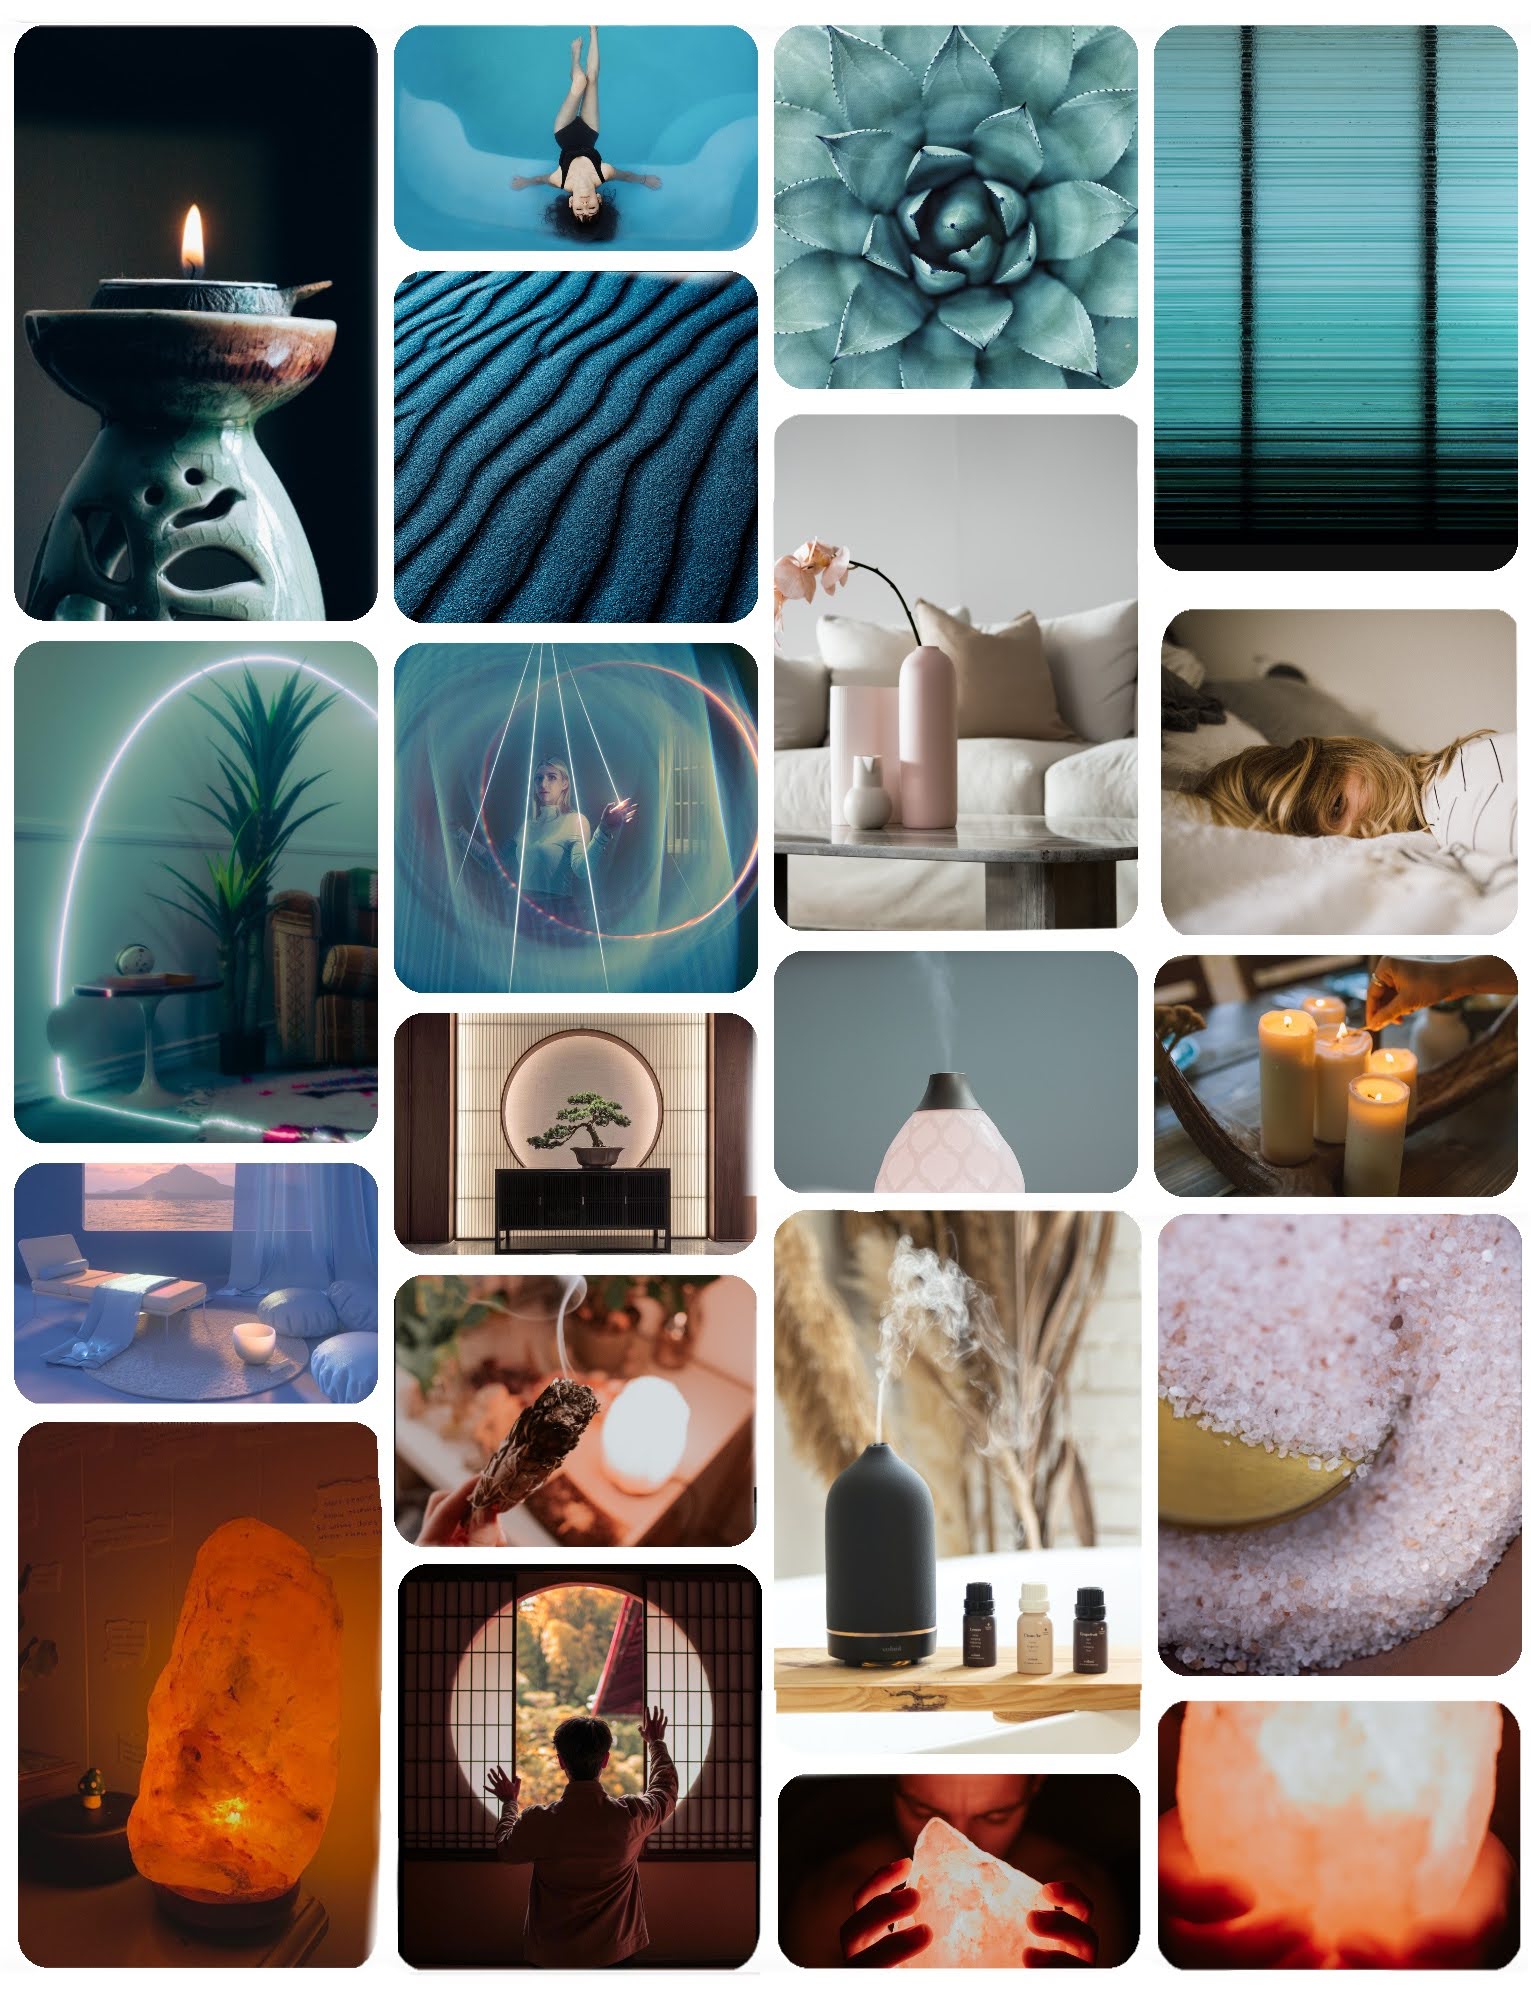 This moodboard represents the different concepts that have inspired me, such as colour, light, texture, patterns, materials…
CONCEPTUAL DEVELOPMENT
And from there I started to design. During the sketching I had to consider different aspects, such as the manufacturing method, the placement of the electronic components…
· Phase 1
I had to make a simple hollow piece on the inside to avoid any inconvenience with the manufacturing process. For that reason, I ended up designing a single-material structure.
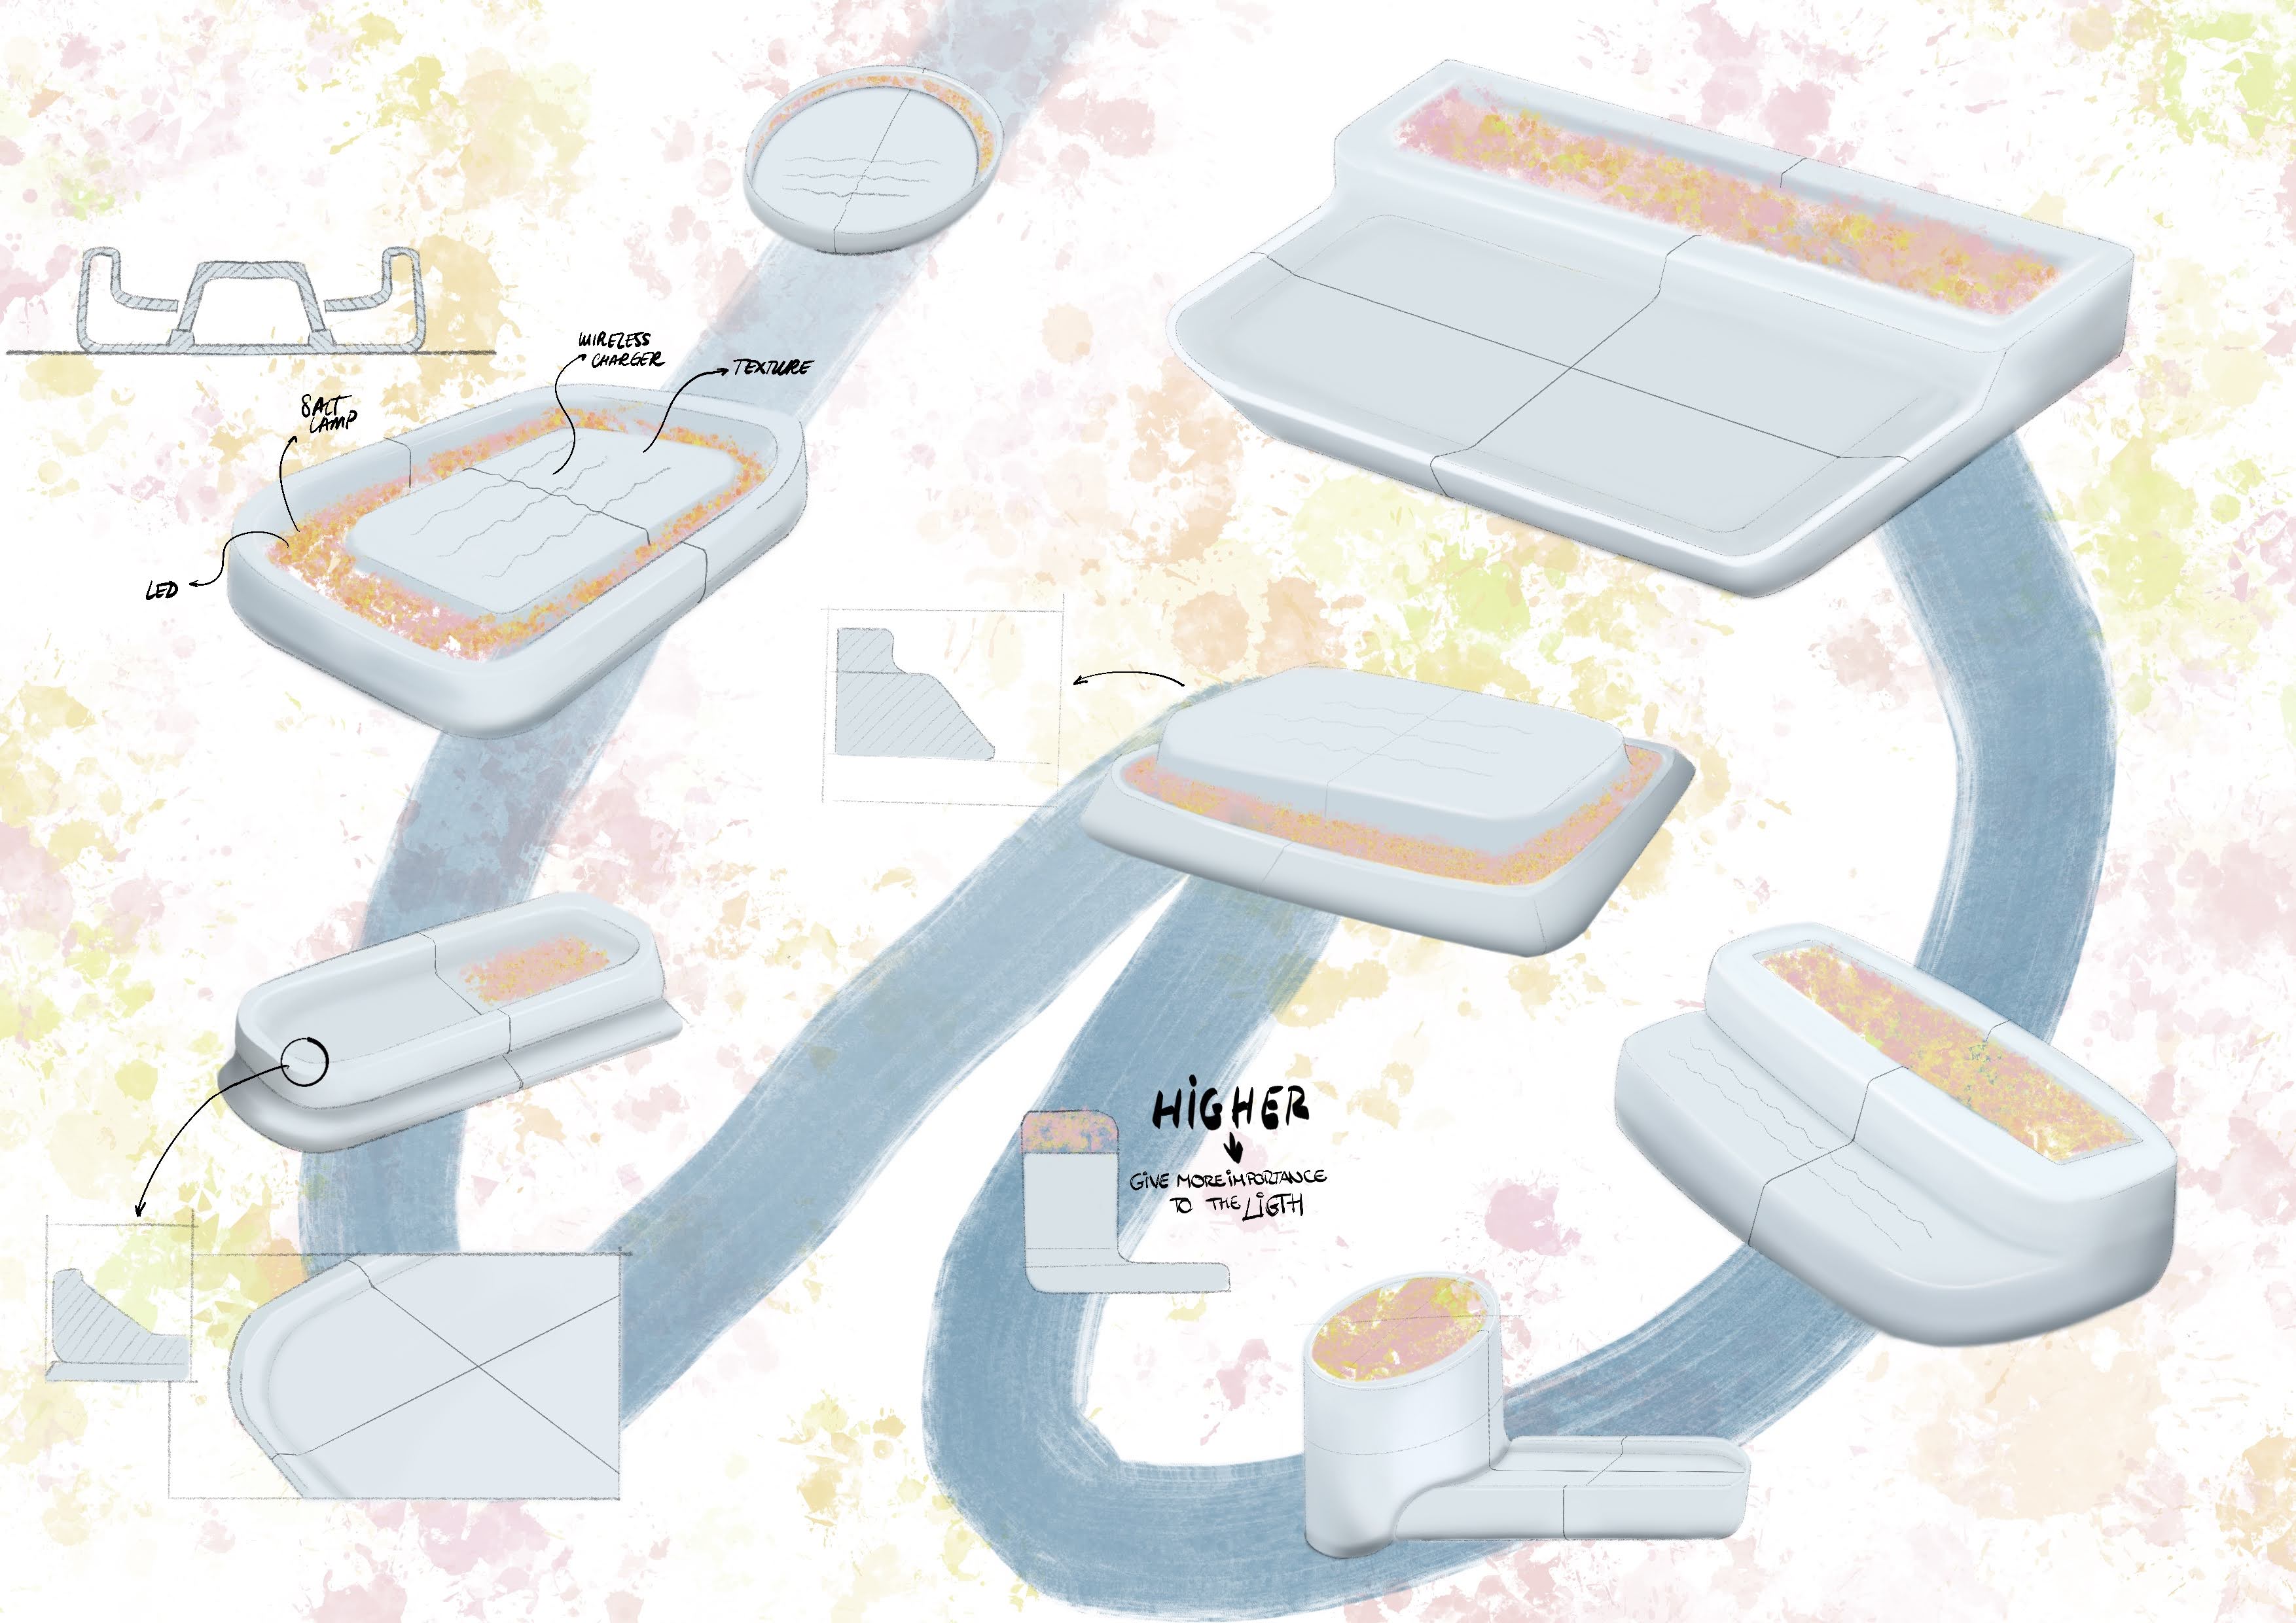
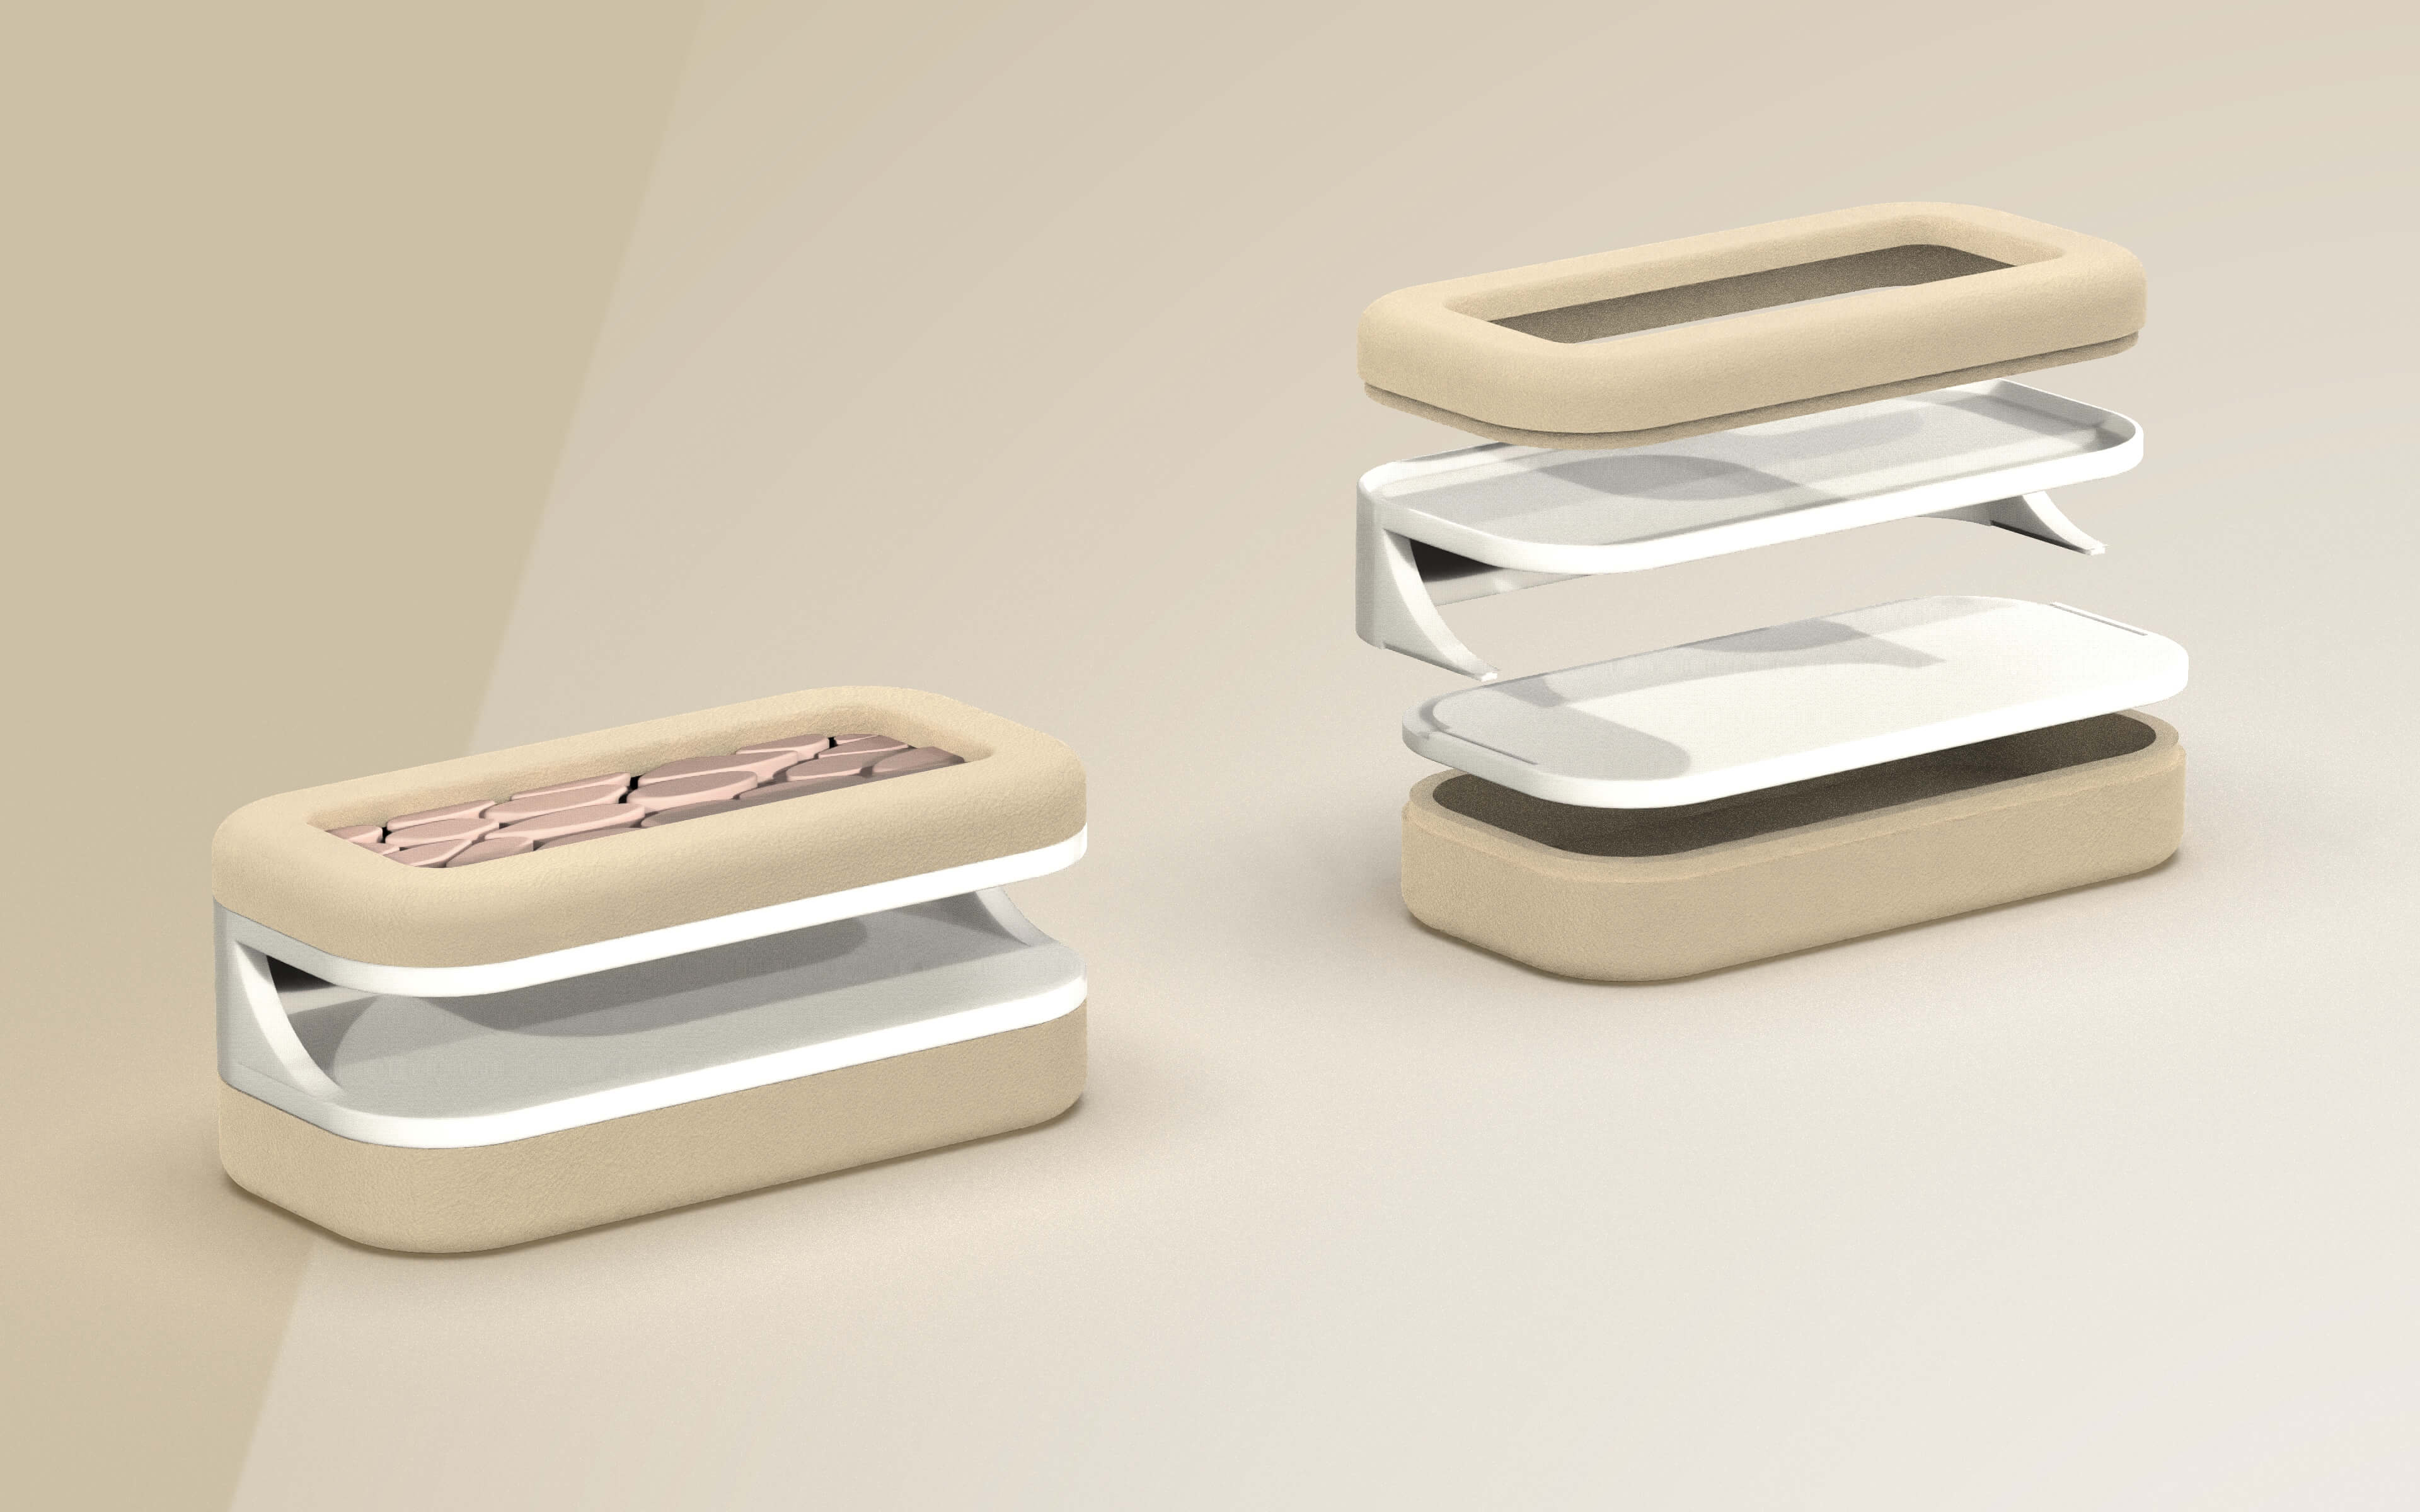
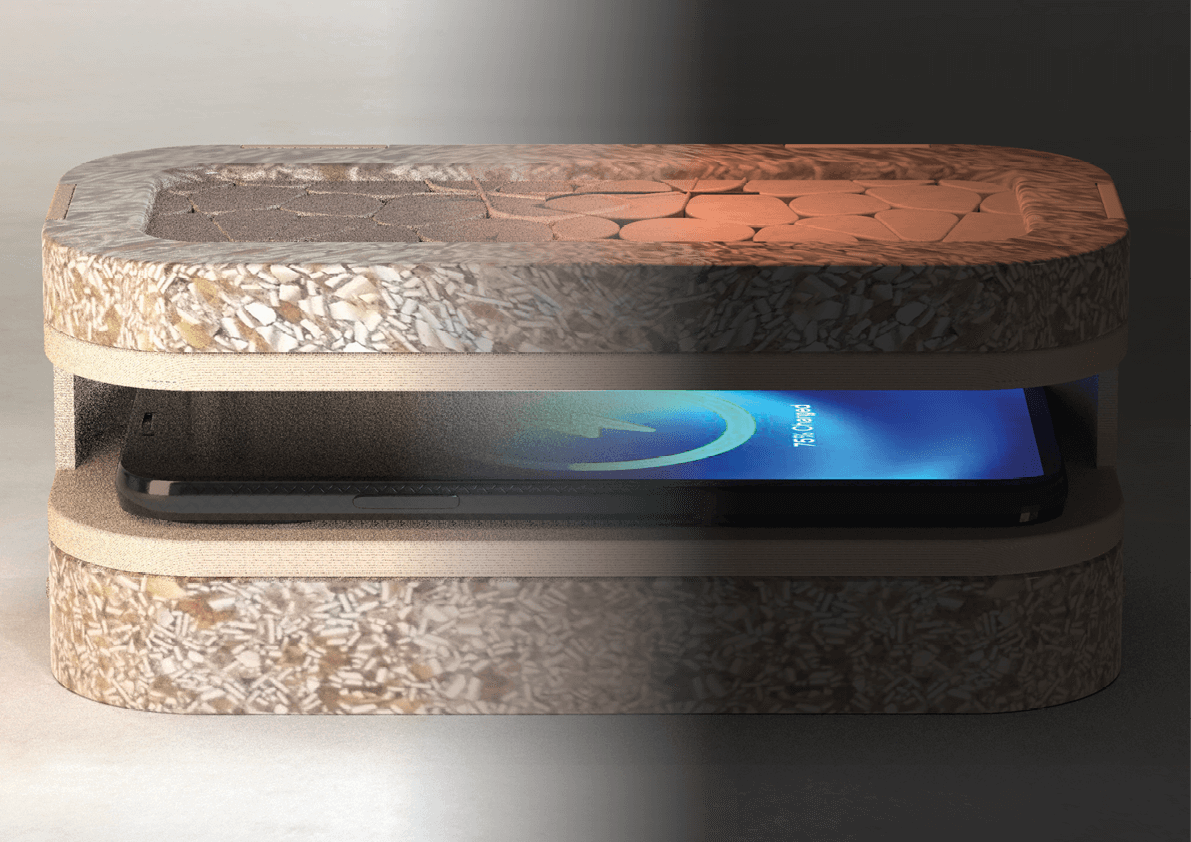
The idea is to make a mold or mill the material. The light part is elevated to give it more importance. Also, it has a textured surface so that if people touched, it creates a relaxing stimulation. Here is a rendering to get an idea of what the final product will look like.
· Phase 2
I thought it would be the final design, however, as all designers know, your first final idea is never the final idea. With the biomaterial experimentation, I learnt and understood how it works and I had to adapt to it. This allowed me to make a more aesthetic design, with coherence in relation to what Aura means and a product that fits the market.
In this new concept, I need to mix two materials/manufacturing techniques. So, I’ll use CNC for the biomaterial made of eggshells and colofonia and PLA 3D printing for the joining of both parts.
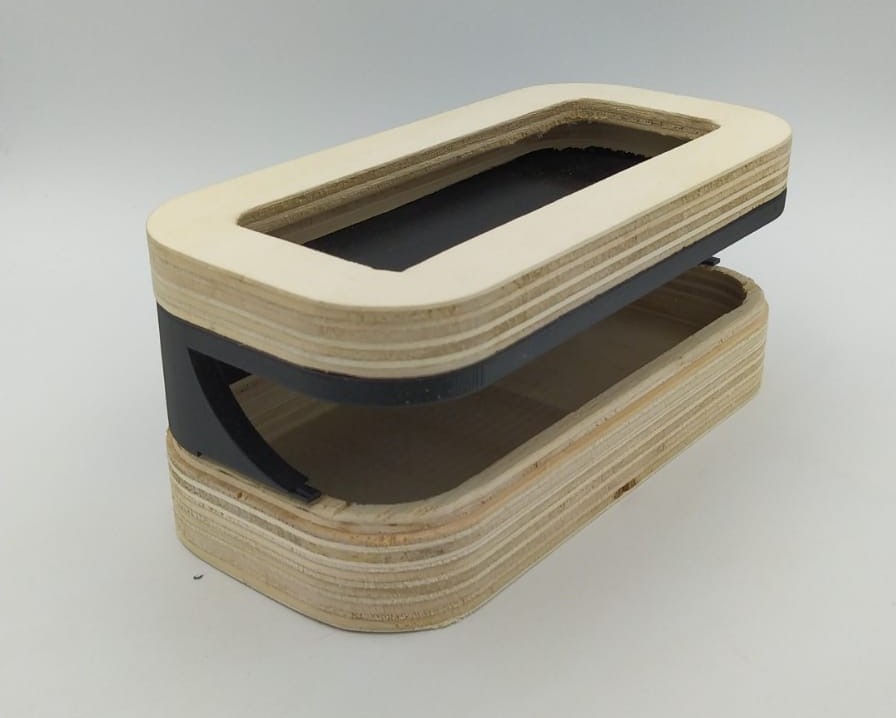
As I was in a moment of closing the design, I made a prototype in order to evaluate the final design. I used wood to replace the biomaterial pieces and black PLA filament. The aim was to check that all the pieces fit together.

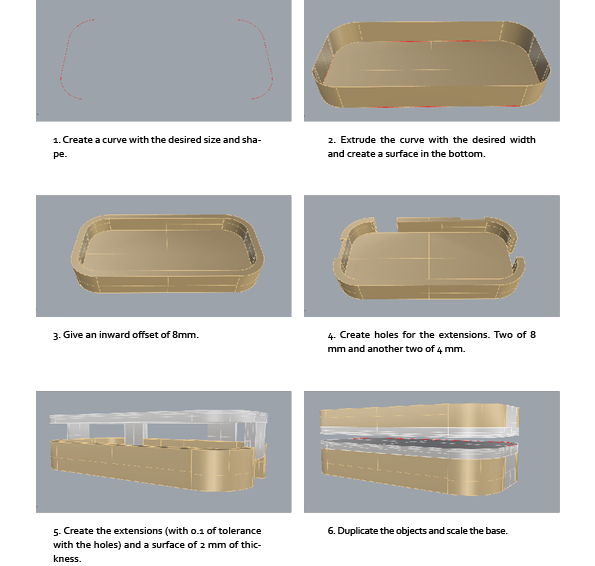
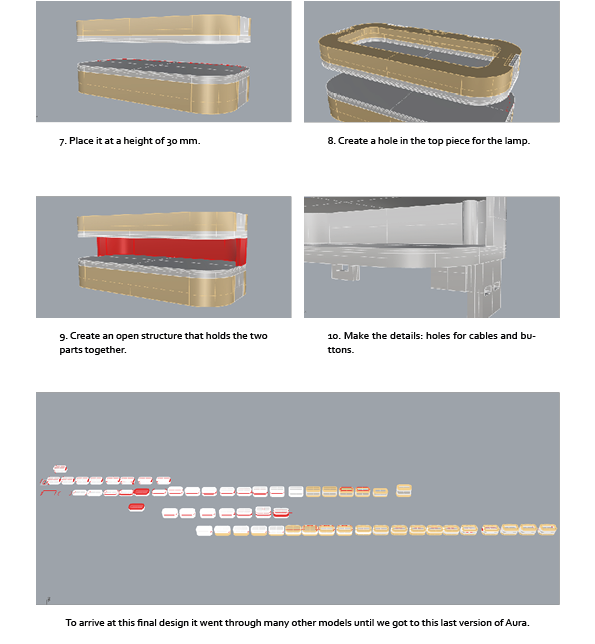
3D DEVELOPMENT
The design was re-evaluate to optimize manufacturing processes. I concluded that the 3D printed piece would be fabricated as a single piece. Also, it would have extensions that would allow the biomaterial to be fastened to the PLA and have holes for the cable and buttons.
AURA
· Manufacturing
> Himalayan Salt Lamp
To make the design more user-friendly and aesthetic, I decided to play with organic shapes. I used Grasshopper, a Rhinoceros plug-in, for this purpose, in which a curve attractor was used to control the Voronoi cells.
In the previous experimentation chapter I explain detaily how I did the silicon mold and the recipe I used.
> Biomaterial
Before “cooking” the biomaterial, I cut a rectangular mold of MDF with 302 x 276 x 58 mm dimensions, where it fits the 2 pieces.
 Settings for the laser cut:
- Speed: 25 mm/s
- Min. power: 70 %
- Max. power: 74 %
In the chapter Biomaterial: Eggshells+colofonia I explain how the biomaterial is made.
For this biomaterial recipe I used:
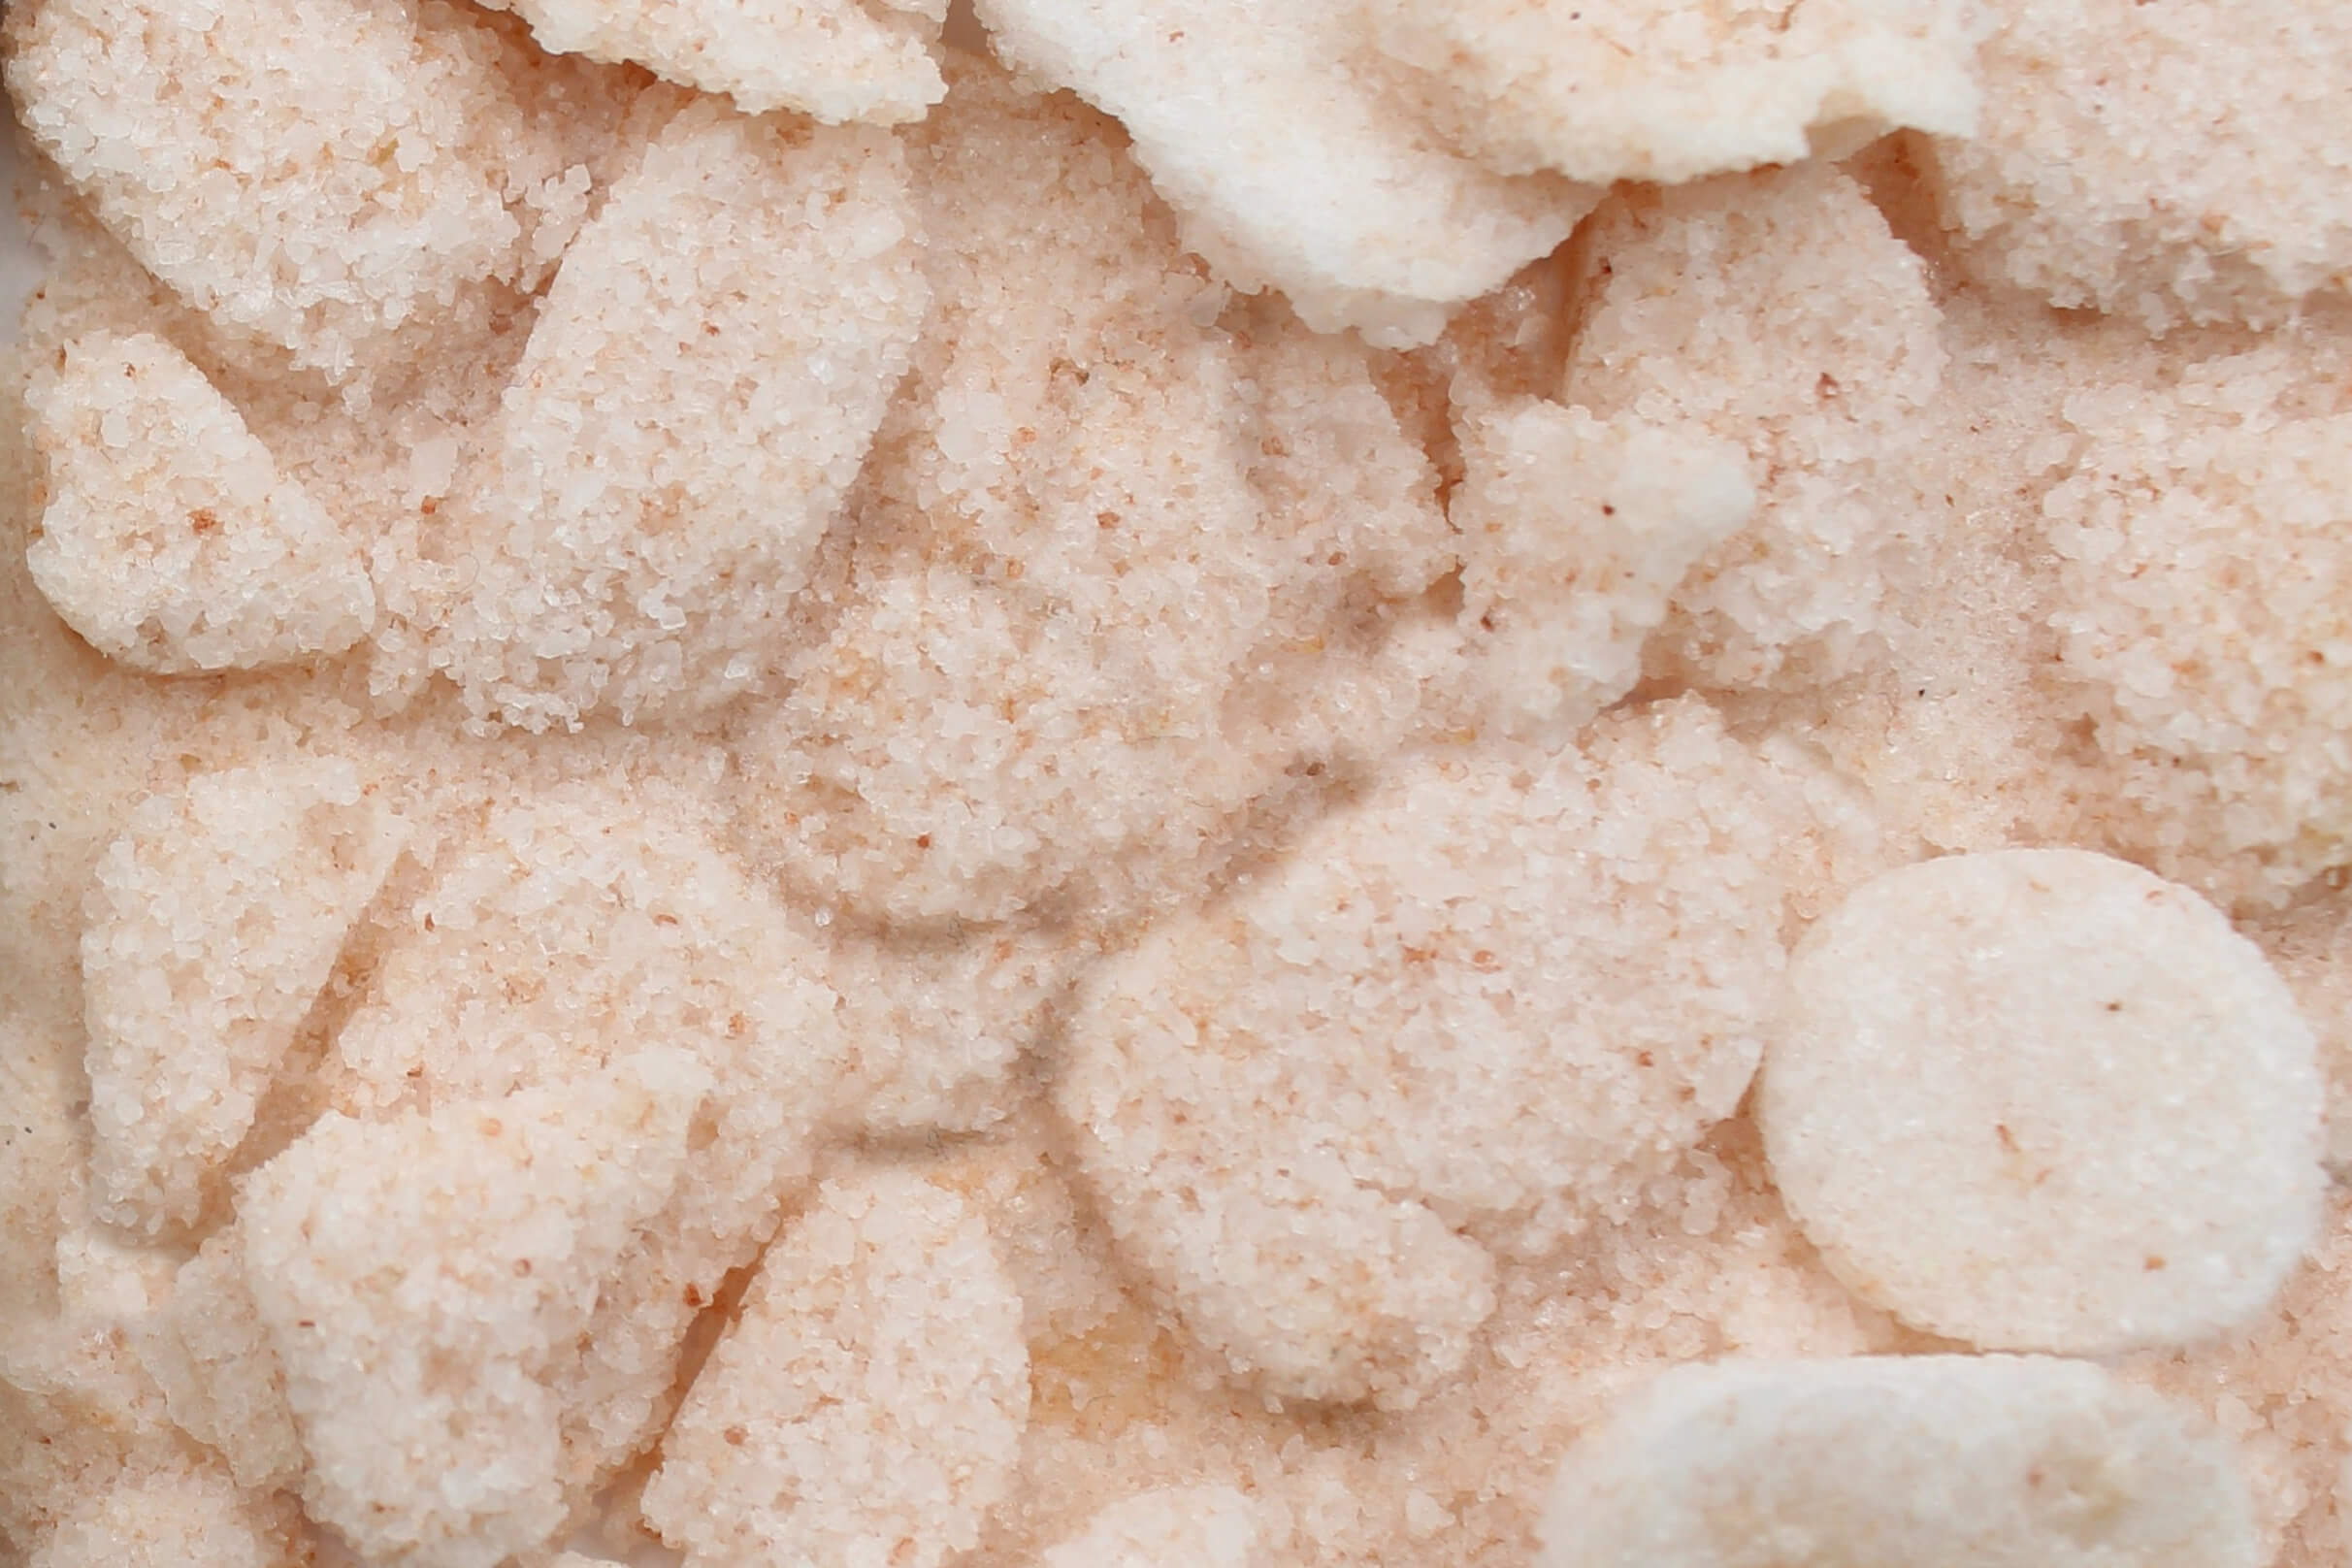
- 2 kg eggshells powder
- 1’500 kg rosin
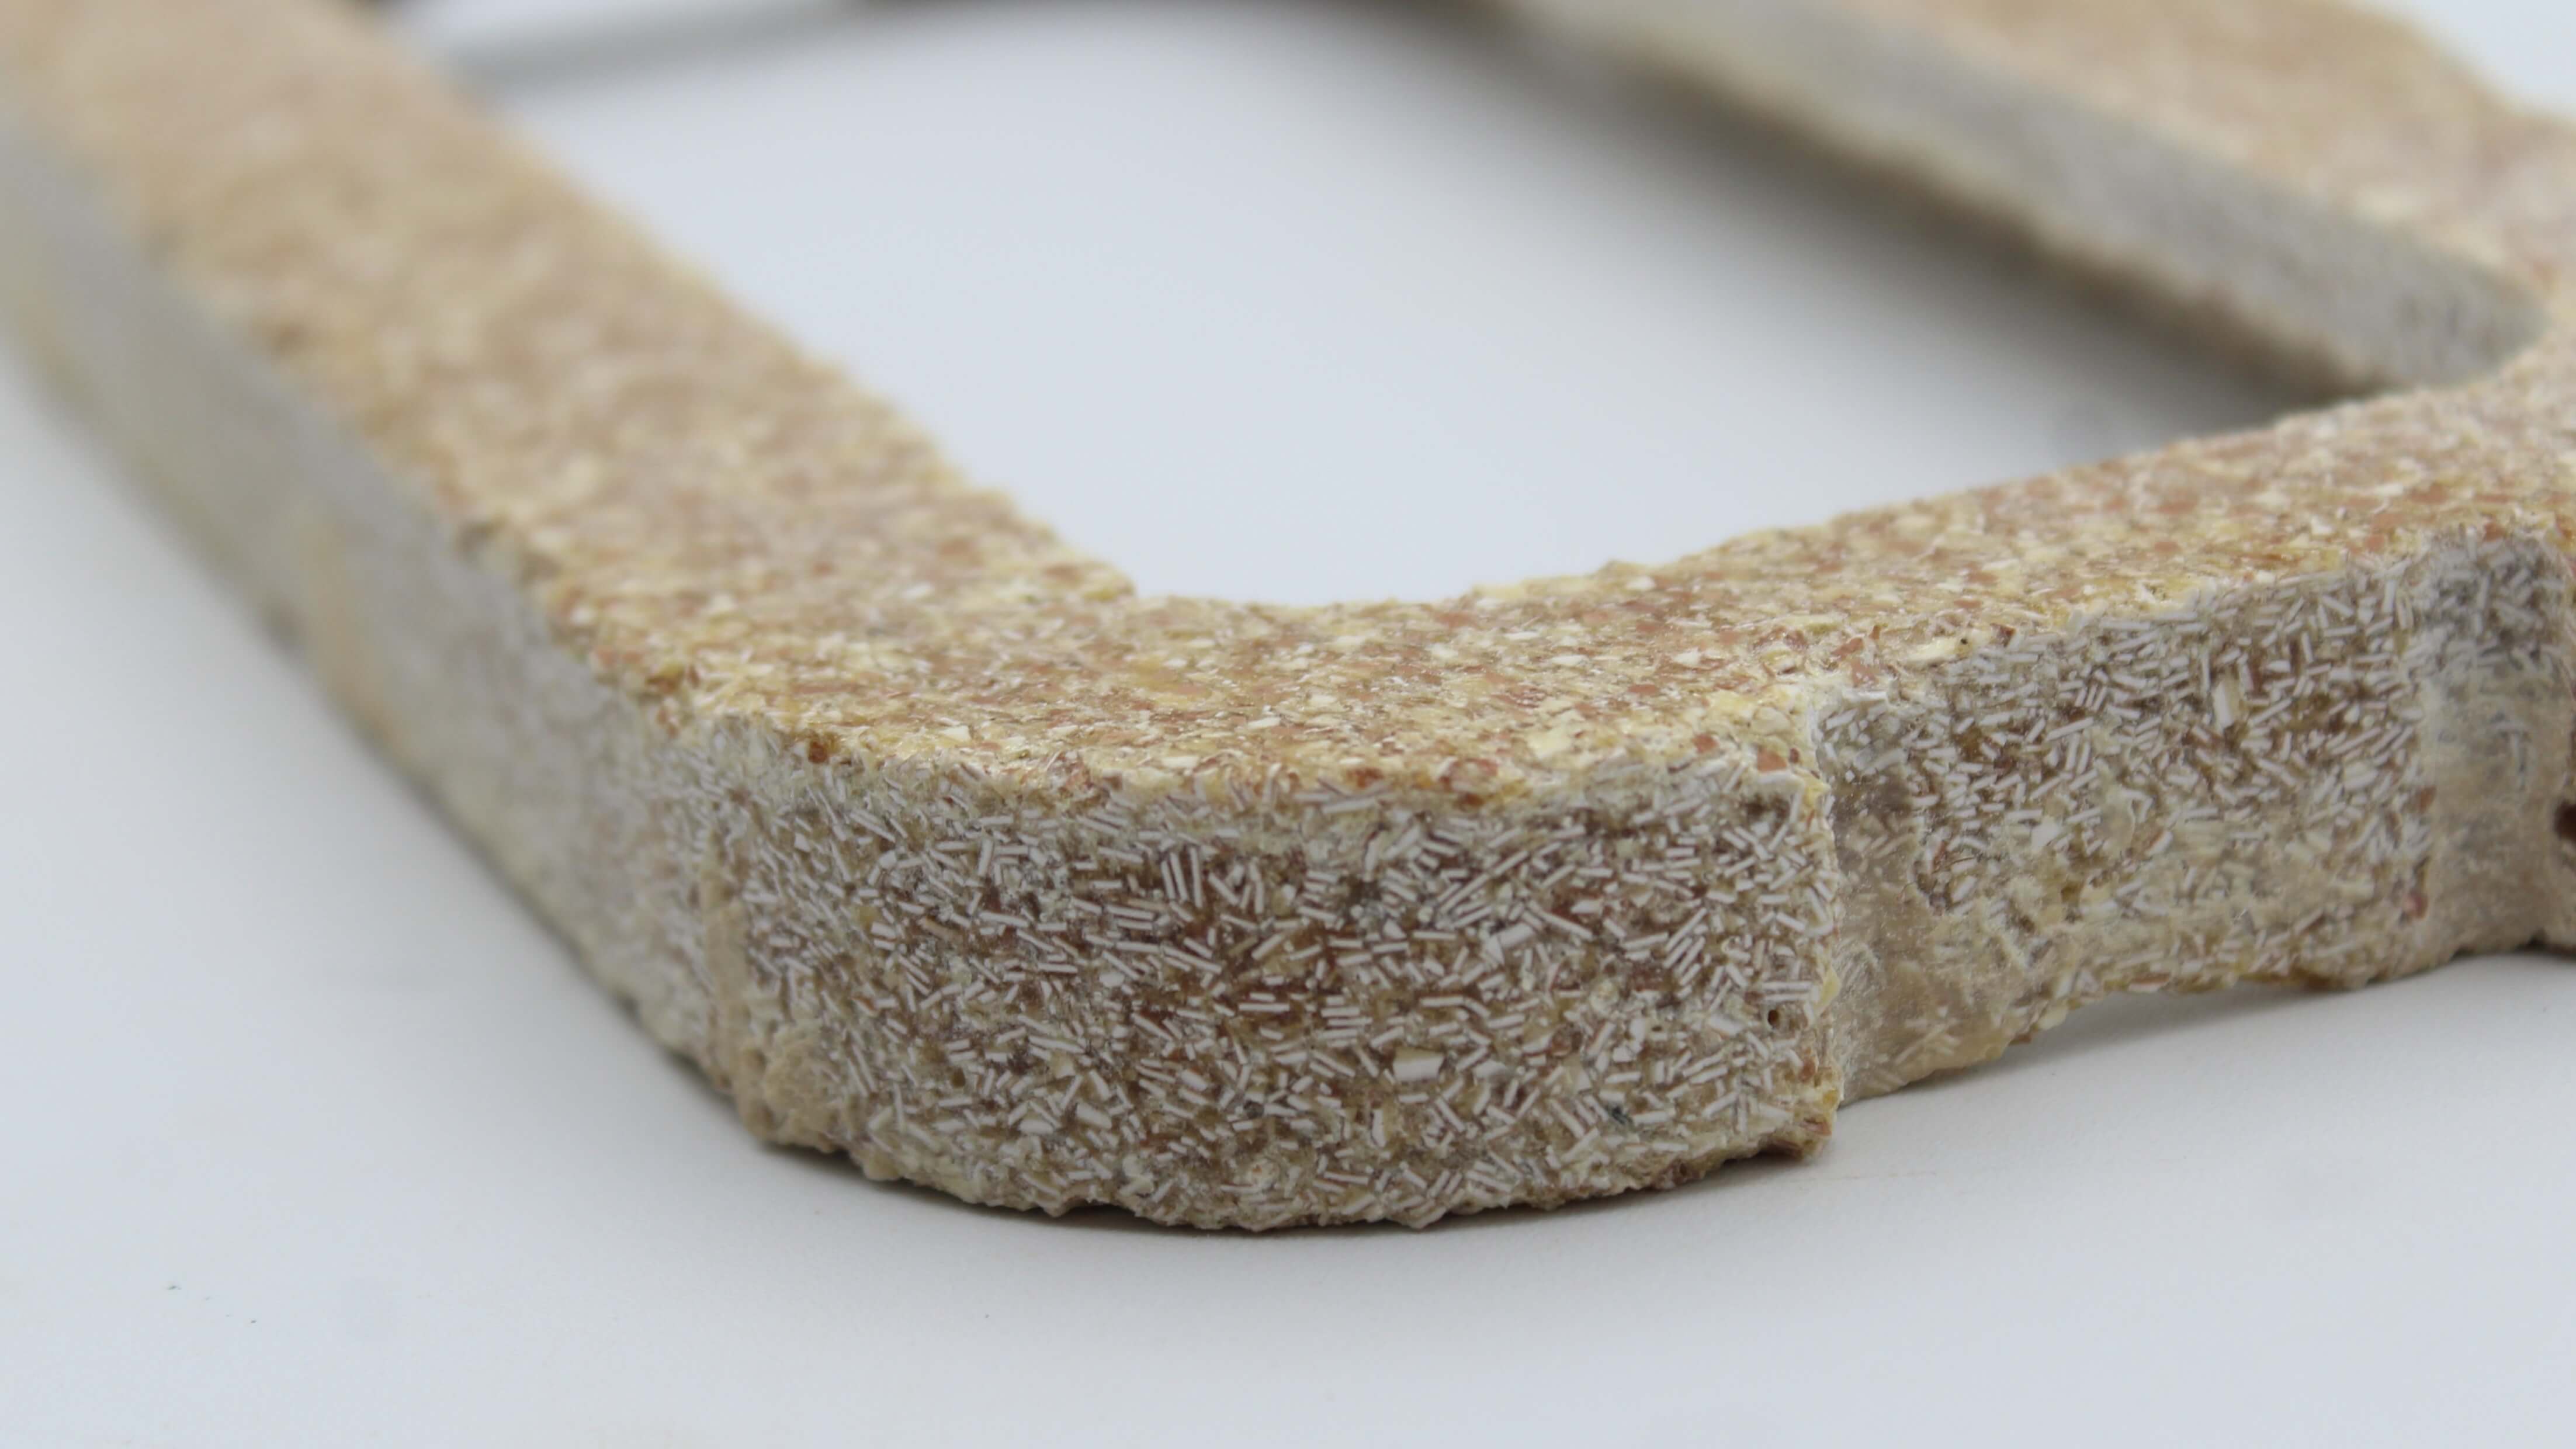
In short, first the eggs are prepared: boiled, dried and crushed. Then melt the rosin and mix it with the eggshell powder and pour it into the mold. Finally, after the mixture is dried, I milled it in the CNC.
RECOMMENDATIONS:
- Use protection equipment: heat gloves and FPP2 mask.
- Before pouring the biomateria into the mold, if the mold is covered with the eggshell powder, when removed, the powder will create a non-stick layer, which will make it easier to remove the biomaterial from the mold.
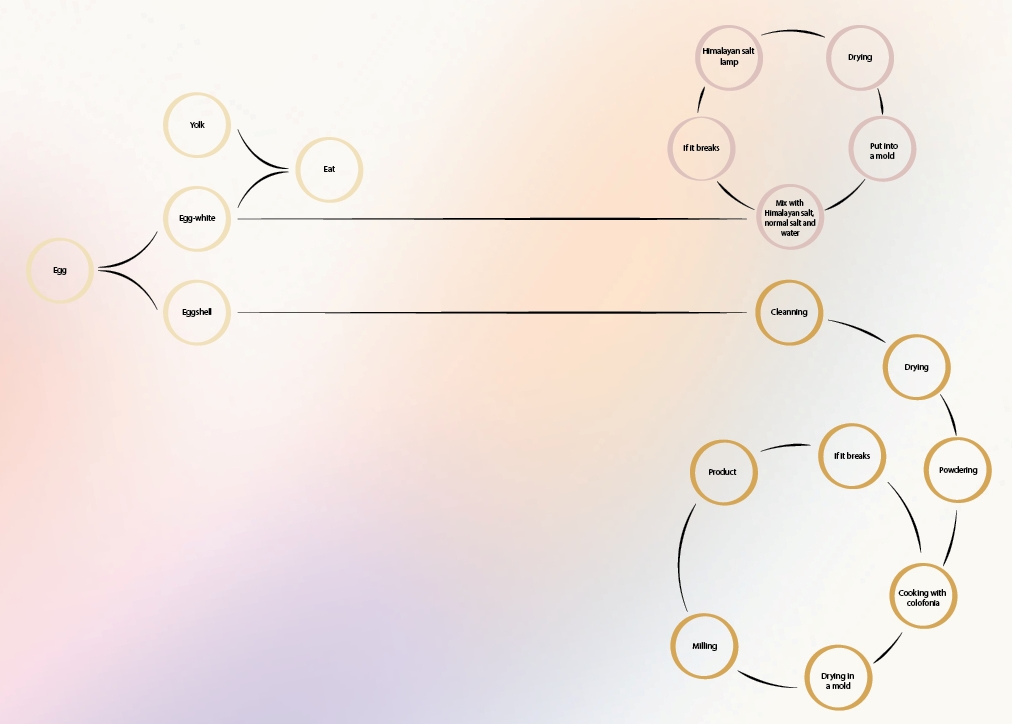
○ CIRCULAR PROCESS
Starting from one food, in this case the egg, it can be applied in different ways to obtain two totally different materials.
Egg white is used as a binder for the Himalayan salt lamp, while eggshell for the biofabrication of a resistant material.
In case any material breaks down, it can be recycled and reused, thus entering into a circular process.
> Structure
I explain how I did the structure in 3D development section.
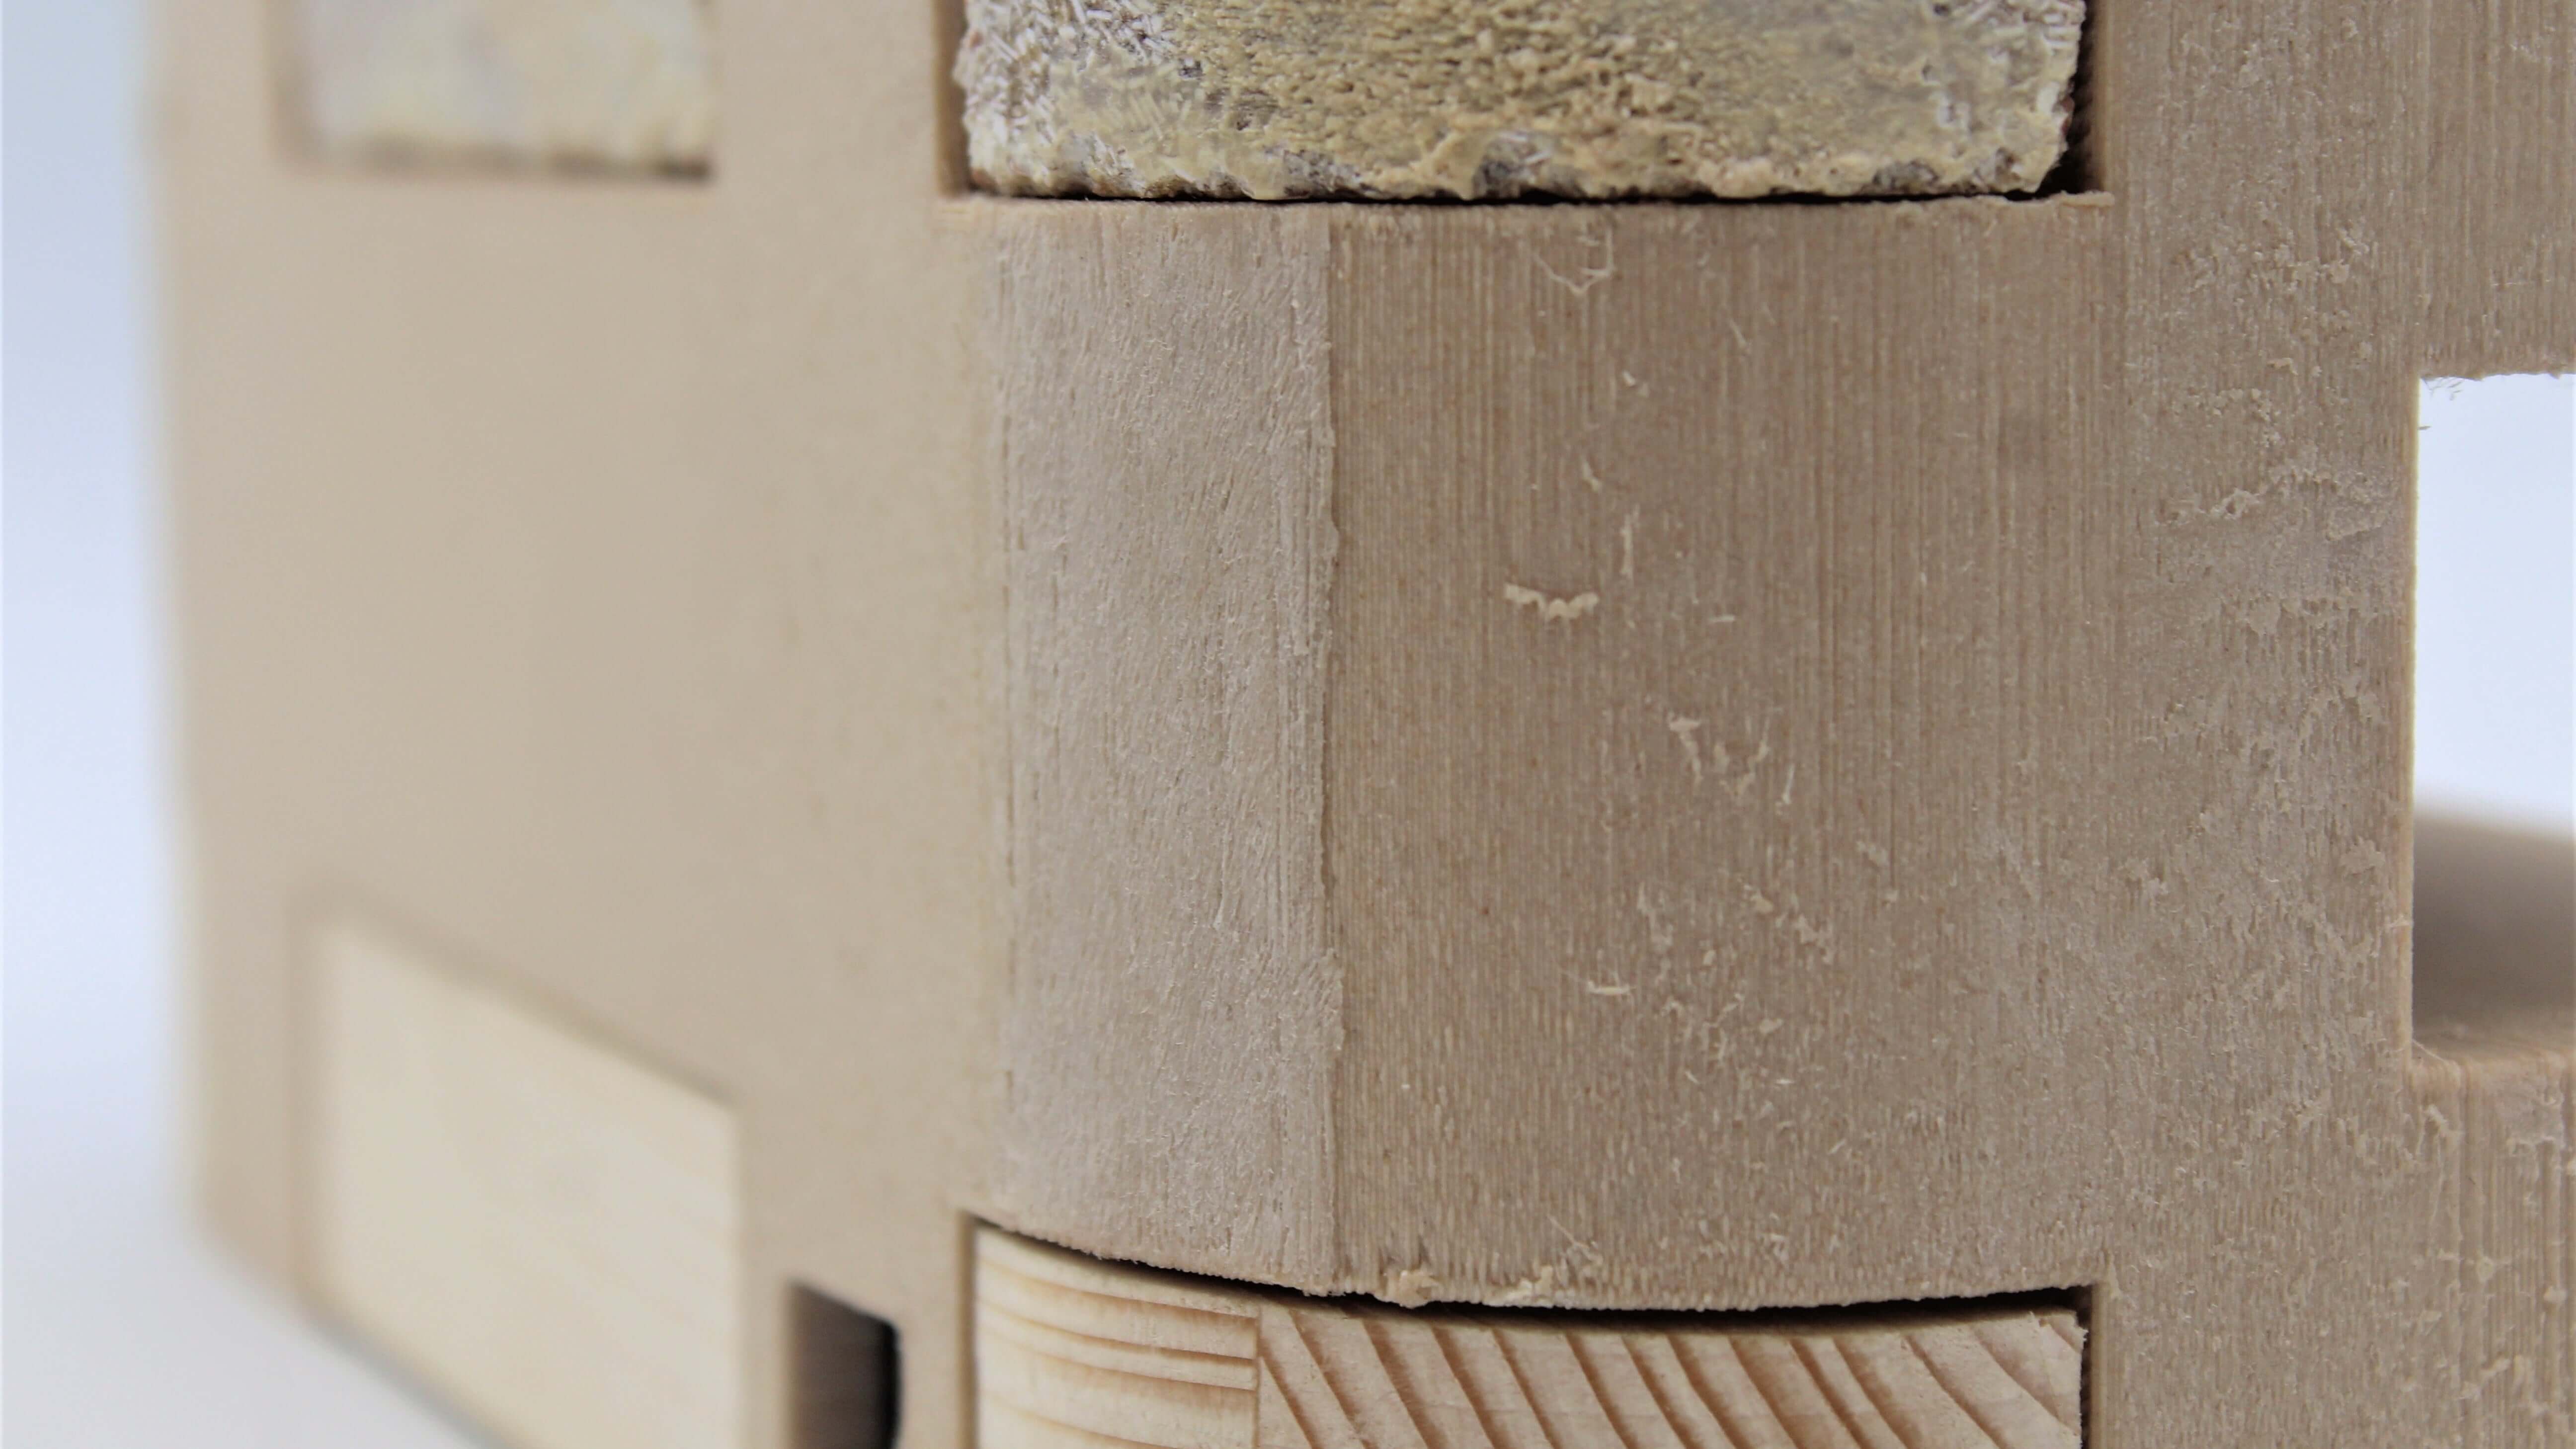
This piece was printed in wood filament. It is a composite that combines a PLA base material with wood dust, cork, and other powdered wood derivatives. This filament gives the aesthetics and feel of real wood.
It used 244g of filament and it took 21h to print it. In the gcode, I added 20 bed layers to ensure that the supports did not move, as happened in the previous print.

> Electronics
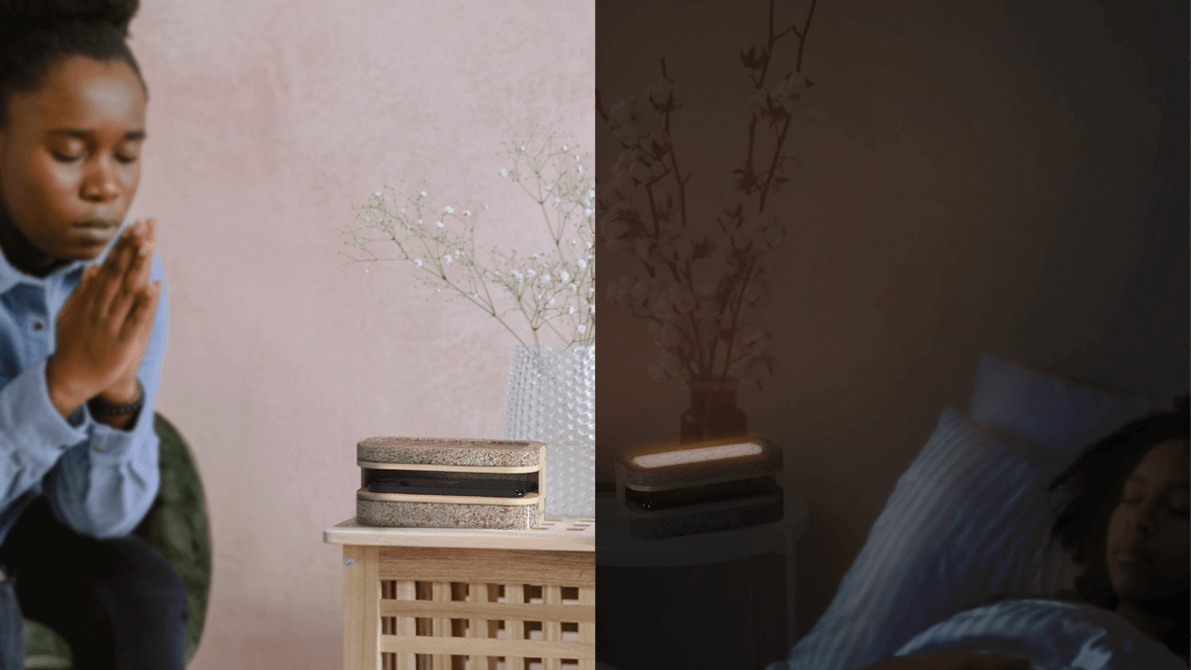
As I have explained in “previous information” chapter, chromotherapy uses seven colors as treatment: red, orange, yellow, green, blue, indigo and violet. For that reason, the lamp illuminates all of them tenuously. The user will have the option to change to the color he/ she wants or needs at that moment with a button or if he/she wants to turn off the light with another button.
Moreover, between the two pieces, the mobile phone can be placed and charge it thanks to the wireless charging base that it incorporates.
With the help of Julian, we soldered the components to the circuit board following this schematic.

In addition, I designed a specific piece to position the NeoPixels.
![]()
![]()
I used this code:
#include <Adafruit_NeoPixel.h>
#ifdef __AVR__
#include <avr/power.h>  // Required for 16 MHz Adafruit Trinket
#endif

#define BUTTON_PIN  2

#define PIXEL_PIN   8  // Digital IO pin connected to the NeoPixels

#define PIXEL_COUNT 5  // Number of NeoPixels


Adafruit_NeoPixel strip(PIXEL_COUNT, PIXEL_PIN, NEO_GRB + NEO_KHZ800);

boolean oldState = HIGH;
int mode = 0;         // Currently-active animation mode, 0-9

void setup() {
    pinMode(BUTTON_PIN, INPUT_PULLUP);
  strip.begin(); // Initialize NeoPixel strip object (REQUIRED)
  strip.show();  // Initialize all pixels to ‘off’
   Serial.begin(9600);
}


void loop() {
  // Get current button state.
  boolean newState = digitalRead(BUTTON_PIN);

  // Check if state changed from high to low (button press).
  if((newState == LOW) && (oldState == HIGH)) {
    // Short delay to debounce button.
    delay(20);
    Serial.println(“change”);

    // Check if button is still low after debounce.
    newState = digitalRead(BUTTON_PIN);
    if(newState == LOW) {      // Yes, still low
      if(++mode > 6) mode = 0; // Advance to next mode, wrap around after #6
      switch(mode) {           // Start the new animation...
        case 0: // Red
             colorWipe(strip.Color(255,   0,   0), 50);
             break;
        case 1: // Orange
             colorWipe(strip.Color(171, 255, 0), 50);
             break;
        case 2:     // Yellow
             colorWipe(strip.Color(150,150, 0), 50);
             break;
        case 3:     // Green
             colorWipe(strip.Color(0, 255, 0), 50);
             break;
        case 4:    // Blue
             colorWipe(strip.Color(0,   0, 255), 50);
             break;
        case 5: // Indigo
             colorWipe(strip.Color(70,   0, 130), 50);
             break;
        case 6:   // Purple
             colorWipe(strip.Color(60, 0, 60), 50);
             break;
        }
     }
  }

  // Set the last-read button state to the old state.
  oldState = newState;
}


void colorWipe(uint32_t color, int wait) {
  for(int i=0; i<strip.numPixels(); i++) { // For each pixel in strip...
    strip.setPixelColor(i, color);         //  Set pixel’s color (in RAM)
    strip.show();                          //  Update strip to match
    delay(wait);                           //  Pause for a moment
  }
}
· Viability
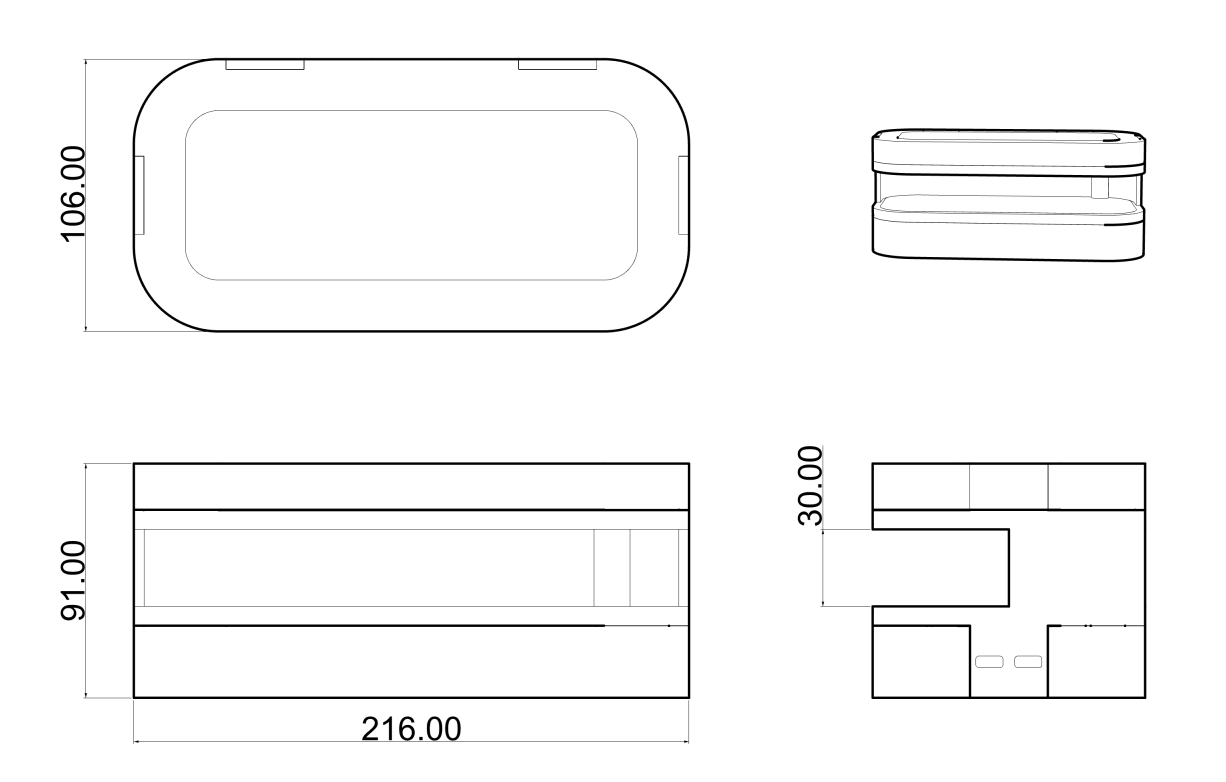
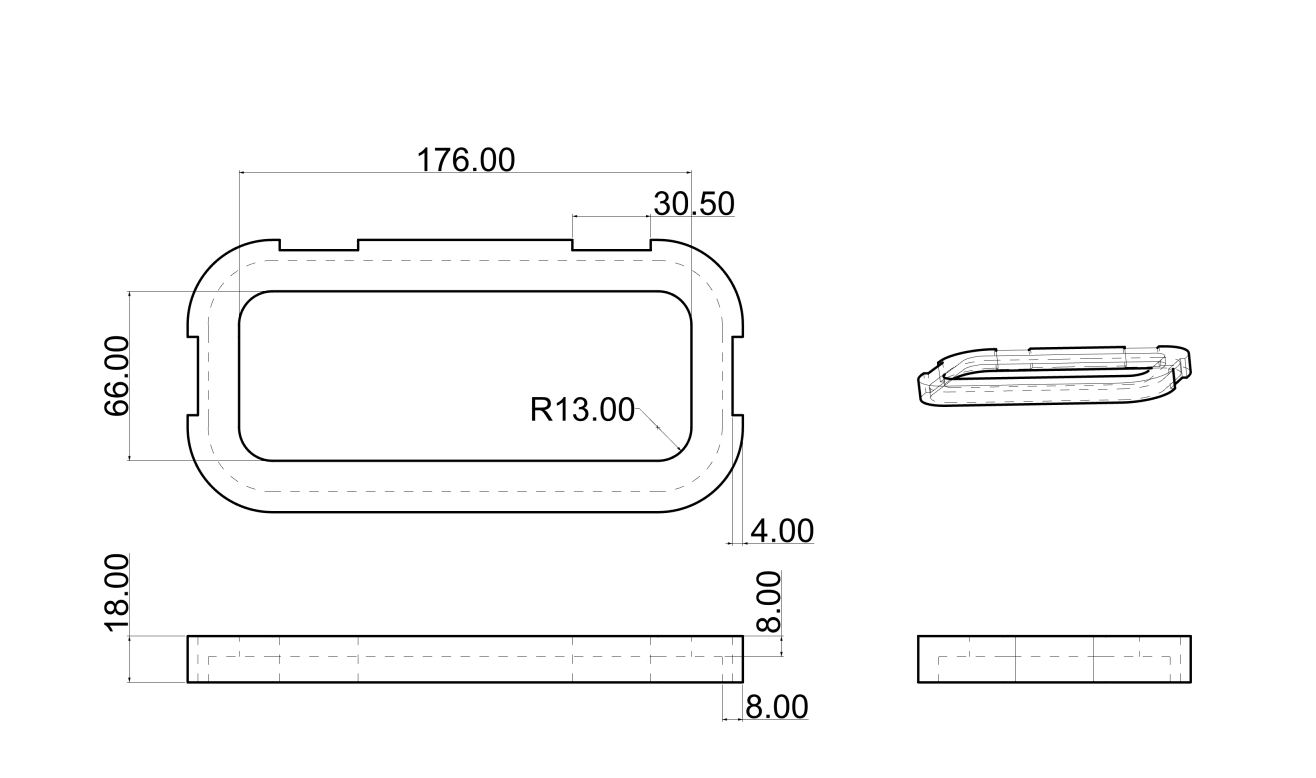
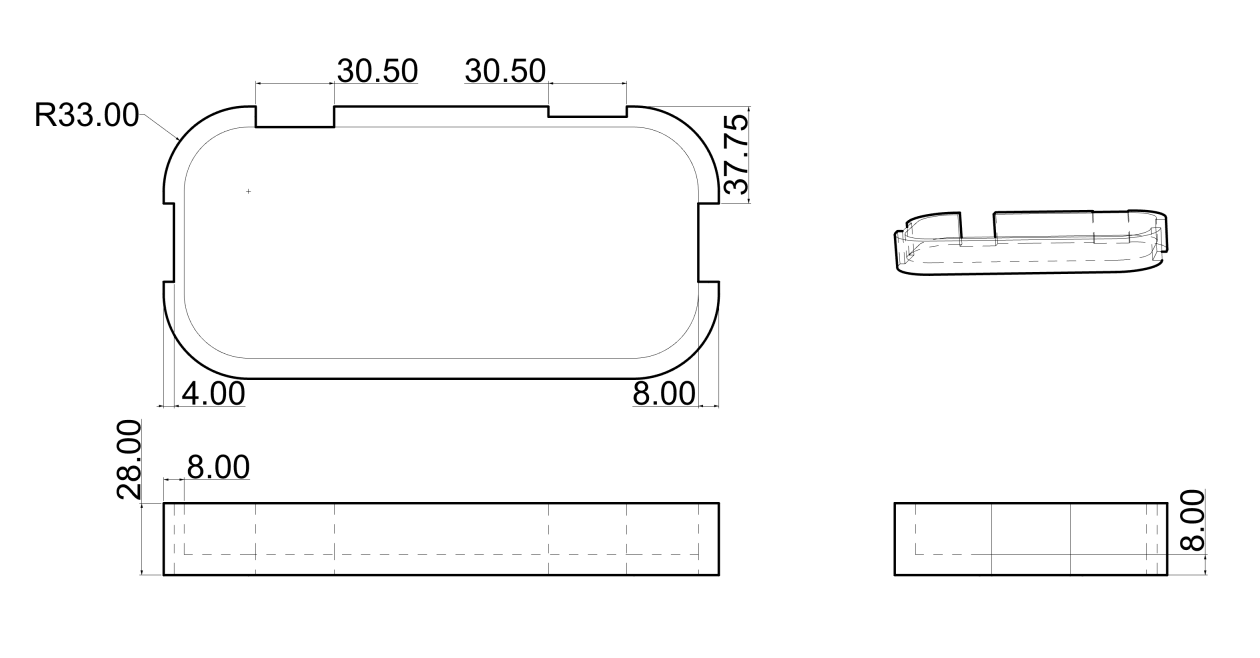
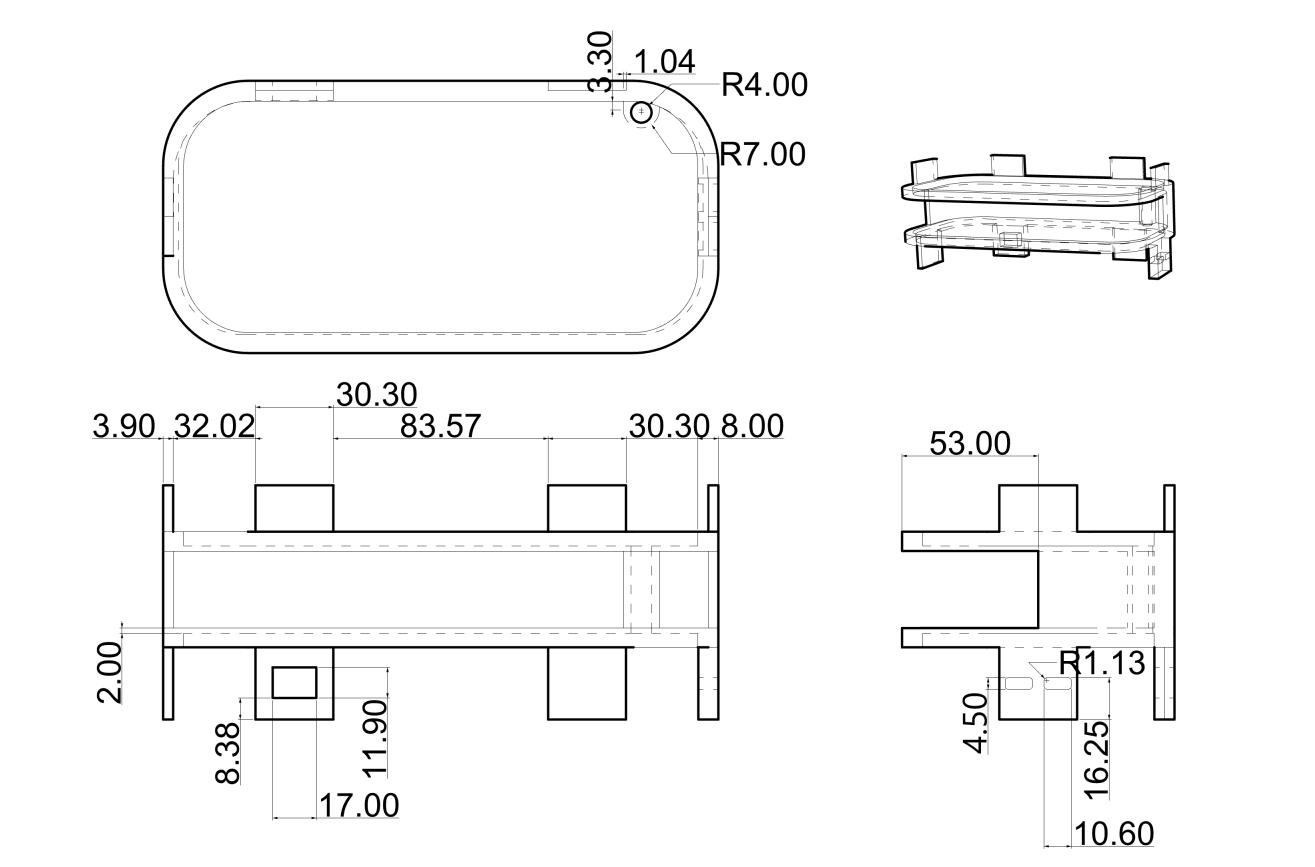
> Technical drawings
I made these drawings so that you can better understand the shape of the product and how it is assembled.
-
General view
-
Top piece
-
Botton piece
-
Structure piece
> Pricing
This is the list of all the materials I have used for Aura:
| Qty | Description | Price | Link | Notes |
|---|---|---|---|---|
| 2 | Himalayan salt (fine) | 1.70 € | Mercadona | - |
| 2 kg | rosin | - | Ceras Martí | By BDC |
| 5 | Eggs | - | Local trade | - |
| Eggshell | - | Local trade | - | |
| 2 kg | Cera Carnauba | - | - | By BDC |
| 1 | Liquid silicone for molds | - | - | By BDC |
| 1 | Casserole 22Ø | 6.95 € | Local trade | - |
| 1 | Casserole 24Ø | 8.95 € | Local trade | - |
| 1 | Wireless charger | 8.95 € | Local trade | - |
| 1 | USB splitter cable | 11.99 € | Amazon | - |
| 1 | Spoon | 1 € | Local trade | - |
| 2 | Heat gloves | - | - | By BDC |
| 1 | FPP2 mask | 0.60 € | Local trade | - |
Tools:
- Laser cut
- 3D Printer
- CNC
- Stove
The costs have been calculated for one unit, due to this type of manufacturing process. Logically, as production increases, manufacturing costs will decrease due to economies of scale.
For the manufacture of AURA, the necessary machines were available to manufacture it at the Basque BioDesign Center, which considerably reduced the price.
I calculated the price based only on the components and it would have a price of 94’54€. The price of current similar products ranges between 50- 100 €, so it falls within the range of sales.
Take a look at the final report summarizing all this information and I hope you enjoy it!