3. 3D Printing & 3D Ceramic Printer Building
· 3D Printing With Ceramics
Last but not least, the 3th part of my project involves the 3d printing. The aim of this part of the research is to 3d print the Local Clays I collected from the mountain. For doing so, first of all I needed to obtain more practice for a better understanding of the whole process, so I spent so many hours kneading the clay and designing in grasshopper, for example.
Designing in Grasshopper for 3D printing With Ceramics
As I said, I designed all my pieces in grasshopper, I've created my own definition which even if it is simple,it allows you to create an endless amount of different shapes.
The Definition - How It Works
This is how my definition looks like:
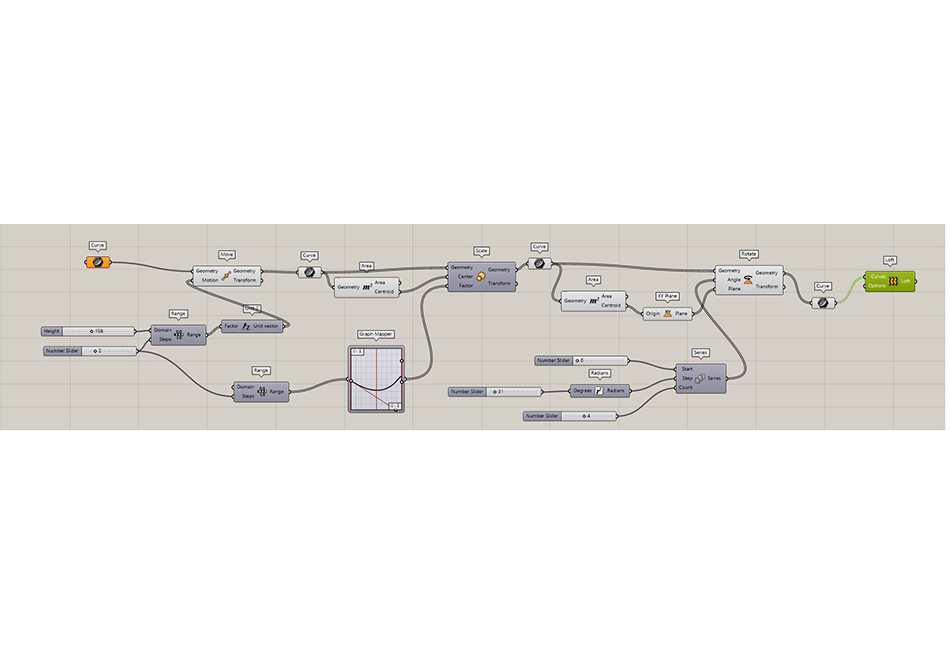
The definition works this way:
- 1. I create one curve in Rhino, which I link in Grasshopper as a "Curve" (you can use whatever line you want).
- 2. Once it is linked, you can choose the height and the number of lines you want for your design.
- 3. You can choose what type of graphic you want for the "Graph Mapper".
- 4. You can choose to apply a torsion to the shape in case you want it.
- 5. Just PLAY until you find a shape you like!
- 6. "Bake" it, ant then "Cap" it.
- 7. Export it as an .STL file to prepare a G-CODE in an slicer.
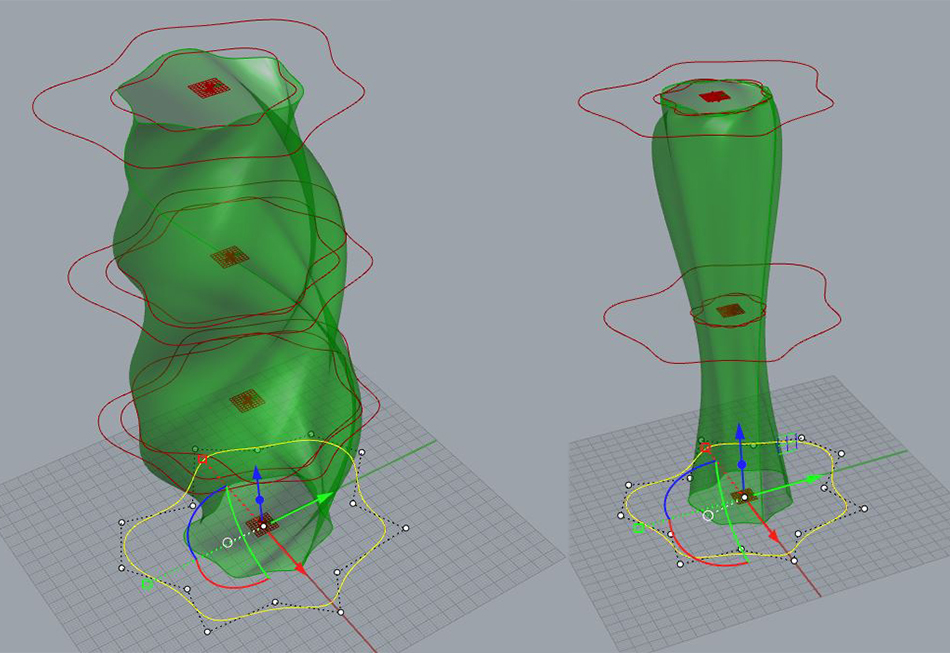
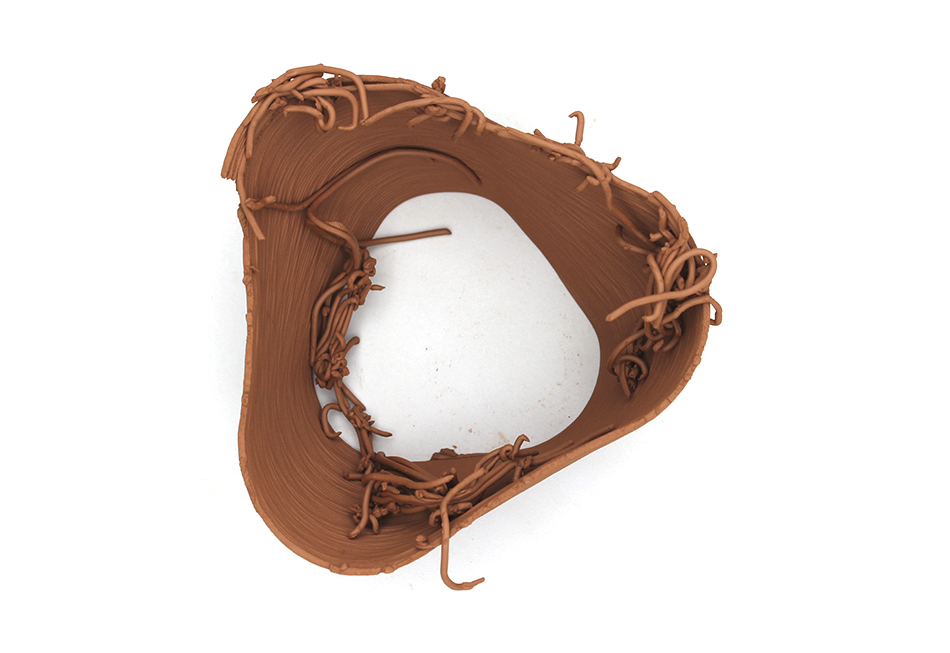
These are two samples created from the same starter line:
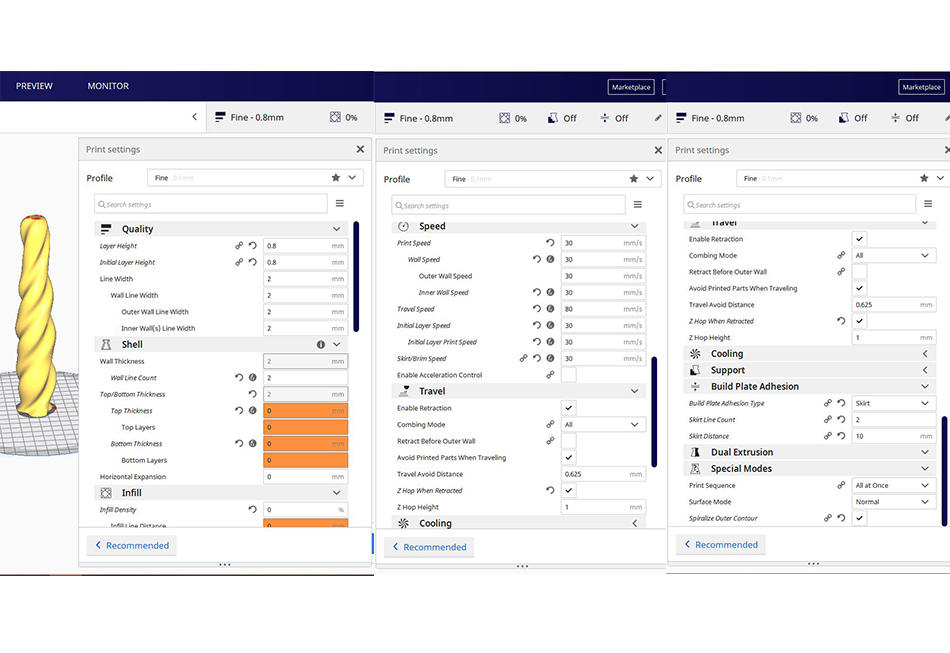
Slicing Your Design on Cura
These are the parametters for slicing the designs on cura for 3d printing with ceramics:
I use the same parametters for all the designs.
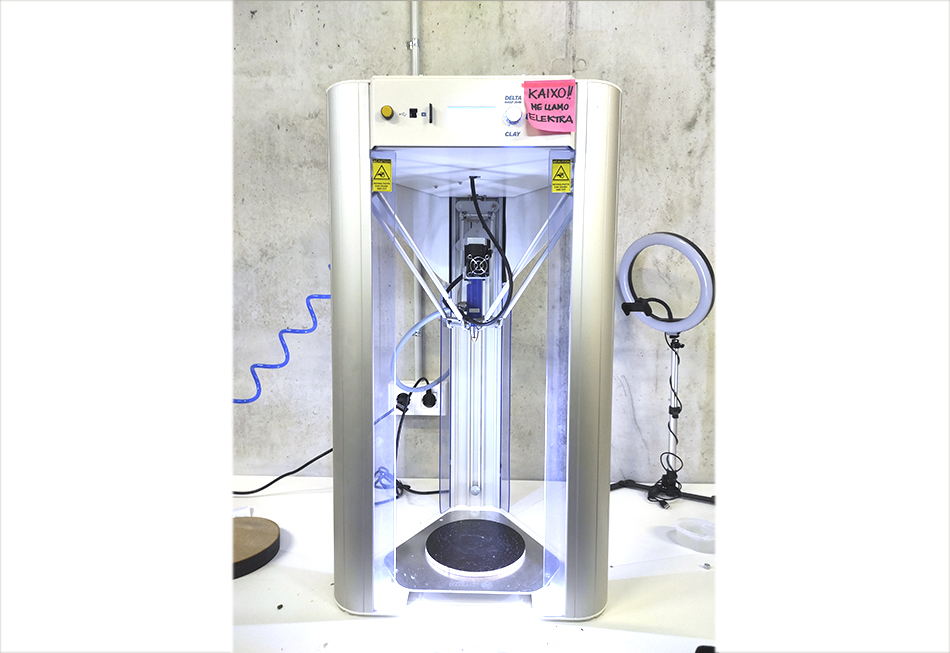
Preparing The Ceramic 3D Printer
Our Ceramic 3D Printer's name is Elektra. She is a Delta WASP 2040 and prints up to 40cm high.
Preparing The Machine
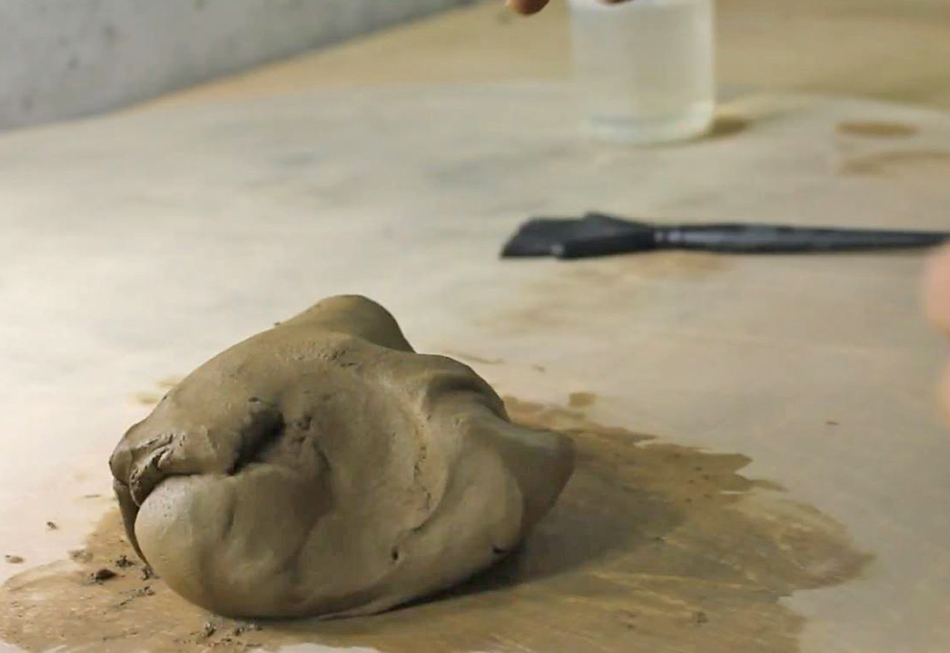
When you want to print with ceramics, one of the most important steps is how to prepare the clay to fill the tank. Here you have the steps you need to follow to prepare it in a proper way.
These is the process you need to follow:
- 1. Make a hole in the clay.
- 2. Add between 5% to 10% of water corresponding to the weight of the material.
- 3. Mix water and clay.
- 4. When the mixture allows it, start kneading it, with the "Ox-head" technique (the name comes from the shape the clays has due to the gesture of the hands when kneading it).
- 5. Once kneaded, the material should be ready to the next step.
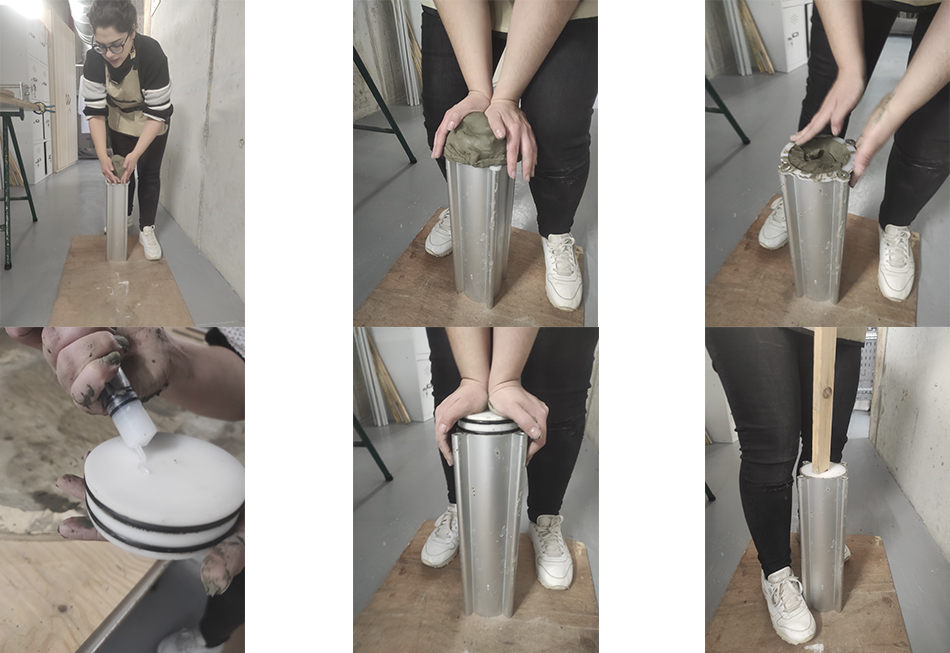
- 6. Then, the tank needs to be dissambled (and there is one piece wich allows you to full it in an easier way, without the problem os the clay entering into the holes).
- 7. You need to fill the tank with pressure from your hands (avoiding the air entering).
- 8. When the tank is full, you need to put some petroleum jelly into the plastic piece (which goes on the top of the clay).
- 9. Then you need too assemble the tank, with the piece which goes below.
- 10. Then close it in the top, and put it on the machine and connect it with the air compressor.
Here you have a tutorial where my instructor Betiana Pavón explains so nicely the whole process of preparing the clay for 3D printing it.
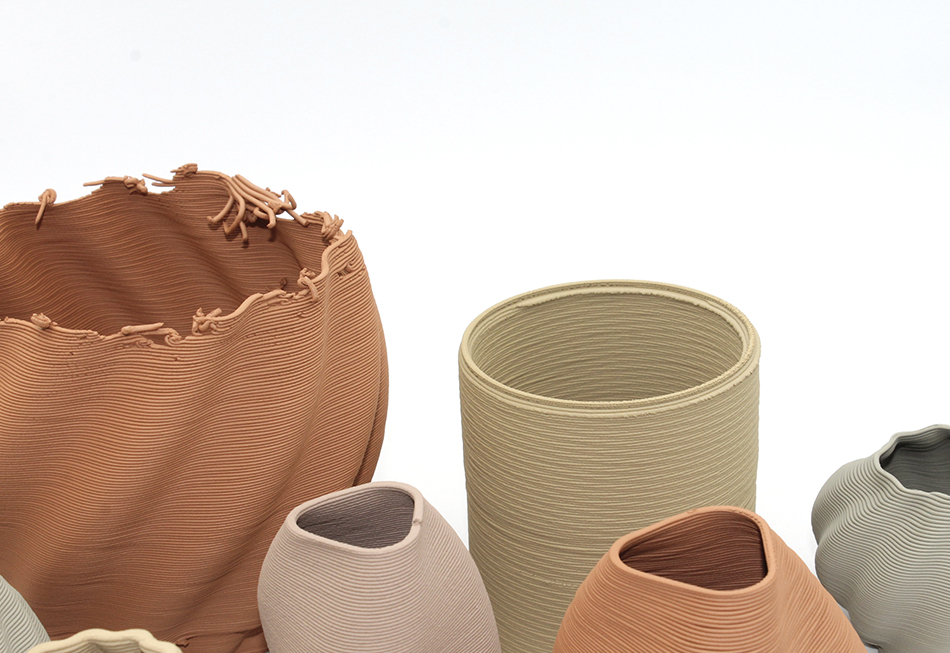
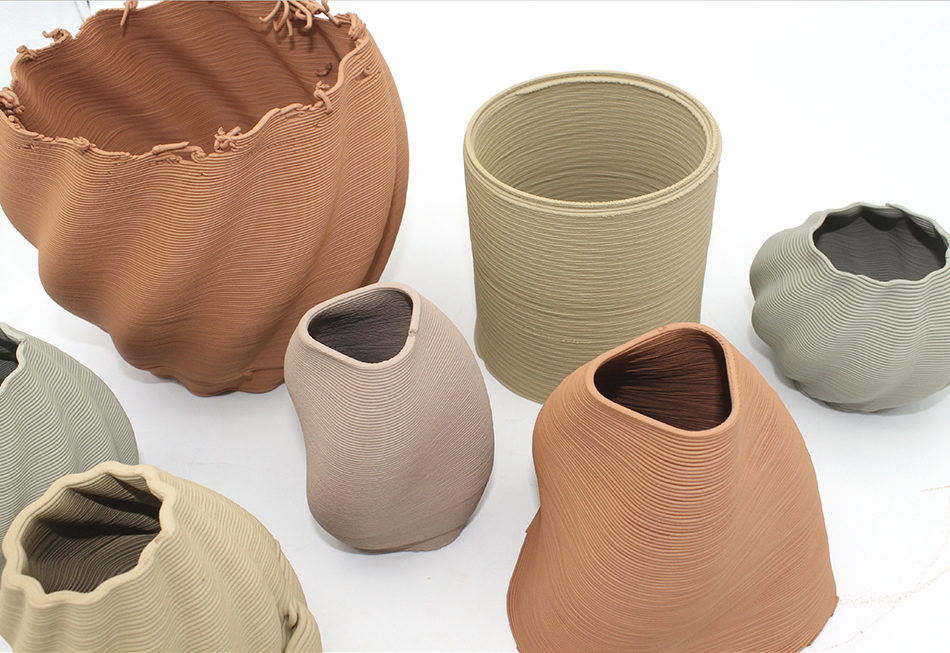
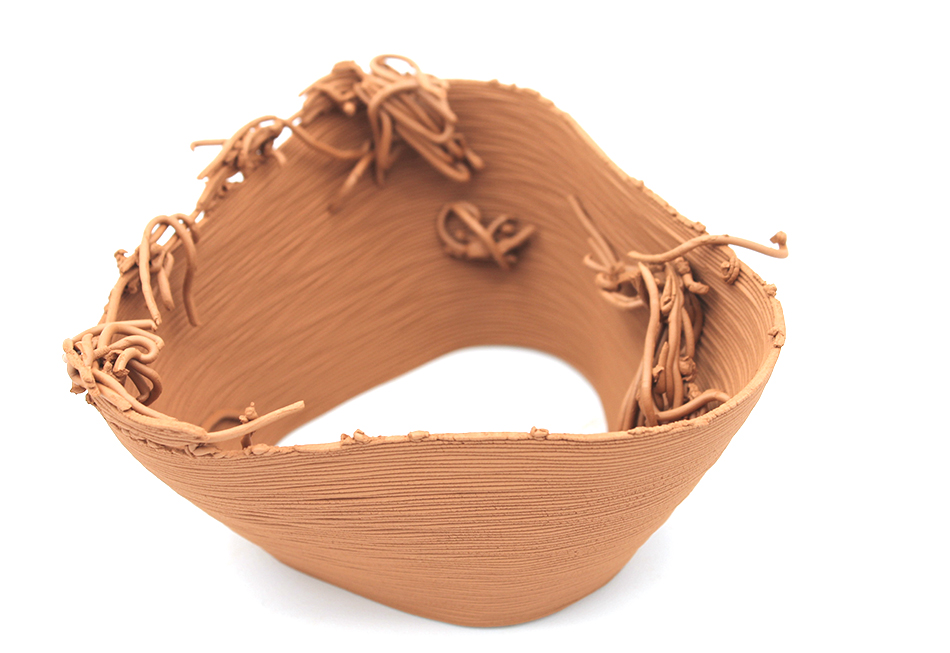
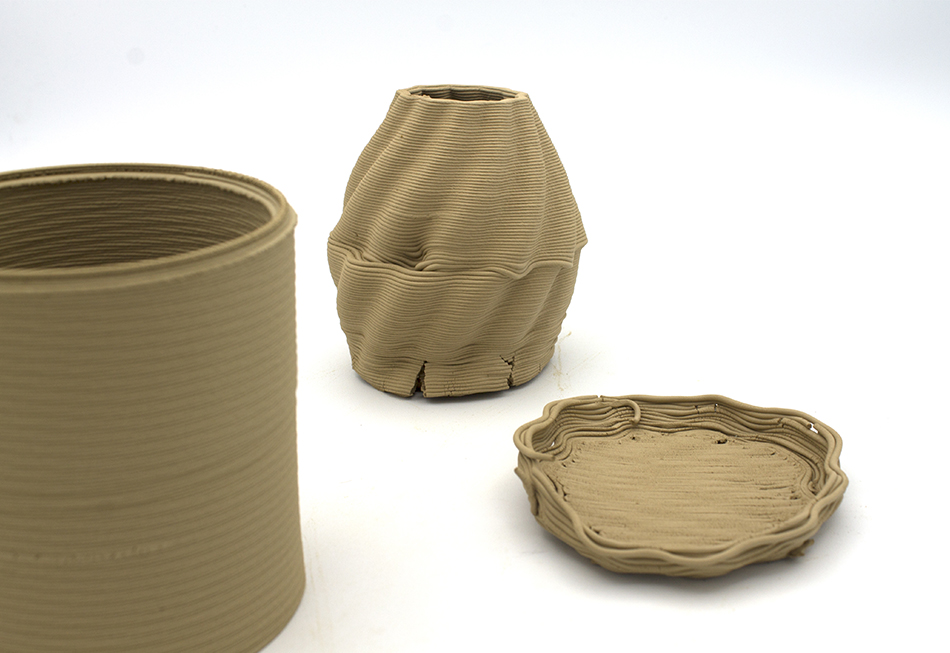
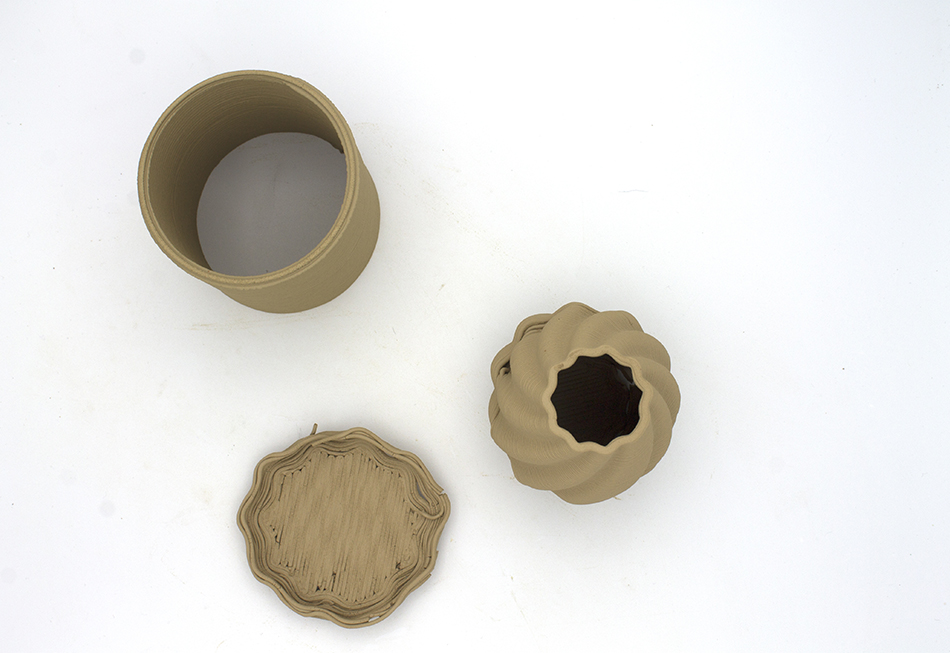
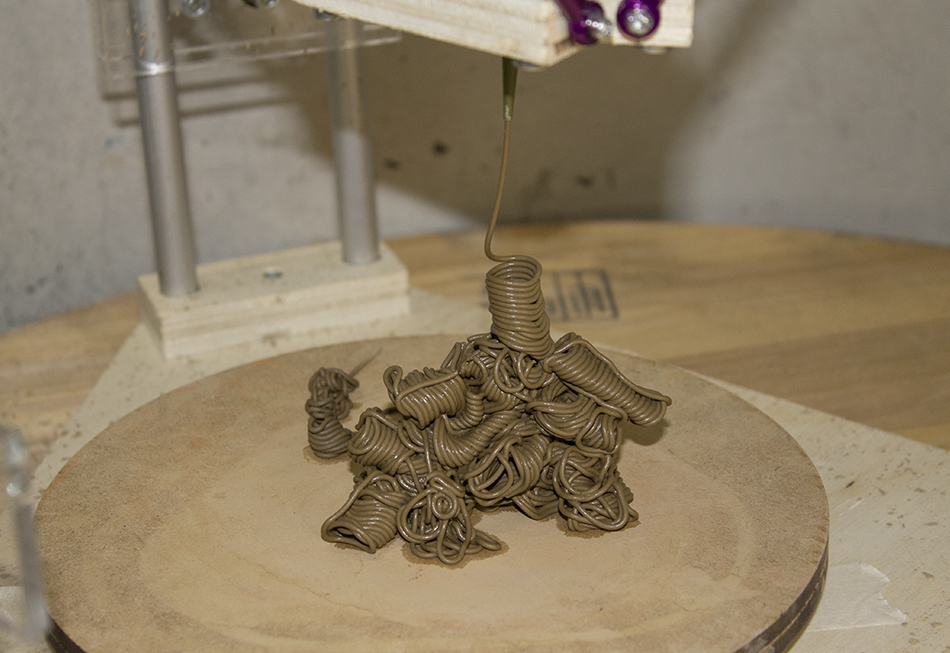
Creating a Family Of Tries
Some Results
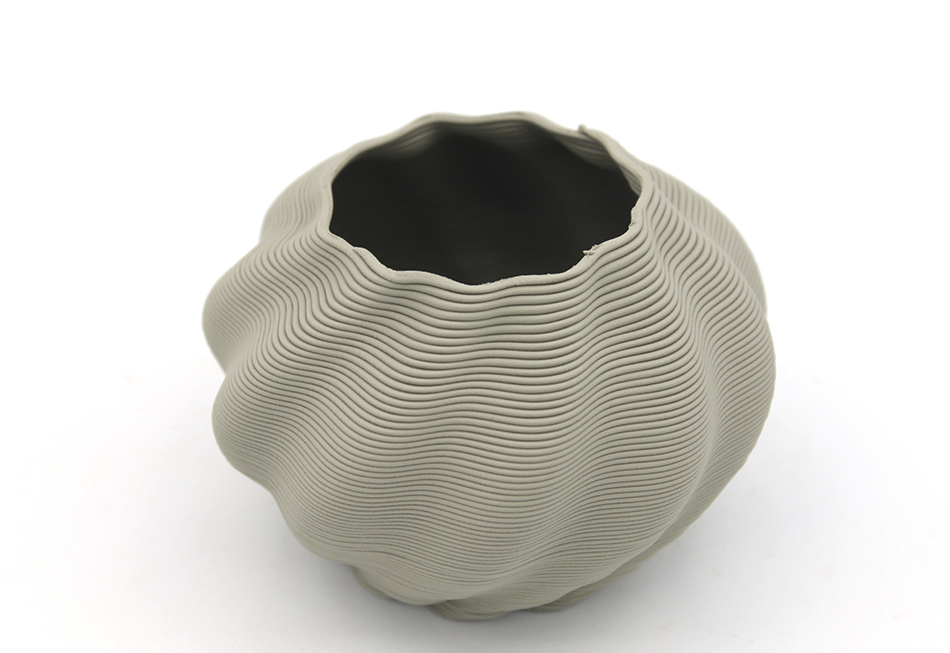
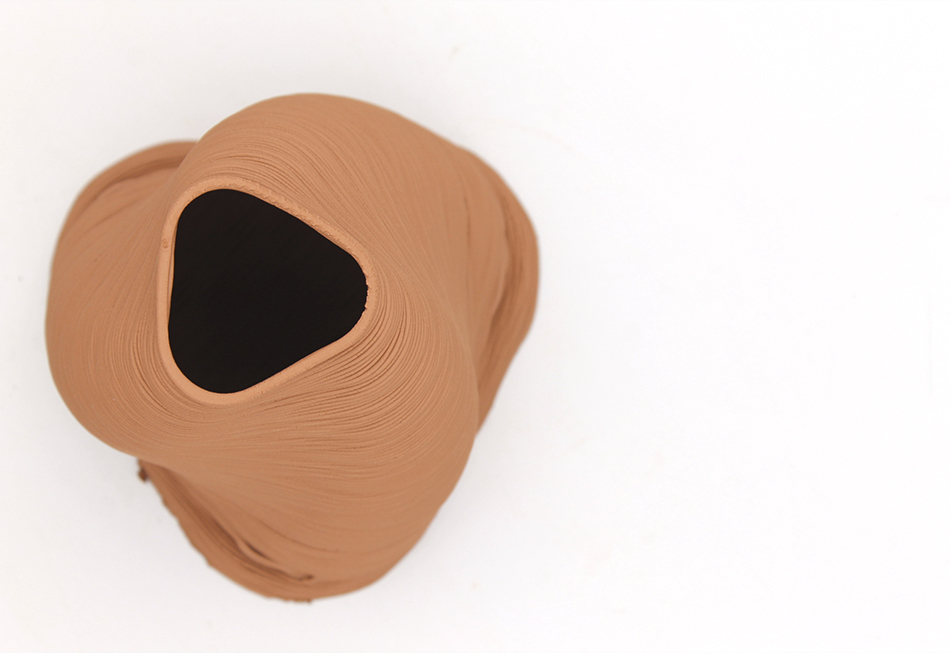
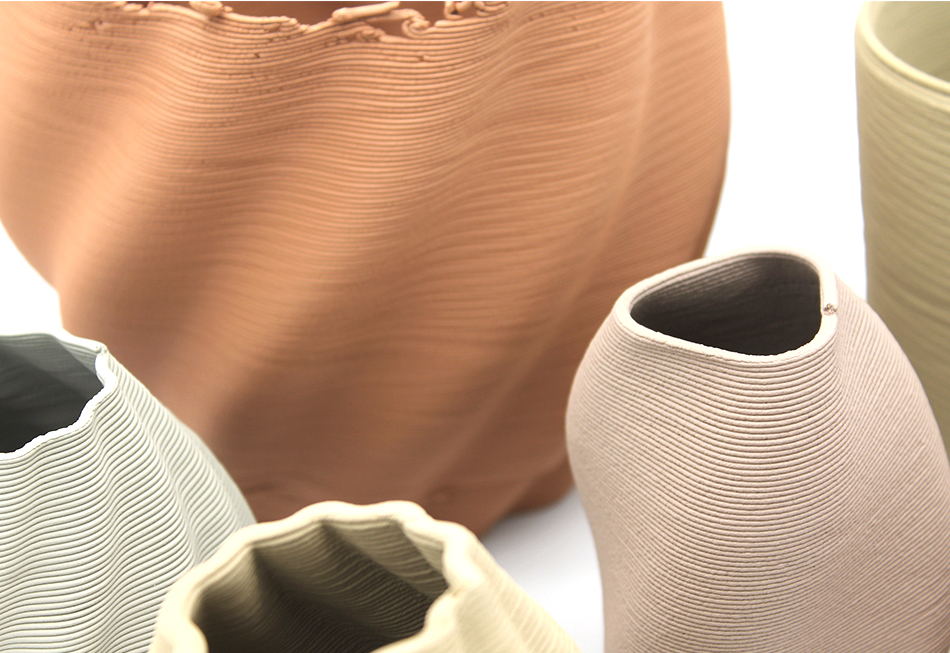


3D Printing With Local Clays
Once I practice 3D printing different clays, I tried with my local ones. The process for preparing your clay for 3D printing starts with the Levigation Process. The only difference between preparing the clay for creating biomaterials and for 3d printing is that in this case you don't need to dry it. Instead of drying, you need to knead it as showed in the video above, and then follow the same steps for preparing the machine explained before.
3D Printing LC-A:
3D Printing LC-B
3D Printing LC-C
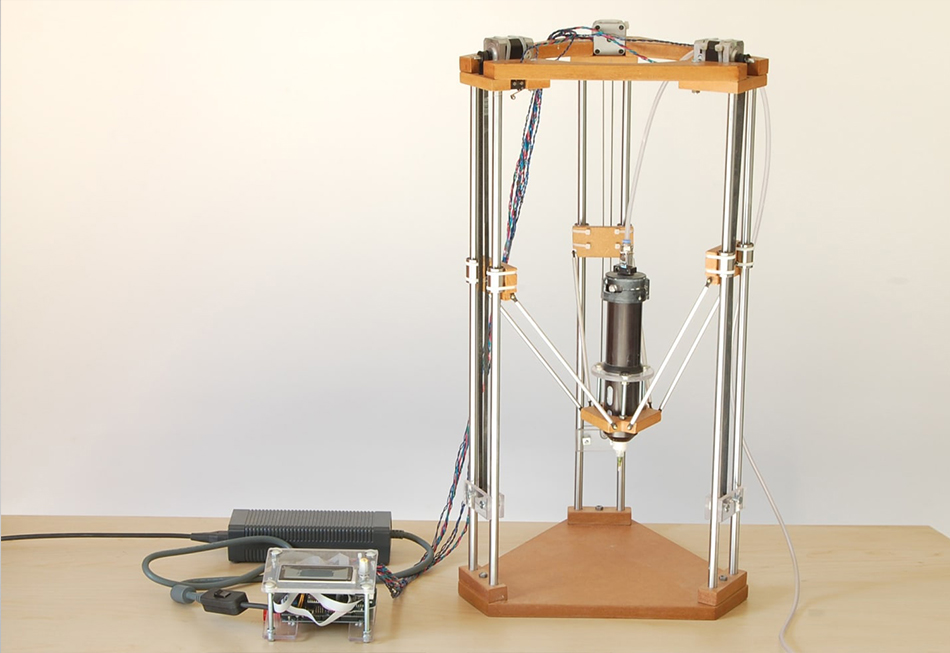
· 3D Ceramic Printer Building: Claudya
For the fact of 3D printing the Local Clays in an easier way, apart from learning how to design, prepare the clay and to 3D print with ceramics generally, I started building my own ceramic 3D printer inspired by the open source machine designed by Jonathan Keep available at the Wikifactory Platform.
I just wanted to build one 3D ceramic printer which was small in size for being more confortable to use, clean and move when creating small samples. So I named my machine as Claudya, and she is still a work in progress that would be finished soon.
Inspiration: Jonathan Keep's 3D Ceramic Printer
About Jonathan Keep and His Design
Jonathan Keep is a practicing artist potter who was based in United Kingdom. He has a recognizable ceramics style for his strong sculptural quality with an enphasis on the form and is also a leading exponent of the 3D ceramic printing.
Claudya is inspired, as I mentioned before by the design created by Jonathan Keep in 2013 shared in Wikifactory, an open source platform. He designed a small Delta 3D ceramic printer that works with a syringe and has a 30cmx20cm printing volume.
This information can be found in this website, but also in this another one.
All the cutting files that are necessary for building the machine can be found also in those pages, where you can also find the original BOM, but it is important to say that not all of the links are available nowadays. For that reason, I've created my own BOM with current available links.
This is the design of his 3D Ceramic Printer:
Claudya
Let me introduce you to my baby Claudya:
Claudya's BOM
I struggled a lot when making the research for the materials since the BOM that appear on the page it's from 2015 so most of the links are not available. Because of that reason I made my own BOM whith links that are currently available.
Here you can find the original BOM (Bill Of Materials) of Jonathan Keep's 3D printer.
And this is Claudya's Bill Of Materials:
| Qty | Description | Price | Link |
|---|---|---|---|
| 3 | 17HS19-1684S1 Nema 17 Bipolar 1.8deg 45Ncm (64oz.in) 1.68A 2.8V 42x42x48mm 4 Wires | 12,87€ | https://www.omc-stepperonline.com/nema-17-stepper-motor/nema-17-bipolar-1-8deg-45ncm-64oz-in-1-68a-2-8v-42x42x48mm-4-wires.html?mfp=184-frame-size-mm%5BNema%2017%20%2842%20x%2042%29%5D%2C149-step-angle-deg%5B1.8%5D%2C146-rated-current-a%5B1.68%5D |
| 6 | Anodized Aluminum Round Tube 12mm | 2,46€ | https://www.bricomart.es/tubo-redodondo-aluminio-anodizado-12-x-1-mm-1-m-10256435.html |
| 1 | LM12UU Linear bearing | 11,87€ | https://es.aliexpress.com/item/1005003428030974.html?spm=a2g0o.productlist.0.0.5b4554f2v11Jz6&algo_pvid=792608e6-df7c-4776-a2be-cd79a8202732&algo_exp_id=792608e6-df7c-4776-a2be-cd79a8202732-55&pdp_ext_f=%7B%22sku_id%22%3A%2212000025738718538%22%7D&pdp_pi=-1%3B12.93%3B-1%3B-1%40salePrice%3BEUR%3Bsearch-mainSearch |
| 1 | RAMPS 1.4 with Arduino mega 2560, LCD Screen | 41,67€ | https://es.aliexpress.com/item/1005003267809504.html?spm=a2g0o.productlist.0.0.4bce5779sAGlEO&algo_pvid=802a626b-5767-4abf-b607-b5b091b8a0f0&algo_exp_id=802a626b-5767-4abf-b607-b5b091b8a0f0-0&pdp_ext_f=%7B%22sku_id%22%3A%2212000024938119443%22%7D&pdp_npi=1%40dis%7CEUR%7C%7C41.67%7C%7C%7C%7C%7C%402100bdd016511782486572752e9ab6%7C12000024938119443%7Csea |
| 3 | End stops - 3 pins | 3.09€ | https://es.aliexpress.com/item/1005003124280678.html?spm=a2g0o.productlist.0.0.7067a6f9R4u8pg&algo_pvid=19649c90-5709-41a5-bc04-abaefa08151b&algo_exp_id=19649c90-5709-41a5-bc04-abaefa08151b-8&pdp_ext_f=%7B%22sku_id%22%3A%2212000024226639654%22%7D&pdp_npi=2%40dis%21EUR%21%212.99%212.99%21%21%21%21%402100bdf116520389202023704eb00a%2112000024226639654%21sea |
| 1 | Wiring cables for endstops (3 pin) and for motor wires (4 pin) - (Search for “DuPont Connectors”, for making up your own wires) | 1,85€ | https://es.aliexpress.com/item/1005002754565519.html?spm=a2g0o.productlist.0.0.36492926T8DmMS&algo_pvid=9cbf95fd-8d59-4fe8-bb68-bdae4f6109b1algo_exp_id=9cbf95fd-8d59-4fe8-bb68-bdae4f6109b1-3&pdp_ext_f=%7B%22sku_id%22%3A%2212000021975273993%22%7D&pdp_npi=1%40dis%7CEUR%7C%7C7.32%7C%7C%7C%7C%7C%402100bddb16511797867318409ef55d%7C12000021975273993%7Csea |
| 1 | 100k Thermosthat | 6,99€ | https://www.amazon.es/gp/product/B07DK5DTMD/ref=ppx_yo_dt_b_asin_title_o03_s00?ie=UTF8&psc=1t |
| 1 | GT2 belts for various 3D printers + GT2 20 tooth Timing Pulleys | 8,43€ | https://es.aliexpress.com/item/1005002623397760.html?spm=a2g0o.order_list.0.0.1630194dSAaZFN&gatewayAdapt=glo2esp |
| 2 | 10 Units of Aliminum M4 RC Link Rod, with Hollow Balls | 5,47€ | https://es.aliexpress.com/item/1005002423833333.html?spm=a2g0o.order_list.0.0.1630194dSAaZFN&gatewayAdapt=glo2esp |
| 3 | 1m Anodized Aluminum Round Tube - 8mm | 1,65€ | https://www.bricomart.es/tubo-redodondo-aluminio-anodizado-8-x-1-mm-1-m-10117884.html |
| 1 | General Purpose Power Brick 12V 220W | 8,60€ | https://www.amazon.es/Tiempo-Saldi-8050705800315-Alimentador-Gris/dp/B083LWHWKC?pd_rd_w=WHUfv&pf_rd_p=1481b776-9a26-4ebb-9e7f-fa2fd6adcb14&pf_rd_r=REGNKWWK92952V8TJ7E7&pd_rd_r=f203f3c1-0dad-457a-9815-c70a2d292afd&pd_rd_wg=CfxTv&pd_rd_i=B083LWHWKC&psc=1&ref_=pd_bap_d_rp_2_t |
| 1 | Glue Liquid Cartridge Dispenser Syringe Barrel (100cc, 200cc, 300cc) | 33,76€ | https://es.aliexpress.com/item/32822167872.html |
| 1 | Glue Liquid Cartridge Dispenser Syringe Barrel (500cc) | 43,41€ | https://es.aliexpress.com/item/32820178621.html |
| 1 | 1/4” Male Thread 6mm Push In Joint Pneumatic Connector Quick Fittings | 0,52€ | https://es.aliexpress.com/item/4000275867183.html?spm=a2g0o.order_list.0.0.1630194dSAaZFN&gatewayAdapt=glo2esp |
| 1 | Ball Valve 1/4 bsp Male Female Air Compressor to hose | 3,50€ | https://es.aliexpress.com/item/1005002423473690.html?spm=a2g0o.order_list.0.0.1630194dSAaZFN&gatewayAdapt=glo2esp |
| 1 | Adjustable Pressure Gauge Pneumatic Regulator 1/4” | 12,00€ | https://www.bricomart.es/manoreductor-aire-comprimido-rosca-hembra-1-4-con-enchufe-rapido-universal-10721284.html |
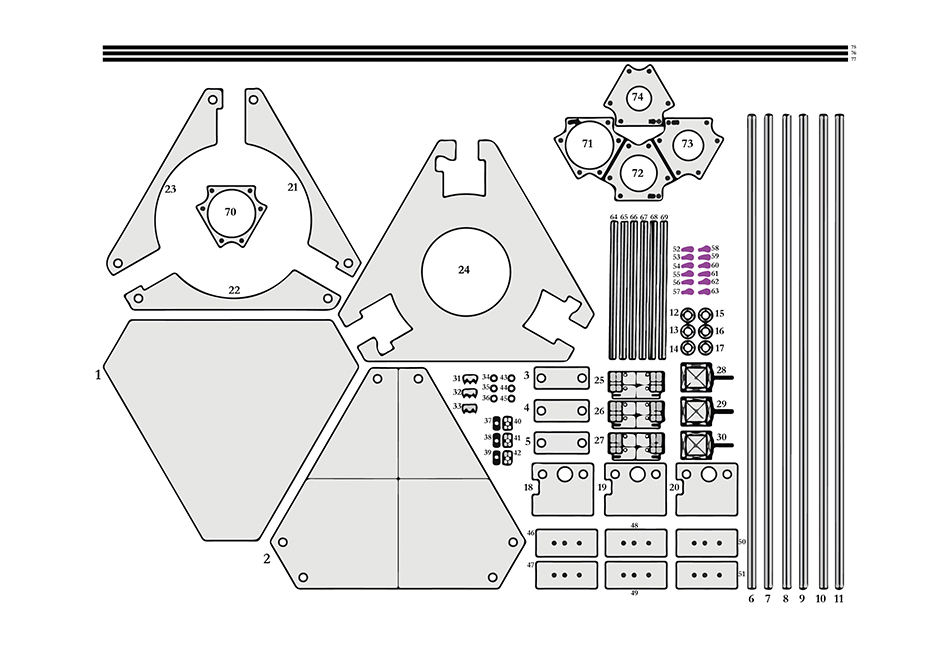
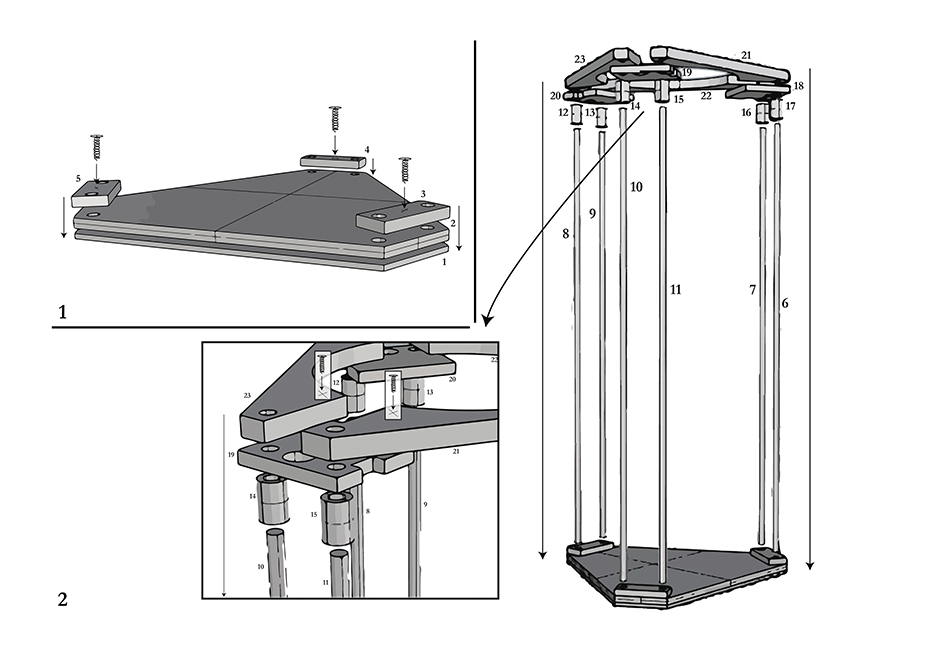
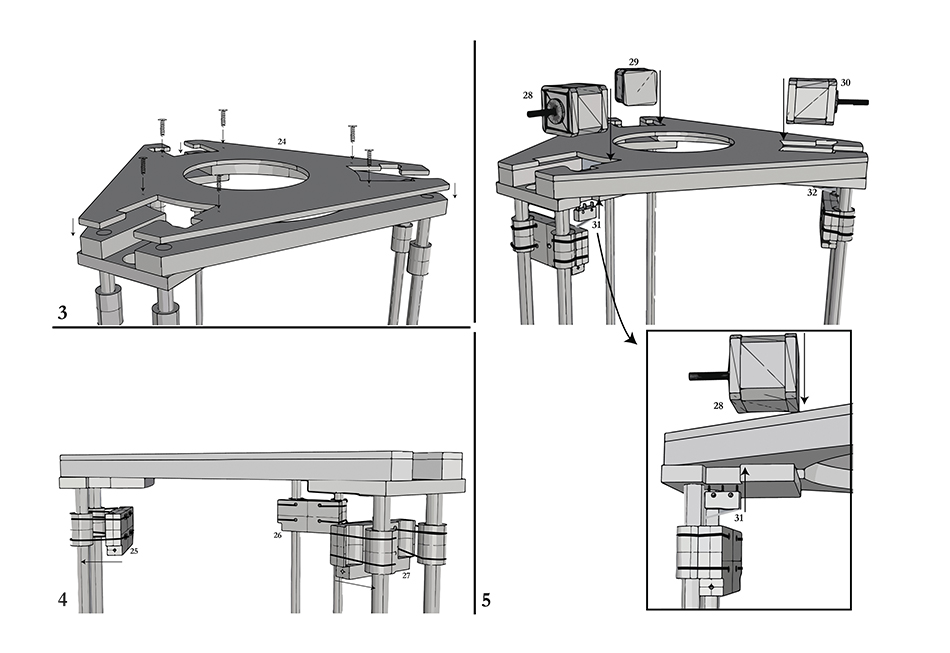
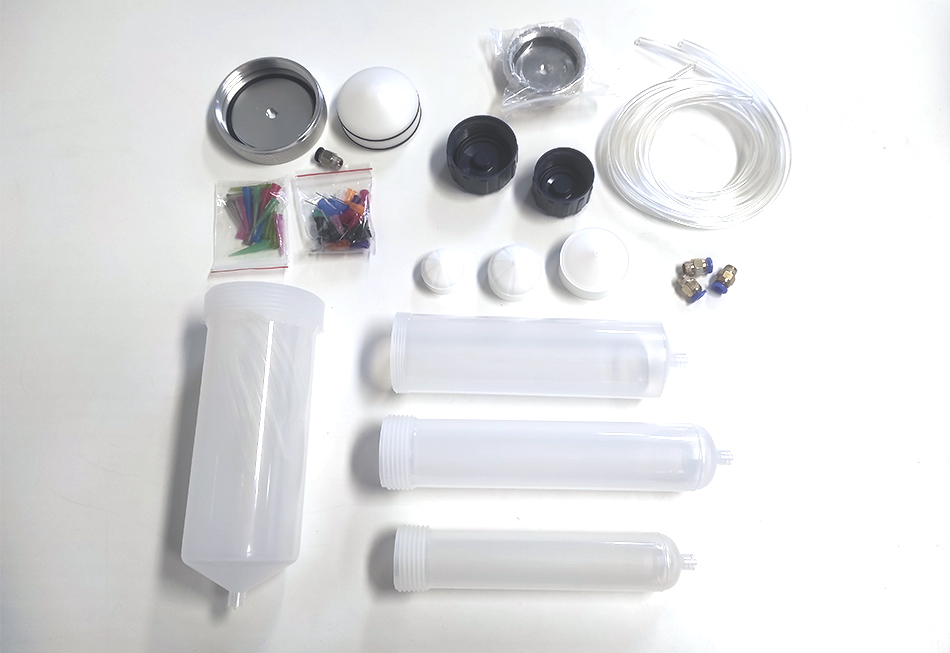
All the Parts You Need
I'll divide all the parts (the ones apart from the BOM), which need to be CNC milled, laser cutted and 3D printed. As I said before, all the original and useful files will be linked to Jonathan Keep's Wikifactory page.
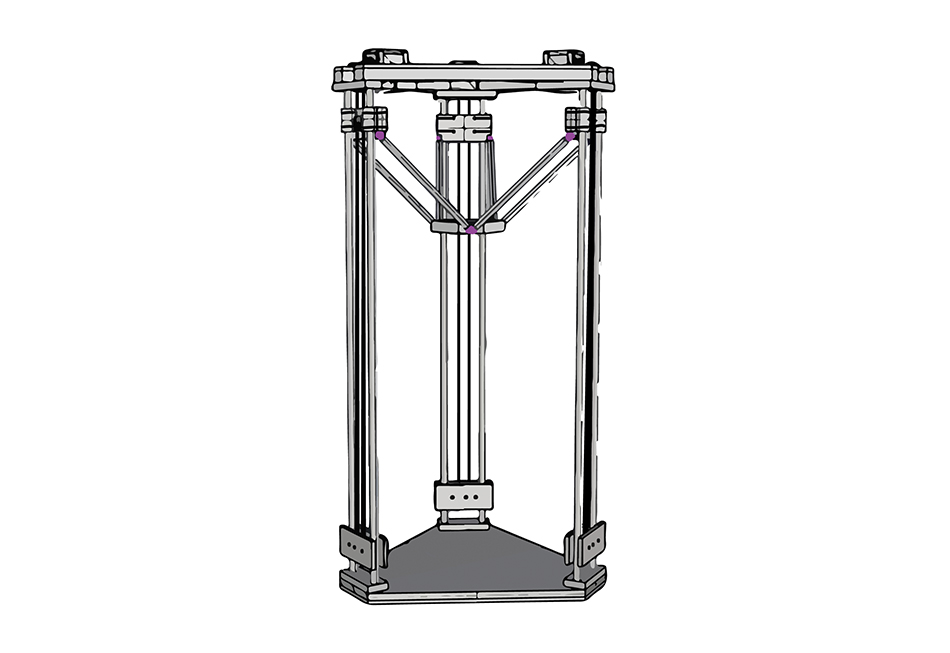
First of all, this is a picture of all the pieces you need (for building the structure). By seeing this I hope everything becomes more understandable, since it's not easy at all to explain how to build a machine from scratch.
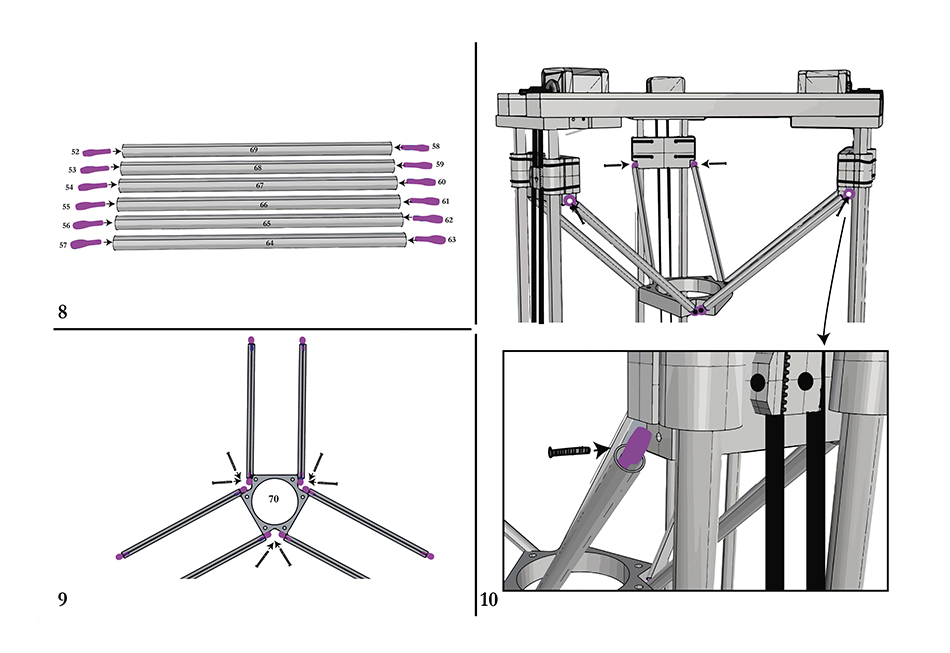
This is an image from Claudya's User Manual:
· CNC Milling
The pieces (by number) that I cut in the CNC Milling machine are these ones: nº 2 (base); nº 3, 4 & 5 (the pieces for holding the tubes); nº 18, 19 & 20 (pieces for the top assembly); nº 21, 22, 23 (top frame) and nº 70 (syringe holder).
Material: 15mm Plywood Board
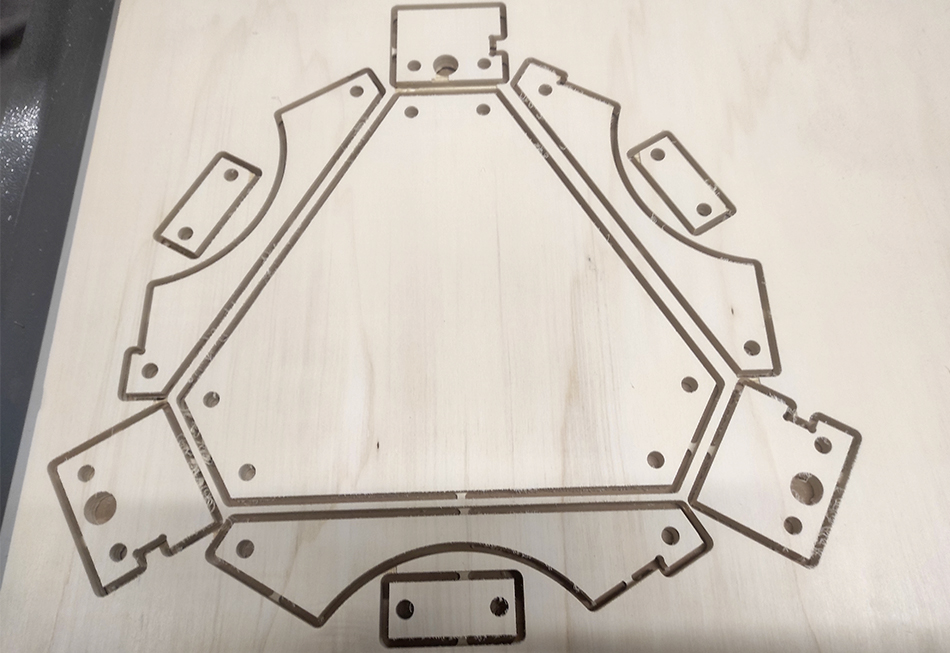

Although I cut my pieces on this material and also on the CNC Milling machine, I highly recommend to try to cut everything on the laser (on a 15mm MDF if possible, due to the fact that everything would fit better).
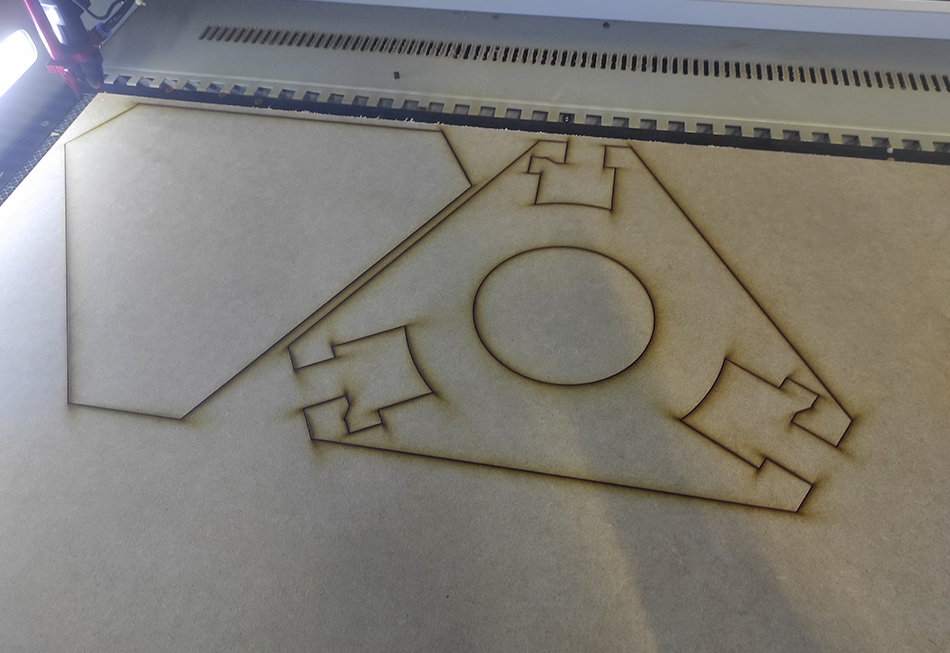
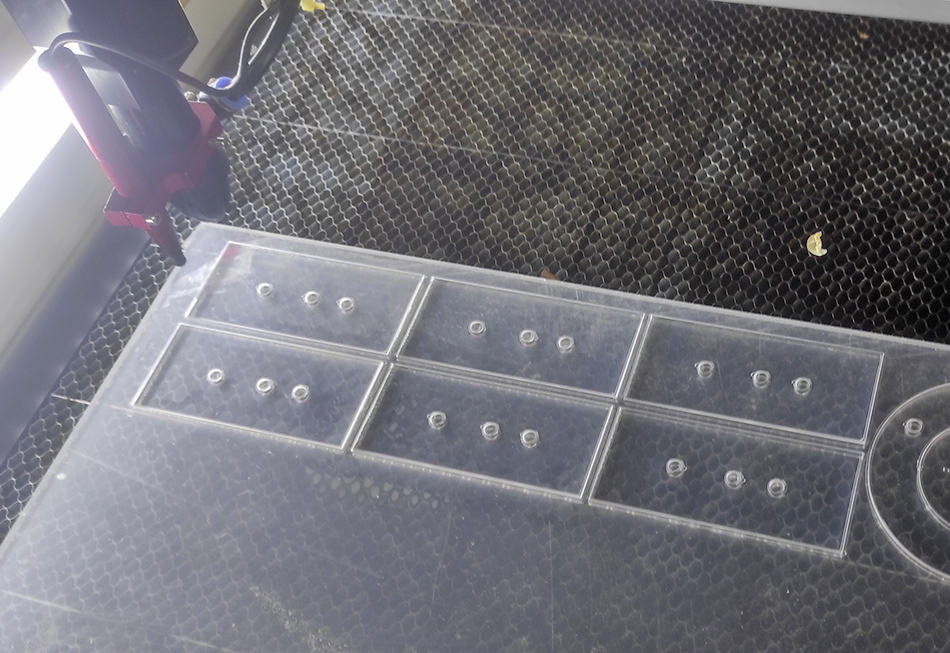
· Laser Cutting
The pieces (by number) that I have laser cutted are these ones: nº1 & 24 (base and top reinforcements) ; nº 46, 47, 48, 49, 50 & 51; nº 71, 72, 73 & 74 (templates for syringes).
These are the parametters for each material:
Material: 3mm MDF - Speed/25 - Min. Power/70 - Max. Power/74
Material: 5mm Methacrylate - Speed/15 - Min. Power/70 - Max. Power/74
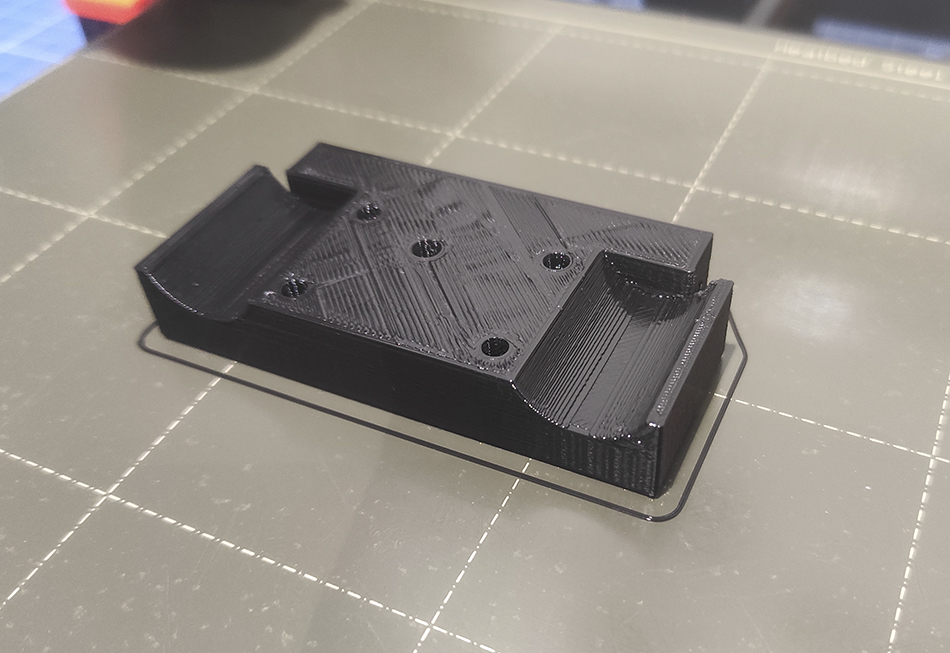
· 3D Printing
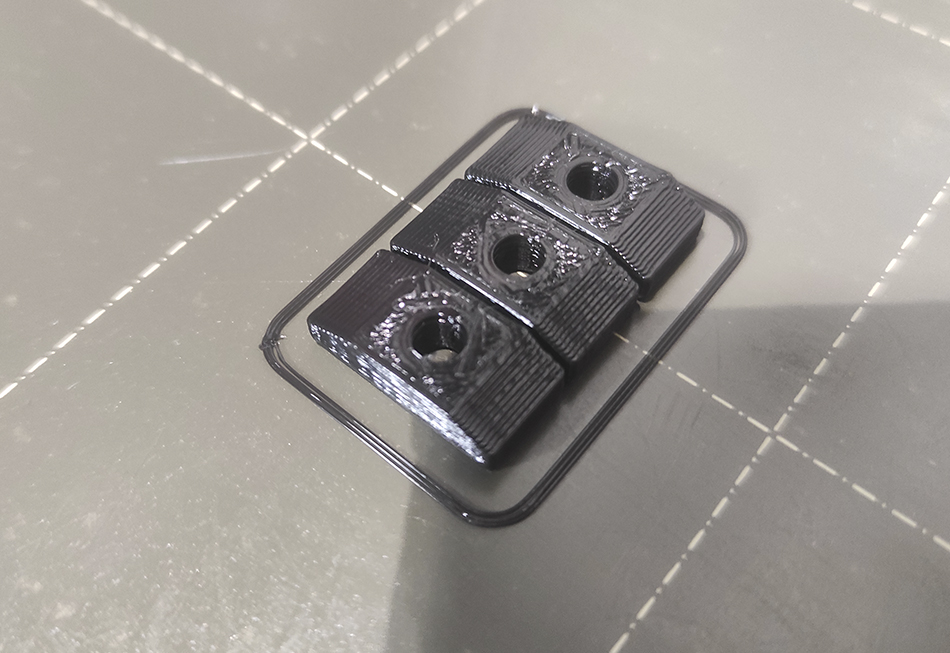
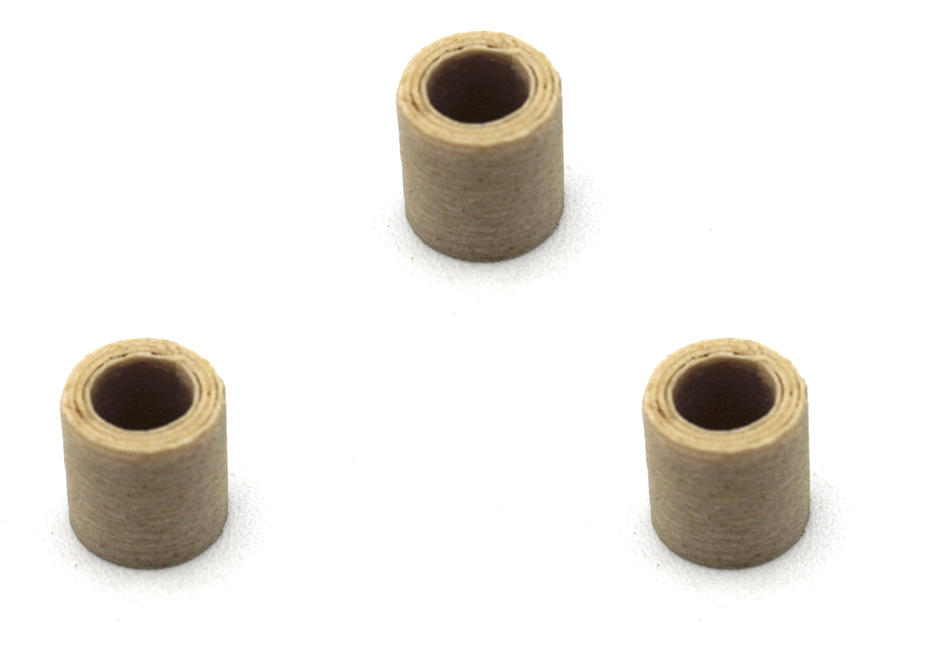
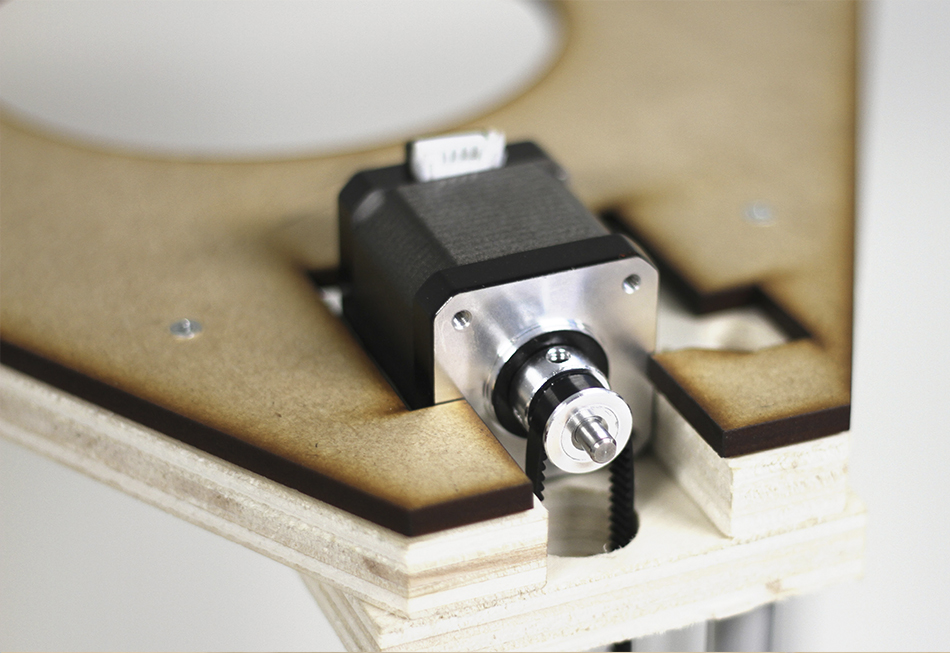
The pieces (by number) that I 3D printed are these ones: nº25, 26 & 27: (pieces for holding the arms); nº 40, 41 & 42 & nº 37, 38 & 39: (pieces for holding the belts); nº 43, 44, 45: (bearings).

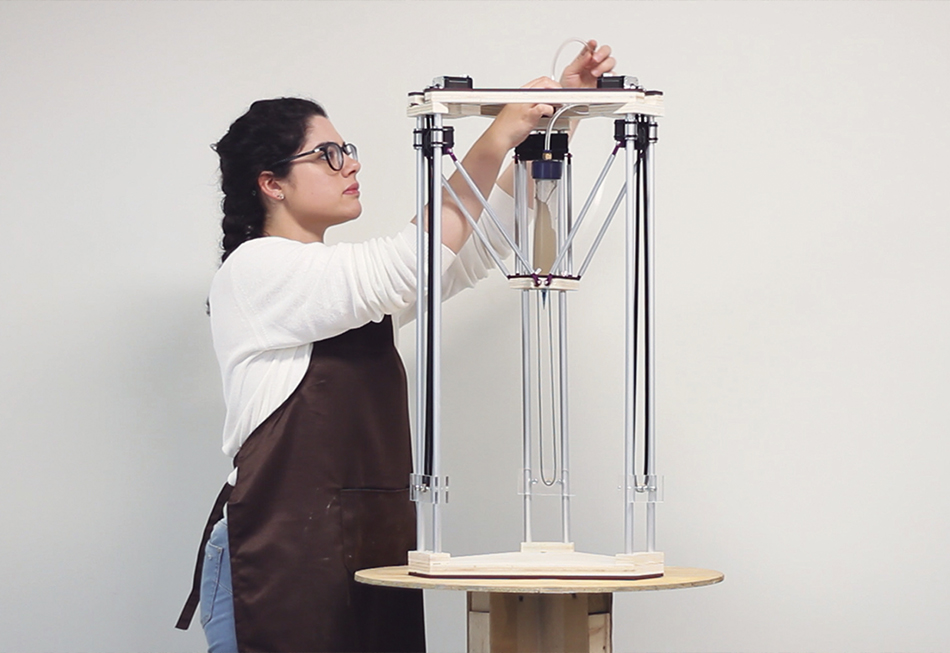
Building Claudya
This is the video were Jonathan Keep shows how to build the machine:
I find Jonathan Keep's video so understandable and it really helped me. Anyway, I thought that for some people a Step by Step illustrated guide would be useful so I created a User Manual for Claudya which you can find at the bottom of this page.
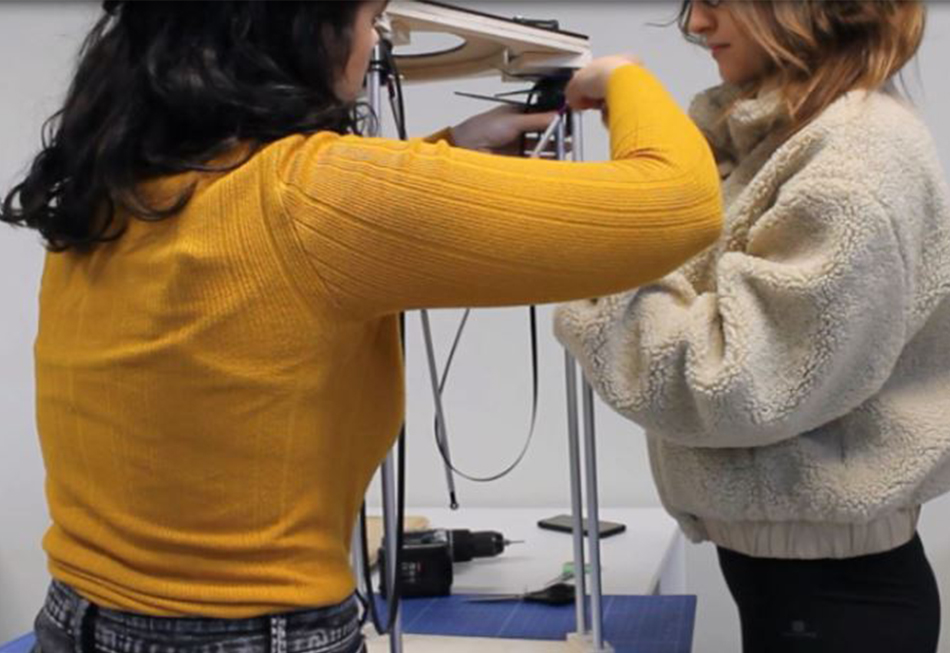
These is the Step by Step building process I illustrated for the User Manual:
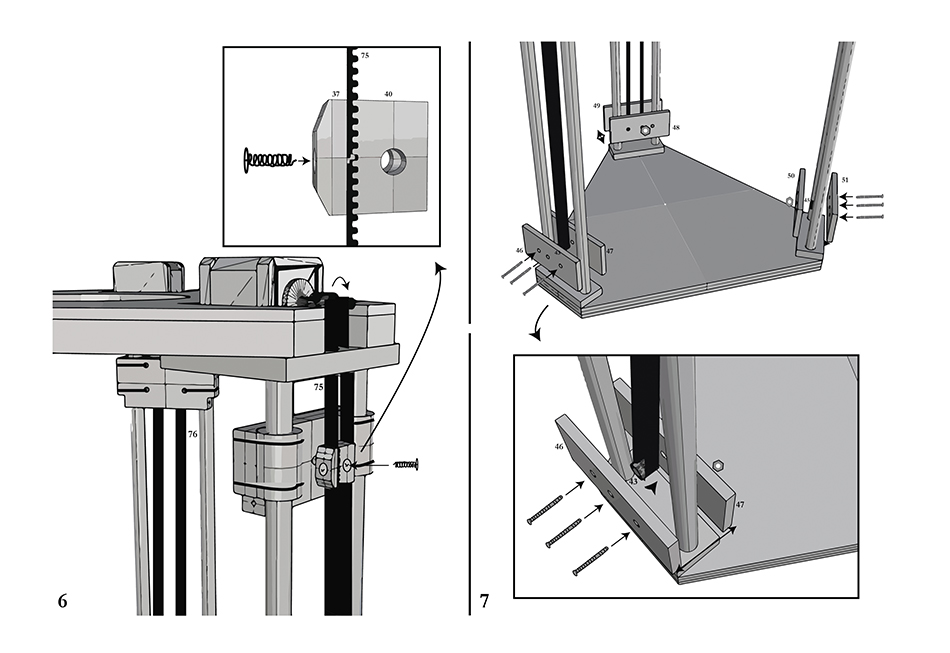
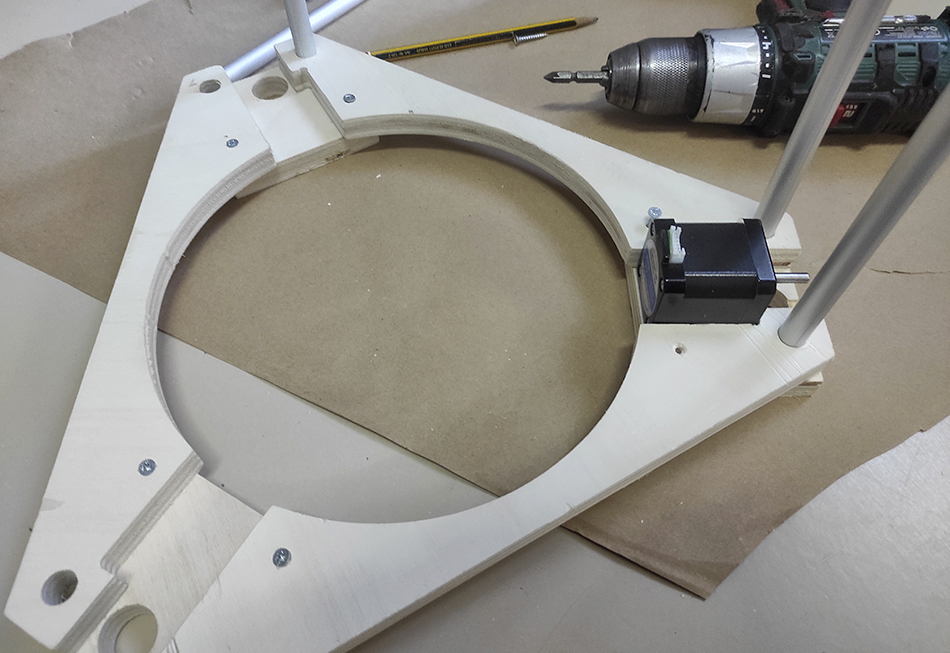
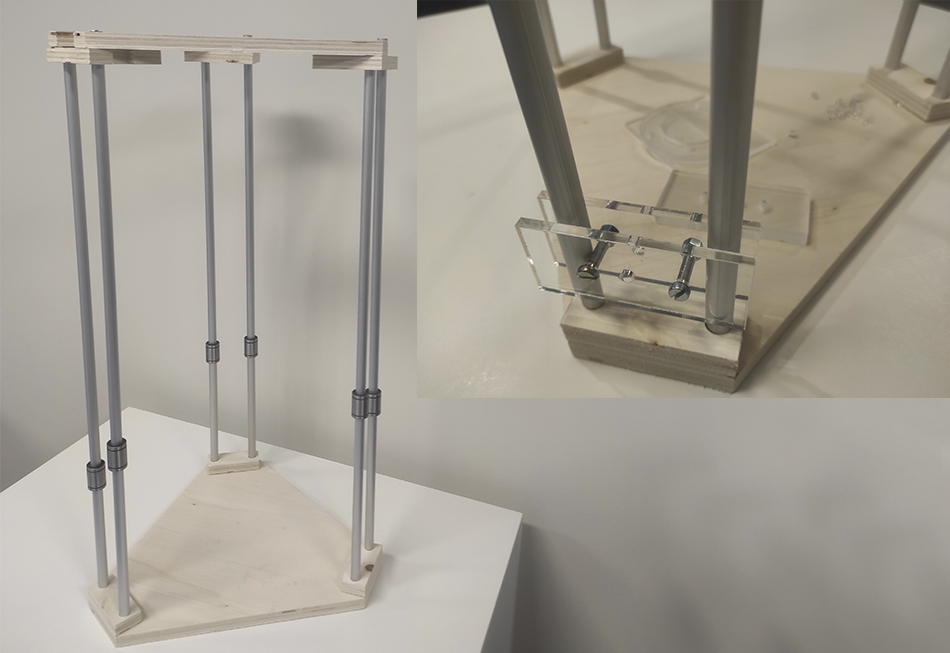
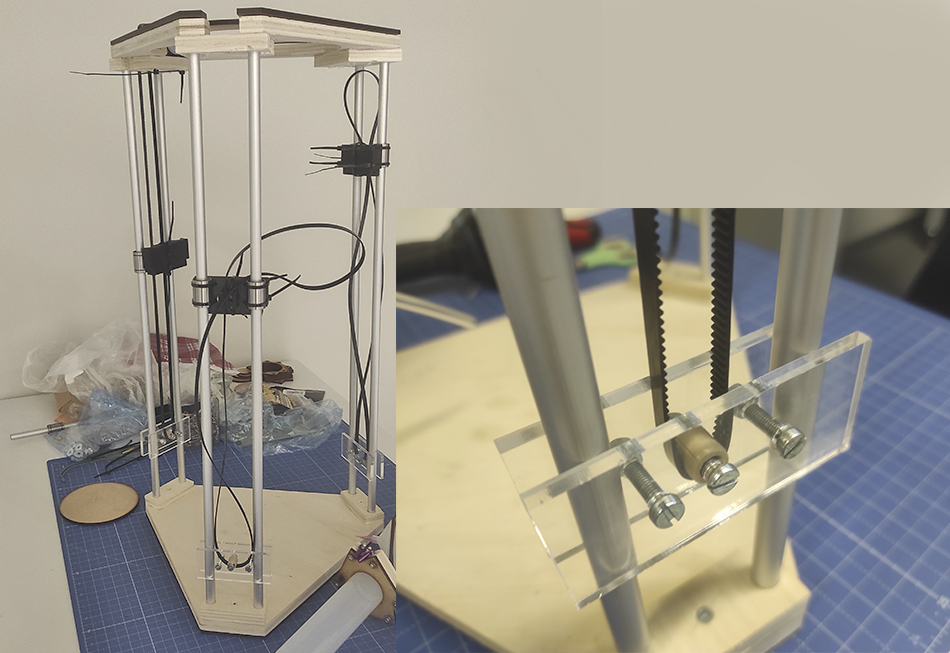
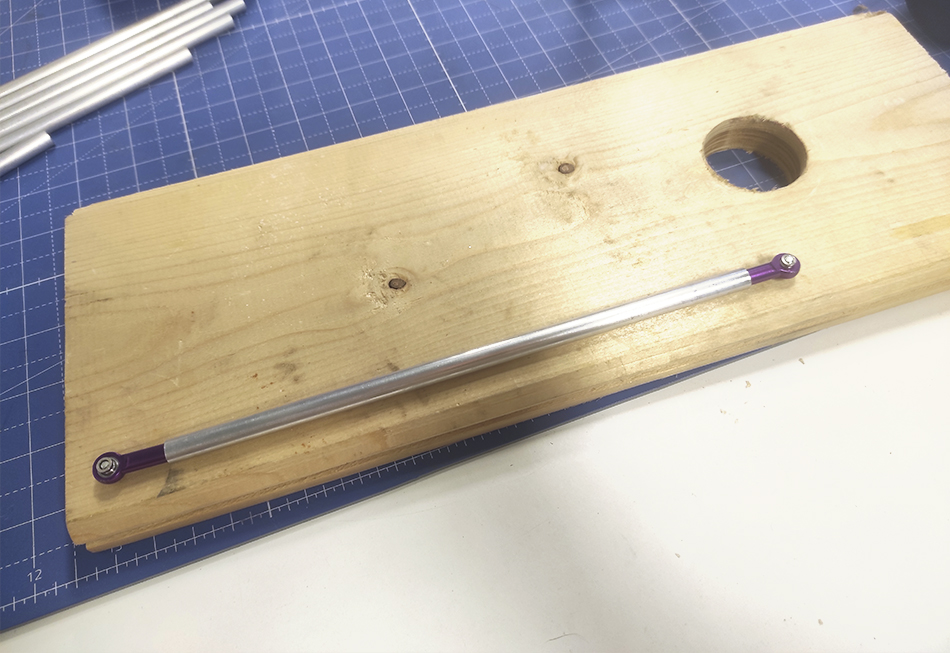
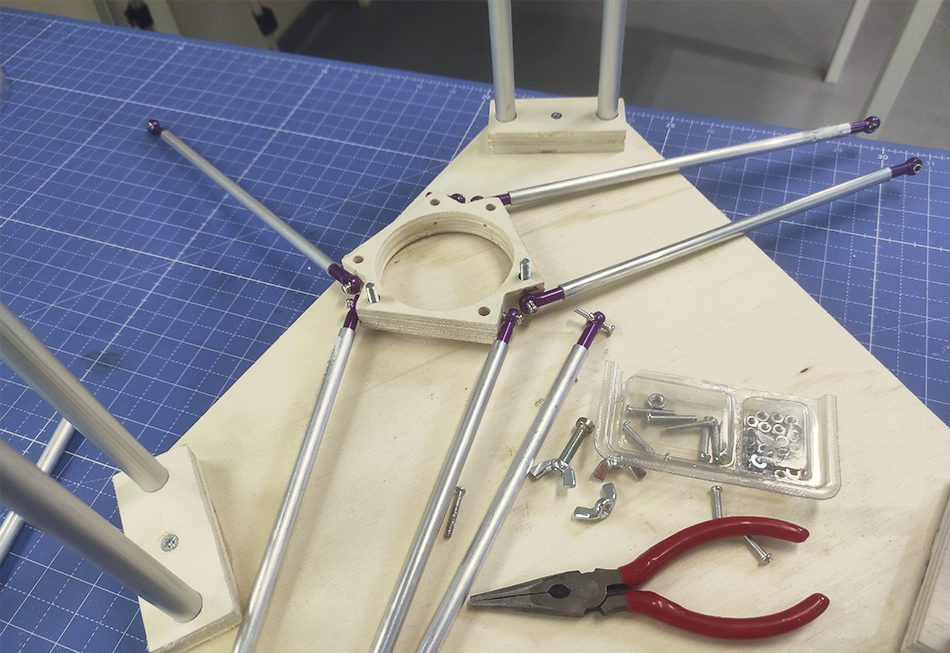
These are some photos of the building process:


Electronics
Now, it would be the time of working on the electronics but I didn't have enough time to put everything together on my machine so in case anyone wanted to do so, Jonathan Keep explains it really well in his page, also in the video where he builds the machine.
This is the page for the Firmware you need to use for the Arduino.
Air Compressor
This is how the connection with the air compressor goes:

Some Changes on the Design
While building the machine, I came through some difficulties in some cases, and I realized that the creation or an adaptation of some of the pieces was needed for going on with the machine building. These are the 4 changes I applied to Claudya:
1. Top & Base Pieces: I designed another two pieces for the top and also the base that reinforce the structure and hold not only the tubes of the body, but also the motor in place without the need of flanges.
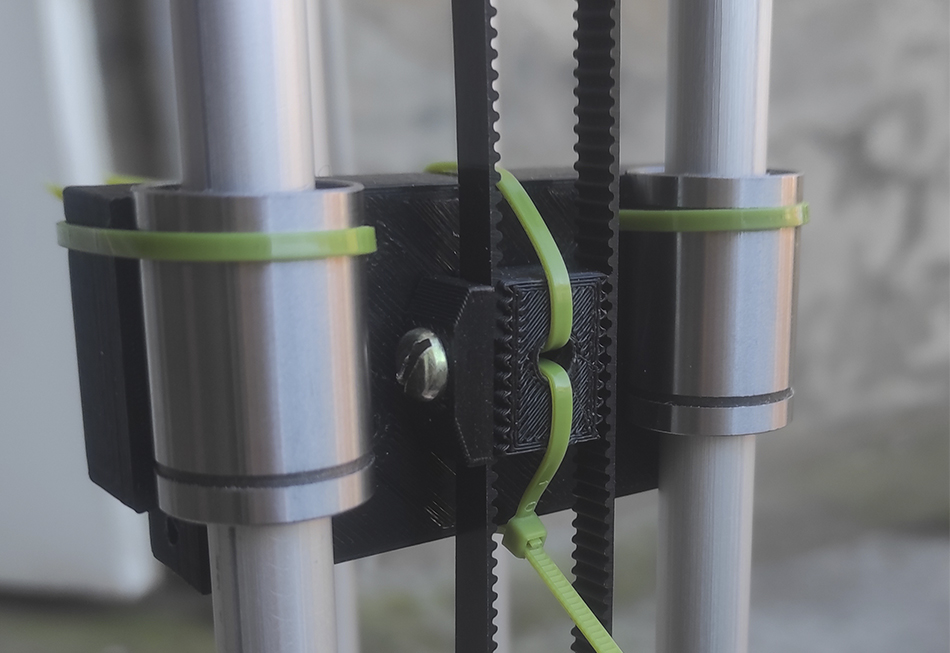
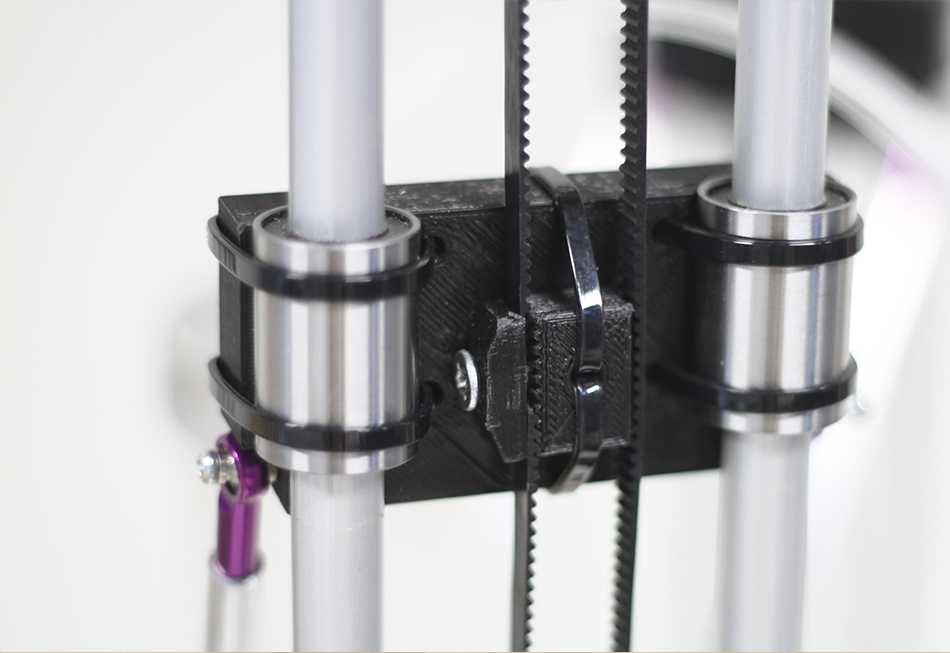
2. 3D Printed Piece for Holding the Arms: The original pieces that hold the arms of the machine, where originally designed in wood, but they needed to be finished manually. For changing that, I 3D modeled the piece (so that it can be reproduced easily), and also added some holes to it for the flanges that will hold this piece tightly closed to the linear bearings.
3. 3D Printed Pieces for Holding the Belts: This part consists of two small pieces that hold the two ends of the belt so tightly, and then they fit into the other 3D printed piece mentioned before.
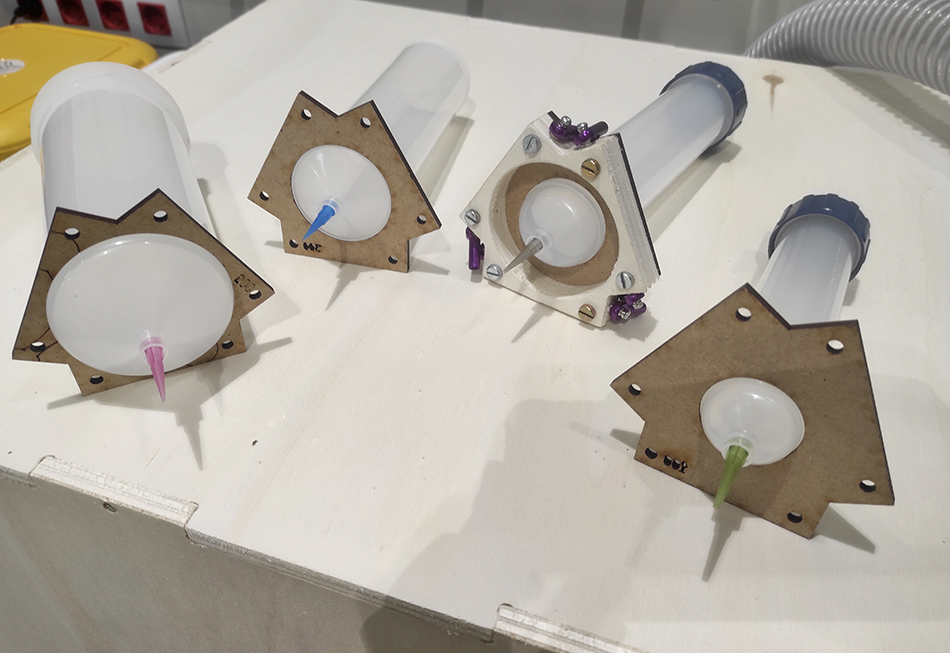
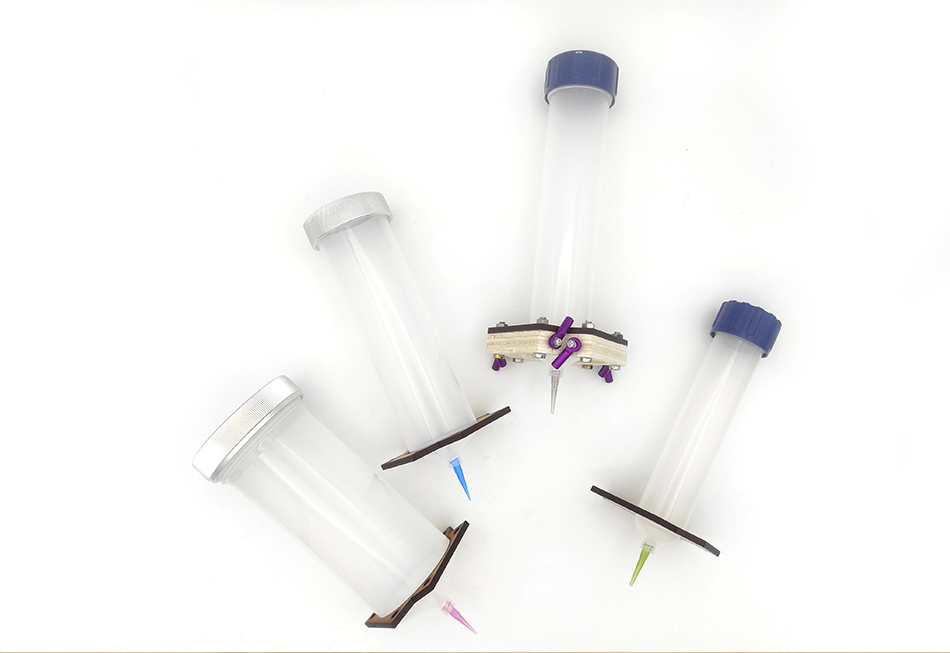
4. Interchangeable Template for Different Syringes: Due to the fact that finding the original extruder was really difficult, I changed it for a glue liquid cartridge dispenser syringe barrel, which comes with its own pneumatic connector and also a tube. I also thought about the fact that it could be interesting to have a way of choosing the size of the syringe depending on the amount of clay needed to use. So that, I designed an interchangeable template that gives you the option of choosing between 4 different barrel sizes (100cc, 200cc, 300cc and 500cc).
Trying the Syringes
Before printing the machine needs to be prepared: The clay needs to be kneaded and you need to fill the machines tank (in this case the tank will be the extruder's syringe). Even if Claudya doesn't move yet, I wanted to try first if the syringes worked.
These are Claudya's syringes
For showing how to prepare the clay with a good consistency for this printer, Jonathan Keep did this video which is in Youtube:
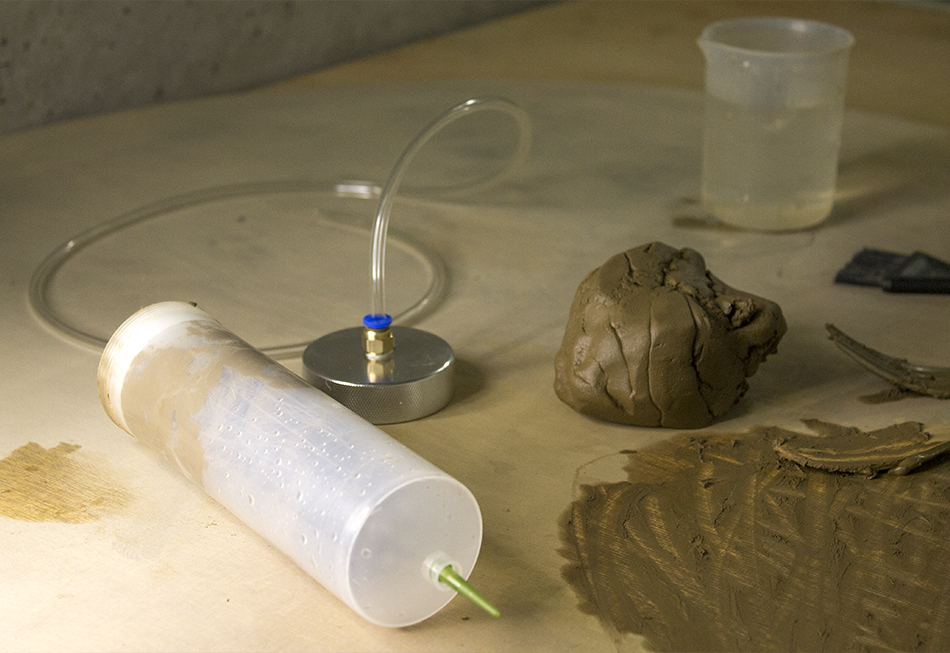
Here you can see how I prepared the Local Clay consistency for the syringe:
And here you can see how the syringe works:
Even if she doesn't move by itself, I could verify not only that the syringes will work but also that the consistency of the clay is the correct one for 3D printing it.
Buztin-Min: Claudya User Manual
This is Buztin-Min: The Project Thesis which contains Claudya's User Manual in page nº165:
This manual covers some aspects on how to build this machine such as the links to the Wikifactory page where the original design is (with all the explanations on how to build it, the original cutting files and the firmware for the electronics of the machine, among others), some added improvements or changes to the original design, the new BOM (Bill Of Materials) and the Step by Step illustrated guide. Basically, this manual covers only some of the aspects that were not covered on the page of the original design where all the information is shared at Wikifactory.
Downloadable Files Folder
On this folder you can find all the downloadable files I've created for Claudya. The original ones from Jonathan Keep's design will be linked to his own page.
Useful Links & References
- Introduction 3D Printing with Clay (Basque Biodesign Center)
- MAKE YOUR OWN 3D DELTA PRINTER FOR CERAMIC
- Self Build Clay Printer, Wikifactory
- Delta All Parts, PDF
- Delta Base, PDF
- Delta Components, PDF
- Delta Top Assembly, PDF
- Ceramic Printer Marlin