8. Wearables
This week started with the super interesting Lecture by Liza Stark which I really enjoyed this time that it was not our first time with electronics. It seemed that it was easier to understand all the information she gave it to us.
So for this week's assignment we need to create 2 actuators swatches and test them with the Arduino or ATtiny (and also learn how to program it, of course) and we also have to create a swatch with one input and one output. So here we go!
Inspiration
These are some more projects that Liza showed us in her Lecture:
· "The Crying Dress" by Kobakant
· "My Heart on My Dress" by Jingwen Zhu
· "Urban Armor #2: The Personal Space Dress" by Kathleen McDermott
What Are Wearables?
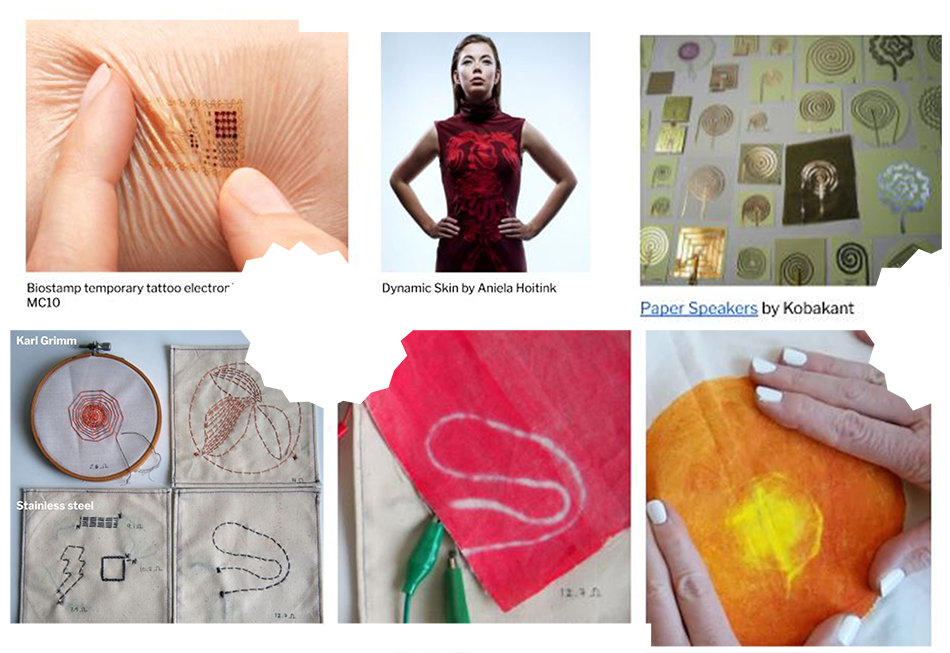
"Wearable technology, also known as "wearables," is a category of electronic devices that can be worn as accessories, embedded in clothing, implanted in the user's body, or even tattooed on the skin."
This info is taken from this Wearable Technology page.
As I said, the week started with the amazing lecture by Liza Stark.
You can watch the lecture here:
· What Is an Actuator?
"An actuator is a component of a circuit that moves or controls another part based on input."
Among the possibilities, regarding the State Changes she focused in three aspects: Visual, Sound and Motion.
Here you have a little about each of them:
- VISUAL
Among the Visual we find some approaches: LEDs, Neopixels, Fiber Optics and Thermochromic Ink.
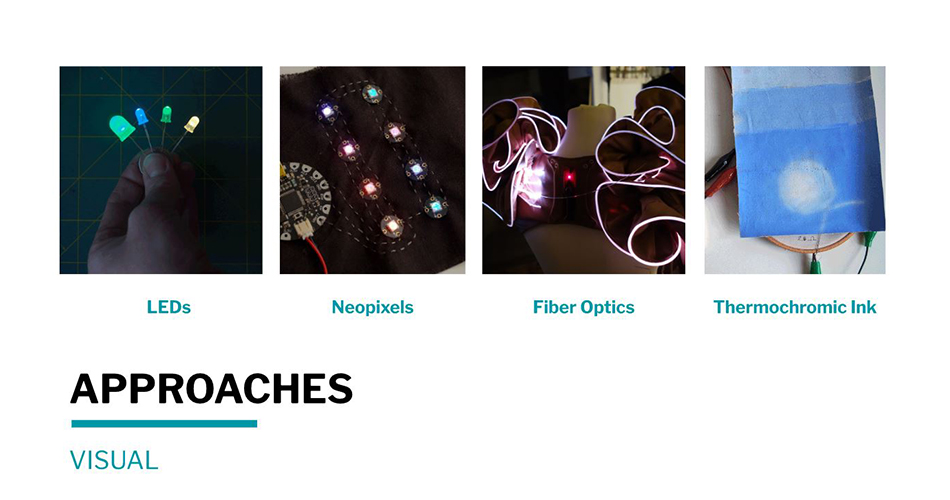
Image from Liza's Lecture
- SOUND
This is a video whe showed us:
- MOTION
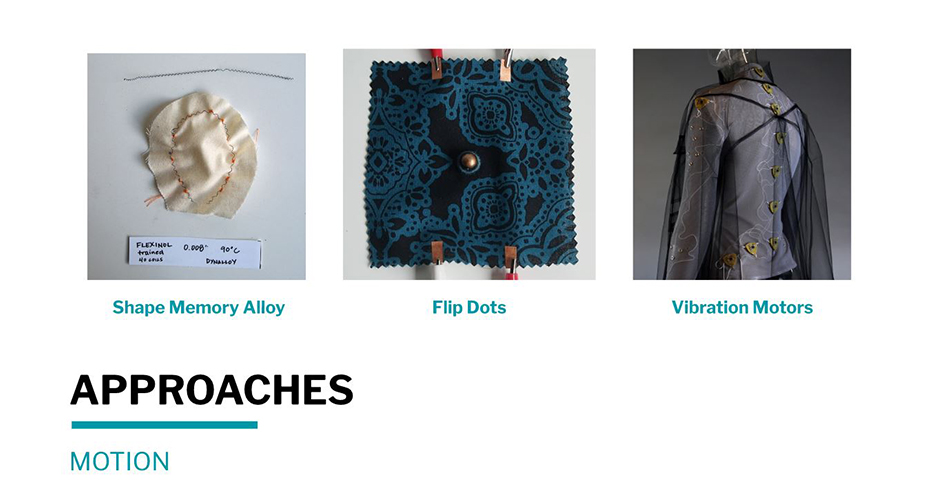
Image from Liza's Lecture
Preparing To Use Actuators
· MOSFET Circuit
Transistors allow us to control the Voltage in our circuits. There are many different types of transistors, the one we are using is called MOSFET and it can be N-Channel or P-Channel (we are using the N-Channel). It has three legs that are G (gate), D (drain) and S (source).
So we started the week working as a team preparing our Mosfet circuit for Emma's tutorial. We copied it from previous years students documentation's pages. We found really useful these ones: Loes Bogers on "Making a transistor circuit", Beatriz Sandini on "Transistor" and Jessica Standley on "Preparing to use actuators: Mosfet Circuit".
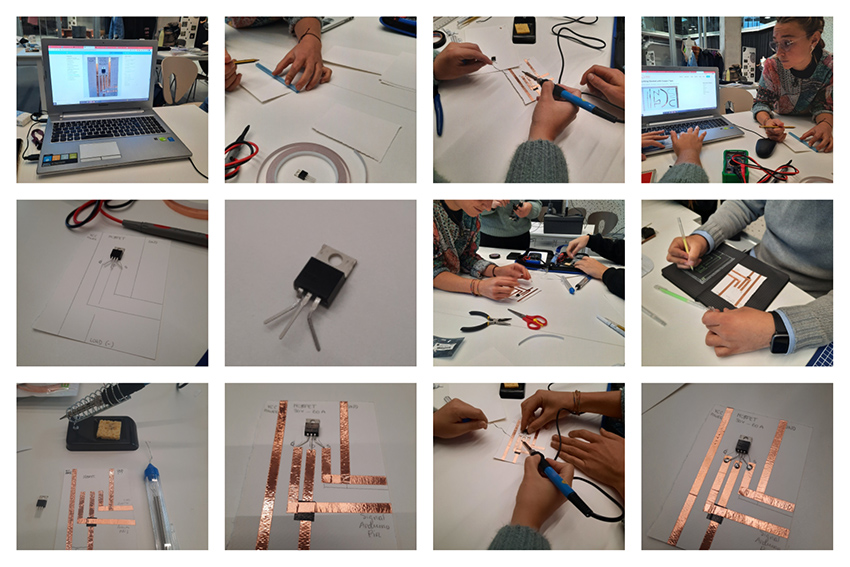
Image from Marisa Satsia's documentation
Depending on the kind of actuator you want to create, the power needs change and you need to use a different MOSFET circuit. We felt a little confused about this at first, but when we realized it, we created the following circuits for trying our different actuators.
These are the slides where Liza showed us the circuits in her lecture:
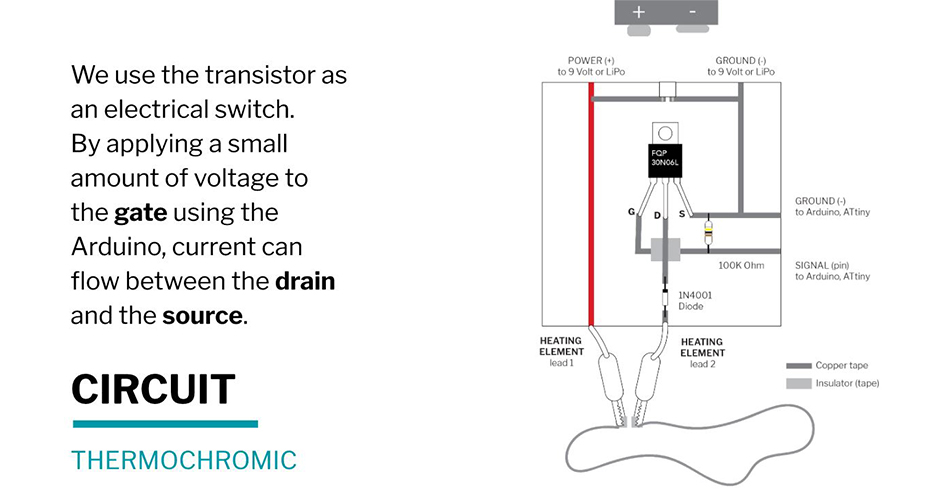
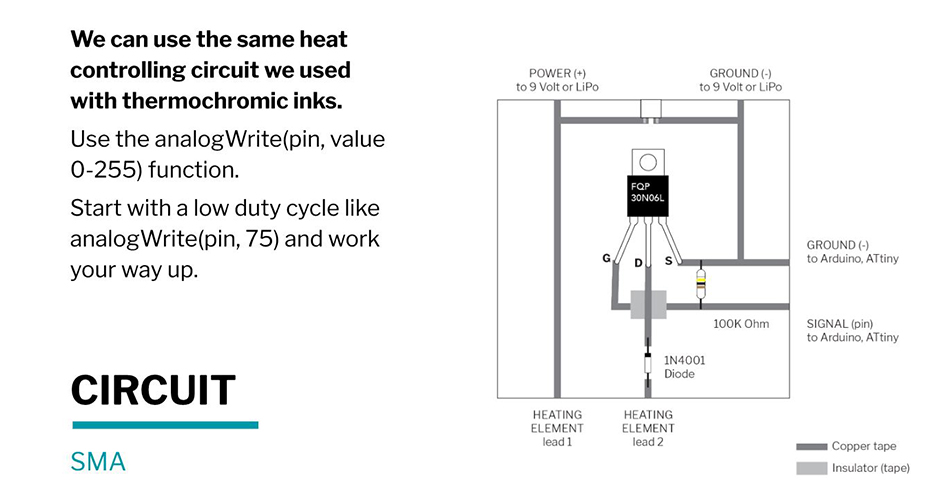
Slides from Liza Stark lecture
And these were the circuits that we created:
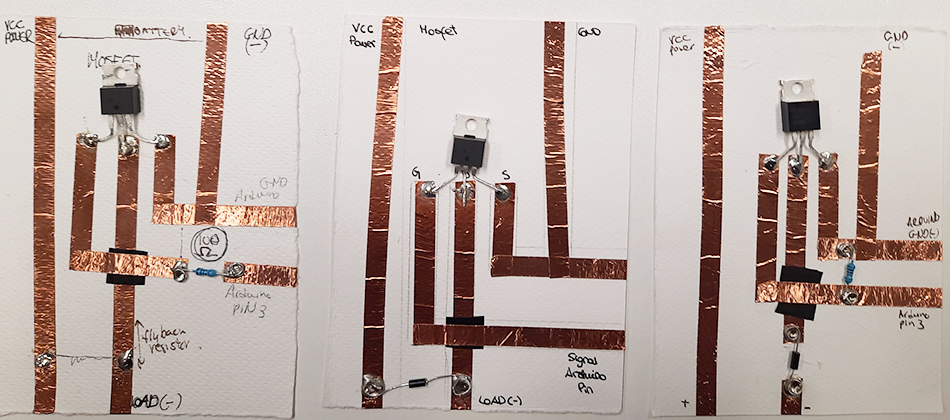
Image from Marisa Satsia's documentation
The Actuators
I worked with my Electronics Venture Buddy Marisa, we worked together for doing all our actuators and also for trying them with the arduino. We looked up at Kobakant's for some different kind of actuators and finally tried the "Speakers" and the "Thermochromic Ink".
· Actuator 1: Speaker
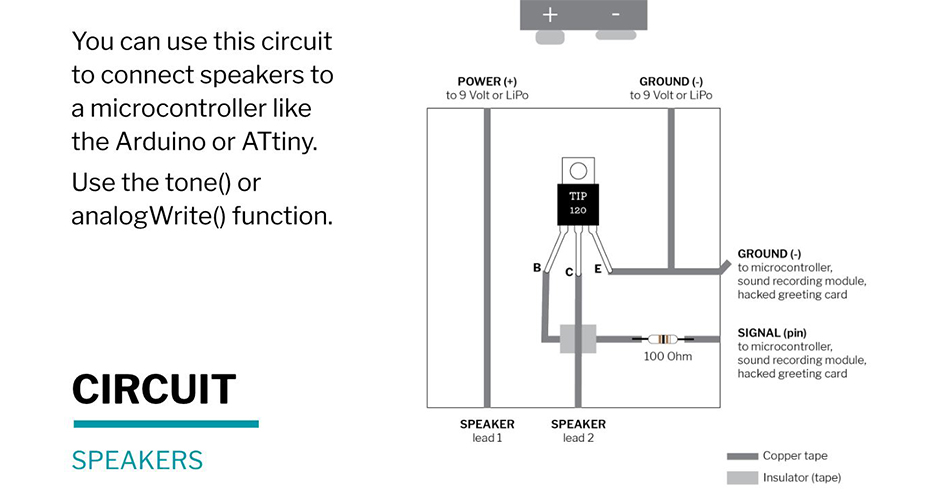
So we decided to make as our first actuator the Speaker. In Kobakant you can find lots of different kind of speakers such as: Fabric Speaker Swatch Example, Fabric Speakers or a Woven Speaker. Inspired by those, we made some to try with. Liza Stark's page was also really helpful.
These are some inspirations from Liza's Lecture:
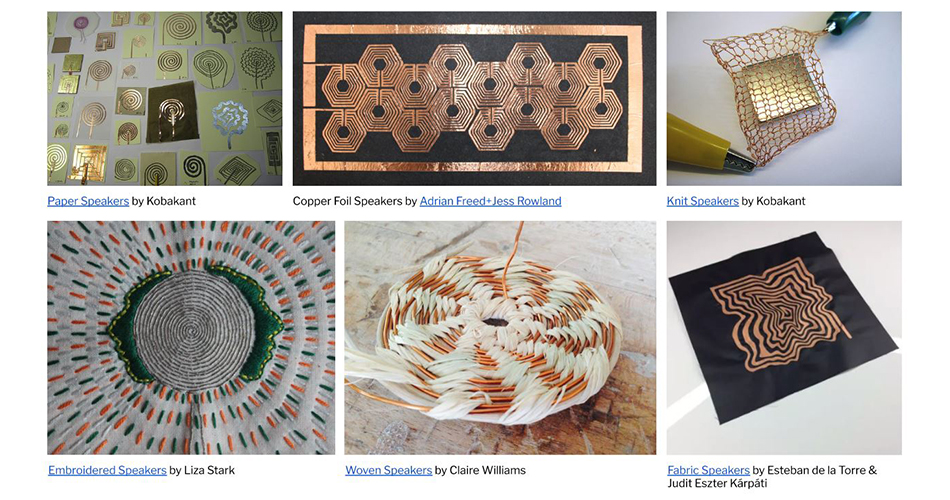
Image from Liza's Lecture
This is an important information from Liza's Lecture to understand how an speaker works:
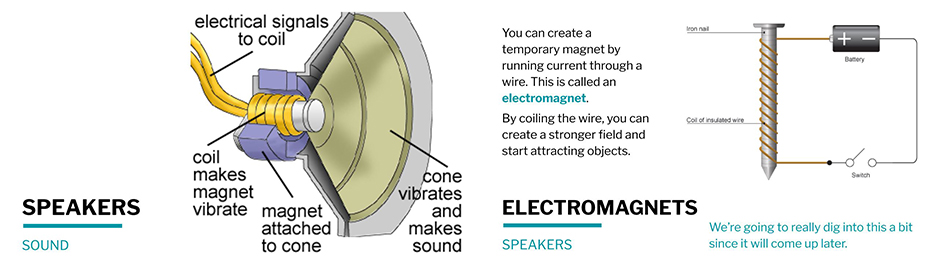
Slides from Liza's Lecture
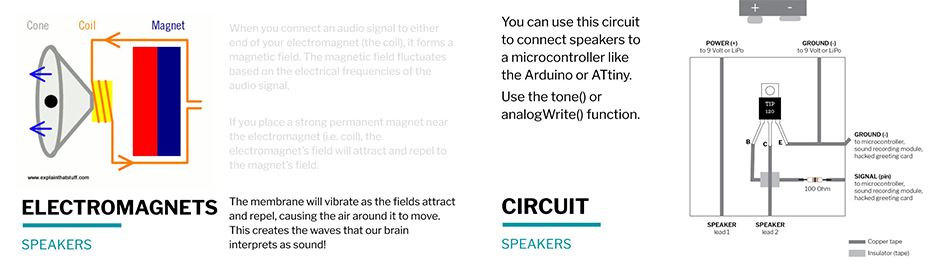
This is in general terms how we need to create a speaker:
Slides from Liza's Lecture
This is the list of materials you need for creating the speakers I've created (Marisa and I worked together but each of us did its own ones):
- Paper
- Conductive tape
- Insulating tape
- Conductive thread
- Regular thread
- Magnets
- Needle
- Fabric scissors
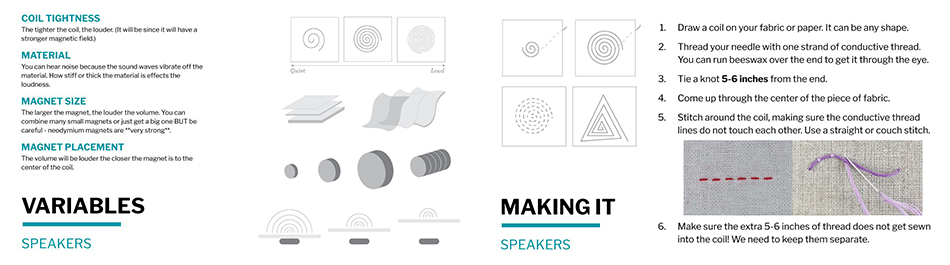
These are the steps you need to follow for doing them:
· Speaker 1: Conductive Tape
- 1. Draw a coil on your paper. It can be any shape.
- 2. Start sticking your conductive tape slowly and carefully, following the coils shape.
- 3. Measure the size of the insulating tape you need from the center to the bottom part (depending on the size of your coil).
- 4. Stick another piece of tape from the center to the bottom (over the insulating tape from the previous step).
- 5. Try the connection with the multimeter to check if both conducitive tape pieces touch correctly.
- 6. If yes, your speaker is ready! :)
This is a collage of the process:
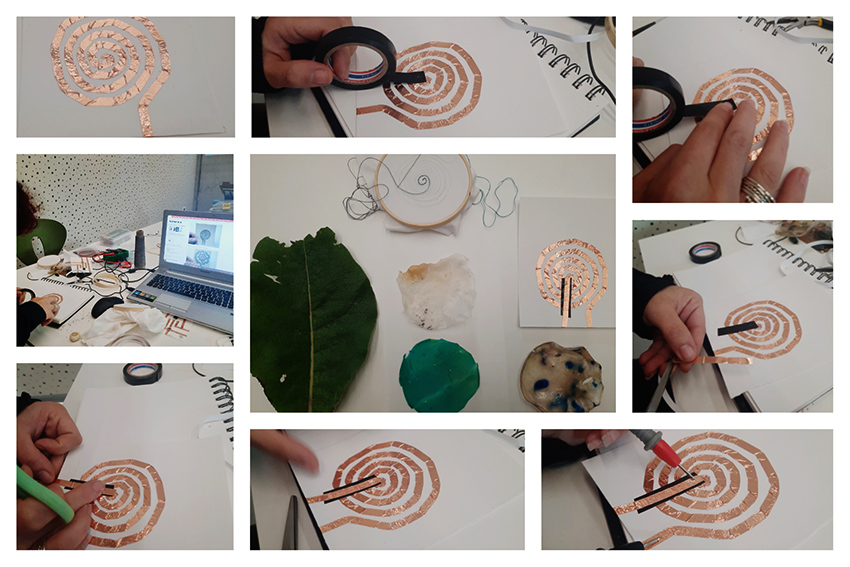
Image from Marisa's documentation
·Speaker 2: Conductive Thread
- 1. Draw a coil on your fabric or paper. It can be any shape.
- 2. Thread your needle with one strand of conductive thread. You can run beeswax over the end to get it through the eye.
- 3. Tie a knot 5-6 inches from the end.
- 4. Come up through the center of the piece of fabric.
- 5. Stitch around the coil, making sure the conductive thread lines do not touch each other. Use a straight or couch stitch.
This information is taken from Liza's Lecture & Kobakant's tutorials, as mentionned before.
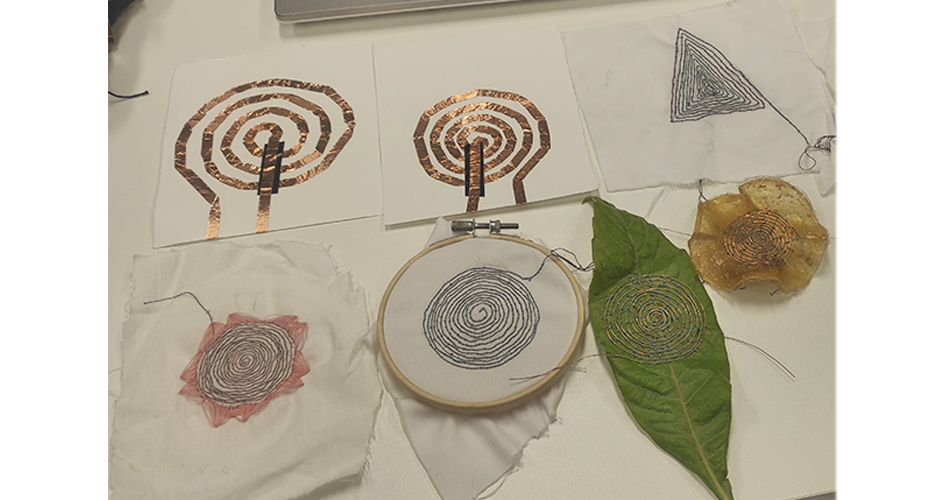
These are the two speakers I made:
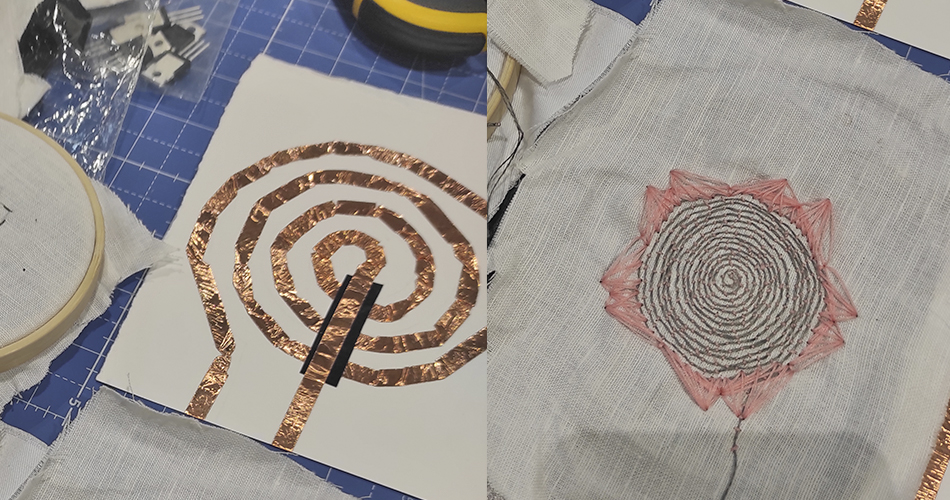
Regarding the speakers, some of them work better than the others, but we are so exited with the results. Also, my peer Marisa made two biospeakers that work really really well and they're amazing, one with a leaf as a support and the other one with a bioplastic.
And these are my speakers and also the ones that Marisa made <3:
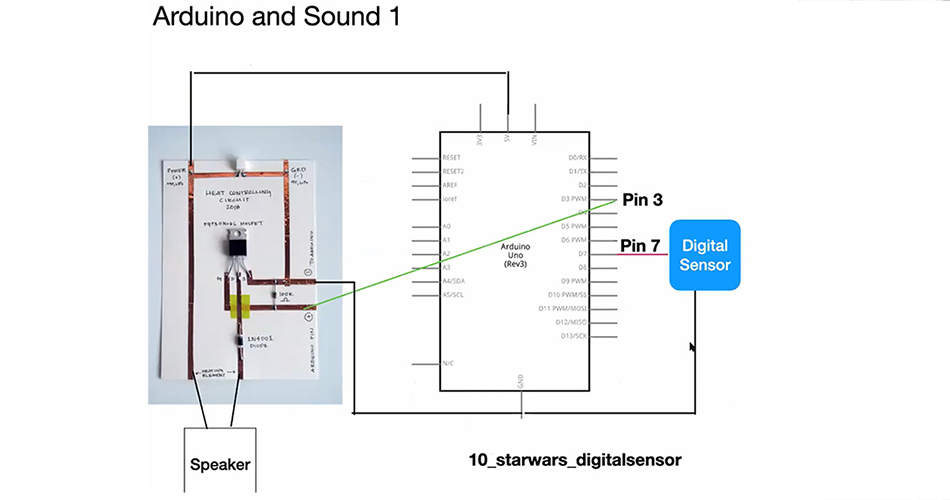
For first trying our speakers, we used this schematic from Emma's tutorial:

And this is the Code we used:
/*
Imperial March - Star Wars
Connect a piezo buzzer or speaker to pin 11 or select a new pin.
More songs available at https://github.com/robsoncouto/arduino-songs

Robson Couto, 2019
*/

#define NOTE_B0  31
#define NOTE_C1  33
#define NOTE_CS1 35
#define NOTE_D1  37
#define NOTE_DS1 39
#define NOTE_E1  41
#define NOTE_F1  44
#define NOTE_FS1 46
#define NOTE_G1  49
#define NOTE_GS1 52
#define NOTE_A1  55
#define NOTE_AS1 58
#define NOTE_B1  62
#define NOTE_C2  65
#define NOTE_CS2 69
#define NOTE_D2  73
#define NOTE_DS2 78
#define NOTE_E2  82
#define NOTE_F2  87
#define NOTE_FS2 93
#define NOTE_G2  98
#define NOTE_GS2 104
#define NOTE_A2  110
#define NOTE_AS2 117
#define NOTE_B2  123
#define NOTE_C3  131
#define NOTE_CS3 139
#define NOTE_D3  147
#define NOTE_DS3 156
#define NOTE_E3  165
#define NOTE_F3  175
#define NOTE_FS3 185
#define NOTE_G3  196
#define NOTE_GS3 208
#define NOTE_A3  220
#define NOTE_AS3 233
#define NOTE_B3  247
#define NOTE_C4  262
#define NOTE_CS4 277
#define NOTE_D4  294
#define NOTE_DS4 311
#define NOTE_E4  330
#define NOTE_F4  349
#define NOTE_FS4 370
#define NOTE_G4  392
#define NOTE_GS4 415
#define NOTE_A4  440
#define NOTE_AS4 466
#define NOTE_B4  494
#define NOTE_C5  523
#define NOTE_CS5 554
#define NOTE_D5  587
#define NOTE_DS5 622
#define NOTE_E5  659
#define NOTE_F5  698
#define NOTE_FS5 740
#define NOTE_G5  784
#define NOTE_GS5 831
#define NOTE_A5  880
#define NOTE_AS5 932
#define NOTE_B5  988
#define NOTE_C6  1047
#define NOTE_CS6 1109
#define NOTE_D6  1175
#define NOTE_DS6 1245
#define NOTE_E6  1319
#define NOTE_F6  1397
#define NOTE_FS6 1480
#define NOTE_G6  1568
#define NOTE_GS6 1661
#define NOTE_A6  1760
#define NOTE_AS6 1865
#define NOTE_B6  1976
#define NOTE_C7  2093
#define NOTE_CS7 2217
#define NOTE_D7  2349
#define NOTE_DS7 2489
#define NOTE_E7  2637
#define NOTE_F7  2794
#define NOTE_FS7 2960
#define NOTE_G7  3136
#define NOTE_GS7 3322
#define NOTE_A7  3520
#define NOTE_AS7 3729
#define NOTE_B7  3951
#define NOTE_C8  4186
#define NOTE_CS8 4435
#define NOTE_D8  4699
#define NOTE_DS8 4978
#define REST      0


// change this to make the song slower or faster
int tempo = 120;

// change this to whichever pin you want to use
int buzzer = 3;

// notes of the moledy followed by the duration.
// a 4 means a quarter note, 8 an eighteenth , 16 sixteenth, so on
// !!negative numbers are used to represent dotted notes,
// so -4 means a dotted quarter note, that is, a quarter plus an eighteenth!!
int melody[] = {

// Dart Vader theme (Imperial March) - Star wars
// Score available at https://musescore.com/user/202909/scores/1141521
// The tenor saxophone part was used

NOTE_A4,-4, NOTE_A4,-4, NOTE_A4,16, NOTE_A4,16, NOTE_A4,16, NOTE_A4,16, NOTE_F4,8, REST,8,
NOTE_A4,-4, NOTE_A4,-4, NOTE_A4,16, NOTE_A4,16, NOTE_A4,16, NOTE_A4,16, NOTE_F4,8, REST,8,
NOTE_A4,4, NOTE_A4,4, NOTE_A4,4, NOTE_F4,-8, NOTE_C5,16,

NOTE_A4,4, NOTE_F4,-8, NOTE_C5,16, NOTE_A4,2,//4
NOTE_E5,4, NOTE_E5,4, NOTE_E5,4, NOTE_F5,-8, NOTE_C5,16,
NOTE_A4,4, NOTE_F4,-8, NOTE_C5,16, NOTE_A4,2,

NOTE_A5,4, NOTE_A4,-8, NOTE_A4,16, NOTE_A5,4, NOTE_GS5,-8, NOTE_G5,16, //7
NOTE_DS5,16, NOTE_D5,16, NOTE_DS5,8, REST,8, NOTE_A4,8, NOTE_DS5,4, NOTE_D5,-8, NOTE_CS5,16,

NOTE_C5,16, NOTE_B4,16, NOTE_C5,16, REST,8, NOTE_F4,8, NOTE_GS4,4, NOTE_F4,-8, NOTE_A4,-16,//9
NOTE_C5,4, NOTE_A4,-8, NOTE_C5,16, NOTE_E5,2,

NOTE_A5,4, NOTE_A4,-8, NOTE_A4,16, NOTE_A5,4, NOTE_GS5,-8, NOTE_G5,16, //7
NOTE_DS5,16, NOTE_D5,16, NOTE_DS5,8, REST,8, NOTE_A4,8, NOTE_DS5,4, NOTE_D5,-8, NOTE_CS5,16,

NOTE_C5,16, NOTE_B4,16, NOTE_C5,16, REST,8, NOTE_F4,8, NOTE_GS4,4, NOTE_F4,-8, NOTE_A4,-16,//9
NOTE_A4,4, NOTE_F4,-8, NOTE_C5,16, NOTE_A4,2,

};

// sizeof gives the number of bytes, each int value is composed of two bytes (16 bits)
// there are two values per note (pitch and duration), so for each note there are four bytes
int notes = sizeof(melody) / sizeof(melody[0]) / 2;

// this calculates the duration of a whole note in ms
int wholenote = (60000 * 4) / tempo;

int divider = 0, noteDuration = 0;

void setup() {

}

void loop() {
// no need to repeat the melody.
play_melody();
}

void play_melody(){
// iterate over the notes of the melody.
// Remember, the array is twice the number of notes (notes + durations)
for (int thisNote = 0; thisNote < notes * 2; thisNote = thisNote + 2) {

// calculates the duration of each note
divider = melody[thisNote + 1];
if (divider > 0) {
// regular note, just proceed
noteDuration = (wholenote) / divider;
} else if (divider < 0) {
// dotted notes are represented with negative durations!!
noteDuration = (wholenote) / abs(divider);
noteDuration *= 1.5; // increases the duration in half for dotted notes
}

// we only play the note for 90% of the duration, leaving 10% as a pause
tone(buzzer, melody[thisNote], noteDuration*0.9);

// Wait for the specief duration before playing the next note.
delay(noteDuration);

// stop the waveform generation before the next note.
noTone(buzzer);
}
}
Here you can verify that they work <3
· The Code
Then, Following Emma's tutorial we managed to make them sound but wanted to go further, so we also changed the song looking up on this page that she told us. There are lots of song's Codes ready to use on your Arduino Code. We finally chose de Jigglypuff Song (which I love) and prepare the code to make It sound. We also used one of the digital sensors we made on the E-Textiles Week that makes the song start when you push it.
We used the same schematic that Emma used in her tutorial but changing the Pin 3 for the Pin 11:
This is the Code we used:
/*
  Jigglypuff's Song
  Connect a piezo buzzer or speaker to pin 11 or select a new pin.
  More songs available at https://github.com/robsoncouto/arduino-songs

                                              Robson Couto, 2019
*/
#define NOTE_B0  31
#define NOTE_C1  33
#define NOTE_CS1 35
#define NOTE_D1  37
#define NOTE_DS1 39
#define NOTE_E1  41
#define NOTE_F1  44
#define NOTE_FS1 46
#define NOTE_G1  49
#define NOTE_GS1 52
#define NOTE_A1  55
#define NOTE_AS1 58
#define NOTE_B1  62
#define NOTE_C2  65
#define NOTE_CS2 69
#define NOTE_D2  73
#define NOTE_DS2 78
#define NOTE_E2  82
#define NOTE_F2  87
#define NOTE_FS2 93
#define NOTE_G2  98
#define NOTE_GS2 104
#define NOTE_A2  110
#define NOTE_AS2 117
#define NOTE_B2  123
#define NOTE_C3  131
#define NOTE_CS3 139
#define NOTE_D3  147
#define NOTE_DS3 156
#define NOTE_E3  165
#define NOTE_F3  175
#define NOTE_FS3 185
#define NOTE_G3  196
#define NOTE_GS3 208
#define NOTE_A3  220
#define NOTE_AS3 233
#define NOTE_B3  247
#define NOTE_C4  262
#define NOTE_CS4 277
#define NOTE_D4  294
#define NOTE_DS4 311
#define NOTE_E4  330
#define NOTE_F4  349
#define NOTE_FS4 370
#define NOTE_G4  392
#define NOTE_GS4 415
#define NOTE_A4  440
#define NOTE_AS4 466
#define NOTE_B4  494
#define NOTE_C5  523
#define NOTE_CS5 554
#define NOTE_D5  587
#define NOTE_DS5 622
#define NOTE_E5  659
#define NOTE_F5  698
#define NOTE_FS5 740
#define NOTE_G5  784
#define NOTE_GS5 831
#define NOTE_A5  880
#define NOTE_AS5 932
#define NOTE_B5  988
#define NOTE_C6  1047
#define NOTE_CS6 1109
#define NOTE_D6  1175
#define NOTE_DS6 1245
#define NOTE_E6  1319
#define NOTE_F6  1397
#define NOTE_FS6 1480
#define NOTE_G6  1568
#define NOTE_GS6 1661
#define NOTE_A6  1760
#define NOTE_AS6 1865
#define NOTE_B6  1976
#define NOTE_C7  2093
#define NOTE_CS7 2217
#define NOTE_D7  2349
#define NOTE_DS7 2489
#define NOTE_E7  2637
#define NOTE_F7  2794
#define NOTE_FS7 2960
#define NOTE_G7  3136
#define NOTE_GS7 3322
#define NOTE_A7  3520
#define NOTE_AS7 3729
#define NOTE_B7  3951
#define NOTE_C8  4186
#define NOTE_CS8 4435
#define NOTE_D8  4699
#define NOTE_DS8 4978
#define REST      0


// change this to make the song slower or faster
int tempo = 85;

// change this to whichever pin you want to use
int buzzer = 11;

// notes of the moledy followed by the duration.
// a 4 means a quarter note, 8 an eighteenth , 16 sixteenth, so on
// !!negative numbers are used to represent dotted notes,
// so -4 means a dotted quarter note, that is, a quarter plus an eighteenth!!
int melody[] = {

  // Jigglypuff's Song
  // Score available at https://musescore.com/user/28109683/scores/5044153

  NOTE_D5,-4, NOTE_A5,8, NOTE_FS5,8, NOTE_D5,8,
  NOTE_E5,-4, NOTE_FS5,8, NOTE_G5,4,
  NOTE_FS5,-4, NOTE_E5,8, NOTE_FS5,4,
  NOTE_D5,-2,
  NOTE_D5,-4, NOTE_A5,8, NOTE_FS5,8, NOTE_D5,8,
  NOTE_E5,-4, NOTE_FS5,8, NOTE_G5,4,
  NOTE_FS5,-1,
  NOTE_D5,-4, NOTE_A5,8, NOTE_FS5,8, NOTE_D5,8,
  NOTE_E5,-4, NOTE_FS5,8, NOTE_G5,4,

  NOTE_FS5,-4, NOTE_E5,8, NOTE_FS5,4,
  NOTE_D5,-2,
  NOTE_D5,-4, NOTE_A5,8, NOTE_FS5,8, NOTE_D5,8,
  NOTE_E5,-4, NOTE_FS5,8, NOTE_G5,4,
  NOTE_FS5,-1,

};

// sizeof gives the number of bytes, each int value is composed of two bytes (16 bits)
// there are two values per note (pitch and duration), so for each note there are four bytes
int notes = sizeof(melody) / sizeof(melody[0]) / 2;

// this calculates the duration of a whole note in ms
int wholenote = (60000 * 4) / tempo;

int divider = 0, noteDuration = 0;

//variable for the senor
int sensor_pin = 7;
int sensor_value = 0;

void setup() {

  pinMode(sensor_pin, INPUT_PULLUP);
  Serial.begin(9600);
}

void loop() {

  //read and save the sensor voltage
  sensor_value = digitalRead(sensor_pin);
  Serial.println(sensor_value);

  if(sensor_value == LOW){  //if the sensor is pressed
      play_melody();  //play the melody
  }

}

void play_melody(){
     // iterate over the notes of the melody.
  // Remember, the array is twice the number of notes (notes + durations)
  for (int thisNote = 0; thisNote < notes * 2; thisNote = thisNote + 2) {

    // calculates the duration of each note
    divider = melody[thisNote + 1];
    if (divider > 0) {
      // regular note, just proceed
      noteDuration = (wholenote) / divider;
    } else if (divider < 0) {
      // dotted notes are represented with negative durations!!
      noteDuration = (wholenote) / abs(divider);
      noteDuration *= 1.5; // increases the duration in half for dotted notes
    }

    // we only play the note for 90% of the duration, leaving 10% as a pause
    tone(buzzer, melody[thisNote], noteDuration * 0.9);

    // Wait for the specief duration before playing the next note.
    delay(noteDuration);

    // stop the waveform generation before the next note.
    noTone(buzzer);
  }
}
And this is the result!
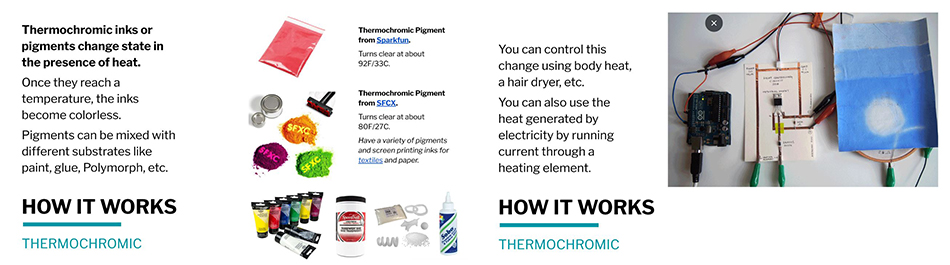
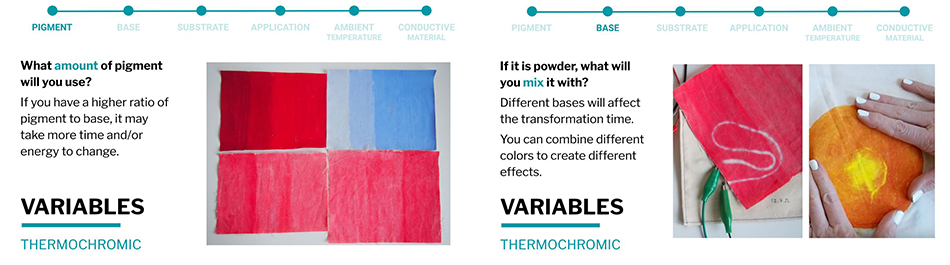
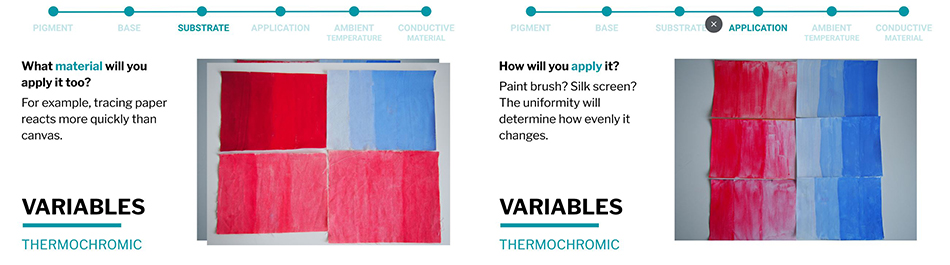
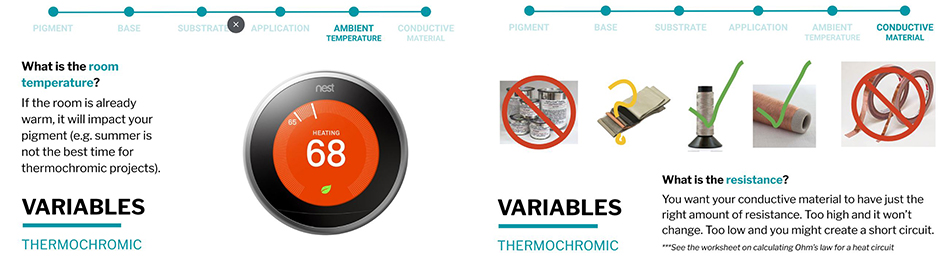
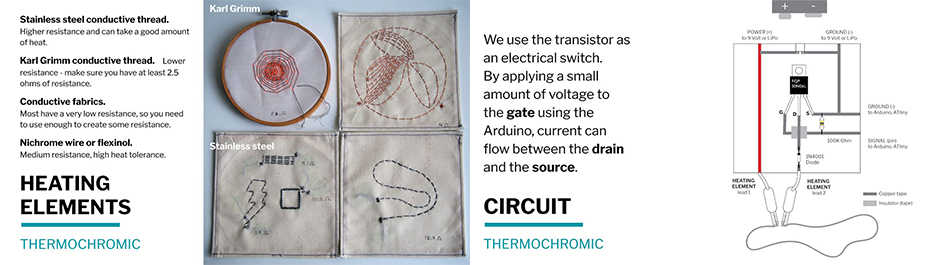
· Actuator 2: Thermochromic Ink
For our second actuator we chose the Thermochromic Ink.
These are important slides from Liza's lecture to understand how the Thermochromic inks or pigments work:
This is the list of materials you need for creating this actuator:
- Conductive thread
- Thermochromic ink
- Paper
- Conductive tape
- Paper tape
- Brush
I'll explain from my peer Marisa's try, since it was the one that worked the best.
This are the steps you need to follow for doing them:
- 1. Paint with a little of paint on a paper with the brush.
- 2. When it dries, cut a string of conductive thread and stick it in the other side of the paper (with the shape you want) with paper tape.
- 3. Make sure that the edges arrive to the ends of the paper, so that you can stick them with the conductive tape (this is where you'll make the contact with the alligator clips).
This collage is from my peer Marisa's documentation:
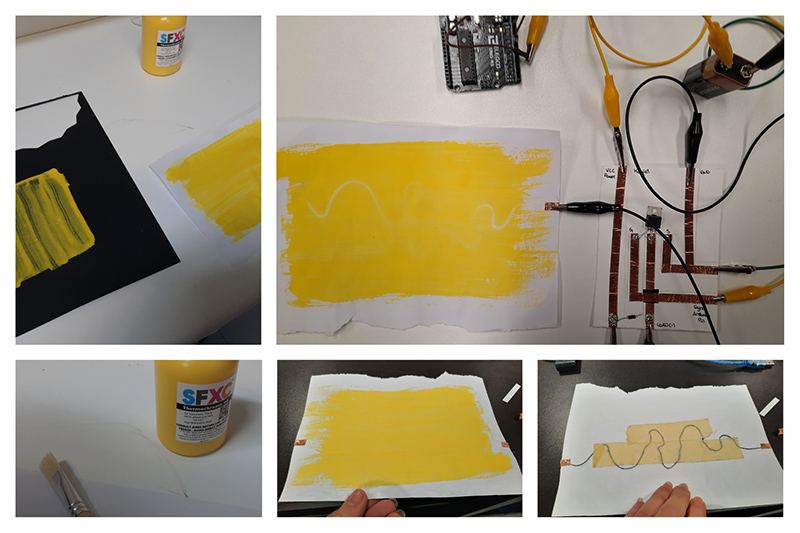
Image from Marisa's documentation
We just painted with a little paint on a paper and then try with a code we found in Liza's page. It didn't work at first and we were so frustrated, we couldn't find what was wrong. Finaly we noticed that we were using the wrong circuit and retried, first with only the battery, then, with also the Arduino and Liza's code and it worked really well!
· The Code
This is the code we used from Liza Stark's page:
void setup() {
  // put your setup code here, to run once:

 pinMode(9, OUTPUT);
 Serial.begin(9600);

}

void loop() {
  // put your main code here, to run repeatedly:

 //Change the second value to change the thermochormic ink's
 //behaviour and transparency:
  analogWrite(9,150);
  Serial.println("ON");
  //Change the delay to keep the heat on longer
  delay(4000);

  //Turn it off to give your circuit a break
  analogWrite(9,0);
  Serial.println("OFF");
  //Increase the delay to bring the color back
  delay(5000);

}
And these are the results:
BOM of the Assignment
This is the BOM (Bill Of Materials) you need for creating these actuators:
| Qty | Description | Price | Link |
|---|---|---|---|
| 1 | Conductive Thread | 19,36€ | https://www.amazon.com/-/es/Aurifil-Bobina-grande-inoxidable-yardas/dp/B017TQW1SQ/ref=sr_1_24?crid=2U6LJC9B5WBPI&keywords=conductive+thread+for+sewable+circuits&qid=1654959250&sprefix=conductive+thread%2Caps%2C424&sr=8-24 |
| 1 | Conductive Tape | 6,99€ | https://www.amazon.es/FEPITO-Manualidades-Reparaciones-el%C3%A9ctricas-conductora/dp/B08FJ6BSG7/ref=asc_df_B08FJ6BSG7/?tag=&linkCode=df0&hvadid=463978830436&hvpos=&hvnetw=g&hvrand=5455156358672551604&hvpone=&hvptwo=&hvqmt=&hvdev=c&hvdvcmdl=&hvlocint=&hvlocphy=1005440&hvtargid=pla-946903352570&ref=&adgrpid=106852983537&th=1 |
| 1 | Insulating Tape | 4,50€ | https://www.amazon.es/Cablepelado-Cinta-aislante-19x0-15mm-Metros/dp/B07351CKPY/ref=asc_df_B07351CKPY/?tag=googshopes-21&linkCode=df0&hvadid=310914418012&hvpos=&hvnetw=g&hvrand=13407663958254047004&hvpone=&hvptwo=&hvqmt=&hvdev=c&hvdvcmdl=&hvlocint=&hvlocphy=1005440&hvtargid=pla-681788418456&th=1 |
| 1 | Magnets | 10,59€ | https://www.amazon.es/Yizhet-cilindro-artesan%C3%ADas-manualidades-organizaci%C3%B3n/dp/B07T5L2DZ8/ref=asc_df_B07T5L2DZ8/?tag=googshopes-21&linkCode=df0&hvadid=366372511884&hvpos=&hvnetw=g&hvrand=2495815432430747153&hvpone=&hvptwo=&hvqmt=&hvdev=c&hvdvcmdl=&hvlocint=&hvlocphy=1005440&hvtargid=pla-781454578468&th=1 |
| 1 | Thermochromic Paint | 36,78€ | https://www.inteligentes.org/home/205-cambio-color-temperatura-pintura-amarilla.html |
| 1 | 9V Battery | € | https://www.amazon.es/AmazonBasics-Paquete-pilas-alcalinas/dp/B00MH4QM1S/ref=asc_df_B00MH4QM1S/?tag=googshopes-21&linkCode=df0&hvadid=195222740293&hvpos=&hvnetw=g&hvrand=9006246655575130797&hvpone=&hvptwo=&hvqmt=&hvdev=c&hvdvcmdl=&hvlocint=&hvlocphy=1005440&hvtargid=pla-185615473732&psc=1 |
| 1 | Arduino UNO | 40,10€ | https://www.amazon.es/SMART-PROJECTS-A000073-Arduino-Uno/dp/B00PUOVSYS/ref=sr_1_7?keywords=arduino+uno&qid=1654959834&sr=8-7 |
| 1 | USB Wire for Arduino UNO | 3,60€ | https://www.amazon.es/Christians-Technik-Shop-Conector-Arduino/dp/B01G1FEKGM/ref=sr_1_6?__mk_es_ES=%C3%85M%C3%85%C5%BD%C3%95%C3%91&crid=1B4KFJZR57XZM&keywords=arduino+uno+usb&qid=1654959877&sprefix=arduino+uno+usb%2Caps%2C474&sr=8-6 |
| 1 | Alligator Clip With Wires | 9,52€ | https://www.amazon.es/Senven%C2%AE30-Cocodrilo-Alligator-pulgadas-colores/dp/B07R44H819/ref=sr_1_2_sspa?crid=20Y4AEK0PWUIU&keywords=alligator+clips&qid=1654959986&sprefix=alligator+clip%2Caps%2C275&sr=8-2-spons&psc=1&spLa=ZW5jcnlwdGVkUXVhbGlmaWVyPUEyRldQVjhXUTdaNEpIJmVuY3J5cHRlZElkPUEwMjY1ODk0MzFXR0ExMDAzTlNESyZlbmNyeXB0ZWRBZElkPUEwNTUyMzMwMkhPMUJOTzU2QlhLRyZ3aWRnZXROYW1lPXNwX2F0ZiZhY3Rpb249Y2xpY2tSZWRpcmVjdCZkb05vdExvZ0NsaWNrPXRydWU= |
| 1 | Jumper Wires | 9,49€ | https://www.amazon.es/AZDelivery-Jumper-Arduino-Raspberry-Breadboard/dp/B07VFK8L9F/ref=sr_1_2_sspa?crid=2GC08EZ5TMWA8&keywords=jumper+wire+cables&qid=1654960059&sprefix=jumper+wire%2Caps%2C224&sr=8-2-spons&psc=1&smid=A1X7QLRQH87QA3&spLa=ZW5jcnlwdGVkUXVhbGlmaWVyPUFLRzRMRUgxV1Y2MzcmZW5jcnlwdGVkSWQ9QTAxNzg5NjI3VkdHUTZFUTRINVcmZW5jcnlwdGVkQWRJZD1BMDYxNDE4OVIzS0hTUUZHSVU5WSZ3aWRnZXROYW1lPXNwX2F0ZiZhY3Rpb249Y2xpY2tSZWRpcmVjdCZkb05vdExvZ0NsaWNrPXRydWU= |
References & Useful Links
Some useful references from Liza Stark:
These previous year's students inspired us:
Tutorials by Emma Pareschi
- Arduino and Power Loads Tutorial by Emma Pareschi
- Arduino, Neopixels ans Sound Tutorial by Emma Pareschi
Useful Links
- Wearables Lecture by Liza Stark
- Wearable Technology - Investopedia
- Kobakant Actuators
- Fabric Speaker Swatch Example from Kobakant
- Fabric Speakers from Kobakant
- Woven Speaker
- URBAN ARMOR