09 | TEXTILE SCAFFOLD
This week focuses on exploring textile techniques and applications of technical textiles in the industry. It introduces the concept of designing custom processes that require the design of a set of tools, processes and workflow. One of the techniques we will be trying out is the CNC milling machine, to create molds.
RESEARCH | IDEATION
I wanted to explore the lokal seaweed Fucus Serratus as a material and a composite material, may aim was to explore and reinvent my processes and techniques working with the seaweed, using thextile scaffolding as a method to understand and explore the material. Therefore my focus was mainly of the trying different ways of making biomaterials and composite materials that could work within textile scaffolding processes.
I embarked this week by looking up other artists and designers working with molding seaweed, and molding in genreal. One of the first designers I looked at was Katrin Thorvaldsdottir whom I was put in contact with last week, whom by chance works with molding masks out of seaweed. She uses the whole seaweed she finds on the beach and then molds this over a face. And I just love her statement about molding with seaweed instead of leather, "when you mold with leather, it comes out exactly as the mold, when you mold with seaweed it has its own character."
To try out different ways of preserving the shape oof the molded seaweed, I researched a lot into different ways of making glue with natural componenents.
- 5 WAYS OF MAKING GLUE
- 20 WAYS TO MAKE GLUE
- 5 WAYS TO MAKE GLUE
- HOW TO MAKE GLUE
- CASEIN GLUE
- CASEING GLUE2
- BEEWAX
Here I also went through Dominique Vial's documentation for Twist Again, to see what types of natural binders we was using for his textile waste vases.
Additionally I used the our own Bio-nmaterial booklet as a reference point, as I wanted to figure out a good way of making a functional bio-material with the local seaweed.
THE ICELANDIC BIO-MATERIALS CHRONICLES can also be seen here, code provided by Emma Shannon.
During this week I used a lot of effort understanding Grashopper in the way that I want to make use of it, namely creating surfaces and creating them out of my own patterns. Therefore I used hours on understanding the workings of patterns, attractions points, surfaces and sinus to get a better comprehension of how to buld those in Grashopper. The lists of workshops will be mentioned below A project I found very inspiering was the bag created by Nicolas Olmos and the mold created by Esther Perbandt and Anastasia Pistofidu whom all worked with parametric patterns created in GH, which were CNC milled in wood and then molded in leather.
Finally i also delved into researching net making, as I wanted to grow crustals on a net, as it is a side going project with Julia Lohmann, that we want to grow seaweed sculptures directly in the water. For this research I used the following amazing tutorials:
* [Betiana Pavon](http://class.textile-academy.org/2019/betiana.pavon/) _FabLab Barcelona 2019-20_
* [Saskia Helinska](https://class.textile-academy.org/2022/saskia-helinska/assignments/week09.html) _FabLab Barcelona 2021-22_
TUTORIALS
GRASHOPPER
- PARAMETRIC WAVER
- GRASHOPPER ATTERACTOR-WAVEBIRD
- RANDOM WAVY PATTERN
- RANDOM WAVE PATTERN WITH TILT
- RANDOM WAVE SURFACES
- WAVY WALL
- PARAMETRIC WAVE SHAPE
- WAVE SIMULATION-KANGOROO
- WAVE LINE SHAPER
- TREE COONFUSION
- WAVE SURFACE
- RIPPLE EFFECT
- CURVES TO SURFACE
TOOLS
- SCALES
- POTS
- JARS
- SPOON
- TONG
- MEASURING
- MOLDS
- TEXTILES
- EMBROIDERY HOOPS
- LEFTOVER PLASTICS
- PLY-WOOD FOR LASERCUT MOLDS
- DRYING CABINET
- NETTING NEEDLES
- NETTING BOARD
- BALOONS
- PLASTIC FILM
PROCESS | WORKFLOW
This week was bivided into different stages:
- 01| CRYSTILISATION AND NET MAKING
- 02| GRASHOPPER TO CREATE MOLDS
- 03| SEAWEED COLLECTNG
- 04| CNC - TRIP
- 05| 3D PRINTING
- 06| GLUE MATERIAL RESEARCH
- 07| GELATIN AND AGAR
GOOD TO KNOW | CRYSTALS AND NETTING
Working with crystals you need to have a substrate on which the crystals can grow. For my substrate I chose to knot some nets. The netting is fun because you can easily create 3D structures as the knots allows you to knot layers or alter direction. Also the sise of the nettign board allows you to create 3D structures. You can easily make your own tool by scraps of wood or waste plastic. My plan is to cut them out in the laser cutter, but it is not necessary.
The recepies we uused for the crystals are all in the CLASS TUTORIAL or on CRYSTAL TUTORIAL. I decided to make Epsom salt crystal and Alum crystals, however after 7 days nothing really happened to them. Even though we did everything according to the recipe and keept them in darker, still and closed conditions.
| MATERIAL | AMOUNT OF MATERIAL |
|---|---|
| Epsom salt | 200 ml |
| Boiled water | 200 ml |
- Boil the water.
- Dissolve salt in water.
- Filter solution through a coffee filter,
- Place the substate in the solution, make sure it does not touch the sides.
- Place container somwhere darker with a tinfoil lid on to prevent dust. Also make sure the sourroundings are not shakeing, like a table or shelf.
| MATERIAL | AMOUNT OF MATERIAL |
|---|---|
| Alun | 60 g |
| Boiled water | 500 ml |
- Boil the water.
- Dissolve salt in water.
- Filter solution through a coffee filter.
- Place the substate in the solution, make sure it does not touch the sides.
- Place container somwhere darker with a tinfoil lid on to prevent dust. Also make sure the sourroundings are not shakeing, like a table or shelf.
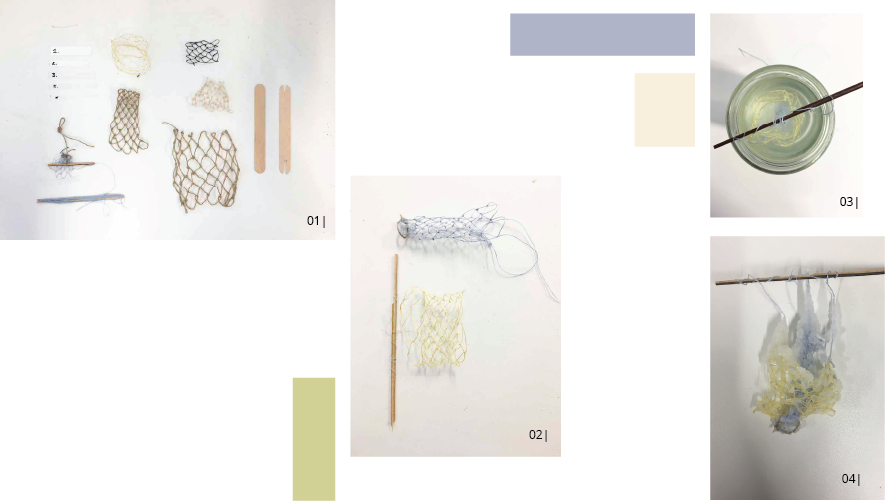
- 01| NET MAKING, TOOLS, SAMPLES, ALBERTE BOJESEN
- 02| FINE 3D NET SAMPLES, ALBERTE BOJESEN
- 03| LOWERING THE SAMPLES IN ALUN SOLUTION, ALBERTE BOJESEN
- 04| SAMPLES FROM ALUN SOLUTION, AFTER 1 MONTH, ALBERTE BOJESEN
After more than a month, some but very few crystals was formed. This might be due to the brand and properties of the alum / epsom salt used. Thus for another time it could be interesting to map the different types ans brands to see what grows the best. It might be due to the saturation as well, my samples might not have been saturated enough, or been contaminated.
GOOD TO KNOW | GRASHOPPER
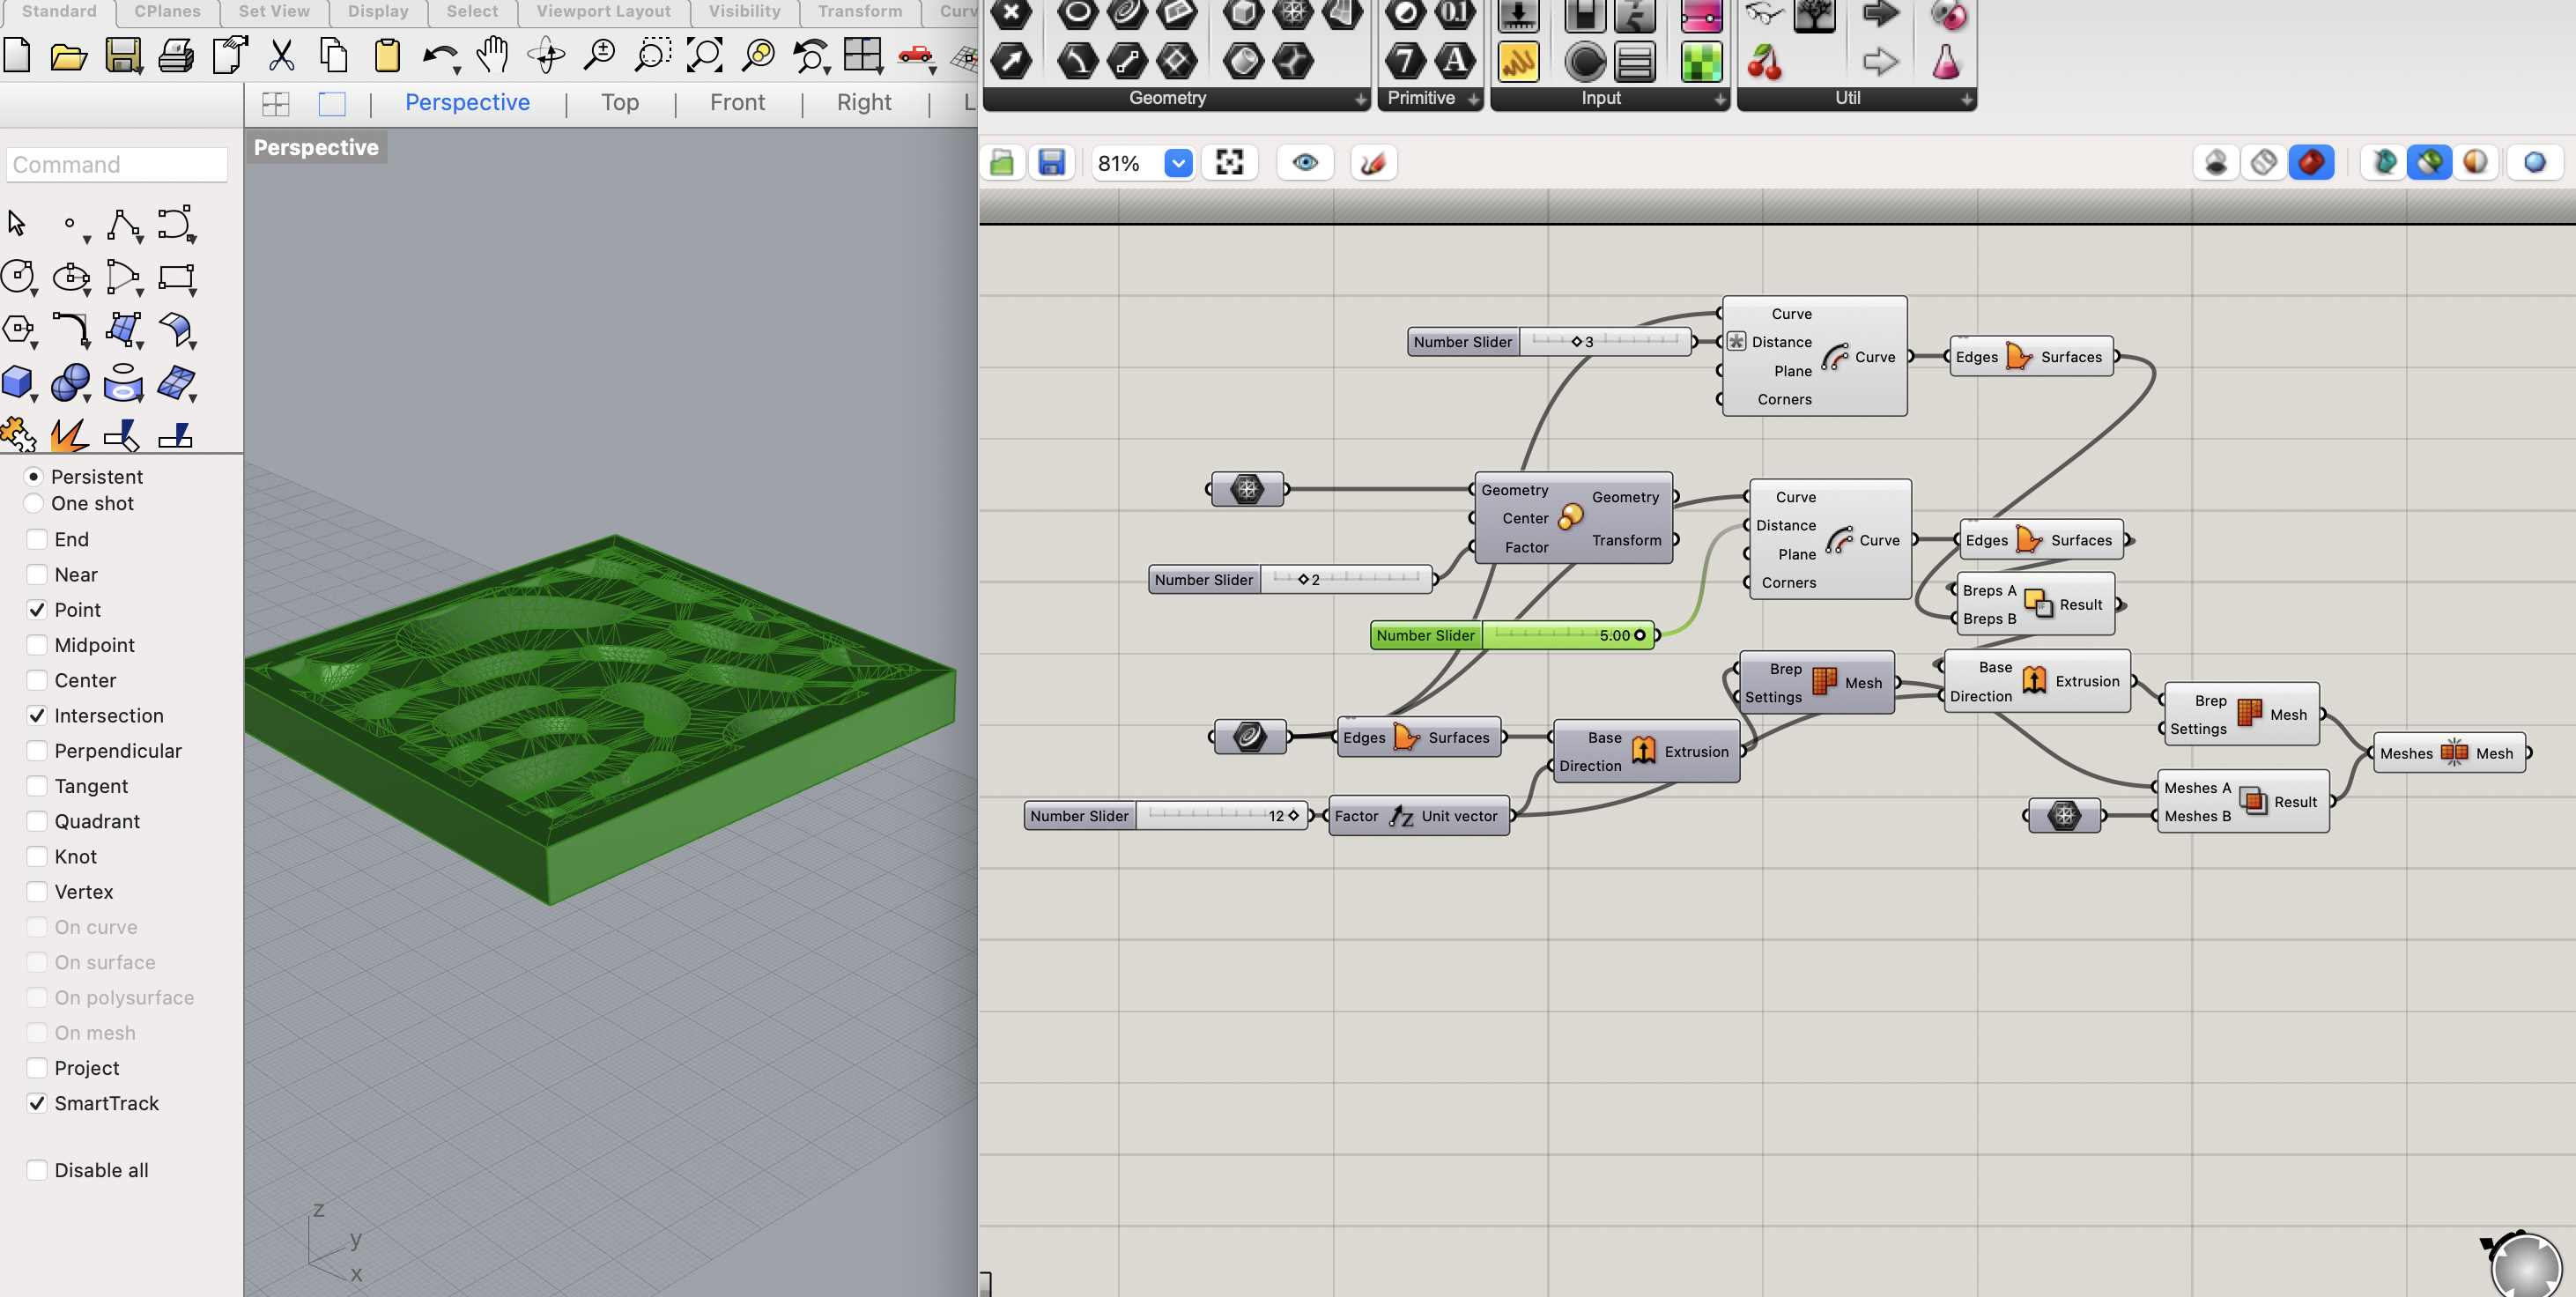
I stated out by wanting to use the same sample from WEEK 06 as a pattern for the CNC milling. I wanted to round off the extrutions to become more organic, like small mountains. However in the beginging I culd not get it to work, when i used the fillet funcion. Thus I started to look into how to manipulate surfaces in grashopper, too thereby be able to work more freely int the program. I ended up with a whole folder of files attempting different parametric patterns according to the turorials. Finally Louise found that I had been using the wrong fillet function, so whe helped me in creating a definition that worked, trying our different thing, finally we also managed to make the rises heighten according to the length of the base curve, which was a really nice thing to learn. The definitions can be found here 1 and 2, whith all the steps we took to refine it, and here are the 3D models.
Here the definition can be seen:
TUTORIALS
- PARAMETRIC WAVER
- GRASHOPPER ATTERACTOR-WAVEBIRD
- RANDOM WAVY PATTERN
- RANDOM WAVE PATTERN WITH TILT
- RANDOM WAVE SURFACES
- WAVY WALL
- PARAMETRIC WAVE SHAPE
- WAVE SIMULATION-KANGOROO
- WAVE LINE SHAPER
- TREE COONFUSION
- WAVE SURFACE
- RIPPLE EFFECT
GOOD TO KNOW | CNC
We took a field trip to Sauðárkrókur's fabLab to try the CNC machine, while I was waiting for the others to cut their I used the time to refining the definition and adding a cutting rectangle. The CNC works in two satges, digitally in a program called VCarve which can only be accessed on place but you can use Fusion360 to create the file format. Here we uploaded the stl file and then det the cutting material, placement and different types drill bits for cutting out, the roughfing can be a larger more rough bit and the more detailed bit should have a more fine drill bit. For the cutting out you should change the drill bit again. When the settings are done the file is saved on a usb and plugged in to the machine. Load the file to the machine an remove the usb, to avoid crashing the usb. The material you are cutting in, in our case a 19mm MDF, should be drilled to the base plate, so it is not moved when the mashine is working. There after you set the zero point of you material and the distance from the drill, and then you are ready to go. I was not able to cut anything as my file turned out to be too fine, ao the bits would not be able to cut it out. It ended up looking like this in the rendering. Therefore I decided to 3D print my mold.
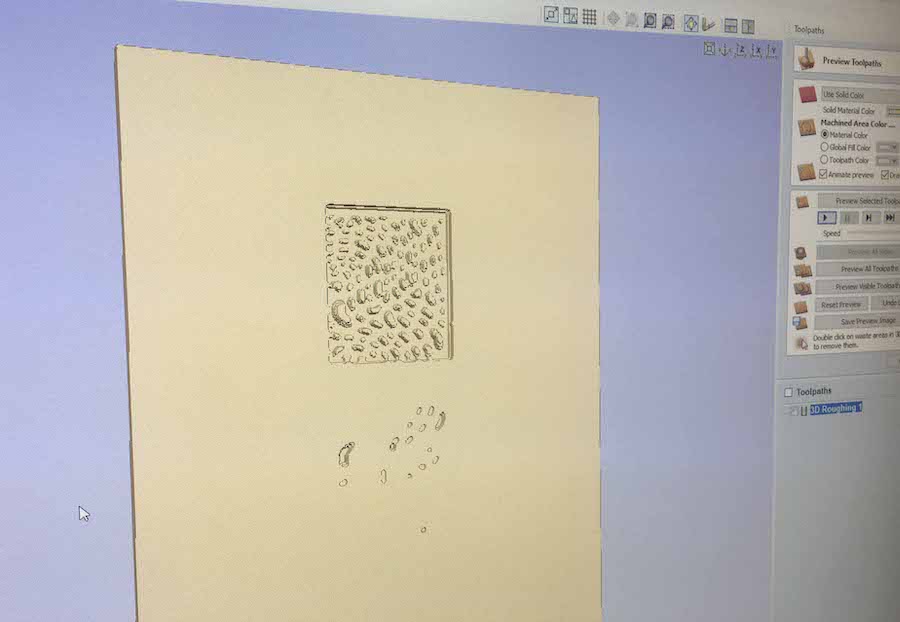
Things you have to consider when working with the CNC, it takes time, you have to take misstakes and prepareing the file and machine into account. It cannot be too fine a pattern, and you have to be carefull with the valleys, as this is also time consuming.
GOOD TO KNOW | 3D-PRINTER
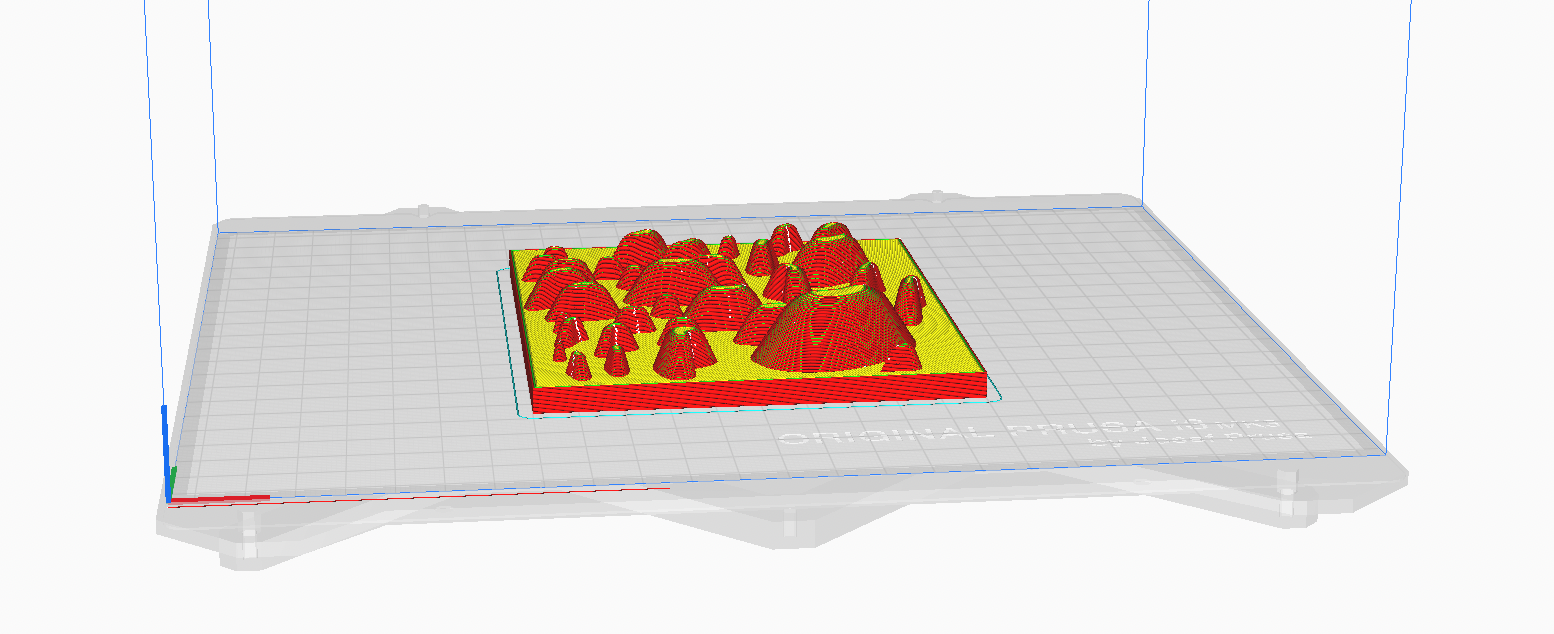
Finally I 3D-ptinted my pattern on our local Pruser printer, using the Cura-Multimaker progrmme. As is has too be quite dense, I scaled the pattern and put an triangular infill with 60%, which made it very dense, and I think it could have been less dense. The all the files can be found here: 3 AND 4.
CURA ULIMAKER SETTINGS
| MATERIAL | HEAT | LAYER THICKNESS | WALL THICKNESS | TOP | BOTTOM | INFILL DENCITY | INFILL PATTERN |
|---|---|---|---|---|---|---|---|
| PLA | 60 | 0.3 | 0.8 | 3 | 3 | 10% | TRIANGLES |
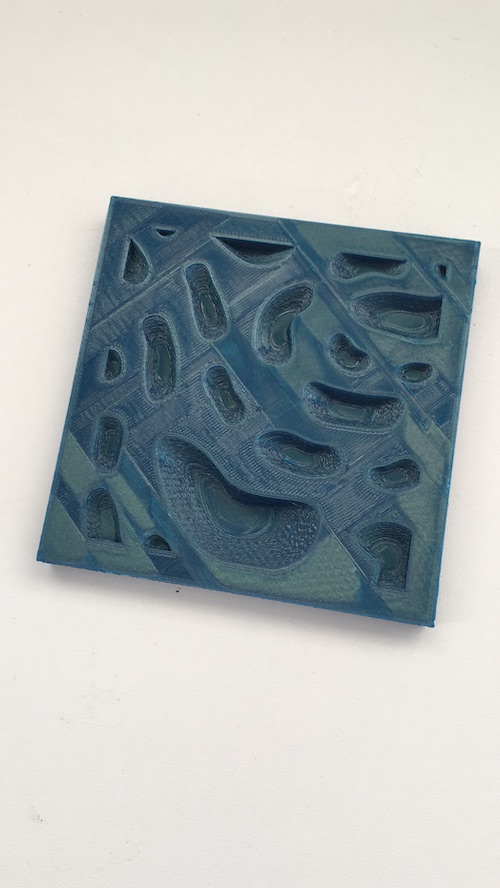
The mould was used to cast both seaweed based material with pine resin and gelatin, however I did not really appreciate the outcome as the mountains was too far from eachoter, resuting in a weird aesthetics. You can see the result further down in the process.
GOOD TO KNOW | SEAWEED AS A MATERIAL
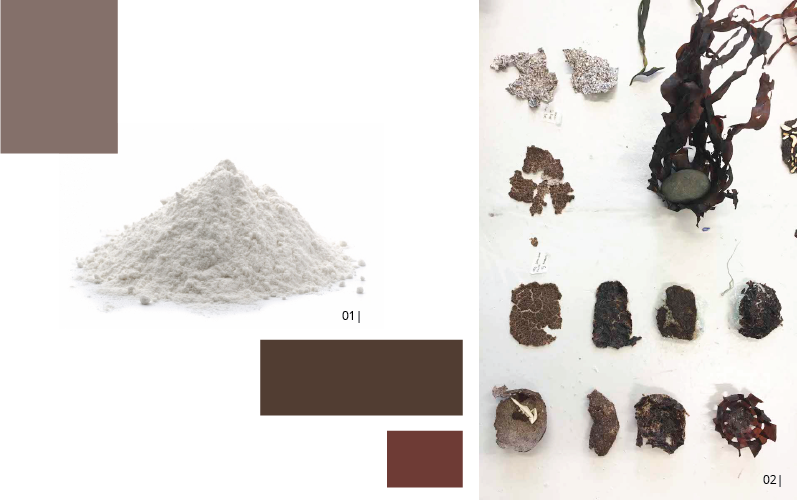
In the begining of the week I went to the beach and collected some seaweed, washed it out with a bit of organic detergent and hung it to dry. I founf that depending of their state of degration the seaweed has different coulurs varying from orange, green, red and brown, some really beautiful colours. I made some samples only with the seaweed, drying it up over a mold, they became very hard and brittle, but they are very beautiful in their brittlenes. The dryed seaweed I ground up in a coffee grinder, making a very fine powder. During the process I interchangebly used the dry powder and soaked it in glycerol water.
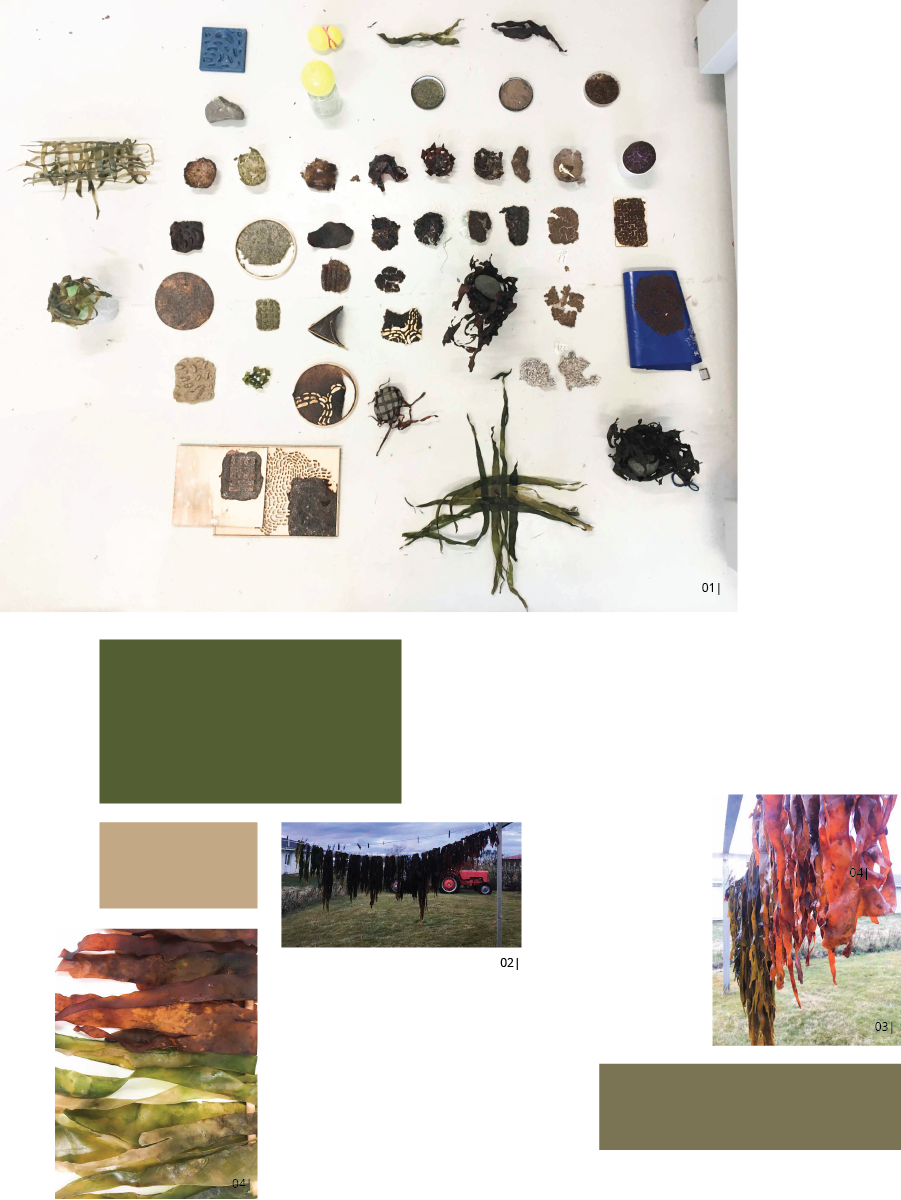
- 01| OVERVIEW OVER MATERIAL SAMPLES, PHOTO ALBERTE BOJESEN
- 02| DRYING RINSED SEAWEED, PHOTO ALBERTE BOJESEN
- 03| DRYING RINSED SEAWEED, PHOTO ALBERTE BOJESEN
- 04| DIFFERENT COLOURS OF THE SEAWEED, PHOTO ALBERTE BOJESEN
- 05| DRYING RINSED SEAWEED, PHOTO ALBERTE BOJESEN
- 06| RINSING THE SEAWEED IN SODA ASH DILUTED WATER, PHOTO ALBERTE BOJESEN
- 01| DRYED AND POWDERED RED SEAWEED, PHOTO ALBERTE BOJESEN
- 02| DRYED AND POWDERED GREEN SEAWEED, PHOTO ALBERTE BOJESEN
- 03| DRYED SEAWEED THAT GOT MOULDED AFTER THE CLAMP, PHOTO ALBERTE BOJESEN
- 04| MOULDING WET SEAWEED USING WEIGHTS, DID NOT WORK, PHOTO ALBERTE BOJESEN
- 05| THE MOULDED SEAWEED WHEN DRIED, PHOTO ALBERTE BOJESEN
- 06| SEAWEED PAPER, CRACKELED UP, PHOTO ALBERTE BOJESEN
- 07| SEAWEED PAPER IN MOULD, CRACKELED UP, PHOTO ALBERTE BOJESEN
- 06| SEAWEED WITH WHEAT FLOUR, CRACKELED UP, PHOTO ALBERTE BOJESEN
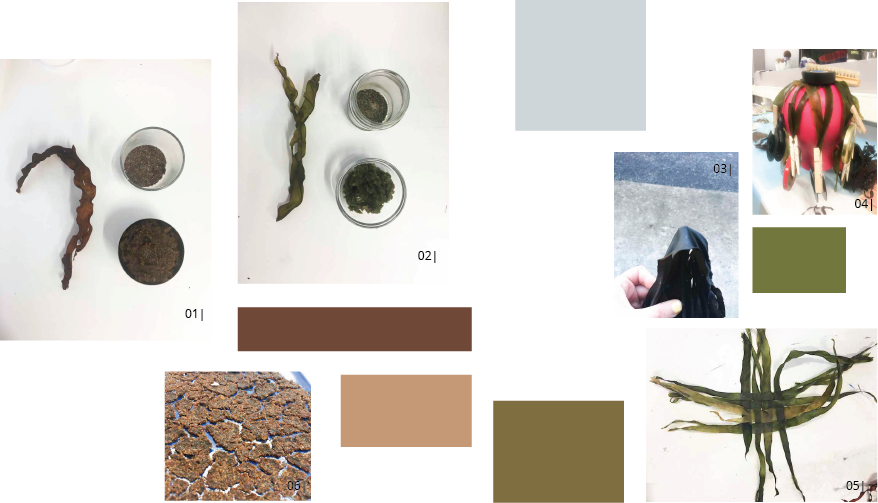
GOOD TO KNOW | SEAWEED AGAR AND GELATINE
From previously working with the Fucus Serratus seaweed I realised that it is not as good as good at becomming a coherent material as the Kombu Kelp when combining it with water and glyserol, and that the alginate bio-material shrank a lot. Therefore I wanted to try the different bio-material with gelatine.
GELATINE 1
| MATERIAL | AMOUNT OF MATERIAL |
|---|---|
| GELATIN | 15 g |
| SEAWEED PASTE (glycerol water) | 50 g |
| GLYCEROL | 14 ml |
| WATER | 75 ml |
GELATINE 2
| MATERIAL | AMOUNT OF MATERIAL |
|---|---|
| GELATIN | 20 g |
| SEAWEED POWDER | 10 g |
| GLYCEROL | 20 ml |
| WATER | 240 ml |
GELATINE AND AGAR
| MATERIAL | AMOUNT OF MATERIAL | SEAWEED FILLING TO 200g of MIXTURE | AMOUNT |
|---|---|---|---|
| AGAR | 3 g | DRIED SEAWEED POWDER | 10 g |
| GELATIN | 20 g | GREEN SEAWEED PASTE | 10 g |
| GLYCEROL | 15 ml | ||
| WATER | 400 ml |
- 01| AGAR
- 02| GELATIN
- 03| GELATIN MAKING, PHOTO ALBERTE BOJESEN
- 04| FINAL SAMPLES, PHOTO ALBERTE BOJESEN
- 05| SEAWEED WITH GELATIN, PHOTO ALBERTE BOJESEN
- 06| SEAWEED WITH GELATIN AND AGAR, PHOTO ALBERTE BOJESEN
- 06| SEAWEED WITH GELATIN, PHOTO ALBERTE BOJESEN
GOOD TO KNOW | SEAWEED FLOUR STARCH
Starch like flour can be used to make binder or a glue, I tried different recipes and starth materials to mix with seaweed. I also added the paste to whole strands of seaweed.
FLOUR STARTCH NON COOKED
| MATERIAL | AMOUNT OF MATERIAL | MATERIAL MIXED WITH SEAWEED | AMOUNT |
|---|---|---|---|
| FLOUR | 50 g | SEAWEED PASTE | 30 g |
| WATER | 100 g | FLOUR PASTE | 20 g |
- Dissolve flour in water to make a paste.
- Mix paste with seaweed.
FLOUR STARTCH COOKED
| MATERIAL | AMOUNT OF MATERIAL | MATERIAL MIXED WITH SEAWEED | AMOUNT |
|---|---|---|---|
| FLOUR | 50 g | SEAWEED PASTE | 30 g |
| WATER | 100 g | FLOUR PASTE | 20 g |
- Boil the water.
- Dissolve flour in water to make a paste.
- Mix paste with seaweed.
- 01| WFEAT FLOUR
- 02| FINAL SAMPLES WITH FLOUR, PHOTO ALBERTE BOJESEN
- 03| WHOLE SEAWEED WITH FLOUR COATING, PHOTO ALBERTE BOJESEN
- 04| SEAWEED MIXED WITH WHEAT FLOUR, PHOTO ALBERTE BOJESEN
- 05| CUT SEAWEED MIXED WITH WHEAT FLOUR, PHOTO ALBERTE BOJESEN
The best result was the boiled flour glue eventhough it said that it ought not to be in one of the recipes I was following. Also the paste worked really well for adding on the whole seewead, as it acts both as a glue and a lacker. However for a composite is craks up alot, and are not flexible at all.
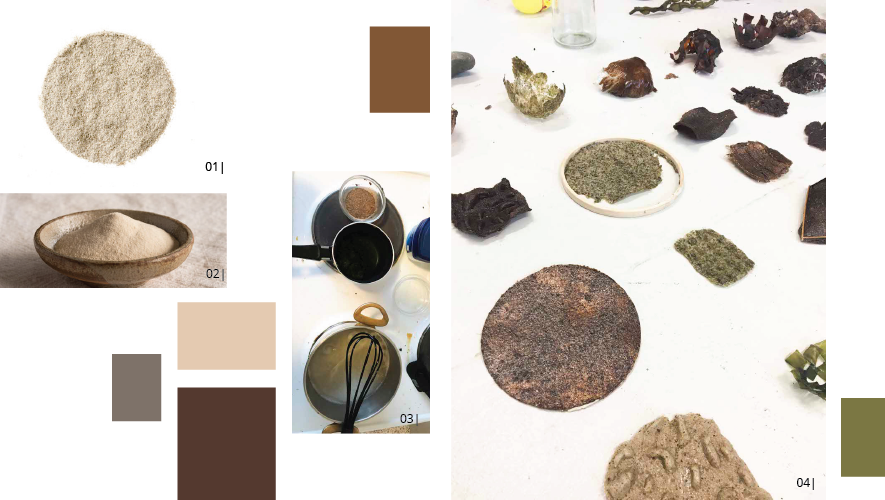
GOOD TO KNOW | SEAWEED POTATO STARCH
Another startch I tryed was the potato startch, which you dissoolve in boiling water and then keep stirring and adding water under heat until you have a nice paste. It takes increddible much water to the starch, you can also re use the paste just heat it up again and add water until it has the right concistency. The heat is important here as it it otherwise jell-like.
I also added the paste to whole strands of seaweed.
| MATERIAL | AMOUNT OF MATERIAL | MATERIAL MIXED WITH SEAWEED | AMOUNT |
|---|---|---|---|
| FLOUR | 50 g | SEAWEED powder | 30 g |
| WATER | 150 g (At least) | FLOUR PASTE | 20 g |
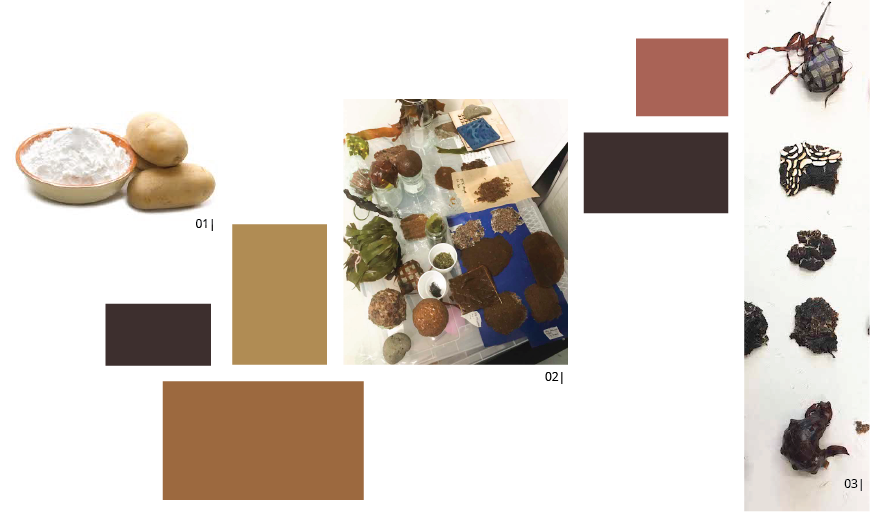
- 01| POTATO FLOUR
- 02| SAMPLES WITH FLOUR, PHOTO ALBERTE BOJESEN
- 03| FINAL SAMPLES WITH FLOUR, PHOTO ALBERTE BOJESEN
- 04| POTATO STRATCH GLUE IN THE MAKING, PHOTO ALBERTE BOJESEN
- 05| SOAKING SEAWEED IN THE GLUE, PHOTO ALBERTE BOJESEN
- 06| WOVEN SEAWEED BASKET WITH POTATO STARTCH COATING, PHOTO ALBERTE BOJESEN
- 07| MIXED SEAWEED WITH POTATO STRATCH AND ADDING OF MODUES, PHOTO ALBERTE BOJESEN
As the flour this functioned really well with whole seaweed. However for a composite is craks up alot, and are not flexible at all.
GOOD TO KNOW | SEAWEED PINE RESIN
I used the recipe from The Icelandic Bio-Material Chronicles . I found out that I could coat my 3D printed mold and my laser cut models from WEEK 06 with vaseline to pour the resin into.
| MATERIAL | AMOUNT OF MATERIAL |
|---|---|
| Pine resin | 45 gr |
| Alcohol | 20 ml |
| Carnaubax wax | 5 gr |
| Coffee | 40 gr |
The resin is very brittle and dulls the colours of the seaweed. The biggest lesson from this was that vaselin was an effective add on on the molds.
CONCLUSION | THOUGHTS
The potato startch coating is very nice, hard and lackery. The wheat flour is more matted. The gelatine and agar mix is far better and softer than only the gelatin material.