07 | COMPUTATIONAL COUTORE
The aim of this week is to learn the language of Grashopper, a programme within Rhino, inorder to create 3D-printet samples on the 3D-printer.
RESEARCH | IDEATION
I started this week by defining some terms that I had never worked with before, the first being parametric design. Parametric design is a design method based on algorithms, i.e. patterns, texture or shapes are based upon algorithmic processes where parameters are put into the algorithm to create the design. This video explains is quite nicely, eventhough he could lay off the side comments.
I found it interesting that many call Antoni Gaudi the forerunner for parametric design, with the use of strings and weights in his analog computering sketch of Sagrada Famillia. Gaudi has had a huge impact on my own design path, with his organic shapes and unconventional and provocative aesthetics. In 2015 I wisited both Sagrada Familia, Casa Mìla and Park Güell. A similar use of analouge parametric design was more recently made by design group GT2T who made a 3D clay printer using the weight of the clay in the fabric to create parametric shapes.
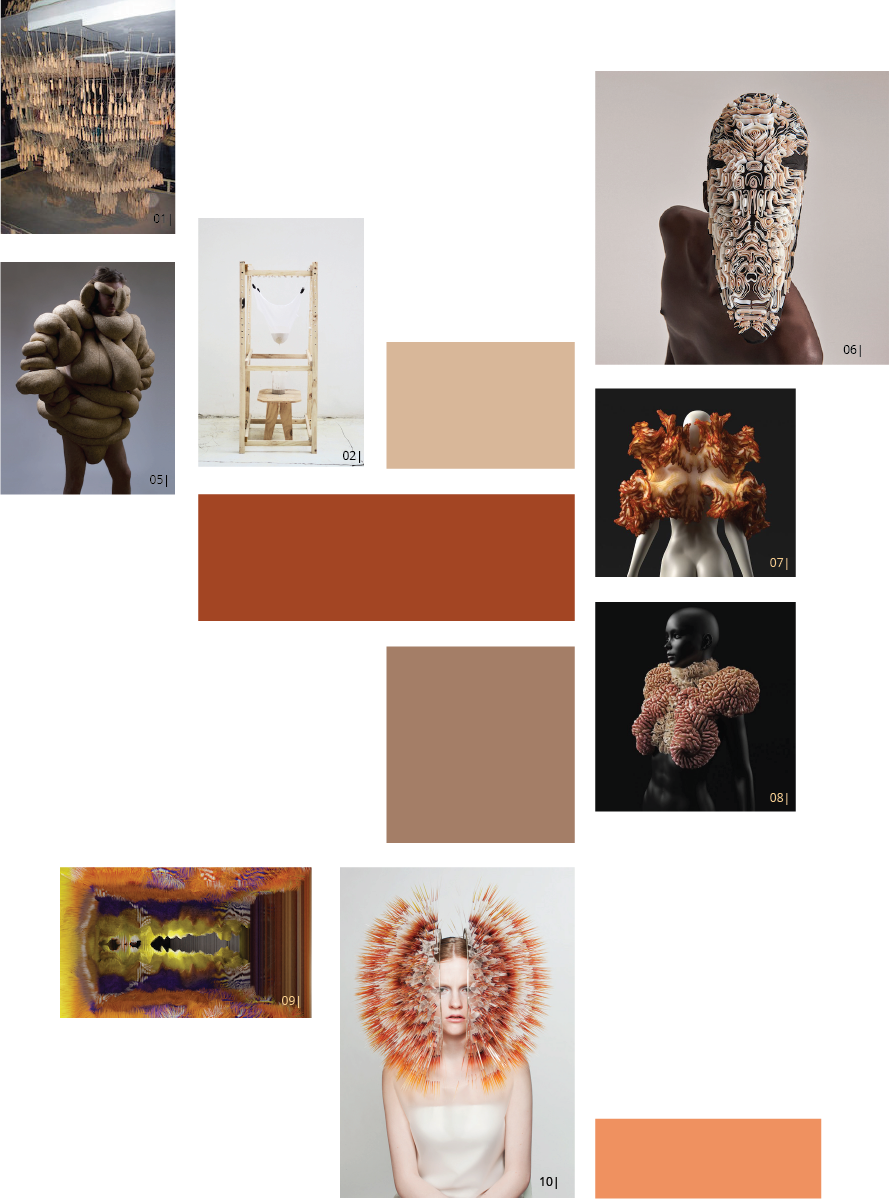
Iris van Herpen was my first introduction to parametric design as well as 3D printed fashion, with her iconic bone dress and snake dress, she quickly became my hero when I first entered the world of wearable design. Similarly with Bart Hess and Lucy McRae's collaboration within the field of body architecture, pushing the boundaried of what the body is and can be, an approach shared by parametric designers Behanz Farahi, Filippo Nassetti and Neri Oxman who also exploser the boundaries of the body using parametric design methods.
03 | IRIS VAND HERPEN, CAPRIOLE.
AiR Presentation: Behnaz Farahi from Charlie Nordstrom on 04 | BEHNAZ FARAHI, AIR.
A designer who works similarly to above designers but like GT2T uses analogic parametric design is Miko Takeda, who by the use of coloured acrylic strips creates outlines that folows the parametrics of the head.
A designer who does the exact opposite is Majli Af Ekenstam, who in 2020 created her MA dregreework completley digital. Instead of using the difgital programs she created textiles only in the digital world, much like an NFT.
- 01 | ANALOG COMPUTERING SKETCH OF SAGRADA FAMILLIA, 1882 ANTONI GAUDI
- 02 | CATENARY POTTERY PRINTER USING ANALOUGE PARAMETRIC DESIGN, 2013,GT2T
- 03 | CAPRIOLE, 2011, IRIS VAN HERPEN
- 04 | AIR, 2015, BEHNAZ FARAHI
- 05 | LUCY AND BART, 2015, LUCY MCRAE AND BART HESS
- 06 | THALSSIC MASKS, 2021, FILIPPO NASSETTI
- 07 | WANDERER, 2019, NERI OXMAN
- 08 | LUNA'S WANDERER, 2019, NERI OXMAN
- 09 | WHITE SWIRL, 2020, MAJLI AF EKENSTAM
- 10 | ATMOSPHERIC REENTRY, 2013, MAIKO TAKEDA
FABRICADEMY SOURCES:
- Laura Civetti Barcelona 2019-20_
- Sara Alvarez TextileLab Amsterdam 2020-21_
- Loes Bogers TextileLab Amsterdam 2019-20_
- Batoul Rashdan Techworks Amman 2021-22_
- Haneem Jaafreh Techworks Amman 2021-22_
- Louise Massacrier Lyon TextileLab 2021-22
- Kate Reed
TUTORIALS
- CLASS TUTORIAL
- RHINO PLUG INS
- INTRODUCTION TO GRASHOPPER
- PARAMETRIC HOUSE
- BASIC INTRO
- PATTERN ARRAY
- CURVES AS ATRACTION POINTS
- ESAY 3D PRINTED FABRIC TURORIAL
- VORINOI ATTRACTIONS
- IMAGE SAMPLER
- PUFFERFISH
- RIPPLE EFFECTS
TOOLS
PROCESS | WORKFLOW
This week evolved around learning to speak Grashopper, which is a very complex but also very amazing program to create parametric designs, as it alows you to alter aspects by chnageing the varues in the defenition. The definition is what we call the recipe of algorithms that becomes the design. The design can then be "baked" and exported to Rhino. The turorials we had in the begining were very overwhelming so I started by looking at shorter tutorials to understand the different commsnds and basic workings of the program.
GOOD TO KNOW | GRASHOPPER
Grashopper is as aforementioned a language to learn, and there are many terms and commands you need to know before you can speak it fluently. My approcah was to learn the basics workings of the program and then modify these commands to what I wanted to make. These are some of the definitions that I worked with, following the tutorials mentioned below. There is also a very good map of the different basic commands: INTRODUCTION TO GRASHOPPER.
TUTORIALS
- INTRODUCTION TO GRASHOPPER
- PARAMETRIC HOUSE
- BASIC INTRO
- PATTERN ARRAY
- CURVES AS ATRACTION POINTS
- ESAY 3D PRINTED FABRIC TURORIAL
- VORINOI ATTRACTIONS
- IMAGE SAMPLER
- PUFFERFISH
- RIPPLE EFFECTS
My idea was to work further on the seaweed pattern from WEEK | 06. After havig done an array of basic pattern definitions such as pattern arrays, attractors and vorinoi attractions, I started working on my patterns. My aim was to manipulate the hand drawn pattern to grow in different ways in the z-plane. I started by importing the Illustator pattern 3 to Rhino and connecting the pattern into a curve component. In order to not use 6 hours to print i scaled and enlaged a part of the pattern, as the small components takes time, I did this by using the command cut in Rhino, hand then poly-line and join to close the curves again. Thereafter I created one definition where the pattern is extruded in the z-direction according to curves.
The second definition I mabe was cuttin the z-extrusion with a curve using the solid difference command, I made a cuve in the z-plane, extruded it and cut the pattern with this extrusion. This is a more manual way of manipulating the pattern but you can define the z-pattern more, i.e. creating a pattern in the pattern, where the curvature is more dynamic. At first I wanted to print it with the flexible TPU filament creating the surface in the same material, however this would have taken 6h to print so I made a new definition without a surface. All the definitions can be found in this google drive file 2.
GOOD TO KNOW | ULTIMAKER CURA
Ultimake Cura is the programe where the .stl file from grashopper and Rhino is opened and saved with 3D-printer settings in a .gcode file so it can be opened in the Prusa 3D-printer. In this program you can alter filling, material, pause and layer thickness to fit the file and material you are using. This code is then ytransfered to the 3D-printer by a SD-card, so everytime you change some settign in the g-code it has to be saved and updated on the SD. I ended up making 3 tests with the second seaweed pattern because the settings did not fit the result I wanted, all these files can be downladed here2.
SETTINGS FOR THE G-CODE:
01 | SEAWEEDPATTERN EXCTRUDED ACCORDING TO CURVES, PI3MK3M_06seweedpattern2.gcode
- MATERIAL: PLA
- HEAT EXTRUDER: 215
- HEAT PLATE: 50
- EXTRUSION THICKNESS: 0.3
- BOTTOM: 6 LAYERS
- TOP: 3 LAYERS
- PUSE AFTER: 3 LAYERS
- BUILT PLATE ADHESION TYPE: SKIRT
- INFILL: 10%, LIGHTNING
02 | FAILED SEAWEEDPATTERN EXCTRUDED ACCORDING TO CURVES
- MATERIAL: PLA
- HEAT EXTRUDER: 230
- HEAT PLATE: 50
- EXTRUSION THICKNESS: 0.3
- BOTTOM: 0 LAYERS
- TOP: 0 LAYERS
- PUSE AFTER: 3 LAYERS
- BUILT PLATE ADHESION TYPE: SKIRT
- INFILL: 10%, LIGHTNING
02 | SEAWEEDPATTERN EXCTRUDED ACCORDING TO CURVES, FLEX TPU, PI3MK3M_06seweedpattern3-nosurface2.gcode
- MATERIAL: TPU
- HEAT EXTRUDER: 240
- HEAT PLATE: 60
- EXTRUSION THICKNESS: 0.3
- BOTTOM: 0 LAYERS
- TOP: 0 LAYERS
- PUSE AFTER: 3 LAYERS
- BUILT PLATE ADHESION TYPE: SKIRT
- INFILL: 10%, LIGHTNING
02 | SEAWEEDPATTERN EXCTRUDED ACCORDING TO CURVES, PlA, PI3MK3M_06seweedpattern3-nosurface4.gcode
- MATERIAL: PLA
- HEAT EXTRUDER: 215
- HEAT PLATE: 50
- EXTRUSION THICKNESS: 0.3
- BOTTOM: 0 LAYERS
- TOP: 0 LAYERS
- PUSE AFTER: 3 LAYERS
- BUILT PLATE ADHESION TYPE: SKIRT
- INFILL: 00, NONE
GOOD TO KNOW | 3D PRINTER ORIGINAL PRUSA
The Pruser 3D-printer is very easy to use, make sure the heating plate is dryed off with alcohol on paper, this aids with the adhesiveness of the plate. Then you press the setting "off load fillament" and let it off load helping it if asked to on the command screen. Thereafter the fillament is added by preheating the printer to the proper material i.e. is it is TPU or PLA etc and choosing the "load filament" setting, gently feeding in the filament. The extrusion will eventually change to ths proper material. If it does not then press "load filament" again. When this process is done you load the file from the SD-card, using the "load file" setting. And then you are ready to go. If you are printing on fabric like my samples are, then the Prusa will stop according to when you added your pause in the Gcode, for me it was set to after the 3rd layer, then the fabric is added using tape and clamps to make it lie flat. Tip is to iron the fabric before. Afterwards you resume the printing. To take off the printed fabric, you have to be gentle so the print is not ripped from the fabric. The removabillity of the ptint depends on the material, TPU is far harder to remove than the PLA, and the densenes of the fabric also plays a role.


- 01 | PRINTING OF 01| SAMPLE, PHOTO ALBERTE BOJESEN
- 02 | 01| SAMPLE, PHOTO ALBERTE BOJESEN
- 03 | 01| SAMPLE ON BODY, PHOTO ALBERTE BOJESEN
- 04 | 02|, 03| AND 04| SAMPLES, PHOTO ALBERTE BOJESEN
- 05 | 04| SAMPLE, PHOTO ALBERTE BOJESEN
- 06 | PRINTING OF 03| SAMPLE, PHOTO ALBERTE BOJESEN
- 07 | 02| AND 03| SAMPLES, PHOTO ALBERTE BOJESEN
- 09 | PRINTING OF 01| SAMPLE, PHOTO ALBERTE BOJESEN
- 10 | 01| SAMPLE, PHOTO ALBERTE BOJESEN
- 11 | 03| SAMPLE, PHOTO ALBERTE BOJESEN
- 12 | 04| SAMPLE, PHOTO ALBERTE BOJESEN
01 | SEAWEEDPATTERN EXCTRUDED ACCORDING TO CURVES, PI3MK3M_06seweedpattern2.gcode The sample is PLA printed on sytreachable black tuile. It turned out really well, I love the sound it makes when the taller pattern shapes meet, and the heavyness and fall of the fabric is really beautifull. I am very excited to see if the wavy lines within the pattern can be highlighted by working more conscious with the attraction curves. This sample is also closley linked to my sand sample of last week, and i would like to try to use grashupper to create a mould for this pattern. Also the backside of this pattern is realy nice as the shine of the PLA gives the fabric a scale like look.
02 | FAILED SEAWEEDPATTERN EXCTRUDED ACCORDING TO CURVES This sample failed beacuse the I had fed the filament wrong and because the temperatures where too low, but the pattern it created is still quite nice.
03 | SEAWEEDPATTERN EXCTRUDED ACCORDING TO CURVES, FLEX TPU, PI3MK3M_06seweedpattern3-nosurface2.gcode The sample is printed on streachable light blue tuile with TPU. The TPU is quite hard to print with, as it leaves lines between the printed shapes due to is flexability. Also I forgot to remove the lightning infill so for the larger shapes it has an infill. The material is also completley different to that of the PLA, it has no noice but the flexability is quite nice.
04 | SEAWEEDPATTERN EXCTRUDED ACCORDING TO CURVES, PlA, PI3MK3M_06seweedpattern3-nosurface4.gcode This sample was printed on a more white dense organza so there were shapes that fell off. The printer also created weird lines iver the open structures, I think this comes of the fact that it is cut in a curve, but when you look at the .gcode or the .stl files there are no lines, so it is probably how the printer goes, even though it should be avoidable. It is interestin seeing the colour shine through the open shapes, giving it a venticular effect, however slightly affected by the lines over the openings.
FABRICATION FILES
-
File: RHINO BASICS ↩
-
File: RHINO, GRASHOPPER AND CURA FILES FOR 3D-PRINTED SAMPLES ↩↩
-
File: SEAWEED LASERCUT FILE ↩