10 | OPEN SOURCE HARDWARE | FROM FIBER TO FABRIC
"The class explores the open source hardware field in general and focuses on its potential in the area of textile. How to update obsolete machines for producing textile? How to take advantage of digital fabrication and open source technology to come up with an open source machine for knitting, weaving and invent new techniques.
This class focuses on the importance of the techniques, tools and machines that create traditional fabrics. The lecture will give an overview on the evolution of these tools and how these impact production and manufacturing, with the focus on hacking, both machines and tools, and creating open source accessible machinery for a broader public." Sara Diaz Rodriguez.
RESEARCH | IDEATION
For this week we worked in teams, and we decided to make an incubator for growing and drying material. However there were also other other prrojects that caught my interest. I met Sara Diaz Rodriguez during my visit to DDW2017 and was bvery impressed with her work with programming 3D patterns in the spinning process which can be prrogrammed for knitting or weaving. This idea of rethinking a process is just amazing.
HILO from Studio HILO on Vimeo.
Another opensource project I am verry interested in is the Knitterate as we just goot one to the lab, so bellow is the link to the webbpage but also where you can logg in for the programming softweare. A program I am very anxious to start learning!
Continueing down the knitting path, Louise Christiansson made a really interesting project where she engineered and built a x,y,z 3D knitting machine. The project also focuses on how the human interacts with the machine itself, which is a really beautiful process.
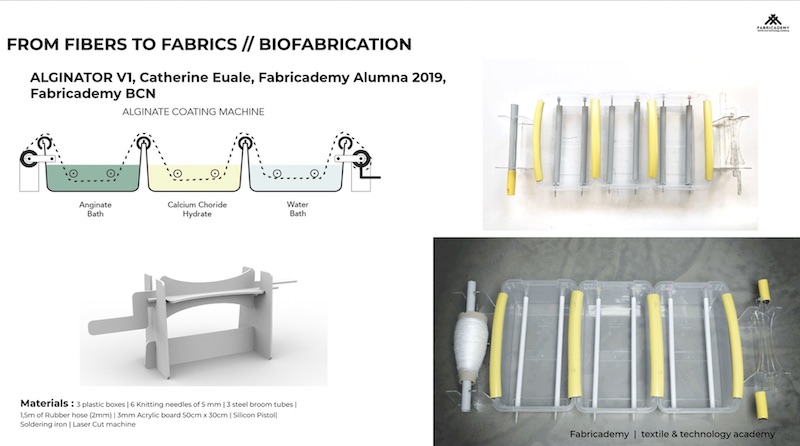
Finally I was also very intrigued by Catherine Euale's Alginator machine, coating filament with alginate.
- 01| STUDIO HILO
- 02| KNITTERATE
- 03| KNITTERATE LOGIN
- 04| CATHRINE EUALE
- Loes Bogers TextileLab Amsterdam 2019-20_
- Pauline Gamore TextileLab Lyon
- Gabriela Lotaif
- Carolina Delgado
Most if the resaech for this week went into understanding the incubator, looking at the following tutorials and tools.
TUTORIALS
- GOOGLE DOC HANDBOOK: INCUBATOR
- LECTURE 2022
- INSTRUCTABLES
- LIST OF MATERIALS AND LINKS
- WENDY'S DOCUMENTATION
- PREVIOIS YEAR DRIVE
- PREVIOUS FABRICADEMY
- PREVIOUS RESEARCH PAPERS
- HACKADAY
TOOLS
- 2D/3D MODELLING RHINO
- 2D MODELLING IILLUSTRATOR
- REGULATING TEMP
- SPARKFUN SENSOR CODE
- SPARKFUN LIBRARY
- CODE FOR CONTROLLING FAN
- LIQUID CRYSTAL
- RELAY MODULES
GOOD TO KNOW | MATERIALS
| Qty | Description | Price | Link | Notes |
|---|---|---|---|---|
| 1 | Arduino UNO | 24 € | https://store.arduino.cc/products/arduino-uno-rev3 | Arduino kit also includes lcd screen and cable |
| 1 | Humidity and temperature sensor | 10.95 $ | https://www.sparkfun.com/products/16467 | find alternative |
| 1 | Relay Module 5V | 22.00 $ | http://amazon.com/test | |
| 1 | USB A to B cable for the Arduino | 6.50 € | https://store.arduino.cc/products/usb-2-0-cable-type-a-b?queryID=undefined | |
| 1 | 75W incandescent light bulb | 2.83 $ | https://www.amazon.com/GE-41032-Incandescent-Globe-White/dp/B00FZYLF50/ref=sr_1_2?keywords=incandescent+light+bulbs+75+watt&qid=1669653476&sr=8-2 | Heating element can also be used |
| 1 | 12V computer fan | 16.99 $ | https://www.amazon.com/6000RPM-Antminer-Cooling-Dissipation-Machines/dp/B09L62QDH4/ref=sr_1_22_sspa?crid=5M8QIMX6D705&keywords=12v+fan&qid=1669653747&sprefix=12v+fa%2Caps%2C277&sr=8-22-spons&psc=1&spLa=ZW5jcnlwdGVkUXVhbGlmaWVyPUEzUkhHOTVSQ09IWUtNJmVuY3J5cHRlZElkPUEwOTA2Mzc3Mk5PTTBUMlQ3QTFYUyZlbmNyeXB0ZWRBZElkPUEwNTMzMTQ2MzQzUVJGTkhJNFZLSiZ3aWRnZXROYW1lPXNwX2J0ZiZhY3Rpb249Y2xpY2tSZWRpcmVjdCZkb05vdExvZ0NsaWNrPXRydWU= | we got our for free from an old computer |
| 2 | 12V power supply | 9.99 $ | https://www.amazon.com/ALITOVE-100-240V-Converter-Security-Surveillance/dp/B07VQHYGRD | order online |
| 1 | Piezo buzzer | 0.95 $ | https://www.sparkfun.com/products/21235 | this or alternative |
| 3 | 10k potentiometer | 3.15 $ | https://www.sparkfun.com/products/9939 | this or alternative |
| 1 | Small LCD screen | 9.99 $ | https://www.amazon.com/SunFounder-Serial-Module-Display-Arduino/dp/B019K5X53O/ref=sr_1_2_sspa?crid=2N6X4JEC2554E&keywords=arduino%2Blcd%2Bscreen&qid=1669654286&sprefix=arduino%2Blcd%2Bscreen%2Caps%2C188&sr=8-2-spons&spLa=ZW5jcnlwdGVkUXVhbGlmaWVyPUExSEhZOFZVUUJVWVVBJmVuY3J5cHRlZElkPUEwOTE5MzU4MUxFOUhQT0NPOUQ2ViZlbmNyeXB0ZWRBZElkPUEwNjg1NDY1M0hTTDVSTVhZQlNUQyZ3aWRnZXROYW1lPXNwX2F0ZiZhY3Rpb249Y2xpY2tSZWRpcmVjdCZkb05vdExvZ0NsaWNrPXRydWU&th=1 | also comes with the arduino kit |
| 6 | Ply wood | 60 € | IAAC | 4mm 750x500mm To make the cabinet |
| 6 | Styrofom | 00 | Seconhand | To make the insulation in the cabinet (adapt the plywood cabinet to your styrofoam box) |
| 1 | Plexiglss | 10 € | Local Fablb | Shelves and front, also used waste from the fablab |
PROCESS | WORKFLOW
This week we worked as a group so we compiled all our work process in a booklet, where every step of building and coding the incubator can be followed see here.
Incubator rator af Margrét Katrín Guttormsdóttir , Alice Sowa and Alberte Bojesen
All the files for laser cutting, Arduino and Arrduino code is in this google doc folder: 1 2.
NEXT STEPS |
We still have a bit of work for finialising the incubator, these are the steps that we still need to do:
- Assemble the shelveing system.
- If time: Add another potentiometer to be able to controll the temerature settings, if so we need to include that in the code 4 and circuit.
- Solder the electronics.
- Impliment the electronics in the box.
- Assemble the small electronic box with the incubator box.
- Test.
RESULTS |
After the completing the Next Steps, this is the final result, where the target temperature is working very accurately.
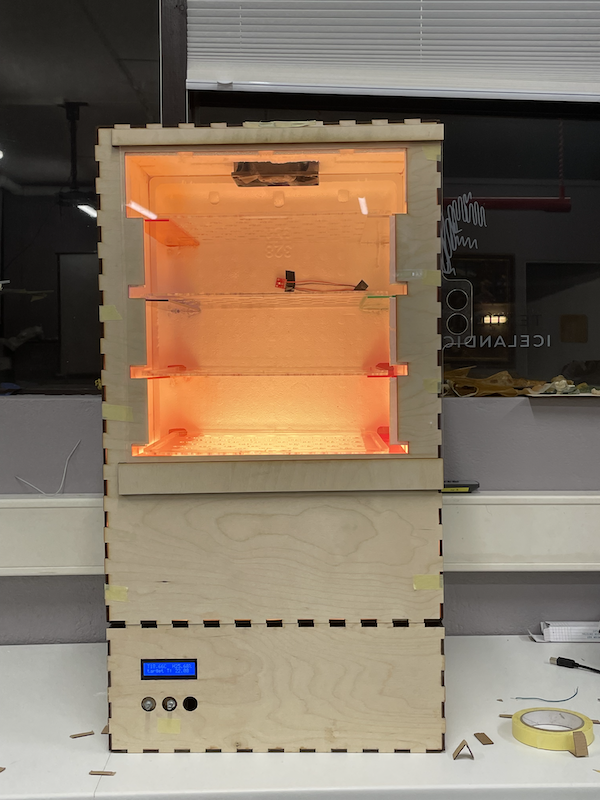
After mangin this, we used it to grown bacteri and mycelium, which functioned quite well. I tried to dry seaweed material in it but it was not able to heat up to the needed tempertures.
Fabrication files
-
File: GOOGLE DOC FOLDER ↩
-
File: GOOGLE DOC READ ME ↩
-
File: ADRUINO CODE ↩